Embed Size (px)
Citation preview
Dell SonicWALL™ GMS 8.1 Virtual ApplianceGetting Started Guide

© 2015 Dell Inc.ALL RIGHTS RESERVED.
This guide contains proprietary information protected by copyright. The software described in this guide is furnished under a software license or nondisclosure agreement. This software may be used or copied only in accordance with the terms of the applicable agreement. No part of this guide may be reproduced or transmitted in any form or by any means, electronic or mechanical, including photocopying and recording for any purpose other than the purchaser’s personal use without the written permission of Dell Inc.
The information in this document is provided in connection with Dell products. No license, express or implied, by estoppel or otherwise, to any intellectual property right is granted by this document or in connection with the sale of Dell products. EXCEPT AS SET FORTH IN THE TERMS AND CONDITIONS AS SPECIFIED IN THE LICENSE AGREEMENT FOR THIS PRODUCT, DELL ASSUMES NO LIABILITY WHATSOEVER AND DISCLAIMS ANY EXPRESS, IMPLIED OR STATUTORY WARRANTY RELATING TO ITS PRODUCTS INCLUDING, BUT NOT LIMITED TO, THE IMPLIED WARRANTY OF MERCHANTABILITY, FITNESS FOR A PARTICULAR PURPOSE, OR NON-INFRINGEMENT. IN NO EVENT SHALL DELL BE LIABLE FOR ANY DIRECT, INDIRECT, CONSEQUENTIAL, PUNITIVE, SPECIAL OR INCIDENTAL DAMAGES (INCLUDING, WITHOUT LIMITATION, DAMAGES FOR LOSS OF PROFITS, BUSINESS INTERRUPTION OR LOSS OF INFORMATION) ARISING OUT OF THE USE OR INABILITY TO USE THIS DOCUMENT, EVEN IF DELL HAS BEEN ADVISED OF THE POSSIBILITY OF SUCH DAMAGES. Dell makes no representations or warranties with respect to the accuracy or completeness of the contents of this document and reserves the right to make changes to specifications and product descriptions at any time without notice. Dell does not make any commitment to update the information contained in this document.
If you have any questions regarding your potential use of this material, contact:
Dell Inc.Attn: LEGAL Dept5 Polaris WayAliso Viejo, CA 92656
Refer to our website (software.dell.com) for regional and international office information.
Patents
For more information, go to http://software.dell.com/legal/patents.aspx.
Trademarks
Dell, the Dell logo, and SonicWALL are trademarks of Dell Inc. Other trademarks and trade names may be used in this document to refer to either the entities claiming the marks and names or their products. Dell disclaims any proprietary interest in the marks and names of others.
GMS Virtual Appliance Getting Started GuideUpdated - December 2015Software Version - 8.1232-003119-00 Rev A
Legend
CAUTION: A CAUTION icon indicates potential damage to hardware or loss of data if instructions are not followed.
WARNING: A WARNING icon indicates a potential for property damage, personal injury, or death.
IMPORTANT NOTE, NOTE, TIP, MOBILE, or VIDEO: An information icon indicates supporting information.

1
Overview
This Getting Started Guide contains installation procedures and configuration guidelines for deploying the Dell SonicWALL™ GMS 8.1 Virtual Appliance as a Virtual Machine in a VMware environment. The Dell SonicWALL GMS Virtual Appliance can configure, manage, and monitor the status of thousands of Dell SonicWALL Internet security appliances and non-Dell SonicWALL appliances from a central location. The Dell SonicWALL GMS Virtual Appliance provides the following benefits:
• Centralized security and network management
• Sophisticated VPN deployment and configuration
• Active device monitoring and alerts
• Intelligent reporting and activity visualization
• Centralized logging and offline management
This document contains the following:
Topics:
• Before You Begin on page 5
• System Requirements on page 5
• Record Configuration Information on page 9
• Introduction to the Management Interfaces on page 10
• Overview of the Two Interfaces on page 10
• Switching Between Management Interfaces on page 11
• UMH System Interface Introduction on page 11
• Management Interface Introduction on page 11
• Installing and Upgrading on page 15
• Installing with VMware vSphere on page 15
• Upgrading From an Earlier Version of Dell SonicWALL GMS on page 25
• Performing Basic Tasks and Host Configuration on page 26
• Power the Virtual Appliance On on page 26
• Configure Host Settings on the Console on page 26
• Configure Host Settings on the Appliance Management Interface on page 28
• Viewing the Settings Summary on page 29
• Editing The Virtual Machine Settings on page 30
• Registering and Licensing on page 32
• Registering/Licensing After a Fresh Install on page 32
• Registering Associated Servers in a Distributed Deployment on page 35
Dell SonicWALL GMS Virtual Appliance Getting Started Guide
3

• Configuring UMH Deployment Options on page 36
• Deployment Considerations on page 36
• Using the Role Configuration Tool on page 37
• Manually Configuring the System Role on page 40
• Controlling Deployment Services on page 51
• Provisioning and Adding Units on page 52
• Provisioning a Dell SonicWALL Firewall Appliance on page 52
• Provisioning a Dell SonicWALL SMA SMB Appliance on page 53
• Provisioning a Dell SonicWALL E-Class SMA Series Appliance on page 54
• Adding Dell SonicWALL Appliances on page 55
• Support on page 58
• Related Technical Documentation on page 58
• Dell SonicWALL Live Product Demos on page 59
Dell SonicWALL GMS Virtual Appliance Getting Started Guide
4

2
Before You Begin
See the following sections for information about Dell SonicWALL GMS Virtual Appliance:
• System Requirements on page 5
• Record Configuration Information on page 9
System RequirementsThe Dell SonicWALL GMS Virtual Appliance comes with a base license to manage either 5, 10, or 25 nodes. You can purchase additional licenses on MySonicWALL. For more information on licensing additional nodes, visit:
http://www.sonicwall.com/us/Products_Solutions.html
Before installing, review the requirements in the following sections:
• GMS Virtual Appliance Supported Platforms on page 5
• Deployment Considerations on page 5
• GMS Virtual Appliance Hardware Resource Requirements on page 6
• MySQL Requirements on page 6
• Java Requirements on page 6
• Browser Requirements on page 7
• Network Requirements on page 7
GMS Virtual Appliance Supported PlatformsThe elements of basic VMware structure must be implemented prior to deploying the Dell SonicWALL GMS Virtual Appliance. The GMS Virtual Appliance runs on the following VMware platforms:
• ESXi 4.1, 5.0, 5.1, and 5.5
• ESXi 4.0 Update 1 (Build 208167 and newer)
• ESX 4.1
• ESX 4.0 Update 1 (Build 208167 and newer)
Deployment ConsiderationsConsider the following before deploying the GMS Virtual Appliance:
• Dell SonicWALL GMS management is not supported on Apple MacOS.
• All modes of the application run in 64-bit mode.
NOTE: GMS is not supported as a VMware virtual machine running in a cloud service, such as Amazon Web Services EC2.
Dell SonicWALL GMS Virtual Appliance Getting Started Guide
5

• Using the Flow Server Agent role requires a minimum of:
• Quad Core
• 16GB of memory
• 300 HDD
GMS Virtual Appliance Hardware Resource RequirementsUse the Capacity Calculator 2 to determine the hardware requirements for your deployment.
The performance of GMS Virtual Appliance depends on the underlying hardware. It is highly recommended to dedicate all the resources that are allocated to the Virtual Appliance, especially the hard-disk (datastore). In environments with high volumes of syslogs or AppFlow (IPFIX), you need to dedicate local datastores to the GMS Virtual Appliance.
When using Thick or Flat provisioning as the storage type option, the entire amount of disk space is allocated when you import and deploy the GMS Virtual Appliance file. When using Thin provisioning, the initial size is very small and grows dynamically as more disk space is needed by the GMS application, until the maximum size is reached. After being allocated, the size does not shrink if the application space requirements are subsequently reduced.
Additional disk space provided to the GMS Virtual Appliance in the virtual environment, beyond the respective limits of 250GB or 950GB, is not utilized.
A minimum of 4GB RAM is required. However, 8GB of RAM is highly recommended for better performance of reporting modules. Read the “Capacity Planning and Performance Tuning” appendix in the GMS Administration Guide.
MySQL RequirementsPreviously, GMS automatically installed MySQL as part of the base installation package. The GMS 8.1 upgrade replaces the Infobright with MySQL database formerly used in earlier versions with Infobright with Postgres (IB-PG). The installer will ask if you want to perform the data migration to the new database. Separately installed instances of MySQL are not supported with GMS.
Java Requirements
Chrome and Internet Explorer no longer supports Java. Use Firefox for Java Applets.
Download and install the latest version of the Java 8 plug-in on any system that accesses the GMS management interface. This can be downloaded from:
www.java.com
or
http://www.oracle.com/technetwork/java/javase/downloads/index.html
NOTE: When the GMS Virtual Appliance is booting for the first time, it takes longer for the server to become available. Do NOT Power Off/On the appliance during this time as doing so will cause the boot to fail and an “Available disk space...” error message to appear. Redo the role configuration, be patient, and the configuration should be successful.
NOTE: Java is required only when you are using Net Monitor, or if you want to use the “Login to Unit” right-click menu of TreeControl.
Dell SonicWALL GMS Virtual Appliance Getting Started Guide
6

Browser RequirementsDell SonicWALL GMS uses advanced browser technologies such as HTML5 that are supported in most recent browsers. Dell SonicWALL recommends using the latest Chrome, Firefox, Internet Explorer, or Safari browsers for administration of the Dell SonicWALL GMS.
This release supports the following Web browsers:
• Google Chrome 42.0 and higher (recommended browser for dashboard real-time graphics display)
• Mozilla Firefox 37.0 and higher
• Microsoft Internet Explorer 10.0 and higher (do not use compatibility mode)
Network RequirementsTo complete the Dell SonicWALL GMS Virtual Appliance deployment process documented in this Getting Started Guide, the following network requirements must be met:
• The Dell SonicWALL GMS server must have access to the Internet
• The Dell SonicWALL GMS server must have a static IP address
• The Dell SonicWALL GMS server’s network connection must be able to accommodate at least 1KB/s for each device under management. For example, if Dell SonicWALL GMS is monitoring 100 Dell SonicWALL appliances, the connection must support at least 100KB/s.
NOTE: Internet Explorer version 10.0 in Metro interfaces of Windows 8 is currently not supported.
NOTE: Turn off Compatibility Mode when accessing the GMS management interface with Internet Explorer. For more information, see the Knowledge Base article located at: https://support.software.dell.com/sonicwall-gms/kb/sw14003
NOTE: Depending on the configuration of Dell SonicWALL log settings and the amount of traffic handled by each device, the network traffic can vary dramatically. The 1KB/s for each device is a general recommendation. Your installation requirements might vary. Refer to the Capacity Calculator 2.
Dell SonicWALL GMS Virtual Appliance Getting Started Guide
7

Dell SonicWALL Appliance and Firmware SupportDell SonicWALL GMS supports SonicWALL firewall App Control policy management and reporting. Refer to the SonicOS documentation for information on which SonicOS firmware versions support these features.
Dell SonicWALL GMS 8.1 supports the following Dell SonicWALL appliances and firmware versions:
Notes:
• GMS supports Dell SonicWALL firewall App Control policy management and App Control reporting support. Refer to the SonicOS documentation for information on the supported SonicOS firmware versions.
• Appliances running firmware newer than this GMS release can still be managed and reports can still be generated. However, the new features in the firmware will be supported in an upcoming release of GMS.
Non-Dell SonicWALL Appliance SupportDell SonicWALL GMS provides monitoring support for non-Dell SonicWALL TCP/IP and SNMP-enabled devices and applications.
NOTE: GMS 8.1 does not support legacy SonicWALL appliances, including:• Firewall appliances running firmware earlier than SonicOS 5.0• CSM Series• CDP Series
Table 1. Component requirements
Dell SonicWALL platforms Dell SonicWALL firmware version
Network security appliance
SuperMassive 10000 series SonicOS 6.0 or newer
NOTE: Only partial policy management and reporting support is currently available. The following SuperMassive specific features are not supported for centralized policy management in GMS:
• Multi-blade Comprehensive Anti-Spam Service (CASS)
• High Availability/Clustering
• Support for Management Interface
• Flow Reporting Configurations
• Multi-blade VPN
• Advanced Switching - Note: This feature is supported only on NSA and SuperMassive platforms.
Contact your SonicWALL Sales representative through https://support.software.dell.com/ for more information.
SuperMassive 9000 series SonicOS 6.1 or newer
NSA series SonicOS 5.0 or newer
TZ and TZ Wireless series SonicOS 5.0 or newer
Dell SonicWALL SOHO and SOHO Wireless SonicOS 6.2.4 or newer
Secure Mobile Access
SRA/SSL-VPN Series SSL-VPN 2.0 or newer (management)SSL-VPN 2.1 or newer (management and reporting)
E-Class SRA Series E-Class SRA 9.0 or newer
SMA 6200/7200 SMA 10.7.2 or newer
Email Security/Anti-Spam
Email Security Series Email Security 7.2 or newer (management only)
Dell SonicWALL GMS Virtual Appliance Getting Started Guide
8

Record Configuration InformationBefore continuing, record the following configuration information for your reference.
SMTP Server Address: The IP address or host name of your Simple Mail Transfer Protocol (SMTP) server. For example, mail.emailprovider.com.
HTTP Web Server Port: The number of your Web server port if customized. The default port is 80.
HTTPS Web Server Port: The number of your secure (SSL) Web server port if customized. The default port is 443.
GMS Administrator Email 1: The email address of a GMS administrator who receives email notifications from GMS.
GMS Administrator Email 2: The email address of an additional GMS administrator who receives email notifications from GMS. This field is optional.
Sender Email Address: The email address from which the email notifications are sent by GMS.
GMS Gateway IP: The IP address of the GMS gateway between the GMS agent and the network. This optional field is only applicable if you have a GMS gateway.
GMS Gateway Password: The password for the GMS gateway. This optional field is only applicable if you have gateway between the GMS and the network.
Database Vendor: Your database vendor if you are using a SQL Server database.*
Database Host/IP: The IP address of the database host. This is not required when using the bundled database on this server.*
Database User: The MySQL user name for the database administrator. This is not required
when using the bundled database on this server. 1
1. This information is needed if Microsoft SQL Server is used, or in the case of a distributed deployment.
Database Password: The MySQL password for the database administrator. This is not required when using the bundled database on this server. 1
Dell SonicWALL GMS Virtual Appliance Getting Started Guide
9

3
Introduction to the Management Interfaces
This section describes the two Dell SonicWALL GMS Virtual Appliance management interfaces. An almost identical URL is used when accessing either the GMS Virtual Appliance management interface or the Universal Management Host system interface, but the URL is modified to specify either “sgms” or “appliance.”
Topics:
• Overview of the Two Interfaces on page 10
• Switching Between Management Interfaces on page 11
• UMH System Interface Introduction on page 11
• Management Interface Introduction on page 11
Overview of the Two InterfacesThe GMS Virtual Appliance Universal Management Suite (UMS) installs two separate management interfaces:
• Dell SonicWALL Universal Management Host (UMH) System Management Interface – Used for system management of the host server, including registration and licensing, setting the admin password, selecting the deployment role, and configuring other system settings.
To access the UMH system management interface on the default HTTP port using a browser on the host server, use the URL:
http://localhost/appliance/
From another system, access the UMH system management interface with the URL:
http://<IP address>:<port>/appliance/
If you are using the standard HTTP port, 80, it is not necessary to append the port number to the IP address.
• Dell SonicWALL GMS Management Interface – Used to access the GMS application that runs on the Windows server. This interface is used to configure GMS management of Dell SonicWALL appliances, including creating policies, viewing reports, and monitoring networks, and for configuring GMS administrative settings.
Access the GMS Virtual Appliance management interface with one of the following URLs:
http://localhost/sgms/
or
http://<IP address>:<port>/sgms/
Dell SonicWALL GMS Virtual Appliance Getting Started Guide
10

Switching Between Management InterfacesOn systems deployed in the All In One role, the “SuperAdmin” user can easily switch between the UMH system management interface and the GMS Virtual Appliance management interface. The SuperAdmin is the master administrator for the entire GMS Virtual Appliance installation.
When logged in to either interface, the SuperAdmin can switch to the login page of the other interface by clicking Switch in the top right corner of the page.
Switch is only visible for users with SuperAdmin privileges.
UMH System Interface IntroductionThe Dell SonicWALL UMH system interface is used for system management of the Dell SonicWALL GMS Virtual Appliance instance, including registration and licensing, setting the admin password, configuring database settings, selecting the deployment role, and configuring other system settings.
When installing Dell SonicWALL Universal Management Suite on a host, a Web server is installed to provide the system management interface. The system interface is available by default at http://localhost/appliance/ after restarting the system.
The login screen allows you to securely log in to the Dell SonicWALL UMH system interface using your system user ID and password.
Management Interface IntroductionGMS Virtual Appliance is a Web-based application for configuring and gathering reports from thousands of Dell SonicWALL Internet security appliances and non-Dell SonicWALL appliances, all from a central location. This section provides an introduction to the main elements of the Web-based management interface.
Topics:
• Login Screen on page 12
• Dashboard on page 12
• Management Interface on page 13
NOTE: The admin account on the system interface can have a different password than the admin account for GMS Virtual Appliance.
Dell SonicWALL GMS Virtual Appliance Getting Started Guide
11

Login ScreenThe login screen allows you to securely log in to GMS Virtual Appliance using your GMS application user ID and password. The GMS Virtual Appliance management interface is available by default at http://localhost/sgms/ after completing registration.
DashboardThe Dashboard control bar provides top-of-the page menu items for customizing the settings of this page. When the Dashboard loads after GMS Virtual Appliance login, the control bar is displayed and then becomes hidden until you place your mouse cursor at the top of the page as shown in the following figure. You can lock the control bar by clicking on the “pin the control bar” icon.
Dell SonicWALL GMS Virtual Appliance Getting Started Guide
12

Management InterfaceThe GMS Virtual Appliance management interface is the main control panel. The management interface allows you to add and modify appliances, complete monitoring and reporting tasks, and configure GMS Virtual Appliance settings.
Topics:
• Navigation Tabs on page 13
• Left Pane on page 13
• Center Pane on page 14
• Right Pane on page 14
• Description of Managed Appliance States on page 14
Navigation TabsThe management interface navigation tabs are located at the top of the management interface.
The navigation tabs are: Dashboard, Firewall, SMA, and Console. The Console tab provides tools to customize options found in the other GMS tabs and to manage GMS Virtual Appliance settings that affect the environment globally.
Left PaneThe left pane of the management interface provides a tree control that displays the current GMS Virtual Appliance view and a list of managed appliances within the current tab. The left pane is only displayed for the Firewall and SMA appliance tabs. The current category and view are indicated by a blue highlighting. The left pane tree control provides the ability to switch between views and displays the current state of each appliance under management. A single box in the tree control indicates a node at appliance or unit level. Two boxes in the tree control indicates a node at a group level. A global node at the top of the tree control is indicated by a three-box icon. The color and additional images superimposed on these icons provide useful status information. For detailed information about appliance states, refer to Description of Managed Appliance States on page 14.
NOTE: If there is only one appliance visible in the Left Pane, then the Left Pane automatically collapses to present a larger screen for the rest of the UI.
Dell SonicWALL GMS Virtual Appliance Getting Started Guide
13

Center PaneThe center pane displays in the appliance tabs: Firewall and SMA. A navigational tree control that provides access to the configuration options available based on navigational tab and left pane selections. The Reports sub-tab provides reporting on the global or appliance level, and is only available for Firewall and SMA.
The current selection in the center pane is indicated by the highlighted item. The center pane options change based on the navigational tab and left pane selections, and selections in the center pane modify the display in the right pane.
Right PaneThe right pane displays the available status or tasks based on the current selection of navigational tab, left pane and center pane options. Configurations completed in the right pane modify global or appliance settings.
Description of Managed Appliance StatesThis section describes the meaning of icons that appear next to managed appliances listed in the left pane of the Dell SonicWALL GMS Virtual Appliance management interface.
Appliance Status
Description
One blue box indicates that the appliance is operating normally. The appliance is accessible from the GMS Virtual Appliance, and no tasks are pending or scheduled.
Three blue boxes indicate that all appliances in the global group of this type (Firewall/SMA) are operating normally.
Dell SonicWALL GMS Virtual Appliance Getting Started Guide
14

4
Installing and Upgrading
The SonicWALL GMS Virtual Appliance is installed by deploying an OVA file to your ESX/ESXi server. Each OVA file contains all software components related to Dell SonicWALL GMS Virtual Appliance including the MySQL database, executable binary files for all GMS services, and other necessary files.
You can deploy one or both OVA files multiple times as needed for your Dell SonicWALL GMS Virtual Appliance environment. Dell SonicWALL GMS Virtual Appliance can be configured for a single server or in a distributed environment on multiple servers. In a distributed deployment, for example, you might use the 250GB file in a Summarizer role, and the 950GB file in a Database role. A distributed deployment can include one or more SonicWALL GMS Virtual Appliances, or Dell SonicWALL GMS Virtual Appliance instances running on Windows Server machines.
You can deploy an OVA file by using the vSphere client that comes with ESX/ESXi. To get the vSphere client, point a browser to your ESX/ESXi server and click on Download vSphere Client.
Dell SonicWALL GMS Virtual Appliance can be installed as a fresh install, or as an upgrade to the latest version of GMS Virtual Appliance.
This section contains the following subsections:
• Installing with VMware vSphere on page 15
• Upgrading From an Earlier Version of Dell SonicWALL GMS on page 25
Installing with VMware vSphereTo do a fresh install of the SonicWALL GMS Virtual Appliance using the vSphere client, complete the following steps:
1 Download the following OVA files from MySonicWALL to a system that is accessible to your ESX/ESXi server.
• sw_gmsvp_vm_eng_8.1.xxxx.yyyy.40GB.64bit.ova
• sw_gmsvp_vm_eng_8.1.xxxx.yyyy.250GB.64bit.ova
• sw_gmsvp_vm_eng_8.1.xxxx.yyyy.950GB.64bit.ova
NOTE: Do not rename the OVA files. The “xxxx” represent the exact version numbers
Dell SonicWALL GMS Virtual Appliance Getting Started Guide
15

2 Launch vSphere.
3 Use vSphere to log on to your ESX/ESXi server.
4 In the Home screen, navigate to a view that shows the virtual machines running on your ESX/ESXi server.
5 To begin the import process, click File.
Dell SonicWALL GMS Virtual Appliance Getting Started Guide
16

6 Select Deploy OVF Template.
7 In the Source screen of the Deploy OVF Template window, enter the name of the OVA file to import in the Deploy from a file or URL field. To deploy from a file, click Browse and then select the OVA file to import. To deploy from a URL, type in the URL of the OVA file.
8 Click Next.
Dell SonicWALL GMS Virtual Appliance Getting Started Guide
17

9 In the OVF Template Details screen, verify the information about the selected file.
• To make a change, click the Source link to return to the Source screen and select a different file.
• Continue, click Next.
10 In the End User License Agreement screen, read the agreement, click Accept.
Dell SonicWALL GMS Virtual Appliance Getting Started Guide
18

11 Click Next.
12 In the Name and Location screen, enter a descriptive name for the virtual appliance into the Name field.
13 Select the desired location in the Inventory Location field. You might wish to incorporate the role or disk size as part of the name, as in GMS_VM_Agent_250GB.
Dell SonicWALL GMS Virtual Appliance Getting Started Guide
19

14 Click Next.
15 In the Resource Pool screen, select the resource pool within which to deploy this SonicWALL GMS Virtual Appliance.
Dell SonicWALL GMS Virtual Appliance Getting Started Guide
20

16 Click Next.
17 In the Datastore screen, select the datastore on which to store the files for the SonicWALL GMS Virtual Appliance.
NOTE: When deploying a 950GB file, be sure to select a resource pool with a block size of either 4 or 8MB.
Dell SonicWALL GMS Virtual Appliance Getting Started Guide
21

18 Click Next.
19 In the Disk Format screen, select the format in which to store the virtual disks for the SonicWALL GMS Virtual Appliance.
• Thin provisioned format
• Thick provisioned format
Dell SonicWALL GMS Virtual Appliance Getting Started Guide
22

20 Click Next.
21 In the Network Mapping screen, select the networks in your inventory to be used for the SonicWALL GMS Virtual Appliance
Dell SonicWALL GMS Virtual Appliance Getting Started Guide
23

22 Click Next.
23 In the Ready to Complete screen, review and verify the displayed information.
24 To begin the deployment with these settings, click Finish. Otherwise, click Back to navigate back through the screens to make a change.
The Deploying dialog box shows the progress.
Dell SonicWALL GMS Virtual Appliance Getting Started Guide
24

25 In the Deployment Completed Successfully dialog box, click Close.
The name of the new SonicWALL GMS Virtual Appliance appears in the left pane of the vSphere window.
26 To power on the virtual appliance and complete required host configuration, see Performing Basic Tasks and Host Configuration on page 26.
27 After completing the basic tasks and host configuration, register and license SonicWALL GMS, see Registering and Licensing on page 32.
Upgrading From an Earlier Version of Dell SonicWALL GMSThe GMS Virtual Appliance can be upgraded from 8.0 to 8.1, but cannot be directly upgraded from GMS versions earlier than 8.0. To upgrade the GMS Virtual Appliance from a version earlier than 8.0, you need to upgrade to major versions of GMS until you reach 8.0, then you can upgrade to GMS 8.1. For Dell SonicWALL GMS Virtual Appliance deployments, upgrading from the GMS 8.0 release to the GMS 8.1 release can be performed on the System > Settings page.
In a distributed environment, shut down all GMS servers except the one that is running the database. Then upgrade the Console/AIOP first and then the other servers. You must upgrade all GMS servers in your deployment to the same version of Dell SonicWALL GMS 8.1. You cannot have some servers running version 8.0 and others running 8.1.
To upgrade, complete the following steps:
1 Download the GMS 8.1 file from www.mysonicwall.comto your workstation:
sw_gmsvp_vm_eng_8.1.xxxx.yyyy.gmsvp-updater.64bit.sh (where xxxx represents the exact version numbers)
2 Log in to the /appliance (System) interface of the GMS server.
3 Navigate to the System > Settings page.
4 Click Browse, navigate to the location where you saved the previous file, and then select it.
5 Click Apply to begin the firmware upgrade installation.
The Virtual Appliance reboots at the end of the installation process.
Dell SonicWALL GMS Virtual Appliance Getting Started Guide
25

5
Performing Basic Tasks and Host Configuration
This section describes how to power on and configure basic settings on the Dell SonicWALL GMS Virtual Appliance, including virtual hardware settings and networking settings.
The following tasks are required to configure your SonicWALL GMS Virtual Appliance before registering it:
1 Power the Virtual Appliance On on page 26
2 Configure Host Settings on the Console on page 26
3 Configure Host Settings on the Appliance Management Interface on page 28
This chapter also contains information on:
• Viewing the Settings Summary on page 29
• Editing The Virtual Machine Settings on page 30
Power the Virtual Appliance OnThere are multiple ways to power the Dell SonicWALL GMS Virtual Appliance on (or off).
To power the virtual appliance on (or off), complete one of the following steps:
• Right-click the SGMS Virtual Appliance in the left pane and navigate to Power > Power On (or Power > Power Off) in the right-click menu.
• Select the GMS Virtual Appliance in the left pane and then click Power on the virtual machine (or Shut down the virtual machine) on the Getting Started tab in the right pane.
• Select the GMS Virtual Appliance in the left pane and then click Power On (or Shut down guest) on the Summary tab in the right pane.
Configure Host Settings on the ConsoleAfter powering on the GMS Virtual Appliance, complete the following steps to open the console and configure the IP address and default route settings:
1 In vSphere, right-click the GMS Virtual Appliance in the left pane.
Dell SonicWALL GMS Virtual Appliance Getting Started Guide
26

2 Select Open Console in the right-click menu.
3 When the console window opens, click inside the window, type snwlcli at the login: prompt.
4 Press Enter. Your mouse pointer disappears when you click in the console window. To release it, press Ctrl+Alt.
5 The console might display warning messages that can be ignored, and then displays a second Login: prompt. Type admin at the Login: prompt.
6 Press Enter.
7 Enter password at the Password: prompt.
8 Press Enter. The SNWLCLI> prompt is displayed.
9 Configure the local IP address for the virtual appliance by entering the following command, substituting your IP address and subnet mask for the values shown here:
interface eth0 10.208.112.175 255.255.255.0
You can also configure IPv6 address at this step by using the interface command. Or, use the /appliance (System) interface Network > Settings screen to do the IPv6 configuration.
10 Configure the default route for the virtual appliance by typing the following command, substituting your gateway IP address for the value shown here:
route --add default --destination 10.208.112.1
You can test connectivity by pinging another server or your main gateway, for example:
ping 10.208.111.1
ping 10.0.0.1
Press Ctrl+c to stop pinging.
11 Enter exit to exit the CLI.
12 Close the console window by clicking the X.
Dell SonicWALL GMS Virtual Appliance Getting Started Guide
27

Configure Host Settings on the Appliance Management InterfaceAfter configuring the IP address and default route settings on the GMS Virtual Appliance console, the next steps are to change the admin password and configure host name, network, and time settings in the appliance management interface. The password is changed during the login process, and the Host Configuration Tool changes the other settings.
The Host Configuration Tool is a wizard that takes you through several basic steps to get your GMS Virtual Appliance configured for your network.
The wizard starts automatically after you log in for the first time and change the admin password. You can cancel the wizard at this time that leaves the default configuration on the virtual appliance and prevents the wizard from automatically starting again.
To complete host configuration for the virtual appliance, complete the following steps:
1 Launch a browser and enter the URL of the virtual appliance, such as:
http://10.208.112.175
2 On the appliance interface login page, enter the default credentials:
User—admin
Password—password
3 Click Submit to log in.
4 The first time you log in to the appliance, you must change the password. The login page re-displays with the default login credentials pre-populated. Enter a new password for the admin account in the New Password field, and enter it again in the Confirm New Password field.
5 Click Submit.
6 The Host Configuration Tool wizard starts automatically. In the Introduction screen, click Next.
7 In the Network Settings screen, configure the following network settings for the GMS Virtual Appliance.
• Name – A descriptive name for this virtual appliance
• Domain – In the form of “sonicwall.com”; this domain is not used for authentication
• Host IP Address – The static IP address for the eth0 interface of the virtual appliance
• Subnet Mask – In the form of 255.255.255.0
• Default Gateway – The IP address of the network gateway – this is the default gateway and is required for networking purposes.
• DNS Server 1 – The IP address of the primary DNS server
• DNS Server 2 (Optional) – The IP address of the secondary DNS server
8 Click Next:
9 In the Time Settings screen, select values for the following system settings on the virtual appliance:
• Time (hh:mm:ss) – Hours, minutes, and seconds of current time; this field is disabled if the NTP option is selected
NOTE: If you log out of the appliance management interface without actually cancelling the wizard, it starts automatically on your next login.
You can manually start the wizard at any time by clicking Wizards at the top-right corner of the page.
NOTE: The new password must be at least seven characters.
Be sure to save or write this password down in a secure location, as it is encrypted and is difficult to recover if you forget it.
Dell SonicWALL GMS Virtual Appliance Getting Started Guide
28

• Date – Month, day, and year of current date; this field is disabled if the NTP option is selected
• TimeZone – Select from the drop-down list
• Set time automatically using NTP – Select this checkbox to use an NTP server to set the virtual appliance time; a default NTP server is pre-configured
10 Click Next:
11 In the Summary screen, verify the settings.
12 Click Back to make changes on a previous screen, or click Apply to accept the settings.
A dialog warns you that the virtual appliance is rebooting.
13 Click OK.
14 Wait for the settings to be applied, possibly for a few minutes. The screen displays a progress bar until it finishes, and then displays the status.
Viewing the Settings SummaryWhen the Dell SonicWALL GMS Virtual Appliance is selected in the left pane, the Summary tab of the vSphere interface displays pertinent information such as memory, powered on/off state, hard disk storage usage, network subnet settings, and other settings.
A short list of commands are also provided on this page, including Power On and Edit Settings.
NOTE: If you modified the DNS settings, the services on the appliance restarts when the changes are applied, causing a momentary connectivity loss to the Web server. Your browser is redirected to the appliance management interface login page.
If you modified the Time settings, the virtual appliance will reboot. Use your browser to reconnect to the appliance management interface.
NOTE: This page might incorrectly indicate that VMware Tools are not installed.
Dell SonicWALL GMS Virtual Appliance Getting Started Guide
29

When using vSphere with vCenter Server, the Migrate and Clone commands are also available.
Editing The Virtual Machine SettingsYou can use the vSphere client to edit settings for the Dell SonicWALL GMS Virtual Appliance, including memory, CPUs, descriptive name, datastore, and resource allocation.
Dell SonicWALL GMS Virtual Appliance Getting Started Guide
30

To edit virtual machine settings:
1 In the vSphere client, right-click the GMS Virtual Appliance in the left navigation pane.
2 Select Edit Settings from the right-click menu.
3 In the Virtual Machine Properties window, the Hardware tab displays the settings for memory, CPU, hard disk, and other hardware. Click on the row in the table to access the editable settings in the right pane.
4 Click the Options tab to view and edit the GMS Virtual Appliance name, location (datastore), guest power management (for standby), and other settings.
5 Click the Resources tab to view and edit the resource allocation settings.
6 When finished, click OK.
Dell SonicWALL GMS Virtual Appliance Getting Started Guide
31

6
Registering and Licensing
All instances of SonicWALL GMS must be registered and licensed before use. This requirement applies to both single server deployments or distributed deployments on multiple servers, to fresh or upgraded installations, and to Virtual Appliance installations on Windows servers or to SonicWALL appliances.
Topics:
• Registering/Licensing After a Fresh Install on page 32
• Registering Associated Servers in a Distributed Deployment on page 35
Registering/Licensing After a Fresh InstallDell SonicWALL GMS registration is completed using the Universal Management Host (UMH) system interface. When installing the Universal Management Suite on a server, or host, a Web server is installed to provide the UMH system interface. The system interface is available by default after restarting the system at: http://localhost/
To complete registration, the system must have access to the Internet and you must have a MySonicWALL account. The Dell SonicWALL License Manager, available on the System > Licenses page of the UMH system interface, allows you to log in and enter your registration information on MySonicWALL.
To register and license Dell SonicWALL GMS on this server, complete the following steps:
1 Do one of these:
• Double-click the Universal Management Suite desktop icon.
NOTE: MySonicWALL registration information is not sold or shared with any other company.
Dell SonicWALL GMS Virtual Appliance Getting Started Guide
32

• Open a Web browser and enter http://localhost/ to launch the UMH system interface.
2 The login page loads by default in English, type admin in the User field, and password in the Password field.
3 Click Submit.
4 The Login page reloads to force a password change. Type a new password into both the New Password and Confirm New Password fields,.
5 Click Submit.
6 If the software detects that the Windows Firewall is enabled on the system, a warning dialog box is displayed on top of the System > Status page. You can do one of these:
• To receive syslog and SNMP packets, either:
• Disable the Windows Firewall
• Configure it to open these ports (default syslog port is UDP 514 and default SNMP port is UDP 162).
NOTE: If you specified a custom port (a port other than the default port 80), modify the URL as follows:
http://localhost:<port>/
For example, if you specified port 8080, the URL would be: http://localhost:8080/
NOTE: GMS includes language support for English, Japanese, Simplified Chinese, Traditional Chinese, Korean, and Brazilian Portuguese. Click the language of your choice at the bottom of this page.
Dell SonicWALL GMS Virtual Appliance Getting Started Guide
33

• Select Perform this check after 30 days if you do not plan to disable the Windows Firewall immediately, and do not wish to see this warning every time you login. The check for Windows Firewall cannot be disabled completely, and if you leave it running you will see this alert after the 30-day delay. You can repeat the delay as many times as needed.
7 When ready, click OK.
8 On the System > Status page, the Registration Pending notification across the top of the screen indicates that the system is not registered, the Serial Number status is UNKNOWN, and the License status displays Not Licensed. To begin registration, click Register in the top, right corner.
9 On the License Management page, enter your MySonicWALL user name and password into the appropriate fields and then click Submit.
10 On the second License Management page, enter your 12-character software serial number into the Serial Number field and your authentication code into the Authentication Code field.
11 Enter a friendly name for the system into the Friendly Name field. The friendly name is displayed on MySonicWALL to more easily identify the installation on this system.
12 Click Submit.
13 The License Management page displays a completion screen. Click Continue. The license summary information displays.
14 After registration, the next step is to select the role for this GMS server. Continue with the procedure described in Using the Role Configuration Tool on page 37.
NOTE: If you do not have a MySonicWALL account, you must create one before continuing. Click the link to create a MySonicWALL account.
NOTE: If this is the first Dell SonicWALL GMS Software that you are registering in a multi-server deployment, the Serial Number and Authentication Code you received from your Dell SonicWALL sales representative is entered here. As you add more instances of Dell SonicWALL GMS Software on Windows Server systems to the distributed deployment, use the same serial number used for the installation of the first GMS Windows Software or Dell SonicWALL appliance. You can use the GMS Windows serial number to register associated servers if it is a full-retail GMS serial number, but not a Demo or Free Trial GMS serial number. See Registering Associated Servers in a Distributed Deployment on page 35.
NOTE: If this is the first Dell SonicWALL GMS Software that you have registered in a multi-server deployment, the Friendly Name for this system is also used as the name for the distributed deployment. See Registering Associated Servers in a Distributed Deployment on page 35.
Dell SonicWALL GMS Virtual Appliance Getting Started Guide
34

Registering Associated Servers in a Distributed DeploymentWhen you have a distributed Dell SonicWALL GMS deployment involving more than one Dell SonicWALL appliance or Virtual Appliance instance of GMS, you can associate these components during the registration process. A MySonicWALL account is required. In a distributed deployment, Dell SonicWALL GMS must be registered and licensed on each server and associated with the initially registered instance of GMS. This is accomplished by entering the serial number of the primary instance of Dell SonicWALL GMS when registering each subsequent server in the distributed deployment.
When the primary instance of Dell SonicWALL GMS is a Dell SonicWALL appliance, you can download the UMS installer from MySonicWALL, so that you can install UMS on Windows systems to be used in the distributed deployment. When registering the Virtual Appliance instances of Dell SonicWALL GMS, use the serial number of the Dell SonicWALL appliance.
To register a Dell SonicWALL GMS instance as an associated server in an existing GMS deployment, complete the following steps:
1 In a browser, log in to the system management interface.
2 Click Register.
3 On the License Management page, enter the same MySonicWALL user name and password that you used when registering the primary instance of GMS into the appropriate fields.
4 Click Submit.
5 On the second License Management page, do one of the following:
• Type the 12 character serial number of the primary GMS into the Serial Number field and type the authentication code of the primary GMS into the Authentication Code field. The primary GMS must already be registered.
• If adding an appliance as a secondary member of a distributed deployment, the License Manager automatically populates the Serial Number field. You have the opportunity to add this unit to the existing deployment in a later step.
• If you have an eight character serial number because you upgraded this distributed deployment from a previous version of GMS, click the Click here if you have an 8 character Serial Number link and enter the eight character serial number of the primary GMS.
6 Type a descriptive name for the system into the Friendly Name field.
7 Click Submit.
8 In the License Management completion screen, click Continue.
9 After registration, the next step is to select the role for this GMS server. Continue with the procedure described in Configuring UMH Deployment Options on page 36.
NOTE: The base 10-node or 25-node management license is not automatically increased when additional servers are associated with an existing Dell SonicWALL GMS deployment. You can purchase additional node licenses on MySonicWALL.
Dell SonicWALL GMS Virtual Appliance Getting Started Guide
35

7
Configuring UMH Deployment Options
The role that you assign to your Dell SonicWALL GMS defines the Universal Management Suite services that it provides. The Dell SonicWALL GMS uses these services to do management, monitoring, and reporting tasks.
Your Dell SonicWALL GMS can be deployed in any of the following roles:
• All in One
• Database Only
• Console
• Agent
• Monitor
• Syslog Collector
• Flow Server
• All in One - Flow Server (Demo Mode Only)
Topics:
• Deployment Considerations on page 36
• Using the Role Configuration Tool on page 37
• Manually Configuring the System Role on page 40
• Controlling Deployment Services on page 51
Deployment Considerations• In the UMH system interface, clicking Details in the same row as a role provides a list of the services that
run on a system in that role, and information about using the role.
• As the number of managed appliances increases, a more distributed deployment provides better performance. To manage large numbers of Dell SonicWALL appliances, you can use several Dell SonicWALL GMS instances operating in different roles in a distributed deployment. These instances can run on Windows Server machines or on Dell SonicWALL appliances.
• You can include the MySQL database installation with any role. The All In One or Database Only roles automatically include the MySQL database. Only one server in a Dell SonicWALL GMS deployment should have the MySQL database included in its role.
• You can scale your deployment to handle more units and more reporting by adding more systems in the Agent role. Agents provide built-in redundancy capability, meaning that if an Agent goes down, other Agents can do the configuration tasks and other tasks of the Agent that went down.
• When configuring the role for the first appliance in a distributed deployment, you should either include the database or be prepared to provide the IP address of an existing database server.
You can meet this database objective in one of the following ways:
• By selecting a role that includes the database automatically, such as All In One or Database Only
• By selecting Include Database (MYSQL) if configuring the system with any other role
Dell SonicWALL GMS Virtual Appliance Getting Started Guide
36

• By setting up a compatible database on another machine and providing that IP address when prompted
Using the Role Configuration ToolThe Role Configuration Tool is a wizard that guides you through the process of defining the deployment role for Dell SonicWALL GMS. Your system must be registered and licensed for Dell SonicWALL GMS to run the Role Configuration Tool.
There are two ways to access the Role Configuration Tool:
• After the appliance is registered and licensed for GMS, the System > Status page of the appliance management interface provides a link to the wizard.
• The Wizards button in the top right corner of the page provides access to the Role Configuration Tool.
To use the Role Configuration Tool, complete the following steps:
1 Log in to the appliance management interface.
2 Navigate to the System > Status page.
3 Click the Wizards button at the top of the page.
4 Click the radio button for the Role Configuration Tool and click Continue.
5 In the Introduction page of the Role Configuration Tool, click Next.
6 In the Setup Type page, select either:
• Yes, if you are adding this system to an existing GMS deployment. Selecting Yes indicates to the wizard that there is an existing GMS database on another server.
• No, if this system is part of a new GMS deployment or is the only system in your GMS deployment.
7 Click Next.
8 If you selected Yes, proceed to Step 11.
9 In the Deployment Type page, select either:
• Yes, if this system is the only GMS server in the deployment.
• No, if there are multiple GMS servers.
10 Click Next
11 In the Role Configuration page, select the desired role for this system. Select Include Database (MYSQL) if you want to configure a GMS database on this system.
Dell SonicWALL GMS Virtual Appliance Getting Started Guide
37

12 Click Next.
13 In the Database Configuration page, enter the database parameters that are required for the selected role. The database fields varies depending on your previous selections.
Certain fields are pre-populated if you choice of role automatically includes the MySQL database or if you select Include Database (MYSQL).
For a MySQL instance, additional fields are available for configuring the database administrator credentials. The Administrator Credentials fields are only displayed and editable in the following circumstances:
• The Database Type is MySQL
• Include Database (MYSQL) is selected either manually or automatically for the chosen role
• The Database Host field is set to localhost and is not editable
When these conditions are met, the administrator password is required to create a regular access user account for the GMS application.
If you selected a role that does not include the MySQL database, you have the option of configuring the use of a SQL Server database in this dialog.
Note the following when selecting values for these fields:
• Database User – Do not use any special characters or sa, root, or admin.
• Database Password – Do not use any special characters.
• Admin Login – If using MySQL, the default Admin Login is 'root'. This cannot be changed.
• Admin Password – Do not use any special characters.
14 When finished entering the database parameters, click Next.
15 In the Other Configuration page, the fields vary depending on the selected role, as follows:
• Gateway Parameters – Required for All in One, Console, and Agent roles
• Syslog Server Parameters - Required for All in One, Console, Agent, and Syslog Collector roles
NOTE: The list of roles on this page varies depending on your previous selections such as whether this system is part of an existing GMS deployment and if it is a single-server or part of a multi-server deployment. Neither the Database Only nor the Include Database (MYSQL) options are available if this system is part of an existing deployment.
Dell SonicWALL GMS Virtual Appliance Getting Started Guide
38

• SMTP Parameters - Required for All in One and Console roles
16 Enter the GMS Gateway IP address and connection password, if you are using a GMS gateway. Leave these fields empty if you are using HTTP/HTTPS to connect to the managed appliances.
17 In the Syslog Server Port field, type in the port used for receiving syslog messages or accept the default of 514.
18 For access to email on this system, including the ability to send email alerts, type the mail server IP address into the SMTP Server field and enter valid email addresses for the Sender Address and Administrator Address.
19 Click Next.
20 In the Summary page, verify that all parameters are correct.
21 either click Back to make changes on a previous screen, or click Apply to accept the settings.
22 Wait for the settings to be applied. The screen displays a progress bar until it finishes, and then displays the status. This phase can take up to 10 minutes, especially if the database was included in the deployment.
23 Click Close to exit the Role Configuration Tool.
Dell SonicWALL GMS Virtual Appliance Getting Started Guide
39

Manually Configuring the System RoleYou can configure the role of the Dell SonicWALL GMS system without using the Role Configuration Tool. All role configuration is done in the UMH system interface, available at the URL:
http://<IP address>:<port>/appliance/
Topics:
• Configuring the All In One Role on page 40
• Configuring the Database Only Role on page 41
• Configuring the Console Role on page 41
• Configuring the Agent Role on page 42
• Configuring the Reports Summarizer Role on page 42
• Configuring the Monitor Role on page 43
• Configuring the Event Role on page 43
• Configuring the Syslog Collector Role on page 44
• Configuring the Flow Server Role on page 45
• Configuring the All in One-Flow Server (Demo Mode Only) on page 45
• Configuring the Gateway on page 46
• Configuring Database Settings on page 48
• Configuring Deployment Settings on page 49
Configuring the All In One RoleThe All In One role is used for demonstrating functionality in test environments, it should not be used in production environments.
The All In One role provides all services utilized by Dell SonicWALL GMS:
• Syslog Collector
• Reports Scheduler
• Update Manager
• Reports Summarizer
• SNMP Manager
• Scheduler
• Monitoring Manager
• Web Server
• Database
• Flow Server
To configure the Gateway settings for this role, refer to Configuring the Gateway on page 46.
NOTE: Dell SonicWALL recommends that you use a multi-system distributed deployment in production environments, with the database on a dedicated server and the other services on one or more systems. When only one other system is deployed, the Console role should be assigned to it.
Dell SonicWALL GMS Virtual Appliance Getting Started Guide
40

Configuring the Database Only RoleThe Database Only role is used in a multi-server Dell SonicWALL GMS deployment. In this role, the server is configured to run only the database service. Dell SonicWALL recommends that one of the servers in a multi-server GMS deployment is assigned a Database Only role.
Only the Universal Management Suite Database service runs on a Database Only system.
The MySQL database engine is pre-installed along with the Dell SonicWALL GMS installation. Dell SonicWALL GMS can also use a MySQL database or a Microsoft SQL Server database installed on a server. Only the MySQL database included in the installer is supported. On the Deployment > Role page in the Dell SonicWALL GMS Virtual Appliance appliance management interface, you can configure your Dell SonicWALL GMS systems to use either a MySQL or a SQL Server database.
To deploy your Dell SonicWALL GMS Virtual Appliance in the Database Only role, complete the steps described in the Configuring Database Settings on page 48.
Configuring the Console RoleThe Console role is used in a multi-server, distributed Dell SonicWALL GMS deployment. In this role, the Dell SonicWALL GMS installation runs all Universal Management Suite services except for the Database service. In this scenario, the Database role is assigned to a separate appliance or server.
In the Console role, the Dell SonicWALL GMS Virtual Appliance behaves as an Agent, and also provides the following functions:
• Provides Web user interface for the Dell SonicWALL GMS application
• Emails Scheduled Reports
• Performs Event Management tasks
• Performs various periodic checks, such as checking for new appliances that can be managed, checking for new firmware versions of managed appliances, and similar functions
To configure the Gateway settings for this role, refer to Configuring the Gateway on page 46.
Dell SonicWALL GMS Virtual Appliance Getting Started Guide
41

Configuring the Agent RoleThe Agent role can be used in a distributed deployment of Dell SonicWALL GMS. The primary functions of this role include the following:
• Manages units by acquiring them, pushing configuration tasks to the units and tracking their up/down status
• Performs monitoring based on ICMP probes, TCP probes, and SNMP OID retrievals
• Collects and stores syslog messages
• Performs report summarization
The following Universal Management Suite services run on an Agent system:
• Syslog Collector
• Reports Summarizer
• SNMP Manager
• Scheduler
• Monitoring Manager
To configure the Gateway settings for this role, refer to Configuring the Gateway on page 46.
Configuring the Reports Summarizer RoleThe Reports Summarizer role is used to dedicate a server for doing only summarization of reports in a multi-server Dell SonicWALL GMS deployment. Syslogs collected by the Syslog Collector service are consumed by the Reports Summarizer service to create generate reports. In such a deployment, it is essential that the Syslog Collectors running on various GMS Servers write syslogs to folders that are accessible by Reports Summarizer systems.
The following services run on a Summarizer system:
• Dell SonicWALL Universal Management Suite - Reports Summarizer
• Dell SonicWALL Universal Management Suite - Web Service Server
To deploy your Dell SonicWALL GMS Virtual Appliance in the Reports Summarizer role, complete the following steps in the appliance management interface:
1 Navigate to the Deployment > Role page.
2 Under Host Role Configuration, select Reports Summarizer.
3 To include the MySQL database on this system, select Include Database (MYSQL). To use a MySQL or Microsoft SQL Server database on another system, do not select this checkbox.
4 Configure the database settings as described in the Configuring Database Settings on page 48.
5 Configure the Web port settings as described in the Configuring Web Port Settings on page 49.
6 To apply your changes, click Update. To change the settings on this page back to the defaults, click Reset.
Dell SonicWALL GMS Virtual Appliance Getting Started Guide
42

Configuring the Monitor RoleThe Monitor role is used to dedicate the Dell SonicWALL GMS installation to monitoring appliances and applications in a multi-server GMS deployment. The monitoring is based on ICMP probes, TCP probes, and SNMP OID retrievals.
Only the Universal Management Suite Monitoring Manager service runs on a Monitor system.
To deploy your Dell SonicWALL GMS Virtual Appliance in the Monitor role, complete the following steps in the appliance management interface:
1 Navigate to the Deployment > Role page.
2 Under Host Role Configuration, select Monitor.
3 To:
• Include the MySQL database on this system, select Include Database (MYSQL).
• Use a MySQL or Microsoft SQL Server database on another system, do not select this checkbox.
4 Configure the database settings as described in the Configuring Database Settings on page 48.
5 Configure the Web port settings as described in the Configuring Web Port Settings on page 49
6 To apply your changes, click Update. To change the settings on this page back to the defaults, click Reset.
Configuring the Event RoleThe Event, or Event Management, role of a GMS Server is used to dedicate a server for doing only event-based alerting of appliances and applications in a multi-server Dell SonicWALL GMS Virtual Appliance deployment.
The following services run on an Event Management system:
• Dell SonicWALL Universal Management Suite - Event Manager
• Dell SonicWALL Universal Management Suite - Web Service Server
Dell SonicWALL GMS Virtual Appliance Getting Started Guide
43
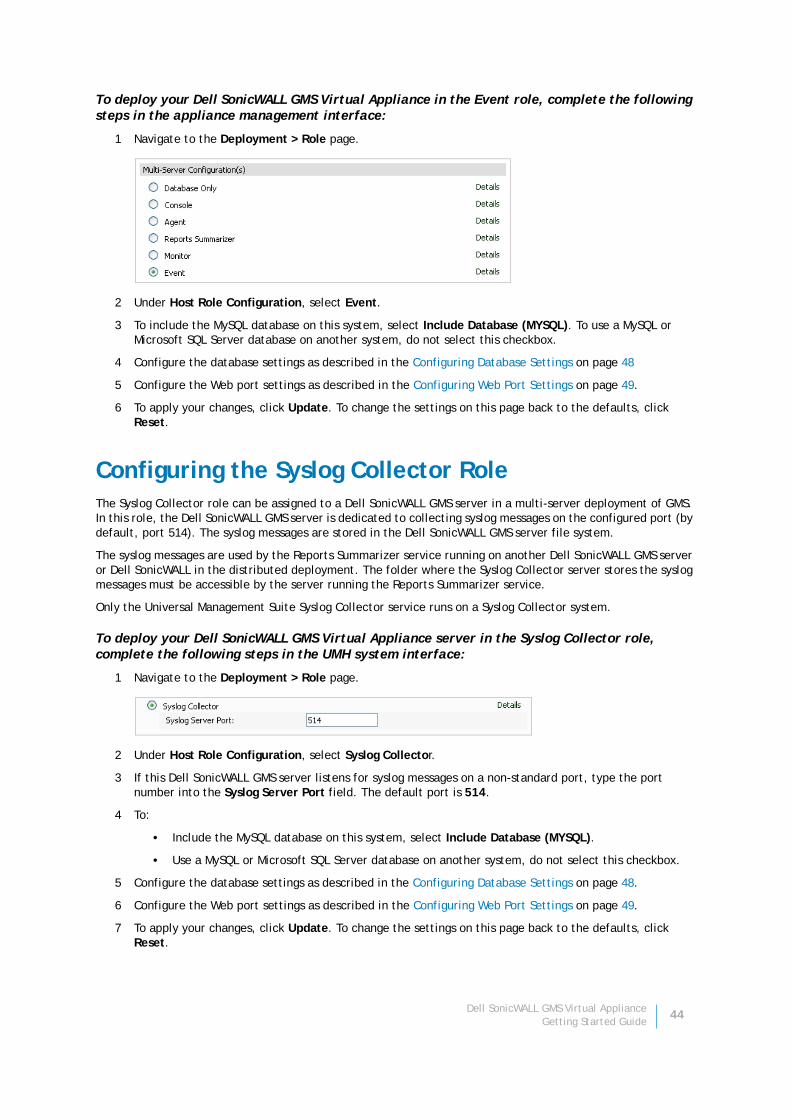
To deploy your Dell SonicWALL GMS Virtual Appliance in the Event role, complete the following steps in the appliance management interface:
1 Navigate to the Deployment > Role page.
2 Under Host Role Configuration, select Event.
3 To include the MySQL database on this system, select Include Database (MYSQL). To use a MySQL or Microsoft SQL Server database on another system, do not select this checkbox.
4 Configure the database settings as described in the Configuring Database Settings on page 48
5 Configure the Web port settings as described in the Configuring Web Port Settings on page 49.
6 To apply your changes, click Update. To change the settings on this page back to the defaults, click Reset.
Configuring the Syslog Collector RoleThe Syslog Collector role can be assigned to a Dell SonicWALL GMS server in a multi-server deployment of GMS. In this role, the Dell SonicWALL GMS server is dedicated to collecting syslog messages on the configured port (by default, port 514). The syslog messages are stored in the Dell SonicWALL GMS server file system.
The syslog messages are used by the Reports Summarizer service running on another Dell SonicWALL GMS server or Dell SonicWALL in the distributed deployment. The folder where the Syslog Collector server stores the syslog messages must be accessible by the server running the Reports Summarizer service.
Only the Universal Management Suite Syslog Collector service runs on a Syslog Collector system.
To deploy your Dell SonicWALL GMS Virtual Appliance server in the Syslog Collector role, complete the following steps in the UMH system interface:
1 Navigate to the Deployment > Role page.
2 Under Host Role Configuration, select Syslog Collector.
3 If this Dell SonicWALL GMS server listens for syslog messages on a non-standard port, type the port number into the Syslog Server Port field. The default port is 514.
4 To:
• Include the MySQL database on this system, select Include Database (MYSQL).
• Use a MySQL or Microsoft SQL Server database on another system, do not select this checkbox.
5 Configure the database settings as described in the Configuring Database Settings on page 48.
6 Configure the Web port settings as described in the Configuring Web Port Settings on page 49.
7 To apply your changes, click Update. To change the settings on this page back to the defaults, click Reset.
Dell SonicWALL GMS Virtual Appliance Getting Started Guide
44

Configuring the Flow Server RoleThe Flow Server role can be used in a distributed deployment of Dell SonicWALL GMS. The primary functions of this role include the following:
• Collect and stores flows from the firewalls
• Performs report summarization
• The following Universal Management Suite services run on an Agent system:
• Dell SonicWALL Universal Management Suite - Flow Server
The single service that runs in this role is Dell SonicWALL Universal Management Suite - Flow Server. The flows are collected and stored in internal databases. To be able to create reports out of these flows, you need to have a GMS server in this deployment with a minimum version of 7.1 and a role of “Console” or “All in One,” and so on. You also need to make sure that the following ports are open:
• UDP 2055
• UDP 5055
• TCP 9063
• TCP 9064
• TCP 9065
• TCP 9066
• TCP 9067
To deploy your Dell SonicWALL GMS Virtual Appliance in the Flow Server role, complete the following steps in the appliance management interface:
1 Navigate to the Deployment > Role page.
2 Under Host Role Configuration, select Flow Server.
3 Configure the database settings as described in the Configuring Database Settings on page 48.
4 Configure the Web port settings as described in the Configuring Web Port Settings on page 49.
5 To apply your changes, click Update. To change the settings on this page back to the defaults, click Reset.
Configuring the All in One-Flow Server (Demo Mode Only)The All In One-Flow Server role is used for demonstrating Flow Server functionality in test environments, it should not be used in production environments. This role configuration is available for the GMS Virtual Appliance only.
Following services run on an All in One-Flow Server Management system:
• Dell SonicWALL Universal Management Suite - Database
• Dell SonicWALL Universal Management Suite - Event Manager
• Dell SonicWALL Universal Management Suite - Flow Server
• Dell SonicWALL Universal Management Suite - Monitoring Manager
• Dell SonicWALL Universal Management Suite - Reports Database
• Dell SonicWALL Universal Management Suite - Reports Scheduler
• Dell SonicWALL Universal Management Suite - Reports Summarizer
Dell SonicWALL GMS Virtual Appliance Getting Started Guide
45
• Dell SonicWALL Universal Management Suite - Scheduler
• Dell SonicWALL Universal Management Suite - Syslog Collector
• Dell SonicWALL Universal Management Suite - Update Manager
• Dell SonicWALL Universal Management Suite - Web Server
• Dell SonicWALL Universal Management Suite - Web Services
To Configure the Gateway settings for this role, refer to Configuring the Gateway on page 46.
Configuring the GatewayAfter choosing a role, select a gateway to configure:
• None on page 46
• NAT Device on page 46
• GMS Gateway on page 47
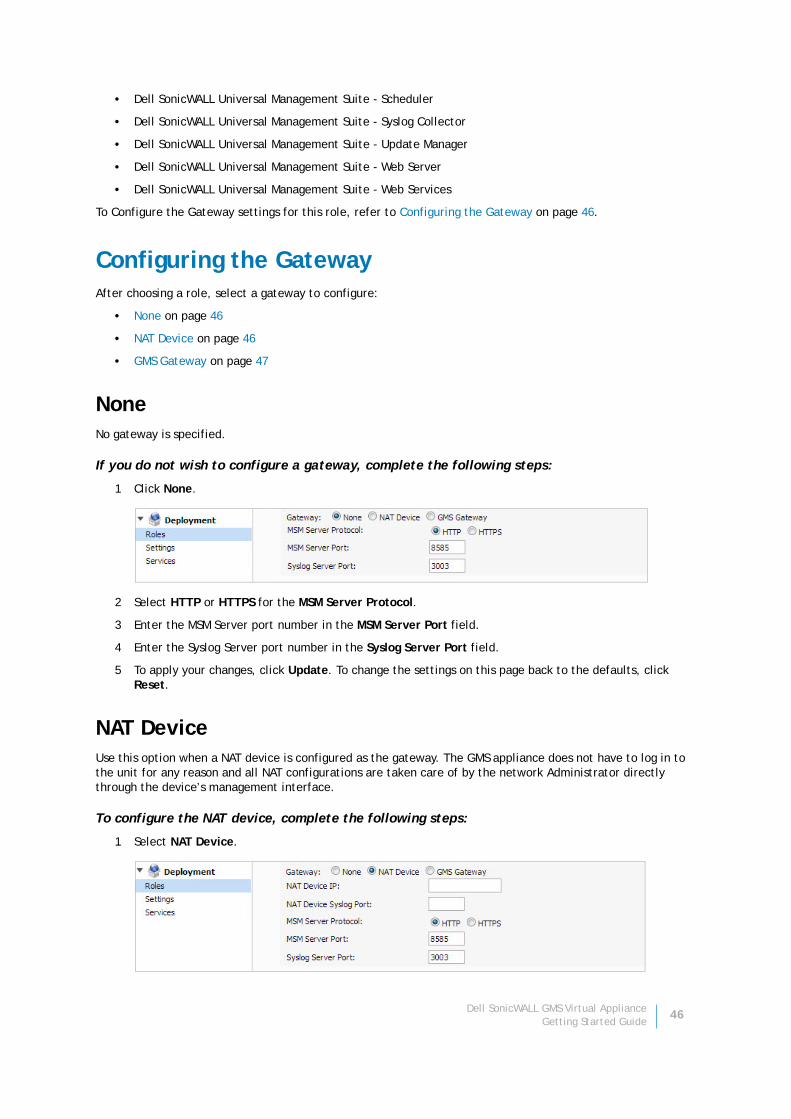
NoneNo gateway is specified.
If you do not wish to configure a gateway, complete the following steps:
1 Click None.
2 Select HTTP or HTTPS for the MSM Server Protocol.
3 Enter the MSM Server port number in the MSM Server Port field.
4 Enter the Syslog Server port number in the Syslog Server Port field.
5 To apply your changes, click Update. To change the settings on this page back to the defaults, click Reset.
NAT DeviceUse this option when a NAT device is configured as the gateway. The GMS appliance does not have to log in to the unit for any reason and all NAT configurations are taken care of by the network Administrator directly through the device’s management interface.
To configure the NAT device, complete the following steps:
1 Select NAT Device.
Dell SonicWALL GMS Virtual Appliance Getting Started Guide
46

2 Click the NAT Device IP field, then enter the NAT Device IP address.
3 Click the NAT Device Syslog Port field, then enter the NAT Device Syslog port number. This is the Syslog port used for Syslogs sent from the managed units.
4 Select HTTP or HTTPS for the MSM Server Protocol.
5 Click the MSM Server Port field, then enter the MSM Server port number.
6 Click the Syslog Server Port field, then enter the Syslog Server port number.
7 To apply your changes, click Update. To change the settings on this page back to the defaults, click Reset.
GMS GatewayUse this option when a Dell SonicWALL device is acting as a Gateway. Using a Dell SonicWALL appliance is recommended, but can be setup as a NAT Device if all units are managed using an SSL tunnel.
To configure the GMS Gateway, complete the following steps:
1 Click GMS Gateway.
2 If the Dell SonicWALL GMS connects to managed appliances through a GMS gateway, click the GMS Gateway IP field, then enter the internal IP address of the device.
If you change the GMS gateway IP address or password, you must also change the settings on this page. To determine if a GMS Gateway is required, see the Dell SonicWALL Getting Started Guide for your product
3 Click the GMS Gateway Port field, then enter the management port used to sign into the device.
4 Click the GMS Gateway User field, then enter the username used to sign into the device.
5 Click the GMS Gateway Password field, then enter the password used to sign into the device.
6 Confirm the GMS Gateway Password you entered.
7 Click the GMS Gateway Syslog Port field, then enter the Syslog port used for syslogs sent from the managed units.
8 Select HTTP or HTTPS for the MSM Server Protocol.
9 Click the MSM Server Port field, then enter the MSM Server port number.
10 Click the Syslog Server Port field, then enter the Syslog Server port number.
11 To apply your changes, click Update. To change the settings on this page back to the defaults, click Reset.
Dell SonicWALL GMS Virtual Appliance Getting Started Guide
47

Configuring Database SettingsDatabase settings configuration is largely the same for any role when you choose to include the database on that server. For roles that automatically include the default MySQL database, such as All In One or Database Only, the Database Type, Database Host, and Database Port fields are not editable. This is also the case for any role when Include Database (MYSQL) is selected. The Administrator Credentials fields are displayed only if the role has been defined to include the installation of the MySQL database. These are not available when a SQL Server database is selected.
This section describes the options for configuring the database settings for either the MySQL database or the Microsoft SQL Server database. Dell SonicWALL GMS can use either a MySQL or a SQL Server database.
To configure the database settings for any role, complete the following steps in the UMH system interface:
1 Navigate to the Deployment > Role page.
2 Select the role for this server.
3 To:
• Include the MySQL database on this system, select Include Database (MYSQL).
• Use a MySQL or Microsoft SQL Server database on another system, do not select this checkbox.
4 Under Database Configuration, if Include Database (MYSQL) was not selected in the previous step, select either MYSQL or SQL Server from the Database Type drop-down menu. This field is not editable if you previously selected Include Database (MYSQL) or if the selected role is All In One or Database Only.
5 In the Database Host field, type in the IP address of the database server or accept the default, localhost, if this Dell SonicWALL GMS Virtual Appliance server includes the database. This field is not editable if you previously selected Include Database (MYSQL) or if the selected role is All In One or Database Only.
6 To use a different user name when GMS accesses the database, type the user name into the Database User field. The default user name is sa.
7 Type the password that GMS uses to access the database into both the Database Password and Confirm Database Password fields.
8 Under Administrator Credentials, type the password for the administrator (root) account into both the Admin Password and Confirm Admin Password fields.
9 To apply your changes, click Update. To change the settings on this page back to the defaults, click Reset.
NOTE: If this appliance connects to a SQL Server system with a non-default instance name, then the entries are different than described in this section. Refer to the Dell SonicWALL GMS Administration Guide for configuration instructions.
NOTE: The Administrator Credentials fields are only displayed and editable in the following circumstances:
• The Database Type is MySQL
• Include Database (MYSQL) is selected either manually or automatically for the chosen role
• The Database Host field is set to localhost and is not editable
When these conditions are met, the administrator password is required to create a regular access user account for the GMS application.
NOTE: It might take 10 or 15 minutes for a database installation to complete. The database installation creates a minimal GMS database. To change database sizes, you might need to use database tools such as MySQL Server Enterprise Manager.
TIP: For optimal performance, you need to configure database maintenance plans. For information on configuring Dell SonicWALL GMS maintenance plans, refer to the GMS Administration Guide.
Dell SonicWALL GMS Virtual Appliance Getting Started Guide
48

Configuring Deployment SettingsThe following sections describes the settings available on the Deployment > Settings page of the system interface:
• Configuring Web Port Settings on page 49
• Configuring SMTP Settings on page 50
• Configuring SSL Certificate Access on page 50
Configuring Web Port Settings
Web port settings configuration is largely the same on any role.
To change the Web port settings, complete the following steps:
1 Navigate to Deployment > Settings > Web Port Configuration.
2 To use a different port for HTTP access to the Dell SonicWALL GMS Virtual Appliance server, type the port number into the HTTP Port field. The default port is 80.
3 To use a different port for HTTPS access to the Dell SonicWALL GMS Virtual Appliance server, type the port number into the HTTPS Port field. The default port is 443.
4 To enable HTTPS redirection, click Enable HTTPS redirection.
5 Click Enable HTTPS Redirection to redirect HTTP to HTTPS when accessing the GMS management interface.
6 In the Public IP text-field, enter the public IP or FQDN of the outside web services.
7 Click Update to apply the Web port settings. The appliance restarts.
8 After the appliance restarts, use the new port to access the appliance management interface. For example:
• If you changed the HTTP port to 8080, use the URL:
http://<IP Address>:8080/appliance/
• If you changed the HTTPS port to 4430, use the URL:
http://<IP Address>:4430/appliance/
NOTE: Changing the Web port settings causes the system to restart.
Dell SonicWALL GMS Virtual Appliance Getting Started Guide
49

Configuring SMTP SettingsThe SMTP settings are used for sending email alerts to the Dell SonicWALL UMH system administrator.
If the Mail Server settings are not configured correctly, you will not receive important email notifications, such as:
• System alerts for your Dell SonicWALL GMS deployment performance
• Availability of product updates, hot fixes, or patches
• Availability of firmware upgrades for managed appliances
• Alerts on your managed appliances’ status
• Scheduled Reports
To configure the SMTP settings, complete the following steps:
1 Navigate to the Deployment > Settings page.
2 In the SMTP Configuration section, enter the IP address of the SMTP server into the SMTP server field.
3 If the SMTP server in your deployment is set to use authentication, click Use Authentication. This option is necessary for all outgoing GMS emails to properly send to the intended recipients.
a Enter the username in the User field.
b Enter and confirm the password in the Password and Confirm Password fields.
4 In the Sender address field, enter the email address that appears as the ‘From’ address when email alerts are sent to the administrator.
5 In the Administrator address field, enter a valid email address for the administrator who receives email alerts.
6 In the Email send timeout field, enter a timeout interval (in minutes). If the server does not respond within the specified interval, the Email send action is stopped and an error is reported.
7 Click Test Connectivity to verify your SMTP server configuration settings.
8 Click Update to apply the SMTP settings.
Configuring SSL Certificate AccessMost Dell SonicWALL GMS Virtual Appliance deployments use the default certificate accompanied with your GMS Web Server. You can also choose to use a custom certificate and a respective unique password for your Dell SonicWALL GMS Virtual Appliance deployment as shown in the following image. The SSL Access Configuration section allows you to configure and upload a custom Keystore/Certificate file for SSL access to the GMS appliance, or select the default local keystore
Dell SonicWALL GMS Virtual Appliance Getting Started Guide
50

To configure SSL access:
1 Navigate to the Deployment > Settings page under SSL Access Configuration section.
2 In the SSL Access Configuration section, select one of these:
• Default to keep, or revert to, the default settings, where the default GMS Web Server certificate with gmsvpserverks keystore is used.
• Custom to upload a custom certificate for GMS SSL access.
3 In the Certificate file field, click Choose File to select your certificate file.
4 In the Certificate Key file field, click Choose File to select your certificate key file.
5 Type the password for the certificate into the Certificate password field.
6 Click View to display details about your certificate.
7 Click Update to submit your changes.
Controlling Deployment ServicesThe Deployment > Services page provides a list of the services that are running on your system as part of Dell SonicWALL GMS Virtual Appliance. It also provides a way to stop or start any of the services.
To stop a service that is currently Enabled, select the checkbox for that service and then click Disable/Stop.
To start a service that is currently Disabled, select the checkbox for that service and then click Enable/Start.
To restart a service that is either Enabled or Disabled, select the checkbox for that service and then click Restart.
Dell SonicWALL GMS Virtual Appliance Getting Started Guide
51

8
Provisioning and Adding Units
After installation, registration, and role configuration, the next steps in setting up your Dell SonicWALL GMS Virtual Appliance are provisioning Dell SonicWALL appliances to support GMS and adding them to the Dell SonicWALL GMS Virtual Appliance. All Dell SonicWALL appliances must be provisioned before adding them to the Dell SonicWALL GMS Virtual Appliance. Make sure the provisioned Dell SonicWALL appliances have a valid GMS license—one GMS license for each Dell SonicWALL appliance.
Topics:
• Provisioning a Dell SonicWALL Firewall Appliance on page 52
• Provisioning a Dell SonicWALL SMA SMB Appliance on page 53
• Provisioning a Dell SonicWALL E-Class SMA Series Appliance on page 54
• Adding Dell SonicWALL Appliances on page 55
Provisioning a Dell SonicWALL Firewall ApplianceTo provision a Dell SonicWALL firewall appliance to support GMS, complete the following steps:
1 Log in to the firewall appliance. Navigate to the Log > Syslog page.
2 In Syslog Servers, click Add.
3 Enter the GMS IP address to start sending syslogs. The GMS service should be activated.
Dell SonicWALL GMS Virtual Appliance Getting Started Guide
52

4 Set the log in UTC format and log category.
5 Navigate to the System > Time page.
6 Enable Display UTC in logs (instead of local time).
Provisioning a Dell SonicWALL SMA SMB ApplianceTo provision a Dell SonicWALL SMA SMB appliance for Dell SonicWALL GMS Virtual Appliance complete the following steps:
1 Log in to the SMA SMB appliance.
2 Navigate to the Log > Analyzer page.
3 In Analyzer Settings, click Enable Analyzer.
4 Click Add to add the GMS IP address, this starts sending syslogs.
Dell SonicWALL GMS Virtual Appliance Getting Started Guide
53

5 Navigate to the System > Time page.
6 Enable Display UTC in logs (instead of local time).
Provisioning a Dell SonicWALL E-Class SMA Series ApplianceCurrently there is no GMS settings implementation in Dell SonicWALL E-Class SMA series appliances. To add GMS reporting support, use the Additional ViewPoint settings in the General Settings > Configure Centralized Management screen, and enter the GMS IP address and port number to start sending syslog.
Dell SonicWALL GMS Virtual Appliance Getting Started Guide
54

Adding Dell SonicWALL AppliancesThis section describes how to add Dell SonicWALL appliances to the GMS. Dell SonicWALL GMS Virtual Appliance checks with the Dell SonicWALL licensing server when you add an appliance, so it is important that Dell SonicWALL GMS Virtual Appliance has Internet access to the server. Dell SonicWALL GMS Virtual Appliance can communicate with Dell SonicWALL appliances through HTTP or HTTPS.
To add a Dell SonicWALL appliance using the Dell SonicWALL GMS Virtual Appliance management interface, complete the following steps:
1 Click the appliance tab that corresponds to the type of appliance that you want to add:
• Firewall
• SMA
2 Expand the Dell SonicWALL GMS Virtual Appliance tree.
3 Select the group to which you are adding the Dell SonicWALL appliance.
4 Right-click the group.
5 Select Add Unit from the pop-up menu. To not specify a group, right-click an open area in the left pane (TreeControl pane) of the Dell SonicWALL GMS Virtual Appliance management interface and select Add Unit or click the Add Unit icon in the tool bar.
Dell SonicWALL GMS Virtual Appliance Getting Started Guide
55

The Add Unit dialog box appears:
6 Enter a descriptive name for the Dell SonicWALL appliance in the Unit Name field. Do not enter the single quote character (‘) in the Unit Name field.
7 Enter the serial number of the Dell SonicWALL appliance in the Serial Number field.
8 For the Managed Address, choose whether to Determine automatically, or Specify manually. Most deployments are able to determine the IP address automatically. If you choose to specify the IP address manually, an option to Make manual address sticky is available. This retains the Manual Mode and the specified IP address is not overwritten.
9 Enter the Administrator login name for the Dell SonicWALL appliance in the Login Name field. The Administrator of the appliance can also enter a Local User or a Remote User name (as configured on the Firewall) for GMS Management. If using Local User or Remote User names, they must be included in the user list created on the Firewall.
10 Enter the password used to access the Dell SonicWALL appliance in the Password field.
11 For Management Mode, select from the following:
• If the Dell SonicWALL appliance is managed through an existing VPN tunnel or over a private network, select Using Existing Tunnel or LAN.
• If the Dell SonicWALL appliance is managed through a dedicated management VPN tunnel, select Using Management Tunnel.
• If the Dell SonicWALL appliance is managed using SSL, select Using SSL (default).
12 Enter the IP address of the managed appliance in the Management Port field (default port is HTTPS: 443). The Dell SonicWALL appliance is connected with HTTPS by default.
13 For VPN tunnel management, enter a 16-character encryption key in the SA Encryption Key field. The key must be exactly 16 characters long and composed of hexadecimal characters. Valid hexadecimal characters are “0” to “9”, and “a” to “f” (such as, 0, 1, 2, 3, 4, 5, 6, 7, 8, 9, a, b, c, d, e, f). For example, a valid key would be: 1234567890abcdef
NOTE: This key must match the encryption key of the SonicWALL appliance. You can set the key on the appliance by logging directly into it.
Dell SonicWALL GMS Virtual Appliance Getting Started Guide
56

14 For VPN tunnel management, enter a 32-character authentication key in the SA Authentication Key field. The key must be exactly 32 characters long and composed of hexadecimal characters. For example, a valid key would be: 1234567890abcdef1234567890abcdef
15 Select the IP address of the GMS agent server that manages the Dell SonicWALL appliance from the Agent IP Address drop-down.
16 If the GMS is configured in a multi-tier distributed environment, enter the IP address of the backup GMS server in the Standby Agent IP field. The backup server automatically manages the SonicWALL appliance in the event of a primary server failure. Any Agent can be configured as the backup. If the GMS is deployed in a single server environment, leave this field blank.
17 Click OK.
The new Dell SonicWALL appliance appears in the GMS management interface. It has a yellow icon that indicates it has not yet been successfully acquired. GMS then attempts to set up an HTTPS connection to access the appliance. GMS then reads the appliance configuration and acquires the Dell SonicWALL appliance for reporting. This takes a few minutes. After the Dell SonicWALL appliance is successfully acquired, its icon turns blue, its configuration settings are displayed at the unit level, and its settings are saved to the database.
NOTE: This key must match the authentication key of the SonicWALL appliance.
NOTE: If GMS is configured in a multi-tier distributed environment, you must select the GMS Agent whose IP address matches the IP address that you specified when configuring the SonicWALL appliance for GMS management.
If GMS is in a single-server environment, the IP address of the GMS agent server already appears in the field.
Dell SonicWALL GMS Virtual Appliance Getting Started Guide
57

9
Support
Related Technical DocumentationDell SonicWALL GMS reference documentation is available at the Dell SonicWALL Technical Documentation Online Library:
https://support.software.dell.com.
Dell SonicWALL GMS video training is available from the GMS Development Team:
http://software.sonicwall.com/gmsvp/Dev-Training/
The Dell SonicWALL GMS documentation set includes the following:
• Dell SonicWALL GMS Release Notes
• Dell SonicWALL GMS Software Getting Started Guide
Dell SonicWALL GMS Virtual Appliance Getting Started Guide
58

• Dell SonicWALL GMS Virtual Appliance Getting Started Guide
• Dell SonicWALL GMS Administration Guide
Dell SonicWALL Live Product DemosGet the most out of your Dell SonicWALL GMS with the complete line of Dell SonicWALL products. The Dell SonicWALL Live Demo Site provides free test drives of Dell SonicWALL security products and services through interactive live product installations:
• UTM/Firewall/VPN
• Continuous Data Protection
• SSL VPN Secure Remote Access
• Content Filtering
• Email Security
• GMS and Analyzer
For further information, visit: http://livedemo.sonicwall.com/
Dell SonicWALL GMS Virtual Appliance Getting Started Guide
59
About Dell
Dell listens to customers and delivers worldwide innovative technology, business solutions and services they trust and value. For more information, visit www.software.dell.com.
Contacting DellTechnical support:Online support
Product questions and sales:(800) 306-9329
Email:[email protected]
Technical support resourcesTechnical support is available to customers who have purchased Dell software with a valid maintenance contract and to customers who have trial versions. To access the Support Portal, go to https://support.software.dell.com/.
The Support Portal provides self-help tools you can use to solve problems quickly and independently, 24 hours a day, 365 days a year. In addition, the portal provides direct access to product support engineers through an online Service Request system.
The site enables you to:
• Create, update, and manage Service Requests (cases)
• View Knowledge Base articles
• Obtain product notifications
• Download software. For trial software, go to Trial Downloads.
• View how-to videos
• Engage in community discussions
• Chat with a support engineer
Dell SonicWALL GMS Virtual Appliance 8.1Getting Started Guide
60