Embed Size (px)
Citation preview
Dell OpenManage Plug-in Version 2.0 for Nagios CoreInstallation Guide

Notes, cautions, and warningsNOTE: A NOTE indicates important information that helps you make better use of your computer.
CAUTION: A CAUTION indicates either potential damage to hardware or loss of data and tells you how to avoid the problem.
WARNING: A WARNING indicates a potential for property damage, personal injury, or death.
Copyright © 2015 Dell Inc. All rights reserved. This product is protected by U.S. and international copyright and intellectual property laws. Dell™ and the Dell logo are trademarks of Dell Inc. in the United States and/or other jurisdictions. All other marks and names mentioned herein may be trademarks of their respective companies.
2015 - 10
Rev. A00

Contents
1 Introduction to the Dell OpenManage Plug-in Version 2.0 for Nagios Core............................................................................................................................ 4
2 System requirements........................................................................................... 6System requirements for management systems..................................................................................7
System requirements for managed systems........................................................................................ 7
3 Downloading and installing the Dell OpenManage Plug-in Version 2.0 for Nagios Core..................................................................................................9
4 Upgrading to Dell OpenManage Plug-in Version 2.0 for Nagios Core.....12
5 Uninstalling the Dell OpenManage Plug-in Version 2.0 for Nagios Core.......................................................................................................................... 15
6 Accessing documents from Dell support site............................................... 16
7 Related Documentation.....................................................................................17
3

1Introduction to the Dell OpenManage Plug-in Version 2.0 for Nagios CoreThis guide provides information about the software requirements, system requirements, and the steps to install, upgrade, and uninstall the Dell OpenManage Plug-in Version 2.0 for Nagios Core.
This plug-in provides capabilities to monitor Dell devices in environments managed by Nagios Core. This plug-in gives you complete hardware-level visibility of Dell devices, including overall and component-level health monitoring. The plug-in provides basic inventory information and event monitoring of Dell devices. The plug-in also supports one-to-one web console launch of the supported Dell devices for further troubleshooting, configuration, and management activities.
The Dell OpenManage Plug-in Version 2.0 for Nagios Core supports the following Dell devices:
• Dell 12th and later generations of Dell PowerEdge servers through the agent-free method by using Integrated Dell Remote Access Controller (iDRAC) with Lifecycle Controller (LC)
• Dell Datacenter Scalable Solutions (DSS)
• Dell PowerEdge FX2/FX2s chassis, Dell PowerEdge VRTX chassis, and Dell PowerEdge M1000e chassis
• Dell EqualLogic PS-Series Storage Arrays, Dell PowerVault MD 34/38 Series Storage Arrays, and Dell Compellent Storage Arrays
For more details on device support, see Support matrix in the “Dell OpenManage Plug-in Version 2.0 for Nagios Core User’s Guide.”
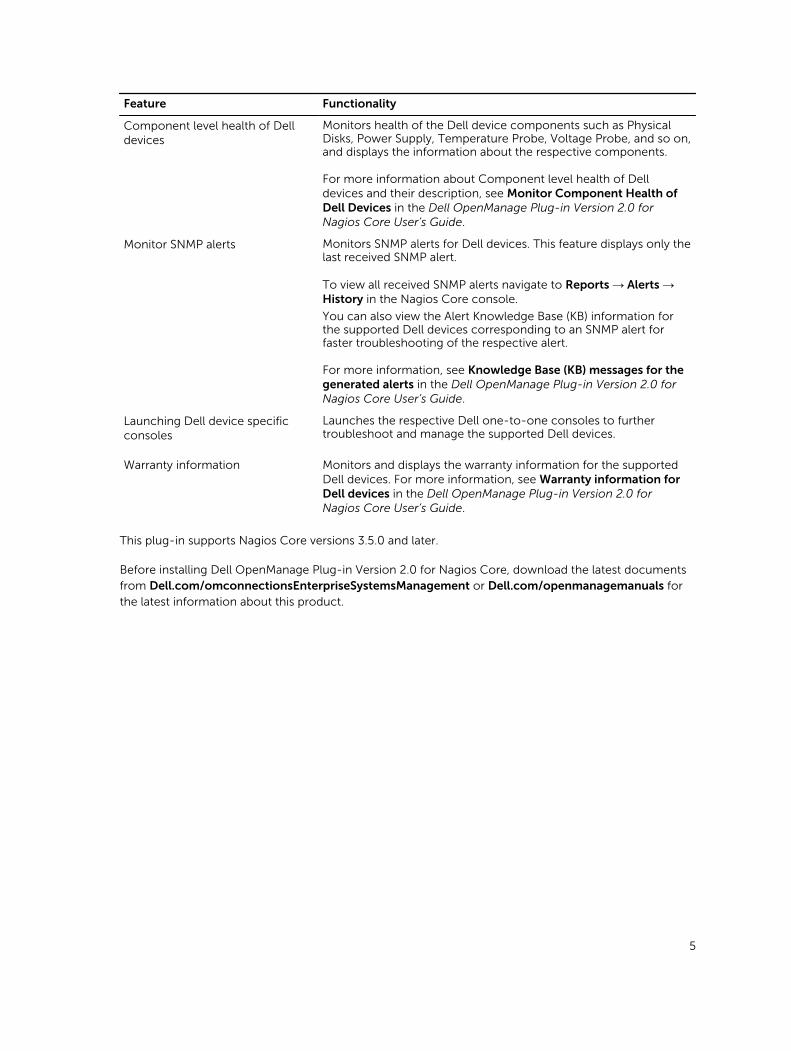
Table 1. Key features
Feature Functionality
Device Discovery Discovers Dell devices. Once the discovery is complete, host and service definitions are created for each device.
To discover Dell servers through iDRAC with Lifecycle Controller, you can opt for either SNMP or WS-MAN protocol. However, Dell storage is discovered using SNMP protocol and Dell chassis is discovered using WS-MAN protocol.
Device Information Displays information about the discovered device such as Service Tag, Firmware Version, Device Name, Device Model, and so on after a device discovery is successful. You can view this information in the Hosts or the Services view in the Nagios Core console.
For more information about device services and their description, see Device Information in the Dell OpenManage Plug-in Version 2.0 for Nagios Core User’s Guide.
Monitor overall health of Dell devices
Monitors the overall health of Dell devices.
4
Feature Functionality
Component level health of Dell devices
Monitors health of the Dell device components such as Physical Disks, Power Supply, Temperature Probe, Voltage Probe, and so on, and displays the information about the respective components.
For more information about Component level health of Dell devices and their description, see Monitor Component Health of Dell Devices in the Dell OpenManage Plug-in Version 2.0 for Nagios Core User’s Guide.
Monitor SNMP alerts Monitors SNMP alerts for Dell devices. This feature displays only the last received SNMP alert.
To view all received SNMP alerts navigate to Reports → Alerts → History in the Nagios Core console.
You can also view the Alert Knowledge Base (KB) information for the supported Dell devices corresponding to an SNMP alert for faster troubleshooting of the respective alert.
For more information, see Knowledge Base (KB) messages for the generated alerts in the Dell OpenManage Plug-in Version 2.0 for Nagios Core User’s Guide.
Launching Dell device specific consoles
Launches the respective Dell one-to-one consoles to further troubleshoot and manage the supported Dell devices.
Warranty information Monitors and displays the warranty information for the supported Dell devices. For more information, see Warranty information for Dell devices in the Dell OpenManage Plug-in Version 2.0 for Nagios Core User’s Guide.
This plug-in supports Nagios Core versions 3.5.0 and later.
Before installing Dell OpenManage Plug-in Version 2.0 for Nagios Core, download the latest documents from Dell.com/omconnectionsEnterpriseSystemsManagement or Dell.com/openmanagemanuals for the latest information about this product.
5

2System requirementsBefore you install the plug-in, ensure that you meet the following requirements based on the protocol you are using:
Common prerequisites:
• Nagios Core version 3.5.0 or later is installed and all the Nagios Core components are functional.
• Perl version 5.8.8 or later is installed.
• The Net-IP Perl module version 1.26 or later is installed.
• (Optional) Java version 1.6 or later is installed to view Dell warranty information.
• (Optional) Socket6 Perl module version 0.23 or later is installed for monitoring managed systems using Internet Protocol version 6 (IPv6).
• (Optional) SNMP Trap Translator (SNMPTT) is installed to receive SNMP alerts. It is recommended to use the latest version.
• (Optional) The supported Dell Remote RACADM utility is installed to monitor component attribute information of Dell chassis such as:
– Speed(RPM) of the Dell Chassis Fan Status.
– InputCurrent(A) of the Dell Chassis PowerSupply Status.
– InputVoltage(V) of the Dell Chassis PowerSupply Status.
– OutputPower(W) of the Dell Chassis PowerSupply Status.
– Health of the Dell Chassis I/O Module Status.
For more information on downloading and installing the supported Dell Remote RACADM utility, go to “en.community.dell.com/techcenter/systems-management/w/wiki/3205.racadm-command-line-interface-for-drac”
For SNMP:
The Net-SNMP Perl module version 6.0.1 or later is installed.
For WS-MAN:
OpenWSMAN and its Perl binding are installed.
NOTE: To discover iDRAC devices, you can opt for either SNMP or WS-MAN protocol based on your requirement. However, Dell storage is discovered using SNMP protocol and Dell chassis is discovered using WS-MAN protocol.
6

System requirements for management systemsThe requirements for the management systems are as follows:
• Red Hat Enterprise Linux (RHEL) 7 and RHEL 6.6 (32-bit and 64-bit)
• SUSE Linux Enterprise Server (SLES) 11 and SLES 10 (32-bit and 64-bit)
ESXi running the supported versions of RHEL and SLES guest operating systems is also supported.
System requirements for managed systemsThe requirements for the managed systems are as follows:
Table 2. Supported firmware versions for Dell devices
Dell Device Firmware Supported Firmware Versions
Dell 12th generation of PowerEdge servers
iDRAC7 2.20.20.20 and 2.15.10.10
Dell 13th generation of PowerEdge servers
iDRAC8 2.20.20.20 and 2.15.10.10
Dell 13th generation of PowerEdge servers (T130, T330, R230, and R330)
iDRAC8 2.22.22.22
Dell PowerEdge R530xd iDRAC8 2.20.20.20 and 2.12.12.12
Dell PowerEdge R930 iDRAC8 2.20.20.20 and 2.13.13.12
Dell PowerEdge C4130 iDRAC8 2.20.20.20 and 2.15.10.10
Dell PowerEdge C6320 iDRAC8 2.14.14.12
Dell Datacenter Scalable Solutions (DSS 1500 and DSS 2500)
iDRAC8 2.16.16.12
Dell Datacenter Scalable Solutions (DSS 1510)
iDRAC8 2.17.17.13
Dell PowerEdge M1000e Chassis CMC 5.1 and 5.0
Dell PowerEdge VRTX Chassis CMC 2.1 and 2.0
Dell PowerEdge FX2/FX2s Chassis CMC 1.3 and 1.2
Dell Compellent Storage Arrays NA 6.6 and 6.5
Dell EqualLogic PS-Series Storage Arrays NA 8.0.4 and 7.1.7
Dell PowerVault MD 34/38 Series Storage Arrays
NA 8.20.09.60 and 8.20.05.60
• If you are using SNMP, ensure that SNMP is configured in the respective devices.
If you want to receive SNMP traps in the Nagios Core console, ensure that you configure the SNMP trap destination in the respective devices.
7

For more information, see Appendix in the Dell OpenManage Plug-in Version 2.0 for Nagios Core User’s Guide at dell.com/omconnectionsEnterpriseSystemsManagement.
• If you are using WS-MAN protocol, it is recommended that you use a WS-MAN service account other than the default service account. For more information, see Configuring User Accounts and Privileges in the respective device’s User’s Guide at Dell.com/esmmanuals.
For the list of supported platforms, see Support Matrix in the Dell OpenManage Plug-in Version 2.0 for Nagios Core User’s Guide.
8
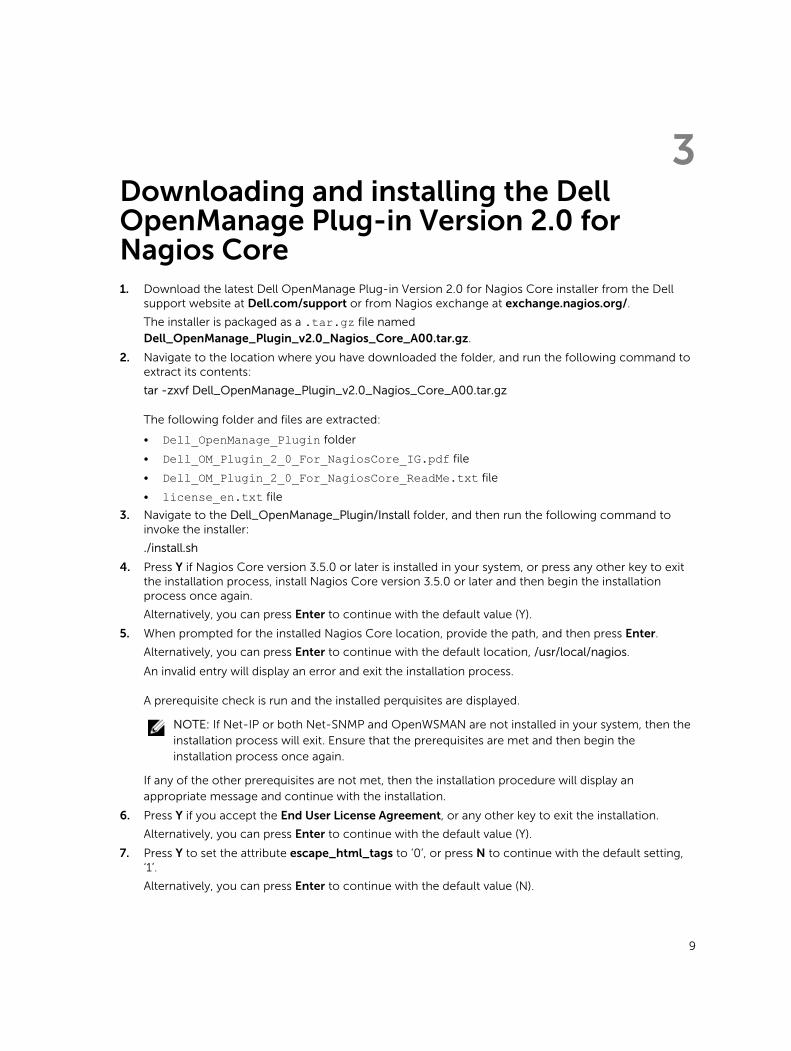
3Downloading and installing the Dell OpenManage Plug-in Version 2.0 for Nagios Core1. Download the latest Dell OpenManage Plug-in Version 2.0 for Nagios Core installer from the Dell
support website at Dell.com/support or from Nagios exchange at exchange.nagios.org/.
The installer is packaged as a .tar.gz file named
Dell_OpenManage_Plugin_v2.0_Nagios_Core_A00.tar.gz.
2. Navigate to the location where you have downloaded the folder, and run the following command to extract its contents:
tar -zxvf Dell_OpenManage_Plugin_v2.0_Nagios_Core_A00.tar.gz
The following folder and files are extracted:
• Dell_OpenManage_Plugin folder
• Dell_OM_Plugin_2_0_For_NagiosCore_IG.pdf file
• Dell_OM_Plugin_2_0_For_NagiosCore_ReadMe.txt file
• license_en.txt file
3. Navigate to the Dell_OpenManage_Plugin/Install folder, and then run the following command to invoke the installer:
./install.sh
4. Press Y if Nagios Core version 3.5.0 or later is installed in your system, or press any other key to exit the installation process, install Nagios Core version 3.5.0 or later and then begin the installation process once again.
Alternatively, you can press Enter to continue with the default value (Y).
5. When prompted for the installed Nagios Core location, provide the path, and then press Enter.
Alternatively, you can press Enter to continue with the default location, /usr/local/nagios.
An invalid entry will display an error and exit the installation process.
A prerequisite check is run and the installed perquisites are displayed.
NOTE: If Net-IP or both Net-SNMP and OpenWSMAN are not installed in your system, then the installation process will exit. Ensure that the prerequisites are met and then begin the installation process once again.
If any of the other prerequisites are not met, then the installation procedure will display an appropriate message and continue with the installation.
6. Press Y if you accept the End User License Agreement, or any other key to exit the installation.
Alternatively, you can press Enter to continue with the default value (Y).
7. Press Y to set the attribute escape_html_tags to ‘0’, or press N to continue with the default setting, ‘1’.
Alternatively, you can press Enter to continue with the default value (N).
9

NOTE: It is recommended that you continue the installation with the attribute escape_html_tags set to ‘0’ for better readability (multiline view) in order to distinguish the different instances or entities in the Dell plug-in.
8. If you have installed SNMPTT, provide the path where SNMPTT is installed, and then press Y to continue with the installation.
Alternatively, you can press Enter to continue with the default file path, /etc/snmp/snmptt.ini. If you have not installed SNMPTT and want to skip this step, press Enter.
NOTE: If SNMPTT was not installed while installing this plug-in, but you later want to receive SNMP alerts, perform the following actions:
• Install SNMPTT.
• Navigate to <NAGIOS_HOME>/dell/install, and then run the following command:
./install.sh trap
<NAGIOS_HOME> is the installed location of Nagios Core and by default, the location of <NAGIOS_HOME> is /usr/local/nagios.
9. If you have installed RACADM, provide the path where RACADM is installed, and then press Y to continue with the installation.
Alternatively, you can press Enter to continue with the default file path, /opt/dell/srvadmin/sbin/racadm. If you have not installed RACADM and want to skip this step, press Enter.
NOTE: If RACADM was not installed while installing this plug-in, but you later want to integrate RACADM, perform the following actions:
• Install RACADM.
• Navigate to <NAGIOS_HOME>/dell/install, and then run the following command:
./install.sh racadm
<NAGIOS_HOME> is the installed location of Nagios Core and by default, the location of <NAGIOS_HOME> is /usr/local/nagios.
10. If you have installed Java, provide the path where Java is installed, and then press Y to continue with the installation.
Alternatively, you can press Enter to continue with the default file path, /usr/bin/java.
NOTE: If Java was not installed while installing this plug-in, but you later want to install or upgrade the Java version, perform the following actions:
• Install Java.
• Navigate to <NAGIOS_HOME>/dell/install, and then run the following command:
./install.sh java
<NAGIOS_HOME> is the installed location of Nagios Core and by default, the location of <NAGIOS_HOME> is /usr/local/nagios.
The plug-in is now installed.
11. To verify the Nagios Core configuration entry, run the following command:
<NAGIOS_HOME>/bin/nagios -v <NAGIOS_HOME>/etc/nagios.cfg
A successful configuration update will display zero errors or warnings. If you receive any errors or warnings during this step, resolve them manually.
12. If you have installed SNMPTT and want to verify the SNMPTT configuration entry, navigate to the path where SNMPTT is installed and verify that the following entries are present in the snmptt.ini file under the section TrapFiles:
10

• <NAGIOS_HOME>/dell/config/templates/Dell_Agent_free_Server_Traps.conf• <NAGIOS_HOME>/dell/config/templates/Dell_Chassis_Traps.conf• <NAGIOS_HOME>/dell/config/templates/Dell_Compellent_Traps.conf• <NAGIOS_HOME>/dell/config/templates/Dell_EqualLogic_Traps.conf• <NAGIOS_HOME>/dell/config/templates/Dell_PowerVaultMD_Traps.conf
13. Restart the Nagios Core services by running the following command:
service nagios restart14. If you have installed SNMPTT, then restart the SNMPTT services by running the following command:
service snmptt restart
11

4Upgrading to Dell OpenManage Plug-in Version 2.0 for Nagios CoreYou can upgrade from Dell OpenManage Plug-in Version 1.0 for Nagios Core to Dell OpenManage Plug-in Version 2.0 for Nagios Core by performing the following steps:
1. Download the latest Dell OpenManage Plug-in Version 2.0 for Nagios Core installer from the Dell support website at Dell.com/support or from Nagios exchange at exchange.nagios.org/.
The installer is packaged as a .tar.gz file named
Dell_OpenManage_Plugin_v2.0_Nagios_Core_A00.tar.gz.
2. Navigate to the location where you have downloaded the folder, and run the following command to extract its contents:
tar -zxvf Dell_OpenManage_Plugin_v2.0_Nagios_Core_A00.tar.gz
The following folder and files are extracted:
• Dell_OpenManage_Plugin folder
• Dell_OM_Plugin_2_0_For_NagiosCore_IG.pdf file
• Dell_OM_Plugin_2_0_For_NagiosCore_ReadMe.txt file
• license_en.txt file
3. Navigate to the Dell_OpenManage_Plugin/Install folder, and then run the following command to invoke the installer:
./install.sh
4. Press Y if Nagios Core version 3.5.0 or later is installed in your system, or press any other key to exit the installation process, install Nagios Core version 3.5.0 or later and then begin the installation process once again.
Alternatively, you can press Enter to continue with the default value (Y).
5. When prompted for the installed Nagios Core location, provide the path, and then press Enter.
Alternatively, you can press Enter to continue with the default location, /usr/local/nagios.
An invalid entry will display an error and exit the installation process.
A prerequisite check is run and the installed perquisites are displayed.
NOTE: If Net-IP or both Net-SNMP and OpenWSMAN are not installed in your system, then the installation process will exit. Ensure that the prerequisites are met and then begin the installation process once again.
If any of the other prerequisites are not met, then the installation procedure will display an appropriate message and continue with the installation.
6. When prompted to upgrade to Dell OpenManage Plug-in Version 2.0 for Nagios Core, press Y. Alternatively, you can press Enter to continue with the default value (Y).
If you do not want to upgrade, press any other key to exit the installation process.
7. Press Y if you accept the End User License Agreement, or any other key to exit the installation.
Alternatively, you can press Enter to continue with the default value (Y).
12

8. If you have installed SNMPTT, provide the path where SNMPTT is installed, and then press Y to continue with the installation.
Alternatively, you can press Enter to continue with the default file path, /etc/snmp/snmptt.ini. If you have not installed SNMPTT and want to skip this step, press Enter.
NOTE: If SNMPTT was not installed while installing this plug-in, but you later want to receive SNMP alerts, perform the following actions:
• Install SNMPTT.
• Navigate to <NAGIOS_HOME>/dell/install, and then run the following command:
./install.sh trap
<NAGIOS_HOME> is the installed location of Nagios Core and by default, the location of <NAGIOS_HOME> is /usr/local/nagios.
9. If you have installed RACADM, provide the path where RACADM is installed, and then press Y to continue with the installation.
Alternatively, you can press Enter to continue with the default file path, /opt/dell/srvadmin/sbin/racadm. If you have not installed RACADM and want to skip this step, press Enter.
NOTE: If RACADM was not installed while installing this plug-in, but you later want to integrate RACADM, perform the following actions:
• Install RACADM.
• Navigate to <NAGIOS_HOME>/dell/install, and then run the following command:
./install.sh racadm
<NAGIOS_HOME> is the installed location of Nagios Core and by default, the location of <NAGIOS_HOME> is /usr/local/nagios.
10. If you have installed Java, provide the path where Java is installed, and then press Y to continue with the installation.
Alternatively, you can press Enter to continue with the default file path, /usr/bin/java.
NOTE: If Java was not installed while installing this plug-in, but you later want to install or upgrade the Java version, perform the following actions:
• Install Java.
• Navigate to <NAGIOS_HOME>/dell/install, and then run the following command:
./install.sh java
<NAGIOS_HOME> is the installed location of Nagios Core and by default, the location of <NAGIOS_HOME> is /usr/local/nagios.
The plug-in is now installed.
11. To verify the Nagios Core configuration entry, run the following command:
<NAGIOS_HOME>/bin/nagios -v <NAGIOS_HOME>/etc/nagios.cfg
A successful configuration update will display zero errors or warnings. If you receive any errors or warnings during this step, resolve them manually.
12. If you have installed SNMPTT and want to verify the SNMPTT configuration entry, navigate to the path where SNMPTT is installed and verify that the following entries are present in the snmptt.ini file under the section TrapFiles:
• <NAGIOS_HOME>/dell/config/templates/Dell_Agent_free_Server_Traps.conf
13

• <NAGIOS_HOME>/dell/config/templates/Dell_Chassis_Traps.conf• <NAGIOS_HOME>/dell/config/templates/Dell_Compellent_Traps.conf• <NAGIOS_HOME>/dell/config/templates/Dell_EqualLogic_Traps.conf• <NAGIOS_HOME>/dell/config/templates/Dell_PowerVaultMD_Traps.conf
13. Restart the Nagios Core services by running the following command:
service nagios restart14. If you have installed SNMPTT, then restart the SNMPTT services by running the following command:
service snmptt restart
14

5Uninstalling the Dell OpenManage Plug-in Version 2.0 for Nagios Core1. Navigate to the <NAGIOS_HOME>/dell/Install folder, and run the following command:
./uninstall.sh
2. When prompted for confirmation of uninstallation, press Y to uninstall or N to quit the uninstallation process.
Alternatively, you can press Enter to exit the uninstallation.
3. When prompted to continue with the uninstallation process, press Y to continue or N to quit the uninstallation process.
Alternatively, you can press Enter to exit.
NOTE: If you have set the value of the attribute escape_html_tags to ‘0’ during installation, then you can reset it back to its default value, ‘1’ by navigating to the <NAGIOS_HOME>/etc/cgi.cfg file and editing this value.
The plug-in is now uninstalled.
4. To verify the uninstallation of the Dell OpenManage Plug-in, navigate to the <NAGIOS_HOME> folder and ensure that the dell folder has been removed.
5. To verify the Nagios Core configuration entry, navigate to the path where Nagios Core is installed and then run the following command:
<NAGIOS_HOME>/bin/nagios -v <NAGIOS_HOME>/etc/nagios.cfg
A successful configuration update will display zero errors or warnings. If you receive any errors or warnings during this step, resolve them manually.
6. If you have installed SNMPTT, navigate to the path where SNMPTT is installed and verify that the following entries have been removed from the snmptt.ini file under the section TrapFiles:
• <NAGIOS_HOME>/dell/config/templates/Dell_Agent_free_Server_Traps.conf• <NAGIOS_HOME>/dell/config/templates/Dell_Chassis_Traps.conf• <NAGIOS_HOME>/dell/config/templates/Dell_Compellent_Traps.conf• <NAGIOS_HOME>/dell/config/templates/Dell_EqualLogic_Traps.conf• <NAGIOS_HOME>/dell/config/templates/Dell_PowerVaultMD_Traps.conf
7. Restart the Nagios Core services by running the following command:
service nagios restart8. If you have installed SNMPTT, restart the SNMPTT services by running the following command:
service snmptt restart
15

6Accessing documents from Dell support siteYou can access the required documents in one of the following ways:
• Using the following links:
– For all Enterprise Systems Management documents — Dell.com/SoftwareSecurityManuals
– For OpenManage documents — Dell.com/OpenManageManuals
– For Remote Enterprise Systems Management documents — Dell.com/esmmanuals
– For OpenManage Connections Enterprise Systems Management documents — Dell.com/OMConnectionsEnterpriseSystemsManagement
– For Serviceability Tools documents — Dell.com/ServiceabilityTools
– For OpenManage Connections Client Systems Management documents — Dell.com/DellClientCommandSuiteManuals
• From the Dell Support site:
a. Go to Dell.com/Support/Home.
b. Under Select a product section, click Software & Security.
c. In the Software & Security group box, click the required link from the following:
– Enterprise Systems Management
– Remote Enterprise Systems Management
– Serviceability Tools
– Dell Client Command Suite
– Connections Client Systems Management
d. To view a document, click the required product version.
• Using search engines:
– Type the name and version of the document in the search box.
16
7Related DocumentationIn addition to this guide, you can access the following guides available on the Dell Support website at Dell.com/support/manuals. On the Manuals page, click Software & Security and click the appropriate product link to access the documents:
• Integrated Dell Remote Access Controller 8 with Lifecycle Controller User’s Guide
• Dell Integrated Remote Access Controller 7 User’s Guide
• Dell Chassis Management Controller for Dell PowerEdge M1000e User’s Guide
• Dell Chassis Management Controller for Dell PowerEdge VRTX User’s Guide
• Dell Chassis Management Controller for Dell PowerEdge FX2/FX2s User’s Guide
• Dell Compellent Storage Arrays User’s Guide
• Dell EqualLogic PS-Series Storage Arrays User’s Guide
• Dell PowerVault MD Storage Arrays User’s Guide
Also see www.nagios.org/documentation for any Nagios Core related documentation.
17