Embed Size (px)
Citation preview

Dell OpenManage Deployment Toolkit Version 5.0.1User's Guide

Notes, Cautions, and WarningsNOTE: A NOTE indicates important information that helps you make better use of your computer.
CAUTION: A CAUTION indicates either potential damage to hardware or loss of data and tells you how to avoid the problem.
WARNING: A WARNING indicates a potential for property damage, personal injury, or death.
Copyright © 2014 Dell Inc. All rights reserved. This product is protected by U.S. and international copyright and intellectual property laws. Dell™ and the Dell logo are trademarks of Dell Inc. in the United States and/or other jurisdictions. All other marks and names mentioned herein may be trademarks of their respective companies.
2014 - 09
Rev. A00

Contents
1 Introduction...........................................................................................................6What Is New In This Release................................................................................................................. 6
Other Documents You May Need.........................................................................................................7
Other Supporting Documents You May Need.....................................................................................8
Accessing documents from Dell support site......................................................................................8
Contacting Dell......................................................................................................................................9
2 Prerequisites And Deployment........................................................................ 10Supported Systems..............................................................................................................................10
Supported Operating Systems............................................................................................................ 10
Supported BIOS Firmware Versions.................................................................................................... 11
Prerequisites And Requirements......................................................................................................... 11
Installation Prerequisites................................................................................................................ 11
Deployment Prerequisites............................................................................................................. 12
Drivers............................................................................................................................................ 13
Other Supporting Tools And System Files.................................................................................... 13
Deploying Operating Systems.............................................................................................................15
Deployment......................................................................................................................................... 15
Deployment Matrix.............................................................................................................................. 16
DTK Deployment Overview.................................................................................................................17
Preparing For Deployment............................................................................................................ 17
Deployment................................................................................................................................... 18
Configuring A Source System ............................................................................................................ 18
RAC And BIOS Configuration........................................................................................................19
How To Obtain Dell Utility Partition Files..................................................................................... 19
3 Downloading DTK.............................................................................................. 20Extracting DTK Components On Systems Running Windows..........................................................20
DTK Components On Systems Running Windows......................................................................20
Extracting DTK Components On Systems Running Linux................................................................. 21
DTK Components On The Mounted Media..................................................................................21
Directory Structure On The Target System.................................................................................. 21
DTK Contents...................................................................................................................................... 22
System Utilities And Supported Files For Windows......................................................................22
System Utilities And Supported Files For Linux............................................................................ 23
Sample Configuration Files For Windows.......................................................................................... 24
Sample Configuration Files For Linux.................................................................................................25
Sample Scripts For Systems Running Windows.................................................................................26

Sample Scripts For Systems Running Linux........................................................................................27
RPMs.................................................................................................................................................... 28
Documentation................................................................................................................................... 28
Drivers And Dell Real Mode Kernel ....................................................................................................28
4 Setting Up A Directory Structure For Deployment...................................... 29DTK Utilities And Files......................................................................................................................... 29
System-Specific Files.......................................................................................................................... 29
Operating System Installation Files.................................................................................................... 30
5 Preparing The Script Files .................................................................................31Using The Sample DTK Scripts To Run A Full Deployment............................................................... 31
Editing The Sample Batch Files To Perform A Complete System Deployment............................... 32
Scripts For Deployment On Systems Running Windows.............................................................32
Scripts For Deployment On Systems Running Linux................................................................... 32
Replication Scripts For Deployment On Systems Running Windows Operating System.......... 33
Replication Scripts For Deployment On Systems Running Linux Operating System.................33
Deployment Scripts For Systems Running Windows Operating Systems.................................. 34
Deployment Scripts For Systems Running Linux Operating Systems ........................................ 35
Other Scripts For Systems Running Windows Operating Systems............................................. 36
Other Scripts For Systems Running Linux Operating Systems....................................................36
Editing Example Of TKENVSET And tkenvset .................................................................................... 37
Specifying DTK Installation Paths................................................................................................. 38
Confirming Or Editing DTK Installation Path Variables................................................................38
Editing DTK Task Scripts......................................................................................................................41
RACREP.BAT Or racrep.sh.............................................................................................................42
RAIDCFG.BAT Or raidcfg.sh..........................................................................................................42
SYSREP.BAT Or sysrep.sh..............................................................................................................42
PARTCFG.BAT Or partcfg.sh.........................................................................................................43
Using DTK Sample Scripts To Capture Configuration Information.................................................. 43
Capturing The System BIOS And BMC Configuration With The SYSCAP Or syscap.sh
Sample Script.................................................................................................................................43
Capturing The RAC Configuration With The RACCAP Or raccap.sh Sample Script.................. 44
UPINIT.BAT Or upinit.sh................................................................................................................45
Preparing The Operating System Installation Scripts........................................................................ 45
W2K8INST.BAT And W2K12INST.BAT...........................................................................................46
UNATTEND.XML AND UNATTEND_UEFI.XML.............................................................................46
Linux Scripts...................................................................................................................................47
suseinst.......................................................................................................................................... 48
6 Running The Deployment Scripts .................................................................. 50

Deployment Using Removable Boot Media With A Network Connection (Media-Based) For
Systems Running Windows................................................................................................................ 50
Media-Based Local Deployment For Systems Running Microsoft Windows ...................................51
Creating And Customizing Images For Windows PE 3.0............................................................. 51
Creating And Customizing Images For Windows PE 4.0 And 5.0............................................... 51
Integrating DTK Directory Structure ............................................................................................ 51
Creating A Bootable Media For Windows PE 3.0......................................................................... 52
Running The Image....................................................................................................................... 52
Media-Based Local Deployment With Networking Enabled For Systems Running Windows.........52
Bootable Windows PE Media With Networking Enabled.............................................................53
Preparing And Populating The Network Share............................................................................ 53
Deployment Using Removable Boot Media Without A Network (Media-Based) Connection
For Systems Running Windows.......................................................................................................... 53
Network Based Deployment For Systems Running Windows.......................................................... 54
Using A Third-Party Deployment Solution Framework For Systems Running Windows.................54
Deployment Using Dell Provided Embedded Linux.......................................................................... 54
Network-Based Deployment........................................................................................................54
Media-Based Deployment............................................................................................................ 55
Deployment Using Customized Embedded Linux.............................................................................57
Using A Third-Party Deployment Solution Framework For Systems Running Linux....................... 58
7 Running Dell Update Packages On Systems Running Embedded Linux.........................................................................................................................59
Running Update Packages In Dell-Provided Embedded Linux.........................................................59
Running Update Packages In Customized Embedded Linux............................................................59
8 Known Issues And Frequently Asked Questions...........................................61Known Issues....................................................................................................................................... 61
General Issues................................................................................................................................61
RAIDCFG Issues............................................................................................................................. 61
Windows PE Installation Issues..................................................................................................... 61
Embedded Linux Installation Issues..............................................................................................61
Frequently Asked Questions............................................................................................................... 61
General Deployment Questions................................................................................................... 61
RAIDCFG Questions...................................................................................................................... 62
SYSCFG Questions........................................................................................................................ 64
Embedded Linux Questions..........................................................................................................65
Windows PE Questions.................................................................................................................66

1IntroductionThe Dell OpenManage Deployment Toolkit (DTK) includes a set of utilities, sample scripts, and sample configuration files that you can use to deploy and configure the Dell systems. You can use DTK to build script-based and RPM-based installation for deploying large number of systems on a pre-operating system environment in a reliable way, without changing their current deployment processes. Using DTK you can install operating systems on Dell systems in BIOS or Unified Extensible Firmware Interface (UEFI) mode.
In addition to the command line utilities used to configure various system features, DTK also provides sample scripts and configuration files to perform common deployment tasks and documentation. These files and scripts describe the use of the DTK in Microsoft Windows Pre-installation Environment (Windows PE) and Linux environments.
What Is New In This Release
NOTE:
DTK version 5.0.1 is supported only on the following systems:
• Dell PowerEdge R730
• PowerEdge R730 XD
• PowerEdge R630
• PowerEdge T630
• Dell Precision R7910
The new features for this release include:
• Support for the installation and deployment of Red Hat Enterprise Linux 7.0 (64–bit) in BIOS and UEFI mode on Dell’s 13thgeneration of PowerEdge servers using DTK ELI.
• Support for the installation of the following operating systems on Dell Precision R7910:
– Windows 8.1 (64–bit) using Windows PE 5.0 (64–bit) in BIOS and UEFI mode
– Windows 7 (64–bit) using Windows PE 4.0 (64–bit) in BIOS and UEFI mode
– Windows 7 (32–bit) using Windows PE 3.0 (32–bit) in BIOS mode
• Added support for additional attributes and values in BIOS setup groups. For more details, see the Command Line Interface Reference Guide at dell.com/openmanagemanuals.
• RAIDCFG configuration supports additional support for the configuration of the following through RAID controller BIOS:
– Managing preserved cache
– Expanding and securing virtual disk size
6

– Managing Security Key
NOTE: For more details, see the Command Line Interface Reference Guide at dell.com/openmanagemanuals.
• PERC 9 extended support for the following controllers running PERC 9.1 firmware:
– PERC H830 Adapter, PERC H330 Adapter, PERC H330 Embedded, PERC H730 Adapter, and PERC H730P Adapter
– PERC H330 Mini Monolithic, PERC H730 Mini Monolithic, and PERC H730P Mini Monolithic
• Support for PERC S130 controller.
NOTE: For the list of supported operating systems and Dell servers, see the Dell Systems Software Support Matrix at dell.com/openmanagemanuals.
Other Documents You May Need
In addition to this guide, you can access the following guides available at dell.com/openmanage/manuals. See Accessing Documents From The Dell Support Site.
• The Dell OpenManage Deployment Toolkit Installation Guide provides information about installing, deploying, and upgrading the DTK on supported Dell systems. The guide is also available as part of the DTK download.
• The Dell OpenManage Deployment Toolkit Command Line Interface Reference Guide provides information about configuring the BIOS, Baseboard Management Controller (BMC), Remote Access Controller (RAC), RAID controllers, and hard-drive partitions on supported Dell systems.
• TheDell OpenManage Installation Guides provides additional information about performing an unattended installation of Server Administrator on systems running supported Windows, Red Hat Enterprise Linux Server, SUSE Linux Enterprise Server, and Citrix Xen Sever operating systems.
• The Dell Systems Software Support Matrix provides information about the various Dell systems and the operating systems supported by these systems.
• The Dell Update Packages User's Guide provides information about obtaining and using Dell Update Packages as part of your system update strategy.
• The Integrated Dell Remote Access Controller 8 (iDRAC8) Command Line Interface Reference Guide provides information about the RACADM subcommands, supported interfaces, property database groups and object definitions for iDRAC8 and CMC.
• The Integrated Dell Remote Access Controller 8 (iDRAC8) User's Guide provides information about configuring and using iDRAC8 for 13th generation rack, tower, and blade servers to remotely manage and monitor your system and its shared resources through a network.
• The Dell Baseboard Management Controller Utilities User's Guide provides information about configuring a managed system to use the BMC Management Utility to manage your system through its BMC. The Dell Update Packages User's Guide provides information about obtaining and using Dell Update Packages as part of your system update strategy.
• The Glossary provides information about the terms used in this document.
• The Deployment Toolkit release notes (for Windows PE and embedded Linux) which is also available as part of the DTK download, provides the latest available information about the installation and operation of the DTK components and the list of PowerEdge systems supported for this version of DTK.
7

Other Supporting Documents You May Need
Besides the Dell-provided documentation, there are numerous other resources to aid you in planning and executing a DTK-assisted deployment.
• Operating system documentation to prepare for and execute the unattended installation process. In addition, you should consult the available web-based resources such as:
– The Microsoft Tech Net database at microsoft.com/technet
– The Red Hat Enterprise Linux support pages at redhat.com
– The SUSE Linux Enterprise Server support pages at novell.com
• Windows PE 3.0, Windows PE 4.0, Windows PE 5.0, Windows Automated Installation Kit (Windows AIK), Windows Assessment and Deployment Kit (ADK), and Windows Deployment Services (WDS) documentation.
• Imaging software documentation, if you are creating a bootable media or are planning to deploy from an image (deploying from an image is not covered in this guide).
Accessing documents from Dell support site
You can access the required documents in one of the following ways:
• Using the following links:
– For all Enterprise Systems Management documents — dell.com/softwaresecuritymanuals
– For Enterprise Systems Management documents — dell.com/openmanagemanuals
– For Remote Enterprise Systems Management documents — dell.com/esmmanuals
– For OpenManage Connections Enterprise Systems Management documents — dell.com/OMConnectionsEnterpriseSystemsManagement
– For Serviceability Tools documents — dell.com/serviceabilitytools
– For Client Systems Management documents — dell.com/clientsystemsmanagement
– For OpenManage Connections Client Systems Management documents — dell.com/connectionsclientsystemsmanagement
• From the Dell Support site:
a. Go to dell.com/support/home.
b. Under General support section, click Software & Security.
c. In the Software & Security group box, click the required link from the following:
– Enterprise Systems Management
– Remote Enterprise Systems Management
– Serviceability Tools
– Client Systems Management
– Connections Client Systems Management
d. To view a document, click the required product version.
• Using search engines:
– Type the name and version of the document in the search box.
8

Contacting DellNOTE: If you do not have an active Internet connection, you can find contact information on your purchase invoice, packing slip, bill, or Dell product catalog.
Dell provides several online and telephone-based support and service options. Availability varies by country and product, and some services may not be available in your area. To contact Dell for sales, technical support, or customer service issues:
1. Go to dell.com/support.
2. Select your support category.
3. Verify your country or region in the Choose a Country/Region drop-down list at the bottom of the page.
4. Select the appropriate service or support link based on your need.
9

2Prerequisites And DeploymentThe Deployment ToolKit (DTK) is a collection of Windows PE and Linux-based utilities and scripts that assist in performing operating system tasks and deployment on Dell systems. An advanced knowledge of Windows PE and Linux is required for users who want to use the DTK utilities to perform pre-operating system and post-operating system configuration tasks or to run a scripted deployment in the respective environments.
A pre-operating system environment is defined as the environment used to configure system hardware before a major operating system, such as Microsoft Windows or Linux, is installed. DTK utilities and scripts, for example, are executed in a Windows PE or Linux environment for hardware configuration.
Because of the open nature of the utilities and scripts and the environment in which they can be used, it is strongly recommended that DTK users have an advanced understanding of the Windows PE and Linux environment and scripting knowledge for the respective environments. DTK users with an advanced understanding of Windows PE and Linux can take full advantage of the utilities and exploit their capabilities above and beyond what the sample scripts can provide.
CAUTION: Some of the DTK utilities can destroy data if used incorrectly. To avoid the potential risk of data loss, take all necessary precautions to protect data so that mission-critical systems are not disrupted in the unlikely event of a failure. See the Dell OpenManage Deployment Toolkit Command Line Interface Reference Guide available at dell.com/openmanagemanuals for complete information about the capabilities of each DTK utility.
Supported Systems
For a complete list of supported Dell PowerEdge systems, see the Dell Systems Software Support Matrix in the required version of OpenManage Software at dell.com/openmanagemanuals.
Supported Operating Systems
DTK utilities support Windows PE 5.0 (64-bit), Windows PE 4.0 (64-bit), and Windows PE 3.0 (64-bit) to deploy the following operating systems:
• On 13th generation of PowerEdge servers:
– Microsoft Windows Server 2012 R2 Datacenter and Standard editions using Windows PE 5.0 (64-bit) in BIOS and UEFI mode
– Windows Server 2012 Datacenter and Standard editions using Windows PE 4.0 (64-bit) in BIOS and UEFI mode
– Windows Server 2008 R2 SP1 (64-bit) using Windows PE 3.0 (64-bit) in BIOS and UEFI mode
• On Dell Precision R7910:
– Windows 8.1 (64-bit) using Windows PE 5.0 (64-bit) in BIOS and UEFI mode
10

– Windows 7 (64-bit) using Windows PE 3.0 (64-bit) in BIOS and UEFI mode
– Windows 7 (32-bit) using Windows PE 3.0 (32-bit) in BIOS mode
For Linux, the DTK utilities support deploying the following operating systems:
• Red Hat Enterprise Linux 7.0 (64-bit) in BIOS and UEFI mode
• Red Hat Enterprise Linux 6.5 (64-bit) in BIOS and UEFI mode
• SUSE Linux Enterprise Server 11 SP3 (64-bit) in BIOS and UEFI mode
You can install the DTK Linux RPM utilities on the following operating systems:
• Red Hat Enterprise Linux 7.0 (64-bit) in BIOS and UEFI mode
• Red Hat Enterprise Linux 6.5 (64-bit) in BIOS and UEFI mode
• SUSE Linux Enterprise Server 11 SP3 (64-bit) in BIOS and UEFI mode
NOTE: The RPMs are available in the RPMs folder of DTK ELI ISO at linux.dell.com/repo/hardware,
and also in the Dell Systems Management Tools and Documentation DVD.
Supported BIOS Firmware Versions
The latest (n) version or the n-1 version of BIOS firmware that is available at support.dell.com.
Prerequisites And Requirements
The prerequisites and requirements to run DTK utilities are as given below.
NOTE: The target system must not have Fibre Channel (FC) devices.
See Also:
• Installation Prerequisites
• Deployment Prerequisites
Installation Prerequisites
Before installing the DTK components for Windows PE, ensure that you have the following:
• The DTK self-extracting zip file (DTKX.X-WINPE-XX.exe), which contains the utilities, sample scripts, sample configuration files, and documentation to deploy your Dell system.
• A Windows workstation or server that has 512 MB of RAM.
Before installing DTK components for embedded Linux, ensure that you have the following:
• The DTK ISO image, which contains the utilities, sample scripts, sample configuration files, RPMs, and documentation to deploy your Dell system.
NOTE: The DTK ISO contains two bootloaders (isolinux for BIOS mode and grub2 for UEFI mode).
• A Linux workstation that has at least 200 MB of free hard-drive space.
11

Deployment Prerequisites
Before beginning the deployment process for Windows PE, ensure that you have all of the following tools, software, and information ready to use or consult:
• Windows Automated Installation Kit (AIK) for Windows Server 2008 R2 to build Windows PE 3.0.
• Windows Assessment and Deployment Kit (ADK) for Windows Server 2012 and Windows Server 2008 to build Windows PE 4.0.
• Windows Assessment and Deployment Kit (ADK) for Windows Server 2012 R2 to build Windows PE 5.0.
• An unzip utility.
• Working knowledge to build Windows PE 3.0, Windows PE 4.0, and Windows PE 5.0 (see the Microsoft documentation to customize Windows PE).
• Working knowledge of Microsoft Remote Installation Services (RIS) and Automated Deployment Services (ADS) (including setting up of RIS and ADS environments) or any other third-party deployment system or tool for Windows PE.
• Working knowledge of Windows Deployment Services (WDS) or any other third-party deployment system or tool for Windows PE.
• A workstation with the following capabilities:
– Writable media drive
– Network access
• A target system with a media drive, if performing a local deployment.
• A target system with a media drive and network access, if performing a network deployment.
• All DTK utilities, sample scripts, and sample configuration files.
• Dell Systems Management Tools and Documentation DVD.
• Your operating system software and documentation.
• An optimally configured source system with network access.
NOTE: You can download the latest drivers from support.dell.com.
For Linux, ensure that you have all of the following tools, software, and information ready to use or consult:
• Advanced knowledge of Linux and Linux scripting (bash), Linux networking, installing and working with RPM Package Managers, and creating and modifying loop file systems.
• Any third-party deployment system or tool.
• A workstation with the following capabilities:
– A writable media drive
– Network access
• A target system with a media drive, if performing a local deployment.
• A target system with a media drive and network access, if performing a network deployment.
• All DTK utilities, sample scripts, sample configuration files, and RPM packages.
• All operating system RPM packages that DTK RPMs require.
NOTE: Tools such as Yellowdog Updater, Modified (YUM), Yet Another Setup Tool (YAST), and Advanced Packaging Tool (APT) can be used to manage RPM dependency issues.
• All other utilities and files necessary to perform the deployment, including all required Linux drivers, operating system drivers, and the Dell utility partition file.
12

• Dell Systems Management Tools and Documentation DVD.
• Your operating system software and documentation.
• An optimally configured source system with network access.
NOTE: You can download the latest drivers from support.dell.com.
Drivers
The following table describes the essential and optional drivers required for Dell‑supported hardware to build your Windows PE environment.
NOTE: The drivers provided have been tested successfully in the Windows PE environment.
Table 1. Drivers Required to Build Your Windows PE Environment
Drivers Purpose
common\hapi Essential files for DTK tools to work.
common\raidcfg Essential files for raidcfg to work.
winpe3.x\WINPE3.0_driverinst.bat Used to install Dell-provided drivers, from \Dell\x32\Drivers or \Dell\x64\Drivers, into the customized Windows PE 3.0 image.
winpe4.x\WINPE4.0_driverinst.bat Used to install Dell-provided drivers, from \Dell\x64\Drivers, into the customized Windows PE 4.0 image.
winpe5.x\WINPE5.0_driverinst.bat Used to install Dell-provided drivers, from \Dell\x64\Drivers, into the customized Windows PE 5.0 image.
Other Supporting Tools And System Files
While DTK provides all the necessary utilities and scripts for deploying Dell systems, there are more applications, utilities, and system files to create the pre-operating system environment in which this toolkit is used.
The following table lists the Windows system files and other tools to use DTK utilities and its sample scripts.
Table 2. Supporting Tools and System Files for Windows
Additional Tools Purpose Source
Windows AIK for Windows Server 2008 R2
Create a bootable media for Windows PE 3.0.
microsoft.com
Windows ADK for Windows Server 2012 and Windows Server 2008
Create a bootable media for Windows PE 4.0.
microsoft.com
Windows ADK for Windows Server 2012 R2
Create a bootable media for Windows PE 5.0.
microsoft.com
13

The following table is a matrix of Linux system files and other tools to use with DTK utilities and its sample scripts.
Table 3. Supporting Tools and System Files for Linux
Additional Tools Purpose Source Save in DTK location
mkfs.* Formats hard-drive partitions.
Any system running the Linux operating system.
In the PATH variable.
fdisk To create Master Boot Record (MBR) partitions in BIOS mode.
Any system running the Linux operating system.
In the PATH variable.
partedTo create GUID Partition Table (GPT) in UEFI mode.
Any system running the Linux operating system.
In the PATH variable.
unzip To unzip files in Linux. Any system running the Linux operating system.
In the PATH variable.
upimg Contains system-specific Dell utility partition files.
NOTE: In the previous releases, each Dell system required a unique upimg file. The upimg file is common for all Dell systems.
/opt/dell/toolkit/systems, or the Dell Systems Build and Update Utility on the Dell Systems Management Tools and Documentation DVD.
/opt/dell /toolkit/ systems
kernel image Used during a Linux unattended installation.
Available on the Linux media.
/opt/dell /toolkit /systems/linux
initial ramdisk Used during a Linux unattended installation.
NOTE: For legacy operating systems, you may need to use the driver disk. At the end of the Red Hat Enterprise Linux Server installation, you may need to install the drivers available on the Systems Build and Update Utility.
Available on the Linux operating system media or on the Systems Build and Update Utility on the Dell Systems Management Tools and Documentation DVD.
/opt/dell /toolkit /systems
14

Deploying Operating Systems
After the system hardware is versioned and configured, an operating system can be installed using unattended setup files, samples of which are provided as part of DTK. The sample configuration files are operating system specific, and have been enhanced for Dell systems. For information on modifying the sample configuration files, see your operating system documentation.
For Windows PE, the sample configuration files contain examples to deploy the following operating systems:
• On 13th generation of PowerEdge servers:
– Microsoft Windows Server 2012 R2 Datacenter and Standard editions using Windows PE 5.0 (64-bit) in BIOS and UEFI mode
– Windows Server 2012 Datacenter and Standard editions using Windows PE 4.0 (64-bit) in BIOS and UEFI mode
– Windows Server 2008 R2 SP1 (64-bit) using Windows PE 3.0 (64-bit) in BIOS and UEFI mode
• On Dell Precision R7910:
– Windows 8.1 (64-bit) using Windows PE 5.0 (64-bit) in BIOS and UEFI mode
– Windows 7 (64-bit) using Windows PE 3.0 (64-bit) in BIOS and UEFI mode
– Windows 7 (32-bit) using Windows PE 3.0 (32-bit) in BIOS mode
NOTE: For the latest supported operating systems, see the Windows PE documentation.
For Linux, the sample configuration files contain examples to deploy the following operating systems:
• Red Hat Enterprise Linux 7.0 (64–bit) in BIOS and UEFI mode
• Red Hat Enterprise Linux 6.5 (64–bit) in BIOS and UEFI mode
• SUSE Linux Enterprise Server 11 SP3 (64–bit) in BIOS and UEFI mode
Deployment
Dell systems can be deployed using several methods. The most common method is using the Systems Build and Update Utility (SBUU) on the Dell Systems Management Tools and Documentation DVD that is shipped with your system. Currently, this method is used to deploy a single system at a time with the installation wizard.
DTK, on the other hand, offers a complete set of utilities, sample scripts, and RPM packages that can be used to automate deployment on large numbers of Dell systems. This guide is designed to help you through some of the most basic planning considerations, logistical preparations, and deployment procedures to get you started using DTK to deploy Dell systems.
A well-thought-out deployment plan is critical to the success of your deployment effort and includes the following considerations:
• Assessing your existing IT environment
• Selecting an operating system
15

• Selecting the optimum Dell OpenManage systems management software configuration for your system
• Choosing a deployment method
DTK is flexible enough to fit into almost any deployment plan.
DTK components can be used in many different ways to assist IT staff in deploying Dell systems in large numbers. Because all the tools and scripts are task-oriented, many of them can be used separately to perform a specific task on many systems or collectively to perform many tasks on many systems at once. For information on the deployment methods, see Running The Deployment Scripts.
Deployment Matrix
Depending on the scope, current business needs, network setup, and process, you can select any of the suggested methods of deployment. The following table provides the configuration complexity and the pros and cons of each deployment method.
Table 4. Deployment Method Matrix
Deployment Methods Complexity Advantages Disadvantages
Local deployment (bootable media)
Relatively simple • Necessary if a network connection is not available or is too slow.
• Can install supported Windows operating systems.
• Can perform a minimal installation of supported Linux operating systems.
• Any change requires the creation of a new bootable media.
• Limited space on media for some operating system installation files.
• Deployment tasks must be performed at the individual target system.
• Media are read-only and requires the creation of a RAMDISK for temporary data storage.
• Installation time is high.
Remote deployment over a network (bootable Windows PE or Linux media with network stack loaded)
Moderate • Everything is in one place in a network share.
• Easy to manage — changes have to be made in a single location.
• Data captured (profiles) can be stored in a network share.
• Data can be replicated from a network share.
• Must have network connection.
• Deployment tasks must be performed at the individual target system.
• Must locate the appropriate Windows PE or embedded Linux network drivers.
• Not supported from a mapped NetWare system.
16

Deployment Methods Complexity Advantages Disadvantages
• Can install supported Windows or Linux operating systems.
Deployment solution framework from a third‑party vendor
Mixed • DTK can be used in context of third-party deployment solution framework.
• Third-party deployment solution framework is used as the deployment transport mechanism.
• Tasks and scripts can be pushed to the target systems.
Must either acquire and learn to use or have an existing third-party deployment solution framework.
PXE boot for Linux High • Everything is in one place on a network share.
• Easy to manage — changes have to be made in only in one place.
• High flexibility for remote deployment.
• No media required.
• Faster deployment.
• Must have high-speed connectivity to network (LAN).
• Set up time is longer.
After you have determined which deployment method best suits the needs of your organization, you are ready to begin building the DTK deployment directory structure on a network volume. For instructions on installing the DTK components and populating the deployment directory structure, see Preparing The Script Files.
DTK Deployment Overview
The deployment process can be separated into two main tasks: preparation and the actual deployment. For more details, see Preparing For Deployment and Deploying.
Preparing For Deployment
For using DTK utilities and scripts to deploy on a target system:
1. On systems running Windows, copy or extract DTK utilities, sample scripts, sample configuration files, and drivers provided (in the zip file) to the Windows PE image. On systems running Linux, obtain the DTK Linux ISO image, which is a self-contained bootable ISO image.
2. On systems running Windows, organize DTK utilities, scripts, and configuration files, the operating system installation files, and the requisite system files and drivers on a network share or local media. On systems running Linux, use and customize the sample scripts per your requirements.
3. Set up an optimally configured source system by using the Dell Systems Build and Update Utility on the Dell Systems Management Tools and Documentation DVD (to install your operating system) and the Systems Service and Diagnostics Tools (to load drivers). This source system acts as the master server that is used to replicate settings to target servers.
17

NOTE: You can also download the latest drivers from support.dell.com.
4. Generate a system BIOS, BMC (Baseboard Management Controller), RAID, and/or RAC configuration profile from the optimally configured source system. Copy the generated configuration files to a read/write share onto the workstation.
NOTE: You can obtain the system BIOS, BMC, RAID, and/or RAC configuration files from DTK Windows PE ISO image and running the SYSCAP.BAT, RAIDCAP.BAT, and RACCAP.BAT scripts or for Linux from DTK Linux ISO image and running the syscap.sh, raidcap.sh, and raccap.sh scripts.
NOTE: You can use a system BIOS configuration profile generated for all systems belonging to the same generation. For example, syscfg_x9xx.ini for 9G systems.
5. Create an operating system answer file that contains unattended operating system software installation information.
6. Edit the DTK sample script files that read the system configuration files to set up the system BIOS, BMC, RAID, and RAC and then install an operating system on a target system.
Deployment
After you have prepared all scripts, files, and utilities, you are ready to proceed with the deployment process. While there are many ways to use DTK utilities to deploy Dell systems, this guide focuses on the two most common methods for Windows PE and Linux: media‑based deployment (local) and network-based deployment (remote).
Configuring A Source System
You need an optimally configured system, both for testing purposes and as the source for the SYSCFG and RAC configuration files, to be used in the deployment process. For instructions on using the sample DTK scripts, SYSCAP.BAT or syscap.sh and RACCAP.BAT or raccap.sh, to generate SYSCFG and RAC configuration files that are used to configure the target system, see Using DTK Sample Scripts To Capture Configuration Information.
You can use the SBUU and Systems Service and Diagnostics Tools available on the Dell Systems Management Tools and Documentation DVD supplied with your system to:
• Streamline the operating system installation.
• Setup and configure your system, including automatic discovery and configuration of Dell-provided RAID controllers and network adapters.
• Access and load the latest utilities, drivers, and diagnostics for your system.
• Install Dell OpenManage systems management software.
NOTE: You can also download the latest drivers from support.dell.com.
For complete information about using the Systems Build and Update Utility and the Dell Systems Service and Diagnostics Tools, see the Dell Systems Build and Update Utility User’s Guide and the Dell Systems Service and Diagnostics Tools Quick Installation Guide, available at dell.com/openmanagemanuals and on the Dell Systems Management Tools and Documentation DVD.
After you have installed the operating system and all applicable device drivers from the Systems Build and Update Utility and Systems Service and Diagnostics Tools, check support.dell.com for the latest drivers. Install all necessary drivers to be used in the deployment in the system directory for the target system.
18

Copy all necessary files in the \Toolkit\Systems\<server_name> directory (Windows) or /opt/dell/toolkit/systems/<server_name) directory (Linux).
RAC And BIOS Configuration
Configure RAC on your source system using the RACADM.EXE (Windows) or racadm (Linux) utility, if applicable. BIOS options can be configured using racadm.
NOTE: For more information on configuring RAC and BIOS options on your source system, see the • Integrated Dell Remote Access Controller 8 (iDRAC8) Version 2.00.00.00 User's Guide.
After you have successfully prepared your directory structure for a deployment and fully configured your source system, you are ready to write, review, or edit the deployment sample scripts. For instructions on editing the sample scripts necessary to run a full deployment, see Preparing The Script Files.
How To Obtain Dell Utility Partition Files
Obtain the Dell utility partition files from /opt/dell/toolkit/systems, or the Systems Build and Update Utility on the Dell Systems Management Tools and Documentation DVD.
19

3Downloading DTKThis section describes some of the procedures necessary to begin the deployment process, including:
• Downloading and unzipping the Deployment Toolkit (DTK) components, including a comprehensive matrix of DTK components.
• Setting up a directory structure to facilitate a successful deployment, including a list of the supporting components that are not included with DTK, but are needed to use DTK.
• Setting up an optimally configured source system.
• Configuring supported RAID controllers.
Extracting DTK Components On Systems Running Windows
DTK components are provided in a self-extracting zip file at support.dell.com. The self-extracting file can be opened on any system running Microsoft Windows operating system. By default, DTKX.XWINPE- XX.exe files are extracted to the root directory of your local hard drive, C:\. You can change this location by giving a different path when extracting the files, but it is recommended that you keep the DTK default directory structure if you plan to use the sample deployment scripts provided with DTK.
1. Download the DTK file DTKX.X-WINPE-XX.exe from support.dell.com and save it on your system.
2. After the file downloads, double-click the file. The Dell OpenManage Deployment Toolkit for WindowsPE screen containing the product and download information appears.
3. Click OK.
4. Click Unzip.
By default, files are unzipped to C:\. You can unzip the DTK components to your local hard drive and then copy them later to a network volume, or you can change the installation path to an available network share. For example, you can unzip the files directly to the network share (for example, Z:\) that you plan to use in the deployment process.
NOTE: Do not copy the DTK components to a Novell NetWare network volume. The DTK network-based deployment is not supported from mapped Novell NetWare systems. The DTK utilities do not run in Windows PE when Novell’s Client32 is loaded.
DTK Components On Systems Running Windows
Workstation is the system on which the DTK components are extracted.
Source system is an optimally configured system from which the system settings are captured.
Target system is the system on which the settings captured from the source system are replicated.
DTK utilities for 32-bit systems are located in the following directories:
• Utilities: \Dell\x32\Toolkit\Tools
20

• Sample scripts: \Dell\x32\Toolkit\Template\Scripts
• Sample configuration files:\Dell\x32\Toolkit\Template\Configs
DTK utilities for 64-bit systems are located in the following directories:
• Utilities: \Dell\x64\Toolkit\Tools
• Sample scripts: \Dell\x64\Toolkit\Template\Scripts
• Sample configuration files: \Dell\x64\Toolkit\Template\Configs
The directory \Dell\x32\Toolkit\Systems or \Dell\x64\Toolkit\Systems is a placeholder that can be used for all system information that is captured using sample scripts and tools (for example, the system specific BIOS) and Baseboard Management Controller (BMC) configuration files used by the DTK utilities for configuring a system). For more information on the deployment directory structure, see Setting Up A Directory Structure For Deployment.
Extracting DTK Components On Systems Running LinuxDTK components are provided as an ISO image at support.dell.com. You can use a CD/DVD burning software to burn the ISO image on a bootable CD/DVD or loop mount the ISO image to access the image contents. To extract DTK components to a workstation running a Linux operating system perform the following steps.
1. Download the ISO image dtk_X.X_XXX_Linux.iso from support.dell.com and save it on your system (where X is the latest DTK version and XXX is the latest build for the DTK release).
2. After the image is downloaded, burn it on a CD/DVD.
DTK Components On The Mounted Media
The following table describes the files, components, and other contents of the mounted media.
Table 5. Mounted Media Contents
Contents Details Location
docs Contains Quick Installation Guide. /mnt/cdrom/docs
LICENSING
Contains all the licenses for the open source components used in the media.
/mnt/cdrom/LICENSING
README Provides the latest product information. /mnt/cdrom
sa.1 Contains the Linux kernel images. /mnt/cdrom/isolinux
sa.2 Initial RAM disk containing the embedded Linux component and DTK tools.
/mnt/cdrom/isolinux
RPMs Contains DTK RPMs and dependency RPMs /mnt/cdrom/RPMs
Directory Structure On The Target System
The following table describes the contents of the directory structure on the target system.
21

Table 6. Target System Directory Structure Contents
Contents Details
/lib The libraries and drivers required for embedded Linux to function.
/bin Basic utilities (ls, chmod, and so on).
/sbin Utilities that are required by the system superuser to perform administrative tasks.
/opt The libraries, binaries, and scripts required for the toolkit to function.
NOTE: The /opt/dell/srvadmin directory must be writable.
/var Any run-time variable data that might be required for embedded Linux and tools to function.
/tmp The only safe, writable area. However, all the data in this folder is lost every time you reboot.
/usr Miscellaneous tools and libraries for embedded Linux to function.
DTK Contents
DTK contains Windows PE-based or Linux-based utilities, sample scripts, sample configuration files, drivers, RPMs, and documentation for automating the deployment on Dell systems. For a more information on DTK utilities, see the Dell OpenManage Deployment Toolkit Command Line Interface Reference Guide. For more information on sample configuration files and scripts, see Editing The Sample Batch Files To Perform A Complete System Deployment and Preparing The Script Files.
System Utilities And Supported Files For Windows
The following table lists the files located in Toolkit\Tools on systems running the Windows operating system. These are the core tools (utilities) that perform pre-operating system configuration and deployment tasks. See the Dell OpenManage Deployment Toolkit Command Line Interface Reference Guide at dell.com/openmanagemanuals for complete information about the capabilities of each DTK utility.
Table 7. System Utilities and Supported Files for Windows
Toolkit Components Purpose
mr2kserv.exe Service required to run (in 32-bit systems) raidcfg.exe functions.
raidcfg.exe Creates and reports Redundant Array of Independent Disks (RAID) information.
syscfg.exe • Reports and configures
– BIOS settings and options
– BMC settings and options
– RAC 5 settings and options
22

Toolkit Components Purpose
– IDRAC settings and options
• Maintains system state between reboots.
• Reports hardware devices and other system-related information.
sysdrmk.exe Used by UPINIT.BAT to patch the boot sector and Master Boot Record (MBR).
config.ini Configuration file used by raidcfg.exe.
CAUTION: Do not edit this file. Incorrect edits might cause raidcfg.exe to fail.
stsvc.ini Configuration file used by raidcfg.exe.
CAUTION: Do not edit this file. Incorrect edits might cause raidcfg.exe to fail.
sys.ini Configuration file used by DTK for deployment.
IDRAC Configures iDRAC 6.
NOTE: This feature may not be supported on all systems.
IDRAC7 Configures iDRAC 7.
NOTE: This feature may not be supported on all systems.
RAC 4 Configures Dell Remote Access Controller (DRAC) 4/P and DRAC 4/I.
RAC 5 Configures DRAC 5/iDRAC.
pci.ids Reports PCI devices when used with syscfg.exe.
disclaimer.txt Displays the disclaimer for the tools.
RaidcfgErrorCodes.txt Lists the error codes and messages for the raidcfg.exe tool.
SyscfgErrorCodes.txt Lists the error codes and messages for the syscfg.exe tool.
System Utilities And Supported Files For Linux
The following table lists the files, located at /opt/dell/toolkit/bin and the supporting libraries located in /opt/dell/toolkit/lib on systems running the Linux operating system. These are the core tools (utilities) that perform pre-operating system configuration and deployment tasks. See the Dell OpenManage Deployment Toolkit Command Line Interface Reference Guide at dell.com/openmanagemanuals for complete information about the capabilities of each DTK utility.
23

Toolkit Components Purpose
pci.ids Used with syscfg to report PCI devices.
racadm Wrapper script, which invokes racadm4, racadm5, or racadm6 depending on the Remote Access Controller (RAC) on your system.
racadm4 Configures DRAC 4/P and DRAC 4/I RACs.
racadm5 Configures DRAC 5 RACs.
racadm6 Configures iDRAC 6.
NOTE: This feature may not be supported on all systems.
racadm7 Configures iDRAC 7.
raidcfg Creates and reports RAID information.
RaidcfgErrorCodes.txt Lists the error codes and messages for the raidcfg tool.
stsvc.ini Configuration file used by raidcfg.
syscfg • Reports and configures BIOS, BMC, and DRAC.
• Maintains the system state between reboots.
• Reports hardware devices and other system-related information.
SyscfgErrorCodes.txt Lists the error codes and messages for the syscfg tool.
sys.ini A .ini file used with syscfg.
UpinitErrorCodes.txt Lists the error codes and messages for upinit.sh.
Sample Configuration Files For Windows
The following table describes examples of Windows configuration files used to perform a scripted deployment. The Windows files for 32-bit and 64-bit supported systems are located in the following directories:
• \Dell\x32\Toolkit\Template\Configs
• \Dell\x64\Toolkit\Template\Configs
NOTE: All configuration files are provided as examples only. These sample configuration files must be edited before they can be used in any deployment tasks.
24
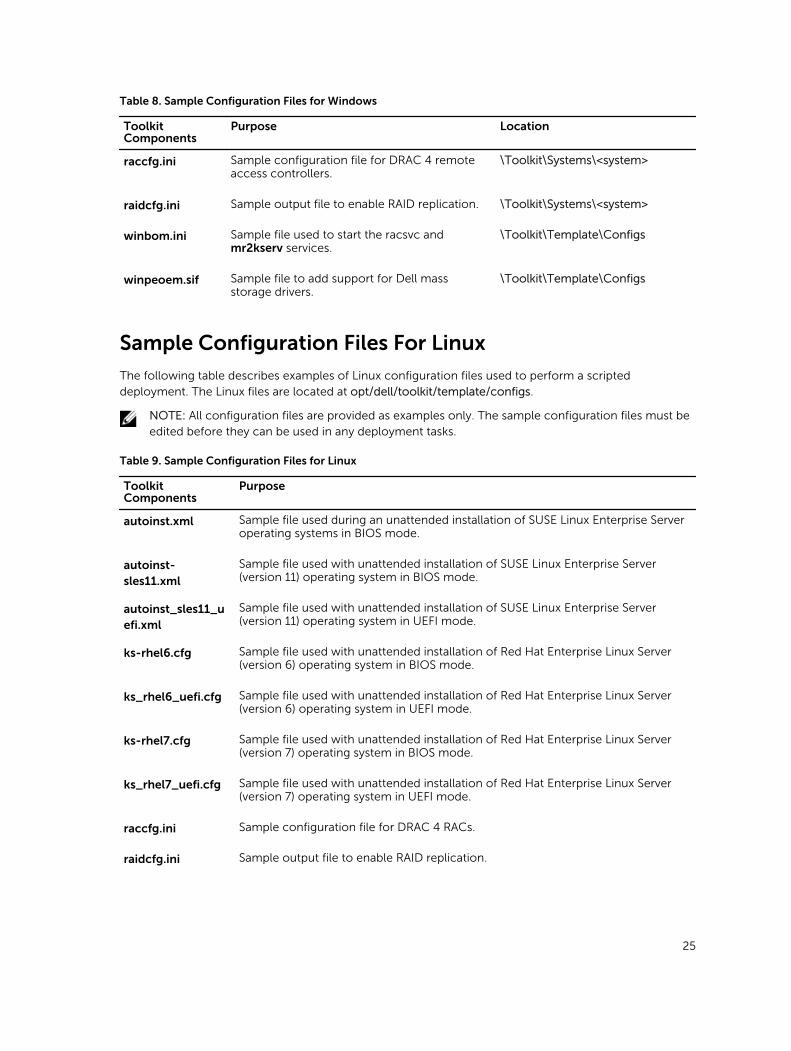
Table 8. Sample Configuration Files for Windows
Toolkit Components
Purpose Location
raccfg.ini Sample configuration file for DRAC 4 remote access controllers.
\Toolkit\Systems\<system>
raidcfg.ini Sample output file to enable RAID replication. \Toolkit\Systems\<system>
winbom.ini Sample file used to start the racsvc and mr2kserv services.
\Toolkit\Template\Configs
winpeoem.sif Sample file to add support for Dell mass storage drivers.
\Toolkit\Template\Configs
Sample Configuration Files For Linux
The following table describes examples of Linux configuration files used to perform a scripted deployment. The Linux files are located at opt/dell/toolkit/template/configs.
NOTE: All configuration files are provided as examples only. The sample configuration files must be edited before they can be used in any deployment tasks.
Table 9. Sample Configuration Files for Linux
Toolkit Components
Purpose
autoinst.xml Sample file used during an unattended installation of SUSE Linux Enterprise Server operating systems in BIOS mode.
autoinst-sles11.xml
Sample file used with unattended installation of SUSE Linux Enterprise Server (version 11) operating system in BIOS mode.
autoinst_sles11_uefi.xml
Sample file used with unattended installation of SUSE Linux Enterprise Server (version 11) operating system in UEFI mode.
ks-rhel6.cfg Sample file used with unattended installation of Red Hat Enterprise Linux Server (version 6) operating system in BIOS mode.
ks_rhel6_uefi.cfg Sample file used with unattended installation of Red Hat Enterprise Linux Server (version 6) operating system in UEFI mode.
ks-rhel7.cfg Sample file used with unattended installation of Red Hat Enterprise Linux Server (version 7) operating system in BIOS mode.
ks_rhel7_uefi.cfg Sample file used with unattended installation of Red Hat Enterprise Linux Server (version 7) operating system in UEFI mode.
raccfg.ini Sample configuration file for DRAC 4 RACs.
raidcfg.ini Sample output file to enable RAID replication.
25

Toolkit Components
Purpose
syscfg.ini Sample configuration file for SYSCFG utility to configure the BIOS, DRAC, and BMC settings.
Sample Scripts For Systems Running Windows
The following table lists Windows sample scripts necessary to perform a scripted deployment. The sample scripts for Windows are located at Toolkit\Template\Scripts.
NOTE: All DTK scripts are provided as examples only. The batch scripts and configuration files must be modified to reflect the unique information for each deployed system.
Table 10. Sample Scripts For Systems Running Windows
Toolkit Components Purpose
createup.cfg This file is used by UPINIT.BAT.
diskpartclr.cfg Used by PARTCFG.BAT to clear the partitions on the selected disks.
diskpartos.cfg Used by PARTCFG.BAT to create deployment partition to install the operating system.
LISTUP.CFG This file is used by UPINIT.BAT.
MOUNTUP.CFG This file is used by UPINIT.BAT.
UMOUNTUP.CFG This file is used by UPINIT.BAT.
DTKRUNALL.BAT Applies BIOS, BMC, RAC, and RAID settings saved in the files to the current system.
ERRHNDL.BAT Handles errors returned in DTK scripts.
PARTCFG.BAT Creates and populates the Dell utility partition and creates the operating system partition on a specified hard drive. The script cleans out all existing partitions on your system before creating and populating the partition.
RACCAP.BAT Captures Remote Access Controller (RAC) settings to a file for DRAC 4 remote access controllers.
RACREP.BAT Applies (replicates) the RAC settings saved in a file to the target system.
RAIDCAP.BAT Captures the RAID settings and saves them to a file.
RAIDCFG.BAT Configures the selected RAID controllers on the system.
26

Toolkit Components Purpose
RAIDREP.BAT Applies (replicates) RAID settings saved in a file to the target system.
SYSCAP.BAT Captures BIOS and BMC configuration settings and saves them to a file.
SYSREP.BAT Applies (replicates) BIOS and BMC configuration settings and configures the target system.
TKENVSET.BAT Sets the path of DTK installation and variables for the specific system being deployed.
UPINIT.BAT Creates and populates the Dell utility partition.
Sample Scripts For Systems Running Linux
The following table lists Linux sample scripts necessary to perform a scripted deployment.
NOTE: All DTK scripts are provided as examples only. The batch scripts and configuration files must be modified to reflect the unique information for each deployed system.
Table 11. Sample Scripts For Systems Running Linux
Toolkit Components Purpose
errhndl.sh Handles errors returned in DTK scripts.
lininst.sh Performs an unattended installation of a supported Red Hat Enterprise Linux Server (version 5 and 6) operating system.
lininst7.sh Performs an unattended installation of a supported Red Hat Enterprise Linux Server (version 7) operating system.
partcfg.sh Creates and populates the Dell utility partition and creates the deployment partition on a specified hard drive. Before doing so, however, this script cleans out all existing partitions in your system.
raccap.sh Captures RAC settings to a file.
racrep.sh Applies (replicates) the RAC settings saved in a file to the target system.
raidcfg.sh Configures all RAID controllers detected in a system.
suseinst.sh Performs an unattended installation of a supported SUSE Linux Enterprise Server operating system.
syscap.sh Captures BIOS and BMC configuration settings and saves them to a file.
sysdrmk Used by upinit.shto patch the boot sector.
27

Toolkit Components Purpose
sysrep.sh Applies (replicates) BIOS and BMC configuration settings and configures the target system.
tkenvset.sh Sets the path of DTK installation and variables for the specific system being deployed.
upinit.sh Creates and populates the Dell utility partition.
RPMs
The following table describes all DTK RPMs at mnt/cdrom/RPMs. The syscfg and raidcfg RPMs are also available in Dell Systems Management Tools and Documentation DVD.Table 12. RPMs
RPMs Purpose
syscfg Configures server BIOS, BMC/DRAC settings, DTK state settings, PCI device detection, and so on.
raidcfg Configures all supported RAID controllers.
racadm Configures RAC.
NOTE: Besides the listed RPMs, a set of dependency RPMs are also available at this location.
Documentation
The following table describes documents containing reference information for each DTK utility and instructions for using DTK utilities and sample scripts. On systems running the Windows operating system, documentation can be found at \Dell\Docs. On systems running the Linux operating system, documentation can be found at mnt/cdrom/docs.
Table 13. Documentation
Toolkit Components Purpose
Dell OpenManage Deployment Toolkit Installation Guide
Contains information about installing and deploying DTK on supported Dell systems.
README Contains the latest information about supported systems, known issues, and important notes. On systems running the Linux operating system, it is located at /mnt/cdrom as well.
Drivers And Dell Real Mode Kernel
Hardware application programing interface (HAPI) drivers are essential for DTK tools to work in the embedded Linux environment. Dell Real Mode Kernel (DRMK) contains the mbr file necessary to create a bootable Dell Utility Partition.
28
4Setting Up A Directory Structure For DeploymentTo perform a Deployment ToolKit (DTK)-enabled deployment, you must create a deployment directory structure on either a network share or your local workstation hard drive. The deployment directory structure is a central repository for all deployment files that can be used for network deployment and to build a bootable deployment media. It can also be used successively as a testing space. For a network-based deployment, you must set up the directory structure on a network volume that is accessible from your workstation, the source system (to generate configuration information), and the target system (to deploy).
If you plan to run a scripted deployment from DTK sample scripts, make sure that the DTK files are correctly structured in the deployment directory. DTK sample scripts use this structure to set the default paths for deployment. If you make changes to the directory structure, you must also make changes to the sample scripts.
The deployment directory structure consists of the following files:
• DTK Utilities And Files
• System-Specific Files
• Operating System Installation Files
NOTE: Do not create your DTK directory structure on a NetWare network volume. DTK network-based deployment is not supported from mapped NetWare systems.
DTK Utilities And Files
All the necessary DTK files are provided as part of the initial installation. It is recommended that you use the default directory structure created in the initial installation of DTK components. The sample scripts provided with DTK are set up to use these default paths.
NOTE: If you choose to create a directory structure for DTK components that is different from the one provided in the initial installation, carefully review and edit each sample script (wherever necessary) to reflect the different directory structure.
A 32-bit unzip utility is required to create the Dell utility partition. Make sure that you copy this utility to one of the directories of your Windows PE image, preferably \windows\system32 folder for Windows or /systems folder for Linux.
System-Specific Files
The directory Toolkit\Systems in systems running Microsoft Windows and /opt/dell/toolkit/systems/system name in systems running Linux acts as a central repository for all the system-specific deployment information. On systems running Linux, the /systems folder acts as a repository for the common files
29

required for the systems. On systems running Windows, you can store all profile configuration files for an optimally configured Dell PowerEdge server in the directory Toolkit\Systems\<server_name>. These files can then be accessed from this directory when deploying multiple similar PowerEdge servers.
NOTE: If you choose to create a directory structure for the system-specific files that is different from the one suggested in this guide, ensure that you carefully review and edit each sample script (wherever necessary) to reflect the different directory structure.
Operating System Installation Files
For more details on installing Windows Server and Linux operating system using DTK, see the Dell OpenManage Deployment Toolkit Installation Guide available at dell.com/openmanagemanuals.
30

5Preparing The Script Files This chapter describes the steps required to use the Deployment Toolkit (DTK) sample scripts to perform a full deployment on a target system in the Microsoft Windows PE and embedded Linux environment.
There are four main tasks:
• Using The Sample DTK Scripts To Run A Full Deployment
• Editing The Sample Batch Files To Perform A Complete System Deployment
• Using DTK Sample Scripts To Capture Configuration Information
• Preparing The Operating System Installation Scripts
Using The Sample DTK Scripts To Run A Full Deployment
A scripted DTK deployment relies on the master deployment file to integrate all the applicable DTK task scripts and utilities and perform pre‑operating system configuration tasks before launching the operating system installation files. The master deployment file, along with the TKENVSET.BAT (for Windows) or tkenvset.sh (for Linux) scripts, makes up the master set of instructions that drives the deployment process. This file is not provided with the sample scripts.
A sample DEPLOY.BAT is given below:
::*****************************************************::Call TKENVSET.BAT to discover platform information::as well as set paths and environment variables for::Deployment Toolkit Tools and Scripts.**********************************************************************************************************:: call RAIDCFG.BAT to configure RAID.::**********************************************************************************************************:: Replicate the system settings to the current SUT!.CALL SYSREP.BAT or DTKRUNALL.BAT.::**********************************************************************************************************::Partitioning the system hard disk. call PARTCFG.BAT.**********************************************************************************************************:: Put hdd as first in boot sequence (1-removable, 2-cdrom, 3-hdd):: If the system configuration has changed (i.e. a::boot device was added, removed, or enabled in BIOS)::the following line should be modified to reflect the::new hdd device number.:: This is calling Windows installer scripts.*****************************************************
31

::%DT_TOOLS%\syscfg --bootseq=hdd.emb.0::call WIN2K8.BAT
Editing The Sample Batch Files To Perform A Complete System Deployment
The sample scripts utilize DTK utilities, the additional supporting utilities, the source system configuration files, the target system hardware drivers, and the operating system installation files to perform a full deployment on the target system.
The sample scripts provided with DTK can be edited and customized using any ASCII text editor that conforms to the hardware available on the target systems. While it is recommended that you use DTK sample scripts to automate your deployment tasks, you can create your own system deployment batch files using any ASCII text editor by incorporating the various DTK utilities and commands in the batch file.
NOTE: For more information about scripting batch files and specific batch file commands, see your Windows PE or Linux operating system documentation.
Each of the utilities, scripts, and system configuration files are described below. Depending on your requirements, you may use all or only some of them in your deployment. You can write your master deployment file to perform a full deployment on a system with the help of utilities, scripts, and configuration files. This file is not provided with the sample scripts.
Scripts For Deployment On Systems Running Windows
The following table lists the capture scripts for Windows.
Table 14. Capture Scripts for Windows
Script Name Description Associated Files
RACCAP.BAT Captures RAC settings to a file for Dell Remote Access Controller 4 (DRAC 4).
• TKENVSET.BAT — Provides information to the tasks scripts about the location of the DTK utilities, scripts, and configuration files.
• RACADM.EXE — Retrieves RAC information and configure settings.
SYSCAP.BAT Captures BIOS and Baseboard Management Controller (BMC) configuration settings and saves them to a file.
• TKENVSET.BAT — Provides information to the tasks scripts about the location of the DTK utilities, scripts, and configuration files.
• SYSCFG.EXE — Configures the BIOS and BMC settings.
RAIDCAP.BAT Captures the RAID settings and saves them to a file
• TKENVSET.BAT — Provides information to the tasks scripts about the location of the DTK utilities, scripts, and configuration files.
• RAIDCFG.EXE— Retrieves RAID information and configure settings.
Scripts For Deployment On Systems Running Linux
The following table lists the capture scripts for Linux.
32

Table 15. Capture Scripts for Linux
Script Name
Description Associated Files
raccap.sh Captures RAC settings to a file for DRAC 4.
• tkenvset.sh — Used by raccap.sh to inform the task scripts where to find the DTK utilities, scripts, and configuration files.
• racadm — Used by raccap.sh to retrieve RAC information and to configure settings. The wrapper script, racadm, invokes racadm4, racadm5, or racadm6 depending on the system configuration.
• syscfg— Used by raccap.sh to configure DRAC.
raidcap.sh Captures the RAID settings and saves them to a file.
• tkenvset.sh — Used by raidcap.sh to inform the task scripts where to find the DTK utilities, scripts, and configuration files.
• raidcfg — Used by raidcap.sh to retrieve RAID information and to configure settings.
syscap.sh Captures BIOS, DRAC, and BMC configuration settings and saves them to a file.
• tkenvset.sh — Used by syscap.sh to inform the task scripts where to find the DTK utilities, scripts, and configuration files.
• syscfg — Used by syscap.sh to configure the BIOS, DRAC, and BMC settings.
Replication Scripts For Deployment On Systems Running Windows Operating System
The following table lists the replication scripts for systems running Windows.
Table 16. Replication Scripts for Windows
Script Name Description Associated Files
RACREP.BAT Applies the RAC configuration settings saved in a file to the current system.
• TKENVSET.BAT — Used by RACREP.BAT to inform the task scripts about where to find the DTK utilities, scripts, and configuration files.
• RACADM.EXE — Used by RACREP.BAT to replicate RAC information and to configure settings.
RAIDREP.BAT
Applies the RAID settings saved in a file to the current system.
• RAIDCFG.EXE — Used by RAIDREP.BAT to retrieve RAID information and to configure settings.
SYSREP.BAT Applies the BIOS and BMC settings saved in a file to the current system.
• TKENVSET.BAT — Used by SYSREP.BAT to inform the task scripts where to find the DTK utilities, scripts, and configuration files.
• SYSCFG.EXE — Used by SYSREP.BAT to configure the BIOS and BMC settings.
Replication Scripts For Deployment On Systems Running Linux Operating System
The following table lists the replication scripts for systems running Linux.
33

Table 17. Replication Scripts for Linux
Script Name
Description Associated Files
racrep.sh Applies the RAC configuration settings saved in a file to the current system.
• tkenvset.sh — Used by racrep.sh to inform the task scripts about where to find the DTK utilities, scripts, and configuration files.
• racadm — Used by racrep.sh to replicate the RAC information and to configure settings. The wrapper script, racadm invokes racadm4 , racadm5 , or racadm6 depending on the system configuration.
• syscfg — Used by racrep.sh to configure DRAC 5.
sysrep.sh Applies the BIOS and BMC settings saved in a file to the current system.
• tkenvset.sh — Used by sysrep.sh to inform the task scripts about where to find the DTK utilities, scripts, and configuration files.
• syscfg — Used by sysrep.sh to configure the BIOS settings.
Deployment Scripts For Systems Running Windows Operating Systems
The following table lists the deployment scripts for Windows.
Table 18. Deployment Scripts For Windows
Script Name Description Associated Files
W2K8INST.BAT
Performs an unattended installation of supported Windows Server 2008 operating systems.
• TKENVSET.BAT — Used by W2K8INST.BAT to inform the task scripts about where to find the DTK utilities, scripts, and configuration files.
• SETUP.EXE — Used by W2K8INST.BAT to install the operating system in conjunction with the UNATTEND.XML answer file.
• UNATTEND.XML — Used by W2K8INST.BAT in conjunction with SETUP.EXE to install the operating system files in BIOS mode.
• UNATTEND_UEFI.XML — Used by W2K8INST.BAT in conjunction with SETUP.EXE to install the operating system files in UEFI mode.
W2K12INST.BAT
Performs an unattended installation of supported Windows Server 2012 operating systems.
NOTE: From Windows Server 2012 onwards, Server Core is the default deployment configuration setting. However, you can modify the xml files to change the setting.
• TKENVSET.BAT — Used by W2K12INST.BAT to inform the task scripts about where to find the DTK utilities, scripts, and configuration files.
• SETUP.EXE — Used by W2K12INST.BAT to install the operating system in conjunction with the UNATTEND.XML answer file.
• UNATTEND2K12.XML — Used by W2K12INST.BAT in conjunction with SETUP.EXE to install the operating system files in BIOS mode.
• UNATTEND2K12_UEFI.XML — Used by W2K12INST.BAT in conjunction with SETUP.EXE to install the operating system files in UEFI mode.
34

Deployment Scripts For Systems Running Linux Operating Systems
The following table lists the deployment scripts for systems running Linux.
Table 19. Deployment Scripts For Linux
Script Name Description Associated Files
lininst.sh and lininst7.sh
Performs an unattended installation of a supported Red Hat Enterprise Linux operating system in BIOS and UEFI mode.
• tkenvset.sh — Used by lininst.sh to inform the task scripts about where to find the DTK utilities, scripts, and configuration files.
• grub — Used to install the operating system in conjunction with the unattended answer file in BIOS mode.
• grub2 — Used to install the operating system in conjunction with the unattended answer file in UEFI mode.
NOTE: Both grub and grub2 uses the following images in conjunction with the unattended answer file to perform unattended operations:
– initial ramdisk — Available on the Dell Systems Build and Update Utility.
– kernel image — Available on the Linux operating system media.
• ks-rhel6.cfg — Used by lininst.sh in conjunction with grub to install the Red Hat Enterprise Linux Server (versions 6) operating system files in BIOS mode.
• ks_rhel6_uefi.cfg — Used by lininst.sh in conjunction with grub2 to install the Red Hat Enterprise Linux Server (versions 6) operating system files in UEFI mode.
• ks-rhel7.cfg — Used by lininst.sh in conjunction with grub to install the Red Hat Enterprise Linux Server (versions 7) operating system files in BIOS mode.
• ks_rhel7_uefi.cfg — Used by lininst.sh in conjunction with grub2 to install the Red Hat Enterprise Linux Server (versions 7) operating system files in UEFI mode.
suseinst.sh Performs an unattended installation of a supported SUSE Linux Enterprise Server operating system.
• tkenvset.sh — Used by suseinst.sh to inform the task scripts about where to find the DTK utilities, scripts, and configuration files.
• grub — Used to install the operating system in conjunction with the unattended answer file in BIOS mode.
• grub2 — Used to install the operating system in conjunction with the unattended answer file in UEFI mode.
NOTE: Both grub and grub2 uses the following images in conjunction with the unattended answer file to perform unattended operations:
– initial ramdisk — Available on the SUSE Linux Enterprise Server operating system media
– kernel image — Available on the SUSE Linux Enterprise Server operating system media
• autoinst.xml — Used by suseinst.sh in conjunction with grub to install the operating system files.
35

Script Name Description Associated Files
• autoinst-sles11.xml — Used by suseinst.sh in conjunction with grub to install the SUSE Linux Enterprise Server (version 11) operating system files in BIOS mode.
• autoinst_sles11_uefi.xml — Used by suseinst.sh in conjunction with grub2 to install the SUSE Linux Enterprise Server (version 11) operating system files in UEFI mode.
Other Scripts For Systems Running Windows Operating Systems
The following table lists the other scripts for systems running Windows.
Table 20. Other Scripts for Windows
Script Name Description Associated Files
TKENVSET.BAT
Sets the path of DTK installation and variables for the system to be deployed and configured. The variables and paths specified in this file must be specified before any of the other supporting scripts can be used.
• SYSCFG.EXE — Used by TKENVSET.BAT to discover the system type.
RAIDCFG.BAT Configures the selected RAID controller detected in the system.
• TKENVSET.BAT — Used by RAIDCFG.BAT to inform the task scripts about where to find the DTK utilities, scripts, and configuration files.
• RAIDCFG.EXE — Used by RAIDCFG.BAT to retrieve RAID information and configure settings.
PARTCFG.BAT Creates and populates the Dell utility partition (UP) and the operating system partition on a specified disk.
• TKENVSET.BAT — Used by PARTCFG.BAT to inform the task scripts about where to find the DTK utilities, scripts, and configuration files.
• DISKPART.EXE — Provided by Windows; this script is used to create partitions on your disk. When creating a Windows PE image, ensure that the DISKPART.EXE tool is present in the Windows PE image you created. This script uses the following files for unattended operations:
– UPINIT.BAT— Used by PARTCFG.BAT to create and populate the Dell utility partition.
– FORMAT.EXE— Provided by Windows to format the partition.
Other Scripts For Systems Running Linux Operating Systems
The following table lists the other scripts for Linux.
36

Table 21. Other Scripts for Linux
Script Name Description Associated Files
tkenvset.sh Sets the path for DTK installation and variables for the system to be deployed and configured. The variables and paths in this file must be specified before any of the other supporting scripts can be used.
• syscfg — Used by tkenvset.sh to discover the system type.
raidcfg.sh Configures the selected RAID controller detected in the system.
• tkenvset.sh — Used by raidcfg.sh to inform the task scripts about where to find the DTK utilities, scripts, and configuration files.
• raidcfg — Used by raidcfg.sh to retrieve RAID information and configure settings.
partcfg.sh In BIOS mode, creates and populates the Dell utility partition and the deployment partition (MBR type) on a specified disk. In UEFI mode, creates deployment partition (GPT type) on a specific disk. The partcfg.shscript uses a /tmpfolder to store a few temporary files critical to its execution.
• tkenvset.sh — Used by partcfg.sh to inform the task scripts about where to find the DTK utilities, scripts, and configuration files.
• fdisk — Used to create partitions on your disk in BIOS mode. When creating an embedded Linux ISO image, make sure that fdisk is present in the embedded Linux environment you created.
• parted — Used to create partitions on your disk in UEFI mode. When creating an embedded Linux ISO image, make sure that parted is present in the embedded Linux environment you created.
This script uses the following file for unattended operations:
• upinit.sh — Used by partcfg.sh to create and populate the Dell utility partition.
NOTE: Do not modify the upinit.sh script.
upinit.sh Creates and populates the Dell utility partition in BIOS mode.
NOTE: Do not modify the upinit.sh script.
• tkenvset.sh — Used by upinit.sh to inform the task scripts about where to find the DTK utilities, scripts, and configuration files.
• fdisk — Used to create partitions on your disk.
• mbr — File necessary to create a bootable Dell utility partition.
• sysdrmk — Used by upinit.sh to patch the boot sector.
• unzip — Used by upinit.sh to populate the Dell utility partition.
• mke2fs — Used to create a ext2 file system.
• upimg.bin — Contains the zipped contents of the Dell utility partition.
Editing Example Of TKENVSET And tkenvset
The majority of editing required for DTK sample scripts involves the TKENVSET.BAT (for Windows) or tkenvset.sh (for Linux) script. As a result, the scripting discussion focuses on this script. Other task scripts
37

may require edits in certain situations. These optional edits are discussed in Editing DTK Task Scripts. The TKENVSET.BAT or tkenvset.sh script sets the path of DTK utilities and scripts and sets the variables for the system to be deployed and configured. The variables and paths specified in this file before other supporting scripts are used.
Specifying DTK Installation Paths
The TKENVSET.BAT or tkenvset.sh sample script is provided with the following default values. These values must be confirmed in some cases, and modified in other cases, before a deployment. Locate the Deployment Toolkit Installation Paths heading to find the following lines:
On systems running Windows:
set DT_DRIVE=X:set DT_PATH=%DT_DRIVE%\Dell\Toolkitset DT_TOOLS=%DT_PATH%\Toolsset DT_SYSTEMS=%DT_PATH%\Systemsset DT_SCRIPTS=%DT_PATH%\Template\Scriptsset DT_STOP_ON_ERROR=FALSEOn systems running Linux:
DT_PATH=$dt_drive/opt/dell/toolkitDT_TOOLS=$dt_path/binDT_SYSTEMS=$dt_path/systemsDT_SCRIPTS=$dt_path/template/scriptsDT_STOP_ON_ERROR=FALSEDT_DRMK=$dt_path/opt/dell/drmk
Confirming Or Editing DTK Installation Path Variables
Perform the following steps to confirm and/or edit the installation path variables:
1. On systems running Windows, set the variable that defines the path to the full set of DTK deployment files (DT_DRIVE). On systems running Windows, this variable is set to X: by default in the sample script. For Windows, this variable is set to X: by default in the sample script. On systems running Linux, this variable is set to $dt_drive/opt/dell/toolkit by default in the sample script. Edit this drive letter to reflect the actual drive letter for DTK deployment files, if necessary.
2. Set the variable that defines the path to the full set of DTK deployment files (DT_PATH). This variable is set to %DT_DRIVE%\Dell\Toolkit (Windows) or $dt_drive/opt/dell/toolkit (Linux) by default in the sample script. Edit this path to reflect the actual location of DTK deployment files, if necessary.
3. Set the variable that defines the directory containing DTK utilities (DT_TOOLS). This variable is set to %DT_PATH%\Tools (Windows) or $dt_path/bin (Linux) by default in the sample script. Edit this path to reflect the actual location of DTK utilities, if necessary.
4. Set the variable that defines the directory containing the configuration files for your Dell systems (DT_SYSTEMS). This variable is set to %DT_PATH%\Systems (Windows) or $dt_path/systems (Linux) by default in the sample script. Edit this path to add a subdirectory for the Dell system you plan to deploy. For example, $dt_path/systems/<server_name>.
5. Set the variable that defines the directory containing DTK deployment scripts (DT_SCRIPTS). This variable is set to %DT_PATH%\Template\Scripts (Windows) or $dt_path/template/scripts (Linux) by default in the sample script. Edit this path to reflect the actual location of DTK deployment scripts, if necessary.
6. Set the variable that indicates whether you want the deployment process to exit when any error is returned (DT_STOP_ON_ERROR). This variable is set to FALSE by default in the sample script, indicating that errors are handled by the ERRHNDL.BAT (Windows) or errhndl.sh (Linux) script. Set the value to TRUE only if you want the deployment to exit when any error is returned.
38

7. For Linux, set the variable that defines the directory containing the DRMK system files necessary to create a Dell utility partition (DT_DRMK). This variable is set to $dt_path/opt/dell/drmk by default in the sample script. Edit this path to reflect the actual location of the DRMK files, if necessary.
Specifying The SYSCFG Variables
The SYSCFG replication file is set to syscfg.ini by default. If you used the SYSCAP.BAT (for Windows) or syscap.sh (for Linux) sample script to generate the file, there is no need to edit the default settings. If you have modified the sample scripts or to the suggested directory structure, confirm that syscfg.ini is correctly named and that the path is set correctly for deployment.
To edit the SYSCFG capture variables, locate the following lines:
In SYSCAP.BAT on systems running Windows:
set DT_SYS_CAPFILE=%DT_SYSTEMS%\%DT_PLATFORM%\syscfg.ini
In syscap.sh on systems running Linux:
set DT_SYS_CAPFILE=$dt_systems/$dt_platform/syscfg.ini
To edit the SYSCFG replication variables, locate the following lines:
In SYSREP.BAT on systems running Windows:
set DT_SYS_REPFILE=%DT_SYSTEMS%\%DT_PLATFORM%\syscfg.ini
In syscap.sh on systems running Linux:
DT_SYS_REPFILE=$dt_systems/$dt_platform/syscfg.ini
NOTE: If the replication requires a change in the memory redundancy mode, reboot the target server and execute the script again to complete the replication.
Specifying The RAC Configuration Variables
The IP address for your target system RAC is set in the sample script as 10.98.8.121 by default. Edit this value to reflect the actual IP address of your target system RAC, if applicable. Additionally, the RAC configuration file used to configure your RAC is set by default to raccfg.ini. If you use the RACCAP.BAT or raccap.sh sample script to generate the raccfg.ini file, there is no need to edit this default setting. If you have made any modifications to the sample scripts or to the suggested directory structure, you must confirm that raccfg.ini is correctly named and that the path is correctly set for your deployment.
To edit the RAC configuration variables, locate the following lines:
In RACCAP.BAT:
set DT_RAC_CAPFILE=%DT_SYSTEMS%\%DT_PLATFORM%\raccfg.ini
In raccap.sh:
DT_RAC_CAPFILE=$dt_systems/$dt_platform/raccfg.ini
To edit the RAC configuration variables, locate the following lines:
In RACREP.BAT:
:: RAC sectionset DT_NICCFG=10.98.8.121set DT_RAC_CAPFILE=%DT_SYSTEMS%\%DT_PLATFORM%\raccfg.ini
39

In racrep.sh:
# RAC sectionDT_NICCFG=10.98.8.121set DT_RAC_CAPFILE=$dt_systems/$dt_platform/raccfg.ini
Specifying Variables Used To Create Disk Partitions And Install The Dell Utility Partition
NOTE: If the primary deployment state (DT_PARTN) is set to OFF, the partitioning deployment state subsection is skipped.
The PARTCFG.BAT (Windows) or partcfg.sh (Linux) sample script provides the following disk partitioning default values. These values must be confirmed in some cases, and modified in other cases, before performing a deployment. Locate the partn label to find the following lines:
In PARTCFG.BAT:
set DT_PARTN_UP=ONset DT_MOUNT=H
:: Default Hard Driveset DT_HD=0
:: PARTCFG sectionset DT_OS_SIZE=4000set DT_OS_FSTYPE=FAT32
if not "%DT_PARTN_UP%"=="ON" goto ospart
:: DELLUP sectionset DT_UP_SIZE=32set DT_UP_IMAGE=%DT_SYSTEMS%\UPIMG.BIN
:: RAIDCFG section:: default size for virtual diskset DT_VD_SIZE=10480:: default size for virtual disk
In partcfg.sh in BIOS mode:
DT_PARTN_UP=on
# Default Hard DriveDT_HD=/dev/sda
# deployment sectionset DT_DP_SIZE=64# DELL UP sectionset DT_UP_SIZE=32set DT_UP_IMAGE=$dt_systems/upimg.bin
# RAIDCFG sectionDT_VD_SIZE=10480# default size for virtual disk
CAUTION: DT_MOUNT specifies the mount point of the Dell utility partition. If your RAMDRIVE, hard drive, or other device already owns this designation, mount does not override the setting and the utility partition is not created.
40

In partcfg.sh in UEFI mode:
DT_PARTN_UP=OFF
# Default Hard DriveDT_HD=/dev/sda
# PARTCFG sectionset DT_DP_SIZE_GPT=125
# RAIDCFG sectionDT_VD_SIZE=10480# default size for virtual disk
Editing The Default Partition Configuration Values
Perform the following steps to edit the default partition configuration default values, as necessary:
1. Edit the default utility partitioning variable (DT_PARTN_UP), if necessary. Set this variable f you want to install the Dell utility partition.
2. Edit the default variable value for the default hard drive (DT_HD for Windows and DT_HD for Linux), if applicable.
NOTE: Ensure that the default variable value for DT_HD is set to a valid non‑removable disk, and not to removable media such as virtual media.
3. Edit the default variable value (DT_DP_SIZE in MB for BIOS mode and DT_DP_SIZE_GPT in MiB for UEFI mode) for the primary operating system partition, if applicable.
4. Edit the default variable value for file system type ( DT_OS_FSTYPE), if applicable.
NOTE: The valid values are FAT32 and NTFS.
5. If the DT_PARTN_UP variable is set to ON, edit the default variable value (in MB) for the utility partition (DT_UP_SIZE), if applicable.
6. If the DT_PARTN_UP variable is set to ON, edit the default variable value for the utility partition installation package location (DT_UP_IMAGE=%DT_SYSTEMS%\UPIMG.BIN for Windows and DT_UP_IMAGE=$dt_systems/upimg.bin for Linux), if applicable.
NOTE: Edit the UPIMG_BIN variable only if you have changed the name or path of the utility partition installation package.
Editing DTK Task Scripts
The task scripts called by the master batch file do not require any edits (with the following exceptions) if the default variable values are utilized in the TKENVSET.BAT or tkenvset.sh scripts. However, if you make any changes to the default values set by the TKENVSET.BAT or tkenvset.sh, you must make the same edits to the matching default values set in the appropriate task scripts. Locate the USER MODIFICATION REQUIRED heading in the task scripts to find the variable values you may need to edit. Each of the following task scripts can be called by the user-written master batch script during a full deployment:
• RACREP.BAT or racrep.sh
• RAIDCFG.BAT or raidcfg.sh
• SYSREP.BAT or sysrep.sh
• PARTCFG.BAT or partcfg.sh
41

RACREP.BAT Or racrep.sh
The RACREP.BAT or racrep.sh sample script applies RAC options to the target system based on configuration information that has been saved in the configuration file. User input is optional, depending on the variables set in the RACREP.BAT or racrep.sh sample script. On systems running Windows, RACREP.BAT script uses RACADM.EXE to configure RAC in the target system. On systems running Linux the racrep.sh script uses racadm wrapper script or the syscfg utility (depending on the version of RAC on your system) to configure RAC in the target system. The raccfg.ini is passed as the first parameter to these scripts. If this parameter is not passed, the default variables values used in these scripts are set in the TKENVSET.BAT or tkenvet.sh scripts. You can specify the IP address to configure the RAC as an optional parameter. The raccfg.ini file is generated with the RACCAP.BAT or raccap.sh sample script. For information about using the RACCAP.BATor raccap.sh sample script to capture RAC configuration information, see RACCAP.BAT Or raccap.sh.
NOTE: For 9G or later systems, racrep.sh and sysrep.sh have duplicate functions. If you run racrep.sh followed by sysrep.sh, the latter overwrites the settings of the former.
RAIDCFG.BAT Or raidcfg.sh
The RAIDCFG.BAT or raidcfg.sh sample script configures RAID controllers detected on the system. User input is optional to run this script. The input parameter is a name or path to a log file. This parameter is not set to any value by default, and no log file is generated. The default variable values used in this script are set in the TKENVSET.BAT or tkenvest.sh scripts. This script uses the RAIDCFG.EXE or raidcfg.sh utility to automatically configure the detected controllers on your target system. For example, for the first controller discovered, if RAIDCFG.EXE or raidcfg.sh discovers only one attached hard drive, the script tries to create RAID 0; if two hard drives are discovered, a RAID 1 configuration is enabled; if three or more hard drives are discovered, a RAID 5 configuration is enabled.
NOTE: On the detected controller, a RAID virtual disk is created only if the array disks connected to that particular controller have space available and, where applicable, are not part of already existing array group.
SYSREP.BAT Or sysrep.sh
The SYSREP.BAT or sysrep.sh sample script applies SYSCFG options to the target system based on configuration information that has been saved in a configuration file. User input is optional to run this script, depending on the variable settings in the SYSREP.BAT orsysrep.sh scripts. This script uses the SYSCFG utility to configure the BIOS and BMC in the target system using the configuration file syscfg.in. Thesyscfg.in is the first parameter passed to this script. If this parameter is not passed, the default variables values used in this script are set in the SYSREP.BAT or sysrep.sh scripts. The syscfg.ini file is generated with the SYSCAP.BAT or syscap.sh sample script. For information about using the SYSCAP.BAT or syscap.sh sample script to capture BIOS and BMC settings, see SYSCAP.BAT Or syscap.sh. The second parameter is a name or path to a log file. This parameter is not set to any value by default, and no log file is generated.
NOTE: If the replication requires a change in the memory redundancy mode, reboot the target server and execute the script again to complete the replication.
NOTE: The racrep.sh and sysrep.sh have duplicate functions. If you run racrep.sh followed by sysrep.sh, the latter overwrites the former settings.
42

PARTCFG.BAT Or partcfg.sh
In BIOS mode, the PARTCFG.BAT or partcfg.sh sample script creates and populates the Dell utility partition using UPINIT.BAT or upinit.sh and creates the deployment partition on a specified disk. In UEFI mode, the partcfg.sh sample script creates the deployment partition on a specified disk. For more information about using the UPINIT.BAT or upinit.sh tool, see UPINIT.BAT Or upinit.sh. User input is not required to run this script. The default variable values used in this script are set in the TKENVSET.BAT or tkenvset.sh scripts.
NOTE: Ensure that DT_HD is set to the required disk to be configured before you execute the PARTCFG.BAT or partcfg.sh script.
Using DTK Sample Scripts To Capture Configuration Information
The SYSCFG and RACADM utilities can read the source system configuration and duplicate that configuration on a target system using a sample DTK script file. These configuration files are used during a full deployment to configure the BIOS, BMC, and RAC settings on the target system. The following sections provide instructions for:
• Capturing The System BIOS And BMC Configuration With The SYSCAP Or syscap Sample Script
• Capturing The RAC Configuration With The RACCAP Or raccap Sample Script
Capturing The System BIOS And BMC Configuration With The SYSCAP Or syscap.sh Sample Script
You can replicate the system BIOS and BMC configurations from a source Dell system to an identical target Dell system.
NOTE: For the script to complete successfully, the source system must have access to the network share that includes the pre-built DTK directory structure.
SYSCAP.BAT Or syscap.sh
The SYSCAP.BAT or syscap.sh sample script captures BIOS and BMC configuration settings and saves them to a specified location. An optional user input can be passed as a parameter. You can provide the path or file name as an input to this script. The default variable values used in this script are set to the correct default values to perform a scripted deployment. The SYSCAP.BAT or syscap.sh script uses the SYSCFG utility to retrieve BIOS and BMC configuration settings from the source system and to save the settings in a file named syscfg.ini in the Z:\Dell\Toolkit\Systems\<target system> directory.
Running The SYSCAP.BAT Or Syscap.sh
To run the SYSCAP.BAT or syscap.sh sample script to capture the BIOS and BMC configuration information in the syscfg.ini file:
1. Edit the startnet.cmd file (on your Windows PE image) or start-up script file (on your embedded Linux image) to call the SYSCAP.BAT or syscap.sh script after the network share with the pre-built DTK directory structure is mounted. For example, add:
On systems running Windows:
call Z:\Dell\Toolkit\Template\Scripts\SYSCAP.BAT
43

On systems running Linux:
/opt/dell/toolkit/template/scripts /syscap.sh2. Boot the source system into Windows PE or embedded Linux.
The script runs and saves the configuration information in the \Toolkit\Systems\<target system> directory in Windows and /opt/dell/toolkit/systems/<target system> directory in Linux.
3. Edit the startnet.cmd file (Windows PE image) or start-up script file (embedded Linux image) to remove the text you added in step 1.
NOTE: The racrep.sh and sysrep.sh have duplicate functions. If you run racrep.sh followed by sysrep.sh, the latter overwrites the former settings.
Capturing The RAC Configuration With The RACCAP Or raccap.sh Sample Script
If your system has a RAC, you can replicate the RAC configuration from the RAC of a source Dell system to an identical target Dell system with an identical RAC.
NOTE: For the script to complete successfully, the source system must have access to the network share that includes the pre-built DTK directory structure.
Running RACCAP.BAT Or raccap.sh
To run the RACCAP.BAT or raccap.sh sample script to capture the RAC configuration information in the raccfg.ini file:
1. Edit the startnet.cmd file (on your Windows PE image) or start-up script file (on your embedded Linux image) to call the RACCAP.BAT or raccap.sh script after the network share with the pre-built DTK directory structure is mounted. For example, add:
On systems running Windows:
Z:\Dell\x32\Toolkit\Template\Scripts\RACCAP.BAT Z:\raccfg.iniOn systems running Linux:
/opt/dell/toolkit/template/scripts/raccap.sh2. Boot the source system into Windows PE or embedded Linux.
The script runs and saves the configuration information in the \Toolkit\Systems\<target system> directory on systems running Windows and /opt/dell/toolkit/systems/<target system> directory on systems running Linux.
3. Edit the startnet.cmd file (Windows PE image) or start-up script file (embedded Linux image) to remove the text you added in step 1.
NOTE: The RAC configuration file is referred to as the .cfg file in the The Integrated Dell Remote Access Controller 8 (iDRAC8) User's Guide . See these guides for additional information about manually creating a RAC configuration file.
NOTE: Do not replicate the RAC IP address when creating a .cfg file. Replicating the RAC IP address can leave the system inaccessible because multiple systems are configured with the same IP address.
NOTE: The racrep.sh and sysrep.sh have duplicate functions. If you run racrep.sh followed by sysrep.sh, the latter overwrites the former settings.
44

RACCAP.BAT Or raccap.sh
The RACCAP.BAT or raccap.sh sample script captures RAC configuration settings and saves them to a specified location. An optional user input can be passed as a parameter. You can provide the path or file name as an input to this script. The default variable values used in this script are set to the correct default values to perform a scripted deployment. On systems running Windows, the RACCAP.BAT uses the RACADM.EXE utility to retrieve RAC configuration settings from the source system and to save it in raccfg.ini file at \Toolkit\Systems\<target system>. On systems running Linux, the raccap.sh script uses the racadm wrapper script or the syscfg utility (depending on the RAC version on your system) to retrieve RAC configuration settings from the source system and to save it in raccfg.ini at /opt/dell/toolkit/systems/<target system>.
NOTE: Ensure that you run RACCAP.BAT in a writable environment. If you run RACCAP.BAT in a read-only environment, DTK displays the message <filename.ini> has been generated.
UPINIT.BAT Or upinit.sh
The UPINIT.BAT or upinit.sh is a tool used to create and populate a new Dell utility partition and to upgrade or downgrade an existing utility partition.
NOTE: You can use this script to create a new Dell utility partition only if there are no existing partitions on your hard disk.
Upgrades or downgrades can be made only to existing Dell utility partitions to capture BIOS and BMC settings using the overwrite option.
CAUTION: The existing Dell utility partition must be the first primary partition on the hard disk. Also, the Dell utility partition must be greater than or equal to 32 MB and less than 2 GB.
For details on the command line arguments to be used for UPINIT.BAT or upinit.sh, see the Dell Deployment Toolkit Command Line Interface Reference Guide dell.com/openmanagemanuals.
Preparing The Operating System Installation Scripts
The W2K8INST.BAT And W2K12INST.BAT script (on systems running supported Windows operating systems), the linux scripts (on systems running supported Red Hat Enterprise Linux Server operating system), and suseinst.sh sample script (on systems running supported SUSE Linux Enterprise Server operating system) are used to perform an installation. The variables and paths must be specified before the operating system can be installed. For more information on installing Red Hat Enterprise Linux and SUSE Linux Enterprise Server, see the Dell OpenManage Deployment Toolkit Installation Guide available at dell.com/openmanagemanuals.
NOTE: It is recommended that you consult your Windows or Red Hat Enterprise Linux Server operating system documentation and unattended deployment documentation to develop a thorough understanding of the unattended installation process before attempting to perform a full scripted deployment.
NOTE: While installing Linux, ensure that you install grub in the boot partition. Otherwise, you cannot boot to the utility partition by pressing the <F10> key during reboot.
45

W2K8INST.BAT And W2K12INST.BAT
The W2K8INST.BAT and W2K12INST.BAT sample scripts are used to perform an unattended installation of the Windows Server 2008 and Windows Server 2012 operating systems respectively. The variables and paths must be specified before the operating system can be installed.
NOTE: It is recommended that you consult your Windows operating system documentation and unattended deployment documentation to develop a thorough understanding of the Windows unattended installation process before attempting to perform a full scripted deployment.
The syntax for W2K8INST.BAT and W2K12INST.BAT are w2k8inst.bat and w2k12inst.bat respectively.
Utilities Used
SETUP.EXE — Used to install the operating system in conjunction with the UNATTEND.XML and UNATTEND_UEFI.XML answer files.
External Dependencies
W2K8INST.BAT and W2K12INST.BAT scripts uses two environment variables: DT_PLATFORM and
DT_DRIVE.
The DT_PLATFORM variable is set by TKENVSET.BAT using platform discovery.
The DT_DRIVE denotes the network drive letter to the network shared path containing the Windows
Server 2008 or the Windows Server 2012 operating system source and the UNATTEND.XML (in BIOS mode) or UNATTEND_UEFI.XML file (in UEFI mode).
The W2K8INST.BAT script uses the UNATTEND.XML file (in BIOS mode) and UNATTEND_UEFI.XML file (in UEFI mode) with SETUP.EXE utility to install the operating system files. The W2K12INST.BAT script uses the UNATTEND2K12.XML file (in BIOS mode) and UNATTEND2K12_UEFI.XML file (in UEFI mode) with SETUP.EXE utility to install the operating system files. For more information about preparing the UNATTEND.XML file, see UNATTEND.XML AND UNATTEND_UEFI.XML.
Specifying The Windows Installation Variables And Installation Paths
To edit the Windows operating system installation variables (in BIOS mode), locate the following lines in W2K8INST.BAT or W2K12INST.BAT:
:: Location of Unattend.xml file
set DT_UNATTEND=%DT_SYSTEMS%\%DT_PLATFORM%\unattend.xml
UNATTEND.XML AND UNATTEND_UEFI.XML
The UNATTEND.XML (in BIOS mode) and UNATTEND_UEFI.XML file (in UEFI mode) are the default name of the answer files for automating the Windows setup during an unattended installation. A sample copy of the UNATTEND.XML and UNATTEND_UEFI.XML file is provided as part of the DTK download in the \Toolkit\Template\Configs directory.
UNATTEND.XML and UNATTEND_UEFI.XML contains the headings and parameters that instruct Windows setup to perform various configuration tasks. In UNATTEND.XML and UNATTEND_UEFI.XML, specify
46

various setup options, including how to partition disks and the location of the Windows image you want to install. Before a full deployment can be run, edit all appropriate headings and parameters, as necessary.
NOTE: On systems running Windows Server 2012 operating system, save the default answer files as UNATTEND2K12.XML or UNATTEND2K12_UEFI.XML.
NOTE: See your operating system documentation for instructions on modifying the options in the operating system unattended installation file to customize the scripted installation of your operating system.
On systems running Windows Server 2008 or Windows Server 2012 operating system, save the completed file in the \Toolkit\os_deploy\<target system> directory after you have completed all necessary modifications to the UNATTEND.XML or UNATTEND_UEFI.XML file.
After you have successfully edited your deployment scripts, you are ready to create your deployment media and run your deployment. For instructions on creating the deployment media and running a full deployment, see Running The Deployment Scripts.
Linux Scripts
The lininst.sh (for Red Hat Enterprise Linux 5 and 6) and lininst7.sh (for Red Hat Enterprise Linux 7) sample scripts are used to perform an unattended installation of the supported Red Hat Enterprise Linux Server operating system in both BIOS and UEFI mode. The variables and paths must be specified before the operating system can be installed.
Utilities Used By Linux Scripts
grub — Used with the kernel image and initial ramdisk files, along with the unattended answer file to install the operating system in BIOS mode.
grub2 — Used with the kernel image and initial ramdisk files, along with the unattended answer file to install the operating system in UEFI mode.
The following are the variables used in grub and grub2:
• DT_OS_DISK — Sets the disk to deploy the Red Hat Enterprise Linux Server 6 operating system.
• DT_OS_NFS_LOC — Sets the disk to deploy the Red Hat Enterprise Linux Server 7 operating system.
• DT_OS_SRC — Sets the location from where to copy the kernel image and initial ramdisk files.
• DT_HD — Sets the required disk to be configured for partition.
External Dependencies Of lininst.sh
The DT_PLATFORM variable is set during deployment by tkenvset.sh using platform discovery.
The lininst.sh script uses the unattended answer file with the grub utility and kernel image and initial ramdisk files to install the operating system files. For more information about preparing the unattended answer file, see Answer Files.
Answer Files
Depending on the version of the Red Hat Enterprise Linux Server operating system, the ks-rhel6.cfg and ks-rhel7.cfg, ks_rhel6_uefi.cfg (only in UEFI mode), or ks_rhel7_uefi.cfg (only in UEFI mode) files are the default names of the answer files to automate an unattended Red Hat Enterprise Linux Server installation. A sample copy of the ks-rhel6.cfg/ks-rhel7.cfg file is provided as part of the DTK download in the /opt/
47
dell/toolkit/template/configs directory. The ks-rhel6.cfg/ks-rhel7.cfg files contain the headings and parameters that instruct the installation utility to perform various configuration tasks. Before a full deployment can be run, edit all appropriate headings and parameters, as necessary.
NOTE: The sample files provided to install Red Hat Enterprise Linux Server (version 6) are ks-rhel6.cfg (in BIOS mode), and ks_rhel6_uefi.cfg (in UEFI mode). To use the sample ks-rhel6.cfg file to install Red Hat Enterprise Linux Server (version 6) using lininst.sh, ensure that you rename the file to ks.cfg. To use the sample ks_rhel6_uefi.cfg file to install Red Hat Enterprise Linux Server (version 6) using lininst.sh, ensure that you rename the file to ks_uefi.cfg.
NOTE: The sample files provided to install Red Hat Enterprise Linux Server (version 7) are ks-rhel7.cfg (in BIOS mode), and ks_rhel7_uefi.cfg (in UEFI mode). To use the sample ks-rhel7.cfg file to install Red Hat Enterprise Linux Server (version 7) using linins7t.sh, ensure that you rename the file to ks.cfg. To use the sample ks_rhel7_uefi.cfg file to install Red Hat Enterprise Linux Server (version 7) using lininst7.sh, ensure that you rename the file to ks_uefi.cfg.
NOTE: See your operating system documentation for instructions on modifying the options in the kick start file to customize the scripted installation of your operating system.
When you have completed all necessary modifications of the kick start file, save the completed file in the /opt/dell/toolkit/systems/<target system> directory.
suseinst
The suseinst.sh sample script is used to perform an unattended installation of a supported SUSE Linux Enterprise Server operating system. The variables and paths must be specified before the operating system can be installed.
CAUTION: It is recommended that you consult your SUSE Linux Enterprise Server operating system documentation and unattended deployment documentation to develop a thorough understanding of the unattended installation process before attempting to perform a full scripted deployment.
NOTE: While installing Linux, ensure that you install grub in the boot partition. Otherwise, you cannot boot to the utility partition by pressing the <F10> key during reboot.
Utilities Used By suseinst
grub — Used with the kernel image and initial ramdisk files, along with the unattended answer file to install the operating system in BIOS mode.
grub2 — Used with the kernel image and initial ramdisk files, along with the unattended answer file to install the operating system in UEFI mode.
Variables Used
• DT_OS_DISK — Sets the disk on which to deploy the SUSE Linux Enterprise Server operating system.
• DT_OS_SRC — Sets the location from where to copy the kernel image and initial ramdisk files.
• DT_OS_PART — Sets the valid partition to install the grub files.
• DT_OS_IMG_PATH — Sets the network share where the operating system files are located.
• DT_SUSE_AUTOINST — Sets the network share from where the autoinst.xml file can be accessed.
External Dependencies Of suseinst.sh
The DT_PLATFORM variable is set during deployment by tkenvset.sh using platform discovery.
48

The suseinst.sh script uses the unattended answer file in conjunction with the grub utility and kernel image and initial ramdisk files to install the operating system files.
autoinst.xml or autoinst_uefi.xml For SUSE Linux Enterprise Server
The autoinst.xml and autoinst_uefi.xml file is the default name of the answer file that you use to automate an unattended SUSE Linux Enterprise Server installation in BIOS and UEFI modes respectively. A sample copy of the autoinst.xml/autoinst_uefi.xml file is provided as part of DTK download in the /opt/dell/toolkit/template/configs directory. The autoinst.xml/autoinst_uefi.xml file contains the headings and parameters that instruct the installation utility to perform various configuration tasks. Before a full deployment can be run, edit all appropriate headings and parameters, as necessary.
NOTE: After installing SUSE Linux Enterprise, change the login password by editing the user node of the root user in autoinst.xml/autoinst_uefi.xml. You can also encrypt the password file by changing false to true in <encrypted config:type="boolean">false</encrypted>.
NOTE: See your operating system documentation for instructions on modifying the options in the autoinst.xml/autoinst_uefi.xml file to customize the scripted installation of your operating system.
When you have completed all necessary modifications of the autoinst.xml/ autoinst_uefi.xml file, save the completed file in the /opt/dell/toolkit/systems/<target system> directory.
After you have successfully edited your deployment scripts, you are ready to create the deployment media and run the deployment. For instructions on creating the deployment media and running a full deployment, see Deployment Using Dell Provided Embedded Linux .
NOTE: During an unattended SUSE Linux Enterprise Server installation, if the installer lists out missing packages, delete the listed packages from autoinst.xml/autoinst_uefi.xml.
49

6Running The Deployment Scripts This chapter provides best practices, procedures, and scenarios for using the Deployment Toolkit (DTK) to perform pre‑operating system configuration tasks and to install supported operating systems on supported Dell systems.
After you have populated the deployment directory structure with all necessary files and carefully edited the deployment scripts and configurations files, you are ready to begin the final stage of the deployment process. Before running the deployment, however, create specific deployment media to facilitate your chosen deployment method. The common deployment scenarios are:
• Media-Based Local Deployment For Systems Running Microsoft Windows
• Media-Based Local Deployment With Networking Enabled For Systems Running Windows
• Deployment Using Removable Boot Media With A Network Connection (Media-Based) For Systems Running Windows
• Deployment Using Removable Boot Media Without A Network Connection (Media-Based) Connection For Systems Running Windows
• Network Based Deployment For Systems Running Windows
• Using A Third-Party Deployment Solution Framework For Systems Running Windows
• Deployment Using Dell Provided Embedded Linux
• Deployment Using Customized Embedded Linux
• Using A Third-Party Deployment Solution Framework For Systems Running Linux
Deployment Using Removable Boot Media With A Network Connection (Media-Based) For Systems Running WindowsFor media-based deployment with a network connection:
1. Create a deployment media containing a bootable image with the appropriate media and network drivers, along with any utilities needed to connect to a network share. The deployment media initiates the deployment process by mapping to the network share where the deployment directory structure resides.
2. Insert the bootable media into the appropriate drive of the system to be deployed.
3. Boot or reboot the system.
The configuration process begins and the following tasks are completed:
• Windows PE or Linux, as the case may be, is installed from the media.
• Network shares are mapped.
• The DTK scripts execute the necessary DTK utilities from the network share or the media itself.
• Configuration information is read from the network share.
50

• The operating system is installed from a network share. This installation may happen after your system reboots.
Media-Based Local Deployment For Systems Running Microsoft Windows
This deployment method is easy to assemble, but is the least flexible. Any change to the system configuration, for example, requires the creation of a new bootable media. This method does not provide a writable media, making it necessary to use predefined and tested configuration files.
For the media-based deployment methods, the following tasks need to be completed:
• Creating And Customizing Images For Windows PE 3.0
• Creating and Customizing Images For Windows PE 4.0 and 5.0
• Integrating The DTK Directory Structure
• Creating A Bootable Media For WIN PE 3.0
• Running The Image
Creating And Customizing Images For Windows PE 3.0
If you are using Windows PE 3.0, download Windows Automated Installation Kit (Windows AIK) from microsoft.com. By default, Windows AIK is copied to the C:\Program Files\Windows AIK directory. You must include the Dell-customized drivers and instrumentation drivers into your Windows PE media-based operating system.
Creating And Customizing Images For Windows PE 4.0 And 5.0
If you are using Windows PE 4.0 or 5.0, download Windows Assessment and Deployment Kit (ADK) from microsoft.com. By default, Windows ADK is copied to the C:\Program Files\Windows Kits directory.
Integrating DTK Directory Structure
DTK provides WINPE3.0_driverinst.bat (for Windows PE 3.0), WINPE4.0_driverinst.bat (for Windows PE 4.0), and WINPE5.0_driverinst.bat (for Windows PE 5.0) scripts to pre-install the Dell drivers into a base Windows PE 3.0, Windows PE 4.0, and Windows PE 5.0 image . To execute the script (for example, WINPE5.0_driverinst.bat) on 64-bit systems:
NOTE: Make sure that you have administrator privileges before running the scripts.
1. At the command prompt, type the following command to change the directory to the location of the script, WINPE5.0_driverinst.bat : cd C:\Dell\x64\Drivers\winpe5.x
2. Execute the script: WINPE5.0_driverinst.bat <WIMPATH> <DTKPATH>where <WIMPATH> is the destination path to create the directory structure for Windows PE and <DTKPATH> is the path for the Dell drivers in the extracted DTK toolkit. For example, WINPE5.0_driverinst.bat C:\winpe_50 C:\DELL\x64\DRIVERS.
This pre-installs the Dell drivers into Windows PE image. The successful execution of the above commands creates a bootable ISO image for Windows PE 4.0 and 5.0 at <WIMPATH>. For creating a bootable media for Windows PE 3.0, see Creating A Bootable Media For WIN PE 3.0.
51

NOTE: The destination folder (C:\winpe_50) is created as part of the process, and must not be an existing directory. The destination path and the path to the Dell drivers must not contain any blank space.
Creating A Bootable Media For Windows PE 3.0
To create a bootable media:
1. Click Start and navigate to All Programs → Microsoft Windows AIK.
2. Click Windows PE Tools Command Prompt to open a command prompt window.
3. Navigate to C:\program files\Windows AIK\Tools\x32 or C:\program files\Windows AIK\Tools\amd64 directory on the system.
4. Execute the script: WINPE3.0_driverinst.bat <WIMPATH> <DTKPATH>where <WIMPATH> is the destination path to create the directory structure for Windows PE and <DTKPATH> is the path for the Dell drivers in the extracted DTK toolkit. For example, WINPE3.0_driverinst.bat C:\winpe_30 C:\DELL\x64\DRIVERS.
This pre-installs the Dell drivers into Windows PE image. The successful execution of the above commands creates a bootable ISO image for Windows PE 3.0 at <WIMPATH>.
NOTE: The destination folder (C:\winpe_30) is created as part of the process, and must not be an existing directory. The destination path and the path to the Dell drivers must not contain any blank space.
5. Run the following command: oscdimg -n -bc:\winpe_30\etfsboot.com c:\winpe_30\ISO c:\winpe_30\WinPE3.0.isoWinPE3.0 iso, a media bootable ISO image is created.
You can use any CD or DVD burning software to burn the image onto a CD or DVD. After burning the ISO image, ensure that it boots from the CD or DVD drive for all the supported Dell systems you plan to deploy. After it boots, you are advised to test all the tools and scripts on these systems to make sure that the integration is successful and that there are no issues with hardware components not being recognized.
Running The Image
You are now ready to use your bootable media to access the deployment components from the directory structure on the media:
1. Boot the target system with the bootable deployment media.
2. Execute the master batch file, which calls individual task scripts and utilities from the media to complete the deployment process.
Media-Based Local Deployment With Networking Enabled For Systems Running Windows
This method provides greater flexibility and is highly recommended in large deployments. The prerequisites are the availability of network bandwidth and all target systems connected to the network.
NOTE: DTK network-based deployment is not supported from mapped Novell NetWare systems.
52

This deployment method is easy to assemble and provides great flexibility in changing the scripts and configuration files. Any change to the system configuration, for example, does not require re‑creation of the bootable media. This method also provides access to the remote share as writable media. Hence, the configuration files captured during the deployment automation process can be saved to the remote share.
Bootable Windows PE Media With Networking Enabled
This process includes:
• Creating a bootable Windows PE media with the appropriate network drivers. This step enables networking services to start, get an IP address, and bring the target system into a functioning network.
NOTE: For more details on how to create a customized version of a single Windows PE bootable media that works across all Dell supported systems and provides an underlying networking stack, see Running The Deployment Scripts.
• Creating scripts to automatically map to a predefined network share.
• Accessing scripts, configuration files, and operating system installation files from the network.
Preparing And Populating The Network Share
This process includes:
• Creating a network share on a system that is always available over the network for the target systems to be deployed.
• Ensuring that a large amount of space is available for storing operating system installation files.
• Ensuring that proper permissions are assigned to this share so that the target systems can read files from and write files to the share.
You can also use the bootable media to call the deployment components from the directory structure on the media and the remaining components from the network share.
1. Boot the target system with the bootable deployment media.
2. Execute the master batch file, which calls individual task scripts and utilities from the network share to complete the deployment process.
Deployment Using Removable Boot Media Without A Network (Media-Based) Connection For Systems Running WindowsFor media-based deployment without a network connection:
1. Create a deployment media containing a bootable image with the appropriate drivers. The media must also include the complete deployment directory structure, which contains all DTK utilities, scripts, and configuration files, an operating system installation answer file, and the required operating system installation files and drivers.
2. Insert the bootable media into the media drive of the system to be deployed (the target system).
3. Boot or reboot the target system.
The deployment process begins and the following tasks are completed:
• Windows PE or embedded Linux, as the case maybe, is installed from the media.
• The DTK scripts execute the necessary DTK utilities from the media.
53

• Configuration information is read from the media.
• The operating system is installed from the media.
Network Based Deployment For Systems Running Windows
For Windows PE environments, deployment using Remote Installation Services (RIS) is recommended. For details, see the Microsoft RIS documentation. You can also use any other deployment tool such as Automated Deployment Services (ADS).
Using A Third-Party Deployment Solution Framework For Systems Running Windows
You can use DTK with any existing third-party deployment solution framework that provides an Automated Deployment Services (ADS) booting infrastructure for Windows Deployment Services (WDS). Because each third-party deployment framework is unique, these solutions fall outside the scope of this document. If you plan to utilize a third-party deployment solution framework, keep in mind that DTK is a Windows PE-based set of tools and scripts, so the deployment solution framework must also support Windows PE as a pre-operating system environment.
Deployment Using Dell Provided Embedded Linux
The two common scenarios for deployment using Dell provided embedded Linux are following:
• Network Based Deployment
• Media Based Deployment
Network-Based Deployment
The two common scenarios for network-based deployment are:
• PXE-Based Deployment
• Network File System or SMBFS File System Based Deployment
PXE-Based Deployment
The procedure enables you to boot DTK over network and pass parameters (startup script location and name) during boot using the Preboot eXecution Environment (PXE) configuration file. This automatically launches the start-up script off the network share, when DTK is booted.
1. Obtain the ISO image of the embedded Linux available at support.dell.com.
2. Set up the Trivial File Transfer Protocol (TFTP) services and the Dynamic Host Configuration Protocol (DHCP) services on your network to boot the target system using PXE.
3. In BIOS mode, copy the contents of the embedded Linux DTK ISO image (SA.1, SA.2, and isolinux.cfg) from /mnt/cdrom/isolinux to the tftp folder. In UEFI mode, copy the contents of the embedded Linux DTK ISO image (SA.1 and SA.2), from /mnt/cdrom/isolinux to the tftp folder.
4. Edit the configuration file (isolinux.cfg for BIOS or efidefault for UEFI mode) by providing the following options:
• IP address of the network share
54

• Share path of the network share
• Name of your startup script
The isolinux.cfg/efidefault file is ready for PXE-booting.
5. Copy isolinux.cfg file into the PXE configuration folder.
6. Create your own start-up script and place it in the network share specified in your modified isolinux.cfg/efidefault file.
The modified script is picked up and executed during the boot process.
NOTE: The network share on which you have the scripts and DTK files are mounted to /opt/dell/toolkit/systems.
NOTE: Ensure that you specify the correct RAMDISK size in the PXE config file before booting through PXE. A sample pxe config file is provided in /mnt/cdrom/isolinux/isolinux.cfg.
Network File System or SMBFS File System Based Deployment
The procedure enables you to boot DTK and launch the start-up script automatically from a network share (NFS or SMBFS).
1. Obtain the ISO image of the embedded Linux available at support.dell.com.
2. Extract the contents of the ISO image to a folder (for example, isoimage) on your hard drive.
3. Copy the custom script to a share (nfs/smbfs).
4. In UEFI mode, modify the corresponding shared section (nfs/smbfs) in EFI/BOOT/dtk_grub.cfg and create iso using mkisofs. For BIOS mode, modify the corresponding shared section (nfs/smbfs) in isolinux/isolinux.cfg and create iso using mkisofs as follows: mkisofs -o output.iso -b isolinux/isolinux.bin -c isolinux/boot.cat -no-emul-boot -boot-load-size 4 -boot-info-table -pad -r -J -hide-joliet- trans-tbl -eltorito-alt-boot -e efiboot.img -no-emul-boot isoimage
NOTE: It is important to use mkisofs to make your customized image because the ISO Linux recognizes only the isolinux.cfg (and all files within /isolinux). If you do not use mkisofs, the HAPI libraries of the DTK cannot load and most of the Dell Update Packages do not work.
NOTE: The scripts that you copy into the media are copied to the RAM disk and run from the RAM disk. This task is done to make sure that the media is not locked. Ensure that your sample scripts have valid path names.
5. Burn the ISO contents to a media.
Your ISO image is ready for booting.
Media-Based Deployment
The different media-based deployments are as follows:
• Deployment Using Custom Scripts
• Deployment Using RPMs
• Deployment Using USB
Deployment Using Custom Scripts
1. Obtain the ISO image of the embedded Linux at support.dell.com.
2. Extract the contents of the ISO image to a folder (for example, isoimage) on your hard drive.
3. Copy the custom scripts into the same folder.
55

NOTE: Your scripts must also take care of copying miscellaneous items to unlock the media, so that the media can be mounted and ejected as per the operating system’s installation process.
4. In /mnt/cdrom/isolinux/isolinux.cfg (for BIOS mode) or in /mnt/cdrom/EFI/BOOT/dtk_grub.cfg (for UEFI mode), edit the cd install section to point to your customized start-up script. In other words, add the share_script option and then use mkisofs to create the ISO image as follows:
mkisofs -o output.iso -b isolinux/isolinux.bin -c isolinux/boot.cat -no-emul-boot -boot-load-size 4 -boot-info-table -pad -r -J -hide-joliet-trans-tbl -eltorito-alt-boot -e efiboot.img -no-emul-boot isoimage
NOTE: It is important to use mkisofs to make your customized image because the ISO Linux recognizes only the isolinux.cfg (and all files within /isolinux). If you do not use mkisofs, the HAPI libraries of the DTK cannot load and most of the Dell Update Packages do not work.
NOTE: The scripts that you copy into the media are copied to the RAM disk and run from the RAM disk. This task is done to make sure that the media is not locked. Ensure that your sample scripts have valid path names.
5. Burn the ISO contents to a media.
6. Your ISO image is ready for booting.
Using RPMs
You can install DTK using Red Hat Package Manger (RPM), Yellowdog Updater, Modified (YUM) or any other RPM Installation Manager, or using DTK tools.
Installing DTK RPMs Using RPM
To install DTK RPMs using RPM:
1. Mount the DTK media at /mnt/cdrom.
2. Navigate to the /mnt/cdrom/RPMs directory.
NOTE: The /mnt/cdrom/RPMs directory contains all DTK RPMs and the dependency RPMs.
3. Install the required DTK RPMs.
NOTE: To resolve the RPM dependency related issues, install the missing RPMs from /mnt/cdrom/RPMs directory. If the RPMs are not available in this directory, install these RPMs from the operating system media.
Installing DTK RPMs Using YUM
To install DTK RPMs using YUM:
1. Install YUM and the dependency RPMs.
2. Mount the DTK iso to /mnt/cdrom.
3. Create a repository file (for example, dtk.repo) for the required operating system in a writable location. The corresponding RPMs for the operating system are located at /mnt/cdrom/RPMs/<OS>, where OS can be the supported Linux operating system.
For example, to deploy DTK RPMs on RHEL 6.x, you can use the following content in dtk.repo file:
[DTK_RHEL6]name=DTK_RHEL6baseurl=file:///mnt/cdrom/RPMs/rhel6/enabled=true
4. Use the following command to install DTK RPMs: yum install -c dtk.repo -y <RPM>, where <RPM> can be DTK binaries.
56

NOTE: For both installations, the raidcfg and syscfg binaries and libraries are installed at /opt/dell/toolkit/bin. The racadm binaries are installed at /opt/dell/srvadmin/bin and /opt/dell/srvadmin/sbin.
Installing DTK RPMs Using DTK Tools
To install DTK RPMs using DTK tools:
1. Mount the DTK media at /mnt/cdrom.
2. Navigate to the /mnt/cdrom/SYSMGMT/dtktools/ directory.
NOTE: The /mnt/cdrom/SYSMGMT/dtktools directory contains all DTK RPMs and the dependency RPMs.
3. Install the required DTK RPMs using dtktools-setup.sh.
NOTE: To resolve the RPM dependency related issues, install the missing RPMs from the /mnt/cdrom/SYSMGMT/srvadmin/linux/RPMS directory. If the RPMs are not available in this directory, install these RPMs from the operating system media.
Post Installation Of RPMs
After installing the RPMs, perform the following:
1. For the binaries syscfg and raidcfg, export the PATH environment variable /opt/dell/toolkit/bin.
2. To start the services, navigate to /opt/dell/srvadmin/sbin, and type: srvadmin-services.sh start
NOTE: If the services are already running, restart the services.
NOTE: To execute the commands to configure the system as per the requirements, see the Dell OpenManage Deployment Toolkit Command Line Interface Reference Guide available at dell.com/openmanagemanuals.
Deployment Using USB
1. Download the ISO image of the embedded Linux from support.dell.com.
2. Download any third-party USB creator tool.
3. Install and launch the tool.
4. Select the downloaded ISO image, and select the option to convert the image to a bootable USB format.
Deployment Using Customized Embedded Linux
Make sure that you have the following basic libraries, Dell toolkit libraries, tools, and utilities required for DTK and integrate them to your embedded Linux deployment environment to proceed with the deployment:
• Drivers for all hardware installed in the embedded Linux. These drivers are available at support.dell.com.
• Serial port configuration utilities (setserial and stty) for racadm.
• Installed and working instrumentation drivers from /mnt/cdrom/tools.
• Point-to-Point Protocol (PPP) tools.
57

• Basic libraries and utilities for Linux to execute customized scripts.
• Installed DTK and the dependency RPMs.
• Necessary entries in the ld.so.config file so that the libraries are installed.
Integrate all the above mentioned libraries, Dell toolkit libraries, tools, and utilities into your embedded Linux environment and proceed with deployment.
NOTE: For more information on how Dell‑provided utilities and drivers are installed, see start-stage3.sh, start-hapi.sh, or start-raid.sh available in /mnt/cdrom/tools.
NOTE: The /opt/dell/srvadmin/sharedand /opt/dell/srvadmin/hapi directories must have read-write permissions. For more details, see start-stage3.sh and start-hapi.sh.
Using A Third-Party Deployment Solution Framework For Systems Running Linux
You can use DTK with any existing third-party deployment solution framework that provides a PXE booting infrastructure that can be used as transport mechanism for the DTK utilities. Because each third-party deployment framework is unique, these solutions are beyond the scope of this document. If you plan to utilize a third-party deployment solution framework, make sure that the deployment solution framework supports embedded Linux as a pre-operating system environment.
58

7Running Dell Update Packages On Systems Running Embedded LinuxYou can run the Dell Update Packages in embedded Linux environments on supported Dell systems. The common scenarios for running update packages are:
• Running Update Packages In Dell-Provided Embedded Linux
• Running Update Packages In Customized Embedded Linux
Running Update Packages In Dell-Provided Embedded Linux
1. Obtain the required update packages from the Dell Server Updates DVD or from support.dell.com.
2. Save the update packages on a network share.
3. Mount the network share where you saved the update packages and run the individual packages.
NOTE: See the Dell Update Packages User's Guide available at dell.com/openmanagemanuals for help on using Dell Update Packages and information on error codes.
Running Update Packages In Customized Embedded Linux
Before running update packages in customized embedded Linux environment, ensure that you meet the dependencies listed in the following table.
Table 22. Dependencies for Dell Update Packages to Run in Customized Embedded Linux
Update Packages Dependency Dependencies Available On
BIOS Instrumentation drivers
dell_rbu
/mnt/cdrom/tools
Kernel
ESM Instrumentation drivers /mnt/cdrom/tools
PERC /etc/dataeng
megaraid driver 2.4.2.0
SCSI drivers
/mnt/cdrom/tools
/mnt/cdrom/tools
Kernel
RAC4 Instrumentation drivers /mnt/cdrom/tools
/mnt/cdrom/tools
59

Update Packages Dependency Dependencies Available On
racser4.sh
RAC 5 Instrumentation drivers /mnt/cdrom/tools
iDRAC Instrumentation drivers /mnt/cdrom/tools
Dell PowerVault 220S SCSI drivers Kernel
SAS SAS drivers Kernel
Any Update Package RPMs
sysvinit
grep
sed
awk
less
fmt
tar.gz
compat-libstdc
proc-mail
libxml2
Linux media or any open source website
After you have met all the dependencies, run the update packages in your customized embedded Linux environment. For more information, see Running Update Packages In Dell-Provided Embedded Linux.
60

8Known Issues And Frequently Asked QuestionsThis section describes known issues with the Deployment Toolkit (DTK) utilities and scripts, including answers to some frequently asked questions.
Known Issues
The following issues are organized by DTK utility or other function.
General Issues
• Virtual disk creation and/or deletion takes a long time on Microsoft Windows PE.
RAIDCFG Issues
• Due to a rounding limitation for RAID 0, RAID 1, and RAID 5, when creating a virtual disk, RAIDCFG can accept a disk size that is 1 MB greater than the maximum allowable virtual disk size limit. However, RAIDCFG creates the maximum virtual disk size and does not display an error. If you want to use the maximum allowable virtual disk size, it is recommended that you do not provide the size in the CLI and let RAIDCFG calculate the size for the RAID type.
Windows PE Installation Issues
• If virtual flash is enabled and does not contain a valid image (for example, if the virtual flash contains a corrupt or random image), you may not be able to install Windows Server 2008 locally or remotely. To fix this issue, install a valid image on virtual flash or disable virtual flash if it is not used during the installation procedure.
Embedded Linux Installation Issues
• If internal SD card is present in the server, you may not be able to install the operating system using default partition. To fix this, remove the SD card from the server.
Frequently Asked Questions
The following questions are organized by DTK utility or other function.
General Deployment Questions
Q: While running SYSCFG.EXE on a Windows PE image, the SYSCFG.EXE tool silently fails.
A: Ensure that you have built your Windows PE image with the /WMI option. For more details, see Running The Deployment Scripts.
61

Q: When I use the sample DTK scripts to deploy multiple systems, do I edit the configuration files to reflect unique information (such as unique system names, IP address, and BIOS asset tags) for each system?
A: The sample scripts are provided as examples for users who want to develop their own deployment process. The scripts may work perfectly in your environment. If not, you may need to develop your own scripts entirely from scratch. If you are deploying multiple systems, for example, provide unique information for each system when appropriate. To perform this task, modify each .ini (or other configuration script) file to reflect the unique information for each system you are deploying (such as the remote access controller (RAC) IP addresses and BIOS asset tags). There are many options available to optimize this process and it is suggested that you conduct an Internet search for available tools.
Q: When I change my hard drive controller from SCSI to RAID (or RAID to SCSI), the system prompts me for confirmation during POST. How can I stop this from happening?
A: Use the --noraidprompt option with the --embscsiraid option to prevent the system from prompting during POST. Data loss results from changing the state of the disk controller, so you must be certain before skipping the prompt. There is no method for using the ‑‑noraidprompt in the input file. If you want to change the controller state through an input file, you must configure your script to call the SYSCFG.EXE utility twice, once to specify the input file, and once to change the controller state with the --noraidprompt option.
Q: What do I do if the PARTCFG script fails?
A: Ensure that DT_HD is set to the required disk to be configured before you execute the PARTCFG script.
RAIDCFG Questions
Q: Why does RAIDCFG display an error message when I use an invalid read, write, and cache policies and/or stripe sizes for a particular controller?
A: All RAID controllers have their own default read, write, and cache policies and stripe sizes. It is possible that if you provide an invalid policy or a stripe size for a particular controller, RAIDCFG may not give an error but creates the virtual disk with the default policy and/or stripe size.
Q: When I execute RAIDCFG with the RAID level of "01," RAIDCFG creates RAID 1, not RAID 01.
A: This behavior occurs because the RAIDCFG CLI parser ignores zeros preceding any parameter value. For example, -r=01 is parsed as -r=1.
Q: What is strict creation?
A: Strict creation is an optional flag that has been added to the create virtual disk command. It allows you to create virtual disks only if the array disks (that is, hard drives) are within a specified percentage of disk space of each other.
Q: Why is the drive location of array disks displayed like 0:0:0?
A: The nexus used to display array disks is "channel:target:lun." The Logical Unit Number (LUN) is always "0." The channel and the target IDs are necessary to identify array disks when dealing with SCSI devices.
62

When dealing with SAS devices, the array disk location is displayed as channel:target:enclosure. It is possible to have the enclosure value as non-zero. If the enclosure has a non-zero value, then all three numbers (channel, target, and enclosure) have to be included on the command line.
Q: Do I need to specify RAID type and size when creating virtual disks?
A: No. The default RAID type is RAID 0. If RAID size is not provided, the maximum size allowed for virtual disk is created. The mandatory fields required to create virtual disks are the controller slot ID and the array disks.
Q: What is a hot spare (failover drive)?
A: A hot spare is an extra and unused disk drive that is part of an array disk subsystem. A hot spare is always in standby mode. If a disk failure occurs, the hot spare replaces the failed drive without interrupting the system.
Q: What is mr2kserv.exe?
A: The mr2kserv.exe is a service needed to configure all LSI RAID controllers in Windows PE. It provides Plug and Play support.
Q: What features have changed from the MS-DOS version of RAIDCFG to the Windows PE and embedded Linux versions?
A: Windows PE and embedded Linux version of RAIDCFG support new controllers. For the list of supported controllers, see Dell Systems Software Support Matrix at dell.com/openmanagemanuals.
Features that have been removed from the MS-DOS version include:
• The --name and --wait options in the create command
• The --runlocation and the --scratchlocation options
• The --getpercentcomplete environment variables
Q: What is the minimum virtual disk size that I can create?
A: For PERC 5 controllers:
• RAID 0: 100 MB
• RAID 1: 100 MB
• RAID 5: 100 MB
For PERC 6 controllers:
• RAID 0: 100 MB
• RAID 1: 100 MB
• RAID 5: 100 MB
• RAID 6: 100 MB
• RAID 60: 100 MB
Q: Why cannot I see any controllers using RAIDCFG?
63

A: Ensure that the RAID controllers can be seen in the BIOS during POST. If the BIOS does not detect the controller, then RAIDCFG does not detect it. Also ensure that the controller is set to RAID mode and not any other mode in the controller BIOS.
Q: What is span length?
A: Span length enables you to select the number of array disks in a span for the nested RAID levels (RAID-10, RAID-50, and RAID-60). The default (minimum permissible) span length value is 2 for RAID-10, 3 for RAID-50, and 4 for RAID-60.
Q: PARTCFG cannot enumerate the virtual disks created by RAIDCFG. What must be done?
A: A reboot is required for PARTCFG to enumerate virtual disks after creating a virtual disk using the RAIDCFG command.
SYSCFG Questions
Q: Can I use the SYSCFG utility to configure Point-to-Point Protocol (PPP) over the serial port to access my RAC?
A: No. The Baseboard Management Controller (BMC) firmware does not support PPP configurations for the serial port.
Q: The SYSCFG utility --lancfgparams option has suboptions that configure the IP address, Gateway, and Subnet Mask for the system BMC. There is also a MAC address. Are these the same as the operating system network parameter of the managed system?
A: No. The Baseboard Management Controller (BMC) has its own IP address, Gateway, Subnet Mask, and MAC address values.
Q: What is the minimum configuration needed to support BMC Platform Event Filtering?
A: You must enable LAN-channel access pefalerting and ensure that you set the BMC IP address and Gateway values for alerting.
Q: I installed the factory defaults for the BMC of my system. Then, I enabled BMC user ID 3. What is the username for this user ID?
A: The default username for user IDs 3 to 10 is NULL.
Q: Can I use this NULL username to remotely log in to a BMC of a system?
A: No. Remote login using a NULL username is not allowed. It is recommended that you always provide a non-null, valid username for the user ID when you enable a BMC user ID.
Q: Are duplicate usernames allowed in the BMC?
A: No. If you enter a username value that already exists, the SYSCFG utility returns an error code of 89, which means This username is already in use. Enter a unique username.
64

Q: In --solcfgparams, when I set the Serial Over LAN (SOL) character send threshold using solcharsendthreshold to be 225, I get a Hardware subsystem error. Invalid data field in request. What are the valid values?
A: The range of valid values for --solcfgparams and --solcharsendthreshold are from 1 to 220.
Q: How do I enable console redirection on a modular system?
A: Set the --serialcomm option value to enableconred. For example, syscfg -serialcomm=enableconred.
Embedded Linux Questions
Q: After installing Linux, I am not able to boot to the utility partition by pressing the <F10> key during reboot.
A: Re-create the utility partition using the upinit.sh script and install grub in the boot partition.
Q: When booting DTK through PXE, my system displays error messages, unknown behavior, and also leads to a kernel panic sometimes. However, booting from the media causes no problems.
A: Ensure that you specify the correct RAMDISK size in the pxe config file before booting through PXE. A sample pxe config file is provided in /mnt/cdrom/isolinux/isolinux.cfg.
Q: Can we use the same sample scripts that we have from earlier versions of DTK?
A: The scripts written for the previous versions of DTK do not work in the later versions for embedded Linux. For the sample scripts, see the directory /opt/dell/toolkit/template/scripts .
Q: After the DTK deployment is complete, the Red Hat Enterprise Linux Server installation keeps going into attended mode or halts with the message ks.cfg not found.
A: If the initrd.img is not available in the operating system, get the latest update of Red Hat Enterprise Linux Server or prepare driver disks for your network or disk controller.
Q: How to apply driver disks during operating system installation?
A: You can apply driver disks as follows:
1. During operating system installation, after the first reboot, attach the driver-disk.iso file to the DVD-ROM or virtual media.
2. At the grub prompt, press <a> followed by <dd> and, then press <Enter>.
Q: Why DTK ELI (32–bit) does not successfully boot up a Dell server running in UEFI mode?
A: On a Dell server running in UEFI mode, DTK supports only 64–bit ELI.
Q:How to delete the Unavailable: RHEL_DTK_UEFI and Unavailable: SLES_DTK_UEFI entries displayed on the F11 UEFI boot manager?
A: Do the following to delete the entries:
1. Identify the boot entry number (for example, BootXYZ) of the entry to be deleted: Run efibootmgr from the command line.
65

2. Delete the entry: Run efibootmgr -b XYZ –B
Windows PE Questions
Q: My system gets the error Illegal or Missing File Types Specified in Section Files.SCSI.Name during an unattended installation of a supported Windows operating system on supported Dell systems.
A: This behavior can occur when the line in the Txtsetup.oem file under the [Files.SCSI. name] heading is not a supported file type. To resolve this behavior, you must remove the line in the Txtsetup.oem file. The dynamic-link library (DLL) file can be copied to the correct location of the installation by placing it in the I386\$Oem$\$$\OEMDIR folder. (OEMDIR is the destination folder where the file would normally be located, if installed to a running operating system. For example, INF files are normally found in the %SystemRoot%\INF folder. The correct OEMDIR destination can be found by searching the INF file used to install the device or driver.) For more information, see Microsoft Knowledge Base Article 275334 available at Microsoft website.
Q: In Windows, I see a blue screen when I delete a virtual disk and create a new one without initialization and attempt to format the disk.
A: Initialize (fast init) the drives before formatting the disk. This prevents the issue.
66