Embed Size (px)
Citation preview

Dell EMC AvamarVersion 18.2
vSphere Web Client Administration Guide302-005-122
REV 01

Copyright © 2001-2018 Dell Inc. or its subsidiaries. All rights reserved.
Published December 2018
Dell believes the information in this publication is accurate as of its publication date. The information is subject to change without notice.
THE INFORMATION IN THIS PUBLICATION IS PROVIDED “AS-IS.“ DELL MAKES NO REPRESENTATIONS OR WARRANTIES OF ANY KIND
WITH RESPECT TO THE INFORMATION IN THIS PUBLICATION, AND SPECIFICALLY DISCLAIMS IMPLIED WARRANTIES OF
MERCHANTABILITY OR FITNESS FOR A PARTICULAR PURPOSE. USE, COPYING, AND DISTRIBUTION OF ANY DELL SOFTWARE DESCRIBED
IN THIS PUBLICATION REQUIRES AN APPLICABLE SOFTWARE LICENSE.
Dell Technologies, Dell, EMC, Dell EMC and other trademarks are trademarks of Dell Inc. or its subsidiaries. Other trademarks may be the property
of their respective owners. Published in the USA.
Dell EMCHopkinton, Massachusetts 01748-91031-508-435-1000 In North America 1-866-464-7381www.DellEMC.com
2 Avamar 18.2 vSphere Web Client Administration Guide

5
Introduction 9Avamar Plug-in for vSphere Web Client...................................................... 10How Avamar works with VMware................................................................10
Guest backup and restore.............................................................. 10Image-level backup and restore...................................................... 11Supported configurations............................................................... 11Guest and image-level backup and restore comparison...................11Changed block tracking..................................................................12
Configuring the Avamar Plug-in for vSphere Web Client 15Avamar server configuration....................................................................... 16Register the Avamar Plug-in for vSphere Web Client .................................16
Unregister the Avamar Plug-in for vSphere Web Client and disableservices.......................................................................................... 17
Access the Avamar Plug-in for vSphere Web Client....................................18Access the plug-in by using Avamar Web User Interface................18Access the plug-in by using the vSphere Client..............................19AUI navigation pane....................................................................... 19
Using the Avamar Plug-in for vSphere Web Client 21Avamar setup............................................................................................. 22Managing backup policies...........................................................................22
Start an on-demand backup of a backup policy............................. 22Edit a backup policy.......................................................................23Add or remove members to a backup policy...................................23Edit policy attributes..................................................................... 24
AUI Activity Monitor................................................................................... 24Activity Monitor details................................................................. 25Monitor backups............................................................................ 27Cancel backups..............................................................................28Restart a backup job......................................................................28View a detailed client session log................................................... 28Monitor restores............................................................................29Cancel restores............................................................................. 29Monitor replication in the AUI........................................................30Cancel a replication task ...............................................................30
Manage clients........................................................................................... 30Add a VMware client......................................................................30Delete a VMware client..................................................................32Enable changed block tracking...................................................... 32
Manage rules.............................................................................................. 33Create a rule.................................................................................. 33Edit a rule...................................................................................... 34Delete a rule.................................................................................. 36
Preface
Chapter 1
Chapter 2
Chapter 3
CONTENTS
Avamar 18.2 vSphere Web Client Administration Guide 3

Proxy Deployment...................................................................................... 36About proxy deployment ...............................................................36Considerations and best practices................................................. 37Deploy proxies............................................................................... 38
Backup and Recovery 41Perform an on-demand backup of a virtual machine by using AUI ..............42
Set advanced plug-in options in the AUI........................................ 43VMware Image backup plug-in options.......................................... 45
Restore an instance of a VM backup by using the AUI ...............................48Restore data to the original virtual machine...................................48Restore data to a different virtual machine....................................49Restore data to a new virtual machine........................................... 51
File-level restore (FLR).............................................................................. 53File-level restore supported configurations....................................53File-level restore limitations...........................................................54Perform a file-level restore (FLR) operation by using AUI............. 56Perform a file-level restore (FLR) operation by using the DataProtection Backup and Recovery File-Level Restore UI.................57
Plug-in Options 61How to set plug-in options..........................................................................62VMware Image backup plug-in options....................................................... 62VMware Image restore plug-in options....................................................... 65Windows VMware GLR plug-in options.......................................................66
Chapter 4
Appendix A
CONTENTS
4 Avamar 18.2 vSphere Web Client Administration Guide

PREFACE
As part of an effort to improve the product lines, revisions of the software andhardware are periodically released. Therefore, some functions that are described inthis document might not be supported by all versions of the software or hardwarecurrently in use. The product release notes provide the most up-to-date informationon product features.
Contact the technical support professional when a product does not function correctlyor does not function as described in this document.
Note
This document was accurate at publication time. To find the latest version of thisdocument, go to Online Support (https://support.EMC.com).
PurposeThis guide describes how to install and use the Avamar Plug-in for VMware vSphereWeb Client to back up and restore VMware image backups on an Avamar server.
AudienceThis document is intended for Avamar system administrators who manage VMwareenvironments and are responsible for backing up and restoring VMware images.
Revision historyThe following table presents the revision history of this document.
Revision Date Description
01 December 14, 2018 GA release of Avamar 18.2
Related documentationThe following publications provide additional information:
l Avamar for VMware User Guide
l E-lab Navigator at https://elabnavigator.emc.com/eln/modernHomeDataProtection
l Avamar Release Notes
l Avamar Administration Guide
l Avamar Operational Best Practices Guide
Avamar 18.2 vSphere Web Client Administration Guide 5
Special notice conventions used in this documentThese conventions are used for special notices.
DANGER
Indicates a hazardous situation which, if not avoided, results in death or seriousinjury.
WARNING
Indicates a hazardous situation which, if not avoided, could result in death orserious injury.
CAUTION
Indicates a hazardous situation which, if not avoided, could result in minor ormoderate injury.
NOTICE
Addresses practices that are not related to personal injury.
Note
Presents information that is important, but not hazard-related.
Typographical conventionsThese type style conventions are used in this document.
Table 1 Typographical conventions
Bold Used for names of interface elements, such as names of windows,dialog boxes, buttons, fields, tab names, key names, and menu paths(what the user specifically selects or clicks)
Italic Used for full titles of publications that are referenced in text
Monospace Used for:
l System code
l System output, such as an error message or script
l Pathnames, filenames, prompts, and syntax
l Commands and options
Monospace italic Used for variables
Monospace bold Used for user input
[ ] Square brackets enclose optional values
| Vertical bar indicates alternate selections - the bar means “or”
{ } Braces enclose content that the user must specify, such as x or y orz
... Ellipses indicate nonessential information that is omitted from theexample
PREFACE
6 Avamar 18.2 vSphere Web Client Administration Guide

Where to get helpThe Avamar support page provides access to licensing information, productdocumentation, advisories, and downloads, as well as how-to and troubleshootinginformation. This information may resolve a product issue before contacting CustomerSupport.
To access the Avamar support page:
1. Go to https://www.dell.com/support/home/us/en/19.
2. Type a product name in the Enter a Service Tag, Serial Number, ServiceRequest, Model, or Keyword search box.
3. Select the product from the list that appears. When you select a product, theProduct Support page loads automatically.
4. (Optional) Add the product to the My Products list by clicking Add to My SavedProducts in the upper right corner of the Product Support page.
Comments and suggestionsComments and suggestions help to continue to improve the accuracy, organization,and overall quality of the user publications. Send comments and suggestions aboutthis document to [email protected].
Please include the following information:
l Product name and version
l Document name, part number, and revision (for example, 01)
l Page numbers
l Other details to help address documentation issues
PREFACE
Avamar 18.2 vSphere Web Client Administration Guide 7

PREFACE
8 Avamar 18.2 vSphere Web Client Administration Guide

CHAPTER 1
Introduction
This chapter includes the following topics:
l Avamar Plug-in for vSphere Web Client............................................................. 10l How Avamar works with VMware....................................................................... 10
Introduction 9
Avamar Plug-in for vSphere Web ClientThe Avamar Plug-in for vSphere Web Client (Avamar plug-in through vSphere Client)is an Avamar-integrated VMware plug-in that provides an easy to use interface forbacking up and restoring VMware image-level backups through a vSphere Web Client.The Avamar plug-in for vSphere Web Client supports image level backup and restorefor multiple vCenters.
The Avamar Web User Interface (AUI) provides a limited subset of Avamar backup andrestore functionality. For full Avamar backup and restore functionality, use AvamarAdministrator.
Note
The Avamar AUI is only supported in stand-alone environments.
The optional Data Protection Restore Client provides support for file-level recoveriesfrom inside the VMware guest operating systems within a single vCenter. Beforeperforming file-level recoveries within the VMware guest operating systems, run thefollowing script on the Avamar server:
ebrserver.pl --initThe Avamar Plug-in for vSphere Web Client requires Avamar Proxies to be installedand configured. See the Avamar for VMware User Guide for additional details onAvamar Proxy installation and configuration.
Note
NAT network connections between the Avamar utility node and the vCenter are notsupported.
How Avamar works with VMwareThere are two ways to back up and restore VMware data with Avamar software:
l Guest backup and restore
l Image-level backup and restore
The following sections describe the differences between image-level backups andguest-level backups. The Avamar plug-in for vSphere Web Client only supports image-level backups. Avamar Administrator supports guest backup and restores and image-level backup and restores.
Guest backup and restoreWith guest backup and restore, you install an Avamar file system client on each virtualmachine. Avamar considers each virtual machine to be a separate client, and you canperform individual backups of each virtual machine.
If databases or specific applications, such as Microsoft Exchange or MicrosoftSharePoint, are running on the virtual machine, then you can use an Avamar plug-in toprotect the application data.
Introduction
10 Avamar 18.2 vSphere Web Client Administration Guide

Image-level backup and restoreAvamar for VMware image-level backups and restores use VMware vStorage API forData Protection (VADP).
Backups and restores require the use of proxy virtual machine clients. Each proxyvirtual machine client provides all of the following capabilities:
l Backup of Microsoft Windows and Linux virtual machines (entire images orspecific drives)
l Restore of Microsoft Windows and Linux virtual machines (entire images orspecific drives)
l Selective restore of individual folders and files to Microsoft Windows and Linuxvirtual machines
Proxies run Avamar software inside a Linux virtual machine, and are deployed using anappliance template (.ova) file.
Supported configurationsThe following storage architectures are supported:
l Fibre Channel Storage Area Network (SAN) storage hosting VMware File System(VMFS) or Raw Device Mapping (RDM)
l iSCSI SAN storage
l Network File System (NFS)
The image backup process requires temporary creation of a VMware virtual machinesnapshot. If the virtual machine is running at the time of backup, this snapshot canimpact disk I/O and consume space on the VMware vmfs datastore. Snapshotcreation and deletion can take a long time if the virtual machine runs a heavy disk I/Oworkload during backup.
This requirement also limits the types of virtual disks that are supported to thefollowing:
l Flat (version 1 and 2)
l RDM in virtual mode only (version 1 and 2)
l Sparse (version 1 and 2)
Guest and image-level backup and restore comparisonThe following table provides a comparison of guest and image-level backup andrestore of VMware data.
Table 2 Comparison of guest and image-level backup and restore
Criterion Guest backup andrestore
Image-level backup andrestore
Supported guest OS All guest operating systemsthat VMware supports,through the use of AvamarFile System clients
All guest operating systemsthat VMware supports
Introduction
Image-level backup and restore 11

Table 2 Comparison of guest and image-level backup and restore (continued)
Criterion Guest backup andrestore
Image-level backup andrestore
Avamar software installation Avamar File System client andoptional application plug-in oneach virtual machine
Avamar proxy virtualmachines on the ESXi host
Avamar server networkconnection
Required for each virtualmachine
Required only for the ESXihost
Deduplication Data within each virtualmachine
Data at image-level
OS consistent Yes Yes
Application consistent Yes Yes if the guest OS hasVMware Tools that areinstalled
Application-aware backup andrestore
Yes, through Avamar plug-insfor applications
No
Virtual machine status forbackup
Virtual machine must berunning
Virtual machine does not needto be running
Backup consumption of CPU,RAM, and disk resources
On the virtual machine On the ESXi host
Backup customization,including exclusion of certainfiles or file types
Yes Yes
Backup of unused file systemspace
No Yes
Restore of individual files andfolders
Yes Yes
Disaster recoveryrequirements
Two-step recovery:
1. Load a known goodoperating system imageon the virtual machine.
2. Restore backup data fromAvamar.
One-step restore of backupdata from Avamar. However,backups may be a "crash-consistent" snapshot of thefull virtual machine image,which might not reliablysupport a full system restorewithout data loss.
Changed block trackingChanged block tracking is a VMware feature that tracks which specific file systemblocks on a virtual machine have changed between backups.
Changed block tracking identifies unused space on a virtual disk during the initialbackup of the virtual machine, and also empty space that has not changed since theprevious backup. Avamar data deduplication performs a similar function. However,using this feature provides valuable I/O reduction earlier in the backup process.Changed block tracking dramatically improves performance if SAN connectivity is notavailable.
Introduction
12 Avamar 18.2 vSphere Web Client Administration Guide

If changed block tracking is not enabled, each virtual machine file system image mustbe fully processed for each backup, possibly resulting in unacceptably long backupwindows, and excessive back-end storage read/write activity.
Changed block tracking can also reduce the time required to restore (roll back) avirtual machine to a recent backup image by automatically eliminating unnecessarywrites during the restore process.
Changed block tracking is only available with the following types of virtual machinesthat use the following types of virtual disk formats:
l Virtual machine versions 7 and later
l RDM disks are only supported in virtual compatibility mode. Physical compatibilitymode is not supported.
l The same disk cannot be mounted by multiple virtual machines.
l Virtual machines must be configured to support snapshots.
Enabling changed block tracking will not take effect until any of the following actionsoccur on the virtual machine:
l Power on
l Resume after
l Suspend
l Snapshot create
l Snapshot delete
l Snapshot revert
Introduction
Changed block tracking 13

Introduction
14 Avamar 18.2 vSphere Web Client Administration Guide
CHAPTER 2
Configuring the Avamar Plug-in for vSphereWeb Client
This chapter includes the folllowing topics:
l Avamar server configuration...............................................................................16l Register the Avamar Plug-in for vSphere Web Client ........................................ 16l Access the Avamar Plug-in for vSphere Web Client........................................... 18
Configuring the Avamar Plug-in for vSphere Web Client 15

Avamar server configurationThe Avamar Plug-in for vSphere Web Client is supported in both Avamar VirtualEdition (AVE) and physical Avamar server environments.
The Avamar server must be installed and configured to support VMware image-levelbackups before the Avamar Plug-in for vSphere Web Client can be used. The Avamarfor VMware User Guide contains detailed instructions for configuring an Avamar serverto support VMware image-level backups.
Register the Avamar Plug-in for vSphere Web ClientAfter you install Avamar and complete Avamar VMware configuration, register theAvamar Plug-in for vSphere Web Client services with vCenter.
Procedure
1. To start the Avamar Web User Interface, open a web browser and type thefollowing URL:
https://Avamar_server/auiwhere Avamar_server is the DNS name or IP address of the Avamar server.
Note
If your environment does not meet HTTPS certificate validation requirements,the certificate validation fails and an error message appears asking if you wantto continue to download packages. Ignoring certificate validation might causesecurity issues.
a. In the Avamar Username field, type a username with administrativeprivileges.
b. In the Avamar Password field, type the password for the administrativeuser.
c. Select Avamar as the Auth Type.
d. Click Log In.
2. In the AUI navigation pane on the left, click , and then click System.
The System window is displayed.
3. Click the Certificate tab, and perform the following steps:
a. Click IMPORT under the Trust Certificate tab.
The Import Certificate dialog box is displayed.
b. In the Alias field, type the name of the vCenter to which the certificatebelongs.
c. To locate and select the certificate, click Browse, and then click NEXT.
The Validation pane is displayed.
d. In the IP field, type the IP address of the vCenter.
e. In the Port field, type the port number.
Configuring the Avamar Plug-in for vSphere Web Client
16 Avamar 18.2 vSphere Web Client Administration Guide

f. Click Validate, and then click OK.
4. Click the VMware Plug-in tab.
5. Locate the vCenter to register with Avamar.
If the vCenter is not listed, verify that you configured the vCenter for AvamarVMware backups through the Avamar Web User Interface.
6. Enable services:
a. Click the button for that vCenter.
b. Select Register.
After registration, the Registered status changes from false to true.
The Avamar Plug-in for vSphere automatically registers with the vCenter andbecomes available through the vSphere Client.
Unregister the Avamar Plug-in for vSphere Web Client and disable servicesIf you decide that you no longer want to use the Avamar plug-in for the vSphere WebClient, you can unregister the plug-in and remove the plug-in from vCenter.
Before you begin
Note
The flash-based vCenter plug-in from Avamar releases previous to 7.5.1 is no longersupported. If you upgraded the Avamar server to release 7.5.1 from a previous releaseand the flash-based plug-in was configured in the previous release, remove the flash-based plug-in from the vCenter managed objects (for example, https://<vcenter_ip>/mob/). To remove the plug-in from vCenter managed objects, go to Contents >
ExtensionManager and copy the plug-in name. Click UnregisterExtension, and thenpaste the plug-in name to unregister.
Procedure
1. To start the Avamar Web User Interface, open a web browser and type thefollowing URL:
https://Avamar_server/auiwhere Avamar_server is the DNS name or IP address of the Avamar server.
Note
If your environment does not meet HTTPS certificate validation requirements,the certificate validation fails and an error message appears asking if you wantto continue to download packages. Ignoring certificate validation might causesecurity issues.
a. In the Avamar Username field, type a username with administrativeprivileges.
b. In the Avamar Password field, type the password for the administrativeuser.
c. Select Avamar as the Auth Type.
d. Click Log In.
Configuring the Avamar Plug-in for vSphere Web Client
Unregister the Avamar Plug-in for vSphere Web Client and disable services 17
2. In the AUI navigation pane on the left, click , and then click System.
The System window is displayed.
3. Click the VMware Plug-in tab.
4. Select the vCenter server.
5. To disable services, click the button for that vCenter, and then selectunregister.
The Avamar Plug-in for vSphere automatically unregisters from the vCenter andis no longer available through the vSphere Client.
Access the Avamar Plug-in for vSphere Web ClientThe Avamar Plug-in for vSphere Web Client is accessed through a web browser andthe vSphere Client.
In order for the Avamar plug-in to be displayed in the vSphere Client homepage, theweb client user must log in with the same or greater VC permission as the "dedicatedvCenter user account" defined in the Avamar for VMware User Guide.
Note
If a user's environment does not meet HTTPS certificate validation requirements, thencertificate validation fails and an error message appears asking the user if they want tocontinue to download packages. Ignoring certificate validation might cause securityissues.
Access the plug-in by using Avamar Web User InterfaceProcedure
1. To start the Avamar Web User Interface, open a web browser and type thefollowing URL:
https://Avamar_server/auiWhere Avamar_server is the DNS name or IP address of the Avamar server.
The Login window is displayed.
2. Select vCenter as the Auth Type.
3. In the vCenter Username field, type the name of the dedicated vCenter user.
4. In the vCenter Password field, type the password for the dedicated vCenteruser.
5. In the vCenter Server field, type the IP address or DNS name of the vCenterserver to log in to.
6. Click Log In.
The AUI dashboard is displayed.
7. To open the navigation pane from anywhere in the UI, click .
The navigation pane opens and displays the available menu items.
Configuring the Avamar Plug-in for vSphere Web Client
18 Avamar 18.2 vSphere Web Client Administration Guide
Access the plug-in by using the vSphere ClientProcedure
1. From the vSphere Client, click Menu > Dell EMC Avamar
The Avamar Plug-in for vSphere Web Client dashboard is displayed.
2. To browse to another location in the UI, click an icon in the navigation pane.
This action opens the menu item in the main window.
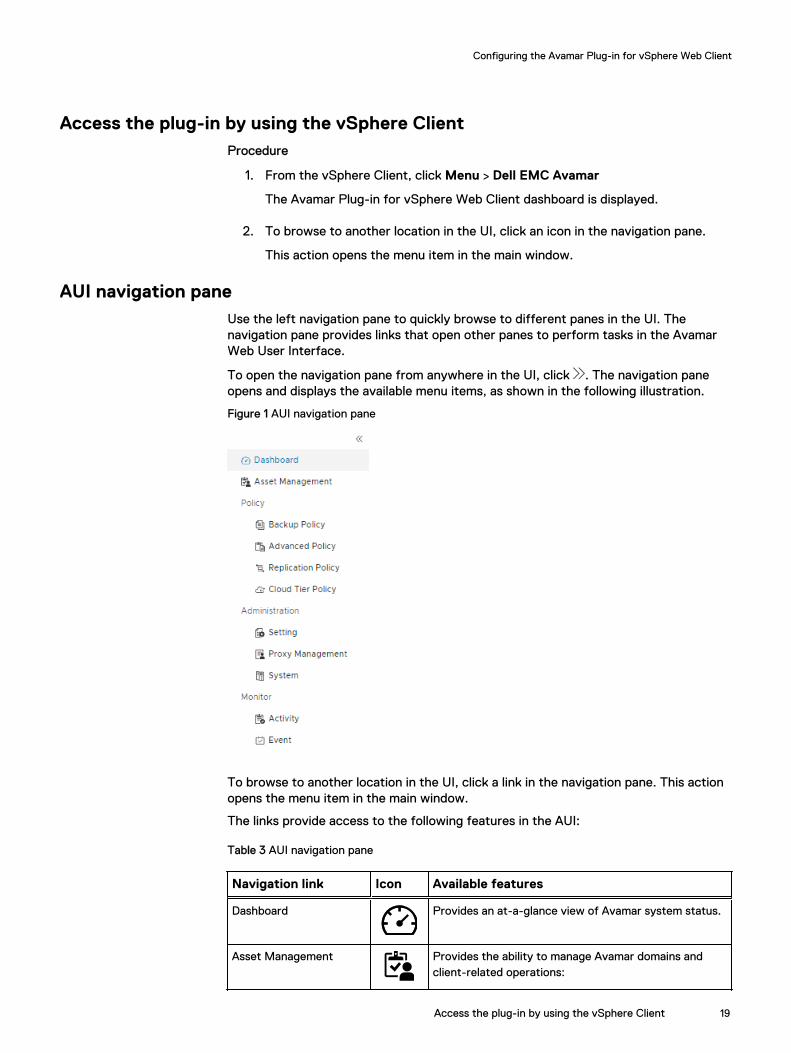
AUI navigation paneUse the left navigation pane to quickly browse to different panes in the UI. Thenavigation pane provides links that open other panes to perform tasks in the AvamarWeb User Interface.
To open the navigation pane from anywhere in the UI, click . The navigation paneopens and displays the available menu items, as shown in the following illustration.
Figure 1 AUI navigation pane
To browse to another location in the UI, click a link in the navigation pane. This actionopens the menu item in the main window.
The links provide access to the following features in the AUI:
Table 3 AUI navigation pane
Navigation link Icon Available features
Dashboard Provides an at-a-glance view of Avamar system status.
Asset Management Provides the ability to manage Avamar domains andclient-related operations:
Configuring the Avamar Plug-in for vSphere Web Client
Access the plug-in by using the vSphere Client 19
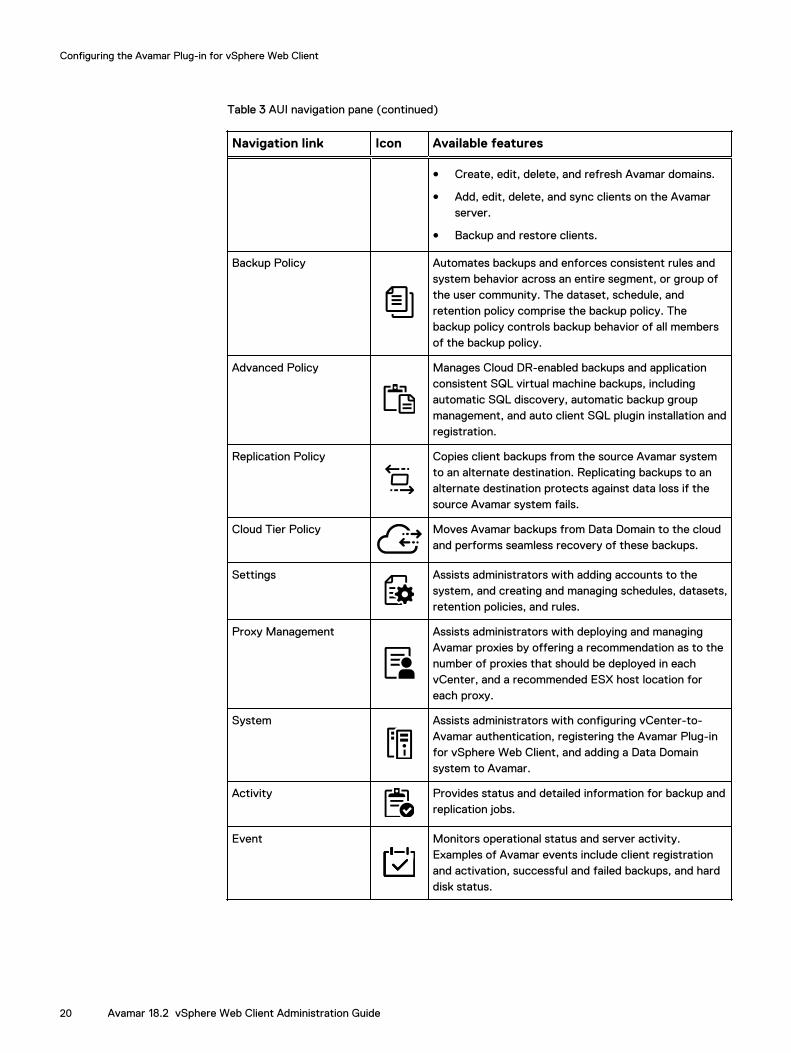
Table 3 AUI navigation pane (continued)
Navigation link Icon Available features
l Create, edit, delete, and refresh Avamar domains.
l Add, edit, delete, and sync clients on the Avamarserver.
l Backup and restore clients.
Backup Policy Automates backups and enforces consistent rules andsystem behavior across an entire segment, or group ofthe user community. The dataset, schedule, andretention policy comprise the backup policy. Thebackup policy controls backup behavior of all membersof the backup policy.
Advanced Policy Manages Cloud DR-enabled backups and applicationconsistent SQL virtual machine backups, includingautomatic SQL discovery, automatic backup groupmanagement, and auto client SQL plugin installation andregistration.
Replication Policy Copies client backups from the source Avamar systemto an alternate destination. Replicating backups to analternate destination protects against data loss if thesource Avamar system fails.
Cloud Tier Policy Moves Avamar backups from Data Domain to the cloudand performs seamless recovery of these backups.
Settings Assists administrators with adding accounts to thesystem, and creating and managing schedules, datasets,retention policies, and rules.
Proxy Management Assists administrators with deploying and managingAvamar proxies by offering a recommendation as to thenumber of proxies that should be deployed in eachvCenter, and a recommended ESX host location foreach proxy.
System Assists administrators with configuring vCenter-to-Avamar authentication, registering the Avamar Plug-infor vSphere Web Client, and adding a Data Domainsystem to Avamar.
Activity Provides status and detailed information for backup andreplication jobs.
Event Monitors operational status and server activity.Examples of Avamar events include client registrationand activation, successful and failed backups, and harddisk status.
Configuring the Avamar Plug-in for vSphere Web Client
20 Avamar 18.2 vSphere Web Client Administration Guide

CHAPTER 3
Using the Avamar Plug-in for vSphere WebClient
This chapter includes the following topics:
l Avamar setup..................................................................................................... 22l Managing backup policies...................................................................................22l AUI Activity Monitor...........................................................................................24l Manage clients...................................................................................................30l Manage rules......................................................................................................33l Proxy Deployment..............................................................................................36
Using the Avamar Plug-in for vSphere Web Client 21

Avamar setupPrior to using the Avamar Plug-in for vSphere Web Client, Avamar Administrator mustbe configured with the following:
l Create a schedule
l Create a retention policy
l Create a group in the Virtual Machines domain
l Select proxies to protect virtual machines in the group
l Configure a data set for each VMware Image Dataset or for all virtual disks
Refer the Avamar Administration Guide for details on Avamar policy configuration.
The best practice is to name the Avamar group with a descriptive name (for example,Backup everyday 2 week retention) which provides the VMware administrator withinformation about the Avamar policy configuration.
After changes are made in Avamar Administrator, use the Refresh icon to updatechanges in the Avamar Plug-in for vSphere Web Client.
Managing backup policiesThe Policies page provides access to backup policy tasks and information.
The Policies page includes a summary of each backup policy on the selected Avamarserver.
Backup policy objects contain the following child objects:
l Schedule—when a scheduled backup is performed
l Retention—how long the backup is stored in the backup appliance
l Dataset—optional backup parameters
l Members—add and remove clients from a backup policy
Start an on-demand backup of a backup policyProtecting an instance assigns the instance to a particular backup policy. You canassign more than one backup policy to an instance.
Procedure
1. In the AUI navigation pane on the left, click , and then click Backup Policy.
The Policy page appears.
2. In the domain tree, select a domain or subdomain for the backup policy.
To select a subdomain for the backup policy, toggle the Include Sub-domainswitch to on.
3. Select a backup policy from the list, and then click START BACKUP.
The instance receives protection that is based on the schedule and retentionperiod that are specified in the backup policy.
Using the Avamar Plug-in for vSphere Web Client
22 Avamar 18.2 vSphere Web Client Administration Guide

Edit a backup policyYou can edit a backup policy, including setting properties and adding or modifyingmembers, datasets, schedules, and retention.
Procedure
1. In the AUI navigation pane on the left, click , and then click Backup Policy.
The Policy page appears.
2. In the domain tree, select a domain or subdomain for the backup policy.
To select a subdomain for the backup policy, toggle the Include Sub-domainswitch to on.
3. Select a backup policy from the list, and then click Edit.
The Policy wizard is displayed where you can modify the required backup policysettings.
Add or remove members to a backup policyYou can configure backup policy attributes, including applying the backup policy toselected clients or removing a backup policy from selected clients. You can add clientswhen you create or add or remove clients when you edit a back policy.
To access the Members page of the Policy wizard, in the AUI navigation pane on theleft, click , click Backup Policy.
Complete the following steps from the Members pane of the Policy wizard.
Procedure
1. In the domain tree, select the domain for the backup policy.
You can only view clients in the domain for the login account. To view all clients,log in to the root domain.
2. To add a client to a backup policy:
a. In the list of clients, select the client that you want to add.
b. Click NEXT.
When you complete this task, the Avamar server applies the backup policy tothe selected clients.
3. To remove a client from a backup policy:
a. In the list of clients, clear the client that you want to remove.
b. Click NEXT.
This step removes the association between selected clients and the backuppolicy. When you complete the task, the backup policy no longer applies to theselected clients.
4. To add a dataset to a backup policy and complete the wizard, click NEXT.
The Dataset pane appears.
Using the Avamar Plug-in for vSphere Web Client
Edit a backup policy 23

Edit policy attributesYou can edit attributes for a policy, including the schedule, retention, dataset, andrules.
Perform the following steps from the Attributes window of the Policy wizard.
Procedure
1. In the AUI navigation pane on the left, click , and then click Backup Policy .
The Policy page appears.
2. In the domain tree, select a domain or subdomain for the client.
To select a subdomain client, toggle the Include Sub-domain switch to on.
3. Select a policy from the list, click , and then click Edit.
The Properties pane appears.
4. Click Next.
The Attributes pane appears.
5. In the Select Existing Schedule field, select a schedule type.
6. In the Select Existing Retention field, select a retention type.
Editing an existing retention period allows you to change how long the backupdata resides on the protection provider.
7. In the Select Existing Dataset field, select a dataset.
Editing a dataset allows you to change the specific data that is protected.
8. To enable rules, in the Enable Rule field, select the check box.
Rules are used to automatically map auto-discovered virtual machines todomains, and to assign backup policies to auto-discovered virtual machines.
9. In the Rules field, select a predefined rule.
10. Click NEXT.
The Members window appears.
AUI Activity MonitorThe Activity Monitor in the Avamar Web User Interface enables you to monitorbackup, restore, backup validation, and replication activity. To perform analysis ortroubleshooting, you can view a detailed log of a client session.
To access the Activity Monitor, open the navigation pane, and then click Activity.The Activity Monitor appears with a list of all activities.
Note
The AUI Activity Monitor window has been optimized for at least 1366 pixels-widescreens. Display issues might occur for smaller screens. To properly display the AUI,ensure that your display is at least 1366 pixels wide.
The Activity Monitor provides you with options to filter the information that appears:
Using the Avamar Plug-in for vSphere Web Client
24 Avamar 18.2 vSphere Web Client Administration Guide

l Filter activities by duration—By default, the Activity Monitor displays the mostrecent 5,000 client activities. To select a different duration, in the Filter activitiesby duration drop-down list, select Last 24 hours or Last 72 hours.
l Filter activities by domain—By default, the Activity Monitor displays all activitiesregardless of domain. To display only the activities for a specific domain, in theFilter activities by domain drop-down list, select a domain or subdomain.
l Filter activities by status—By default, the Activity Monitor displays all activitiesregardless of status.To display only activities with a specific status, at the top of the Activity Monitor,select one of the following options:
n Canceled
n Completed
n Completed with Exceptions
n Failed
n Running
n Waiting
To filter activities by client, start time, plug-in, or type, click in their respectivecolumn.
The Activity Monitor displays the date and time that an activity began, and the totalnumber of bytes examined during an activity.
To view activity details, expand the Details pane, by clicking .
Activity Monitor detailsThe following tables provide details on the information that is available in the AvamarWeb User Interface Activity Monitor.
Table 4 Session details available in the Activity Monitor
Field Description
Status Status of the backup, restore, or validationactivity.
Error Code If the activity did not successfully complete, anumeric error code appears. To view adetailed explanation, double-click the errorcode.
Start Time Date and time that this activity began,adjusted for the prevailing time zone, which isshown in parentheses. Daylight Savings Time(DST) transitions are automaticallycompensated.
Elapsed Time Elapsed time for this activity.
End Time Date and time that this activity completed,adjusted for the prevailing time zone, which isshown in parentheses. Daylight Savings Time(DST) transitions are automaticallycompensated.
Using the Avamar Plug-in for vSphere Web Client
Activity Monitor details 25
Table 4 Session details available in the Activity Monitor (continued)
Field Description
Type Type of activity. The Avamar Administratoronline help provides details on each type.
Server Server on which the activity occurred, eitherthe Avamar server or a Data Domain system.
Progress Bytes Total number of bytes examined during thisactivity.
New Bytes Percentage of new bytes backed up to eitherthe Avamar server or a Data Domain system.Low numbers indicate high levels of datadeduplication.
Table 5 Client details available in the Activity Monitor
Field Description
ID The unique identifier for the Avamar client.
Client Avamar client name.
Domain Full location of the client in the Avamarserver.
OS Client operating system.
Client Release Avamar client software version. If this activityis a VMware image backup or restore, thenthis value is the Avamar client softwareversion running on the image proxy client.
Proxy If this activity is a VMware image backup orrestore, then this value is the name of theproxy client performing the backup or restoreon behalf of the virtual machine. Blank for allother activities.
Table 6 Policy details available in the Activity Monitor
Field Description
Sched. Start Time Date and time that this activity was scheduledto begin.
Sched. End Time Date and time that this activity was scheduledto end.
Elapsed Wait Total amount of time that this activity spentin the activity queue. That is, the scheduledstart time minus the actual start time.
Policy Group that started this activity. One of thefollowing values:
Using the Avamar Plug-in for vSphere Web Client
26 Avamar 18.2 vSphere Web Client Administration Guide
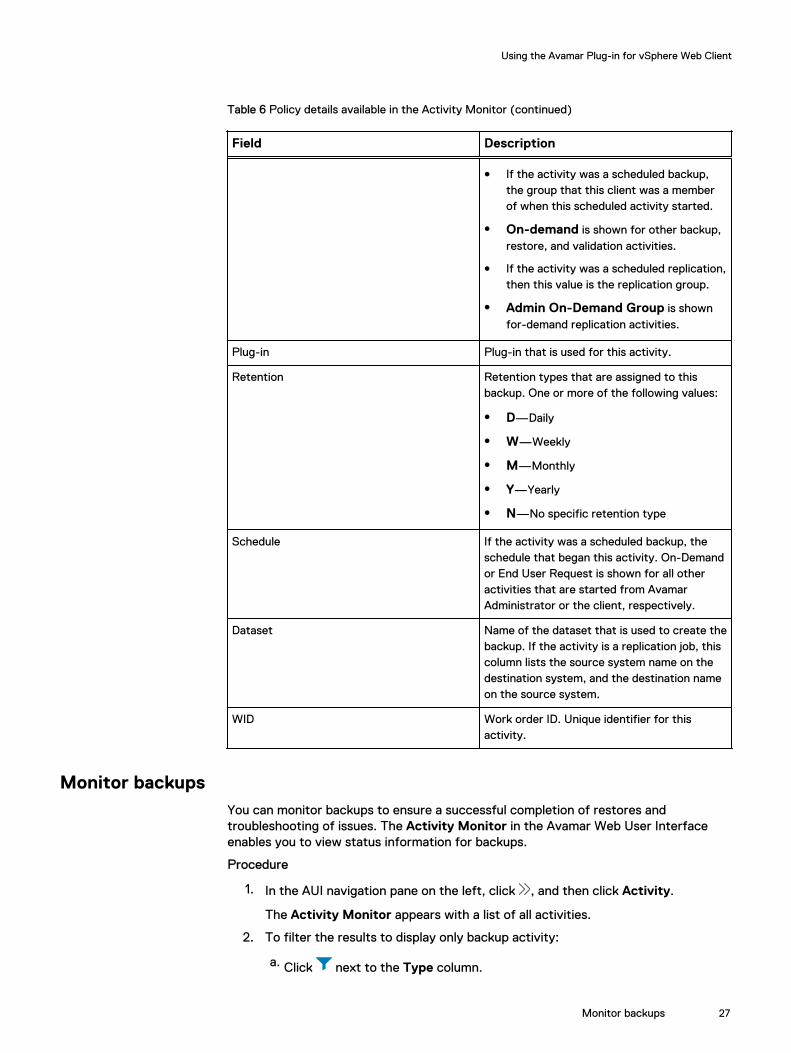
Table 6 Policy details available in the Activity Monitor (continued)
Field Description
l If the activity was a scheduled backup,the group that this client was a memberof when this scheduled activity started.
l On-demand is shown for other backup,restore, and validation activities.
l If the activity was a scheduled replication,then this value is the replication group.
l Admin On-Demand Group is shownfor-demand replication activities.
Plug-in Plug-in that is used for this activity.
Retention Retention types that are assigned to thisbackup. One or more of the following values:
l D—Daily
l W—Weekly
l M—Monthly
l Y—Yearly
l N—No specific retention type
Schedule If the activity was a scheduled backup, theschedule that began this activity. On-Demandor End User Request is shown for all otheractivities that are started from AvamarAdministrator or the client, respectively.
Dataset Name of the dataset that is used to create thebackup. If the activity is a replication job, thiscolumn lists the source system name on thedestination system, and the destination nameon the source system.
WID Work order ID. Unique identifier for thisactivity.
Monitor backupsYou can monitor backups to ensure a successful completion of restores andtroubleshooting of issues. The Activity Monitor in the Avamar Web User Interfaceenables you to view status information for backups.
Procedure
1. In the AUI navigation pane on the left, click , and then click Activity.
The Activity Monitor appears with a list of all activities.
2. To filter the results to display only backup activity:
a. Click next to the Type column.
Using the Avamar Plug-in for vSphere Web Client
Monitor backups 27

b. Type On-Demand Backup.
c. Press Enter.
Cancel backupsYou can cancel a backup any time before it completes. The cancellation might take 5minutes or longer. The backup might complete before the cancellation finishes.
Procedure
1. In the AUI navigation pane on the left, click , and then click Activity.
The Activity Monitor appears with a list of activities.
2. Select the backup from the list.
3. Click CANCEL.
A confirmation dialog box is displayed.
4. Click YES.
Restart a backup jobYou can restart a completed or failed backup job in the Activity Monitor of theAvamar Web User Interface.
Procedure
1. In the AUI navigation pane on the left, click , and then click Activity.
The Activity Monitor appears with a list of all activities.
2. Select a backup job in the list, and then click RESTART.
A confirmation dialog box appears.
3. Click YES.
View a detailed client session logThe Activity Monitor in the Avamar Web User Interface enables you to view adetailed log of a client session to perform analysis or troubleshooting.
Procedure
1. In the AUI navigation pane on the left, click , and then click Activity.
The Activity Monitor appears and displays a list of all activities.
2. Select an activity from the list, and then click VIEW LOGS.
The Log details window appears. By default, the Activity Monitor displays adetailed log of all client backup activity for the past 72 hours.
3. To filter the content based on a search string, in the search field, type thestring.
4. To download the log file, click Download.
Using the Avamar Plug-in for vSphere Web Client
28 Avamar 18.2 vSphere Web Client Administration Guide

Monitor restoresYou can monitor and view status information for backup and restore operations in theActivity Monitor.
To access the Activity Monitor, open the navigation pane, and then click Activity.The Activity Monitor appears with a list of all activities.
Note
The AUI Activity Monitor window has been optimized for at least 1366 pixels-widescreens. Display issues might occur for smaller screens. To properly display the AUI,ensure that your display is at least 1366 pixels wide.
The Activity Monitor provides you with options to filter the information that appears:
l Filter activities by duration—By default, the Activity Monitor displays the mostrecent 5,000 client activities. To select a different duration, in the Filter activitiesby duration drop-down list, select Last 24 hours or Last 72 hours.
l Filter activities by domain—By default, the Activity Monitor displays all activitiesregardless of domain. To display only the activities for a specific domain, in theFilter activities by domain drop-down list, select a domain or subdomain.
l Filter activities by status—By default, the Activity Monitor displays all activitiesregardless of status.To display only activities with a specific status, at the top of the Activity Monitor,select one of the following options:
n Canceled
n Completed
n Completed with Exceptions
n Failed
n Running
n Waiting
To filter activities by client, start time, plug-in, or type, click in their respectivecolumn.
The Activity Monitor displays the date and time that an activity began, and the totalnumber of bytes examined during an activity.
To view activity details, expand the Details pane, by clicking .
Cancel restoresYou can cancel a restore any time before it completes. The cancellation might take 5minutes or longer. The restore might complete before the cancellation finishes.
Procedure
1. In the AUI navigation pane on the left, click , and then click Activity.
The Activity Monitor appears with a list of activities.
2. Select the restore from the list.
3. Click CANCEL.
A confirmation dialog box is displayed.
Using the Avamar Plug-in for vSphere Web Client
Monitor restores 29

4. Click YES.
Monitor replication in the AUIThe Activity window in the AUI enables you to view status information for both on-demand and scheduled replication activity.
Procedure
1. In the AUI navigation pane on the left, click , and then go to Monitor >Activity.
The Activity Monitor appears and displays a list of all activities. Replicationjobs indicate Replication Source in the Type column. Additionally, you canfilter the view to display only replication jobs.
2. To filter the results to display only replication activity:
a. Click next to the Type column.
b. Type Replication Source.
Cancel a replication taskYou can cancel a policy-based replication task in the Activity Monitor any time beforeit completes. The cancellation might take 5 minutes or longer. The replication maycomplete before the cancellation finishes.
Procedure
1. In the AUI navigation pane on the left, click , and then click Activity.
The Activity Monitor appears with a list of activities.
2. Select the replication task from the list.
3. Click CANCEL.
A confirmation dialog box appears.
4. Click YES.
Manage clientsYou must add each vCenter that you intend to protect as an Avamar client.
In the Asset Management window, you can add or remove a client, and edit clientinformation.
Add a VMware clientProcedure
1. In the AUI navigation pane on the left, click , and then click AssetManagement.
2. In the domain tree, select a vCenter domain or a subdomain for the client.
3. Click ADD CLIENT.
Using the Avamar Plug-in for vSphere Web Client
30 Avamar 18.2 vSphere Web Client Administration Guide
Note
The Avamar for VMware User Guide provides information about VMwarevCenter, Image Proxy, and virtual machine client types.
The Select VMware Entity pane is displayed.
4. In the Select VMware Entity window, complete the following tasks:
l To view the vSphere virtual machines and templates, toggle the Host/Cluster switch to off.
l To view the vSphere hosts and clusters, toggle the Host/Cluster switch toon.
The vCenter inventory list displays on the right pane according to the VMwareentity that was selected in the left pane.
Note
Resource pools are not visible in the vSphere virtual machines and templatesview. They are only visible in the hosts and clusters view.
a. To select a folder, resource pool, virtual machine, or vApp, in the right pane,
click .
The VMware entities is displayed in the lower pane.
b. When adding a container, in the right pane, toggle the Dynamic switch to onto make this a dynamic container.
This setting enables dynamic policies.
c. When adding a container, in the right pane, toggle the Static switch to on tomake this a static container.
d. To enable changed block tracking, in the right pane, toggle the CBT switchto on.
If changed block tracking is not enabled, each virtual machine image must befully processed for each backup, which might result in long backup windows,or excessive back-end storage read and write activity.
Note
Enabling changed block tracking does not take effect until any of thefollowing actions occur on the virtual machine:
l Reboot
l Power on
l Resume after suspend
l Migrate
e. To add a dynamic container that uses recursive protection, in the right pane,toggle the Recursive switch to on.
This task automatically adds all the child entities, including thesubcontainers, virtual machines, and vApps residing in the subcontainers.
Using the Avamar Plug-in for vSphere Web Client
Add a VMware client 31
5. Click OK.
6. If you enabled change block tracking:
a. In the vSphere Client, locate the virtual machine.
b. Perform any of the following actions for each virtual machine:
l Reboot
l Power on
l Resume after suspend
l Migrate
7. To remove a folder, resource pool, virtual machine, or vApp, in the lower pane,click .
8. Click YES.
Delete a VMware clientDelete a client and all backups of the client. Optionally, choose to delete all replicasthat exist on replication destination systems.
When you delete a client, Avamar permanently deletes all backups that are stored forthat client. Only delete a client when you are certain that there is no reason to retainthe backups. If there is any doubt, retire the client instead.
Procedure
1. In the AUI navigation pane on the left, click , and then click AssetManagement.
2. In the hierarchical Domain tree, select a vCenter domain or a subdomain.
3. In the list of clients, select the client that you want to delete.
You can only view clients in the domain for the login account. To view all clients,log in to the root domain.
4. Click MORE ACTIONS > Delete Client.
The Delete Client dialog box appears and displays the number of existingbackups for the client.
5. Select I understand this action is permanent and irreversible.
This field is a safety net to avoid unintentionally deleting a client and the client'sbackups.
6. Click YES.
Enable changed block trackingIf changed block tracking is not enabled, each virtual machine image must be fullyprocessed for each backup, which might result in long backup windows, or excessiveback-end storage read and write activity.
Enabling changed block tracking does not take effect until any of the following actionsoccur on the virtual machine:
l Reboot
l Power on
l Resume after suspend
Using the Avamar Plug-in for vSphere Web Client
32 Avamar 18.2 vSphere Web Client Administration Guide

l Migrate
Procedure
1. In the AUI navigation pane on the left, click , and then click AssetManagement.
2. In the hierarchical Domain tree, select a vCenter domain or a subdomain.
To include subdomain clients, toggle the Include Sub-domain switch to on.
3. In the list of clients, select the client that you want to edit.
You can only view clients in the domain for the login account. To view all clients,log in to the root domain.
4. Click MORE ACTIONS > Edit Client.
The Edit Client dialog box appears and displays the number of existing backupsfor the client.
5. To enable changed block tracking:
a. Select the VMware tab.
b. In the CBT field, select the check box.
c. Click UPDATE.
Manage rulesRules are used by the Avamar Server for domain map and automatic backup policyassignment for auto-discovered VMs.
You can create a new rule, edit an existing rule, or delete a rule.
Create a ruleRules are used by the Avamar server for domain map and automatic backup policyassignment for autodiscovered VMs.
When creating rules, ensure that rules are mutually exclusive, to avoid the situationwhere a VM might qualify under multiple rules.
Procedure
1. In the AUI navigation pane on the left, click , and then click Settings.
2. Click the Rule tab.
3. In the domain tree, select a vCenter domain or subdomain for the client.
4. On the Setting page, complete the following tasks:
a. Click ADD.
The New Rule window is displayed.
5. In the Rule Name field, type a name for the rule.
6. In the Match Type field, select whether the rule should match Any of the listedfilter mechanisms, or All of them.
This selection allows you to configure multiple different filters to select VMs,and to determine how these filters interact with one another to select thecorrect virtual machines. For example, you might create a filter that uses avirtual machine folder path to select virtual machines, and another filter thatuses a virtual machine naming convention.
Using the Avamar Plug-in for vSphere Web Client
Manage rules 33

Use this option to determine which virtual machines are included under this rule:
l To include only virtual machines that are in the defined folder path and alsofollow the naming convention, select All.This step excludes virtual machines that are in the folder path but that donot follow the naming convention. It also excludes virtual machines thatfollow the naming convention but are not in the folder path
l To include any virtual machines that are either in the virtual machine folderpath or that follow the naming convention, select Any.
7. To add a filter:
a. Click .
This step adds a row to the list of filters.
b. In the Filter column, select a filter type.
For example, to create a filter that uses a virtual machine namingconvention, select VM Name, or to create filter that uses a vCenter VM Tag,select VM Tag.
c. In the Operator column, select the operand.
For example, if VM Name is selected for the filter type and begins with isselected for the operand, then all virtual machines whose names begin withthe filter text is selected.
d. In the Value column, type the filter text.
For example, to create a filter that selects all virtual machines whose namesbegin with the text string HR_, select VM Name for the filter type, beginswith for the operand, and type HR_ for the filter text.
8. To create additional filters, click .
This step adds a row to the list of filters.
9. To delete an existing filter, click Delete.
10. Click SUBMIT.
Changes made to tags may experience a delay of up to 12 hours before beingenforced. For this reason, edit tags with caution, or perform a synchronizedvCenter operation, which automatically synchronizes the vCenter with theAvamar server.
Edit a ruleWhen editing a rule, ensure that rules are mutually exclusive, to avoid the situationwhere a virtual machine might qualify under multiple rules.
Procedure
1. In the AUI navigation pane on the left, click , and then click Settings.
2. Click the Rule tab.
3. In the domain tree, select a vCenter domain or subdomain for the client.
4. In the Settings page, complete the following tasks:
a. Select a folder that contains a VMware entity.
b. Select a rule from the list that you want to edit, and then click EDIT.
Using the Avamar Plug-in for vSphere Web Client
34 Avamar 18.2 vSphere Web Client Administration Guide

The Edit Rule window is displayed.
5. In the Rule Name field, type a name for the rule.
6. In the Match Type field, select whether the rule should match Any of the listedfilter mechanisms, or All of them.
This selection allows you to configure multiple different filters to select VMs,and to determine how these filters interact with one another to select thecorrect virtual machines. For example, you might create a filter that uses avirtual machine folder path to select virtual machines, and another filter thatuses a virtual machine naming convention.
Use this option to determine which virtual machines are included under this rule:
l To include only virtual machines that are in the defined folder path and alsofollow the naming convention, select All.This step excludes virtual machines that are in the folder path but that donot follow the naming convention. It also excludes virtual machines thatfollow the naming convention but are not in the folder path.
l To include any virtual machines that are either in the virtual machine folderpath or that follow the naming convention, select Any.
7. To add a filter:
a. Click .
This step adds a row to the list of filters.
b. In the Filter column, select a filter type.
For example, to create a filter that uses a virtual machine namingconvention, select VM Name, or to create filter that uses a vCenter VM Tag,select VM Tag.
c. In the Operator column, select the operand.
For example, if VM Name is selected for the filter type and begins with isselected for the operand, then all virtual machines whose names begin withthe filter text is selected.
d. In the Value column, type the filter text.
For example, to create a filter that selects all virtual machines whose namesbegin with the text string HR_, select VM Name for the filter type, beginswith for the operand, and type HR_ for the filter text.
8. To create additional filters, click .
This step adds a row to the list of filters.
9. To delete an existing filter:
a. Select the filter.
b. In the Actions column, click Delete.
10. Click SUBMIT.
Changes made to tags may experience a delay of up to 12 hours before beingenforced. For this reason, edit tags with caution, or perform a synchronizedvCenter operation, which automatically synchronizes the vCenter with theAvamar server.
Using the Avamar Plug-in for vSphere Web Client
Edit a rule 35

Delete a ruleProcedure
1. In the AUI navigation pane on the left, click , and then click Settings.
2. Click the Rule tab.
3. In the domain tree, select a vCenter domain or subdomain for the client.
4. In the Setting page, complete the following tasks:
a. Select a rule from the list.
b. Click DELETE.
Proxy DeploymentProxy Deployment is a feature that assists administrators with deploying andmanaging Avamar proxies in vCenter environments.
Proxy Deployment is the preferred method for deploying proxies. Manual proxydeployment is still supported if necessary.
About proxy deploymentProxy Deployment assists administrators with proxy deployment by offering arecommendation as to the number of proxies that should be deployed in each vCenter,and a recommended ESX host location for each proxy.
When generating a recommendation, Proxy Deployment performs a static point-in-time analysis of the virtual infrastructure. This analysis gathers data about the virtualinfrastructure, such as the number of virtual machines, the number of datastores, andthe number of virtual machines hosted in each datastore.
Users specify a data change rate and backup window duration for their site.
Proxy Deployment then calculates the optimum number of proxies that are required toback up those virtual machines in the time that is allotted by the backup window.Proxy Deployment also considers the datastore and ESX host topology, and suggestsan optimal ESX host location for each proxy so that all datastores are protected.
This calculated proxy deployment topology is offered as a recommendation. Thisrecommendation can be accepted as offered, or modified to meet specific siterequirements.
Before proxies can be deployed, each recommended proxy must be configured byspecifying:
l Proxy name
l Avamar server domain where the proxy resides
l Proxy IP address
l Datastore assignment
l Network settings:
n Which existing virtual network to use
n DNS servers
n Network gateway
n Network mask
Using the Avamar Plug-in for vSphere Web Client
36 Avamar 18.2 vSphere Web Client Administration Guide

n NTP
After all proxies are configured, clicking creates the proxy virtual machines with thespecified configuration settings.
You can generate new proxy deployment recommendations at any time. This is usefulfor periodically reevaluating and optimizing proxy deployments when significantchanges have occurred in the virtual infrastructure.
Considerations and best practicesProxy Deployment has been intentionally designed to ensure broad compatibility withmost customer environments. This necessitated making certain design assumptionsabout typical customer environments and reasonable proxy capabilities in thoseenvironments. Understanding these design assumptions can help you to betterunderstand Proxy Deployment recommendations in order to potentially furtheroptimize proxy deployment at your site. Some best practices are also discussed.
Data change rateThe data change rate is the percentage of a client file system that actually changesbetween backups. Data change rates directly impact the number of proxies required tosuccessfully back up all required virtual machines in the time allotted by the backupwindow. More data to be backed up requires more time, more proxies, or both.
Even though empirical field data routinely reports client data change rates of 3-4% perday, by default Proxy Deployment assumes a client data change rate of 12% per day.The intentionally conservative use of 12% as a design assumption provides a buffer.
If client data change rates at your site are routinely lower or higher than theseassumed values, you can add or delete proxies as needed. You can also shorten orlengthen the backup window.
Proxy data ingestion rateProxy data ingestion rate is another parameter that directly impacts the number ofproxies required to successfully back up all required virtual machines in the timeallotted by the backup window. By default, Proxy Deployment assumes that eachproxy can run 8 concurrent backup jobs and process 500 GB of data per hour.
While an assumed proxy data ingestion rate of 500 GB per hour is a very conservativeestimate, a number of factors at each customer site directly affect the actual proxydata ingestion rate. Some of these factors are the:
l Avamar server architecture (physical Avamar server using a Data Domain systemfor back end storage versus a virtual Avamar server hosted in vCenter)
l Type of storage media used for proxy storage
l Network infrastructure and connectivity speed
l SAN infrastructure and connectivity speed
If proxy data ingestion rates at your site are routinely lower or higher than 500 GB perhour, you can add or delete proxies as needed. You can also shorten or lengthen thebackup window.
If your site consistently experiences substantially different proxy data ingestion rates(that is, either substantially lower or higher than 500 GB per hour), you canpermanently change the default proxy data ingestion rate setting, which will affect allfuture proxy deployment recommendations. To do this:
1. Open a command shell and log in to the Avamar server as user admin.
2. Switch user to root by typing su - .
Using the Avamar Plug-in for vSphere Web Client
Considerations and best practices 37

3. Open /etc/vcs/dm.properties in a UNIX text editor.
4. Change the proxy_ingest_rate_gb_per_hour setting.
5. Save your changes and close /etc/vcs/dm.properties.
Protecting against proxy over commitBy default, each Avamar proxy is configured to allow 8 concurrent backup jobs. Thissetting is known to work well for most customer sites.
We recommend against increasing the number of concurrent jobs to more than 8because it can lead to a condition in which too many backup jobs are queued for agiven proxy (proxy over commit). This causes uneven distribution of backup jobsamong proxies, and can also cause a bottleneck in which backup jobs to take longer tocomplete than they otherwise might.
Some sites might benefit from configuring some proxies to allow fewer concurrentbackup jobs. This generally requires deploying additional proxies, but can result inmore even distribution of backup jobs among proxies, as opposed to concentrating orclustering backups in a certain area of the virtual infrastructure.
Optimization for level-1 incremental change block backupsWhen Proxy Deployment generates a proxy deploy recommendation, it does so bycalculating how many proxies are required to sustain normal backup operations. Oneof the assumptions about normal backup operation is that backups will be level-1incremental or changed block backups, not level-0 full backups.
Level-0 backups inherently take longer and use more proxy resources. Therefore,large new virtual machine deployments can adversely affect the ability to complete allrequired backups in the time allotted by the backup window.
For this reason, whenever possible phase-in large new virtual machine deployments inorder to give the system an opportunity to ingest the necessary level-0 backups.
If a phased-in deployment is not possible, another approach is to tolerate the failedbackups that will occur due to proxy over commit. Once the system begins to settle,proxy resources will be under committed, and those virtual machines will eventually bebacked up. Administrators should monitor the situation closely to ensure that thesystem does settle and that the virtual machines eventually do successfully back up.
Note
Avamar will attempt to deploy proxies where needed, but it is impossible to know alldetails about the environment so it is important you verify the proxy deployment doesnot over allocate proxies beyond the maximum supported.
Deploy proxiesDeploy one or more proxies on each vCenter that you intend to protect with imagebackup.
If the proxy is deployed to a Distributed Resource Scheduler (DRS) enabled cluster,the cluster can move the proxy by using storage vMotion. While the proxy is migratingto a different storage, the jobs that are managed by the proxy are at risk. HotAdd doesnot work for the proxies that are located in a DRS cluster. Therefore, disable DRS forthe deployed Avamar Proxy virtual machines.
Procedure
1. In the AUI navigation pane on the left, click , and then click ProxyManagement.
The Proxy Deployment page is displayed.
Using the Avamar Plug-in for vSphere Web Client
38 Avamar 18.2 vSphere Web Client Administration Guide

2. In the Config pane, complete the following settings:
a. Select a vCenter.
b. Set the Data Change Rate (%).
c. Set the Backup Window (minutes).
d. To include virtual machines using direct attached storage in thisrecommendation, select the Protect Virtual Machines on Local Storagecheck box.
This option ignores virtual machines on clustered-host local storage.
3. Click CREATE RECOMMENDATION.
The recommendation is added to the list in the lower pane.
The Recommendations pane shows the proposed deployment topology.Proposed new proxies are displayed under each ESX host with the name Newproxy.
4. For each recommended proxy you intend to deploy, configure the proxy asfollows:
a. In the Recommendations pane, select a New proxy.
b. Click .
The New Proxy dialog box is displayed.
c. Type the proxy name in the Name field.
d. Select an Avamar server Domain where this proxy resides.
e. Type the IP address in the IP field.
f. Select a datastore from the Datastore list.
g. Select a virtual network from the Network list.
h. Type the fully qualified DNS server name or IP address in the DNS Stringfield.
i. Type the network gateway IP address in the Gateway field.
j. Type the network mask in the Netmask field.
k. Click SAVE.
5. (Optional) Add other proxies that you want to deploy:
Note
You must be prepared to specify the proxy name, IP address, fully qualified DNSserver name or IP address, network gateway and network mask for each proxyyou add.
a. In the tree pane, select an ESX host.
b. Click New Proxy.
The New Proxy dialog box is displayed.
c. Type the proxy hostname in the Name field.
d. Select an Avamar server in the Domain list where the proxy resides.
Using the Avamar Plug-in for vSphere Web Client
Deploy proxies 39
e. Type the IP address in the IP field.
f. Select a datastore from the Datastore list.
g. Select a virtual network from the Network list.
h. Type the fully qualified DNS server name or IP address in the DNS Stringfield.
i. Type the network gateway IP address in the Gateway field.
j. Type the network mask in the Netmask field.
k. Optional, type the NTP server address in the NTP field.
l. Click SAVE.
6. (Optional) Delete any proxies that you do not want to deploy:
a. In the tree pane, select a proxy.
b. Click .
c. Click YES.
7. To update the proxy topology, click .
8. When the proposed deployment topology is satisfactory, click to apply thechanges and deploy the proxy.
Results
If a proxy fails to deploy, it is completely deleted from the system. That hostname andIP address are available for subsequent proxy deployments.
Using the Avamar Plug-in for vSphere Web Client
40 Avamar 18.2 vSphere Web Client Administration Guide

CHAPTER 4
Backup and Recovery
This chapter includes the following topics:
l Perform an on-demand backup of a virtual machine by using AUI ..................... 42l Restore an instance of a VM backup by using the AUI .......................................48l File-level restore (FLR)......................................................................................53
Backup and Recovery 41
Perform an on-demand backup of a virtual machine by usingAUI
You can perform an instance backup that is independent of existing schedules andpolicies.
Procedure
1. In the AUI navigation pane on the left, click , and then click AssetManagement.
The Asset Management window is displayed.
2. In the domain tree, select the domain for the client.
3. In the list of clients, select a virtual machine client, VMware folder, resourcepool, or vApp.
4. Click BACKUP.
The Backup wizard is displayed. In the Plugins pane, a list of plug-ins on theclient is displayed.
5. In the Plugin pane, perform the following steps:
a. Browse to and select the check box next to the data that you want to backup.
b. Click NEXT.
The Basic Configuration window is displayed.
6. In the Basic Configuration pane, perform the following steps:
a. Select the backup retention policy settings:
l To automatically delete this backup from the Avamar server after aspecific amount of time, select Retention period. Specify the number ofdays, weeks, months, or years for the retention period.
l To automatically delete this backup from the Avamar server on a specificcalendar date, select End date and browse to that date on the calendar.
l To keep this backup for as long as this client remains active in theAvamar server, select No end date.
b. In the Avamar encryption method list, select the encryption method to usefor data transfer between the client and the Avamar server during thebackup.
The encryption technology and bit strength for a client/server connectiondepends on several factors, including the client operating system andAvamar server version. The Avamar Product Security Guide providesadditional information.
c. In the Optionally select a proxy to perform backup list, select the proxy.
The default setting is Automatic, which enables the Avamar server tochoose the best proxy for this operation.
d. Click NEXT.
The More Options window is displayed.
Backup and Recovery
42 Avamar 18.2 vSphere Web Client Administration Guide

7. In the More Options pane, set the plug-in options:
Toggle the Show Advanced Options switch to view advanced configurationoptions. Set advanced plug-in options in the AUI provides more informationabout the advanced backup options.
VMware Image backup plug-in options provides more information about thebasic backup options.
8. Click FINISH.
The following status message is displayed:
Backup initiated.
Set advanced plug-in options in the AUIPerform the following optional tasks from the More Options window when performingan on-demand backup.
Procedure
1. Toggle the Show Advanced Options switch to on.
2. To enable changed block tracking, select the Use Changed Block Tracking(CBT) to increase performance checkbox.
3. To enable the Avamar server to report information to the vSphere Client aboutthe most recent backup and most recent successful backup, select the SetAnnotionation Tag LastBackupStatus and LastSuccessfulBackup checkbox.
When selected, the following information displays in the vSphere Web Client:
l LastSuccessfulBackupStatus-com.dellemc.avamar: The date and time of themost recent successful backup.
l LastBackupStatus-com.dellemc.avamar: The date and time of the mostrecent backup, whether successful or not.
4. To index VMware image backups, select Index VMware Image Backups.
5. To exclude the Windows page file (pagefile.sys) from the backup, selectExclude page file blocks when performing image backup on Windows VM.
Note
Page file exclusion is supported only for Windows Servers version 2008 R2 andabove. For client versions of Windows, this option has no effect. The page file isincluded in backups of Windows clients, regardless of this setting.
6. To exclude deleted file blocks from the backup, select Exclude deleted fileblocks when performing image backup on Windows VM.
7. For the Exclude files with path and filter field, type the files that you want toexclude.
Note
If you exclude a file during backup, and then try a restore of the excluded file,the excluded is visible but unstable.
Backup and Recovery
Set advanced plug-in options in the AUI 43

8. To store this backup on a Data Domain system, select the Store backup onData Domain System checkbox, then select a Data Domain system from thelist.
9. From the Encryption method to Data Domain system list, select theencryption method to use for data transfer between the client and the DataDomain system during the backup.
10. For the Windows VMware Image plug-in only, select one or more SnapshotQuiesce Options. The options include the following:
l Fail backup on snapshot quiesce error.
l If VMware tools are not running, mark completed backup as 'Complete w/Exception' (applications are not quiesced).
11. For the Max times to retry snapshot detele option, type the maximum numberof times that a snapshot delete operation should be tried.
12. In Guest Credentials, type a virtual machine guest OS user account name andpassword with sufficient privileges to run scripts before or after the backup.
For log truncation backups of Exchange servers, guest credentials must haveadministrator privileges. If multiple VMs are backed up, the same credentialsmust be used for all VMs.
13. To run a script before the vmdk snapshot:
a. Type the full path and filename of the script that is run.
b. Ensure that the script timeout is sufficient for the script to complete.
14. To run a script after the backup completes and the vmdk snapshot is removed:
a. Type the full path and filename of the script that is run.
b. Ensure that the script timeout is sufficient for the script to complete.
15. For the Windows VMware Image plug-in only, in the Snapshot quiesce timeout(minutes) filed, type the number of minutes to wait before a snapshot quiesceoperation is considered to have failed.
16. If performing an image backup of a Microsoft SQL server, select the type ofauthentication:
l NT Authentication uses the credentials that are entered in GuestCredentials for authentication.
l Application Authentication uses the SQL Server Username and SQLServer Password to log in to the SQL server.
17. If performing an image backup of a Microsoft SQL server, identify the post-action options:
l Type the maximum number of minutes to wait before post-action operationsare considered to have failed in the Post Action Timeout (minutes) option.
l Select the type of post-action operation. LOG Truncation performs logtruncation after the backup has successfully completed.
l All disks of the VM must be selected for on-demand backup or log truncationwill not occur.
18. If performing an image backup of a Microsoft Exchange server, select the typeof post-action operation. LOG Truncation performs log truncation after thebackup has successfully completed.
Backup and Recovery
44 Avamar 18.2 vSphere Web Client Administration Guide

19. Click FINISH.
VMware Image backup plug-in optionsThese backup options are available for the Avamar VMware Image plug-in.
Table 7 Backup options for Avamar VMware Image plug-in
Setting Description
Use Changed Block Tracking (CBT) toincrease performance
If selected, the VMware changed blocktracking feature is used to identify areas ofthe virtual machine file system that havechanged since the last backup and onlyprocess those changed areas during the nextbackup.
Note
Changed block tracking must be enabled atthe virtual machine level in order for thisfeature to work.
Set Annotionation Tag LastBackupStatus andLastSuccessfulBackup
If selected, enables the Avamar server toreport information to the vSphere Web Clientor the legacy Windows-based vSphere clientabout the most recent backup and mostrecent successful backup.
When selected, the following information isdisplayed in the Annotation list of the vSphereWeb Client:
l LastSuccessfulBackupStatus-com.dellemc.avamar: The date andtime of the most recent successfulbackup.
l LastBackupStatus-com.dellemc.avamar: The date andtime of the most recent backup, whethersuccessful or not.
Exclude page file blocks when performingimage backup on Windows VM
If selected, excludes the Windows page file(pagefile.sys) from the backup for all the
partitions. It is not limited to primarypartitions.
Note
Page file exclusion is supported only forWindows Servers version 2008 R2 and above.For client versions of Windows, this optionhas no effect; the page file is included inbackups of Windows clients, regardless of thissetting.
Backup and Recovery
VMware Image backup plug-in options 45

Table 7 Backup options for Avamar VMware Image plug-in (continued)
Setting Description
Note
The proxy uses NBD transport mode internallyin order to read the page file blocks. Afterrecognizing the required blocks, the availablemode (hotadd/nbdssl/nbd) will be usedaccordingly for backup or restore operations.
Exclude deleted file blocks when performingimage backup on Windows VM
If selected, excludes the deleted file blocksfrom the backup for all the partitions. It is notlimited to primary partitions.
Exclude files with path and filter Excludes the files with path and filter from thebackup for all the partitions. It is not limited toprimary partitions.
Type the full path of the file or folder or thefilter path of the files and folders. Separatemultiple entries with a comma.
To exclude files with path and filter, type thepath in the following format:
l Start with driver letter
l End with "/" to exclude a folder
l End without "/" to exclude a file
l Use "*" as a wildcard in the filename toexclude all files. Do not use "*" as awildcard in the file path.For example:
n *:/*/*.TXT is not supported.
n D:/folder/*.txt is supported.
n D:/folder/* is supported.
Store backups on Data Domain system To store the backup on a Data Domain systeminstead of the Avamar server, select thecheckbox and then select the Data Domainsystem from the list.
Note
To enable this option, add a Data Domainsystem to the Avamar configuration. TheAvamar and Data Domain System IntegrationGuide provides instructions.
Encryption method to Data Domain system Specifies the encryption method for datatransfer between the client and the DataDomain system during the backup. As ofAvamar release 7.5, the only supportedencryption method is "high."
Backup and Recovery
46 Avamar 18.2 vSphere Web Client Administration Guide

Table 7 Backup options for Avamar VMware Image plug-in (continued)
Setting Description
Snapshot delete retry
Max times to retry snapshot delete The maximum number of times that asnapshot delete operations should beattempted.
Guest credentials
Username Guest operating system user account withsufficient privileges to run scripts.
Password Password for the guest operating systemusername.
Pre-snapshot Script
Script file Full path and filename of the script that will berun before the vmdk snapshot.
Maximum script run time (minutes) Maximum number of minutes this script isallowed to run before timing out.
Post-snapshot Script
Script file Full path and filename of the script that will berun after the backup completes and the vmdksnapshot is removed.
Maximum script run time (minutes) Maximum number of minutes this script isallowed to run before timing out.
Snapshot quiesce timeout
Snapshot quiesce timeout (minutes) Maximum number of minutes to wait beforethe snapshot quiesce operation is consideredto have failed (Windows WMware Image plug-in only)
Microsoft SQL Server authentication
NT Authentication Uses the credentials that are entered in GuestCredentials for authentication. User musthave administrative privileges and must havewrite permissions for the files system andread permissions for the Windows registry.
Application Authentication Uses the SQL Server Username and SQLServer Password to log into the SQL server.
Microsoft SQL Server post action
Post Action Timeout (minutes) Maximum number of minutes to wait beforepost-action operations are considered to havefailed. Default is 900 seconds.
Post Action Type of MSSQL The type of post-action operation to perform.The only available option is LOG Truncation,which performs log truncation after thebackup has been performed. When backing up
Backup and Recovery
VMware Image backup plug-in options 47

Table 7 Backup options for Avamar VMware Image plug-in (continued)
Setting Description
a single VM, all disks of the VM must beselected or log truncation will not occur.
Restore an instance of a VM backup by using the AUIAny successful instance backup can be used to restore a copy of that instance. Youcan find a backup to restore by date. When you perform the restore, you can restoreto either the original location, a different location, or multiple locations.
When you perform the restore, you can restore to either the original virtual machine,to a new virtual machine, or to a different virtual machine.
Restore data to the original virtual machine
To access the Restore wizard, in the AUI navigation pane on the left, click , and thenclick Asset Management > Restore.
Procedure
1. In the AUI navigation pane on the left, click , and then click AssetManagement.
The Asset Management window is displayed.
2. In the domain tree, select the domain for the client.
3. In the list of clients, select the client computer to recover.
A list of completed backups for this instance is displayed. Any backup in this listcan be used to restore the instance.
4. (Optional) To locate backups by date:
a. In the right pane, click VIEW MORE.
b. Click SEARCH.
c. In the From and To fields, specify the date range.
d. Click RETRIEVE.
e. In the list of backups, select a backup.
The list of backups for the date range is displayed.
5. Click the RESTORE tab.
The Select Restore Content dialog box appears and displays a list of volumesthat are contained within the backup. The volume names identify the originalmount point.
6. (Optional) To perform a file-level restoration (FLR) of the content, perform thefollowing steps:
a. Toggle the FLR switch to on.
The list of folders is displayed.
b. Select the folder or file that you want to restore, and then click RESTORE.
The FLR feature retrieves files from the backup without the need to complete afull restore operation. This feature provides the ability to restore specific files
Backup and Recovery
48 Avamar 18.2 vSphere Web Client Administration Guide

from a volume in a particular backup, or browse the files that are contained inthe backup volumes.
7. In the Select Restore Content dialog box, perform the following steps:
a. In the hierarchy tree, select the folder that you want to restore.
b. In the Contents pane, select the files that are contained within the folder.
c. Click NEXT.
The Restore wizard is displayed and opens to the Basic Config page.
8. In the Destination Client field:
a. Select Restore to Original Virtual Machine.
b. Click NEXT.
The Backups pane is displayed.
9. In the Backup Content pane, perform the following steps:
a. In the hierarchical Domain tree, select the client that you want to restore.
The Contents of Backup pane displays a list of files that are containedwithin that folder.
b. In the right pane, select the virtual machine backup that you want to restore.
c. Click NEXT.
The Destination Location pane is displayed.
10. In the Destination Locationpane, select Restore to Original Virtual Machine.
The More Options pane is displayed.
11. In the More Options pane, set the plug-in options:
a. In the Post Restore Options field, select an option.
b. To restore the virtual machine configuration, select Restore VirtualMachine Configuration.
c. To restore the virtual machine as a new disk, select Restore as a new disk.
d. To use Changed Block Tracking (CBT) to increase performance, select UseCBT to increase performance.
e. In the Proxy field, select an option.
Plug-in Options provides the complete list of plug-in options.
12. Click NEXT.
The Summary pane is displayed.
13. In the Summay pane, review the provided information, and then click FINISH.
The following status message is displayed:
Restore request initiated.
Restore data to a different virtual machine
To access the Restore wizard, in the AUI navigation pane on the left, click , and thenclick Asset Management > Restore.
Backup and Recovery
Restore data to a different virtual machine 49

Procedure
1. In the AUI navigation pane on the left, click , and then click AssetManagement.
The Asset Management window is displayed.
2. In the domain tree, select the domain for the client.
3. In the list of clients, select the client computer to recover.
A list of completed backups for this instance is displayed. Any backup in this listcan be used to restore the instance.
4. (Optional) To locate backups by date:
a. In the right pane, click VIEW MORE.
b. Click SEARCH.
c. In the From and To fields, specify the date range.
d. Click RETRIEVE.
e. In the list of backups, select a backup.
The list of backups for the date range is displayed.
5. Click the RESTORE tab.
The Select Restore Content dialog box appears and displays a list of volumesthat are contained within the backup. The volume names identify the originalmount point.
6. (Optional) To perform a file-level restoration (FLR) of the content, perform thefollowing steps:
a. Toggle the FLR switch to on.
The list of folders is displayed.
b. Select the folder or file that you want to restore, and then click RESTORE.
The FLR feature retrieves files from the backup without the need to complete afull restore operation. This feature provides the ability to restore specific filesfrom a volume in a particular backup, or browse the files that are contained inthe backup volumes.
7. In the Select Restore Content dialog box, perform the following steps:
a. In the hierarchy tree, select the folder that you want to restore.
b. In the Contents pane, select the files that are contained within the folder.
c. Click NEXT.
The Restore wizard is displayed and opens to the Basic Config page.
8. In the Basic Config pane, perform the following steps:
a. In the Destination field, select Restore to different (existing) VirtualMachine.
b. In the Post Restore Options field, select an option.
c. To restore the virtual machine as a new disk, select Restore as a new disk.
d. To use Changed Block Tracking (CBT) to increase performance, select UseCBT to increase performance check box.
Backup and Recovery
50 Avamar 18.2 vSphere Web Client Administration Guide

e. In the Proxy field, select an option.
Plug-in Options provides the complete list of plug-in options.
The Advanced Config page appears.
9. In the Advanced Config pane, complete the following steps:
a. To view hosts, toggle Host/Cluster to off.
b. To view a cluster, toggle Host/Cluster to on.
c. In the Host/Cluster pane, expand the domain name, and then select a hostor cluster.
The selected IP address appears.
10. Click NEXT.
The Summary pane is displayed.
11. In the Summay pane, review the provided information, and then click FINISH.
The following status message is displayed:
Restore request initiated.
Restore data to a new virtual machine
To access the Restore wizard, in the AUI navigation pane on the left, click , and thenclick Asset Management > Restore.
Procedure
1. In the AUI navigation pane on the left, click , and then click AssetManagement.
The Asset Management window is displayed.
2. In the domain tree, select the domain for the client.
3. In the list of clients, select the client computer to recover.
A list of completed backups for this instance is displayed. Any backup in this listcan be used to restore the instance.
4. (Optional) To locate backups by date:
a. In the right pane, click VIEW MORE.
b. Click SEARCH.
c. In the From and To fields, specify the date range.
d. Click RETRIEVE.
e. In the list of backups, select a backup.
The list of backups for the date range is displayed.
5. Click the RESTORE tab.
The Select Restore Content dialog box appears and displays a list of volumesthat are contained within the backup. The volume names identify the originalmount point.
6. (Optional) To perform a file-level restoration (FLR) of the content, perform thefollowing steps:
Backup and Recovery
Restore data to a new virtual machine 51

a. Toggle the FLR switch to on.
The list of folders is displayed.
b. Select the folder or file that you want to restore, and then click RESTORE.
The FLR feature retrieves files from the backup without the need to complete afull restore operation. This feature provides the ability to restore specific filesfrom a volume in a particular backup, or browse the files that are contained inthe backup volumes.
7. In the Select Restore Content dialog box, perform the following steps:
a. In the hierarchy tree, select the folder that you want to restore.
b. In the Contents pane, select the files that are contained within the folder.
c. Click NEXT.
The Restore wizard is displayed and opens to the Basic Config page.
8. In the Basic Config pane, perform the following steps:
a. In the Destination field, select Restore to new Virtual Machine.
b. In the Post Restore Options field, select an option.
c. To use Changed Block Tracking (CBT) to increase performance, select UseCBT to increase performance check box.
d. In the Proxy field, select an option.
Plug-in Options provides the complete list of plug-in options.
The Advanced Config page appears.
9. In the Advanced Config pane, complete the following steps:
a. In the vCenter field, select a vCenter.
b. In the VM Name field, type the name of the virtual machine.
c. Click NEXT.
10. In the Location pane, complete the following steps:
a. Expand the domain name, and then select a destination.
The selected location appears.
b. Click NEXT.
11. In the Host/Cluster pane, complete the following steps:
a. Expand the domain name, and then select a host or cluster.
The selected IP address appears.
b. Click NEXT.
12. In the Resource Pool pane, complete the following steps:
a. Expand the domain name, and then select a resource pool.
The selected resource pool appears.
b. Click NEXT.
13. On the Datastore pane, complete the following steps:
a. Select a datastore.
Backup and Recovery
52 Avamar 18.2 vSphere Web Client Administration Guide
b. Click NEXT.
14. Click NEXT.
The Summary pane is displayed.
15. In the Summay pane, review the provided information, and then click FINISH.
The following status message is displayed:
Restore request initiated.
File-level restore (FLR)Avamar delivers support for file-level restoration (FLR) from instance backups to allowusers to retrieve files from a backup without the need to complete a full restoreoperation. This feature provides the ability to restore specific files from a volume in aparticular backup, or browse the files that are contained in the backup volumes.
Note
To use the FLR feature, ensure that the virtual machine is powered on.
File-level restore supported configurationsThe following supported configurations require that both the proxy version andAvamar server to be at Avamar release 7.5 Service Pack 1 or later:
Partitioning schemeThe following table outlines the partitioning scheme for (File-level restore) FLR.
Table 8 FLR support partitioning scheme
Partitioningscheme
Guest OS FLR Comment
MBR Windows/Linux Supported
EBR (LogicalPartition)
Windows/Linux Supported
GPT Windows/Linux Partial support Support BTRFS andLVM base on GPT inLinux
MixedGPT Windows/Linux Not supported Hybrid MBR
File system supportThe following table outlines the file system support for FLR.
Table 9 File system support for FLR
File systemtype
Guest OS Partitioningscheme
Partition ID Partitionless disk
LVM
ext2 Linux MBR, EBR 0x83 Support Support
ext3 Linux MBR, EBR 0x83 Support Support
ext4 Linux MBR, EBR 0x83 Support Support
Backup and Recovery
File-level restore (FLR) 53

Table 9 File system support for FLR (continued)
File systemtype
Guest OS Partitioningscheme
Partition ID Partitionless disk
LVM
ntfs Windows MBR, EBR,GPT
0x04/0x07 Support Support
vfat Windows MBR, EBR 0x06/0x0E Support Support
xfs Linux MBR, EBR 0x83 Support Support
reiserfs Linux MBR, EBR 0x83 Support Support
btrfs Linux MBR, EBR,GPT
0x83 Support Support
LVM supportThe following table outlines the LVM support for FLR.
Table 10 LVM support for FLR
LV type FLR
Linear LV Support
Striped LV Support
Mirrored LV Support
RAID LV Support
Thin LV Support
Multi-device supportThe following table outlines multi-device support for FLR.
Table 11 Multi-device support for FLR
RAID Occur FLR
RAID 0/Striping LVM/BTRFS Support
RAID 1/Mirroring LVM/BTRFS Support
RAID 4 LVM Support
RAID 5 LVM Support
RAID 6 LVM Support
RAID10 LVM/BTRFS Support
File-level restore limitationsFile-level restore has the following limitations:
l You cannot restore or browse symbolic links.
l Browsing either a specified directory that is contained within a backup or a restoredestination is limited to 50,000 files or folders.
Backup and Recovery
54 Avamar 18.2 vSphere Web Client Administration Guide
l Restore is limited to 20,000 objects (files or folders) in the same restoreoperation.
l You can restore files from a Windows backup only to a Windows machine, and filesfrom a Linux backup only to a Linux machine.
l The vCenter must be added to the root domain in the AUI. Any other location forthe vCenter domain is not supported.
l When performing a file-level restore to a /tmp location, the Avamar softwareredirects data to a private /tmp location.For example: /tmp/systemd-private-*
l All virtual machine clients must be in /vCenter/VirtualMachines subfolder in theAUI. Any other location for the VMs is not supported.
l To overwrite ACLs of an existing file or folder, ensure that the user has ownershiprights of the target file or folder that is being overwritten.
l Only one vCenter is allowed to be configured for the AUI.
Note
If more than one vCenter is configured in Avamar, you must ensure that theAvamar server's vcenter-sso-info.cfg reflects the correct vCenter serverfor the VC_hostname parameter. For example, the sample file /usr/local/avamar/var/ebr/server_data/prefs/vcenter-sso-info.cfg:
vcenter-sso-hostname=<VC_hostname>vcenter-sso-port=7444# configure only if more than one vCentervcenter-hostname=<VC_hostname>
Unsupported virtual disk configurationsFile-level restore does not support the following virtual disk configurations:
l Filesystems that support FLR require a higher kernel than proxy operating system(3.12)
n XFS Free Inode B-Tree(finobt)
n Ext4 sparse_supper2(3.16), metdata_csum(3.18), encrypt(4.1), project(4.5)
l Windows Dynamic disks
l Encrypted/compressed partitions or bootloaders
l Deduplicated NTFS
l Unformatted disks
l Browsing of multiple active disks/partitions. Only the first active disk/partitiondisplays for browsing.
Note
FLR operations on virtual machines with Logical Volume Manager (LVM)configurations are supported only if the LVM configuration is complete. A completeLVM configuration consists of at least one partition that is configured with a type 8E-Linux LVM, which consists of one or more physical volumes. These physical volumescontain one or more volume groups that are made up of one or more logical volumes.
Backup and Recovery
File-level restore limitations 55
Perform a file-level restore (FLR) operation by using AUIThe FLR feature retrieves files from the backup without the need to complete a fullrestore operation. This feature provides the ability to restore specific files from avolume in a particular backup, or browse the files that are contained in the backupvolumes.
Before you begin
To perform file-level restores:
l Ensure that the source VM exists in VMware, and is powered on and registered.
l Ensure that an up-to-date version of VMware Tools is installed and running on thesource VM.
l For non-Windows platforms, the user can be part of the Standard orAdministrators group.
l For Windows VMs, only a local administrator user can perform file-level restore.Additionally, ensure that you disable User Account Control (UAC). Theknowledgebase article at https://support.emc.com/kb/477118 provides moreinformation.
To access the Restore wizard, In the AUI navigation pane on the left, click , and thenclick Asset Management > Restore.
Procedure
1. In the AUI navigation pane on the left, click , and then click AssetManagement.
The Asset Management window is displayed.
2. In the domain tree, select the domain for the client.
3. In the list of clients, select the client computer to recover.
A list of completed backups for this instance is displayed. Any backup in this listcan be used to restore the instance.
4. (Optional) To locate backups by date:
a. In the right pane, click VIEW MORE.
b. Click SEARCH.
c. In the From and To fields, specify the date range.
d. Click RETRIEVE.
e. In the list of backups, select a backup.
The list of backups for the date range is displayed.
5. Click the RESTORE tab.
The Select Restore Content dialog box appears and displays a list of volumesthat are contained within the backup. The volume names identify the originalmount point.
6. To perform a file-level restoration (FLR) of the content, perform the followingsteps:
a. Toggle the FLR switch to on.
The list of folders is displayed.
Backup and Recovery
56 Avamar 18.2 vSphere Web Client Administration Guide

b. Select the folder or file that you want to restore, and then click RESTORE.
The FLR feature retrieves files from the backup without the need to complete afull restore operation. This feature provides the ability to restore specific filesfrom a volume in a particular backup, or browse the files that are contained inthe backup volumes.
The Basic Config pane appears.
7. In the Basic Config pane, perform the following steps:
a. To select a client, perform the following steps:
a. Click SELECT CLIENT.The Select Client pane appears.
b. In the Domain tree, select a domain for the client.
c. In the Client pane, choose a destination client.
d. Click OK.
b. In the Username field, type the username for the destination client.
c. In the Password field, type the password for the destination client.
d. In the Location field, the path for the restore.
e. (Optional) Select Restore ACL to restore ACLs.
Note
If the Restore ACL option is selected, the user performing the restore musthave file ownership of the original file to perform the restore. If the fileownership has changed since the backup was performed and the userperforming the restore does not have proper file ownership, the restore fails.
f. In the Proxy field, select a proxy.
8. Click NEXT.
The Summary pane is displayed.
9. In the Summay pane, review the provided information, and then click FINISH.
The following status message is displayed:
Restore request initiated.
Perform a file-level restore (FLR) operation by using the Data ProtectionBackup and Recovery File-Level Restore UI
With the Data Protection Backup and Recovery File-Level Restore UI, a local usercan restore specific files and folders from a source VM to the original VM on Windowsand Linux VMs. In this mode, you connect to the Restore Client from a VM that hasbeen backed up by Avamar.
Before you begin
To perform file-level restores:
l Ensure that the source VM exists in VMware, and is powered on and registered.
l Ensure that an up-to-date version of VMware Tools is installed and running on thesource VM.
Backup and Recovery
Perform a file-level restore (FLR) operation by using the Data Protection Backup and Recovery File-Level Restore UI 57

l For non-Windows platforms, the user can be part of the Standard orAdministrators group.
l For Windows VMs, only a local administrator user can perform file-level restore.Additionally, ensure that you disable User Account Control (UAC) beforeperforming a file-level restore. The knowledgebase article at https://support.emc.com/kb/477118 provides more information.
Procedure
1. Before performing file-level recoveries within the VMware guest operatingsystems, run the following script on the Avamar server:
ebrserver.pl --init
2. To start the Data Protection Backup and Recovery File-Level Restore UI,open a web browser and type the following URL:
https://VMware_Backup_Appliance_Host/flrWhere VMware_Backup_Appliance_Host is the DNS name or IP address of theVMware Backup Appliance from which the VM is backed up.
Note
If a user's environment does not meet HTTPS certificate validationrequirements, then certificate validation fails and an error message appearsasking the user if they want to continue to download packages. Ignoringcertificate validation might cause security issues.
3. In the Password field, type the password of the VM that you want to browseand perform file restore operation on.
4. To launch the Data Protection Backup and Recovery File-Level Restore UI fromthe same VM that you want to browse and restore to, click Login to originalVM.
The Select the backups to restore from pane appears that lists the backupsfor the VM.
5. To launch the Data Protection Backup and Recovery File-Level Restore UIfrom a different VM that you want to browse and restore to:
a. Select Login to alternate VM.
b. Type the DNS name or IP address of the VMware Backup Appliance of theVM that you want to browse and restore to.
The Select the backups to restore from pane appears that lists the backupsfor the VM.
6. Select a backup and then click Next.
The Select items to restore pane appears.
7. Select the file to restore:
a. In the left pane, browse the files and folders available for recovery.
b. In the right pane, select the files and folders that you would like to recover.
c. Click Next.
8. Click Yes to confirm that you have selected the correct files and folders.
The Select destination to restore to pane appears.
Backup and Recovery
58 Avamar 18.2 vSphere Web Client Administration Guide

Note
If the folder hierarchy does not appear. The file system in use on the VM mightnot be supported.
9. (Optional) Toggle Restore ACL to restore ACLs.
Note
If the Restore ACL option is selected, the user performing the restore musthave file ownership of the original file to perform the restore. If the fileownership has changed since the backup was performed and the userperforming the restore does not have proper file ownership, the restore fails.
10. In the Select destination to restore pane, perform the following steps:
a. Select the folder to which you want to restore the items.
b. Click Finish.
Backup and Recovery
Perform a file-level restore (FLR) operation by using the Data Protection Backup and Recovery File-Level Restore UI 59

Backup and Recovery
60 Avamar 18.2 vSphere Web Client Administration Guide

APPENDIX A
Plug-in Options
This appendix includes the following topics:
l How to set plug-in options................................................................................. 62l VMware Image backup plug-in options...............................................................62l VMware Image restore plug-in options...............................................................65l Windows VMware GLR plug-in options.............................................................. 66
Plug-in Options 61

How to set plug-in optionsPlug-in options enable you to control specific actions for on-demand backups,restores, and scheduled backups. The available plug-in options depend on theoperation type and plug-in type.
Specify plug-in options in the AUI for on-demand backup or restore wizards, or when adataset for a scheduled backup is created. Set plug-in options with the graphical userinterface (GUI) controls (text boxes, check boxes, radio buttons, and so forth). Typean option and its value in the Key and Value fields.
NOTICE
The Avamar software does not check or validate the information that is typed in theShow Free Form section of the More Options pane. The values in the Key and Valuefields override settings that are specified with the GUI controls for the options.
VMware Image backup plug-in optionsThese backup options are available for the Avamar VMware Image plug-in.
Table 12 Backup options for Avamar VMware Image plug-in
Setting Description
Use Changed Block Tracking (CBT) toincrease performance
If selected, the VMware changed blocktracking feature is used to identify areas ofthe virtual machine file system that havechanged since the last backup and onlyprocess those changed areas during the nextbackup.
Note
Changed block tracking must be enabled atthe virtual machine level in order for thisfeature to work.
Set Annotionation Tag LastBackupStatus andLastSuccessfulBackup
If selected, enables the Avamar server toreport information to the vSphere Web Clientor the legacy Windows-based vSphere clientabout the most recent backup and mostrecent successful backup.
When selected, the following information isdisplayed in the Annotation list of the vSphereWeb Client:
l LastSuccessfulBackupStatus-com.dellemc.avamar: The date andtime of the most recent successfulbackup.
l LastBackupStatus-com.dellemc.avamar: The date and
Plug-in Options
62 Avamar 18.2 vSphere Web Client Administration Guide
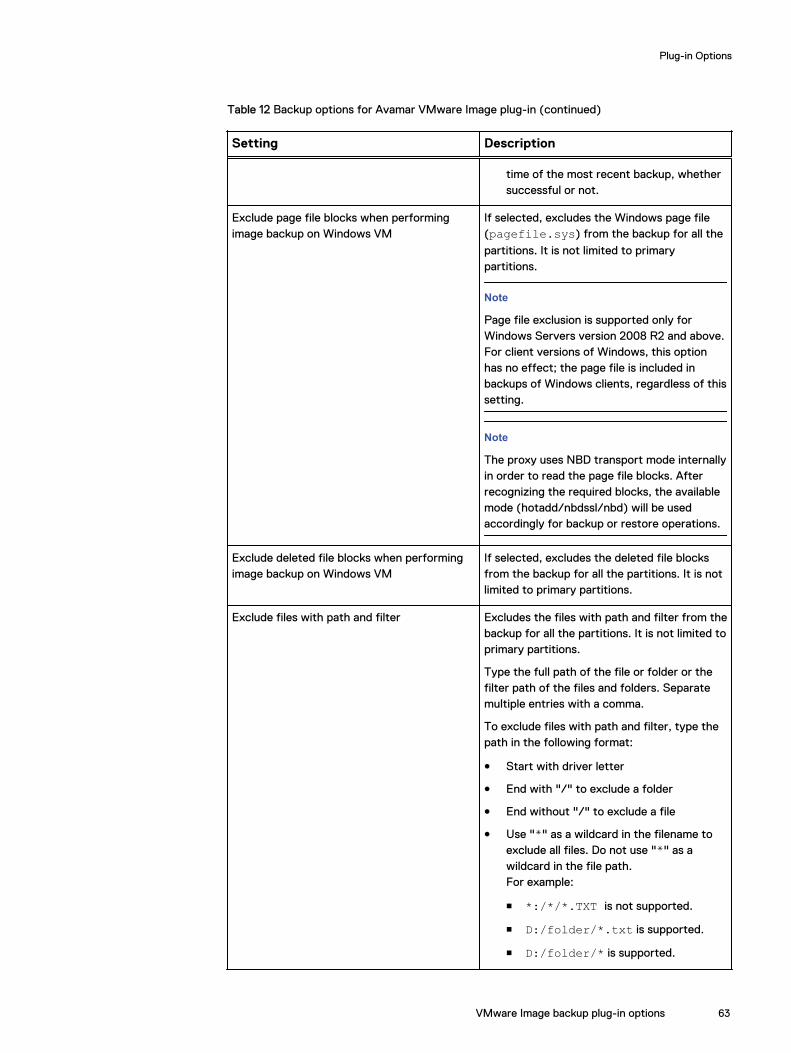
Table 12 Backup options for Avamar VMware Image plug-in (continued)
Setting Description
time of the most recent backup, whethersuccessful or not.
Exclude page file blocks when performingimage backup on Windows VM
If selected, excludes the Windows page file(pagefile.sys) from the backup for all the
partitions. It is not limited to primarypartitions.
Note
Page file exclusion is supported only forWindows Servers version 2008 R2 and above.For client versions of Windows, this optionhas no effect; the page file is included inbackups of Windows clients, regardless of thissetting.
Note
The proxy uses NBD transport mode internallyin order to read the page file blocks. Afterrecognizing the required blocks, the availablemode (hotadd/nbdssl/nbd) will be usedaccordingly for backup or restore operations.
Exclude deleted file blocks when performingimage backup on Windows VM
If selected, excludes the deleted file blocksfrom the backup for all the partitions. It is notlimited to primary partitions.
Exclude files with path and filter Excludes the files with path and filter from thebackup for all the partitions. It is not limited toprimary partitions.
Type the full path of the file or folder or thefilter path of the files and folders. Separatemultiple entries with a comma.
To exclude files with path and filter, type thepath in the following format:
l Start with driver letter
l End with "/" to exclude a folder
l End without "/" to exclude a file
l Use "*" as a wildcard in the filename toexclude all files. Do not use "*" as awildcard in the file path.For example:
n *:/*/*.TXT is not supported.
n D:/folder/*.txt is supported.
n D:/folder/* is supported.
Plug-in Options
VMware Image backup plug-in options 63

Table 12 Backup options for Avamar VMware Image plug-in (continued)
Setting Description
Store backups on Data Domain system To store the backup on a Data Domain systeminstead of the Avamar server, select thecheckbox and then select the Data Domainsystem from the list.
Note
To enable this option, add a Data Domainsystem to the Avamar configuration. TheAvamar and Data Domain System IntegrationGuide provides instructions.
Encryption method to Data Domain system Specifies the encryption method for datatransfer between the client and the DataDomain system during the backup. As ofAvamar release 7.5, the only supportedencryption method is "high."
Snapshot delete retry
Max times to retry snapshot delete The maximum number of times that asnapshot delete operations should beattempted.
Guest credentials
Username Guest operating system user account withsufficient privileges to run scripts.
Password Password for the guest operating systemusername.
Pre-snapshot Script
Script file Full path and filename of the script that will berun before the vmdk snapshot.
Maximum script run time (minutes) Maximum number of minutes this script isallowed to run before timing out.
Post-snapshot Script
Script file Full path and filename of the script that will berun after the backup completes and the vmdksnapshot is removed.
Maximum script run time (minutes) Maximum number of minutes this script isallowed to run before timing out.
Snapshot quiesce timeout
Snapshot quiesce timeout (minutes) Maximum number of minutes to wait beforethe snapshot quiesce operation is consideredto have failed (Windows WMware Image plug-in only)
Microsoft SQL Server authentication
Plug-in Options
64 Avamar 18.2 vSphere Web Client Administration Guide

Table 12 Backup options for Avamar VMware Image plug-in (continued)
Setting Description
NT Authentication Uses the credentials that are entered in GuestCredentials for authentication. User musthave administrative privileges and must havewrite permissions for the files system andread permissions for the Windows registry.
Application Authentication Uses the SQL Server Username and SQLServer Password to log into the SQL server.
Microsoft SQL Server post action
Post Action Timeout (minutes) Maximum number of minutes to wait beforepost-action operations are considered to havefailed. Default is 900 seconds.
Post Action Type of MSSQL The type of post-action operation to perform.The only available option is LOG Truncation,which performs log truncation after thebackup has been performed. When backing upa single VM, all disks of the VM must beselected or log truncation will not occur.
VMware Image restore plug-in optionsThese restore options are available for the Avamar VMware Image plug-in.
Table 13 Restore options for Avamar VMware Image plug-in
Setting Description
Use Changed Block Tracking (CBT) toincrease performance
If selected, the VMware changed blocktracking feature is used to identify areas ofthe virtual machine file system that havechanged since the last backup and onlyprocess those changed areas during thisrestore operation.
Note
Changed block tracking must enabled at thevirtual machine level in order for this featureto work.
Encryption method from Data Domain system Specifies the encryption method for datatransfer between the Data Domain systemand the client during the restore. As ofAvamar release 7.5, the only supportedencryption method is "high."
Plug-in Options
VMware Image restore plug-in options 65
Windows VMware GLR plug-in optionsBackup operations are not supported by the Avamar Windows VMware GLR plug-in,and no user-configurable restore options are available.
Plug-in Options
66 Avamar 18.2 vSphere Web Client Administration Guide