Embed Size (px)
Citation preview

Confidential – For Training Purposes Only 1
Download Instructions for the
Terminal Line
*Note: For Downloading a V Series Terminal Please See “Download Instructions for the Dejavoo V Series Terminal Line” document.
X5 Dial
X8 Dual Comm
M3 GPRS
M8 GPRS Tri Comm

Confidential – For Training Purposes Only 2
DEJAVOO SYSTEMS DOWNLOAD FROM APPLICATION MENU
DOWNLOAD VIA MODEM – STARTING FROM APPLICATION MENU
Follow the steps below for a terminal software download via Modem (Dial) when you are beginning from the Application Menu. Be sure there is an active Phone line connected to the terminal’s Modem port.
*Important Note: When downloading a wireless unit via Ethernet please see “Wireless M Line Download Addendum” In this document.
Step Action Display
1. From the idle prompt press the ENTER key to access the CORE Menu.
2.
From the CORE Menu use the up and down arrow keys to highlight UTILITY.
Press the Green ENTER Key to make your selection.
(Enter password if prompted)
3.
From the UTILITY Menu Use the up and down arrow keys to highlight SOFTWARE DOWNLOAD.
Press the Green ENTER key to make your selection.
4.
Use the up and down arrow keys to highlight CONFIGURE.
Press the Green ENTER key to Make your selection.
5. Press the Green ENTER key to select the option for INTERFACE.
.
02/01/08 2:03
Swipe or Enter Card#
Féé Favorites Fê
Reports →→ Favorites →→
Core Menu
Utility →→
Settings →→
Communications →→
Utility
Software Download →→
Connect →→
Cyclic Call →→
Software Download
Configure →→
Protocol →→ Session →→
Configuration
Interface →→

Confidential – For Training Purposes Only 3
DOWNLOAD VIA MODEM – IN APPLICATION MENU, CONTINUED
Step Action Display
6.
Use the up and down arrow keys to highlight MODEM.
Press the Green ENTER key to Make your selection.
7.
Input Dialing Prefix needed if any is necessary then press ENTER.
(If no dialing prefix is needed leave blank and press ENTER to bypass)
.
8.
Use the up and down arrow keys to highlight the correct Dial Type.
Press the Green ENTER key to Make your selection.
9.
Input the phone number the terminal will use to dial out to. (without the dashes)
1-631-675-2013 Press the Green ENTER key to continue.
10. The terminal will display MODEM COMMAND: ATN1C.
Press the Green ENTER key to confirm.
11. The terminal wil display MODULATION
Press the Green ENTER key to select AUTO.
.
Ethernet →→ PPP →→ Modem →→
Interface
Dial Prefix:
9
Dial Type
Tone
Pulse
Tone →→
Phone Number?
16316752013
Modem Command?
ATN1C1
Modulation
Tone V22 V22b
Auto →→

Confidential – For Training Purposes Only 4
DOWNLOAD VIA MODEM – IN APPLICATION MENU, CONTINUED
Step Action Display
12. The terminal flashes “Media set up succeeded” and returns to the Interface Menu.
.
13.
Use the down arrow key to highlight PPP.
Press the Green ENTER key to Make your selection.
14.
The terminal displays USER NAME:
Using the alphanumeric keypad input the following:
123
Then press the Green ENTER key.
(Note: to clear characters use the yellow backspace key)
15.
The terminal displays PASSWORD:
Using the alphanumeric keypad input the following:
123
Then press the Green ENTER key.
(Note: to clear characters use the yellow backspace key)
16.
Press the Yellow back space key to return to the CONFIGURATION Menu.
Use the down arrow key to highlight PROTOCOL.
Press the Green ENTER key to Make your selection.
Media set up succeeded
OS Menu
Ethernet →→ Modem→→ PPP→→
Interface
123
User Name:
123
Password:
Configuration Interface →→
Session →→
Protocol →→

Confidential – For Training Purposes Only 5
DOWNLOAD VIA MODEM – IN APPLICATION MENU, CONTINUED
Step Action Display
17. Press the Green ENTER key to select TCP.
.
18.
The terminal displays REMOTE SERVER:
Using the yellow backspace key clear out any data in this field so it is blank.
Then press the RED X key.
The terminal will display REMOTE IP, input the remote IP address: 066.011.130.143
Then press ENTER
19.
The terminal displays TCP PORT NUMBER:
If Then
Port Number Shows on Screen
Confirm Port Number is: 5000 Then Press ENTER
No Port Number shows on screen
Input the Port #: 5000 Then press ENTER
Wrong Port Number shows on Screen
Press the YELLOW Backspace key to clear out the wrong Port # and then use the keypad to input 5000 then press ENTER.
20. The terminal flashes “Media set up succeeded” and returns to the configuration Menu.
.
UDP →→
Protocol
TCP →→
066.011.130.143
Remote IP:
Tcp Port Number:
5000
Connection Menu
Media set up succeeded

Confidential – For Training Purposes Only 6
DOWNLOAD VIA MODEM – IN APPLICATION MENU, CONTINUED
Step Action Display
21.
Use the up and down arrow keys to highlight SESSION.
Press the Green ENTER key to Make your selection.
22. Press the Green ENTER key to select MODEM.
.
23. The terminal flashes “Media set up succeeded” and returns to the Configuration Menu.
.
24.
Press the Red X Key Twice, the terminal returns to the Software Download menu.
Press the Up arrow to highlight CONNECT then press the Green ENTER key.
25. Press the Green ENTER key to select the option for TMS.
.
Interface →→ Protocol →→
Configuration
Session →→
Ethernet →→ SSL →→
Modem →→
Configuration
Media set up succeeded
OS Menu
Configure →→ Cyclic Call →→
Software Download
Connect →→
FTP →→
Downloader
TMS →→

Confidential – For Training Purposes Only 7
DOWNLOAD VIA MODEM – IN APPLICATION MENU, CONTINUED
Step Action Display
26.
The terminal prompts for the SCENARIO NUMBER, input the TPN #, then press the
Green ENTER key.
Note: five zeros will always prelude the TPN #. The format is as follows: 00000.1234567899 (five zeros + 10 digit TPN)
For OS upgrades the format is:
00000.00207 (five zeros + 5 digit OS TPN)
The terminal will connect with MMSx and begin to install the new software. Upon completion the terminal will initialize and return to the idle prompt.
Scenario Number?
00000.000000000

Confidential – For Training Purposes Only 8
DOWNLOAD VIA ETHERNET – STARTING FROM APPLICATION MENU
Follow the steps below to set up the Dejavoo terminal to download software via the Ethernet (IP) when you are starting from the application menu. Be sure there is an active CAT5 Ethernet cable connected to the terminal’s Ethernet port. *Important Note: When downloading a wireless unit via Ethernet please see “Wireless M Line Download Addendum” In this document.
Step Action Display
1. From the idle prompt press the ENTER key to access the CORE Menu.
2.
From the CORE Menu use the up and down arrow keys to highlight UTILITY.
Press the Green ENTER Key to make your selection.
(Enter password if prompted)
3.
From the UTILITY Menu Use the up and down arrow keys to highlight SOFTWARE DOWNLOAD.
Press the Green ENTER key to make your selection.
4.
Use the up and down arrow keys to highlight CONFIGURE.
Press the Green ENTER key to Make your selection.
5. Press the Green ENTER key to select the option for INTERFACE.
.
Reports →→ Favorites →→
Core Menu
Utility →→
02/01/08 2:03
Swipe or Enter Card#
Féé Favorites Fê
Connect →→
Cyclic Call →→
Software Download
Configure →→
Settings →→
Communications →→
Utility
Software Download →→
Protocol →→ Session →→
Configuration
Interface →→

Confidential – For Training Purposes Only 9
DOWNLOAD VIA ETHERNET – IN APPLICATION MENU, CONTINUED
Step Action Display
6. Press the Green ENTER key to select the option for ETHERNET.
.
7. Press the UP Arrow key to indicate YES.
8. The terminal flashes “Media set up succeeded” and returns to the Interface Menu.
.
9.
Press the Yellow back space key to return to the CONFIGURATION Menu.
Use the up and down arrow keys to highlight PROTOCOL.
Press the Green ENTER key to Make your selection.
10. Press the Green ENTER key to select TCP.
.
Modem →→ PPP →→
Ethernet →→
Interface
Use dhcp
Configuration
Yes No
Media set up succeeded
Connection Menu
UDP →→
Protocol
TCP →→
Interface →→
Session →→
Configuration
Protocol →→

Confidential – For Training Purposes Only 10
DOWNLOAD VIA ETHERNET – IN APPLICATION MENU, CONTINUED
Step Action Display
11.
The terminal displays REMOTE SERVER:
Using the yellow backspace key clear out any data in this field so it is blank.
Then press the RED X key.
The terminal will display REMOTE IP, input the remote IP address: 066.011.130.143
Then press ENTER
12.
The terminal displays TCP PORT NUMBER:
If Then
Port Number Shows on Screen
Confirm Port Number is: 5000 Then Press ENTER
No Port Number shows on screen
Input the Port #: 5000 Then press ENTER
13. The terminal flashes “Media set up succeeded” and returns to the configuration Menu.
.
14.
Use the up and down arrow keys to highlight SESSION.
Press the Green ENTER key to Make your selection.
Tcp Port Number:
5000
Media set up succeeded
Connection Menu
Interface →→ Protocol →→
Configuration
Session →→
066.011.130.143
Remote IP:

Confidential – For Training Purposes Only 11
DOWNLOAD VIA ETHERNET – IN APPLICATION MENU, CONTINUED
Step Action Display
15. Press the Green ENTER key to select ETHERNET.
.
16. The terminal flashes “Media set up succeeded” and returns to the Configuration Menu.
.
17.
Press the Red X Key Twice, the terminal returns to the Software Download menu.
Press the Up arrow to highlight CONNECT then press the Green ENTER key.
18. Press the Green ENTER key to select the option for TMS.
.
19.
The terminal prompts for the SCENARIO NUMBER, input the TPN #, then press the
Green ENTER key.
Note: five zeros will always prelude the TPN #. The format is as follows:
00000.1234567899 (five zeros + 10 digit TPN) For OS upgrades the format is:
00000.00207 (five zeros + 5 digit OS TPN)
Modem →→ SSL →→
Ethernet →→
Configuration
Media set up succeeded
OS Menu
Scenario Number?
00000.000000000
Configure →→ Cyclic Call →→
Software Download
Connect →→
FTP →→
Downloader
TMS →→

Confidential – For Training Purposes Only 12
DOWNLOAD VIA GPRS (WIRELESS TERMINALS ONLY) – IN APPLICATION MENU
Follow the steps below to set up the Dejavoo terminal to download software via the wireless GPRS network when you are starting from the application menu. Be sure all initializing status’ have registered to YES and that the unit is charged with a signal prior to beginning the download. *Note: If any of the initializing statuses remains at NO and does not register to YES it is necessary to download via the Operating System. See Instructions in this document.
Step Action Display
1. From the idle prompt press the ENTER key to access the CORE Menu.
2.
From the CORE Menu use the up and down arrow keys to highlight UTILITY.
Press the Green ENTER Key to make your selection.
(Enter password if prompted)
3.
From the UTILITY Menu Use the up and down arrow keys to highlight SOFTWARE DOWNLOAD.
Press the Green ENTER key to make your selection.
4.
Use the up and down arrow keys to highlight CONFIGURE.
Press the Green ENTER key to Make your selection.
5.
Use the up and down arrow keys to highlight PROTOCOL.
Press the Green ENTER key to Make your selection.
Reports →→ Favorites →→
Core Menu
Utility →→
02/01/08 2:03
Swipe or Enter Card#
Féé Favorites Fê
Connect →→
Cyclic Call →→
Software Download
Configure →→
Settings →→
Communications →→
Utility
Software Download →→
Interface →→
Session →→
Configuration
Protocol →→

Confidential – For Training Purposes Only 13
DOWNLOAD VIA GPRS (WIRELESS TERMINALS ONLY) – IN APPLICATION MENU , CONTINUED
Step Action Display
6. Press the Green ENTER key to select TCP.
.
7.
The terminal displays REMOTE SERVER:
Using the yellow backspace key clear out any data in this field so it is blank.
Then press the RED X key.
The terminal will display REMOTE IP, input the remote IP address: 066.011.130.143
Then press ENTER
8.
The terminal displays TCP PORT NUMBER:
If Then
Port Number Shows on Screen
Confirm Port Number is: 5000 Then Press ENTER
No Port Number shows on screen
Input the Port #: 5000 Then press ENTER
9. The terminal flashes “Media set up succeeded” and returns to the configuration Menu.
.
10.
Use the down arrow key to highlight SESSION.
Press the Green ENTER key to Make your selection.
Tcp Port Number:
5000
Media set up succeeded
Connection Menu
Interface →→ Protocol →→
Configuration
Session →→
UDP →→
Protocol
TCP →→
066.011.130.143
Remote IP:

Confidential – For Training Purposes Only 14
DOWNLOAD VIA GPRS (WIRELESS TERMINALS ONLY) – IN APPLICATION MENU , CONTINUED
Step Action Display
11.
Use the down arrow key to highlight GPRS.
Press the Green ENTER key to Make your selection..
12. The terminal flashes “Media set up succeeded” and returns to the Configuration Menu.
.
13.
Press the Red X Key Twice, the terminal returns to the Software Download menu.
Press the Up arrow to highlight CONNECT then press the Green ENTER key.
14. Press the Green ENTER key to select the option for TMS.
.
15.
The terminal prompts for the SCENARIO NUMBER, input the TPN #, then press the
Green ENTER key.
Note: five zeros will always prelude the TPN #. The format is as follows: 00000.1234567899 (five zeros + 10 digit TPN)
For OS upgrades the format is:
00000.00207 (five zeros + 5 digit OS TPN)
Modem →→ SSL →→
GPRS →→
Configuration
Media set up succeeded
OS Menu
Scenario Number?
00000.000000000
Configure →→ Cyclic Call →→
Software Download
Connect →→
FTP →→
Downloader
TMS →→

Confidential – For Training Purposes Only 15
DEJAVOO SYSTEMS DOWNLOAD FROM THE OPERATING SYSTEM MENU
HOW TO ACCESS THE DEJAVOO OPERATING SYSTEM
When no previous application has been installed it is necessary to download application software via the Operating System (OS). Use the steps below to access the Dejavoo OS.
Step Action Display
1.
Power cycle the terminal, when the display reads “MagIC Booting..” begin to repeatedly press the double zero (00) key until the screen displays MAINT CODE?
2.
The terminal will prompt for MAINT CODE.
Use the keypad to input 7509 then press the Green ENTER Key.
3. You are now in the terminals OS menu.
Booting… Mag IC ³
MAINT CODE?
7509
2. Execute 3. Console
OS Menu
1. Remote

Confidential – For Training Purposes Only 16
MODEM DOWNLOAD STARTING FROM THE OPERATING SYSTEM MENU
Use the steps below to download a TPN (Terminal Profile Number) with a phone line via MODEM when in the Dejavoo OS. *Important Note: When downloading a wireless unit via Ethernet please see “Wireless M Line Download Addendum” In this document.
Step Action Display
1.
Press the down arrow key to highlight CONFIGURE. Press the green ENTER Key.
2.
From the Configuration Menu press the ENTER Key to select INTERFACE.
3. Press the down arrow key to highlight MODEM, then press the green ENTER key.
4.
If Then If a dial prefix is needed to access an outside line
use the keypad to input the correct prefix
If NO dial prefix is needed leave blank
Press ENTER
5. Use the arrow keys to select correct dial type, TONE or PULSE, then press ENTER.
Ethernet →→ PPP →→ Modem →→
Interface
Dial Prefix:
9
Dial Type
Tone
Pulse
Tone →→
Protocol →→ Session →→
Configuration
Interface →→
3. Console 4. Security
OS Menu
5. Configure

Confidential – For Training Purposes Only 17
MODEM DOWNLOAD - IN OPERATING SYSTEM, CONTINUED…
Step Action Display
6.
Input the phone number the terminal will use to dial out to. (without the dashes)
1-631-675-2013 Press the Green ENTER key to continue.
7.
The terminal will display MODEM COMMAND: ATN1C.
Press the Green ENTER key to confirm.
8. Press the Green ENTER Key to select AUTO.
9.
The Terminal Screen will flash “Media Set up succeeded” and return to the Interface Menu.
10.
Use the down arrow key to highlight PPP.
Press the Green ENTER key to Make your selection.
Modulation
Tone V22 V22b
Auto →→
Media set up succeeded
Ethernet →→ Modem→→
PPP→→
Interface
Modem Command?
ATN1C1
Phone Number?
16316752013
Confidential – For Training Purposes Only 18
MODEM DOWNLOAD - IN OPERATING SYSTEM, CONTINUED…
Step Action Display
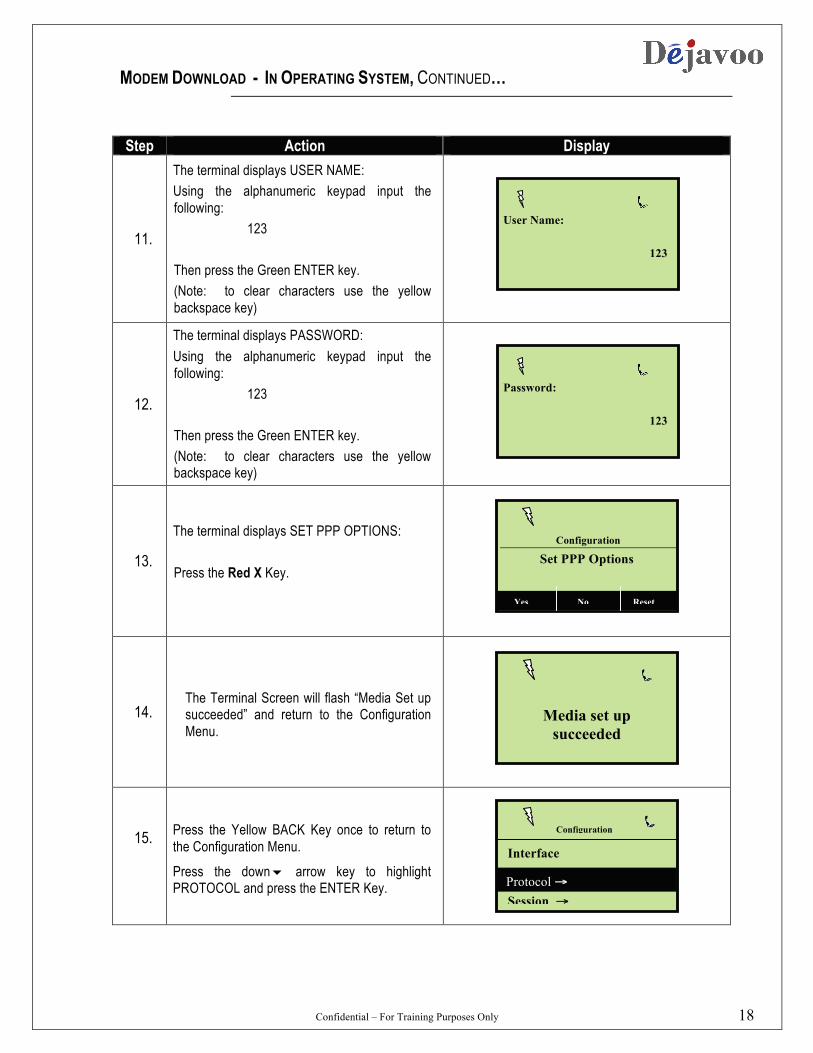
11.
The terminal displays USER NAME:
Using the alphanumeric keypad input the following:
123
Then press the Green ENTER key.
(Note: to clear characters use the yellow backspace key)
12.
The terminal displays PASSWORD:
Using the alphanumeric keypad input the following:
123
Then press the Green ENTER key.
(Note: to clear characters use the yellow backspace key)
13.
The terminal displays SET PPP OPTIONS:
Press the Red X Key.
14. The Terminal Screen will flash “Media Set up succeeded” and return to the Configuration Menu.
15.
Press the Yellow BACK Key once to return to the Configuration Menu.
Press the down arrow key to highlight PROTOCOL and press the ENTER Key.
123
User Name:
Set PPP Options
Configuration
Yes No Reset
Media set up succeeded
123
Password:
Interface
Session →→
Configuration
Protocol →→

Confidential – For Training Purposes Only 19
MODEM DOWNLOAD - IN OPERATING SYSTEM, CONTINUED…
MODEM DOWNLOAD - IN OPERATING SYSTEM, CONTINUED…
Step Action Display
16. Press the Green ENTER key to select TCP.
.
17.
The terminal displays REMOTE SERVER:
Using the yellow backspace key clear out any data in this field so it is blank.
Then press the RED X key.
The terminal will display REMOTE IP, input the remote IP address: 066.011.130.143
Then press ENTER
18.
The terminal displays TCP PORT NUMBER:
If Then
Port Number Shows on Screen
Confirm Port Number is: 5000 Then Press ENTER
No Port Number shows on screen
Input the Port #: 5000 Then press ENTER
Wrong Port Number shows on Screen
Press the YELLOW Backspace key to clear out the wrong Port # and then use the keypad to input 5000 then press ENTER.
19. The Terminal Screen will flash “Media Set up succeeded” and returns to the CONFIGURATION Menu.
1
2. UDP →→ 3. SSL →→
Protocol
1. TCP →→
Tcp Port Number:
5000
Media set up succeeded
066.011.130.143
Remote IP:

Confidential – For Training Purposes Only 20
Step Action Display
20. Use the down arrow key to highlight SESSION, then press the Green ENTER Key.
21. Use the down arrow key to highlight MODEM, then press the Green ENTER.
22. The Terminal Screen will flash “Media Set up succeeded” and return to CONFIGURATION Menu.
23.
Press the Red X Key until the terminal returns to the OS Main Menu.
Press the Green ENTER key to select REMOTE.
24. Press the down arrow key to highlight TMS, then press the Green ENTER.
Interface →→ Protocol →→
Configuration
Session →→
Ethernet →→ SSL →→
Modem →→
Configuration
Media set up succeeded
2. Execute 3. Console
OS Menu
1. Remote
1. PROD 3. FTP →→
Downloader
2. TMS →→

Confidential – For Training Purposes Only 21
MODEM DOWNLOAD - IN OPERATING SYSTEM, CONTINUED…
Step Action Display
25.
The terminal prompts for the SCENARIO NUMBER, input the TPN #, then press the Green
ENTER key.
Note: five zeros will always prelude the TPN #. The format is as follows: 00000.1234567899 (five zeros + 10 digit TPN) For OS upgrades the format is:
00000.00207 (five zeros + 5 digit OS TPN)
26. The terminal will connect with MMSx and begin to install the new software. Upon completion the terminal will initialize and return to the idle prompt.
Scenario Number?
00000.000000000

Confidential – For Training Purposes Only 22
ETHERNET DOWNLOADS STARTING FROM THE OPERATING SYSTEM MENU
Use the steps below to download a TPN (Terminal Profile Number) with an IP connection via ETHERNET when beginning in the Dejavoo OS Menu. *Important Note: When downloading a wireless unit via Ethernet please see “Wireless M Line Download Addendum” In this document.
Step Action Display
1.
Press the down arrow key to highlight CONFIGURE. Press the green ENTER Key.
2.
From the Configuration Menu press the ENTER Key to select INTERFACE.
3.
Press the Green ENTER key to select the option for ETHERNET.
4.
Press the UP Arrow key to indicate YES.
5.
The terminal flashes “Media set up succeeded” and returns to the Interface Menu.
Modem →→ PPP →→
Ethernet →→
Interface
Use dhcp
Configuration
Yes No
Media set up succeeded
Connection Menu
3. Console 4. Security
OS Menu
5. Configure
Protocol →→ Session →→
Configuration
Interface →→

Confidential – For Training Purposes Only 23
ETHERNET DOWNLOADS IN OPERATING SYSTEM, CONTINUED…
Step Action Display
6.
Press the Yellow back space key to return to the CONFIGURATION Menu.
Use the down arrow key to highlight PROTOCOL.
Press the Green ENTER key
7.
Press the Green ENTER key to select TCP.
8.
The terminal displays REMOTE SERVER:
Using the yellow backspace key clear out any data in this field so it is blank.
Then press the RED X key.
The terminal will display REMOTE IP, input the remote IP address: 066.011.130.143
Then press ENTER
9.
The terminal displays TCP PORT NUMBER:
If Then
Port Number Shows on Screen
Confirm Port Number is: 5000, Then Press ENTER
No Port Number shows on screen
Input the Port #: 5000 Then press ENTER
Wrong Port Number shows on screen
Press the YELLOW backspace key to clear data and input 5000 then press ENTER.
UDP →→
Protocol
TCP →→
Tcp Port Number:
5000
Interface →→
Session →→
Configuration
Protocol →→
066.011.130.143
Remote IP:

Confidential – For Training Purposes Only 24
ETHERNET DOWNLOADS IN OPERATING SYSTEM, CONTINUED…
Step Action Display
12.
The terminal flashes “Media set up succeeded” and returns to the configuration Menu.
13.
Use the down arrow key to highlight SESSION.
Press the Green ENTER key
14.
Press the Green ENTER key to select ETHERNET.
15. The terminal flashes “Media set up succeeded” and returns to the Configuration Menu.
16.
Press the Red X Key until the terminal returns to the OS Main Menu.
Press the Green ENTER key to select REMOTE.
Media set up succeeded
Connection Menu
Interface →→ Protocol →→
Configuration
Session →→
Modem →→ SSL →→
Ethernet →→
Configuration
Media set up succeeded
OS Menu
2. Execute 3. Console
OS Menu
1. Remote

Confidential – For Training Purposes Only 25
ETHERNET DOWNLOADS IN OPERATING SYSTEM, CONTINUED…
Step Action Display
17. Press the down arrow key to highlight TMS, then press the Green ENTER.
18.
The terminal prompts for the SCENARIO NUMBER, input the TPN #, then press the Green
ENTER key.
Note: five zeros will always prelude the TPN #. The format is as follows: 00000.1234567899 (five zeros + 10 digit TPN)
For OS upgrades the format is: 00000.00207 (five zeros + 5 digit OS TPN)
19.
The terminal will connect with MMSx and begin to install the new software. Upon completion the terminal will initialize and return to the idle prompt.
1. PROD 3. FTP →→
Downloader
2. TMS →→
Scenario Number?
00000.000000000

Confidential – For Training Purposes Only 26
DOWNLOAD VIA GPRS (WIRELESS TERMINALS ONLY) – FROM OPERATING SYSTEM
Follow the steps below to set up the Dejavoo terminal to download software via the wireless GPRS network when you are starting from the application menu. Be sure that the unit is charged with a signal prior to beginning the download.
Step Action Display
1.
Press the down arrow key to highlight CONFIGURE. Press the green ENTER Key.
2.
From the Configuration Menu press the ENTER Key to select INTERFACE.
3.
Press the down arrow key to highlight GPRS.
Press the green ENTER Key.
4.
Press ENTER to select SETTINGS.
Press the green ENTER Key.
5.
Press the down arrow key to highlight APN Name
Press the green ENTER Key.
Modem →→ PPP →→
GPRS →→
Interface
3. Console 4. Security
OS Menu
5. Configure
Protocol →→ Session →→
Configuration
Interface →→
SIM →→ Always On →→
Settings →→
Configuration
Phone Number →→
Operator ID →→ APN Name →→
Settings

Confidential – For Training Purposes Only 27
DOWNLOAD VIA GPRS (WIRELESS TERMINALS ONLY) – FROM OPERATING SYSTEM , CONTINUED
Step Action Display
6.
The terminal displays GPRS APN:
Using the alphanumeric keypad input the wireless APN.
Then press the Green ENTER key.
*note: this is case sensitive and must be lower case. For the dot (.) press the middle favorites key, then the number 3, then arrow down to highlight the dot and press ENTER.
7.
The terminal flashes “Media set up succeeded” and returns to the Interface Menu.
8.
Press the Yellow back space key 3 times to return to the CONFIGURATION Menu.
Use the down arrow key to highlight PROTOCOL.
Press the Green ENTER key
9.
Press the Green ENTER key to select TCP.
Media set up succeeded
Connection Menu
dejavoo.globalm2m.net
GPRS APN:
UDP →→
Protocol
TCP →→
Interface →→
Session →→
Configuration
Protocol →→

Confidential – For Training Purposes Only 28
DOWNLOAD VIA GPRS (WIRELESS TERMINALS ONLY) – FROM OPERATING SYSTEM , CONTINUED
10.
The terminal displays REMOTE SERVER:
Using the yellow backspace key clear out any data in this field so it is blank.
Then press the RED X key.
The terminal will display REMOTE IP, input the remote IP address: 066.011.130.143
Then press ENTER
11.
The terminal displays TCP PORT NUMBER:
If Then
Port Number Shows on Screen
Confirm Port Number is: 5000, Then Press ENTER
No Port Number shows on screen
Input the Port #: 5000 Then press ENTER
Wrong Port Number shows on screen
Press the YELLOW backspace key to clear data and input 5000 then press ENTER.
12.
The terminal flashes “Media set up succeeded” and returns to the configuration Menu.
13.
Use the down arrow key to highlight SESSION.
Press the Green ENTER key
14. Use the down arrow key to highlight GPRS.
Press the Green ENTER key
Step Action Display
Media set up succeeded
Connection Menu
Tcp Port Number:
5000
Interface →→ Protocol →→
Configuration
Session →→
Modem →→ SSL →→
GPRS →→
Configuration
066.011.130.143
Remote IP:

Confidential – For Training Purposes Only 29
DOWNLOAD VIA GPRS (WIRELESS TERMINALS ONLY) – FROM OPERATING SYSTEM , CONTINUED
15.
Press the Red X Key until the terminal returns to the OS Main Menu.
Press the Green ENTER key to select REMOTE.
16. Press the down arrow key to highlight TMS, then press the Green ENTER.
17.
The terminal prompts for the SCENARIO NUMBER, input the TPN #, then press the Green ENTER key.
Note: five zeros will always prelude the TPN #. The format is as follows: 00000.1234567899 (five zeros + 10 digit TPN)
For OS upgrades the format is:
00000.00207 (five zeros + 5 digit OS TPN)
18.
The terminal will connect with MMSx and begin to install the new software. Upon completion the terminal will initialize and return to the idle prompt.
Step Action Display
2. Execute 3. Console
OS Menu
1. Remote
1. PROD 3. FTP →→
Downloader
2. TMS →→
Scenario Number?
00000.000000000

Confidential – For Training Purposes Only 30
WIRELESS M LINE DOWNLOAD ADDENDUM – WHEN DOWNLOADING VIA MODEM OR IP
When downloading an M Line wireless terminal via Modem or Via Ethernet it is necessary to set the ALWAYS ON indicator to OFF. Use the steps below to turn ALWAYS ON off from the terminal menu then proceed with the steps for downloading in this document.
Step Action Display
1.
Press the down arrow key to highlight CONFIGURE. Press the green ENTER Key.
2.
From the Configuration Menu press the ENTER Key to select INTERFACE.
3.
Press the down arrow key to highlight GPRS.
Press the green ENTER Key.
4.
Press the down arrow key to highlight ALWAYS ON.
Press the green ENTER Key.
5.
Press the down arrow key to highlight STOP.
Press the green ENTER Key.
Modem →→ PPP →→
GPRS →→
Interface
3. Console 4. Security
OS Menu
5. Configure
Protocol →→ Session →→
Configuration
Interface →→
Settings →→ SIM →→
Always On →→
Configuration
Start →→ Stop →→
Always-On

Confidential – For Training Purposes Only 31
DEJAVOO TERMINAL DOWNLOADS VIA USB KEY
SETTING UP THE USB KEY FOR SOFTWARE DOWNLOAD
Dejavoo terminals can be downloaded via USB key quickly and easily. It is important the uncompressed (Unzipped) TPN file folder is placed in a folder named “download” and that the file name “download” sits on the root directory of the USB key. Use the instructions below for correctly setting up your TPN on the USB key.
Step Action Display
1. Save the compressed (.ZIP) TPN File to your desktop.
n
2.
Right click on Desktop and select New � Folder.
3.
Rename the Folder download.
4. Locate the Compressed (.Zip) TPN file on your desktop where you saved it in step 1.
Continued on next page

Confidential – For Training Purposes Only 32
. SETTING UP THE USB KEY FOR SOFTWARE DOWNLOAD, CONTINUED
Step Action Display
5.
Right click on Compressed (.Zip) TPN file on your desktop and select EXTRACT ALL… from the menu.
6. When the SELECT DESTINATION window appears click on the EXTRACT button.
7.
A window will appear listing all of the software files (.TAR) that have been extracted from the Zipped Folder and placed into a subfolder on your Desktop. You can close this window.
8.
Find the file on your desk top that you just uncompressed. With your mouse drag the file over to the folder you named “download” and drop the “unzipped” TPN folder into the download folder. (The “unzipped “subfolder will be titled with the TPN you are downloading.)
Continued on next page

Confidential – For Training Purposes Only 33
SETTING UP THE USB KEY FOR SOFTWARE DOWNLOAD, CONTINUED
Step Action Display
9.
Insert your USB\ Key into your computer’s USB Port. Your computer will identify that a USB Removable Drive has been inserted and the window to the right will open. Click on “Open Folder to View Files”
10. A window will open showing the contents of the USB Drive.
11. Click on the folder named “download” on your desktop and drag it with your mouse and drop it into the Removable USB Drive.
12. You can remove the USB Drive from your PC port. It is
now set up for terminal USB Download.

Confidential – For Training Purposes Only 34
DOWNLOADING SOFTWARE VIA USB KEY
The versatility of Dejavoo terminals enables software installation quickly and easily with a USB key inserted into one of the two USB ports located on the back of the terminal. The software file to be installed must be placed on the USB key root directory in a file titled “download” or the terminal will not recognize it. Follow these steps to Download via USB key.
Step Action Display
1.
Insert the USB key. It will take a few moments for the terminal to read the USB key and your terminal display will say: “USB Key Dwl”. All Software files that you have dropped into the folder named “download” will appear.
2.
Use the up and down arrow keys to highlight the software file you wish to install.
Press the Green ENTER Key to begin installation.
3.
Upon completion the terminal will display CONTINUE DOWNLOAD? To install additional software press the up arrow to select YES and repeat step 2. If NO, the terminal will initiate the new software and return to the idle prompt. *Note: When downloading a new OS via USB it is important that you answer NO to this question, when the terminal is done initializing the new OS the USB directory will reappear.
4. When all desired files have been installed you can remove the USB key from the back of the terminal.
1234567899 dv_os_fw_206
USB Key dwl
1231238990
USB
Continue Download?
USB Key dwl
Yes No
USB
1234567899 dv_os_fw_206
USB Key dwl
1231238990
USB

Confidential – For Training Purposes Only 35
TROUBLE SHOOTING USB DOWNLOADS
Below are some important facts about USB downloading. Please read though the list carefully to avoid download issues.
TERMINAL NOT READING USB
KEY
(1) The most common reason for this is that the USB key is not set up correctly. Make sure the TPN is unzipped and stored in the folder named “download” and that the “download” folder is stored directly on the USB Key root directory.
(2) Although there may be other files on the USB root directory other than the one named
“download”, if those other files contain any special characters the terminal will be unable to read the “download” folder.
(3) In order for the terminal to read the file named “download” and its contents (TPNs) the file
names must not have any spaces or special characters. All application files (.TAR files) need to be in a subfolder in the download folder in order for the terminal to read them.
(4) If you have just completed an OS upgrade and the terminal is not reading the USB key, it is
necessary to “Reformat” the terminal memory then continue with the USB download. To reformat the memory, see instructions in this document.
UPGRADING OS
SOFTWARE Upgrading the OS Software using a USB is quick and saves a lot of time. When the OS download has completed and the terminal prompts “CONTINUE DOWNLOAD?” It is important that you answer NO, even if you still need to no load the TPN. The terminal will initialize the new OS (you will hear a series of beeps) and the USB directory will reappear, it is at this time that you can proceed to load the TPN. If the USB directory does not reappear, after the OS Download is complete and the OS Menu is on the display, simply remove and re-insert the USB Key.