Embed Size (px)
Citation preview

Deepwater Horizon RBS 8D BOP MUX Control System Report
To the U. S. Chemical Safety and Hazard Investigation Board
CSB-FINAL REPORT-MUX(06-02-2014)
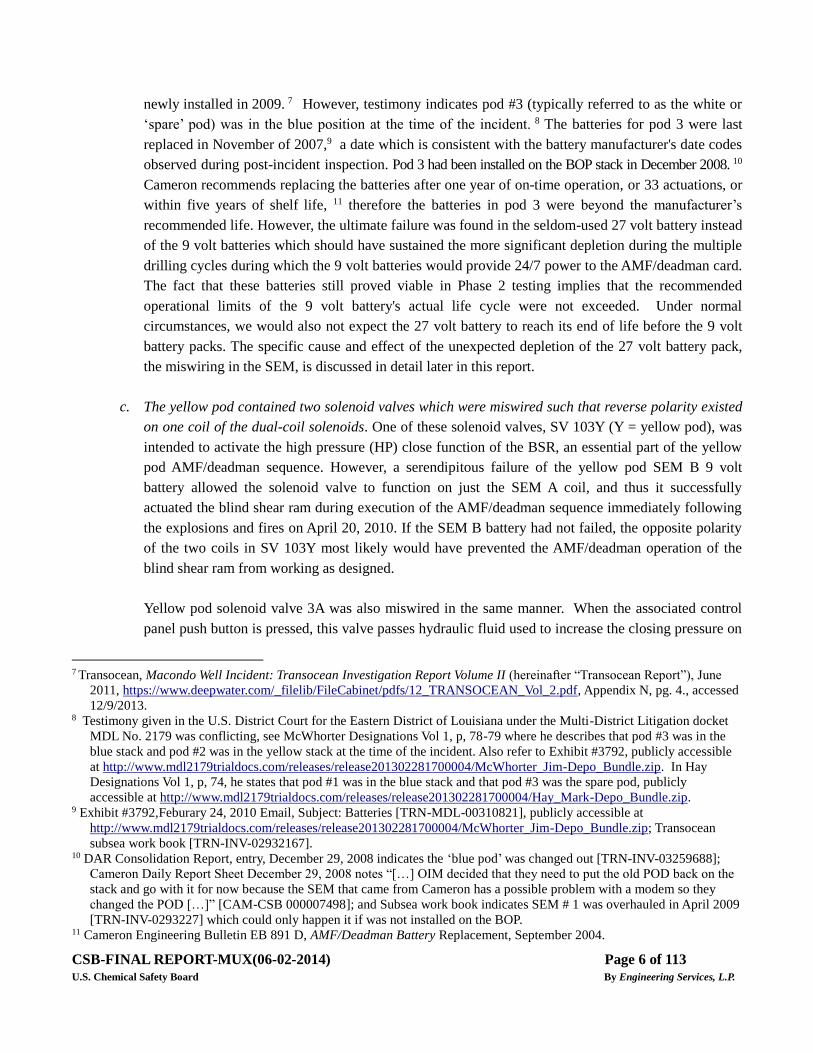
The Deepwater Horizon BOP stack at NASA-Michoud (with the upper LMRP portion on left)
This analysis considered the BOP examinations that were conducted by Det Norske Veritas (DNV) at the NASA
Michoud facility near New Orleans, Louisiana. The examinations were in two phases, the first conducted for the
Joint Investigation Team and a Phase 2 funded by BP. CSB and Engineering Services were excluded from Phase
2, but subsequently obtained examination information from that period.

CSB-FINAL REPORT-MUX(06-02-2014) Page 2 of 113
U.S. Chemical Safety Board By Engineering Services, L.P.
MUX Control System Investigation Index
Contents
1 Executive Summary .......................................................................................................................... 4
1.1 Key Findings .................................................................................................................................... 5
1.2 BOP Control System Architecture .................................................................................................... 8
1.3 AMF/deadman Activated in Response to Incident ......................................................................... 10
1.4 Miswired Solenoid Testing ............................................................................................................. 11
2 Definitions and Acronyms .............................................................................................................. 13
3 Overview of BOP Subsea Control System..................................................................................... 15
3.1 BOP System Overview ................................................................................................................... 15
3.2 MUX Control System Component Description.............................................................................. 15
3.2.1 MUX Control Panels ................................................................................................................... 16
3.2.2 BOP Control Pods ....................................................................................................................... 17
3.2.3 BOP Solenoid Valves .................................................................................................................. 18
3.2.4 BOP Pod Batteries ....................................................................................................................... 19
3.2.5 BOP Pod Selection ...................................................................................................................... 20
3.3 Emergency Operating Modes ......................................................................................................... 20
4 Analysis: AMF/deadman Activation April 20, 2010 ..................................................................... 22
4.1 Location of the Control Pods on the BOP Stack at the Time of the Incident ................................. 24
4.2 The AMF/deadman was Armed at the Time of the Incident ........................................................... 26
4.3 Pie Connectors ................................................................................................................................ 26
4.4 PLC Executable Files ..................................................................................................................... 27
4.5 Premature Draining of the Blue Pod 27 volt Battery...................................................................... 27
4.5.1 Blue Pod SEM A and SEM B Miswiring .................................................................................... 28
4.5.2 The Effect of Blue Pod SEM Miswiring ..................................................................................... 28
4.5.3 Testing Which Should Reveal Wiring Defects ............................................................................ 28
4.6 SV 103Y Solenoid Valve Miswired ................................................................................................ 29
4.6.1 Solenoid Testing: PETU Characterization .................................................................................. 30
4.6.2 Solenoids Laboratory Bench Testing .......................................................................................... 33
4.6.3 Solenoids Disassembly: Verification of Miswiring ..................................................................... 33
4.7 How a Miswired Solenoid Valve Operates ..................................................................................... 34
4.8 BOP Batteries ................................................................................................................................. 36

CSB-FINAL REPORT-MUX(06-02-2014) Page 3 of 113
U.S. Chemical Safety Board By Engineering Services, L.P.
4.8.1 Age of BOP Batteries .................................................................................................................. 37
4.8.2 Overview of Battery Expectations and ES Investigation of the DWH BOP Batteries ................ 38
4.8.3 Battery Testing Results ................................................................................................................ 40
4.9 AMF/deadman testing at Michoud ................................................................................................. 43
4.10 Actuation of the AMF/deadman Sequence on April 20, 2010 ...................................................... 44
5 Conclusion ....................................................................................................................................... 44
Appendix A: Control Pod System Battery Information, Testing, and Analysis ............................ 47
Appendix B: Blue Pod SEM B D17 Diode Discoloration ................................................................ 67
Appendix C: Portable Electronic Test Units (PETU) Characterization Analysis ......................... 71
Appendix D: Review of Blue Pod SEM Wiring Defects .................................................................. 76
Appendix E: CSB Exemplar Solenoid Testing ................................................................................. 84
Appendix F: Review of Cameron FAT Test Procedures ................................................................ 100
Appendix G: Analysis of Pie Connector Evidence ......................................................................... 105
Appendix H: Historical Changes to AMF/deadman Sequence ..................................................... 112

CSB-FINAL REPORT-MUX(06-02-2014) Page 4 of 113
U.S. Chemical Safety Board By Engineering Services, L.P.
1 Executive Summary
The control system for the Deepwater Horizon blowout preventer (BOP) supported manual functioning of the
BOP for normal drilling operations as well as automatic and manually-initiated emergency functions to seal the
well. The completely automatic emergency shut-in functions were the AMF/deadman and autoshear. The
Emergency Disconnect System (EDS) was a manual shutdown system, requiring human initiation. Each of these
emergency shut-in systems were designed to activate an emergency closure of the BOP by using high pressure
hydraulic fluid to close the BOP blind shear ram (BSR), a device intended to shear drill pipe passing through the
BOP and then shut in the well, stopping any further flow of fluids from leaving the well. At various instances
during and following the blowout of the Macondo well on April 20, 2010, each of these systems were called upon
to seal the well.1
The main focus of this control system investigation has been on whether and when the AMF/deadman activated.
The control systems were reviewed from the subsystem down to a component level, where sufficient evidence and
testing were available for evaluation.
A Joint Investigation Team (JIT) was formed by the Bureau of Ocean Energy Management, Regulation and
Enforcement (BOEMRE) and the United States Coast Guard (USCG). BOEMRE contracted Det Norske Veritas
(DNV) to conduct a Forensic Examination of the BOP, which had been recovered and brought to a USCG base at
the NASA Michoud Booster Assembly facility, near New Orleans, Louisiana. The objectives of conducting tests
on the recovered BOP included determining the “performance of the BOP system during the well control event,
any failures that may have occurred, and the sequence of events leading to failure(s) of the BOP.”2
After a testing plan was approved by the participants,3 the physical testing started November 15, 2010 at the
NASA Michoud Booster Assembly Facility, outside of New Orleans. The site work, which was later referred to as
Phase 1 BOP testing, was declared over by DNV and BOEMRE representatives on March 4, 2011.
1 Engineering Services supports the finding determined by BP and others that when the EDS was manually initiated from the
Deepwater Horizon, communication with the BOP had already been lost due to the explosions and fire on the rig. As a
result, the EDS could not activate the BSR. The autoshear function was activated 33 hours after the explosions using a
remotely operated vehicle at the BOP, but flow from the well was not stopped. See Engineering Services separate report,
Deepwater Horizon Blowout Preventer Failure Analysis, for further discussing and documentation. 2 Bureau of Ocean Energy Management Regulation and Enforcement (BOEMRE), March 11, 2011. Forensic Examination of
Deepwater Horizon Blowout Preventer, Report No. EP030842 (hereinafter “DNV Report”),
http://www.uscg.mil/hq/cg5/cg545/dw/exhib/DNV%20Report%20EP030842%20for%20BOEMRE%20Volume%20I.pdf.
Accessed March 12, 2012, and Addenda, May 2, 2011, page 1. 3 Five other parties were organized along with the U.S. Chemical Safety Board (CSB) into a Technical Working Group
(TWG): BP, Transocean, Cameron, U.S. Department of Justice, and the Multi-District Litigation group (MDL). The TWG
served to review and approve protocols and to approve/disapprove any deviations in the test procedures as the need arose.
The TWG members had a closer level of access than other party representatives in witnessing the actual testing. In
addition, USCG, FBI, NASA, and EPA had various responsibilities at the test site. CSB contracted Engineering Services
LP (ES) to assist in the BOP examination and analysis. An ES engineer usually served as the CSB TWG representative,
although CSB staff also served in this role at times.

CSB-FINAL REPORT-MUX(06-02-2014) Page 5 of 113
U.S. Chemical Safety Board By Engineering Services, L.P.
There was a Phase 2 of the BOP examination that excluded CSB and ES, but Phase 2 documents, photos, and
videos were subsequently made available and considered in this report. During Phase 2 additional tests were
conducted and some components further disassembled. While much of the test results used for the analysis
presented in this report were developed in concert with other investigatory entities, new key findings presented
here are also the result of independent Chemical Safety Board (CSB)-initiated testing.
Specifically, the analysis in this report aims to answer the following questions:
1. Were the AMF/deadman emergency shut-in system components in place and operable?
2. For any failed AMF/deadman subsystems and components, were the pre-accident testing procedures
capable of revealing the failed components, and were those procedures utilized?
3. What lessons learned can be developed to minimize the effect of any control component failures in the
future?
1.1 Key Findings
1. The BOP emergency shut-in systems were not fully operable prior to the incident. Despite failures to
multiple redundant systems, the AMF/deadman activated when communications, electric power and
hydraulic power were severed between the Deepwater Horizon and the BOP immediately following the
explosions and fire on the rig.
a. Internal SEM miswiring drained the blue control pod 27 volt battery pack, preventing the blue control
pod from activating the emergency AMF/deadman sequence. Wiring nonconformances were
discovered at Michoud during Phase 2 testing.4 This miswiring caused premature connection of the
emergency 27 volt battery to two AMF/deadman pressure transducers, which were already powered
by the SEM 24vdc power supply. The premature connection drained the 27 volt batteries, preventing
the emergency AMF/deadman sequence from activating the blind shear ram from the blue control
pod. Phase 2 testing further confirmed that the 9 volt battery packs in the blue pod were not drained
as asserted in other theories for the failure of the blue pod.5
b. The batteries for the blue control pod were used beyond their recommended useful life, but the blue
pod 27 volt battery pack failed prematurely due to miswiring in the SEM A signal wiring. The date
codes on the batteries of the control pod in the blue position on the BOP suggest they were manufactured
in 2005 and 2006.6 The Transocean Report implied that the batteries for the pod in the blue position were
4 Phase 2 Test Preparation Sheet, DNV2011061904: BOP-033. 5 This finding is contrary to the Transocean Report, which suggested that the 27 volt battery failed after successfully carrying
out the AMF/deadman sequence. Transocean Report: Macondo Well Incident – Transocean Investigation Report, June
2011, page 31 and Appendix N, page 27. 6 Phase 2 Test Preparation Sheets, DNV2011061602:BOP-028 and DNV20110603:BOP-027.
CSB-FINAL REPORT-MUX(06-02-2014) Page 6 of 113
U.S. Chemical Safety Board By Engineering Services, L.P.
newly installed in 2009. 7
However, testimony indicates pod #3 (typically referred to as the white or
‘spare’ pod) was in the blue position at the time of the incident. 8 The batteries for pod 3 were last
replaced in November of 2007,9 a date which is consistent with the battery manufacturer's date codes
observed during post-incident inspection. Pod 3 had been installed on the BOP stack in December 2008. 10
Cameron recommends replacing the batteries after one year of on-time operation, or 33 actuations, or
within five years of shelf life, 11 therefore the batteries in pod 3 were beyond the manufacturer’s
recommended life. However, the ultimate failure was found in the seldom-used 27 volt battery instead
of the 9 volt batteries which should have sustained the more significant depletion during the multiple
drilling cycles during which the 9 volt batteries would provide 24/7 power to the AMF/deadman card.
The fact that these batteries still proved viable in Phase 2 testing implies that the recommended
operational limits of the 9 volt battery's actual life cycle were not exceeded. Under normal
circumstances, we would also not expect the 27 volt battery to reach its end of life before the 9 volt
battery packs. The specific cause and effect of the unexpected depletion of the 27 volt battery pack,
the miswiring in the SEM, is discussed in detail later in this report.
c. The yellow pod contained two solenoid valves which were miswired such that reverse polarity existed
on one coil of the dual-coil solenoids. One of these solenoid valves, SV 103Y (Y = yellow pod), was
intended to activate the high pressure (HP) close function of the BSR, an essential part of the yellow
pod AMF/deadman sequence. However, a serendipitous failure of the yellow pod SEM B 9 volt
battery allowed the solenoid valve to function on just the SEM A coil, and thus it successfully
actuated the blind shear ram during execution of the AMF/deadman sequence immediately following
the explosions and fires on April 20, 2010. If the SEM B battery had not failed, the opposite polarity
of the two coils in SV 103Y most likely would have prevented the AMF/deadman operation of the
blind shear ram from working as designed.
Yellow pod solenoid valve 3A was also miswired in the same manner. When the associated control
panel push button is pressed, this valve passes hydraulic fluid used to increase the closing pressure on
7 Transocean, Macondo Well Incident: Transocean Investigation Report Volume II (hereinafter “Transocean Report”), June
2011, https://www.deepwater.com/_filelib/FileCabinet/pdfs/12_TRANSOCEAN_Vol_2.pdf, Appendix N, pg. 4., accessed
12/9/2013. 8 Testimony given in the U.S. District Court for the Eastern District of Louisiana under the Multi-District Litigation docket
MDL No. 2179 was conflicting, see McWhorter Designations Vol 1, p, 78-79 where he describes that pod #3 was in the
blue stack and pod #2 was in the yellow stack at the time of the incident. Also refer to Exhibit #3792, publicly accessible
at http://www.mdl2179trialdocs.com/releases/release201302281700004/McWhorter_Jim-Depo_Bundle.zip. In Hay
Designations Vol 1, p, 74, he states that pod #1 was in the blue stack and that pod #3 was the spare pod, publicly
accessible at http://www.mdl2179trialdocs.com/releases/release201302281700004/Hay_Mark-Depo_Bundle.zip. 9 Exhibit #3792,Feburary 24, 2010 Email, Subject: Batteries [TRN-MDL-00310821], publicly accessible at
http://www.mdl2179trialdocs.com/releases/release201302281700004/McWhorter_Jim-Depo_Bundle.zip; Transocean
subsea work book [TRN-INV-02932167]. 10 DAR Consolidation Report, entry, December 29, 2008 indicates the ‘blue pod’ was changed out [TRN-INV-03259688];
Cameron Daily Report Sheet December 29, 2008 notes “[…] OIM decided that they need to put the old POD back on the
stack and go with it for now because the SEM that came from Cameron has a possible problem with a modem so they
changed the POD […]” [CAM-CSB 000007498]; and Subsea work book indicates SEM # 1 was overhauled in April 2009
[TRN-INV-0293227] which could only happen it if was not installed on the BOP. 11 Cameron Engineering Bulletin EB 891 D, AMF/Deadman Battery Replacement, September 2004.

CSB-FINAL REPORT-MUX(06-02-2014) Page 7 of 113
U.S. Chemical Safety Board By Engineering Services, L.P.
the BOP upper annular preventer. ES does not have any evidence that the miswired SV 3A prevented
setting of the upper annular regulator pressure set point during normal operations. Testing of an
exemplar solenoid valve suggests that rig operators could possibly have succeeded in using the
miswired 3A by persistently pressing the associated control system push button rather than just
holding it down. Post-incident testing of the yellow pod at the surface reported that operation of the
3A solenoid was “sluggish,” and took a “long time to fire.”12
2. Pre-accident testing procedures using the rig-based BOP control system were not capable of revealing all
of the failed components of the BOP emergency shut-in system.
a. The design of the BOP control system did not allow independent functional testing of its redundant
AMF/deadman subsystems either while the BOP was on the rig or while it was in subsea service.
There were four separate emergency subsystems which could activate the AMF/deadman; there were
two control pods, each with its own 27 volt battery pack, and each of these two pods had two
independent subsea electronics modules (SEMs), each with its own programmable logic controller
(PLC), AMF/deadman card and 9 volt battery pack. However, the four subsystems could not be
independently tested using the BOP control system. Without independent functional testing for each
of these four subsystems, latent failures which disable as many as three of these redundant systems
could still result in a successful overall AMF/deadman test result. A successful test even with no
working redundant backups would fail to reveal that the reliability of the AMF/deadman emergency
safety was severely compromised.
3. Other items relating to the control system.
a. The emergency AMF/deadman system was not tested either before deployment to the wellhead nor
while the BOP was in service subsea. ES found no evidence in the form of deck test function results
or testimony to suggest that testing of critical AMF/deadman system components (e.g., electronics,
batteries and high pressure shear circuits) was performed prior to deploying the BOP at Macondo.
The control system had no capability for reporting the condition of the batteries after being deployed
subsea.
b. Regular subsea testing of the blind shear ram did not include the high pressure emergency circuit that
included the miswired solenoid SV 103Y. The blind shear ram was function tested regularly (closed
and reopened) while the BOP was in service. This function test can be done with either a low-pressure
(1,500 psig) manifold regulator circuit used for normal drilling operations, or with a high-pressure
circuit (4,000 psig) that is shared with the AMF/deadman. These two hydraulic circuits are
12 Handwritten note by Cameron representative on Deck Test Procedure for Mark-II Control Pod, for solenoid (3A),
“sluggish—activate & takes a long time to fire, skips.” [BP-HZN-BLY00060717].

CSB-FINAL REPORT-MUX(06-02-2014) Page 8 of 113
U.S. Chemical Safety Board By Engineering Services, L.P.
independent, using different electronic controls and solenoids. The high-pressure AMF/deadman
circuit containing the miswired SV 103Y solenoid was not tested.13
1.2 BOP Control System Architecture
The BOP control system (Figure 1) included multiple rig-mounted control panels and two subsea control pods
(designated as blue and yellow), containing control computers sealed in subsea electronics modules (SEMs).14
Data was sent between the rig and the control pods via multiplexed (MUX) communication, a method which is
capable of sending multiple simultaneous signals over a single communications cable. In this case, modems
transmitted and received commands and inputs to and from the subsea BOP on copper wire MUX cables. The
cables were supported by attachment to the drilling riser, the connection pipe between the rig and the BOP
through which the drill pipe, drilling tools and drilling fluid were passed. Electrical power for the MUX system
was provided from the surface to the pods by the Deepwater Horizon’s normal power system and its battery-based
backup power system, called the uninterruptible power supply (UPS). Hydraulic power was used for normal
operation of the BOP functions, and this was also provided from the rig via hydraulic lines.
The subsea control system included redundancy. The complete subsea BOP control system contained the blue pod
and the yellow pod, both attached to the lower marine riser package (LMRP).15 Each pod had its own 27 volt
battery for emergency power supply independent of surface-supplied power. Each control pod also had two
redundant SEM computer systems (SEM A & SEM B), each with a dedicated AMF/deadman CPU card powered
by a dedicated 9 volt battery.
13 API RP 53, 3rd Ed., the MMS-referenced standard, states “All operational components of the BOP equipment systems
should be functioned at least once a week to verify the component’s intended operations.” The definition of component is
commonly interpreted to be the various preventers (e.g., upper annular, blind shear ram). Thus, a test using the LP BSR
would be in compliance in the API recommendation and MMS requirements. 14 RBS8D Multiplex BOP Control System – Volumes 1-8, CAM-CSB 000004070. 15 For a description of the BOP stack components, see Appendix B of the separate Engineering Services report Deepwater
Horizon Blowout Preventer Failure Analysis.

CSB-FINAL REPORT-MUX(06-02-2014) Page 9 of 113
U.S. Chemical Safety Board By Engineering Services, L.P.
Figure 1. The BOP control system included multiple rig-mounted control panels and two subsea control
pods (designated as blue and yellow). Data was sent between the rig and the control pods via
multiplexed (MUX) communication cables supported by attachment to the drilling riser. During normal
operations, electrical and hydraulic power for the MUX system was provided from the rig, but during
emergency situations could be provided from subsea batteries contained in the yellow and blue pods
and hydraulic reservoirs called accumulators.

CSB-FINAL REPORT-MUX(06-02-2014) Page 10 of 113
U.S. Chemical Safety Board By Engineering Services, L.P.
The Emergency Disconnect System (EDS) was one of the BOP emergency systems. The EDS required human
initiation. It was designed to activate the high pressure blind shear ram (HP BSR) close circuit, shearing drillpipe
in the BOP and sealing in the well. It would then disconnect the LMRP, the top portion of the BOP located above
the BSR and other rams and preventers. The Deepwater Horizon could then leave the area with the riser and
LMRP hanging below the rig. A typical scenario that might have necessitated the use of EDS would be if the
Deepwater Horizon had begun to drift off station and outside an allowable operating distance. Increasing offset
could have pulled the riser apart, and/or potentially bent the wellhead. The crew could have activated the EDS
while still within safe limits, sealing the well and disconnecting the riser before excessive loads developed.
The Automatic Mode Function, or Deadman, emergency shut-in system (AMF/deadman) was designed to close
the HP BSR without human intervention and without electrical or hydraulic power from the rig by using subsea
batteries and hydraulic reservoirs called accumulators. The AMF/deadman should activate on the simultaneous
loss of electrical power, communications, and hydraulic pressure from the rig to the BOP. Both the blue and
yellow pods should respond in parallel to provide the logic and battery power for initiating a sequence of
solenoids intended to hydraulically close the HP BSR and some other connected functions. A typical scenario
might be the accidental severing of the riser, examples being over-tension from excessive vessel offset
(telescoping joint becoming fully extended), connector fatigue/corrosion damage, or a severe explosion and fire
such as what occurred on the Deepwater Horizon.
The autoshear emergency shut-in system could also activate the HP BSR close function. When armed, this system
was designed to function upon an unintended separation of the LMRP from the lower portion of the BOP, e.g., an
accidental disconnect due to human error or controls malfunction.
1.3 AMF/deadman Activated in Response to Incident
The ES analysis concludes that when utilities and communication were lost between the Deepwater Horizon and
the BOP during the incident on April 20, 2010, neither the blue or yellow pod executed a normal AMF/deadman
sequence. However, through a combination of redundancy and serendipity, the AMF/deadman did activate.
The blue pod failed to execute the AMF/deadman upon loss of surface utilities and communication from the
Deepwater Horizon because of an aging drained 27 volt battery which was further aggravated by SEM internal
wiring deficiencies. The 27 volt battery in the blue pod failed to energize the programmed sequence of solenoids,
including the HP blind shear ram close solenoid (SV 103 – blue) because the voltage on the battery pack was too
low.16
16BP Deepwater Horizon accident investigation report, September 8, 2010, p. 154 (hereinafter “BP Report”),
http://www.google.com/url?sa=t&rct=j&q=&esrc=s&source=web&cd=1&cts=1331666404195&ved=0CCkQFjAA&url=
http%3A%2F%2Fwww.bp.com%2Fliveassets%2Fbp_internet%2Fglobalbp%2Fglobalbp_uk_english%2Fincident_respon
se%2FSTAGING%2Flocal_assets%2Fdownloads_pdfs%2FDeepwater_Horizon_Accident_Investigation_Report.pdf&ei=
x55fT7qYJunIsQKFqPSMCA&usg=AFQjCNE4cEa7fTYS0DYjDfGY60zekb6cqw. Accessed March 12, 2012;
DNV Report, p. 60, Accessed August 14, 2013.

CSB-FINAL REPORT-MUX(06-02-2014) Page 11 of 113
U.S. Chemical Safety Board By Engineering Services, L.P.
The redundant yellow pod also had an unknown condition which might have caused the yellow pod to fail. Its
safety-critical HP blind shear ram close solenoid (SV #103 Y) was miswired. The pod solenoids each have two
redundant coils (A and B), each independently energized by one of the two redundant SEMs in the pod. Normally,
the 2-coil solenoid can be successfully energized by either SEM A or SEM B or by both. But in the case where
one coil is miswired, the reverse polarity of that coil will fight the forward polarity of the other coil when
energized at the same time. Simultaneously energizing opposing coils will cause the solenoid not to actuate. In the
AMF/deadman scenario, this miswiring of the SV 103 Y means if both SEMs worked as designed, the blind shear
ram would not be closed by the yellow pod. As it turned out, the SEM B 9 volt battery had been prematurely
drained due to some unknown external condition or internal battery defect. It did not even have enough capacity
to complete the first step of the AMF/deadman sequence, that of rebooting the SEM B PLC. ES concludes that the
premature failure of the SEM B 9 volt battery allowed only the SEM A coil to energize and thus SV 103Y
successfully actuated attempting to seal the well. However, at the time of actuation, off-center drill pipe in the
BOP prevented the BSR from closing and sealing the well.17
1.4 Miswired Solenoid Testing
AMF/deadman system testing and solenoid component tests accomplished during Phase 1 testing provided
inconsistent results. ES discusses the test results in this report. Part of the ES research to clear up the Michoud test
results includes CSB-sponsored testing of an exemplar solenoid valve (SV) to determine the effect of having one
coil reverse-wired. We determined that a miswired solenoid should work satisfactorily when only one coil is
energized at a time. When both coils are energized simultaneously, neither coil succeeds in actuating the valve as
designed.
When a SEM actuates a solenoid, it does not send a simple constant voltage DC electrical signal. Instead, it uses a
30-second long complex signal called a pulse-width-modulated (PWM) DC voltage.18 The response of energizing
forward-wired and reverse-wired solenoid coils with the type of PWM signal used by the SEMs is difficult to
predict. Differences in timing between activating the signals of less than a second could make a difference. Using
an exemplar solenoid, ES designed testing to determine whether a non-simultaneous or out-of-sync energizing by
SEM A and SEM B could actuate the solenoid valve. Pulse-width-modulated (PWM) DC voltages were
programmed similarly to the pulse sequences used in the SEMs. Our testing reveals that the valve could actuate in
brief, intermittent pulses if the 103 solenoid valve was energized for 30 seconds with SEM A and SEM B PWM
cycles out-of-sync by more than 250 milliseconds.19 ES, therefore, hypothesized two possible scenarios for the
AMF/deadman sequence concerning the yellow pod during the incident, both relating to the critical health of the
SEM B 9 volt battery.
Scenario 1 for yellow pod AMF/deadman—assuming both yellow pod SEM A & B 9 volt battery packs are
viable—SEM A and SEM B are out of sync by more than 250 milliseconds.
17 See separate Engineering Services report, Deepwater Horizon Blowout Preventer Failure Analysis for off-center drill pipe
discussion. 18 Phase 2 Test Preparation Sheet, DNV2011060643: BOP-015-2, PETU Solenoid Drive Characterization testing, p. 4-5. 19 See Appendix F: CSB Exemplar Solenoid Testing in this report

CSB-FINAL REPORT-MUX(06-02-2014) Page 12 of 113
U.S. Chemical Safety Board By Engineering Services, L.P.
After loss of surface power and communications, the SV 103Y possibly could have been moved enough to
transmit a series of hydraulic pulses during the 30 seconds that 103 would have been energized. But those pulses
would have been of limited duration. SV 103Y passes hydraulic fluid at pilot pressure (3,000 psi) to actuate the
HP shear valve, which, in turn, provides hydraulic fluid at high pressure (4,000 psi) to close the BSR. We did not
simulate or otherwise evaluate the high-pressure circuit to the BSR pistons; therefore, we cannot reach a
conclusion about the extent to which SV 103 pulses would have provided useful shearing in the HP circuit. It is
not possible to quantify from our test how much hydraulic pressure and fluid volume would have been available
to act on the blind shear rams. However, even in this scenario, we believe some useful work would have been
produced to compress or dent the drill pipe.20 Of the two, we conclude that this is not the more probable scenario
unless it were shown that the Yellow pod SEM B battery had not failed under subsea conditions at the time of the
incident.
Scenario 2 for Yellow Pod AMF/deadman—Assuming SEM B 9 volt Battery Pack Was Prematurely Drained
This scenario is based on the SEM B battery pack in the yellow pod being in a drained condition at the time of the
AMF/deadman actuation. As a result, the yellow pod initiated the AMF/deadman sequence only on SEM A. With
only one coil of the miswired SV 103Y being fired, the solenoid actuated correctly and attempted to close the
blind shear rams. The yellow pod AMF/deadman tests during Phase 1 testing occurred at ambient temperatures
was near 21ºC. Subsea temperatures would have been closer to 2ºC. While SEM internal temperatures would have
been higher than 2ºC, the cooler subsea environment would have decreased the ability of the 9 volt battery to
power the SEM. In addition, when compared to the SEM A 9 volt battery, the SEM B battery was in a defective
condition totally unrelated to normal electrical loads imposed. When applying non-linear capacity re-rating factors
for subsea thermal conditions and battery resting recovery and then comparing the Michoud results to those non-
linear conditions, ES concludes that the defective 9 volt battery would not have successfully powered the SEM B
PLC through the AMF/deadman sequence at the time of the incident, and that the sequence was completed
successfully by the SEM A PLC alone. Of the two, we conclude that this scenario is more probable. (See
Appendix Sections C1.2 and C1.3 for additional details of the failing battery capacity.)
A third possibility is that the 9v SEM B battery had enough power sub-sea to complete the SEM B AMF/deadman
sequence. ES considered this possibility. Given that possibility, Scenario 1 then becomes the more likely.
However, the fact remains that the SEM B 9 volt battery dramatically failed all battery load testing at Michoud by
quickly drawing down the battery voltage. Our research on the 5 volt Linear Technology regulator on the AMF
card revealed that it required approximately 6.0 volts from the AMF 9v battery to carry the load for the SEM
PLC. This factor in combination with the thermal and resting recovery factors mentioned above, led us to assign a
low probability to the viability of this battery. In any case, we believe that the evidence has shown that some
useful hydraulic pressure to the blind shear rams acted on the off-center drill pipe.
20 For additional discussion of the initial hydrostatic/wellbore differential pressure acting to close the Blind Shear Rams, see
Engineering Services’ BOP Failure Analysis Report, Section 11.

CSB-FINAL REPORT-MUX(06-02-2014) Page 13 of 113
U.S. Chemical Safety Board By Engineering Services, L.P.
2 Definitions and Acronyms
Automatic Mode Function (AMF/deadman) – A pre-programmed emergency shut-in mode for closing the blind
shear ram in the BOP using batteries for control power and high-pressure hydraulic energy stored in accumulators
on the BOP stack. The term ‘deadman’ implies that this sequence is initiated without human intervention when all
other electrical power, data communications and hydraulic pressure from the rig have been lost.
AMF/deadman Shutdown Sequence Definition File – An ASCII file with a programmed sequence and timing
executed by the PLC in the SEM when triggered by the AMF/deadman printed circuit board’s CPU.
Autoshear – A mechanical spring-loaded pin tied to a pilot valve that actuates a low-pressure hydraulic signal
when the LMRP accidentally separates from the BOP. The low-pressure hydraulic circuit energizes the pilot-
operated HP shear valve, which sends high pressure to the blind shear ram and closes the ST locks on any closed
ram.
Blind Shear Rams (BSR) – A two-piece heavy duty BOP valve designed to close the annular space and shear drill
pipe, if necessary, and to seal the entire area. The blind shear ram could be closed under LP (low operating
pressure) by human initiation to use the BSR without drill pipe across the BSR. The HP BSR could also be closed
by human initiation or by the AMF/deadman or autoshear sequences without human intervention and with or
without drill pipe inside the BOP. The HP BSR hydraulic circuit was separate from the LP BSR circuit.
Emergency Disconnect System (EDS) – A manually initiated system which closes the blind shear ram and then
unlatches the LMRP and riser from the BOP. This system is intended for an incident in which the dynamically-
positioned rig unexpectedly or intentionally is to move off location.
Emergency shut-in Device (ESD) – A generic term for a BOP emergency control that closes the BSR, specifically
the Emergency Disconnect System, the AMF/deadman, and the autoshear. API Specification 16D identifies the
latter two as backup control systems. 21
Factory acceptance testing (FAT) – A FAT procedure is typically developed by the equipment manufacturer. It is
usually performed after original manufacture and following any modification by the manufacturer. A FAT
procedure can be used in the field as well. In this case, the equipment may be connected to the customer’s
process, requiring adjustments in the test procedure. This test procedure is sometimes referred to as a Site
Acceptance Test. Regardless, the purpose is the same; to fully test the equipment functionality against its
specifications.
Multiplex Control System (MUX) – A system which uses modems (modulator/demodulator) for sending and
receiving signals through copper wiring to and from control computers. The subsea MUX cables are attached to
the riser. These multi-conductor cables carry the multiplexed signals in both directions. Some conductors in the
21 API Specification 16D, Specification for Control Systems for Drilling Well Control Equipment and Control Systems for
Diverter Equipment, Second Edition 2004, p. 37.

CSB-FINAL REPORT-MUX(06-02-2014) Page 14 of 113
U.S. Chemical Safety Board By Engineering Services, L.P.
MUX cable also carry 230 VAC power from the UPS systems on the rig to power the subsea MUX system under
normal conditions.
MUX Control Pod – An electro-hydraulic valve control on the Lower Marine Riser Package (LMRP) of the BOP
stack. The Deepwater Horizon included three control pods designated Pod #1, Pod #2, and Pod #3. The pods were
interchangeable and any one of them could be installed in the yellow or blue position on the BOP stack.22
Operators select one pod as the primary pod to control hydraulic functions BOP. Both pods receive MUX
controller commands to initiate solenoid valve actions in parallel with the selected pod. But without hydraulic
pressure, the actuation of the unselected solenoid valve has no hydraulic effect.
Programmable Logic Controller (PLC) – An industrial computer which accepts commands from the rig deck
control panels and continually cycles through programmed inputs. The subsea MUX PLCs normally communicate
with other computers on the rig and subsea, but they can operate individually in an emergency on battery power
during the AMF/deadman sequence. All MUX control computers on the entire system (subsea and rig-based)
respond to the communications bus and react as prompted.
Relay – An electrical switch which is electrically initiated by the control system and can have multiple outputs for
small power activation or control inputs to other logical devices.
Solenoid Valve (SV) – A hydraulic valve which is initiated electrically by the control system and which produces a
pressure output by opening an internal valve. The DWH Cameron Mark IIsubsea SV had two redundant coils
within their core. The design of the solenoid permits actuation of the hydraulic valve by either coil or both when
the coils are energized by the 24/27vdc power supplies.
ST Locks –Wedge-shaped devices which are used to automatically lock the BOP rams in the closed position after
an emergency closure, such as the AMF/deadman or autoshear. They may also be activated by a surface panel
push button command.
Subsea Electronic Module (SEM) – A sealed pressure vessel used to protect the subsea electronics and batteries
from the subsea environment pressures and moisture. One SEM module/vessel is included with each MUX
control pod. Each SEM has internal redundancy including two PLCs, two 9 volt battery packs, and two
AMF/deadman cards. These duplicate systems are referred to as SEM A and SEM B.
Subsea Transducer Modules (STM) – Vessels on each pod which facilitate the electronics and wiring to the
pressure and temperature transmitters used for MUX control system inputs. There were two STMs at Macondo.
Technical Working Group (TWG) – During Phase 1 of the BOP testing, five other parties were organized along
with the U.S. Chemical Safety Board (CSB) into a Technical Working Group: BP, Transocean, Cameron, U.S.
Department of Justice, and the Multi-District Litigation group (MDL). The TWG served to review and approve
22 Testimony given in the U.S. District Court for the Eastern District of Louisiana under the Multi-District Litigation docket
MDL No. 2179, see McWhorter Designations Vol 1, p, 67-68.

CSB-FINAL REPORT-MUX(06-02-2014) Page 15 of 113
U.S. Chemical Safety Board By Engineering Services, L.P.
protocols and to approve/disapprove any deviations in the test procedures, as the need arose. The TWG members
had a closer level of access (than other party representatives) in witnessing the actual testing.
3 Overview of BOP Subsea Control System
This section provides a general description of the components of the Deepwater Horizon blowout preventer which
are associated with the control system for emergency shut-in functions. The details provided here include those
necessary to understand the ES analysis. For a more detailed review of the control system, the reader is referred to
other previously published reports on the Macondo incident that describe the BOP control system.23
3.1 BOP System Overview
See Appendix B of the separate Engineering Services report, Deepwater Horizon Blowout Preventer Failure
Analysis for description of the BOP stack components.
3.2 MUX Control System Component Description
The Deepwater Horizon BOP was controlled by a Cameron Mark II electro-hydraulic MUX24 control system.25
Electro-hydraulic means that portions of the system were controlled by electrical signals and portions by
manipulating hydraulic fluid. Electrical power for was provided to the BOP system from the Deepwater Horizon’s
Power and Communication Cabinets (A & B). Each cabinet also had a dedicated UPS (uninterruptible power
supply) that supplied 230 VAC electrical power to the BOP system for a minimum of two hours if main power
from the rig were interrupted or removed.26 Hydraulic power was also provided from the rig via hydraulic lines. A
series of hydraulic fluid storage vessels, called accumulators, were located on the rig to provide fluid pressure in
the event that pumps supplying hydraulic power were interrupted. Two additional sets of accumulators (one for
the BOP stack and one for the LMRP) were located on the BOP stack for use by emergency systems in the event
that hydraulic pressure from the rig was lost. The Mark II control system, commands and sensor signals were
transmitted and received between the BOP system and the rig using modems transmitting over copper MUX
cables.
The Deepwater Horizon MUX control system was housed in the LMRP. The fluid connection for hydraulic
controls between the LMRP and the BOP stack were made using devices called stingers. The stingers were
located at the bottom of the LMRP. To connect, they were extended into corresponding receptacles in the top of
the BOP stack. Seals on the stingers were then activated to prevent leaks.
23 Appendix H of the BP Report Sections 1 and 2. 24 MUX is an abbreviation for “multiplexed communications,” a method which is capable of sending multiple simultaneous
signals over a single communications cable. 25 Drawing SK-122100-21-04 General Arrangement of MUX Control System, CAM-CSB000004214. 26 Drawing SK-122100-21-04 sheet 1 of 4, Interconnection Diagram. TRN-HCEC-00016703.

CSB-FINAL REPORT-MUX(06-02-2014) Page 16 of 113
U.S. Chemical Safety Board By Engineering Services, L.P.
3.2.1 MUX Control Panels
There were two redundant control panels for sending commands to the BOP system. On the Deepwater Horizon,
the driller’s control panel (DCP) was located in the driller’s shack on the rig drilling floor. This panel contained
pushbuttons for controlling the various BOP functions (see Figure 2 and Figure 3). A redundant pushbutton
control panel, alternately referred to as the toolpusher’s (TCP) or offshore installation manager’s control panel
was located on the bridge of the Deepwater Horizon.
Figure 2. Deepwater Horizon Driller’s Control Panel27
The photograph in Figure 3 shows the pushbuttons for the BSR and the casing shear ram (CSR). The pushbuttons
shown on a graphic depicting the BOP stack (black vertical stripe, also seen in Figure 2) are for the lower pressure
BSR and CSR functions. The HP BSR and HP CSR buttons can be seen to the left of the lower pressure
pushbuttons. There are also control panel pushbuttons for manually extending and sealing the stingers
27 Constructed from CAM-CSB-000005284 and CAM-CSB-000005286.

CSB-FINAL REPORT-MUX(06-02-2014) Page 17 of 113
U.S. Chemical Safety Board By Engineering Services, L.P.
Figure 3. Portion of the control pushbutton panel for the BOP.28
3.2.2 BOP Control Pods
At the BOP stack, the electrical power, hydraulic power and control signals are received by devices located in two
redundant, sealed containers mounted to the LMRP. These containers were called pods, one the yellow pod, and
the other the blue pod. The pods contain the subsea electronic modules (SEMs), subsea transducer modules
(STMs), hydraulic pressure regulators, solenoid pilot valves, hydraulic accumulators and hydraulic valves.29
Each pod contains two redundant subsea electronic modules (SEM A and SEM B) located in a SEM housing. See
Figure 4. Each SEM includes a programmable logic controller (PLC), an AMF/deadman controller card, and a 9
volt battery pack for booting and operating the AMF/deadman card. There is one 27 volt battery pack per SEM
housing, providing power for sensors and solenoids needed by both SEMs only during an emergency event.
28 BP-HZN-BLY00056468 29 Transocean Report, Appendix N, AMF Testing, p.1.

CSB-FINAL REPORT-MUX(06-02-2014) Page 18 of 113
U.S. Chemical Safety Board By Engineering Services, L.P.
Figure 4. SEM from the Deepwater Horizon (left) with its protective housing removed (right) as
observed during Phase 1 testing.
3.2.3 BOP Solenoid Valves
The SEMs convert the MUX control commands from the rig (or autonomous commands generated within the
SEMs) to various actions, hydraulically operating the BOP system devices (rams, preventers and valves). The
SEM electrical outputs are converted by hydraulic fluid actions using electrically-powered devices called solenoid
valves. A solenoid is a device which uses a magnetic field to cause a mechanical action. In this case the magnetic
field is caused by a SEM electrical signal passing through a coil of wire, and the mechanical action is to open and
close a solenoid valve to start and stop hydraulic fluid to a BOP system device. The solenoid valves had to operate
under pressures of 3000 to 5000 psi, and at cold subsea temperatures on the order of 35°F. As a result, they were
enclosed in a heavy stainless steel housing which protected the solenoid and valve parts, and they included a cable
assemblies that allowed them to be plug-connected to the control system. See Figure 5.

CSB-FINAL REPORT-MUX(06-02-2014) Page 19 of 113
U.S. Chemical Safety Board By Engineering Services, L.P.
Figure 5. Typical BOP solenoid valve (Photo—Engineering Services)
Each BOP control system solenoid valve has two operating coils, one is connected to SEM A and the other coil is
connected to SEM B. While this dual coil design was meant to provide redundancy, it was the basis for failure of
solenoid valves on the Deepwater Horizon.
When a solenoid is electrically energized, the magnetic forces in the coil30 pull the armature of the solenoid into
the space within the coil and open the valve. When the coil is deenergized, a spring pushes the armature back
outside of the coils, closing the valve. With redundant dual coils, energizing either coil is sufficient to actuate the
solenoid. However, the polarity of the coils is critical. If one of the coils is wired with opposite polarity, the
magnetic effect will be canceled. One coil creates an electromagnet with a North-South orientation. The other
creates a South-North orientation. The net magnetic force is zero. In this condition, the valve would not open,
even though both coils were energized. A solenoid key to the operation of the AMF/deadman on the Deepwater
Horizon BOP, the #103 solenoid valve operated by the yellow pod (SV 103Y) was erroneously wired with reverse
polarity coils.
3.2.4 BOP Pod Batteries
Each SEM housing has two types of battery packs. Each SEM has a 9 volt battery pack which provides power to
the AMF/deadman card. The second is a 27 volt battery pack common to both SEMs which provides power to the
24 volt-rated relays on the AMF/deadman card, to the hydraulic fluid pressure sensors and to the output modules
from the SEM programmable logic controllers.
The batteries in use at the time of the accident were manufactured by SAFT.31 The battery packs in the pods
consisted of multiple 3 volt lithium manganese dioxide cells (Li-MnO2) cells. The arrangement of the individual
30 Passing an electrical current through a coil of wire creates a magnetic field, an electromagnet, with a North and South pole,
just like a permanent magnet. 31 See Appendix A in this report for catalog cuts and additional battery details.

CSB-FINAL REPORT-MUX(06-02-2014) Page 20 of 113
U.S. Chemical Safety Board By Engineering Services, L.P.
batteries (two in series, and three sets of two in parallel) formed the 9 volt battery packs, and three 9 volt packs
were connected in series to form the 27 volt battery pack.32
Using the manufacturer’s information, we calculated that each of the 9 volt and 27 volt battery packs were derated
by Cameron from the manufacturer’s amp-hour ratings by 12.5%. After derating, each battery had a rating of 42
amp-hours, which was published by Cameron in its quality test procedures.33
3.2.5 BOP Pod Selection
The Deepwater Horizon control panels contained two sets of section pushbuttons which determined how control
signals were handled by the pods. The primary pod selection pushbuttons allowed the rig crew to select either the
blue pod or yellow pod as the active control pod. The active control pod would be connected to the rig hydraulic
supply through the conduit valve package (CVP). If, for example, a hydraulic fluid leak developed in one pod, the
other pod could be selected as the active pod from the surface control panel. The transfer of control between pods
was handled by remote control valves in the CVP.
While only the selected pod received normal rig-sourced hydraulic fluid supply, both pods received simultaneous
commands from the rig and both energized their respective solenoid valves. The difference was that only the
selected pod solenoid valves, connected to the CVP, did useful work since it did had hydraulic pressure available.
In a situation such as activation of the AMF/Autoshear system, hydraulic power came from the BOP system-
mounted accumulators, not the rig-based hydraulic system. In this case, hydraulic fluid was made available to
both pods, and both blue and yellow solenoids would act in parallel to actually do work to complete the
command.
3.3 Emergency Operating Modes
The control system can enter an emergency operating mode in three situations:
rig personnel are aware of an impending problem prompting them to initiate the emergency disconnect
system to disconnect riser and LMRP from the well;
the rig unexpectedly moves off location causing the autoshear system to initiate, closing the blind shear
ram and releasing the LMRP;
when deck utilities are lost and the crew has no other way to communicate with and operate the subsea
BOP the AMF/deadman will trigger.
The emergency shut-in modes are discussed next.
32 Additional battery information appears in the BP Report, Appendix X, p. 1. 33 Cameron Factory Acceptance Test Procedures for Subsea Electron Module (Horizon AMF/Deadman In Current Situation)
,Document No. X-065449-05-03, Rev 2, CAM-CSB000008040.

CSB-FINAL REPORT-MUX(06-02-2014) Page 21 of 113
U.S. Chemical Safety Board By Engineering Services, L.P.
Emergency Disconnect System – The emergency disconnect system (EDS) is managed by the surface MUX and
is manually initiated. A single-button activation initiates a pre-defined sequence of functions on the BOP stack to
secure the well and disconnect the LMRP and riser. The EDS is most frequently used to avoid damage to the BOP
and wellhead if a dynamically positioned rig unexpectedly moves off location. The emergency disconnect
sequence can be activated from either the toolpusher’s or driller’s control panels (TCP or DCP). The sequence is
designed to close the high-pressure blind shear ram, close the choke and kill valves and unlatch the LMRP
connector (along with choke/kill connectors).
Witness accounts indicated that the crew attempted to activate the EDS approximately seven minutes after the
initial explosion.34 The LMRP did not disconnect and hydrocarbons continued to flow, indicating that the BSR did
not function or seal, most likely due to lost communications and electrical power to the MUX cables caused by
the explosions on the rig.
Autoshear Function System – The autoshear mechanically activates the high-pressure shear circuit to close the
blind shear rams and ST Locks if the LMRP is unexpectedly disconnected from the BOP stack. A trigger valve
between the LMRP and Stack plates will activate the Blind Shear Ram and Blind Shear ST Lock functions. The
Autoshear function must be "Armed" via the function on the DCP or TCP (Auto Shear, ARM). The hydraulic
power to close the Blind Shear Ram will be from the stack mounted accumulators.
AMF/deadman – Once the AMF/deadman has been armed from the surface, three conditions are necessary to
initiate the deadman sequence:
1. Loss of electrical power and communication from the MUX umbilical
2. Loss of communication from the other pod’s SEM
3. Loss of conduit pressure relative to hydrostatic (subsea ambient) pressure
A pushbutton on the control panels was used to arm and disarm the AMF/deadman. When AMF/deadman was
armed, the pod’s 9 volt battery packs would be connected to power the AMF/deadman card for each SEM. When
condition 1 occurred, loss of electrical power and communications, the 27 volt battery pack would be connected
to power the two pressure transducers used to check condition 3.
Conditions 1 through 3 would occur during a disaster such as parting of the riser, or major explosion and fire on
the rig which could damage the MUX cables causing loss of surface utilities and leaving the subsea BOP control
system to self-initiate the closure of the blind shear ram.
The stored hydraulic power to perform the AMF/deadman sequence was supplied from the stack mounted
accumulators.
34 BP Report, p. 47.

CSB-FINAL REPORT-MUX(06-02-2014) Page 22 of 113
U.S. Chemical Safety Board By Engineering Services, L.P.
4 Analysis: AMF/deadman Activation April 20, 2010
The first set of findings to be analyzed center around our conclusion that the AMF/deadman sequence activated on
April 20, 2010 when communications, electric power and hydraulic power were severed between the Deepwater
Horizon and the BOP immediately following the explosions and fire on the rig.
As described in detail is in this section, and summarized in Figure 6, the two SEMs in the blue pod were
miswired, which caused the emergency 27 volt battery to prematurely connect the two AMF/deadman pressure
transducers. The premature connection drained the 27 volt battery, preventing the AMF/deadman sequence from
activating from the blue pod. The yellow pod contained two miswired solenoid valves such that a reverse polarity
existed between the dual coils. One of these solenoids (103 Y) was for the yellow pod AMF/deadman system to
actuate the BSR. However, a premature depletion of the yellow pod SEM B 9 volt battery caused the solenoid
valve to be functioned by the SEM A coil alone, thus actuating the BSR closure. Drill pipe buckled off-center in
the BOP prohibited the BSR from fully closing and sealing the well.35
Figure 6. Summary of battery conditions and solenoid 103 wiring within the yellow (left) and blue (right)
pods at the time of the incident.
35 See separate Engineering Services separate report, Deepwater Horizon Blowout Preventer Failure Analysis, for description
of buckling phenomena.

CSB-FINAL REPORT-MUX(06-02-2014) Page 23 of 113
U.S. Chemical Safety Board By Engineering Services, L.P.
The analysis of Deepwater Horizon BOP was completed in a three-part process that began during intervention
efforts to halt the flow of hydrocarbon from the well, and then continued through two phases of analysis, referred
to as Phase 1 and Phase 2. Intervention efforts included re-establishing electrical and hydraulic communications
with the BOP stack.36 To do this, the yellow and blue pods, were individually brought to the surface of the Q4000
and Discoverer Enterprise, intervention vessels used to assist with intervention efforts, May 4, 201037 and July 4,
201038 respectively. When raised to the surface, the solenoids of each pod were function tested and the integrity of
pipe, tubing, hoses and hydraulic lines were verified as well as execution of the AMF/deadman system.39 During
testing, neither the yellow pod nor the blue pod completed the AMF/Deadman sequence correctly. After repairs
and modifications had been made to the pods, they were re-deployed to the BOP stack subsea.40
The Deepwater Horizon’s blowout preventer, including the yellow and blue pods, was recovered from the well
head on September 4, 2010 and transferred to the NASA-Michoud facility in New Orleans, LA for Phase 1
testing. Det Norske Veritas (DNV) was contracted by The Joint Investigation awarded to complete Phase 1
testing.41 Phase 1 testing was declared over by DNV and BOEMRE representatives on March 4, 2011. ES and
CSB were present for this testing.
Phase 2 testing of the BOP began after BP filed a Motion for Access to the Deepwater Horizon Blowout Preventer
for Further Forensic Inspection.42 ES and CSB were excluded from this phase of testing, but documents, photos,
and videos were subsequently made available and considered in this analysis. During Phase 2 additional tests
were conducted and some components further disassembled. Phase 2 testing commenced on April 18, 2011 and
then concluded on June 22, 2011. 43
What follows in Section Analysis: AMF/deadman Activation April 20, 2010 is the analysis which provides the
basis for AMF/deadman activation findings. The first section describes the location of the available control pods
on the BOP stack at the time of the incident. The next three sections contain analysis which documents portions of
the AMF/deadman control system which were found not to be causal:
Location of the Control Pods on the BOP Stack at the Time of the Incident
The Deepwater Horizon had three pods for its BOP, referred to as pod #1, #2, and #3. Any of these three pods
could be installed in the yellow or blue position on the BOP stack. A review of various Transocean documents
36 Re-run & Function Test Yellow Pod, Document Number 2200-T2-DO-PR-4039, 10 May 2010, Document Revision C BP-
HZN-bLY00060764. 37 Cameron Controls Daily Report Sheet. Publicly accessed at
http://www.mdl2179trialdocs.com/releases/release201304041200022/TREX-03602.pdf; CAM_CIV_0046703. 38 Internal BP Recovery Logs [BP-HZN-BLY00061061]. 39 Yellow Pod: Cameron Controls Daily Report Sheet. Publicly accessed at
http://www.mdl2179trialdocs.com/releases/release201304041200022/TREX-03602.pdf; CAM_CIV_0046705.
Blue Pod: Cameron Factory Acceptance Test Procedures for Subsea Electron Module (Horizon AMF/Deadman In Current
Situation) [BP-HZN-BLY00061082 - BP-HZN-BLY00061093]. 40 Blue Pod Deployment [OSC-OWH BOEM-GOMR-B04-00003-0156]; Top Kill Procedures Manual for MC252-1 Re-run
& Function Test Yellow Pod [BP-HZN-BLY00060869 - BP-HZN-BLY000060905]. 41 DNV report p.10. 42 2011-04-19 Court Order Approving DNV-BP BOP TESTING CONTRACT. 43 Lab notebook from Phase 2 testing.

CSB-FINAL REPORT-MUX(06-02-2014) Page 24 of 113
U.S. Chemical Safety Board By Engineering Services, L.P.
indicates the pods were not clearly differentiated by pod number or color. For example, the Rig Maintenance
System (RMS) refers to the pods simply by their position (blue or yellow), but does not indicate if the work being
completed is on pod 1, 2, or 3. A review of work orders for the various pods appear to correlate the pod numbers
to colors, blue (pod 1), yellow (pod 2), and white (pod 3), While witness testimony asserted that the color
designations were consistently correlated to the numbers, we have found one Cameron equipment repair quote
that refers to the ‘blue pod’ as the ‘third pod’.
In a ‘subsea workbook’ that summarizes daily logs and the RMS, the pods are referred to by numbers, but
Transocean’s Daily Activity Report (DAR) consolidation reports which summarize daily activities refer to the pods
either by color (or ‘spare’ when referring to the white pod) or number. Sometimes the DAR specifies the location
of a pod on the BOP stack, for instance on January 23, 2006 the following entry is made “Installed #1 pod in the
yellow position on LMRP […],” but not always. Witness testimony indicates that pod 3 (white or ‘spare’) was in
the blue position and pod 2 (yellow) was placed in the yellow position before the Deepwater Horizon BOP was
deployed at Macondo. The same witness testimony further indicates the SEM of pod 1 had been transferred into
pod 2. While the DAR documents the SEM transfer, it does so by referring to pod 1 (blue pod) as the ‘spare pod’,
“Removing SEM from yellow pod and installing SEM from spare pod into yellow.” The DAR does not explicitly
document that pod 1 (blue) was in the spare position or that pod 3 (white) was in the blue position, but other
documents support that to be the case.
For the remainder of the report, ‘blue pod’ or ‘blue control pod’ will be used to refer to the control pod found in
the blue position and ‘yellow pod’ or ‘yellow control pod’ for the control pod found in the yellow position.
The AMF/deadman was Armed at the Time of the Incident
Pie Connectors
PLC Executable Files
The final four sections provide the analysis of the portions of the system where faults were found:
Premature Draining of the Blue Pod 27 volt Battery
SV 103Y Solenoid Valve Miswired
How a Miswired Solenoid Valve Operates
BOP Batteries
4.1 Location of the Control Pods on the BOP Stack at the Time of the
Incident
The Deepwater Horizon had three pods for its BOP, referred to as pod #1, #2, and #3. Any of these three pods
could be installed in the yellow or blue position on the BOP stack. A review of various Transocean documents
indicates the pods were not clearly differentiated by pod number or color. For example, the Rig Maintenance
System (RMS) refers to the pods simply by their position (blue or yellow), but does not indicate if the work being

CSB-FINAL REPORT-MUX(06-02-2014) Page 25 of 113
U.S. Chemical Safety Board By Engineering Services, L.P.
completed is on pod 1, 2, or 3.44 A review of work orders for the various pods appear to correlate the pod numbers
to colors, blue (pod 1), yellow (pod 2), and white (pod 3),45 While witness testimony asserted that the color
designations were consistently correlated to the numbers,46 we have found one Cameron equipment repair quote
that refers to the ‘blue pod’ as the ‘third pod’.
In a ‘subsea workbook’ that summarizes daily logs and the RMS, the pods are referred to by numbers,47 but
Transocean’s Daily Activity Report (DAR) consolidation reports which summarize daily activities refer to the
pods either by color (or ‘spare’ when referring to the white pod) or number.48 Sometimes the DAR specifies the
location of a pod on the BOP stack, for instance on January 23, 2006 the following entry is made “Installed #1
pod in the yellow position on LMRP […],”49 but not always. Witness testimony indicates that pod 3 (white or
‘spare’) was in the blue position and pod 2 (yellow) was placed in the yellow position before the Deepwater
Horizon BOP was deployed at Macondo.50 The same witness testimony further indicates the SEM of pod 1 had
been transferred into pod 2. While the DAR documents the SEM transfer,51 it does so by referring to pod 1 (blue
pod) as the ‘spare pod’, “Removing SEM from yellow pod and installing SEM from spare pod into yellow.” The
DAR does not explicitly document that pod 1 (blue) was in the spare position or that pod 3 (white) was in the blue
position, but other documents support that to be the case. 52
For the remainder of the report, ‘blue pod’ or ‘blue control pod’ will be used to refer to the control pod found in
the blue position and ‘yellow pod’ or ‘yellow control pod’ for the control pod found in the yellow position.
44 RMS II Equipment History [TRN-INV-03235829], publically available at
http://www.mdl2179trialdocs.com/releases/release201305171200030/TREX-052683.pdf. 45 Yellow pod work orders [TRN-INV-00031471], Blue pod work orders [TRN-INV-00031384], and White pod work orders
[TRN-INV-00031441]. 46 Testimony given in the U.S. District Court for the Eastern District of Louisiana under the Multi-District Litigation docket
MDL No. 2179, see Hay Designations Vol 1, p, 74, publically available at
http://www.mdl2179trialdocs.com/releases/release201302281700004/Hay_Mark-Depo_Bundle.zip. 47 Transocean subsea work book [TRN-INV-02932167]. 48 DAR Consolidation Report for subsea personnel activities printed June 2, 2010 covering the time period from April 24,
2002 to February 17, 2010 [TRN-INV-03259497]. 49 Ibid [TRN-INV-03259590]. 50 Testimony given in the U.S. District Court for the Eastern District of Louisiana under the Multi-District Litigation docket
MDL No. 2179 was conflicting, see McWhorter Designations Vol 1, p, 78-79 where he describes that pod #3 was in the
blue stack and pod #2 was in the yellow stack at the time of the incident, publicly accessible at
http://www.mdl2179trialdocs.com/releases/release201302281700004/McWhorter_Jim-Depo_Bundle.zip. 51 DAR Consolidation Report, entry September 8, 2009, [TRN-INV-03259710]. 52 DAR Consolidation Report, entry, December 29, 2008 indicates the ‘blue pod’ was changed out [TRN-INV-03259688];
Cameron Daily Report Sheet December 29, 2008 notes “[…] OIM decided that they need to put the old POD back on the
stack and go with it for now because the SEM that came from Cameron has a possible problem with a modem so they
changed the POD […]” [CAM-CSB 000007498]; Subsea work book indicates SEM # 1 was overhauled in April 2009
[TRN-INV-0293227] which could only happen it if was not installed on the BOP; DAR Consolidation Report, entry, April
15, 2009 indicates “SEM from spare pod to be sent in to Cameron” [TRN-INV-03259697].

CSB-FINAL REPORT-MUX(06-02-2014) Page 26 of 113
U.S. Chemical Safety Board By Engineering Services, L.P.
4.2 The AMF/deadman was Armed at the Time of the Incident
Two items suggest that the AMF/deadman was armed on April 20, 2010. First, Transocean claims a photo taken
during a routine ModuSpec survey on April 10, 201053 shows that the system was armed. It should be noted that
neither the CSB nor ES have been able to independently verify Transocean’s photographic evidence. Second,
screenshots of each pod’s SEMs after retrieval show three of the SEMs were in a disarmed (blue SEM A, yellow
SEM A, and yellow SEM B) while one of the SEMs was in an armed state (blue SEM B).54 The residual state of
arming for the blue SEM B indicates that it had been armed at some point prior, but for some reason did not dis-
arm.
ES has not reached a conclusion on why the blue pod SEM B still exhibited an “armed” status when retrieved, 55
but one possibility for the lack of disarming lies with the depleted condition the blue pod 27 volt battery was
found in after the incident (see Appendix A). When the AMF/deadman system is armed from the rig, the system
sends a 12 volt pulse (using SEM power) to a 12 volt bi-stable relay.56 This implies that when rig personnel
disarm the AMF/deadman intentionally, the necessary pulse voltage is available on the 24 volt SEM bus. In the
case of an AMF/deadman actuation, at the end of the sequence the PLC directs the 27 volt battery, which was used
to energize the solenoids, to fire the 12 volt pulse to unlatch the bi-stable relay which then disconnects the
batteries and disarms the AMF/deadman. An expert retained by BP to investigate the DWH BOP control system
conducted testing of an exemplar bi-stable relay. BP’s expert concluded that a depleted 27 volt battery could
operate the 12 volt relay even though it might be unable to operate the solenoids in the pod. 57
4.3 Pie Connectors
Pie connections, Figure 7, were used to interface the SEM electronics pressure-rated vessel with wiring to other
parts of the pod. The wedge-shaped plug contacts used to make this interface connection were subject to long-
term corrosion. The pie connections were inspected during Phase 2 testing of the BOP. There is no evidence that
the pie connection or the solenoid cable interface to the pie connectors played any negative role in the MUX
control system or AMF/deadman sequence. Faults on the system due to bad pie connections would have been
noted on the deck by system diagnostics before the accident as well as during Phase 1 testing at Michoud. No
53 Transocean Report, Appendix N, reference 16. 54 BP-HZN-BLY00404955 and BP-HZN-BLY00329472. 55 There is an open question as to whether the blue pod may have actually initiated the suspended AMF/deadman sequence
when power from the PETU was first connected to the retrieved pod. No visible stinger actions would have been noted
since no hydraulic power was connected to the pod at that point in time. During the Michoud AMF/testing, the blue pod
immediately responded and began the AMF solenoid sequence once PETU power was restored following an unsuccessful
AMF/deadman test. The "Deadman" analog values following that Michoud test also showed a disparity between the SEM
A (active) and SEM B (not active) after the AMF/deadman sequence had completed. 56 The 12 volts is generated by cutting the 24 volt SEM bus in half using a RC (resistor capacitor) circuit. Expert Report of
Author Zatarain, Transocean Deepwater Horizon Blowout Preventer Subsea Control System, p 43, publically accessible
http://www.mdl2179trialdocs.com/releases/release201305171200030/TREX-040009.pdf. 57 Expert Report of Author Zatarain, Transocean Deepwater Horizon Blowout Preventer Subsea Control System, p 45,
publically accessible http://www.mdl2179trialdocs.com/releases/release201305171200030/TREX-040009.pdf.

CSB-FINAL REPORT-MUX(06-02-2014) Page 27 of 113
U.S. Chemical Safety Board By Engineering Services, L.P.
faults were noted on solenoid valves in the AMF/deadman sequence. For additional analysis of the pie connectors
and their oxide coating, see Appendix H.
Figure 7. Pie connectors as observed in Phase 2.
4.4 PLC Executable Files
Technicians downloaded the programmable logic controller executable files from the SEMs of the blue and
yellow pods.58 The checklist contained in the test document indicates that the executable files were identical
across all four SEMs.
4.5 Premature Draining of the Blue Pod 27 volt Battery
The blue pod was initially retrieved on July 4, 2010 as part of the intervention efforts by BP and Transocean to
stop the continuing blowout.59 Tests that simulated the conditions necessary to trigger the AMF/deadman system
on SEM A and SEM B showed that the AMF/deadman sequence would not initiate until power was reapplied
using a portable electronic test unit (PETU). 60 A PETU allows simulation of signals to the SEMs so that various
SEM functions can be tested. Subsequent testing of the batteries on the Q4000 and during Phase 1 and Phase 2
testing showed that the 27 volt battery pack was depleted (See Appendix A for more details).
58Phase 2 Test Preparation Sheet DNV2011062110: BOP-038. 59 Internal BP Recovery Logs [BP-HZN-BLY00061061]. 60 Internal BP Recovery Logs [BP-HZN-BLY00061076]; Cameron Factory Acceptance Test Procedures for Subsea Electron
Module (Horizon AMF/Deadman In Current Situation) [BP-HZN-BLY00061082 - BP-HZN-BLY00061093].

CSB-FINAL REPORT-MUX(06-02-2014) Page 28 of 113
U.S. Chemical Safety Board By Engineering Services, L.P.
Integrity testing of the connections for both SEM A and SEM B in the blue pod revealed nonconformances with
the wiring diagrams provided by Cameron. The data were collected during Phase 2 testing at Michoud, and by
charter, only published test measurements. The scope did not include investigation beyond the test measurements.
The technicians performing the tests did not draw any conclusions as to the cause or effect of any
nonconformances found. The conclusions reached below are the result of analysis by ES.
4.5.1 Blue Pod SEM A and SEM B Miswiring
During the Phase 2 observations and tests on the SEM electronics, the technicians traced the wiring from both
AMF/deadman card connectors using continuity test methods to verify the point-to-point wiring.61 Several of the
point-to-point tests on the blue pod resulted in “Open Lead” notations, which means that no electrical connection
existed between two points which the wiring diagram showed were supposed to be connected by a wire.62 This
result was unexpected
4.5.2 The Effect of Blue Pod SEM Miswiring
Engineering Services reviewed the Subsea Electronic Module Wiring Diagrams63 to determine the potential
impact of the missing or disconnected wires on the integrity of the AMF/deadman system. The AMF/deadman
system was designed to minimize the need to use battery power. Active monitoring of the hydraulic pressure
transducers using power from the 27 volt battery pack was not supposed to begin until an AMF/deadman card
detected that both power and communication had been lost to itself and to the other three AMF/deadman cards.
This is what we believe would have resulted from the miswiring condition. The open leads would have caused the
blue SEM A AMF/deadman card to act as if all power and communications been lost. This card then triggered
monitoring of hydraulic pressure using the 27 volt battery pack, draining it over time, beginning with BOP
deployment on February 8, 2010 until, at some point prior to the incident on April 20, it no longer had the
capability to complete the AMF/deadman sequence. A detailed explanation of the miswiring appears in Appendix
D4: Review of Blue Pod SEM Wiring Defects.
The resulting effect of this additional drain on the blue pod 27 volt battery must be considered in conjunction with
our finding that all of the blue pod batteries were beyond their “recommended” useful life cycle expectancy based
on Cameron's recommendations for battery replacement.
4.5.3 Testing Which Should Reveal Wiring Defects
Evidence exists that Cameron conducted a point-to-point wiring check of what we believe was the pod 1 SEM on
June 22, 2009.64 We arrived at this conclusion based on notations on the purchase orders and other FAT test
documents from that same period. The records indicate that all sheets were fully highlighted for any external
wiring (non-pc board circuits) between the various components and terminal strips within the SEM. This is the
SEM that was transferred into pod 2 in the yellow position on the BOP. If these wiring checks had been
61Phase 2 Test Preparation Sheet DNV2011061904: BOP-033. 62 Ibid, p. 31. 63 Subsea Electronic module Wiring Diagrams, Drawing No. SK-122178-21-06, sheets 2-45 [CAM-CSB000013924]. 64 There is a handwritten note on the drawing that states “Point to point 6/22/09” and then it is signed, Subsea Electronic
module Wiring Diagrams, Drawing No. SK-122178-21-06, sheets 2-45 [CAM-CSB000013924].

CSB-FINAL REPORT-MUX(06-02-2014) Page 29 of 113
U.S. Chemical Safety Board By Engineering Services, L.P.
accomplished on pod 3when it was last refurbished at the beginning of 2007,65 we believe that the same
discrepancies found during Phase 2 would have been found during point-to-point checks. We have not found any
documentation to indicate the wiring checks were completed on pod 3.
A deck test, configured like those written for the yellow and blue pods when they were raised to the surface
during intervention, should have detected the wiring deficiencies in the blue pod had they been implemented prior
to splashing the BOP. For example, consider three possible scenarios of the AMF deck test procedure:66
1. The deck test called for sequentially cutting off power and communications and then reducing
hydraulic pressure (or simulated pressure). In this case the AMF test would have worked correctly.
2. The deck test called for first reducing hydraulic pressure (or simulated pressure), and then removing
power by turning off the PETU. This test would have immediately and prematurely activated the AMF
sequence after the reduction in hydraulic pressure.
3. If FAT or deck tests were not accomplished on this level of detail, then the miswiring would not have
been found.
There is a FAT procedure that has been filed with other documents concerning the 2007 repair on pod 3, but it
should be noted that while the steps of the procedure have been initialed, there is not accompanying Cameron
employee signature like we have observed with most other FAT procedures we have reviewed.67 ES cannot
explain why pod 3 appears to have passed the AMF/deadman FAT procedure.
4.6 SV 103Y Solenoid Valve Miswired
The yellow pod was also retrieved as part of BP and Transocean’s intervention efforts and initially tested between
May 6 and May 8, 2010.68 During this testing, solenoid valves were functioned from SEM A and SEM B and SV
103Y was recorded as failed for both SEMs. The AMF/deadman test conducted on the Q4000 with the yellow pod
also failed to complete. As a result, SV 103Y was replaced with a different solenoid, referred to as SV 103
Replacement, or SV 103R. With the replacement solenoid in place, the yellow pod passed the on-deck
AMF/deadman tests and was redeployed subsea. Later, Phase 2 testing revealed that one of the coils of SV 103 Y
was wired with reverse-polarity.
The Upper Annular Preventer “increase pressure” solenoid valve for the Yellow pod, SV 3AY, also failed for both
SEM A and SEM B on the Q4000 and was found to be miswired during Phase 2 testing. One of the tests said 3A
65 Transocean subsea work book [TRN-INV-02932227]; Horizon WCS BOP-BOP Control Pods [BP-HZN-BLY00055866];
Operation Control Ticket MARK 2, MUX SECTION. CONTROL POD [CAM-CSB-000013542]; White pod work
orders [TRN-INV-00031448]. 66 Cameron Factory Acceptance Test Procedures for Subsea Electron Module (Horizon AMF/Deadman In Current Situation)
,Document No. X-065449-05-03, Rev 2, [CAM-CSB 000008037]. 67 Operation Control Ticket MARK 2, MUX SECTION. CONTROL POD [CAM-CSB-000013542]. 68 Deck Test Procedure for Mark-II Control Pod Cameron, P/N 2020708-21 DWH, 4 May 2010, CAM-CSB000008013. All
non-regulator pod solenoid valves were pressure tested. The result columns on test pages 8 to 10 for SEM A and SEM B
are initialed and timed separately; Cameron Controls Daily Report Sheet. Publicly accessed at
http://www.mdl2179trialdocs.com/releases/release201304041200022/TREX-03602.pdf; [CAM_CIV_0046703].

CSB-FINAL REPORT-MUX(06-02-2014) Page 30 of 113
U.S. Chemical Safety Board By Engineering Services, L.P.
was “sluggish—activate & takes a long time to fire, skips.”69 Our testing of an exemplar solenoid valve, Section How
a Miswired Solenoid Valve Operates, provides a potential explanation of this test result.
4.6.1 Solenoid Testing: PETU Characterization
Technicians used four different PETUs during testing at various times on the Q4000 and during Phase 1 and 2 of
the BOP testing. Visual inspection of the PETUs revealed they all had a switch that could be toggled between “A”
or “B”. Some of the PETUs had another switch that could toggle between “Single” and “A+B”. This switch is
apparent on the PETU shown in Figure 8, but missing from the PETU shown in Figure 9.
At the time of Phase 1 testing, during individual solenoid valve testing DNV believed that the PETU with the
“A+B/single” switch could simultaneously energize both coils in the SV and that the other type of PETU would
only energize a single coil as selected by the “A/B” toggle switch.70 Characterization tests of the PETUs
completed by DNV during Phase 2 testing determined this not to be the case. As clarified during Phase 2, the
PETU with the “A+B/single” switch only activates a single coil (as determined by the setting of A/B toggle
switch) while the PETU lacking the “A+B/single” switch always activated both coils.71 For further information on
the PETU testing see Appendix C2 – PETU Characterization Analysis.
Table 4-1: Summery of PETU capabilities as determined from Phase 2 BOP testing.
PETU with “A+B/single” switch
(Figure 8)
PETU lacking A+B/single switch
(Figure 9)
Coils activated
Only activates one coil at a time as
determined by the “A/B” toggle
switch
Always activates both coils
69 Handwritten note by Cameron representative on Deck Test Procedure for Mark-II Control Pod, for solenoid (3A),
“sluggish—activate & takes a long time to fire, skips.” [BP-HZN-BLY00060717]. 70 DNV Report page 50 71 Phase 2 Test Preparation Sheet DNV2011060643: BOP-015-2 Summary PETU Solenoid Drive Characterization and
DNV2011060743 :BOP-015-3 Summary PETU Solenoid Drive Characterization.

CSB-FINAL REPORT-MUX(06-02-2014) Page 31 of 113
U.S. Chemical Safety Board By Engineering Services, L.P.
Figure 8. PETU: Note the A/B switch and the Single/A+B switch - Photo Phase 2 testing
Figure 9. PETU: This one has no Single/A+B switch - Photo from Q4000 Intervention”

CSB-FINAL REPORT-MUX(06-02-2014) Page 32 of 113
U.S. Chemical Safety Board By Engineering Services, L.P.
When testing of the pods was first conducted on the Q4000, serial numbers of the PETUs used were not recorded,
but a technician conducting the test recalled that a PETU without the “A+B/single” (Figure 8) was used;72 test
results from the miswired SV 103Y support this recollection.73 To fail during deck testing, both coils in SV 103Y
would have to be energized simultaneously. If only one coil were energized, SV 103Y should have opened (See
Section 4.7 for details).
The effect of this PETU misunderstanding also created the perception of inconclusive test results at Michoud
during Phase 1 testing. During Phase 1, DNV conducted several tests on 103 Y using the two (2) PETUs to select
the target SEMs and so determine how a particular solenoid activated using SEM A, SEM B, or both. During the
tests, SV 103Y exhibited inconsistent actuations which could not be explained at the time.
During Phase 2, protocols were developed to characterize each PETU with all of the variable SEM A and SEM B
settings available on the front panel of each device. The results proved valuable in understanding the
idiosyncrasies of each PETU. Once testing revealed that the solenoid valve was reverse wired on one coil, and
once the functioning of the switch positions on the PETUs were understood, all but one of the SV component tests
exhibited predictable results. ES determined that simultaneous energizing of both coils of a solenoid valve using a
PETU when one coil has reversed polarity prevents the solenoid valve from actuating. Energizing either coil
individually, whether reverse wired or not, will actuate the solenoid properly. Further analysis of these
characterization tests is included in Appendix C of this report.
This insight into the operation of the PETUs clarified the AMF/deadman and component tests at Michoud during
Phase .74 An analysis of the five AMF/deadman tests75 now reveals the following findings, all of which will be
discussed in detail shortly:
1. Tests 1 and 2 both revealed a possible 6-second, out-of-sync delay between SEM A and B on both pods
(yellow pod with SV 103R and blue pod with PETU power).
2. Test 2 confirmed that the AMF/deadman sequence could not be initiated due to the dead 27 volt battery in
the blue pod.
3. Test 3, yellow pod, exhibited a 7-second pressure duration resulting from a dying 9 volt battery (using
original SV 103Y).
4. Tests 4 and 5, yellow pod, actuated the AMF/deadman properly because by this time the SEM B 9 volt
battery had died and SV103Y could be energized from only one coil.
72 Testimony given in the U.S. District Court for the Eastern District of Louisiana under the Multi-District Litigation docket
MDL No. 2179, see LeNormand Designations Vol 1, p, 83, publicly accessible at
http://www.mdl2179trialdocs.com/releases/release201302281700004/LeNormand_William-Depo_Bundle.zip. 73 Yellow Pod: Cameron Factory Acceptance Test Procedures for Subsea Electron Module (Horizon AMF/Deadman In
Current Situation), [BP-HZN-BLY00060717]. 74 DNV Report, p. 43-51 75 See Appendix E for a review of the Michoud AMF/deadman testing.

CSB-FINAL REPORT-MUX(06-02-2014) Page 33 of 113
U.S. Chemical Safety Board By Engineering Services, L.P.
4.6.2 Solenoids Laboratory Bench Testing
During the Phase 1 testing, the bench testing of the solenoids did not include simultaneous energizing of both
coils. Instead, individual coils were energized to determine pick-up and drop-out voltages. The tests were
performed under laboratory conditions, ambient temperature, and without pressure applied to the inlet.76
During Phase 2, additional tests were performed on the solenoid valves to determine how they operated at deep
sea temperatures (approximately 32-34ºF). These tests were accomplished first without pressure, and then with
3,000 psig pressure.77 Solenoids from the yellow pod, SV 3AY, SV 103Y, and SV 103R, and from the blue pod,
SV 103B, were tested in the laboratory setup. A microphone was mounted inside the cold test chamber to pick up
valve actuation. The protocol called for energizing coils A and B separately, then A and B simultaneously using a
laboratory 24vdc power supply. SV 3AY and SV 103Y both failed to actuate when both A and B coils were
energized.78 Since the test facility was noisy, additional tests were accomplished with 3,000 psig hydraulic
pressure. Again, solenoids SV 3AY and SV 103Y failed only on the simultaneous A and B tests.79
The results of these simultaneous coil tests indicated that the polarity of the two coils in SV 3AY and SV 103Y
were opposing, therefore negating each other’s magnetic effect under constant 24vdc power, which caused the
solenoid valve to not actuate.
4.6.3 Solenoids Disassembly: Verification of Miswiring
During Phase 2 testing, technicians disassembled and compared four solenoids to Cameron specifications, SV
3AY, SV 103Y, SV 103R and SV 103B.80 As indicated in the photograph of one of the disassembled solenoids
(Figure 10),
76 DNV Report, p. 41-42. 77 Phase 2 Test Preparation Sheet DNV2011051601:TPS BOP-009 and DNV2011051801 :TPS BOP-010. 78 Phase 2 Test Preparation Sheet DNV2011051601 : TPS BOP-009, p. 2-3. 79 Phase 2 Test Preparation Sheet DNV2011051801 : TPS BOP-010 p. 2-3. 80 Disassembly and verification of wiring connections appear as follows: Phase 2 Test Preparation Sheet DNV2011052708,
May 27, 2011, for original solenoid valve 103 yellow; Phase 2 Test Preparation Sheet DNV2011052603, May 26, 2011,
for solenoid valve 3A yellow; Phase 2 Test Preparation Sheet DNV2011052602, May 26, 2011, for solenoid valve 103
blue; and Phase 2 Test Preparation Sheet DNV2011052513, May 25, 2011, for solenoid valve 103 replacement.

CSB-FINAL REPORT-MUX(06-02-2014) Page 34 of 113
U.S. Chemical Safety Board By Engineering Services, L.P.
Figure 10. (Left) Photograph of Y103 wire arrangement from Phase 2 testing with pins 1 and 4
connected to white wires and 2 and 3 connected to black wires. (Right) Schematic of correct
arrangement of wires, with pins 1 and 3 connected to white wires and 2 and 4 connected to black wires.
one coil end was terminated with a white insulated wire and the other end was terminated with a black insulated
wire. Pin assignments inside the housing were consistent with the cable outside the housing which connected each
solenoid valve to its SEM. Pins 1 and 2 were for coil #1, and Pins 3 and 4 were for coil #2.
SV 103R was found to be connected as follows: white to Pin 1, black to Pin 2, white to Pin 3, and black to Pin 4.
This solenoid valve appeared to be correctly wired. SV 103B had the same wiring arrangement. SV 3A and SV
103Y, both had reversed colors (black-white rather than white-black) on one coil. The reversed colors verified that
one coil had been miswired in each of the solenoid valves.
4.7 How a Miswired Solenoid Valve Operates
Bench testing of SV 3A and SV 103Y during Phase 2 indicated that simultaneously energizing both coils (with
one coil reverse-wired) resulted in no actuation of the solenoid. This bench testing used constant 24 volt DC
power. However, the SEMs do not use constant voltage DC power to energize the solenoids. They use a cycling
pulse-width-modulated (PWM) voltage that peaks at 24 volts. Due to the properties of this SEM-generated PWM,
the effective voltage, measured with a multimeter during Phase 1 solenoid testing, cycled from an initial high of
24-26 volts to a subsequent low of 13-15 volts.81 See Figure 11 below. This is a common technique used to
minimize power to a solenoid. The high voltage (long pulse) “pulls in” the solenoid, and then the lower voltage
(short pulses) are sufficient to “hold it in.” The PWM power supply thus minimized battery drain during
AMF/deadman sequencing and reduced heat buildup in the solenoids.
81 The multimeter measures a type of average voltage called the root-mean-squared (RMS) voltage.

CSB-FINAL REPORT-MUX(06-02-2014) Page 35 of 113
U.S. Chemical Safety Board By Engineering Services, L.P.
Figure 11. Pulse Width Voltage Sequence (Engineering Services)
Since the PWM-applied voltages are not constant, we considered the possibility that the two opposing coils in a
miswired solenoid might not fully cancel each other all of the time. The PWM cycle for each coil could be out of
sync, permitting periods when one coil was at an effective voltage peak while the other was at an effective voltage
minimum. These periods of non-zero net voltage might allow operation of the solenoid for short periods of the
total 7 second cycle sequence.
To test this hypothesis, the CSB sponsored testing of an exemplar solenoid valve to determine whether any out-of-
sync energizing of the two opposite polarity solenoid valve coils would permit the valve to open.82 (More details
of this testing are presented in Appendix E.)
Out-of-sync operation between the two AMF/deadman cards in the yellow pod could result from differences in
SEM A and B PLC reboot timing, differences in electronic component tolerances, and different response times to
the interpretation of the loss of hydraulic pressure. Cameron’s QA testing documents for AMF/deadman FAT
procedures83 contained the following note: “The AMF/deadman card in the PLC rack has a delay of 12-15 seconds
once all conditions are met.” The timing tolerance between the two AMF/deadman cards, therefore, appeared to
be as much as 3 seconds different based on this situation anticipated by this note alone. An Engineering Services
analysis of the AMF/deadman tests from Michoud concludes that the SEMs can be out of sync by as much as 6
seconds.84 ES testing showed that the SEMs can experience a short cycle differential delay that can allow one coil
to actuate before the other miswired coil is able to oppose its magnetic effect. This minor offsetting of effective
voltage can cause the solenoid to open briefly. Our tests of a 30-second duration solenoid valve open signal
(matching the programming of the AMF/deadman sequence) could have produced as much as 13 seconds of
opening time for SV 103Y, based on the SEMs being out of sync by at least 3 seconds.
82 The test took place in a lab of Koester Corporation, Napoleon, Ohio on September 18-20, 2012. Additional follow-up
testing was accomplished in Kingwood, Texas on November 12, 2012. 83 Factor Acceptance Test Procedure for Subsea Electronic Module, Document No. X-065449-02, June 1999, p. 34 [CAM-
CSB000013890]. 84 See the spreadsheet analysis of SV 103 timing for five AMF/deadman Tests at Michoud in Appendix E. CSB testing
included a series of out-of-sync tests, and ES developed a graphics program to analyze the test results.

CSB-FINAL REPORT-MUX(06-02-2014) Page 36 of 113
U.S. Chemical Safety Board By Engineering Services, L.P.
Evidence suggests that this type of limited, partial operation of a miswired solenoid was possible. The Upper
Annular Preventer “increase pressure” solenoid valve for the yellow pod, SV 3AY, was also found to be miswired
during Phase 2 testing. During testing on the Q4000, test results noted that it was “sluggish—activate & takes a long
time to fire, skips.”85,86 Normally, in order to increase the pressure of the upper annular preventer, the appropriate
button on the rig was simply depressed. However, if the yellow pod was selected from the rig, this would not have
been the case. At best, assuming the valve stayed open while the button was pressed, the limited, partial
movement caused by the miswired solenoid would be manifest as a slow-operating, or “sluggish” valve. Even if
the miswired SV 3AY would only stay open for a short period of time and then close, rig operators could possibly
have succeeded in using it by persistently pressing the control system push button rather than just holding it down.
A handheld electrostatic field detector in the form of a “light pen” had been used during initial functional testing
of SV 103Y on the Q4000, so ES also tested the electrostatic field around the exemplar solenoid while it was
being operated in opposing polarity mode as well as in correct polarity mode. Our electrostatic tests aimed to
determine the effectiveness of the handheld detector tests by observing whether the magnetic and electrostatic
fields outside the stainless steel solenoid casing would permit the observer to differentiate between
electromagnetic fields of coils that were of the same polarity and those that were of opposing polarity. We
determined that the sensitivity of the light pen used in the Q4000 testing of SV 103 could possibly detect the
fields, but it would register only the net electrostatic effect of the opposing coils (i.e., no solenoid actuation).
In summary, we reached the following conclusions from our exemplar testing:
1. The minimum offset between coils which produced any valve actuation was 250 mSec.
2. Delays of more than 250 mSec due to out-of-sync PWM voltage sources and short-cycle effects, similar
to that which we saw during component testing at Michoud, could cause the solenoid valve to be open in
a series of periodic pulses.
3. Delays of more than 3 seconds could cause the valve to open for as much as 40% of the duration of the
PWM sequence (for 12 seconds of a complete 30 second cycle in this case).87
4.8 BOP Batteries
The AMF/deadman emergency shut-in procedure was totally dependent on the viability of at least one 9 volt
battery pack and the 27 volt battery pack in the same control pod. AMF/deadman was the only emergency shut-in
system that relied on batteries for initiating the sequence. Normal operations, manual initiation of EDS, and
autoshear modes did not rely on the BOP batteries. Lithium manganese dioxide batteries which evidence an
extremely low voltage can be obviously identified as a failed battery. However, open circuit voltage tests on
severely drained batteries can show near-normal voltages which cannot indicate available battery life unless load
tested. This type of battery has a very flat discharge curve over its life cycle. The voltage will remain in range
85 The test was intended to activate the solenoid on just one coil, but as explained earlier, ES believes the PETU being used
was actually actuating both SEM A and SEM B simultaneously rather than one at a time. 86 Handwritten note by Cameron representative on Deck Test Procedure for Mark-II Control Pod, for solenoid (3A),
“sluggish—activate & takes a long time to fire, skips.” [BP-HZN-BLY00060717]. 87 The test protocol, further analysis, and data appear in Appendix E: CSB Exemplar Solenoid Testing.

CSB-FINAL REPORT-MUX(06-02-2014) Page 37 of 113
U.S. Chemical Safety Board By Engineering Services, L.P.
when not under load and can recover some voltage and power after load has been imposed and removed. The
batteries used in the BOP were not rechargeable.
4.8.1 Age of BOP Batteries
Our investigation of the age of the batteries in the blue and yellow pods at the time of the accident differ from the
findings in the Transocean Report.
The Transocean Report states:
Cameron recommends replacing the batteries after one year of operation or 33 AMF/deadman
actuations, or within five years of shelf life. The Deepwater Horizon pod batteries were last
changed on the following dates:
• Pod No. 1 (Blue pod) on April 25, 2009
• Pod No. 2 (Yellow pod) on Oct. 13, 2009
• Pod No. 3 (spare pod) on Nov. 4, 2007
During a routine rig condition assessment on the Deepwater Horizon in April 2010, ModuSpec
confirmed that all batteries in the SEMs were new.88
However, testimony given the U.S. District Court for the Eastern District of Louisiana case revealed that the
batteries for the pod in the blue position were last replaced in November of 2007,89 a date which is more
consistent with the battery manufacturer's date codes observed during post-incident inspection.
The following table shows the battery date codes as inspected by technicians during the SEM observations during
Phase 2: 90
Table 4-2: 27 volt Battery Inspection History
Pod 27 VOLT BATTERY
PACKS
9v SEM A 9v SEM B Date Installed
Blue 01/2006 01/2006 01/2006 10/2005 10/2005 2007
Yellow 05/2009 04/2009 04/2009 04/2009 04/2009 2009
Engineering Services
88 Battery dates are from the Transocean Report, Appendix N, p. 4. 89 Testimony given in the U.S. District Court for the Eastern District of Louisiana under the Multi-District Litigation docket
MDL No. 2179, see McWhorter Designations Vol 1, p, 78-79 where he describes that pod #3 was in the blue stack and
pod #2 was in the yellow stack at the time of the incident. Also refer to Exhibit #3792, publicly accessible at
http://www.mdl2179trialdocs.com/releases/release201302281700004/McWhorter_Jim-Depo_Bundle.zip. 90 Phase 2 Test Preparation Sheet Test Protocol Sheets DNV2011061603: TPS BOP-027 and DNV2011061602: PS BOP-028.

CSB-FINAL REPORT-MUX(06-02-2014) Page 38 of 113
U.S. Chemical Safety Board By Engineering Services, L.P.
4.8.2 Overview of Battery Expectations and Engineering Services Investigation
of the DWH BOP Batteries
Engineering Services investigated the operation of the BOP batteries including their intended and actual function
during the AMF/deadman arming duration, emergency initiation of the solenoid firing sequence and conclusion of
that sequence. This research resulted in the development of a typical profile of battery pack capacity drain in both
the 9 volt and 27 volt batteries.
4.8.2.1 The 9 volt Battery Pack Loads
Our calculations of the theoretical loads showed that the long term arming activity, while drilling, imposed a
greater load on a 9 volt battery while powering only the AMF card than did the loads imposed by an actual
AMF/deadman firing sequence. While the AMF firing sequence imposes a heavy 5.5-7.0 amp load on the 9 volt
battery, it does so for only 37 seconds.91 This is defined as one (1) actuation. In contrast, the AMF arming duration
imposed less than 2 milliamperes of load to run the AMF CPU,92 but for a much longer time. In our case it had to
do so from February 8, 2010 to April 20, 2010 (71 days). This amounts to some 6.13 million seconds. Simply
multiplying current times the time duration tells us that the arming cycle consumed 48.5-60.2 times as much
battery capacity than it needed during the 37 seconds of heavier loading while the AMF/deadman was rebooting
and running the SEM programmable logic controller (PLC) CPU. This is important because it shows that the
small continuing drain on a 9 volt battery can lead to more serious depletion of that battery leading up to the all-
important emergency event, when it needs to then provide a much heavier load to also power the SEM through its
solenoid control sequence. If the 9 volt battery is aging, or has some internal defect, it may provide sufficient
power for the arming phase, but then fail just when it is required to produce the heavier load imposed by the
initiation of the emergency AMF sequence.
Load testing evidence indicates there was an internal battery deficiency in the 9 volt SEM B battery pack in the
yellow pod on April 20, 2010 not experienced by the SEM A battery. During load testing of both batteries during
Phase 2, the SEM A battery tested much better than the SEM B battery. Since both batteries had the same date
codes and were being used in the same pod, there is no known reason for the two battery packs to have such
different results in the load testing. Ultimately, this likely failure of the SEM B battery subsea would have
permitted the AMF/deadman sequence to successfully initiate to close the Blind Shear Rams.
4.8.2.2 The 27 volt Battery Pack Loads
The 27 volt battery packs in the Cameron design are not intended to be utilized in any way until they are
connected to the subsea ambient pressure and hydraulic conduit supply pressure sensors (transducers and one
AMF card relay coil) once the AMF card senses a complete loss of deck power/communications. Once the AMF
card senses the additional critical condition that hydraulic supply pressure is lost, the AMF/deadman will begin its
reboot of the SEM PLC and signal the need for it to execute the AMF/deadman sequence. Only during that phase,
91 "FAT Procedure for SEM" CAM-CSB 000014282
92 Ibid - page 000014277 and "Battery Pack Longevity Tests" TREX 5153 dated 03/22/04, pg. 3

CSB-FINAL REPORT-MUX(06-02-2014) Page 39 of 113
U.S. Chemical Safety Board By Engineering Services, L.P.
will the 27 volt battery pack provide the power necessary to fire the solenoids in the programmed sequence
controlled by the SEM PLC. Based on this understanding of how the 27 volt battery is delivering power over the
course of a drilling cycle, we found that this battery should see no drain on its capacity until an emergency event
occurs or when being tested in an AMF/deadman FAT or deck test.
If rig power and communications are lost before hydraulic pressure is lost, the 27 volt battery will be connected to
power the pressure transducers in order to verify the subsequent loss of hydraulic pressure. In a catastrophic
emergency situation similar to that which occurred on the Deepwater Horizon, the 27 volt battery might only have
to power the sensors for a few seconds at most. The load imposed by these pressure sensors was calculated to be
only 30.53 milliamperes (based on actual pressure transducer ratings, conditions at the time plus 8mA for the
relay coil). This is a minimal load considering the short time frame in which it is usually imposed. When the
SEM has started its solenoid control sequence, the 27 volt battery load increases dramatically as it fires the
programmed solenoids ending with solenoid valve 103 which should close the BSRs and set the ST Locks. The
SEM PLC finalizes its 37 second sequence by causing the 27 volt battery to power a final 12 volt pulse which
shifts the bi-stable relay on the AMF card back to the dis-armed position and causes both the 9 volt and 27 volt
battery packs to be disconnected.
Engineering Services calculated that one completed AMF/deadman sequence should only consume 0.64 amp-hrs
or 1.5% of the initial design capacity of 42 amp-hrs for the 27 volt battery pack. Assuming that the 27 volt battery
was utilized for 33 AMF/deadman actuation sequences, a simplistic calculation would imply that the 27 volt
battery pack could easily handle that number of actuations with 50% capacity remaining. These calculations and
the discussion above regarding the 9 volt battery typical discharge profile, led us to consider the important
question of why the blue pod 27 volt battery failed rather that the 9 volt batteries in that pod. Load testing of the 9
volt blue pod batteries at Michoud proved that they were still viable, even after being utilized beyond Cameron's
recommended limitations of 1 year of service or 33 AMF actuations. One possible answer as to why the 27 volt
battery was depleted was that the blue pod had been subjected to numerous AMF/deadman tests and emergency
activations. If this were the case and the ratio of AMF tests relative to the length of total AMF arming duration
was high, then we might consider that as a factor which could explain the depletion of the 27 volt battery much
more quickly than the 9 volt batteries in the blue pod.
The question of why the blue pod 27 volt battery was so depleted compared to the 9 volt batteries was answered
in that it had been subjected to a premature connection to pressure sensors as soon as the AMF was armed subsea.
This was caused by the miswiring in the blue pod SEM documented by technicians during phase 2 testing. The
effect of this miswiring was to cause the logic in the AMF card to immediately connect the 27 volt batteries to
long-term transducer loads at the start of each drilling cycle. Our calculations show that the pressure transducers
and relay coil loads on the 27 volt battery could have consumed as much as 80% of its useful capacity on the
Macondo well.93
93 These calculations are based on the interpolated ratio of the (4-20 mA) pressure transducer actual pressures to the rated
pressure of each transducer. The hydraulic conduit P/T rating was 12,000 psi; actual pressure was 5500; and the
interpolated (4-20mA) result was 11.33 mA. The ambient subsea pressure P/T rating was 5000 psi; actual pressure was

CSB-FINAL REPORT-MUX(06-02-2014) Page 40 of 113
U.S. Chemical Safety Board By Engineering Services, L.P.
4.8.3 Battery Testing Results
The yellow and blue pod batteries were initially tested, not under load, on the Q4000 and Enterprise with the
following results.
Table 4-3. Battery Testing on the Q4000 – Yellow pod94
Battery Test 1 Volts
SEM A (9V) 8.85
SEM B (9V) 8.85
Solenoid/Transducer (27V) 18.41 *
The reading for the 27 volt battery is suspect because later readings during Phase 1 indicated that this 27
volt battery had good voltage of 28.2 volts. The technician might have tested the incorrect terminals for
the 27 volt battery and effectively tested the differential between 27 volt and 9 volt batteries (28.2v –
8.85v = 19.35v).
Table 4-4. Battery Testing on the Enterprise – Blue pod95
Battery Test 1 Volts Test 2 Volts
SEM A (9V) 8.78 8.77
SEM B (9V) 0.142* 0.142*
Solenoid/Transducer (27V) 7.61 7.61
These readings for the SEM B battery are suspect because later readings at Michoud indicated that this 9
volt battery had good voltage and passed the load tests. The technician might have tested the incorrect
terminals, measuring the differential between the failed 27 volt battery and the good 9 volt battery.
During the Phase 1 testing, technicians measured battery voltages externally at the pie connections. Table 4-5
indicates the as-received voltages measured at Michoud for the control pod batteries. The blue pod 27 volt battery
failed, showing minimal residual voltage.
2250; and the interpolated (4-20mA) result was 11.20 mA. Adding these results to the 8 mA load for the relay coil =
30.53 mA. 94 Cameron Daily Report Sheet – 5 May 2010 [CAM-CSB 000015435]. 95 Blue Pod Recovery Log – 5 July 2010; BP-HZN-BLY00061 076

CSB-FINAL REPORT-MUX(06-02-2014) Page 41 of 113
U.S. Chemical Safety Board By Engineering Services, L.P.
Table 4-5. As-received blue and yellow pod battery testing at Michoud96
Battery Blue Pod
Test 1 Volts
Blue Pod
Test 2 Volts
Yellow Pod
Test 1 Volts
Yellow Pod
Test 2 Volts
SEM A (9V) 8.9 8.9 8.7 8.7
SEM B (9V) 8.7 8.7 8.4 8.4
Solenoid/Transd
ucer (27V)
1.1 1.0 28.2 28.2
Table 4-6 shows the results of load testing, first using a 100 ohm resistor, and then using a 20 ohm resistor. The
yellow pod SEM B 9 volt battery dipped below 8.0 volts in the 20 ohm load test, indicating that it was the most
susceptible to failure of any of the 9 volt batteries.
Table 4-6. Battery load test results from Phase 1.97
Blue Pod Yellow Pod
Load Resistor Load Resistor
100 Ohm 20 Ohm 100 Ohm 20 Ohm
Battery Description
Voltage Voltage
Initial After 2
Min. Initial
After 2
Min. Initial
After 2
Min. Initial
After 2
Min.
SEM A (9V) 8.6 8.6 8.3 8.2 8.3 8.3 8.0 8.0
SEM B (9V) 8.4 8.4 8.1 8.0 8.1 8.1 7.7 7.6
Sol. & P/T (27V) N/A N/A N/A N/A 27.1 26.9 26 25.4
Table 4-7. Battery Test Voltages following the AMF/deadman tests (not under load) from Phase 1.98
Battery Description Blue Pod (Volts) Yellow Pod (Volts)
SEM A (9V) 8.9 8.6
SEM B (9V) 8.6 8.4
Solenoid/Transducer
(27V) 0.7 27.7
The load tests are a better measure of the battery’s health and possible remaining life than a voltage test. The 9
volt battery packs had to maintain a minimum of 5vdc during load testing to assure that the battery could reboot
96 DNV Report, p. 42.
97 DNV Report, p. 43.
98 DNV Report, p. 46.

CSB-FINAL REPORT-MUX(06-02-2014) Page 42 of 113
U.S. Chemical Safety Board By Engineering Services, L.P.
the PLC in the SEM. During Phase 1 testing, The SEM B 9 volt battery for the yellow pod exhibited a voltage dip
to 7.6 volts when tested with a 20 ohm resistor. The 20 ohm load was not sufficient though to stress the 9 volt
battery to its routine limits. During Phase 2 testing, additional tests that more closely emulated the AMF/deadman
load scenario revealed that the 9 volt SEM B battery in the yellow pod had failed (see Appendix A for analysis on
the appropriate load testing).
Figure 12 and Figure 13 show that only the SEM B 9 volt battery in the yellow pod failed both ambient and cold
load tests during Phase 2 testing.
Figure 12. Ambient load testing of the 9 volt batteries during Phase 2.
Initial Load Recovery
0
2
4
6
8
10
Ambient Temperature 9v Battery Load Test ~ 78 degF
1.6 Ohm Test Load for 75 Seconds
9v Yellow SemA
9v Yellow SemB
9v Blue SemA
9v Blue SemB
9v New
Test Sequence
Vo
lts
DC

CSB-FINAL REPORT-MUX(06-02-2014) Page 43 of 113
U.S. Chemical Safety Board By Engineering Services, L.P.
4.9 AMF/deadman testing at Michoud
ES believes that the 9 volt SEM B battery in the yellow pod failed during AMF/deadman testing at Michoud on
March 3, 2011, otherwise the partial success of the AMF/deadman tests using the miswired 103 Y original
solenoid could not have occurred. The failure of this battery while rebooting and operating the AMF/deadman
card and PLC in SEM B caused the solenoid valve 103 original to work correctly on only the SEM A solenoid coil
for the last seven seconds of the sequence (See Appendix E for more details).
The load testing of the yellow SEM B battery in both Phase 1 and Phase 2 indicated that the battery capacity had
deteriorated between March 4, 2011 and June 18, 2011. This deterioration might have been due to a combination
of unexplained internal cell failure, AMF/deadman testing load and/or battery load testing. After considering the
fact that the 9 volt SEM B battery experienced failure during AMF/deadman testing, we then attempted to analyze
the battery's condition subsea on April 20, 2010. ES estimates that the Yellow pod SEM B 9 volt battery should
have had 91% of useful life remaining even after the AMF/deadman tests during Phase 1 and load testing in Phase
2 (See Appendix A). Since this battery failed load testing and the SEM A 9 volt battery was still viable, we
conclude that this battery pack (manufacturer date codes indicate April 2009) suffered a premature failure and
Figure 13. Cold temperature load testing of the 9 volt batteries during Phase 2.

CSB-FINAL REPORT-MUX(06-02-2014) Page 44 of 113
U.S. Chemical Safety Board By Engineering Services, L.P.
depletion of its amp-hour capacity. The failure may be due to a latent internal defect, though external defects
cannot be dismissed.99
4.10 Actuation of the AMF/deadman Sequence on April 20, 2010
Since the yellow pod SEM B battery failed to successfully execute AMF/deadman at Michoud where the ambient
temperature was between 60 and 70ºF, the possibility exists that the battery had failed in subsea service during the
incident due to lower temperatures and subsequent decreased capacity. This would be important because the
failure of one SEM in the yellow pod during the AMF/deadman sequence would cause the miswired SV 103 to
actuate successfully on one coil. The ES review of the SAFT temperature derating tables for these cells indicates
that the decrease in battery capacity could be as much as 12-15 percent given a 20ºC temperature difference (20ºC
- 0ºC) between Michoud ambient and subsea operation, making it likely the battery would not have had sufficient
power to energize the SEM B coil on the day of the incident (See Appendix A). Despite actuation of the blind
shear ram as part of the AMF/deadman sequence, drill pipe buckled off-center in the BOP prohibited the BSR
from fully closing and sealing the well
5 Conclusion
The main focus of the ES MUX control system investigation has been on the events that occurred after the release
of hydrocarbons on the rig caused catastrophic explosions which damaged the ability of the surface control
system to shut in the well with human intervention. Once the surface controls were rendered inoperable, the only
remaining system that could detect the damage and attempt to prevent additional hydrocarbons from being
released was the subsea blowout preventer and its electro-hydraulic control system. The autoshear was not
triggered during the incident, but was initiated during the ROV intervention in the days following the disaster. The
only other emergency shut-in system that required no human intervention and that was left to respond was the
AMF/deadman. That system eventually became the focus of the CSB’s controls investigation.
The Mark II MUX control system emergency shut-in procedure (AMF/deadman) was vulnerable to failure due to
its dependence on battery power to complete the required sequence of solenoids to close the blind shear ram.
Battery capacity was limited. AMF/deadman testing was discouraged because of the resulting drain on the
batteries. Without periodic testing, however, component failures within the AMF/deadman system such as
miswired components or failed batteries could not be detected. Battery life concerns were at odds with the need to
verify the availability of the AMF/deadman components.
Cameron’s advice to users of the Mark II batteries covers parameters for predicting the useful life of these
emergency batteries including maximum shelf life, number of actuations and time in service. All of these
requirements depend on human observations and maintenance programs to predict the time of replacement. There
was no real-time method to analyze remaining life of the 9 volt or 27 volt battery packs.
99 See Appendix A: Yellow Pod Battery Drain Analysis.

CSB-FINAL REPORT-MUX(06-02-2014) Page 45 of 113
U.S. Chemical Safety Board By Engineering Services, L.P.
The Mark II MUX control system redundancy relies, in part, on the application of dual-coil solenoids to improve
the availability of the solenoid and to initiate the function from either of the two SEM control PLCs. The dual-coil
concept is valid unless one coil is miswired, which causes it to work in opposition to the correctly wired coil. Coil
polarity must be verified after any refurbishment and after its placement on the pod, to realize the true
redundancy.
The reverse polarity of one coil of a dual-coil solenoid is a fault condition that could have been monitored by
programming the system diagnostics, which would analyze the functioning of each solenoid coil separately and
together and analyzing the results. However, the Mark II system did not have this type of system diagnostic;
rather, to catch solenoid defects, it relied on procedures to verify proper refurbishment and testing procedures.
This made the solenoids vulnerable to human error by maintenance technicians.
The more troublesome defect in the MUX control system was the miswiring of the blue pod SEM. Wire tracing
efforts during Phase 2 testing revealed that the AMF/deadman circuits were not wired consistent with the
available drawings. Without unfettered access to the Phase 2 testing details or to the proprietary design of the
AMF/deadman card and SEM, ES can only hypothesize the impact of those wiring nonconformances on the
AMF/deadman system. The fact remains that the blue pod and yellow pod SEMs were wired differently.

CSB-FINAL REPORT-MUX(06-02-2014) Page 46 of 113
U.S. Chemical Safety Board By Engineering Services, L.P.
Appendices
Appendix A: Control Pod System Battery Information, Testing, and Analysis ............................ 47
Appendix B: Blue Pod SEM B D17 Diode Discoloration ................................................................ 67
Appendix C: Portable Electronic Test Units (PETU) Characterization Analysis ......................... 71
Appendix D: Review of Blue Pod SEM Wiring Defects .................................................................. 76
Appendix E: CSB Exemplar Solenoid Testing ................................................................................. 84
Appendix F: Review of Cameron FAT Test Procedures ................................................................ 100
Appendix G: Analysis of Pie Connector Evidence ......................................................................... 105
Appendix H: Historical Changes to AMF/deadman Sequence ..................................................... 112

CSB-FINAL REPORT-MUX(06-02-2014) Page 47 of 113
U.S. Chemical Safety Board By Engineering Services, L.P.
Appendix A: Control Pod System Battery Information, Testing, and
Analysis
The batteries in service on the Deepwater Horizon BOP were manufactured by SAFT. The 9 volt and 27 volt
battery packs were assembled by using multiple cells to achieve the required voltage and amp-hour capacity. The
following are catalog cuts from the battery cell manufacturer’s website.100
Figure 14. Catalog cuts from the battery cell manufacturer’s website.
100 www.saftbatteries.com/force_download/LM_33550.pdf

CSB-FINAL REPORT-MUX(06-02-2014) Page 48 of 113
U.S. Chemical Safety Board By Engineering Services, L.P.
Figure 15. Catalog cuts from the battery cell manufacturer’s website.

CSB-FINAL REPORT-MUX(06-02-2014) Page 49 of 113
U.S. Chemical Safety Board By Engineering Services, L.P.
Figure 16. Catalog cuts from the battery cell manufacturer’s website.
A.1 Battery Parts Documentation
The following data from the Phase 2 inspections document the date codes of the SEM batteries as found in each
pod. Date codes are coded as follows: Four digit number followed by a single letter. The first two digits indicate
MONTH, following 2 digits indicate YEAR, and the letter corresponds to the Week of Month of manufacture.101
101 Testimony given in the U.S. District Court for the Eastern District of Louisiana under the Multi-District Litigation docket
MDL No. 2179, see Gaude Designations, p 36, publicly accessible at
http://www.mdl2179trialdocs.com/releases/release201302281700004/Gaude_Ed-Depo_Bundle.zip.

CSB-FINAL REPORT-MUX(06-02-2014) Page 50 of 113
U.S. Chemical Safety Board By Engineering Services, L.P.
A.1.1 Blue Pod Batteries102
Battery Pack Blue Pod - SEM A
Cameron Part No. 2232368-01
Contract No. 4500604090
Date Code: 1005-C
S/N: 000269 Connector: -X78
Location: Top from flange – Side of 2 batteries
Battery Pack Blue Pod - SEM B
Cameron Part No. 2232368-01
Contract No. 4500604090
Date Code: 1005-C
S/N: 000267 Connector: -X79 Note: gash on battery
Location: Bottom side from flange – Side of 2 batteries
Battery Pack Blue Pod – 27VDC
Cameron Part No. 2232368-01
Contract No. 4500633612
Date Code: 0106-B
S/N: 000353 Connector: -X80 (Positive term)
Location: Top from flange – 3 batt side
Battery Pack Blue Pod - 27VDC
Cameron Part No. 2232368-01
Contract No. 4500633612
Date Code: 0106-B
S/N: 000435 Connector: -X76 Note: scratch on battery cover
Location: Middle battery on 3 batt side
102 Phase 2 Test Preparation Sheet, DNV2011061603: BOP-027.

CSB-FINAL REPORT-MUX(06-02-2014) Page 51 of 113
U.S. Chemical Safety Board By Engineering Services, L.P.
Battery Pack Blue Pod - 27VDC
Cameron Part No. 2232368-01
Contract No. 4500633612
Date Code: 0106-B
S/N: 000333 Connector: -X77
Location: Bottom battery on 3 batt side (+27VDC)
A.1.2 Yellow Pod103
Battery Pack Yellow Pod - SEM B
Cameron Part No. 2232368-01
Contract No. 4501923014 (45019230140)
Date Code: 0409A
S/N: 000706 Connector: -X79
Location: Top from flange – 2 batt side
Battery Pack Yellow Pod - SEM A
Cameron Part No. 2232368-01
Contract No. 4501923014
Date Code: 0409A
S/N: 000705 Connector: -X78
Location: Top from flange – 2 batt side
Battery Pack Yellow Pod – 27VDC
Cameron Part No. 2232368-01
Contract No. 4501923014
Date Code: 0509D
S/N: 000743 Connector: -X77 (Negative term)
Location: Top from flange – 3 batt side
103Phase 2 Test Preparation Sheet, DNV2011061602: BOP-028.

CSB-FINAL REPORT-MUX(06-02-2014) Page 52 of 113
U.S. Chemical Safety Board By Engineering Services, L.P.
Battery Pack Yellow Pod - 27VDC
Cameron Part No. 2232368-01
Contract No. 4501923014
Date Code: 0409A
S/N: 000703 Connector: -X76
Location: Middle from flange – 3 batt side
Battery Pack Yellow Pod - 27VDC
Cameron Part No. 2232368-01
Contract No. 4501923014
Date Code: 0409A
S/N: 000704 Connector: -X80 (Positive term)
Location: Bottom from flange – +27 volt batt side
A.2 Battery Testing, Phase 2104
The following data is included from the Phase 2 load testing of the pod batteries and exemplar batteries with date
codes of October 2010. These load tests were accomplished in warm ambient (77+ºF) and cold subsea (35-39ºF)
temperatures.
104 Phase 2 Test Preparation Sheets, DNV2011061701: BOP-029 (6/17/11), exemplar (new) 9 volt and 27 volt battery load
tests (20 ohms - ambient); DNV2011061702: BOP-030, exemplar (new) batteries cold load tests (1.5 ohm, 10 ohm –35ºF);
DNV2011061802: BOP-032 (6/18/11), exemplar (new) and pod batteries cold load tests (1.5 and 10 ohm); DNV2011061903:
BOP-030 (6/19/11), exemplar (new) and pod batteries ambient load tests (1.5 and 10 ohm).

CSB-FINAL REPORT-MUX(06-02-2014) Page 53 of 113
U.S. Chemical Safety Board By Engineering Services, L.P.
Exemplar (new) battery load test. (20 ohm load only)
Battery: New 9V Part No.: 2232368-01 Rev 02
Date Code: 1010-A S/N: 0001124
Initial Battery Voltage: 9.66 vdc – No load
Battery Voltage after 3 minutes at load: 9.13 vdc
Battery Voltage recovered: 9.36 vdc (after some unknown time)
Exemplar (new) battery load test: (20 ohm load only)
Battery: New 27V Part No.: 2232368-01 Rev 02
Date Code: 1010-A (All- top, middle and bottom)
S/N: 0001122 – top, 0001119 – middle, 0001123 – bottom
Initial Battery Voltage: 28.76 vdc – No load
Battery Voltage after 3 minutes at load:26.00 vdc
Battery Voltage recovered: 27.01 and climbing (after some unknown time)
Exemplar (new) batteries – at Deep Sea cold temperature
Battery load resistance: 1.5 ohms
Battery Temperature: 35 DegF at start of test
Initial Battery Voltage: 9.66 vdc
Battery Voltage after 75 seconds: 7.63 vdc, 4.8 amps
Battery Voltage recovered: 8.72 climbing
Battery Temperature: 34.9 degF at end of test
Battery load resistance: 10 ohms
Battery Temperature – “ambient” ? (Temperatures not recorded for this test; assumed near 34 degF)
Initial Battery Voltage: 27.55 vdc
Battery Voltage after 75 seconds: 25.43 vdc, 2.55 amps (2.48 near end of test)
Battery Voltage recovered: 26.73 vdc
Full Load Battery Tests at Deep Sea (Cold) Temperature
New Exemplar 27 v Battery – Lot date codes; 1010A, 1010A, 0710A
Serial Numbers: 0001118, 0001117, 0001022
Part No.: All (3ea) 2232368-01 Rev2
Start Test Battery Temperature; 40.2 degF
Initial Battery Voltage = 28.88 VDC
Load resistor = 10 ohms
Battery Voltage at 75 seconds = 24.82 vdc, 2.454 amps
Recovery Voltage = 26.87 vdc

CSB-FINAL REPORT-MUX(06-02-2014) Page 54 of 113
U.S. Chemical Safety Board By Engineering Services, L.P.
Yellow Pod 27 v Battery Pack
Start Test Battery Temperature: 39.8 degF
Initial Batt. Voltage = 27.27 vdc
Load resistor = 10 ohms
Battery Voltage at 75 seconds = 23.98 vdc, 2.413-2.374 amps
Recovery Voltage = 26.22 vdc
Blue Pod 27 v Battery Pack (not tested due to drained condition)
Full Load Battery Test (Cold) – New Exemplar 9 vdc battery
Part No.: 2232368-01 Rev2
Date Code: 0710B
Serial Number: 0001021
Start Test Battery Temperature: 39.6º F
Initial Battery Voltage = 9.67 vdc
Load resistor = 1.5 + 0.1 ohms
Battery Voltage at 75 seconds = 7.68 vdc, 4.8 - 4.63 amps
Recovery Voltage = 8.79 vdc
Full Load Battery Test (Cold) – 9 vdc Battery Yellow Pod SEM B
Start Test Battery Temperature: 39.0 degF
Initial Battery Voltage = 7.81 vdc
Load resistor = 1.5 + 0.1 ohms
Battery Voltage at 75 seconds = 1.61 vdc, 1.24 - 0.98 amps
Recovery Voltage = 5.9 vdc (climbing very fast)
Full Load Battery Test (Cold) – 9 vdc Battery Yellow Pod SEM A
Start Test Battery Temperature: 39.6 degF
Initial Batt. Voltage = 8.32 vdc
Load resistor = 1.5 + 0.1 ohms
Battery Voltage at 75 seconds = 6.43 vdc, 3.83 amps
Recovery Voltage = 7.72 vdc (climbing)
Full Load Battery Test (Cold) – 9 vdc Battery Blue Pod SEM A
Start Test Battery Temperature: 38.6 degF
Initial Batt. Voltage = 8.69 vdc
Load resistor = 1.5 + 0.1 ohms
Battery Voltage at 75 seconds = 6.66 vdc, 4.023 amps
Recovery Voltage = 8.19 vdc

CSB-FINAL REPORT-MUX(06-02-2014) Page 55 of 113
U.S. Chemical Safety Board By Engineering Services, L.P.
Full Load Battery Test (Cold) – 9 vdc Battery Blue Pod SEM B
Start Test Battery Temperature: 38.9 degF
Initial Battery Voltage = 8.51 vdc
Load resistor = 1.5 + 0.1 ohms
Batt. Voltage at 75 seconds = 6.35 vdc, 3.84 amps
Recovery Voltage = 7.96 vdc
Full Load Battery Test (Ambient) – New Exemplar 27 vdc battery
Part No.: 2232368-01 Rev02
Date Code: 1010A, 1010A, 0710A
Serial Numbers: 0001118, 0001117, 0001022
Start Test Battery Temperature: 77.6 degF
Initial Battery Voltage = 28.24 vdc
Load resistor = 10 ohms
Batt. Voltage immediately on application of load = 26.45v 2.602 amps
Batt. Voltage at 75 seconds = 25.34 vdc, 2.508 amps
Recovery Voltage = 26.76 vdc (climbing)
Full Load Battery Test (Ambient) – New Exemplar 9 volt battery
Part No.: 2232368-01 Rev2
Date Code: 0710B
Serial Number: 0001021
Start Test Battery Temperature: 77.7 degF
Initial Battery Voltage = 9.40 vdc
Load resistor = 1.5 (+ 0.1?) ohms
Batt. Voltage immediately on application of load = 8.34 vdc, 5.01 amps
Batt. Voltage at 75 seconds = 7.89 vdc, 4.77 amps
Recovery Voltage = 8.82 vdc
Full Load Battery Test (Ambient) - Yellow Pod 27 v Battery Pack
Start Test Battery Temperature: 77.5 degF
Initial Batt. Voltage = 27.03 vdc
Load resistor = 10 ohms
Battery Voltage immediately on application of load = 25.54 vdc, 2.526 amps
Battery Voltage at 75 seconds = 24.92 vdc, 2.467 amps
Recovery Voltage = 26.31 vdc (climbing)
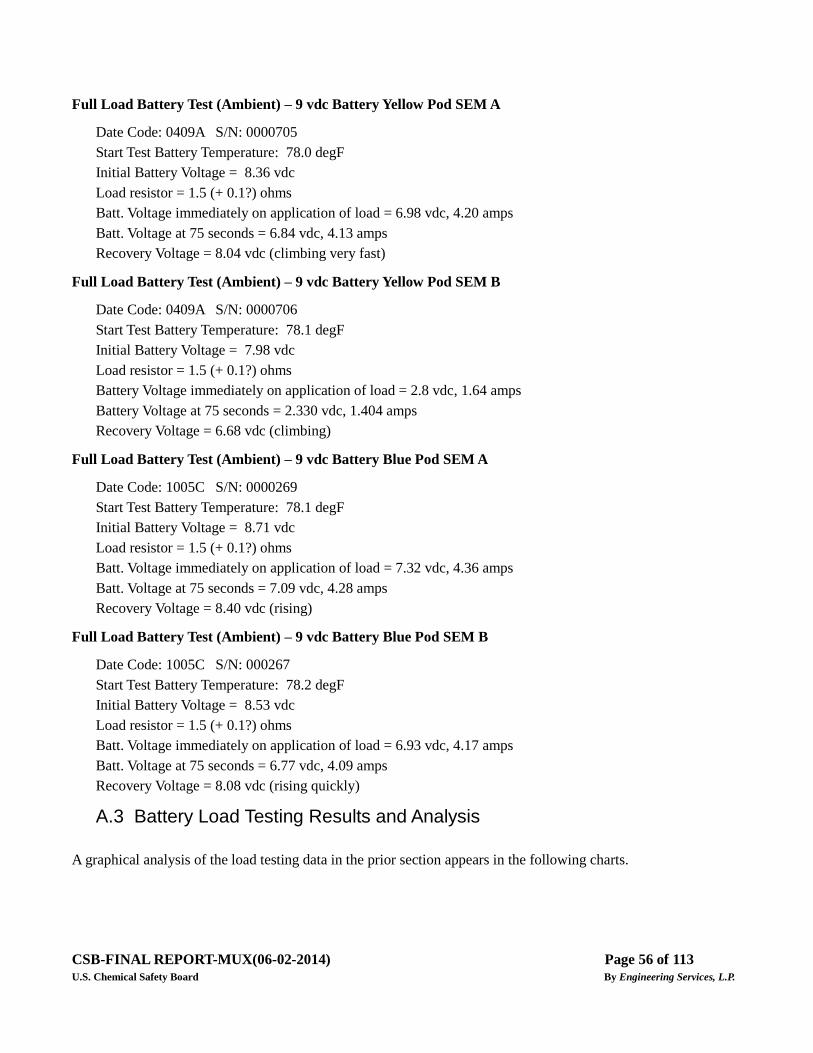
CSB-FINAL REPORT-MUX(06-02-2014) Page 56 of 113
U.S. Chemical Safety Board By Engineering Services, L.P.
Full Load Battery Test (Ambient) – 9 vdc Battery Yellow Pod SEM A
Date Code: 0409A S/N: 0000705
Start Test Battery Temperature: 78.0 degF
Initial Battery Voltage = 8.36 vdc
Load resistor = 1.5 (+ 0.1?) ohms
Batt. Voltage immediately on application of load = 6.98 vdc, 4.20 amps
Batt. Voltage at 75 seconds = 6.84 vdc, 4.13 amps
Recovery Voltage = 8.04 vdc (climbing very fast)
Full Load Battery Test (Ambient) – 9 vdc Battery Yellow Pod SEM B
Date Code: 0409A S/N: 0000706
Start Test Battery Temperature: 78.1 degF
Initial Battery Voltage = 7.98 vdc
Load resistor = 1.5 (+ 0.1?) ohms
Battery Voltage immediately on application of load = 2.8 vdc, 1.64 amps
Battery Voltage at 75 seconds = 2.330 vdc, 1.404 amps
Recovery Voltage = 6.68 vdc (climbing)
Full Load Battery Test (Ambient) – 9 vdc Battery Blue Pod SEM A
Date Code: 1005C S/N: 0000269
Start Test Battery Temperature: 78.1 degF
Initial Battery Voltage = 8.71 vdc
Load resistor = 1.5 (+ 0.1?) ohms
Batt. Voltage immediately on application of load = 7.32 vdc, 4.36 amps
Batt. Voltage at 75 seconds = 7.09 vdc, 4.28 amps
Recovery Voltage = 8.40 vdc (rising)
Full Load Battery Test (Ambient) – 9 vdc Battery Blue Pod SEM B
Date Code: 1005C S/N: 000267
Start Test Battery Temperature: 78.2 degF
Initial Battery Voltage = 8.53 vdc
Load resistor = 1.5 (+ 0.1?) ohms
Batt. Voltage immediately on application of load = 6.93 vdc, 4.17 amps
Batt. Voltage at 75 seconds = 6.77 vdc, 4.09 amps
Recovery Voltage = 8.08 vdc (rising quickly)
A.3 Battery Load Testing Results and Analysis
A graphical analysis of the load testing data in the prior section appears in the following charts.

CSB-FINAL REPORT-MUX(06-02-2014) Page 57 of 113
U.S. Chemical Safety Board By Engineering Services, L.P.
Engineering Services
Figure A3-1: 9 volt Battery Cold Test Results
The yellow pod SEM B 9 volt battery failed the load test.
Engineering Services
Figure A3-2: 9 volt Battery Ambient Test Results
The yellow pod SEM B 9 volt battery also failed the ambient temperature load test.

CSB-FINAL REPORT-MUX(06-02-2014) Page 58 of 113
U.S. Chemical Safety Board By Engineering Services, L.P.
Engineering Services
Figure A2-3: 27 volt Cold Battery Load Test Results
The yellow pod 27 volt battery closely follows the new battery cold load test.
The blue pod 27 volt battery was drained and could not be tested.
Engineering Services
Figure A3-4: 27 volt Ambient Load Test Results
The yellow pod 27 volt battery closely follows the new battery ambient load test
The blue pod 27 volt battery was drained and could not be tested

CSB-FINAL REPORT-MUX(06-02-2014) Page 59 of 113
U.S. Chemical Safety Board By Engineering Services, L.P.
A Cameron Factory Acceptance Test Procedure for the subsea electronic module,105 indicates that the 9 volt
battery load during AMF/deadman is 4-7 amp (with a note: “Each SEM A & B, depends on SEM electronics”)
and < 3 amps for the 27 volt battery.106 AMF/deadman duration is described as less than 1.5 minutes.
Assuming a 9 volt battery must produce 4-7 amps, it should be tested at a conservative level of approximately 7
amps or more. The predicted resistor size to achieve 7 amps would be 1.29 ohms.107 Assuming the addition of a
shunt resistor of 0.1 ohms in the circuit, the additional resistor size should have been 1.2 ohms. The test was
accomplished using 1.5 ohms, which was in the proper range given the specific unknown current draw for the
PLC reboot cycle.
Assuming a 27 volt battery must produce 3 amps, it should be tested at 3 amps or more. The calculated resistor
size to achieve that 3 amps would be 9 ohms.108 Assuming the addition of a 0.1 ohm shunt resistor, the additional
resistor should have been 8.9 ohms, but was tested with 10 ohms. This is within an adequate range. An analysis of
the AMF/deadman solenoid firing sequence indicates that no more than four solenoids are energized at one time
in one pod during AMF/deadman. Since the total load imposed by one solenoid is approximately 0.6 amps
(assume 24v / 40 ohm coil resistance = 0.6), then the total load for four solenoids would be 2.4 amps. This was
within the range of the load testing.
One of the functions of the 9 volt AMF/deadman battery is to reboot the PLC so that it can execute the
AMF/deadman sequence in the shutdown.asc file. The PLC requires 5 vdc to operate, and this voltage is designed
to be provided through the AMF/deadman card and its onboard 9v-to-5v DC regulator. This Linear Technology
regulator (LT11083CP-5) requires a minimum 6.5v on the input to produce an output of 5 volts at the rated load of
7.5 amps. Assuming that we only needed 2.7 amps to reboot the PLC, the regulator would need 5 volts to
accomplish the reboot according to the manufacturer’s documentation.
105 Factor Acceptance Test Procedure for Subsea Electronic Module, Document No. X-065449-05-03, May 11, 2010, [CAM-
CSB000008040].
106 Note, test documentation from Phase 2 (DNV2011061903 - BOP-030 Full Load Battery Test with SEM batteries )
indicates that the load on the 9 volt battery during the AMF/deadman sequence was 2.3 to 2.6 amps which does not agree
with the Cameron FAT procedure cited in the previous footnote.
107 R=V/I, 9 volts/7 amps
108 R=V/I, 27 volts/3 amps

CSB-FINAL REPORT-MUX(06-02-2014) Page 60 of 113
U.S. Chemical Safety Board By Engineering Services, L.P.
Linear Technology
Figure A3-5: Typical Application for the LT1083 Regulator
Anything less than 5 volts would severely limit the ability of the regulator to produce enough power for the reboot
cycle (5 Vin → 5 Vout, 1.0 input/output ratio on the graph above).
A.4 Battery Discharge Curve and Derating
The following discharge profile (for 20ºC) for the SAFT LM33550 battery cell indicates that the knee of the
curve, where useful life ends, is at approximately 2.6 volts per cell.

CSB-FINAL REPORT-MUX(06-02-2014) Page 61 of 113
U.S. Chemical Safety Board By Engineering Services, L.P.
SAFT
Figure A3-6: Battery Discharge Profiles at +20ºC
For three cells in a series, the critical voltage is approximately 7.8 to 8.0 volts. Battery pack (3-Cell) voltage
measurements under 7.5 volts with some significant loading would indicate a failing battery near the end of its
amp-hour limits.

CSB-FINAL REPORT-MUX(06-02-2014) Page 62 of 113
U.S. Chemical Safety Board By Engineering Services, L.P.
SAFT
Figure A3-7: Capacity vs. Current and Temperature
A.4.1 SAFT LM 33550 Battery Capacity Chart as Function of Temperature and
Current
For a 12-cell battery pack consisting of three cells in series and four strings in parallel, the amp-hour rating would
be 4 x 12 AH = 48 (@ 20ºC), but Cameron documents indicate 42 AH for this complete package. Their calculated
derating was therefore 6/48 = 12.5%. The capacity curve from SAFT (above) confirms that these cells should be
derated by approximately 12.5% for subsea temperatures (21ºC vs. 0ºC curves).
A.4.2 Estimated Battery Drain on 9 volt Yellow Pod Battery
ES estimated all of the known battery drains on the failed yellow pod battery leading up to the suspected point of
failure in the second yellow pod AMF/deadman test at Michoud Phase 1. These calculations were accomplished to
determine whether the known battery usage and testing could have used a significant portion of the derated amp
hours for this battery. The resulting calculations (1.03% of derated capacity) show that the testing before the point
of suspected battery failure on March 3, 2011 did not reveal any significant loading on the battery.
That 1.03%, is shown in the right column in the spreadsheet of Figure A3-8. This minimal depletion of the battery
suggests that its condition was not much changed from its original condition subsea. Adding that 1.03% capacity
back into the battery would give us an indication of its subsea condition at the time of the incident. There are other
factors that must also be considered which we will address below.

CSB-FINAL REPORT-MUX(06-02-2014) Page 63 of 113
U.S. Chemical Safety Board By Engineering Services, L.P.
9v Battery Time Amp-Hrs
Amp-Hrs
* % AH *
Amp-Hrs **
Battery Test
Description Date Reference Comments Load Amps Seconds Used Remaining Remaining Surface
Original Installation 10/13/09
T.O. Report
App N, Pg 4 42.00 100.00%
Deck/FAT Test of
AMF
Oct '09 –
Feb '10 ?
No
documented
AMF test
prior to
deployment
Assuming 1 AMF test
on this pod prior to
deployment. 7 37 0.0719 41.93 99.83%
Arm AMF 02/08/10
T.O. Report
App N, pg 7
“Armed” current for
71 days 0.002 6,134,400 3.4080 38.52 91.71%
AMF Actual 04/20/10 Incident Fired AMF 7 37 0.0719 38.45 91.54% Failure
AMF Simulation 05/06/10 Using original 103 SV 7 37 0.0719 38.38 91.37% 0.43 1.03%
AMF Simulation 05/06/10 Using original 103 SV 7 37 0.0719 38.30 91.20% 0.36 0.86%
AMF Simulation 05/12/10
Using replacement
103 SV 7 37 0.0719 38.23 91.03% 0.29 0.69%
AMF Simulation 05/12/10
Using replacement
103 SV 7 37 0.0719 38.16 90.86% 0.22 0.52% Battery Load Testing –
Michoud Phase 1 DNV pg 43
Using 100 ohm
resistor 0.081 120 0.0027 38.16 90.85% 0.15 0.35% Battery Load Testing –
Michoud Phase 1 DNV pg 43
Using 20 ohm resistor
load 0.385 120 0.0128 38.15 90.83% 0.14 0.34%
AMF Simulation 03/03/11 DNV pg 46
Using replacement
103 SV 7 37 0.0719 38.08 90.66% 0.13 0.31%
AMF Simulation 03/03/11 DNV pg 47
Orig 103 SV, battery
fails during testing 7 30 0.0583 38.02 90.52% 0.06 0.14%
AMF Simulation 03/03/11 DNV pg 47
Orig 103 SV, battery
failed 7 37 0.0719 37.95 90.35% 0.00 0.00
AMF Simulation 03/03/11 DNV pg 49
Orig 103 SV, battery
failed 7 37 0.0719 37.87 90.17% -0.07
Battery Load Testing 06/18/11 Cold load testing 3.83 75 0.0798 37.79 89.98% -0.15
Battery Load Testing 06/19/11 Ambient load test 1.4 75 0.0292 37.76 89.92% -0.18
* De-rated AmpHrs for new battery. See De-Rating sheet. ** Calculations of Amp-Hrs used on surface since incident and prior to battery failure at Michoud in reverse order, as battery capacity drains to the point where it was
unable to reboot/power the PLC Figure C1-8: Yellow Pod SEM B Battery Drain History

CSB-FINAL REPORT-MUX(06-02-2014) Page 64 of 113
U.S. Chemical Safety Board By Engineering Services, L.P.
We assumed only 2 mA of current draw on the 9 volt battery pack for the AMF/deadman card during
AMF/deadman arming period of 71 days while the BOP was in service before the April 20, 2010 incident. The
assumed 2 mA has not been confirmed other than as referenced in the Transocean Report.109
ES calculations indicated that only about 10% of the yellow pod SEM B 9 volt battery amp hours had been used
from February 8, 2010 to the start of AMF/deadman testing at Phase 1. These calculations are very sensitive to the
current draw of the AMF/deadman card during arming. ES assumed 100% of the derated capacity of 42 amp-hrs
at the start of Macondo drilling.
Even though the calculations do not imply significant battery drain on the Macondo well and subsequent testing,
ES believes that this battery experienced premature failure during the second AMF/deadman test of the yellow
pod (using original SV 103). This opinion is based in part on the significant disparity between the two identical 9
volt batteries in the yellow pod with the same date codes. The failure of this battery while rebooting and operating
the AMF/deadman card and PLC in SEM B while the sequence was energizing SV 103 (AMF/deadman Testing at
Michoud) caused the solenoid valve 103 original to work correctly on only the SEM A solenoid coil for the last
seven seconds of the sequence.
Since the battery failed to successfully execute AMF/deadman at Michoud where the ambient temperature was
between 60 and 70ºF, the possibility existed that the battery had failed in subsea service during the incident due to
lower temperatures and subsequent decreased capacity. This would be important because the failure of one SEM
in the yellow pod during the AMF/deadman sequence would cause the miswired SV 103 to actuate successfully
on one coil. The ES review of the SAFT temperature derating tables for these cells indicates that the decrease in
battery capacity could be as much as 12-15 percent given a 20ºC temperature difference (20ºC - 0ºC) between
Michoud ambient and subsea operation (at a current draw of 7 amps).
Testimony given in the case by a Cameron representative indicated that subsea internal SEM operating
temperatures could be in the range of 60-70ºF.110 Neither Cameron nor BP was able to provide any more specific
information concerning the subsea SEM internal operating temperatures.111
Regardless of the absolute temperature differential between subsea and Michoud, it would be expected that there
would be some relative delta T (temperature). The 9 volt battery would need to have only 1.03% less capacity
subsea than at Michoud for it to be at the same point of failure as it was at during Michoud testing.
109 Transocean Report, Appendix N, p. 7. 110 When asked to provide the operating temperature range within the SEM vessel, the response was, “I don’t remember any
specific number. I do remember a range being, just from , you know, discussion with some of the service personnel […]
60 degrees Fahrenheit to 70 degrees Fahrenheit. That’s just a rough estimate.” Testimony given in the U.S. District Court
for the Eastern District of Louisiana under the Multi-District Litigation docket MDL No. 2179, see Coronado
Designations Vol 1, p, 45, publically available at
http://www.mdl2179trialdocs.com/releases/release201304041200022/Coronado_Richard-Depo_Bundle.zip. 111 Communications with CSB.

CSB-FINAL REPORT-MUX(06-02-2014) Page 65 of 113
U.S. Chemical Safety Board By Engineering Services, L.P.
There are, in fact, two factors that could have caused the failing 9 volt battery to have slightly increased capacity
at Michoud. The first, as we have mentioned, is the increased delta T thermal effect on capacity from subsea to
Michoud. Also, there is another known effect in all batteries which is the recovery in capacity due to “resting”.
This is an effect based on the chemistry of the battery which restores some minimal capacity after a period of
loading. In order to quantify the relative capacity of the battery subsea we must “add back” the amp hours used by
that battery in surface testing since the accident and then subtract the effects of the increase due to delta T thermal
increase and resting recovery capacity. If the increased capacity due to thermal increase and resting recovery was
greater than 1.03%, then we can conclude that the yellow pod SEM B 9 volt battery capacity was below the
failure capacity level at the time of the incident.
Photographs taken on the Q4000 indicate that internal operating temperatures of the SEM when on the surface
could be 81 to 94ºF (27 to 34.5ºC). 112 If we assume a subsea internal operating temperature of 60ºF (15.5ºC), we
could have a delta T as much as (34.5-15.5ºC) 19ºC differential increase at Michoud.113 Next, we take a zoomed
look at the SAFT capacity chart in Figure A3-7.
Figure A3-8: Zoomed View of SAFT Capacity chart vs. current and temperature – modified by
Engineering Services
From this chart we cannot interpolate the capacity difference (increase) based on an increase in temperature from
15.5 to 34.5ºC at 7.0 amps. We can however, get some indication that an increase of 0.1 to 0.2 AH capacity might
be entirely possible. This would amount to 1 to 2% recovered capacity based on temperature rise from subsea to
Michoud.
112 Photographs BP-HZN-BLY00061060 and BP-HZN-BLY00061073 113 MDL Exhibit TREX-3628 is an email in which the Blue pod SEM internal temperature is noted at “88.02 degrees” on Feb.
19, 2010. We do not know if this temperature is normal or abnormal and we have seen no records regarding the internal
temperature of the Yellow pod SEM during the Macondo drilling activities.

CSB-FINAL REPORT-MUX(06-02-2014) Page 66 of 113
U.S. Chemical Safety Board By Engineering Services, L.P.
In addition to the thermal capacity increase effect, we addressed the resting capacity increase which would have
occurred after the 9 volt and 27 volt batteries in the yellow pod would have been disconnected after the
AMF/deadman sequence concluded on April 20, 2010. Engineering Services accomplished load testing on
exemplar SAFT batteries. (Battery Cells - SAFT Model LM22150, 3v nominal, 3.2 volts (no load), 900mAH
rated capacity) These cells were similar in chemistry and construction to the SAFT batteries used in the DWH
BOP, but smaller capacity. Our testing included simulating a multi-cell battery pack (4 cells, 2 series and 2
parallel strings) which included one previously depleted cell. This setup was intended to simulate a battery pack
with a single defective cell. First, we drained this nominal 6 volt battery pack to 1.3 volts using 18.1 ohms of
resistance. This test duration was slightly less than 6 hours. The test was accomplished at 700F. After 3 days of
resting (no load), we again tested the battery pack at 700F and found a 0.28% increase in resting capacity (based
on full rated capacity of 1.8 AH). If we were to base this resting recovery as a percentage based on a “dis-abled”
capacity rating due to the defective cell, the resting recovery would be something closer to 0.46%.
If we consider the thermal increase in battery capacity to be at least 1%-2% and the resting recovery capacity
increase to be on the order of 0.28 to 0.46%, we find that the battery had gained enough capacity to provide the
1.03% capacity utilized on the surface. Any additional increase in delta T or resting recovery gains would serve to
increase confidence in these results.
As a result of our investigation, we conclude that the 9 volt SEM B yellow pod battery functioned to some extent
at Michoud in early testing due to the thermal increase and resting recovery increase in capacity when compared
to its subsea condition on April 20, 2010.
Based on these calculations and estimates, it appears possible that the battery had already failed on April 20, 2010.
The yellow pod SEM B battery may not have been able to support the 5-7 amp load required to power the SEM
PLC and therefore the AMF/deadman would have worked on the redundant SEM A, with only one coil of the
miswired 103 being energized. If the SEM B 9v battery was viable during the incident, then the alternative
scenario becomes the effective case in which the mis-wired 103 solenoid valve can partially fire the
AMF/deadman sequence based on the out-of-sync timing plus the cumulative pulsation durations.
The battery date code for the battery pack was April 2009. The failure of this battery so soon after manufacture
indicates that it experienced either an internal defect, loose inter-cell connection, or some other unexplained
external drain of its capacity.

CSB-FINAL REPORT-MUX(06-02-2014) Page 67 of 113
U.S. Chemical Safety Board By Engineering Services, L.P.
Appendix B: Blue Pod SEM B D17 Diode Discoloration
On June 19 and June 20, 2011, as part of Phase 2 testing, technicians removed the AMF/deadman cards from the
yellow and blue pod SEMs and traced the circuitry that was attached to the four AMF/deadman cards. The
technicians photographed both sides of each card and annotated the photos with notes regarding the quality of the
protective conformal coating on the printed circuit boards and other observations of potential quality concerns.114
Most of the notes were relatively innocuous, but a notable exception from June 20 concerned “some discoloration
at the solder joints” of diode115 D17 on the blue pod SEM B AMF/deadman card. The discoloration, seen in
Figure B-1, on diode D17 suggests heat stress, most likely due to overcurrent.
Figure B-1. Discolored Diode D17 on blue pod SEM B AMF/deadman card as observed during Phase 2 testing.
Diode D17 on the AMF/deadman cards is the first board-mounted component connected to the external 9 volt
AMF/deadman battery pack. This battery, while connected to the AMF card through diode D17, does not power
the AMF card until a 12 volt latching relay on the card is energized by an external command from the SEM. This
command is referred to as “arming” the AMF/deadman and is initiated by deck personnel during normal drilling
114 Technician notes on the AMF/deadman card appear in DNV2011061904 Test Preparation Sheet BOP-033. 115 A diode is like a one-way valve for electrical current. Current can flow in one direction, but not in the reverse direction.

CSB-FINAL REPORT-MUX(06-02-2014) Page 68 of 113
U.S. Chemical Safety Board By Engineering Services, L.P.
operations. Once armed, the latching relay connects the 9 volt battery power to the AMF card and its CPU. When
in the armed state, the AMF card can sense the input requirements for a healthy BOP and will remain powered
from the 9 volt battery until dis-armed manually from surface control panels or after a completed emergency shut-
in via the AMF Deadman sequence.
If diode D17 had failed prior to the incident, then the blue pod SEM B AMF card could never have gotten the
battery power it needed to operate. In this case, however, MUX diagnostics should have alerted the operator of the
defect.116 Regardless, one would expect that the redundant blue pod SEM A AMF/deadman system would have
still been available and the blue pod could have still activated the AMF/deadman sequence.
Using a volt-ohm meter, a technician tested both the forward and backward resistance of diode D17.117 The
forward resistance was recorded at 4.5 meg-ohm, and the reverse resistance was recorded at 1.0 meg-ohm. These
tests indicate that there would be no current flow through the diode in either direction. The forward resistance
check should have been less than 1 ohm. Another test was accomplished to test the board end of diode D17 and it
was found to be grounded (to pin 15 or 17) at 0.2 ohms.
An open question about D17 is whether the technician actually broke through the conformal coating when taking
the measurements, but we were able to make use of other measurements to verify the failed condition of the
diode. The most significant of the technician’s measurements was the grounded connection on the in-board side of
D17. The photograph in of D17 in Figure B-2 reveals that it is connected in series to a resistor (R6) mounted on
116 ES cannot verify whether a single (1 out of 4) AMF/deadman card fault would generate a “not armed” signal. Since each
AMF/deadman card had an armed output signal, the assumption is that the control system would require all four
AMF/deadman cards to report arming success to display an armed status.
117 Page 26 of the datasheet.
Figure B-2. Photograph of diode D17 connected to resistor R6.

CSB-FINAL REPORT-MUX(06-02-2014) Page 69 of 113
U.S. Chemical Safety Board By Engineering Services, L.P.
the board. At the very least, the circuit then has the following configuration from the external battery to the
resistor – Figure B-3.
It is obvious that one of the technician's measurements pierced the conformal coating in order to get such a low
reading of 0.2 ohm to ground. If diode D17 were grounded at point A and the diode was still working, then the
SEM B 9 volt battery would have been completely drained over a short period of time due to the short to ground.
Since the Blue SEM B 9 volt battery passed all load tests imposed on it late in the Phase 2 testing, we conclude
that the diode was not conducting forward current to the AMF card.
The next question is when did the D17 diode fail? When an AMF/deadman sequence is activated, there is an
analog signal called “AMF/deadman Arm” which changes value once the AMF/deadman is set and then when it
has concluded. When AMF/deadman sequence is activated, the raw analog value is around 15. When the
AMF/deadman sequence has been deactivated, the signal is greater than 900.
During Phase 1 testing, the initial analog values for Blue pod SEM B indicated that AMF/deadman sequence was
not active for either SEM. Then, after activating the AMF/deadman system, both SEMs in the blue pod displayed
active signals:
9V Battery Diode D17 Resistor R6
Grounded at
this point A
this point A
AMF Circuit Board
Figure B-3. Circuit configuration from the 9 volt battery to resistor R6.

CSB-FINAL REPORT-MUX(06-02-2014) Page 70 of 113
U.S. Chemical Safety Board By Engineering Services, L.P.
Table B-1. Analog Channel Values
Action Yellow Pod Blue Pod
SEM A (mA) SEM B (mA) SEM A (mA) SEM B (mA)
Baseline 913 916 919 915
Deactivate AMF/deadman 917 915 918 915
Activate AMF/deadman 18 16 14 16
DNV Report Table 7118
Because the AMF/deadman system could be armed prior to AMF/testing, ES suspects that diode D17 likely failed
during the AMF/deadman test, but that it was operable before the AMF/deadman began on March 3, 2012 and
was not a factor at the time of the incident.
118 DNV Report, Table 7, p. 45.

CSB-FINAL REPORT-MUX(06-02-2014) Page 71 of 113
U.S. Chemical Safety Board By Engineering Services, L.P.
Appendix C: Portable Electronic Test Units (PETU) Characterization
Analysis
This section documents the use of PETUs in the Phase 1 and Phase 2 testing and explains the apparent
idiosyncrasies in PETU operation and inconsistencies in actuating solenoid valve 103Y original.
SEM Designation PETU-1 PETU-2 PETU-1 Original* PETU-2 Original**
Manufacturer Cameron Cameron Cameron Cameron
Assembly # 222650-78 222650-78 223180-49 223180-38
Serial # 300082255 4286 B0004 11780713-01
A/B/ Switch
Capability
Yes Yes Yes Yes
Single/A+B Switch
Capable
No Yes No Yes
Test Procedure
Reference
BOP-015-2 BOP-015-1 BOP-015-3 BOP-015-3
Problems – PETUs
did not work as per
SEM A/B switch
indications
A/B switch (A or B)
actuates both A and
B. Neutral position
actuates both also.
A/B switch is OK
But A+B switch
setting does not fire
both SEMs
Incorrectly actuates
both coils regardless
of A/B switch setting.
Does not operate the
A+B when set. Only
fires A or B
depending on A/B
switch setting.
Engineering Services
Table C-1 PETUs Used in Phase 1 and 2 Testing And Characterization of the Results and
Idiosyncrasies
* Original – indicates PETUs used in testing in March 2011 – Phase 1
**PETU 1 original was used in Phase 1 until on March 4, 2011, Cameron also provided PETU 2
original because TWG wanted to test with A+B switch capabilities assuming we could fire both coils
simultaneously. This PETU-2 original did not energize A+B coils. The DNV Report also refers to
PETU-1 original as PETU-Y. PETU-2 original is referred to as PETU-B in the DNV Report (p. 50).

CSB-FINAL REPORT-MUX(06-02-2014) Page 72 of 113
U.S. Chemical Safety Board By Engineering Services, L.P.
C.1 Solenoid Driver Characterization
Solenoid valve 103 replacement (yellow) was tested with PETU 2 A+B/single switch in the single position. PETU
2 worked as set up, but 103R failed on coil A due to a shorted internal lead wire (pinched in prior re-assembly, or
the result of an impressed test overvoltage of 35 vdc for 1μsec.119
Solenoid valve 103 Blue was tested with PETU 1 and PETU 2.120 PETU 2 worked as expected in both SEM A
and SEM B single positions. However, when set on A+B, PETU 2 did not fire both coils, instead, firing only the
single A or B coil. PETU 1 actuated both coils A and B when set in the A position. PETU 1 also actuated both
coils A and B when set in the B position. Technicians found that both coils also fired when the A/B switch was set
in a neutral position.
Solenoid valve 103 blue was tested with PETU 1 original and PETU 2 original.121 PETU 2 original worked
correctly in both SEM A and SEM B single switch settings. When set on the A+B settings, PETU 2 original did
not operate as expected and energized only one coil A or B in the respective SEM settings.
PETU 1 original actuated both A and B coils in all switch positions (SEM A, SEM B, and neutral positions). SEM
A and SEM B appeared to have the same length of the initial pulse (6.4 div * 200 mSec = 1.28 seconds for initial
long pulse).
C.2 Background On the PETUs and Miswired Solenoids
Several details of the solenoids and PETUs are noteworthy as background information relating to the PETU
characterization study.
When solenoids 3A and 103 original from the Yellow pod were bench tested in February 2011, we did not know
that these two solenoids were miswired. When they were tested in the lab using proper +/- voltage connections on
pins 1-2 and 3-4, these solenoids actuated even on the miswired coils. Coil pickup and dropout voltages were
measured and recorded. The takeaway is that a single miswired coil can actuate the solenoid even though the coil
would see reversed voltage. This is simply a function of how a coil acts on a free-floating armature core or
plunger. The action of the magnetic circuit is such that the plunger wants to minimize the air gap regardless of
how voltage is applied to the coil.122
119 Phase 2 Test Preparation Sheet, DNV2011060642: BOP-015-1, p 4.
120 Phase 2 Test Preparation Sheet, DNV2011060643: BOP-015-2.
121 Phase 2 Test Preparation Sheet, DNV2011060743: BOP-015-3.
122DNV Report, sections 6.1.10 and 6.1.11, p. 41.

CSB-FINAL REPORT-MUX(06-02-2014) Page 73 of 113
U.S. Chemical Safety Board By Engineering Services, L.P.
However, we now know that when the two coils are energized simultaneously with steady DC voltage, the
solenoid will not actuate because the coils are opposing each other with identical and offsetting forces with the net
result that the armature does not move.123
When a PETU is used to actuate a solenoid, the PETU does not provide power to the solenoid. Instead, it only
sends a control signal to one or both SEMs, which power the solenoid through the SEM 24 vdc power supply and
the solenoid driver board. The PETU control signal is instantaneous in actuating one or both of the A and B
solenoid coils through the SEMs. In this respect, the PETUs differ from the potential out-of-sync manner that
SEM A and SEM B would fire both solenoid 103 coils during a reboot and initiation of the AMF/deadman
sequence.
C.3 Review of PETU Idiosyncrasies Acting on Solenoid Component and
AMF/deadman Tests
During the Phase 1 component testing of the pod solenoids and AMF/deadman sequences, there appeared to be
inconsistencies in whether the solenoids activated. As it turned out, most of the inconsistencies were due either to
the idiosyncrasies in the internal A/B or A+B switch wiring of the PETUs or to solenoid 103Y original having one
coil reverse wired. Table C2-2 itemizes the DNV component test results when using PETUs to actuate the
solenoid valve and resolve the inconsistencies. The “Expected” column data is based on what we now know about
the PETUs
123Phase 2 Test preparation Sheet, DNV2011051801: TPS BOP-010.

CSB-FINAL REPORT-MUX(06-02-2014) Page 74 of 113
U.S. Chemical Safety Board By Engineering Services, L.P.
Test # PETU* Attempted Action
SEM A, B or A+B
Actuation
Expected**
DVN Page
Reference
1 1 Original 103B - Blue A Yes Yes 44
2 1 Original 103B – Blue B Yes Yes 44
3 1 Original 103Y orig – Yellow A No No 44
4 1 Original 103Y orig – Yellow B No No 44
5 1 Original 103Y replace – Yellow A Yes Yes 44
6 1 Original 103Y replace – Yellow B Yes Yes 44
7 1 Original 103Y orig – Yellow A No No 47
8 1 Original 103Y orig – Yellow B No No 47
9 1 Original 103Y orig – Yellow A No No 49
10 1 Original 103Y orig – Yellow B No No 49
11 2 Original 103Y orig – Yellow A+B Yes Yes 50
12 2 Original 103Y orig – Yellow A Yes Yes 50
13 2 Original 103Y orig – Yellow B Yes Yes 50
14 1 Original 103Y orig – Yellow A Yes No –
aberration
50
15 1 Original 103Y orig – Yellow B No No 50
16 1 Original 103Y orig – Yellow A No No 50
17 2 Original 103Y – Yellow A Yes Yes 50
18 2 Original 103Y – Yellow B Yes Yes 50
19 2 Original 103Y – Yellow A Yes Yes 51
20 2 Original 103Y – Yellow B Yes Yes 51
21 2 Original 103Y – Yellow A+B Yes Yes 51
Engineering Services – based on DNV Report, March 2011.
Note: See also handwritten notes DNV-CSB 000228
Table C-2 – Solenoid Component Testing Using PETUs, March 3, 2011
The table omits multiple tests with the same results.
*PETU 1 original is also referred to as PETU-Y; PETU 2 original is also referred to as PETU B.
**Expected column based on the characterization results of Phase 2 testing, which determined how
each PETU acted as described above If Expected column = Actuation column, then results were
consistent with identified PETU operation.
Based on the characterization testing of the PETUs in Phase 2, the solenoid component testing in Phase 1 is sound
(with the one aberration noted above in test 14). During the Phase 1 AMF/deadman and solenoid component
testing, it seemed that solenoid 103Y original was exhibiting inconsistent actuations. The inconsistencies were

CSB-FINAL REPORT-MUX(06-02-2014) Page 75 of 113
U.S. Chemical Safety Board By Engineering Services, L.P.
likely due to the internal miswiring of the PETUs, which were used to actuate the miswired 103Y original
solenoid. Once it was clear that the solenoid valve was reverse wired on one coil and that the labeling of the
switch positions on PETU 1 and PETU 2 was presenting incorrect expectations, all of the SV component tests,
except one, exhibited predictable results.
The removal of apparent inconsistencies in the operations of the PETUs and 103Y solenoid provides a better
understanding of the test results from the Phase 1 solenoid component and AMF/deadman testing. Armed with
this insight, we proceeded with pulse-width-modulation testing, both in-sync and out-of-sync, on an exemplar
solenoid valve to determine the probabilities that a miswired solenoid could accomplish the AMF/deadman
actuation of the blind shear rams.124
124 Referenced diagrams and procedures: PETU Circuit Diagram, SK-122126-21-06, CAM-CSB000005589;
PETU Interconnection, Cable Circuit Diagram, SK-066201-55-04, CAM-CSB000005595; PETU Inteconnection.
Distribution Cab. Circuit Diagram, SK-066200-85-04, CAM-CSB000005593; FAT Procedure PETU, Doc. X-065396-38,
CAM-CSB000010937.

CSB-FINAL REPORT-MUX(06-02-2014) Page 76 of 113
U.S. Chemical Safety Board By Engineering Services, L.P.
Appendix D: Review of Blue Pod SEM Wiring Defects
Figure D-1 and this discussion outline the effect of the miswiring in the blue pod SEM. The illustration shows the
results of the technicians’ point-to-point wiring verification of the blue pod SEM A and SEM B AMF card
connections to the rest of the pod during Phase 2 testing. 125 The technicians found that several connections
required by the drawings were not connected and were referred to in the technicians’ notes as an “open lead.” The
test measurement cannot determine if the wire was missing entirely, routed to another unknown location, or
simply disconnected at one end or the other. The technicians testing scope did not include investigation beyond
the initial conductivity test.
The open lead/missing connections were identified as:
Blue SEM A (-X47 is the edge connector for the SEM A AMF card)
-X47 pin 14 to -X10, pin 11
-X47 pin 14 to -K4, pin 14
-X47 pin 16 to -X10, pin 11
Additional tests were made to connector -X11 which proved that terminals 14 and 16 were connected instead to
pins 7 & 8 on connector -X11. Since there was no connection of terminals 14 & 16 to -X10, it is implied that pins
7 & 8 of connector -X11 were also not connected to -X10. Wiring diagram sheet 2 of 47 requires pins 7 & 8 of -
X11 to be connected to -X10 pin 11. These pins have to do with an AMF trigger in or out from the second pod.
D.1 Blue SEM B (-X75 is the edge connector for the SEM B AMF card)
On page 34 of the TPS, two (2) wiring tests were noted as being “Open Lead > 20M” [20 megOhm].
-X75 pin 14 to -X10, pin 11
-X75 pin 16 to -X10, pin 11
It should be noted that the test from -X75 pin14 to -K6, pin 14 showed normal continuity of 0.3 ohm. Also, the
technicians apparently did not test SEM B terminals 14 & 16 connections to -X11. If these wires were connected
to -X11, then they would not conform to sheet 2 of 47.
Instead of pin 11 on Connector -X10, additional tests proved that Blue SEM A terminals 14 and 16 were
mistakenly connected to pins 7 and 8 on Connector -X11. No test results could be located to determine if
analogous mistaken connections existed from blue SEM B terminals 14 and 16 to pins 7 and 8 on Connector –
125 Test Preparation Sheet DNV2011061904 BOP-033, pp. 30, 31, 33, and 34.

CSB-FINAL REPORT-MUX(06-02-2014) Page 77 of 113
U.S. Chemical Safety Board By Engineering Services, L.P.
X11. If these SEM B wires were connected to -X11, then, like SEM A, they would not conform to the wiring
diagram.
Figure D-1: Blue Pod Miswiring (Source: Engineering Services)
At the time of their testing, the pod SEMs had been removed from each pod with no physical wiring connection
between pods. Figure D-1 shows the simulated orange connection point from the yellow to connector -X10
terminal 11. Since wires were not connected from -X10:11 to the AMF card, terminals 14 or 16, the blue pod
could not sense that the yellow pod was active.

CSB-FINAL REPORT-MUX(06-02-2014) Page 78 of 113
U.S. Chemical Safety Board By Engineering Services, L.P.
All of the open lead connections in the blue pod SEM concerned terminals 14 and 16 on the AMF card, which are
labeled on Figure D-1 as “Active this Pod” and “Active Remote Pod,” respectively. No open leads were found in
the yellow pod. 126
Since the AMF board is required to check for certain signal conditions before executing the AMF/deadman
sequence, these two terminations are essential to determining the healthy state of the power and communications
within the current pod and within the other remote pod. Some call this the “heartbeat” signal.
This appendix focuses on the effect of these missing and miswired connections, beginning with what the SEM B
card and the SEM A card sense after the AMF is armed.
D.2 SEM B Card
In the SEM B card, terminal 14 is not connected to connector -X10, terminal 11 as required, but it is connected to
the closed K6 relay, which is closed when the SEM power supply and communications signals are present. This
connection communicates to the SEM B card that there is still some health (power and communications active) in
this pod, confirming that it is not yet time to connect the 27 volt battery pack to power and measure the two
pressure transducers for the hydrostatic and riser conduit hydraulic pressure.
There is no signal to terminal 16 because of missing wiring, implying that the remote pod may not be active.
However, if this pod is still active through terminal 14, the AMF card logic would not proceed with the AMF
emergency sequence. The conclusion is that the SEM B card determines that the system is still partially active and
healthy.
D.3 SEM A Card
The short answer to what the SEM A card senses is nothing. There is no active signal connected to either terminal
14 or 16. The SEM A card terminals 14 and 16 are not connected to connector -X10 or to the K4 relay contact.
This presents a false condition caused by the missing wiring to connector -X10 and miswiring instead to
connector -X11. If the missing wires from -X11 to -X10 had been in place, the signal from the yellow pod would
have been present to the SEM A card. Since there are no active signals to either the “Active this Pod” or “Active
Remote Pod” terminals, the armed SEM A card must initiate the next step in the logic sequence, which is to turn
on the relay connecting the blue pod 27 volt battery pack to power the two pressure transducers.
The conditions that resulted from the wiring nonconformances would be detected immediately upon the initial
arming of the blue pod AMF from the surface, on February 8, 2010. When arming was initiated, the pressure
transducers would have reported that both pressure conditions were normal, in effect communicating to the AMF
card that there was no need to proceed with the emergency AMF/Deadman sequence.
126Other open lead exceptions were noted for the battery connections in both the yellow and blue pods, but they were
corrected with updated drawings.

CSB-FINAL REPORT-MUX(06-02-2014) Page 79 of 113
U.S. Chemical Safety Board By Engineering Services, L.P.
The blue pod SEM A card would have then remained for some time following arming until the 27 volt battery was
drained to the point that it had a lower voltage than the SEM 24vdc power supply. Because of the missing wiring
and false signal to the AMF card, the SEM 24v power supply was still available and connected to power the two
pressure transducers. Once the 27 volt battery voltage dropped below 24 volts, the 24v SEM power supply would
automatically power the supply for the two AMF pressure transducers. The 27 volt battery and the SEM power
supply were prevented from reverse power flow by blocking diodes. The battery likely drained to lower than 24
volts because of a continuing relay load of 8 mA during the 71 days that the AMF was armed prior to the accident
on April 20, 2010.
ES concludes that the missing wires and miswiring in the blue pod caused the premature battery drain on the 27
volt battery pack so that it could not support the required AMF functions of rebooting the PLC and energizing the
solenoid sequence once the final AMF condition, surface hydraulic pressure, was lost in the disaster.
D.4 Detailed Review of the Blue Pod Defects
In CAM-CSB 000005174, SEM A wiring starts on Sheet 2 and ends on Sheet 23 with the SEM A AMF card
interface. SEM B wiring starts on Sheet 24 and ends on Sheet 45 with the SEM B AMF card interface. Sheets 46
and 47 are apparently not used. Sheet 1 of 47 contains legend information regarding the nomenclature used to
identify wiring device designations, terminations, and locations within the various sheets. For example,
nomenclature on the end of a wire shown on the drawing might be: -X10:11 and 2.2, meaning the wire shown will
be routed from the termination point shown on that drawing to termination on device -X10, terminal 11 – to be
found on sheet 2, at approximately column 2 of that sheet.
Following the open wires found in blue pod SEM A would lead to Sheet 23, which is included in the Phase 2 Test
Preparation Sheet BOP-033 page 30. The first open wire originated from the AMF Card (-A31) termination point
(-X47) terminal 14. This terminal is identified as “Active this Pod.” This is one of the critical signal inputs
indicating that this pod is alive and functioning. Terminal 14 should be wired to -X10:11 on Sheet 2 column 2. On
Sheet 2, -X10 is the subsea J-Box connection point, which connects the blue pod SEM (A&B) to the exterior of
the SEM. Numerous wires are connected to terminal 11 of -X10. The wiring from the SEM A AMF terminal 14 to
this multiple-junction point terminal 11 was missing or disconnected.
Following the second open lead (page 31 of BOP-033) again from terminal 14 on the AMF card leads to -K4 pin
14 on Sheet 17 column 6. This is the same Active this Pod terminal and should be wired to Sheet 17, device -K4.
K4 is a relay and -K4:14 is a normally open (N.O.) relay contact.
Following the line from -K4.A1 (column 6, below terminals 11 and 14) to the left side of the drawing leads to -
X3:37, which is connected to the 24vdc bus for SEM A. This implies that the coil of relay K4, terminals A1 and
A2, is energized whenever 24vdc exists on the bus. The N.O. contact, terminals 11 and 14, will close whenever
there is power from the deck to the SEM via the riser electrical cables. This connection to terminal 14 of the AMF
card and its subsequent indirect connection to -X10 appear to form part of the necessary conditions, which if
absent, could elect to initiate the AMF/Deadman sequence.

CSB-FINAL REPORT-MUX(06-02-2014) Page 80 of 113
U.S. Chemical Safety Board By Engineering Services, L.P.
A third wire was “open lead” on page 31 of BOP-033. This wire extends from terminal 16 of the AMF card. That
termination point is identified as “Active Remote Pod.” Terminal 16 should also have been connected to -X10:11
Sheet 2 column 2. This is the same termination point for terminal 14. Therefore, were the wires connected
properly, terminals 14, 16, and -K4:14 were essentially all to be tied together at the same common multiple-
termination point on Sheet 2. But testing showed that these wires were not connected as shown on the drawings
for some unknown reason. Additional testing by NASA indicates that the technicians found continuity from
terminals 14 and 16 from the AMF card to connection point -X11.127 Since there was no conductivity to -X10,
there were additional missing wires between -X10 and -X11.128
The purpose of “capped” receptacle -X11 is unclear. Some quality tests refer to both X10 and X11, but we cannot
reverse engineer the purpose for connector X11. Perhaps it was used only for testing purposes on the surface.
There were also missing wires in SEM B AMF card of the blue pod (Sheet 45). 129 Again, the same terminals 14
and 16 on the AMF card are found not connected as shown on the drawings. These two terminals should have
been connected to the same multiple-termination point as shown on Sheet 2. In NASA’s point-to-point testing,
terminal 14, which also connects to -K6 pin 14, was in fact connected to that K6 relay shown on Sheet 40 column
6. Relay K6 functions identically to relay K4 in that it provides a healthy condition signal that power and control
are “normal.” The wire from AMF terminal 16, Active Remote Pod, however, was not connected to the common
termination point on Sheet 2.
By the fact that the K6 relay contacts, terminal 14, was found connected to terminal 14 of the AMF card, the
Active This Pod was getting an external signal that “this pod” was alive and had power available from the deck
under normal operating conditions, even though terminal 16 was not getting an indication of health from the
remote pod. The result is the false indication that the AMF is armed and ready to read such signals.
Assuming that AMF is armed the wiring defects were present before April 20, 2010, the SEM B AMF card would
be getting a signal that the remote pod (yellow) was alive and healthy, which indicated that power and control
127 See the handwritten note of Phase 2 Test Preparation Sheet, DNV2011061904 BOP-033 at the bottom of page 31. 128 ES researched the possibility that a “heartbeat” signal might have been available to the SEMs from external connections at
connector –X11 to the Riser Control Box (RCB). Per the drawings, there was only one external cable to the “Sub-sea J-
Box” which was then connected to the RCB. That cable connected only to the connector at –X10. The following drawings
confirm that the only external connection for the “heartbeat” signal is a single cable to –X10. SK-122178-21-06 Sht. 2 of
47 TREX-5157 (-X11 connection is shown as “Not Used – 20k PSI Cap”, SK-122178-21 Sht. 1 of 1 (CAMCG-
00000334) indicates that there are four (4) external connectors around the periphery of the SEM vessel; These are “Sub-
sea J-Box, STM I, STM II,… the fourth indicates “CAP”. SK-122100-21-04 Sht. 1 of 4 (TRN-HCEC 00016703) is a
complete interconnection diagram for the MUX. It clearly shows no direct connection between the RCB and the “SEM
Assy.” other than the one through the Sub-sea J-Box. This is consistent with Sht. 1 of 1 above that the SEM is connected
only to the Sub-sea J-Box, STM I and STM II and shows 1 external blank connection. The sub-sea J-box is connected to
the RCB and there is a “heart beat” signal in that cable from the RCB through the Sub-sea J-box to the SEM connector –
X10. There is no external connection to –X11 shown on these drawings.
129 See Phase 2 Test Preparation Sheet, DNV2011061904 BOP-033, page 34.

CSB-FINAL REPORT-MUX(06-02-2014) Page 81 of 113
U.S. Chemical Safety Board By Engineering Services, L.P.
were still available to the remote pod even if this blue pod was not healthy. But the result of the wiring defects on
the SEM A AMF card losing both Active this Pod and Active Remote Pod signals would result in communicating
to this one SEM A AMF card that all power and control/communications signals had been lost.
This miscommunication signaled that the only remaining condition for activation of the AMF/Deadman sequence
would be the loss of hydraulic pressure, which did not happen in the 71 days of drilling activity and normal
operations leading up to the incident.
It appears that the control system logic requires the 27 volt battery pack to be connected only after a loss of
power, control, and communications signals, with the exception that it holds one 24v relay coil to permit the AMF
control of other 24v relays. The BP Report confirms this logic step.130
This precondition for connecting the 27 volt battery is somewhat contrary to the Transocean Report, which
advised that the 27 volt battery was connected whenever the AMF was armed. It is connected only to one relay
coil, but not to the two pressure transducers. Connection to the pressure transducers requires loss of SEM power
and control. Transocean’s battery load calculations were then based on maximum loading (20 mA) of the 4-20 mA
transducers, allowing only the 27 volt battery pack to have 43.75 days of useful life. This calculation is
erroneous, as it would require changing the battery pack after a month of drilling service. Transocean’s estimated
short life cycle also excludes any use of the 27 volt battery to fire solenoids. ES concurs with BP's understanding
of the 27 volt battery getting connected to the transducers only after the AMF card senses a loss of power to the
SEM. In addition, Transocean’s calculations reveal that the 27 volt battery should have completely drained by
March 22, a full month before the accident. This 9 volt battery failure scenario is not credible, because the 9 volt
blue pod batteries passed all load tests at Michoud.
When the 27 volt battery gets connected, then the wiring defect in the blue pod SEM A (and not the wiring defects
in SEM B) would have signaled the SEM A AMF card to connect the 27 volt battery using an AMF card relay to
energize the two pressure transducers, TP9 and TP10. These pressure transducers were necessary to detect the loss
of hydraulic pressure relative to the ambient subsea hydrostatic pressure. They are normally powered by the
SEM’s 24vdc bus until that bus loses power. The premature connection of the 27 volt battery would occur
immediately whenever AMF was put into the armed state. This would cause the 27 volt battery of the blue pod to
be loaded prematurely even though it was designed to be connected only after loss of power and communications.
In turn, this premature connection of the blue pod battery caused the early failure of the 27 volt battery before the
incident. ES battery drain calculations appear below.
130 BP Report, Appendix X, AMF Sensor Relay, p.4,

CSB-FINAL REPORT-MUX(06-02-2014) Page 82 of 113
U.S. Chemical Safety Board By Engineering Services, L.P.
Figure D-2: Blue Pod 27 volt Battery Loading Time Segments (Source: Engineering Services)
Figure D-2 contains three distinct blue pod 27 volt battery loading time segments:
1. Load for relay 1 coil and two pressure transducers from initial arming
2. Load for relay 1 coil and shared load on two pressure transducers with SEM
3. Load for relay 1 coil only
Assuming that arming started on February. 8, 2010 and continued until the loss of rig power on April 20, 2010, we
have produced estimated calculations based on the expected load current of the pressure transducers and relay 1
coil current on the 27 volt battery for these 71 days. This is accomplished by first extrapolating the actual
pressures for each transducer across the 4-20 mA range of the transducers. Each transducer had a different
maximum pressure rating. The hydraulic/conduit rating was 12,000 psi, and the hydrostatic/ambient rating was
5,000 psi. The actual total milli-amp load for the transducers was estimated to be 22.53 mA. The current load of
the relay 1 coil varied from a high of 9.6 mA down to 7.6 mA as the battery voltage declined. We also considered
the additional factor of the active SEM 24v power supply contributing some power to the transducers as the
battery voltage dropped below 24 volts.
The resulting amp-hour load calculated for the arming period turns out to be more than 80% of the battery
capacity starting condition of 40 AH (40 → 7.5 AH). We chose 40 AH for the initial condition of the battery,

CSB-FINAL REPORT-MUX(06-02-2014) Page 83 of 113
U.S. Chemical Safety Board By Engineering Services, L.P.
which was derated from 48 AH for subsea temperature conditions by 12.5%, and we then further assumed some
shelf life (2006 to 2010) and prior testing losses of 2 AH).
We concluded that the premature connection of the blue pod 27 volt battery, caused by miswiring in the SEM, led
to a premature, unintended, and critical drain of the battery through the two pressure transducers, thereby
preventing the 27 volt battery from energizing the emergency AMF solenoids.

CSB-FINAL REPORT-MUX(06-02-2014) Page 84 of 113
U.S. Chemical Safety Board By Engineering Services, L.P.
Appendix E: CSB Exemplar Solenoid Testing
The test protocol included programming two PLCs (programmable logic controllers) to simulate the pulse-width-
modulated DC voltage sequence similar to the sequence used in the SEM’s solenoid driver module. This appendix
describes the programmed test sequence;
The 24 vdc was programmed as a fixed pulse-width sequence similar to the original PLC solenoid drivers in the
SEMs. The repeating pulse widths were used to simulate the solenoid driver sequence observed during solenoid
testing at Michoud. The sequence was programmed to be 30 seconds long for each PLC to match the SV 103
duration in the AMF/deadman sequence.
Both PLCs were programmed with the same 30 second sequence; however, PLC-1 was programmed to start the
PLC-2 sequence with a delay, which could be varied for each test. The minimum increment of delay was 1 mSec.
A four-channel digital storage oscilloscope131 was used to review and save the test data. Once the sequence was
initiated by pressing a start button for PLC-1, the oscilloscope would capture the voltages for each coil, the
current for coil A, and the output of the solenoid outlet pressure transducer, and the data saved for further
evaluation.
Air pressure (~ 100-125 psig) was applied to the SV inlet. The outlet of the SV was deadheaded in a pressure
gauge and the pressure transducer. The vent was open to atmosphere. The solenoid valve was placed in an ice
water bath during testing to prevent overheating of the coils.
131 Agilent Technologies, oscilloscope model DSOX2004A, 4-channel, 70 MHz, S/N MY521411068. Certificate of
calibration: April 8, 2012.

CSB-FINAL REPORT-MUX(06-02-2014) Page 85 of 113
U.S. Chemical Safety Board By Engineering Services, L.P.
Engineering Services
Figure E-2: Exemplar Solenoid Valve with Fabricated Header and Piping
A manifold header connection block was fabricated to compress the inlet, vent, and outlet o-rings with the aim of
forming a sealed interface with the valve and providing threaded ports for the manifold piping.132
Engineering Services
Figure E-3: Exemplar Solenoid Valve with Attached Cable
132 Exemplar solenoid information: Assembly PN 223290-63 Rev 04, Assembly SN 110744510-88 5009. Other ID:
400276664-01, 200070974.

CSB-FINAL REPORT-MUX(06-02-2014) Page 86 of 113
U.S. Chemical Safety Board By Engineering Services, L.P.
Figure E-3: Exemplar Solenoid Control (Source: Engineering Services)
Figure E-3 shows the layout and connections for the solenoid test protocol. There were two PLCs operating the
test. For simplification, only one is shown in this diagram representing SEM A / coil A.

CSB-FINAL REPORT-MUX(06-02-2014) Page 87 of 113
U.S. Chemical Safety Board By Engineering Services, L.P.
Engineering Services
Figure E-4. Ice bath with exemplar solenoid and oscilloscope
Engineering Services
Figure E-6. Allen Bradley PLCs with power supply, pushbuttons, and I/O wiring

CSB-FINAL REPORT-MUX(06-02-2014) Page 88 of 113
U.S. Chemical Safety Board By Engineering Services, L.P.
E.1 Exemplar Solenoid Testing Results and Graphics
A minimum of 200 mSec delay in PLC-2 was necessary to open the SV briefly. Out-of-sync delays greater than
200 mSec caused increases in opening time. Since the opening pulse was one second long, the series of tests
revealed that delays beyond the length of the opening pulse did not produce any additional number of valve
openings. (See Figure E-.) Increasing the delay between PLCs, however, did increase the duration of total valve
opening time for the programmed 30 second sequence. (See Figure E-7.)
Engineering Services
Figure E-6. Number of Valve Openings as a Function of Delay
0 250 500 750 1000 1250 1500 1750 2000
0
2
4
6
8
10
12
Number of Valve openings
as a fuction of A/B delay
Tests 5 - 34
A/B delay, mSecs.

CSB-FINAL REPORT-MUX(06-02-2014) Page 89 of 113
U.S. Chemical Safety Board By Engineering Services, L.P.
Engineering Services
Figure E-7. Total Valve Open Time for the SV as a Function of Delay between the two PLCs, 30-
second Sequence
The following is a snapshot of the oscilloscope trace for Test #34, which consisted of a 33-second duration using a
3-second delay in PLC-2. There were 10 solenoid pulses during this test period, which totaled 13.6 seconds of
opening time.
Traces #1 & 3 are solenoid coil voltages (A&B) on a PWM pulse sequence with offset delay. Trace #2 is coil A
current. Trace #4 is voltage related to air pressure output of the valve on a pressure transducer (0-5v). Valve is
open when voltage goes high.
The traces above and graphic plot below indicate 10 pulses for a total opening time of 13.6 seconds for a test
duration of 33 seconds (30-second sequence + 3-second delay).
0 500 1000 1500 2000 2500 3000
0
2
4
6
8
10
12
14
Total time valve open, secs.
Tests 5 - 34
A/B delay, mSecs.
To
tal ti
me
op
en
, s
ec
s.

CSB-FINAL REPORT-MUX(06-02-2014) Page 90 of 113
U.S. Chemical Safety Board By Engineering Services, L.P.
Engineering Services
Figure E-9: Oscilloscope Trace - Test #34
Engineering Services
Figure E-10: Graphical Plot of Valve Pulses 3-Second Out-of-Sync Condition

CSB-FINAL REPORT-MUX(06-02-2014) Page 91 of 113
U.S. Chemical Safety Board By Engineering Services, L.P.
Figure E-10 plots Test #34, showing the PLC-A voltage plot in blue, the PLC-B plot in green (shown as negative
pulses to indicate reversed coil wiring), the PLC-A current in red and the pressure transducer opening in purple.
The dark lines over the voltage plots are calculated RMS (root mean squared) voltage values, as a proportional
representation of the effective value of voltage contributing to the magnetic effect. The RMS values were
calculated for each coil and then added together to show the net effect of the applied voltage in producing an
electromotive force to move the solenoid core (heavy black line).
E.2 Effect of Out-of-Sync and Short-Cycle Testing
Cameron documents advised that there would be a 12- to 15-second delay in starting the AMF/deadman sequence
after meeting all conditions.133 AMF/deadman testing at Michoud during Phase 1 also confirmed the delays after
PETU power was removed from the SEM. Given this variable timing in responding to an emergency, energizing
coil A and coil B could be out of sync by as much as 3 seconds and permit the solenoid valve to fire in pulses on
the pilot pressure side of the blind shear rams. Our analysis of actual Michoud AMF/deadman testing indicates
that the out-of-sync delay could be as much as 6 seconds. (See Figure E-13,
AMF%20Timing%20SpreadsheetTiming Analysis of SV103.)
We also found that one of the solenoid component tests at Michoud revealed a short-cycle of the initial sequence
in SEM A while being initiated by a PETU. This shortened cycle was approximately 6.2 seconds, as opposed to
7.2 seconds seen in the SEM B sequence. The Michoud test data appears in Figure E-11.134
The initial short cycle of approximately 6 seconds in SEM A is seen in the test (1.00 S/division) captured in
Figure E-11. The out-of-sync condition continued throughout the test even though the short-cycle did not
continue, as seen in Figure E-12.
133 CAM-CSB000013890, Document X-200261-62-18, p. 20. 134 DNV2011060643, TPS BOP-015-2, PETU Solenoid Driver Characterization.

CSB-FINAL REPORT-MUX(06-02-2014) Page 92 of 113
U.S. Chemical Safety Board By Engineering Services, L.P.
Figure E-11: Short-cycle Seen in PETU Characterization Tests during Phase 2 testing.
Figure E-12: Out-of-Sync Condition Remains after Short Cycle Ends as observed during Phase 2
testing.

CSB-FINAL REPORT-MUX(06-02-2014) Page 93 of 113
U.S. Chemical Safety Board By Engineering Services, L.P.
The SEM A trace in Figure C5-12 reveals that the 7.2-second sequence resumed after the initial short cycle of 6.2
seconds. However, the out-of-sync condition remained between the two SEM A and B coils. ES believes that the
SEM solenoid driver module, not the PETU, caused this condition.
This short cycle produced an out-of-sync condition of approximately 1 second. We tested this condition in Tests
58 – 61 by setting the second PLC for a 1-second delay and then making the electrical connections to the valve
(using an auxiliary DPDT switch) after the initial long pulses from both PLCs had fired. Thus, we prevented any
possible residual magnetic effect or valve operation from an initial long pulse in PLC-1. The result of Test 58 was
eight brief pulses within the 30 second test for a total valve opening time of 8.6 seconds.
When the RBS 8D BOP was manufactured in 2000, the AMF/deadman sequence was programmed to include a
56-second sequence in which the actuation of the 103 BSR solenoid was set for 18 seconds. Prior to being
deployed at Macondo, the AMF/deadman sequence was revised. Evidence taken during the inspection of the pod
SEMs (ref – DNV2011062110 TPS BOP-038) on June 21, 2011 indicate that all four SEMs had identical
shutdown.asc files. These files were used during the AMF/deadman reboot of the PLCs to interrupt the normal
PLC cycle to execute the AMF/deadman solenoid valve sequence.
The programmed sequence calls for a 30-second activation duration for the 103 HP BSR solenoid valve. Based
on our 30-second exemplar test duration, and a 3-second delay between PLCs, we saw 10 pulse operations of the
solenoid valve and a total opening time of 13.6 seconds for the solenoid valve (Test 34 as shown earlier).
While we cannot precisely define the out-of-sync conditions at the time of the incident, we do know from our
exemplar testing that a minimum of 200 mSec differential was required to actuate the valve in miswired condition
(for 0.2 seconds). Much more than 200 mSec of delay would be required to do significant work through the pilot-
operated high pressure shear valve to send sufficient high-pressure hydraulic fluid to the blind shear ram pistons.
E.3 Additional Analysis of Out-Of-Sync Conditions
Figure E-13 shows the results of our graphic analysis of the five AMF/deadman tests during Phase 1 Michoud
testing. The green bars on the timing analysis indicate the duration in which the 103 solenoid valve was open for
each test. Table E-1 summarizes the opening times for the 103 close BSR valve.

CSB-FINAL REPORT-MUX(06-02-2014) Page 94 of 113
U.S. Chemical Safety Board By Engineering Services, L.P.
Programmed
Sequence
Yellow – Using
Replace. 103 SV
Blue – on
PETU Power
Yellow – Using
Orig. 103 SV
Yellow – Using
Orig. 103 SV
Yellow- Using
Orig. 103 SV
Test 1 Test 2 Test 3 Test 4 Test 5
For SV 103 DNV Table 8 DNV Table 9 DNV Table 11 DNV Table 12 DNV Table 13
SV 103 Total
Opening
Time
30 sec. 36 sec. 36 sec. 7 sec. * 31 sec. ** 30 sec. **
Differential
SEM Timing
0 + 6 sec. + 6 sec. SEM B Battery
Failed in Test
1 sec. 0 sec.
Engineering Services
Table E-1: Phase 1 AMF/deadman Tests - Timing for SV 103 (Source: Engineering Services)
* 9 volt SEM B Battery fails during test sequence
** 9 volt Battery fails and is unable to reboot SEM B
The PLCs in the pods were programmed only for 30 seconds of operation of the 103 solenoid valve.
Actual testing at Michoud revealed in the above table, Tests 1 and 2, show that the SEMs can be out of
sync by as much as 6 seconds in actual AMF/deadman since the total opening time was 36 seconds. The
36 seconds cannot be taken to mean some random variable in the PLC timing, but rather in the timing of
the AMF card to start the sequence in one SEM prior to the start of the sequence in the other SEM. The
36 seconds in Test 1 says nothing about the viability of the SEM B 9v battery. That battery appears to
have failed in Tests 3, 4 and 5. It is quite possible that this same battery failed to support SEM B (and the
103 solenoid valve) for a full 30 seconds in Test 1. It is possible that SEM B was “leading” SEM A in the
initiation of the sequence, but failed during the final seconds of Test 1 when SEM A was carrying the
second coil of the replacement 103 solenoid.
The 6 second differential timing is significant to the theory and exemplar testing in that it would permit a
mis-wired solenoid valve to 6 seconds of initial operating time plus the cumulative duration of the open
pulses while both SEMs are acting on the solenoid valve.

CSB-FINAL REPORT-MUX(06-02-2014) Page 95 of 113
U.S. Chemical Safety Board By Engineering Services, L.P.
Table E-1. Timing Analysis of SV 103 for Five AMF/deadman Tests at Michoud.
Event
/Func Yellow Pod – 103
Replacement Blue Pod – AMF
on Re-power Yellow Pod – 103
Original Yellow Pod – 103
Original Yellow Pod – 103
Original
Test 1 Test 2 Test 3 Test 4 Test 5
Timing secs.
AMF Testing
Sequence ID Programmed
Sequence ID DNV pg 46
Table 8 ID DNV pg 46
Table 9 ID DNV pg 47
Table 11 ID DNV pg 47 Table 12 ID
DNV pg 49 Table 13 ID
-16
Disconnect PETU Power to Pod
X
Disconnect PETU Power to pod
X X X X
-15
-14
This delay, prior to starting the PLC
-13
reboot likely caused by power
-12 supply capacitance.
-11
Laptop Comms to PETU- Off and PLC Starts Reboot
Y
Loss of Power, Comms & Hydraulic
Y
Laptop Comms off – PLC starts reboot cycle
Y
AMF signal to PLC starts reboot when power was re-established by PETU
Y ? Y
0
PLC Rebooted, Starts AMF sequence,
33/43
PLC Rebooted, Starts AMF sequence,
33/43
33/4
3 ?
33/43
33/4
3
1
Stack & LMRP Stingers Extend
Stack & LMRP Stingers Extend

CSB-FINAL REPORT-MUX(06-02-2014) Page 96 of 113
U.S. Chemical Safety Board By Engineering Services, L.P.
Event
/Func Yellow Pod – 103
Replacement Blue Pod – AMF
on Re-power Yellow Pod – 103
Original Yellow Pod – 103
Original Yellow Pod – 103
Original
Test 1 Test 2 Test 3 Test 4 Test 5
Timing secs.
AMF Testing
Sequence ID Programmed
Sequence ID DNV pg 46
Table 8 ID DNV pg 46
Table 9 ID DNV pg 47
Table 11 ID DNV pg 47 Table 12 ID
DNV pg 49 Table 13 ID
2 Early by 3 sec
35/45
3
possible timing
measurement
35/4
5
35/45
4 error
5
Energized Stack & LMRP Stingers
35/45 Energized Stack & LMRP Stingers
35/45
?
This activation of 103 works
47
This activation of 103 works
47
6 One second early
47 because SEM B 9v battery
because SEM B 9v battery
7 De-activate Stingers Extend &
47 De-activate Stingers Extend &
47
possible timing
measurement
has failed and cannot
has failed and cannot
8
Energize 103 Blind Shear Ram Close
Energize 103 Blind Shear Ram Close
error 47 reboot SEM B PLC
reboot SEM B PLC
9
10 P
11 R
12 O
13 G
14 R
15 A
16 M
17 M
18 E
19 D

CSB-FINAL REPORT-MUX(06-02-2014) Page 97 of 113
U.S. Chemical Safety Board By Engineering Services, L.P.
Event
/Func Yellow Pod – 103
Replacement Blue Pod – AMF
on Re-power Yellow Pod – 103
Original Yellow Pod – 103
Original Yellow Pod – 103
Original
Test 1 Test 2 Test 3 Test 4 Test 5
Timing secs.
AMF Testing
Sequence ID Programmed
Sequence ID DNV pg 46
Table 8 ID DNV pg 46
Table 9 ID DNV pg 47
Table 11 ID DNV pg 47 Table 12 ID
DNV pg 49 Table 13 ID
20
21 S
22 E
23 Q
24 U
25 E
26 N
27 C Delay in activation of 103
47
28 E due to opposing wired coils
29 9V SEM B battery fails
30 30 and PLC-B goes off-line.
31
32 S
33 E
34 C
35 . Short cycle of 7 sec. Due
Off Pressure is off after 30 sec
Off
36 to mis-wired 103 and the
Pressure off after 31 sec.
Off Timing is exactly as
37 De-activate BSR Close
Off De-activate BSR Close
OFF
failure of SEM B 9v batt.
Difference of 1 second
programmed. One 9v

CSB-FINAL REPORT-MUX(06-02-2014) Page 98 of 113
U.S. Chemical Safety Board By Engineering Services, L.P.
Event
/Func Yellow Pod – 103
Replacement Blue Pod – AMF
on Re-power Yellow Pod – 103
Original Yellow Pod – 103
Original Yellow Pod – 103
Original
Test 1 Test 2 Test 3 Test 4 Test 5
Timing secs.
AMF Testing
Sequence ID Programmed
Sequence ID DNV pg 46
Table 8 ID DNV pg 46
Table 9 ID DNV pg 47
Table 11 ID DNV pg 47 Table 12 ID
DNV pg 49 Table 13 ID
38 may be measuring error.
battery has failed to
39 One 9v battery has failed
reboot SEM B.
40 to reboot SEM B.
41
42 Pressure is Off after 36
sec. Off
43 Extended duration
could
44 have been due to A&B
Pressure is Off 36 sec.
Off
45 sync delay of 6 sec.
Extended duration could
46 have been due to A&B
47 sync delay of 6 sec.

CSB-FINAL REPORT-MUX(06-02-2014) Page 99 of 113
U.S. Chemical Safety Board By Engineering Services, L.P.
E.4 Electrostatic Detector Measurements on the Reverse-wired Solenoid
Valve
ES conducted a test using a non-contact voltage tester with sensitivity control (Extech DVA30) in an attempt to
get an external indication that the solenoid was being energized. We wired coil B backwards and set PLC-B for
the minimum 1 mSec delay. Essentially, PLC-A and PLC-B were synchronized with coil B being miswired. We
knew from prior tests that this wiring arrangement would not permit the valve to actuate.
Figure E-14: Extech DVA30 Non-contact Voltage Detector
The detector was placed on the exterior of the solenoid, and the sensitivity was adjusted to not light or beep when
there was no electrical power to the SV. The test was started with both coils energized at the same time. The
detector sensed the voltage, but the solenoid valve did not actuate.
Our testing revealed that the sensitivity of such devices can cause erroneous results. Any external attempt at
checking solenoid actuation, may verify electrification, but it cannot confirm actuation of the valve in the case
that one coil of the dual-coil solenoid is reverse-wired.
CSB-FINAL REPORT-MUX(06-02-2014) Page 100 of 113
U.S. Chemical Safety Board By Engineering Services, L.P.
Appendix F: Review of Cameron FAT Test Procedures
ES reviewed several FAT and AMF/deadman testing procedures for DWH MUX control pods or individual SEMs
to assess their ability in detecting problems in the emergency control systems. These procedures provided vital
input to understand what Cameron considered necessary for quality assurance functioning of the MUX control
pods and SEMS. The sections that follow document our comments on each procedure. Comments were made
where deviations to the written procedure were made during testing or where test equipment or methods appeared
to be changed over time. In most cases, we make no attempt here to analyze the “color” identity or position of
these pods/SEM relative to their location on the date of the accident. If a color of the pod is indicated, it is
because the FAT procedure indicated it as such.
F.1 Cameron FAT Test for Subsea Electronic Module.135
This procedure was used during the upgrade of the yellow pod SEM with new pie connectors and batteries from
August to December 2006. ES has the following comments on this procedure:
1. Section 2, page 22 of 43 of this procedure states: “Remove PETU connection from X10 and install on
X11. Leave the PETU switch in the A position.” The pulse generator is to be connected to X11 pins
9 & 12 (SEM B).
2. The procedure was signed off,136 but no AMF/deadman test result steps (pages 20-28) were initialed.
3. In an email to Cameron, Transocean apparently was dissatisfied with the quality of the work.
4. Another FAT AMF/deadman Procedure was accomplished – X-065449-05 (CAM-CSB000013591)
for this work.
5. The bottom of page 6, AMF should have been initiated, but there are no initials or checkmarks.
6. This procedure uses external power supplies in lieu of 9 volt and 27 volt batteries.
Summary – A” pulse generator” is used in this test to simulate part of the AMF/deadman conditions. The
AMF/deadman test used external power supplies. The AMF/deadman batteries were not used.
F.2 Cameron FAT Test for Blue Pod SEM, November 2007137
1. This test setup description used two PETUs and two pods and -X10 and -X11 connections.
2. The results columns138 show only check marks in columns Ba and Bb, implying that only one pod
was used. Perhaps the other pod was simulated by the second PETU.
135 Document X-200751-21-03, December 6, 2006, [CAM-CSB000013545]. 136 Ibid., p. 29 of 43.
137 AMF/deadman procedure X-065449-05, November 7, 2001 [CAM-CSB000013742]. 138 Ibid., pp. 4-7 of 9.

CSB-FINAL REPORT-MUX(06-02-2014) Page 101 of 113
U.S. Chemical Safety Board By Engineering Services, L.P.
3. The final condition to complete the AMF/deadman trigger is downward adjustment of the TP9
pressure transducer (simulated pressure).139 This action triggered the AMF/deadman sequence
correctly.
Summary – This test would not have caught the wiring nonconformance found by technicians in the Blue pod
since the simulated removal of power and communications was not the last conditional trigger.
F.3 Cameron FAT Test for Subsea Electronic Module (Extended Version)140
This FAT procedure was accomplished on the blue pod in June 2009. ES has the following comments on this
procedure:
1. The solenoid test does not specify how to set up the PETU switches (A/B, Single/A+B).141
2. It is not clear that the solenoid test separately test coils A and B. The test does not include both
separate tests and simultaneous tests.
3. Analog tests for SEM A and B seem to imply nonconformances (NCR) on the analog values.142
These non-conformances were simply accepted by Transocean and Cameron. The Deadman active
and deactivate values were not documented and might have been part of the nonconformances which
were deemed acceptable.
4. The analog values for AMF/deadman active/de-active are not documented in the AMF/deadman
sequence test for SEM A. 143 Test 1 proves that loss of hydraulic pressure can trigger AMF/deadman
sequence.144
5. Handwritten changes appear on the testing pages relating to -X10, -X11, pins 7, 8, 9, and 12,145
and regarding how the PETU was connected to -X10 or -X11 and its switch (A/B) settings.
6. In this test procedure, the PETU was to be connected to -X10 (SEM A), but the pulse generator
was to be attached to -X11 (SEM B) pins 9 and 12 (handwritten pins 7, 8). This procedure may be the
wrong one for this pod SEM. See note at grid F:5 “AMF/deadman Trigger In … Not Used,” regarding
pins 7, 8.146
7. This test was a SEM-only test, which did not involve the actual solenoids on the Blue pod. It used
test solenoids that were connected temporarily.147 In this procedure, only one coil is energized at a
time. No polarity testing of SV coils is accomplished because this test does not apply to a test of the
actual pod solenoid valves.
139 Ibid., p. 6, 140 CAM-CSB000013890, Document X-065449-02, June 22, 1999. 141 Ibid., p. 10. 142 Ibid, pp. 14-15. 143NEED TO FIX CITATION: Form X200261-62-18, April 4, 2007, p. 20. 144 Test 1, p. 21. 145 Ibid., pp. 20, 22, 23. 146 CAM-CSB000005175, SEM Wiring Diagram, SK-122178-21-06, Sheet 2 of 47. 147Ibid., pp. 20 and 22.

CSB-FINAL REPORT-MUX(06-02-2014) Page 102 of 113
U.S. Chemical Safety Board By Engineering Services, L.P.
8. Page 20 notations include: “Redline AMF/deadman Functions.”
Summary – Technicians were modifying the written procedures during the tests. Either the procedures were
incorrect for this type of test or the tests were conducted out of compliance with design requirements. This test has
limitations since actual solenoids were not in place. Nonconformances were noted on the AMF/deadman
functions.
F.4 Cameron Refurbishment of Yellow Pod SEM
Cameron refurbished and tested the apparently defective yellow pod SEM in February 2010, while drilling was
underway at Macondo. Given our hindsight that miswired solenoids and defective wiring were in the subsea pods,
this review of test procedures for a pod that was not in use on the DWH aimed to assess the state of the quality of
FAT testing in early 2010.148 ES has the following comments on this procedure:
1. There are differences between this procedure and X200261-62-18 in C6.3. In this case, the PETU
connections are being made to SEM A, but the pulse generator is connected directly to pins 14 and 16
on the AMF/deadman card instead of to -X10 or -X11. If the wires from pins 14 and 16 were
misconnected as they were in the blue pod, then this procedure would not pick up the wiring
deficiencies external to the AMF/deadman card that technicians observed.
2. Solenoids being tested here are test solenoids, not actual pod solenoids. In this procedure, only
one coil is energized at a time. No polarity testing of SV coils is accomplished because this test does
not apply to the actual pod solenoid valves.
3. The test technician appears not to have complied with the SEM B test (Section 2) instruction to
remove the “PETU connection from SEM A and move to SEM B” and instead, simply switched the
PETU to SEM B (handwritten) instead of leaving the switch in the SEM A position and moving the
connection to SEM B. Alternately, the test technician might have assumed a typographic error in the
procedure. In either case, he did not follow the procedure as written.
4. This SEM is shipped to the DWH rig and becomes the spare SEM on the white pod.
Summary – The test technician is adapting the procedure to the equipment under test. The procedure does not
exactly fit the equipment. Cameron’s procedure has now changed for using of the pulse generator. The procedure
calls for the pulse generator to be connected in a way that places it at the AMF/deadman card, which assumes that
the SEM is open and those terminals are accessible. Access to these terminals would not be available when the
SEM is closed, unless these terminals are wired to external connector -X10 or -X11.
148 The FAT procedure was CAM-CSB000014274, X-065449-05, “Factory Acceptance Test Procedure for Subsea Electronic
Module (AMF),” July 24, 2009, revision 01.

CSB-FINAL REPORT-MUX(06-02-2014) Page 103 of 113
U.S. Chemical Safety Board By Engineering Services, L.P.
F.5 Cameron Deck Test Procedure for Mark II Control Pod149
This procedure was used for the retrieved pod retrieved from the yellow position. ES has the following comments
on this procedure:
1. This is the only deck test procedure that we have seen for the Cameron Mark II control pods. It is
unnumbered and there were no recommended deck test procedures for the MUX BOP control system
found in the RBS 8D Data Books or Operations Manual.
2. PETU to SEM cable has only four conductors/pins. This arrangement is not compatible with the
connection described in the PETU-SEM cable circuit diagram.150 No mention of PETU A/B switch
settings. No mention is made of separate SEM A and SEM B connection points.
3. Upper annular pressure increase (3A) solenoid fails to operate. PETU operating mode must
energize both coils due to the fact that this miswired SV failed its test.151
4. The solenoid valve of the upper annular regulator is noted to have failed (3A),152 but there are
separate tests for SEM A and SEM B. Apparently, the test setup or the PETU was not able to test only
one coil separately from the other. If it had, both tests would have passed since miswired 3A would
have failed only on simultaneous energizing of both coils.
5. There is no advice on switching PETU A/B switch or moving PETU-SEM cable for the pilot and
function circuit.153 Both SEM A and B columns were verified and initialed. The miswired SV 103
appears to have passed this test,154 while the SV 103 is identified as failing the test.155
Summary – Michoud evidence from PETU characterization is that the A/B switch energizes both coils even
though set to one or the other. This deck test procedure, if used on the deck prior to BOP deployment, needs
clarification relative to polarity of the coils. Testing verification of coil A and B apparently cannot be made by a
PETU that tests both coils at the same time.
F.6 Cameron FAT Procedure for SEM Horizon AMF/deadman156
This procedure was used for the retrieved Yellow pod. ES has the following comments on this procedure:
1. Page 4 of the procedure states, “All connectors designations and channel references left blank
should be filled out by referencing the schematics.” Previous AMF/deadman procedures specified
X10 and X11 connection points, but here referred only to SEM A and SEM B connections. This may
149 Cameron P/N 2020708-21 May 4, 2010 (used during intervention only). 150 CAM-CSB000005595, SK-066201-55-04, p. 5 151 Ibid., p. 11. 152 Ibid., 13. 153 Ibid., p. 19. 154 CAM-CSB000008033, p. 21. 155 CAM-CSB000008036, p. 10. 156 CAM-CSB000008037, Applicable in current situation – Form X-065449-05-03, May 11, 2010 (Used in intervention
only).

CSB-FINAL REPORT-MUX(06-02-2014) Page 104 of 113
U.S. Chemical Safety Board By Engineering Services, L.P.
imply that Cameron’s internal wiring of the SEM (to X10 and X11) has been changed from the
version of the drawings that technicians were using in their wiring point-to-point checks.
2. Page 5 notes that solenoid and battery connections were left “as is” from subsea.
3. Page 6, Test SEM B, Section 2 calls for removing “the PETU connection from SEM A and
connect to SEM B. Select SEM B modem with the PETU modem switch.” This instruction is verified
with initials.
4. On page 9, the AMF/deadman sequence is signed off for Tests 1 and 2. The test sequence is 74
seconds long instead of 37 seconds as programmed into the SEM.
Summary – We question the results that show the 74-second duration of the AMF/deadman test.
F.7 FAT for AMF/deadman In Current Situation157
ES has the following comments on this procedure:
1. Test 1 relates to the simulation of loss of hydraulic pressure to the pod, and Test 2 relates to the
loss of power and communications. These tests now have only two conditional triggers for
AMF/deadman to start instead of the three conditional triggers. The difference is that this test assumes
that the other pod is not pulsing the digital line and has lost its power and communications.
2. Testing was accomplished with pressure on the hydraulic and hydrostatic pressure transducers.
Summary – None of the four AMF/deadman tests on the blue pod was successful. The AMF/deadman fired only
after PETU power was reconnected to the SEM because the 27 volt battery was nearly completely drained.
F.8 Integrity of AMF/deadman Functional QA Testing on DWH in 2010
The FAT testing procedures for the MUX control pods and the AMF/deadman function depend on whether the test
includes both pods, a single pod, or a single SEM. The procedures appear to be dependent on the technician’s
knowledge of the equipment. In some cases, the procedures are modified. Section F6 shows that Cameron’s
AMF/deadman procedure for a single pod leaves the technician to determine which connector and channel are to
be used based on the schematic drawings. This lack of specificity causes concern that the test requirements are
dependent on the current state of the drawings. Perhaps changes to the pods have been made over the years which
cannot be tracked, or they have not been tracked by the manufacturer, but they should have been documented by
red-lined drawings. If the manufacturer cannot be specific on how to test a pod or SEM which was manufactured
in 1999-2000, then the integrity of the testing falls to the owner to prepare deck and functional tests based on the
owner’s knowledge and modifications over the years and its own as-built drawing modifications.
The post-accident deck test procedures were apparently generated post-accident, suggesting that there was no
procedure in place for testing the AMF/deadman functionality on the rig.
157 Intervention Testing on Enterprise, July 2010 Blue pod. Document X-065449-05-03 form, May 11, 2010. (BP-HZN-
BLY00061082)

CSB-FINAL REPORT-MUX(06-02-2014) Page 105 of 113
U.S. Chemical Safety Board By Engineering Services, L.P.
Appendix G: Analysis of Pie Connector Evidence
External observations during Phase 2 testing indicate some of the pie connectors exhibited white oxidation at the
male/female plug interface on the SEM housing external connections. The exterior portions of these plugs were
exposed to seawater and subsea pressures. The presence of oxidation around the male plugs indicates some
galvanic action occurred to form the oxide deposits.
Phase 1 protocols did not permit the TWG to review the PETU diagnostic analysis of the control pods to
determine if there were any faults on any of the solenoid circuits. Any fault on a solenoid coil might have been
due, in part, to abnormally high pie connection resistances caused by oxide buildup.
The male/female connection interfaces were cleaned of the oxide deposits during Phase 2 on June 13 and 15,
2011. Resistance measurements were then taken external to the SEM at the plug (female connection) interface.
These measurements were essentially open-circuit measurements in the range of 40 to 60 k-ohms and did not
address the in-circuit resistances with the oxide in place.158
158 Test Documents DNV2011061012 and DNV20110615

CSB-FINAL REPORT-MUX(06-02-2014) Page 106 of 113
U.S. Chemical Safety Board By Engineering Services, L.P.
G.1 Review of Oxidation on Control Pod SEM Pie Connectors
The following snapshots were taken from Phase 2 videos. These views show oxidation created on certain pie
connectors.159
Figure C7-1: Blue Pod SEM
Pie Connector 3 appears to be the only connection which has severe oxide exposure. In particular,
pie connection 3E is the only connection that exhibits these corrosion products. (function 3E = Blue
Pod Hotline Supply)
159 Documentation of the pie connector numbering system is found in CAMCG 00000334 and CAM-CSB000005171on
drawing SK-122178-21-04 sheet 1 of 3.

CSB-FINAL REPORT-MUX(06-02-2014) Page 107 of 113
U.S. Chemical Safety Board By Engineering Services, L.P.
Figure C7-2: Title Pre-test Oxide Cleaning
Close-up of Blue pod SEM connection 3E as technician begins to clean the oxide before testing
resistance in connections. Dummy plugs are used to seal unused connections as in connectors #14
and #15.
Phase 2 Testing
Figure C7-3: Oxide Cleaning Process
Technician uses swab and compressed air to clean oxide out of connection. After cleaning, 3E pie
connection interior contacts are not bright and shiny like other connections.

CSB-FINAL REPORT-MUX(06-02-2014) Page 108 of 113
U.S. Chemical Safety Board By Engineering Services, L.P.
Phase 2 Testing
Figure C7-4: Contact Comparison
This image from Video 20120614084748 at 1:17:00 shows dull gray contacts in 3E and brighter
contacts in 3F.
G.2 Functional Analysis of Blue Pod SEM Oxides on Pie Connectors
Pie Connector Number = Solenoid Number & SV Action.
The following solenoid had significant oxide buildup on the Blue pod pie connectors:
3E = SV15 – Blue/Yellow160 Pod Hotline Supply – OPEN
In general, there was more oxidation on the yellow pod SEM than on the blue pod. The yellow pod anodes were
almost completely consumed while the Blue pod anodes were still in relatively good shape. The visual difference
between the condition of each pod’s anodes is dramatic.
The blue and yellow pod anodes were documented with photographs during Phase 2 testing.161 We found no
written summary or quantitative analysis by DNV on their anode findings.
Our review of the Phase 2 photos and videos visually determined which pie connections looked to have the most
oxide buildup before they were cleaned. Some pie connections were spare and had dummy plugs inserted into the
female connection point.
160 Note: drawings are not clear regarding the correct Blue/Yellow notations on both pod's 3E solenoid valves 161 DNV Test Documentation DNV2011042002 and DNV2011042003

CSB-FINAL REPORT-MUX(06-02-2014) Page 109 of 113
U.S. Chemical Safety Board By Engineering Services, L.P.
The next photograph shows corrosion on the yellow pod pie connections.
Figure C7-5: Corrosive Oxides on Yellow Pod SEM as seen during Phase 2 testing.
The yellow pod SEM has several areas of corrosion from oxides (Video 20110614174414).
Figure C7-6: Yellow Pod SEM Connections, Alternative View as seen during Phase 2 testing.
This view of yellow pod SEM connections is just before cleaning (Video June 15, 2011, BD C14 411
20110615095114).

CSB-FINAL REPORT-MUX(06-02-2014) Page 110 of 113
U.S. Chemical Safety Board By Engineering Services, L.P.
Figure C7-7: Yellow Pod - 20110614174414 video snapshot as seen during Phase 2 testing.
Figure C7-8: Close-up of yellow Pod Pie Connections as seen during Phase 2 testing.

CSB-FINAL REPORT-MUX(06-02-2014) Page 111 of 113
U.S. Chemical Safety Board By Engineering Services, L.P.
G.3 Functional Analysis of Yellow Pod SEM Oxides on Pie Connectors
Pie Connector Number = Solenoid Number & SV Action -
The following solenoids were observed to have significant oxide buildup on the Yellow pod pie connectors:
3E = Solenoid Valve (SV) 15 – Yellow/Blue* pod Hotline Supply – OPEN
5B = SV36 – Mud Boost Valve – CLOSE
5C = SV39 – Quick Start Accumulator Pilot – (action not specified)
6B = SV48 – Wellbore P/T Connector – RETRACT
6E = SV52 – (Internal Direct) LMRP Stinger Seal Cylinders – ENERGIZE
7A = SV111 – Wellhead Connector Gasket Release – HOLD
7C = SV19 – Choke/Kill Connector Primary – UNLATCH
8E = SV103 – H.P. Shear Ram – CLOSE
15D = SV28 – Outer Bleed Valve – CLOSE
17C = SV58 – (Blue/Yellow) Solenoid Pilot Supply Dump – OPEN
17E = SV116 – Tubing Hangar Pin – RETRACT
The testing during the Michoud Phase 2 testing did not adequately address the potential for these oxides to add
resistance to solenoid valve electrical circuits, which might have affected the ability of the BOP to function as
intended.
The male/female connection interfaces were cleaned of the oxides deposits on June 13 and June 15, 2011.
Resistance measurements were then taken external to the SEM at the plug (female connection) interface. As
essentially open-circuit measurements in the range of 40 to 60 k-ohms, they did not address the in-circuit
resistances with the oxide still in place.
The formation of the oxides could have been caused by a galvanic interaction between the sacrificial anodes on
the pod when the solenoid was energized with a 24-volt DC voltage during periodic actuation. There may also be
some oxidation due to dissimilar metal corrosion in the connections where the plug did not adequately seal to
keep seawater from getting to the male/female interface.
The quality of the forensic evaluation was also affected when solenoids 3A and 103 of the Yellow pod were
removed during intervention on the Q4000. These solenoids were suspected of not working and were replaced.
Removal and reinsertion of the plug might have improved the connection by reducing any oxide resistance.
Samples of the oxide were obtained during Phase 2 examination, but were not tested.

CSB-FINAL REPORT-MUX(06-02-2014) Page 112 of 113
U.S. Chemical Safety Board By Engineering Services, L.P.
The SEM diagnostics use minimal voltages and currents to test the integrity of the solenoid coil circuits. The
oxide coatings at the interface might not have interfered with the SEM diagnostics, but theoretically could have
minimized the actuation voltage at the solenoid coils.
Appendix H: Historical Changes to AMF/deadman Sequence
The original SEM software and AMF/deadman shutdown sequence (circa 2000) was different and more complex
than the one in place at the time of the incident in 2010. The original AMF/deadman sequence took 56 seconds
and included several functions which had been removed from sequence by 2010. The original sequence162
appears in Table H1 below.
From the earliest days of manufacture of this BOP control system, Cameron recommended against testing the
AMF/deadman sequence using the internal batteries, 163 mounted at that time in the subsea transducer module
(STM). Instead, Cameron tested the AMF/deadman sequence at the factory using an external STM battery
simulator which used external 9 volt and 27 volt power supplies.164
Over time, Cameron modified the pods, AMF/deadman batteries, and the AMF/deadman sequence.
When the executable programs were downloaded from the blue and yellow pod SEMs,165 the AMF/deadman
original sequence was found to be modified to eliminate all of the non-bold functions in Table H-1, those which
follow “De-energize HP Blind Shear Ram Close (#103).” The duration for the HP BSR Close function was also
increased from 18 seconds to 30 seconds, providing additional assurance that the BSR would close completely.
Explicit setting of the ST locks was removed from the sequence programming, but the ST locks were still set by
control system changes to automatically set them as part of the HP BSR Close function
162See pg 440, [CSB2010-10-I-OS-042101] [CAM-CSB 000009325] 163 A guidance note from Cameron sates, “Cameron Controls does not recommend operation of this test due to battery life.”
Cameron also advised that only five solenoid valves can be energized at one time. 164 [CAM-CSB 000009838], p 514. 165 Phase 2 Test Preparation Sheet TPS BOP-038, June 21, 2011

CSB-FINAL REPORT-MUX(06-02-2014) Page 113 of 113
U.S. Chemical Safety Board By Engineering Services, L.P.
Table H-1: Original (Pre-Macondo) SEM software and AMF/deadman shutdown sequence
Non-bold functions were later deleted from the sequence
Elapsed
Time
(seconds)
Activity
:00 Energize LMRP Stinger, Extend
Energize Stack Stinger, Extend
:05 Energize LMRP Stinger Seals, Energize
Energize Stack Stinger Seals, Energize
:07 De-energize (Vent) LMRP Stinger, Extend
De-energize (Vent) Stack Stinger, Extend
Energize LMRP Accumulator, Charge Pilot (#21)
Energize LMRP Accumulator, Charge (#23)
Energize High Pressure Blind/Shear Ram Close (#103)
:25 De-energize (Vent) High-Pressure Blind/Shear Ram Close (#103) Energize ST Locks, Lock (#70)
:29 De-energize (Vent) ST Locks, Lock (#70)
Energize Stack Accumulators, Dump (#101)
:34 De-energize (Vent) Stack Accumulators, Dump (#101)
De-energize (Vent) Stack Stinger Seals, Energize
Energize Stack Stinger Seals, De-energize
:36 Energize Stack Stinger Retract
De-energize (Vent) Stack Stinger Seals, De-energize
Energize Mud Boost Valve, Open (#35)
:41 De-energize (Vent) Mud Boost Valve, Open
Energize Stack Stinger Seals, Energize
:43 De-energize (Vent) Stack Stinger, Retract
De-energize (Vent) Stack Stinger Seals, Energize
Energize Dead Man System Activate (#22)
:51 De-energize (Vent) Dead Man System, Activate (#22)
Retract, Wellbore Pressure/Temperature Connectors
Unlatch, Choke/Kill Connector Primary
Unlatch, Choke/Kill Connector Secondary
Unlatch, LMRP Connector Primary
Unlatch, LMRP Connector Secondary
Energize LMRP Accumulators, Dump (#57)
:56 De-energize (Vent) LMRP Accumulators, Dump (#57)
De-energize (Vent) LMRP Accumulators, Charge Pilot (#21)
De-energize (Vent) LMRP Accumulators, Charge (#23)