Embed Size (px)
Citation preview

Deep Sky Imager™:The Basics
Color
Black and White Pro II
Pro II
Pro III

When first opening the packing box, note carefully the following parts:
• Deep Sky Imager camera• Parfocal ring• USB cable • DB-9 to RJ-11 adapter• LX200® serial cable• Autostar® #497 serial cable• CD ROM, including the Operating Instruction in .pdf format
Recommended Minimum System:
PC running Windows® 2000 with 500 MB RAM and 100 MB free disk space.
To get the best view and resolution for the images in this manual, zoom in to 200% using the viewing controlsin the Acrobat® Reader control bar.
Parts Listing
2

The following procedure is also found on the printed Quick Start Guide supplied with this product.
Before you can operate the Deep Sky Imager camera, you must install the Autostar Suite software.
1. Do not plug the USB cable into your PC at this time. You will be asked to do so later in this installation.2. Turn on your PC. Allow Windows to load.3. Place the CD ROM into your PC's CD drive. 4. The Main Menu screen displays. Click “Install Autostar Suite.”5. You are prompted to choose a directory in which to install the driver. You may accept the default directory or
create your own directory path. Click “Next” when done.6. The “Select Components” window displays. This window allows you to choose whether or not to install the
Guide Star Catalog. Note: This is an optional catalog that may be used by the Planetarium program and contains all of the locations of the Hubble Space Telescope (HST) Guide stars. This file is very large and takes up a largeamount of memory. Only download if you have enough memory or wish to use this amount of memory ofyour hard drive. Memory totals for the file and your hard drive are displayed in this window.If you wish to install the catalog, check the GSC check box.If you do not wish to install the catalog, uncheck the GSC check box.Then click “Next.”
7. The “Start Installation” window displays. The program is now ready to install the Autostar Suite. Click “Next”to begin installation.
8. The “Microsoft Text to Speech Engine” window displays. Click “Yes” to agree to the terms and to continuewith the installation.
9. The “Microsoft .Net Framework installation” window displays. You must click “Yes” for the Deep Sky Imagerto operate. If it's already installed, click “Cancel” when the maintenance mode screen is displayed.
10. Once .Net Framework installs, the .Net Framework agreement displays. Click “OK” to continue.11. A window displays that allows you to install Adobe® Acrobat Reader if you do not already have it installed on
your PC. Click “Yes” or “No.”12. The “InstallShield® Wizard for the Meade Deep Sky Imager” displays. Click “Next.”13. A window displays prompting you to do a complete or custom install of InstallShield Wizard. Click on the
“Complete” button and then click “Install” to begin installation.14. InstallShield Wizard completes installation. Click “Finish.”15. A window displays that tells you that Autostar Suite has been installed. Click “Finish.”
Install the Autostar Suite Software
3

To connect the Deep Sky Imager Camera to your PC, you need to install the Deep Sky Imager device driverand connect the USB cable:
1. Connect one end of the USB Cable to the Deep Sky Imager camera.2. Connect the other end of the USB Cable to your PC or to a USB hub.3. “Found camera” displays at the bottom right of your PC screen. 4. The “Hardware Wizard” window displays. The “Install Software” selection is checked as the default choice.
Click “Next.” The Wizard searches for the driver.5. (XP versions only) “Windows Logo Test” window displays. Clicking “Continue Anyway” will install a driver
that should operate with most PC configurations.6. The driver is installed. Click “Finish.”
The camera driver is now installed and your PC will now be able to recognize the Deep Sky Imager wheneveryou connect it to the PC.
Check out page 56 to learn some helpful tips for your camera.
Windows Vista® users:
1. When dialog (“New Hardware”) “Windows needs to install driver...,” select “locate and install driver software.
2. Wait for Windows to 'give up' the search—this may take a long time.
3. When “Windows couldn't find driver software,” select “Browse my computer driver software.” Select “Browse.”
4. Navigate to the driver directory: C\program files\meade\autostar suite\envisage\driver\2k-xp
5. When “Windows can't verify the publisher of this driver software” displays, select “Install this driver softwareanyway.”
6. When “Found new hardware - Meade DSI” displays, select “Close.”
Plug into any PC port and the drive loads. The software drivers never need to be installed again.
Connect The Deep Sky Imager Camera to Your PC
4

If the Autostar Suite icon doesn’t appear on your desktop, you can start the Autostar Suite program by going toStart All Program/Meade/Autostar Suite. The Planetarium program will display. You can open other programs of the Suite by going to the Image menu and selecting the desired program, or You can run Envisage from Start/All programs/Meade/Envisage.
You can open the Operating Instruction manuals or the Meade General Catalog by selecting them from the MainMenu screen of the CD ROM.
The manuals can also be found (without a disk in the drive) in Start/All Programs/Meade/Manuals.
Click the word “Meade” in the Main Menu or in the General catalog to go www.meade.com.
Start the Suite Software
5

6
To connect the Deep Sky Imager camera to an ETX Telescope:• While looking at the back of the telescope, orient the Deep Sky Imager camera into the eyepiece holder so
that the USB cable points to the left of the telescope’s optical tube.
To connect the Deep Sky Imager camera to an LX-200 ® or LX-90® Telescope:• While looking at the back of the telescope, orient the Deep Sky Imager camera into the eyepiece holder so
that the USB cable points to the right of the telescope’s optical tube.
To connect the Deep Sky Imager camera to other telescopes:• Move the Deep Sky Imager camera around in the eyepiece holder until the image on the Deep Sky Imager
display screen (39) is upright.
To connect the Deep Sky Imager camera as an autoguider:• Attach the correct serial cable from the telescope’s control panel RS-232 port to the comm port of your PC
(see the Autoguider instruction sheet for more information). Also see “Autoguider and Telescope Controls,”page 31, for more information.
• Click on the telescope tab (16). Enter the PC’s comm port number or Netscope Server.• Click the Connect button (27).
Connect the Deep Sky Imager Camera to Your Telescope

To open the Envisage Imaging program, go to the Image menu of the Planetarium program and select Deep SkyImager Imaging.
The Envisage program will display.
Open the Envisage® Program
7

8
Envisage Controls
cd
f
i j
1)
1!1$
1^1&
1*
1(
2)
2!
2@
2#
2%
2^ 2&2*
3)
3*
24
3!3%
3$
3^
3&
3#
2(
b
1%1@hge 1#
3@

1. Gain and Offset sliders2. Preview and Exposure controls3. Auto Exp (Exposure) controls4. Monochrome check box [grayed out for
B&W model]
5. Live Image check box6. Dark Sub check box7. Long Exp check box8. Color button [grayed out for B&W model]
9. Combine and Quality controls10. Image Process box11. Object Name box12. File status boxes13. Save Process button14. Start/Stop button15. Image Acquire status bars16. Stats, Telescope tabs17. Help, Live, File Names tabs18. Histogram display19. Histogram sliders and controls20. Countdown display21. Autocontrast, Shadow Enhance controls
Key to Envisage Controls
9
22. Magic Eye Focus 23. CCD Temperature24. File Name25. File Open and Settings menu26. Comm port field27. Connect/Disconnect button28. Telescope controls (up, down, right,
left, focus)29. Autoguide/Guiding or Track/Tracking
button (displays depending on whetherscope can autoguide or track)
30. Tracking box31. Centroid32. Will Cal (Calibrate)/No Calibrate button33. Center and Set Target buttons34. Corr (Correct) Gain control35. FL in mm (Focal Length in millimeters)36. Target Status display37. Live Image38. Dark Spot, Full Screen, Zoom
check box
Throughout this manual, any number that is displayed in parentheses refers to keyabove. For example, “(3)” refers to the Auto Exp button and “(14)” refers to theStart/Stop button. Mono (4) and Color (8) buttons are not available for the Black & Whiteimager and are grayed out. The CCD Temperature Readout display (41) is only available withDSI II and DSI III models.

Once you have connected your camera to the computer and opened the Envisage program, you’ll want to starttaking pictures. Follow the steps below to start taking simple pictures with your Deep Sky Imager camera. Werecommend that the first time you take pictures, you do so during daylight hours. Point your telescope at a stationary landmark, such as a building, telephone pole or so forth—trees and other objects that move slightlyare not the best objects to use during your first image tests.
1. Click on the “Auto Exp” button (3). See “Auto Exp Button,” page 19, for more information.
2. Click on the combo box controls in the “ImageProcess” field (10) to display a list of object types.Scroll down the list and select “Terrestrial.” See“Image Process,” page 21, for more information.
3. Type a name for the object in the “Object Name” box (11). This will be used as the image file name. See “Object Name,” page 22, for more information.
4. Click “Save Process” button (13). Select “JPEG”and “Normal Operation.” See “Save Process,”page 22, for more information.
5. Click on the “Live” tab (17). See “Live ImageCheck Box,” page 19, for more information.
Start Taking Pictures1
10

more...
6. An image should be already displayed on the screen (39). Use the focuser onyour telescope to focus the object. See “Magic Eye Focus,” page 25 for moreinformation about focusing. If you are having a lot of problems focusing yourimage, see “The Parfocal Ring,” pages 17-18.
7. Click “Start (14).”
The camera begins taking pictures and will continue to do so until you click on “Stop.” Watch the Status box (24). When “Images” reaches 50, click the “Stop” button (14).
Go to the next page to find out what the program is doing once you press “Start.”
Start Taking Pictures2
11
• The live image is displayed on the program’s display screen if the Live box is checked and the Live tab isselected (these are the default settings).
• When you press Start, the Deep Sky Imager camera begins taking images and continues to take imagesuntil you press stop. The Envisage program uses the first 10 images it takes as a baseline to compare withthe images it takes subsequently. In other words, the program is always comparing images. Note: The usercan change the amount of images that the program uses as a baseline. See “Evaluation Count,” page 21,for more information.
• The program takes images with the best contrast and quality and assembles the best of these images (thatis, the program “stacks the best images”) into one image; this image is referred to as the composite imagein this manual.
• After you press the Start button, the composite image is displayed as a new tab above the display screen.When you press Stop and select this tab, the final version of the composite image is displayed.
• After about 10 images are taken, the Envisage program applies a sharpening filter to the composite image.You can choose which sharpening filter you wish to use from the most to the least sharp, or none. You canchange the filter setting while the camera is taking pictures. See “Kernel Filter,” page 21, for more information.
• Further image enhancement or filtering may be performed in other image editing software, such as the supplied Image Processing software or Adobe® Photoshop. Make sure you select an image type that can beopened (such as JPEG or BMP) by the Image Editing software.
more...
What Happens When You Press Start1
12

• The Envisage program is continually resaving the composite image. If the Save Every Composite Image boxis selected, in the Save Option dialog the program will save every image that added to the composite image(see page 22 for more information). If your PC crashes or loses power, the images that have been taken upto the time of the crash or power loss will automatically be saved—the user does not need to save themmanually.
• The Envisage program continues to composite the image until you press the Stop button. Typically, about 50images are needed to get a high quality composite image. After 50 images, the quality of the image increases only in small amounts; about 90% of the quality level will have been accumulated with about 50images.
• When you press Start again, the Envisage program begins to accumulate a new composite image andrenames the image in a new tab. For example, if you named the first image “Building,” the next images willbe named “Building 0002,” then “Building 0003” and so forth, so that it doesn’t overwrite the previouslysaved images.
• If a name/number was previously saved as a file name, the program will choose the next available number.For example, if “Building 0007” was previously saved, the next file will be named “Building 0008.”
• Note that controls that are not currently available are grayed out.
Check out page 56 to learn some helpful tips for your camera.
What Happens When You Press Start2
13
1. Insert camera into the telescope as previously described.
2. Click on the Live tab (17).
3. Click Auto Exp (3). The program will find a good exposure automatically. Set the image balance according toyour taste using the Contrast (21) and Color Balance (8) [color models only] controls.
4. Use Shadow Enhance if necessary. This control is excellent for the moons of Jupiter, craters of the Moon,some deep sky objects such as nebulae.
5. Go to the Image Process box (10) and select the process from the pop up menu you wish to image (e.g.,moon, planet, etc.).
6. Click the Save Process button and a dialog box displays. Select file type. Typically you will select “jpeg.” Ifyou wish to perform image processing in another program such as Photoshop, select “tif.”
7. Draw a box around the planet or a bright feature of the object you wish to image. Or if the object is bright,choose a dark area, and check the Dark Spot box (40).
8. Enter a name in the Object Name status.
9. Click Start (14). The program will now begin to take images.
14
How to take a picture of a terrestrial object, the Moon or a planet

1. Insert camera into the telescope as previously described.
2. Click on the Live tab (17).
3. Set the Live Exp spin button to 1.0 second.
4. Click Mono box (not available for Black and White models; continue on to the next step). You shouldsee bright stars on the Live screen.
5. Before taking the first shot of the evening, leave the camera sit for 5 to 10 minutes to allow the temperatureof the camera to stabilize.
6. In the Image Process dialog box, select “Take Darks.” Use the default values. Click the Start button.
7. A warning displays prompting you to cover the telescope. Cover the end of your telescope so that no lightcan get in. Click OK when it is covered.
8. The imager begins taking dark frames (see “Dark Frames” page 34, for more information). The Dark Framesare saved in the directory: C:Meade Images/Dark. The program will display how long the Dark Frame exposures will take. Important Note: Do not take dark frames while the camera is cooling off.
9. When the Dark Frame exposures are completed, a dialog displays prompting you to uncover the telescope.Click OK. The Dark Subtract box (6) should be checked now; if not, do so now.
10. Stars should be visible on the live tab screen.
11. Select a star to image by drawing a box around it. If the telescope is connected you can use the telescopecontrol (Arrow keys) to help choose a star. See “ Autoguiding and Telescope Controls,” page 31, for more information.
12. Adjust the focus by looking at the magic eye focus box, which is a 3D plot of the intensity of the selectedstar. Make the sides as sharp as possible. See page 25 for information on setting the magic eye focus.
13. Check the Long Exp box (7). Set exposure to 15 seconds. This will allow you to take a preview of a singleimage to view an example of how the camera is imaging.
14. Click Preview (2). The countdown timer counts down from 15 to zero seconds.
15. You can now tweak the image. Uncheck mono box [not available for Black and White models; continueto step #17]. more...
An example of taking a picture of a deep sky object
15

16. Click Color to bring up the color control dialog. Then click “Auto WB.” Color image controls display [notavailable for Black and White models].
17. Adjust Autocontrast (21) and Shadow Enhance (21).
17. In the Image Process menu (10), choose “Deep Sky.” Use the default values.
18. Once you have a reasonable color or black and white image, type in a name in the Object Name box (11)Tip: If your object’s name contains a number, such as M31, add a dash after the number. The program Automatically saves each image with a number and the dash will allow your image namesto be displayed as M31-0001, M31-0002, M31-0003, etc.
19. Click Start (the button is then displayed as “Stop”). The imager begins taking pictures.
20. The imager now takes 15 second images. Be patient. Take a number of pictures until your image looks goodand click Stop to abort. You will now have an image that you can post on the web or submit to one of theDeep Sky Imager user groups.
Experiment with Contrast, Shadow Enhance, Histogram sliders and Dark Subtract, and you will begin to takeimages like an expert.
Dark Frame Subtraction takes out a lot of “hot” pixels from the image. Play with this control to see what effect ithas on your image.
16
Preview image without color balance orcontrast (color model only).
Preview image with color balance andcontrast (color model only).
Final image after 50 combined images(color model only).

The Parfocal Ring1
17
It is extremely useful to have the Deep Sky Imager camera and a telescope eyepiece be parfocal—it will saveyou time when you need to refocus.
Parfocal means setting two or more eyepieces to the same focus. (In this case, one eyepiece is a camera.) Inother words, if you focus one eyepiece in your telescope, then you remove it and replace it with a parfocal eyepiece, the parfocal eyepiece will require little, if any, refocusing.
The following procedure will show you how to make your Deep Sky Imager camera parfocal with a low-powerwide-field 25mm or 26mm eyepiece (do not perform this procedure with a high-power eyepiece). Use the supplied parfocal ring and perform the procedure during the daytime.
more...

1. Open the Envisage program. 2. Insert the Deep Sky Imager camera into the telescope eyepiece holder. Do not tighten the eyepiece holder
thumbscrew. Make sure the Deep Sky Imager camera slides down as far as it will go into the eyepiece holder.
3. Point the telescope at a terrestrial object that has a lot of contrast with the surrounding area and if possible,has a distinctive edge (like a building, for example).
4. If you have previously moved the histogram sliders, move the top slider to the 0 position (move all the wayto the left) and move the bottom slider to the 256 position (move all the way to the right).
5. Click on the Auto Exp (3) button.6. An image which may be or may not be focused appears on the
display screen.7. Use the telescope’s focuser to get a rough focus of the object. Be patient.
You may have to rotate the focuser back and forth until you can achievefocus of the image.
8. When the image is roughly in focus, remove the camera from the eyepiece.
9. Place the supplied parfocal ring over the bottom chrome tubing of the eyepiece. Do not tighten the ring.
10. Place the eyepiece and tubing into the eyepiece holder. Do not tightenany of the thumbscrews yet. See photo at right.
11. Do not use the telescope focuser in this step. Lift the eyepiece (but not the parfocal ring) until the object isfocused.
12. When the object is focused, tighten the parfocal ring. The eyepiece is now parfocal with the Deep SkyImager camera. Do not remove or change the position of the parfocal ring or you will need to repeatthe procedure.
Now, instead of focusing the camera with the telescope focuser (which is somewhat difficult and time consuming), insert in the eye piece/parfocal assembly and focus the eyepiece as you normally would. Thenremove the eyepiece and replace the camera. You’ll find that the camera is focused and may need only minorfocuser adjustment.
The Parfocal Ring2
18

Gain and Offset sliders (1): Similar to a TV set’s contrast and brightness controls. These controls are automatically set after you pick an Object (10) type and click on the Auto Exp button (3). Most users will seldom,if ever, need to set these controls manually.
Auto Exp. button (3): Automatically sets the Gain and Offset controls(1) for the camera. Before taking pictures,choose an Object (10) type and click on the Auto Exp button. This will adjust the camera to give you the typicalcontrast and brightness you need to take pictures for the type of object you have selected. You can furtheradjust the picture by adjusting the Histogram sliders (19), Filters (Kernel Filters, page 21, for more information)and focusing the telescope (see “Magic Eye Focus,” page 25, for more information).
Mono check box (4) [grayed out and not available for the Black and White model]: Check this box to take ablack and white picture.
Live Image check box (17): Click to display live camera image in the Image Display (39).
Dark Subtract check box (6): See “Dark Frames,” page 27, for more information.
Color Dialog Cntl (Color Balance) (8) [grayed out and not available for the Black and White model]: Allowsyou to control your images’ color. It is recommended that you click “Auto WB” and then make further adjustments using the other controls. Auto automatically sets a color balance, balancing the red and blue valuesin relation to the green. Note: Once Auto is pressed, the values selected by Auto WB remain do notchange, unless changed by the user—they are not continually updated by the program. When you begina new image, it is recommended that you reset the values in the Color dialog.
Automatic Adjustment Controls1
19

Color sliders [not available for the Black and White model]. Experiment with these sliders to change tochange the image color.
Sharp [not available for the Black and White model or DSI III] provides a sharper image, but the colors areless saturated.
Soft [not available for the Black and White model or DSI III] provides more saturated colors.
Daylight [not available for the Black and White model] provides a brighter image. Note that this may also beused for deep sky images. Experiment with this setting using the Preview Control (7).
Reset [not available for the Black and White model] sets of the color sliders to midrange. This might be helpful if you wish to perform color correction in another image processing program, such as Adobe Photoshop.
Long Exposure check box. Check this box to set a long exposure. If your telescope is only crudely aligned, set avalue of no more than 15 seconds (this is a good starting value for any telescope to use) in the spin box to theleft of this check box.
How to take a long exposure:
Turn off mono and click “Preview.”
A countdown displays and the live check is turned off.
An image displays.
You can now use the color balance [not available for the Black and White model], focus, contrast, shadowenhance and auto contrast to adjust and manipulate the image.
Once you have the preview sets the way you want your image, click on Start (14) and an image will be composited using your Long Exposure settings.
Live check box. Check this box to set your live settings and focus. Check the Mono box [not available for theBlack and White model] and set the spin box to the left of this check box to 1 sec. You will now have animage that you can easily focus using the Magic Eye focus controls (see Magic Eye Focus, page 25).
Automatic Adjustment Controls2
20

Setting Menu (25): Click on the Setting Tab to display the Settingfields. These are field that may be filled in by the user, if so desired.It also contains the directory paths for the Images and Dark framesdirectories.
Combine (9): Selects a minimum quality level that is acceptablewhen images are added together to produce the composite image. Typically 50% is selected. You may wish to set itlower (e.g., 30%) if you have an image that has a lot of turbulenceor other noise, but should try adjusting other controls first, such asthe Histogram sliders (19). Also try refocusing the telescope.
Image Process (10): Displays a list of objects to view, such as Planets, the Moon, terrestrial, etc. Adjusts someof the image processing settings to preset levels that will assist you in better quality images for the selectedobject. Also “Take Dark” is on this list; see “Dark Frames,” page 34, for more information.
Kernel Filter: The chosen sharpening filter is applied to the composite image as it is saved and is displayed inthe live Display Image after about 10 images are accumulated. 3 levels of sharp filters, 1 edge only filter and“None” (no filter) are available. The settings for this filter appear when terrestrial or Moon is selected from theImage Process (10) list.
Click on the Min Quality % spin box (9) to change the minimum quality level.
Evaluation Count (9) allows you change number of images accumulated andevaluated to determine a quality baseline when the Start button is pressed.Normally, 10 images are evaluated (this is the default number). Click in the spinbox to change the number of images used.
Image Processing Controls1
21

Object Name (11): Type in a name for the object. Each time the Envisage programbegins to accumulate a new composite image, it renumbers the image in a new tab,using your original name. For example, if you named the first image “Building,” thenext images will be named “Building 2,” then “Building 3” and so forth, so that itdoesn’t overwrite the previously saved images. If a name/number was previously saved as a file name, theprogram will choose the next available number. For example, if “Building 7” was previously saved, the next filewill be named “Building 8” and will not overwrite the file “Building 7.”
Save Process (13): Click on this button to select the type of file format inwhich to save your picture. Beginners are recommended to save theirpictures in “Jpeg” format. However, if you wish to perform further imageprocessing, select “BMP” or “Fits.” The last two formats, “Fits” and“Fits3P” are uncompressed formats, are for use by advanced users. “Tif”files usually take up the most memory, but may be a useful format if youplan to use Adobe Photoshop. See “Time-Lapse Settings,” page 27.
Save Options (13): Normally images are added together make up acomposite image or if they have too low of a quality level, they may bediscarded. However, you may choose to save every composite image the camera creates by selecting SaveEvery Composite Image in the Save Options box.
These images are not displayed as separate images; only the last saved composite image is displayed. Thesefiles are stored in the directory you have chosen using the Image Directory field or the default directory chosenby the program during installation. If you wish to view any of these files, Click on the File Open button (25), andthen choose the file from the directory.
If you set the Min Quality % box to zero (0), every picture will be saved.
The number of images the camera takes is displayed in the Status Displays (12) and the name on the FileName tabs (17) change with each new composite picture.
Start/Stop button (14): Press to start or stop the camera taking pictures. See “What Happens When You PressStart,” page12, for more information.
Image Processing Controls2
22

Image Acquire Status bars (15): Display while the Deep Sky Imager camera is takingpictures. Also a box displays the images format (e.g., jpeg), type of operation, time-lapsesequence or other pertinent information..
Image Directory field and Browse button: Click on the Settings menu(25) to display a dialog box. In this box, click on the Browse buttonto locate a directory or type in a directory path in the field. Or youmay just type in the directory name in the field. If you type in a newdirectory, the directory will be created when the first image is saved.
Dark Frames Directory field and Browse button: You may select thedirectory in which to save your Dark Frames. Click on the Browsebutton to locate a directory or type in a directory path in the field. Oryou may just type in the directory name in the field. If you type in anew directory, the directory will be created when the first image is saved.
Settings dialog allows you to enter user information (name, location, Autostar model, etc). This information issaved in the header.
Tracking Status Bar. Provides tracking information.
Dark Spot check box. Click to center the on a dark area instead of a light area when using a centroid box.A quality measurement displays, which shows the difference between the central pixel and the threshold.
Time-Lapse. Contains some common presets and allows you to choose your own time-lapse settings as well.See page 27 for more information.
Image Processing Controls3
23

File Open menu (25): Allows you to open a file you have previously created. Click on this button and yourdirectory list displays. Choose the desired file and it opens as a tab above the Image Display window. Seediagram below.
Notice that there are scroll arrows (37, see diagram above) at the end of the tab row. Click on these arrows todisplay more composite image file tabs.
Close(38): Allows you to close a composite image file. First click on the tab you wish to close, then click onthe File->Close menu or press the Delete Key to close the file. You cannot close the live image tab.
File Settings Tab
24
Scroll Arrows
Close button

The Magic Eye Focus (22) displays a 3-D surface plot of the intensity of the imagecentered on the crosshairs of the tracking box (see page 28). As you adjust the focus,the peak of the plot will grow or shrink and the edges will grow steeper or less steep.Best focus is achieved at maximum peak and steepness.
Magic Eye Focus
25

To connect to your telescope, see the printed instruction sheet that wasincluding with Autostar Suite.
Once the telescope is connected, you may use the following controls (28):
Use the Arrow keys to move the telescope.
Click on an Arrow to move in that direction at Guide Speed. Hold and drag on anArrow in the direction you wish to move to increase the speed. Hold and drag anarrow in the opposite direction to decrease speed. Release to stop.
If your telescope has motorized focus, use the focus button to focus on theobject (only one focus speed is available).
Connecting your Telescope andTelescope Controls
26

Envisage software allows you to take time-lapse images of an object.This means you can set the software to take an image, wait and thentake another image after a period of time goes by, and continue theprocess for however long you desire. This is ideal for taking images ofclouds moving through the sky or creating an animation that shows therotation of Jupiter (see “Making a Movie of the Rotation of Jupiter,” page36, for more a procedure on that topic).
When you begin a time-lapse sequence, you can perform other tasks orgo inside and catch up on your sleep. Envisage does all the work for you automatically.
The setting for Time-Lapse sequencing are found in the Save Process dialog box. Choose “Save a Time-Lapse”Sequence” to use this feature.
You will need to set three parameters for a time-lapse sequence:
Frame Time: How long the image takes to acquire an image (be sure you know how your telescope can imagean object—some telescopes can track for long periods, other will get a fuzzy image after perhaps 5 minutes—set your frame time accordingly).
Wait Time: The amount of time the imager waits before taking the next picture; this is the amount of time itremains idle between images. It can be set to zero.
Total Time: How long do you want the entire sequence to run.
Time-Lapse Settings
27

28
Deep Sky Imager Camera ProgramAdvanced Concepts

Drawing a tracking box allows you to track (that is, to follow) a bright spot that is surrounded by a dark area.This is very much like your telescope’s tracking feature.
A centroid is the spot where the crosshairs meet. You can use the centroids to help you center an object in abox. The centroid is used for shifting an image before it is combined in a composite image, and also is used forautoguiding.
To create a tracking box, just use the cursor to draw a box around an object. For your first tests of this feature,try to choose an object that is bright and has a dark area surrounding it. You can experiment with this as you getfamiliar with the function.
If you’re tracking a crater on the moon, draw the box about the center or a bright spot in a crater.
Tracking Boxes and Centroids
29

The Histogram controls allow you more control of the brightness, contrast and mid-range tones of your Deep Sky Imager camera.
Experiment with these controls. Select an easily focused terrestrial image and adjust theHistogram sliders. You will notice the Live image growing brighter or darker, and evennotice mid-tones becoming more visible. You will have to adjust these sliders differentlyfor each object and can adjust the sliders “on the fly” as you are creating a composite image.
You can also use these control when you select Preview. When you return to the liveimage, it will apply the setting you choose while in the preview mode.
Note: The effect of the sliders is saved in all file types.
Autocontrast: Automatically sets the sliders for the best contrast. You can change thesettings from 1 through 5 to set more contrast. Each number provides a higher level ofcontrast than the last; 5 is good for very dim objects.
Shadow Enhance: Helps bring out details in the shadows (gamma).
Histogram Display and Controls
30

Autoguider and Telescope Controls 1
31
For users familiar with the product, the Deep Sky Imager camera functions in a manner similar to the MeadePictor 201XT CCD Autoguider.
An autoguider helps keep an object centered so that a 35mm camera can take long exposures of an image.Note that you do not have to set the Deep Sky Imager camera for a long exposure using Exposurecontrols (2). Autoguiding is used typically with telescope mounted in the equatorial mode, although itcan also be used with LX200GPS Telescope mounted in the alt/az mode.
To use the Deep Sky Imager camera as an autoguider, perform the following procedure. You will need an off-axis guider (see the Meade General Catalog for more information) and the supplied serial cable that isappropriate for your model telescope. You will also need to know the focal length of your telescope.
1. Attach the off-axis guider and your 35mm camera to your telescope as described in that product’s instruction manual. Insert and tighten the Deep Sky Imager into the eyepiece holder.
2. Click on the Telescope tab.
3. Attach one end of the serial cable to one of your PC’s comm ports and theother end to the telescope’s RS-232 port.
4. Type in the comm port number into comm port box.
5. Click the Connect button (it will then display “Disconnect”). The buttonsbelow the Connect button become active and status data is displayed, suchas which version of Autostar is connected, whether your telescope canAutoguide or just track, and so forth. If the telescope is capable of autoguiding, “Can AutoGuide” will display.
6. Check to make sure your cable is properly attached, that you have the correct port number selected and so forth. If the telescope connection is verified, you will receive a “passed” message.
more....

Autoguider and Telescope Controls2
32
7. In the “FL IN MM” field (focal length in millimeters), type in the focal length, in millimeters, of your guide scope.
8. Locate a star using your telescope’s alignment and Go To procedures. Focus and prepare the imager as described earlier in this manual. You may now use the arrow keys (28) to center the object you have chosen. Click on an arrow to move in that direction at Guide Speed. Hold and drag on an arrow in thedirection you wish to move to increase the speed. Hold and drag an arrow in the opposite direction todecrease speed. Release to stop.
9. If your telescope has motorized focus, use the focus button to focus on the object (only one focus speed isavailable).
10. Draw a tracking box around the star.
11. Click the Track Here button (the button then displays “Tracking”). Will Cal displays on the Calibrate button.
12. When you click on the Track Here button (you do not need to press the Will Cal button), the program beginsto calibrate. It then begins to autoguide your telescope and displays X and Y error coordinates in the StatusDisplay box (24). When the program is done calibrating, it will start tracking and a yellow circle will appearon your target object.
13. Click the Tracking button (the button then displays “Track Here” again) to stop tracking.
If you don’t move your telescope or rotate the guider assembly, you do not need to recalibrate. However, if youwish to recalibrate, click on the No Cal button to force it to calibrate (which will then display “Will Cal”).
The Track Last button will start tracking from where it was (the last tracking position) before it was stopped.

Other Features
Center Target: Click Center Target to move the yellow circle to the center of the screen. The telescope modelswill follow (some telescopes will move more slowly than others).
Set Target: Click Set Target and click on a position on the screen. The target will move to the this position.
Corr (Correction) Gain: Sets how aggressive the correction operates. Default setting is 0.5. .01 is the lowest and1.0 is the highest setting.
If your telescope takes too long to reach to the yellow circle, increase the gain.
If you telescope keeps overshooting the yellow circle, moving back and forth, decrease the gain.
If the telescope never reaches the yellow circle, recalibrate: Click the Tracking and No-Cal buttons. Then clickthe Track button again.
33
Autoguider and Telescope Controls3
In oil painting, it is important to prepare the surface of the canvas to receive the paint. The unfinished surface ofthe canvas is not conducive to the fine brushstrokes required for fine art. The surface may have fabric strings orgrainy bumps that will distort the finished picture. Canvas preparation is accomplished by applying oil gessowith broad regular strokes in one direction. After drying for several days the artist sands the surface untilsmooth and repeats the gessoing process as needed to achieve a smooth surface. Only then is the canvasready for the artist to begin.
A similar process is needed for the Deep Sky Imager which can be thought of as a canvas for a fine painting,only in this case the canvas is the silicon surface of the imager. This silicon surface is uneven in a different way.If the Deep Sky Image sensor is covered to block all light for a period of time and the resulting image examined,you would expect it to be uniformly black, but it is not! This image, which is called a “dark frame”, is speckledwith a pattern of dots of varying intensities. The brightest dots are called “hot pixels” and all of these are createdby electrons leaking into the pixels due to heat or other means and not from exposure to light. This pattern isvery predictable and changes only in intensity with time. If this “dark noise pattern” is not removed from theexposure it will add distortion to the picture.
Fortunately, because “dark noise” is predictable, it can be subtracted from an exposure leaving a clear image.AutoStar Suite software performs these “dark noise” subtractions automatically for Meade imagers because theytransfer complete and uncompressed images to the computer.
Images from webcams can't apply “dark noise” subtraction. Why? Because they compress their data and areunable to create a “dark frame” for correcting the image.
Some Words about Dark Frames
34
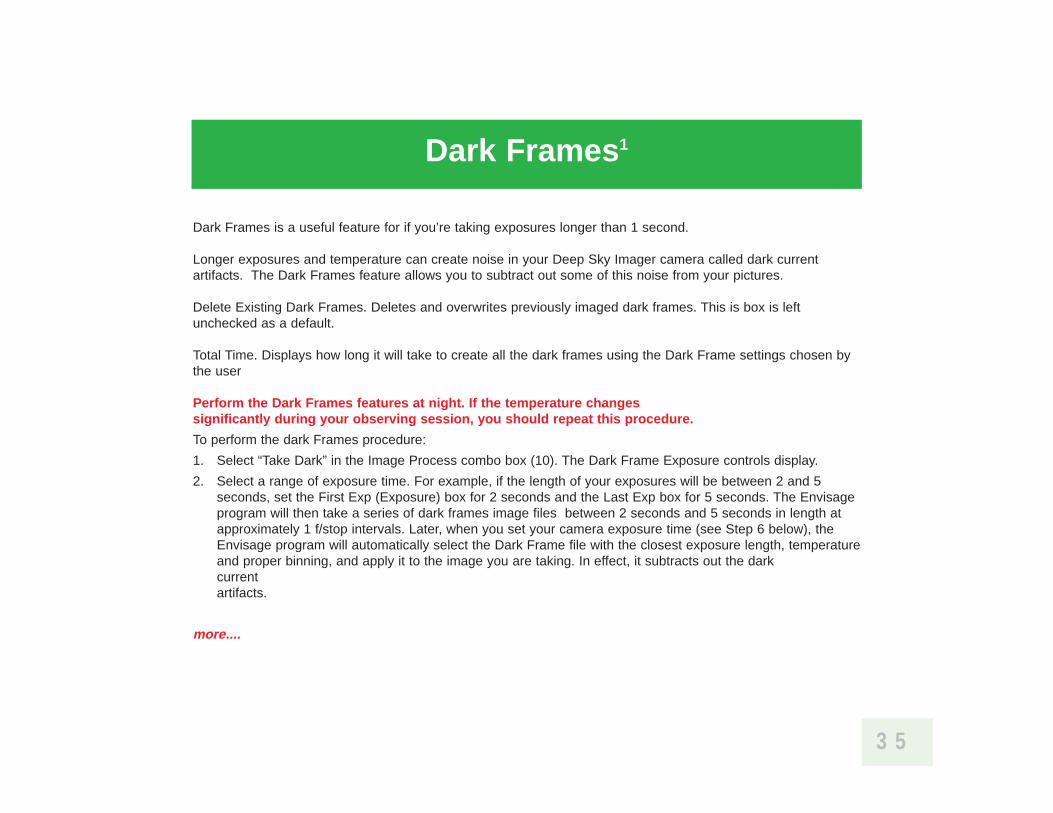
Dark Frames is a useful feature for if you’re taking exposures longer than 1 second.
Longer exposures and temperature can create noise in your Deep Sky Imager camera called dark current artifacts. The Dark Frames feature allows you to subtract out some of this noise from your pictures.
Delete Existing Dark Frames. Deletes and overwrites previously imaged dark frames. This is box is leftunchecked as a default.
Total Time. Displays how long it will take to create all the dark frames using the Dark Frame settings chosen bythe user
Perform the Dark Frames features at night. If the temperature changes significantly during your observing session, you should repeat this procedure.
To perform the dark Frames procedure:
1. Select “Take Dark” in the Image Process combo box (10). The Dark Frame Exposure controls display.
2. Select a range of exposure time. For example, if the length of your exposures will be between 2 and 5seconds, set the First Exp (Exposure) box for 2 seconds and the Last Exp box for 5 seconds. The Envisageprogram will then take a series of dark frames image files between 2 seconds and 5 seconds in length atapproximately 1 f/stop intervals. Later, when you set your camera exposure time (see Step 6 below), theEnvisage program will automatically select the Dark Frame file with the closest exposure length, temperatureand proper binning, and apply it to the image you are taking. In effect, it subtracts out the dark current artifacts.
more....
Dark Frames1
35
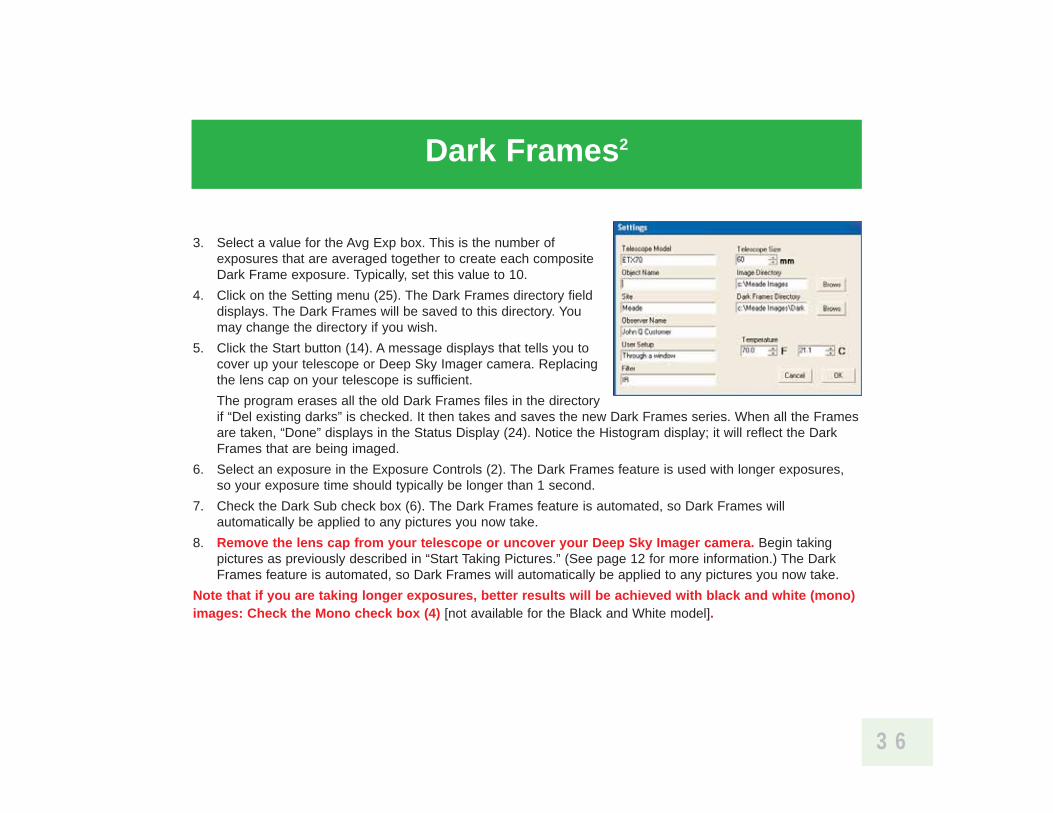
3. Select a value for the Avg Exp box. This is the number ofexposures that are averaged together to create each compositeDark Frame exposure. Typically, set this value to 10.
4. Click on the Setting menu (25). The Dark Frames directory fielddisplays. The Dark Frames will be saved to this directory. Youmay change the directory if you wish.
5. Click the Start button (14). A message displays that tells you tocover up your telescope or Deep Sky Imager camera. Replacingthe lens cap on your telescope is sufficient.
The program erases all the old Dark Frames files in the directoryif “Del existing darks” is checked. It then takes and saves the new Dark Frames series. When all the Framesare taken, “Done” displays in the Status Display (24). Notice the Histogram display; it will reflect the DarkFrames that are being imaged.
6. Select an exposure in the Exposure Controls (2). The Dark Frames feature is used with longer exposures,so your exposure time should typically be longer than 1 second.
7. Check the Dark Sub check box (6). The Dark Frames feature is automated, so Dark Frames willautomatically be applied to any pictures you now take.
8. Remove the lens cap from your telescope or uncover your Deep Sky Imager camera. Begin takingpictures as previously described in “Start Taking Pictures.” (See page 12 for more information.) The DarkFrames feature is automated, so Dark Frames will automatically be applied to any pictures you now take.
Note that if you are taking longer exposures, better results will be achieved with black and white (mono)images: Check the Mono check box (4) [not available for the Black and White model].
Dark Frames2
36

You should become familiar with autoguiding/auto tracking and calibration procedures as described in“Autoguider and Telescope Controls,” page 31.
1. Click on the Save Process button to open the dialog box.
2. Set the file type. Choose “jpeg” if just wish to create a movie, or select “tif” if you wish to process the framesin another image editing software program, such as Photoshop.
3. In the Save Option, select “Save as a Time-Lapse Sequence.”
4. Select “Jupiter Time Lapse” in the Time-Lapse presets. This preset is set up to watch the Red Spot travelacross the face of Jupiter. The sequence takes about 4 hours and takes 24 images.
5. Follow the procedures for Autoguiding or auto tracking as described in “Autoguider and Telescope Controls,”page 31. Draw box around Jupiter so that the telescope will track Jupiter.
6. Click OK.
7. Select “Planet” in the Image Process dialog.
8. Click Auto Exp (3), so that the exposure will be corrected. You can tweak the color [color models only],contrast, shadow enhancement and so forth. as described earlier in this manual.
9. Type in “Jupiter” in the Object name box.
10. Click Start to begin the time-lapse sequence.
Make a Movie of the Rotation of Jupiter
37
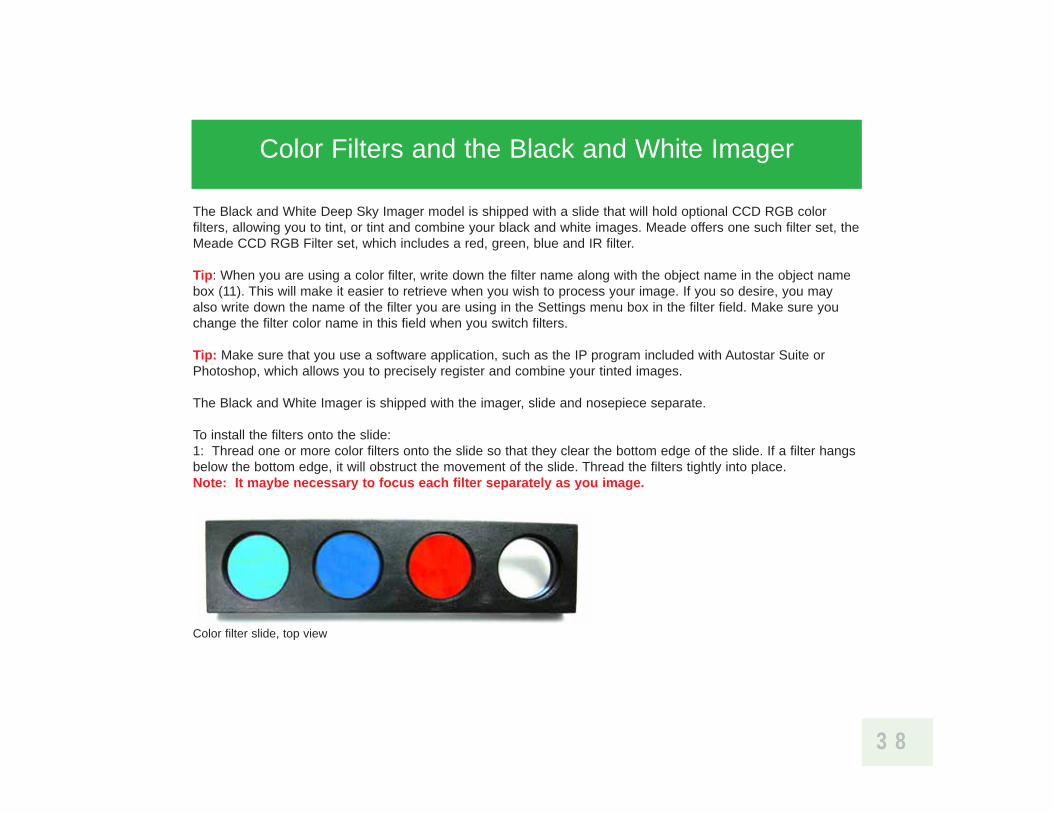
The Black and White Deep Sky Imager model is shipped with a slide that will hold optional CCD RGB colorfilters, allowing you to tint, or tint and combine your black and white images. Meade offers one such filter set, theMeade CCD RGB Filter set, which includes a red, green, blue and IR filter.
Tip: When you are using a color filter, write down the filter name along with the object name in the object namebox (11). This will make it easier to retrieve when you wish to process your image. If you so desire, you mayalso write down the name of the filter you are using in the Settings menu box in the filter field. Make sure youchange the filter color name in this field when you switch filters.
Tip: Make sure that you use a software application, such as the IP program included with Autostar Suite orPhotoshop, which allows you to precisely register and combine your tinted images.
The Black and White Imager is shipped with the imager, slide and nosepiece separate.
To install the filters onto the slide:1: Thread one or more color filters onto the slide so that they clear the bottom edge of the slide. If a filter hangsbelow the bottom edge, it will obstruct the movement of the slide. Thread the filters tightly into place. Note: It maybe necessary to focus each filter separately as you image.
38
Color Filters and the Black and White Imager
Color filter slide, top view

2. Thread the nosepiece into place and firmly tighten.
3. Gently push the slide into slide housing on the camera. Notice that you can feel each filter “click” in place asyou move the slide across the camera. This will make it easier to tell if the filter is in place in the dark.
Note the order that you installed the filters as it may be difficult to determine color in the dark. And be awarethat either end of the slide can be placed into either end of the housing.
You may now choose a filter for imaging.
Color Filters and the Black and White Imager2
39
Attach nosepiece. Push the slide into housing

Drizzle Tutorial #1This tutorial demonstrates the basic operation of Drizzle and how you get started. The following tutorial assumesthat you have the imager on the telescope pointed at a Deep Sky object properly focused and that dark frameshave been taken up to the longest desired exposure time.
Recommended settings
File Type -> FITS3PSave Options -> Save All Uncombined Images
The above settings are highly recommended. FITS3P will save the full dynamic range of the imager and “SaveAll...” will allow you to run the images back through drizzle offline allowing you to try different settings. Thesesetting are found by pressing the Save Proc... button on the imager tab.
1. Select “Drizzle” from the “Image Process” dropdown menu.
2. Enter a name in the Object Name box.
3. Set Min Quality and Evaluation Count as desired.
Press the Settings button. See the Drizzle Resolutions section of this document for a description of thesesettings. These settings are not critical if you used the recommended settings above because you will be able run the images back through drizzle off line.
4. Start autotracking
Follow the directions in the manual on page 31 and set up your Meade Telescope for autotracking/Guiding.Be sure the Imager pull down in the Telescope tab is set to the imager you are using for drizzle. Theimagers are identified by name.
More...
Drizzle Tutorials
40

5. Select 2 stars
The first star selected will be the shift star this is the position that will be shifted for subsequent images.This is also the star that will be used for telescope tracking. The second star is to determine the rotationangle from the first star. It is important to pick stars that are close to the center. Keep the selection withinthe middle third of the image, this way the telescope control will have maximum shift space. The telescopecontrol will not shift the selected stars out of the image. When you run the images off line you can selectdifferent stars. If your telescope is polar mounted and well aligned you can use a single star, this will giveyou the maximum field of view possible.
6. Press Start
Envisage will create a new tab and putthe drizzled image there. Be patient,depending on your Drizzle settings andthe speed of your computer it may take2030 seconds after the count down forthe first image to appear. The imagemay be bigger than your screen, in thiscase scroll bars will appear on the rightand bottom.
7. Telescope Tracking
If you select the live image you will seeyour selected stars and a yellow circlewith a cross. This is the target position.If your star was on the yellow crosswhen Start was pressed then theyellow cross will be in the upper rightcorner.
More....
Drizzle Tutorials2
41

Once the star reaches the first target position the yellow cross will move to the lower right corner. Thetarget position will move to the next position each time the selected star reaches it. The next position is thelower left corner and the last position is the upper left corner. Once the star reaches the last positionimaging will stop. But the telescope will continue to track on the last position. During imaging you canchange the target position by pressing the “Set Target” button and then clicking on the desired targetposition on the live image.
8. Final Stretch
Once the image is complete you can touch up the histogram stretch and shadow enhance settings and thensave the final result by selecting File->Save from the menu.
Drizzle Tutorial #2This tutorial demonstrates how to use Drizzle after you have already captured images and are working off-line.
Offline Processing
A new feature is the ability to run your captured images back through the Drizzle process. Bring up theprogram without the imager plugged in (to lighten the load of the processing power of your computer). You willthen see the “Image Files” tab on the top.
1. Add images
Press the Add button in the Image Files tab on the top. The familiar Open dialog will appear. Navigate tothe directory where the images are. Select the first image of the sequence and then scroll to the last image.Hold the shift key down and click on the last image. All the file names from the first to the last should beselected. Now press Open. After a few seconds the files should appear in the “file name” list box.
Drizzle Tutorials3
42

2. Select images
Select the first image in the list and after a few seconds it should appear in the live display. You can use thearrow keys and go up an down the list and the image will appear. Inspect each image and click on theRemove button to take the bad images out of the list. This will not delete the image from your hard drive.
3. File Type: [what ever you want your final image type to be]
This setting is up to you. The FITS file types will save the full dynamic range but the others formats may bemore user friendly.
4. Save Options: Normal
This is the only setting that is valid, the other settings are ignored.
5. Select “Drizzle” from the “Image Process” dropdown menu.
6. Enter a name in the Object Name box.
7. Set Min Quality and Evaluation Count to 0 and 1 respectively.
Select these settings so that every image will be used in the final composite image. This is acceptablebecause you have eliminated all the bad images in a prior step.
8. Press the Settings button.
See the Drizzle Resolutions section and the sections following it for a description of these settings. Thesesettings can be experimented with each time you re-run the process.
9. Select 2 stars. More...
Drizzle Tutorials4
43

Click on the first file and then select the tracking stars. They don’t have to be the same ones selected whenthe images were taken. After the selection you can use the arrow down key to check the tracking of the 2 stars.
10. Press Start
Envisage will create a new tab and put the drizzled image there. Be patient, depending on your Drizzle settings and the speed of your computer it may take 20 to 30 seconds for the first image to appear. Theimage may be bigger than your screen: If so, scroll bars will appear on the right and bottom. The current file name is displayed in the status box below the drizzle settings. The system will stop when all thefiles have been processed.
Drizzle Tutorials5
44

11. Final Stretch.
Once the image is complete, you can touch up the histogram stretch, shadow enhance settings and thensave the final result by selecting File->Save from the menu. The file will always be saved to your defaultimage directory. If you want to save in a different format then press the Save Proc... button and set the filetype then select File->Save from the menu.
12. Stretch any file.
By selecting File->Open you can load any image file and perform a histogram stretch and shadowenhance(gamma) and then save the file in the currently selected file type by selecting File->Save. The fileis always saved in the default image directory which is C:\Meade Images by default.
Drizzle Tutorials6
45

Developed by NASA for the Hubble Space Telescope, Drizzle has features that dramatically increase the resolution and field of view of the Deep Sky Imager Pro's CCD chip. When the object being imaged would normally need a bigger chip camera, the astrophotographer can enable the Drizzle feature, which produces aneffective 4.9 mega pixel camera from the Deep Sky Imager Pro's 640x480 CCD chip with Meade AutoStarcontrolled telescopes.
It may seem that we are exaggerating, so here are the numbers: If a user selects Drizzle and inputs the valueof 2 in the Drizzle 'Extended View' setting (effectively making a 2x2 mosaic), and a value of 2 in the ‘DrizzleResolution’ (which takes multiple undersampled dithered shots of the object and reconstructs the image athigher resolution), they will end up with a picture that is 2560 pixels by 1920 pixels or 4,915,200 pixels. Theuncompressed RAM file (in FITS format) will be approximately 10 megabytes. Drizzle is not simply enlarging theimage as in interpolation. We move the telescope which in turn moves the image across the CCD sensor toperform seamless precision mosaics.
On the next page is a screen shot of Deep Sky Imager Pro’s image capture software called “AutoStar Envisage”with the Drizzle Settings dialog box opened:
Description of Drizzle
46

In the Drizzle Settings dialog box you have three options, “Drizzle Resolution,” “Extended View,” and “PixelFraction.” Here is what happens as you change each setting:
Description of Drizzle2
47

Drizzle Resolution
By increasing the Drizzle Resolution number (maximum value 2), the image resolution is higher creating biggerimage scale. It looks like the image is simply enlarged, but in fact by taking multiple undersampled ditheredshots of the object it reconstructs the image at higher resolution. Notice the Drizzle Size increase from640x480 to 1248x936, and the final image size being 1248x936. To accomplish this increase in resolution, wemove the AutoStar controlled telescope a small amount and take an image, again and again reading outfractions of each pixel and then reconstructing the image.
Description of Drizzle3
48

Extended View
Extended view increases the value to a maximum of 2 (effectively making a 2x2 mosaic). We move thetelescope in small precision movements, pause to take an image, and then repeat the action to make aseamless mosaic. This increases the true field of view of the image. Notice the outer frame has increased theeffective field coverage and the file size has changed from 640, 480 to 1280, 960.
Description of Drizzle4
49
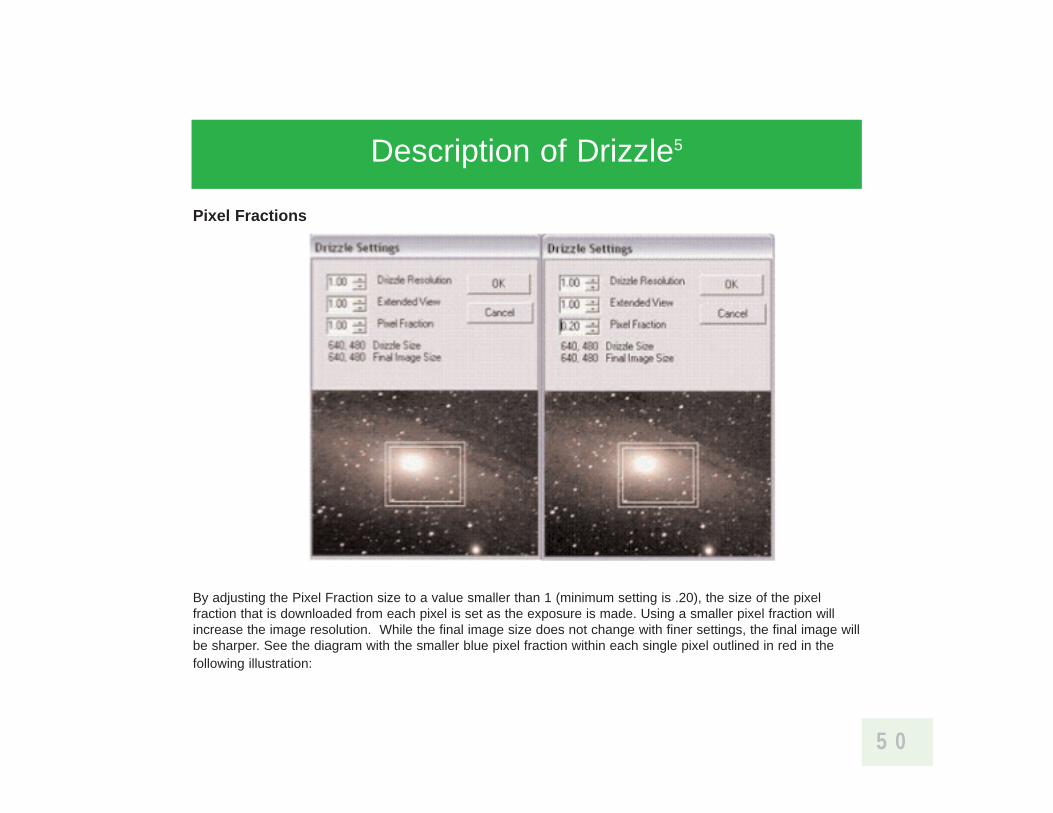
Pixel Fractions
By adjusting the Pixel Fraction size to a value smaller than 1 (minimum setting is .20), the size of the pixelfraction that is downloaded from each pixel is set as the exposure is made. Using a smaller pixel fraction willincrease the image resolution. While the final image size does not change with finer settings, the final image willbe sharper. See the diagram with the smaller blue pixel fraction within each single pixel outlined in red in thefollowing illustration:
Description of Drizzle5
50

Description of Drizzle6
51

Field De-Rotation
Instead of just tracking and stacking images by following the movements of one star, the Envisage Softwarewith Drizzle will track and stack images locked on two stars, and can correct for image rotation that occurs if thetelescope is tracking in the Altazimuth configuration, or in a roughly polar aligned telescope. Using this feature,you can do a quick alignment of your Meade telescope in Altaz, turn on the Envisage, select Drizzle, and draw abox around each of two stars in the field. The resulting image will not show rotational star trails.
Description of Drizzle7
52

Multiple Cameras: The latest software release now supports guiding and imaging with multiple cameras: Youcan connect up to 5 and use any combination of DSI, DSI Pro, DSI II, DSI Pro II or LPI. But you must use aUSB 2.0 interface and, if necessary, a powered hub. Make sure you have enough power in your ports to run allyour cameras.
Drizzle: The Drizzle function has been sped up for all models.
Color Algorithm has been improved on color imagers.
Zoom: If you check the zoom percentage box, you can zoom into the center of the image. If you draw a selection a box around a part of the image, you will zoom into that part of the image. Select a zoom percentagefrom 100% to 500%.
The zoom check box and zoom percentage box are displayed on the tab directly above each live image screen.
Change Stretch on Completed Images. When an image is completed you can now alter the histogram stretchvalues and save them in the final image. Just pull down the file->save menu and the image will be saved in thecurrent file time. You can also change the file type in Save Proc... and then save again in the new type.
Image Files imager type. You can now rerun images through Drizzle or shift and combine by using the ImageFiles tab. Use the Add button and browse to the files you want to use and select them in the order you want.Then click on the first file in the list and it will appear in the corresponding Image File tab like a live image froma camera. Draw a box around one or two stars if you want de-rotation and press the start button. The image willstart building and automatically stop when all the file images have been processed. It is recommended that thefile type FITS3P be used for the image files because you can process with the full 16 bits from the DSI.
More...
New Features in this Release
53

Imager Naming. The new software will prompt you to name your Deep Sky Imager the first time you runEnvisage with the imager plugged in. Keep the name short and descriptive. This name will stay with that imagereven on a different computer. The name is used to identify the imager when using multiple imagers. It is alsoused for dark frames. If you have more than one imager it is important to give a unique name to each imager.You can change the name in the “Cntrl” dialog when using the Pro or the Color dialog when using the originalDeep Sky Imager.
Imager Tabs. There is now an imager tab for each imager connected to the computer. The tab name is thesame as the imager name and when it is selected the corresponding live tab with the same name will beselected automatically. When a live tab is selected then the corresponding imager tab will be selected also.There is an extra imager tab called “Image Files” this is a virtual imager that can be loaded with files and thenthose images can be sent through the Drizzle process as though they came from the imager. This way you canrerun the Drizzle process with new settings for different results.
Additional Features
54

The following features are only available with DSI II models. Otherwise, the DSI II color model functions thesame as the DSI, and the DSI Pro II functions the same as the DSI Pro.
Resolution: 748 x 577 pixels. The DSI II models have almost twice the resolutions as the other models.
CCD Temperature (41): Reads the temperature at the camera when you take dark frames. These are saved inthe dark frames directory. The saved file name will include the length of the exposure and the temperature.
When you click on dark frame subtract, a dark frame from this directory will be selected that is within the 5° ofthe current temperature and within 1.5 to 3 seconds of your exposure length. If you do not have a dark framethat matches these requirements, you will be requested to take a dark frame at the current temperature andselected exposure rate.
The temperature sensor accuracy is ± 2°. Temperature readings are made in half-degree increments.
The following features are only available with DSI III models.
Resolution: 1360 x 1029CCD Temp: Same as DS II (see above)Color version is RGB Bayer Pattern for better color reproduction.Progressive Scan readout for better lunar and planetary images.2/3 inch sensor for a much wider field of view.2x2 binning.
DSI II Features
DSI III Features
55
The following are some tips we have discovered that are very useful. Perform these procedures in the daytime,unless otherwise mentioned.
• Make sure you connect to the correct ports on your computer. Use a USB 2.0 interface.
• After you install the software, see if the camera is working. You should see lighting shifts on the live screenas you move it about. The camera does not have to be focused or inserted into the telescope to try this out.
• Focus your telescope with an 25mm eyepiece in place before inserting the camera into the telescope. Onceyou focus, you can make the camera parfocal as described on page 17, or can just try to focus the camerawith the focuser. But focus using the eyepiece first.
• The field of view of a 25mm eyepiece is about 3 time the field of view of the camera.
• The driver has to be installed twice. This is normal for Windows. You will hear the installation tonestwice. Do not try to delete one of the drivers.
• You will need to take dark frames (do this at night) to image with any of the the Deep Sky Imagers. If youhave never taken dark frames before, or do not know what dark frames are, read up on dark frames, pages34 to 36.
Finally, Some Important Tips
56

This document and the Meade Autostar IP Software described herein, are copyrighted and are protected from reproduction, proliferation, and disclosure underthe Copyright laws of the United States of America. The Software contained herein is licensed to you under the terms of a License Agreement incorporated inthe Software. PLEASE READ IT BEFORE USING. By using the Software, you are accepting and agreeing to such terms. If you do not accept the terms,return the Software unused to the place of purchase for a full refund.
Information in this document is subject to change without notice and does not represent a commitment on the part of Meade Instruments Corp. The softwareand/or databases described in this document are furnished under a license agreement. The software and/or databases may be used or copied only inaccordance with the terms of the agreement. It is against the law to copy the software on any medium except as specifically allowed in the license agreement.The purchaser may make one copy of the software for backup purposes. No part of this manual and/or databases may be reproduced or transmitted in any formor by any means; electronic or mechanical, including photocopying, recording, or information storage and retrieval systems, for any purpose other that thepurchaser’s personal use, without the express written permission of Meade Instruments Corp.
Copyright © 2007 by Meade Instruments Corp. All rights reserved. Printed in the United States of America.
Microsoft is a registered trademark and Windows and Vista are a trademarks of Microsoft Corporation.
Acrobat Reader and Photoshop are trademarks of the Adobe Corporation.
LIMITED WARRANTY
LIMITED WARRANTY. Meade Instruments warrants that (a) the SOFTWARE will perform substantially in accordance with the accompanying written materialsfor a period of ninety (90) days from the date of receipt, and (b) any hardware accompanying the SOFTWARE will be free from defects in materials andworkmanship under normal use and service for a period of one (1) year from the date of receipt. Any implied warranties on the SOFTWARE and hardware arelimited to ninety (90) days and one (1) year respectively. Some states/countries do not allow limitations on duration of an implied warranty, so the abovelimitation may not apply to you.
CUSTOMER REMEDIES. Meade Instruments entire liability and your exclusive remedy shall be, at Meade’s option, either (a) repair or (b) replacement of theSOFTWARE or hardware that does not meet Meade’s Limited Warranty. You must return the defective item to Meade Instruments, at your expense, with a copyof your receipt. This Limited Warranty is void if failure of the SOFTWARE or hardware has resulted from accident, abuse, or misapplication. Any replacementSOFTWARE or hardware will be warranted for the remainder of the original warranty period or thirty (30) days, whichever is longer. Outside of the UnitedStates, these remedies are not available without proof of purchase from an authorized non-U.S. source.
NO OTHER WARRANTIES. Meade Instruments and its suppliers disclaim all other warranties, either expressed or implied, including, but not limited to, impliedwarranties of merchantability and fitness for a particular purpose, with regard to the SOFTWARE, the accompanying written materials, and any accompanyinghardware. This limited warranty gives you specific legal rights. You may have other rights which vary from state/country to state/country.
NO LIABILITY FOR CONSEQUENTIAL DAMAGES. In no event shall Meade Instruments, or its suppliers, be liable for any damages whatsoever (includingwithout limitation, damages for loss of business profits, business interruption, loss of business information, or any other pecuniary loss) arising out of the use of,or inability to use, the Meade product, even if Meade Instruments has been advised of the possibility of such damages. Because some states/countries do notallow the exclusion or limitation of liability for consequential or incidental damages, the above limitation may not apply to you.
U.S. GOVERNMENT RESTRICTED RIGHTS
The SOFTWARE and documentation are provided with RESTRICTED RIGHTS. Use, duplication, or disclosure by the Government is subject to restriction as setforth in subparagraph (c)(1)(ii) of The Rights in Technical Data and Computer Software clause at DFARS 252.227-7013 or subparagraphs (c)(1) and (2) of theCommercial Computer Software—Restricted Rights at 48 CFR 52.227-19, as applicable. Manufacturer is Meade Instruments Corporation, 6001 Oak Canyon,Irvine, California 92618.
57

9/07(800) 626-3233 www.meade.com


![Solar irradiance forecasting using ground-based sky images · Allied Vision GE 2040C UCSD Sky Imager (USI) [Chow et al., 2015] 6 Sky Imager Forecast Procedure Calibrated Imagery Detect](https://img.dokumen.tips/doc/110x75/604d3ac85d0ba17449631bb0/solar-irradiance-forecasting-using-ground-based-sky-images-allied-vision-ge-2040c.jpg)