Embed Size (px)
Citation preview

|11,111
Jill.!
Additional information on this product and
answers to frequently asked questions can be
found at our Customer Support Website.
Puede encontrar m_isinformaci6n sobre este
producto y respuestas alas preguntas m_isfrecuentes
en nuestro sitio Web de atenci6n al cliente.
htt p://www.so ny.net/
Printed on 70% or more recycled paper.
Impreso en papel reciclado en un 70% omas.
Printed in China
IIIIIIIIIII4170098110
c
m
SONY 4-1 70-098-11(1)
......
DCR-SR68/SR88/SX43/SX44/SX63
Digital Video Camera Recorder
Operating Guide
Guia de operaciones
_EmOR¥ 5TII_K M s_,_,
I-Ibndl-I _____nd111_
© 2010 Sony Corporation

Owner'sRecord
The model and serial numbers are located
on the bottom. Record the serial number
in the space provided below. Refbr to thesenumbers whenew, r you call upon your Sonydealer regarding this product.
Model No. DCR-
Serial No.
Model No. AC-
Serial No.
This symbol is intendedto alert the user to the
presence of importantoperating and maintenance(servicing) instructions inthe literature accompanyingthe appliance.
To reduce fire or shock hazard, do notexpose the unit to rain or moisture.
Do not expose the batteries toexcessive heat such as sunshine, fire or
the like.
CAUHON:10 REDUC£_H_ RISKOFE CTRICSNOOK,
Do NOr REMOVECOVER(O_ BACK)¸
NO USE_-SERVlCEAIJLEPARRSINSIDE
rtEFERSErtVlClNGTOQUALIFIEDSERVICEPERSONNEL.
This symbol is intendedto alert the user to the
presence of uninsulated
"dangerous wfltage" withinthe product's enclosure
that may be of sufficientmagnitude to constitutea risk of electric shock to
persons.

SAVE THESE INSTRUCTIONS.DANGER - TO REDUCE THE RISK OF FIREOR ELECTRIC SHOCK,CAREFULLY FOLLOW THESEINSTRUCTIONS.• Read these instructions.
• Keep these instructions.
• Heed all warnings.• Follow all instructions.
• Do not use this apparatus near water.
• Clean only with dry cloth.
• Do not block a W w.ntilation openings. Install in accordance with the manufhcturer's
instructions.
• Do not install near a W heat sources such as radiators, heat registers, stoves, or other
apparatus (including amplifiers) that produce heat.
• Do not detbat the satbty purpose of the polarized or grounding-type plug. A polarized plug
has two blades with one wider than the other. A grounding type plug has two blades and a
third grounding prong. The wide blade or the third prong are provided for your safet}: If
the provided plug does not fit into your outlet, consult an electrician for replacement of theobsolete outlet.
• Protect the power cord from being walked on or pinched particularly at plugs, conw.nience
receptacles, and the point where they exit from the apparatus.
• Only use attachments/accessories specified by the manufacturer.
• Use only with the cart, stand, tripod, bracket, or table specified by the manufacturer, or
sold with the apparatus. When a cart is used, use caution when moving the cart/apparatus
combination to awfid injury from tip-ow.r.
• Unplug this apparatus during lightning storms or when unused for long periods of time.
• Refer all servicing to qualified service personnel. Servicing is required when the apparatus
has been damaged in any wa}; such as power-supply cord or plug is damaged, liquid has
been spilled or objects haw. fallen into the apparatus, the apparatus has been exposed to
rain or moisture, does not operate normall}; or has been dropped.
• If the shape of the plug does not fit the power outlet, use an attachment plug adaptor of the
proper configuration fbr the power outlet.
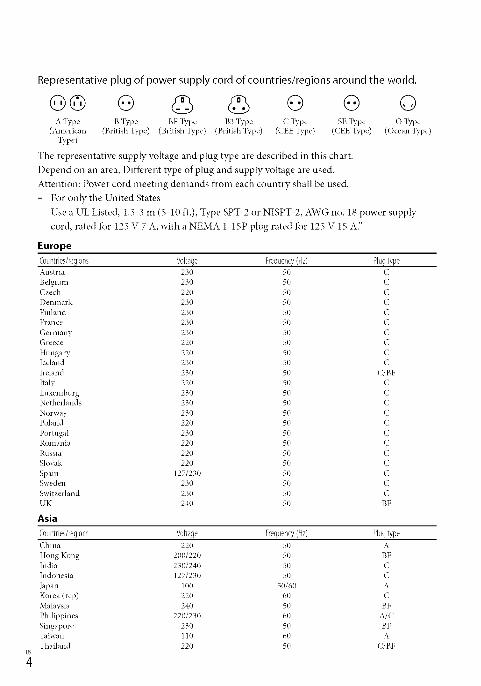
Representative plug of power supply cord of countries/regions around the world.
Go o o G oA l_T,e B 'I_T,e BF l_T,e B3 'I?q_e C Type SE "I?q_e O "I_T,e
(American (British Type) (British Type) (British'I?_pe) ((EE'I_,pe) (CEE'I_pe) (Ocean 'I_,pe)
133,e)
The representatiw, supply voltage and plug type are described in this chart.
Depend on an area, Diffbrent type of plug and supply voltage are used.
Attention: Power cord meeting demands from each country shall be used.
- For only the United States
Use a UL Listed, 1.5-3 m (5-10 ft.), Type SPT-2 or NISPT-2, AWG no. 18 power supply
cord, rated for 125 V 7 A, with a NEMA 1-15P plug rated for 125 V 15 A"
Europe
Countries/regions Voltage Frequency(Hz) Plug typeAustria 230 50 C
Belgium 230 50 C
Czech 220 50 C
I)enmark 230 50 C
Finland 230 50 C
France 230 50 C
Germany 230 50 CGreece 220 50 C
Hungary 220 50 CIceland 230 50 C
Ireland 230 50 C/BF
Italy 220 50 C
I,uxemburg 230 50 C
Netherlands 230 50 C
Norway 230 50 C
Poland 220 50 C
Portugal 230 50 C
Romania 220 50 C
Russia 220 50 C
Slovak 220 50 C
Spain 127/230 50 CSweden 230 50 C
Switzerland 230 50 C
UK 240 50 BF
Asia
Countries/regions Voltage Frequency(Hz) Plug type
China 220 50 A
Hong Kong 200/220 50 BF
India 230/240 50 C
Indonesia 127/230 50 C
Japan 100 50/60 A
Korea (rep) 220 60 C
Malaysia 240 50 BF
Philippines 220/230 60 A/C
Singapore 230 50 BF
Taiwan 110 60 A
Thailand 220 50 (/BF

Countries/regions Voltage Frequency(Hz) Plugtype
VietllalIl 220 50 A/(
Oceania
Countries/regions Voltage Frequency(Hz) PlugtypeAustralia 240 50 O
New Zealand 230/240 50 O
North America
Countries/regions Voltage Frequency(Hz) Plugtype
Canada 120 60 A
USA 120 60 A
Central America
Countries/regions Voltage Frequency(Hz) PlugtypeBahamas 120/240 60 A
Costa Rica 110 60 A
Cuba 110/220 60 A/C
Dominican (rep) 110 60 A
El Salvador 110 60 AGuatemala 120 60 A
Honduras 110 60 A
Jamaica 110 50 AMexico 120/127 60 A
Nicaragua 120/240 60 APanama 110/220 60 A
South America
Countries/regions Voltage Frequency(Hz) Plugtype
Argentina 220 50 (/BF/O
Brazil 127/220 60 A/C
Chile 220 50 C
Colombia 120 60 A
Peru 220 60 A/C
\_,nezuela 120 60 A
Middle East
Countries/regions Voltage Frequency(Hz) Plugtype
h'an 220 50 C/BF
Iraq 220 50 C/BF
Israel 230 50 C
Saudi Arabia 127/220 50 A/C/BF
Turkey 220 50 C
UAE 240 50 C/BF
Africa
Countries/regions Voltage Frequency(Hz) Plugtype
Algeria 127/220 50 (
Congo (dem) 220 50 C
Egypt 220 50 C
Ethiopia 220 50 C
Kenya 240 50 C/BF
Nigeria 230 50 C/BF
South Africa 220/230 50 C/BF
Tanzania 230 50 C/BF
Tunisia 220 50 C

Read this first
Betbre operating the unit, please read this
manual thoroughl?; and retain it for futurereference.
Battery pack
If the battery pack is mishandled, the
battery pack can burst, cause a fire or ew, n
chemical burns. Obserw, the fbllowingcautions.
• Do not disassemble.
• Do not crush and do not expose the battery
pack to any shock or lbrce such as hammering,
dropping or stepping on it.• Do not short circuit and do not allow metal
objects to come into contact with the batteryterminals.
• Do not expose to high temperature above 60°C
(140 °F) such as in direct sunlight or in a car
parked in the sun.
• Do not incinerate or dispose of in fire.
• Do not handle damaged or leaking lithium ionbatteries.
• Be sure to charge the battery pack using a
genuine Sony battery charger or a device that
can charge the battery pack.
• Keep the battery pack out of the reach of small
children.
• Keep the battery pack dr3c
• Replace onlywith the same or equNalent tTpe
recommended by Son3_
• Dispose of used battery packs promptly as
described in the instructions.
Replace the battery with the specified type
onb: Otherwise, fire or injury may result.
ACAdaptor
Do not use the AC Adaptor placed in anarrow space, such as between a wall andfurniture.
Use the nearby wall outlet (wall socket)when using the AC Adaptor. Disconnectthe AC Adaptor from the wall outlet (wall
socket) immediately if aW malfunctionoccurs while using your camcorder.
Ew, n if your camcorder is turned off., ACpower source (mains) is still supplied toit while connected to the wall outlet (wallsocket) via the AC Adaptor.
RECYCLIN6LITHIUM-IONBATTERIES
Lithium-Ion batteries are
recyclable.You can help preserw, ourenvironment by returningyour used rechargeablebatteries to the collection and
recycling location nearest you.
For more infbnnation
regarding recycling ofrechargeable batteries, call tollfree 1-800-822- 8837, or visit
http://www.rbrc.org/Caution: Do not handle
damaged or leaking Lithium-Ion batteries.
Battery pack
This device complies with Part 15 of the
FCC Rules. Operation is subject to the
following two conditions: (1) This device
may not cause harmful interference, and
(2) this device must accept any interference
receiw, d, including interference that may
cause undesired operation.
This Class B digital apparatus complieswith Canadian ICES-003.

UL is an internationally recognized safety
organization.
The UL Mark on the product means it hasbeen UL Listed.
If you haw. aW questions about thisproduct, you may call:
SoW Customer Information Center 1-800-222-SONY (7669).The number below is for the FCC related
matters onl}:
RegulatoryInformation
Declaration of ConformityTrade Name: SONYModel No.: DCR-SX43
Responsible Party: Sony Electronics Inc.
Address: 16530 Via Esprillo, San Diego,CA 92127 U.S.A.
Telephone No.: 858-942-2230This device complies with Part 15 of the
FCC Rules. Operation is subject to thefollowing two conditions: (1) This device
may not cause harmful interference,and (2) this device must accept any
interfbrence receiw.d, includinginterfbrence that may cause undesired
operation.
Declaration of ConformityTrade Name: SONYModel No.: DCR-SX44
Responsible Party: Sony Electronics Inc.Address: 16530 Via Esprillo, San Diego,CA 92127 U.S.A.
Telephone No.: 858-942-2230This device complies with Part 15 of theFCC Rules. Operation is subject to thefollowing two conditions: (1) This devicemay not cause harmful interference,and (2) this device must accept anyinterfbrence receiw.d, includinginterfbrence that may cause undesiredoperation.
Declaration of ConformityTrade Name: SONYModel No.: DCR-SX63
Responsible Party: Sony Electronics Inc.
Address: 16530 Via Esprillo, San Diego,CA 92127 U.S.A.
Telephone No.: 858-942-2230
This device complies with Part 15 of the
FCC Rules. Operation is subject to the
following two conditions: (1) This device
may not cause harmful interfbrence,
and (2) this device must accept any
interference receiw.d, including
interference that may cause undesired
operation.
Declaration of ConformityTrade Name: SONY
Model No.: DCR-SR68
Responsible Party: Sony Electronics Inc.
Address: 16530 Via Esprillo, San Diego,CA 92127 U.S.A.
Telephone No.: 858-942-2230
This device complies with Part 15 of the
FCC Rules. Operation is subject to the
following two conditions: (1) This device
may not cause harmful interfbrence,
and (2) this device must accept any
interference receiw.d, including
interference that may cause undesired
operation.
Declaration of ConformityTrade Name: SONY
Model No.: DCR-SR88
Responsible Party: Sony Electronics Inc.
Address: 16530 Via Esprillo, San Diego,CA 92127 U.S.A.
Telephone No.: 858-942-2230
This device complies with Part 15 of the
FCC Rules. Operation is subject to the
following two conditions: (1) This device
may not cause harmful interfbrence,
and (2) this device must accept any
interference receiw.d, including
interference that may cause undesired
operation.

CAUTION
You are cautioned that any changes ormodifications not expressly approved inthis manual could w_id your authority tooperate this equipment.
Note
This equipment has been tested and fbundto comply with the limits for a Class Bdigital device, pursuant to Part 15 of theFCC Rules.
These limits are designed to providereasonable protection against harmfulinterfk,rence in a residential installation.
This equipment generates, uses, andcan radiate radio frequency energy and,if not installed and used in accordance
with the instructions, may cause harmfulinterfk,rence to radio communications.
Howew, r, there is no guarantee thatinterfk,rence will not occur in a particularinstallation. If this equipment does causeharmful interfk,rence to radio or television
reception, which can be determined byturning the equipment off"and on, theuser is encouraged to try to correct theintert_,rence by one or more of the tollowingmeasures:
- Reorient or relocate the receiving antenna.- Increasethe separation between the
equipment and receiver.
- Connect the equipment into an outlet ona circuit different f)comthat to which thereceiveris connected.
- Consult the dealer or an experienced radio/TV technician tbr help.
The supplied interface cable nmst be usedwith the equipment in order to comply withthe limits for a digital device pursuant toSubpart B of Part 15 of FCC Rules.
Supplied items
The numbers in ( ) are the supplied
quantity.
[] AC Adaptor (1)
[] Power cord (Mains lead) (1)
[] A/V connecting cable (1) []
[] USB cable (1) []
[] Rechargeable battery pack NP-FV30 (1)
[] CD-ROM "Handycam" Application
Software (1)
- "PMB"(sot_ware,including "PMB Help")- "Handycam" Handbook (PDF)
[] "Operating Guide" (This manual) (1)
[] []
• See page 21 [-}orthe memory card you can use
with this camcorder.
Using the camcorder
• Do not hold the camcorder by the tbllowing
parts, and also do not hold the camcorder by
the jack covers.
LCDscreen
Battery pack
• The camcorder is not dustproot'ed, dripproot'edor waterproofed. See "Precautions" (p. 60).

Menu items, LCD panel, and lens
• A menu item that is grayed out is not available
under the current recording or playbackconditions.
• The LCD screen is manu*hctured using
extremely high-precision technology, so over
99.99% of the pixels are operational fbr effective
use. However, there may be some tiny black
points and/or bright points (white, red, blue,
or green in color) that appear constantly on the
LCD screen. These points are normal results of
the manufhcturing process and do not affbct the
recording in any wa)_
White, red, blue or green points
• Exposing the LCD screen or the lens to direct
sunlight fbr long periods of time may causemalfunctions.
• Do not aim at the sun. Doing so might cause
your camcorder to malfimction. Take images
of the sun only in low light conditions, such asat dusk.
About changing the language setting
• The on screen displays in each local language
are used *br illustrating the operating
procedures. Change the screen language befbre
using your camcorder if necessary (p. 19).
Recording
• When you use a memory card with your
camcorder *br the first time, fbrmatting the
memory card with your camcorder (p. 55) is
recommended fbr stable operation.
All data recorded on the memory card will
be deleted when it is fbrmatted, and cannot
be recovered. Save important data to your
computer, etc., befbrehand.
• Befbre starting to record, test the recording
function to make sure that the image and sound
are recorded without any problems.
• Compensation fbr the contents of recordings
cannot be provided, even if recording or
playback is not possible due to a malfunction of
the camcorder, storage media, etc.
• TV color systems diffbr depending on the
country/region. To view your recordings on a
TV, you need an NTSC system based T'_(
• Television programs, fihns, video tapes,
and other materials may be copyrighted.
Unauthorized recording of such materials may
be contrary to copyright laws.
Note on playback
• Images recorded on your camcorder may not
play correctly on other devices.
Conversely, images recorded on other devices
may not play correctly on this camcorder.
Save all your recorded image data
• To prevent your image data from being lost,
save all your recorded images on external media
periodicall> It is recommended that you save
the image data on a disc such as a DVD R using
your computer. Also, you can save your image
data using a VCR or a DVD/HDD recorder,
etc. (p. 45).
Notes on battery pack/AC Adaptor
• Be sure to remove the battery pack or the AC
Adaptor after turning off the camcorder.
• Disconnect the AC Adaptor fi'om the
camcorder, holding both the camcorder and the
DC plug.
Note on the camcorder/battery pack
temperature
• When the temperature of the camcorder
or battery pack becomes extremely high or
extremely low, you may not be able to record
or play back on the camcorder, due to the
protection *batures of the camcorder being
activated in such situations. In this case, an
indicator appears on the LCD screen.

When the camcorder is connected to a
computer or accessories
• Do not try to lbrmat the recording media of the
camcorder using a computer. If you do so, your
camcorder may not operate correctl3c
• When connecting your camcorder to anotherdevice with a cable, be sure to insert the
connector plug in the correct wa3c Pushing the
plug lbrcibly into the terminal will damage the
terminal and may result in a malflmction of
your camcorder.
If you cannot record/play back images,
perform [MEDIA FORMAT]
• If you repeat recording/deleting images for
a long time, t)cagmentation of data occurs on
the recording media. Images cannot be saved
or recorded. In such a case, save },our images
on some type of external media first, and then
peribrm [MEDIA FORMAT] by touching
(MENU) _ [Show others] _ [MEDIA
FORMAT] (under _'_ [MANAGE MEDIA]
category) _ the desired medimn (DCR-
SR68/SR88/SX44/SX63) _ [YES] --* [YES]
Carl Zeiss lens
• 5_ur camcorder is equipped with a Carl Zeiss
lens, which was developed jointly by Carl
Zeiss, in Germany, and Sony Corporation, and
produces superior images. It adopts the MTF
measurement system fbr video cameras and
offi:rs a quality typical of a Carl Zeiss lens.MTF- Modulation Transfer Function. The
nmnber value indicates the amount of light
fl'om a subject coming into the lens.
Notes on optional accessories
• We recommend using genuine Sony accessories.
• Availability of such products is subject to
country/region.
About images, illustrations, and screen
displays of this manual
• The example images used in this manual for
illustration purposes are captured using a
digital still camera, and therefbre may appear
diffi.,rent fl'om images and screen indicators that
actually appear on your camcorder. And, the
illustrations of your camcorder and its screen
indication are exaggerated or simplified tbr
understandabilit>• In this manual, the internal hard disk (DCR-
SR68/SR88), the internal memory (DCR4X44/
SX63) of your camcorder and memory card are
called "recording media2
• Design and specifications of your camcorder
and accessories are subject to change withoutnotice.
Confirm the model name of your
camcorder
• The model name is shown in this manual when
there is a diffbrence in specification betweenmodels. Confirm the model name on the
bottom of your camcorder.
• The main differences in specification of thisseries are as fbllows.
Recording Capacity USB jackmedia of internal
recordingmedia
DCR- Internal 80 GB
SR68 hard
disk + 120 GB
SR88 memorycard
DCR- Memory _ Input/SX43 card output
DCR- Internal 4 GB
SX44 memory
DCR- + 16 GB
SX63 memorycard
1;

• Do not do any of the lbllowing, otherwise, the
recording media may be damaged, recorded
images may be impossible to play back or maybe lost, or other malfunctions could occur.
- Eject the memory card when the access lamp
(p. 22) is lit or flashing
- Remove the battery pack or AC Adaptor fl'om
the camcorder, or subject the camcorder toshock or vibration when the _ (Movie)/ll_l
(Photo) lamps (p. 18) or the access lamp
(p. 22) are lit or flashing
• When using a shoulder belt (sold separately), do
not crash the camcorder against an object.
• Do not L:seyour camcorder in very loud areas.
On the drop sensor (DCR-SR68/SR88)
• To protect the internal hard disk f)com shock
by dropping, the camcorder has a drop sensor
t\mction. When a drop occurs, or under a non_
gravity condition, the block noise made when
this function is activated by the camcorder may
also he recorded. If the drop sensor catches a
drop repeatedly, recording/playback may be
stopped.
Note on using the camcorder at high
altitudes (DCR-SR68/SR88)
• Do not turn on the camcorder in a low_pressure
area, where the altitude is more than 5,000
meters (16,000 fi.,et). Doing so may damage the
internal hard disk drive of your camcorder.

Operation flow
#
Getting started (p. 15)
Prepare the power source and recording media.
Recording movies and photos (p. 23)
Recording movies _ p. 25_" Changing the recording mode
_" Expected recording time (MEDIA INFO)
Shooting photos _ p. 26
Playing movies and photos
Playback on the camcorder _ p. 28
Playing images on a TV _ p. 31
Saving images
Saving movies and photos with a computer _ p. 36
Saving movies and photos in external media _ p. 43
Saving images with a DVD writer/recorder _ p. 45

Table of contents
IMPORTANT SAFETY INSTRUCTIONS ............................................................ 3
Read this first ......................................................................................... 6
Operation flow ..................................................................................... 12
_ Getting startedStep 1 : Charging the battery pack ............................................................. 15
Charging the battery pack abroad .................................................... 17
Step 2:Turning the power on, and setting the date and time ........................... 18
Changing the language setting ........................................................ 19
Step 3: Preparing the recording media ....................................................... 20
To check the recording media settings ............................................... 21
Dubbing or copying movies and photos from the internal recording media
to memory card (DCR-SR68/SR88/SX44/SX63) ..................................... 22
_ Recording/PlaybackRecording ........................................................................................... 23
Playback on the camcorder ..................................................................... 28
Playing images on aTV .......................................................................... 31
_ Making good use of your camcorderDeleting movies and photos .................................................................... 34
Saving movies and photos with a computerPreparing a computer (Windows) ............................................................. 36
When using a Macintosh ................................................................ 36
Starting PMB (Picture Motion Browser) ....................................................... 39
Creating a disc with one touch (OneTouch Disc Burn) .................................... 39
Importing movies and photos to a computer ............................................... 40
Creating a disc ..................................................................................... 41
Copying a disc ............................................................................. 42
Editing movies ............................................................................ 42
Capturing photos from a movie ....................................................... 42
_ Saving images with an external deviceSaving images in external media (DIRECT COPY) ........................................... 43
Creating a disc with a DVD writer, recorder .................................................. 45
n
_3

Customizing your camcorderUsing menus ....................................................................................... 51
Getting detailed information from the"Handycam"Handbook ......................... 57
_ Additional information_ Troubleshooting ............................................................................... 58
Precautions ......................................................................................... 60
Specifications ...................................................................................... 62
Quick referenceScreen indicators .................................................................................. 66
Parts and controls ................................................................................. 67
Index ................................................................................................. 70
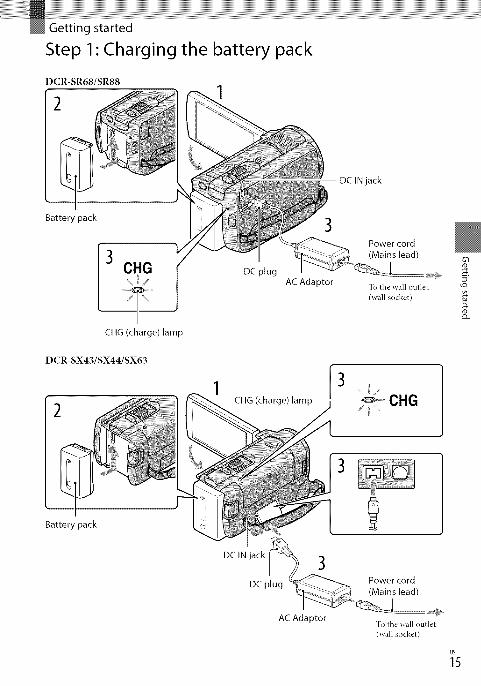
Step 1" Charging the battery pack
DCR-SR68/SR881
DC IN jack
Battery pack
CHG (charge) lamp
DCR-SX43/SX44/SX63
3
DC plugAC Adaptor
CHG (charge) lamp
Power cord
(Mains lead)
To the wall outlet
(wall socket)
3\ /
z \
3
5"
Battery pack
ocINjack_ 3
AC Adaptor "Ibthe wall outlet
(wall socket)
_5
You can charge the "InfoLITHIUM" battery pack (V series) after attaching it to yourcamcorder.
(_ Notes• 5_u cannot attach any "InibLITHIUM" battery pack other than the V series to your camcorder.
Turn offyour camcorder by closing the LCDscreen.
Attach the battery pack by sliding it in the direction of the arrow until itclicks.
Connect the AC Adaptor and the power cord (mains lead) to yourcamcorder and the wall outlet (wall socket).
• Align the • mark on the DC plug with that on the DC IN jack.
The CHG (charge) lamp lights up and charging starts. The CHG (charge) lamp turns off
when the battery pack is fully charged.
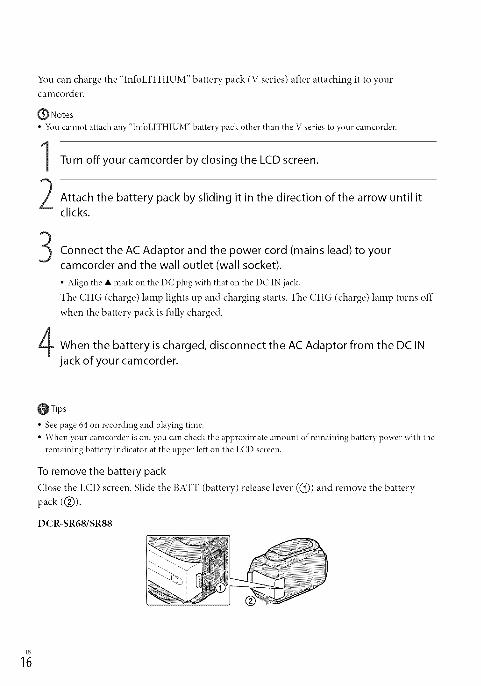
When the battery is charged, disconnect the ACAdaptor from the DCINjack of your camcorder.
_Tips
• See page 64 on recording and playing time.
• \Vhen your camcorder is on, you can check the approximate amount of remaining battery power with the
remaining battery indicator at the upper left on the LCD screen.
To remove the battery pack
Close the LCD screen. Slide the BATT (battery) release lever ((_)) and remove the battery
pack (@).
DCR-SR68/SR88
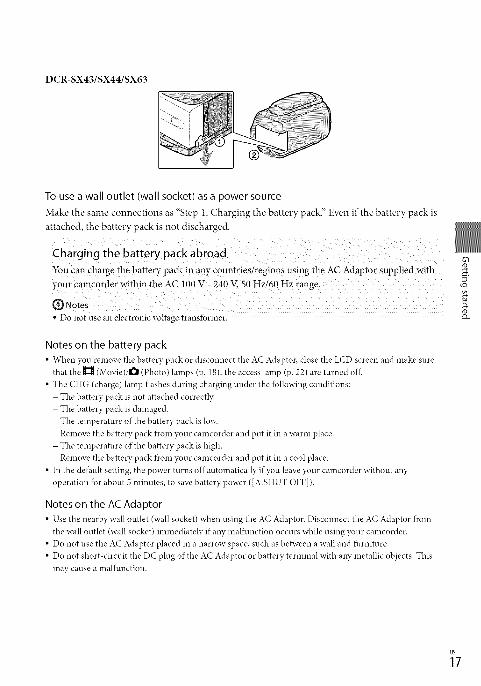
DCR-SX43/SX44/SX63
To use a wall outlet (wall socket) as a power source
Make the same connections as "Step l: Charging the batter}, pack." Even ffthe batter}, pack is
attached, the battery pack is not discharged.
Charging the battery pack abr0ad
You can charg _ the battery-pack in any countries/regi0ns using the AC Adaptor supplied with
your camc0rde r within the AC !00 V 2240 V, 50 HZ/60 H z r_ge:
(_ Notes
Do not use an electronic voltage transformer.
Notes on the battery pack
• When you remove the battery pack or disconnect the A(" Adaptor, close the LCD screen and make sure
that the ]IZN(Movie)/O (Photo) lamps (p. 18), the access lamp (p. 22) are turned of__
• The CHG (charge) lamp flashes during charging under the fbllowing conditions:
- The battery pack is not attached correctl3c
- The battery pack is damaged.
- The temperature of the battery pack is lox_c
Remove the battery pack t)com your camcorder and put it in a warm place.
- The temperature of the battery pack is high.
Remove the battery pack t)com your camcorder and put it in a cool place.
• In the defhult setting, the power turns off automatically if you leave your camcorder without any
operation fbr about 5 minutes, to save battery power ([A.SHUT OFF]).
Notes on the AC Adaptor
• Use the nearby wall outlet (wall socket) when using the A(" Adaptor. Disconnect the A(" Adaptor _)com
the wall outlet (wall socket) immediately if any malfunction occurs while using your camcorder.
• Do not use the AC Adaptor placed in a narrow space, such as between a wall and *_.*rniture.
• Do not short-circuit the DC plug of the AC Adaptor or battery terminal with any metallic objects. This
may cause a malfunction.
63
D-
_7

Step 2:Turning the power on, and setting thedate and time
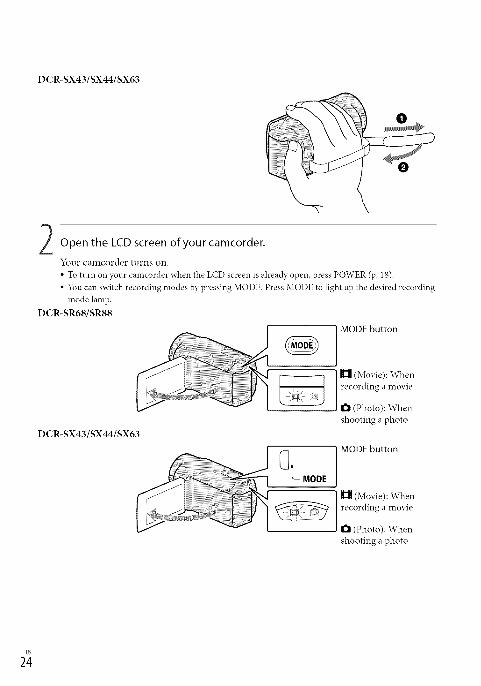
1Open the LCD screen of your camcorder.
Your camcorder turns Oll.
• To ttirn on ?Tourcamcorder when the LCD screen is open, press POWER.
POWER button
POWER
] MODE lanlp
Select the desired geographical area with _/_, then touch [NEXT].
Touch the button on ithe LCD screen.
• To set the date and time again, touch _ (MENU) _ [Show others] _ [CLOCK/[] LANG]
(under _ [GENERAL SET] category) _ [CLOCK SETI. When an item is not on the screen, touch
m/m until the item appears.
Set [DST SET] or [SUMMERTIME], date and time, then touch Ii_l.
The clock starts.
• If you set [DST SET] or [SUMMERTIME] to [ONI, the clock advances 1 hour.
{IIIIISET _JAN-I-2010 12:00 00AM SIT "
11

{_ Notes
• The date and time do not appear during recording, but they are automatically recorded on the recordingmedia, and can be displayed during playback. To display tbe date and time, touch _ (MENU)
[Sbow otbers] _ [PLAYBACK SET] (under _ [PLAY'BACK] category) _ ]DATA CODE] --' [DATE/
TIME] _ | _ | _ |.
• 5_u can turn offthe operation beeps by touching | (MENU) _ [Show others] _ [SOUND/DISP
SET] (under _¢_ [GENERAL SET] category) _ [BEEP] _ [OFF] _ _ _ _ _ I_'_.
• If the button you touch does not react correctly, calibrate the touch panel.
To turn offthe power
Close the LCD screen. The _ll (Movie) lamp flashes for a fbw seconds and the power is turnedoff_
_Tips
• 5_u can turn off your camcorder also by pressing POWER.
• When [POWER ON BY LCD] is set to [OFF], turn offyour camcorder by pressing POWER. 63
5"Changing the language setting
You can change the on-screen d!sp!ays to sh0w messages in a Specifie d language. ,_Touch _ (MENU) _ [Show others] _ [CLOCK/IN LANG] (under % [GENERAL SET] _-
category) _ [IN LANGUAGE SET] _ a desired ianguage _ I1_/_ _ _ B._I.
_9

Step 3: Preparing the recording media
The recording media that can be used diffk,rs depending Ollyour camcorder. The fbllowing
icolls are displayed on the screen of your camcorder.
DCR-SX43:
DCR-SX44/SX63:
DCR-SR68/SR88:
Memory card
Internal memory Memory card
Internal hard disk Memory card
× In the defhult setting, both movies and photos are recorded on this recording media. 5_u can perform
recording, playback and editing operations on the selected medium.
_Tips
• See page 64 for the recordable time of movies.
Touch _ (MENU) --_ [Show others] --_ [MEDIA SETTINGS] (under_
[MANAGE MEDIA] category) --_ [MOVIE MEDIA SET].
The [MOVIE MEDIA SET] screen appears.
Touch the desired recording media.
Touch [YES] --_ IBI_i.
The recording medium is changed.
Touch _ (MENU) --_ [Show others] --_ [MEDIA SETTINGS] (under_
[MANAGE MEDIA] category) --_ [PHOTO MEDIA SET].
The [PHOTO MEDIA SET] screen appears.
Touch the desired recording media.

Touch EYES]-_* _.
The recording medium is changed.
When recgrding in movie recording m°de or photo recording mode, the recording media
icon is displayed in the top right C0rner 0f the Screen.
L=,,,,, _ Rei0rdi{{g mid}a ii0n
, The icon dispIayedon the LCD screen varies depending on the camcorder you.use.
{_ Notes
• Set the recording medium to [MEMORY CARD] to record movies and/or photos on memory card
(DCR4R68/SR88/SX44/SX63).
Types of memory card that can be used with your camcorder
• Only "Memory Stick PRO Duo" media, "Memory Stick PRO HG Duo" media, SD memory cards and
SDHC memory cards can be used with this camcorder. A MultiMediaCard cannot be used with thiscamcorder.
• In this manual, "Memory Stick PRO Dud' media and "Memory Stick PRO-HG Duo" media are refbrred
to as "Memory Stick PRO Duo" media.
• Memory cards of up to 32 GB are guaranteed to work with your camcorder.
Types of"Memory Stick" media that can be used with your camcorder
• For recording movies, it is recommended that you use "Memory Stick PRO Duo" media of 512 MB or
larger marked with:
- MEMORY5TIERPRO DUO("Memory Stick PRO Duo" media) .×
-MEMORYSII[RPR0-H[il]UI] ("Memory Stick PRO-HG Duo" media)
× Marked with Mark2 or not, either can be used.
"MemoryStickPRODuo"media/"MemoryStickPRO-HGDuo"media
(Thissizecanbe usedwith yourcamcorder,)
• "Memory Stick PRO Duo" media can be used only with "Memory Stick PRO" media compatible
equipment.
• Do not attach a label or the like on "Memory Stick PRO Dug' media or "Memory Stick Dug' media
adaptor.
2

Open the cover, orient the memory card's notched corner as shown in the
illustration, and insert into the memory card slot until it clicks.
• Close the cover after inserting the memory card.
DCR-SR68/SR88 DCR-SX43/SX44/SX63
Access lamp
Note direction of notched corner. Access lamp Note direction of notched corner.
The [Create a new hnage Database File.] screen may appear if you insert a new memory
card. In that case, touch [YES]. If you record only photos on the memory card, touch
[NO].
• Confirm the direction of the memory card. If you forcibly insert the memory card in the wrongdirection, the memory card, memory card slot, or image data may be damaged.
Q Notes
• If [Failed to create a new hnage Database File. It may be possible that there is not enough ficeespace.]
is displayed, initialize the memory card by touching _ (MENU) _ [Show others] --* [MEDIA
FORMAT[ (under _"J_ [MANAGE MEDIA] category) _ [MEMORY CARD] (DCR-SR68/SR88/SX441
SX63) --* [YES] --* [YES] --* I!_1_.
To eject the memory card
Open the cow'r and lightly push the memory card in once.• Do not open the cover during recording.• When inserting or ejecting the memory card, be careiul so that the memory card does not pop out and
drop.
Dubbing or copying movies and photos from the interna! recording mediato memory card (DCR,SR68iSR88/SX44iSX63)
Touch _ (MENU)_ [sh0W otherS] _ [MOVIE DUB]/[PHOTO COPY[ (Under _
[EDIT] category), then follow the displays on the screen.

RecordingIn the default setting, movies are recorded on the following recording media.
DCR-SX43: Memory card
DCR-SX44/SX63: Internal memory
DCR-SR68/SR88: Internal hard disk
_Tips
• See page 20 on changing the recording media (DCR-SR68/SR88/SX44/SX63).
To open the lens cover
Slide the LENS COVER switch to open.
DCR-SR68/SR88 DCR- SX43/SX44/SX63
_Tips
• When you finish recording or when you play back images, close the lens cover.
Fasten the grip belt.
DCR-SR68/SR88
g37,
_3
DCR-SX43/SX44/SX63
Open the LCD screen of your camcorder.
Your camcorder turns Oll.
• To turn on your camcorder when the LCD screen is already open, press POWER (p. 18).
• 5_u can switch recording modes by pressing MODE. Press MODE to light up the desired recording
mode lamp.
DCR-SR68/SR88
MODE button
................................................................................................ RZII(movie): When
eco ing.movieI_1 (Photo): When
shooting a photo
DCR-SX43/SX44/SX63
I MODE button
GL o0
_ (Movie): When::: 7o:m2shooting a photo

Press START/STOP to start recording.
• _u can start recording also by touching • in the bottom left of the LCD screen.
DCR-SR68/SR88 DCR-SX43/SX44/SX63
START/STOP button
[STBY] --_ [REC]
To stop recording, press START/STOP again.• 5fbu can stop recording also by touching • in the bottom left of LCD screen.
• The icons and indicators on the LCD panel will be displayed fbr about 3 seconds, then disappear after
turning on your camcorder or switching the recording (movie/photo)/playback modes. To display the
icons and indicators again, touch an3_vhere on the screen except the rec & zoom buttons on the LCD.
Rec & zoom buttons on LCD
[{_o_1 _about 3sec
{ J after
{_ Notes
• If you close the LCD screen while recording movies, the camcorder stops recording.• The maximum continuous recordable time of movies is about 13 hours.
• When a movie file exceeds 2 GB, the next movie file is created automaticall3c
• It will take several seconds until you can start recording after you turn on the camcorder. _bu cannot
operate your camcorder during this time.
_5

• The fbllowing states will be indicated if data is still being written onto the recording media after recording
has finished. During this time, do not apply shock or vibration to the camcorder, or remove the battery or
AC Adaptor.
- Access lamp (p. 22) is lit or flashing
- The media icon in the upper right of the LCD screen is flashing
_Tips
• When a *;aceis detected, a white f)came appears and the image quality around the fhce is optimized
automatically ([FACE DETECTION]).
• _bu can capture photos f)comrecorded movies.
• gee page 64 on the recordable time of movies.
• _bu can check the recordable time, estimated remaining capacity, etc., by touching _ (MENU)
[Show others] _ [MEDIA INFO] (under _'_} [MANAGE MEDIA] category).
• The LCD screen of your camcorder can display recording images across the entire screen (lull pixel
display). However, this may cause slight trimming of the top, bottom, right and left edges of images when
played back on a TV which is not compatible with full pixel displa?_ In this case, set [GUIDEFRAME] to
[ON], and record images using the outer fi'ame displayed on the screen as a guide.
• [ItzltSTEADYSHOT] is set to [ON] in the deflmlt setting.
• To adjust the angle of the LCD panel, first open the LCD panel 90 degrees to the camcorder (@), and
then adjust the angle ((_)).
@ 90 degrees (m_.c,:.) _(_ ! ....@ 180 degrees (rmux.) _al-- ......................... (_) 90 degrees to
the camcorder
Data code during recording
The recording date, time and condition are recorded automatically on the recording media.
They are not displayed during recording. Howew.r, you can check them as [DATA CODE]
during playback. To display them, touch _ (MENU) ---+ [Show others] ---+ [PLAYBACK
SET] (under I_} [PLAYBACK] category) ---+a desired setting ---+_ ---+ _ ---+ B_l
In the default setting, photos are recorded on the tbllowing recording media.
DCR-SX43: Memory card
DCR-SX44/SX63: Internal memory
DCR-SR68/SR88: Internal hard disk
_Tips
• See page 20 on changing the recording media (DCR-SR68/SR88/SX44/SX63).
2;

Press MODE to turn on the O (Photo) lamp.
The LCD screen display switches for photo recording mode, and the screen aspect ratiobecomes 4:3.
Press PHOTO lightly to adjust the focus, then press it fully.
• _!\ntcan record photos alsoby touching _ on the LCD screen.
DCR-SR68/SR88 DCR-SX43/SX44/SX63
Flashes ---+ Lights up
WhenIIIIIIIIdisappears, the photo is recorded.
g3S.
_Tips• To change the image size, touch _ (MENU) _ [Show others] _ [_ IMAGE SIZE] (under
[PHOTO SETTINGS] category) _ a desired setting _ | _ _.
• 5_u can check the recordable nmnber of photos on the LCD screen (p. 66).
_7

Playback on !:hecamcorder
In the default setting, movies and photos that are recorded on the following recording media
are played.
DCR-SX43: Memory card
DCR-SX44/SX63: Internal memory
DCR-SR68/SR88: Internal hard disk
_Tips• See page 20on changing the recording media (DCR-SR68/SR88/SX44/SX63).
Open the LCDscreen of your camcorder.
Your camcorder turns on,
• To tt*rnon }Tourcamcorder when the LCD screen is alreadyopen, press PO\VER(p. 18).
Pressl-_'l(VlEW IMAGES).
r;q
The VISUAL INDEX screen appears after some seconds.• _u can display the VISUAL INDEX screen also by touching _ (VIE\V IMAGES) on the LCD
screen.
Touch _ll (Movie) ((_) --_ a desired movie ((]_)) to play back a movie.Touch the I_ (Photo) ((_) --_ a desired photo ((]_)) to view a photo.
Movies are displayed and sorted by recording date.
[
[] Switchesoperating button display.[] To MENU screen

[] Displays the screen to select the index type ([DATE INDEX]/[ LmFILM ROLL]/
[[] FACE] ).
[] _1_ : Displays movies recorded on the previous/next date. _
[] U/_ : Displays the previous/next movie.
[] Returns to the recording screen.
_D_is displayed when FA_is touched.
• _\}u can scroll the display by touching and dragging FD_or _E_.
• 11_1appears with the movie or photo that was most recently played or recorded. If you touch the
movie or photo with 11_1,you can continue playback ficom the previous time. (1_ appears on the
photo recorded on a memory card.)
Playing movies
Your camcorder starts playing the selected movie.
Volume adj ustment - _
Previous -
To stop -
To fast-reverse
_1 Next
_ OPTIONTo fast-_brward
To pause/play
_Tips
• When playback fl'om the selected movie reaches the last movie, the screen returns to the VISUAL INDEXscreen.
• Touch I_'_11/! during pause to play back movies slowly.
• As you repeat touching I_"_11/! during playback, movies are played as fhst as about 5 timesabout 10 times _ about 30 tittles _ about 60 times.
• 5_u can display the VISUAL INDEX by touching _ (MENU) _ [Show others] _ [VISUAL
INDEX] (under _ [PLAYBACK] category).
• The recording date, tittle, and shooting conditions are recorded automatically during recording. This
infbrmation is not displayed during recording, but you can display it during playback bv touching |
(MENU) _ IS1...... thers] _ [PLAYBACK SET] {under _ [PLAYBACK] ca{egory) '+ [DATA
CODE] --' a desired setting _ _ _ _ _ minim.
To adjust the sound volume of movies
While playing back movies, touch | ---+adjust with I_'_m/ml_ll ___+I1_!1• 5_u can also adjust the sound volume by using _/l_JI in the OPTION MENU.
g8S.
_9

Viewing photos
Yourcamcorder displays the selected photo.
Previous To start/stop slide show
Igl 1, >oo14 NextTo the VISUAL - _ _ ii] ', _ j OPTION
INDEX screen
_Tips
• When viewing photos recorded on a memory card, _ _ (playback tblder) appears on the screen.
3;
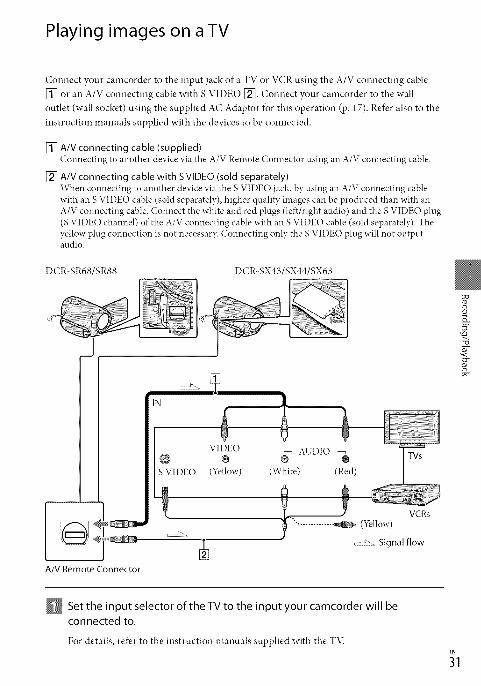
Playing images on a TV
Connect your camcorder to the input jack ofa TV or VCR using the A/V connecting cable
[] or an A/V connecting cable with S VIDE() []_]. Connect your camcorder to the wall
outlet (wall socket) using the supplied AC Adaptor for this operation (p. 17). Ref'er also to the
instruction manuals supplied with the devices to be connected.
[] A/V connecting cable (supplied)
Connecting to another device via the A/V Remote Connector using an A/V connecting cable.
[] A/V connecting cable with S VIDEO (sold separately)When connecting to another device via the S VIDEO jack, by using an A/V connecting cable
with an S VIDEO cable (sold separately), higher quality images can be produced than with an
A/V connecting cable. Connect the white and red plugs (left/right audio) and the S VIDE() plug(S VIDEO channel) of the A/V connecting cable with an S VIDEO cable (sold separately). The
yellow plug connection is not necessar_c Connecting only the S VIDEO plug will not outputaudio.
DCR-SR68/SR88
_0_
A/V Remote Connector
DCR-SX43/SX44/SX63
VID_EO _ AUDIO
@ ÷ ® ®IDEO (Yellow) (White) (Red)
TVs
VCRs
"............. _ (Yellow)
, _ Signal flow
g8S.
Set the input selector of the TV to the input your camcorder will beconnected to.
For details, retbr to the instruction manuals supplied with the TV.

Connect your camcorder to a TV with the A/V connecting cable ([_,supplied) or an A/V connecting cable with S VIDEO ([], sold separately).
Connect your camcorder to the input jack of the TV.
Play back movies and photos on your camcorder (p. 28).
To set the aspect ratio according to the connected TV (16:9/4:3)
Touch _ (MENU) ---+ [Show others] ---+ [OUTPUT SETTINGS] (under 4_ [GENERAL
SET] category) ---+ [TV TYPE] ---+ [16:9] or [4:3] ---+_ ---+ _ ---+ _.
When connecting to yourTV via a VCR
Connect ),our camcorder to the LINE IN input on the VCR using the A/V connecting cable.
Set the input selector on the VCR to LINE (VIDEO 1, VIDEO 2, etc.).
When yourTV is monaural (When yourTV has only one audio input jack)
Connect the yellow plug of the A/V connecting cable to the video input jack and connect the
white (left channel) or red (right channel) plug to the audio input jack of your TV or VCR.
O Notes
• When you connect your camcorder to a TV compatible with the ID 1/ID 2 system, set [TV TYPE] to
[ 16:9]. The TV switches to full mode automatically. Re*br also to the instruction manuals supplied with
your T'vi
• When you set [TV TYPEI to [4:3], the image quality may deteriorate. Also, when the recorded image's
aspect ratio switches between 16:9 (wide) and 4:3, the image may jitter.
• On some 4:3 TVs, the photos recorded in 4:3 aspect ratio may not be displayed fidl screen. This is not amalfimction.
T• When )Tot* playback an image recorded in 16:9 (wide) aspect ratio on a 4:3 T'_ not compatible with the
16:9(wide) signal, set [TV TYPE] to [4:3].

_Tips
• To check infbrmation (counter, etc.) on the screen of the monitor, touch _ (MENU) _ [Show
othersl _ [OUTPUT SETTINGS] (under _ [GENERAL SET] category) _" [DISP OUTPUT]
[V-OUT/PANELI --' _ --_ _ --_ _'_.
g3S.
_3
Deleting movies and
photos
You can free media space by deleting
movies and photos from recording media.
O Notes
• _u cannot restore images once they are
deleted. Save important movies and photos inadvance.
• Do not remove the battery pack or the AC
Adaptor from your camcorder while deleting
the images. It may damage the recording media.
• Do not eject memory card while deleting
images f)comthe memory card.
• 5_u cannot delete protected movies and photos.
Undo the protection of the movies and photos
to delete them, beIbre you try to delete them.
• If the deleted movie is included in the Playlist,
the movie added to the Playlist is deleted also
from the Playlist.
_Tips
• 5_u can delete an image on the playback screenfrom El OPTION MENU.
• Tu delete all images recorded in the recording
media, and recover all the recordable space ofthe media, fbrmat the media.
• Reduced-size images which enable you to view
many images at the same time on an indexscreen are called "thumbnails2
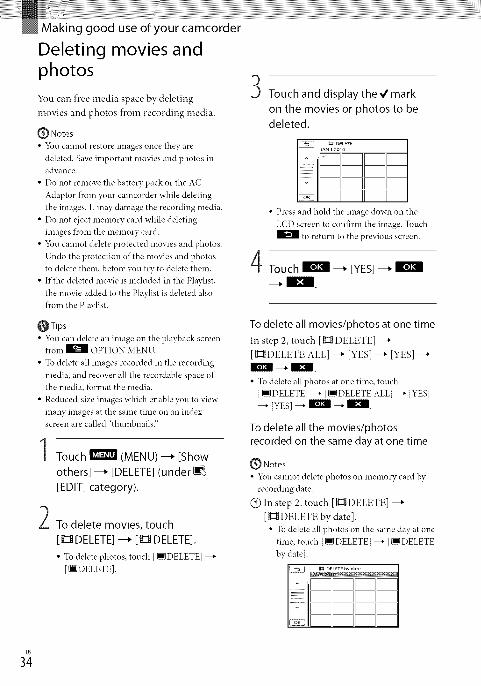
1 Touch _ (MENU) --_ [Showothers] --_ [DELETE](under _
[EDIT] category).
To delete movies, touch
[1t_ DELETE] --_ [g::ltDELETE].
• Tu delete photos, touch [ _DELETE] _"
[_DELETE].
Touch and display the 4 mark
on the movies or photos to be
deleted.
• Press and hold the image down on the
LCD screen to confirm the image. Touch
to return to the previous screen.
Touch _ --_ EYES]--_
--_.
To delete all movies/photos at one time
In step 2, touch [ _ DELETE] ---+
[ g:::ItDELETE ALL] ---+ [YES] ---+ [YES] ---+
• Tu delete all photos at one time, touch
[_DELETE] _" [_DELETE ALL] _" [YES]--' [YES] --' _ --' |.
To delete all the movies/photosrecorded on the same day at one time
{_ Notes
• _\m cannot delete photos on memory card by
recording date.
(Z) In step 2, touch [ 11211DELETE] ---+
[ _ DELETE by date].
• Tu delete all photos on the same day at one
time, touch [_DELETE] _ [_DELETE
by date].

@ Touch _/_ to select the recording
date of the desired movies/photos, thentouch _.
• Touch the image down on the LCD screento confirm tile image.Touch _ to
return to the previous screen.
@ Touch [YES] ---+ E! ---+_'_.
_:57.
3S.
_5

Preparing a computer
(Windows)
3;
You can perfbrm following operations using
"PMB (Picture Motion Browser)."
-hnporting images to a computer
-Viewing and editing imported images
-Creating a disc
-Uploading movies and photos to websites
To save movies and photos using a
computer, install "PMB" from the supplied
CD-ROM beforehand.
Q Notes
• Do not tbrmat the media of your camcorder
li"om a computer. _\mr camcorder may not
operate correctly.
• 5_u can create discs using 12 cm discs of
tbllowing type with "PMB2
- DVD-R/DVD+R/DVD+R DL: Unrewritable
- DVD-RW/DVD+RW: Rewritable
Microsoft \,gindows XP SP3×2/\,gindows Vista
SP2_3/\,Vindows 7
Intel Pentium III 1 GHz or faster
DirectX 9.0c or later (This product is basedon DirectX technolog,_: It is necessary to haveDirectX installed.)
256 MB or more
Other system requirements fbr OS shouldbe met.
Disk volume required fbr installation:
Approximately 500 MB (5 GB or more maybe necessary when creating DVD discs.)
iiMinimunl 1,024 x 768 dots
_ Standard installation is required. Operation is
not assured if the OS has been upgraded or in amulti boot environment.
_264 bit editions and Starter (Edition) are not
supported. Windows Image Mastering API
(IMAPI) Ver.2.0 or newer is required to use disccreation function, etc.
_3Starter (Edition) is not supported.
_4Faster processor is recommended.
(_ Notes
• Operation with all computer environments isnot assured.
When using a Macintosh
The supplied software "PMB" is not
supported by Macintosh computers.
To process photos using a Macintosh
computer connected to your camcorder,
see the following website.
http:D guide.d-imaging.sony.co.jp/mac
Ins! US
Install "PMB" before connecting your
camcorder to a computer.
_ Notes• Ifa version of"PMB" under 5.0.00 has been
installed on your computer, you can start all
applications li"om "PMB Launcher" by installing
"PMB" firom the supplied CD ROM. Double-click the "PMB Launcher" short cut icon on the
computer screen to start "PMB Launcher;'• Ifa version of"PMB" under 5.0.00 has been
installed on your computer, you maybe unableto use some functions of those "PMB':

Confirm that your camcorder isnot connected to the computer.
Turn on the computer.
• Logon as an Administrator Ibrinstallation.
• Close all applications running on the
computer bdore installing the software.
then click [Next] --_ [Install].
Turn on your camcorder, thenconnect the camcorder to the
computer using the supplied USBcable.
Place the supplied CD-ROM in
the disc drive of your computer.
The installation screen appears.
• If the screen does not appear, click
[Start] _ [Computer] (in Windows
XR [My Computer]), then double-click
[SONYPMB (E:)] (CD ROM) _.
×Drive names (such as (E:)) may vary
depending on the computer.
Click [Install].
Select the country or region.
Select the language for theapplication to be installed, then
proceed to the next screen.
Read the terms of the license
agreement carefully. If you agreeto the terms, change @ to _, and
The [USB SELECT] screen appears on
the camcorder screen automatically.
N Touch the one of the media types
displayed on the screen to make
the computer recognize yourcamcorder.
[ O USB CONNECT]: Internal hard
disk (DCR-SR68/SR88)
[ l_ USB CONNECT]: Internal
memory (DCR-SX44/SX63)
[_USB CONNECT]: Memory card
• The displayed recording media difi%r
depending on the model.
• If the [USB SELECT] screen does not
appear, touch _ (MENU) _ [Showothers] _ [USB CONNECT] (under :'_'}
[OTHERS] category).
Click [Continue] on the computerscreen.
Follow the on-screen instructionsto install the software.
• Depelrdilrgon the computer,you mayneed to install third part}, software.If
<.
<o
o_
o
8
S"u
_7

the installation screen appears, lbllow
the instructions to install the requiredso_tware.
• Restart the computer if required to
complete the installation.
• Connect the camcorder to the computer
during the installation.
When the installation is completed,
following icons will appear.
Remow, the CD-ROM from your
computer.
_: Starts "PMB ?'
_: Displays PMB Help.
g?: Displays "PMB Launcher." "PMB
Launcher" enables you to start "PMB"
or other software, or to open web sites.
• Other icons may appear.
• No icon may appear depending on the
installation procedure.
(_ Notes• To create discs or use other fimctions on
Windows XR hnage Mastering API v2.0 *br
Windows XP should be installed. If Image
Mastering API v2.0 fbr Windows XP has not
been installed yet, select it ficom required
programs on the installation screen and install
it *bllowing the procedures displayed. (The
computer nmst be connected to the internet
fbr the installation.) 5_u may install huage
Mastering API v2.0 fbr Windows XP in
response to the message displayed when you tryto start those functions.
To disconnect your camcorder from the
computer
@ (;lick the @_ icon at the bottom right of the
desktop of the computer _" [Safely remove
USB Mass Storage Device].
@ Touch [END] _ [YES] on the camcorder
screen.
@ Disconnect the USB cable.
(_ Notes
• Access fl'om the computer using the supplied
software "PMB2 Do not modit_ the files or
folders on the camcorder ficom the computer.
The image files may be destroyed or may not be
played back.
• Operation is not guaranteed, if you per*brm the
above operation.
• When you delete image files, f___llowthe steps
on page 34. Do not delete the image files on the
camcorder directly fl'om the computer.
• Do not copy the files on the recording
media ficom the computer. Operation is not
guaranteed.

Starting PMB (Picture
Motion Browser)
Double-click the "PMB" short-cut icon Oll
the computer screen.
{_ Notes• Ifthe icon is not displayedon the computer
screen,click [Start] _ jail Programs][g;_PMB] to start "PMB?
You can view, edit, or create discs of movies
and photos using "PMB"
For details on how to use "PMB_' read the
"PMB Help,' Double-click the "PMB Help"
short-cut icon on the computer screen to
open the "PMB Help,'
{_ Notes
• If the icon is not displayed on the computer
screen, click [Start] _ jail Programs]
[PMB] _ [PMB Help]. xL\mcan also open the
"PMB Help" ficom [Help] of"PMB2
Creating a disc withone touch
(OneTouch Disc Burn)
Movies and photos recorded on your
camcorder that haw, not yet been saw, d
with One Touch Disc Burn function can be
saw, d on a disc automatically.
• Install "PMB" belbrehand (p. 36), however, donot start "PMB2
• Connect your camcorder to the wall outlet (wall
socket) using the AC Adaptor supplied fbr this
operation (p. 17).
• With One Touch Disc Burn function on your
camcorder, you can save movies and photos
recorded on the internal recording media only(DCR-SR68/SR88/SX44/SX63).
Turn on your computer, and place
an unused disc on the DVD drive.
• See page 36 lor the type of'discs you calluse.
• If any other software than "PMB" starts
automaticall> shut it down.
Turn on your camcorder, then
connect the camcorder to the
computer using the supplied USB
cable.
Press *_(DISC BURN).
<.g_
o<
o_
o
_g
3"u
_9

Follow the instructions on the
computer screen.
Q Notes
• Movies and photos are not saved on the
computer when ?Tot*perfbrm One Touch DiscBurn.
Importing movies andphotos to a computer
Movies and photos recorded on your
camcorder can be imported to a computer.
Turn on the computer beforehand.
(_ Notes
• Colmect your calncorder to the wall outlet (wall
socket) using the supplied AC Adaptor *brthis
operation (p. 17).
Turn on your camcorder, then
connect the camcorder to the
computer using the supplied USB
cable.
2
The [USB SELECT] screen appears onthe camcorder screen.
Touch the recording media that
contains the images you want tosave on the camcorder screen.
[O USB CONNECT]: Internal hard
disk
[_) USB CONNECT]: Internal
memory[_ USB CONNECT]: Memory card
• The displayed recording media differdepending on the model.
• If the [USBSELECT]screen does notappear, touch _ (MENU) _ [Showothers] _ [USBCONNECT] (under
[OTHERS]category).
The [hnport] window appears on the
computer screen.
4;

Creating a disc
3 Click [Import].
• Ref_.'rto "PMB Help" (p. 39) for details.
>;>;
Movies and photos are imported to
your computer.
When the operation is completed, the
"PMB" screen appears.
You can create a disc by selecting movies
previously imported to your computer
(p.40).
Turn on your computer, and place
an unused disc on the DVDdrive.
• See page 36 *br the type of discs you can
use.
• If any other software than "PMB" starts
automatically, shut it down.
Start"PMg"(p. 39).
Click [Calendar] or [Index] on
the left side in the window, and
select the folder or date, then
select the movies.
• To select plural movies, hold the Ctrl keydown and click thumbnails.
<.At the top of the window, click
_--_ [Create DVD-Video Format
Discs (STD)]. _.
The window used to select moviesD_
appears. _3_• To add movies to the previously selected 09,
ones, select the movies in the main o
window and drag and drop onto the -_._q-
window fbr selecting movies.
S-¢j

5 Follow the instructions on the
screen to create a disc.
• It may take a long time to create a disc.
You can copy a recorde d disc to another
disc using _'Video Disc CoPier;!
Click [Start] _[All programs]
[PMB] _[PMB Launcher] _ [Disc
creatio n] _ [Video Disc Copie r] m start
the software: See _WideoDisc C0Pier"
helpon the operation:
Editing movie s
You can cut out 0nly necessary partsfrom a movie and save it as another file.
Double-c!ick the movie to be edited on
"pMB," then click [Show Edit palette]
on the right side of the screen _[Tri m
Video], or select the [Manipulate] menu
_ [Edit] _[Tri m Video]! See "pM BHelp'! (p. 39) for details.
Capturing photos from a movie
You can save a frame of a movie as a
photo file.Double-click the movie to be edited on
"PMB." then click [Show Edit Palette]
on the right side of the screen --+ [Save
Frame]. See "PMB Help" (p. 39) fordetails,

Saving images inexternal media
(DIRECT COPY)
You can save movies and photos on external
media (USB storage device), such as an
external hard disk driw,. You can also play
back images on the camcorder or another
playback device.
{_ Notes
• For this operation, you need the USB Adaptor
Cable VMC-UAMI (sold separately).
• The USB Adaptor Cable VMC UAM1 may not
be available in some countries/regions.
• _u cannot use the following devices as an
external media.
- media wi_h a capacity exceeding 2 TB
- ordinary disc drive such as CD or DVD drive- media connected via USB hub
- media with builtqn USB hub
- card reader
• h_u may not be able to use external media witha code function.
• FAT file system is available Ibr your camcorder.If the external media was f___rmattedto NTFS
file system, etc., fbrmat the external media on
},our camcorder befbre use. The Ibrmat screen
appears when the external media is connected
to },our camcorder.
• Operation is not assured with every connectabledevice.
• Connect your camcorder to the wall outlet (wall
socket) using the supplied AC adaptor (p. 17).
• Refi.'r to the instruction manual supplied with
the external media.
• Refi.'r to the Sony support page for your
country/region for details on external mediathat can be used.
1Connect the AC Adaptor and the
power cord (mains lead) to the
DC IN jack of your camcorder andthe wall outlet (wall socket).
2
3
4
5
If the external media has the AC
power cable, connect it to the
wall outlet (wall socket).
Connect the USB Adaptor Cable
to the external media.
Connect the USB Adaptor Cable
to the _ (USB) jack of your
camcorder.
When the [Create a new hnage
Database File.] screen appears, touch
[YES].
Touch [Copy.] on the camcorder
screen.
DCR- SR68/SR88/SX44/SX63:
Movies and photos in the internal
recording media of the camcorder that
haw, not yet been saw,d on to externalmedia can be saved.
DCR-SX43:
Movies and photos in the camcorder
that haw, not yet been saved on to
external media can be saved,
.%
(D
_3
• This screen will appear only when there
are newly recorded images.
After the operation is completed,touch _ on the camcorder
screen.
Notes
• The number of scenes you can save on theexternal media are as fbllows.
Movies: 9,999
Photos: 9,999 f)cames x 899 fblders
The number of scenes may be smaller
depending on the type of images recorded.
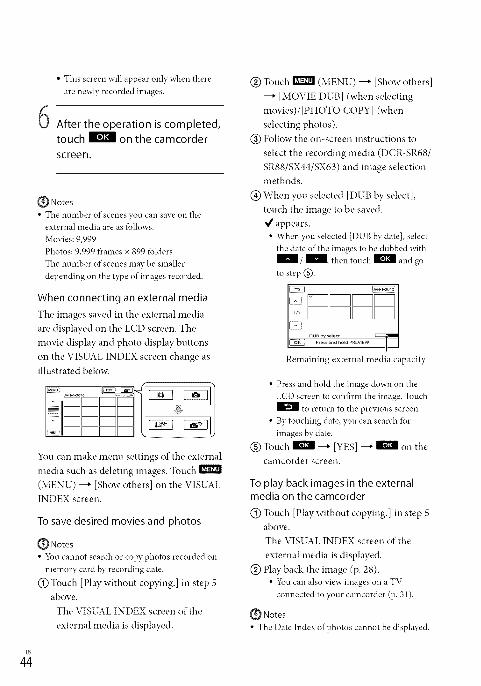
When connecting an external media
The images saved in the external media
are displayed on the LCD screen. The
movie display and photo display buttons
on the VISUAL INDEX screen change as
illustrated below.
You can make menu settings of the external
media such as deleting images. Touch !
(MENU) ---+ [Show others] on the VISUAL
INDEX screen.
To save desired movies and photos
_) Notes• 5_u cannot search or copy photos recorded on
memory card by recording date.
(_) Touch [Play without copying.] in step 5abow'.
The VISUAL INDEX screen of the
external media is displayed.
@ Touch _ (MENU) ---+ [Show others]
---+ [MOVIE DUB] (when selecting
movies)/[PHOTO COPY] (when
selecting photos).
@ Follow the on-screen instructions to
select the recording media (DCR-SR68/
SR88/SX44/SX63) and image selectionmethods.
@ When you selected [DUB by select],
touch the image to be saw,&
appears.• When you selected [DUB by date], select
the date of the imagesto be dubbed with/ _, then touch _ and go
to step@.
Remaining external media capacity
• Press and hold the image down on the
LCD screen to confirm the image. Touch
to return to the previous screen.
• By touching date, you can search for
images by date.
@ Touch _'_ ---+ [YES] ---+ _ on the
camcorder screen.
To play back images in the externalmedia on the camcorder
(_) Touch [Play without copying.] in step 5abow,.
The VISUAL INDEX screen of the
external media is displayed.
@ Play back the image (p. 28).• 5f\mcan alsoview images on a TV
connected to your camcorder (p. 31).
(_ Notes• The DateIndex of photos cannot be displayed.
• If your camcorder does not recognize the
external media, try the *bllowing operations.
- Reconnect the USB Adaptor Cable to yourcamcorder
- If the external media has the AC power cable,
connect it to the wall outlet (wall socket)
To finish the external media connection
(_) Touch I!_ on the VISUAL INDEX
screen of the external media.
@ Disconnect the USB Adaptor Cable.
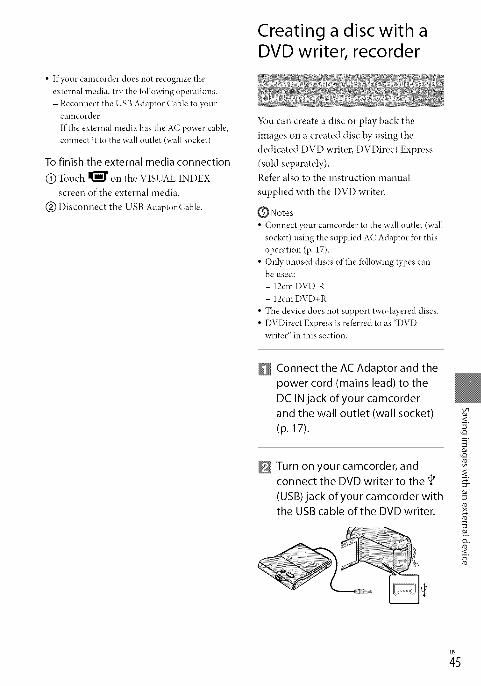
Creating a disc with aDVD writer, recorder
You can create a disc or play back the
images on a created disc by using the
dedicated DVD writer, DVDirect Express
(sold separately).
Refk, r also to the instruction manual
supplied with the DVD writer.
_ Notes
• Connect your camcorder to the wall outlet (wall
socket) using the supplied AC Adaptor fbr this
operation (p. 17).
• Only unused discs of the *bllowing types canbe used:
- 12cm DVD R
- 12cm DVD+R
• The device does not support two layered discs.
• DVDirect Express is referred to as "DVDwriter" in this section.
Connect the AC Adaptor and thepower cord (mains lead) to the
DC IN jack of your camcorder
and the wall outlet (wall socket)
(p. 17).
Turn on your camcorder, andconnect the DVD writer to the
(USB) jack of your camcorder withthe USB cable of the DVD writer.
<.vo
vo
.¢
<.
_5
H
Insert an unused disc into the
DVD writer, and close the disc
tray.
The [DIS(: BURN] screen appears Oll
the camcorder screen.
Press _ (DISC BURN) on the DVD
writer.
Movies recorded Oll the internal
recording media that haw, not been
saw, d on aW discs will be recorded
onto the disc (DCR-SR68/SR88/SX44/
SX63).Movies that have not been saw,d on
any discs will be recorded onto the disc
(DCR-SX43).
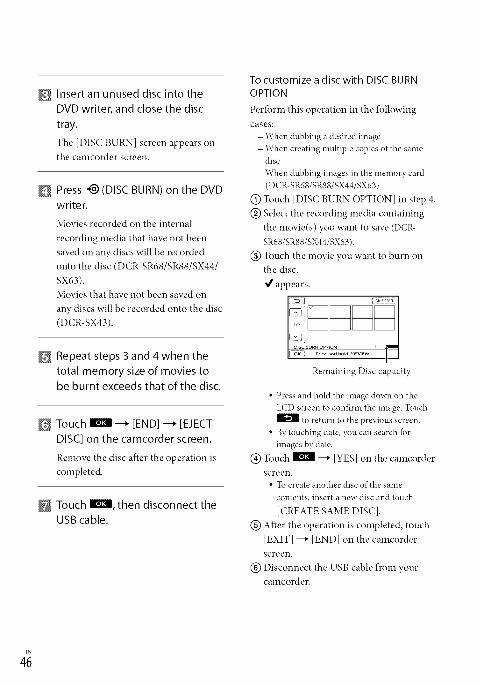
To customize a disc with DISC BURN
OPTION
Perfbrm this operation in the following
cases:- When dubbing a desired image- When creating multiple copies of the same
disc
- When dubbing images in the memory card(DCR-SR68/SR88/SK44/SX63)
(_) Touch [DISC BURN OPTION] in step 4.
@ Select the recording media containing
the movie(s) you want to saw, (DCR-
SR68/SR88/SX44/SX63).
@ Touch the movie you want to burn onthe disc.
4 appears,
D
Repeat steps 3 and 4 when the
total memory size of movies to
be burnt exceeds that of the disc.
Touch IE! --_ [END] --_ [EJECT
DISC] on the camcorder screen.
Remow, the disc after the operation is
completed.
Touch IEl, then disconnect theUSB cable.
Remaining Disc capacity
• Press and hold the image down on the
LCD screen to confirm the image. Touch
to rett*rn to the previous screen.
• By touching date, you can search for
images by date.
@ Touch _ ---+ [YES] on the camcorder
screen.• To create another disc of the same
contents, insert a new disc and touch
[CREATE SAME DISC].
@ After the operation is completed, touch
[EXIT] ---+ [END] on the camcorder
screen.
(_) Disconnect the USB cable from your
camcorder.

To play backa disc on the DVD writer
(Z) Connect the AC Adaptor and the power
cord (mains lead) to the DC IN jack of
your camcorder and the wall outlet (wall
socket) (p. 17).
@ Turn on your camcorder, and connect
the DVD writer to the _ (USB) jack of
your camcorder with the USB cable ofthe DVD writer.
• 5_u can play back movieson the TVscreen by connecting tile camcorder to aTV (p. 31).
@ Insert a created disc into the DVD
writer.
The movies on the disc appear asVISUAL INDEX on the camcorder
screen.
@ Press the play button on the DVD writer,• 5_u can alsooperate by the camcorder
screen.
@Touch [END] ---+ [EJECT DISC] on thecamcorder screen and remow, the disc
after the operation is completed,
@ Touch | and disconnect the USBcable.
_} Notes
• Do not do aW of the *bllowing when creating
a disc.
- Turn off the camcorder
- Disconnect tile USB cable or the AC adaptor
- Subject tile camcorder to mechanical shockor vibration
- Eject the memory card ficom the camcorder
• Play the created disc to make sure dubbing was
pertbrmed correctly befbre deleting the movies
on your canlcorder.
• If [Failed.] or [DISC BURN fhiled.] appears onthe screen, insert another disc into tile DVD
writer and perfbrm the DISC BURN operation
again.
_Tips
• If the total memory size of movies to be burnt
by the DISC BURN operation exceeds that of
the disc, disc creation stops when the limit is
reached. The last movie on the disc maybecut off.
• Disc creation time to dub movies to the limit of
the disc is about 20 to 60 minutes. It may take
more time depending on the recording mode orthe number of scenes.
• If you cannot play back created discs on any
DVD player, connect the camcorder to the
DVD writer, and then play back.
You can saw' movies on a disc by
connecting your camcorder to disc creation
devices, such as a So W DVD writer other
than DVDirect Express, with the USB
cable. Refbr also to the instruction manuals
supplied with the devices to be connected.
(_ Notes
• Sony DVD writer may not be available in some
countries/regions.
• Connect your camcorder to the wall outlet (wall
socket) using the supplied AC Adaptor for this
operation (p. 17).
Connect the AC Adaptor and the
power cord (mains lead) to the
DC IN jack of your camcorderand the wall outlet (wall socket)
(p. 17).
<.
x¢
<.
_7
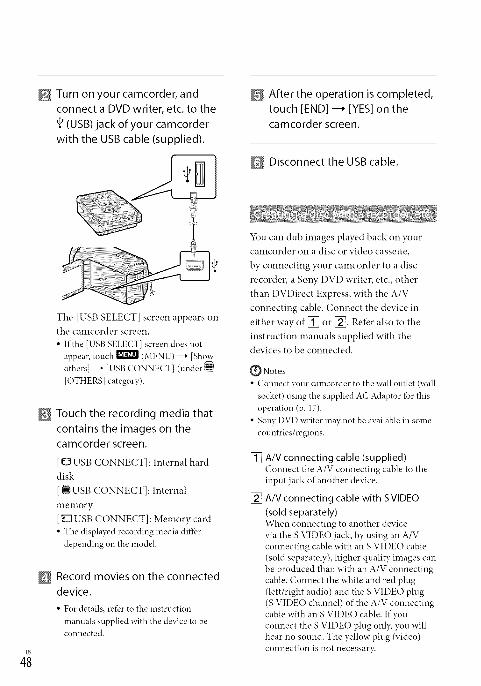
Turn on your camcorder, andconnect a DVD writer, etc. to the
(USB) jack of your camcorder
with the USB cable (supplied).
The [USB SELECT] screen appears on
the camcorder screen.
• If the [USB SELECT] screen does not
appear, touch _ (MENU) _ [Show
others] _ [USB CONNECT] (under _
[OTHERS] category).
N Touch the recording media that
contains the images on thecamcorder screen.
[O USB CONNECT]: Internal hard
disk
[_ USB CONNECT]: Internal
menlory[_USB CONNECT]: Memory card• The displayed recording media diffbr
depending on the model.
Record movies on the connecteddevice.
• For details, ref_.'rto the instruction
manuals supplied with the deviceto beconnected.
After the operation is completed,touch [END] -_ [YES] on the
camcorder screen.
Disconnect the USB cable.
You can dub images played back on your
camcorder on a disc or video cassette,
by connecting your camcorder to a disc
recorder, a SoW DVD writer, etc., other
than DVDirect Express, with the A/V
connecting cable. Connect the device in
either way of [] or _. Retbr also to the
instruction manuals supplied with thedevices to be connected.
{_ Notes
• Connect your camcorder to the wall outlet (wall
socket) using the supplied AC Adaptor lbr this
operation (p. 17).
• SoW DVD writer may not be availahle in some
countries/regions.
[]
[]
A/V connecting cable (supplied)
Connect the A/V connecting cahle to theinput jack of another device.
A/V connecting cable with S VIDEO
(sold separately)
When connecting to another devicevia the S VIDE() jack, by using an A/V
connecting cable with an S VIDEO cable(sold separately), higher quality images can
be produced than with an A/V connectingcable. Connect the white and red plug
(left/right audio) and the S VIDEO plug(S VIDEO channel) of the A/V connecting
cable with an S VIDEO cable. If youconnect the S VIDEO plug only, you will
hear no sound. The yellow plug (video)
connection is not necessar,_:

A/V Remote Connector
DCR-SX43/SX44/SX63
A/V Remote Connector
Input
s VIDEO
VIDEO
N]-- ®4(Yellow)
(\Vhite)
> V®<_AUI)IO
(Red)('_Mlow)
,--_'-- Signal flow
Insert the recording media in the
recording device.
• If your recording device has an input
selector, set it to the input mode.
Connect your camcorder to therecording device (a disc recorder,
etc.) with the A/V connecting
cable [] (supplied) or an A/V
connecting cable with SVlDEO
[] (sold separately).
• Connect your camcorder to the input jacksof the recording device.
Start playback on yourcamcorder, and record it on the
recording device.
• Reibrto the instruction manuals suppliedwith your recording device lbr details.
When dubbing is finished, stop
the recording device, and then
your camcorder.
Notes
• Since dubbing is perfornred via analog data<.
transfer, the image quality may deteriorate.
• To hide the screen indicators (such as a counter, _"etc.) on the screen of the nronitor device <oconnected, touch _I_ (MENU) _ [Show
others] _ [OUTPUT SETTINGS] (under
'_ [GENERAL SET] category) _ [DISPOUTPUT] _ [LCD PANEL] (the defimlt
setting) _* _ _ _ _ _. x
• To record the date/tinre or camera settings data,touch _ (MENU) _ [Show others] _[PLAYBACK SET] (under _ [PLAYBACK] _-
category) _ [DATA CODE] --* a desired
setting _ | --+ _ _ _. In
addition, touch _ (MENU) _ [Show
others] _ [OUTPUT SETTINGS] (under
_ [GENERAL SET] category) _ [DISPOUTPUT] _ IV OUT/PANEL] _ _
|-,|.
_9

• When the screen size of display devices (TV,
etc.) is 4:3, touch _ (MENU) _ [Show
others] _ [OUTPUT SETTINGSI (under <_
[GENERAL SETI category) _ [TV TYPEI[4:3[ --' _ --' _--_ --' _'_.
• When you connect a monaural device, connect
the yellow plug of the A/V connecting cable
to the video input jack, and the white (left
channel) or the red (right channel) plug to the
audio input jack on the device.

Using menus
Using the menus, you can perform useful functions and change various settings. If you make
good use of menu operations, you can enjoy using your camcorder.
The camcorder has various menu items under each of eight menu categories.
MANUAL SETTINGS (Items to adjust for scene condition) --* p. 54
SHOOTING SET (Items for customized shooting) --* p. 54
PHOTO SETTINGS (Items for recording photos) --* p. 54
PLAYBACK (Items for playback) --* p. 54
EDIT (Items for editing) --* p. 55
OTHERS (Items for other settings) --* p. 55
MANAGE MEDIA (Items for recording media) --* p. SS
@%GENERAL SET (Other setup items) --* p. 56
• Menu items are described in more details in the "Handycam" Handbook.
/ l_ : The menu list mow, s from category to category.
/ _ : The menu list mow, s through 4 items at once.
• _\m can touch buttons and drag the screen to scroll the list of the menu.
• The selected category icon is displayed in orange.• _\m can return to the MY MENU screen by touching [_ when displayed.
(_) Touch I'_r_
@ Touch [Show others] on the MY MENU screen.
• See the next page*brdetails on MY MENU.
@ Touch the central part in the left side of screen to change the display.
@ Touch the menu item to be changed.
@ After changing the setting, touch I'll
To finish setting the nlenu, touch _.
To return to the previous nlenu screen, touch
• _ may not be displayed depending on the menu item.
3
¢D

Q Notes
• 5_u may not be able to set some menu items, depending on the recording or playback conditions.
• Grayed out menu items or settings are not available.
OTips
• Depending on the menu items being changed, },our camcorder switches between playback mode and
recording mode (movie/photo).
You can use the menu items more easily by registering the menu items you use most often on
MY MENU. You can register 6 menu items on each MY MENU of the MOVIE, PHOTO, and
PLAYBACK.
Example: deleting [SPOT MTR/FCS] and registering [_ FADER]
j: ..................
@ Touch |.
@ Touch [MY MENU SETTING].
@ Touch ]MOVIE].
@ Touch [SPOT MTR/FCS].
@ Touch 11'0!1.
@ Touch [g::llFADER] (under @ [MANUAL SETTINGS] category).
@When MY MENU is displayed, touch |.
Repeat the same steps abow, to register menu items on MY MENU, and enjoy using your
"Handycam"
OTips
• When an external storage device is connected, the exclusive MY MENU appears.

The OPTION MENU appears just like the pop-up window that appears when you right-click
the mouse on a computer. \_Then _ is displayed at bottom-right of the screen, you call use
the OPTION MENU. You touch _, and the menu items you call change ill the context
appear. Menu itenl
ITab
(_) Touch _ (OPTION).
@ Touch the desired tab ---+ the item to change the setting.
@ After completing the setting, touch I_/_
(_ Notes
• Grayed out menu items or settings are not available.
• When the item you want is not on the screen, touch another tab. (There may be no tab.)
• The tabs and items that appear on the screen depend on the recording/playback status of your camcorderat the time.
©
5"
3B_
_3

(MANUAL SETTINGS) category
SCENESELECTION..................Selects an appropriate recording setting according to the type of scene,such as night view or beach.
g:NFADER....................................Fades scenes in or out.
WHITE BAL.................................Adjusts the color balance to the brightness of the recording environment.
SPOT MTR/FCS .........................Adjusts the brightness and fbcus fbr the selected subject simultaneously.
SPOT METER .............................Adjusts the brightness of images to a subject you touch on the screen.
SPOT FOCUS .............................Focuses on a subject you touch on the screen.
EXPOSURE .................................Adjusts the brightness of movies and photos.
FOCUS.........................................Focuses manually.
TELE MACRO .............................Shoots a subject in focus with, the bacl%round out of fbcus.
[_ (SHOOTING SET) category
g:_REC MODE ...........................Sets the mode to record movies. \\then recording f_st moving subject, ahigh image quality is recommended.
GUIDEFRAME............................Displays the frame to make sure the subject is horizontal or vertical.
gzltSTEADYSHOT......................Sets the SteadyShot hmction when recording movies.
AUTO SLW SHUTTR................Adjusts the shutter speed automaticall?_
FACEDETECTION....................Adjusts the image quality of the Ihce(s) automatically.
AUDIO RECSET
BLT-INZOOM MIC..........Records movies with vivid sound appropriate to the zoom position.
MICREFLEVEL................. Sets the microphone level.
OTHERRECSET
g:NDIGITALZOOM .........Sets the nmxinmm zoom level of the digital zoom that exceeds the zoomlevel of the optical zoom.
g:NWIDESELECT.............Sets the horizontal to vertical ratio when recording movies.
[_ (PHOTO SETTINGS) category
_ SELF-TIMER..........................Sets the self timer when your camcorder is in photo recording mode.
[] IMAGE SIZE..........................Sets the photo size.
FILENO.......................................Sets how to assign the file number.
(PLAYBACK) category
VISUAL INDEX...........................Displays recording images as thumbnails (p. 28).
VIEW IMAGES
DATEINDEX .....................Enables searching _br desired images by date.
FILMROLL..................Displays and plays the scenes by a certain interval.
[] FACE..............................Displays and plays the Ihce scenes.
PLAYLIST.....................................Displays and plays the playlist of movies.
PLAYBACKSET
DATACODE ......................Displays the detailed recording data during playback.
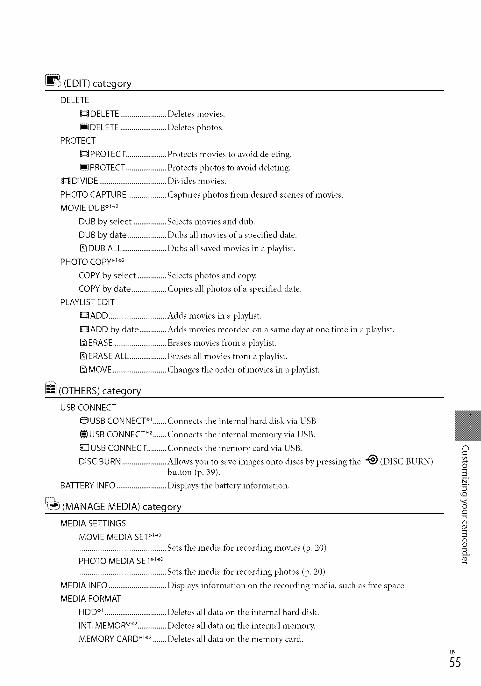
(EDIT) category
DELETE
g_ DELETE ........................ Deletes movies.
[] DELETE ........................ Deletes photos.
PROTECT
g:_ PROTECT ..................... Protects movies to avoid deleting.
[] PROTECT ..................... Protects photos to avoid deleting.
g:NDIVI DE ................................... DMdes movies.
PHOTO CAPTURE .................... Captures photos fl'om desired scenes of movies.
MOVIE DUB X_*2
DUB by select ................. Selects movies and dub.
DUB by date .................... Dubs all movies of a specified date.
DUB ALL ....................... Dubs all saved movies in a playlist.
PHOTO COPY X__.2
COPY by select ............... Selects photos and cop}<
COPY by date .................. Copies all photos of a specified date.
PLAYLIST EDIT
ADD .............................. Adds movies in a playlist.
g:NADD by date .............. Adds movies recorded on a same day at one time in a playlist.
ERASE ........................... Erases movies fl'om a playlist.
ERASE ALL ................... Erases all movies ficom a playlist.
MOVE ............................ Changes the order of movies in a playlist.
(OTHERS) category
USB CONNECT
OUSB CONNECT *_....... ('onnects the internal hard disk via USB
_1 USB CONNECT*2.......Connects the internal memory via USB.
_USB CONNECT .......... Connects the memory card via USB.
DISC BURN ....................... Allows you to save images onto discs by pressing the "_ (DISC BURN)
button (p. 39).
BATTE RY IN FO .......................... Displays the battery infbrmation.
(MANAGE MEDIA) category
MEDIA SETTINGS
MOVIE MEDIA SET _2
............................................. Sets the media fbr recording movies (p. 20).
PHOTO MEDIA SETx_2
............................................. Sets the media fbr recording photos (p. 20).
MEDIA INFO .............................. Displays iniormation on the recording media, such as f]cee space.
MEDIA FORMAT
HDD " ................................ Deletes all data on the internal hard disk.
_2INT. MEMORY " ............... Deletes all data on the internal rnemor)<
2MEMORY CARD* _ ....... Deletes all data on the memory card.
c-3
03
5"Lo
38
¢D
_5
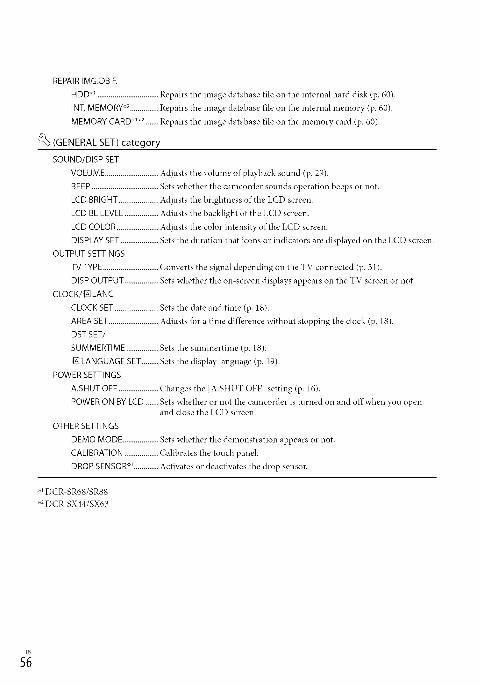
REPAIRIMG.DB F.
HDD×_................................Repairs the image database file on the internal hard disk (p. 60).
INT.MEMORY×2...............Repairs the image database file on the internal memory (p. 60).
MEMORY CARD×_×2.......Repairs the image database file on the memory card (p. 60).
C_ (GENERAL SET) category
SOUND/DISP SET
VOLUME............................Adjusts the volume of playback sound (p. 29).
BEEP...................................Sets whether the camcorder sounds operation beeps or not.
LCD BRIGHT.....................Adjusts the brightness of the LCD screen.
LCD BLLEVEL..................Adjusts the backlight of the LCD screen.
LCD COLOR......................Adjusts the color intensity of the LCD screen.
DISPLAYSET....................Sets the duration that icons or indicators are displayed on the LCD screen.OUTPUT SETTINGS
TV TYPE .............................Converts the signal depending on the TV connected (p. 31).
DISP OUTPUT ..................Sets whether the on screen displays appears on the TV screen or not.
CLOCK/{NLANG
CLOCK SET.......................Sets the date and time (p. 18).
AREA SET..........................Adjusts lbr a time difference without stopping the clock (p. 18).
DSTgET/
SUMMERTIME .................Sets the sumn_ertime (p. 18).
_LANGUAGE gET.........Sets the display language (p. 19).
POWERSETTINGS
A.SHUT OFF .....................('hanges the [A.SHUT OFF] setting (p. 16).
POWER ON BYLCD .......Sets whether or not the camcorder is turned on and offwhen you openand close the LCD screen.
OTHERSETTINGS
DEMO MODE ...................Sets whether the demonstration appears or not.
CALIBRATION..................Calibrates the touch panel.
DROP SENSOW4 .............Activates or deactivates the drop sensor.
×_DCR SR68/SR88
.×2DCR-SX44/SX63
s;

Getting detailedinformation from the
"Handycam" Handbook
The "Handycam" Handbook is a user guide
designed to be read on a computer screen.
The functions of your camcorder are
described, some of them with color photos.
The "Handycam" Handbook is intended to
be read when you want to know more about
operating your camcorder.
To install the"Handycam"
Handbook on a Windows
computer, place the supplied
CD-ROM in the disc drive of your
computer.
On the installation screen
displayed, click [Handycam
Handbook].
To view the "Handycam" Handbook,double-click the short-cut icon Oll the
colnputer screen.
• When using a Macintosh, open the [Handbook]
[US] fblder in the CD ROM, then copy
[Handbook.pdf].
• 5_u need Adobe Reader to read "Handycam"
Handbook. If it is not installed on your
computer, you can download it ficom the Adobe
Systems web page:
http://w_ adob e.com/
• Refbr to "PMB Help" fbr details on the supplied
software "PMB" (p. 39).
Select the desired language
and the model name of your
camcorder, then click [Handycam
Handbook (PDF)].
• The model name of your camcorder is
printed on its bottom surface.
Click [Exit] ---+ [Exit], then remove
the CD-ROM from your computer.
o
5"
3
_7

Troubleshooting
If you run into aW problems using your
camcoMer, fbllow the steps below.
(Z) Check the list (p. 58 to 60), andinspect your camcorder.V
(g) Remove the power source, attachthe power source again after about 1
minute, and turn the camcorder on.
(_) Press RESET (p. 67, 68) using a
pointed object, and turn the
camcorder on.
If you press RESET, all settings,
including the clock setting, are reset.
@ Contact your Sony dealer or localauthorized Sony service facility.
• _ur camcorder may he required to initialize or
change the current internal recording media of
your camcorder, depending on the problem. Inthe event of this, the data stored on the internal
recording media will be deleted. Be sure to
save the data on the internal recording media
on other media (backup) be*bre sending your
camcorder fbr repair. We will not compensate
you for any loss of internal recording mediadata.
• During repair, we may check a minimmn
amount of data stored on the internal recording
media in order to investigate the problem.
However, your Sony dealer will neither copy
nor retain },our data.
• See the "Handycam" Handbook (p. 57) tbr
details on the symptoms of your camcorder,
and "PMB Help" (p. 39) on connecting your
canlcorder to a conlputer.
The power does not turn on.
• Attach a charged battery pack to the
camcorder (p. 15).
• Connect the plug of the AC Adaptor to the
wall outlet (wall socket) (p. 17).
The camcorder does not operate even
when the power is set to on.
• It takes a few seconds tor your camcorder to
be ready to shoot atter the power is turned on.This is not a maltunction.
• Disconnect the AC Adaptor fl'om the wall
outlet (wall socket) or remove the battery
pack, then reconnect it atter about 1 minute.
If your camcorder still does not work, press
RESET (p. 67, 68) using a pointed object. (If
you press RESET, all settings, including the
clock setting, are reset.)
• The temperature of your camcorder is
extremely high. Turn off the camcorder and
leave it for a while in a cool place.
• The temperature of your camcorder is
extremely lo_< Leave the camcorder with the
power turned on. If you still cannot operate
your camcorder, turn off the camcorder and
take it to a warm place. Leave the camcorderthere tor a while, then turn on the camcorder.
Your camcorder gets warm.
• Your camcorder may become warm during
operation. This is not a malfunction.
The power abruptly turns off.
• Use the AC Adaptor (p. 17).
• Turn on the power again.
• Charge the battery pack (p. 15).
Pressing START/STOP or PHOTO does not
record images.
• Press MODE to turn on the _ (Movie) or I1_
(Photo) lamp.
• Your camcorder is recording the image you
have just shot on the recording media. I2m
cannot make any new recordings during this
period.
• The recording media is full. Delete
unnecessary images (p. 34).
• Total number of movie scenes or photos has
exceeded the recordable capacity of your
camcorder. Delete unnecessary hnages (p. 34).
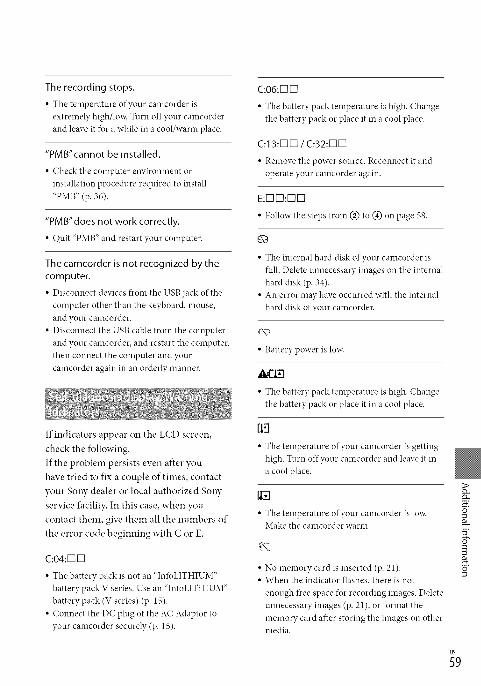
Therecordingstops.•Thetemperatureofyourcamcorderisextremelyhigh/lo_:Turnoffyourcamcorderandleaveitforawhileinacool/wannplace.
"PMB"cannot be installed.
• Check the computer environment or
installation procedure required to install
"PMB" (p. 36).
"PMB"does not work correctly.
• Quit "PMB" and restart your computer.
The camcorder is not recognized by the
computer.
• Disconnect devices from the USB jack of the
computer other than the keyboard, mouse,
and your camcorder.
• Disconnect the USB cable from the computer
and your camcorder, and restart the computer,
then connect the computer and your
camcorder again in an orderly manner.
If indicators appear on the LCD screen,
check the following.
If the problem persists even after you
have tried to fix a couple of times, contact
your SoW dealer or local authorized SoW
service facility. In this case, when you
contact them, giw, them all the numbers of
the error code beginning with C or E.
C:04:1_1_
• The battery pack is not an "IntbLITHIUM"
battery pack V series. Use an "IntbLITHIUM"
battery pack (V series) (p. 15).
• Connect the DC plug of the AC Adaptor to
your camcorder securely (p. 15).
C:06:1_1_
• The batter), pack temperature is high. Change
the battery pack or place it in a cool place.
C: 13:[Z] [Z]/ C:32:[ZJ[Z]
• Remove the power source. Reconnect it and
operate your camcorder again.
E:I_ I_:1_1_
• Follow the steps from (_) to (_) on page 58.
o
• The internal hard disk of your camcorder is
fl_fll.Delete unnecessary images on the internal
hard disk (p. 34).
• An error may have occurred with the internal
hard disk of your camcorder.
• Battery power is lox_:
A(I_
• The battery pack temperature is high. Change
the battery pack or place it in a cool place.
[l.l
• The temperature of your camcorder is getting
high. Turn offyour camcorder and leave it in
a cool place.
• The temperature of your camcorder is lo_:Make the camcorder warm.
• No memory card is inserted (p. 21).• When the indicator flashes, there is not
enough flee space for recording images. Delete
unnecessary images (p. 21), or tbrmat the
memory card after storing the images on othermedia.
g
_9

Precautions
• The Image Database File is damaged. Check
the data base tile by touching _ (MENU)
_*" [Show others] _ ]REPAIR IMG.DB F.]
(under _') ]MANAGE MEDIA] category)
the recording medium (DCR-SR68/SR88/
SX44/SX63).
• The memory card is damaged. Format the
memory card with your camcorder (p. 55).
• Incompatible memory card is inserted (p. 21).
_] o---_
• Access to the memory card was restricted on
another device.
• The carncorder is unsteady. Hold the camcorder
stea@ with both hands. However, note that
the camera-shake warning indicator does not
disappear.
'o
• The drop sensor function is actNated. 52_u
may not be able to record nor play back
images.
• The recording media is fldl. Delete unnecessary
images (p. 34).
6;
On use and care
• Do not use or store the camcorder and
accessories in the following locations:
- AnDvhere extremely hot, cold or humid.
Never leave them exposed to temperatures
above 60 °C (140 °F), such as under direct
sunlight, near heaters or in a car parked in
the sun. They may malfunction or becomedefurmed.
- Near strong magnetic fields or mechanical
vibration. The camcorder may mOfunction,
- Near strong radio waves or radiation. The
camcorder may not be able to record properl>
- Near AM receivers and video equipment.
Noise may occur.- On a sandy beach or anywhere dusty. If
sand or dust gets in your camcorder, it maymalfunction. Sometimes this malflmction
cannot be repaired.- Near windows or outdoors, where the LCD
screen or the lens may be exposed to direct
sunlight. This damages the inside of the LCD
screen.
• Operate your camcorder on DC 6.8 V/7.2 V
(battery pack) or DC 8.4 V (AC Adaptor).
• For DC or AC operation, use the accessories
recommended in these operating instructions.
• Do not let your camcorder get wet, fbr example,
f)cornrain or sea water. If your camcorder
gets wet, it may malfunction. Sometimes thismalfunction cannot be repaired.
• If any solid object or liquid gets inside the
casing, unplug your camcorder and have it
checked by a Sony dealer before operating it
any further.
• Avoid rough handling, disassembling,
modif_4ng, physical shock, or impact such
as hammering, dropping or stepping on the
product. Be particularly carethl of the lens.
• Keep the camcorder turning offwhen you are
not using your camcorder.• Do not wrap 3'our camcorder with a towel, for
example, and operate it. Doing so might cause
heat to build up inside.
• When disconnecting the power cord (mains
lead), pull it by the plug and not the cord (lead).
• Do not damage the power cord (mains lead)
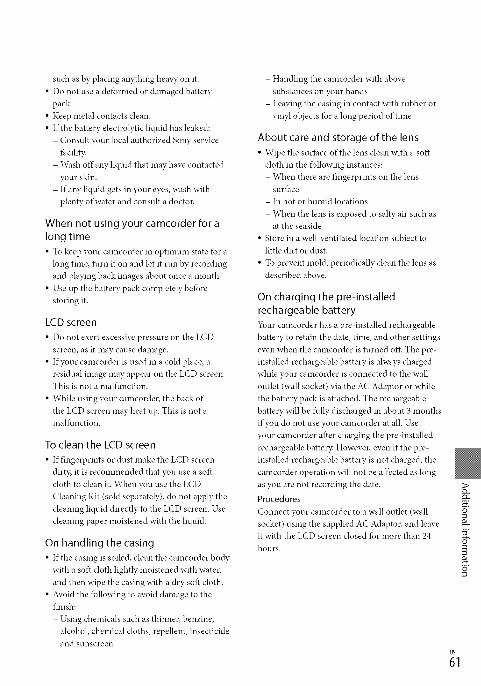
suchasbyplacinganythingheaxTonit.• Donotuseadefbrmedordamagedbatterypack.
• Keepmetalcontactsclean.• Ifthebatteryelectrolyticliquidhasleaked:-ConsultyourlocalauthorizedSonyservicefhcility.
-Washoffanyliquidthatmayhavecontactedyourskin.
-Ifanyliquidgetsinyoureyes,washwithplentyofwaterandconsultadoctor.
When not using your camcorder for a
long time
• To keep your camcorder in optinmm state fbr a
long time, turn it on and let it run by recording
and playing back images about once a month.
• Use up the battery pack completely beibre
storing it.
LCD screen
• Do not exert excessive pressure on the LCD
screen, as it may cause damage.
• If your camcorder is used in a cold place, a
residual image may appear on the LCD screen.This is not a malfunction.
• While using your camcorder, the back of
the LCD screen may heat up. This is not amalfunction.
To clean the LCD screen
• If fingerprints or dust make the LCD screen
dirty, it is recommended that you use a sof_t
cloth to clean it. When you use the LCD
Cleaning Kit (sold separately), do not apply the
cleaning liquid directly to the LCD screen. Use
cleaning paper moistened with the liquid.
On handling the casing
• If the casing is soiled, clean the camcorder body
with a soft cloth lightly moistened with water,
and then wipe the casing with a dry soft cloth.
• Avoid the fbllowing to avoid damage to thefinish:
- Using chemicals such as thinner, benzine,
alcohol, chemical cloths, repellent, insecticide
and sunscreen
- Handling the camcorder with above
substances on your hands
- Leaving the casing in contact with rubber or
vinyl objects lbr a long period of time
About care and storage of the lens
• Wipe the surihce of the lens clean with a soft
cloth in the fbllowing instances:
- When there are fingerprints on the lenssurfi_ce
- In hot or hmnid locations
- When the lens is exposed to salty air such asat the seaside
• Store in a well ventilated location subject tolittle dirt or dust.
• To prevent mold, periodically clean the lens as
described above.
On charging the pre-installed
rechargeable battery
_ttr camcorder has a pre-installed rechargeable
battery to retain the date, time, and other settings
even when the camcorder is turned off The pre
installed rechargeable battery is ahvays charged
while your camcorder is connected to the wall
outlet (wall socket) via the AC Adaptor or while
the battery pack is attached. The rechargeable
battery will be lhlly discharged in about 3 months
if you do not use your camcorder at all. Use
your camcorder after charging the preqnstalled
rechargeable batter3c However, even if the pre
installed rechargeable battery is not charged, the
camcorder operation will not be affbcted as long
as you are not recording the date.
Procedures
Connect your camcorder to a wall outlet (wall
socket) using the supplied AC Adaptor, and leaveit with the LCD screen closed for more than 24
hours.
g

Specifications
d
Note on disposal/transfer of the
camcorder (DCR-SR68/SR88/SX44/
SX63)
Even if you delete all movies and still images, or
perfbrm [MEDIA FORMAT], data on the internal
recording media may not be completely erased.
When you transfi.,r the camcorder, it is
recommended that you perfbrm [EMPTYI
(See "Getting detailed information fi'om the
"Handycanf' Handbook" on page 57.) to prevent
the recovery of your data. Also, when you dispose
of the camcorder, it is recommended that you
destroy the actual body of the camcorder.
Note on disposal/transfer of memorycard
Even if you delete data in the memory card or
fbrmat the memory card on your camcorder or
a computer, you may not delete data from the
memory card completel> When you give the
memory card to somebody, it is recommended
that you delete data completely using data
deletion software on a computer. Also, when you
dispose of the memory card, it is recommended
that you destroy the actual body of the memorycard.
System
Signal format: NTSC color, EIA standards
Movie recording fbrmat:Video: MPEG-2 PS
Audio recording system:Dolby Digital 2chDolby Digital Stereo Creator
Photo file fbrmat
: DCF Vet.2.0 Compatible: ExifVer.2.21 Compatible: MPF Baseline Compatible
Recording media (Movie/Photo)Internal hard diskDCR SR68:80 GBDCR-SR88:120 GB
Internal memoryDCR SX44:4 GBDCR-SX63:16 GB
"Memory Stick PRO Duo" mediaSD memory card, SDHC memory card (Class2,4,6, 10)
When measuring media capacity, 1 GB equals1 billion bytes, a portion of which is used forsystem management and/or application files.The capacity that a user can use is belox_:
DCR SR68: Approx. 79.3 GBDCR SR88: Approx. 119 GBDCR SX44: Approx. 3.86 GB
DCR-SX63: Approx. 15.5 GB
Image device2.25 mm (1/8 type) CCD (Charge CoupledDevice)
Gross: Approx. 680 000 pixelsEf_-i.,ctive(Movie, 16:9): Approx. 410 000pixelsEf_-i.,ctive(Photo, 16:9): Approx. 250 000 pixelsEf_-i.,ctive(Photo, 4:3): Approx. 340 000 pixels
LensCarl Zeiss Vario-Tessar
60 x (Optical), 2 000 x (Digital)
DCR-SR68/SR88
Filter diameter: 30 mm (1 3/16 in.)
F1.8 _ 6.0
Focal length:1:-1.8 _ 108 mm (3/32 _ 4 3/8 in.)When converted to a 35 mm still camera
For movies: 39 _ 2 340 mm (1 9/1692 1/4 in.) (16:9)For photos: 44 _ 2 640 mm (1 3/4 _ 104 in.)(4:3)
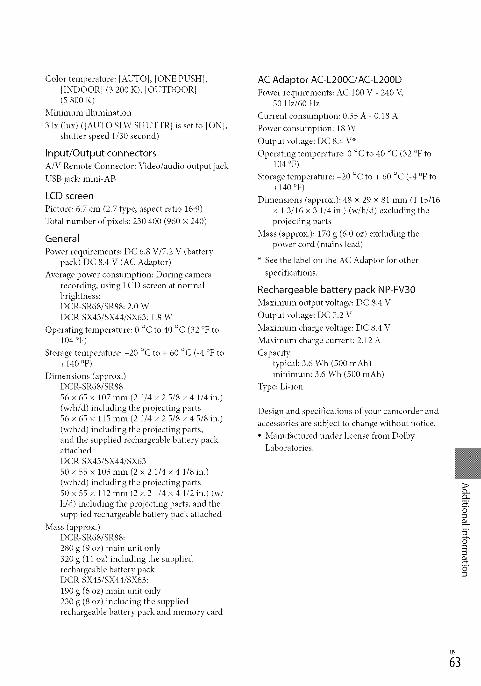
Colortemperature:[AUTO],[ONEPUSH],[INDOOR](3200K),[OUTDOOR](5800K)
Minimumillmnination3lx(lux)([AUTOSLWSHUTTR]issetto[ON],
shutterspeed1/30second)Input/OutputconnectorsA/VRemoteConnector:Video/audiooutputjackUSBjack:mini-ABLCD screen
Picture: 6.7 cm (2.7 type, aspect ratio 16:9)
Total number ofpixels: 230 400 (960 × 240)
General
Power requirements: D(" 6.8 V/7.2 V (batterypack) DC 8.4 V (AC Adaptor)
Average power consmnption: During camerarecording, using LCD screen at normalbrightness:DCR SR68/SR88:2.0 WDCR-SX43/SX44/SX63:1.8 W
Operating temperature: 0 °C to 40 °C (32 °F to104 °F)
Storage temperature: 20 °C to + 60 °C (-4 °F to+ 140 °F)
Dimensions (approx.)DCR SR68/SR8856 x 65 x 107mm (2 1/4 x 2 5/8 x 4 1/4 in.)
(w/h/d) including the projecting parts56 x 65 x 115 mm (2 1/4 x 2 5/8 x 4 5/8 in.)
(w/h/d) including the projecting parts,and the supplied rechargeable battery packattached
DCR SX43/SX44/SX6350x55x103mm(2x21/4x41/8in.)
(w/h/d) including the projecting parts50 x 55 x 112 mm (2 x 2 1/4 x 4 1/2 in.) (w/
h/d) including the projecting parts, and thesupplied rechargeable battery pack attached
Mass (approx.)DCR-SR68/SR88:
280 g (9 oz) main unit only320 g (11 oz) including the suppliedrechargeable battery packDCR- SX43/SX44/SX63:
190 g (6 oz) main unit only230 g (8 oz) including the suppliedrechargeable battery pack and memory card
AC Adaptor AC-L200C/AC-L200D
Power requirements: AC 100 V - 240 V,50 Hz/60 Hz
Current consumption: 0.35 A - 0.18 A
Power consumption: 18 W
Output voltage: DC 8.4 V×
Operating temperature: 0 °C to 40 °C (32 °F to104 °F)
Storage temperature: 20 °C to + 60 °C (-4 °F to+140 °F)
Dimensions (approx.): 48 x 29 x 81 mm (1 15/16x 1 3/16 x 3 1/4 in.) (w/h/d) excluding theprojecting parts
Mass (approx.): 170 g (6.0 oz) excluding thepower cord (mains lead)
× See the label on the AC Adaptor for other
specifications.
Rechargeable battery pack NP-FV30
Maximum output voltage: DC 8.4 V
Output voltage: DC 7.2 V
Maximum charge voltage: DC 8.4 V
Maximum charge current: 2.12 A
Capacitytypical: 3.6 Wh (500 mAh)minimum: 3.6 Wh (500 mAh)
Type: Liqon
Design and specifications of your camcorder and
accessories are subject to change without notice.
• Manu*hctured under license f}comDolbyLaboratories.
g
_3
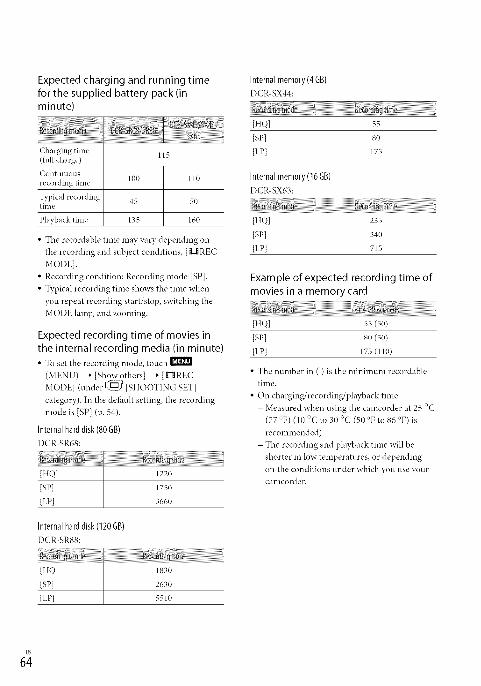
Expected charging and running timefor the supplied battery pack (inminute)
( harging time
(full charge)
( Olltilluous
recording time
"I3_pical recordingtime
Playback time
115
100 110
45 50
135 160
• The recordable time may vary depending on
the recording and subject conditions, [g:l REC
MODE].
• Recording condition: Recording mode [SP].
• Typical recording time shows the time when
you repeat recording start/stop, switching the
MODE lamp, and zooming.
Expected recording time of movies in
the internal recording media (in minute)
• To set the recording mode, touch
(MENU) _ [Show others] _ [_ItREC
MODE] (under E_ [SHOOTING SET]
category). In the de£ault setting, the recording
mode is [SP] (p. 54).
Internal harddisk (80GB)
DCR-SR68:
IHQ] 1220
[SP] 1750
[LP] 3660
Internal hard disk (120 GB)
DCR-SR88:
[HQ] 1830
[SP] 2630
[LP] 5510
Internal memory(4GB)
DCR-SX44:
[HQ] 55
[SP] 80
[LP] 175
Internalmemory(16 GB)
DCR4X63:
[HQ] 235
[SP] 340
[LP] 715
Example of expected recording time ofmovies in a memory card
[HQ] 55 (50)
[SP] S0 (50)
[LP] 175 (110)
• The number in ( ) is the minimum recordable
time.
• On charging/recording/playback time- Measured when using the camcorder at 25 °C
(77 °F) (10 °C to 30 °C (50 °F to 86 °F) is
recommended)
- The recording and playback time will be
shorter in low temperatures, or depending
on the conditions under which you use yourcamcoRter.

On trademarks
• "Handycam" and H.r_r"J_ are
registered trademarks of Sony Corporation.• "Memory Stick)' ",,_, ..;' "Memory Stick Duo;'
"MEMDRYSTICK0U0;'"Memory Stick PRO Duo)'
"MEMORYSTICKPRD Ouo;'"Memory StickPRO-HG Duo;' "MEMORYSTI[I_PRB-H[i Duo)'
"Memory Stick Micro;' "MagicGate;'"Mz_,G I(Z(_TE;' "MagicGate MemoryStick" and "MagicGate Memory Stick Dud' are
trademarks or registered trademarks of Sony
Corporation.• "InfbLITHIUM" is a trademark of Sony
Corporation.• "DVDirect" is a trademark of Sony
Corporation.• Dolby and the double D symbol are trademarks
of Dolby Laboratories.• Microsoft, Windows, Windows Vista, and
DirectX are either registered trademarks ortrademarks of Microsoft Corporation in theUnited States and/or other countries.
• Macintosh and Mac OS are registeredtrademarks of Apple Inc. in the U.S. and othercountries.
• Intel, Intel Core, and Pentimn are trademarks
or registered trademarks of Intel Corporationor its subsidiaries in the United States and other
countries.
• Adobe, the Adobe logo, and Adobe Acrobatare either registered trademarks or trademarksof Adobe Systems Incorporated in the UnitedStates and/or other countries.
• SDHC logo is a trademark.
r-_raa
• MultiMediaCard is a trademark ofMultiMediaCard Association.
All other product names mentioned herein may
be the trademarks or registered trademarks of
their respective companies. Furthermore, Tmand@ are not mentioned in each case in this manual.
&
g
5"
_5

Screen indicators
Upper left (:enter Upper right
Bottom
Upper left
MENU button
xt_) Self-timer recording
|!, MICREF LEVEL low
4:..33 WIDE SELECT
BLT-IN ZOOM MIC
_q 60 min Remaining battery
• _11 Recording fnlder ofmemory card
-Ca VIDEO LIGHT
Return button
Center
[STBY]/[REC] Recording status
V_VGA 1_0_l_2M Photo size
_,D Slide show set
((_ _ _IIL_I_ Warning
Playback mode
Upper right
SP LP Recording mode (HQ/SP/LP)
O 1_1 _ Recording/playback/editing media
Counter (hour:minute:0:00:00second)
Estimated recording[00min]remaining time
WHITE BLACKFADERFADER FADER
'_OFF Drop sensor off
_3 Drop sensor activated
9999 I_-O Approximate number of
9999 €'1.1_ recordable photos and9999 €'J-IB recording media
• Playback fblder ofmemory card
Current playing movie or
100/112 photo/Number of totalrecorded movies or photos
Bottom
_a_ [FACE DETECTION] setto [OFF]
l& -" Manual fncus
[] _ @ _ SCENE SELECTION
-',6,'_-@_ b.llz:i _rllite balance
1('_}_ SteadyShot off
SPOT MTR/FCS/SPOTMETER/EXPOSURE
T_ TELE MACRO
[] Bacldight
OPTION button
VIEW IMAGES buttonI_I
Slide show button
I_l 101-0005 Data file name
Protected image
Index button
• Indicators and their positions are approximate
and may difl_r f)com what you actually see.
• Some indicators may not appear, depending on
your camcorder modeh
6;

Parts and controls
Figures in ( ) are refk,rence pages.
DCR-SR68/SR88
[]
[]
[]
[]
[] Built-in microphone
[] Lens (Carl Zeiss lens)
[] LENS COVER switch
[] LED VIDEO LIGHT
[] A/V Remote Connector (31)
DCR-SX43/SX44/SX63
[]
[]
[] Speaker
[] Lens (Carl Zeiss lens)
[] LENS COVER switch
[] LED VIDEO LIGHT
[] Built-in microphone
[_ LCD screen/Touch panel
If yon rotate the LCD panel 180 degrees, yon
can close the LCD panel with the LCD screen
*hcing out. This is convenient during playback
operations.
DCR-SR68/SR88
[][]
[][][]
Speaker
[]I-_1 (VIEW IMAGES) button (28)
[] "*_)(DISC BURN) button (39)
[] POWER button (18)
[] RESET button
Press RESET using a pointed object.
Press RESET to initialize all the settings
including the clock setting.
[_ PHOTO button (27)
I1_ (movie)/l_ (photo) lamp (24)
MODE button (24)
[_] [] (Backlight) button
_] LIGHT button
Press to light up the LIGHT.
[_ _' (USB) jack (37, 39, 40, 43, 45)
£3
_7
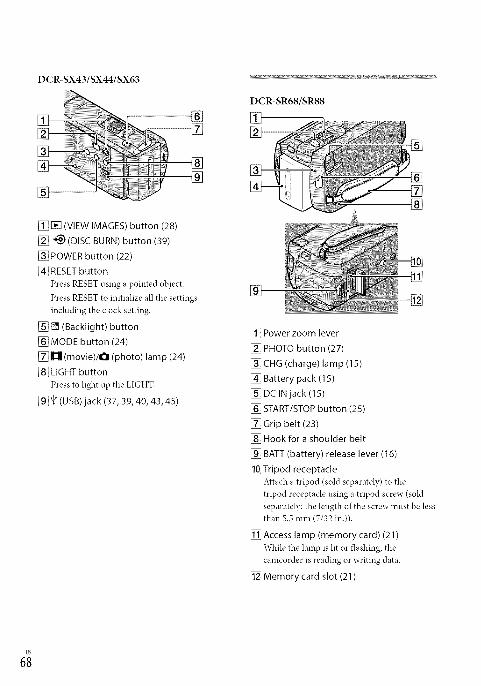
DCR-SX43/SX44/SX63
[]
_1-_1 (VIEW IMAGES) button (28)
[_ _)(DISC BURN) button (39)
[_ POWER button (22)
[_ RESET button
Press RESET using a pointed object.
Press RESET to initialize all the settings
including the clock setting.
[_ [] (Backlight) button
[_ MODE button (24)
[] I1_ (movie)/O (photo) lamp (24)
[_ LIGHT button
Press to light up the LIGHT.
[_ t) (USB)jack (37, 39, 40, 43, 45)
[]
[][]
DCR-SR68/SR88
[]
[]
[]
[]
[][]
[]
[] Power zoom lever
[] PHOTO button (27)
[] CHG (charge) lamp (15)
[] Battery pack (15)
[] DC IN jack (15)
[] START/STOP button (25)
[] Grip belt (23)
[] Hook for a shoulder belt
[] BATT (battery) release lever (16)
[] Tripod receptacle
Attach a tripod (sold separately) to the
tripod receptacle using a tripod screw (sold
separately: the length of the screw must be lessthan 5.5 nnn (7/32 in.)).
[] Access lamp (memory card) (21)
While the lamp is lit or flashing, the
camcorder is reading or writing data.
[] Memory card slot (21)

DCR-SX43/SX44/SX63[]
[]
[][]
[]
[] Power zoom lever
[] PHOTO button (27)
[] Battery pack
[] CHG (charge) lamp (15)
[] START/STOP button (25)
[] Grip belt (23)
[] DC IN jack (15)
[] Memory card slot (21)
[] BATT (battery) release lever (16)
[] A/V Remote Connector (31)
[] Tripod receptacle
Attach a tripod (sold separately) to the
tripod receptacle using a tripod screw (sold
separately: the length of the screw nmst be less
than 5.5 mm (7/32 in.)).
[] Access lamp (memory card) (21)
While the lamp is lit or flashing, the
camcorder is reading or writing data.
r0
_9

Index
16:9 ............................................... 32
4:3 ................................................. 32
A/V connecting cable ........... 31, 48
Altitude ........................................ 11
Battery pack ................................. 15
Capturing photos l)com a movie
....................................................... 42
Care .............................................. 60
Charging the battery pack ......... 15
Charging the battery pack abroad....................................................... 17
CLOCK SET ................................ 18
Computer ..................................... 36
Computer system ........................ 36
Copy ............................................. 22
Copying a disc ............................. 42
Creating a disc ...................... 41, 45
DATA CODE .............................. 19
DATE/TIME ................................ 19
DELETE ....................................... 34
Disc recorder ............................... 48
Dubbing ....................................... 22
DVDirect Express ....................... 45
DVD writer ............................ 45, 47
Editing movies ............................ 42
External media ............................ 43
Fully charged ............................... 15
"Hamtycam" Handbook ............. 57
Install ............................................ 36
Internal hard disk ....................... 20
7;
Internal memory ......................... 20
LANGUAGE SET ....................... 19
Macintosh .................................... 36
Maintenance ................................ 60
MEDIA SETTINGS .................... 20
Memory card ............................... 21
"Memory Stick" media ............... 21
"Memory Stick PRO HG Duo"
media ............................................ 21
"Memory Stick PRO Duo" media.........................................................
Menus ..................................... 51, 54
MOVIE MEDIA SET ................. 20
Movies .................................... 25, 28
MY MENU .................................. 51
MY MENU SETTING ............... 51
One Touch Disc Burn ................ 39
Oi)eration beeps .......................... 19
Operation flow ............................ 12
OPTION MENU ........................ 53
Parts and controls ....................... 67
PHOTO MEDIA SET ................ 20
Photos .................................... 26, 28
Playback ....................................... 28
PMB (Picture Motion Browser)
................................................. 36, 39
PMB Help .................................... 39
Power on ...................................... 18
Precautions .................................. 60
Rec & zoom buttons on LCD....25
Recording .................................... 25
Recording and playback time ...64
Recording media ......................... 20
Repair ........................................... 58
RESET .......................................... 68
Saving images in external media
....................................................... 43
Screen indicators ........................ 66
Self diagnosis display ................. 59
Setting the date and time ........... 18
Software ....................................... 36
Si) ecifications .............................. 62
Supplied item s ............................... 8
Thumbnail ................................... 34
Troubleshooting .......................... 58
Turning the power on ................ 18
TV ................................................. 31
TV TYPE ..................................... 31
USB cable ............................... 45, 47
USB CONNECT ................... 45, 47
VIEW IMAGES .......................... 28
VISUAL INDEX ......................... 28
Volume ......................................... 29
15_dl outlet (wall socket) ............ 15
\aklrning indicators ..................... 59
\a?indows ...................................... 36
Zoom ............................................ 25


Lea este apartado enprimer lugar
Antes de utilizar la unidad, leadetenidamente este manual y cons_,rwqopara futuras consultas.
Hombredel producto:VideocamaraDigitalModelo: DCR-SR68/SR88/SX43/SX63
POR FAVOR LEA DETALLADAMENTE ESTE MANUAL
DE INSTRUCCIONES ANTES DE CONECTAR Y OPERAR
ESTE EQUIPO.
RECUERDE QUE UN MAL USO DE SU APARATO
PODRiA ANULAR LA GARANTiA.
Pararedudrel riesgode incendiosoelectrocution,noexpongala unidada laIluvia nia la humedad.
Noexpongalaspilasa fuentes decalorexcesivo,comola luz solardirecta, el fuegoosimilares.
Bateria
Si la bateria se manipula indebidamente,puede explotar y causar un incendio oprovocarle quemaduras quimicas. Tenga encuenta las siguientes precauciones.• No desmonte el producto.• No aplaste ni exponga la baterla a impactos tales
como golpeso caidas,ni la deje caer o la pise.• No provoque on cortocircuito en la bateria
ni permita que objetosmet_ilicosentren encontacto con sus terminales.
• No exponga la bateria a temperaturas superiores
a 60 °Ccomo a la luz solar directa, o en elinterior de on automdvil estacionado al sol.
• No la incinere ni la arroje al fnego.• No manipule baterias de iones de litio dafiadas
o que presenten fugas.• Asegfiresede cargar la bateria con on
cargador de baterias original de Sony o con undispositivo que pueda cargarla.
• Mantenga la bateria fnera del alcance de nifios
pequefios.• Mantenga la bateria seca.• Sustitfiyala dnicamente por otra del nlismo tipo
o equivalente recomendada por Son?_• Deshfigase de la baterias usada lo antes posible
segdn el procedimiento que se describe en lasinstr ucciones.
Sustituya la bateria unicamente por otra deltipo especificado. De lo contrario, es posibleque se produzcan incendios o lesiones.
Adaptadordealimentaciondeca
No utilice el adaptador de alimentaci6nde ca colocado en un espacio angosto, talcomo entre una pared y los muebles.
Si utiliza el adaptador de alimentacidn deca con{,ctelo a un tomacorriente de paredcercano. Si se produce alguna falla defuncionamiento al utilizar la videoc_hnara,
desconecte el adaptador de alimentaci6n deca del tomacorriente de inmediato.
Aunque la videoc_hnara est{, apagada,seguir_i recibiendo adaptador dealimentaci6n de ca (corriente dom{,stica)
mientras est{, conectada a la toma de paredmediante el adaptador de alimentaci6n deca
Elementos suministrados
Los nthneros entre ( ) indican la cantidad
suministrada.
[] Adaptador de alimentaci6n de ca (1)
[] Cable de alimentaci6n (1)
[] Cable de conexi6n de A/V (1) []
[] Cable USB (1) []
[] Bateria recargable NP-FV30 (1)
[] CD-ROM "Handycam" Application
Software (1)
- "PMB"(so*_ware,incluye la "Ayuda de PMB")- Guia pr_icticade "Handycam" (PDF)
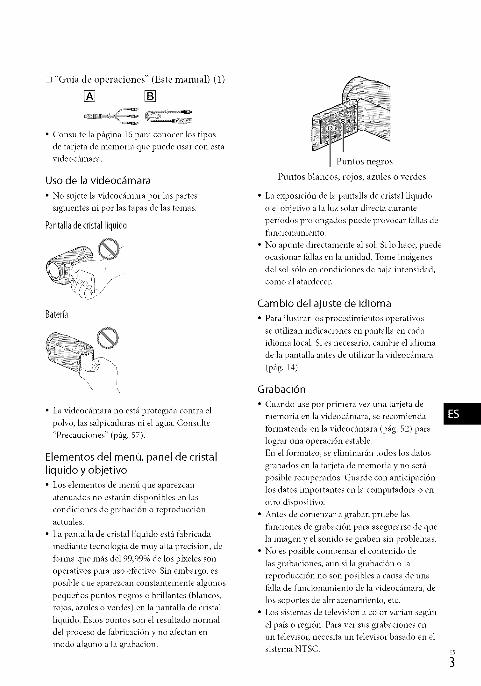
[] "Guia de operaciones" (Este manual) (1)
[] []
• Consulte la Digina 16 para conocer los tipos
de tarjeta de memoria que puede usar con estavideoc_imara.
Uso de la videockmara
• No sujete la videocMnara por las partes
siguientes ni pot las tapas de las tomas.
Pantalladecristalliquid0
Bater_
• La videoc_hnara no esttl protegida contra el
poNo, las salpicaduras ni el agua. Consulte
"Precauciones" (p_ig. 57).
Elementos del ment_, panel de cristal
liq uido y objetivo
• Los elementos de menfi que aparezcan
atenuados no estadm disponibles en las
condiciones de grabaci6n o reproducci6nactuales.
• La pantalla de cristal liquido est_'l fhbricada
mediante tecnologia de m W alta precisi6n, de
Ibrma que m_is de199,99% de los pixeles son
operatNos para uso efectNo. Sin embargo, es
posible que aparezcan constantemente algunos
pequefios puntos negros o brillantes (blancos,
rojos, azules o verdes) en la pantalla de cristal
liquido. Estos puntos son el resultado normal
del proceso de fhbricaci6n y no afi:ctan en
modo alguno a la grabacidn.
Puntos blancos, rojos, azules o verdes
• La exposicidn de la pantalla de cristal liquido
o el objetivo a la luz solar directa durante
periodos prolongados puede provocar fhllas de
funcionamiento.
• No apunte directamente al sol. Si lo hace, puede
ocasionar fldlas en la unidad. Tome imtlgenes
del sol s61o en condiciones de baja intensidad,como al atardecer.
Cambio del ajuste de idioma
• Para ilustrar los procedimientos operativos
se utilizan indicaciones en pantalla en cadaidioma local. Si es necesario, cambie el idioma
de la pantalla antes de utilizar la videocfimara
(p_ig. 14).
Grabaci6n
• (;uando use por primera vez una tarjeta dememoria en la videocfimara, se recomienda
*brmatearla en la videoc_hnara (Dig. 52) para
lograr una operaci6n estable.
En el fbrmateo, se eliminar_'m todos los datos
grabados en la tarjeta de memoria y no ser_i
posible recuperarlos. Guarde con anticipaci6n
los datos importantes en la computadora o en
otto dispositivo.
• Antes de comenzar a grabar, pruebe las
funciones de grabacidn para asegurarse de que
la imagen y el sonido se graben sin problemas.
• No es posible compensar el contenido de
las grabaciones, aun si la grabaci6n o la
reproducci6n no son posibles a causa de una*hlla de funcionamiento de la videoc_imara, de
los soportes de almacenamiento, etc.
• Los sistemas de televisi6n a color varian segfin
el pals o regi6n. Para ver sus grabaciones enun televisor, necesita un televisor basado en el
sistema NTSC.

• Los programas de televisidn, peliculas, cintas de
video y demas materiales pueden estar sujetos a
derechos de autor. La grabacidn no autorizada
de tales materiales puede ir en contra de lo
establecido pot las leyes de derechos de autor.
Nota sobre la reproducci6n
• Es posible que las imagenes grabadas en la
videocrimara no se reproduzcan correctamente
en otros dispositivos.
Por el contrario, es posible que las
imrigenes grabadas en otros dispositivos
no se reproduzcan correctamente en estavideocrimara.
Guarde todos los datos de imagen
grabados
• Para evitar que los datos de imagen se pierdan,
guarde todas las imagenes grabadas en un
soporte externo de manera periddica. Se
recomienda guardar los datos de imagen en
un disco DVD R mediante la computadora.
Asimismo, puede guardar los datos de imagen
mediante una videograbadora o una grabadora
de DVD/HDD, etc. (prig. 41).
Notas sobre la bateria/Adaptador de
alimentaci6n de ca
• Asegfirese de retirar la baterla o el adaptador
de alimentacidn de ca luego de apagar lavideocrimara.
• Desconecte el adaptador de alimentacidn de ca
de la videocamara, sujetando la videocrimara y
la clavija de cc
bl[*l
Nota sobre la temperatura de la
videockmara y la bateria
• Cuando la temperatura de la videocrimara
o la baterla seademasiado alta o baja, es
posible que no sepueda grabar ni reproducir
en la videocrimara. Esto sedebe aque enestascondiciones seactivan las funciones de
proteccidn de ]a videocrimara. En este caso,
aparecerri un indicador en la pantalla de crista]
llquido.
Si la videockmara se conecta a una
computadora o a accesorios
• No intente fbrmatear el soporte de grabacidn
de la videocrimara mediante una computadora.
Si lo hace, es posible que la videocrimara no
funcione correctamente.
• Cuando conecte la videocrimara a otro
dispositivo a trav{'s de un cable, asegflrese de
insertar la clavija del conector en la direccidn
correcta. Si empuja a la fuerza la clavija en el
terminal, este podrla dafiarse, lo que a su vez
podrla provocar una fhlla de *_mcionamiento dela videocamara.
Si no puede grabar o reproducir
imkgenes, ejecute [FORMAT.SOPORTE]
• Si repite la grabacidn o la eliminacidn de
imrigenes durante un tiempo prolongado, se
producirri la fi'agmentacidn de datos en el
soporte de grabacidn. No es posible guardar
o grabar imrigenes. En esos casos, guarde las
imrigenes en un tipo de soporte externo en
primer lugar y, a continuacidn, lleve a cabo la
operacidn [FORMAT.SOPORTE] al tocar
(MENU) _ [Mostrar otrosl -+ [FORMAT.
SOPORTEI (en la categoria Q...D_[GESTION
SOPORTE]) _' el soporte deseado (DCR-
SR68/SR88/SK44/SX63) _ [SI] _ [SI]
Objetivo Carl Zeiss
• La videocrimara estri equipada con un objetivo
Carl Zeiss que permite obtener imrigenes
de gran calidad y que rue desarrollado
conjuntamente pot Carl Zeiss, en Alemania,
y SoW Corporation. Adopta el sistema de
medici6n MTF para videocamaras y ofrece una
calidad eqniparable a la de un objetivo CarlZeiss.
MTF- Modulation Transfi.,r Function. E1
valor num{'rico indica la cantidad de luz de un
motivo que entra en el objetivo.
Notas sobre los accesorios opcionales
• Se recomienda utilizar accesorios originales
de Son},.

• Ladisponibilidaddeestosproductosestrisujetaalpalsolaregidn.
Acerca de las imkgenes, ilustraciones y
pantallas de este manual
• Las imrigenes de ejemplo que se utilizan en este
manual con fnes ilustrativos fueron capturadas
mediante una crimara digital de imrigenes
fjas y, por lo tanto, pueden lucir difi.,rentes
a las imrigenes e indicadores en pantalla
qne aparecen reahnente en la videocrimara.
Asimismo, las ilustraciones de la videocrimara
y las indicaciones de la pantalla han sido
exageradas o simplificadas para facilitar su
comprensi6n.
• En este manual, el disco duro interno (DCR-
SR68/SR88), la memoria interna (DCP,
SX44/SX63) de la videocrimara y la tarjeta de
memoria reciben el nombre de "soportes de
grabaci6n'_
• E1disefio y las especifcaciones de la
videocrimara y los accesorios estrin sujetos a
modificaciones sin previo aviso.
Confirme el nOmero de modelo de la
videockmara
• E1nombre del modelo se muestra en este
manual cuando existen di*brencias en las
especificaciones entre los modelos. Confirme elnfimero de modelo de la videocrimara.
• Las principales diferencias de especificacidn de
esta serie son las siguientes.
Soportes Capacidad Tomade del USB
grabacidn soporte degrabaci6ninterno
DCR- Disco 80 GBSR68 duro
DCR- interno + 120 GBSR88 tarjeta de
memoria
DCR- Tarjeta de _SX43 memoria
Entrada/salida
DCR- Memoria 4 GB
SX44 interna +
DCR- tarjeta de 16 GB
SX63 memoria
• No realice ninguna de las acciones que sedescriben a continuacidn; de lo contrario, el
soporte de grabacidn podria resultar dafiado,
podria set imposible reproducir imrigenes
grabadas, que estas se perdieran o podrian
producirse otras fi_llas de funcionamiento.
- Expulsar la tarjeta de memoria cuando el
indicador de acceso (prig. 17) est_ encendido
o parpadeando
- Extraer la bateria o el adaptador dealimentacidn de ca de la videocrimara o
someter la videocrimara a golpes o vibraciones
cuando los indicadores _ (pelicula)/l_l
(*bto) (prig. 13) o el indicador de acceso
(prig. 17) est_n encendidos o parpadeando
• Cuando utilice una bandolera (se vende por
separado), no golpee la videocrimara contra
ningfin objeto.
• No utilice la videocrimara en rireas donde haymucho ruido.
Acerca del sensor de caidas (DCR-SR681
SR88)
• Para proteger el disco duro interno contra
los golpes producidos pot las caidas, lavideocrimara cuenta con una *kmcidn de sensor
de caidas. Cuando se produce una caida, o en

condicionesdeIhltadegravedad,esposiblequetambi_'nsegrabeelruidodebloqueoqueseproducecuandolavideoctlmaraactivaestafuncidn.Sielsensordecaidasdetectaunacaldarepetidamente,esposiblequesedetengalagrabacidnolareproduccidn.
Nota sobre el uso de la videoc_mara a
grandes altitudes (DCR-SR68/SR88)
• No encienda la videoc_'mmra en tlreas de baja
presidn, de altitud superior a los 5 000 metro.
Si lo hace, puede dafmrse la unidad de discoduro interno de la videocfimara.

Flujo de operaci6n
Procedimientos iniciales (pa'g. 10)
Prepare la fuente de alimentacidn y el soporte de grabacidn,
1Grabacidn de pel[culas y fotos (pa'g. 18)
Grabacidn de peliculas _ p_ig, 20"_" Cambio del modo de grabacidn
"_" Tiempo de grabaci6n previsto (INFO SOPORTE)
Captura de fotos _ p_ig. 22
....... ...............................................................................................................................................................................................................................................................................Reproduccidn de pel[culas y fotos
Reproduccidn en la videoc_hnara _ p_ig, 23
Reproduccidn de im_igenes en un televisor _ p_ig, 26 ....
Almacenamiento de ima'genes
Ahnacenamiento de peliculas y fi)tos con una computadora "_
p_ig, 31
Ahnacenamiento de peliculas y totos en soportes externos "_
pilg, 39
Ahnacenamiento de im_igenes con una grabadora de DVD "_
p_ig. 41

Indice
Lea este apartado en primer lugar ............................................................... 2
Flujo de operaci6n .................................................................................. 7
_ Procedimientos inicialesPaso 1: Carga de la bateria ...................................................................... 10
Carga de la bateria en el extranjero ................................................... 12
Paso 2: Encendido y ajuste de la fecha y la hora ............................................ 13
Cambio del ajuste de idioma ........................................................... 14
Paso 3: Preparaci6n del soporte de grabaci6n .............................................. 15
Para comprobar los ajustes del soporte de grabaci6n ............................ 16
Copia de peliculas y fotos desde el soporte de grabaci6n interno a la tarjetade memoria (DCR-SR68/SR88/S×44/S×63) .......................................... 17
_ Grabaci6n/reproducci6nGrabaci6n ........................................................................................... 18
Reproducci6n en la videoc_mara .............................................................. 23
Reproducci6n de im_genes en un televisor ................................................. 26
Utilizaci6n correcta de la videoc_maraEliminaci6n de peliculas y fotos ................................................................ 29
_ Almacenamiento de peliculas y fotos con una computadoraPreparaci6n de la computadora (Windows) ................................................. 31
Si utiliza un Macintosh ................................................................... 31
Inicio de PMB (Picture Motion Browser) ...................................................... 34
Creaci6n de un disco con un solo toque (One Touch Disc Burn) ........................ 35
Importaci6n de peliculas y fotos a una computadora ..................................... 36Creaci6n de un disco ............................................................................. 37
Copia de un disco ......................................................................... 37
Edici6n de peliculas ...................................................................... 37
Captura de fotos desde una pelicula ................................................. 38
_ Archivo de im_genes con un dispositivo externoArchivo de im_genes en un soporte externo (COPIADIRECTA)......................... 39
Creaci6n de un disco con una grabadora de DVD .......................................... 41
Personalizaci6n de la videoc_maraUso de los menOs ................................................................................. 47
Obtenci6n de informaci6n detallada de la Guia pr_ctica de"Handycam'. ............ 53
_ Informaci6n complementaria_ Soluci6n de problemas ...................................................................... 54
Precauciones ....................................................................................... 57
Especificaciones ................................................................................... 59
Referencia r_pidaIndicadores de la pantalla ....................................................................... 62
Piezas y controles ................................................................................. 63
[ndice ................................................................................................ 66

Paso I" Carga de la bateria
DCR-SR68/SR881
Toma DC IN
Bateria
Indicador CHG (carga)
DCR-SX43/SX44/SX63
3Cable dealimentaci6n
Clavija de cc
Adaptador de AI toli'tacorriellte de
alimentaci6n paredde ca
3Indicador CHG
(carga)
3
1;
BateriaQ
_omoDCN_ .)Clavija de cc _'-_ _:>_. Cable de
alimentaci6n
Adaptador de A1tomacorrientealimentaci6n de ca
de pared

Puede cargar la bateria "InfoLITHIUM" (serie V) despu{,s de instalarla ell la videoc_imara.
{_ Notas
• No puede instalar ningtma baterfa "InfbLITHIUM" que no sea de la serie V en la videoc_imara.
Para apagar la videocamara, cierre la pantalla de cristal liquido.
Instale la bateria en la direcci6n que indica la flecha hasta que oiga unclic.
Conecte el adaptador de alimentaci6n de ca y el cable de alimentaci6n a
la videocamara y al tomacorriente de pared.
• Alinee la marca • de la clavijade cccon la marca de la toma DC IN.
E1indicador CHG (carga) se enciende y se inicia el proceso de carga. E1 indicador CHG
(carga) se apaga cuando la bateria est_icompletamente cargada.
Cuando la bateria est0 cargada, desconecte el adaptador de ca de la tomaDC IN de la videocamara.
"D
Sugerencias
• Consulte la Digina 60 para conocer los tiempos de grabacidn y reproduccidn.
• Con la videocfimara encendida, puede comprobar el tiempo restante aproximado de la baterla a trav_,s del
indicador de bateria restante situado en la esquina superior izquierda de la pantalla de cristal liquido.
Para extraer la bateria
Cierre la pantalla de cristal liquido. Deslice la palanca de liberacidn de BATT (bateria) ((_)) y
retire la bateria (@).
DCR-SR68/SR88

DCR-SX43/SX44/SX63
Para usar un tomacorriente de pared como fuente de alimentaci6n
Realice las nfismas conexiones que las indicadas ell el "Paso 1: Carga de la bateria". Aunque la
bateria est6 instalada, no se descargar;i.
Puede cargar la bateria en Cualquier pals 0 regi6n Con el adaptador de alimentaci6n de Ca
suministrad0 Con !a videoc_mara dentro d e Un rang0 de ca de entre 100 v y 240 v
, No utilice un transformador de voltaje electrdnico.
Notas sobre la bateria
• Antes de extraer la baterla o el adaptador de alimentacidn de ca cierre la pantalla de cristal lfquido y
compruebe que los indicadores mZlt(Pelicula)/O (Foto) (prig. 13) y el indicador de acceso (prig. 17) est_n
apagados.
• E1indicador CHG (carga) parpadea durante la carga en las condiciones siguientes:- La bateria no estri conectada correctamente.
- La bateria estri dafiada.
- La temperatura de la bateria es baja.
Retire la baterla de la videocrimara y pdngala en un lugar crilido.
- La temperatura de la bateria es alta.
Retire la baterla de la videocrimara y pdngala en un lugar l)cio.
• En el ajuste predeterminado, la alimentacidn se apaga automriticamente si no utiliza la videocrimara
durante unos 5 minuto, para ahorrar energia de la baterfa ([APAGADO AUTO]).
Notas acerca del adaptador de alimentaci6n de ca
• Utilice un tonlacorriente de pared cercano cuando utilice el adaptador de alimentacidn de ca
En caso de que se produzca un fhllo de funcionamiento al utilizar la videocrimara, desconecte el
adaptador de alimentaci6n de ca del tomacorriente de pared inmediatamente.
• No coloque el adaptador de alimentaci6n de ca en lugares estrechos, como por ejemplo entre una pared
y un mueble.
• No provnque un cortocircuito en la clavija de cc del adaptador de alimentaci6n de ca ni en el terminal de
la baterfa con ningt'm objeto metrilico, ya que podria causar una *;aliade funcionamiento.
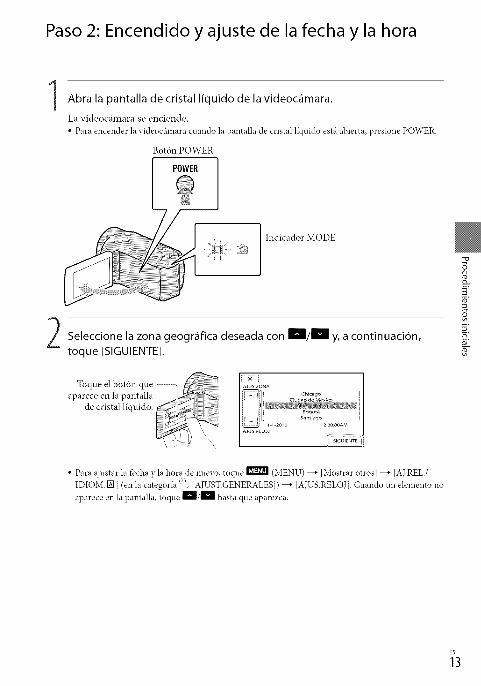
Paso 2: Encendido y ajuste de la fecha y la hora
I bra la pantalla de cristal liquido de la videoc_mara.
La videoc_imara se enciende.
• Para encender la videoc_imara cuando la pantalla de cristal llquido esta abierta, presione PO\VER.
Bot6n POWER
POWER
I
Selecdone la zona geogr_fica deseada con _/_ y, a continuaddn,
toque [SIGUIENTE].
g_
3"
Toque el boron que --aparece en la pantalla
de cristal liquido.
• Para ajustar la fi:cha y la hora de nuevo, toque _ (MENU) _ [Mostrar otros] --* [AJ.REL./1>
IDIOM. IN] (en la categorla _ [AIUST.GENERALES]) --* [AJUS.RELOJ]. Cuando tm elemento no
aparece en la pantalla, toque _/_ hasta que aparezca.
_3

Ajuste [HORAVERANO], la fecha y la hora y, a continuaci6n, toque I!_11.
E1 reloj elnpezarti a funcionar.
• Si ajusta [HORA VERANO] en [ACTIVADO], el reloj se adelanta 1 hora.
_-1-20_0 _>00:00av I[ < '_AC_MC_°
, SIGUIENT_ |LoJ
Notas
• La fecha y la hora no aparecen durante la grabacidn, aunque se graban antom_iticamente en el soporte de
grabacidn y se pueden visualizar durante la reproduccidn. Para visualizar la fecha y la hora, toque
(MENU) _ [Mostrar otros] _ [AJUSTES REPROD.] (en la categorla _ [REPRODUCCION])
[CODIGO DATOS] --* [FECHA/HORA] --' _ -+ _ --' _'_'_.
• Para desactivar los pitidos de iuncionamiento, toque _ (MENU) _ [Mostrar otros] _ [AJUS.
SON./PANT.] (en la categorla _'@[AJUST.GENERALES]) _ [PITIDO] _ [DESACTI'vl] _ |
• Si el botdn que toca no reacciona correctamente, deberia calibrar el panel t_ictil.
Para apagar la videockmara
Cierre la pantalla de cristal lkluido. E1 indicador H (pelicula) parpadea durante varios
segundo y se apaga la videoc_imara.
Sugerencias
• Tambi_m puede apagar la videoc_imara al presionar POWER.
• Cuando [ENCEND.CON LCD] est{' ajustado en [DESACTI\(], presione POWER para apagar lavideocfimara.
Puede m0dificar las !ndicacion es en pantalla para que muestren los mensaje sen un idiom adeterminado.
Toque_ (MENU) _ [M0strar0tr0s] _ [Aj.RELd!DIOM.IN](en ia categ0ria%[AJUST.GENERALES]) _ [AJUSTE IDIOMA[_] _ el idioma deseado _ _ _
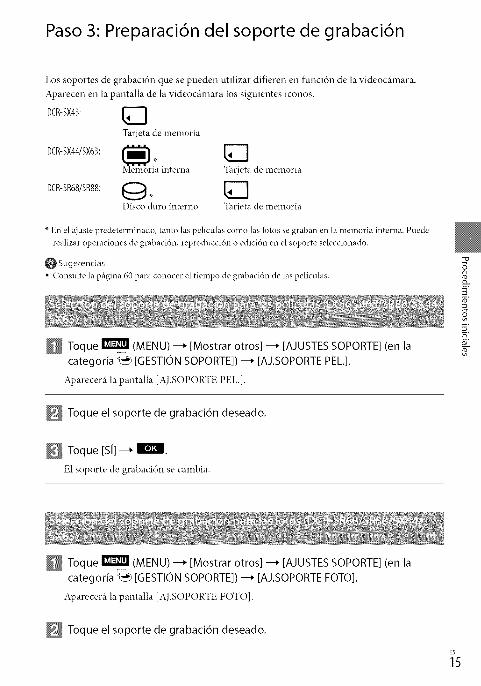
Paso 3: Preparaci6n del soporte de grabaci6n
Los soportes de grabacidn que se pueden utilizar difieren ell funcidn de la videocthnara.
Aparecen ell la pantalla de la videocthnara los siguientes iconos.
DCR-SX43:
DCR-SX44/SX63:
DCR-SR68/SR88:
Tarjeta de memoria
Memoria interna Tarjeta de memoria
Disco duro interno Tarjeta de memoria
En el ajuste predeterminado, tanto las peliculas como las iotos se graban en la memoria interna. Puede
realizar operaciones de grabacidn, reproduccigm o edicidn en el soporte seleccionado.
O Sugerencias
• Consulte la Digina 60 para conocer el tiempo de grabacidn de las peliculas.
Toque _ (MENU) --_ [Mostrar otros] --_ [AJUSTES SOPORTE] (en lacategoria Q_) [GESTION SOPORTE]) --_ [AJ.SOPORTE PEL.].
Aparecer_i la pantalla [AJ.SOPORTE PEL].
Toque el soporte de grabaci6n deseado.
Toque [S[]---+_.
E1 soporte de grabaci6n se cambia.
"0
og_
5"
F0"
Toque ! (MENU) --_ [Mostrar otros] --_ [AJUSTES SOPORTE] (en lacategoria _ [GESTION SOPORTE]) --_ [AJ.SOPORTE FOTO].
Aparecer_i la pantalla [AJ.SOPORTE FOTO].
Toque el soporte de grabaci6n deseado.
_5

Toque [Sl] --_ Im?i.
E1 soporte de grabaci6n se cambia.
Para c0mprobar !os ajustes de! soporte de grabaci6n
Cuando graba en modo de grabaci6n de pe!iculas o de fotos, e! icono de! sop0rte de
grabaci6n aparece en la esquina superior derecha de !a Pantalla.
..... _ !con0 de! S0pQrte d_grabaci6nI I
" E1 icono que aparece en la pantalIa de cristal iiquido varia dependiendo de la videocfimara que utilice.
1;
@ Notas
• Ajuste el soporte de grabacidn en [TARJ.MEMORIA] para grabar pellculas o ibtos en la tarjeta de
memoria (DCR4R68/SR88/SX44/SX63).
Tipos de tarjetas de memoria que se pueden utilizar con la videockmara
• Con esta videocfimara solamente se pueden usar "Memory Stick PRO Duo", "Memory Stick PRO HG
Dud; tarjetas de memoria SD y SDHC. Con esta videocfimara no se puede usar una MultiMediaCard.
• En este manual, tanto "Memory Stick PRO Dud' como "Memory Stick PRO-HG Dud' reciben el nombre
de "Memory Stick PRO Dud_
• Se garantiza el funcionamiento de tarjetas de memoria de hasta 32 GB con la videoctlmara.
Tipos de"Memory Stick"que se pueden utilizar con la videockmara
• Para grabar pellculas, se recomienda utilizar un "Memory Stick PRO Duo" de una capacidad de 512 MB o
mils de las marcas siguientes:
- MEMORY5TICKPRO DUg ("Memory Stick PRO Duo") _
- MEMORYSTI[I(PRO-H5BUO("Memory Stick PRO-HG Duo")Puede utilizarse lleve la marca Mark2 o no.
"Memory StickPRODuo"/"MemoryStickPRO-HGDuo"
(Estetamafiopuedeutilizarseconlavideoc_mara.)
• Los "Memory Stick PRO Duo" pueden usarse solamente con equipos compatibles con "Memory StickPRO'_
• No adhiera etiquetas ni similares en un "Memory Stick PRO Duo" ni en un adaptador para "MemoryStick Duo".

Abra la tapa, oriente la esquina con muesca de la tarjeta de memoria como se
muestra en la ilustraci6n e ins_rtela en la ranura para tarjeta de memoria hasta
que encaje con un clic.
• Cierre la tapa una vez insertada la tarjeta de memoria.
DCR-SR68/SR88 DCR-SX43/SX44/SX63Indicador de acceso
Observe la direcci6n de la esquina Indicador de oacceso Observe la direcci6n de la esquina _.
con muesca, con muesca. 5"
Es posible que aparezca la pantalla [(;rear nuevo arch.base de datos de imtigenes.] si N"
inserta una tarjeta de memoria nueva. Ell ese caso, toque [SI]. Si solamente va a grabar o
f()tos ell la tarjeta de memoria, toque [NO]. 5"
• Confinne la direcci6n de la tarjeta de memoria. Si inserta la tarjeta de memoria a la fuerza en la _0"
direccidn incorrecta, es posible que se dafie la tarjeta de memoria, la ranura para tarjeta de memoria
o los datos de imagen.
{_ Notas
• Si aparece [Error al crear un nuevo archivo de base de datos de imfigenes. Es posible que no existasuficiente espacio libre.], toque _ (MENU) _ [Mostrar otros] _ [FORMAT.SOPORTE] (en la
categoria _'_ [GESTION SOPORTE]) _ [TARJ.MEMORIA] (DCR4R68/SR88/SX44/SX63) _ [SI]
[SI] _ _ para inicializar la tarjeta de memoria.
Para expulsar la tarjeta de memoria
Abra la tapa y presione ligeramente la tarjeta de melnoria hacia adentro una vez.
• No abra la tapa durante la grabaci6n.
• A1 insertar o expulsar la tarjeta de melnoria, tenga cuidado de que no salga impulsada y se caiga.
Copia de pelicu!as y fotos desde el soporte de wabaci6n interno a latarjeta de memoria (DCR,SR68/SR88/SX44/SX63)
Toque _ (MENU) _ [Mostrar otros] _ [COPIA PEL_CULA]![COPIAR FOTO] (en lacateg0ria _ [EDIT]) y, a continuaci6n, siga las instrucciones en pantalla.
_7

GrabacidnEn el ajuste predetern_inado, las peliculas se graban en los siguientes soportes.
DCR-SX43: tarjeta de memoria
DCR-SX44/SX63: memoria interna
DCR-SR68/SR88: disco duro interno
Sugerencias
• Consulte la pfigina 15 para obtener infbrmacidn acerca de cdmo cambiar el soporte de grabacidn(DCR-SR68/SR88/SX44/SX63).
Para abrir la tapa del objetivo
Deslice el interruptor de la LENS COVER para abrirla.
DCR-SR68/SR88 DCR-SX43/SX44/SX63
Sugerencias
• Cuando termine de grabar o cuando reproduzca las imfigenes, cierre la tapa del objetivo.
I Ajuste la correa de sujecidn.
DCR-SR68/SR88

DCR-SX43/SX44/SX63
Abra la pantalla de cristal I[quido de la videoc_mara.
La videoc_imara se enciende.
• Para encender la videoc_imara cuando la pantalla de cristal llquido est_i abierta, presione POWER
(Dig. 13).
• Para alternar entre modos de grabacidn, presione MODE. Presione MODE para qne se encienda el
indicador de acceso del modo de grabacidn.
DCR-SR68/SR88
DCR-SX43/SX44/SX63
] Bot6n MODE
] _ (Pelicula): Cuando
] graba una pelicula
/ €'a (Foto): Cuando
captura una foto
gr_li'_Fai:£7 PCellCnU_iit_
captura una foto
g-
¢_.
g,
_9

Presione START/STOP para iniciar la grabaci6n.
• TambiL'n puede iniciar la grabacidn si toca • en la parte inferior izquierda de la pantalla de cristal
liquido.DCR-SR68/SR88 DCR-SX43/SX44/SX63
Botdn START/STOP
Para detener la grabacidn, presione START/STOP de nuevo.
w1T[ESPERA] ---" [GRAB.]
• TambiL'n puede detener la grabacidn si toca • en la parte infi:rior izquierda de la pantalla de cristal
liquido.
2;
• DespuL's de encender la videoc_imara o de cambiar los modos de grabacidn (pelicula/*bto) o
reproduccidn, los iconos e indicadores del panel de cristal liqnido se muestran durante unos 3 segundo y
luego desaparecen. Para mostrar los iconos e indicadores de nuevo, toque cualqnier parte de la pantalla
de cristal liquido excepto los botones de grabacidn y zoom.
Botones de grabacidn y zoom de la pantalla de cristal liquido
1_ ...... unos_ 3
segundodespu_s
Q Notas
• Si cierra la pantalla de cristal liquido mientras graba peliculas, se detendr_i la grabacidn.
• E1tiempo mfiximo de grabacidn continua de peliculas es de aproximadamente 13 hora.
• Cuando un archivo de pelicula supera los 2 GB, el siguiente archivo de pelicula se crea automfiticamente.

•Trasencenderlavideoctlmara,estatardarfivariossegundoantesdepodercomenzaragrabar.Duranteestetiempo,nopodnlutilizarlavideoctlmara.
• Sidespu4sdefinalizarlagrabacidnseesttlngrabandotodaviadatosenelsoporte,seindicarfinlossiguientesestados.Duranteestetiempo,noapliquegolpesovibracionesalavideoctlmara,niretirelabateriaoeladaptadordealimentacidndeca-E1indicadordeacceso(ptlg.17)estfiencendidooparpadeando-E1iconodelsoportedelapartesuperiorderechadelapantalladecristallfquidoparpadeaSugerencias
• Cuandosedetecteunacara,aparecerfiunmarcoblancoylacalidaddeimagenalrededordelacaraseoptimizarfidemaneraautomfitica([DETECCIONCARA]).
• Puedecapturarfbtosapartirdelaspelfculasgrabadas.• Consultelap_igina60paraconocereltiempodegrabacidndelaspellculas.• Paracomprobareltiempoylacapacidaddegrabacidnrestantesaproximados,etc.,toque_ (MENU)_"[Mostrarotros]_"[INFOSOPORTE](enlacategorfaQ"_)[GESTIONSOPORTE]).
• Lapantalladecristalllquidodelavideocfimarapuedemostrarimfigenesdegrabacidnentodalapantalla(visualizacidndeplxelescompletos).Sinembargo,estopuedeocasionarunleverecortedelosbordessuperior,infi.,rior,derechoeizquierdodelasirmlgenesalreproducirlasenuntelevisorquenoseacompatibleconlavisualizacidndeplxelescompletos.Enestecaso,ajuste[GUIAFOTOG.]en[ACTIVADO]yutilicecomogulaelmarcoexternoquesemuestraenlapantallaparagrabarimfigenes.
• [g2_STEADYSHOT]estfiajustadoen[ACTIVADO]enelajustepredeterminado.• Paraajustarel_ingulodelpaneldecristallfquido,primeroabraelpaneldecristalllquido90gradosconrespectoalavideocfimara((_)yajusteel_ingulo(@).
@90grados(infix.)
@180 grados (infix.) @ 90 grados
respecto a lavideocfimara
C6digo de datos durante la grabaci6n
La fecha y la hora de grabacidn y las condiciones de fihnacidn se graban autom_iticamente
en el soporte de grabacidn. Esta informacidn no se muestra durante la grabacidn, pero
puede w,rla durante la reproduccidn si toca [CODIGO DATOS]. Para mostrarlas,
toque _ (MENU) ---+ [Mostrar otros] ---+ [AJUSTES REPROD.] (en la categoria
[REPRODUCCION]) ---+el ajuste deseado ---+_ ---+_ ---+ B_I
G3

En el ajuste predeterminado, las fotos se graban en los siguientes soportes.
DCR-SX43: tarjeta de memoria
DCR-SX44/SX63: memoria interna
DCR-SR68/SR88: disco duro interno
Sugerencias
• Consulte la prigina 15 para obtener infbrmacidn acerca de cdmo cambiar el soporte de grabacidn
(DCR-SR68/SR88/SX44/SX63).
Presione MODE para encender el indicador O (Foto).
La visualizacidn de la pantalla de cristal lkluido cambia para el modo de grabacidn de
totos y el tbrmato de la pantalla se ajusta ell 4:3.
Presione PHOTO levemente para ajustar el enfoque y luego presi6nelo
completamente.
• Para grabar iotos, tambi_'n puede tocar _ en la pantalla de cristal llquido.
DCR-SR68/SR88 DCR- SX43/SX44/SX63
Parpadea ---+ Se
enciende
Cuando IMII desaparece, se graba la _bto.
Sugerencias
• Para cambiar el tamafio de la imagen, toque _ (MENU) _ [Mostrar otros] _ [_TAM.IMAGEN]
(en la categorla _ [AJUST.FOTO CAM.]) _ el ajuste deseado _ E! _ _.
• Puede conocer la cantidad de *btos que puede guardar en la pantalla de cristal llquido (prig. 62).

Reproducci6n en lavJdeoc_mara
En el ajuste predeterminado, se reproducen las peliculas y fotos grabadas en los siguientes
medios de grabaci6n.
DCR-SX43: tarjeta de memoria
DCR-SX44/SX63: memoria interna
DCR-SR68/SR88: disco duro interno
Sugerencias
• Consulte la ptlgina 15 para obtener infbrmacidn acerca de cdmo cambiar el soporte de grabacidn
(DCR4R68/SR88/SX44/SX63).
1
2
Abra la pantalla de cristal liquido de la videoc_mara.
La videoc_hnara se enciende.
• Para encender la videoctlmara cuando la pantalla de cristal llquido est_iabierta, presione POWER
(Dig. 13).
Presione _ (VISUALIZAR IMAGENES).
3
Luego de unos segundo, aparece la pantalla VISUAL INDEX.
• Tambi&l puede mostrar la pantalla VISUAL INDEX al tocar _ (VISUALIZAR IMAGENES) en
la pantalla de cristal llquido.
Para reproducir una pelicula, toque _11(Pelicula)(@)--> la pelicula
deseada (@).
Para vet una foto, toque I_ (Foto) ((_) ---> la foto deseada (@).
Las peliculas se muestran y se ordenan por t_,cha de grabacidn.
_,_1-_ _ _'_1
£:
iig,
_3

[] Cambia la visualizacidn del botdn de funcionamiento.
[] A la pantalla MENU
[] Muestra la pantalla para seleccionar el tipo de indice ([INDICE DE FECHAS]/
[ I_mROLLO PELIC,]/[ [] CARA]),
[] _/ml_ : nmestra las peliculas grabadas en la fecha anterior/siguiente. _
[] _/m : nmestra la pelicula anterior/siguiente.
[] Permite volver a la pantalla de grabacidn,
× [_ se muestra cuando se toca [_.
• Toque y arrastre _D_o _E_para desplazar la pantalla.
• I1_1 aparece junto con la pelicula o fbto que se reprodujo o se grab6 mils recientemente. Si toca la
pelicula o fbto con 11_1,puede continuar la reproduccidn desde el momento anterior. (1_ aparece en
la futo grabada en una tarjeta de memoria).
21
Anterior -
Detencidn -
Rebobinado r@ido
Reproducci6n de peliculas
La videoc_hnara comienza a reproducir la pelicula seleccionada.
Ajuste del volumen - _}_ J
......................] iii_il Siguiente
......og_--,I OPTION
Avance r@ido
Pausa/reproduccidn
Sugerencias
• Cuando la reproduccidn desde la pelicula seleccionada llega a la tSltirna pelicula, vuelve a mostrarse la
pantalla VISUAL INDEX.
• Toque I_1"_11/! durante la pausa para reproducir la pelicula a cfimara lenta.
• Si sigue tocando I_'_11/_ durante la reproduccidn, las peliculas se reproducen con un aumento de
velocidad de aproximadamente 5 veces _" 10 veces _" 30 veces _" 60 veces.
• Puede nrostrar la pantalla VISUAL INDEX si toca _ (MENU) _ [Mostrar otros] _" [VISUAL
INDEX] (en la categoria _ [REPRODUCCION]).
• La fecha y la hora de grabacidn y las condiciones de fihnacidn se graban automfiticamente durante
la grabacidn. Esta infbrmacidn no se muestra durante la grabacidn, pero puede verla durante la
reproduccidn si toca _ (MENU) _" [Mostrar otros] _" [AIUSTES REPROD.] (en la categorfa
[REPRODUCCION]) _" [CODIGO DATOS] _" el ajuste deseado _" | _" | _" |.
Para ajustar el volumen del sonido de las peliculas
Durante la reproduccidn de peliculas, toque _ --+ ajuste con I_n/m_lm __+|.

•Tambi&lpuedeajustarelvolumendesonidomediante_/_ enOPTIONMENU.Visualizaci6n de fotos
La videocfimara muestra la foto seleccionada.
Inicio/detenci6n
de presentacion de
Anterim i_a __a[ll diapositivasI( 1-0014 SiguienteIralapantalla-_ --'1"_ _ , _ ,_= -- OPTION
VISUAL INDEX
Sugerencias
• Cuando visualiza fotos grabadas en una tarjeta de memoria, aparece en la pantalla _ _ (carpeta de
reproduccidn).
g,
_5

Reproducci6n de im genes en un televisor
Conecte la videocthnara a la toma de entrada de un televisor o videograbadora mediante
el cable de conexi6n de A/V [] o un cable de conexi6n de A/V con S VIDEO [_. Conecte
la videoc_imara al tomacorriente de pared usando el adaptador de alimentaci6n de ca
suministrado para esta operaci6n (prig. 12). Consulte tambKn los manuales de instrucciones
suministrados con los dispositiw)s que desea conectar.
[] Cable de conexi6n de A/V (suministrado)Conexi6n a otro dispositivo a trav_s de Conector remoto de A/V mediante un cable de conexidnde A/K
[] Cable de conexi6n de A/V con S VIDEO (se vende pot separado)
Si se conecta a otro dispositivo a trav_s de la toma de S VIDEO mediante un cable de conexidnde A/V con un cable S VIDEO (se vende por separado), se pueden producir im£lgenes de ma,_r
calidad que con un cable de conexidn de A/V_ Conecte las clavijas blanca y roja (audio izquierdo/derecho) y la clavija S VIDEO (canal S VIDEO) del cable de conexidn de A/V con el cable
S VIDEO (se vende por separado). La conexidn de la clavija amarilla no es necesaria. Si seconecta s61o la clavija de S VIDEO, no habr£l salida de audio.
DCR-SR68/SR88
Conector remoto de A/V
DCR-SX43/SX44/SX63
IN
tV VIDEO
@ ÷IDEO (Amarillo)
AUDIO® ®
(Blanco) (Rojo)
Televisores
l Videograbadoras"".............. _ (Amarillo)
::::L_, Flujo de sefiales
2;

Ajuste el selector de entrada del televisor a la entrada a la que se conectar_la videoc_mara.
Para conocer los detalles, consulte el manual de instrucciones suministrado con el
televisor.
Conecte la videoc_mara al televisor con el cable de conexidn de A/V (_]
suministrado) o un cable de conexidn de A/V con SVlDEO ([_, se vende pot
separado).
Conecte la videoc_imara a la toma de entrada del televisor.
Reproduzca pel[culas y fotos en la videocamara (Pag. 23).
Para ajustar el formato seg0n el televisor conectado (16:9/4:3)
Toque _ (MENU) ---+ [Mostrar otros] ---+ [MUSTES SALIDA] (en la categona" _5, [A]UST.
GENERALES]) ---+ [TIPO TV] ---+ [16:9] o [4:3] ---+ _ ---+ _ ---+aP,I
AI conectar el televisor a trav_s de una videograbadora
Conecte la videoc_imara a la toma de entrada LINE IN de la videograbadora mediante el cable
de conexidn de A/V. Ajuste el selector de entrada de la videograbadora en LINE (VIDEO 1,
VIDEO 2, etc.).
Si el televisor es monoaural (si el televisor s61o dispone de una toma de entrada de
audio)
Conecte la clavija amarilla del cable de conexidn de A/V a la toma de entrada de video y
conecte la clavija blanca (canal izquieMo) o la clavija roja (canal derecho) a la toma de entrada
de audio del televisor o la videograbadora.
{_Notas
• Cuando conecte la videoc_imara a un televisor compatible con el sistema ID- l/IDa2, ajuste [TWO TV]
en [16:9]. E1televisor cambia autom_iticamente al modo de pantalla completa. Consulte tambi_n losmanuales de instrucciones suministrados con el televisor.
• Si ajusta [TWO TV] en [4:31, puede deteriorarse la calidad de imagen. Asimismo, cuando la relacidn de
aspecto de la imagen grabada cambia entre 16:9 (panor_imica) y 4:3, la imagen puede fluctuar.
o
_7
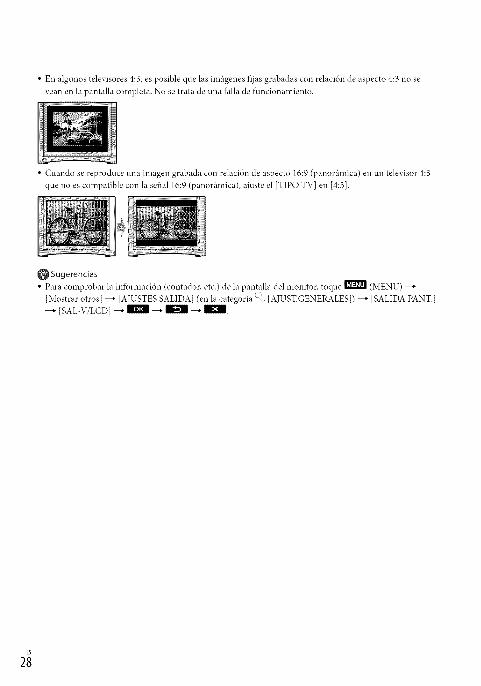
• En algunos televisores 4:3, es posible que las imfigenes fijas grabadas con relacidn de aspecto 4:3 no se
vean en la pantalla completa. No se trata de una fhlla de funcionamiento.
• Cuando se reproduce una imagen grabada con relaci6n de aspecto 16:9 (panorfimica) en un televisor 4:3
que no es compatible con la serial 16:9 (panortlmica), ajuste el [TIPO TV] en [4:3].
Sugerencias
• Para comprobar la infbrmacidn (contador, etc.) de la pantalla del monitor, toque _ (MENU)
[Mostrar otros] _ [AJUSTES SALIDA] (en la categorla _ [AJUST.GENERALES]) _ [SALIDA PANT.]
[SAL_V/LCD] _ _ _ _ _ |.

Eliminaci6n de
peliculas y fotos
Puede liberar espacio ell el soporte de
grabacidn si elimina peliculas y fotosahnacenadas ell _1.
{_ Notas
• Una vez eliminadas, las im_igenes no se
pueden restaurar. Guarde las pellculas y fbtos
importantes de antemano.
• No extraiga la bateria ni el adaptador dealimentacidn de ca de la videoc_imara durante
la eliminaci6n de imtlgenes. Podrla dafiarse el
soporte de grabacidn.
• No extraiga la tarjeta de memoria mientras
elimina imtlgenes almacenadas en ella.
• No es posible eliminar peliculas y fbtos
protegidas. Desactive la proteccidn de
las pellculas y las fbtos antes de intentareliminarlas.
• Si la pelicula eliminada estfi incluida en la
playlist, tambi_n se elimina de la playlist.
|
Sugerencias
• Es posible borrar una imagen de la pantalla de
reproduccidn desde _ OPTION MENU.
• Para elinfinar todas las im_igenes almacenadas
en el soporte de grabacidn y recuperar todo el
espacio disponible en el soporte, lbrmatee el
soporte.
• Las imfigenes de tamafio reducido que
permiten ver varias imfigenes al mismo tiempo
en una pantalla de indice se conocen como"miniat uras".
1 Toque _ (MENU) -_ [Mostrar
otros] -_ [BORRAR] (en la
categoria _ [EDIT]).
Para eliminar peliculas, toque
[fLIt BORRAR] --_ [g::ltBORRAR].
• Para eliminar fbtos, toque [_BORRAR][[] BORRAR].
Toque las peliculas o fotos que
desea eliminar para que se
muestre la marca 4.
• Mantenga presionada la imagen en
la pantalla de cristal llquido para
confirmarla. Toque _ para volver a la
pantalla anterior.
Toque El --_ IS[] --_ _ --_
para borrar todas las peliculas/fotos de
una vez
En el paso 2, toque [ItZItBORRAR] ---+
[g_11BORRAR TODO] ---+ IS{] ---+ [S{]---+
• Para elinfinar todas las fotos a la vez, toque
[[]BORRAR] _ [[]BORRAR TODO][sf] -, [sf] --, IEI -, _.
Para borrar a la vez todas las peliculas/fotos grabadas el mismo dia
_) Notas
• No es posible eliminar las fbtos de la tarjeta de
memoria por fbcha de grabacidn.
(_)En el paso 2, toque [IVItBORRAR] ---+
[ ItztlBORRAR p.fecha].
C
g,
m
<.
_9

• Para diminar a la vez todas las tbtos del
mismo dia, toque [[]BORRAR]
[ [] BORRAR p.lbcha].
(_) Toque I_/_ para seleccionar la
fk,cha de grabacidn de las peliculas/fbtos
que &see B a continuacidn, toque Jill• Toque la imagen en la pantalla de cristal
llquido para confirmarla. T_Nuepara volver a la pantalla anterior.
@Toque [SI] ---+_ ---+ _'-_
3;
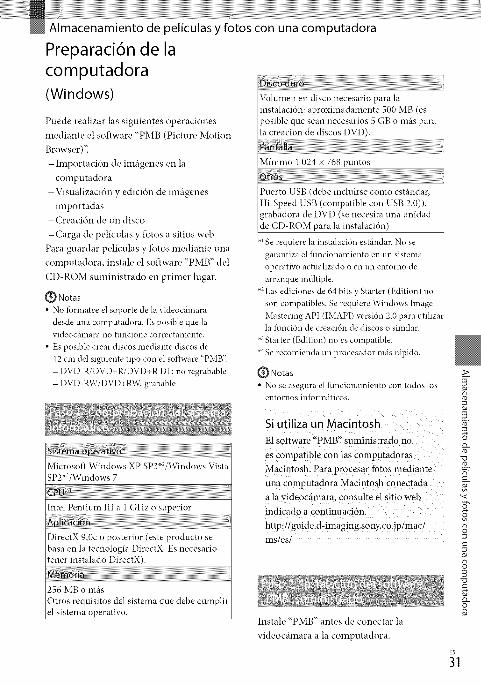
Preparaci6n de la
computadora
(Windows)
Puede realizar las siguientes operaciones
mediante el software "PMB (Picture Motion
Browser)".
-hnportaci6n de im_igenes en la
computadora
-Visualizaci6n y edici6n de im_igenes
importadas
- Creaci6n de un disco
- Carga de peliculas y fotos a sitios web
Para guardar peliculas y fbtos mediante una
computadora, instale el software "PMB" del
CD-ROM suministrado en primer lugar.
I_ Notas
• No f_mnatee el soporte de la videocfimara
desde una computadora. Es posible que lavideoctlmara no funcione correctamente.
• Es posible crear discos mediante discos de
12 cm del siguiente tipo con el software "PMB".
- DVD R/DVD+R/DVD+R DL: no regrabable
- DVD-RW/DVD+RW: grabable
Microsoft Windows XP SP3_2/Windows VistaSP2×3/_rindows 7
U ..................................
Intel Pentium III a 1 GHz o superior
iiDirectX 9,0c o posterior (este producto sebasa en la tecnologla DirectX. Es necesario
tenet instalado DirectX).
256 MB o mils
Otros requisitos del sistema que debe cumplirel sistema operativo.
Vohunen en disco necesario para lainstalacidn: aproximadamente 500 MB (es
posible que sean necesarios 5 GB o m{ls parala creacion de discos DVD).
Mfnimo 1 024 x 768 puntos
Puerto USB (debe incluirse como estfindar,
Hi-Speed USB (compatible con USB 2.0)),grabadora de DVD (se necesita una unidad
de CD-ROM para la instalaci6n)
< Se requiere la instalacidn esffmdar. No se
garantiza el funcionamiento en un sistema
operativo actualizado o en un entorno de
arranque m61tiple.
.×2Las ediciones de 64 bits y Starter (Edition) no
son compatibles. Se requiere Windows hnage
Mastering API (IMAPI) versidn 2,0 para utilizarla funcidn de creacidn de discos o similar.
.×3Starter (Edition) no es compatible.
.×4Se recomienda un procesador mils r@ido.
(_ Notas
• No se asegura el funcionamiento con todos losentornos informfiticos.
Si utiliza un Macintosh
E1 software "PMB" suministrado no
es compatible con las computadoras
Macintosh. Para procesar fotos mediante
una computadora Macintosh conectada
a la videoc_imara, consulte el sitio web
indicado a continuacion.
http://guide.d-imaging.sony.co.jp/mac/
lns/es/
Instale "PMB" antes de conectar la
videooimara a la computadora.
3>
g
o
c
,<
3
==
3
o

Q Notas
• Si hay instalada una versidn de "PMB" anterior
a la 5,0,00 en la computadora, puede iniciar
todas las aplicaciones desde "PMB Launcher"al instalar el software desde el CD-ROM
suministrado. Haga doble clic en el icono de
acceso directo "PMB Launcher" en la pantalla
de la computadora para abrir el so/iware.
• Si hay instalada una versidn de "PMB" anterior
a la 5,0,00 en la computadora, es posible qne
no pueda utilizar algunas fimciones de estesoftware.
Confirme que la videoc_mara no
est_ conectada a la computadora.
Encienda la computadora.
• Inicie sesidn como administrador pararealizar la instalacidn.
• Cierre todas las aplicaciones que se est('n
ejecutando en la computadora antes deinstalar el software.
Coloque el CD-ROM suministrado
en la unidad de disco de la
computadora.
Aparecer_i la pantalla de instalacidn.
• Si la pantalla no aparece, haga clic en
[Iniciol _ [Equipol (en Windows XR [Mi
PC]) y, a continuacidn, haga doble clic en
[SONYPMB (E:)] (CD-ROM) _.
× Los nombres de las unidades (como
(E:)) pueden variar en funcidn de la
computadora.
Haga clic en [Instalaci6n].
Seleccione el pais o la regi6n.
Seleccione el idioma del
programa que desea instalar
y continOe con la siguiente
pantalla.
@
N
N
Lea detenidamente las
condiciones del acuerdo de
licencia. Si est_ de acuerdo con
las condiciones, cambie O a
y, a continuaci6n, haga clic en
[Siguiente] --_ [Instalar].
Encienda la videoc_mara y
con&tela a la computadoramediante el cable USB
suministrado.
La pantalla [SELEC.USB] aparece
en la pantalla de la videoc_imara
autom_iticamente.
Toque uno de los tipos de
soporte que se muestran
en la pantalla para que la
computadora reconozca lavideoc_mara.
[O CONEXION USB]: disco duro
interno (DCR-SR68/SR88)
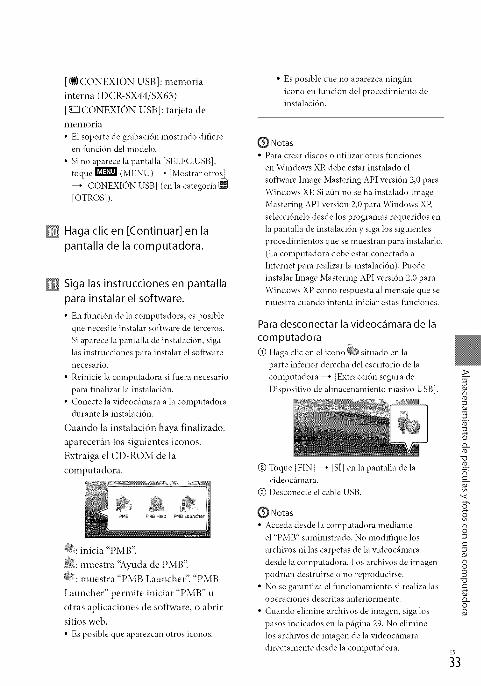
[ (_ CONEXION USB]: memoria
interna (DCR-SX44/SX63)
[_ CONEXION USB]: tarjeta de
melnoria
• E1soporte de grabaci6n mostrado difiereen itmci6n del modelo.
• Si no aparece la pantalla [SELEC.USB],
toque _ (MENU) _ [Mostrar otros]
[CONEXION USB] (en la categoria
[OTROS]).
Haga clic en [Continuar] en la
pantalla de la computadora.
Siga las instrucciones en pantalla
para instalar el software.
• En funci6n de la computadora, es posible
que necesite instalar software de terceros.
Si aparece la pantalla de instalaci6n, siga
las instrucciones para instalar el softwarenecesario.
• Reinicie la computadora si fuera necesario
para finalizar la instalaci6n.
• Conecte la videocfimara a la computadoradurante la instalaci6n.
Cuando la instalaci6n haya finalizado,
aparecertin los siguientes iconos.
Extraiga el CD-ROM de la
computadora.
_:*: inicia "PMB".
_: muestra "Ayuda de PMB".
g?: muestra "PMB Launcher". "PMB
Launcher" pennite iniciar "PMB" u
otras aplicaciones de software, o abrirsitios web.
• Es posible qne aparezcan otros iconos.
• Es posible que no aparezca ningdn
icono en funci6n del procedimiento deinstalacidn.
Notas
• Para crear discos o utilizar otras funciones
en Windows XR debe estar instalado el
software hnage Mastering API versidn 2,0 para
Windows XR Si afin no se ha instalado Image
Mastering API versidn 2,0 para Windows XR
seleccidnelo desde los programas requeridos en
la pantalla de instalacidn y siga los siguientes
procedimientos que se muestran para instalarlo.
(La computadora debe estar conectada a
Internet para realizar la instalacidn). Puede
instalar hnage Mastering API versidn 2,0 para
Windows XP como respuesta al mensaje que semuestra cuando intenta iniciar estas lhnciones.
Para desconectar la videockmara de la
computadora
@ Haga clic en el icono _ situado en la
parte infi.'rior derecha del escritorio de la
computadora _ [Extracci6n segura de
Dispositivo de ahnacenamiento masivo USB].
@ Toque [FIN] _ [SI] en la pantalla de la
videoc_imara.
@ Desconecte el cable USB.
Notas
• Acceda desde la computadora mediante
el "PMB" suministrado. No modifique los
archivos ni las carpetas de la videocfimara
desde la computadora. Los archivos de imagen
podrian destruirse o no reproducirse.
• No se garantiza el funcionamiento si realiza las
operaciones descritas anteriormente.
• Cuando elimine archivos de imagen, siga los
pasos indicados en la pfigina 29. No elimine
los archivos de imagen de la videoc_imara
directamente desde la computadora.
3>
g
o
¥c
,<
3
3
o_0
_3

• No copie los archivos en el soporte de grabacidn
desde la computadora. No se garantiza elfuncionamiento.
Inicio de PMB (Picture
Motion Browser)
Haga done clic en el icono de acceso
directo de "PMB" en la pantalla de la
computadora.
(_ Notas
• Si el icono no se muestra en la pantalla de la
computadora, haga @cen [Inicio] _ [Todos
los programas] _ [ PMB] para mlclar
"PMB'_
Puede visualizar, editar o crear discos de
peliculas y fbtos mediante "PMB".
Si desea obtener m_is informacidn acerca
de la utilizacidn de "PMB", lea la "Ayuda de
PMB". Haga done clic en el icono de acceso
directo "Ayuda de PMB" en la pantalla de la
computadora para abrirla.
_ Notas
• Si el icono no se muestra en la pantalla de la
computadora, haga clic en [Inicio] _ [Todos
los programas] --_ [PMB] _ [Ayuda de PMB].
Asimismo, puede abrir la 'Ayuda de PMB"
desde la [Ayuda] de "PMB'_

Creaci6n de un disco
con un solo toque
(OneTouch Disc Burn)
Las peliculas y las fotos grabadas en la
videocthnara que no se hayan guardado con
la funci6n One Touch Disc Burn se pueden
guardar automtiticamente en un disco.
• Instale en primer lugar "PMB" (Dig. 31); sin
embargo, no inicie "PMB".• Conecte la videoc_imara al tomacorriente de
pared mediante el adaptador de alimentaci6n
de ca smninistrado para realizar esta operacidn
(p_ig. 12).• Con la funcidn One Touch Disc Burn
de la videoc_imara, es posible guardar
pelfculas y fbtos grabadas finicamente
en el soporte de grabaci6n interno
(DCR- SR68/SR88/SX44/SX63 ).
1Encienda la computadora y
coloque un disco no utilizado
anteriormente en la unidad de
DVD.
• Consulte la p_igina 31 para obtener
infbrmaci6n acerca de los discos que
puede utilizar.• Si un software dif_.'rente a "PMB" se inicia
autom_iticamente, ci4rrelo.
Encienda la videocamara y
conOctela a la computadoramediante el cable USB
suministrado.
Presione *_)(DISC BURN).
Siga las instrucciones de la
pantalla de la computadora.
Notas
• Las pellculas y las fbtos no se guardan en la
computadora cuando lleva a cabo la funci6nOne Touch Disc Burn.
3>
o
¥c__
,<
o3
3
o
_5

Importaci6n depeliculas y fotos a una
computadora
Las peliculas y las fbtografias grabadas en
la videoc_imara se pueden importar a una
computadora. Encienda la computadora en
primer lugar.
_) Notas
• Conecte la videoc_imara al tomacorriente de
pared usando el adaptador de alimentaci6n deca suministrado para esta operacidn (Dig. 12).
Encienda la videoc_mara y
con_ctela a la computadora
mediante el cable USB
suministrado.
3
La ventana [hnportar] aparece ell la
pantalla de la computadora.
Haga clic en [Importar].
• Consulte la "Ayuda de PMB" (p_ig. 34) si
desea obtener rntls il_ibrmacidn.
Las peliculas y las totos se importar_in a
la computadora.
Una vez finalizada la operaci6n,
aparecer_i la pantalla "PMB".
3;
2
La pantalla [SELEC.USB] aparece ell la
pantalla de la videocthnara.
Toque en la pantalla de la
videoc_mara el soporte de
grabaci6n que contiene las
im_genes que desea guardar.
[0 CONEXIC)N USB]: disco duro
interno
[1_ CONEXION USB]: memoria
interna
[_CONEXION USB]: tarjeta de
n'tel-l'tor ia
• E1soporte de grabaci6n mostrado difiereen foncidn del modelo.
• Sino aparece la pantalla [SELEC.USB],toque _ (MENU) _ [Mostrar otros]
ICONEXION USB] (en la caegoria _
[OTROS]).

Creaci6n de un disco
Para crear un disco, puede seleccionar
las peliculas importadas previamente a la
computadora (p_g. 36).
Encienda la computadora y
coloque un disco no utilizadoanteriormente en la unidad deDVD.
• Consulte la p_igina 31 para obtener
infbrmacidn acerca de los discos que
puede utilizar.• Si un software difi:rente a "PMB" se inicia
autormiticamente, ci4rrelo.
Inicie"PMB"(p_g. 34).
Haga clic en [Calendario] o
[[ndice] en el lateral izquierdo de
la ventana y seleccione la carpeta
o la fecha y, a continuaci6n,
seleccione las peliculas.
• Para seleccionar varias pellculas, lnantenga
presionada la tecla Ctrl y haga clic en las
imfigenes en miniatura.
En la parte superior de la
ventana, haga clic en _ --_
[Crear discos formato DVD-Video
(STD)].
Se abre law, ntana de seleccidn de
peliculas.
• Para afiadir pellculas alas seleccionadas
anteriormente, selecci6nelas en la ventana
principal, y arrfistrelas y su{'ltelas en la
ventana de seleccidn de pellculas.
Siga las instrucciones en pantalla
para crear un disco.
• La creaci6n de un disco puede tardarbastante.
Copia de un disco
Es posible copiar un disco grabado a otto
disco mediante la aplicaci6n %qdeo Disc
Copier".
Haga clic en [Inicio] --+ [Todos los
programas] -4 [PMB] -4 [PMB
Launcher] -4 [Creacion del disco]
--+ [Video Disc Copier] para iniciar el
software. Para obtener m_s informaci6n
sobre e] funcionamiento, consulte la
ayuda de "Video Disc Copier.
Edici6n de peliculas
Es posible cortar las partes de una
pelicula que se consideran necesarias y
guardarlas como un archivo separado.
Haga doble clic en la pelicula que desea
editar en "PMB" y, a continuacion.
haga clic en [Mostrar pMeta de edicidnl
en el lateral derecho de la pantalla -_
[Recortar video], o seleccione el memi
[Manipular] -4 [Editar] --_ [Recortar
video]. Para obtener m_s detalles.
consulte 'Ayuda de PMB" (prig. 34',
3>
g
o
,<
8
8
o
_7

Captura de fotos desde unapelicu la
Es posible guardar un fotograma de una
pelicula como un archivo de fotografia.
Haga done clic en la pelicula que desea
editar en _'PMB" y. a continuacion.
haga dic en [Mostrar paleta de edicidn]
en el lateral derecho de la pantalla
[Guardar fotograma]. Para obtener
mtis detalles, consulte _Ayuda de PMB"
(p_g. 34).

Archivo de im genes
en un soporte externo(COPIA DIRECTA)
Es posible guardar las peliculas y fbtos
en un soporte externo (dispositiw_ de
ahnacenamiento USB), tal como una
unidad de disco duro externa. Tambi{,n
puede reproducir im_igenes en la
videocthnara o en otto dispositiw_ de
reproducci6n.
{_ Notas
• Para realizar esta operaci6n, se necesita tm cable
adaptador USB VMC-UAM1 (se vende pot
separado).
• Es posible que el cable adaptador USB VMC
UAM1 no est{' disponible en algunos palses o
regiones.
• No puede utilizar los siguientes dispositivos
conlo soportes externos.
- soportes con una capacidad superior a 2 TB
- unidad de disco comdn, tal como una unidadde CD o DVD
- soportes conectados a trav4s de unconcentrador USB
- soportes con un concentrador USB
incorporado
- lector de tarjetas
• Tal vez no sea posible utilizar soportes externos
con una funci6n de cddigo.
• E1sistema de archivos FAT estti disponible
para la videoctimara. Si el soporte externo se*brmate6 con el sistema de archivos NTFS o
similar, fbrmat{'elo en la videoc_imara antes
de utilizarlo. Aparecer_i la pantalla de *brmato
cuando el soporte externo se conecte a la
videoctimara.
• No se asegura el funcionamiento con todos los
dispositivos conectables.• Conecte la videoc_imara al tomacorriente de
pared mediante el adaptador de alimentaci6n de
ca suministrado (Dig. 12).• Consulte el manual de instrucciones
smninistrado con el soporte externo.
• Consulte detalles de los soportes externos qne
se pueden utilizar en la Digina de soporte de
Sony de su pals o regi6n.
1
2
3
4
Conecte el adaptador de
alimentaci6n de ca y el cable
de alimentaci6n a la toma
DC IN de la videocamara y al
tomacorriente de pared.
Si el soporte externo dispone deun cable de alimentaci6n de ca
conOctelo al tomacorriente de
pared.
Conecte el cable adaptador USB
al soporte externo.
Conecte el cable adaptadorUSB a la toma _ (USB) de la
videocamara.
Cuando aparezca la pantalla
[Crear nuevo arch.base de datos de
imtigenes.], toque [SI]. 3>
o
=*
3
D-
-g
o
o
_9
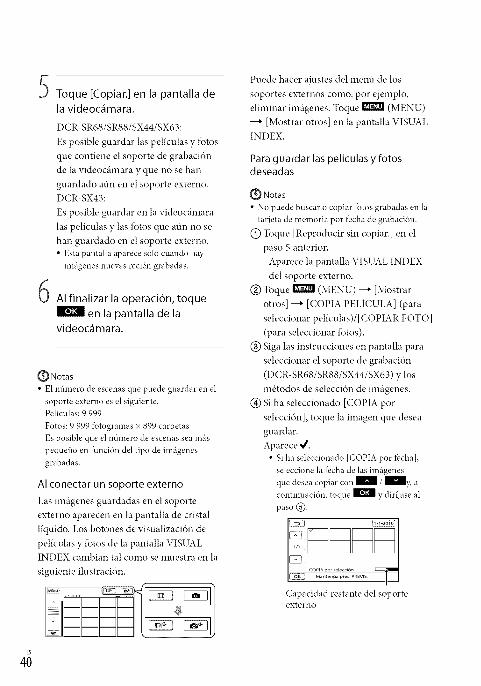
Toque [Copiar.] en la pantalla de
la videoc_mara.
DCR-SR68/SR88/SX44/SX63:
Es posible guardar las peliculas y fbtos
que contiene el soporte de grabaci6n
de la videoc_imara y que no se han
guardado afin en el soporte externo.DCR-SX43:
Es posible guardar en la videoc_imara
las peliculas y las fbtos que afin no se
han guardado en el soporte externo.• Esta pantalla aparece sdlo cuando hay
im_igenesnuevas reci{'ngrabadas.
AI finalizar la operaci6n, toque
en la pantalla de lavideoc_mara.
Q Notas
• E1ndmero de escenas que puede guardar en el
soporte externo es el siguiente.Pellculas: 9 999
Fotos: 9 999 fbtogramas × 899 carpetas
Es posible que el nfimero de escenas sea m_is
pequeflo en funcidn del tipo de im_igenes
grabadas.
AI conectar un soporte externo
Las im_igenes guardadas en el soporte
externo aparecen en la pantalla de cristal
liquido. Los botones de visualizaci6n de
peliculas y fbtos de la pantalla VISUALINDEX cambian tal como se muestra en la
siguiente ilustraci6n.
Puede hacer ajustes del mend de los
soportes externos como, por ejemplo,
eliminar imtigenes. Toque _ (MENU)
---+ [Mostrar otros] en la pantalla VISUALINDEX.
Para guardar las peliculas y fotosdeseadas
Q Notas
• No puede buscar o copiar lbtos grabadas en latarjeta de memoria pot fbchade grabacidn.
(_) Toque [Reproducir sin copiar.] en el
paso 5 anterior.
Aparece la pantalla VISUAL INDEX
del soporte externo.
@ Toque _ (MENU) ---+ [Mostrar
otros] ---+ [COPIA PELICULA] (para
seleccionar peliculas)/[COPIAR FOTO]
(para seleccionar fotos).
@ Siga las instrucciones en pantalla para
seleccionar el soporte de grabaci6n
(DCR-SR68/SR88/SX44/SX63) y los
m_,todos de selecci6n de imtigenes.
(_) Si ha seleccionado [COPIA pot
selecci6n], toque la imagen que desea
guardar.
Aparece 4.• Si ha seleccionado [COPIApor lbcha],
seleccione la fbchade las imtlgenesque desea copiar con _ / _y, acontinuaci6n, toque E! ydirljase al
paso (_).
Capacidad restante del soporteexterno

• Mantenga presionada la imagen en
la pantalla de cristal liqnido paraconfirmarla. Toque _ para volver a la
pantalla anterior.
• A1tocar la f_cha, puede buscar imrigenes
por la f_cha.
@Toque _ ---+ [Sf] ---+ | en la
pantalla de la videoc_imara.
Para reproducir imkgenes del soporte
externo en la videockmara
(_) Toque [Reproducir sin copiar.] en el
paso 5 anterior.
Aparece la pantalla VISUAL INDEX del
soporte externo.
@ Reproduzca la imagen (prig. 23).
• Tambi_n puede ver las imrigenes en untelevisor conectado a la videocrimara
(prig. 26).
_} Notas
• No se puede mostrar el indice de fbchas delbtos.
• Si la videocrimara no reconoce el soporte
externo, intente las siguientes operaciones.
- Vuelva a conectar el cable adaptador USB a lavideocrimara
- Si el soporte externo dispone de un cable dealimentacidn de ca con&telo al tomacorriente
de pared
Para terminar la conexi6n del soporteexterno
@ Toque II_ en la pantalla VISUAL
INDEX del soporte externo.
@ Desconecte el cableadaptador USB.
Creaci6n de un disco
con una grabadora deDVD
Es posible crear un disco o reproducir las
ilmigenes de un disco creado usando la
grabadora de DVD especifica, DVDirect
Express (sew, nde por separado).
Consulte tambi{,n los manuales de
instrucciones suministrados con la
grabadora de DVD.
_ Notas• Conecte la videocrimara al tomacorriente de
pared usando el adaptador de alimentaci6n de
ca smninistrado para esta operacidn (prig. 12).
• Sdlo se pueden utilizar discos no utilizados
anteriormente de los siguientes tipos:- DVD Rde 12 cm
- DVD+R de 12 cm
• E1dispositivo no es compatible con discos de
doble capa.
• En esta seccidn, DVDirect Express recibe el
nombre de "grabadora de DVD'_
@ Conecte el adaptador de
alimentaci6n de ca y el cablede alimentaci6n a la toma
DC IN de la videocamara y al
tomacorriente de pared (pag. 12).
N Encienda la videocamara
y conecte la grabadora deDVD en la toma _ (USB) de la
videocamara con el cable USB de
la grabadora de DVD.
3>7,
o
n
g
o_
o
.¢
o

Toque IE! y, a continuaci6n,desconecte el cable USB.
N
H
N
Inserte un disco no utilizado
anteriormente en la grabadora de
DVD y cierre la bandeja de discos.
La pantalla [GRABAR EN DISCO]
aparece en la pantalla de lavideoc_imara.
Presione _ (DISC BURN) en la
grabadora de DVD.
Las peliculas grabadas en el soporte
de grabacidn interno que no se han
guardado en ningtin disco se grabar_in
en el disco (DCR-SR68/SR88/SX44/
SX63),
Las peliculas que no se han guardado
en ningtin disco se grabartin en el disco
(DCR-SX43).
Repita los pasos 3 y 4 cuandoel tamafio de memoria total de
las peliculas que desea grabar
supere el tamaflo del disco.
N Toque _ --_ [FIN] --_
[EXPULSAR DISCO] en la pantallade la videoc_mara.
Extraiga el disco una vez que finalice la
operacidn,
Para personalizar un disco con OPC.GRAB.DISCO
Llew' a cabo esta operacidn en los
siguientes casos:- A1copiar una imagen deseada
- A1crear varias copias del mismo disco- A1copiar im_igenesen la tarjeta de memoria
(DCR SR68/SR88/SX44/SX63)
(_) Toque [OPC.GRAB.DISCO] en el paso4,
@ Seleccione el soporte de grabacidn que
contiene las peliculas que &sea guardar
(DCR SR68/SR88/SX44/SX63).
@ Toque la pelicula que &sea grabar en eldisco,
Aparece 4.
Capacidad restante del disco
• Mantenga presionada la imagen en
la pantalla de cristal liquido paraconfirmarla. Toque _ para volver a la
pantalla anterior.
• AI tocar la fecha, puede buscar imtlgenes
por la fecha.
@ Toque _ ---+ [SI] en la pantalla de la
videoc_imara.
• Para crear otto disco con el mismo
contenido, inserte un disco nuevo y toque
[CREAR UN DISC() IGUAL].
@ A1 finalizar la operaci6n, toque
[SALIR] ---+ [FIN] en la pantalla de la
videoc_imara.

(_) Desconecte el cable USB de la
videoc_imara.
Para reproducir un disco en elreproductor de DVD
(!) Conecte el adaptador de alimentaci6n
de ca y el cable de alimentaci6n a la
toma de DC IN de la videoc_imara y al
tomacorriente de pared (p_ig. 12).
(_) Encienda la videoc_hnara y conecte la
grabadora de DVD en la toma q_(USB)
de la videoc_imara con el cable USB de la
grabadora de DVD.
• Puede repro&_cirpdlc/llas en la pantalladel televisor si conecta la videoc_imaraa un
televisor (p_'_g.26).
@ Inserte un disco creado en la grabadorade DVD.
Las peliculas del disco aparecen como
VISUAL INDEX en la pantalla de la
videoc_hnara,
@ Presione el bot(m reproducci(m de la
grabadora de DVD.
• Tambi&npuede operar la reproduccidnmediante la videoc_imara.
@Toque [FIN] ---+ [EXPULSAR DISCO]
en la pantalla de la videoc_imara y
extraiga el disco una vez que finalice la
operaci6n,
@ Toque _ y desconecte el cable USB.
(_ Notas
• No realice ninguna de las acciones siguientesmientras crea un disco.
- Apagarla videoc_imara
- Desconectar el cable USB o el adaptador dealimentaci6n de ca
- Someter la videoclmmra a go]pes ovibraciones
- Expulsar la tarjeta de memoria de lavideocg_mara
• Reproduzca el disco creado para asegurarse deque la copia se realizd correctamente antes de
eliminar las pelictflas de la videoc_imara.
• Si [Se produjo un error.] o [Error al ejecutar
GRABAR EN DISCO.] aparecen en la pantalla,
iJ_serte otto disco en la grabadora de DVD y
repita la operaci6n de DISC BURN.
Sugerencias
• Si el tamafio de memoria total de las pellculas
que se van a grabar mediante la operaci6n DISC
BURN supera el tamaflo del disco, la creacidn
del disco se detendr_'_ al alcanzar el lfinite de
tamaflo. Es posible que la tiltima pellcula del
disco qnede incompleta.
• E1 tiempo de creaci6n del disco para copiar
pellculas hasta completar la capacidad total del
disco es de entre 20 y 60 minuto. Puede 1]ew_r
m_is tiempo en funci6n del modo de grabacidno de la cantidad de escenas.
• Si no puede reproducir los discos creados
en ningdn reproductor de DVD, conecte
la videoc_imara a la grabadora de DVD y
reprod0zca]os.
Es posible guardar peliculas en un disco si
conecta la videoc_hnara a los dispositiw)s
de creaci6n de discos, como una grabadora
de DVD de SoW que no sea DVDirect
Express, con el cable USB, Consultetambi{,n los manuales de instrucciones
suministrados con los dispositiw)s quedesea conectar.
3>
©
3
_g
©
©
Es
43

O Notas
• Es posible que la grabadora de DVD de Sony no
est,' disponible en algunos palses o regiones.• Conecte la videocrimara al tomacorriente de
pared usando el adaptador de alimentacidn de
ca smninistrado para esta operacidn (prig. 12).
@ Conecte el adaptador de
alimentaci6n de ca y el cablede alimentaci6n a la toma
DC IN de la videoc_mara y al
tomacorriente de pared (p_g. 12).
N Encienda la videoc_mara y
conecte una grabadora de DVD,etc. a la toma _ (USB) de la
videoc_mara mediante el cable
USB (suministrado).
[O CONEXION USB]: disco duro
interno
[_ CONEXION USB]: memoria
interna
[_ CONEXION USB]: tarjeta demelnoria
• E1 soporte de grabacidn mostrado difiereen %ncidn del modelo.
Grabe las pel[culas en el
dispositivo conectado.
• Para obtener mris detalles, consulte el
manual de instrucciones suministrado de
los dispositivos que conecte.
AI finalizar la operaci6n, toque[FIN] --_ [S[] en la pantalla de lavideoc_mara.
Desconecte el cable USB.
41
La pantalla [SELEC.USB] aparece en la
pantalla de la videoc_imara.
• Si no aparece la pantalla [SELEC.USB],toque _ (MENU) _ [Mostrar otros]
[CONEXION USB] (en la categorla _._')
[OTROS]).
Toque en la pantalla de la
videograbadora el soporte de
grabaci6n que contiene las
im_genes.
Puede copiar im_igenes reproducidas en la
videocthnara en un disco o videocasete si
conecta la videoctimara a una grabadora
de discos, una grabadora de DVD de Sony,
etc., distinta de DVDirect Express, con
el cable de conexi6n de A/V. Conecte el
dispositiw_ de una de las maneras indicadas
en las ilustraciones [] o [_. Consultetambi_,n los manuales de instrucciones
suministrados con los dispositivos que
desea conectar.

(_ Notas
• Conecte la videocfimara al tomacorriente de
pared usando el adaptador de alimentacidn de
ca suministrado para esta operacidn (ptlg. 12).
• Es posible que la grabadora de DVD de Sony no
est_ disponible en algunos paises o regiones.
[] Cable de conexi6n de A/V
(suministrado)Conecte el cable de conexion de A/V a la
toma de entrada de otro dispositivo.
[] Cable de conexidn de A/V con SVIDEO
(se vende pot separado)
Si se conecta a otro dispositivo a trav_s dela toma de S VIDEO mediante un cable de
conexidn de A/V con un cable S VIDEO
(se vende por separado), se pueden
producir im_igenes de mayor calidad quecon un cable de conexion de A/_ Conecte
las clavijas blanca y roja (audio izquierdo/derecho) y la clavija S VIDEO (canal
S VIDEO) del cable de conexion deA/V con el cable S VIDEO. Si conecta
solamente la clavija S VIDEO, no se oirfisonido. La conexidn de la clavija amarilla
(video) no es necesaria.
Conector remoto de A/V
Entrada
SVIDEO
VII)EO
N]-- ®4(Amarillo)
(Blanco)
z> f®_AUDIO
L®_(Rojo)
(Amarillo)
....... Flujo de setSales
Introduzca el soporte de
grabaci6n en el dispositivo de
grabaci6n.
3>
o
8
o_
E"o
Bo
_5
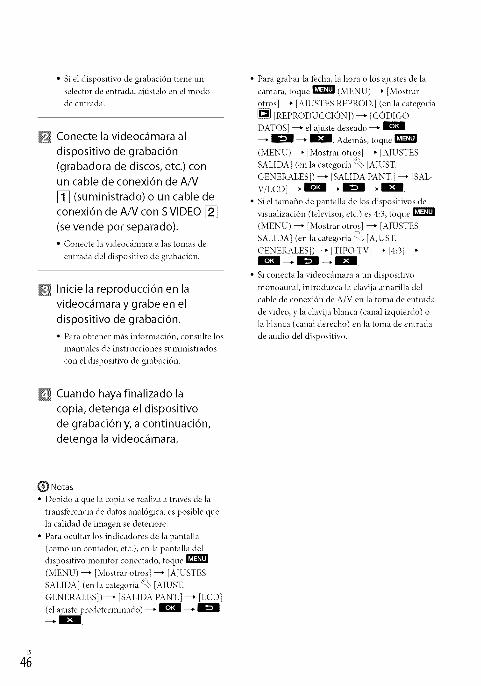
• Si el dispositivo de grabacidn tiene un
selector de entrada, ajfistelo en el modode entrada.
Conecte la videoc_mara al
dispositivo de grabaci6n
(grabadora de discos, etc.) con
un cable de conexi6n de A/V
[] (suministrado) o un cable de
conexi6n de A/V con SVlDEO []
(se vende pot separado).
• Conecte la videoc_imara a las tomas de
entrada del dispositivo de grabacidn.
Inicie la reproducci6n en la
videoc_mara y grabe en el
dispositivo de grabaci6n.
• Para obtener rmls informaci6n, consulte los
manuales de instrucciones suministrados
con el dispositivo de grabacidn.
Cuando haya finalizado la
copia, detenga el dispositivo
de grabaci6n y, a continuaci6n,
detenga la videoc_mara.
• Para grabar la fecha, la hora o los ajustes de la
c_imara, toque _ (MENU) _ [Mostrar
otros] _ [AJUSTES REPROD.] (en la categorfa{l_ll [REPRODUCCION]) _ [C0DIGO
DATOS] _ el ajuste deseado _
_ _ _. Ademtls, toque
(MENU) _ [Mostrar otros] _ [AJUSTES
SALIDA] (en la categoria e_ [AJUST.
GENERALES]) --+ [SALIDA PANT.] --+ [SAL-V/LCD] _ _ _ _ _ _.
• Si el tamafio de pantalla de los dispositivos de
visualizacidn (televisor, etc.) es 4:3, toque
(MENU) _ [Mostrar otros] -_ [AJUSTESSALIDA] (en la categorla _ [AJUST.
GENERALES]) --+ [TIPO TV] _ [4:3]___ ___ n___.
• Si conecta la videocfimara a un dispositivo
monoaural, introduzca la clavija amarilla delcable de conexidn de A/V en la toma de entrada
de video, y la clavija blanca (canal izquierdo) o
la blanca (canal derecho) en la toma de entrada
de audio del dispositivo.
Notas
• Debido a que la copia se realiza a trav4s de la
transferencia de datos anal6gica, es posible que
la calidad de imagen se deteriore.
• Para ocultar los indicadores de la pantalla
(como un contador, etc.), en la pantalla del
dispositivo monitor conectado, toque
(MENU) _ [Mostrar otros] --* [AJUSTES
SALIDA] (en la categorla e_ [AJUST.
GENERALES]) _ [SALIDA PANT.] _ [LCD]
(el ajuste predeterminado) _ E! __.
4;

Uso de los menOs
Mediante la utilizacidn de los memis, es posible ejecutar funciones utiles y cambiar diw, rsos
ajustes, Si utiliza correctamente los mends, puede disfrutar de la utilizaci6n de la videocthnara,
La videocthnara dispone de diw, rsos elementos de mend en cada una de las ocho categorias de
mend,
AJUST.MANUALES (Elementos para ajustar las condiciones de la escena) --*
p6g. 50
{_ AJUSTES TOMA (Elementos para toma de im6genes personalizada) --* p6g. 50
AJUST.FOTO CAM. (Elementos para la grabaci6n de fotos) --* p6g. 50
REPRODUCCION (Elementos para la reproducci6n) --* p6g. 50
EDIT (Elementos para la edici6n) --* p6g. 51
OTROS (Elementos para otros ajustes) --* p6g. 51
GESTION SOPORTE (Elementos para los soportes de grabaci6n) --* p6g. 51
AJUST.GENERALES (Otros elementos de la configuraci6n) --* p6g. 52
• Los elementos de menfi se describen detalladamente en la Gula pr_ictica de "Han@cam".
-- _ / _ : la lista del lnenfi se mueve de categoria a categoria.
/ _ : la lista del lnenfi se mueve de a 4 elementos al mismo tiempo,
• Puede tocar los botones y arrastrar la pantalla para desplazarse pot la lista del mend.
• E1icono de la categorla seleccionada se muestra de color narania.
• Tambi&a puede volver a la pantalla MI MENI.) si toca _ cuando se muestra.
(_) Toque r_q_l
@ Toque [Mostrar otros] en la pantalla de MI MENI2.• Consulte la Digina siguiente para obtener detalles sobreMI MENI].
@ Toque la parte central del lado de izquierdo de la pantalla para cambiar la visualizacidn,
@ Toque el elemento de ment'l que va a cambiar.
@ Despu& de cambiar el ajuste, toque |.
g
N-<
R
_0
_7

Para terminar el ajuste del mend, toque _.
Para volver a la pantalla de mend anterior, toque
• Es posible qne no semuestre _ segdn el elemento del men6.
@ Notas
• Segfin las condiciones de grabacidn o reproduccidn, es posible qne no se puedan ajustar algunoselementos de men6.
• Los elementos de men6 o ajustes atenuados no esffm disponibles.
Sugerencias
• En funcidn de los elementos de menfl que cambien, la videoctlmara alterna entre el modo de
reproduccidn y el modo de grabacidn (pelicula/fbto).
Es posible utilizar los elementos de lnenu ln_s fScilmente si registra los elementos de lnenu
que utiliza con m_is frecuencia ell MI MENI). Es posible registrar 6 elementos de lnenu ell
cada MI MENI2 de PELICULA, FOTO y REPRODUCCION.
Ejemplo: eliminar [MED./ENF.PUNTO] y registrar [g:::llDESVANECEDOR]
(9_/
_ AJUSTMANU^L_S
^ _i777iii_iii_i_ 7771
(_) Toque I_'d_
@ Toque [AJUSTE MI MENI2].
@ Toque [PELICULA].
@ Toque [MED./ENEPUNTO].
@ Toque i'_
@ Toque [EliDESVANECEDOR] (en la categoria @ [AJUST.MANUALES]).
(_ Cuando aparezca MI MENI2, toque |.
Repita los mismos pasos anteriores para registrar elementos de menu en MI MENI) y disfrute
de la "Handycam".
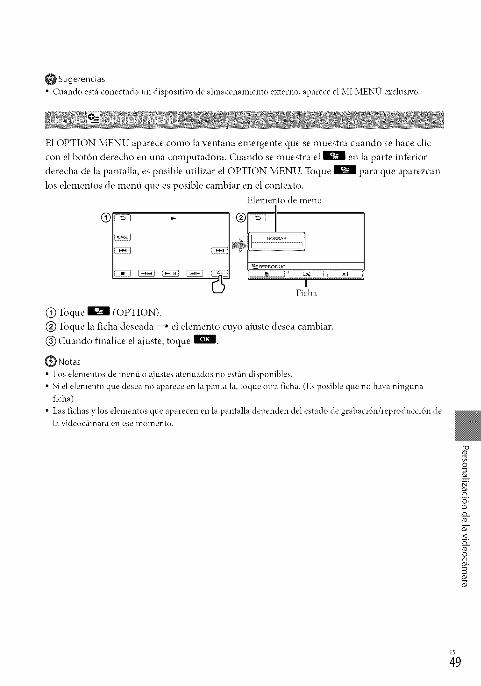
Sugerencias
• Cuando estfi conectado tm dispositivo de almacenanliento externo, aparece el MI MENI) exclusivo.
E1OPTION MENU aparece como la ventana emergente que se muestra cuando se hace clic
con el botdn derecho en una computadora. Cuando se muestra el _ en la parte infk,rior
derecha de la pantalla, es posible utilizar el OPTION MENU. Toque | para que aparezcan
los elementos de menti que es posible cambiar en el contexto.Elemento de men6
t__) Ficha
(_) Toque _ (OPTION).
@ Toque la ficha deseada ---+ el elemento cuyo ajuste desea cambiar.
@ Cuando finalice el ajuste, toque _.
(_ Notas
• Los elementos de menfi o ajustes atenuados no est_in disponibles.
• Si el elemento que desea no aparece en la pantalla, toque otra ficha. (Es posible que no haya ninguna
ficha).
• Las fichas y los elementos que aparecen en la pantalla dependen del estado de grabacidn/reproduccidn dela videocfimara en ese momento.
N-
n
_9

s;
Categoria I_(AJUST.MANUALES)
SELEC.ESCENA.........................Permite seleccionar un ajuste de grabacidn apropiado on ihncidn del tipode escena, como una vista nocturna o la playa.
DESVANECEDOR................Permite aumentar o desvanecer las escenas.
BAL.BLANCOS..........................Permite ajustar el balance cromfitico al brillo del entorno de grabacidn.
MED./ENF.PUNTO....................Permite ajustar el brillo y el enfbque del motivo seleccionado de manerasimult_inea.
MEDID.PUNTO ..........................Permite ajustar el brillo de las imfigenes al motivo que toque en la pantalla.
ENFOQ.PUNTO .........................Permite eniocar el motivo que toque en la pantalla.
EXPOSICION..............................Permite ajustar el brillo de las pellculas y las ibtografias.
ENFOQUE ...................................Permite eniocar de iorma manual.
TELE MACRO .............................Permite capturar un motivo enibcado con el fbndo desenibcado.
Categoria I_(AJU STESTOMA)
IlzltMODO GRAB.......................Permite ajustar el modo de grabacidn de las pellculas. Para grabar unmotivo que se mueva con rapidez, se recomienda una calidad de imagenalta.
GU[A FOTOG .............................Permite visualizar un marco para asegurarse de que el motivo est_ienposicidn horizontal o vertical.
STEADYSHOT......................Permite ajustar la fl.mcidn SteadyShot cuando se graban pellculas.
OB.LENTOAUTO ......................Permite ajustar de forma automtltica la velocidad de obturacidn.
DETECCION CARA...................Permite ajustar la calidad de imagen de las caras automtlticamente.
AJ.GRAB.AUDIO
MIC.ZOOM INCOR.........Permite grabar pellculas con sonido intenso de acuerdo con la posicidndel zoom.
NIVELREFMIC.................Permite ajustar el nivel del micrdfono.
OTROSAJ.GRAB.
IIZItZOOM DIGITAL.........Permite ajustar el nivel de zoom mtLximo del zoom digital que supera elnivel de zoom del zoom @rico.
SELEC.PANOR............Permite ajustar la relacidn horizontal a vertical al grabar peliculas.
Categoria _ (AJUST.FOTO C¢,M.)
_AUTODISPAR .......................Permite _\iustar el disparador autom_ttico cuando la videoc_'mlara seencuentra en el modo de grabacidn de ibtos.
_TAM.IMAGEN .......................Permite ajustar el tamafio de la foto.
NUM.ARCNIVO.........................Permite ajustar el modo de asignacidn del nfimero de archivo.
Categoria _ (REPRODUCCION)
VISUAL INDEX...........................Permite visualizar imt_tgenes de grabacidn como miniaturas (ptlg. 23).VISUALIZAR IMAG.
INDICE DE FECHAS........Permite habilitar la bhsqueda de im_igenes deseadas por fbcha.
ROLLO PELIC.............Permite visualizar y reproducir las escenas con cierto intervalo entre elias.

[]CARA.............................Permite visualizar y reproducir las escenas con caras.
PLAYLIST.....................................Permite visualizar y reproducir la playlist de pellculas.
AJUSTESREPROD.
CODIGO DATOS..............Permite visualizar los datos detallados de grabacidn durante lareproducci6n.
Categoria _ (EDIT)
BORRAR
BORRAR ...................... Permite
[] BORRAR ....................... Permite
PROTEGER
PROTEGER .................. Permite
[] PROTEGER .................. Permite
DlVl DI R.................................. Permite
TOMA FOTOG R,a,F.................... Permite
COPIA PELICULA ×_2
COPIA por seleccidn..... Permite
COPIA por fecha ............ Permite
COPIA DE TODO ........ Permite
COPIAR FOTO ×_2
COPIAR por selec ........... Permite
COPIAR por fecha .......... Permite
EDICION PLAYLIST
AIC,IA DI R ....................... Permite
AIC,IADIR p.fecha ........ Permite
playlist.
1_ BORRAR ....................... Permite
1_ BORRAR TODO .......... Permite
1_ MOVER ......................... Permite
Categoria _ (OTROS)
CONEXION USB
eliminar peliculas.
eliminar iotos.
proteger las peliculas para evitar que se eliminen.
proteger las fi_tos para evitar que se eliminen.
dMdir pellculas.
capturar fbtos de escenas deseadas de pellculas.
seleccionar peliculas y realizar copias.
copiar todas las pellculas de una f_:cha especificada.
copiar todas las pellculas guardadas en una playlist.
seleccionar iotos y realizar copias.
copiar todas las fbtos de una fi.'cha especificada.
afiadir pellculas a una playlist.
afiadir pellculas grabadas en un mismo dla y a una hora en una
borrar peliculas de una playlist.
borrar todas las pellculas de una playlist.
cambiar el orden de las peliculas en una playlist.
1OCONEXION USB× .....Permite conectar el disco duro interno mediante USB
_1 CONEXION USB×2.....Permite conectar la memoria interna mediante USB.
_CONEXION USB........Permite conectar la tarjeta de memoria mediante USB.
GRABAR EN DISCO ........Permite guardar imfigenes en discos si se pulsa el botdn '*_ (DISC
BURN) (pslg. 35).INFORM.BATERJA.....................Permite mostrar la informacidn de la bateria.
Categoria [_,_ (GESTION SOPORTE)
AJUSTESSOPORTE
i 2AJ.SOPORTEPEL.x _ ....Perlnite ajustar el soporte para ]a grabaci6n de pellculas (pslg. 15).
AJ.SOPORTEFOTO_2
.............................................Permite ajustar el soporte para ]a grabaci6n de iotos (p_ig. 15).
2
o
N-
¢5

INFO SOPORTE .........................Permite visualizar inibrmacidn del soporte de grabacidn, como el espaciolibre.
FORMAT.SOPORTE
HDD _ ................................Permite eliminar todos los datos del disco duro interno.
MEMORIA INTERNA_2...Permite eliminar todos los datos de la memoria interna.
TARJ.MEMORIAX-X2........Permite eliminar todos los datos de la tarjeta de memoria.
REP.ARCH.BD.IM.
HDD×_................................Permite reparar el archivo de base de datos de imrigenes en el disco durointerno (prig. 56).
MEMORIA INTERNA×2...Permite reparar el archivo de base de datos de imrigenes en la memoriainterna (prig. 56).
TARJ.MEMORIAX*_2........Permite reparar el archivo de base de datos de imrigenes en la tarjeta dememoria (prig. 56).
Categoria _> (AJUST.GENERALES)
AJUS.SON./PANT.
VOL.....................................Permite ajustar el volumen del sonido de reproduccidn (prig. 24).
PITIDO ...............................Permite ajustar si el sonido de lhncionamiento emite un pitido o no.
BRILLOLCD......................Permite ajustar el brillo de la pantalla de cristal llquido.
NIVLUZ LCD....................Permite ajustar la luz de fbndo de la pantalla de cristal liquido.
COLOR LCD ......................Permite ajustar la intensidad del color de la pantalla de cristal liqnido.
AJUSTE PANTALLA........Permite ajustar la duracidn de la visualizaci6n de los iconos o indicadoresen la pantalla de cristal liquido.
AJUSTES SALIDA
TI PO TV .............................. Permite
SALI DA PANT. .................. Permite
no.
AJ.REL./IDIOM.t71
AJUS.RELOJ ...................... Permite
AJUS.ZONA ...................... Permite
HORA VERANO ............... Permite
AJUSTE IDIOMA t71 ........ Permite
AJ.ENCENDIDO
APAGADO AUTO ............ Permite
convertir la serial en funcidn del televisor conectado (prig. 26).
ajustar si se visualizan las indicaciones en pantalla en el televisor o
ajustar la fi.,cha y la hora (prig. 13).
ajustar una diibrencia temporal sin detener el reloj (prig. 13).
ajustar el horario de verano (prig. 13).
ajustar el idioma de la pantalla (prig. 14).
cambiar el ajuste [APAGADO AUTO] (prig. 11).
ENCEND.CONLCD.........Permite _\iustar si la videocrimara estri encendida o apagada cuando se abreo se cierra la pantalla de cristal liquido.
OTROSAJUSTES
MODO DEMO ..................Permite ajustar si se muestra la demostracidn o no.
CALIBRACION .................Permite calibrar el panel trictil.
SENSOR CAiDA _*...........Activa o desactiva el sensor de caidas.
×_DCR SR68/SR88
.×2DCR-SX44/SX63
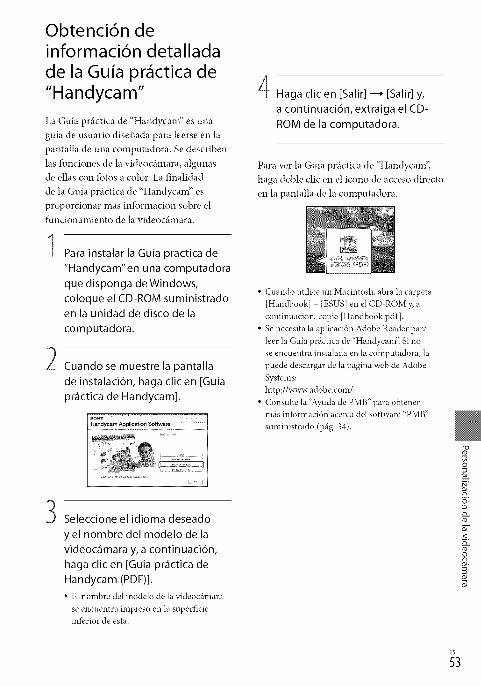
Obtenci6n deinformaci6n detallada
de la Guia pr ctica de
"Handycam"
La Guia pnictica de "Hand},cam" es una
guia de usuario diseflada para leerse en la
pantalla de una computadora. Se describen
las funciones de la videooimara, algunas
de ellas con fbtos a color. La finalidad
de la Guia pnictica de "Handycam" es
proporcionar m_is informacidn sobre el
funcionamiento de la videooimara.
1 Para instalar la Guia pr_ctica de
"Handycam"en una computadora
que disponga de Windows,
coloque el CD-ROM suministradoen la unidad de disco de la
computadora.
Cuando se muestre la pantalla
de instalaci6n, haga clic en [Guia
pr_ctica de Handycam].
3 Seleccione el idioma deseado
yel nombre del modelo de la
videoc_mara y, a continuaci6n,
haga clic en [Guia pr_ctica de
Handycam (PDF)].
• E1nombre del modelo de la videoc_imara
se encuentra impreso en la superficieinfi.'riorde esta.
Haga clic en [Salir] --_ [Salir] y,
a continuaci6n, extraiga el CD-
ROM de la computadora.
Para ver la Guia pr_ictica de "Handycam",
haga done clic en el icono de acceso directo
en la pantalla de la computadora.
• Cuando utilice un Macintosh, abra la carpeta
[Handbook] [ESUS] en el CD ROM y, a
continuacidn, copie [Handbook.pdf].
• Se necesita la aplicacidn Adobe Reader para
leer la Guia pnlctica de "Han@canf_ Si no
se encuentra instalada en la computadora, la
puede descargar de la ptlgina web de Adobe
Systems:
http://wx_ adob e.com/
• Consulte la "Ayuda de PMB" para obtenermils inIbrmaci6n acerca del software "PMB"
smninistrado (p_'lg.34).
g
g
n
_3

Soluci6n de
problemas
Si tiene algtin problema al utilizar la
videoc_imara, siga los pasos que se indican a
continuacidn.
@ Verifique la lista (P_g. 54 a 56) einspeccione la videoc_mara.
@ Desconecte la fuente de
alimentaci6n, con_ctela nuevamente
despu_s de aproximadamente
1 minuto y encienda la videoc_mara.
(_) Presione RESET (p_g. 64) con un
objeto puntiagudo y encienda la
videoc_mara.
A1 presionar RESET, se restablecen
todos los ajustes, incluido el del reloj.
@ P6ngase en contacto con el
distribuidor Sony o con un centro de
servicio t6cnico local autorizado de
Sony.
• En flmci6n del problema, puede que seanecesario inicializar la videoc_imara o
cambiar el disco duro de esta. En este caso, la
in*brmaci6n ahnacenada en la memoria interna
se perder_i. Asegtirese de guardar los datos de
la memoria interna en otro soporte (copia de
seguridad) antes de enviar la videocfimara para
su reparacidn. No podemos ofrecer ninguna
compensacidn pot la p_'rdida de datos de lanlemoria interna.
• Durante la reparaci6n, es posible que tengamos
que comprobar una minima cantidad de los
datos ahnacenados en el soporte de grabaci6n
para investigar el problema. No obstante, el
distribuidor Sony no copiar_i ni conservar_i losdatos.
• Consulte la Gula pr_ictica de "Handycanf'
(Dig. 53) para obtener in*brmacidn sobre los
problemas de la videoc_imara y la 'Ayuda de
PMB" (Dig. 34) para obtener infbrmacidnsobre la conexidn de la videoc_imara a una
computadora.
La videoc_mara no se enciende.
• Instale una bateria cargada en la videocfimara
(Dig. 10).
• Conecte la clavija del adaptador de
alimentacidn de ca al tomacorriente de pared
(p_ig. 12).
La videoc_mara no funciona aunque laalimentaci6n est_ encendida.
• Despu& de encenderse, la videocinnara
tarda algunos instantes en estar lista para
tomar imfigenes. No se trata de una falla defuncionamiento.
• Desconecte el adaptador de alimentacidn de
ca del tomacorriente de pared o extraiga la
bateria y vuelva a conectarlos transcurrido
aproximadamente 1 minuto. Si la videocimmra
contintia sin funcionar, presione RESET
(prig. 64) con un objeto puntiagudo. (A1
presionar RESET, se restablecen todos los
ajustes, incluido el del reloj).
• La temperatura de la videocfilnara es
extremadamente alta. Apague la videocfimara
y dOjela en on sitio fresco durante unosminuto.
• La temperatura de la videocfilnara es
extremadamente baja. Deja la videociunara
encendida. Si de todos modos no puede
utilizar la videociunara, apfiguela y coldquela
en un lugar cfilido. Deje la videocfilnara
durante unos minuto y, a continuacidn,enci{'ndala.
La videoc_mara se calienta.
• Es posible que la videoc/nnara se calientedurante el funcionamiento. No se trata de una
falla de funcionamiento.
La alimentaci6n se desconecta
repentinamente.
• Utilice el adaptador de alimentacidn de ca
(p_ig. 12).• Encienda de nuevo la alimentaci6n.
• Cargue la bateria (prig. 10).
Las imggenes no se graban al presionarSTART/STOP o PHOTO.
• Presione MODE para encender el indicador
(pelicula) o O (fbto).
• La videocfimara estfi grabando en el soporte
de grabaci6n la escena que acaba de tomar. No
se pueden realizar nuevas grabaciones durante
este periodo.
• E1soporte de grabaci6n estfi lleno. Elimine las
imfigenes innecesarias (prig. 29).
• La cantidad total de escenas de pelicula
o fbtos supera la capacidad de grabaci6n
de la videocfimara. Elimine las imfigenes
innecesarias (prig. 29).
La grabaci6n se detiene.
• La temperatura de la videocfimara es
extrelnadamente alta o baja. Apague la
videocfimara y d0jela en un sitio fl'esco ocfilido durante unos minuto.
"PMB"no se puede instalar.
• Compruebe el entorno informfitico o el
procedimiento de instalaci6n necesarios para
instalar el software "PMB" (prig. 31).
"PMB" no funciona correctamente.
• Salgade "PMB"y rei _iciela co nputadora
La computadora no reconoce lavideoc&mara.
• Desconecte cuak]uier dispositivo de ]atoma
USB de la computadora excepto el teclado, el
ratdn y la videocimmra.
• Desconecte el cable USB de la computadora
y de la videocfimara, reinicie la computadora
y, a continuaci6n, conecte de nuevo la
computadora con la videocfimara de la manera
apropiada.
Si en la pantalla de cristal liquido aparecen
indicadores, compruebe lo siguiente.
Si el problema persiste despu& de intentar
solucionarlo varias w,ces, p6ngase en
contacto con su distribuidor Sony o con uncentro de servicio t{,cnico local autorizado
de Sony. En este caso, cuando contactecon ellos, faciliteles todos los nthneros del
c6digo de error que comience pot C o E.
C:04:1717
• La bateria no es una bateria "IntoLITHIUM"
de la serie \( Utilice una bateria
"IntoLITHIUM" (serie V) (prig. 10).
• Conecte firlnemente la clavija de ccal
adaptador de alimentaci6n de ca de la
videocfimara (prig. 10).
C:06:1_1_
• La temperatura de la bateria es elevada.
Cambie la bateria o coloquela en un lugar
fl'esco.
C:I 3:rTr7 / C:32:rTr7
• Desconecte la fuente de alimentaci6n.
Con0ctela de nuevo y vueNa a poner enmarcha la videocfimara.
E:I717:1717
• Siga los pasos (_) a @ indicados en la pfigina54.
5-
33"D
_5

s;
Q
• E1 disco duro interno de la videocrimara estri
lleno. Elimine las ilnrigenes innecesarias del
disco duro interno (prig. 29).
• Puede haberse producido un error en el discoduro interno de la videocrimara.
• Labateria dispone de poca energia.
A4:I_
• La temperatura de la bateria es elevada.
Cambie la bateria o coldquela en un lugarfi_esco.
• La temperatura de la videocimlara estri
aumentando. Apague la videocrimara y d_'jelaen un sitio fresco.
• La teinperatura de la videocrimara es baja.
Haga que aumente la temperatura de lavideocrimara.
• No se insert6 ninguna tarjeta de memoria
(prig. 16).
• Si el indicador parpadea, significa que no
queda espacio libre suficiente para grabar
imiigenes. Elimine las imrigenes innecesarias
(prig. 16) o formatee la tarjeta de melnoria
despuOs de guardar las hnrigenes en otto
soporte.
• E1 archivo de base de datos de imrigenes
estri daflado. Para comprobar el archivo de
la base de datos, toque _ (MENU)
[Mostrar otrosl _ [REP.ARCH.BD.IM.I (en
la categoria Q")9[GESTION SOPORTEI)
el soporte de grabaci6n (DCR SR68/SR88/
SX44/SX63).
• La tarjeta de memoria estri daflada. Formatee
la tarjeta de memoria con la computadora
(prig. 51).
• Se insert6 una tarjeta de memoria
incompatible (prig. 16).
[_ o---_
• Se restringi6 el acceso a la tarjeta de meinoria
en otto dispositivo.
• La videocrimara se encuentra en una posicidn
inestable. Suj4tela firmemente con ambas
manos. No obstante, tenga en cuenta que elindicador de advertencia de sacudidas de la
crimara no desaparecerri.
• Se activ6 la funcidn del sensor de caidas.
Tal vez no sea posible grabar ni reproducir
imrigenes.
• E1 soporte de grabacidn estri lleno. Elimine las
imrigenes innecesarias (prig. 29).

Precauciones
Uso y cuidados
• No utilice ni almacene la videocfimara y los
accesorios en los siguientes lugares:
- Cualquier lugar extremadamente cfilido,
f)do o hfimedo. No los deje expuestos a
temperaturas superiores a 60 °C como bajo laluz solar directa, cerca de calefi_ctores o en un
vehfculo estacionado bajo el sol, ya que puededefbrmarse o suf)cir lhllas de lhncionamiento.
- Cerca de campos magn_ticos intensos ovibraciones mecfinicas. La videocfimara
podrla sufl'ir fidlas de funcionamiento.- Cerca de ondas radiofBnicas lhertes o
radiaciones. Es posible qne la videoc_imara no
pueda grabar correctamente.
- Cerca de receptores de AM y de equipos de
video. Es posible qne se produzcan ruidos.
- En una playa o cualqnier lugar con
mucho polvo. Si entra arena o polvo en la
videocfimara, pueden causar una fhlla defuncionamiento. En ocasiones, esta fidla de
funcionamiento puede resultar irreparable.
- Cerca de ventanas o en el exterior, donde la
pantalla de cristal lfquido o el objetivo pueden
quedar expuestos a la luz solar directa. Esto
puede daflar la pantalla de cristal liquido.
• Alimente la videocfimara con cc de 6,8 V/7,2 V
(baterfa) o cc de 8,4 V (adaptador de
alimentacidn de ca)
• Para alimentar la videocfimara con cc o ca
utilice los accesorios recomendados en este
manual de instr ucciones.
• No permita que la videoc_imara se moje; por
ejemplo, bajo la lluvia o por el agua del mar.
Si la videocfimara se moja, podria sufl'ir fidlasde funcionamiento. En ocasiones, esta falla de
flmcionanfiento puede resultar irreparable.
• Si dentro de la videoc_imara entra algfin objeto
o llquido, descon&tela y haga qne la revise un
distribuidor de Sony antes de volver a utilizarla.
• Evite manipular, desmontar o modificar la
videoctlmara bruscamente y exponerla a
golpes o impactos como martillazos, caldas o
pisotones. Sea especialmente cuidadoso con el
objetivo.
• Cuando no utilice la videoc_imara, mant_ngala
apagada.
• No utilice la videoctlmara envuelta en
una toalla, por ejemplo. Si lo hace, puederecalentarse internamente.
• Cuando desconecte el cable de alimentaci6n,
tire del enchulb y nunca del cable.• Procure no daflar el cable de alimentacidn al
colocar un objeto pesado sobre 41.• No use la baterla si est_ideformada o daflada.
• Mantenga limpios los contactos met_'dicos.
• Si se producen fugas del lfquido electrolftico
de la pila:
- Pdngase en contacto con un centro de servicio
t&nico local autorizado de Son}c
- Limpiese con agua cualqnier llquido qne haya
entrado en contacto con su pid.
- Si le entra llquido en los ojos, l_iveselos con
agua abundante y acuda a un m_dico.
Cuando no utilice la videockmara
durante un tiempo prolongado
• Para mantener la videocfimara en 6ptimo estado
durante nmcho tiempo, enci{'ndala y d{'jela
funcionar grabando y reproduciendo irmlgenes
aproximadamente una vez al rues.
• Agote la baterla completamente antes de
guardarla.
Pantalla de cristal liquido
• No ejerza excesiva presi6n sobre la pantalla de
cristal llquido, ya que puede provocar dafios.
• Cuando utilice la videocfimara en un lugar frfo,
es posible que en la pantalla de cristal liqnido
aparezca una imagen residual. No se trata deuna _;allade funcionamiento.
• Mientras utiliza la videocfimara, la parte
posterior de la pantalla de cristal llquido se
puede calentar. No se trata de una fidla defuncionamiento.
Para limpiar la pantalla de cristal liquido
• Si la pantalla de cristal lfquido so ensucia de
huellas dactilares o polvo, se recomienda el uso
de un patio suave para limpiarla. Si utiliza el kit
de limpieza para la pantalla de cristal llquido (se
vende por separado), no aplique el lfquido de
limpieza directamente sobre la pantalla. Utilice
papel de limpieza hmnedecido con el lfquido.
3
_7
Manipulaci6n de la unidad
• Si la unidad esttl sucia, limpie el cuerpo de la
videoctlmara con un patio suave ligeramente
humedecido con agua > a continuacidn, limpie
la unidad con un patio suave y seco.
• No realice ninguna de las acciones siguientes
para evitar dafiar el acabado:
- Usar productos qulmicos como dilwentes,
bencina, alcohol, patios con productos
qulmicos, repelentes, insecticidas y pantallassolares
- Utilizar la videoc_imara con las sustancias
mencionadas en las lnanos
- Dejar la unidad en contacto con objetos de
goma o vinilo durante un tiempo prolongado
Cuidado y almacenamiento del
objetivo
• Frote la superficie del objetivo con un patio
suave en los casos siguientes:
- Cuando haya huellas dactilares en la
superficie del objetivo
- En lugares c_'didos o hflmedos
- Cuando el objetivo est4 expuesto al aire salado
como, por ejemplo, a orillas del mar
• Gmlrdelo en un lugar bien ventilado donde no
haya suciedad ni mucho polvo.
• Para evitar la aparicidn de moho, limpie el
objetivo periddicamente como se ha descritoanteriormente.
Carga de la pila recargable preinstalada
La videoctlmara contiene una bateria recargable
preinstalada para conservar la fecha, la hora y
otros ajustes aunque est{' apagada. La bateria
recargable preinstalada siempre se carga mientrasla videocfimara estfi conectada al tomacorriente
de pared mediante el adaptador de alimentacidnde ca o cuando la bateria estfi instalada. La
baterla recargable se descargarfi completamente
transcurridos aproximadamente 3 meses sino utiliza la videoctlmara en absoluto. Utilice
la videocfimara despu& de cargar la bateria
recargable preinstalada. Sin embargo, aunque no
est4 cargada, el funcionamiento de la videocfimara
no se verfi af_ctado, siempre qne no se est{'
ES grabandola fecha.
58
Procedimientos
Conecte la videoctlmara a un tomacorriente de
pared mediante el adaptador de alimentacidn
de ca suministrado y deje la pantalla de cristal
llqnido cerrada durante mils de 24 hora.
Nota sobre la eliminaci6n o
transferencia de la videockmara (DCR-
SR68/SR88/SX44!SX63)
Incluso si elimina todas las pellculas e irmlgenes
*_jas, o si lleva a cabo la operacidn [FORMAT.
SOPORTE], es posible que los datos del soporte
de grabacidn interno no se borren por completo.
Cuando transfiera la videoctlmara, se recomienda
ejecutar la funcidn [VACIARI (consulte"Obtencidn de infbrmacidn detallada de la Guia
prfictica de "Handycam"' en la Digina 53) para
evitar la posible recuperacidn de sus datos.
Asimismo, se recomienda destruir f_sicamente la
videoc_imara en el momento de desecharla.
Nota sobre la eliminaci6n o
transferencia de la tarjeta de memoria
Incluso si elimina datos de la tarjeta de memoria
o la fbrmatea en una videocfimara o computadora,
es posible que no se borren completamente
los datos de dicha tarjeta. Si entrega la tarjeta
de memoria a otra persona, es recomendable
eliminar los datos completamente medianteel software de eliminacidn de datos en una
computadora. Asimismo, se recomienda destruir
fisicamente la tarjeta de memoria en el momentode desecharla.
Especificaciones
Sistema
Formato de serial: color NTSC, esttlndares EIA
Formato de grabacidn de pellcula:Video: MPEG 2 Pg
Sistema de grabacidn de audio:Dolby Digital de 2 canalesDolby Digital Stereo Creator
Formato de archivo de lbtografia: compatible con DCF Ver.2,0: compatible con Exif'v\,r.2,21: compatible con MPF Baseline
Soporte de grabacidn (pellcula o lbtografla)Disco duro internoDCR SR68:80 GBDCR-SR88:120 GBMemoria internaDCR SX44:4 GBDCR-SX63:16 GB
"Memory Stick PRO Duo"Tarjeta de memoria SD, tarjeta de memoriaSDHC (Clase 2, 4, 6, 10)
A1calcular la capacidad del soporte, 1 GBeqnivale a 1 000 millones de bytes, una partede los cuales se utiliza para la gestidn delsistema o para archivos de aplicacidn.La capacidad que un usuario puede utilizar esla siguiente.DCR SR68: aprox. 79,3 GB
DCR SR88: aprox. 119 GBDCR SX44: aprox. 3,86 GBDCR-SX63: aprox. 15,5 GB
Dispositivo de imagenCCD (dispositivo de carga acoplada) de2,25 mm (tipo 1/8)Bruto: aprox. 680 000 pixelesEfectivos (pelicula, 16:9): aprox. 410 000pixelesEfectivos (foto, 16:9): aprox. 250 000 pixelesEfectivos (fbto, 4:3): aprox. 340 000 pixeles
ObjetivoCarl Zeiss Vario Tessar
60 x (6ptico), 2 000 x (digital)
DCR-SR68/SR88Ditlmetro del filtro: 30 mm
F1,8 - 6,0Distancia fbcal:
f_-l,8 _ 108 mmgi se convierte en una cfimara de imfigenesfijas de 35 mmPara peliculas: 39 - 2 340 mm (16:9)Para fotos: 44 _ 2 640 mm (4:3)
Temperatura de color: [AUTOM.], [UNA PULS.],[INTERIOR] (3 200 K), [EXTERIOR](5 800 K)
Iluminaci6n minima
3 lx (lux) (cuando lOB.LENTO AUTO] estfiajustado en [ACTIVADO], velocidad deobturacidn 1/30 de segundo)
Conectores de entrada/salida
Conector remoto de A/V: toma de salida de video
y audioToma USB: minbAB
Pantalla de cristal liquido
hnagen: 6,7 cm (tipo 2,7; fbrmato 16:9)
NOmero total de pixeles: 230 400 (960 x 240)
General
Requisitos de alimentaci6n: cc de 6,8 V/7,2 V(bateria) cc de 8,4 V (adaptador dealimentacidn de ca)
Consumo medio de energia: durante la grabacidncon la videoctlmara con la pantalla de cristalliquido ajustada en un nivel de brillo normal:DCR SR68/SR88:2,0 WDCR SX43/SX44/SX63:1,8 W
Temperatura de funcionamiento: de 0 °C a 40 °C
Temperatura de almacenamiento: de 20 °C a+ 60 °C
Dimensiones (aprox.)DCR4R68/SR88
56 x 65 x 107 mm (an/al/prf) incluidas laspartes salientes56 x 65 x 115 mm (an/al/prf) incluidaslas partes salientes y la bateria recargablesmninistrada instalada
DCR4X43/SX44/SX63
50 x 55 x 103 mm (an/al/prf) incluidas laspartes salientes50 x 55 x 112 mm (an/al/prf) incluidaslas partes salientes y la bateria recargablesmninistrada instalada
Peso (aprox.)DCR SR68/SR88:
280 g s61o la unidad principal320 g incluida la bateria recargablesmninistradaDCR SX43/SX44/SX63:
190 g s61o la unidad principal230 g incluida la bateria recargablesmninistrada y la tarjeta de memoria
8"D
_9
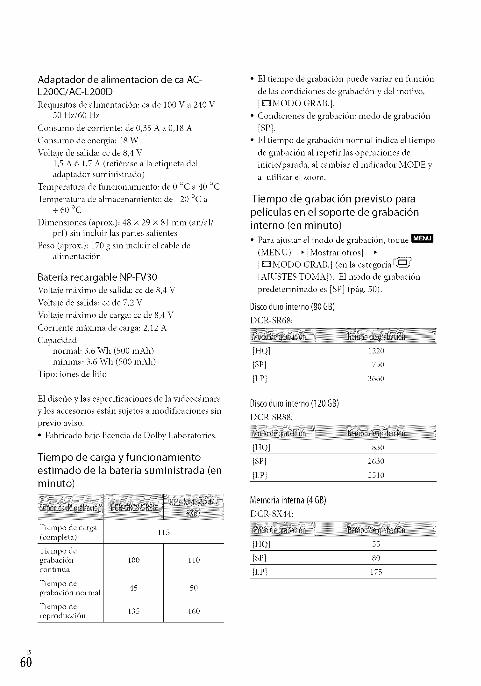
Adaptador de alimentaci6n de ca AC-L200C/AC-L200D
Requisitos de alimentacidn: ca de 100 V a 240 V50 Hz/60 Hz
Consumo de corriente: de 0,35 A a 0,18 A
Consumo de energia: 18 W
"v\}ltajede salida: cc de 8,4 V1,5 A d 1,7 A (refi('rase a la etiqueta deladaptador suministrado)
Temperatura de funcionamiento: de 0 °C a 40 °C
Temperatura de almacenamiento: de 20 °C a+ 60 °C
Dimensiones (aprox.): 48 x 29 x 81 mm (an/al/prf) sin incluir las partes salientes
Peso (aprox.): 170 g sin incluir el cable dealimentacidn
Bateria recargable NP-FV30
"v\}ltt\jemfiximo de salida: cc de 8,4 V
"v\_ltt\jede salida: cc de 7,2 V
"v\_ltajemfiximo de carga: cc de 8,4 V
Corriente mfixima de carga: 2,12 A
Capacidadnormal: 3,6 Wh (500 mAh)minima: 3,6 Wh (500 mAh)
Tipo: Jones de litio
E1 diseflo y las especificaciones de la videocfimara
y los accesorios estfin sujetos a modificaciones sin
previo aviso.
• Fabricado bajo licencia de Dolby Laboratories.
Tiempo de carga y funcionamiento
estimado de la bateria suministrada (en
minuto)
Tiempo de carga 115(completa)
Tiempo degrabacidnColltillua
Tiempo degrabacidn normal
Tiempo dereproduccidn
100 110
45 50
135 160
• E1tiempo de grabacidn puede variar en fi.mcidn
de las condiciones de grabacidn y del motivo,[ _ MODO GRAB.].
• Condiciones de grabacidn: modo de grabacidn
[SP].
• E1tiempo de grabacidn normal indica el tiempo
de grabaci6n al repetir las operaciones de
inicio/parada, al cambiar el indicador MODE yal utilizar el zoom.
Tiempo de grabaci6n previsto parapeliculas en el soporte de grabaci6ninterno (en minuto)
• Para ajustar el modo de grabacidn, toque(MENU) --_ [Mostrar otros][llzltMODO GRAB.](en la categoria[_
[AJUSTESTOMA]). E1modo de grabacidnpredeterminado es [SP] (p_ig.50).
Discodumintern0(806B)
DCR4R68:
[HQ] 1220
[SP] 1750
[LP] 3660
Disco duro interno (120 GB)
DCR4R88:
[HQ] 1830
[SP] 2630
[LP] 5510
Memoria interna (4 6B)
DCR-SX44:
[HQ] 55
[SP] 80
[LP] 175
68

Memoriainterna(16GB)
DCR-SX63:
[HQ I 235
[SP] 340
[I,P] 715
Ejemplo de tiempo de grabaci6nprevisto para peliculas en una tarjetade memoria
[HQ I 55 (50)
[SP] S0(50)
[I,P] 175 (110)
• Los nfimeros entre par4ntesis ( ) indican el
tiempo minimo de grabacidn.
• Acerca del tiempo de
carga/grabacidn/reproduccidn
- Tiempos medidos con la videocfimara a una
temperatura de 25 °C (se recomienda una
temperatura de entre 10 °C y 30 °C)
- En funcidn de las condiciones en las que
utilice la videoc_imara, es posible que el
tiempo de grabacidn y reproduccidn se vea
reducido a bajas temperaturas.
Marcas comerciales
• "Handycam" y H-I_nWcl_rn son marcas
comerciales registradas de Sony Corporation.• "Memory Stick'; "_, ?; "Memory Stick Duo';
"MEMORYSTICKDUO';"Memory Stick PRO
Dud; "MEMORY STICK PRO OUO'_ "Memory
Stick PRO-HG Duo'; "MEMORYSll[l{ PR0-1IG Dtln';
"Memory Stick Micrd; "MagicGate';"IVL_GICG_&.TE'; "MagicGate MemoryStick" y "MagicGate Memory Stick Duo" sonmarcas comerciales o marcas comerciales
registradas de SoW Corporation.• "InibLITHIUM" es una marca comercial de
SoW Corporation.• "DVDirect" es una marca comercial de SoW
Corporation.• Dolby y el simbolo de double D son marcas
comerciales de Dolby Laboratories.• Microsoft, Windows, Windows Vista y DirectX
son marcas comerciales registradas o marcascomerciales de Microsoft Corporation en losEstados Unidos y/o en otros paises.
• Macintosh y Mac OS son marcas comercialesregistradas de Apple Inc. en los EE. UU. y en
otros paises.• Intel, Intel Core y Pentium son marcas
comerciales o marcas comerciales registradasde Intel Corporation o sus subsidiarias en los
Estados Unidos y en otros paises.
• Adobe, el logotipo de Adobe y Adobe Acrobason marcas comerciales registradas o marcas
comerciales de Adobe Systems Incorporated enlos Estados Unidos y/o en otros paises.
• E1logotipo SDHC es una marca comercial.
• MultiMediaCard es una marca comercial deMultiMediaCard Associaion.
Todos ins dem_is nombres de productos
mencionados en este manual pueden set marcas
comerciales o marcas comerciales registradas
de sus respectNas compafiias. Adem_is, en este
manual, TMy (R)no se inclwen de fbrma expresaen todos los casos.
m
S"u

Referencia r_pida
Indicadores de la
pantallaParte superior Parte superior
izqulerda Parte central derecha
Parte inferior
Parte superior izquierda
_i Botdn MENUGrabacion con disparador
O automltico
|1, NIVEL REFMIC bajo
SELEC.PANOR.
MIC.ZOOM INCOR.
60 rain Baterla restante
Carpeta de grabacidn de la_ tarjeta de memoria
-_ VIDEO LIGHT
Botdn Volver
Parte central
[ESPERA]/ Estado de la grabacidn[GRAB.]_A _02M Tamafio de la foto
Presentacion de
C**_ diapositivas aiustada __
c'_ $_x__3 _ Advertencia
Modo de reproducci6n
Parte superior derecha
Modo de grabacidn
gl_ _ "k"0" (HQ/SP/LP)
Soporte de grabacidn/
_ gZ! reprodnccidn/edicidn
Contador (hora:minato:
0:00:00 segundo)
Tiempo de grabacion[00mini restante previsto
FUnD FUnD DESVANECEDORBLANCO NEGRO
Sensor de caidas'_&_ desactivado
_ Sensor de caidas activado
9999 1_-{::3 N(m_ero aproximad-o de9999 I_l" _ fotos que puede grabar y
9999 I_1-_ soporte de grabacidn
Carpeta de reprodaccidn_l _ de la tarjeta de memona
Pelicola o foto en
reproduccidn/ndmero100/112 total de pelicolas o fotos
grabadas
Parte inferior
[DETECCION CARA]
:lg, a}_tstado en [DESACqTv2]
c_ _ -_ Enfoque manual
"-5 @ _ SELEC.ESCENA
_16',_@# ixmzl Balance de blancos
((,_)_ SteadyShot desactivado
MED./ENF.PUNTO/MEDID.PUNTO/EXPOSICION
T_ TELE MACRO
[] Luz de rondo
Botdn OPTION
Bot6n VISUALIZARIMAGENES
Bot6n de presentacidn de
diapositivas
Nombre del archivo deI_1 101-0005 datos
Imagen protegid_a
Bot6n de indice

Piezas y controles
• Los indicadores y sus posiciones son
aproximados y pueden variar respecto de su
apariencia real.
• Segtin el modelo de la videoc_imara, es posible
que algunos indicadores no aparezcan.
Los numeros entre ( ) corresponden alas
p_iginas de retbrencia.
DCR-SR68/SR88
[]
[_ Micr6fono incorporado
[_ Objetivo (objetivo Carl Zeiss)
[_ Interruptor de la LENS COVER
[_ LED VIDEO LIGHT
_] Conector remoto de A/V (26)
DCR-SX43/SX44/SX63
[_ Altavoz
[_70bjetivo (objetivo Carl Zeiss)
Interruptor de la LENS COVER
[_ LED VIDEO LIGHT
[_ Micr6fono incorporado
g
5,"u
Is
63
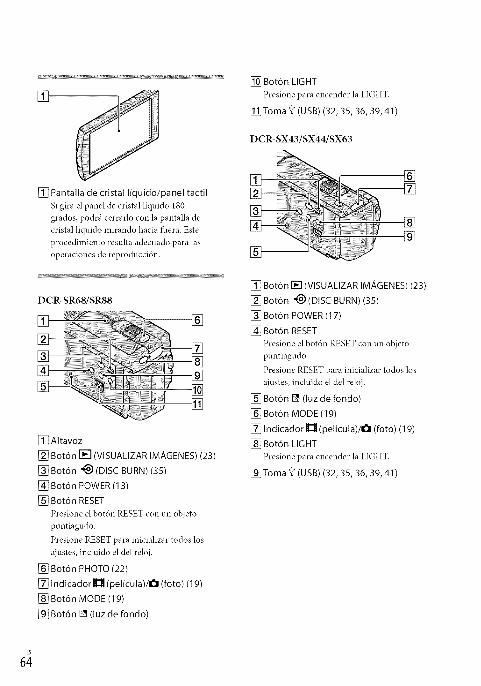
[]
[_ Pantalla de cristal liquido/panel t_ctil
Si gira el panel de cristal llquido 180
grados, podr_i cerrarlo con la pantalla de
cristal lfquido mirando hacia fuera. Este
procedimiento resulta adecuado para las
operaciones de reproducci6n.
DCR-SR68/SR88
[]
[][][]
[_ Altavoz
[_7 Bot6n [] (VISUALIZAR IMAGENES) (23)
[_ Bot6n *_) (DISC BURN)(35)
[_ Bot6n POWER (13)
[_ Bot6n RESET
Presione el bot6n RESET con tm objeto
puntiagudo.
Presione RESET para inicializar todos los
ajustes, incluido el del reloj.
[_ Bot6n PHOTO (22)
[] Indicador H (pelicula)/O (foto) (I 9)
[_ Bot6n MODE (I 9)
[_ Bot6n [] (luz de rondo)
[] Bot6n LIGHT
Presione para encender la LIGHT.
[] Toma _ (USB) (32, 35, 36, 39, 41)
DCR-SX43/SX44/SX63
[] []
[][]
[] Bot6n [] (VISUALIZAR IMAGENES) (23)
[] Bot6n _ (DISC BURN)(35)
[] got6n POWER (17)
[] got6n RESET
Presione el botdn RESET con un objeto
puntiagudo.
Presione RESET para inicializar todos los
_\justes, incluido el del reloj.
[] Bot6n [] (luz de rondo)
[] got6n MODE (19)
[] Indicador _ (pelicula)/O (foto) (19)
[] got6n LIGHT
Presione para encender la LIGHT.
[] Toma _ (USB) (32, 35, 36, 39, 41)
61
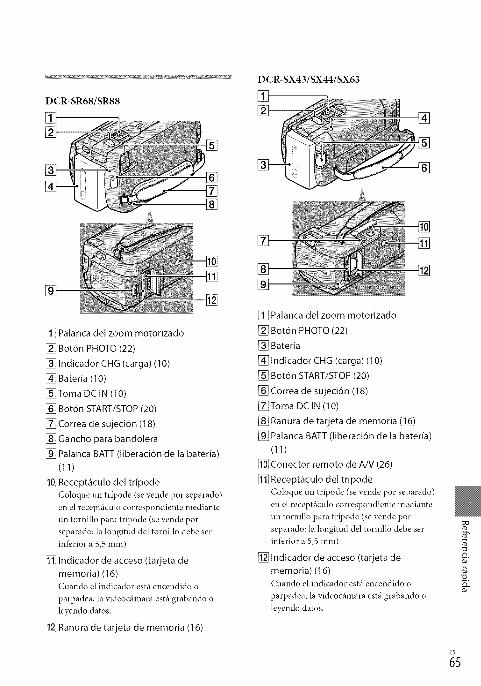
DCR-SR68/SR88
[]
[]
[]
[]
[][]
[]
[] Palanca del zoom motorizado
[] Bot6n PHOTO (22)
[] Indicador CHG (carga) (10)
[] Bateria (10)
[_ Toma DC IN (10)
[] Bot6n START/STOP (20)
[] Correa de sujeci6n (18)
[] Gancho para bandolera
[] Palanca BATT (liberaci6n de la bateria)
(11)
[] Recept_culo del tripode
Coloque un tripode (se vende por separado)
en el receptficulo correspondiente mediante
un tornillo para tripode (se vende por
separado: la longitud del tornillo debe ser
inferior a 5,5 mm)
[] Indicador de acceso (tarjeta de
memoria) (16)
Cuando el indicador est_iencendido o
parpadea, la videocfimara esttl grabando o
leyendo datos.
[] Ranura de tarjeta de memoda (16)
DCR-SX43/SX44/SX63
[]
[]
[][]
[]
[]
[]
Palanca del zoom motorizado
[] Botdn PHOTO (22)
[] Bateria
[] Indicador CHG (carga) (10)
[_ Botdn START/STOP (20)
[] Correa de sujeci6n (18)
[]Toma DC IN (10)
[] Ranura de tarjeta de memoria (16)
[_ Palanca BATT (liberaci6n de la bateria)
(11)
[] Conector remoto de A/V (26)
Recept_culo del tripode
Co]oque ttn tripode (se vende por separado)
en el recept_iculo correspondiente mediante
un tornillo para tripode (se vende por
separado: la longitud del tornillo debe serinf_.'rior a 5,5 ram)
1_ Indicador de acceso (tarjeta de
memoda) (16)Cuando el indicador estfi encendido o
parpadea, la videoctlmara esttl grabando o
leyendo datos.
"D
_5

Indice
16:9 ............................................... 27
4:3 ................................................. 27
AJ.SOPORTE FOTO .................. 15
AJ.SOPORTE PEL ..................... 15
AJUS.RELOJ ................................ 13
Ajuste de la lbcha yla hora ........ 13
AJUSTE IDIOMA ...................... 14
AJUSTE MI MEND ...................47
AJUSTES SOPORTE .................. 15
Altitud ............................................ 6
Archivo de im_'lgenes en unsoporte externo ........................... 39
Ayuda de PMB ............................ 34
Bateria .......................................... l0
BORRAR ..................................... 29
Botones de grabaci6n y zoom dela pantalla de cristal liquido ......20
Cable de conexi6n de A/V...26, 45
Cable USB.............................. 41, 43
Captura de lbtos desde unapelicula ......................................... 38
Carga de la bateria ...................... l0
Carga de la bateria en elextranjero ..................................... 12CODIGO DATOS ....................... 14
Completamente cargada ............ l0
Computadora .............................. 31
CONEXION USB.................41, 43
Copia ............................................ 17
Copia de un disco ....................... 37
Creaci6n de un disco ............37, 41
Cuidado ....................................... 57
Disco duro interno ..................... 15
DVDirect Express .......................41
Edici6n de peliculas ................... 37
6;
Elementos suministrados ............ 2
Encendido .................................... 13
Encendido de la unidad ............. 13
Especificaciones .......................... 59
FECHA/HORA ........................... 14
Flujo de operaci6n ........................ 7
Fotos .......................................22, 23
Grabacidn .................................... 20
Grabadora de discos ...................44
Grabadora de DVD ..............41, 43
Guia prfictica de "Han@cam"...53
hnagen en miniatura ..................29Indicadores de advertencia .......55
Indicadores de la pantalla ..........62Instalacidn ...................................31
Macintosh .................................... 31
Mantenimiento ...........................57
Memoria interna ......................... 15
"Memory Stick". .......................... 16
"Memory Stick PRO Duo". ........ 16
"Memory Stick PRO HG Duo"....................................................... 16
Menus ..................................... 47, 50
MI MENU ...................................47
One Touch Disc Burn ................35
OPTION MENU ........................ 49
Peliculas .................................20, 23
Piezas y controles ........................ 63
Pitidos de funcionamiento ........ 14
PMB (Picture Motion Browser)................................................. 31, 34
Precauciones ................................ 57
Reparaci6n ...................................54
Reproducci6n .............................. 23
RESET .......................................... 64
Sistema inlorm,'itico ...................31
Sot'tware .......................................31
Soluci6n de problemas ...............54
Soportes de grabaci6n ................ 15
Soportes externos .......................39
Tarjeta de memoria .................... 16
Tiempo de grabaci6n yreproduccidn ...............................60TIPO TV ...................................... 26
Tomacorriente de pared ............. l0TV ................................................. 26
VISUAL INDEX .........................23
Visualizacidn de autodiagn6stico....................................................... 55
VISUALIZAR IMA ....................23
Volumen ...................................... 24
\_qndows ...................................... 31
Zoom ............................................ 20


![MARTES 29 DE JULIO · Johanna Pimiento, Directora Programa Gobierno en Línea - MinTIC Diego Molano Vega - Ministro TIC D _/ oD i_t s ] u]v] d v}o}P_ Ç ^ ] u o / v(} u ] v o }^uµ](https://img.dokumen.tips/doc/110x75/5f11c53d32006f5be25df1aa/martes-29-de-julio-johanna-pimiento-directora-programa-gobierno-en-lnea-mintic.jpg)


![öw ÿ 15ÿ Environmental Sensitivity Index Map (fukushima 15)...l_T N-NKO\ l_T N-NKO\ Qq {, 8 S÷ Qq {, 1 0 S÷ Qq {, 9 S÷ T xï l8] \ T m\0«0ó0È0ê0ü0¯0é0Ö0´0ë0ÕX4 l_T](https://img.dokumen.tips/doc/110x75/60bc5d28e3c1cd189709c330/w-15-environmental-sensitivity-index-map-fukushima-15-lt-n-nko-lt.jpg)


![1.Mankiw.ch10[1] AD I_t](https://img.dokumen.tips/doc/110x75/55cf97a0550346d033929f4d/1mankiwch101-ad-it.jpg)


