Embed Size (px)
Citation preview

INVERTER / CHARGERDC to AC true sinewave inverter
programmable automatic battery chargerautomatic transfer switch
Owner’s Manual
EPC 1600-12 ePRO Combi 12V / 60Amp EPC 1800-24 ePRO Combi 24V / 35Amp
EPC 2000-12 ePRO Combi 12V / 80Amp EPC 2500-24 ePRO Combi 24V / 50Amp
EPC 3000-12 ePRO Combi 12V / 120Amp EPC 3500-24 ePRO Combi 24V / 70Amp
Enerdrive ePRO Inverter / Charger Owners ManualPage 2
PLEASE KEEP THIS MANUAL FOR FUTURE REFERENCEFor safe and optimum performance, the Enerdrive ePRO Inverter / Charger must be used properly. Carefully read and follow all instructions and guidelines in this manual and give special attention to the CAUTION and WARNING statements.
Disclaimer
While every precaution has been taken to ensure the accuracy of the contents of this guide, Enerdrive assumes no responsibility for errors or omissions. Note as well that specifications and product functionality may change without notice.
Important
Please be sure to read and save the entire manual before using your Enerdrive ePRO Inverter / Charger. Misuse may result in damage to the unit and/or cause harm or serious injury. Read manual in its entirety before using the unit and save manual for future reference.
Product Numbers - ePRO Inverter / Charger Series
EPC 1600-12 ePRO Combi 12V / 60Amp EPC 1800-24 ePRO Combi 24V / 35Amp
EPC 2000-12 ePRO Combi 12V / 80Amp EPC 2500-24 ePRO Combi 24V / 50Amp
EPC 3000-12 ePRO Combi 12V / 120Amp EPC 3500-24 ePRO Combi 24V / 70Amp
ePRO Inverter / Charger Owners Manual Rev 2
Service Contact Information
ENERDRIVE PTY LTDUnit 11, 1029 Manly Road Tingalpa, Queensland, Australia 4173Ph: 1300 851 535 / Fax: 07 3390 6911Email: [email protected] | Web: www.enerdrive.com.au

Page 3Enerdrive ePRO Inverter / Charger Owners Manual
Notice of CopyrightEnerdrive ePRO Combi EPC 1600-12 to EPC 3500-24 inverter/charger owner’s manual © 2012-2014 Enerdrive . All rights reserved. No part of this document may be reproduced in any form or disclosed to third parties without the express written permission of Enerdrive Pty Ltd, Unit 11, 1029 Manly Road Tingalpa, Queensland, Australia 4173. Enerdrive reserves the right to revise this document and to periodically make changes to the content hereof without obligation or organization of such revisions or changes, unless required to do so by prior arrangement.
Exclusions For Documentation And Product Usage
1. Unless specifically agreed to in writing, Enerdrive Pty Ltd : makes no warranty as to the accuracy, sufficiency or suitability of any technical or other information provided in its manuals or other documentation
2. Assumes no responsibility or liability for losses, damages, costs or expenses, whether special, direct, indirect, consequential or incidental, which might arise out of the use of such information. The use of any such information will be entirely at the user’s risk
3. Reminds you that if this manual is in any language other than english although steps have been taken to maintain the accuracy of the translation, the accuracy cannot be guaranteed.
4. Makes no warranty, either expressed or implied, including but not limited to any implied warranties of merchantability or fitness for a particular purpose, regarding these Enerdrive products and makes such Enerdrive products available solely on an “as is” basis.
5. Shall in no event be liable to anyone for special, collateral, incidental, or consequential damages in connection with or arising out of purchase or use of these Enerdrive products. The sole and exclusive liability to Enerdrive, regardless of the form of action, shall not exceed the purchase price of the Enerdrive products described here in.

Enerdrive ePRO Inverter / Charger Owners ManualPage 4
Table Of Contents1. INTRODUCTION ..................................................................................... 5
2. DESCRIPTION .......................................................................................... 8
3. CONFIGURING THE ePRO COMBI ..................................................... 10
3.1 General .......................................................................................... 10
3.2 Factory default parameter settings ...................................... 11
3.3 DIP switch settings overview ................................................. 16
4. GENERAL OPERATION .......................................................................... 20
4.1 Operating the ePRO Combi .................................................... 20
4.2 ePRO Combi LED indicators and error modes .................. 21
4.2.1. Error indications ........................................................................ 23
4.3 Programmable Alarm relay ..................................................... 24
4.4 Trigger input ................................................................................ 24
4.5 Load requirements in inverter mode ................................... 25
5. CHARGER OPERATION ......................................................................... 26
5.1 Charge programs ....................................................................... 26
5.2 Equalizing a flooded battery .................................................. 29
6. TROUBLESHOOTING GUIDELINE ...................................................... 32
7. TECHNICAL SPECIFICATIONS ............................................................. 38
8. WARRANTY CONDITIONS ................................................................... 44
9. NOTES ....................................................................................................... 46

Page 5Enerdrive ePRO Inverter / Charger Owners Manual
1. IntroductionThank you for purchasing a Enerdrive ePRO Combi inverter/charger combination. Please read this owner’s manual for information about using the product correctly and safely. Keep this owner’s manual and all other included documentation close to the product for future reference. For the most recent manual revision, please check the downloads section on our website.
The purpose of this owner’s manual is to provide explanations and procedures for operating, and configuring the ePRO Combi. For installing the ePRO Combi, a separate installation guide is included. The installation guide is intended for installers that should have knowledge and experience in installing electrical equipment, knowledge of the applicable installation codes, and awareness of the hazards involved in performing electrical work and how to reduce those hazards.
CAUTIONThis section contains important safety information for the Enerdrive ePRO Combi. Each time, before using the Enerdrive ePRO Combi, READ ALL instructions and cautionary markings on or provided with the inverter, and all appropriate sections of this guide. The Enerdrive ePRO Combi contains no user serviceable parts. See Warranty section for how to handle product issues.

Enerdrive ePRO Inverter / Charger Owners ManualPage 6
WARNINGFAILURE TO FOLLOW THESE INSTRUCTIONS CAN RESULT IN DEATH OR SERIOUS INJURY When working with electrical equipment or lead acid batteries, have someone nearby in case of an emergency.
Study and follow all the battery manufacturer’s specific precautions when installing, using and servicing the battery connected to the inverter.
Wear eye protection and gloves.
Avoid touching your eyes while using this unit.
Keep fresh water and soap on hand in the event battery acid comes in contact with eyes. If this occurs, cleanse right away with soap and water for a minimum of 15 minutes and seek medical attention.
Batteries produce explosive gases. DO NOT smoke or have an open spark or fire near the system.
Keep unit away from moist or damp areas.
Avoid dropping any metal tool or object on the battery. Doing so could create a spark or short circuit which goes through the battery or another electrical tool that may create an explosion.
WARNINGFIRE AND/OR CHEMICAL BURN HAZARD Do not cover or obstruct any air vent openings and/or install in a zero-clearance compartment.
Page 7Enerdrive ePRO Inverter / Charger Owners Manual
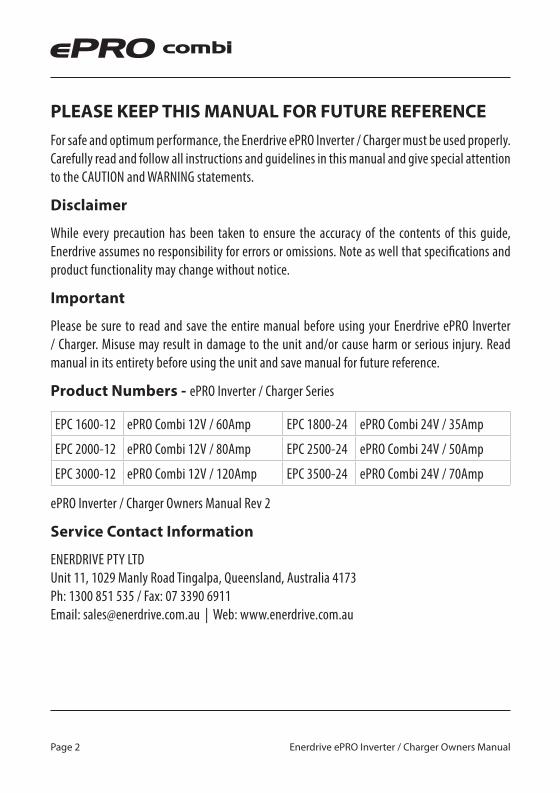
WARNINGSHOCK HAZARD. KEEP AWAY FROM CHILDREN!Avoid moisture. Never expose unit to snow, water, etc.
Unit provides 230 VAC, treat the AC output socket the same as regular wall AC sockets at home.
WARNINGEXPLOSION HAZARD!DO NOT use the Enerdrive ePRO Combi in the vicinity of flammable fumes or gases (such as gas bottles or large engines).
AVOID covering the ventilation openings. Always operate unit in an open and well ventilated area.
Prolonged contact to high heat or freezing temperatures will decrease the working life of the unit.
LIMITATIONS OF USEDo not use in connection with life support systems or other medical equipment or devices.

Enerdrive ePRO Inverter / Charger Owners ManualPage 8
2. DescriptionThe Enerdrive ePRO Combi is an all-in-one combination of a DC to AC true sinewave inverter, an advanced multi-stage battery charger and a high speed AC transfer switch. All this is built into one compact, yet installer friendly enclosure. Besides these three main functions, there are several unique features offered as well. Some of which benefit from the strong interaction between the three main functions.
The main task of the ePRO Combi is to act as an uninterruptible AC power supply (UPS). In case of a grid/generator failure or disconnection, the ePRO Combi immediately stops charging the battery, releases the AC transfer switch and activates the inverter which takes over the supply to the connected loads. All this is achieved so fast, that even very critical loads like computers will continue to operate without any problems. In case the grid/generator is reconnected again and the voltage and frequency are within acceptable limits, the ePRO Combi activates the AC transfer switch and battery charger again, while deactivating the inverter. The connected loads are now supplied again by the grid/generator without any interruption.
Additionally, the ePRO Combi offers features like :
• AC Input Power Boost, which temporarily assists weak AC input sources when the connected load needs more power than available from the grid or generator.
• AC Input Current Limit, which limits the maximum current consumed from the AC input source by the ePRO Combi. This limit is user adjustable.
• Power Factor Corrected AC Input, which optimizes energy efficiency and makes sure that the maximum amount of charging current is available from your AC source.
• Intelligent 4-stage charge programs, user programmable to fit any battery type.

Page 9Enerdrive ePRO Inverter / Charger Owners Manual
• Fully programmable inverter, transfer switch and battery charger parameters, using the Dashboard for Windows software.
• Programmable alarm relay, for optimal control of external devices like generator starting or selective load disconnection.
• Freely assignable trigger input, which allows the user to control the ePRO Combi by external events.
• Temperature controlled fans, to guarantee silent operation under less than full load conditions.
• Temperature compensated battery charging, using the standard supplied battery temperature sensor for maximum battery lifetimes.

Enerdrive ePRO Inverter / Charger Owners ManualPage 10
3. Configuring The Enerdrive ePRO Combi3.1 General
The ePRO Combi can be configured in two ways. Using the DIP switches located in the connection bay, a small selection of basic settings can be made. In most cases this will be sufficient to quickly setup the unit for typical applications. Another option is to setup the ePRO Combi using the Dashboard for Windows software. This software is included in the optional ePROLink to USB Communication Kit (part.# 5092120), which also contains an isolated interface box required to connect the ePRO Combi to a PC. Using Dashboard, all available parameters can be edited, and it is also possible to edit or create your own battery charge programs.
CAUTIONWhen configuring the ePRO Combi by Dashboard, make sure that DIP switch 1 is set to ON (External). When set to ON, all remaining DIP switch settings (2 up to 7 or 9) are ignored and the ePRO Combi will always load the parameter settings as configured in Dashboard.
When DIP switch 1 is set to OFF (Local) again, DIP switch 2 up to 7 or 9 are overriding the corresponding parameter settings previously made in Dashboard. The parameters that cannot be configured by DIP switches, shall return to the factory default settings.
This manual will only describe the DIP switch settings and all relevant factory default parameters. Configuration by ePRO Dashboard will be explained in the ePRO Dashboard manual that comes with the ePROLink to USB Communication Kit.
Page 11Enerdrive ePRO Inverter / Charger Owners Manual
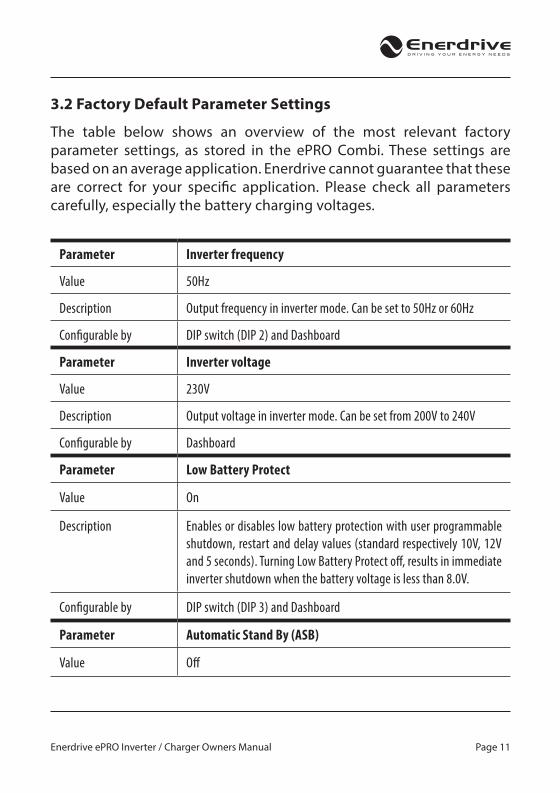
3.2 Factory Default Parameter Settings
The table below shows an overview of the most relevant factory parameter settings, as stored in the ePRO Combi. These settings are based on an average application. Enerdrive cannot guarantee that these are correct for your specific application. Please check all parameters carefully, especially the battery charging voltages.
Parameter Inverter frequency
Value 50Hz
Description Output frequency in inverter mode. Can be set to 50Hz or 60Hz
Configurable by DIP switch (DIP 2) and Dashboard
Parameter Inverter voltage
Value 230V
Description Output voltage in inverter mode. Can be set from 200V to 240V
Configurable by Dashboard
Parameter Low Battery Protect
Value On
Description Enables or disables low battery protection with user programmable shutdown, restart and delay values (standard respectively 10V, 12V and 5 seconds). Turning Low Battery Protect off, results in immediate inverter shutdown when the battery voltage is less than 8.0V.
Configurable by DIP switch (DIP 3) and Dashboard
Parameter Automatic Stand By (ASB)
Value Off

Enerdrive ePRO Inverter / Charger Owners ManualPage 12
Description Enables or disables ASB. If enabled, the inverter will jump to ASB mode automatically, when the connected load power consumption drops below a user programmable level. In ASB mode the inverter pulses it’s output sinewave in order to detect when the connected load requires more power again. While running in ASB mode, the ePRO Combi itself draws significantly less current from the battery. As soon as the load power demand increases again, the inverter will automatically jump to continuous mode delivering uninterrupted power to the load. When disabled, the inverter will always run in continuous mode, which is better for critical loads like computers, clocks and AV equipment.
Configurable by DIP switch (DIP 4) and Dashboard
Parameter AC input voltage range (transfer switch)
Value 180V – 270V
Description Input voltage range which is accepted by the ePRO Combi for feeding through to the connected load. Two AC undervoltage values can be set. An absolute undervoltage level which directly releases the AC transfer switch when exceeded (factory setting = 150V), and a delayed undervoltage level, which releases the AC transfer switch after a certain delay (factory settings are 180V and 5 seconds). The charger stops charging when the AC input voltage drops below 185V and restarts again above 190V.
Configurable by Dashboard
Parameter AC input frequency range
Value 45Hz – 65Hz
Description Input frequency range which is accepted by the ePRO Combi. Can be set to full range (45Hz – 65Hz), or to a smaller range within the 45Hz lower and 65Hz upper boundaries.
Configurable by Dashboard

Page 13Enerdrive ePRO Inverter / Charger Owners Manual
Parameter AC Input Current Limit
Value 16.0A or 30.0A (depending on model)
Description Represents the maximum continuous current that the ePRO Combi will draw from the AC input source. To assure this, the ePRO Combi will either reduce the charge current automatically, or (when enabled) will activate the AC Input Power Boost feature which will supply the additional power demand by running the inverter in parallel with the AC input source. When the connected load still draws too much current, the installer can either choose to deactivate the AC transfer switch, or keep it closed and allow it to exceed the AC input current limit value. This value can be set from 1.0A to 16.0A or 2.0A to 30.0A (depending on model) by Dashboard or the optional Universal Remote Control.
Configurable by Dashboard and Universal Remote Control
Parameter AC Input Power Boost
Value Off
Description AC Input Power Boost temporarily assists weak AC input sources when the connected load needs more power than available from the grid or generator. This is accomplished by running the inverter in parallel with the AC input source. The inverter can add power up to it’s nominal output power rating assuming the battery is healthy. This parameter can be set On or Off.
Configurable by DIP switch (DIP 7) and Dashboard
Parameter Ground switch
Value Enabled

Enerdrive ePRO Inverter / Charger Owners ManualPage 14
Description The ground switch is an internal relay that automatically connects AC output Neutral (N) to Protective Earth (PE = chassis) in inverter mode. This enables the use of a ground fault circuit interrupter (GFCI) at the AC output of the ePRO Combi. When a non-grounded (floating-) output is required, this Parameter can be disabled.
Configurable by DIP switch 8 (onEPC 2000-12 to 3500-24 models only) and Dashboard
Parameter AC input fail sensitivity
Value Normal
Description This parameter can be set to Very Low, Low, Normal, High and Very High. The value of this Parameter decides how fast the ePRO Combi detects a signal fail at the AC input. The lower settings are resulting in a slower AC input source inverter transfer time, while the higher settings result in the fastest transfer times. The settings Low and Very Low can be used when the AC input signal is distorted or unstable, which could be the case when a small generator is used. The settings High and Very High can be used when the ePRO Combi is connected to a solid grid or quality generator. The factory setting Normal is a good compromise, which still results in a fast AC input source inverter transfer time of less than 5ms, while being reasonably immune against distorted AC input signals.
Configurable by Dashboard
Parameter Battery type / Charge program
Value AGM

Page 15Enerdrive ePRO Inverter / Charger Owners Manual
Description The default charge program AGM is compatible with typical AGM type batteries, but can be used for other types of lead-acid batteries as well. Please make sure that you always check if the ePRO Combi charge program settings, are compatible with the used battery! The AGM charge program absorption voltage is 14.3V (28.6V@24V) and the float voltage is 13.3V (26.6V@24V). Other selectable charge programs are Flooded, GEL and Custom. For further charge program information, please see chapters 3.3 and 5.1.
Configurable by DIP switch (DIP 5 and 6) and Dashboard
Parameter Charge current limit
Value 100%
Description This parameter sets the maximum charge current in percent. This value can be set from 10% to 100% by Dashboard or the optional Universal Remote Control. You can set this parameter to a lower value when the connected battery is too small and cannot handle the maximum charge current, or when you wish to (temporarily) reduce the charger current share, in the total amount of current flowing through the AC input of the ePRO Combi.
Configurable by Dashboard and Universal Remote Control
Enerdrive ePRO Inverter / Charger Owners ManualPage 16
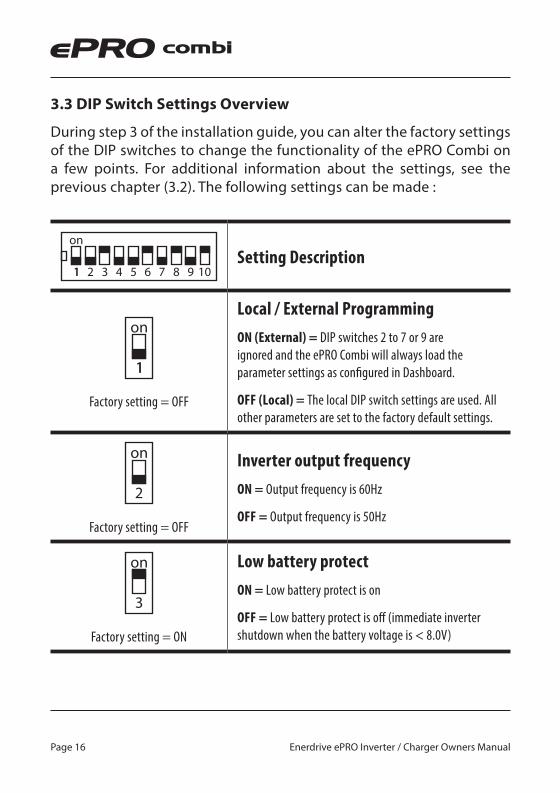
3.3 DIP Switch Settings Overview
During step 3 of the installation guide, you can alter the factory settings of the DIP switches to change the functionality of the ePRO Combi on a few points. For additional information about the settings, see the previous chapter (3.2). The following settings can be made :
Setting Description
Factory setting = OFF
Local / External ProgrammingON (External) = DIP switches 2 to 7 or 9 are ignored and the ePRO Combi will always load the parameter settings as configured in Dashboard.
OFF (Local) = The local DIP switch settings are used. All other parameters are set to the factory default settings.
Factory setting = OFF
Inverter output frequencyON = Output frequency is 60Hz
OFF = Output frequency is 50Hz
Factory setting = ON
Low battery protectON = Low battery protect is on
OFF = Low battery protect is off (immediate inverter shutdown when the battery voltage is < 8.0V)

Page 17Enerdrive ePRO Inverter / Charger Owners Manual
Factory setting = OFF
ASB modeON = ASB mode on
OFF = ASB mode off
Factory setting 5 = OFF
Factory setting 6 = ON
Battery type / Charge program1)5 = OFF Battery type = Flooded
6 = OFF Absorption voltage = 14.4V or 28.8V Float voltage = 13.5V or 27.0V5 = ON Battery type = GEL6 = OFF Absorption voltage = 14.2V or 28.4V Float voltage = 13.5V or 27.0V5 = OFF Battery type = AGM6 = ON Absorption voltage = 14.3V or 28.6V Float voltage = 13.3V or 26.6V
5 = ON Battery type = Custom (created by Dashboard)
6 = ON Absorption voltage = set by Dashboard Float voltage = set by Dashboard
Factory setting = OFF
AC Input Power BoostON = AC Input Power Boost on
OFF = AC Input Power Boost off

Enerdrive ePRO Inverter / Charger Owners ManualPage 18
Factory setting = ON
Models : ePRO Combi 1600-1800Bypass remote switch (Bypasses the remote switch connection when no remote switch is connected)
ON = Remote switch connection terminals are bypassed
OFF = remote switch connection terminals are open. A remote switch must be connected and switched ON in order to activate the ePRO Combi. The local on/off switch on the front panel always overrides the remote switch. So in order to use the remote switch, the local on/off switch must be in the ‘on’ or ‘charger only’ position.
Models : ePRO Combi 2000-3500Ground switch/relay
ON = Ground switch is enabled
OFF = Ground switch is disabled
Factory setting = OFF
Models : ePRO Combi 2000-3500 onlyReserved

Page 19Enerdrive ePRO Inverter / Charger Owners Manual
Factory setting = ON
Models : ePRO Combi 2000-3500 onlyBypass remote switch (Bypasses the remote switch connection when no remote switch is connected)
ON = Remote switch connection terminals are bypassed
OFF = Remote switch connection terminals are open. A remote switch must be connected and switched ON in order to activate the ePRO Combi. The local on/off switch on the front panel always overrides the remote switch. So in order to use the remote switch, the local on/off switch must be in the ‘on’ or ‘charger only’ position.
CAUTION1) Invalid battery type settings can cause serious damage to your batteries and/or connected battery loads. Always consult your battery’s documentation for the correct charge voltage settings.

Enerdrive ePRO Inverter / Charger Owners ManualPage 20
4. General Operation4.1 Operating the ePRO Combi
The main switch on the ePRO Combi has three positions : On, Off and Charger only (see image in chapter 4.2).
When switched to On, the ePRO Combi will perform all tasks automatically. It will power up in inverter mode, supplying power to the connected load. When a grid or generator is connected to the AC input, the ePRO Combi will analyse this signal. If the voltage and frequency of this signal are both within the required limits, the ePRO Combi will synchronize to the input signal and activates the AC transfer switch automatically. Now the connected loads are being powered from the AC input source and the ePRO Combi will also start charging the battery. As soon as the voltage or the frequency of the AC input signal are exceeding the required limits (for example when the AC input signal disappears), the ePRO Combi will immediately stop charging, release the AC transfer switch and activate the inverter again. All this happens so fast, that the connected load will not be disturbed.
When switched to Off, the ePRO Combi is completely shut down and cannot be activated by a remote switch or the Universal Remote Control either. In this mode, the ePRO Combi will draw no current from the battery.
When switched to Charger only, the ePRO Combi will disable the inverter mode and will only work as a stand alone battery charger. As soon as a usable AC input signal is available, the ePRO Combi will activate the AC transfer switch and starts charging the battery. When the AC input signal fails, the AC transfer switch will be released again and the charger stops charging. No AC signal will be present at the ePRO Combi output when there is no AC input signal either.
Information about the LED indicators on the frontpanel and the different error mode codes, can be found in the next chapter.
Page 21Enerdrive ePRO Inverter / Charger Owners Manual
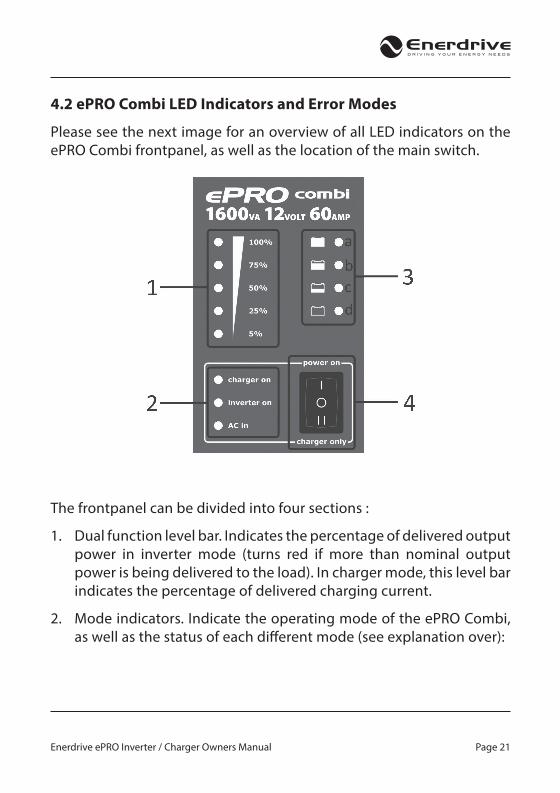
4.2 ePRO Combi LED Indicators and Error Modes
Please see the next image for an overview of all LED indicators on the ePRO Combi frontpanel, as well as the location of the main switch.
The frontpanel can be divided into four sections :
1. Dual function level bar. Indicates the percentage of delivered output power in inverter mode (turns red if more than nominal output power is being delivered to the load). In charger mode, this level bar indicates the percentage of delivered charging current.
2. Mode indicators. Indicate the operating mode of the ePRO Combi, as well as the status of each different mode (see explanation over):

Enerdrive ePRO Inverter / Charger Owners ManualPage 22
‘charger on’ LED
Off not charging
On (green) charging
On (blinking red) error (see chapter 4.2.1)
On (red) charger disabled
‘inverter on’ LED
Off not inverting
On (green) inverting or power boosting
On (blinking red) error (see chapter 4.2.1)
On (red) inverter disabled
‘AC in’ LED
Off No AC input present, transfer switch open
On (blinking green) AC input present and within range, ePRO Combi is synchronizing
On (green) AC input approved, transfer switch closed
On (blinking red) AC input present but out of range
On (red) AC transfer switch disabled

Page 23Enerdrive ePRO Inverter / Charger Owners Manual
3. Charge status bar. Gives a rough indication of the charging progress, see below :
LED 3a 100% full (ready)
LED 3b 80% full
LED 3c 50% full
LED 3d empty
4. Power on, off, charger only switch. See chapter 4.1 for more explanations.
4.2.1. Error Indications
When the so called mode indicator LEDs are blinking red, an error has been detected. Each mode indicator LED can either blink red individually, or combined along with one or more other mode indicator LEDs. There are five different error indications, each with their own blinking pattern :
One flash in a row Battery related error (too low or too high battery voltage, too low or too high battery temperature, too high battery ripple voltage, battery defect)
Two flashes in a row AC overload error (AC load requires too much power from the inverter, AC output short circuit)
Three flashes in a row High temperature error (ePro Combi shuts down on high temperature)
Four flashes in a row Device error (an error has occurred inside the ePRO Combi. Please return for service)
Five flashes in a row Charge program error (only for ‘charger on’ indicator LED).
Charge program selection set to Custom, while custom made charge program contains an error or time-out.
Enerdrive ePRO Inverter / Charger Owners ManualPage 24
The ePRO Combi will mostly recover from an error mode automatically when the cause of the error has been resolved. However, when an error has occurred due to a high battery ripple voltage or an AC transfer switch over-current, the ePRO Combi needs to be switched off and on again manually (manual restart). The ePRO Combi also needs to be restarted manually, when too many battery or overload errors have occurred within a short period of time.
4.3 Programmable Alarm Relay
The ePRO Combi is equipped with one or two (depending on model) programmable potential free alarm relays. Standard, this relay (or relay 1 on EPC 2000-12 to 3500-24 models) will be activated when the unit shuts down and jumps to an error mode. The alarm relay de-activates again when the error has been resolved and the ePRO Combi is running in normal operating mode again.
Relay 2 on the EPC 2000-12 to 3500-24 models will be activated only after the AC supply has become available. In case of battery operation, Relay 2 will deactivate immediately. This can be used to switch less critical AC loads (i.e. electric boiler, aircon) on and off that are allowed to be supplied by the mains or generator only.
Using ePRO Dashboard, it is also possible to configure the programmable relays to perform a different task, like starting a generator when the battery voltage has reached a certain low voltage level.
Both normally closed and normally open contacts of these relays are available. For the EPC 1600 to 1800 models, the maximum relay contact ratings are 30Vdc/1A or 60Vdc/0.3A. For the EPC 2000 to 3500 models, the maximum relay contact ratings are 30Vdc/16A or 250Vac/16A.
4.4 Trigger Input
The trigger input offers a way of externally controlling the behaviour of the ePRO Combi. The trigger input can be connected to an external

Page 25Enerdrive ePRO Inverter / Charger Owners Manual
switch or a potential free relay contact. By closing this external switch or contact, a user programmable ‘action’ will be performed. Such an action could for example be to release the AC transfer switch, temporarily disable the AC input Power Boost feature or force the ePRO Combi to switch to inverter mode. All this can be configured in ePRO Dashboard. The EPC 1600 to 1800 models are equipped with one trigger input, while the EPC 2000 to 3500 models are equipped with two trigger inputs.
4.5 Load Requirements in Inverter Mode
Before you connect your appliance(s) to the ePRO Combi AC output, always check it’s maximum power consumption. Do not connect appliances to the AC output requiring more than the nominal power rating of the inverter continuously. Unless these appliances are switched on only when the AC transfer switch is activated, and power is drawn from an external source with a larger capacity than the inverter.
Some appliances like motors or pumps, draw large inrush currents at startup. It is possible that the startup current exceeds the over-current trip level of the inverter. In this case the output voltage will shortly decrease to limit the output current of the inverter. If the over-current trip level is continuously exceeded, the inverter will shut down and automatically restart within 20 seconds. In this case it is advisable to disconnect this appliance from the inverter, since it requires too much power to be driven by this unit. The ePRO Combi needs to be restarted manually when it has shut down due to overloads for four times in a row. Note that at higher ambient temperature levels, the overload capacity of the ePRO Combi will be reduced.

Enerdrive ePRO Inverter / Charger Owners ManualPage 26
5. Charger Operation5.1 Charge Programs
All standard selectable charge programs (using DIP switches 5 and 6), perform a four stage IUoUoP charging process comprising of a “Bulk”, an “Absorption”, a “Float” and a “Pulse” stage. The image below visualizes the four stage charging process :
Page 27Enerdrive ePRO Inverter / Charger Owners Manual
In the Bulk stage, the charger delivers full output current and typically returns approximately 80% of charge back into the battery once the absorption voltage is reached. During this stage, the battery empty and battery 50% full indicators will be lit depending on the Bulk charge progress. When the absorption voltage has been reached, the Absorption stage will be entered and the battery 80% full indicator will be lit. This stage will return the final 20% of charge to the battery. The output voltage is kept at a constant level and the charge current decreases as a function of the battery’s state of charge. When the charge current has dropped below a certain value or when the maximum absorption timer has been expired, the Float stage will be entered. The battery full Indicator will be lit and an acoustical message will sound, indicating that the battery is full. In this stage the battery voltage will be held constant at a safe level for the battery. It will maintain the battery in optimal condition for as long as the battery remains connected to the activated charger. Connected battery loads will be directly powered by the charger up to the charger’s maximum output current level. When even more current is drawn, the battery must supply this which results in a declining battery voltage. At a certain battery voltage level, the charger jumps back to the Bulk stage and will finalize a complete charging process again, once the battery load consumption has dropped below the charger’s maximum output current level.
The fourth stage called “Pulse”, will perform a short refresh charge of approximately 1 hour each 7 days while the charger operates in the Float stage. This will keep the battery in optimal condition while prolonging it’s lifetime. The battery can remain connected to the activated charger continuously, without risk of overcharging.
When the battery temperature sensor is installed, the charger automatically compensates the charge voltages against battery temperature. This means that the charge voltages are slightly increased at lower temperatures and decreased at higher temperatures (-30mV/°C

Enerdrive ePRO Inverter / Charger Owners ManualPage 28
at 12V chargers and -60mV/°C at 24V chargers). This way, overcharging is prevented which prolongs your battery’s lifetime.
When the standard selectable charging programs do not satisfy your requirements, or when different voltage- and current levels are needed, you can edit or create your own charge programs using ePRO Dashboard. Up to 8 different stages can be linked together and all individual stages can be configured extensively.
Page 29Enerdrive ePRO Inverter / Charger Owners Manual
5.2 Equalizing a Flooded Battery
If you are using a flooded lead acid battery, an occasional equalization charge cycle may be recommended by the manufacturer. This might also be true when the flooded battery has been very deeply discharged or often charged inadequately. During equalization, the battery will be charged up to 15.5V (or 31V for 24V models) at a reduced output current level. Before starting an equalization charge cycle, the following caution statements must be read carefully :
CAUTIONEqualization should only be performed on a flooded (wet) lead acid battery. Therefore the ePRO Combi only allows equalization when the battery type DIP switches are set to Flooded. Other battery types like GEL or AGM will be damaged by this process.
Always follow the battery manufacturer’s instructions when equalizing flooded batteries.
During equalization, the battery generates explosive gasses. Follow all the battery safety precautions enclosed with your ePRO Combi. Ventilate the area around the battery sufficiently and ensure that there are no sources of flames or sparks in the vicinity.
Disconnect all loads connected to the battery during equalization. The voltage applied to the battery during this process may be above safe levels for some loads.
The ePRO Combi cannot automatically determine when to stop the equalization of a battery. The user must monitor the battery’s specific gravity throughout this process to determine the end of the equalization cycle. The internal 2 hours time-out timer of your charger is only intended as a safety feature, but may not be sufficiently short to prevent battery damage. Therefore, equalizing a battery is always a process that must continuously be supervised by the user.

Enerdrive ePRO Inverter / Charger Owners ManualPage 30
Since equalization is only allowed for flooded (wet-) lead acid batteries, the ePRO Combi will only allow this function to be available when the “Flooded” charging program is selected (see chapter 3.3). Besides this, the charger also needs to have a full charge cycle completed and must operate in the Float stage. When these two conditions are met, the equalization charge mode can be activated by pressing the recessed push-button on the bottom side of the unit (see images below) for 3 seconds, until all charge status indicators start flashing.
Models :EPC 1600-12 to 1800-24 :
Models :EPC 2000-12 to 3500-24 :
Page 31Enerdrive ePRO Inverter / Charger Owners Manual
The ePRO Combi will allow a maximum equalization time of 2 hours before it automatically jumps back to the Float stage. If the specific gravity of each cell does not match the battery manufacturer’s specifications yet, you can initiate a new 2 hours equalization cycle by pressing the push-button for 3 seconds again. Always keep on checking the specific gravity of each cell repeatedly during the equalization process. When these values are correct, you can manually exit the equalization process by pressing the recessed push-button once. The ePRO Combi will then return to the Float stage.

Enerdrive ePRO Inverter / Charger Owners ManualPage 32
6. Troubleshooting GuidePlease see the table below if you experience any problems with the ePRO Combi and/or the installation.
Problem Possible cause Remedy
ePRO Combi is not working at all.
Main switch in Off (0) position. Push the power switch in the ‘I’ or ‘II’ position.
Remote switch or Universal Remote Control have deactivated the ePRO Combi.
Activate the ePRO Combi remotely or check DIP switch 8 or 10 for correct setting.
Poor contact between the ePRO Combi battery wires and the battery terminals.
Clean battery terminals or
ePRO Combi wire contacts. Tighten battery terminal screws.
Blown DC fuse. Check battery fuse or internal ePRO Combi fuse (EPC1600-1800 only).
Very poor battery condition. Replace battery.
The charger mode is not working (AC transfer switch does not activate either).
The AC input voltage or frequency are out of range or too unstable.
Make sure that the AC input voltage is between 185V - 270V and the frequency between 45Hz – 65Hz (assuming standard settings)
Charger mode and/or the AC transfer switch are disabled during setup using Dashboard.
Enable Charger mode and the AC transfer switch using Dashboard.

Page 33Enerdrive ePRO Inverter / Charger Owners Manual
The battery is not being charged up to it’s maximum capacity.
Incorrect absorption charge voltage setting.
Check DIP switch 5 and 6 for correct settings. Or adjust the absorption voltage using ePRO Dashboard.
Incorrect charge current setting. Adjust the charge current using the Universal Remote Control or ePRO Dashboard. Typically, the charge current should be set to 10%-20% of the total battery capacity
Too much voltage loss in battery cables and/or connections.
Make sure that the battery cables have a large enough diameter. Check if all DC connections are solidly made.
Additional battery loads are consuming too much current during charging.
Turn-off or disconnect all battery loads.
Charge current is too low.
High ambient temperature. Try to lower the ambient temperature around the ePRO Combi.
Charger is operating in the absorption charging stage.
Do nothing. The battery is almost fully charged and consumes less current by itself.
Enerdrive ePRO Inverter / Charger Owners ManualPage 34
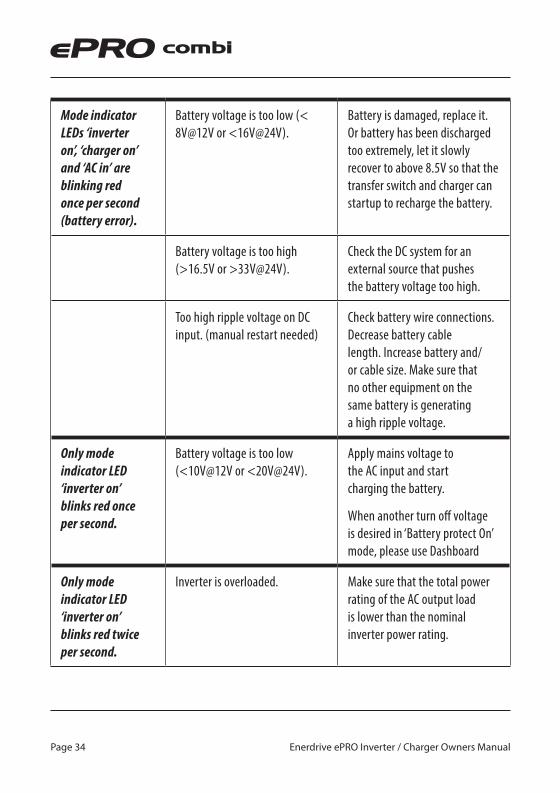
Mode indicator LEDs ‘inverter on’, ‘charger on’ and ‘AC in’ are blinking red once per second (battery error).
Battery voltage is too low (< 8V@12V or <16V@24V).
Battery is damaged, replace it. Or battery has been discharged too extremely, let it slowly recover to above 8.5V so that the transfer switch and charger can startup to recharge the battery.
Battery voltage is too high (>16.5V or >33V@24V).
Check the DC system for an external source that pushes the battery voltage too high.
Too high ripple voltage on DC input. (manual restart needed)
Check battery wire connections. Decrease battery cable length. Increase battery and/or cable size. Make sure that no other equipment on the same battery is generating a high ripple voltage.
Only mode indicator LED ‘inverter on’ blinks red once per second.
Battery voltage is too low (<10V@12V or <20V@24V).
Apply mains voltage to the AC input and start charging the battery.
When another turn off voltage is desired in ‘Battery protect On’ mode, please use Dashboard
Only mode indicator LED ‘inverter on’ blinks red twice per second.
Inverter is overloaded. Make sure that the total power rating of the AC output load is lower than the nominal inverter power rating.
Page 35Enerdrive ePRO Inverter / Charger Owners Manual
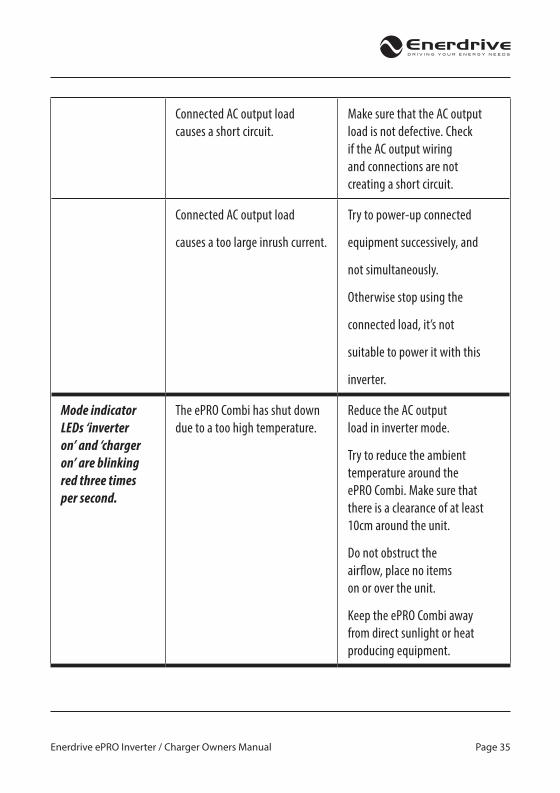
Connected AC output load causes a short circuit.
Make sure that the AC output load is not defective. Check if the AC output wiring and connections are not creating a short circuit.
Connected AC output load
causes a too large inrush current.
Try to power-up connected
equipment successively, and
not simultaneously.
Otherwise stop using the
connected load, it’s not
suitable to power it with this
inverter.
Mode indicator LEDs ‘inverter on’ and ‘charger on’ are blinking red three times per second.
The ePRO Combi has shut down due to a too high temperature.
Reduce the AC output load in inverter mode.
Try to reduce the ambient temperature around the ePRO Combi. Make sure that there is a clearance of at least 10cm around the unit.
Do not obstruct the airflow, place no items on or over the unit.
Keep the ePRO Combi away from direct sunlight or heat producing equipment.

Enerdrive ePRO Inverter / Charger Owners ManualPage 36
Mode indicator LED ‘AC in’ blinks red once per second.
AC input signal is present but not within required voltage and frequency borders.
Make sure that the AC input voltage falls within 185V- 270V and 45Hz-65Hz.
All mode indicator LEDs ‘inverter on’, ‘charger on’ and ‘AC in’ are blinking red twice per second (manual restart needed)
Maximum AC transfer switch current has been exceeded.
Reduce the AC output load
Mode indicator LED ‘inverter on’ or ‘charger on’ or ‘AC in’ is red continuously.
Either the inverter mode, or the charger mode or the AC transfer switch has been disabled using Dashboard.
Enable again using Dashboard if required.
If only ‘inverter on’ is red continuously.
ePRO Combi main switch is put into ‘charger only’ mode, meaning that the inverter is disabled.
Output power bar is red (inverter mode).
The inverter is overloaded and will shut down after a certain time (depending on the amount of overload)
Reduce the AC output load

Page 37Enerdrive ePRO Inverter / Charger Owners Manual
All mode indicator LEDs ‘inverter on’, ‘charger on’ and ‘AC in’ are blinking red four times.
Device or connection fault. ePRO Combi is defective, return for service.
External AC source is connected to the AC output instead of the AC input.
Mode indicator LED ‘charger on’ blinks five times.
Charge program error. User has selected an empty or invalid charge program (‘custom’ charge program is empty from factory).
Advanced user made charge program contains ‘go-to error’ condition, for example when a charge stage takes too much time.
If none of the above remedies will help to solve the problem you are encountering, then it is best to contact your local Enerdrive distributor for further help and / or possible repair of your Enerdrive ePRO Combi.
WARNING: SHOCK HAZARDDo not disassemble the ePRO Combi yourself, there are dangerously high voltages present inside and will also void your warranty.

Enerdrive ePRO Inverter / Charger Owners ManualPage 38
7. Technical SpecificationsEPC1600-12-60 / EPC1800-24-35
Parameter EPC1600-12-60 EPC1800-24-35
Inverter stage
Output power 1) Pnom 1300W 1400W
P10minutes 1600W 1800W
Psurge 2500W 3000W
Output voltage / frequency 230Vac ± 2% / 50Hz ± 0.05%
Output waveform True sinewave (THD < 5% 1) @ Pnom)
Input voltage (± 3% tolerance): Nominal 12V 24V
Range 10.52) – 16Vdc 212) – 32Vdc
Maximum efficiency 92% 94%
No load power consumption3) [ASB] < 10W [2.0W] < 12W [2.0W]
Charger stage
AC input voltage 185 – 270Vac / 45 – 65Hz / PF > 0.95
Maximum continuous charging current4) 60A 35A
Standard charge voltage (bulk / float @ 25°C) 14.3V / 13.3V 28.6V / 26.6V
Charge algorithm or program IUoUoP, intelligent 4 stage, temp. comp.
AC Transfer switch
Maximum continuous current 16Arms
Transfer time (typical) 0ms (inv. mains) / < 5ms (mains inv.)
General
ePROLink enabled Yes
Protections high/low battery voltage, high temperature, overload, short circuit,
high ripple voltage and low AC input voltage
DC connections Two wires, length 1.5 meters, 35mm2
AC connections Screw terminals

Page 39Enerdrive ePRO Inverter / Charger Owners Manual
Enclosure body size 351 x 210 x 114mm
Total weight 10.7kg
Protection class / Op. temp. / Storage temp. IP21 / -20°C .. +50°C / -40°C .. +80°C
Standards Complies with IEC 60335-2-29 including Australian deviations.
Note : the given specifications are subject to change without notice.
1. Measured with resistive load. Power ratings are subject to a tolerance of 10% and are decreasing as temperature rises with a rate of approx. 1.2%/°C starting from 25°C.
2. Undervoltage limit is dynamic. This limit decreases with increasing load to compensate the voltage drop across cables and connections.
3. Measured at nominal input voltage and 25°C
4. At higher ambient temperatures, maximum output current shall be reduced automatically

Enerdrive ePRO Inverter / Charger Owners ManualPage 40
EPC2000-12-80 / EPC2500-24-50
Parameter EPC2000-12-80 EPC2500-24-50
Inverter stage
Output power 1) Pnom 1800W 2000W
P10minutes 2100W 2500W
Psurge 4000W 5500W
Output voltage / frequency 230Vac ± 2% / 50Hz ± 0.05%
Output waveform True sinewave (THD < 5% 1) @ Pnom)
Input voltage (± 3% tolerance): Nominal 12V 24V
Range 10.52) – 16Vdc 212) – 32Vdc
Maximum efficiency 92% 93%
No load power consumption 3) [ASB] < 20W [3.5W] < 20W [4.0W]
Charger stage
AC input voltage 185 – 270Vac / 45 – 65Hz / PF > 0.95
Maximum continuous charging current 4)(Sec.) 80A (4A) 50A (4A)
Standard charge voltage (bulk / float @ 25°C) 14.3V / 13.3V 28.6V / 26.6V
Charge algorithm or program IUoUoP, intelligent 4 stage, temp. comp.
AC Transfer switch
Maximum continuous current 30Arms
Transfer time (typical) 0ms (inv. mains) / < 5ms (mains inv.)
General
ePROLink enabled Yes
Protections high/low battery voltage, high temperature, overload, short circuit,
high ripple voltage and low AC input voltage
DC connections M10 bolt terminals
AC connections Screw terminals
Enclosure body size 370 x 431 x 132mm
Page 41Enerdrive ePRO Inverter / Charger Owners Manual
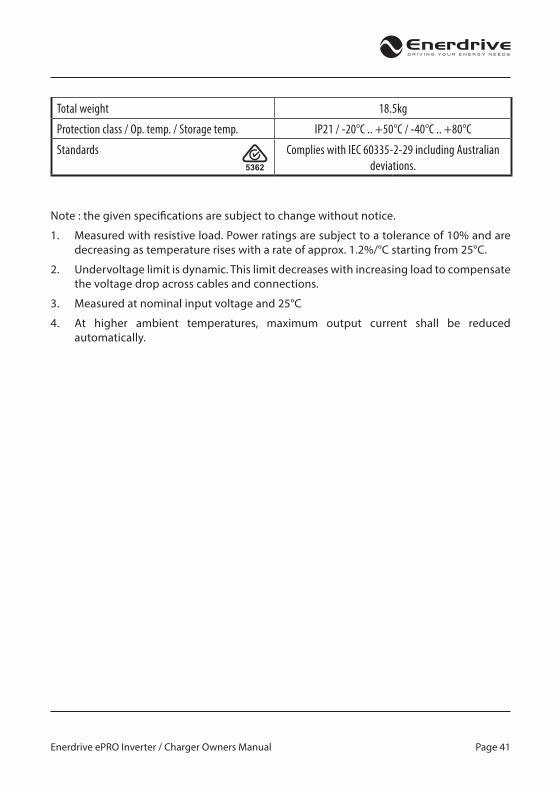
Total weight 18.5kg
Protection class / Op. temp. / Storage temp. IP21 / -20°C .. +50°C / -40°C .. +80°C
Standards Complies with IEC 60335-2-29 including Australian deviations.
Note : the given specifications are subject to change without notice.
1. Measured with resistive load. Power ratings are subject to a tolerance of 10% and are decreasing as temperature rises with a rate of approx. 1.2%/°C starting from 25°C.
2. Undervoltage limit is dynamic. This limit decreases with increasing load to compensate the voltage drop across cables and connections.
3. Measured at nominal input voltage and 25°C
4. At higher ambient temperatures, maximum output current shall be reduced automatically.

Enerdrive ePRO Inverter / Charger Owners ManualPage 42
EPC3000-12-120 / EPC3500-24-70
Parameter EPC3000-12-120 EPC3500-24-70
Inverter stage
Output power 1) Pnom 2600W 2800W
P10minutes 3200W 3800W
Psurge 5000W 6500W
Output voltage / frequency 230Vac ± 2% / 50Hz ± 0.05%
Output waveform True sinewave (THD < 5% 1) @ Pnom)
Input voltage (± 3% tolerance): Nominal 12V 24V
Range 10.52) – 16Vdc 212) – 32Vdc
Maximum efficiency 92% 93%
No load power consumption 3) [ASB] < 20W [3.5W] < 20W [4.0W]
Charger stage
AC input voltage 185 – 270Vac / 45 – 65Hz / PF > 0.95
Maximum continuous charging current 4)(Sec.) 120A (4A) 70A (4A)
Standard charge voltage (bulk / float @ 25°C) 14.3V / 13.3V 28.6V / 26.6V
Charge algorithm or program IUoUoP, intelligent 4 stage, temp. comp.
AC Transfer switch
Maximum continuous current 30Arms
Transfer time (typical) 0ms (inv. mains) / < 5ms (mains inv.)
General
ePROLink enabled Yes
Protections high/low battery voltage, high temperature, overload, short circuit,
high ripple voltage and low AC input voltage
DC connections M10 bolt terminals
AC connections Screw terminals
Enclosure body size 370 x 431 x 132mm

Page 43Enerdrive ePRO Inverter / Charger Owners Manual
Total weight 19.0kg
Protection class / Op. temp. / Storage temp. IP21 / -20°C .. +50°C / -40°C .. +80°C
Standards Complies with IEC 60335-2-29 including Australian deviations.
Note : the given specifications are subject to change without notice.
1. Measured with resistive load. Power ratings are subject to a tolerance of 10% and are decreasing as temperature rises with a rate of approx. 1.2%/°C starting from 25°C.
2. Undervoltage limit is dynamic. This limit decreases with increasing load to compensate the voltage drop across cables and connections.
3. Measured at nominal input voltage and 25°C
4. At higher ambient temperatures, maximum output current shall be reduced automatically
Enerdrive ePRO Inverter / Charger Owners ManualPage 44
8. WarrantyTWO YEAR LIMITED WARRANTY
Our goods come with guarantees that cannot be excluded under the Australian Consumer Law. You are entitled to a replacement or refund for a major failure and for compensation for any other reasonably foreseeable loss or damage. You are also entitled to have the goods repaired or replaced if the goods fail to be of acceptable quality and the failure does not amount to a major failure.
The limited warranty program is the only one that applies to this unit, and it sets forth all the responsibilities of Enerdrive. There is no other warranty, other than those described herein. Any implied warranty of merchantability of fitness for a particular purpose on this unit is limited in duration to the duration of this warranty.
This unit is warranted, to the original purchaser only, to be free of defects in materials and workmanship for two years from the date of purchase without additional charge. The warranty does not extend to subsequent purchasers or users other than OEM applications.
This unit is not intended for commercial use. This warranty does not apply to damage to units from misuse or incorrect installation/connection. Misuse includes wiring or connecting to improper polarity power sources.
RETURN/REPAIR POLICY:
If you are experiencing any problems with your unit, please contact our customer service department at [email protected] or Phone 1300 851 535 before returning product to retail store. After speaking to a customer service representative, if products are deemed non-working or malfunctioning, the product may be returned to the purchasing store within 30 days of original purchase. Any defective unit that is returned
Page 45Enerdrive ePRO Inverter / Charger Owners Manual
to Enerdrive within 30 days of the date of purchase will be replaced free of charge.
If such a unit is returned more than 30 days but less than two years from the purchase date, Enerdrive will repair the unit or, at its option, replace it, free of charge. If the unit is repaired, new or reconditioned replacement parts may be used, at manufacturer’s option. A unit may be replaced with a new or reconditioned unit of the same or comparable design. The repaired or replaced unit will then be warranted under these terms for the remainder of the warranty period. The customer is responsible for the shipping charges on all returned items back to Enerdrive.
LIMITATIONS:
This warranty does not cover accessories, such as adapters and batteries, damage or defects result from normal wear and tear (including chips, scratches, abrasions, discoloration or fading due to usage or exposure to sunlight), accidents, damage during shipping to our service facility, alterations, unauthorized use or repair, neglect, misuse, abuse, failure to follow instructions for care and maintenance, fire and flood.
If your problem is not covered by this warranty, call our Support Team at [email protected] or phone 1300 851 535 for general information if applicable.

Enerdrive ePRO Inverter / Charger Owners ManualPage 46

Page 47Enerdrive ePRO Inverter / Charger Owners Manual

Enerdrive ePRO Inverter / Charger Owners ManualPage 48