Embed Size (px)
Citation preview

DbProtect 6.4.9 Getting Started Guide
.trustwave.com Updated October 9, 2007

DbProtect Getting Started Guide - January 6, 2017
Copyright © 2017 Trustwave Holdings, Inc. All rights reserved. ii
Legal Notice
Copyright © 2017 Trustwave Holdings, Inc.
All rights reserved. This document is protected by copyright and any distribution, reproduction, copying, or decompilation is strictly prohibited without the prior written consent of Trustwave. No part of this document may be reproduced in any form or by any means without the prior written authorization of Trustwave. While every precaution has been taken in the preparation of this document, Trustwave assumes no responsibility for errors or omissions. This publication and features described herein are subject to change without notice.
While the authors have used their best efforts in preparing this document, they make no representation or warranties with respect to the accuracy or completeness of the contents of this document and specifically disclaim any implied warranties of merchantability or fitness for a particular purpose. No warranty may be created or extended by sales representatives or written sales materials. The advice and strategies contained herein may not be suitable for your situation. You should consult with a professional where appropriate. Neither the author nor Trustwave shall be liable for any loss of profit or any commercial damages, including but not limited to direct, indirect, special, incidental, consequential, or other damages.
The most current version of this document may be obtained by contacting:
Trustwave Technical Support: Phone: +1.800.363.1621 Email: [email protected]
Trademarks Trustwave and the Trustwave logo are trademarks of Trustwave. Such trademarks shall not be used, copied, or disseminated in any manner without the prior written permission of Trustwave.
Revision History Version Date Changes
6.4.6 July 14 2015 • Updated release
6.4.7 March 29, 2016 • Updated release
6.4.8 June 27, 2016 • Updated release
6.4.9 January 6, 2017 • Updated release

DbProtect Getting Started Guide - January 6, 2017
Copyright © 2017 Trustwave Holdings, Inc. All rights reserved. iii
Formatting Conventions
This manual uses the following formatting conventions to denote specific information.
Formats and Symbols
Meaning
Blue Underline A blue underline indicates a Web site or e-mail address.
Bold Bold text denotes UI control and names such as commands, menu items, tab and field names, button and checkbox names, window and dialog box names, and areas of windows or dialog boxes.
Code Text in Courier New 9 pt in blue indicates computer code or information at a command line.
Italics Italics denote the name of a published work, the current document, or another document, and are also used for text emphasis, to introduce a new term, and for path names.
[Square brackets]
Square brackets indicate a placeholder for values and expressions.
Notes, Tips, and Cautions
Note: This symbol indicates information that applies to the task at hand.
Tip: This symbol denotes a suggestion for a better or more productive way to use the product.
Caution: This symbol highlights a warning against using the software in an unintended manner.
DbProtect Getting Started Guide - January 6, 2017
Copyright © 2017 Trustwave Holdings, Inc. All rights reserved. iv
About This Document
The DbProtect Getting Started Guide provides a brief overview of how to get started with DbProtect; it is not intended to be a comprehensive document on the various features and capabilities found within the platform.

DbProtect Getting Started Guide - January 6, 2017
Copyright © 2017 Trustwave Holdings, Inc. All rights reserved. v
Table of Contents
Legal Notice ii
Trademarks ......................................................................................................................................... ii Revision History .................................................................................................................................. ii
Formatting Conventions iii
Notes, Tips, and Cautions ................................................................................................................... iii
About This Document iv
1 Introduction 8
1.1 What’s New in DbProtect 6.4.7, 6.4.8, and 6.4.9 .......................................................................... 8 1.2 Features introduced in Previous Versions .................................................................................... 8 1.3 Before You Begin .......................................................................................................................... 9 1.4 Overview of Components ............................................................................................................. 9 1.5 Target Database Support Matrix ................................................................................................. 11
2 Identify Your Product Use Profile 12
2.1 System Specifications ................................................................................................................. 12 2.2 Planning for Installation and First-Time Use ............................................................................... 14 2.3 DbProtect Component Versions ................................................................................................. 17
3 Logging in for the First Time 18
3.1 First Login ................................................................................................................................... 18 3.2 Set Up Users and Organizations ................................................................................................ 18 3.3 Add Assets .................................................................................................................................. 19 3.4 Add Assets Using Discovery ....................................................................................................... 20 3.5 Using Asset Attributes ................................................................................................................ 21
3.5.1 Managing asset attributes for multiple assets ............................................................... 21 3.5.2 Using asset attributes to filter report results .................................................................. 21 3.5.3 Asset Groups ................................................................................................................. 22
4 Vulnerability Management 23
4.1 Prerequisites ............................................................................................................................... 23 4.2 Use of Policies ............................................................................................................................ 23 4.3 Run Vulnerability Assessments .................................................................................................. 23 4.4 Provision Database Users to Run Audits ................................................................................... 24 4.5 Reporting on Pen Tests and Audits ............................................................................................ 24 4.6 Schedule a Report ...................................................................................................................... 24 4.7 Triggering report jobs from scan jobs ......................................................................................... 25

DbProtect Getting Started Guide - January 6, 2017
Copyright © 2017 Trustwave Holdings, Inc. All rights reserved. vi
5 Rights Management 26
5.1 Prerequisites ............................................................................................................................... 26 5.2 Select a Policy ............................................................................................................................ 26 5.3 Run a Rights Review .................................................................................................................. 26 5.4 Investigating and Reporting on User Rights ............................................................................... 27
6 Activity Monitoring 29
6.1 Prerequisites ............................................................................................................................... 29 6.2 Configure a Sensor to Monitor a Database ................................................................................ 29 6.3 Use of Policies ............................................................................................................................ 29
7 Investigate Alerts and Audit Trail 31
7.1 Prerequisites ............................................................................................................................... 31 7.2 Dashboards ................................................................................................................................. 31 7.3 Hierarchies .................................................................................................................................. 31 7.4 View Policies ............................................................................................................................... 31 7.5 Review Alerts .............................................................................................................................. 31
8 Active Response 32
8.1 Prerequisites ............................................................................................................................... 32
9 System Administration 33
9.1 Prerequisites ............................................................................................................................... 33 9.2 Manage Licenses ........................................................................................................................ 33 9.3 Component Versions .................................................................................................................. 33 9.4 Manage Organizations ................................................................................................................ 33 9.5 Work with Scan Engines ............................................................................................................. 34 9.6 Advanced Scan Engine Configuration ........................................................................................ 34 9.7 Define Users and their Role-based Access ................................................................................ 35
10 Maintenance and Disaster Recovery 36
10.1 Maintenance Topics ................................................................................................................ 36 10.2 Backup and Disaster Recovery ............................................................................................... 37 10.3 Bulk Data Management ........................................................................................................... 37
11 Considerations for Upgrade from previous versions 39
11.1 Upgrade Considerations: Sensor Re-Registration .................................................................. 39 11.2 Upgrade Considerations: Supported Components ................................................................. 39 11.3 Upgrade Considerations: Supported Upgrade Paths .............................................................. 39 11.4 Upgrade Considerations: Contact Support .............................................................................. 39
12 Network Range Restrictions 40

DbProtect Getting Started Guide - January 6, 2017
Copyright © 2017 Trustwave Holdings, Inc. All rights reserved. vii
12.1 Network Range Restrictions .................................................................................................... 40 12.2 Advanced Scan Engine Settings ............................................................................................. 40
13 Changes in License Management 41
13.1 Licenses are now Centrally Stored .......................................................................................... 41 13.2 Working Product after License Overage ................................................................................. 41 13.3 Recover Licenses when Asset is No Longer Needed ............................................................. 41 13.4 Review License Usage ............................................................................................................ 42 13.5 Compliance Packs ................................................................................................................... 42
About Trustwave 43

DbProtect Getting Started Guide - January 6, 2017
Introduction Copyright © 2017 Trustwave Holdings, Inc. All rights reserved. 8
1 Introduction
DbProtect 6.4.9 is the newest release in the DbProtect 6.4 series. It includes a rollup of all features and patches released through the Support Portal for users of previous DbProtect 6.4 versions.
DbProtect is a precision database security and compliance solution that helps organizations control their database security processes in a more streamlined way. Designed to scale from small to medium sized business to large enterprises, DbProtect boosts operational efficiency and streamlines key database security activities while enabling organizations to achieve database security, minimize risk, and achieve regulatory compliance.
DbProtect is comprised of three feature modules:
1. Vulnerability Management: Capability to locate, examine and report on database security vulnerabilities and misconfigurations in any database.
2. Rights Management: Capability to examine and report on organization’s database user and object privileges, ownership, and access controls.
3. Activity Monitoring: Capability to track, identify, and alert on all database activities, suspicious behavior and other threats.
1.1 What’s New in DbProtect 6.4.7, 6.4.8, and 6.4.9 The new features introduced in DbProtect 6.4.9 are:
• Support for audit scanning of MongoDB
• Support for SQL Server 2016 (discovery, audit, and URR scanning)
DBProtect 6.4.8 is a maintenance release.
The new feature introduced in DbProtect 6.4.7 is support for scanning of Teradata Database.
1.2 Features introduced in Previous Versions The DbProtect 6.4 product series introduces a new look and feel, and a new workflow that simplifies running scans, viewing results, and generating reports.
DbProtect users can easily access and share the security information specifically needed to do their jobs, without exposing data they are not authorized to see — all without running multiple scans on the same assets.
A more granular set of role-based access controls and a new organizational management system help organizations break down the communication silos among information security teams, database groups, and other stakeholders.
Highlights of new features introduced in DbProtect 6.4 include:
• Support for scanning Oracle 12c in multi-tenancy mode (For connection details, see section 3.5.3; for reporting details, see section 4.5)

DbProtect Getting Started Guide - January 6, 2017
Introduction Copyright © 2017 Trustwave Holdings, Inc. All rights reserved. 9
• User interface support for managing certificates that are used for connections to secure Sybase assets
• Support for Audits of Microsoft Azure SQL Database
• Asset Attributes can now be used in asset selection for jobs and report filters (see section 3.5)
• Advanced permission management for report viewing rights (see section 3.2)
• Support for named pipes connection to SQL Server for Rights Review scans (see section 3.3)
• New Fix Reference Details report
• Bulk data management (see section 10.3)
• Allow Scan jobs to trigger separate Report jobs (see section 4.7)
• Scanning of Microsoft SQL Server 2014 (introduced in release 6.4.6)
1.3 Before You Begin The DbProtect product suite offers a set of software components that are used for scanning and monitoring databases. This guide assists you with identifying your class of product use, identifying the corresponding system specifications and also provides a starting point to prepare you for your installation and first time use of the product.
1.4 Overview of Components The DbProtect suite is comprised of a Web application server, data repository and distributed components for scanning (scan engines) and monitoring (sensors). The credentials users log on to DbProtect with (using a Web browser) are authenticated against a Windows domain or accounts created locally on the Web application server. Once logged on, users are authorized to use DbProtect with the privileges granted to them through their role memberships.
The browser and distributed components communicate with one another using secure protocols. For certain types of scans the scan engines communicate with targets using vendor-supported ODBC and .Net database drivers. Sensors are normally installed on the same host as the database since this type of deployment can detect local administrative connections to the database. Sometimes the network sensors are installed to observe network trafficking flowing to/from target databases.
Figure 1: Sample DbProtect deployment

DbProtect Getting Started Guide - January 6, 2017
Introduction Copyright © 2017 Trustwave Holdings, Inc. All rights reserved. 10
It is possible to scale each of these components to achieve the goals necessary for your intended scope. The following sections will help identify the profile that best fits your product use.

DbProtect Getting Started Guide - January 6, 2017
Introduction Copyright © 2017 Trustwave Holdings, Inc. All rights reserved. 11
1.5 Target Database Support Matrix The following chart provides platforms and versions supported by the various DbProtect components:

DbProtect Getting Started Guide - January 6, 2017
Identify Your Product Use Profile Copyright © 2017 Trustwave Holdings, Inc. All rights reserved. 12
2 Identify Your Product Use Profile
It is important to select the appropriate scope of intended use to have a satisfying product experience with DbProtect. To determine your best-fit profile, use the table below.
Note: If more than one profile fits your needs, select one that is lower in the table.
If you have… and need to… and have the need to… and retain data for…
then your needs match a product use profile as…
1-10 databases Run scans a few times a year, monitor very little
Navigate through live alerts, dashboards and reports; rarely use any other reporting function.
Less than a year
Pilot
10-50 databases Run monthly scans; monitor for privileged users
Navigate through live alerts, dashboards and reports, run monthly reports for job trends, summary and detailed results of each scan.
1-3 years Starter
50-1000 databases
Run weekly scans Provide live and scheduled data artifacts for various classes of stakeholders. These are generated in different formats and scheduled for delivery to the appropriate personnel. Use trend analysis for measurement against business goals.
3+ years Standard
Databases
Policy/Frequency
Reporting Needs
Data Retention
Best-Fit Profile
Once you have determined your best-fit profile, the next section will help prepare the specifications to provision a DbProtect system that fulfills your needs.
2.1 System Specifications There are various sizes of DbProtect environments you can provision. Referencing the product use profile that best fits your needs, the below table provides a summary of typical specifications used in each of these scenarios.

DbProtect Getting Started Guide - January 6, 2017
Identify Your Product Use Profile Copyright © 2017 Trustwave Holdings, Inc. All rights reserved. 13
Product Use Profile
Resource
Pilot Starter Standard
Memory 12 GB 12-24 GB 24-128 GB
Processor x64 Processor2.0 GHz+
2-4 cores 4-8 cores 8+ cores
Disk 30 GB for application
75 GB for temp / output
30 GB for application
100-250 GB for temp / output
30 GB for application
250+ GB for temp / output
Operating System Windows Server 2008 or Windows Server 2008 R2 or Windows Server 2012 or Windows Server 2012 R2
64-bit Standard Editions or higher.
SQL Server Repository Supported Versions
SQL Server 2008 or SQL Server 2008 R2 or SQL Server 2012 or SQL Server 2014
64-bit Standard Editions or higher.
SQL Server Repository Considerations
The repository may be installed on the same host as the application server. Memory limits should be set to not exceed 30% of the host.
The repository should be installed on a separate host from the application server, typically in a production SQL farm.
The repository should be installed on a separate host from the application server, typically in a high- performance SQL farm, actively managed by DBA operations teams.
Scan Engines
For Vulnerability Management and/or Rights Review
Each scan engine is typically installed on a host with 8-16 GB RAM, 2-4 Processor Cores 2.0 GHz+, 50GB free disk space running Windows Server 2008 or Windows Server 2008 R2 or Windows Server 2012 64-bit Standard Editions or higher. In order to run authenticated vulnerability or rights review scans, you will need to install ODBC and .Net database drivers to connect to any databases other than Microsoft SQL Server and Oracle.
Sensors For Activity Monitoring
Monitoring is facilitated using sensors that are available for a variety of platforms. Most frequently, these sensors are installed on the databases to be monitored. Occasionally, sensors may be placed on a network that can observe all traffic to/from a select set of databases. The management of all sensors is carried out securely from the DbProtect Management Console.
DbProtect Getting Started Guide - January 6, 2017
Identify Your Product Use Profile Copyright © 2017 Trustwave Holdings, Inc. All rights reserved. 14
Product Use Profile
Resource
Pilot Starter Standard
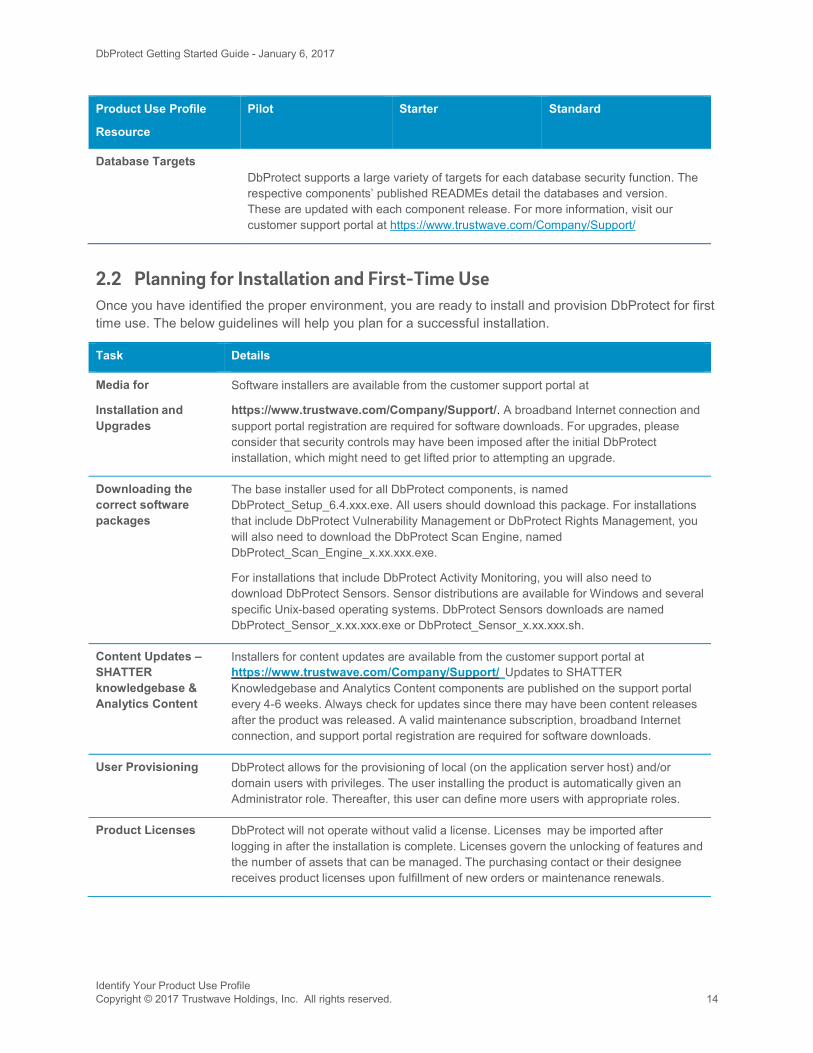
Database Targets DbProtect supports a large variety of targets for each database security function. The respective components’ published READMEs detail the databases and version. These are updated with each component release. For more information, visit our customer support portal at https://www.trustwave.com/Company/Support/
2.2 Planning for Installation and First-Time Use Once you have identified the proper environment, you are ready to install and provision DbProtect for first time use. The below guidelines will help you plan for a successful installation.
Task Details
Media for
Installation and Upgrades
Software installers are available from the customer support portal at
https://www.trustwave.com/Company/Support/. A broadband Internet connection and support portal registration are required for software downloads. For upgrades, please consider that security controls may have been imposed after the initial DbProtect installation, which might need to get lifted prior to attempting an upgrade.
Downloading the correct software packages
The base installer used for all DbProtect components, is named DbProtect_Setup_6.4.xxx.exe. All users should download this package. For installations that include DbProtect Vulnerability Management or DbProtect Rights Management, you will also need to download the DbProtect Scan Engine, named DbProtect_Scan_Engine_x.xx.xxx.exe.
For installations that include DbProtect Activity Monitoring, you will also need to download DbProtect Sensors. Sensor distributions are available for Windows and several specific Unix-based operating systems. DbProtect Sensors downloads are named DbProtect_Sensor_x.xx.xxx.exe or DbProtect_Sensor_x.xx.xxx.sh.
Content Updates – SHATTER knowledgebase & Analytics Content
Installers for content updates are available from the customer support portal at https://www.trustwave.com/Company/Support/ Updates to SHATTER Knowledgebase and Analytics Content components are published on the support portal every 4-6 weeks. Always check for updates since there may have been content releases after the product was released. A valid maintenance subscription, broadband Internet connection, and support portal registration are required for software downloads.
User Provisioning DbProtect allows for the provisioning of local (on the application server host) and/or domain users with privileges. The user installing the product is automatically given an Administrator role. Thereafter, this user can define more users with appropriate roles.
Product Licenses DbProtect will not operate without valid a license. Licenses may be imported after logging in after the installation is complete. Licenses govern the unlocking of features and the number of assets that can be managed. The purchasing contact or their designee receives product licenses upon fulfillment of new orders or maintenance renewals.

DbProtect Getting Started Guide - January 6, 2017
Identify Your Product Use Profile Copyright © 2017 Trustwave Holdings, Inc. All rights reserved. 15
Task Details
Browser-based Product Use
Using DbProtect requires an internet browser. Internet Explorer 8, 9, 10 and 11 are supported.
Install-time – Required Privileges
DbProtect’s Console and Scan Engine must be installed by a Windows user with Local Administrator rights. The SQL Server database account used for installation should have SYSADMIN and DBCREATOR rights. Four new databases will be added to the SQL Server Instance during DbProtect installation. The four databases are:
AppDetective
dbpstaging
dbpdatawarehouse
DbPAnalytics
Runtime Services – Required Privileges
At runtime, DbProtect’s Console is composed of Windows Services. The service accounts for running DbProtect Windows services must have “Local Administrator” and “Log On As A Service” rights. The following services make up the DbProtect management console application (the Web application server):
• DbProtect Enterprise Services Host
• DbProtect Naming & Directory Service
• DbProtect Scan Engine Proxy
• DbProtect Message Collector
• IBM Cognos
Additionally, if you plan to use domain accounts (rather than local ones) to log on to DbProtect, the service account for the DbProtect Enterprise Services Host requires privileges to authenticate users to your Windows Active Directory Domain. This account should be a user on the relevant domain. For domain hierarchies, additional cross-domain trusts need to be in place to successfully authenticate users from related domains. In some domain configurations, it is sufficient to add the Windows host to the proper domain and run this service as Local System. If you only plan to use local users to authenticate to DbProtect, then this service should be run using LocalSystem.
The Runtime accounts that DbProtect uses to connect to its Microsoft SQL Server Repository must be DBO over all four DbProtect databases (AppDetective, dbstaging, dbpdatawarehouse, DbAnalytics).
DbProtect Scan Engine runs as a single service: Trustwave Scan Engine Host
The service account for the scan engine may require the ability to impersonate other Windows accounts. This is required if your environment uses Windows Authentication to connect to your target databases. Scan engines act as a proxy to make Windows Authentication based connections to target databases in order to run Audits and Rights Review jobs. This configuration requires the service account to be a domain user account with the “Impersonate a client after authentication” (SelmpersonatePrivilege) right. If you only intend to scan databases using the native database authentication credentials, then run this service as LocalSystem.
Database client drivers are also required to be installed where the scan engine resides.
DbProtect Getting Started Guide - January 6, 2017
Identify Your Product Use Profile Copyright © 2017 Trustwave Holdings, Inc. All rights reserved. 16
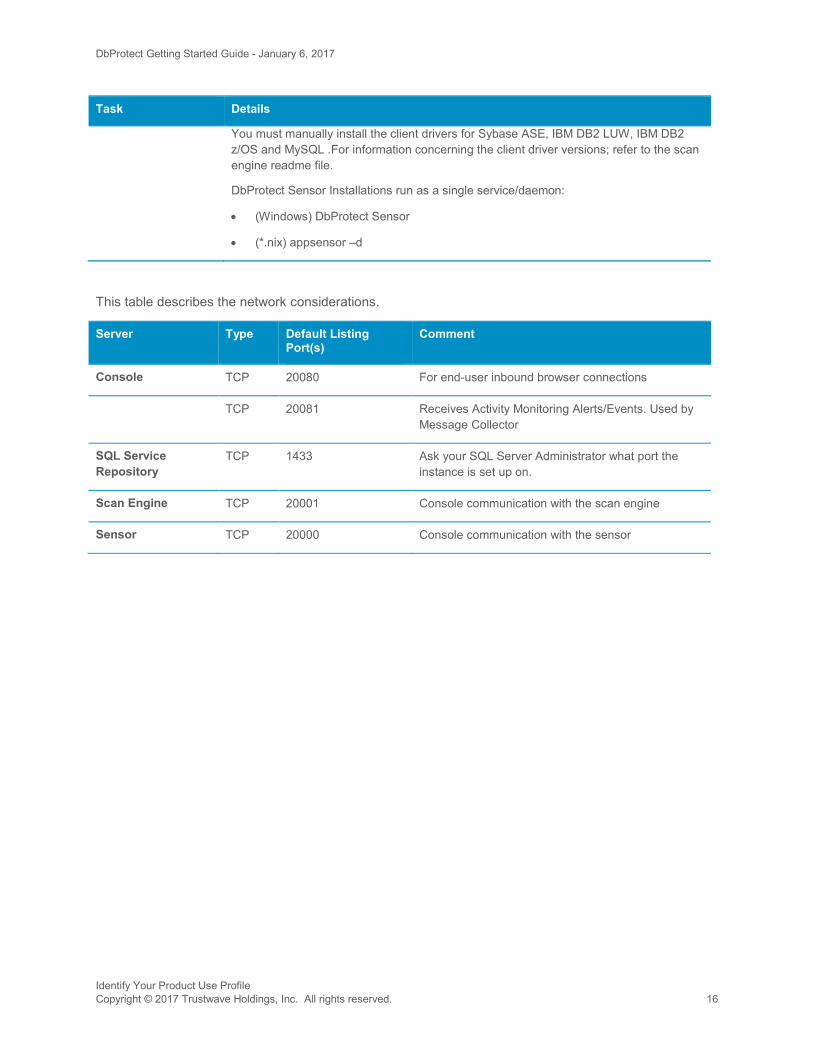
Task Details
You must manually install the client drivers for Sybase ASE, IBM DB2 LUW, IBM DB2 z/OS and MySQL .For information concerning the client driver versions; refer to the scan engine readme file.
DbProtect Sensor Installations run as a single service/daemon:
• (Windows) DbProtect Sensor
• (*.nix) appsensor –d
This table describes the network considerations.
Server Type Default Listing Port(s)
Comment
Console TCP 20080 For end-user inbound browser connections
TCP 20081 Receives Activity Monitoring Alerts/Events. Used by Message Collector
SQL Service Repository
TCP 1433 Ask your SQL Server Administrator what port the instance is set up on.
Scan Engine TCP 20001 Console communication with the scan engine
Sensor TCP 20000 Console communication with the sensor

DbProtect Getting Started Guide - January 6, 2017
Identify Your Product Use Profile Copyright © 2017 Trustwave Holdings, Inc. All rights reserved. 17
2.3 DbProtect Component Versions DbProtect 6.4.9 is compatible with the following component versions:
• DbProtect Scan Engine: 3.X (for scanning of MongoDB, 3.2 is required)
• SHATTER Knowledgebase: 4.59 and newer
Activity Monitoring Sensors supported by DbProtect 6.4.3 will be compatible with this upgrade. The following Sensor versions are the minimum versions supported with DbProtect 6.4 and above.
Database Type Database OS Platform Sensor Version
Microsoft SQL Server Windows 3.15.84 or higher
Oracle Database All support Unix platforms 3.15.84 or higher
Oracle Database Linux 4.0.27 or higher
Sybase ASE Linux, Unix, Windows 3.15.84 or higher
IBM DB2 LUW Linux, Unix, Windows 3.15.84 or higher
Oracle Database *Network Sensor* 3.15.84 or higher
Sybase ASE *Network Sensor* 3.15.84 or higher
IBM DB2 LUX *Network Sensor* 3.15.84 or higher

DbProtect Getting Started Guide - January 6, 2017
Logging in for the First Time Copyright © 2017 Trustwave Holdings, Inc. All rights reserved. 18
3 Logging in for the First Time
Prerequisites:
• Valid login to DbProtect with System Administrator role
• Valid DbProtect license file
Install the DbProtect License files by copying the license file(s) you have received into the DbProtect Licenses folder.
3.1 First Login 1. Open your browser and navigate to the DbProtect URL.
Note: DbProtect only accepts HTTPS connections and typically listens on port 20080.
2. Your URL will look something like: https://dbprotect.mydomain.com:20080
3. At the login prompt click Login.
4. If the system does not log you in automatically, select Manually from the drop down box.
5. Enter your credentials for DbProtect, and then click Login.
3.2 Set Up Users and Organizations DbProtect enforces a strict security model to control access to the systems functions and the data it collects. Two systems of access controls are implemented within DbProtect. A system of Roles and Privileges controls users’ access to product functions (such as viewing a report or running a scan). A separate system of Organizations control access to assets (databases) and asset related data (scan results, audit events, and alerts).
You must set up an Organization before performing any other tasks.
1. Navigate to Set Up > Users & Orgs > Organizations.
2. Click New Organization.
3. The Create New Organization window opens. DbProtect uses Organizations to control users’ access to data within the system. Organizations can be implemented as flat structures, or can be arranged in hierarchies where a child organization’s access rights are inherently limited by their parent’s access rights. You will start with setting up a single top-level organization.
4. Name the Organization by filling in the Name box (make sure the No Parent radio button is selected).
5. From the Owners drop down, select your own login name and then click Create. The Create New Organization window closes.
6. Log out of DbProtect.
DbProtect Getting Started Guide - January 6, 2017
Logging in for the First Time Copyright © 2017 Trustwave Holdings, Inc. All rights reserved. 19
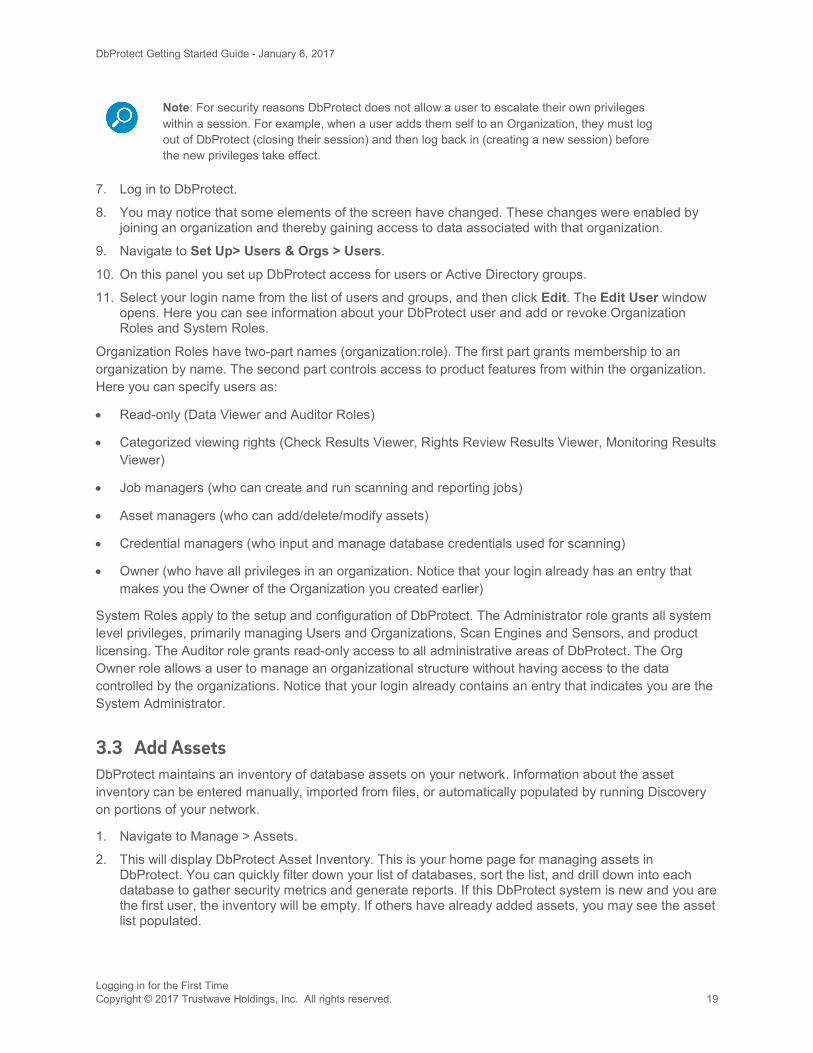
Note: For security reasons DbProtect does not allow a user to escalate their own privileges within a session. For example, when a user adds them self to an Organization, they must log out of DbProtect (closing their session) and then log back in (creating a new session) before the new privileges take effect.
7. Log in to DbProtect.
8. You may notice that some elements of the screen have changed. These changes were enabled by joining an organization and thereby gaining access to data associated with that organization.
9. Navigate to Set Up> Users & Orgs > Users.
10. On this panel you set up DbProtect access for users or Active Directory groups.
11. Select your login name from the list of users and groups, and then click Edit. The Edit User window opens. Here you can see information about your DbProtect user and add or revoke Organization Roles and System Roles.
Organization Roles have two-part names (organization:role). The first part grants membership to an organization by name. The second part controls access to product features from within the organization. Here you can specify users as:
• Read-only (Data Viewer and Auditor Roles)
• Categorized viewing rights (Check Results Viewer, Rights Review Results Viewer, Monitoring Results Viewer)
• Job managers (who can create and run scanning and reporting jobs)
• Asset managers (who can add/delete/modify assets)
• Credential managers (who input and manage database credentials used for scanning)
• Owner (who have all privileges in an organization. Notice that your login already has an entry that makes you the Owner of the Organization you created earlier)
System Roles apply to the setup and configuration of DbProtect. The Administrator role grants all system level privileges, primarily managing Users and Organizations, Scan Engines and Sensors, and product licensing. The Auditor role grants read-only access to all administrative areas of DbProtect. The Org Owner role allows a user to manage an organizational structure without having access to the data controlled by the organizations. Notice that your login already contains an entry that indicates you are the System Administrator.
3.3 Add Assets DbProtect maintains an inventory of database assets on your network. Information about the asset inventory can be entered manually, imported from files, or automatically populated by running Discovery on portions of your network.
1. Navigate to Manage > Assets.
2. This will display DbProtect Asset Inventory. This is your home page for managing assets in DbProtect. You can quickly filter down your list of databases, sort the list, and drill down into each database to gather security metrics and generate reports. If this DbProtect system is new and you are the first user, the inventory will be empty. If others have already added assets, you may see the asset list populated.
DbProtect Getting Started Guide - January 6, 2017
Logging in for the First Time Copyright © 2017 Trustwave Holdings, Inc. All rights reserved. 20
3. Click New Asset. This opens the Create an Asset window, where you can manually add new databases to the inventory.
The following steps describe how to add a new asset to the system and then delete it.
4. In the Name box type My First Asset.
5. Select the first item from the Type list (Microsoft SQL Server). In the Database/Instance/SID box, type Test.
6. Click Select near Organization Associations and choose the organization you created earlier.
7. Entering Endpoints:
a. For database connections that use a hostname and port number, you could type Testhost in the Host box and 123 into the Port box.
b. For database connections which require the use of SQL Server named pipes or Oracle service names, click “Add Attributes” and add an attribute called “pipeName” or “oracleServiceName” with the appropriate value as needed. The following descriptive information is available when you click on “View system attribute names”: pipeName Overrides the default pipe name for Microsoft SQL Server connections. This credential type should specify 'Named Pipe' as the network protocol. For example, if the pipe name is '\\host_name\pipe\sql\query', the correct value of this attribute is: 'sql\query'. oracleServiceName Specifies a service name to be used for connecting to an Oracle asset.
8. Click Create, the Create an Asset window will close. In the Search box on the left side of the screen, type My First Asset and click Enter or click the magnifying glass icon. The inventory filters out any other assets present and displays the SQL Server you just created. Select the asset and click Delete on the toolbar. When the warning message appears, click Yes.
3.4 Add Assets Using Discovery Another option for adding assets is running Discovery, a scan of the network that identifies the databases that are running and responsive. To add assets by running Discovery:
1. Navigate to Manage > Jobs > Jobs.
2. Click on New Job to display a wizard that will guide you through the process of specifying Job parameters.
3. Select Discovery from the options on the left panel.
4. Name the job, and select the organization you created earlier for the job to run in. Click Continue.
5. Click Add Criteria to setup network ranges for discovery. Fill out the form with information about your network. In the Network Destinations box type a list or range of IP addresses to scan or type a list of host names.
6. Select Add Default Ports (unless you know the specific ports your databases use; if so, select Add Specific Ports and provide a list or range of ports).
7. Make sure Assume Live Ports is not checked (checking this box dramatically increases the time it takes to run Discovery). Select the database types you want to scan from the Asset Types checklist. Click Add to close the Add Discovery window.
8. Click Create and the Discovery job will be saved and ready to run.

DbProtect Getting Started Guide - January 6, 2017
Logging in for the First Time Copyright © 2017 Trustwave Holdings, Inc. All rights reserved. 21
Note: Many organizations impose security restrictions on running network discovery scans. If you are unsure of the restrictions within your environment, contact your IT department before you run Discovery.
9. Select the new Discovery from the job list and click Run Now.
10. You can review the progress of your job by navigating to Manage > Jobs > In Progress. For the job to complete, the results must be published to DbProtect’s data warehouse. By default, the warehousing window encompasses over 23 hours of the day. If you want to review the results immediately, wait for each asset in the job to reach the “Waiting for scheduled ETL time window” state, and then navigate to System Settings > Warehousing and click Update Now.
11. Once Discovery is complete, navigate to Manage > Assets. Any newly discovered assets now appear on your inventory list.
3.5 Using Asset Attributes Several new features expand the capabilities of custom Asset Attributes.
3.5.1 Managing asset attributes for multiple assets 1. Navigate to Manage > Assets.
2. Select one or more desired assets.
3. Click the Manage Attributes button.
The asset management dialog box displays any existing attribute name and value pairs for the selected assets.
4. Edit existing attributes by selecting the corresponding row, changing the value as desired, and clicking the Set button.
5. Add a new attribute to the selected assets by entering a new attribute name and value in the dialog boxes and clicking the Set button.
6. Click the Save button to save all attribute changes and close the dialog box.
3.5.2 Using asset attributes to filter report results 1. Navigate to Report > On Demand.
2. Select the Check Status report from the Check Results report group.
3. Click the View Filters link in the report headers.
4. Click the View asset selection criteria link in the Filters dialog.
5. Select Attribute Name from the asset selection criteria drop-down list and enter the attribute name in the adjacent text box.
6. Click the plus sign icon to the right of the text box to add a second criteria line.
a. Select Attribute Value from the drop-down list on the second criteria line, and enter the attribute value in the adjacent text box. Choose the “equals” radio button for an exact match, or “contains” for a sub-string match.
b. Click Apply to apply your attribute filter to the report results.

DbProtect Getting Started Guide - January 6, 2017
Logging in for the First Time Copyright © 2017 Trustwave Holdings, Inc. All rights reserved. 22
3.5.3 Asset Groups The special asset attribute called “assetGroup” can be used to encapsulate several assets into one asset group and to operate on this group as one unit. Some examples of when this can be useful are:
Oracle 12c in multi-tenancy mode - You can create individual assets corresponding to individual Pluggable Databases (PDBs), and the Container Database (CDB), and then mark them as a part of one group representing the entire database instance.
Oracle RAC - You can create individual assets corresponding to various databases that participate in the high-availability configurations of one RAC, and mark them as a part of one group.
Windows Server Failover Clusters - You can create individual assets corresponding to individual instances that work together to provide the AlwaysOn and High-availability features, and then mark them as a part of one group.
The same goes for any assets it makes sense to group into a logical unit of work.
Once several assets are marked as being part of one asset group, you can easily run jobs against these assets, and report on them together. If the composition of the asset group changes in the future, the jobs will correctly run against the latest assets that are included in the group.
Additional information on this feature is available in DbProtect’s on-line help. After logging in to the DbProtect interface, select Learn About Features from the Help menu in the upper right-hand corner.

DbProtect Getting Started Guide - January 6, 2017
Vulnerability Management Copyright © 2017 Trustwave Holdings, Inc. All rights reserved. 23
4 Vulnerability Management
DbProtect Vulnerability Management performs in-depth analysis for security vulnerabilities and misconfigurations in any database. This guide will walk you through the process of running a Penetration Test or an Audit on a database, and then examining those results.
4.1 Prerequisites • DbProtect login with the following roles: Job Manager; Credential Manager; and Data Viewer
• The login is in at least one organization
• At least one asset discovered, manually inputted, or imported into DbProtect
4.2 Use of Policies Policies are groupings of security checks that test a database system, known as an Asset in DbProtect, for vulnerabilities and insecure configuration settings that open attack vectors to the database. There are numerous built-in policies in DbProtect that can be chosen for your Pen Tests or your Audit.
Note: You can also customize and define your own Policies by using the Policy Editor in DbProtect. The Policy Editor is invoked by starting a program that is located on the server where the Console is installed. The Policy Editor can be found on the server by going to the Start menu: Start > All Programs > Trustwave > DbProtect >Policy Editor.
Advanced features in the Policy Editor include crafting user-defined checks and creating report filters—the ability to apply certain conditions when a violation should not be reported.
4.3 Run Vulnerability Assessments This section covers two types of assessments—Pen Tests and Audits. Assessments are point-in-time security snapshots of your Assets. You create a Job to enact the process of a security assessment. These can be scheduled to run automatically at scheduled times, or they can be run immediately.
1. To start a vulnerability assessment navigate to Manage >Jobs >Jobs.
2. Click on New Job and that will bring up a wizard that will guide you through the process of performing an assessment. There are two vulnerability assessment types: Pen Test and Audit. A Pen Test is a security assessment that does not require any credentials (user accounts or privileges). An Audit is a much deeper, granular security assessment that does require credentials.
3. First, create a Pen Test. You can retry the same steps for an Audit. The wizard will guide you through the required settings.
4. Select Pen Test and fill out the required fields. Click Continue.
5. On the Asset screen, select Assets by clicking on the Add Assets and select a database. Click Add Assets, then click Next >.
6. On the Policy screen, select the Demo – Pen Test (Built-in), and click Next >.
7. On the Reports screen, click on Add Report and select the Check Status report then choose MHT as your file format and click Save.

DbProtect Getting Started Guide - January 6, 2017
Vulnerability Management Copyright © 2017 Trustwave Holdings, Inc. All rights reserved. 24
8. Click Create to save and your Job and close the wizard.
After you create a Job, you need to execute it. You can run it immediately by clicking Run Now, or schedule it to run at a future time by clicking on Schedule.
9. Find the Job you just created on the screen and click on the Run Now button. This will start the Job immediately.
10. Navigate to the In Progress page to view its progress. For the job to complete, the results must be published to DbProtect’s data warehouse. By default, the warehousing window encompasses over 23 hours of the day. If you want to review the results immediately, wait for each asset in the job to reach the “Waiting for scheduled ETL time window” state, and then navigate to System Settings > Warehousing and click Update Now.
4.4 Provision Database Users to Run Audits To run Audit scans, you need access to database logins with the appropriate privileges granted. DbProtect ships with a set of sample database user creation scripts that you can use as a starting point for creating minimally privileged database users to run your scans. The scripts are installed with both DbProtect and Scan Engine at:
<INSTALL_DIR>\Trustwave\DbProtect\Resources\ShatterKnowledgebase\UserCreationScripts
Scripts for creating typical audit users (recommended for most deployments) as well as power users (required for running all checks) are available for each database platform. In order to run these scripts, you must connect to the target database as a DBA-level user (with the authority to create users and grant privileges).
4.5 Reporting on Pen Tests and Audits Now that assessment data has been collected for your Asset, you can review the security results interactively. In general, you can review all the security results for your entire Organization by navigating to the Report section and investigating the collected information from the Dashboard, or the Library, or pre-generated reports from the History page.
To review the results from the last assessment:
1. Navigate to Report > History.
2. Select the report that was generated as a result of the assessment.
3. Click on the Report link to open the report.
4. Another starting point to review security results is to navigate to Report > Library, and click on the Findings Summary report.
5. To review the results for a specific Asset navigate to Manage > Assets and locate the Asset.
6. Highlight the Asset by clicking on it. On the Assets toolbar, click on the View Summary Report button, and a dashboard for that Asset appears. There will be links to relevant reports under the Assessment heading. Click on either the Summary or Details report to begin your security review.
4.6 Schedule a Report Reports can be scheduled so that information will be prepared for a predetermined time. To schedule a report:

DbProtect Getting Started Guide - January 6, 2017
Vulnerability Management Copyright © 2017 Trustwave Holdings, Inc. All rights reserved. 25
1. Navigate to Manage > Jobs > Jobs.
2. Click New Job and select the Report option. The wizard will guide you through the various options. You can select multiple reports to be generated within a single Job.
3. Once your Report job has been created, select it on the Jobs page and click on Schedule.
4. Define the schedule for your job, whether it be a one-time execution at a future date, or a recurring schedule.
5. Click Save when finished.
4.7 Triggering report jobs from scan jobs It is now possible for Audit, Penetration Test and Rights Review jobs to trigger a separate Report job upon completion. The triggered Report job need not be in the same organization as the triggering job, as long as the DbProtect user who is setting the trigger has the “Job Manager” role in both organizations. The DbProtect user who will run the scan job need only have the “Job Manager” role in the organization that contains the scan job.
The settings for this feature are in the Advanced section for Audit jobs.
1. Navigate to Manage > Jobs > Jobs.
2. Edit an existing Audit, Penetration Test, or Rights Review job, or create a new job using the steps above.
3. On the Advanced Settings screen, scroll down to the Select one or more report jobs to run after this job completes section.
4. Using the drop-down menu, select report jobs to run automatically whenever this scan job is run.
5. Click Save when finished.

DbProtect Getting Started Guide - January 6, 2017
Rights Management Copyright © 2017 Trustwave Holdings, Inc. All rights reserved. 26
5 Rights Management
DbProtect Rights Management performs in-depth analysis on database users, roles, and privileges. This section describes how to run a Rights Review scan on a database, and then use the results to identify privileged users and logins with access to sensitive database objects.
5.1 Prerequisites • DbProtect login with the following roles: Job Manager; Credential Manager; and Data Viewer.
• The login is in at least one organization.
• At least one asset discovered, manually inputted, or imported into DbProtect.
5.2 Select a Policy Rights Review Policies define the scope of security information retrieved during the scan. Two polices are supported for Rights Review:
• Quick Scan: retrieves Users, Roles, Object Inventory and System Privileges.
• Full Scan: retrieves all the information retrieved in the Quick Scan but also includes all Object Privileges
Due to the nature of Object Privileges, the amount of information retrieved and stored for a Full Scan can become very large. Having a very large result set for review is a much more difficult starting point. Once you understand the system level results, moving on to inspecting object entitlements is a natural step. Once you start running full scans, the larger datasets will lengthen your scan and report generation times.
5.3 Run a Rights Review Rights Review scans are point-in-time snapshots of the access controls in place in your Assets. DbProtect uses a system of Jobs to specify, schedule and run Rights Review scans. To start a Rights Review:
1. Navigate to: Manage > Jobs >Jobs.
2. Click New Job to display a wizard that will guide you through the process of specifying Job parameters.
3. Start by selecting Rights Review from the options on the left panel. Next, name the job, and select an organization for the job to run in. Click Continue.
4. Next, select assets to be scanned. Click Add Assets. The Asset Selector window opens and display a list of assets accessible by the organization selected in the last step.
Note: Assets that are not accessible from the organization you selected in the last step are not displayed.
5. Select the assets you want to scan from the list and click Add Assets. The Asset Selector will close, and the assets you chose are displayed on the Asset screen.

DbProtect Getting Started Guide - January 6, 2017
Rights Management Copyright © 2017 Trustwave Holdings, Inc. All rights reserved. 27
6. Next, input credentials to connect to the assets selected in the last step.
7. For each asset displayed, click the key icon in the row marked Database, and then click Add Database Override. The Create New DB Credential window will open. Choose the Authentication Type, and then fill in the form with the requested information. Click Test to validate that the credentials supplied can login and have the necessary privileges to run Rights Review. Click Save to store the credentials. Store a credential for each asset.
8. Next, select a Policy.
9. From the drop down menu, select Quick Scan.
10. Once a Policy has been select, click Save to store the Job, close the Edit Job Wizard, and return to the Manage > Jobs > Jobs screen.
11. The last step is to select the newly created Job from the list, and click the Run Now button on the toolbar. You can review the progress of your job by navigating to Manage | Jobs | In Progress. Rights Review scans tend to take between two minutes for a fresh database install to a few hours for a large production application with hundreds of users and tens of thousands of objects.
In order for the Rights Review job to complete, the results must be published to DbProtect’s data warehouse. By default, this process occurs on a daily schedule. If you want to review the results immediately, wait for each asset in the job to reach the Waiting for scheduled ETL time window state, and then click Force Data Warehousing from the Jobs in Progress toolbar.
5.4 Investigating and Reporting on User Rights Now that Rights Review data has been collected and analyzed, DbProtect can begin to answer important questions about users and their effective privileges. One of the most common uses for Rights Management is to identify privileged users in database systems. To view a list of the most privileged users in the assets you’ve scanned, navigate to Report > Dashboards > Rights Review.
A summary of the Most Privileged Users appears in the upper-left quadrant of the dashboard screen. Here you will see a short list of users, ranked by their level of administrative access to the database environment.
Click Full List to drill-into a complete report, where all database users in the environment will be listed, again ranked by their level of admin access.
When the All Users by Admin Likeness report opens, click the first user listed. This drills down into Assets for an Excessively Privileged User report. Here you see a list of assets that your most privileged user can access, along with an Admin Likeness Score for each. The higher the score, the closer the user is to having all the privileges of the built-in system administrator on that asset.
To obtain additional detail, click the Asset Name column on the first asset listed. This drills down once again, this time into the Excessively Privileged Users – Detailed Review report, where you will find a complete listing of effective privileges for the user and asset combination that you have selected. To zero-in on specific privileges, click Filter and use the Advanced Filter Options to locate the specific privileges and/or objects you are interested in.
To investigate other privileged users, return to the All Users by Admin Likeness report and drill-into any other users on the list. You can now detail exactly which users have highly privileged access to your environment, which systems they can access, and what specific actions they can perform on those systems.

DbProtect Getting Started Guide - January 6, 2017
Rights Management Copyright © 2017 Trustwave Holdings, Inc. All rights reserved. 28
Another common use case for DbProtect Rights Management is to identify any users with access to sensitive database objects.
To get started:
1. Navigate to: Report > Library. Click All Objects in Organization to open a report that will list all the database objects found during previous Rights Review scans. For this example, we are going to find users with access to database usernames and passwords.
2. When the All Objects in Organization report opens, click Filter.
3. From the Advanced Filter Options select Object Name.
4. Click the equals radio button.
5. Supply an object name. This will vary based on the type of database(s) you scanned. For Oracle, type user$. For SQL Server or Sybase, type syslogins. For DB2 type sysdbauth. Click Apply.
The report will refresh itself to display a list of databases that contain an object with the name you specified in the Filter.
6. Scroll down to the list, and click the Object Name column on the first entry. A window will open, offering several drill-down options. Here you can chose from a few different detailed report options. To get a list of all users with access to the object we are investigating, click Object Access.
An Object Access report will open, listing all users and roles with access to the specified object, and explaining the path of grants that provides said access. You can add additional filtering criteria in this report (for example, you can list all users with read (SELECT) access, or list any role with access to modify (INSERT/UPDATE/DELETE) data). You can now detail exactly which users have access to your most sensitive database objects, and can begin the process of implementing least privilege for each of your organization’s database users.
DbProtect Getting Started Guide - January 6, 2017
Activity Monitoring Copyright © 2017 Trustwave Holdings, Inc. All rights reserved. 29
6 Activity Monitoring
The Activity Monitoring module watches databases 24/7, tracking privileged access and identifying any attempted exploits or suspicious activity. With Active Response, organizations can even take automated action to stop an attack in progress. DbProtect allows you to create Policies and Filters and to tune your detection parameters to customize which audit and security events you want to monitor. This helps you focus security efforts on information that is relevant, while bypassing false positives and irrelevant events.
6.1 Prerequisites • DbProtect login with System Administrator role
• A sensor has been installed on a database host to be monitored
6.2 Configure a Sensor to Monitor a Database To utilize DbProtect’s Activity Monitoring capabilities to protect a database, you first need to install and configure a sensor.
After you’ve you have successfully installed, registered, and configured the sensor, you must deploy a policy to the sensor to tell it what specific events you wish it to monitor for.
6.3 Use of Policies Activity Monitoring policies are used to address various business and compliance requirements, including:
• Regulatory obligations to monitor access to sensitive information
• Identifying and alerting in real time to threats against critical data assets
• Providing an independent audit trail of authorized activity made by Privileged Database Users
• Providing for a compensating control for unpatched vulnerabilities identified during a vulnerability assessment
To create or edit an Activity Monitoring policy:
1. Navigate to Manage > Monitoring > Policies.
2. To create a new policy, click on Create New Policy.
3. Click on the + next to “Oracle” to view the available built-in Oracle monitoring rules. To add a rule that monitors for ALTER DATABASE, click on the + next to “Audit Events” and select the “ALTER DATABASE Statement” rule by adding a tick mark next to the rule title.
4. To save a policy, type a policy name in the dialog box next to the Save button. Click Save.
To further customize a rule, you can create a Filter or Exception.
1. Navigate to Manage>Monitoring> Filters.
2. To create a Filter, click the Audit Filter Wizard Create button, and follow the on-screen instructions.
DbProtect Getting Started Guide - January 6, 2017
Activity Monitoring Copyright © 2017 Trustwave Holdings, Inc. All rights reserved. 30
3. To create an Exception, click the Exception Wizard Create button, and follow the on-screen instructions.
Once you have created a Filter or Exception, you’ll need to add it to your monitoring policy.
4. Navigate to Manage > Monitoring > Policies. Scroll down the policy list until you have found the policy you want to add the filter or exception to. Click Edit.
5. Click the + next to the database type you created a Filter or Exception for.
6. Click the + next to Audit Events to expand the category view.
7. Scroll down the rule list to find the Audit rule you created a filter or exception for.
8. Click the box next to the filter/exception in the list.
9. Click the Save button at the top of the window to save your policy.
Note: If the policy is a built-in policy, give the policy a unique name, and click the Save As button.
To begin monitoring with your policy, you must now send your policy to the sensor. Click the Deploy button next to the policy you want to deploy to your sensor(s). Follow the on-screen instructions.

DbProtect Getting Started Guide - January 6, 2017
Investigate Alerts and Audit Trail Copyright © 2017 Trustwave Holdings, Inc. All rights reserved. 31
7 Investigate Alerts and Audit Trail
7.1 Prerequisites DbProtect login with Data Viewer, Owner, or System Administrator role
There are several ways to view real-time security and audit events captured by DbProtect: executive-level drill-down dashboards, interactive analytics reports, and customizable monitoring reports.
7.2 Dashboards The Activity Monitoring dashboards in DbProtect offer high-level and drill-down views of active database threats and other relevant monitoring information. The Threats by Severity dashboard offers information on monitored database threats by severity and type.
The Compensating Controls dashboard element (lower left quadrant) lists all databases in the Asset list that are not currently being monitored by DbProtect. The Inactivity Trends dashboard element (lower right quadrant) shows database inactivity trend information; to view this dashboard, navigate to Report > Dashboard > Activity Monitoring.
7.3 Hierarchies When viewing results in the Dashboard, data can be viewed at any level of a hierarchy of your organization. To view results for a different “Viewing Organization” click the Pencil icon on the upper –right side of the screen.
Selecting a different Viewing Organization (by following the instructions on the screen) will either increase or decrease the scope of the data presented in both dashboards and reports, depending on which Viewing Organization you choose.
7.4 View Policies To view the monitoring policies currently deployed for each asset being monitored:
Navigate to: Report > Library > Operations > Policy Management > Monitoring Configuration.
7.5 Review Alerts You can review Alerts on the Alert Screen, or generate a report from the Report Library.
To Navigate to the Alert Screen: Manage > Monitoring > Alerts.
To view details of a monitored alert, click on the number in the corresponding colored box on the left- hand side of the window Alert Screen.
To access an Alert report navigate to: Report > Library > Monitoring > Alerts. Click on Latest Activity.
DbProtect Getting Started Guide - January 6, 2017
Active Response Copyright © 2017 Trustwave Holdings, Inc. All rights reserved. 32
8 Active Response
8.1 Prerequisites • DbProtect login with System Administrator role
• A registered sensor
DbProtectʹs Active Response feature allows organizations to define a set of automatic actions based on user‐ defined policy and the risk level of an activity.
You can use active response to:
• Block user connections when users violate rules
• Quarantine the accounts of users who behave suspiciously
• Configure custom system reactions to events, based on your specific business needs
Note: Active Response behaviors are not enabled by default in new installations of DbProtect. To enable active response behaviors, please see the DbProtect 6.4 Sensor Guide.
1. Once Active Response behaviors are enabled in DbProtect by your System Administrator, navigate to Manage > Monitoring > Sensors > Sensor Manager.
2. Highlight a sensor and click Reconfigure.
3. On the Sensor Manager: Configure DbProtect Sensor page, click Reconfigure.
4. Click Next on the Database Identification page.
5. Click Next on the Organization selector page.
6. Select Active Responses on the next page, and click Next.
7. Select one of the available choices from the Active Responses list on the left side of the screen. Select ALTER DATABASE from the Alerts list on the right side of the screen. Click Add.
8. Click Next.
9. Click Next on the confirmation screen.
10. Click Deploy to Sensor.

DbProtect Getting Started Guide - January 6, 2017
System Administration Copyright © 2017 Trustwave Holdings, Inc. All rights reserved. 33
9 System Administration
9.1 Prerequisites • DbProtect login with Administrator role
• Licensed product or valid license key file(s)
9.2 Manage Licenses You must have a valid license to use DbProtect. License(s) are delivered as email attachments to the DbProtect purchasing contact or their delegate. Warnings are displayed when you have expired or invalid licenses, and when you have exceeded the number of databases you have licensed.
Navigate to Set Up > System Settings > Licensing to view your current licensed status. If you need to add a license, click on Add License, and you can paste in the contents of your license file to import a license.
9.3 Component Versions When you contact customer support for product questions, you will likely be asked to provide version information for your environment. Obtain this by navigating to Set Up > System Settings > About DbProtect.
9.4 Manage Organizations Organizations are flexible containers for database assets where you can:
• Manage assets
• Enforce role-based access control for users
• Access, separate and/or filter data
• Manage the availability of policies for vulnerability management
• Impose operational restrictions for scan engines
You need to define at least one organization to use core product functions. To get started navigate to Set Up > Users & Orgs > Organizations. You are prompted for an organization name and a reference in the hierarchy to place the new organization, in case you have already created some. If you need to change the name of the organization at a later time, click Edit.
For DbProtect environments where there are no security or privacy concerns, there is no need to build any further organizations. Assets may be added through Asset Management or as results of a discovery or sensor configuration.
If you require finer access controls, you may need to create more organizations.
DbProtect Getting Started Guide - January 6, 2017
System Administration Copyright © 2017 Trustwave Holdings, Inc. All rights reserved. 34
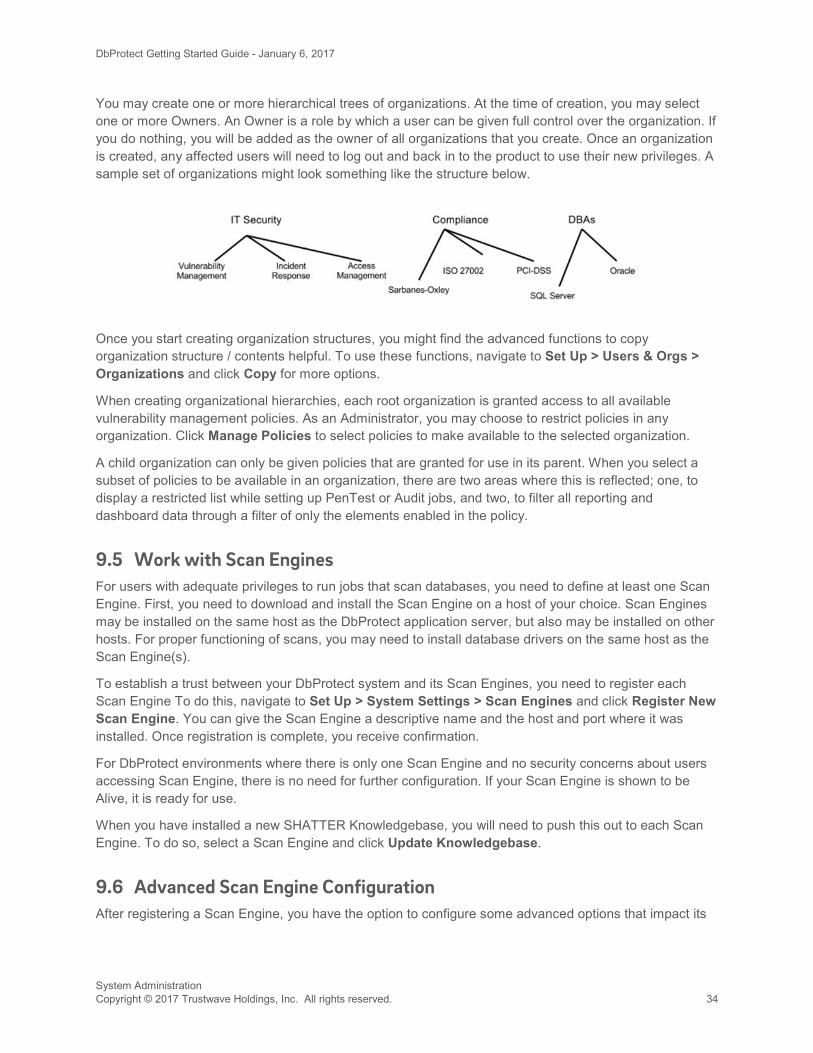
You may create one or more hierarchical trees of organizations. At the time of creation, you may select one or more Owners. An Owner is a role by which a user can be given full control over the organization. If you do nothing, you will be added as the owner of all organizations that you create. Once an organization is created, any affected users will need to log out and back in to the product to use their new privileges. A sample set of organizations might look something like the structure below.
Once you start creating organization structures, you might find the advanced functions to copy organization structure / contents helpful. To use these functions, navigate to Set Up > Users & Orgs > Organizations and click Copy for more options.
When creating organizational hierarchies, each root organization is granted access to all available vulnerability management policies. As an Administrator, you may choose to restrict policies in any organization. Click Manage Policies to select policies to make available to the selected organization.
A child organization can only be given policies that are granted for use in its parent. When you select a subset of policies to be available in an organization, there are two areas where this is reflected; one, to display a restricted list while setting up PenTest or Audit jobs, and two, to filter all reporting and dashboard data through a filter of only the elements enabled in the policy.
9.5 Work with Scan Engines For users with adequate privileges to run jobs that scan databases, you need to define at least one Scan Engine. First, you need to download and install the Scan Engine on a host of your choice. Scan Engines may be installed on the same host as the DbProtect application server, but also may be installed on other hosts. For proper functioning of scans, you may need to install database drivers on the same host as the Scan Engine(s).
To establish a trust between your DbProtect system and its Scan Engines, you need to register each Scan Engine To do this, navigate to Set Up > System Settings > Scan Engines and click Register New Scan Engine. You can give the Scan Engine a descriptive name and the host and port where it was installed. Once registration is complete, you receive confirmation.
For DbProtect environments where there is only one Scan Engine and no security concerns about users accessing Scan Engine, there is no need for further configuration. If your Scan Engine is shown to be Alive, it is ready for use.
When you have installed a new SHATTER Knowledgebase, you will need to push this out to each Scan Engine. To do so, select a Scan Engine and click Update Knowledgebase.
9.6 Advanced Scan Engine Configuration After registering a Scan Engine, you have the option to configure some advanced options that impact its

DbProtect Getting Started Guide - January 6, 2017
System Administration Copyright © 2017 Trustwave Holdings, Inc. All rights reserved. 35
use. Setting these configuration options are not required. You may return to set or change these options at a later time by navigating to Set Up > System Settings > Scan Engines and clicking Configure. The definition of these configuration options is described below.
Configuration Option Details
Discovery Network Interface Use this option if you would like to direct requests for discovery to be sent out of a particular physical networking interface on the Scan Engine host. If this is unset, jobs that discover databases will loop through each live network interface. If this is not the preferred behavior, select a particular network interface to be used for discovery.
Availability Use this option if you’d like to declare a particular Scan Engine offline. This is usually motivated by the need for maintenance / upgrade on the Scan Engine or its host. It may also be used when the administrator does not wish to have scan jobs fulfilled by the selected Scan Engine. Any new scan requests will not run against offline Scan Engines.
Organization
Restrictions
Use this option to allow only certain organizations to have access to particular Scan Engines. When nothing is defined, the system determines the best-fit Scan Engine based on availability and load. When restricted, only the allowed organizations can run jobs on the Scan Engine. This is typically used for scanning sensitive network segments where restricted access is necessary. It may also be used when very special database drivers are needed to connect to certain databases and cannot coexist with other drivers.
Group Use this option to associate an Asset directly with a Scan Engine. When nothing is defined, the system determines the best-fit Scan Engine based on availability and load. When a Group Name is defined, only Assets that have a custom asset attribute called scanGroup, whose value matches the value entered for Group Name, will be able to use this Scan Engine. Likewise, an Asset that has the scanGroup custom asset attribute will only be scanned using a Scan Engine with a matching Group Name. This definition is most commonly used to model specific access points to networks or define datacenter proximity to scan engines.
9.7 Define Users and their Role-based Access In order for users to be granted access to DbProtect, they may be added with particular roles. There are two types of roles, administrative and organizational. The latter defined to the scope of a particular organization. To define or edit users and their level of access to DbProtect: Navigate to Set Up > Users & Orgs > Users. You may click New User or Edit to define users with particular roles. A user can be granted one or more roles in one or more organizations. In addition, they can be granted administrative roles. After defining a user, you may look at the details panel which shows all of the role memberships and effective permissions for the selected user. If users are logged on while their role memberships are defined or changed, the effective permissions for the selected user. If users are logged on while their role memberships are defined or changed, the effective permissions go into effect when they log back on.

DbProtect Getting Started Guide - January 6, 2017
Maintenance and Disaster Recovery Copyright © 2017 Trustwave Holdings, Inc. All rights reserved. 36
10 Maintenance and Disaster Recovery
10.1 Maintenance Topics DbProtect has very little need for routine maintenance. Most maintenance is required due to changes in the environment or an unplanned growth of consumed resources. The typical areas of maintenance are highlighted below. Maintenance Task Description
Networking DbProtect suite components should be treated in the same class as production databases and application servers. In DHCP environments, the addresses must be reserved. Failing to do so might lead to some components losing communication with others when the underlying host restarts and gets new network addresses.
Disk Growth & Starvation
There are a number of elements that lead to growth of disk usage on the application server. Primarily, this is from the storage of finished reports and the use of %TEMP% directories during report generation. When a host runs low on disk, reports might start to fail, and the host may slow down overall while the operating system is attempting to use disk.
SQL Server Repositories During a fresh install of DbProtect, the databases are created with simple recovery mode. However, it is customary to not use this in production. Once a proper recovery mode has been selected, a maintenance plan should be put in place in order to routinely maintain transaction logs. In addition, the growth of databases due to collected data should be projected, observed and factored into routine expansion planning.
Users & Credentials DbProtect refers to users that are part of the local or domain environment. For the servicing of locked accounts and password changes, the appropriate IT administrator would need to address these, since they are defined outside DbProtect. Although Windows groups may be used to define access, the administration of groups and their membership is also handled outside DbProtect.
Certificates & Ciphers DbProtect uses a built-in web application server. This serves web pages securely.
However, a self-signed web server certificate is installed with the product. In order
to provide a secure browsing experience, customers should install their own web server certificates that are signed by an authority that will be trusted within their own IT environments. In addition, for SSL communications across components, ciphers may be restricted to ones that are authorized by the IT environment.
Licensing Ensure that you have a valid DbProtect license. In the absence of this, you will not be able to use all product functions.
Virtualized Resources With the increased use of virtualized environments, resource starvation commonly occurs due to an over subscription of available resources, and/or restrictions in access to disk or network resources. Lingering reports of performance degradation warrants a closer inspection of the provisioning of virtualized environments.
DbProtect Getting Started Guide - January 6, 2017
Maintenance and Disaster Recovery Copyright © 2017 Trustwave Holdings, Inc. All rights reserved. 37
Maintenance Task Description
Contacting Support You are welcome to contact the support desk for any questions or concerns arising from operation of the product. For the various ways to contact us, please visit
https://www.trustwave.com/Company/Support/.
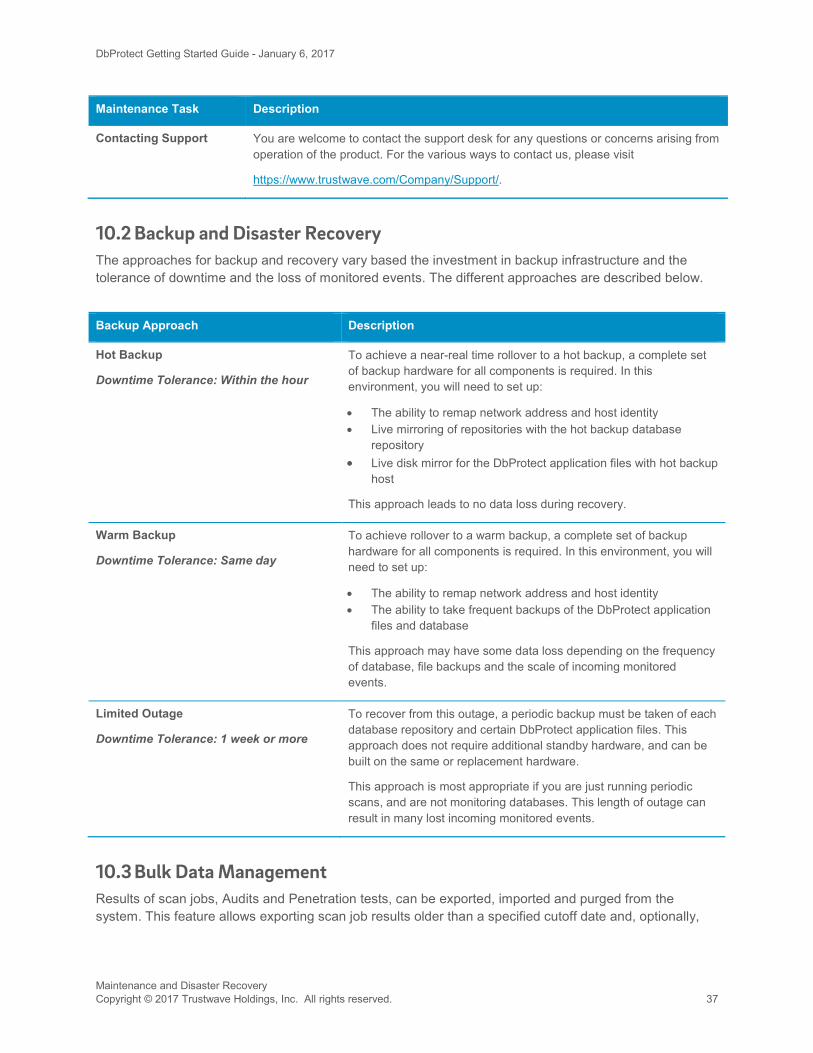
10.2 Backup and Disaster Recovery The approaches for backup and recovery vary based the investment in backup infrastructure and the tolerance of downtime and the loss of monitored events. The different approaches are described below.
Backup Approach Description
Hot Backup
Downtime Tolerance: Within the hour
To achieve a near-real time rollover to a hot backup, a complete set of backup hardware for all components is required. In this environment, you will need to set up:
• The ability to remap network address and host identity • Live mirroring of repositories with the hot backup database
repository • Live disk mirror for the DbProtect application files with hot backup
host
This approach leads to no data loss during recovery.
Warm Backup
Downtime Tolerance: Same day
To achieve rollover to a warm backup, a complete set of backup hardware for all components is required. In this environment, you will need to set up:
• The ability to remap network address and host identity • The ability to take frequent backups of the DbProtect application
files and database
This approach may have some data loss depending on the frequency of database, file backups and the scale of incoming monitored events.
Limited Outage
Downtime Tolerance: 1 week or more
To recover from this outage, a periodic backup must be taken of each database repository and certain DbProtect application files. This approach does not require additional standby hardware, and can be built on the same or replacement hardware.
This approach is most appropriate if you are just running periodic scans, and are not monitoring databases. This length of outage can result in many lost incoming monitored events.
10.3 Bulk Data Management Results of scan jobs, Audits and Penetration tests, can be exported, imported and purged from the system. This feature allows exporting scan job results older than a specified cutoff date and, optionally,
DbProtect Getting Started Guide - January 6, 2017
Maintenance and Disaster Recovery Copyright © 2017 Trustwave Holdings, Inc. All rights reserved. 38
purging them. When needed, these results can be imported back into DbProtect and will then be available for reporting.
Located in the EnterpriseServicesHost\util folder under the product installation directory, three new command line utilities provide these features. These utilities will prompt for DbProtect user credentials. The supplied user credentials must have the DbProtect System Administrator role.
• ExportResults.bat
• ImportResults.bat
• PurgeResults.bat
Using the Windows command prompt, run any of these commands with no arguments to receive detailed usage information.

DbProtect Getting Started Guide - January 6, 2017
Considerations for Upgrade from previous versions Copyright © 2017 Trustwave Holdings, Inc. All rights reserved. 39
11 Considerations for Upgrade from previous versions
11.1 Upgrade Considerations: Sensor Re-Registration As a result of internal security enhancements, upgrading to DbProtect 6.4.9 will invalidate all existing Sensor registrations. Each sensor must be forcibly unregistered and reregistered using a simple process documented in the Readme file. Please refer to the Readme for details.
11.2 Upgrade Considerations: Supported Components Microsoft Windows 2003 Server and Microsoft SQL Server 2005 are no longer supported for upgrades or fresh installations.
Any DbProtect system must be installed on supported components prior to upgrade. The following are a list of supported OS’s and databases for backend repository:
• Microsoft Windows 2008 64 bit, Windows 2008 R2 64 bit, Windows 2012 64 bit, Windows 2012 R2 64 bit
• Microsoft SQL Server 2008, SQL Server 2008 R2, SQL Server 2012, SQL Server 2014
11.3 Upgrade Considerations: Supported Upgrade Paths Upgrades to DbProtect 6.4.9 can be made from DbProtect 6.4.3 and above.
If you need to upgrade from a prior version, you must first upgrade to at least version 6.4.3.
11.4 Upgrade Considerations: Contact Support If you have any questions regarding upgrading to DbProtect 6.4.9 you can contact support. For contact information, visit https://www.trustwave.com/Company/Support and select DbProtect for details.
DbProtect Getting Started Guide - January 6, 2017
Network Range Restrictions Copyright © 2017 Trustwave Holdings, Inc. All rights reserved. 40
12 Network Range Restrictions
12.1 Network Range Restrictions Range restriction is accomplished by installation and network topology. DbProtect also supports capability scanning by restricting Scan Engines to service specific Organizations.
To set Organization restrictions first navigate to Set Up > System Settings > Scan Engines. Then highlight a specific Scan Engine and click on the Configure button. In the dialog box that appears, choose Organizational Restrictions, and select the individual Organizations to which the Scan Engine should restrict its service.
Restricting Scan Engines to service specific Organizations provides, but is not limited to the following:
• Dedicated service to specific Organizations (for example, application-based, line of business)
• Restriction by network topology where the Scan Engine lives
• Capability of Scan Engines to test specific database types based on available drivers
12.2 Advanced Scan Engine Settings Other advanced settings (for example, simultaneous connections setting maximum threads) for the management of Scan Engines can be found in the Server.config files on the servers where the Scan Engines are installed. The Server.config files can be found located in one the following directories depending on the setting:
<Install Directory>\Trustwave\ScanEngineHost\Discovery
<Install Directory>\Trustwave\ScanEngineHost\Checks
<Install Directory>\Trustwave\ScanEngineHost\UserRights

DbProtect Getting Started Guide - January 6, 2017
Changes in License Management Copyright © 2017 Trustwave Holdings, Inc. All rights reserved. 41
13 Changes in License Management
License management has been simplified in DbProtect 6.4 and above. All your existing license files are still valid.
The key changes are:
• Licenses are now centrally stored
• Working product after license overage
• Recover licenses when an Asset is no longer needed
• Review license usage
13.1 Licenses are now Centrally Stored License files are now centrally stored on the Console (the web application server). Licenses no longer need to be allocated or distributed on any Scan Engines for Vulnerability Management or Rights Management usage.
All licenses are to be stored in the following server directory on the Console server:
<Install Directory >\Trustwave\DbProtect\Licenses
Existing license files from 6.3.1 are still valid. You do not need to request any new license files. Simply place your existing license files into the license directory.
If you have a deployment where you have split your licensing into multiple files on multiple Scan Engine servers, simply move those license files to the license directory on the Console. If your license files are node locked to a specific server (Machine ID specific), you may contact your Account Representative or our Customer Support team, and we will be happy to assist you and consolidate your licenses.
You can optionally install your license files directly from the web interface. To install license files, log in to DbProtect and navigate to: Set Up > System Settings > Licensing and then click on Add License and follow the on-screen instructions.
13.2 Working Product after License Overage DbProtect will continue to function and allow you to login even after you have exceeded your license usage. A license overage notification will be displayed after login if this situation occurs.
13.3 Recover Licenses when Asset is No Longer Needed Licensing for DbProtect is tied to the number of Assets and for the usage of Vulnerability Management, Rights Management, and Activity Monitoring. When an Audit or a Pen Test is performed on an Asset, a Vulnerability Management license is consumed for the Asset that is tested. When a Rights Review is performed on an Asset, a Rights Management license is consumed for the Asset. When Activity Monitoring is registered and configured on a specific Asset, an Activity Monitoring license is consumed for that Asset. Once a license is associated, you can perform as many Vulnerability Management or Rights

DbProtect Getting Started Guide - January 6, 2017
Changes in License Management Copyright © 2017 Trustwave Holdings, Inc. All rights reserved. 42
Management scans or collects as much Activity Monitoring data for that Asset—it will not consume another license. This is consistent with previous versions of DbProtect.
However, if the identity of an Asset changes, you can edit the Asset and change attributes such as the IP Address or the hostname, and the license association will not be disrupted. You can modify the identity of an Asset by navigating to Manage > Assets, then selecting the Asset, and clicking on the Edit button.
If you decommission an Asset, you can also have it removed from DbProtect’s asset inventory, and you can recover the license that was consumed for that Asset. To remove an Asset from DbProtect, navigate to Manage > Assets, then select the Asset, and click on the Manage Org Associations button, and deselect every Organization it is associated with. After user confirmation, the system will automatically determine that the Asset is no longer needed, and it will remove it along with its security results data from the system.
13.4 Review License Usage You can review your license usage as follows:
1. Navigate to Set Up > System Settings > Licensing.
2. Click the Get License Utilization Report button.
13.5 Compliance Packs Please note that if you are using Compliance Packs in DbProtect 6.3.1, they are not compatible for use in DbProtect 6.4 versions and above. In the DbProtect 6.4 version line, the main features of the Compliance Packs for DISA STIG and for CIS Security Benchmarks are available to all after upgrading to DbProtect 6.4.3 or higher.
DbProtect Getting Started Guide - January 6, 2017
About Trustwave
Trustwave helps businesses fight cybercrime, protect data and reduce security risk. With cloud and managed security services, integrated technologies and a team of security experts, ethical hackers and researchers, Trustwave enables businesses to transform the way they manage their information security and compliance programs. More than three million businesses are enrolled in the Trustwave TrustKeeper® cloud platform, through which Trustwave delivers automated, efficient and cost-effective threat, vulnerability and compliance management. Trustwave is headquartered in Chicago, with customers in 96 countries. For more information about Trustwave, visit https://www.trustwave.com.
![Skaffold - storage.googleapis.com · [getting-started getting-started] Hello world! [getting-started getting-started] Hello world! [getting-started getting-started] Hello world! 5](https://img.dokumen.tips/doc/110x75/5ec939f2a76a033f091c5ac7/skaffold-getting-started-getting-started-hello-world-getting-started-getting-started.jpg)