Embed Size (px)
Citation preview
DBMakerXML Tool User's Guide

CASEMaker Inc./Corporate Headquarters
1680 Civic Center Drive
Santa Clara, CA 95050, U.S.A.
www.casemaker.com
www.casemaker.com/support ©Copyright 1995-2012 by CASEMaker Inc. Document No. 645049-235077/DBM53-M12302012-XMLT Publication Date: 2012-12-30 All rights reserved. No part of this manual may be reproduced, stored in a retrieval system, or transmitted in any form, without the prior written permission of the manufacturer. For a description of updated functions that do not appear in this manual, read the file named README.TXT after installing the CASEMaker DBMaker software. Trademarks CASEMaker, the CASEMaker logo, and DBMaker are registered trademarks of CASEMaker Inc. Microsoft, MS-DOS, Windows, and Windows NT are registered trademarks of Microsoft Corp. UNIX is a registered trademark of The Open Group. ANSI is a registered trademark of American National Standards Institute, Inc. Other product names mentioned herein may be trademarks of their respective holders and are mentioned only form information purposes. SQL is an industry language and is not the property of any company or group of companies, or of any organization or group of organizations. Notices The software described in this manual is covered by the license agreement supplied with the software. Contact your dealer for warranty details. Your dealer makes no representations or warranties with respect to the merchantability or fitness of this computer product for any particular purpose. Your dealer is not responsible for any damage caused to this computer product by external forces including sudden shock, excess heat, cold, or humidity, nor for any loss or damage caused by incorrect voltage or incompatible hardware and/or software. Information in this manual has been carefully checked for reliability; however, no responsibility is assumed for inaccuracies. This manual is subject to change without notice. This text is not here.

1Contents
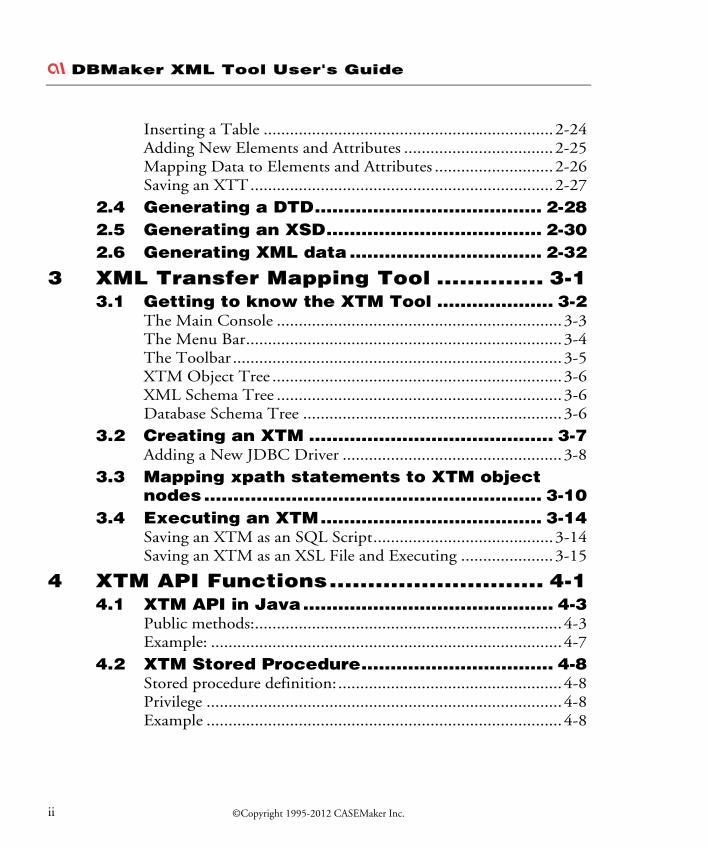
Contents
1 Introduction .......................................1-1
2 XML Transfer Template Tool .............2-1 2.1 Getting to Know the XTT Tool .....................2-3
Opening the XTT tool and logging into a database ............... 2-3 The Main Console ................................................................. 2-4 The Menu Bar ....................................................................... 2-4 The Toolbar........................................................................... 2-7 The XTT Editing Panel ......................................................... 2-8 The Database Schema Panel ................................................ 2-11 The Detailed Editing Panel.................................................. 2-12 The Customize Dialog ......................................................... 2-17 The User Preferences Dialog ................................................ 2-17 The Tree Operation Options Dialog ................................... 2-18
2.2 Creating a New XTT ...................................2-19 Creating an empty XTT file................................................. 2-19 Creating an XTT from a DTD file ...................................... 2-19 Creating an XTT from an XSD file...................................... 2-21 Creating an XTT from an XML file..................................... 2-22
2.3 Editing an XTT ............................................2-23 About the Design View........................................................ 2-23
©Copyright 1995-2012 CASEMaker Inc. i
DBMaker XML Tool User's Guide1
Inserting a Table ..................................................................2-24 Adding New Elements and Attributes ..................................2-25 Mapping Data to Elements and Attributes ...........................2-26 Saving an XTT.....................................................................2-27
2.4 Generating a DTD....................................... 2-28 2.5 Generating an XSD..................................... 2-30 2.6 Generating XML data ................................. 2-32
3 XML Transfer Mapping Tool .............. 3-1 3.1 Getting to know the XTM Tool .................... 3-2
The Main Console .................................................................3-3 The Menu Bar........................................................................3-4 The Toolbar ...........................................................................3-5 XTM Object Tree ..................................................................3-6 XML Schema Tree .................................................................3-6 Database Schema Tree ...........................................................3-6
3.2 Creating an XTM .......................................... 3-7 Adding a New JDBC Driver ..................................................3-8
3.3 Mapping xpath statements to XTM object nodes .......................................................... 3-10
3.4 Executing an XTM...................................... 3-14 Saving an XTM as an SQL Script.........................................3-14 Saving an XTM as an XSL File and Executing .....................3-15
4 XTM API Functions............................ 4-1 4.1 XTM API in Java........................................... 4-3
Public methods:......................................................................4-3 Example: ................................................................................4-7
4.2 XTM Stored Procedure................................. 4-8 Stored procedure definition:...................................................4-8 Privilege .................................................................................4-8 Example .................................................................................4-8
©Copyright 1995-2012 CASEMaker Inc. ii
1Contents
5 XTT API Functions .............................5-1 5.1 XTT API in Java ............................................5-2
Public methods: ..................................................................... 5-2 Example: ................................................................................ 5-6
5.2 XTT Stored Procedure ..................................5-7 Stored procedure definition:................................................... 5-7 Privilege ................................................................................. 5-7 Examples................................................................................ 5-7
©Copyright 1995-2012 CASEMaker Inc. iii

DBMaker XML Tool User's Guide1
©Copyright 1995-2012 CASEMaker Inc. iv

1Introduction 1
©Copyright 1995-2012 CASEMaker Inc. 1-1
1 Introduction
DBMaker includes two Java-based, platform-independent tools for passing data between a database and XML documents. The XML Transfer Template tool and the XML Transfer Mapping tool allow you to create custom templates that determine how data maps from a database to XML files.
Once you have created a template, you can use one of the APIs provided by DBMaker to help automate the process of synchronizing data between the database and XML files. DBMaker provides stored procedures as well as APIs in Java to help you accomplish this task.

DBMaker XML Tool User's Guide1
©Copyright 1995-2012 CASEMaker Inc. 1-2

1XML Transfer Template Tool 2
©Copyright 1995-2012 CASEMaker Inc. 2-1
2 XML Transfer Template Tool
The purpose of the XML Transfer Template (XTT) tool is to provide a customizable bridge between database data and XML documents. The bridge takes the form of a template file, the XML Transfer Template (XTT). The XTT file determines which database tables and columns to map to which XML elements and attributes. You determine the mapping using drag-and-drop operations in the XTT tool. The XTT tool ensures that XTT syntax is correct, and also aids in performing tasks such as generating schema documents (XSD) or document type definitions (DTD).
Using The XTT tool to transform data is a four-phase process – creating or importing the XTT structure, linking XTT objects to the database with SQL queries, generating DTD or XSD files if necessary, and finally generating the XML document.
Usually, linking XTT objects will only be necessary if you are importing an existing XML structure from either an XML file, XSD, or DTD. Likewise, linking will not be necessary if you are creating an XTT based on the database. Hybrid situations may exist, however; for example, where you have an existing XML structure but need to add new elements for new data.
XTT files define a map from database tables and columns to the elements and attributes of an XML file. An XTT file is a document with syntax similar to a valid XML document. Elements define tables and columns, and attributes define SQL queries, attribute names and values, and element values for XML documents generated using the XTT.

DBMaker XML Tool User's Guide1
Example:
The following is a complete XTT file that maps data from the table CARD. It maps the columns FIRSTNAME, LASTNAME, and TITLE as attributes of the element CARD, and the column NUM as a child element: <?xml version="1.0" encoding="UTF-8"?> <xtt:template xmlns:xtt="urn:schema-dbmaker-com:xml-template"> <root> <CARD xtt:query="CARD_SQL0" xtt:command="select NUM, FIRSTNAME, LASTNAME, TITLE, BMP from SYSADM.CARD"> <xtt:attribute name="FIRSTNAME" value="$CARD_SQL0.FIRSTNAME"/> <xtt:attribute name="LASTNAME" value="$CARD_SQL0.LASTNAME"/> <xtt:attribute name="TITLE" value="$CARD_SQL0.TITLE"/> <NUM xtt:textvalue="$CARD_SQL0.NUM" /> </CARD> </root> </xtt:template>
If the XTT in the above example is run, the following XML file is generated: <?xml version="1.0" encoding="US-ASCII" ?> <root> <CARD FIRSTNAME="Eddie" LASTNAME="Brown" TITLE="Manager"> <NUM>1</NUM> </CARD> </root>
The XTT tool provides a simple user interface for scripting, validating and running XTT files. The following sections describe the user interface, and give procedures to help you quickly learn to start creating your own XTT files.
©Copyright 1995-2012 CASEMaker Inc. 2-2

1XML Transfer Template Tool 2
©Copyright 1995-2012 CASEMaker Inc. 2-3
2.1 Getting to Know the XTT Tool
This section describes the elements of the XTT Tool user interface and how to log onto the database.
Opening the XTT tool and logging into a database
When you open the XTT tool from the Windows start menu you will automatically be prompted to log into the database. Select the database from which you want to export information. You must have an account on the database in order to log in. Be sure to use an account that has access to all the tables that you will need information from.
Figure 2-1: The login dialog
To open the XTT tool and log into a database:
1. From the Windows Start menu, click Start > Programs > DBMaker 5.3 > XML Transfer Template.
2. In the Login dialog, select a database and enter a user name and password
3. Click Ok. The XTT tool will display database tables in the Database Schema Panel.

DBMaker XML Tool User's Guide1
The Main Console
The Main Console can be divided into five logical areas. Refer to Figure 2-2, below.
Figure 2-2: Elements of the Main Console
The Menu Bar
The Menu Bar consists of five menus: File, Database, Operation, Options, and Help. Menu item are disabled if they cannot be used. Refer to the following sections for each menu item’s function.
FILE
The File menu consists of the following items:
©Copyright 1995-2012 CASEMaker Inc. 2-4
1XML Transfer Template Tool 2
©Copyright 1995-2012 CASEMaker Inc. 2-5
New XTT > Empty XTT: Creates a new empty XTT. Refer to Creating an empty XTT file for more information
New XTT > With imported DTD: Creates a new XTT based on a DTD file. Refer to Creating an XTT from a DTD file for more information
New XTT > With imported XSD: Creates a new XTT based on an XSD file. Refer to Creating an XTT from an XSD file for more information
New XTT > With imported XML: Creates a new XTT based on an XML file. Refer to Creating an XTT from an XML file for more information
Open XTT: opens the Open dialog with .XTT as the default file extension filter.
Close: closes the XTT currently open in the XTT editing panel. If the XTT has been modified a confirmation dialog will ask to save changes.
Save: saves the XTT currently open in the XTT editing panel. If the XTT has not been saved before, the Save as dialog will open.
Save as: Opens the Save as dialog with .XTT as the default file extension.
Generate DTD: Opens the Save as dialog with .DTD as the default file extension. Refer to Generating a DTD for more information.
Generate XSD: Opens the Save as dialog with .XSD as the default file extension. Refer to Generating an XSD for more information
Recent files: displays the most recently opened files
Exit: exits the XML Transfer Template tool
DATABASE
The Database menu consists of the following items:
Connect: Opens the Login dialog. A list of databases appears in the drop down menu.
Disconnect: stops the session with the database. The content in the database schema panel is cleared.

DBMaker XML Tool User's Guide1
Refresh: refreshes the database schema panel if a session is active.
OPERATION
The Operation menu consists of the following items:
Insert > Element: inserts a new empty element into the XTT object tree. Refer to Adding New Elements and Attributes for more information
Insert > Attribute: inserts a new empty attribute into the XTT object tree. Refer to Adding New Elements and Attributes for more information
Undo: returns the XTT object tree to the state it was in before the last modification
Copy: copies the selected node of the XTT object tree and all descendants
Cut: cuts the selected node of the XTT object tree and all descendants
Paste: Pastes the last cut or copied node of the XTT object tree and all descendants.
Remove: removes the selected node of the XTT object tree and all descendants
Run: executes the XTT file. Refer to Generating XML data for more information.
Validate: checks if variable references for elements exist in the parent element, and checks if SQL commands in elements are valid in the database
OPTIONS
The Options menu consists of the following items:
Preferences: opens the user preferences dialog
Tree operation options: opens the tree operation options dialog
HELP
The Help menu consists of the following items:
Help: opens the online help.
©Copyright 1995-2012 CASEMaker Inc. 2-6
1XML Transfer Template Tool 2
©Copyright 1995-2012 CASEMaker Inc. 2-7
web site: opens a browser window to the web site www.dbmaker.com.
about: displays information about the XML transfer template including the build date and number, the CASEMaker technical support e-mail address, and a link to www.dbmaker.com.
The Toolbar
This section shows the toolbar items with their equivalent menu bar operations.
FILE OPERATIONS
New empty XTT= menubar > File > New XTT > Empty XTT
Open XTT= menubar > File > Open XTT
Save= menubar > File > Save
Close= menubar > File > Close
XTT TREE OPERATIONS
Add Attribute Object = menubar > Operation > Insert > Attribute
Add Element Object = menubar > Operation > Insert > Element
Remove Tree Node = menubar > Operation . Remove
Move Up = Move current selected node before its previous sibling node. The element can be moved before another element but cannot be moved before an attribute.
Move Down = Move current selected node after its next sibling node. The attribute can only be moved after another attribute but can’t be moved after an element.
OPENED FILES
DBMaker XML Tool User's Guide1
The combo box displays all open XTT filenames. If the file has been edited, then there will be an asterisk (*) after the filename. When you choose a different filename, the XTT edit panel will reload and show the XTT tree of the newly selected file.
OPERATION OPTIONS
Run Transfer = menubar > Operations > Run
Help = menubar > Help > Help
Insert as Child = Insert elements as child elements (when performing drag-and-drop operations)
Inset as Sibling = Insert elements as sibling elements (when performing drag-and-drop operations)
= Add a new node (when performing drag-and-drop operations)
= Link by source structure (when performing drag-and-drop operations)
= Add a new element below the selected element (follows Insert as … rule)
= Add a new attribute within the selected element
= Operation options – when selected, causes Customize dialog to appear when performing drag-and-drop operations on tables or views.
The XTT Editing Panel
The XTT editing panel consists of two views: the design view and the source view. The design view contains the XTT object tree and is displayed by default when an XTT is created or opened. The XTT object tree is a logical representation of the XTT file itself, which is a well-formed XML document. The XTT object tree consists of five types of elements, described in Table 2-1.
XTT object type Tree node name Content description
<xtt:template> xtt:template (none)
©Copyright 1995-2012 CASEMaker Inc. 2-8

1XML Transfer Template Tool 2
©Copyright 1995-2012 CASEMaker Inc. 2-9
XTT object type Tree node name Content description
<root> root (none)
<xtt:attribute> value of attribute ‘name’ value of attribute ‘value’
user-defined element without query or text value
element’s tag name (none)
user-defined element with query
element’s tag name value of attribute ‘xtt:query’ + ‘=’
+ value of attribute ‘xtt:command’
user-defined element with text value
element’s tag name value of attribute ‘textvalue’
Table 2-1: Element types in the XTT object tree

DBMaker XML Tool User's Guide1
The five XTT element types as they appear in the design view are illustrated in Table 2-2.
Table 2-2: Design view of element types in the XTT object tree
To select an XTT tree object, left-click on it, and it will be highlighted in blue. If you right click on the design view, a pop-up menu will appear depending on the object that is highlighted. Right-clicking on an object will not cause it to be selected. Table 2-3 summarizes the pop-up menu contents for different selected elements.
Node type Pop-up menu
<xtt:template> N/A
attribute ‘Change to ELEMENT’ - the selected attribute node will be replaced by an element with the same name. The data in the value attribute will be copied to the textvalue attribute of the new element
Cut – same as ctrl-X
Copy – same as ctrl-C
‘Remove’ - removes the current selected node from the tree
©Copyright 1995-2012 CASEMaker Inc. 2-10

1XML Transfer Template Tool 2
©Copyright 1995-2012 CASEMaker Inc. 2-11
user-defined element Element – creates a new element below the selected element. Whether the new element is inserted as a sibling or child element depends on whether the Insert as Child or Insert as Sibling option has been selected
Attribute – creates a new attribute for the selected element
‘Change to ATTRIBUTE’ – only provided if the object has no sub node (either attribute or element). The selected element will be replaced by an attribute with the same name. The data in textvalue will be copied to the value attribute of the new attribute
Cut – same as ctrl-X
Copy – same as ctrl-C
Paste – same as ctrl-V
‘Remove’ - to remove the current selected node from the tree
Table 2-3: pop-up menus available in the XTT editing panel design view
The Source tab displays the source code for the XTT file.
The Database Schema Panel
The database schema panel shows the table/views of the connected database as a schema tree. By expanding the table/view node, it will show each column as its sub node. The nodes in the schema tree can be dragged into the XTT tree panel. It will then add a new node or link the schema information into XTT tree depending on he settings selected

DBMaker XML Tool User's Guide1
The Detailed Editing Panel
Detail editing panel shows the detailed properties of the selected node in the XTT tree. The general rule for text fields in the editing panel is that when an object outside the text field or area is selected the value is set. For example, the name field will be set after the next field is selected or the XTT tree selection is changed. The change can be seen on the XTT tree.
XTT:TEMPLATE
Figure 2-3: The language encoding menu of the detailed editing panel
Encoding – The Encoding menu specifies the text encoding for any output XML file. The choices are database local (the text encoding specified in the database), UTF-8, UTF-16LE and UTF-16BE. The default is database local. If database local is Big5 and the encoding setting is database local, then the output XML will be encoded in Big5.
Header – The header box it is where you add information like a schema file or applicable XSL in the output XML file. The XTT engine will print the content in this block to the output XML file after <?xml version=”1.0”…?> . Be sure to type valid XML content in this header block.
©Copyright 1995-2012 CASEMaker Inc. 2-12

1XML Transfer Template Tool 2
©Copyright 1995-2012 CASEMaker Inc. 2-13
Parameters – you may add as many parameters as you want. The parameter name must be unique. Press the ‘delete’ key to remove a selected row. The last empty row cannot be removed. The parameter default can be empty.
There are a few display settings available for the output XML file. The default value for each setting is ‘system default’. The display settings will apply to all XTT objects unless specified otherwise.
Empty abbreviation –
0 – always show start and end tags for an element, even if its content is empty.
1 – to use the abbreviated form of the end tag if no sub element is produced. For example, <Department id=”1001” />.
2 – hide the start and end tags if the element content is empty; no text, no attribute, no child element. If the element only has attributes, it will use type 1 abbreviation.

DBMaker XML Tool User's Guide1
Indent – the number of indent spaces in the source document for each sub level as displayed in a text editor. For example, if the number is 2, then the start tag of the root will be indented 2 spaces, and a sub node of the root will be indented 4 spaces.
Line break –
0 – do not add any line break.
1 – add a line break after an end tag.
2 – add a line break after every start and end tag.
Line break char – the character(s) to be added as line break.
0 – {CR}
1– {LF}
2 – {CR}{LF}.
Display mode – the way to display text data. Generally, the text character ‘<’ will be replaced with ‘<’ in the text content. But ‘<’ can be used if it is enclosed in the CDATA section, or the text content itself is already an XML fragment and can be added into the output XML as a part of the XML content. There are 3 different ways to display text data.
0 – display XML text content with the escape character.
1 – use a CDATA section to enclose the text value.
2 – make the content native XML text.
Null handling – specify how to handle null data.
0 – skip null data. If it’s an attribute, then do nothing.
1 – show empty content. For example, <NAME></NAME>.
2 – display ‘NULL’. For example, <NAME>NULL</NAME>.
LO mode – specify how to handle large objects.
0 – dump large object data directly into the XML file. Print a string if it is CLOB type data or print in hexadecimal format if it is BLOB type data.
©Copyright 1995-2012 CASEMaker Inc. 2-14

1XML Transfer Template Tool 2
©Copyright 1995-2012 CASEMaker Inc. 2-15
1 – to store large object data in external file.
USER-DEFINED ELEMENT
The following represents the properties of a user-defined element in the XTT object tree.
Figure 2-4: The detailed editing panel for a user-defined element
Name – the element name. It is case-sensitive and cannot be empty.
Value – the text value. This is a text expression, which can have both constant text and a variable reference. For example, you might want to add the country code to all phone number data, such as "886 - $SQL1.PHONE", where "886 –" is the constant text and "$SQL1.PHONE" is the variable reference. The XTT engine will concatenate both into the output XML file as the text value of the element.
Browse button – the browse button will list all the available parameters and variable references at the current level. You can choose the variable name(s) and insert them into the text expression field next to the browse button.

DBMaker XML Tool User's Guide1
Figure 2-5: The query view for a user-defined element in the detailed editing panel
An element can have embedded query properties in it. A valid XTT element will have both fields (name and command) specified or both left as empty.
Name – the query name. It will be used as a variable reference in the sub nodes.
Command – SQL query statement. The statement must be able to generate a result set. For example, you cannot type a delete table statement here.
The display settings are similar to the ones in xtt:template, But the default is ‘follow template setting’.
Null handling – there are only two choices instead of three. If ‘follow template setting’ is selected and the template has the null handling setting as ‘0 - skip null data’, then it will be treated as ‘1 show empty content’.
1 – show empty content. For example, <NAME></NAME>.
2 – display ‘NULL’. For example, <NAME>NULL</NAME>.
ATTRIBUTE NODE
©Copyright 1995-2012 CASEMaker Inc. 2-16

1XML Transfer Template Tool 2
©Copyright 1995-2012 CASEMaker Inc. 2-17
Figure 2-6: An attribute viewed in the detailed editing panel
Name – attribute name. The Name field cannot be empty. Multiple attributes must have names unique to the same parent element.
Value – the attribute value; a text expression field.
There are only two display settings for an attribute node; null handling and LO mode. The default for both is ‘follow template setting’.
The Customize Dialog
The customize dialog appears when performing drag-and-drop operations if you have selected show customize dialog. The appearance of the customize dialog depends on the settings selected in the tree operation options dialog. There are two main views for the customize dialog depending on whether you have selected Link by source structure or Add a new node.
The User Preferences Dialog
The user preferences dialog is where you select the user interface language, and the method by which you wish to view the results. You may select English, Chinese, or Japanese as the user interface language. You may also choose to select your default XML browser or your default text editor to view the output when running the XTT.

DBMaker XML Tool User's Guide1
The Tree Operation Options Dialog
The tree operation options dialog is where you select the behavior of drag-and-drop operations. You may select to add database objects as elements or attributes; add objects as child nodes or sibling nodes; and to add objects as new trees, or to link data to existing elements or attributes.
©Copyright 1995-2012 CASEMaker Inc. 2-18
1XML Transfer Template Tool 2
©Copyright 1995-2012 CASEMaker Inc. 2-19
2.2 Creating a New XTT
An XTT is the map by which XML data files are produced. An XTT may be created in one of four ways: from an empty XTT file, from a DTD file, From an XSD file, and from an XML file.
Creating an empty XTT file
Creating an empty XTT file is useful if you have data in a database that you want to display in XML form, but have no preconditions for how the XML data must be formatted. An empty XTT file consists only of the root node. After creating an empty XTT file, you may add elements and attributes. To learn about adding elements and attributes refer to Editing an XTT.
To create an empty XTT file:
1. Open the XTT tool and log in to the database that you want to use.
2. Click File > New XTT > Empty XTT. The root node will appear in the XTT object tree.
Creating an XTT from a DTD file
You may want to define the structure of your XML documents based on an existing Document Type Definition (DTD) file. If you have an existing XML document based on an external DTD and want to produce XML files from database data that conforms to that DTD, then you can create an XTT from a DTD file.
A root element must be specified for an XTT. During the import process a dialog allows you to select any valid element definition as the root for the XTT.
After creating the XTT, all the elements and attributes under the selected root node of the DTD will appear in the XTT object tree, however, none of the element or attribute definitions contain values – there is no method to pass SQL data to an XML file using the XTT. This may be accomplished by editing element nodes in the XTT

DBMaker XML Tool User's Guide1
object tree. For details on how to modify nodes in the XTT object tree, refer to Mapping Data to Elements.
To create an XTT from a DTD:
1. Open the XTT tool and log in to the database that you want to use.
2. Click File > New XTT > With imported DTD.
3. In the Import from DTD dialog, select the DTD file to import and click Import from DTD.
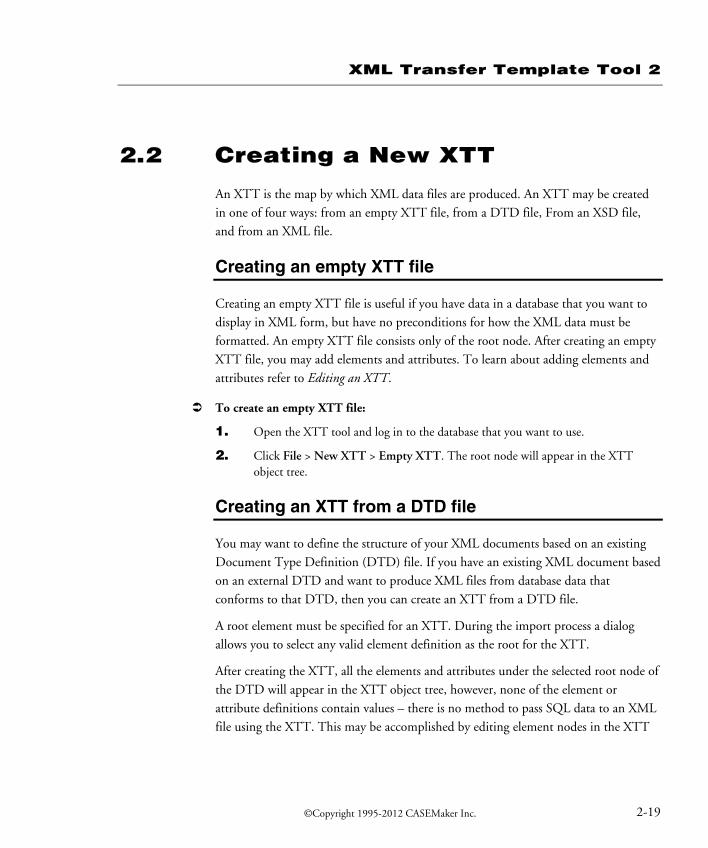
4. In the Choose a DTD dom tree node as root dialog, select an element definition to be the root element in the XTT object tree and click Ok.
©Copyright 1995-2012 CASEMaker Inc. 2-20
1XML Transfer Template Tool 2
©Copyright 1995-2012 CASEMaker Inc. 2-21
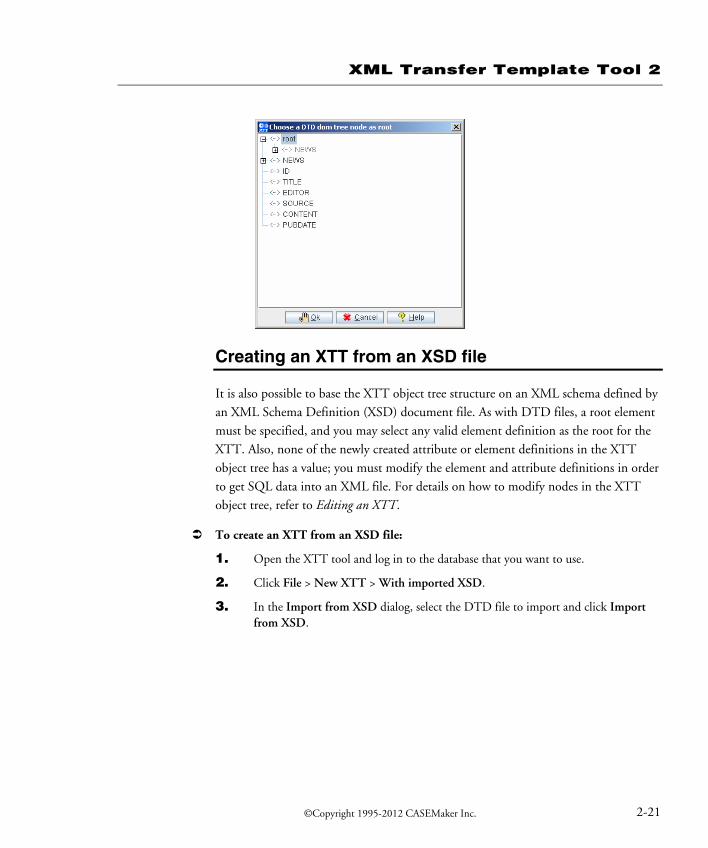
Creating an XTT from an XSD file
It is also possible to base the XTT object tree structure on an XML schema defined by an XML Schema Definition (XSD) document file. As with DTD files, a root element must be specified, and you may select any valid element definition as the root for the XTT. Also, none of the newly created attribute or element definitions in the XTT object tree has a value; you must modify the element and attribute definitions in order to get SQL data into an XML file. For details on how to modify nodes in the XTT object tree, refer to Editing an XTT.
To create an XTT from an XSD file:
1. Open the XTT tool and log in to the database that you want to use.
2. Click File > New XTT > With imported XSD.
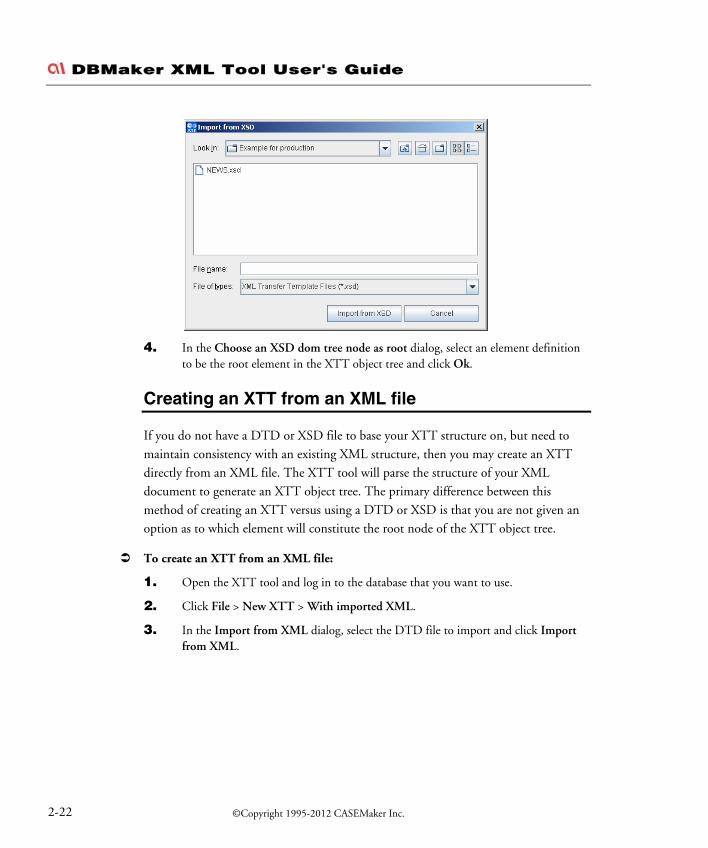
3. In the Import from XSD dialog, select the DTD file to import and click Import from XSD.
DBMaker XML Tool User's Guide1
4. In the Choose an XSD dom tree node as root dialog, select an element definition to be the root element in the XTT object tree and click Ok.
Creating an XTT from an XML file
If you do not have a DTD or XSD file to base your XTT structure on, but need to maintain consistency with an existing XML structure, then you may create an XTT directly from an XML file. The XTT tool will parse the structure of your XML document to generate an XTT object tree. The primary difference between this method of creating an XTT versus using a DTD or XSD is that you are not given an option as to which element will constitute the root node of the XTT object tree.
To create an XTT from an XML file:
1. Open the XTT tool and log in to the database that you want to use.
2. Click File > New XTT > With imported XML.
3. In the Import from XML dialog, select the DTD file to import and click Import from XML.
©Copyright 1995-2012 CASEMaker Inc. 2-22

1XML Transfer Template Tool 2
©Copyright 1995-2012 CASEMaker Inc. 2-23
2.3 Editing an XTT
After you have created the root node and structure (if creating an XTT from XML, DTD, or XSD), you will want to provide content for the generated XML file. For blank XTTs, this is primarily a drag-and-drop operation from the tables in the database schema panel into the XTT object tree. The sections Inserting a Table and Adding New Elements and Attributes, describe the primary tasks you will need to accomplish if creating a new XTT.
For XTTs based on an XML, DTD, or XSD file, you will need to add query statements and values to the attribute and element definitions in the XTT object tree. These tasks are described the section Mapping Data to Elements and Attributes.
These tasks are not mutually exclusive and the above guidelines are only provided to enable you to quickly understand how to create a valid XTT document. At times you may find it useful to modify an element definition in a new XTT – one example being if you only wish to select values from an SQL table that meet some conditions. Or you may not need to conform precisely to the XML schema that your XTT is based on – in which case it is possible to use drag-and-drop operations to build your XTT object tree.
About the Design View
The design view of the XTT editing panel displays the XTT object tree. For a new, blank XTT, the XTT object tree contains only the XTT template node and an empty root node. An XTT object tree that has been created from an XML, XSD, or DTD will have a different root. Refer to The XTT Editing Panel for detailed information on the objects and functions available in the design view.
DBMaker XML Tool User's Guide1
Inserting a Table
You can insert a table as a child or sibling. The first table you insert must be a child of the root node; attempting to add an element to the xtt:template node will return an error.
Before a table is added to the XTT object tree, you can choose which columns are to be added as elements, which columns to add as attributes, which columns to select but not add to the XTT object tree, and which columns not to select. This is accomplished in the customize dialog. Click the show customize dialog button if you want the customize dialog to appear when adding object to the XTT object tree.
When inserting a table, the customize dialog will display a query object name, and the structure of the database object as it will appear after it is entered into the XTT object tree. By default both parent and child objects are inserted as elements. You may also choose to insert child objects as attributes, to select database objects without inserting them as attribute objects or element objects, or to not select the database objects.
After you have inserted the first table, subsequent tables may be added as children or siblings of the first table. Tables must always be represented as elements in the XTT object tree. If you have created in the XTT an existing file, any tables you insert can be children or siblings of any of the existing XTT elements
To insert a table as a child node:
1. Click Option > Tree Operation Options.
2. In the Tree Operation Options dialog click Add as element, Insert as a child, and Add mode.
©Copyright 1995-2012 CASEMaker Inc. 2-24

1XML Transfer Template Tool 2
©Copyright 1995-2012 CASEMaker Inc. 2-25
3. Select a table from the database schema panel
4. Drag the table from the database schema panel to the XTT object tree node that is to be the parent of the new node.
5. In the customize dialog, select any columns that you do not want to include and click remove. Select any columns that you wish to select in the SQL command, but do not want to export to the XML file and click hidden. Select any columns that you wish to add as attributes and click attribute. Select any columns that you wish to add as elements and click element.
6. Click OK. The table will appear as a new element in the XTT object tree. Columns will appear as elements and attributes, depending on how they were selected in the customize dialog.
Adding New Elements and Attributes
You may need to add elements or attributes to the XTT object tree in order to create the desired data structure. Note that the following procedure only describes how to add empty elements and attributes. Refer to defining elements and defining attributes for information on how to map data from the database to empty elements in the XTT object tree.
DBMaker XML Tool User's Guide1
To add new elements or attributes:
1. Select the element to which you will add a new element or attribute.
2. Determine the relationship between the selected element and your new object: click insert as sibling to make the new object a sibling of the selected element, click insert as child to make the new object a child of the selected element.
3. Click add attribute object to add an attribute. Click add element object to add a new element.
4. Type a name for the new object in the name box of the detailed editing panel and press Enter.
Mapping Data to Elements and Attributes
Elements should be associated with data. To associate an element object with data, the parent element object must contain an SQL query. The SQL query must select the table and column that will map to the child element object. After associating the parent element with an SQL query, you must associate a child element with the column.
Use the link by source structure tree operation option to associate elements with SQL queries. When you associate an element with an SQL query, use the customize dialog to associate child elements or attributes with the selected columns of the SQL query. Dragging a table from the database schema panel into a parent element in the XTT object tree will cause the customize dialog to open.
When linking element objects by source structure, the customize dialog will show the query object name, and two columns: the XTT object column, and the mapping column. The XTT object column displays all child elements and attributes of the element that you have dragged the table into. The mapping column displays any existing content, and is where you select the column content that you want to map from. Click a row in the mapping column to select an SQL data source for the corresponding XTT object.
To map data to an empty XTT element object:
1. Click a table in the database schema panel.
©Copyright 1995-2012 CASEMaker Inc. 2-26

1XML Transfer Template Tool 2
©Copyright 1995-2012 CASEMaker Inc. 2-27
2. Drag the table to an element object in the XTT object tree. The element you dragged the table into will be the parent element.
3. In the Customize dialog, select the mapping that you wish to perform. For each element and attribute object:
a) Click the Mapping column that corresponds to the XTT object that you wish to map database data to.
b) Select the value for the XTT object from the drop-down menu. The value is the equivalent of the column data in the database. It appears in the format of the name of the SQL query followed by a dot, and then the column name.
4. Click OK when you have completed selecting mapping values for all the XTT object nodes that you wish to map to database columns.
Saving an XTT
After you have completed editing the XTT object tree, you should save the XTT file. The saved XTT file can be later recalled for modification, or called in a stored procedure to automatically pass database data to XML files.
To save an XTT click the Save icon, or click File > Save from the menu bar.

DBMaker XML Tool User's Guide1
2.4 Generating a DTD
If your development requirements determine that you will need to create a Document Type Definition (DTD) file to describe the structure of generated XML files, then you can use the Generate DTD function in the XML Transfer Template tool.
The DTD file structure will be consistent with the structure of the source XTT
Example:
Given the following XTT file: <?xml version="1.0" encoding="US-ASCII"?> <xtt:template xmlns:xtt="urn:schema-dbmaker-com:xml-template"> <root> <CARD xtt:query="CARD_SQL0" xtt:command="select NUM, FIRSTNAME, LASTNAME, TITLE, BMP from SYSADM.CARD"> <NUM xtt:textvalue="$CARD_SQL0.NUM" /> <FIRSTNAME xtt:textvalue="$CARD_SQL0.FIRSTNAME" /> <LASTNAME xtt:textvalue="$CARD_SQL0.LASTNAME" /> <TITLE xtt:textvalue="$CARD_SQL0.TITLE" /> <BMP xtt:textvalue="$CARD_SQL0.BMP" /> </CARD> </root> </xtt:template>
The resultant DTD file will be: <?xml version="1.0" encoding="UTF-8"?> <!ELEMENT root (CARD*) > <!ELEMENT CARD (NUM, FIRSTNAME, LASTNAME, TITLE, BMP) > <!ELEMENT NUM (#PCDATA) > <!ELEMENT FIRSTNAME (#PCDATA) > <!ELEMENT LASTNAME (#PCDATA) > <!ELEMENT TITLE (#PCDATA) > <!ELEMENT BMP (#PCDATA) >
To generate a DTD file from an XTT object tree:
1. Ensure that the XTT that you want to convert to a DTD is open.
2. Click File > Generate DTD.
3. In the Generate DTD dialog, select an output path and specify a file name and encoding type. Possible encoding types include: UTF-8, UTF-6LE, UTF-16BE, and Local Code.
©Copyright 1995-2012 CASEMaker Inc. 2-28

1XML Transfer Template Tool 2
©Copyright 1995-2012 CASEMaker Inc. 2-29
4. Click Generate DTD, a DTD file will be created in the selected folder.

DBMaker XML Tool User's Guide1
2.5 Generating an XSD
You may wish to generate an XML schema file from the logical structure represented in the XTT file. Some tools may require a schema file to be able to parse XML data. The schema file structure is consistent with the XTT object tree structure. In the example below, a small XTT file is used to generate a schema file.
Example
Given an XTT file with the following object tree structure: <?xml version="1.0" encoding="US-ASCII"?> <xtt:template xmlns:xtt="urn:schema-dbmaker-com:xml-template"> <root> <CARD xtt:query="CARD_SQL0" xtt:command="select NUM, FIRSTNAME, LASTNAME, TITLE, BMP from SYSADM.CARD"> <xtt:attribute name="NUM" value="$CARD_SQL0.NUM"/> <xtt:attribute name="FIRSTNAME" value="$CARD_SQL0.FIRSTNAME"/> <xtt:attribute name="LASTNAME" value="$CARD_SQL0.LASTNAME"/> <xtt:attribute name="TITLE" value="$CARD_SQL0.TITLE"/> <BMP xtt:textvalue="$CARD_SQL0.BMP" /> </CARD> </root> </xtt:template>
The resultant schema file structure will be: <?xml version="1.0" encoding="UTF-8"?> <xsd:schema xmlns:xsd="http://www.w3.org/2001/XMLSchema"> <xsd:element name="root"> <xsd:complexType> <xsd:sequence> <xsd:element ref="CARD" maxOccurs="unbounded"/> </xsd:sequence> </xsd:complexType> </xsd:element> <xsd:element name="CARD"> <xsd:complexType> <xsd:sequence> <xsd:element ref="BMP" /> </xsd:sequence> <xsd:attribute name="NUM" type="xsd:int"/> <xsd:attribute name="FIRSTNAME" type="xsd:string"/> <xsd:attribute name="LASTNAME" type="xsd:string"/> <xsd:attribute name="TITLE" type="xsd:string"/> </xsd:complexType> </xsd:element> <xsd:element name="BMP" type="xsd:string"/>
©Copyright 1995-2012 CASEMaker Inc. 2-30

1XML Transfer Template Tool 2
©Copyright 1995-2012 CASEMaker Inc. 2-31
</xsd:schema>
To generate an XSD file from an XTT object tree:
1. Ensure that the XTT that you want to convert to an XSD is open.
2. Click File > Generate XSD.
3. In the Generate XSD dialog, select an output path and specify a file name and encoding type. Possible encoding types include: UTF-8, UTF-6LE, UTF-16BE, and Local Code.
4. Click Generate XSD, an XSD file will be created in the selected folder.

DBMaker XML Tool User's Guide1
2.6 Generating XML data
After creating the required transfer template and optional DTD or XSD file, you are ready to generate an XML file using the data stored in the database.
The Run transfer function is most useful for testing the XTT. After you have created an XTT, you can use it to generate XML documents on demand and pass data to your XML application.
The following example shows a completed XTT template file and corresponding output file. <?xml version="1.0" encoding="US-ASCII"?> <xtt:template xmlns:xtt="urn:schema-dbmaker-com:xml-template"> <root> <CARD xtt:query="CARD_SQL0" xtt:command="select NUM, FIRSTNAME, LASTNAME, TITLE, BMP from SYSADM.CARD"> <NUM xtt:textvalue="$CARD_SQL0.NUM" /> <FIRSTNAME xtt:textvalue="$CARD_SQL0.FIRSTNAME" /> <LASTNAME xtt:textvalue="$CARD_SQL0.LASTNAME" /> <TITLE xtt:textvalue="$CARD_SQL0.TITLE" /> <BMP xtt:textvalue="$CARD_SQL0.BMP" /> </CARD> </root> </xtt:template>
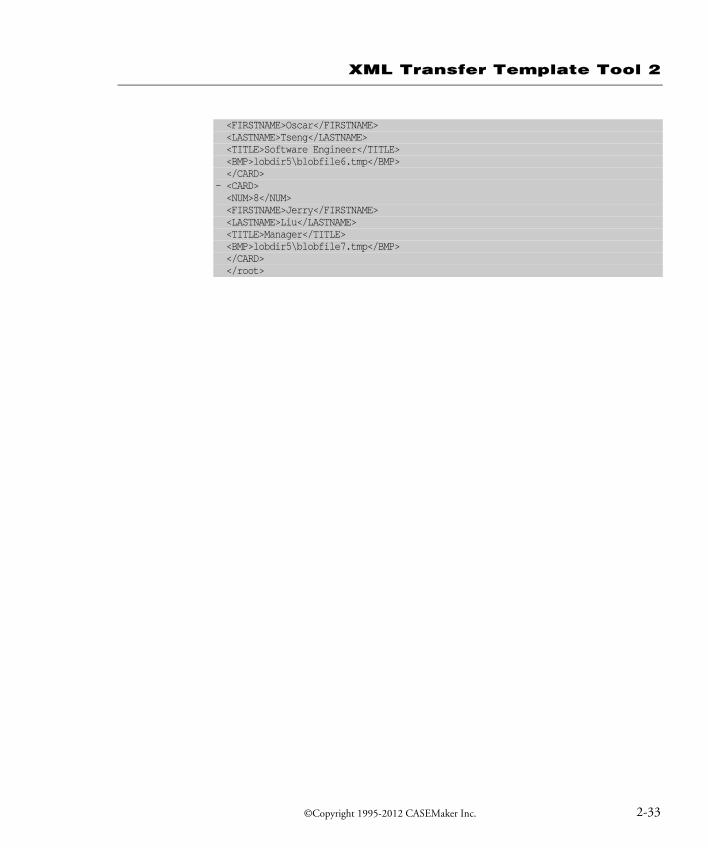
The corresponding output file for the preceding XTT file: <?xml version="1.0" encoding="US-ASCII" ?> - <root> - <CARD> <NUM>1</NUM> <FIRSTNAME>Eddie</FIRSTNAME> <LASTNAME>Chang</LASTNAME> <TITLE>Manager</TITLE> <BMP>lobdir5\blobfile0.tmp</BMP> </CARD> - <CARD> <NUM>2</NUM> <FIRSTNAME>Hook</FIRSTNAME> <LASTNAME>Hu</LASTNAME> <TITLE>Software Engineer</TITLE> <BMP>lobdir5\blobfile1.tmp</BMP> </CARD> </CARD> - <CARD> <NUM>7</NUM>
©Copyright 1995-2012 CASEMaker Inc. 2-32
1XML Transfer Template Tool 2
©Copyright 1995-2012 CASEMaker Inc. 2-33
<FIRSTNAME>Oscar</FIRSTNAME> <LASTNAME>Tseng</LASTNAME> <TITLE>Software Engineer</TITLE> <BMP>lobdir5\blobfile6.tmp</BMP> </CARD> - <CARD> <NUM>8</NUM> <FIRSTNAME>Jerry</FIRSTNAME> <LASTNAME>Liu</LASTNAME> <TITLE>Manager</TITLE> <BMP>lobdir5\blobfile7.tmp</BMP> </CARD> </root>

DBMaker XML Tool User's Guide1
©Copyright 1995-2012 CASEMaker Inc. 2-34
1XML Transfer Mapping Tool 3
©Copyright 1995-2012 CASEMaker Inc. 3-1
3 XML Transfer Mapping Tool
The XML transfer mapping (XTM) tool allows you to pass XML data to a database using XSL transformations. The XML Transfer mapping tool consists of three parts: an XML schema part, which displays the schema of the XML file(s) that you are using as source data; an SQL database part, which displays the database tables; and an XTM part, which displays the mapping from the XML schema to the database tables.
Using the tool can be summarized in five basic steps: opening a source XML or XSD file to create a source XML schema, connecting to a database, creating an XTM structure from the database table, mapping elements and attributes from the source XML schema, and finally storing the XTM structure as an XSL file.
Once the XSL file is created, it can be used to transform any XML file that conforms to the source schema to database data.

DBMaker XML Tool User's Guide1
3.1 Getting to know the XTM Tool
Unlike the XTT tool, the XTM tool does not require a connection to the database when it is opened. The tool creates a database connection when you create or open an XTM, and is used to display the database schema tree, described in XML Schema Tree.
This chapter describes all of the major screen elements in the XTM tool.
©Copyright 1995-2012 CASEMaker Inc. 3-2

1XML Transfer Mapping Tool 3
©Copyright 1995-2012 CASEMaker Inc. 3-3
The Main Console
The main console of the XTM tool can be broken down into five major areas as illustrated in Figure 3-1.
Figure 3-1: Elements of the XTM main console
Menu Bar XML Schema Panel Toolbar
XTM Editing Panel Database Schema Panel

DBMaker XML Tool User's Guide1
The Menu Bar
The menu bar consists of four menus: File, Operations, Options, and Help. Menu item are disabled if they cannot be used. Refer to the following sections for each menu item’s function
The File menu consists of the following items:
New: opens the New XTM dialog, which prompts you to enter source schema and database information
Open: opens the Open dialog with .XSL as the default file extension filter.
Save: saves the XTM currently open in the XTM editing panel as an XSL file. If the XTM has not been saved before, the Save as dialog will open.
Save as: Opens the Save as dialog with .XSL as the default file extension.
Close: closes the XTM currently open in the XTM editing panel. If the XTM has been modified a confirmation dialog will ask to save changes
Recent files: Lists the XSL files opened during the current session
Exit: Exits the XTM tool. Opens the Save as dialog with .XSL as the default file extension if the current XTM has not been saved
OPERATION
The Operation menu consists of the following items:
Undo: returns the XTT object tree to the state it was in before the last modification
Redo: Executes the last performed action again
Insert: Inserts a new XTM control node. Opens the New XTM Control Node dialog
Remove: Removes the selected node of the XTM object tree and all descendants
©Copyright 1995-2012 CASEMaker Inc. 3-4
1XML Transfer Mapping Tool 3
©Copyright 1995-2012 CASEMaker Inc. 3-5
Run: Opens the Execute XTM dialog. The XTM dialog offers the option to immediately execute the XTM and send data to the database or to generate an SQL script for later use
Refresh: Queries the database to refresh database schema
OPTIONS
The Options menu consists of the following items:
Preferences: opens the Preferences dialog, which allows you to choose the language that the UI is displayed in, and to specify different syntax for the connect section of the XSL file
JDBC Drivers: opens the JDBC Drivers dialog, which allows you to connect to other data sources
HELP
The Help menu consists of the following items:
Help: opens the online help.
web site: opens a browser window to the web site www.dbmaker.com.
about: displays information about the XML transfer template including the build date and number, the CASEMaker technical support e-mail address, and a link to www.dbmaker.com.
The Toolbar
New File: Menu bar > File > New
Open File: Menu bar > File > Open
Save File: Menu bar > File > Save
Close File: Menu bar > File > Close
Add new Table/Statement Node: Menu bar > Operations > Insert

DBMaker XML Tool User's Guide1
Delete Node: Menu bar > Operations > Remove
Undo: Menu bar > Operations > Undo {command}
Redo: Menu bar > Operations > Redo
Run: Menu bar > Operations > run
Refresh Database: Menu bar > Operations > Refresh
XTM Object Tree
The XTM Object Tree is a logical representation of the structure of the XTM file. It contains two columns: the XTM column and the xpath column. The XTM column contains a graphical tree representation of objects that have been inserted from the Database Schema Tree. The xpath column contains a path to address the corresponding location in the XML schema tree.
XML Schema Tree
The XML Schema Tree provides a graphical representation of the schema of the XML, DTD, or XSD file from which the XTD will create addresses. Any XML file that conforms to the schema represented in the XML Schema Tree can be used as a data source after the XTM has been created and saves as an XSL.
Database Schema Tree
The Database Schema Tree displays a logical representation of database tables within the selected database.
©Copyright 1995-2012 CASEMaker Inc. 3-6
1XML Transfer Mapping Tool 3
©Copyright 1995-2012 CASEMaker Inc. 3-7
3.2 Creating an XTM
Creating an XTM requires selecting a data source and connecting to a database.
The data source must be an XML, XSD, or DTD file. You must choose one of the elements in the source file to be the root. Only child elements and attributes of the selected element will be visible in the XML schema panel after you create the XTM file. If you want to include other elements or attributes, you will need to create a new XTM file.
Connecting to a database requires a driver and a connection to the database. The standard driver for DBMaker databases is dbmaker.sql.JdbcOdbcDriver. For more information about drivers refer to Adding a New JDBC Driver. The connection to the database requires that the database is started, that a channel of communications over TCP/IP is open, and that a username and password for an account with privileges on the tables you wish to display is available.
To create a new XTM:
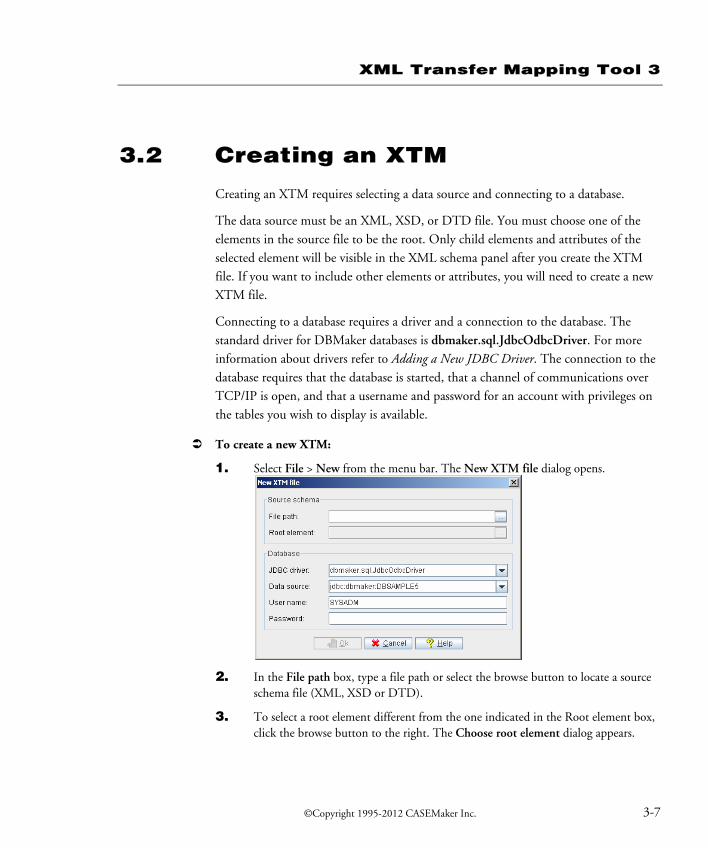
1. Select File > New from the menu bar. The New XTM file dialog opens.
2. In the File path box, type a file path or select the browse button to locate a source schema file (XML, XSD or DTD).
3. To select a root element different from the one indicated in the Root element box, click the browse button to the right. The Choose root element dialog appears.
DBMaker XML Tool User's Guide1
4. Select the element you want to be the root from the tree. Double-click an element in the tree to expand the node and see its child elements.
5. Click Ok.
6. In the Database box, select a JDBC driver and a data source from the menus.
7. Enter the User name and password of an account on the database.
8. Click Ok. The selected XML schema and database tables will appear in the XML Schema Panel and Database Schema panel, respectively.
To open an existing XTM:
1. Select File > Open from the menu bar.
2. Select the XSL file that you want to open using the file chooser.
3. In the File path box, type a file path or select the browse button to locate a source schema file (XML, XSD or DTD).
4. To select a root element different from the one indicated in the Root element box, click the browse button to the right. The Choose root element dialog appears.
5. Select the element you want to be the root from the tree. Double-click an element in the tree to expand the node and see its child elements.
6. Click Ok.
7. In the Database box, select a JDBC driver and a data source from the menus.
8. Enter the User name and password of an account on the database.
9. Click Ok.. The selected XML schema and database tables will appear in the XML Schema Panel and Database Schema panel, respectively.
Adding a New JDBC Driver
It may be necessary to use a different JDBC driver than the ones provided. It is possible to connect to databases provided by different vendors as long as the JDBC driver is present. The XTM tool provides this function through the Options menu. It is not necessary to have an XTM open to add a new driver.
You may also edit or remove drivers that you have added. The default drivers cannot be removed or edited.
©Copyright 1995-2012 CASEMaker Inc. 3-8

1XML Transfer Mapping Tool 3
©Copyright 1995-2012 CASEMaker Inc. 3-9
To add a new JDBC driver
1. Select Options > JDBC Drivers from the menu bar. The JDBC Drivers window opens.
2. Click Add. The JDBC driver detail dialog opens.
3. Type a class name and prefix for data source into the appropriate text boxes.
4. Type a class path or click the browse button to navigate to the location of the driver.
5. Click Ok.
6. The new driver will appear in the list of JDBC drivers. Click Ok.

DBMaker XML Tool User's Guide1
3.3 Mapping xpath statements to XTM object nodes
After creating a new XTM, the next step is to create a map between the nodes in the XML schema and the database tables. First you will need to add database tables to the XTM object tree, then you will need to add XML schema paths to properly map from the address in the XML schema where the data is located.
To create the structure of the XTM object tree, drag-and-drop tables from the database into the desired location in the XTM object tree. The first node must be dropped onto the root node; subsequent nodes can be dropped into the root node or any other node that represents a table. Tables cannot be dropped into a node representing a column. When you drop a table, it will appear in the XTM column with all of the columns visible.
After the XTM object tree structure is complete, drag-and-drop nodes from the XML schema panel onto the desired node in the XTM object tree. A statement will appear in the xpath column that corresponds to the xpath representation of the element or attribute address in the XML schema. Furthermore, xpath statements will be preceded by a data property if the are numerical or binary data types. A data property statement will not precede character data types. The xpath data property and corresponding data types are summarized in Table 3-1
XPATH DATA PROPERTY SQL DATA TYPE
Char
Varchar
Longvarchar
Longvarbinary
File
Nchar
Character data
Nvarchar
©Copyright 1995-2012 CASEMaker Inc. 3-10

1XML Transfer Mapping Tool 3
©Copyright 1995-2012 CASEMaker Inc. 3-11
XPATH DATA PROPERTY SQL DATA TYPE
Nclob
Serial
Smallint
Int
Float
Double
Numerical data
Decimal
Binary
Date
Time
Normalize-space (binary) data
Timestamp
Table 3-1: xpath data properties and corresponding SQL data types
To build the structure of an XTM:
1. Create a new XTM or open an existing XTM:
2. Drag-and-drop the table that you want to import data to from the Database schema panel to the xtm column of the XTM editing panel.

DBMaker XML Tool User's Guide1
3. Drag-and drop the elements or attributes to the XTM nodes that you want to map the data to. The xpath statement appears in the xpath column.
©Copyright 1995-2012 CASEMaker Inc. 3-12

1XML Transfer Mapping Tool 3
©Copyright 1995-2012 CASEMaker Inc. 3-13
4. When you are finished, click File > Save.
5. Browse to the folder where you want to store the XTM and type a file name. The file will automatically be saved with the extension .XSL.
DBMaker XML Tool User's Guide1
3.4 Executing an XTM
After creating the XTM and saving it as an XSL file, you can pass data from the source XML file to the database by executing the XTM. When executing the XTM, you can choose to save the data as an XSL file and run the XTM, or save the transformation as an SQL script. Saving as an SQL script will not enter any data into the database. You must execute the script to enter the data into the database.
If you are trying to automate data transfer using a data transfer API or stored procedure, then you should save the transformation as an XSL file.
Saving an XTM as an SQL Script
Saving an XTM as an SQL script allows you to create an SQL script that will perform the same operation on the database as executing the XTM file, only it stores the equivalent SQL commands in a script file. This method will not actually store any data in the database. Be sure to save the XTM as an XSL file before performing this operation, as it will not save either XML data or the transformation other than in the form of the SQL script.
To execute an XTM and save output as an SQL script:
1. Click Operations > Run. The Execute XTM window will appear.
2. Click Save as SQL Script.
3. In the Save as SQL Script box, enter the full path and file name for the XSL file, or select a file and path by clicking the browse button.
4. In the Source XML box, enter a full path and file name for the XML file to import data from, or select a file and path by clicking the browse button.
5. Click OK. The XTM Tool will create an SQL script. You can run the SQL script from the dmSQL prompt or using the JDBA tool to enter data into the database.
Example:
SQL script output: INSERT INTO DELPHI.CHINESE (ID,TEXT) VALUES (?,?);
©Copyright 1995-2012 CASEMaker Inc. 3-14
1XML Transfer Mapping Tool 3
©Copyright 1995-2012 CASEMaker Inc. 3-15
1,'lobdir1\clobfile0.txt'; 2,'lobdir1\clobfile1.txt'; 3,'lobdir1\clobfile2.txt'; 4,'lobdir1\clobfile3.txt'; 5,'lobdir1\clobfile4.txt'; …
Saving an XTM as an XSL File and Executing
Saving the XTM as an XSL file and executing performs the same operation as the XTM API or stored procedure. Executing the XTM file allows you to find errors in a transformation before you have automated it, and allows you to test the output for a given transformation to ensure that it produces the desired result.
To execute an XTM and save output as an XSL file:
1. Click Operations > Run. The Execute XTM window will appear.
2. Click Save as XTM and run.
3. In the Save as XTM and Run box, enter the full path and file name for the XSL file, or select a file and path by clicking the browse button.
4. In the Source XML box, enter a full path and file name for the XML file to import data from, or select a file and path by clicking the browse button.
5. Click OK. The XTM Tool will create an XSL file and add new data to the selected tables in the database.
Example:
XSL output: <?xml version="1.0" encoding="UTF-8"?> <xsl:stylesheet xmlns:xsl="http://www.w3.org/1999/XSL/Transform" version="1.0" xmlns:xtm="dbmaker.xml.xtm.XMLTransferMap" extension-element-prefixes="xtm"> <xsl:template match="/"> <xtm:connect driver="dbmaker.sql.JdbcOdbcDriver" datasource="jdbc:dbmaker:DBNAME"> <xtm:table owner="DELPHI" name="CHINESE" select="/root/CHINESE"> <xtm:column name="ID" select="number(@ID)"/> <xtm:column name="TEXT" select="@TEXT"/> </xtm:table> </xtm:connect> </xsl:template> </xsl:stylesheet>
DBMaker XML Tool User's Guide1
©Copyright 1995-2012 CASEMaker Inc. 3-16

1XTM API Functions 4
©Copyright 1995-2012 CASEMaker Inc. 4-1
4 XTM API Functions
After you have created an XTM file you are ready to automate the transfer process. The XTM API allows you to automate the process. DBMaker provides four XTM Transfer APIs; the XTM API in C, the XTM API in Java, and the XTM API stored procedure.
The XTM API requires a few common objects to process:
Source XML file – the data source for XTM is kept in an XML file.
XTM file – the file specifies how to retrieve data from source XML and save into the database.
In addition, the following properties may be requires depending on how you choose to implement the API:
Database connection – you may optionally pass the JDBC/ODBC connection to the XTM engine . If specified, then it will use this connection and ignore the element ‘xtm:connect’ in the XTM file. A JDBC connection can be established using a JDBC driver provided by one of several vendors, but an ODBC connection should use the DBMaker ODBC connection handle.
User name – the user name for database connection. In some cases, you might not want to add the user name to ‘xtm:connect’. Alternatively, you may pass the user name when processing XTM file. If specified, then the user name in the XTM file be used instead of the one in ‘xtm:connect’.
Password – the password used to log into the database. Like the user name, you may pass the password to the XTM engine in an API argument.

DBMaker XML Tool User's Guide1
The search rule for a database connection in XTM processing is:
1. The connection details are passed in the setConnection method.
2. Connection with the user/password passed in the setUser / setPassword method.
3. Connection information is specified in <xtm:connect> in the XTM file.
If the same property is set more than once before calling the run method, then only the last input value will be used.
©Copyright 1995-2012 CASEMaker Inc. 4-2

1XTM API Functions 4
©Copyright 1995-2012 CASEMaker Inc. 4-3
4.1 XTM API in Java
The XTM processor also provides the Java class dbmaker.xml.XTM.
Public methods:
CONSTRUCTOR :
Constructs a XTM object.
Syntax XTM( )
SETCONNECTION
Sets the database connection. This functions accepts the java.sql.Connection object as an argument. The connection can be established via the DBMaker JDBC driver or a JDBC driver from other vender.
Syntax void setConnection( Connection conn );
ARGUMENT INPUT/OUTPUT DESCRIPTION
conn Input Object of Class java.sql.Connection (cannot be null).

DBMaker XML Tool User's Guide1
SETUSER
Sets the user for a database connection.
Syntax void setUser ( String user);
ARGUMENT INPUT/OUTPUT DESCRIPTION
user Input User name
SETPASSWORD
Sets the user’s password for a database connection.
Syntax void setPassword ( String password );
ARGUMENT INPUT/OUTPUT DESCRIPTION
password Input Password used for database connection
©Copyright 1995-2012 CASEMaker Inc. 4-4

1XTM API Functions 4
©Copyright 1995-2012 CASEMaker Inc. 4-5
SETPARAMETER
Set parameter for XSL processor. Parameter value will be available during XTM processing. It can be referenced in the syntax as $parameter_name.
Syntax void setParameters ( String name, Object value );
ARGUMENT INPUT/OUTPUT DESCRIPTION
name Input Parameter name. Parameter name is a qualified name as a two-part string, the namespace URI enclosed in curly braces ({}), followed by the local name. If the name has a null URL, the String only contain the local name. An application can safely check for a non-null URI by testing to see if the first character of the name is a '{' character. For example, if a URI and local name were obtained from an element defined with <xyz:foo xmlns:xyz="http://xyz.foo.com/yada/baz.html"/>, then the qualified name would be "{http://xyz.foo.com/yada/baz.html}foo". Note that no prefix is used.
value Input The parameter value.

DBMaker XML Tool User's Guide1
GETERROR
If return code from run() is not SUCCESS, then use this method to get the error message. If no error, then this method will return NULL.
Syntax String getError();
RUN
The method run() will transform the XTM content. The XTM itself is actually an XSL file. The XTM engine is an extension of the Apache Xalan XSLT processor. The transformer will transform the source XML file according to the specification in the XTM file.
Syntax int run ( String xtmfile, String xmlfile);
ARGUMENT INPUT/OUTPUT DESCRIPTION
xtmfile Input XTM filename. It cannot be null.
xmlfile Input Source XML filename. It cannot be null.
RETURNS DESCRIPTION
SUCCESS Engine successfully processed source XML file with XTM specification.
©Copyright 1995-2012 CASEMaker Inc. 4-6
1XTM API Functions 4
©Copyright 1995-2012 CASEMaker Inc. 4-7
RETURNS DESCRIPTION
ERR_XTM_PROCESS Possible reasons for XTM process errors include:
XSTL process error – XTM or source XML file is not valid XML, or the XTM is not a valid XSL file.
XTM syntax error.
SQL Error The SQL command produced an error.
Example: /* create new XTM object */ XTM transfer = new XTM(); /* start transformation */ int rc = transfer.run(xtm, xml); /* check if process fails. if so, getError for error detail. */ if ( rc != 0 ) { System.out.println(transfer.getError()+"\n"); }
DBMaker XML Tool User's Guide1
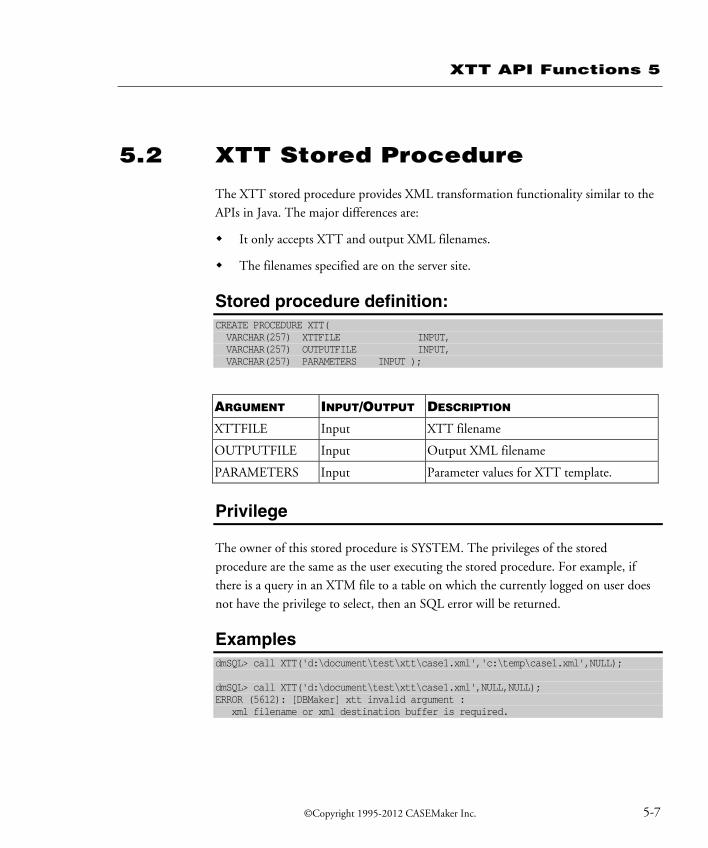
4.2 XTM Stored Procedure
The XTM stored procedure provides an XTM transformation function similar to the Java APIs. The main differences are
It only accepts XTM and source XML filenames.
It only uses a current database connection.
The filenames specified will be on the server site.
Stored procedure definition:
Syntax CREATE PROCEDURE XTM( VARCHAR(257) XTMFILE INPUT, VARCHAR(257) XMLFILE INPUT );
ARGUMENT INPUT/OUTPUT DESCRIPTION
XTMFILE Input XTM filename
XMLFILE Input Source XML filename
Privilege
The owner of this stored procedure is SYSTEM. The privileges of the stored procedure are the same as the user executing the stored procedure. For example, if there is an insert statement in an XTM file to a table on which the user does not have the privilege to insert, then an SQL error will be returned.
Example dmSQL> call XTM('c:\temp\case1.xsl ','c:\temp\case1.xml');
©Copyright 1995-2012 CASEMaker Inc. 4-8
1XTT API Functions 5
©Copyright 1995-2012 CASEMaker Inc. 5-1
5 XTT API Functions
The XTT API is provided by DBMaker for automating the output of XML data from the database to files or a location in memory. APIs are provided in Java, and also in the form of a stored procedure. A few common properties are required for XTT to process:
Database connection - either with a connection string or pre-connected handle.
XTT - either the XTT filename or XTT content in memory buffer.
Output XML - either the XML filename or a pre-allocated buffer for output XML content.
Parameters - a string with the parameter values for the template file. The string might contain several pairs of parameter names and values. Each pair is separated by comma. The text on the left of the equal sign is the name of parameter, on the right is the value. The values may be enclosed by doubles quote or single quotes. For example, "student_id='10012',class_id='103'".

DBMaker XML Tool User's Guide1
5.1 XTT API in Java
Public methods:
CONSTRUCTOR AND DESTRUCTOR: XTT( )
Constructs a XTT object. finalize ( )
Before destroying a XTT object.
SETDATABASECONNECTION
This function sets the database connection.
Syntax int setDatabaseConnection( dbmaster.sql.JdbcOdbcConnection handle )
ARGUMENT INPUT/OUTPUT DESCRIPTION
conn Input DBMaker jdbc connection object (cannot be null).
©Copyright 1995-2012 CASEMaker Inc. 5-2

1XTT API Functions 5
©Copyright 1995-2012 CASEMaker Inc. 5-3
RETURNS
SUCCESS Setting the database connection with hdbc will always return SUCCESS. If setting the database connection with a connection string, it will try to connect using the connection specified, and will return SUCCESS if successful.
SQLConnect Error The function will return this string if setting the database connection with a connection string fails.
SETXTT
Sets the XTT filename or content.
Syntax void setXtt( String xttFileName );
ARGUMENT INPUT/OUTPUT DESCRIPTION
xttFileName Input XTT filename
void setXtt( byte [] xttValue );
ARGUMENT INPUT/OUTPUT DESCRIPTION
xttValue Input Byte array with XTT content.
SETOUTPUTXML
Sets the output XML filename or a memory buffer for output content.
Syntax void setOutputXml( String xmlFileName );
DBMaker XML Tool User's Guide1
ARGUMENT INPUT/OUTPUT DESCRIPTION
xmlFileName Input Output XML filename
void setOutputXml( byte [] xmlValue );
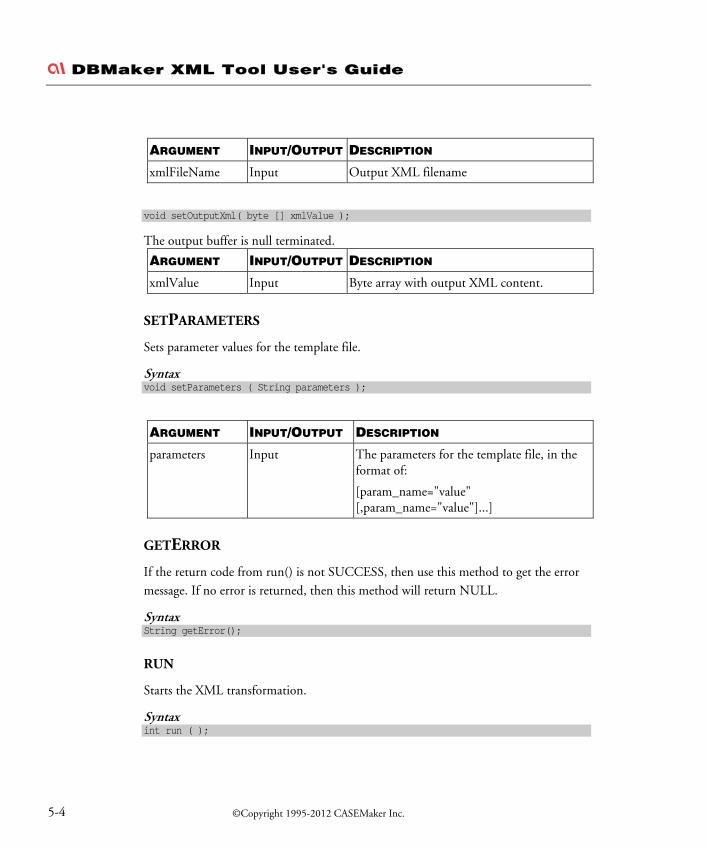
The output buffer is null terminated.
ARGUMENT INPUT/OUTPUT DESCRIPTION
xmlValue Input Byte array with output XML content.
SETPARAMETERS
Sets parameter values for the template file.
Syntax void setParameters ( String parameters );
ARGUMENT INPUT/OUTPUT DESCRIPTION
parameters Input The parameters for the template file, in the format of:
[param_name="value" [,param_name="value"]...]
GETERROR
If the return code from run() is not SUCCESS, then use this method to get the error message. If no error is returned, then this method will return NULL.
Syntax String getError();
RUN
Starts the XML transformation.
Syntax int run ( );
©Copyright 1995-2012 CASEMaker Inc. 5-4

1XTT API Functions 5
©Copyright 1995-2012 CASEMaker Inc. 5-5
RETURNS DESCRIPTION
SUCCESS Transformation successful.
ERR_XTT_INV_ARG Missing required arguments/properties for XTT engine to process. For example, no XTT filename or XTT content is set.
ERR_XTT_XERCES_PARSER Error returned by apache xerces parser. XTT is not in valid XML format.
ERR_XTT_INV_SYNTAX Invalid XTT syntax. Possible causes:
No recognized xtt element or attribute.
Not exactly one user-defined element in xtt:template element.
<xtt:attribute> is declared after any user-defined element in its parent.
<xtt:parameter> is declared after a user-defined element under <xtt:template>
Missing required attribute.
ERR_XTT_PROCESS XTT process errors:
Failed to create folder or file.
Invalid variable references.
SQL Error An SQL error occurred during processing.
DBMaker XML Tool User's Guide1
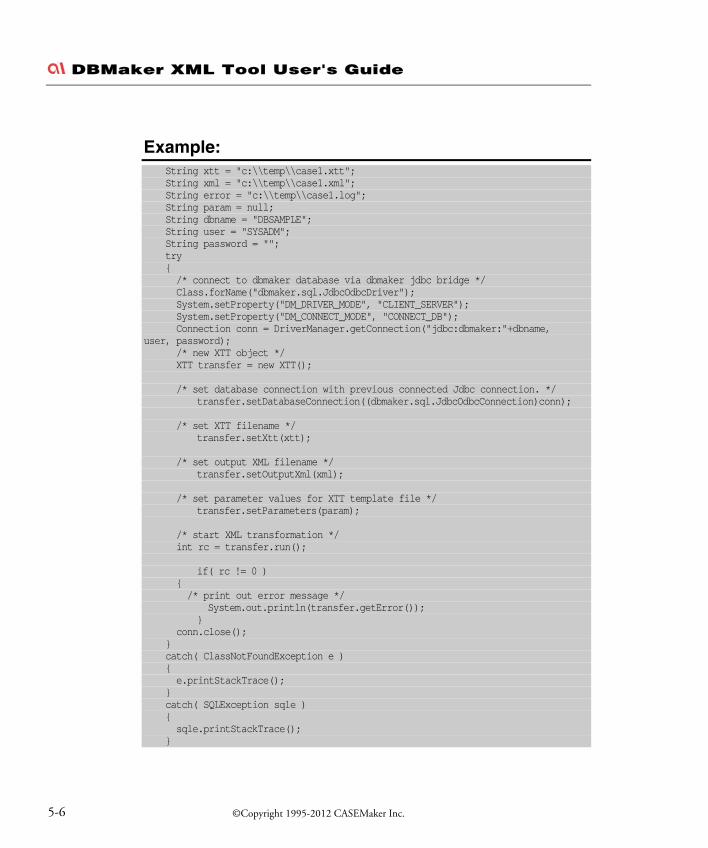
Example: String xtt = "c:\\temp\\case1.xtt"; String xml = "c:\\temp\\case1.xml"; String error = "c:\\temp\\case1.log"; String param = null; String dbname = "DBSAMPLE"; String user = "SYSADM"; String password = ""; try { /* connect to dbmaker database via dbmaker jdbc bridge */ Class.forName("dbmaker.sql.JdbcOdbcDriver"); System.setProperty("DM_DRIVER_MODE", "CLIENT_SERVER"); System.setProperty("DM_CONNECT_MODE", "CONNECT_DB"); Connection conn = DriverManager.getConnection("jdbc:dbmaker:"+dbname, user, password); /* new XTT object */ XTT transfer = new XTT(); /* set database connection with previous connected Jdbc connection. */ transfer.setDatabaseConnection((dbmaker.sql.JdbcOdbcConnection)conn); /* set XTT filename */ transfer.setXtt(xtt); /* set output XML filename */ transfer.setOutputXml(xml); /* set parameter values for XTT template file */ transfer.setParameters(param); /* start XML transformation */ int rc = transfer.run(); if( rc != 0 ) { /* print out error message */ System.out.println(transfer.getError()); } conn.close(); } catch( ClassNotFoundException e ) { e.printStackTrace(); } catch( SQLException sqle ) { sqle.printStackTrace(); }
©Copyright 1995-2012 CASEMaker Inc. 5-6
1XTT API Functions 5
©Copyright 1995-2012 CASEMaker Inc. 5-7
5.2 XTT Stored Procedure
The XTT stored procedure provides XML transformation functionality similar to the APIs in Java. The major differences are:
It only accepts XTT and output XML filenames.
The filenames specified are on the server site.
Stored procedure definition: CREATE PROCEDURE XTT( VARCHAR(257) XTTFILE INPUT, VARCHAR(257) OUTPUTFILE INPUT, VARCHAR(257) PARAMETERS INPUT );
ARGUMENT INPUT/OUTPUT DESCRIPTION
XTTFILE Input XTT filename
OUTPUTFILE Input Output XML filename
PARAMETERS Input Parameter values for XTT template.
Privilege
The owner of this stored procedure is SYSTEM. The privileges of the stored procedure are the same as the user executing the stored procedure. For example, if there is a query in an XTM file to a table on which the currently logged on user does not have the privilege to select, then an SQL error will be returned.
Examples dmSQL> call XTT('d:\document\test\xtt\case1.xml','c:\temp\case1.xml',NULL); dmSQL> call XTT('d:\document\test\xtt\case1.xml',NULL,NULL); ERROR (5612): [DBMaker] xtt invalid argument : xml filename or xml destination buffer is required.
DBMaker XML Tool User's Guide1
©Copyright 1995-2012 CASEMaker Inc. 5-8