Embed Size (px)
Citation preview
Rev. 1.2 12/15 Copyright © 2015 by Silicon Laboratories Si53108
Si53108
DB800ZL 8-OUTPUT PCIE GEN 3 BUFFER/ZERO DELAY BUFFER
Features
Applications
Description
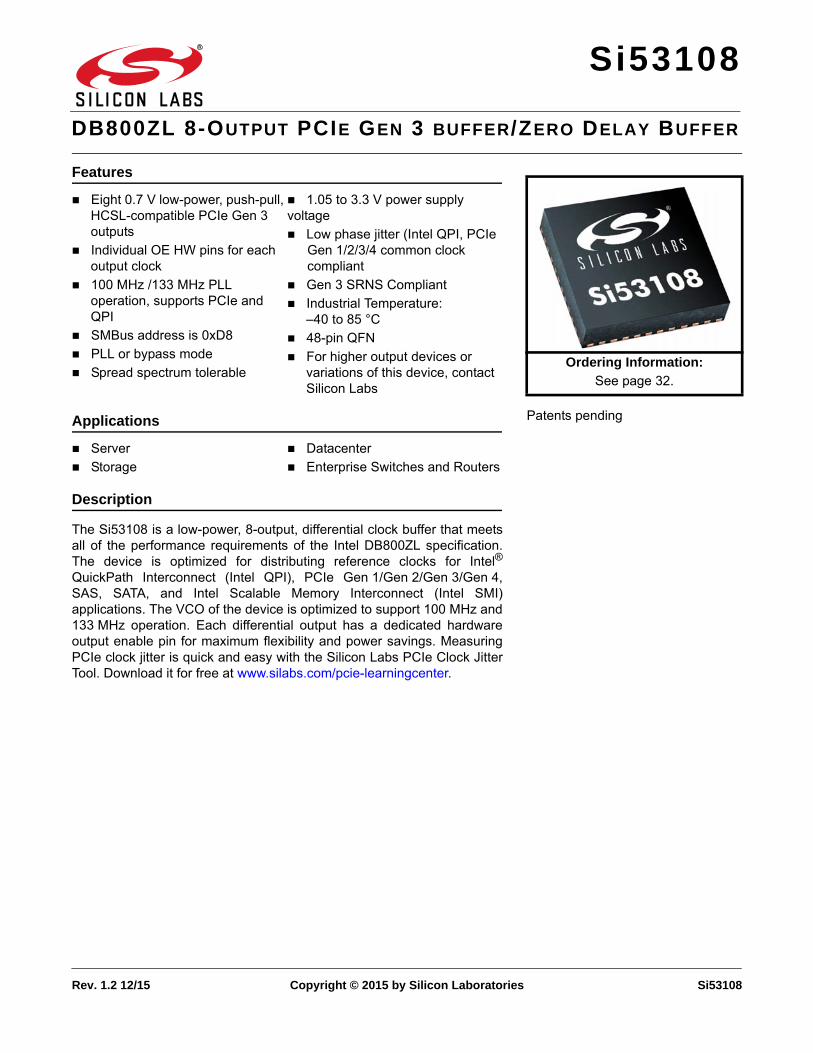
The Si53108 is a low-power, 8-output, differential clock buffer that meetsall of the performance requirements of the Intel DB800ZL specification.The device is optimized for distributing reference clocks for Intel®
QuickPath Interconnect (Intel QPI), PCIe Gen 1/Gen 2/Gen 3/Gen 4,SAS, SATA, and Intel Scalable Memory Interconnect (Intel SMI)applications. The VCO of the device is optimized to support 100 MHz and133 MHz operation. Each differential output has a dedicated hardwareoutput enable pin for maximum flexibility and power savings. MeasuringPCIe clock jitter is quick and easy with the Silicon Labs PCIe Clock JitterTool. Download it for free at www.silabs.com/pcie-learningcenter.
Eight 0.7 V low-power, push-pull, HCSL-compatible PCIe Gen 3 outputs
Individual OE HW pins for each output clock
100 MHz /133 MHz PLL operation, supports PCIe and QPI
SMBus address is 0xD8
PLL or bypass mode
Spread spectrum tolerable
1.05 to 3.3 V power supply voltage
Low phase jitter (Intel QPI, PCIe Gen 1/2/3/4 common clock compliant
Gen 3 SRNS Compliant
Industrial Temperature:–40 to 85 °C
48-pin QFN
For higher output devices or variations of this device, contact Silicon Labs
Server
Storage
Datacenter
Enterprise Switches and Routers
Patents pending
Ordering Information:
See page 32.

Si53108
2 Rev. 1.2
Functional Block Diagram
FB_OUT
DIF_[7:0]SSC CompatiblePLL
Control Logic
SCLSDA
PWRGD / PWRDN
HBW_BYPASS_LBW
100M_133
CLK_IN
CLK_IN
OE_[7:0]8

Si53108
Rev. 1.2 3
TABLE OF CONTENTS
Section Page
1. Electrical Specifications . . . . . . . . . . . . . . . . . . . . . . . . . . . . . . . . . . . . . . . . . . . . . . . . . . . . . . . . . 42. Functional Description . . . . . . . . . . . . . . . . . . . . . . . . . . . . . . . . . . . . . . . . . . . . . . . . . . . . . . . . . . 14
2.1. CLK_IN, CLK_IN . . . . . . . . . . . . . . . . . . . . . . . . . . . . . . . . . . . . . . . . . . . . . . . . . . . . . . . . . . 142.2. OE and Output Enables (Control Registers) . . . . . . . . . . . . . . . . . . . . . . . . . . . . . . . . . . . . . 142.3. 100M_133M—Frequency Selection . . . . . . . . . . . . . . . . . . . . . . . . . . . . . . . . . . . . . . . . . . . 142.4. PWRGD/PWRDN . . . . . . . . . . . . . . . . . . . . . . . . . . . . . . . . . . . . . . . . . . . . . . . . . . . . . . . . . 152.5. HBW_BYPASS_LBW . . . . . . . . . . . . . . . . . . . . . . . . . . . . . . . . . . . . . . . . . . . . . . . . . . . . . . 172.6. SMBUS Address . . . . . . . . . . . . . . . . . . . . . . . . . . . . . . . . . . . . . . . . . . . . . . . . . . . . . . . . . . 172.7. Miscellaneous Requirements . . . . . . . . . . . . . . . . . . . . . . . . . . . . . . . . . . . . . . . . . . . . . . . . 17
3. Test and Measurement Setup . . . . . . . . . . . . . . . . . . . . . . . . . . . . . . . . . . . . . . . . . . . . . . . . . . . . 193.1. Input Edge . . . . . . . . . . . . . . . . . . . . . . . . . . . . . . . . . . . . . . . . . . . . . . . . . . . . . . . . . . . . . . . 193.2. Termination of Differential Outputs . . . . . . . . . . . . . . . . . . . . . . . . . . . . . . . . . . . . . . . . . . . . 20
4. Control Registers . . . . . . . . . . . . . . . . . . . . . . . . . . . . . . . . . . . . . . . . . . . . . . . . . . . . . . . . . . . . . . 214.1. Byte Read/Write . . . . . . . . . . . . . . . . . . . . . . . . . . . . . . . . . . . . . . . . . . . . . . . . . . . . . . . . . . 214.2. Block Read/Write . . . . . . . . . . . . . . . . . . . . . . . . . . . . . . . . . . . . . . . . . . . . . . . . . . . . . . . . . 224.3. Control Registers . . . . . . . . . . . . . . . . . . . . . . . . . . . . . . . . . . . . . . . . . . . . . . . . . . . . . . . . . 23
5. Power Filtering Example . . . . . . . . . . . . . . . . . . . . . . . . . . . . . . . . . . . . . . . . . . . . . . . . . . . . . . . . 285.1. Ferrite Bead Power Filtering . . . . . . . . . . . . . . . . . . . . . . . . . . . . . . . . . . . . . . . . . . . . . . . . . 28
6. Pin Descriptions: 48-Pin QFN . . . . . . . . . . . . . . . . . . . . . . . . . . . . . . . . . . . . . . . . . . . . . . . . . . . . 297. Ordering Guide . . . . . . . . . . . . . . . . . . . . . . . . . . . . . . . . . . . . . . . . . . . . . . . . . . . . . . . . . . . . . . . . 328. Package Outline . . . . . . . . . . . . . . . . . . . . . . . . . . . . . . . . . . . . . . . . . . . . . . . . . . . . . . . . . . . . . . . 339. Land Pattern . . . . . . . . . . . . . . . . . . . . . . . . . . . . . . . . . . . . . . . . . . . . . . . . . . . . . . . . . . . . . . . . . . 35Document Change List . . . . . . . . . . . . . . . . . . . . . . . . . . . . . . . . . . . . . . . . . . . . . . . . . . . . . . . . . . . . 37

Si53108
4 Rev. 1.2
1. Electrical Specifications
Table 1. Absolute Maximum Ratings
Parameter Symbol Min Max Unit
3.3 V Core Supply Voltage1 VDD/VDD_A — 4.6 V
3.3 V I/O Supply Voltage1 VDD_IO — 4.6 V
3.3 V Input High Voltage1,2 VIH — 4.6 V
3.3 V Input Low Voltage1 VIL −0.5 — V
Storage Temperature1 ts –65 150 °C
Input ESD protection3 ESD 2000 — V
Notes:1. Consult manufacturer regarding extended operation in excess of normal DC operating parameters. 2. Maximum VIH is not to exceed maximum VDD.3. Human body model.
Table 2. DC Operating Characteristics VDD_A = 3.3 V±5%, VDD = 3.3 V±5%
Parameter Symbol Test Condition Min Max Unit
3.3 V Core Supply Voltage VDD/VDD_A 3.3 V ±5% 3.135 3.465 V
3.3 V Input High Voltage VIH VDD 2.0 VDD+0.3 V
3.3 V Input Low Voltage VIL VSS-0.3 0.8 V
Input Leakage Current1 IIL 0 < VIN < VDD –5 +5 µA
3.3 V Input High Voltage2 VIH_FS VDD 0.7 VDD+0.3 V
3.3 V Input Low Voltage2 VIL_FS VSS–0.3 0.35 V
3.3 V Input Low Voltage VIL_Tri 0 0.8 V
3.3 V Input Med Voltage VIM_Tri 1.2 1.8 V
3.3 V Input High Voltage VIH_Tri 2.2 VDD V
3.3 V Output High Voltage3 VOH IOH = –1 mA 2.4 — V
3.3 V Output Low Voltage3 VOL IOL = 1 mA — 0.4 V
Input Capacitance4 CIN 2.5 4.5 pF
DIFF_IN Capacitance CDIF_IN 1.5 2.7 pF
Output pin Capacitance COUT 6 pF
Output Capacitance4 COUT 2.5 4.5 pF
Pin Inductance LPIN — 7 nH
Ambient Temperature TA No Airflow –40 85 °C
Notes:1. Input Leakage Current does not include inputs with pull-up or pull-down resistors. Inputs with resistors should state
current requirements.2. Internal voltage reference is to be used to guarantee VIH_FS and VIL_FS thresholds levels over full operating range.3. Signal edge is required to be monotonic when transitioning through this region.4. Ccomp capacitance based on pad metallization and silicon device capacitance. Not including pin capacitance.

Si53108
Rev. 1.2 5
Table 3. Clock Input ParametersTA = –40 to 85 °C; supply voltage VDD = 3.3 V ±5%
Parameter Symbol Test Condition Min Typ Max Unit
Input Frequency FIN Bypass Mode 33 — 150 MHz
PLL Mode, 100 MHz 90 100 110 MHz
PLL Mode, 133.33 MHz 120 133.33 147 MHz
Input High Voltage- CLK_IN VIHDIF Differential inputssingle-ended measurement
600 800 1150 mV
Input Low Voltage- CLK_IN VILDIF Differential inputssingle-ended measurement
VSS –300 0 300 mV
Input Common Mode Voltage - CLK_IN
VCOM Common Mode Voltage Input 300 — 1000 mV
Input Amplitude- CLK_IN VSwing Peak to Peak 300 — 1450
Input Slew Rate- CLK_IN IDDVDDAPD Measured differentially 0.4 — 8 V/ns
Input Leakage Current IIN VIN = VDD, VIN = GND –5 — 5 A
Input Duty Cycle dtin Measured from differential waveform
45 — 55 %
Input Jitter, Cycle-Cycle JDIFIN Differential measurement 0 — 125 ps
Input SS Modulation Fre-quency
fMODIN Triangle Wave Modulation 30 — 33 kHz
Table 4. Current ConsumptionTA = –40 to 85 °C; supply voltage VDD = 3.3 V ±5%
Parameter Symbol Test Condition Min Typ Max Unit
Operating Current IDDVDD 133 MHz, VDD Rail — 79 90 mA
IDDVDDA 133 MHz, VDDA + VDDR, PLL Mode — 14 20 mA
Power Down Current IDDVDDPD Power Down, VDD Rail — 1 1.5 mA
IDDVDDAPD Power Down, VDDA Rail — 4 8 mA

Si53108
6 Rev. 1.2
Table 5. Output Relational Timing ParametersTA = –40 to 85 °C; supply voltage VDD = 3.3 V ±5%
Parameter Test Condition Min TYP Max Unit Notes
CLK_IN, DIF[x:0] Input-to-Output Delay in PLL ModeNominal Value
–100 20 100 ps 1,2,4,5
CLK_IN, DIF[x:0] Input-to-Output Delay in Bypass ModeNominal Value
2.5 3.3 4.5 ns 2,3,5
CLK_IN, DIF[x:0] Input-to-Output Delay Variation in PLL mode (over voltage and temperature)Nominal Value
–100 39 100 ps 2,3,5
CLK_IN, DIF[x:0] Input-to-Output Delay Variation in Bypass Mode (over voltage and temperature)Nominal Value
–250 250 ps 2,3,5
CLK_IN, DIF[7:0] Output-to-Output Skew across all 12 out-puts (Common to Bypass and PLL mode)
0 25 50 ps 1,2,3,5
Notes:1. Measured into fixed 2 pF load cap. Input-to-output skew is measured at the first output edge following the
corresponding input.2. Measured from differential cross-point to differential cross-point.3. All Bypass Mode Input-to-Output specs refer to the timing between an input edge and the specific output edge created
by it.4. This parameter is deterministic for a given device.5. Measured with scope averaging on to find mean value
Table 6. PLL Bandwidth and PeakingTA = –40 to 85 °C; supply voltage VDD = 3.3 V ±5%
Parameter Test Condition Min TYP Max Unit Notes
PLL Jitter Peaking HBW_BYPASS_LBW = 0 — 0.4 2.0 dB 2
PLL Jitter Peaking HBW_BYPASS_LBW = 1 — 0.1 2.0 dB 2
PLL Bandwidth HBW_BYPASS_LBW = 1 2 3 4 MHz 1
PLL Bandwidth HBW_BYPASS_LBW = 0 0.7 1 1.4 MHz 1
Notes:1. Measured at 3 db down or half power point.2. Measured as maximum pass band gain. At frequencies with the loop BW, highest point of magnification is call PLL
jitter peaking.
Si53108
Rev. 1.2 7
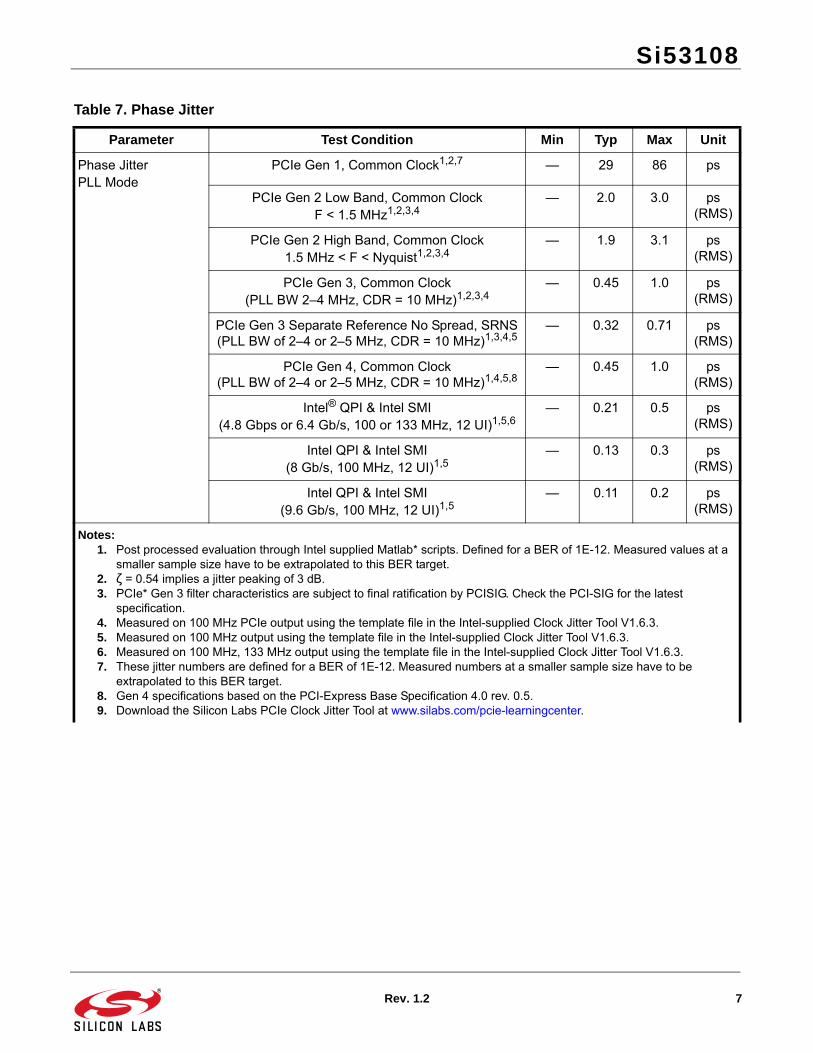
Table 7. Phase Jitter
Parameter Test Condition Min Typ Max Unit
Phase JitterPLL Mode
PCIe Gen 1, Common Clock1,2,7 — 29 86 ps
PCIe Gen 2 Low Band, Common ClockF < 1.5 MHz1,2,3,4
— 2.0 3.0 ps (RMS)
PCIe Gen 2 High Band, Common Clock1.5 MHz < F < Nyquist1,2,3,4
— 1.9 3.1 ps (RMS)
PCIe Gen 3, Common Clock(PLL BW 2–4 MHz, CDR = 10 MHz)1,2,3,4
— 0.45 1.0 ps (RMS)
PCIe Gen 3 Separate Reference No Spread, SRNS (PLL BW of 2–4 or 2–5 MHz, CDR = 10 MHz)1,3,4,5
— 0.32 0.71 ps (RMS)
PCIe Gen 4, Common Clock (PLL BW of 2–4 or 2–5 MHz, CDR = 10 MHz)1,4,5,8
— 0.45 1.0 ps (RMS)
Intel® QPI & Intel SMI (4.8 Gbps or 6.4 Gb/s, 100 or 133 MHz, 12 UI)1,5,6
— 0.21 0.5 ps (RMS)
Intel QPI & Intel SMI (8 Gb/s, 100 MHz, 12 UI)1,5
— 0.13 0.3 ps (RMS)
Intel QPI & Intel SMI (9.6 Gb/s, 100 MHz, 12 UI)1,5
— 0.11 0.2 ps (RMS)
Notes:1. Post processed evaluation through Intel supplied Matlab* scripts. Defined for a BER of 1E-12. Measured values at a
smaller sample size have to be extrapolated to this BER target. 2. ζ = 0.54 implies a jitter peaking of 3 dB. 3. PCIe* Gen 3 filter characteristics are subject to final ratification by PCISIG. Check the PCI-SIG for the latest
specification.4. Measured on 100 MHz PCIe output using the template file in the Intel-supplied Clock Jitter Tool V1.6.3.5. Measured on 100 MHz output using the template file in the Intel-supplied Clock Jitter Tool V1.6.3.6. Measured on 100 MHz, 133 MHz output using the template file in the Intel-supplied Clock Jitter Tool V1.6.3.7. These jitter numbers are defined for a BER of 1E-12. Measured numbers at a smaller sample size have to be
extrapolated to this BER target.8. Gen 4 specifications based on the PCI-Express Base Specification 4.0 rev. 0.5.9. Download the Silicon Labs PCIe Clock Jitter Tool at www.silabs.com/pcie-learningcenter.

Si53108
8 Rev. 1.2
Additive Phase JitterBypass Mode
PCIe Gen 11,2,7 — 10 — ps
PCIe Gen 2 Low BandF < 1.5 MHz1,2,3,4
— 1.2 — ps (RMS)
PCIe Gen 2 High Band1.5 MHz < F < Nyquist1,2,3,4
— 1.3 — ps (RMS)
PCIe Gen 3(PLL BW 2–4 MHz, CDR = 10 MHz)1,2,3,4
— 0.25 — ps (RMS)
PCIe Gen 4, Common Clock (PLL BW of 2–4 or 2–5 MHz, CDR = 10 MHz)1,4,5,8
— 0.25 — ps (RMS)
Intel QPI & Intel® SMI(4.8 Gbps or 6.4 Gb/s, 100 or 133 MHz, 12 UI)1,5,6
— 0.12 — ps (RMS)
Intel QPI & Intel® SMI(8 Gb/s, 100 MHz, 12 UI)1,5
— 0.1 — ps (RMS)
Intel QPI & Intel® SMI(9.6 Gb/s, 100 MHz, 12 UI)1,5
— 0.09 — ps (RMS)
Table 7. Phase Jitter (Continued)
Notes:1. Post processed evaluation through Intel supplied Matlab* scripts. Defined for a BER of 1E-12. Measured values at a
smaller sample size have to be extrapolated to this BER target. 2. ζ = 0.54 implies a jitter peaking of 3 dB. 3. PCIe* Gen 3 filter characteristics are subject to final ratification by PCISIG. Check the PCI-SIG for the latest
specification.4. Measured on 100 MHz PCIe output using the template file in the Intel-supplied Clock Jitter Tool V1.6.3.5. Measured on 100 MHz output using the template file in the Intel-supplied Clock Jitter Tool V1.6.3.6. Measured on 100 MHz, 133 MHz output using the template file in the Intel-supplied Clock Jitter Tool V1.6.3.7. These jitter numbers are defined for a BER of 1E-12. Measured numbers at a smaller sample size have to be
extrapolated to this BER target.8. Gen 4 specifications based on the PCI-Express Base Specification 4.0 rev. 0.5.9. Download the Silicon Labs PCIe Clock Jitter Tool at www.silabs.com/pcie-learningcenter.

Si53108
Rev. 1.2 9
Table 8. DIF 0.7 V AC Timing Characteristics (Non-Spread Spectrum Mode)
Parameter Symbol CLK 100 MHz, 133 MHz Unit Notes
Min Typ Max
Clock Stabilization Time TSTAB — — 1.8 ms 22
Long Term Accuracy LACC — — 100 ppm 4,8,16
Absolute Host CLK Period (100 MHz) TABS 9.94900 — 10.05100 ns 4,5,8
Absolute Host CLK Period (133 MHz) TABS 7.44925 — 7.55075 ns 4,5,8
Edge _rate Edge _rate 1.0 — 4.0 V/ns 2,4,8
Rise/Fall Matching TRISE_MAT/TFALL_MAT
— — 20 % 4,7,19,21
Voltage High (typ 0.7 V) VHIGH 660 — 850 mV 3,8, 12
Voltage Low (typ 0.0 V) VLOW –150 — 150 mV 4,7,11
Maximum Voltage VMAX — — 1150 mV 7
Absolute Crossing Point Voltages VCROSS(abs)
300 — 550 mV 1,3,4,7,14
Total Variation of Vcross Over All Edges
Total ∆ VCROSS
— — 140 mV 4,7,15
Cycle-to-Cycle Jitter TCCJITTER — 50 ps 4,8,20
Duty Cycle Duty Cycle 45 — 55 % 4,8
Maximum Voltage (Overshoot) Vovs — — VHigh + 0.3 V 4,7,12
Maximum Voltage (Undershoot) Vuds — — VLow – 0.3 V 4,7,13
Si53108
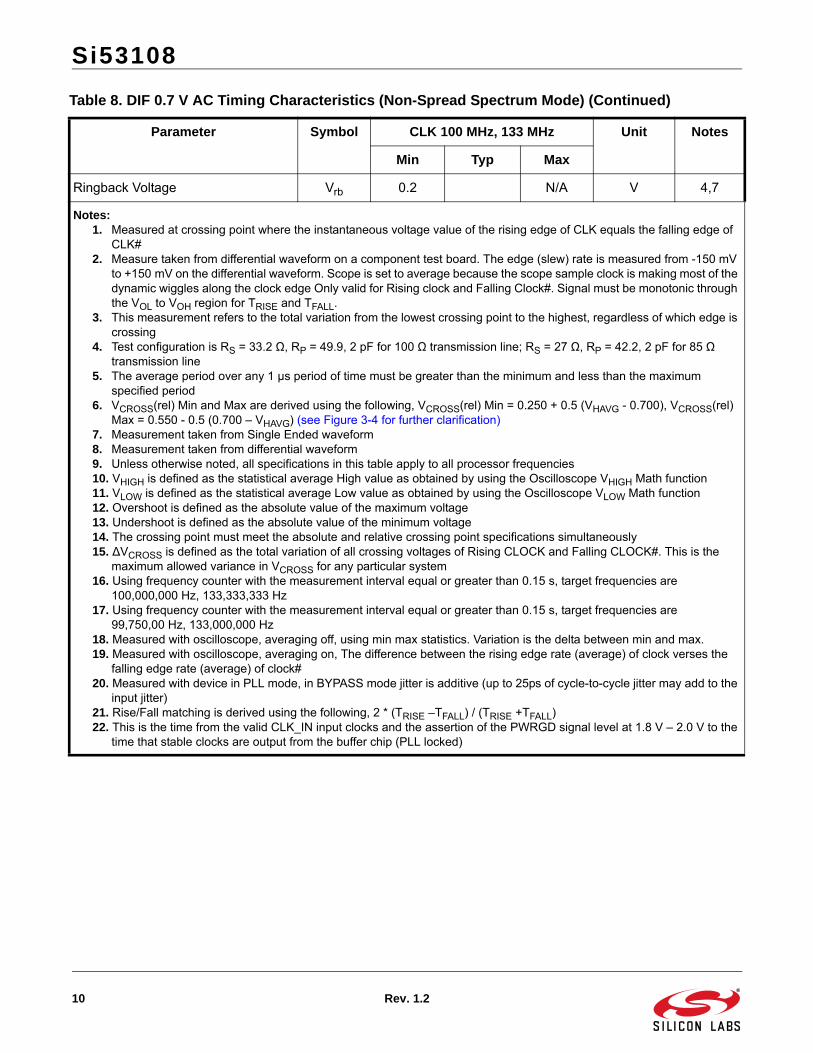
10 Rev. 1.2
Ringback Voltage Vrb 0.2 N/A V 4,7
Notes:1. Measured at crossing point where the instantaneous voltage value of the rising edge of CLK equals the falling edge of
CLK#2. Measure taken from differential waveform on a component test board. The edge (slew) rate is measured from -150 mV
to +150 mV on the differential waveform. Scope is set to average because the scope sample clock is making most of the dynamic wiggles along the clock edge Only valid for Rising clock and Falling Clock#. Signal must be monotonic through the VOL to VOH region for TRISE and TFALL.
3. This measurement refers to the total variation from the lowest crossing point to the highest, regardless of which edge is crossing
4. Test configuration is RS = 33.2 Ω, RP = 49.9, 2 pF for 100 Ω transmission line; RS = 27 Ω, RP = 42.2, 2 pF for 85 Ω transmission line
5. The average period over any 1 μs period of time must be greater than the minimum and less than the maximum specified period
6. VCROSS(rel) Min and Max are derived using the following, VCROSS(rel) Min = 0.250 + 0.5 (VHAVG - 0.700), VCROSS(rel) Max = 0.550 - 0.5 (0.700 – VHAVG) (see Figure 3-4 for further clarification)
7. Measurement taken from Single Ended waveform8. Measurement taken from differential waveform9. Unless otherwise noted, all specifications in this table apply to all processor frequencies10. VHIGH is defined as the statistical average High value as obtained by using the Oscilloscope VHIGH Math function11. VLOW is defined as the statistical average Low value as obtained by using the Oscilloscope VLOW Math function12. Overshoot is defined as the absolute value of the maximum voltage13. Undershoot is defined as the absolute value of the minimum voltage14. The crossing point must meet the absolute and relative crossing point specifications simultaneously15. ∆VCROSS is defined as the total variation of all crossing voltages of Rising CLOCK and Falling CLOCK#. This is the
maximum allowed variance in VCROSS for any particular system16. Using frequency counter with the measurement interval equal or greater than 0.15 s, target frequencies are
100,000,000 Hz, 133,333,333 Hz17. Using frequency counter with the measurement interval equal or greater than 0.15 s, target frequencies are
99,750,00 Hz, 133,000,000 Hz18. Measured with oscilloscope, averaging off, using min max statistics. Variation is the delta between min and max.19. Measured with oscilloscope, averaging on, The difference between the rising edge rate (average) of clock verses the
falling edge rate (average) of clock#20. Measured with device in PLL mode, in BYPASS mode jitter is additive (up to 25ps of cycle-to-cycle jitter may add to the
input jitter)21. Rise/Fall matching is derived using the following, 2 * (TRISE –TFALL) / (TRISE +TFALL)22. This is the time from the valid CLK_IN input clocks and the assertion of the PWRGD signal level at 1.8 V – 2.0 V to the
time that stable clocks are output from the buffer chip (PLL locked)
Table 8. DIF 0.7 V AC Timing Characteristics (Non-Spread Spectrum Mode) (Continued)
Parameter Symbol CLK 100 MHz, 133 MHz Unit Notes
Min Typ Max

Si53108
Rev. 1.2 11
Table 9. DIF 0.7 V AC Timing Characteristics (–0.5% Spread Spectrum Mode)
Parameter Symbol CLK 100 MHz, 133 MHz Unit Notes
Min Typ Max
Clock Stabilization Time TSTAB — 1.8 ms 22
Long Term Accuracy LACC — 100 ppm 4,8,16
Absolute Host CLK Period (100 MHz) TABS 9.94900 10.10126 ns 4,5,8
Absolute Host CLK Period (133 MHz) TABS 7.44925 7.58845 ns 4,5,8
Edge _rate Edge _rate 1.0 4.0 V/ns 2,4,8
Rise/Fall Matching TRISE_MAT/TFALL_MAT
— 20 % 4,7,19,21
Voltage High (typ 0.70 V) VHIGH 660 850 mV 4,7,10
Voltage Low (typ 0.0 V) VLOW –150 150 mV 4,7,11
Maximum Voltage VMAX — 1150 mV 7
Absolute Crossing Point Voltages VCROSS(abs)
300 550 mV 1,3,4,7,14
Relative Crossing Point Voltages VCROSS(rel)
Calc Calc mV 4,6,7,14
Total Variation of Vcross Over All Edges
Total ∆ VCROSS
— 140 mV 4,7,15
Cycle-to-Cycle Jitter TCCJITTER 50 ps 4,8,20
Duty Cycle Duty Cycle 45 55 % 4,8
Maximum Voltage (Overshoot) Vovs — VHigh + 0.3 V 4,7,12
Maximum Voltage (Undershoot) Vuds — VLow – 0.3 V 4,7,13

Si53108
12 Rev. 1.2
Ringback Voltage Vrb 0.2 N/A V 4,7
Notes:1. Measured at crossing point where the instantaneous voltage value of the rising edge of CLK equals the falling edge of
CLK#2. Measure taken from differential waveform on a component test board. The edge (slew) rate is measured from -150 mV
to +150 mV on the differential waveform. Scope is set to average because the scope sample clock is making most of the dynamic wiggles along the clock edge Only valid for Rising clock and Falling Clock#. Signal must be monotonic through the VOL to VOH region for TRISE and TFALL.
3. This measurement refers to the total variation from the lowest crossing point to the highest, regardless of which edge is crossing
4. Test configuration is RS = 33.2 Ω, RP = 49.9, 2 pF for 100 Ω transmission line; RS = 27 Ω, RP = 42.2, 2 pF for 85 Ω transmission line
5. The average period over any 1 μs period of time must be greater than the minimum and less than the maximum specified period
6. VCROSS(rel) Min and Max are derived using the following, VCROSS(rel) Min = 0.250 + 0.5 (VHAVG - 0.700), VCROSS(rel) Max = 0.550 - 0.5 (0.700 – VHAVG) (see Figure 3-4 for further clarification)
7. Measurement taken from Single Ended waveform8. Measurement taken from differential waveform9. Unless otherwise noted, all specifications in this table apply to all processor frequencies10. VHIGH is defined as the statistical average High value as obtained by using the Oscilloscope VHIGH Math function11. VLOW is defined as the statistical average Low value as obtained by using the Oscilloscope VLOW Math function12. Overshoot is defined as the absolute value of the maximum voltage13. Undershoot is defined as the absolute value of the minimum voltage14. The crossing point must meet the absolute and relative crossing point specifications simultaneously15. ∆VCROSS is defined as the total variation of all crossing voltages of Rising CLOCK and Falling CLOCK#. This is the
maximum allowed variance in VCROSS for any particular system16. Using frequency counter with the measurement interval equal or greater than 0.15 s, target frequencies are
100,000,000 Hz, 133,333,333 Hz17. Using frequency counter with the measurement interval equal or greater than 0.15 s, target frequencies are
99,750,00 Hz, 133,000,000 Hz18. Measured with oscilloscope, averaging off, using min max statistics. Variation is the delta between min and max.19. Measured with oscilloscope, averaging on, The difference between the rising edge rate (average) of clock verses the
falling edge rate (average) of clock#20. Measured with device in PLL mode, in BYPASS mode jitter is additive (up to 25ps of cycle-to-cycle jitter may add to the
input jitter)21. Rise/Fall matching is derived using the following, 2 * (TRISE –TFALL) / (TRISE +TFALL)22. This is the time from the valid CLK_IN input clocks and the assertion of the PWRGD signal level at 1.8 V – 2.0 V to the
time that stable clocks are output from the buffer chip (PLL locked)
Table 9. DIF 0.7 V AC Timing Characteristics (–0.5% Spread Spectrum Mode) (Continued)
Parameter Symbol CLK 100 MHz, 133 MHz Unit Notes
Min Typ Max

Si53108
Rev. 1.2 13
Table 10. Clock Periods Differential Clock Outputs with SSC Disabled
SSC ON
Center Freq, MHz
Measurement Window Unit
1 Clock 1 µs 0.1 s 0.1 s 0.1 s 1 µs 1 Clock
–C–C Jitter
AbsPer Min
–SSC
Short Term AVG
Min
–ppm Long
Term AVG Min
0 ppm Period
Nominal
+ppm Long
Term AVG Max
+SSC Short
Term AVG Max
+C-C Jitter
AbsPer Max
100.00 9.94900 9.99900 10.00000 10.00100 10.05100 ns
133.33 7.44925 7.49925 7.50000 7.50075 7.55075 ns
Table 11. Clock Periods Differential Clock Outputs with SSC Enabled
SSC ON
Center Freq, MHz
Measurement Window Unit
1 Clock 1 µs 0.1 s 0.1 s 0.1 s 1 µs 1 Clock
–C–C Jitter
AbsPer Min
–SSC
Short Term AVG
Min
–ppm Long
Term AVG Min
0 ppm Period
Nominal
+ppm Long
Term AVG Max
+SSC Short
Term AVG Max
+C-C Jitter
AbsPer Max
99.75 9.94900 9.99900 10.02406 10.02506 10.02607 10.05126 10.10126 ns
133.33 7.44925 7.49925 7.51805 7.51880 7.51955 7.53845 7.58845 ns
Si53108
14 Rev. 1.2
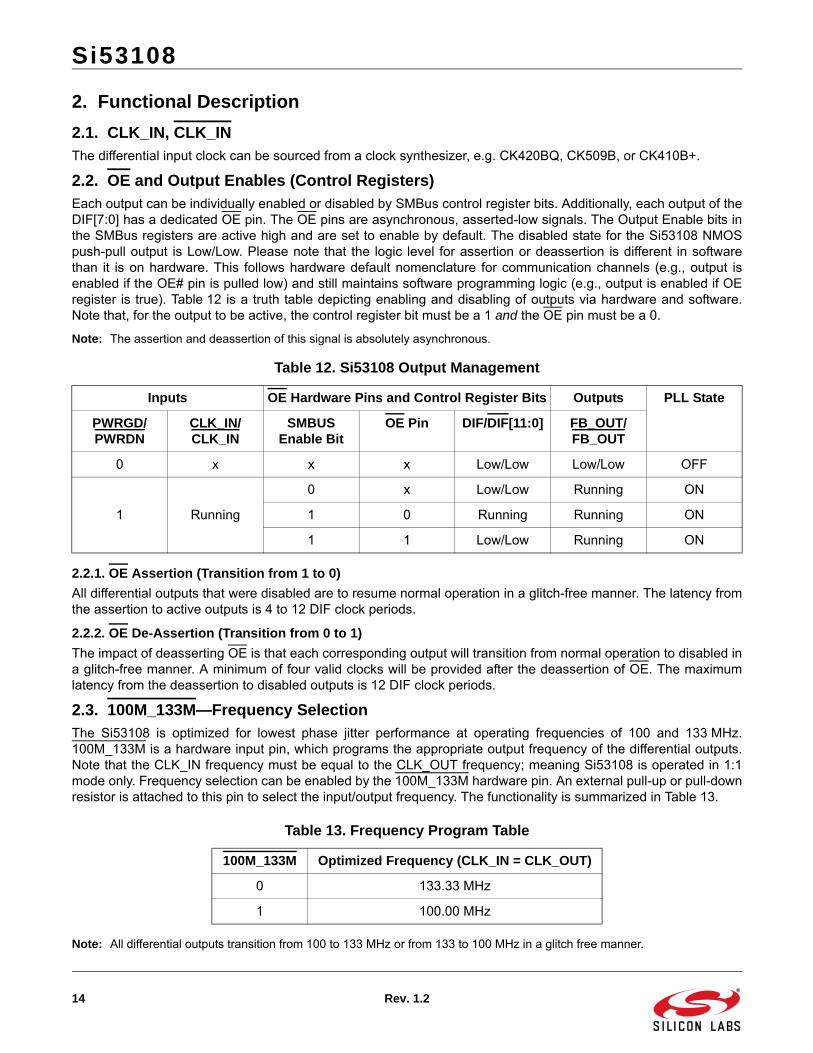
2. Functional Description
2.1. CLK_IN, CLK_INThe differential input clock can be sourced from a clock synthesizer, e.g. CK420BQ, CK509B, or CK410B+.
2.2. OE and Output Enables (Control Registers)Each output can be individually enabled or disabled by SMBus control register bits. Additionally, each output of theDIF[7:0] has a dedicated OE pin. The OE pins are asynchronous, asserted-low signals. The Output Enable bits inthe SMBus registers are active high and are set to enable by default. The disabled state for the Si53108 NMOSpush-pull output is Low/Low. Please note that the logic level for assertion or deassertion is different in softwarethan it is on hardware. This follows hardware default nomenclature for communication channels (e.g., output isenabled if the OE# pin is pulled low) and still maintains software programming logic (e.g., output is enabled if OEregister is true). Table 12 is a truth table depicting enabling and disabling of outputs via hardware and software.Note that, for the output to be active, the control register bit must be a 1 and the OE pin must be a 0.
Note: The assertion and deassertion of this signal is absolutely asynchronous.
2.2.1. OE Assertion (Transition from 1 to 0)
All differential outputs that were disabled are to resume normal operation in a glitch-free manner. The latency fromthe assertion to active outputs is 4 to 12 DIF clock periods.
2.2.2. OE De-Assertion (Transition from 0 to 1)
The impact of deasserting OE is that each corresponding output will transition from normal operation to disabled ina glitch-free manner. A minimum of four valid clocks will be provided after the deassertion of OE. The maximumlatency from the deassertion to disabled outputs is 12 DIF clock periods.
2.3. 100M_133M—Frequency SelectionThe Si53108 is optimized for lowest phase jitter performance at operating frequencies of 100 and 133 MHz.100M_133M is a hardware input pin, which programs the appropriate output frequency of the differential outputs.Note that the CLK_IN frequency must be equal to the CLK_OUT frequency; meaning Si53108 is operated in 1:1mode only. Frequency selection can be enabled by the 100M_133M hardware pin. An external pull-up or pull-downresistor is attached to this pin to select the input/output frequency. The functionality is summarized in Table 13.
Note: All differential outputs transition from 100 to 133 MHz or from 133 to 100 MHz in a glitch free manner.
Table 12. Si53108 Output Management
Inputs OE Hardware Pins and Control Register Bits Outputs PLL State
PWRGD/PWRDN
CLK_IN/CLK_IN
SMBUS Enable Bit
OE Pin DIF/DIF[11:0] FB_OUT/FB_OUT
0 x x x Low/Low Low/Low OFF
1 Running
0 x Low/Low Running ON
1 0 Running Running ON
1 1 Low/Low Running ON
Table 13. Frequency Program Table
100M_133M Optimized Frequency (CLK_IN = CLK_OUT)
0 133.33 MHz
1 100.00 MHz

Si53108
Rev. 1.2 15
2.4. PWRGD/PWRDNPWRGD is asserted high and deasserted low. Deassertion of PWRGD (pulling the signal low) is equivalent toindicating a power-down condition. PWRGD (assertion) is used by the Si53108 to sample initial configurations,such as frequency select condition and SA selections. After PWRGD has been asserted high for the first time, thepin becomes a PWRDN (Power Down) pin that can be used to shut off all clocks cleanly and instruct the device toinvoke power-saving mode. PWRDN is a completely asynchronous active low input. When entering power-savingmode, PWRDN should be asserted low prior to shutting off the input clock or power to ensure all clocks shut downin a glitch free manner. When PWRDN is asserted low, all clocks will be disabled prior to turning off the VCO. WhenPWRDN is deasserted high, all clocks will start and stop without any abnormal behavior and will meet all AC andDC parameters.
Note: The assertion and deassertion of PWRDN is absolutely asynchronous.
Warning: Disabling of the CLK_IN input clock prior to assertion of PWRDN is an undefined mode and not recommended. Operation in this mode may result in glitches, excessive frequency shifting, etc.
Table 14. PWRGD/PWRDN Functionality
PWRGD/PWRDN
DIF DIF
0 Low Low
1 Normal Normal

Si53108
16 Rev. 1.2
2.4.1. PWRDN Assertion
When PWRDN is sampled low by two consecutive rising edges of DIF, all differential outputs must be held LOW/LOW on the next DIF high-to-low transition.
Figure 1. PWRDN Assertion
2.4.2. PWRGD Assertion
The power-up latency is to be less than 1.8 ms. This is the time from a valid CLK_IN input clock and the assertionof the PWRGD signal to the time that stable clocks are output from the device (PLL locked). All differential outputsstopped in a LOW/LOW condition resulting from power down must be driven high in less than 300 µs of PWRDNdeassertion to a voltage greater than 200 mV.
Figure 2. PWRGD Assertion (Pwrdown—Deassertion)
PWRDWN
DIF
DIF
PWRGD
Tstable<1.8 ms
Tdrive_Pwrdn#<300 µs; > 200 mV
DIF
DIF

Si53108
Rev. 1.2 17
2.5. HBW_BYPASS_LBWThe HBW_BYPASS_LBW pin is a tri-level function input pin (refer to Table 15 for VIL_Tri, VIM_Tri, and VIH_Tri signallevels). It is used to select between PLL high-bandwidth, PLL bypass mode, or PLL low-bandwidth mode. In PLLbypass mode, the input clock is passed directly to the output stage, which may result in up to 50 ps of additivecycle-to-cycle jitter (50 ps + input jitter) on the differential outputs. In the case of PLL mode, the input clock ispassed through a PLL to reduce high-frequency jitter. The PLL HBW, BYPASS, and PLL LBW modes may beselected by asserting the HBW_BYPASS_LBW input pin to the appropriate level described in Table 15.
The Si53108 has the ability to override the latch value of the PLL operating mode from hardware strap pin 5 via theuse of Byte 0 and bits 2 and 1. Byte 0 bit 3 must be set to 1 to allow the user to change Bits 2 and 1, affecting thePLL. Bits 7 and 6 will always read back the original latched value. A warm reset of the system will have to beaccomplished if the user changes these bits.
2.6. SMBUS Address
2.7. Miscellaneous RequirementsData Transfer Rate: 100 kbps (standard mode) is the base functionality required. Fast mode (400 kbps)functionality is optional.
Logic Levels: SMBus logic levels are based on a percentage of VDD for the controller and other devices on thebus. Assume all devices are based on a 3.3 V supply.
Clock Stretching: The clock buffer must not hold/stretch the SCL or SDA lines low for more than 10 ms. Clockstretching is discouraged and should only be used as a last resort. Stretching the clock/data lines for longer thanthis time puts the device in an error/time-out mode and may not be supported in all platforms. It is assumed that alldata transfers can be completed as specified without the use of clock/data stretching.
General Call: It is assumed that the clock buffer will not have to respond to the “general call.”
Electrical Characteristics: All electrical characteristics must meet the standard mode specifications found inSection 3 of the SMBus 2.0 specification.
Pull-Up Resistors: Any internal resistor pull-ups on the SDATA and SCLK inputs must be stated in the individualdatasheet. The use of internal pull-ups on these pins of below 100 K is discouraged. Assume that the boarddesigner will use a single external pull-up resistor for each line and that these values are in the 5–6 k range.Assume one SMBus device per DIMM (serial presence detect), one SMBus controller, one clock buffer, one clockdriver plus one/two more SMBus devices on the platform for capacitive loading purposes.
Input Glitch Filters: Only fast mode SMBus devices require input glitch filters to suppress bus noise. The clockbuffer is specified as a standard mode device and is not required to support this feature. However, it is considered
Table 15. PLL Bandwidth and Readback Table
HBW_BYPASS_LBW Pin Mode Byte 0, Bit 7 Byte 0, Bit 6
L LBW 0 0
M BYPASS 0 1
H HBW 1 1
Table 16. SMBUS Address
Address LSB
1101100 +Read/Write

Si53108
18 Rev. 1.2
a good design practice to include the filters.
PWRDN: If a clock buffer is placed in PWRDN mode, the SDATA and SCLK inputs must be Tri-stated and thedevice must retain all programming information. IDD current due to the SMBus circuitry must be characterized andin the data sheet.

Si53108
Rev. 1.2 19
3. Test and Measurement Setup
3.1. Input EdgeInput edge rate is based on single-ended measurement. This is the minimum input edge rate at which the Si53108is guaranteed to meet all performance specifications.
3.1.1. Measurement Points for Differential
Figure 3. Measurement Points for Rise Time and Fall Time
Figure 4. Single-Ended Measurement Points for Vovs, Vuds, Vrb
Table 17. Input Edge Rate
Frequency Min Max Unit
100 MHz 0.35 N/A V/ns
133 MHz 0.35 N/A V/ns
+150 mV
-150 mV
Slew_rise
+150 mV
-150 mV
Slew_fall
0.0 V V_swing 0.0 V
Diff
Vovs
VHigh
Vrb
VLow
Vrb
Vuds

Si53108
20 Rev. 1.2
Figure 5. Differential (CLOCK–CLOCK) Measurement Points (Tperiod, Duty Cycle, Jitter)
3.2. Termination of Differential OutputsAll differential outputs are to be tested into a 100 or 85 differential impedance transmission line. Sourceterminated clocks have some inherent limitations as to the maximum trace length and frequencies that can besupported. For CPU outputs, a maximum trace length of 10” and a maximum of 200 MHz are assumed. For SRCclocks, a maximum trace length of 16” and maximum frequency of 100 MHz is assumed. For frequencies beyond200 MHz, trace lengths must be restricted to avoid signal integrity problems.
3.2.1. Termination of Differential NMOS Push-Pull Type Outputs
Figure 6. 0.7 V Configuration Test Load Board Termination for NMOS Push-Pull
Table 18. Differential Output Termination
Clock Board Trace Impedance Rs Rp Unit
DIFF Clocks—50 configuration 100 33+5% N/A
DIFF Clocks—43 configuration 85 27+5% N/A
TPeriod
Low Duty Cycle %High Duty Cycle %
Skew measurement point
0.000 V
T-Line10" Typical
T-Line10" Typical
Receiver
2 pF
2 pF
Source Terminated
Rs
Rs
Clock
Clock #
Si5
3108

Si53108
Rev. 1.2 21
4. Control Registers
4.1. Byte Read/WriteReading or writing a register in an SMBus slave device in byte mode always involves specifying the registernumber.
4.1.1. Byte Read
The standard byte read is as shown in Figure 7. It is an extension of the byte write. The write start condition isrepeated; then, the slave device starts sending data, and the master acknowledges it until the last byte is sent. Themaster terminates the transfer with a NAK, then a stop condition. For byte operation, the 2 x 7th bit of thecommand byte must be set. For block operations, the 2 x 7th bit must be reset. If the bit is not set, the next bytemust be the byte transfer count.
Figure 7. Byte Read Protocol
4.1.2. Byte Write
Figure 8 illustrates a simple, typical byte write. For byte operation, the 2 x 7th bit of the command byte must be set.For block operations, the 2 x 7th bit must be reset. If the bit is not set, the next byte must be the byte transfer count.The count can be between 1 and 32. It is not allowed to be zero or to exceed 32.
Figure 8. Byte Write Protocol
SlaveT Wr A Command Slave ARd Data Byte 0 N PA r
CommandstarTCondition
Byte Read Protocol
Acknowledgerepeat starT Not ack
stoPCondition
Register # to read
2 x 7 bit = 1
1 7 1 1 8 1 1 7 11 8 1 1
Master to
Slave to
SlaveT Wr A Command Data Byte 0A
Command
starT Condition
Byte Write Protocol
AcknowledgeRegister # to write
2 x 7 bit = 1
1 7 1 1 8 1 8 11
Master to
Slave to
A P
stoP Condition

Si53108
22 Rev. 1.2
4.2. Block Read/Write4.2.1. Block Read
After the slave address is sent with the R/W condition bit set, the command byte is sent with the MSB = 0. Theslave acknowledges the register index in the command byte. The master sends a repeat start function. After theslave acknowledges this, the slave sends the number of bytes it wants to transfer (>0 and <33). The masteracknowledges each byte except the last and sends a stop function.
Figure 9. Block Read Protocol
4.2.2. Block Write
After the slave address is sent with the R/W condition bit not set, the command byte is sent with the MSB = 0. Thelower seven bits indicate the register at which to start the transfer. If the command byte is 00h, the slave device willbe compatible with existing block mode slave devices. The next byte of a write must be the count of bytes that themaster will transfer to the slave device. The byte count must be greater than zero and less than 33. Following thisbyte are the data bytes to be transferred to the slave device. The slave device always acknowledges each bytereceived. The transfer is terminated after the slave sends the Ack and the master sends a stop function.
Figure 10. Block Write Protocol
SlaveT Wr A Command Code
CommandstarTCondition
Block Read Protocol
Acknowledgerepeat starTRegister # to
read2 x 7 bit = 1
1 7 1 1 8
Master to
Slave to
Slave ARdA r1 1 7 11
Data Byte A Data Byte 0 A Data Byte 1 N P8 1 8 1 8 1 1
Not acknowledgestoP Condition
Slave AddressT Wr A Command
Command bitstarTCondition
Block Write Protocol
AcknowledgeRegister # to write
2 x 7 bit = 0
1 7 1 1 8Master to
Slave toA1
Data Byte 0 A Data Byte 1 A P1 8 1 8 1 1
stoP Condition
Byte Count = 2 A8

Si53108
Rev. 1.2 23
4.3. Control Registers
Note: Byte 0, bit_[3:1] are BW PLL SW enable for the Si53108. Setting bit 3 to 1 allows the user to override the Latch valuefrom pin 5 via use of bits 2 and 1. Use the values from the PLL Operating Mode Readback Table. Note that Bits 7 and 6will keep the value originally latched on pin 5. A warm reset of the system will have to be accomplished if the userchanges these bits.
Table 19. Byte 0: Frequency Select, Output Enable, PLL Mode Control Register
Bit Description If Bit = 0 If Bit = 1 Type Default Output(s) Affected
0 100M_133M# Frequency Select
133 MHz 100 MHz R Latched at power up
DIF[11:0]
1 PLL Mode 0 See PLL Operating Mode Readback Table
RW 1
2 PLL Mode 1 RW 1
3 PLL Software Enable HW Latch SMBUS Control
RW 0
4 Reserved 0
5 Reserved 0
6 PLL Mode 0 See PLL Operating Mode Readback Table
R Latched at power up
7 PLL Mode 1 See PLL Operating Mode Readback Table
R Latched at power up

Si53108
24 Rev. 1.2
Table 20. Byte 1: Output Enable Control Register
Bit Description If Bit = 0 If Bit = 1 Type Default Output(s) Affected
0 Reserved 1
1 Output Enable DIF 0 Low/Low for Si53108
Enabled RW 1 DIF[0]
2 Output Enable DIF 1 Low/Low for Si53108
Enabled RW 1 DIF[1]
3 Reserved 1
4 Output Enable DIF 2 Low/Low for Si53108
Enabled RW 1 DIF[2]
5 Output Enable DIF 3 Low/Low for Si53108
Enabled RW 1 DIF[3]
6 Output Enable DIF 4 Low/Low for Si53108
Enabled RW 1 DIF[4]
7 Output Enable DIF 5 Low/Low for Si53108
Enabled RW 1 DIF[5]
Note: Output Control — “0” overrides OE pin.

Si53108
Rev. 1.2 25
Table 21. Byte 2: Output Enable Control Register
Bit Description If Bit = 0 If Bit = 1 Type Default Output(s) Affected
0 Output Enable for DIF 6 Low/Low Enabled RW 1 DIF[6]
1 Reserved 1
2 Output Enable for DIF 7 Low/Low Enabled RW 1 DIF[7]
3 Reserved 0
4 Reserved 0
5 Reserved 0
6 Reserved 0
7 Reserved 0
Table 22. Byte 3: Reserved Control Register
Bit Description If Bit = 0 If Bit = 1 Type Default Output(s) Affected
0 Reserved 0
1 Reserved 0
2 Reserved 0
3 Reserved 0
4 Reserved 0
5 Reserved 0
6 Reserved 0
7 Reserved 0

Si53108
26 Rev. 1.2
Table 23. Byte 4: Reserved Control Register
Bit Description If Bit = 0 If Bit = 1 Type Default Output(s) Affected
0 Reserved 0
1 Reserved 0
2 Reserved 0
3 Reserved 0
4 Reserved 0
5 Reserved 0
6 Reserved 0
7 Reserved 0
Table 24. Byte 5: Vendor/Revision Identification Control Register
Bit Description If Bit = 0 If Bit = 1 Type Default Default
0 Vendor ID Bit 0 R Vendor Specific 0
1 Vendor ID Bit 1 R Vendor Specific 0
2 Vendor ID Bit 2 R Vendor Specific 0
3 Vendor ID Bit 3 R Vendor Specific 1
4 Revision Code Bit 0 R Vendor Specific 0
5 Revision Code Bit 1 R Vendor Specific 0
6 Revision Code Bit 2 R Vendor Specific 0
7 Revision Code Bit 3 R Vendor Specific 0
Table 25. Byte 6: Device ID Control Register
Bit Description If Bit = 0 If Bit = 1 Type Default Default
0 Device ID 0 R 1 0
1 Device ID 1 R 1 0
2 Device ID 2 R 1 0
3 Device ID 3 R 0 0
4 Device ID 4 R 0 0
5 Device ID 5 R 1 0
6 Device ID 6 R 1 0
7 Device ID 7 (MSB) R 1 0

Si53108
Rev. 1.2 27
Table 26. Byte 7: Byte Count Register
Bit Description If Bit = 0 If Bit = 1 Type Default Output(s) Affected
0 BC0 - Writing to this register con-figures how many bytes will be
read back
RW 0
1 BC1 -Writing to this register con-figures how many bytes will be
read back
RW 0
2 BC2 -Writing to this register con-figures how many bytes will be
read back
RW 0
3 BC3 -Writing to this register con-figures how many bytes will be
read back
RW 1
4 BC4 -Writing to this register con-figures how many bytes will be
read back
RW 0
5 Reserved 0
6 Reserved 0
7 Reserved 0

Si53108
28 Rev. 1.2
5. Power Filtering Example
5.1. Ferrite Bead Power FilteringSilicon Labs recommends using a ferrite bead with characteristics matching Murata BLM15EG221SN1.
Figure 11. Recommended Si53108 Power Filtering
Si53108
Rev. 1.2 29
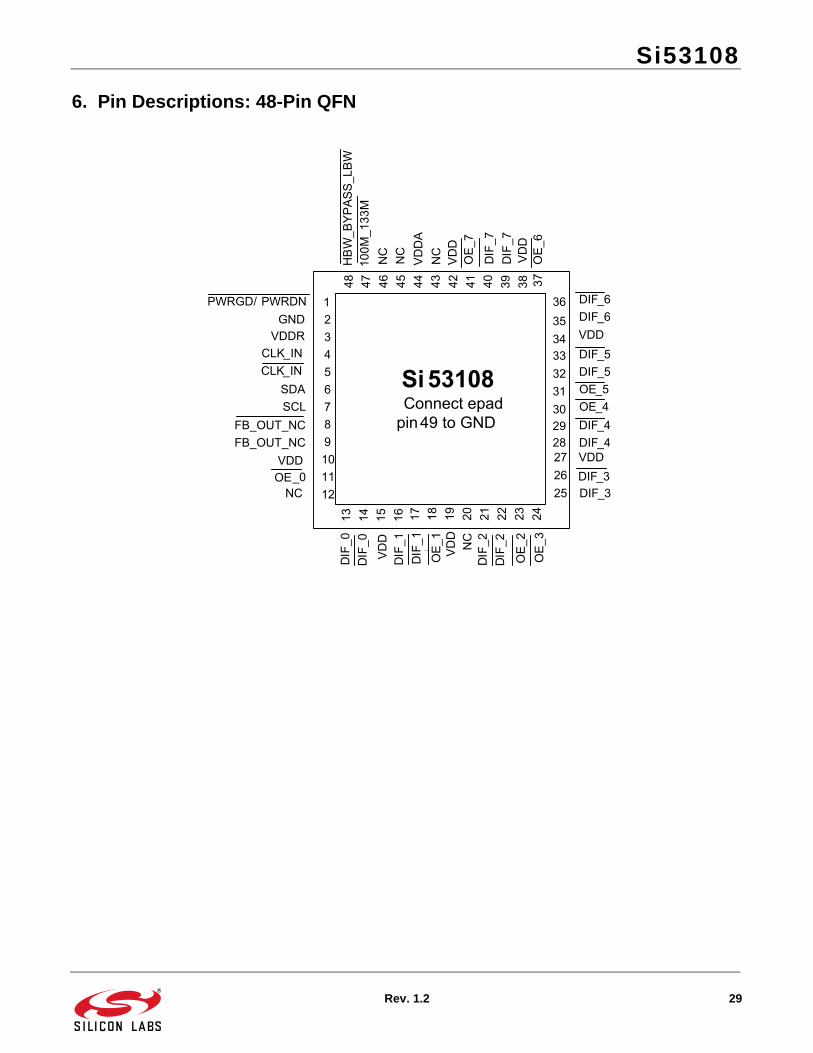
6. Pin Descriptions: 48-Pin QFN
Si53108Connect epadpin49 to GND
23456789101112
13 14 15 16
1
VDDA
NC
100M_133M
HBW_BYPASS_LBW
PWRGD/ PWRDNGND
VDD
CLK_INCLK_IN
SDASCL
FB_OUT_NCFB_OUT_NC
DIF_7
DIF_7
OE_7
OE_6
DIF_6DIF_6
NC
VDD
DIF_5DIF_5OE_5OE_4DIF_4DIF_4
48 47 46 45 44 43 42 41 40 39 38 37
36353433
VDD
18 19 20 21 22 23 24
2526272829303132
17
DIF_0
DIF_0
OE
OE_1
DIF_1
DIF_1
VDD
DIF_2
DIF_2
OE_2
OE_3
DIF_3DIF_3
VDDR
VDD
NC
VDD
VDD
NCNC
_0

Si53108
30 Rev. 1.2
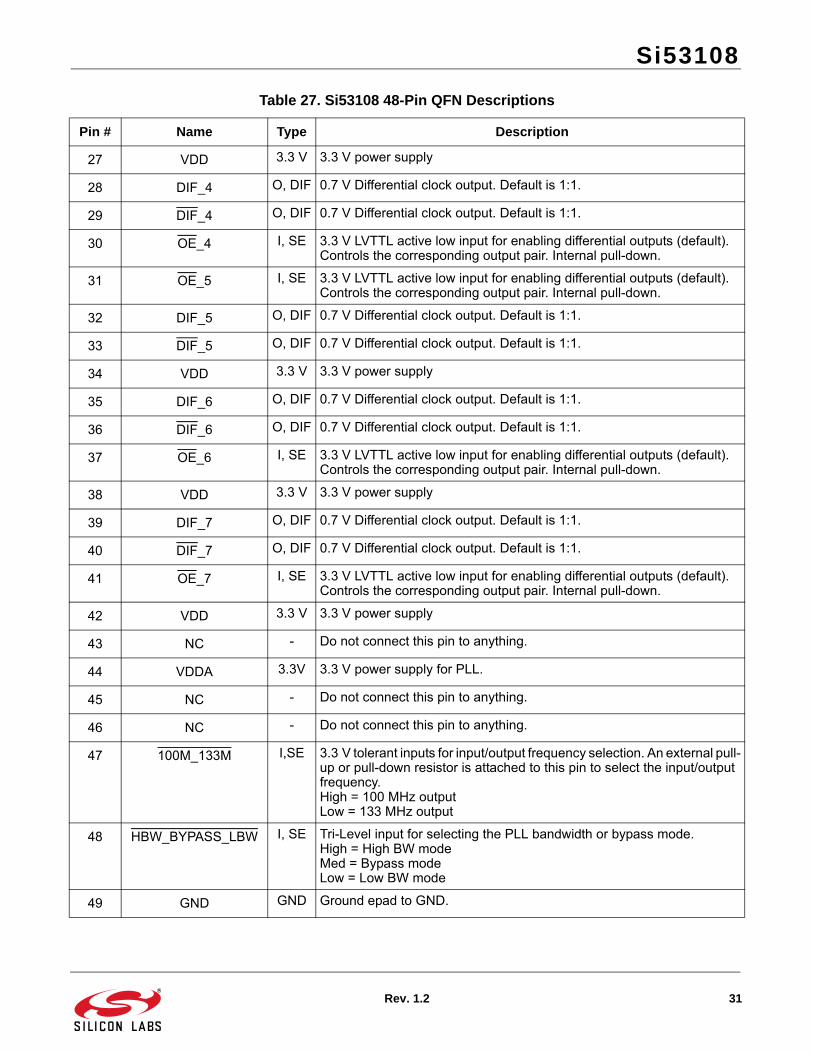
Table 27. Si53108 48-Pin QFN Descriptions
Pin # Name Type Description
1 PWRGD/PWRDN I 3.3 V LVTTL input to power up or power down the device.
2 GND GND Connect this pin to ground.
3 VDDR VDD 3.3 V power supply for differential input receiver. This VDDR should be treated as an analog power rail and filtered appropriately.
4 CLK_IN I, DIF 0.7 V Differential input.
5 CLK_IN I, DIF 0.7 V Differential input.
6 SDA I/O Open collector SMBus data.
7 SCL I/O SMBus slave clock input.
8 FB_OUT_NC I/O No connect. There are active signals on pin 8 and 9, do not connect anything to these pins.
9 FB_OUT_NC I/O No connect. There are active signals on pin 8and 9, do not connect anything to these pins.
10 VDD 3.3 V 3.3 V power supply
11 OE_0 I, SE 3.3 V LVTTL active low input for enabling differential outputs (default). Controls the corresponding output pair. Internal pull-down.
12 NC - Do not connect this pin to anything.
13 DIF_0 O, DIF 0.7 V Differential clock output. Default is 1:1.
14 DIF_0 O, DIF 0.7 V Differential clock output. Default is 1:1.
15 VDD 3.3 V 3.3 V power supply for outputs.
16 DIF_1 O, DIF 0.7 V Differential clock output. Default is 1:1.
17 DIF_1 O, DIF 0.7 V Differential clock output. Default is 1:1.
18 OE_1 I, SE 3.3 V LVTTL active low input for enabling differential outputs (default). Controls the corresponding output pair. Internal pull-down.
19 VDD 3.3 V 3.3 V power supply
20 NC - Do not connect this pin to anything.
21 DIF_2 O, DIF 0.7 V Differential clock output. Default is 1:1.
22 DIF_2 O, DIF 0.7 V Differential clock output. Default is 1:1.
23 OE_2 I, SE 3.3 V LVTTL active low input for enabling differential outputs (default). Controls the corresponding output pair. Internal pull-down.
24 OE_3 I, SE 3.3 V LVTTL active low input for enabling differential outputs (default). Controls the corresponding output pair. Internal pull-down.
25 DIF_3 O, DIF 0.7 V Differential clock output. Default is 1:1.
26 DIF_3 O, DIF 0.7 V Differential clock output. Default is 1:1.
Si53108
Rev. 1.2 31
27 VDD 3.3 V 3.3 V power supply
28 DIF_4 O, DIF 0.7 V Differential clock output. Default is 1:1.
29 DIF_4 O, DIF 0.7 V Differential clock output. Default is 1:1.
30 OE_4 I, SE 3.3 V LVTTL active low input for enabling differential outputs (default). Controls the corresponding output pair. Internal pull-down.
31 OE_5 I, SE 3.3 V LVTTL active low input for enabling differential outputs (default). Controls the corresponding output pair. Internal pull-down.
32 DIF_5 O, DIF 0.7 V Differential clock output. Default is 1:1.
33 DIF_5 O, DIF 0.7 V Differential clock output. Default is 1:1.
34 VDD 3.3 V 3.3 V power supply
35 DIF_6 O, DIF 0.7 V Differential clock output. Default is 1:1.
36 DIF_6 O, DIF 0.7 V Differential clock output. Default is 1:1.
37 OE_6 I, SE 3.3 V LVTTL active low input for enabling differential outputs (default). Controls the corresponding output pair. Internal pull-down.
38 VDD 3.3 V 3.3 V power supply
39 DIF_7 O, DIF 0.7 V Differential clock output. Default is 1:1.
40 DIF_7 O, DIF 0.7 V Differential clock output. Default is 1:1.
41 OE_7 I, SE 3.3 V LVTTL active low input for enabling differential outputs (default). Controls the corresponding output pair. Internal pull-down.
42 VDD 3.3 V 3.3 V power supply
43 NC - Do not connect this pin to anything.
44 VDDA 3.3V 3.3 V power supply for PLL.
45 NC - Do not connect this pin to anything.
46 NC - Do not connect this pin to anything.
47 100M_133M I,SE 3.3 V tolerant inputs for input/output frequency selection. An external pull-up or pull-down resistor is attached to this pin to select the input/output frequency. High = 100 MHz output Low = 133 MHz output
48 HBW_BYPASS_LBW I, SE Tri-Level input for selecting the PLL bandwidth or bypass mode.High = High BW modeMed = Bypass modeLow = Low BW mode
49 GND GND Ground epad to GND.
Table 27. Si53108 48-Pin QFN Descriptions
Pin # Name Type Description

Si53108
32 Rev. 1.2
7. Ordering Guide
Part Number Package Type Temperature
Lead-free
Si53108-A01AGM 48-pin QFN Extended, –40 to 85 C
Si53108-A01AGMR 48-pin QFN—Tape and Reel Extended, –40 to 85 C

Si53108
Rev. 1.2 33
8. Package Outline
Figure 12 illustrates the package details for the Si53108. Table 28 lists the values for the dimensions shown in theillustration.
Figure 12. 48-Pin Quad Flat No Lead (QFN) Package
Table 28. Package Diagram Dimensions
Dimension Min Nom Max
A 0.80 0.85 0.90
A1 0.00 0.02 0.05
b 0.15 0.20 0.25
D 6.00 BSC.
D2 3.50 3.60 3.70
e 0.40 BSC.
E 6.00 BSC.
E2 3.50 3.60 3.70
L 0.30 0.40 0.50
aaa 0.10
bbb 0.10
ccc 0.10
Notes:1. All dimensions shown are in millimeters (mm) unless otherwise noted.2. Dimensioning and Tolerancing per ANSI Y14.5M-1994.3. This drawing conforms to JEDEC outline MO-2204. Recommended card reflow profile is per the JEDEC/IPC J-STD-020
specification for Small Body Components.

Si53108
34 Rev. 1.2
ddd 0.10
eee 0.08
Table 28. Package Diagram Dimensions
Dimension Min Nom Max
Notes:1. All dimensions shown are in millimeters (mm) unless otherwise noted.2. Dimensioning and Tolerancing per ANSI Y14.5M-1994.3. This drawing conforms to JEDEC outline MO-2204. Recommended card reflow profile is per the JEDEC/IPC J-STD-020
specification for Small Body Components.
Si53108
Rev. 1.2 35
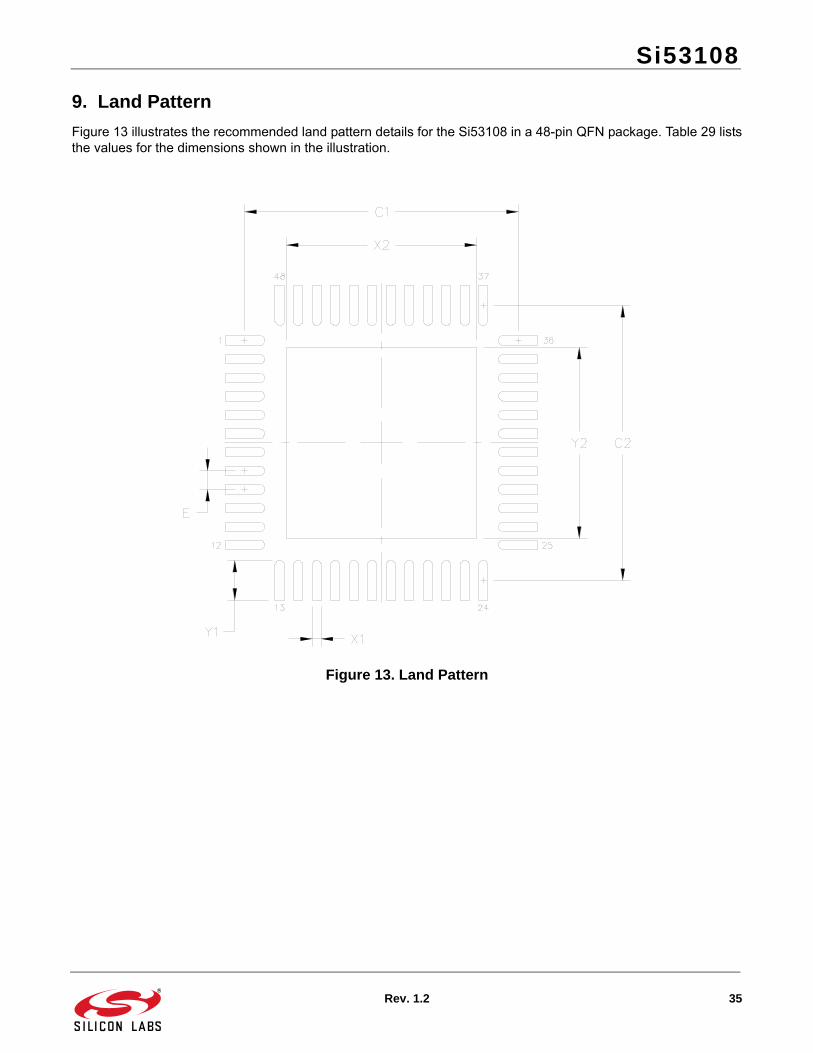
9. Land Pattern
Figure 13 illustrates the recommended land pattern details for the Si53108 in a 48-pin QFN package. Table 29 liststhe values for the dimensions shown in the illustration.
Figure 13. Land Pattern

Si53108
36 Rev. 1.2
Table 29. PCB Land Pattern Dimensions
Dimension mm
C1 5.90
C2 5.90
E 0.40
X1 0.20
Y1 0.85
X2 4.10
Y2 4.10
Notes:General
1. All dimensions shown are in millimeters (mm).2. This Land Pattern Design is based on the IPC-7351 guidelines.3. All dimensions shown are at Maximum Material Condition (MMC). Least Material
Condition (LMC) is calculated based on a Fabrication Allowance of 0.05 mm.Solder Mask Design
4. All metal pads are to be non-solder mask defined (NSMD). Clearance between the solder mask and the metal pad is to be 60 m minimum, all the way around the pad.
Stencil Design5. A stainless steel, laser-cut and electro-polished stencil with trapezoidal walls
should be used to assure good solder paste release.6. The stencil thickness should be 0.125 mm (5 mils).7. The ratio of stencil aperture to land pad size should be 1:1 for all perimeter pads.8. A 3x3 array of 1.0 mm square openings on a 1.5 mm pitch should be used for the
center ground pad.Card Assembly
9. A No-Clean, Type-3 solder paste is recommended.10. The recommended card reflow profile is per the JEDEC/IPC J-STD-020
specification for Small Body Components.
Si53108
Rev. 1.2 37
DOCUMENT CHANGE LIST
Revision 1.0 to Revision 1.1 Updated PLL Bandwidth Specifications in Table 6.
Revision 1.1 to Revision 1.2 Updated Features on page 1.
Updated Description on page 1.
Updated specs in Table 7, “Phase Jitter,” on page 7.
DisclaimerSilicon Laboratories intends to provide customers with the latest, accurate, and in-depth documentation of all peripherals and modules available for system and software implementers using or intending to use the Silicon Laboratories products. Characterization data, available modules and peripherals, memory sizes and memory addresses refer to each specific device, and "Typical" parameters provided can and do vary in different applications. Application examples described herein are for illustrative purposes only. Silicon Laboratories reserves the right to make changes without further notice and limitation to product information, specifications, and descriptions herein, and does not give warranties as to the accuracy or completeness of the included information. Silicon Laboratories shall have no liability for the consequences of use of the information supplied herein. This document does not imply or express copyright licenses granted hereunder to design or fabricate any integrated circuits. The products must not be used within any Life Support System without the specific written consent of Silicon Laboratories. A "Life Support System" is any product or system intended to support or sustain life and/or health, which, if it fails, can be reasonably expected to result in significant personal injury or death. Silicon Laboratories products are generally not intended for military applications. Silicon Laboratories products shall under no circumstances be used in weapons of mass destruction including (but not limited to) nuclear, biological or chemical weapons, or missiles capable of delivering such weapons.
Trademark InformationSilicon Laboratories Inc., Silicon Laboratories, Silicon Labs, SiLabs and the Silicon Labs logo, CMEMS®, EFM, EFM32, EFR, Energy Micro, Energy Micro logo and combinations thereof, "the world’s most energy friendly microcontrollers", Ember®, EZLink®, EZMac®, EZRadio®, EZRadioPRO®, DSPLL®, ISOmodem ®, Precision32®, ProSLIC®, SiPHY®, USBXpress® and others are trademarks or registered trademarks of Silicon Laboratories Inc. ARM, CORTEX, Cortex-M3 and THUMB are trademarks or registered trademarks of ARM Holdings. Keil is a registered trademark of ARM Limited. All other products or brand names mentioned herein are trademarks of their respective holders.
http://www.silabs.com
Silicon Laboratories Inc.400 West Cesar ChavezAustin, TX 78701USA
ClockBuilder Pro
One-click access to Timing tools, documentation, software, source code libraries & more. Available for Windows and iOS (CBGo only).
www.silabs.com/CBPro
Timing Portfoliowww.silabs.com/timing
SW/HWwww.silabs.com/CBPro
Qualitywww.silabs.com/quality
Support and Communitycommunity.silabs.com