Embed Size (px)
DESCRIPTION
DB2 Send Port
Citation preview
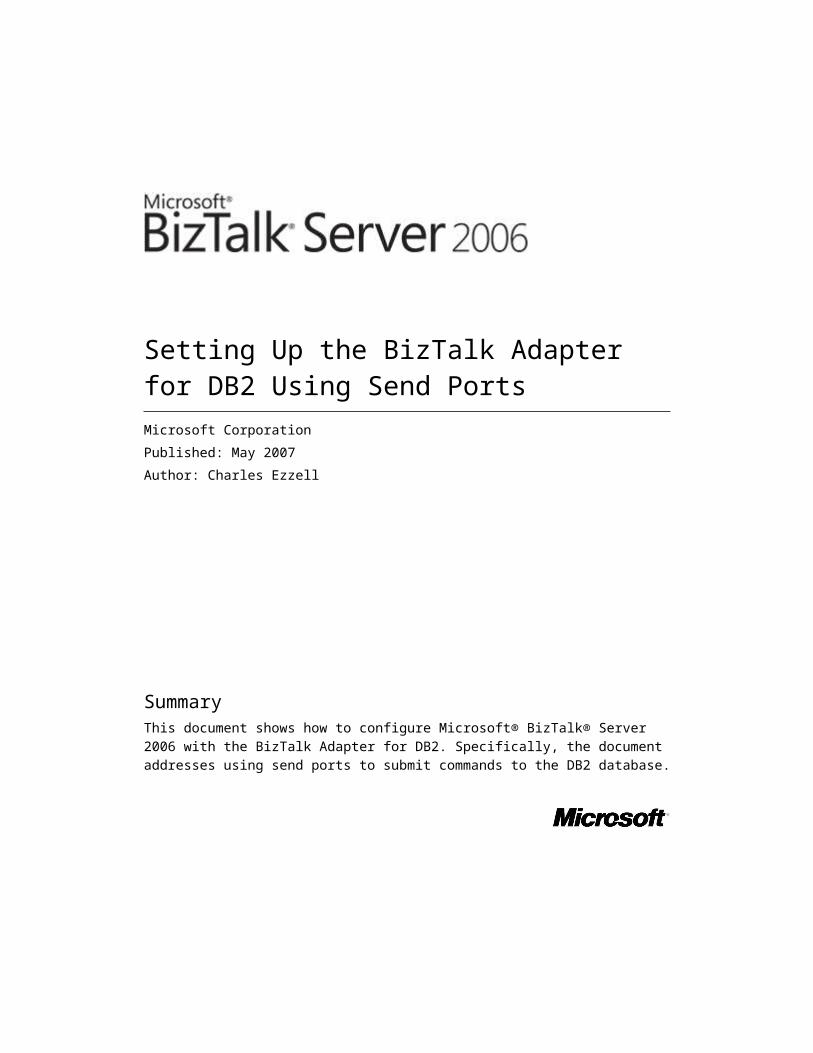
Setting Up the BizTalk Adapter for DB2 Using Send Ports
Microsoft Corporation
Published: May 2007
Author: Charles Ezzell
SummaryThis document shows how to configure Microsoft® BizTalk® Server 2006 with the BizTalk
Adapter for DB2. Specifically, the document addresses using send ports to submit
commands to the DB2 database.

Contents
Setting Up the BizTalk Adapter for DB2 Using Send Ports.................................................5
Overview......................................................................................................................... 5
Setting Up the Data Connection.....................................................................................5
What Are Updategrams?..............................................................................................16
Insert......................................................................................................................... 16
Delete........................................................................................................................ 16
Update....................................................................................................................... 17
Stored Procedures....................................................................................................17
SELECT Statements.................................................................................................17
Converting Updategrams to a SQL Statement..........................................................18
Data Value Conversion..............................................................................................19
ResultSet Messages.................................................................................................20
BizTalk Configuration....................................................................................................21
Create a Send Port in BizTalk Server........................................................................21
Create a Second Send Port......................................................................................24
Create a Receive Port (One-Way).............................................................................27
Visual Studio 2005 Configuration.................................................................................31
Test 1 - Calling a Stored Procedure with No Parameters..........................................31
Creating the XSD file.............................................................................................31
Create the XML File...............................................................................................38
Testing................................................................................................................... 38
Test 2 - Calling a Stored Procedure With IN and OUT Parameters...........................42
Test 3 - Using a Send Port to Insert Rows Into a Table.............................................46
Test 4 - Using a Send Port to Update Rows in a Table..............................................50
Test 5 - Using a Send Port to Delete Rows from a Table...........................................53
Test 6 - Using a Send Port to Send a SELECT Statement........................................56
ADDENDUM.................................................................................................................58
Data Flow Charts.......................................................................................................58
Test 1 - Calling a Stored Procedure with No Parameters.......................................58
Test 2 - Calling a Stored Procedure with In and Out Parameters...........................59
Test 3 - Using a Send Port to Insert Rows into a Table..........................................60
Test 4 - Using a Send Port to Update Rows in a Table..........................................62
Test 5 - Using a Send Port to Delete Rows into a Table.........................................63
Test 6 - Using a Send Port to Send a Select Statement.........................................64
Considerations Regarding Stored Procedures..........................................................64
Stored Procedure Used for Tests...........................................................................64
Test Runs...............................................................................................................65
Conclusions from the Tests....................................................................................68
Conclusion.................................................................................................................... 69
Copyright...................................................................................................................... 69

Setting Up the BizTalk Adapter for DB2 Using Send Ports
Charles Ezzell
Microsoft Corporation
May 2007
Summary: This document shows how to configure Microsoft® BizTalk® Server 2006 with
the BizTalk Adapter for DB2. Specifically, the document addresses using send ports to
submit commands to the DB2 database.
OverviewThis document contains the following sections:
Setting Up the Data Connection
What Are Updategrams?
BizTalk Configuration
Visual Studio 2005 Configuration
Data Flow Charts
The information in this document is a general introduction to the previous topics. It is not
meant to be an in-depth resource for creating BizTalk applications. Rather, it is intended
to help with basic configuration and setup.
In most cases, you should start with a basic project such as the one presented in this
document, and then build on that as necessary. One indication that everything is going as
designed is if the samples work for you.
Setting Up the Data ConnectionTo begin with, verify that you can connect to your DB2 database using the Microsoft OLE
DB Provider for DB2. The best and quickest way to do this is to use the Data Access
Tool.
The following example demonstrates connecting to an AS/400 called CONTOSO.
To connect to an AS/400
1. Click Start, point to All Programs, point to Microsoft BizTalk Adapters for
5

Host Systems, and then click Data Access Tool.
2. Create a DB2 OLE DB UDL to point to the host. To do this, on the File menu,
click New, and then click Data Source. This begins the wizard.
3. On the Data Source Wizard screen, click Next.
4. Select DB2/AS400 for Data source platform, select TCP/IP for Network type,
and then click Next.
6

5. On the TCP/IP Network Connection screen, enter CONTOSO (or any DB2
host) in the Address or alias box.
7

6. The default port for AS/400 is 446. If your port is different, change this field, and
then click Next. This brings up the DB2Database screen.
Settings on this page will depend on your DB2 system. For DB2/400, the initial
catalog is the RDBNAME (the database name of the remote computer). (Use the
WRKRDBDIRE command from an AS/400 console.) For DB2 (MVS, OS/390),
this is referred to as LOCATION. For DB2/UDB, this property is referred to as
DATABASE. For more information about these properties, click Help at the
bottom of the page.
8
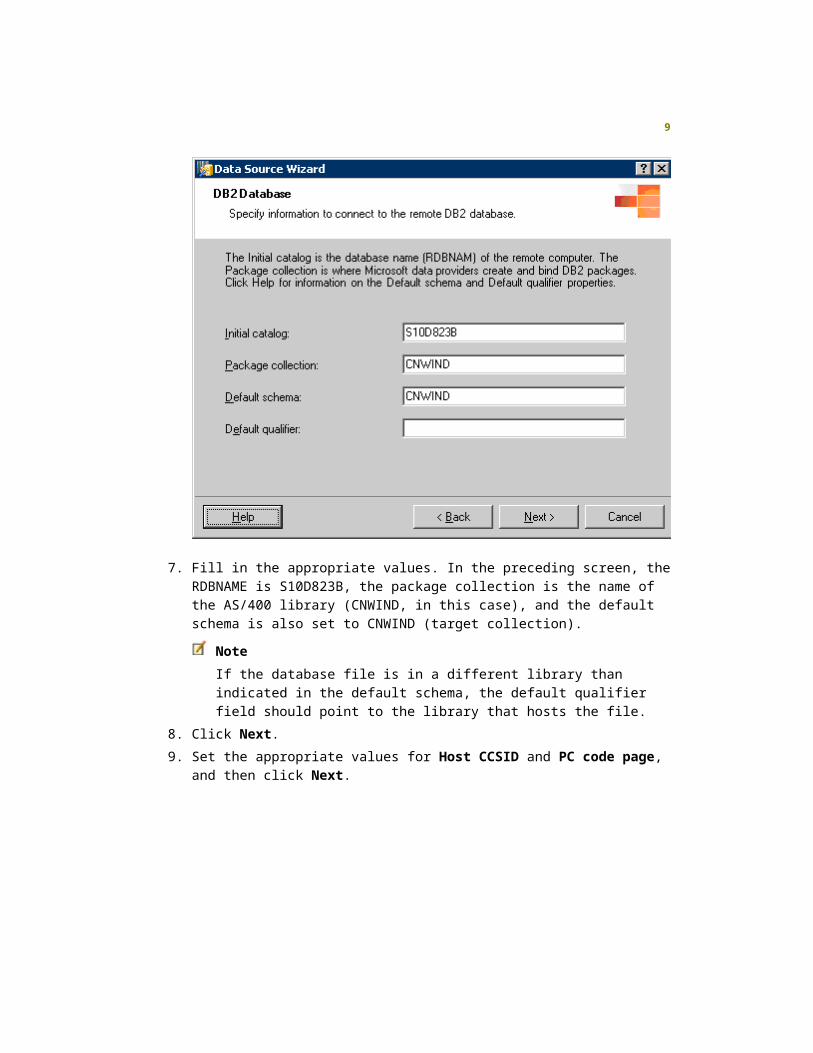
7. Fill in the appropriate values. In the preceding screen, the RDBNAME is
S10D823B, the package collection is the name of the AS/400 library (CNWIND,
in this case), and the default schema is also set to CNWIND (target collection).
Note
If the database file is in a different library than indicated in the default
schema, the default qualifier field should point to the library that hosts the
file.
8. Click Next.
9. Set the appropriate values for Host CCSID and PC code page, and then click
Next.
9

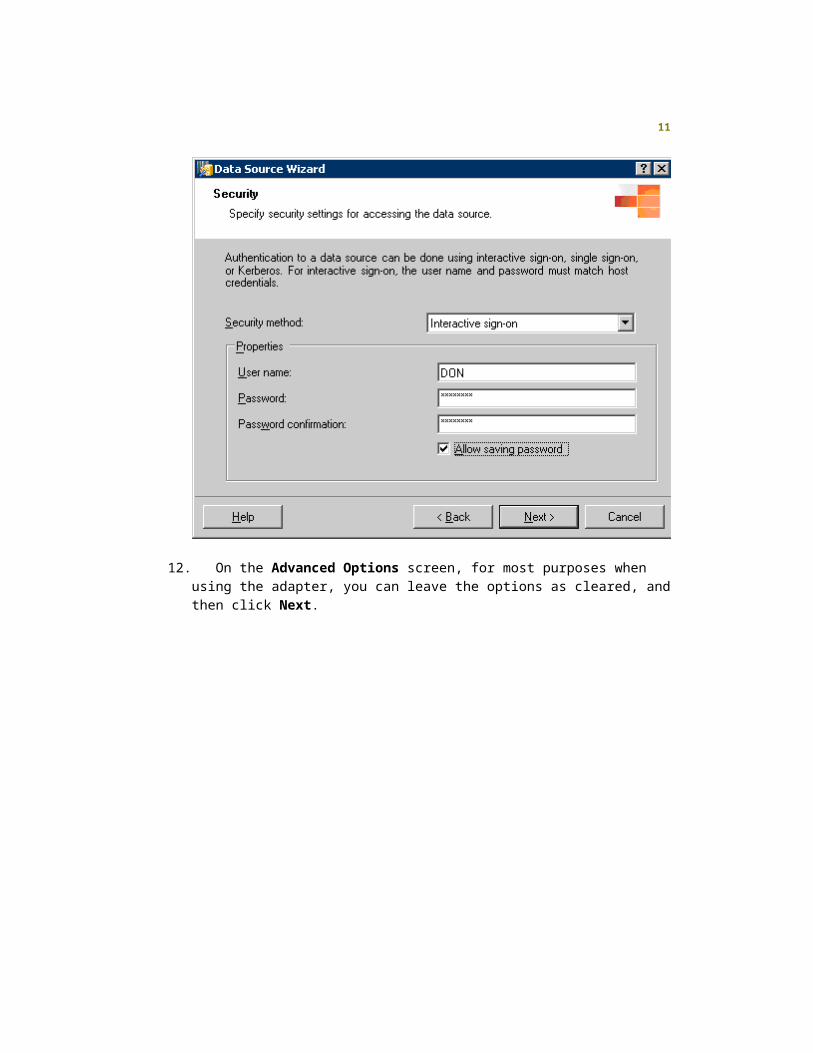
10. On the Security screen, enter the security method that you wish to use, and fill in
the appropriate fields. In this example, the security method is Interactive sign-
on, and the password will be saved to the UDL, which will be created later in this
wizard.
Note
These fields are case-sensitive.
11. Once you have filled in the information for your security method, click Next.
10
12. On the Advanced Options screen, for most purposes when using the adapter,
you can leave the options as cleared, and then click Next.
11

The Validation screen appears. If you click Connect, the DB2 provider verifies
whether it can do a basic connection (for instance, no password required) to the
DB2 system.
A successful connection should have output similar to this:
Successfully connected to data source 'New Data Source'.
Server class: DB2/400
Server version: 05.04.0000
13. Click Sample Query. This should return the tables on the host from the
information that you have provided in previous steps.
12

14. Click Packages.
This creates DB2 packages that are required for executing SQL statements.
Creating packages on DB2 requires authority to CREATE, BIND, and GRANT
privileges to PUBLIC. If you do not have sufficient authority (with the user
ID/password given earlier in the Security screen), contact the database
administrator.
When this is run on AS/400, you should end up with output similar to this:
Connected to data source 'New Data Source'.
AUTOCOMMITTED package has been created.
READ COMMITTED package has been created.
READ UNCOMMITTED package has been created.
SERIALIZABLE package has been created.
REPEATABLE READ package has been created.
The package creation process has completed successfully.
After performing the preceding action in the Validation screen, click Next to continue
to the Saving Information screen.
13
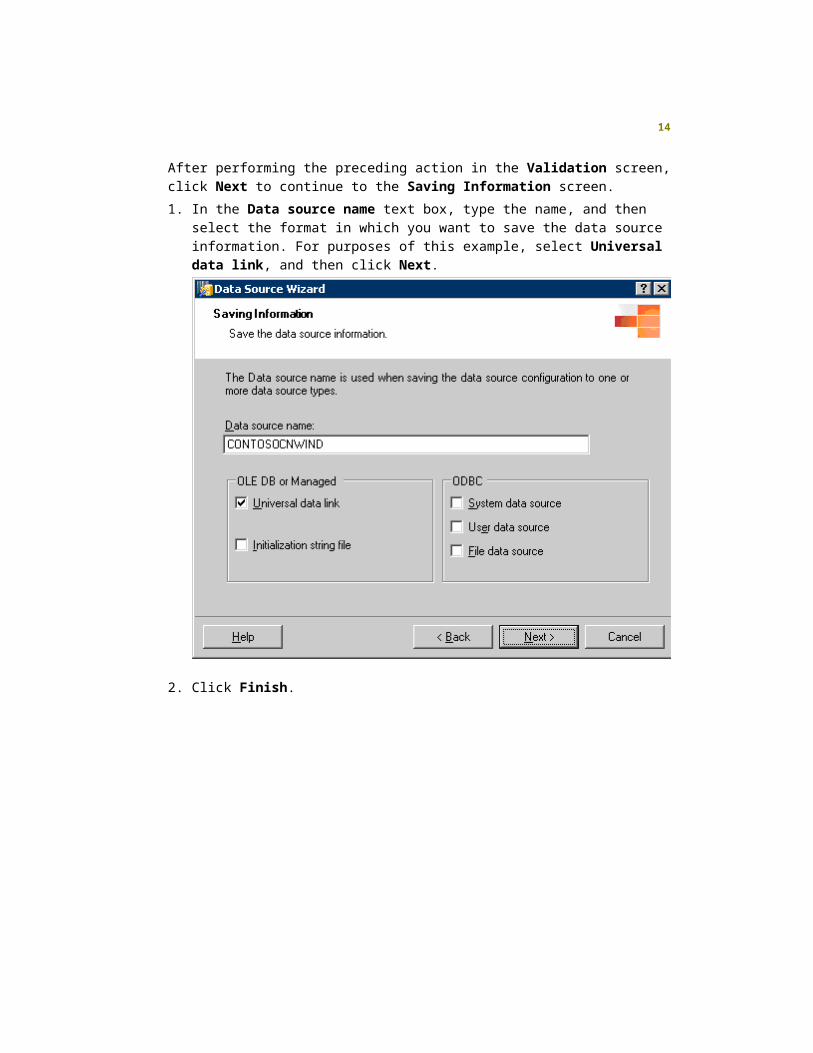
1. In the Data source name text box, type the name, and then select the format in
which you want to save the data source information. For purposes of this
example, select Universal data link, and then click Next.
2. Click Finish.
14
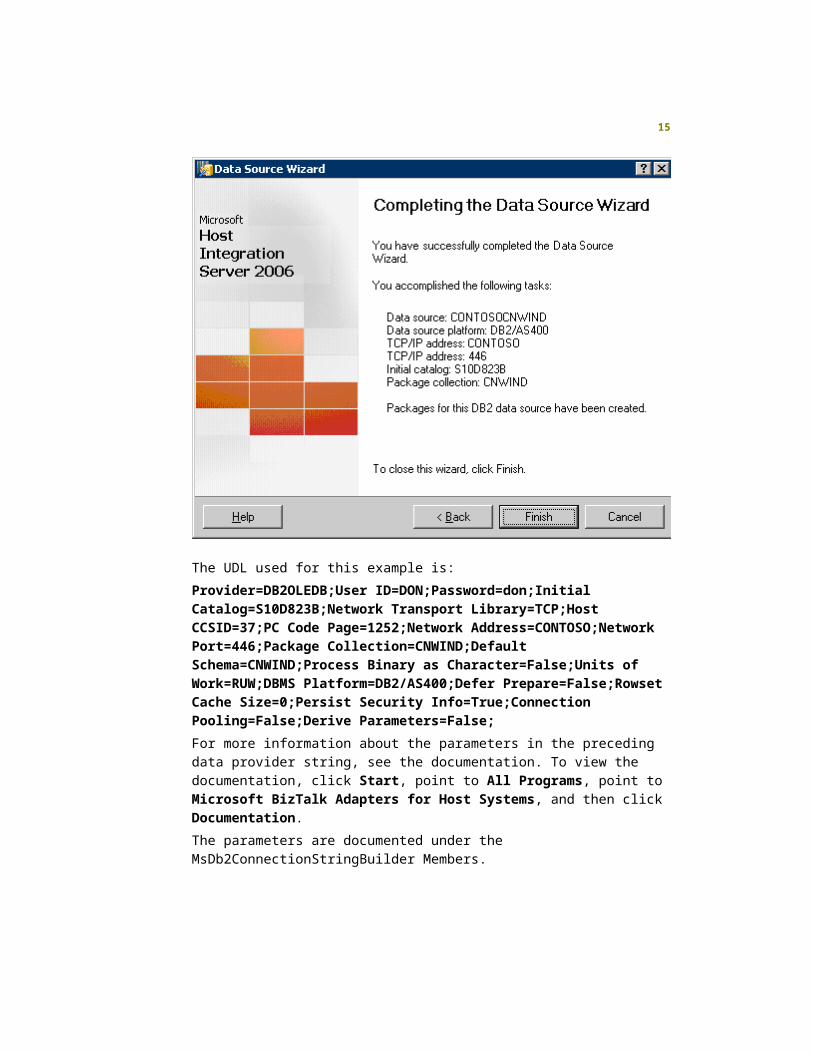
The UDL used for this example is:
Provider=DB2OLEDB;User ID=DON;Password=don;Initial
Catalog=S10D823B;Network Transport Library=TCP;Host CCSID=37;PC
Code Page=1252;Network Address=CONTOSO;Network Port=446;Package
Collection=CNWIND;Default Schema=CNWIND;Process Binary as
Character=False;Units of Work=RUW;DBMS Platform=DB2/AS400;Defer
Prepare=False;Rowset Cache Size=0;Persist Security Info=True;Connection
Pooling=False;Derive Parameters=False;
For more information about the parameters in the preceding data provider string,
see the documentation. To view the documentation, click Start, point to All
Programs, point to Microsoft BizTalk Adapters for Host Systems, and then
click Documentation.
The parameters are documented under the MsDb2ConnectionStringBuilder
Members.
15
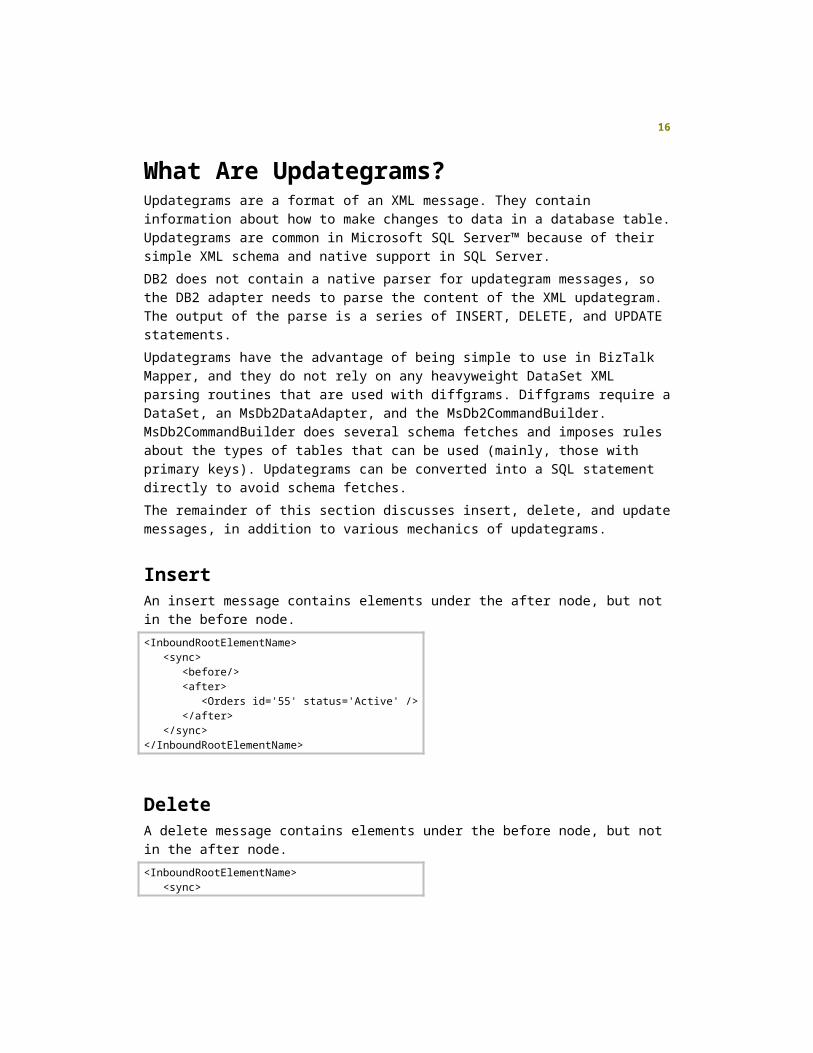
What Are Updategrams?Updategrams are a format of an XML message. They contain information about how to
make changes to data in a database table. Updategrams are common in Microsoft SQL
Server™ because of their simple XML schema and native support in SQL Server.
DB2 does not contain a native parser for updategram messages, so the DB2 adapter
needs to parse the content of the XML updategram. The output of the parse is a series of
INSERT, DELETE, and UPDATE statements.
Updategrams have the advantage of being simple to use in BizTalk Mapper, and they do
not rely on any heavyweight DataSet XML parsing routines that are used with diffgrams.
Diffgrams require a DataSet, an MsDb2DataAdapter, and the MsDb2CommandBuilder.
MsDb2CommandBuilder does several schema fetches and imposes rules about the
types of tables that can be used (mainly, those with primary keys). Updategrams can be
converted into a SQL statement directly to avoid schema fetches.
The remainder of this section discusses insert, delete, and update messages, in addition
to various mechanics of updategrams.
InsertAn insert message contains elements under the after node, but not in the before node.
<InboundRootElementName> <sync> <before/> <after> <Orders id='55' status='Active' /> </after> </sync></InboundRootElementName>
DeleteA delete message contains elements under the before node, but not in the after node.
<InboundRootElementName> <sync> <before> <Orders id='55' status='Active' /> </before> <after/> </sync></InboundRootElementName>
16

UpdateAn update message contains elements under both the before and after nodes; the
original value is stored under the before node and the new values are stored under the
after node:
<InboundRootElementName> <sync> <before> <Orders id='55' status='Active' /> </before> <after> <Orders id='55' status='Filled' /> </after> </sync></InboundRootElementName>
Stored ProceduresUpdategrams, as defined in SQL Server, do not contain any syntax for executing stored
procedures. The updategram syntax that the DB2 adapter uses contains an extension for
executing stored procedures with parameters:
<InboundRootElementName> <sync> <StoredProcedure> <AddOrder id=’55’ status=’New’/> </StoredProcedure> </sync></InboundRootElementName>
The updategram for the stored procedure does not contain before or after elements; it
only lists the stored procedure to execute as the element name. Parameters are listed as
attributes in the order that they should be added to the stored procedure.
SELECT StatementsUpdategrams, as defined in SQL Server, do not contain any syntax for executing
SELECT statements. The updategram syntax used by the DB2 adapter will contain an
extension for executing SELECT statements:
<InboundRootElementName> <sync> <Select>SELECT * FROM ORDERS WHERE STATUS = ‘New’</Select> </sync></InboundRootElementName>
17

The updategram for the SELECT statement does not contain before or after elements. It
only lists the SELECT statement to be executed as the element name.
Converting Updategrams to a SQL StatementWhen an insert message is given to the DB2 adapter to be sent, the contents are
translated into a SQL statement. This SQL statement uses all of the available information
that is given in the message body: the table name, the column names, and their values.
As an example, this insert updategram:
<InboundRootElementName> <sync> <before/> <after> <Orders id='55' status='Active' /> </after> </sync></InboundRootElementName>
translates to the SQL statement:
INSERT INTO Orders (id, status) values (?, ?)
The adapter uses parameters to avoid SQL injection attacks. However, using parameters
has a cost in that the data type of the parameters must be discovered for each SQL
statement using the MsDb2CommandBuilder.DeriveParameters() method. This uses
the Distributed Relational Database Architecture Application Requestor's (DRDA AR)
DESCRIBE statement functionality to determine each parameter’s data type, size,
precision, and scale. The adapter converts each string value from the updategram into
the parameter’s type. The command is then executed.
DELETE statements work similarly to INSERT statements during conversion, except that
the column values are used in a WHERE clause.
<InboundRootElementName> <sync> <before> <Orders id='55' status='Active' /> </before> <after/> </sync></InboundRootElementName>DELETE FROM Orders WHERE id = ? AND status = ?
UPDATE statements use the before values of the updategram in a WHERE clause and
the after values in the SET clause:
18

<InboundRootElementName> <sync> <before> <Orders id='55' status='Active' /> </before> <after> <Orders id='55' status='Filled' /> </after> </sync></InboundRootElementName>UPDATE Orders SET id = ?, status = ? WHERE id = ? AND status = ?
The stored procedure extension also uses the
MsDb2CommandBuilder.DeriveParameters() method to find the data types of stored
procedure parameters for conversion:
<InboundRootElementName> <sync> <StoredProcedure> <AddOrder id=’55’ status=’New’/> </StoredProcedure> </sync></InboundRootElementName>CALL AddOrder (?, ?)
Data Value ConversionWhen an updategram is converted to a SQL statement with parameters, data conversion
must take place from a string type to the parameter data type. The following chart
illustrates these conversions.
MsDb2Type .NET Data Type Conversion
BigInt Int64.TryParse()
Int Int32.TryParse()
SmallInt
Bit
TinyInt
Int16.TryParse()
Timestamp
Date
DateTime.TryParse()
Time TimeSpan.TryParse()
19

MsDb2Type .NET Data Type Conversion
Double Double.TryParse()
Real Single.TryParse()
Decimal
Numeric
Decimal.TryParse()
Binary
CharForBit
VarBinary VarCharForBit
Byte[] conversion (hex values)
Char
WideChar
VarChar
Graphic
VarGraphic
VarWideGraphic
String
When the adapter receives a result set from DB2, the data is converted to an XML
message using the column value’s ToString() method. This uses the current culture to
translate to a string.
When converting from xsd:dateTime to CLS DateTime, the TryParse method does work
successfully.
ResultSet MessagesResult set data is returned to BizTalk using a message that contains a row of data. The
schema for this message is similar to an updategram, except that the sync, before, and
after elements are removed:
<OutboundRootElementName> <Orders id='55' status='Active' /></OutboundRootElementName >
The user specifies a single root element name (OutboundRootElementName). The table
name is used as the nested element name. Column names are attributes, with each data
value as the column name attribute value.
20

BizTalk ConfigurationThe example in this section illustrates how to create a BizTalk application to call a stored
procedure on the host. In this case the host is an AS/400, but it could be any other DB2
platform (such as DB2/Linux or DB2/MVS). This application will also be used to build on
for other options.
To begin, in the BizTalk Administration console, create a new application. This example
uses an application named HISDB2Test1.
Create a Send Port in BizTalk Server
To create a send port
1. In the BizTalk Administration console, right-click Send Ports in your application.
point to New, and then click Static Solicit-Response.
2. Name the port SendPort_DB2Test1.
21

3. In the Type text box, select DB2, and then click Configure.
4. On the DB2 Transport Properties dialog box, click the ellipses on the
connection string property to bring up the next screen.
5. Select Existing connection string, and then click Browse. At this point, you
should be able to select the UDL created earlier.
6. Click Open, and then click Finish. You should be back at the DB2 Transport
Properties screen.
22

7. Supply the information for Document Target Namespace and the Response
Root Element Name, and then click OK.
This example uses DB2Test1 and DB2TestReceive, respectively, for these fields.
8. While still in the Send Port Properties dialog box, to create a filter, click Filters.
This is not totally configured yet, but will be later when the receive port is created.
Set the BTS.ReceivePortName property value to
ReceivePort_DB2Test1Request.
23

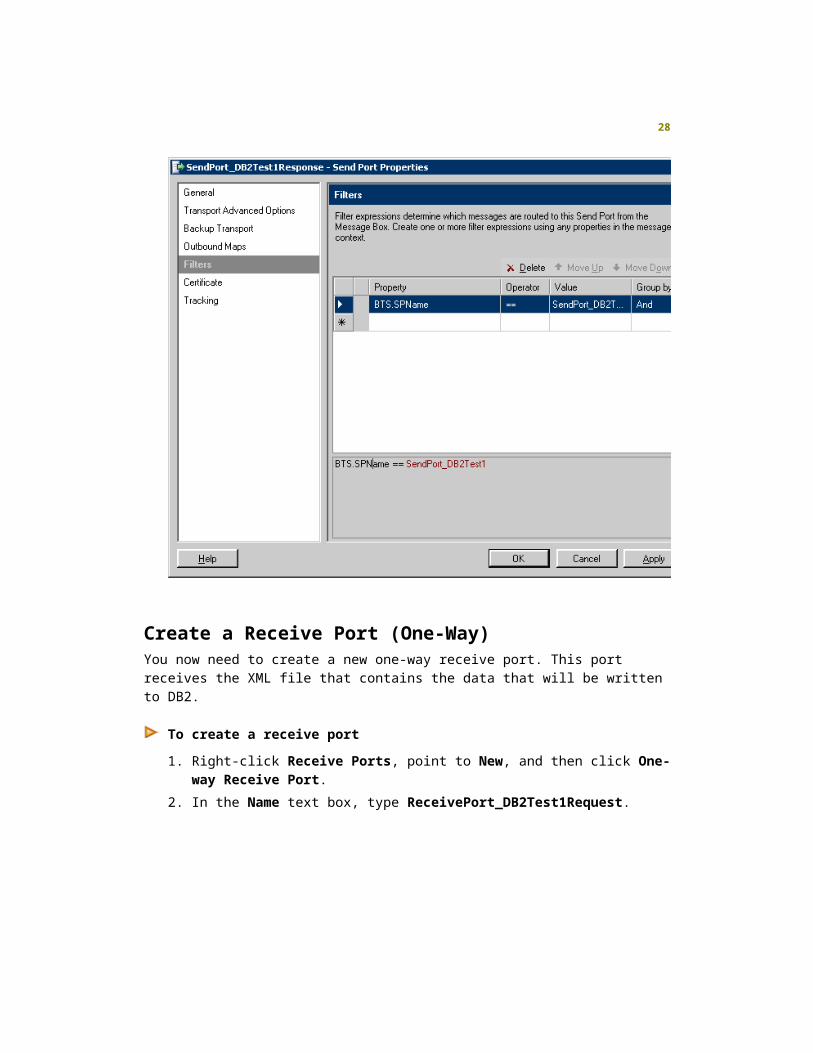
Create a Second Send PortIn this step, you create a static one-way port to persist the response from DB2 to a file.
To create the second send port
1. Create another send port (static one-way) to receive the response, and in the
Name text box, type SendPort_DB2Test1Response.
24

2. In the Type drop-down menu, select File and then click Configure.
3. In the FILE Transport Properties screen, for the destination folder, browse to a
directory on your drive, and for the file name, type DB2Test1Response_
%MessageID%.xml.
25

4. Click OK.
5. In the SendPort_DB2Test1Response - Send Port Properties screen, select
Filters.
This creates a filter to route the response messages that the DB2 adapter
receives.
6. Set the BTS.SPName property value to SendPort_DB2Test1, and then click
OK.
26

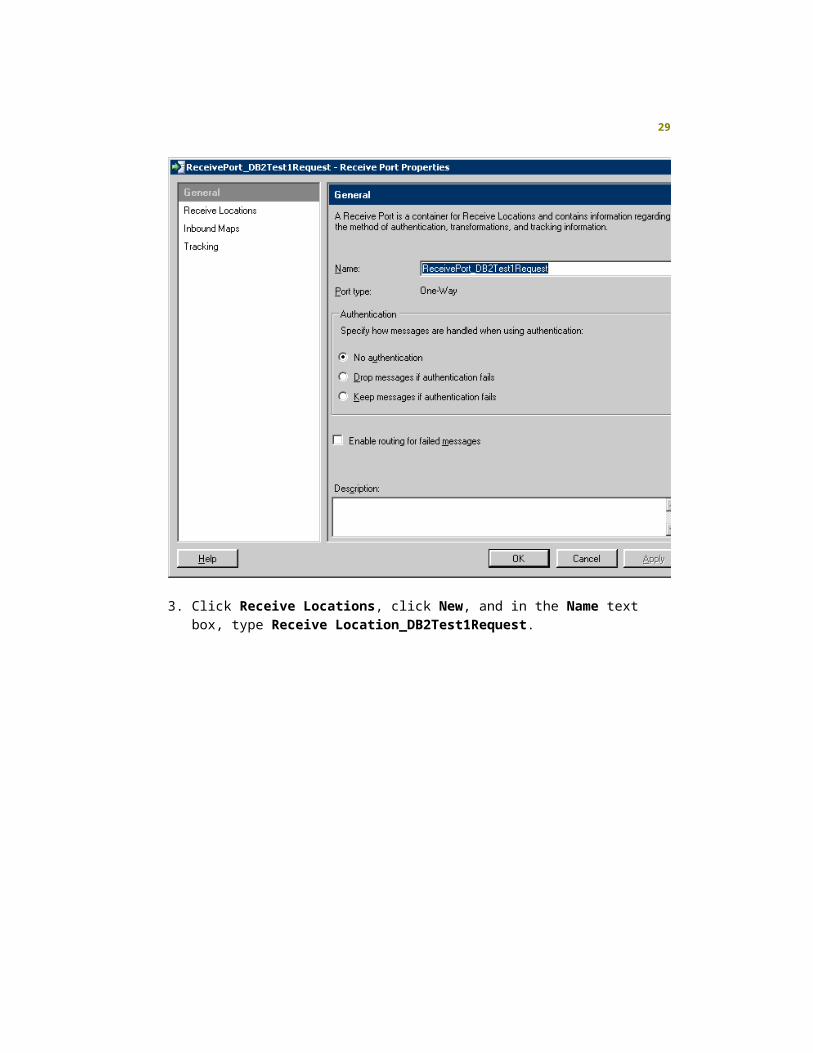
Create a Receive Port (One-Way)You now need to create a new one-way receive port. This port receives the XML file that
contains the data that will be written to DB2.
To create a receive port
1. Right-click Receive Ports, point to New, and then click One-way Receive Port.
2. In the Name text box, type ReceivePort_DB2Test1Request.
27
3. Click Receive Locations, click New, and in the Name text box, type Receive
Location_DB2Test1Request.
28
4. In the Type drop-down menu, select FILE, and then click Configure.
5. In the FILE Transport Properties screen, for the destination folder, browse to a
directory on your drive in which XML files will be placed.
29

6. Keep clicking OK until you exit the dialog boxes.
30

Visual Studio 2005 ConfigurationThis is the configuration for Microsoft Visual Studio® 2005.
Test 1 - Calling a Stored Procedure with No ParametersIn Visual Studio 2005, create a new BizTalk project.
Creating the XSD file
To create the XSD file
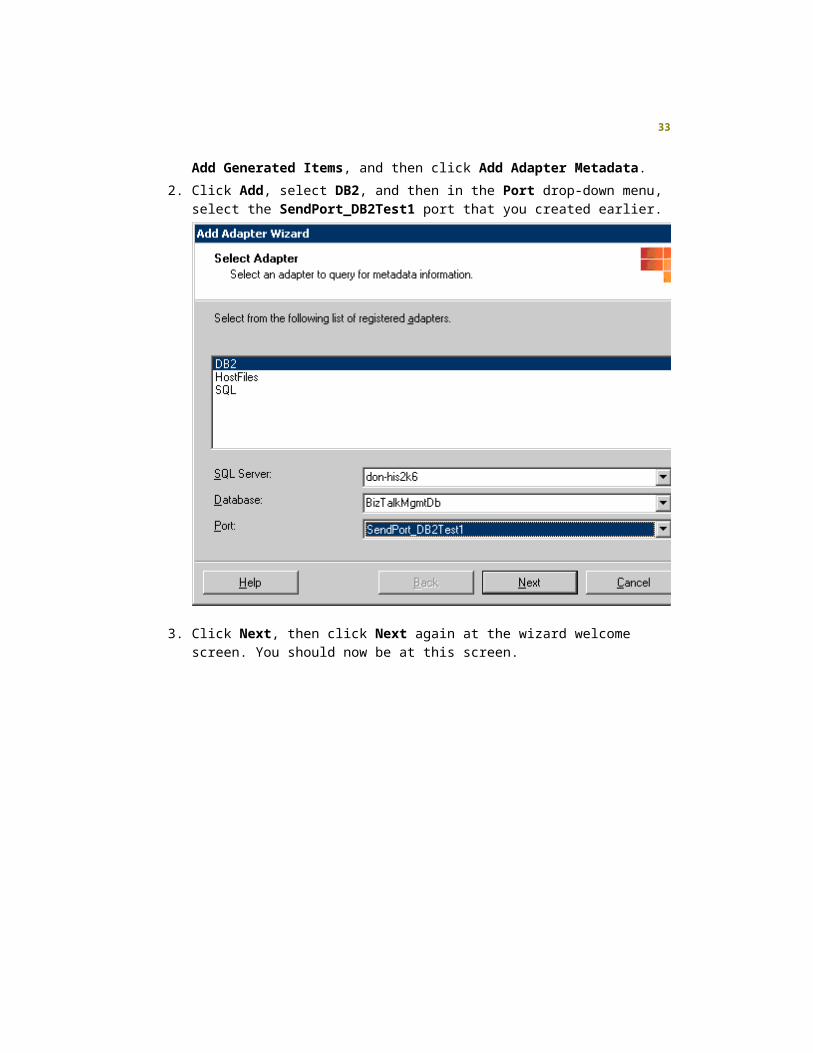
1. Once you have created your project, in Solution Explorer of Visual Studio, right-
click the project, point to Add, click Add Generated Items, and then click Add
Adapter Metadata.
2. Click Add, select DB2, and then in the Port drop-down menu, select the
31

SendPort_DB2Test1 port that you created earlier.
3. Click Next, then click Next again at the wizard welcome screen. You should now
be at this screen.
32
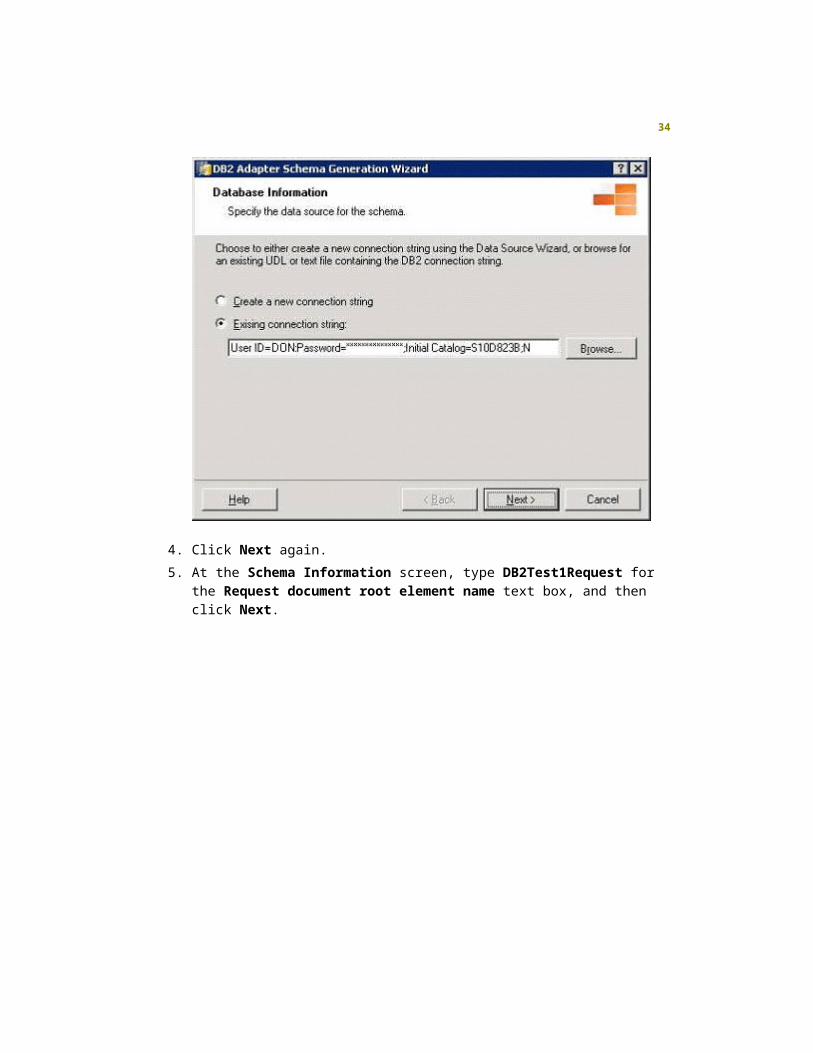
4. Click Next again.
5. At the Schema Information screen, type DB2Test1Request for the Request
document root element name text box, and then click Next.
33
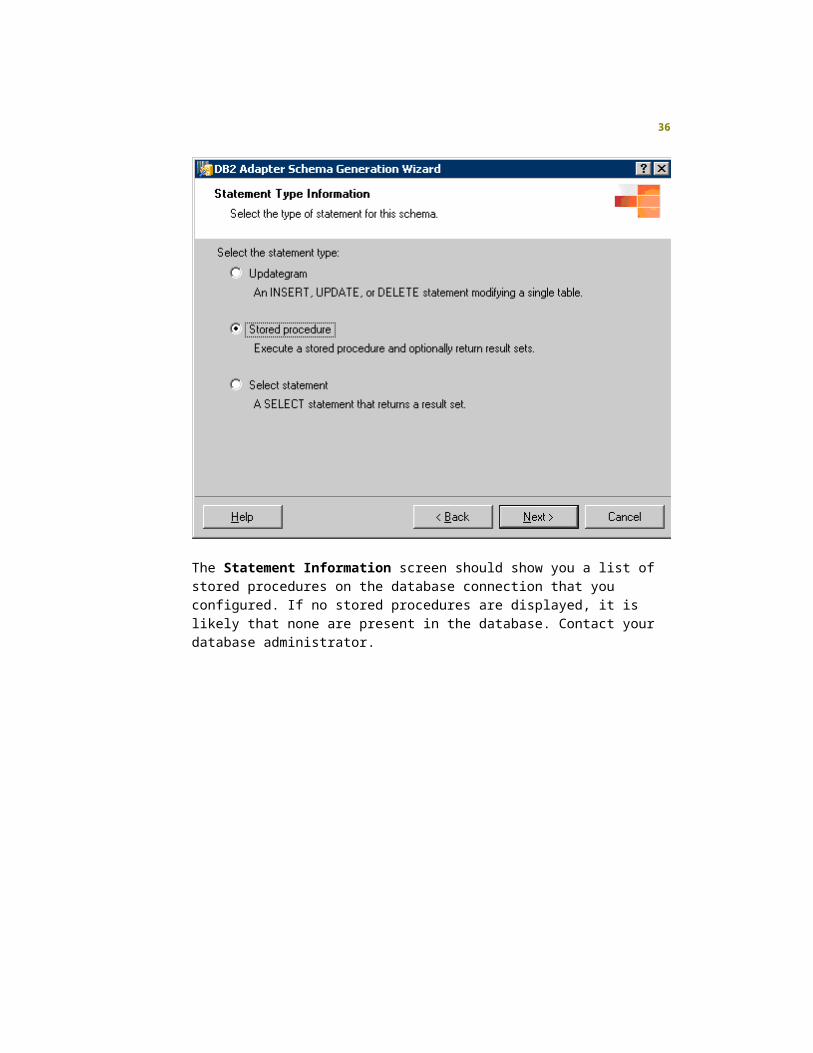
6. On the Statement Type Information screen, select Stored procedure, and then
click Next.
34

The Statement Information screen should show you a list of stored procedures
on the database connection that you configured. If no stored procedures are
displayed, it is likely that none are present in the database. Contact your
database administrator.
35
7. In this example, the first stored procedure is selected. This does not pass any
parameters. Rather, it calls the stored procedure, which returns a result set from
multiple tables.
36

8. Click Next, and then click Finish.
At this point you should have an XSD file in Solution Explorer under references.
In this example, it is called MsDB2SendStoredProc.xsd.
Note As you create each XSD file, you can rename them (along with the
orchestration file) to something more meaningful.
The final Solution Explorer window should resemble the following.
37

Create the XML File
To create the XML file
1. Right-click the .xsd file that you have created, and then select Generate
Instance.
2. When this has completed, the output window of Visual Studio should show
something similar to this.
Invoking component...
Create XML Instance succeeded for schema MsDb2SendStoredProc.xsd.
Generated <file:///C:\Documents and Settings\don\Local Settings\Temp\
_SchemaData\MsDb2SendStoredProc_output.xml> as output.
Component invocation succeeded.
3. Copy the file from the preceding location, and place it someplace safe. In this
example, it is placed in the directory C:\temp.
4. The output file created above should look similar to this.
<ns0:DB2Test1Request xmlns:ns0="DB2Test1"> <sync> <StoredProcedure> <SP_CATSALES /> </StoredProcedure> </sync></ns0:DB2Test1Request>
Testing
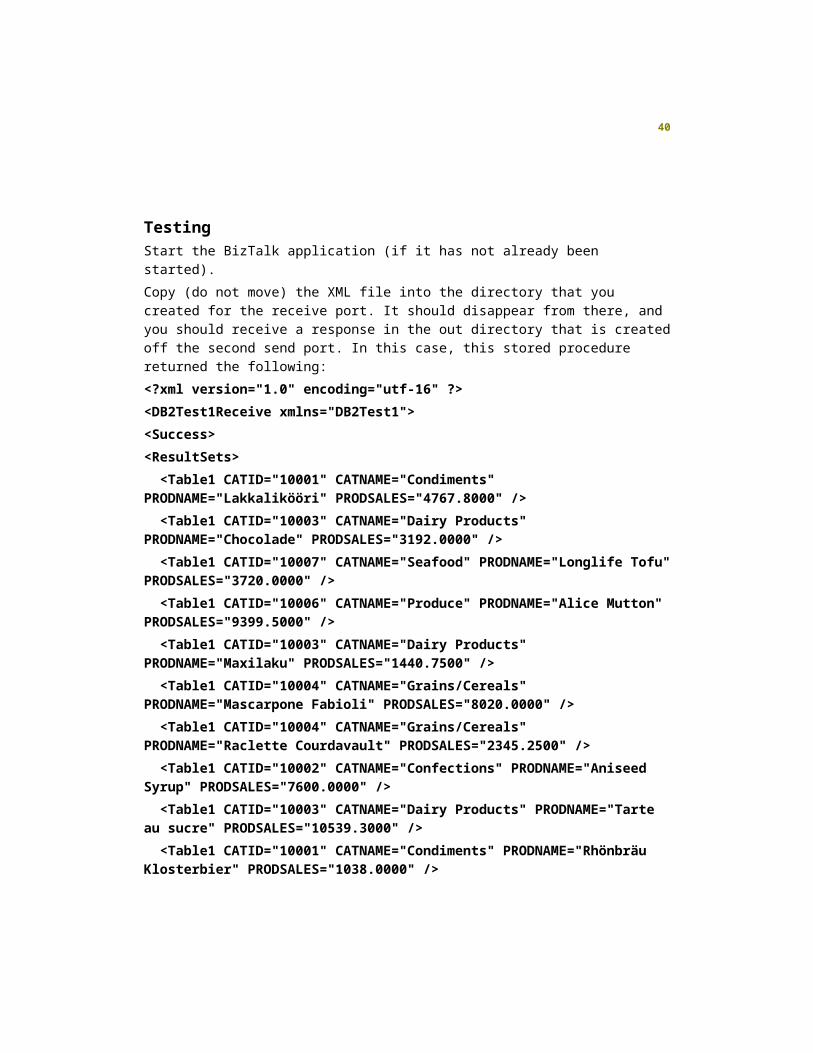
Start the BizTalk application (if it has not already been started).
Copy (do not move) the XML file into the directory that you created for the receive port. It
should disappear from there, and you should receive a response in the out directory that
is created off the second send port. In this case, this stored procedure returned the
following:
<?xml version="1.0" encoding="utf-16" ?>
<DB2Test1Receive xmlns="DB2Test1">
<Success>
38

<ResultSets>
<Table1 CATID="10001" CATNAME="Condiments" PRODNAME="Lakkalikööri"
PRODSALES="4767.8000" />
<Table1 CATID="10003" CATNAME="Dairy Products" PRODNAME="Chocolade"
PRODSALES="3192.0000" />
<Table1 CATID="10007" CATNAME="Seafood" PRODNAME="Longlife Tofu"
PRODSALES="3720.0000" />
<Table1 CATID="10006" CATNAME="Produce" PRODNAME="Alice Mutton"
PRODSALES="9399.5000" />
<Table1 CATID="10003" CATNAME="Dairy Products" PRODNAME="Maxilaku"
PRODSALES="1440.7500" />
<Table1 CATID="10004" CATNAME="Grains/Cereals" PRODNAME="Mascarpone
Fabioli" PRODSALES="8020.0000" />
<Table1 CATID="10004" CATNAME="Grains/Cereals" PRODNAME="Raclette
Courdavault" PRODSALES="2345.2500" />
<Table1 CATID="10002" CATNAME="Confections" PRODNAME="Aniseed Syrup"
PRODSALES="7600.0000" />
<Table1 CATID="10003" CATNAME="Dairy Products" PRODNAME="Tarte au
sucre" PRODSALES="10539.3000" />
<Table1 CATID="10001" CATNAME="Condiments" PRODNAME="Rhönbräu
Klosterbier" PRODSALES="1038.0000" />
<Table1 CATID="10004" CATNAME="Grains/Cereals" PRODNAME="Queso
Cabrales" PRODSALES="10391.2000" />
<Table1 CATID="10002" CATNAME="Confections" PRODNAME="Louisiana Fiery
Hot Pepper Sauce" PRODSALES="8571.8500" />
<Table1 CATID="10004" CATNAME="Grains/Cereals"
PRODNAME="Gudbrandsdalsost" PRODSALES="4520.0000" />
<Table1 CATID="10002" CATNAME="Confections" PRODNAME="Chef Anton's
Gumbo Mix" PRODSALES="5737.6000" />
<Table1 CATID="10003" CATNAME="Dairy Products" PRODNAME="Zaanse
koeken" PRODSALES="3079.2000" />
<Table1 CATID="10002" CATNAME="Confections" PRODNAME="Gula Malacca"
PRODSALES="11518.4000" />
<Table1 CATID="10003" CATNAME="Dairy Products" PRODNAME="Sir Rodney's
Marmalade" PRODSALES="3211.9000" />
39
<Table1 CATID="10003" CATNAME="Dairy Products" PRODNAME="Valkoinen
suklaa" PRODSALES="3240.0000" />
<Table1 CATID="10002" CATNAME="Confections" PRODNAME="Northwoods
Cranberry Sauce" PRODSALES="9444.0000" />
<Table1 CATID="10002" CATNAME="Confections" PRODNAME="Louisiana Hot
Spiced Okra" PRODSALES="9898.0000" />
<Table1 CATID="10005" CATNAME="Meat/Poultry" PRODNAME="Gnocchi di
nonna Alice" PRODSALES="8990.4000" />
<Table1 CATID="10007" CATNAME="Seafood" PRODNAME="Manjimup Dried
Apples" PRODSALES="2226.2500" />
<Table1 CATID="10007" CATNAME="Seafood" PRODNAME="Tofu"
PRODSALES="848.4000" />
<Table1 CATID="10005" CATNAME="Meat/Poultry" PRODNAME="Tunnbröd"
PRODSALES="4338.6000" />
<Table1 CATID="10002" CATNAME="Confections" PRODNAME="Vegie-spread"
PRODSALES="22673.6000" />
<Table1 CATID="10003" CATNAME="Dairy Products" PRODNAME="Scottish
Longbreads" PRODSALES="910.0000" />
<Table1 CATID="10006" CATNAME="Produce" PRODNAME="Perth Pasties"
PRODSALES="2142.0000" />
<Table1 CATID="10007" CATNAME="Seafood" PRODNAME="Uncle Bob's Organic
Dried Pears" PRODSALES="2500.0000" />
<Table1 CATID="10005" CATNAME="Meat/Poultry" PRODNAME="Singaporean
Hokkien Fried Mee" PRODSALES="5151.6000" />
<Table1 CATID="10002" CATNAME="Confections" PRODNAME="Original
Frankfurter grüne Soße" PRODSALES="7707.6000" />
<Table1 CATID="10001" CATNAME="Condiments" PRODNAME="Chartreuse
verte" PRODSALES="51962.2000" />
<Table1 CATID="10003" CATNAME="Dairy Products" PRODNAME="Sir Rodney's
Scones" PRODSALES="7776.0000" />
<Table1 CATID="10005" CATNAME="Meat/Poultry" PRODNAME="Wimmers gute
Semmelknödel" PRODSALES="7417.1000" />
<Table1 CATID="10001" CATNAME="Condiments" PRODNAME="Côte de Blaye"
PRODSALES="676.0000" />
<Table1 CATID="10003" CATNAME="Dairy Products" PRODNAME="Gumbär
Gummibärchen" PRODSALES="1926.4000" />
40

<Table1 CATID="10004" CATNAME="Grains/Cereals" PRODNAME="Gorgonzola
Telino" PRODSALES="6554.7000" />
<Table1 CATID="10006" CATNAME="Produce" PRODNAME="Tourtière"
PRODSALES="10766.8000" />
<Table1 CATID="10004" CATNAME="Grains/Cereals" PRODNAME="Queso
Manchego La Pastora" PRODSALES="7425.6000" />
<Table1 CATID="10007" CATNAME="Seafood" PRODNAME="Rössle Sauerkraut"
PRODSALES="10974.0000" />
<Table1 CATID="10001" CATNAME="Condiments" PRODNAME="Laughing
Lumberjack Lager" PRODSALES="3094.0000" />
<Table1 CATID="10003" CATNAME="Dairy Products" PRODNAME="NuNuCa Nuß-
Nougat-Creme" PRODSALES="1756.8000" />
<Table1 CATID="10001" CATNAME="Condiments" PRODNAME="Outback Lager"
PRODSALES="15156.0000" />
<Table1 CATID="10004" CATNAME="Grains/Cereals" PRODNAME="Flotemysost"
PRODSALES="5880.0000" />
<Table1 CATID="10005" CATNAME="Meat/Poultry" PRODNAME="Ravioli Angelo"
PRODSALES="34754.8000" />
<Table1 CATID="10002" CATNAME="Confections" PRODNAME="Sirop d'érable"
PRODSALES="21794.0000" />
<Table1 CATID="10002" CATNAME="Confections" PRODNAME="Chef Anton's
Cajun Seasoning" PRODSALES="1760.0000" />
<Table1 CATID="10002" CATNAME="Confections" PRODNAME="Genen Shouyu"
PRODSALES="6561.1500" />
<Table1 CATID="10003" CATNAME="Dairy Products" PRODNAME="Teatime
Chocolate Biscuits" PRODSALES="17250.0000" />
<Table1 CATID="10003" CATNAME="Dairy Products" PRODNAME="Pavlova"
PRODSALES="1503.5000" />
<Table1 CATID="10004" CATNAME="Grains/Cereals" PRODNAME="Mozzarella di
Giovanni" PRODSALES="9034.3000" />
<Table1 CATID="10001" CATNAME="Condiments" PRODNAME="Steeleye Stout"
PRODSALES="2240.0000" />
<Table1 CATID="10006" CATNAME="Produce" PRODNAME="Pâté chinois"
PRODSALES="3415.2500" />
<Table1 CATID="10001" CATNAME="Condiments" PRODNAME="Chang"
PRODSALES="5295.6000" />
41
<Table1 CATID="10003" CATNAME="Dairy Products" PRODNAME="Schoggi
Schokolade" PRODSALES="10961.3700" />
<Table1 CATID="10004" CATNAME="Grains/Cereals" PRODNAME="Camembert
Pierrot" PRODSALES="37917.0000" />
<Table1 CATID="10004" CATNAME="Grains/Cereals" PRODNAME="Geitost"
PRODSALES="3136.0000" />
<Table1 CATID="10001" CATNAME="Condiments" PRODNAME="Sasquatch Ale"
PRODSALES="814.5000" />
<Table1 CATID="10001" CATNAME="Condiments" PRODNAME="Guaraná
Fantástica" PRODSALES="2392.2000" />
<Table1 CATID="10006" CATNAME="Produce" PRODNAME="Thüringer
Rostbratwurst" PRODSALES="14610.0000" />
<Table1 CATID="10006" CATNAME="Produce" PRODNAME="Mishi Kobe Niku"
PRODSALES="4560.0000" />
<Table1 CATID="10005" CATNAME="Meat/Poultry" PRODNAME="Gustaf's
Knäckebröd" PRODSALES="5686.0000" />
<Table1 CATID="10005" CATNAME="Meat/Poultry" PRODNAME="Filo Mix"
PRODSALES="26065.4000" />
<Table1 CATID="10002" CATNAME="Confections" PRODNAME="Grandma's
Boysenberry Spread" PRODSALES="405.6500" />
<Table1 CATID="10001" CATNAME="Condiments" PRODNAME="Ipoh Coffee"
PRODSALES="6006.0000" />
</ResultSets>
</Success>
</DB2Test1Receive>
Test 2 - Calling a Stored Procedure With IN and OUT ParametersThis stored procedure inserts five values into a row (five IN parameters), returns five
values (five OUT parameters), and also returns a result set.
CREATE PROCEDURE CNWIND.SP_INOUTSALES (
IN I_PRODID INTEGER ,
IN I_ORDYEAR CHAR(4) ,
IN I_ORDMONTH CHAR(3) ,
IN I_QTY SMALLINT ,
42
IN I_AMOUNT DECIMAL(9, 2) ,
OUT O_PRODID INTEGER ,
OUT O_ORDYEAR CHAR(4) ,
OUT O_ORDMONTH CHAR(3) ,
OUT O_QTY SMALLINT ,
OUT O_AMOUNT DECIMAL(9, 2) )
DYNAMIC RESULT SETS 2
LANGUAGE SQL
SPECIFIC CNWIND.SP_INOUTSALES
NOT DETERMINISTIC
MODIFIES SQL DATA
CALLED ON NULL INPUT
SET OPTION ALWBLK = *ALLREAD ,
ALWCPYDTA = *OPTIMIZE ,
COMMIT = *NONE ,
DECRESULT = (31, 31, 00) ,
DFTRDBCOL = *NONE ,
DYNDFTCOL = *NO ,
DYNUSRPRF = *USER ,
SRTSEQ = *HEX BEGIN
DECLARE C1 CURSOR FOR SELECT PRODID , ORDYEAR , ORDMONTH , QTY ,
AMOUNT FROM CNWIND . SALES WHERE PRODID = I_PRODID ;
DECLARE C2 CURSOR WITH RETURN FOR SELECT * FROM CNWIND . SALES ;
INSERT INTO CNWIND . SALES ( PRODID , ORDYEAR , ORDMONTH , QTY ,
AMOUNT ) VALUES ( I_PRODID , I_ORDYEAR , I_ORDMONTH , I_QTY , I_AMOUNT )
;
OPEN C1 ;
OPEN C2 ;
FETCH C1 INTO O_PRODID , O_ORDYEAR , O_ORDMONTH , O_QTY ,
O_AMOUNT ;
END ;
This stored procedure contains a total of ten parameters: 5 IN, 5 OUT.
When creating the schema in Visual Studio, make sure to select ALL values. When you
first look at a stored procedure in the wizard, the dialog box looks similar to this.
43
As you select the parameters, the results at the bottom of the page will be updated.
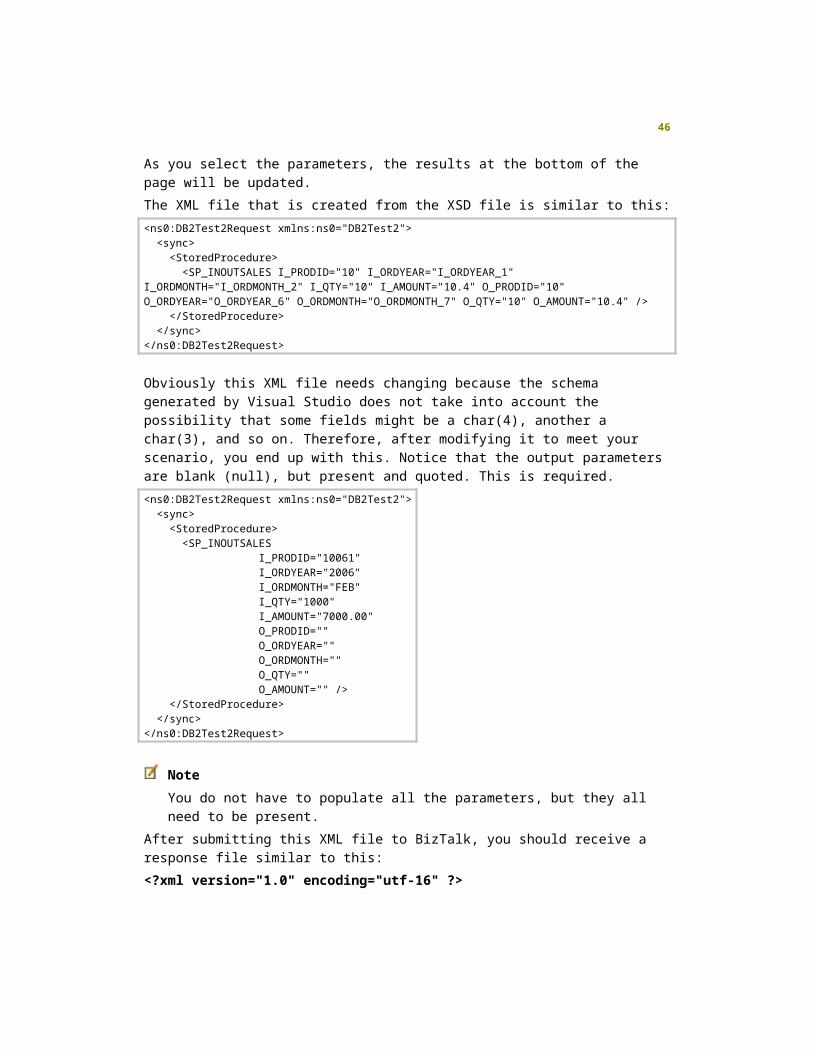
The XML file that is created from the XSD file is similar to this:
<ns0:DB2Test2Request xmlns:ns0="DB2Test2"> <sync> <StoredProcedure> <SP_INOUTSALES I_PRODID="10" I_ORDYEAR="I_ORDYEAR_1" I_ORDMONTH="I_ORDMONTH_2" I_QTY="10" I_AMOUNT="10.4" O_PRODID="10" O_ORDYEAR="O_ORDYEAR_6" O_ORDMONTH="O_ORDMONTH_7" O_QTY="10" O_AMOUNT="10.4" /> </StoredProcedure> </sync></ns0:DB2Test2Request>
Obviously this XML file needs changing because the schema generated by Visual Studio
does not take into account the possibility that some fields might be a char(4), another a
char(3), and so on. Therefore, after modifying it to meet your scenario, you end up with
this. Notice that the output parameters are blank (null), but present and quoted. This is
required.
<ns0:DB2Test2Request xmlns:ns0="DB2Test2"> <sync> <StoredProcedure>
44

<SP_INOUTSALES I_PRODID="10061" I_ORDYEAR="2006" I_ORDMONTH="FEB" I_QTY="1000" I_AMOUNT="7000.00" O_PRODID="" O_ORDYEAR="" O_ORDMONTH="" O_QTY="" O_AMOUNT="" /> </StoredProcedure> </sync></ns0:DB2Test2Request>
Note
You do not have to populate all the parameters, but they all need to be present.
After submitting this XML file to BizTalk, you should receive a response file similar to this:
<?xml version="1.0" encoding="utf-16" ?>
<DB2Test1Receive xmlns="DB2Test1">
<Success>
<SP_INOUTSALES I_PRODID="" I_ORDYEAR="" I_ORDMONTH="" I_QTY=""
I_AMOUNT="" O_PRODID="10061" O_ORDYEAR="2006" O_ORDMONTH="FEB"
O_QTY="1000" O_AMOUNT="7000.00" />
<ResultSets>
<Table1 PRODID="10051" ORDYEAR="2007" ORDMONTH="JAN" QTY="10"
AMOUNT="70.00" />
<Table1 PRODID="10052" ORDYEAR="2007" ORDMONTH="JAN" QTY="10"
AMOUNT="70.00" />
<Table1 PRODID="10053" ORDYEAR="2007" ORDMONTH="JAN" QTY="10"
AMOUNT="70.00" />
<Table1 PRODID="10054" ORDYEAR="2007" ORDMONTH="JAN" QTY="10"
AMOUNT="70.00" />
<Table1 PRODID="10055" ORDYEAR="2007" ORDMONTH="JAN" QTY="10"
AMOUNT="70.00" />
<Table1 PRODID="10056" ORDYEAR="2007" ORDMONTH="JAN" QTY="10"
AMOUNT="70.00" />
<Table1 PRODID="10057" ORDYEAR="2007" ORDMONTH="JAN" QTY="10"
AMOUNT="70.00" />
45
<Table1 PRODID="10058" ORDYEAR="2007" ORDMONTH="JAN" QTY="10"
AMOUNT="70.00" />
<Table1 PRODID="10060" ORDYEAR="2006" ORDMONTH="FEB" QTY="100"
AMOUNT="700.00" />
<Table1 PRODID="10061" ORDYEAR="2006" ORDMONTH="FEB" QTY="1000"
AMOUNT="7000.00" />
</ResultSets>
</Success>
</DB2Test1Receive>
In the first return (after the <Success> tag, the input parameters are now set to null (""),
and the output parameters are now populated. The fetch statement in the stored
procedure returns these values.
The result set shows all values that are currently in the table as specified in the stored
procedure (select * from).
Test 3 - Using a Send Port to Insert Rows Into a TableIn this test, the send port that was created previously (SendPort_DB2Test1) is used to
update a table.
To use a send port to insert table rows
1. Begin by starting the Add Generated Items wizard, and select the port as you
did previously.
2. When you get to the Statement Type Information screen, select Updategram,
and then click Next.
46

3. In the Statement Information screen, in Select the type of updategram, click
Insert, select a table, click Check all, click Next, and then click Finish.
47

4. Right-click the generated XSD file, generate an instance, and then save the XML
file to preserve it.
When you first open the file in Visual Studio it should look similar to this:
<ns0:DB2Test3Request xmlns:ns0="DB2Test3"> <sync> <after> <AREAS AREAID="AREAID_0" AREADESC="AREADESC_1" REGIONID="10" /> <AREAS AREAID="AREAID_0" AREADESC="AREADESC_1" REGIONID="10" /> <AREAS AREAID="AREAID_0" AREADESC="AREADESC_1" REGIONID="10" /> </after> <after> <AREAS AREAID="AREAID_0" AREADESC="AREADESC_1" REGIONID="10" /> <AREAS AREAID="AREAID_0" AREADESC="AREADESC_1" REGIONID="10" /> <AREAS AREAID="AREAID_0" AREADESC="AREADESC_1" REGIONID="10" /> </after> <after> <AREAS AREAID="AREAID_0" AREADESC="AREADESC_1" REGIONID="10" /> <AREAS AREAID="AREAID_0" AREADESC="AREADESC_1" REGIONID="10" /> <AREAS AREAID="AREAID_0" AREADESC="AREADESC_1" REGIONID="10" /> </after> </sync></ns0:DB2Test3Request>
48

Edit the file so it fits your scenario. For instance:
<ns0:DB2Test3Request xmlns:ns0="DB2Test3"> <sync> <after> <AREAS AREAID="28105" AREADESC="Matthews" REGIONID="101" /> <AREAS AREAID="28277" AREADESC="Charlotte" REGIONID="101" /> <AREAS AREAID="28201" AREADESC="Charlotte" REGIONID="101" /> </after> <after> <AREAS AREAID="27408" AREADESC="Greensboro" REGIONID="101" /> <AREAS AREAID="27608" AREADESC="Raleigh" REGIONID="101" /> <AREAS AREAID="27104" AREADESC="Winston Salem" REGIONID="101" /> </after> </sync></ns0:DB2Test3Request>
It is also possible to modify the file to include an <after> statement such as:
<ns0:DB2Test3Request xmlns:ns0="DB2Test3"> <sync> <after> <AREAS AREAID="28105" AREADESC="Matthews" REGIONID="101" /> <AREAS AREAID="28277" AREADESC="Charlotte" REGIONID="101" /> <AREAS AREAID="28201" AREADESC="Charlotte" REGIONID="101" /> <AREAS AREAID="27408" AREADESC="Greensboro" REGIONID="101" /> <AREAS AREAID="27608" AREADESC="Raleigh" REGIONID="101" /> <AREAS AREAID="27104" AREADESC="Winston Salem" REGIONID="101" /> </after> </sync></ns0:DB2Test3Request>
5. Copy this file into your directory used previously. When the message has been
processed, you should have an XML file similar to this:
<?xml version="1.0" encoding="utf-16"?><DB2Test1Receive xmlns="DB2Test1"> <Success> <RowsAffected>1</RowsAffected> </Success> <Success> <RowsAffected>1</RowsAffected> </Success> <Success> <RowsAffected>1</RowsAffected> </Success> <Success> <RowsAffected>1</RowsAffected> </Success> <Success>
49

<RowsAffected>1</RowsAffected> </Success> <Success> <RowsAffected>1</RowsAffected> </Success></DB2Test1Receive>
There should be one Success for each row that is inserted.
Test 4 - Using a Send Port to Update Rows in a TableIn this test, you use the send port created previously (SendPort_DB2Test1) to update a
row in the table.
To use a send port for updating table rows
1. Start the Add Generated Items wizard, and select the port as you did previously.
2. When you get to the Statement Type Information screen, select Updategram,
and then click Next.
3. In the Statement Information screen, in Select the type of updategram, click
50

Update, select a table, click Check all, click Next, and then click Finish.
4. After doing this, right-click the generated XSD file, generate an instance, then
save the XML file to preserve it.
When you first open the file in Visual Studio, it should look similar to this:
<ns0:DB2Test4Request xmlns:ns0="DB2Test4"> <sync> <before> <AREAS AREAID="AREAID_0" AREADESC="AREADESC_1" REGIONID="10" /> <AREAS AREAID="AREAID_0" AREADESC="AREADESC_1" REGIONID="10" /> <AREAS AREAID="AREAID_0" AREADESC="AREADESC_1" REGIONID="10" /> </before> <before> <AREAS AREAID="AREAID_0" AREADESC="AREADESC_1" REGIONID="10" /> <AREAS AREAID="AREAID_0" AREADESC="AREADESC_1" REGIONID="10" /> <AREAS AREAID="AREAID_0" AREADESC="AREADESC_1" REGIONID="10" /> </before> <before> <AREAS AREAID="AREAID_0" AREADESC="AREADESC_1" REGIONID="10" /> <AREAS AREAID="AREAID_0" AREADESC="AREADESC_1" REGIONID="10" /> <AREAS AREAID="AREAID_0" AREADESC="AREADESC_1" REGIONID="10" /> </before> <after>
51

<AREAS AREAID="AREAID_0" AREADESC="AREADESC_1" REGIONID="10" /> <AREAS AREAID="AREAID_0" AREADESC="AREADESC_1" REGIONID="10" /> <AREAS AREAID="AREAID_0" AREADESC="AREADESC_1" REGIONID="10" /> </after> <after> <AREAS AREAID="AREAID_0" AREADESC="AREADESC_1" REGIONID="10" /> <AREAS AREAID="AREAID_0" AREADESC="AREADESC_1" REGIONID="10" /> <AREAS AREAID="AREAID_0" AREADESC="AREADESC_1" REGIONID="10" /> </after> <after> <AREAS AREAID="AREAID_0" AREADESC="AREADESC_1" REGIONID="10" /> <AREAS AREAID="AREAID_0" AREADESC="AREADESC_1" REGIONID="10" /> <AREAS AREAID="AREAID_0" AREADESC="AREADESC_1" REGIONID="10" /> </after> </sync></ns0:DB2Test4Request>
As stated previously, edit the file to meet your scenario. The previous test (inserting
rows) contains a deliberate mistake in one of the inserts (the line containing <AREAS
AREAID="28201" AREADESC="Charlotte" REGIONID="101" />). This should have
been 28226 instead of 28201 for the AREAID.
To make sure only the 28201 entry is updated, the XML file is modified as such:
<ns0:DB2Test4Request xmlns:ns0="DB2Test4"> <sync> <before> <AREAS AREAID="28201" AREADESC="Charlotte" REGIONID="101" /> </before> <after> <AREAS AREAID="28226" /> </after> </sync></ns0:DB2Test4Request>
After submitting this to the send port, you should receive the following:
<?xml version="1.0" encoding="utf-16"?><DB2Test1Receive
xmlns="DB2Test1"><Success><RowsAffected>1</RowsAffected></Success></
DB2Test1Receive>
Looking at the database in SQL Server verifies that the update took place:
EXEC ( 'SELECT * FROM CNWIND.AREAS') AT CONTOSOCNWIND;
The preceding query returned
…
…
…
52

27104Winston Salem101
27608Raleigh101
27408Greensboro101
28226Charlotte101
28277Charlotte101
28105Matthews101
In this particular table, the AREAID is a unique field, so it would have been possible
to just specify the AREAID in the ‘before’ section of the updategram.
Test 5 - Using a Send Port to Delete Rows from a TableIn this test, you use the send port that was created previously (SendPort_DB2Test1) to
delete the rows that you added (and updated) in the table.
Using a send port for deleting table rows
1. Start the Add Generated Items wizard, and select the port as previously done.
2. In the Statement TypeInformation screen, select Updategram, and then click
Next.
53

3. In the Statement Information screen, in Select the type of updategram, click
Delete, select a table, click Check all, click Next, and then click Finish
54

4. Right-click the generated XSD file, generate an instance, then save the XML file
to preserve it.
5. Open the XML file. It should look similar to this.
<ns0:DB2Test5 xmlns:ns0="DB2Test5"> <sync> <before> <AREAS AREAID="AREAID_0" AREADESC="AREADESC_1" REGIONID="10" /> <AREAS AREAID="AREAID_0" AREADESC="AREADESC_1" REGIONID="10" /> <AREAS AREAID="AREAID_0" AREADESC="AREADESC_1" REGIONID="10" /> </before> <before> <AREAS AREAID="AREAID_0" AREADESC="AREADESC_1" REGIONID="10" /> <AREAS AREAID="AREAID_0" AREADESC="AREADESC_1" REGIONID="10" /> <AREAS AREAID="AREAID_0" AREADESC="AREADESC_1" REGIONID="10" /> </before> <before> <AREAS AREAID="AREAID_0" AREADESC="AREADESC_1" REGIONID="10" /> <AREAS AREAID="AREAID_0" AREADESC="AREADESC_1" REGIONID="10" /> <AREAS AREAID="AREAID_0" AREADESC="AREADESC_1" REGIONID="10" /> </before> </sync></ns0:DB2Test5>
55

Once again, modify the XML file to meet your scenario:
<ns0:DB2Test5 xmlns:ns0="DB2Test5"> <sync> <before> <AREAS AREAID="28105" AREADESC="Matthews" REGIONID="101" /> <AREAS AREAID="28277" AREADESC="Charlotte" REGIONID="101" /> <AREAS AREAID="28201" AREADESC="Charlotte" REGIONID="101" /> </before> <before> <AREAS AREAID="27408" AREADESC="Greensboro" REGIONID="101" /> <AREAS AREAID="27608" AREADESC="Raleigh" REGIONID="101" /> <AREAS AREAID="27104" AREADESC="Winston Salem" REGIONID="101" /> </before> </sync></ns0:DB2Test5>
Note
There is a deliberate mistake in the preceding XML file, which will be
corrected in a later exercise.
<?xml version="1.0" encoding="utf-16" ?>
<DB2Test1Receive xmlns="DB2Test1">
<Success>
<RowsAffected>1</RowsAffected>
</Success>
<Success>
<RowsAffected>1</RowsAffected>
</Success>
<Success>
<RowsAffected>1</RowsAffected>
</Success>
<Success>
<RowsAffected>0</RowsAffected>
</Success>
<Success>
<RowsAffected>1</RowsAffected>
</Success>
56

<Success>
<RowsAffected>1</RowsAffected>
</Success>
</DB2Test1Receive>
Notice in the preceding, the “failure” -> <RowsAffected>0</RowsAffected>. This is
because an AREAID of 28201 was submitted, which was changed in the previous
example. Therefore, this row was not deleted. However, all other rows were deleted
successfully.
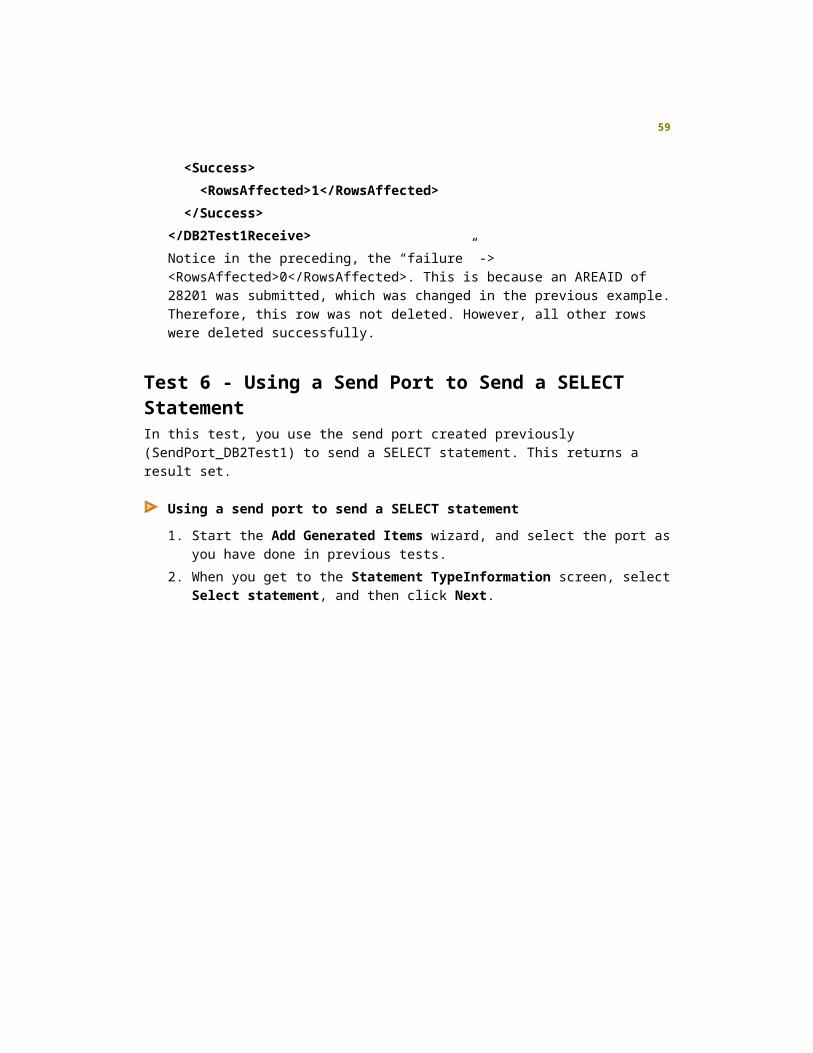
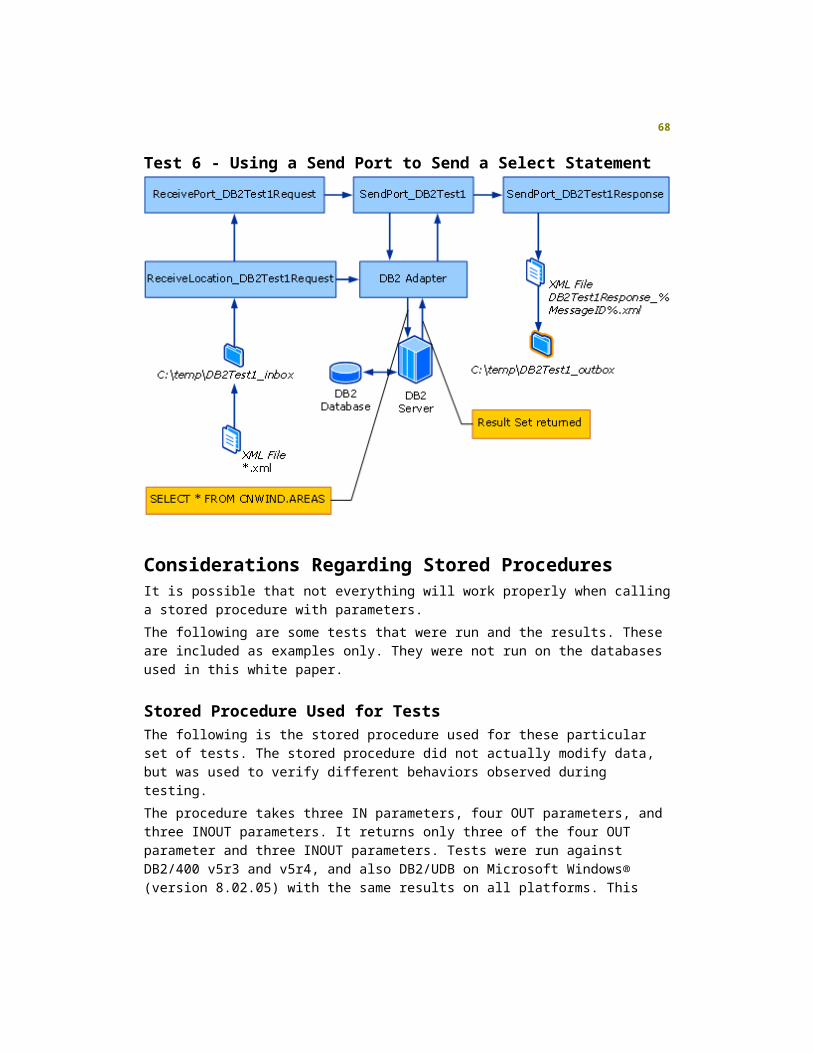
Test 6 - Using a Send Port to Send a SELECT StatementIn this test, you use the send port created previously (SendPort_DB2Test1) to send a
SELECT statement. This returns a result set.
Using a send port to send a SELECT statement
1. Start the Add Generated Items wizard, and select the port as you have done in
previous tests.
2. When you get to the Statement TypeInformation screen, select Select
statement, and then click Next.
57

3. Click Finish. There are no other dialog boxes with this option.
4. Generate the XML file as previously, and bring it up in Visual Studio.
The original should look similar to this:
<ns0:DB2Test6Request xmlns:ns0="DB2Test6"> <sync> <Select>Select_0</Select> </sync></ns0:DB2Test6Request>
5. Modify it to contain a SELECT statement:
<ns0:DB2Test6Request xmlns:ns0="DB2Test6"> <sync> <Select>SELECT * FROM CNWIND.AREAS</Select> </sync></ns0:DB2Test6Request>
Once you have saved the file, submit this as you have done previously.
The output should be similar to this:
<?xml version="1.0" encoding="utf-16" ?>
58
<DB2Test1Receive xmlns="DB2Test1">
<Success>
<ResultSets>
<AREAS AREAID="01581" AREADESC="Westboro" REGIONID="101" />
<AREAS AREAID="01730" AREADESC="Bedford" REGIONID="101" />
<AREAS AREAID="01833" AREADESC="Georgetow" REGIONID="101" />
<AREAS AREAID="02116" AREADESC="Boston" REGIONID="101" />
<AREAS AREAID="02139" AREADESC="Cambridge" REGIONID="101" />
<AREAS AREAID="02184" AREADESC="Braintree" REGIONID="101" />
<AREAS AREAID="02903" AREADESC="Providence" REGIONID="101" />
...
...
...
<AREAS AREAID="98052" AREADESC="Redmond" REGIONID="102" />
<AREAS AREAID="98104" AREADESC="Seattle" REGIONID="102" />
<AREAS AREAID="28226" AREADESC="Charlotte" REGIONID="101" />
</ResultSets>
</Success>
</DB2Test1Receive>
The 28226, Charlotte values are still present because this row has not been deleted
at this time.
ADDENDUM
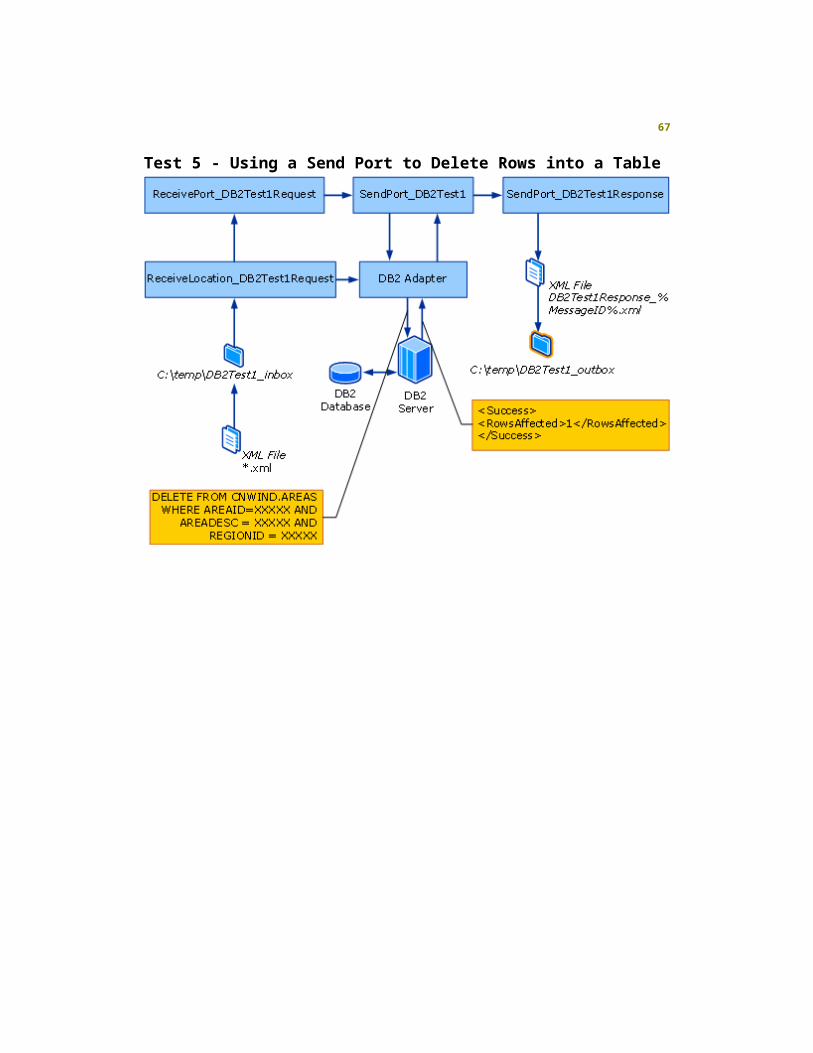
Data Flow ChartsAll the previous tests used the three ports configured in the "BizTalk Configuration"
section (2 send ports, 1 receive port). The flows are the same for all the tests.
Test 1 - Calling a Stored Procedure with No Parameters
When the application is started, the Receive Port ReceivePort_DB2Test1Request
monitors the receive location ReceiveLocation_DB2Test1Request. This points to C:\temp\
DB2Test1_inbox.
When any XML file (specified as *.xml) appears in this location, it is picked up by
SendPort_DB2Test1.
59

SendPort_DB2Test1 then takes the XML file and submits it to the DB2 adapter. The DB2
adapter parses the XML file, and based on what is there, sends the appropriate
commands to the DB2 host database.
The DB2 host responds with a message to state if the insert was successful. This is
picked up by SendPort_DB2Test1Response, and written to C:\temp\DB2Test1_outbox as
DB2Test1Response_%MessageID%.xml.
Test 2 - Calling a Stored Procedure with In and Out Parameters
This is the same as earlier, except that the call statement included parameters passed
and received from the stored procedure.
60

Test 3 - Using a Send Port to Insert Rows into a Table.
In this test, an XML file was sent to update files. The only change here is in the statement
sent to the host.
61

62

Test 4 - Using a Send Port to Update Rows in a Table
63

Test 5 - Using a Send Port to Delete Rows into a Table
64

Test 6 - Using a Send Port to Send a Select Statement
Considerations Regarding Stored ProceduresIt is possible that not everything will work properly when calling a stored procedure with
parameters.
The following are some tests that were run and the results. These are included as
examples only. They were not run on the databases used in this white paper.
Stored Procedure Used for Tests
The following is the stored procedure used for these particular set of tests. The stored
procedure did not actually modify data, but was used to verify different behaviors
observed during testing.
The procedure takes three IN parameters, four OUT parameters, and three INOUT
parameters. It returns only three of the four OUT parameter and three INOUT
parameters. Tests were run against DB2/400 v5r3 and v5r4, and also DB2/UDB on
Microsoft Windows® (version 8.02.05) with the same results on all platforms. This helps
in verifying that there were no specific DB2 versioning issues.
CREATE PROCEDURE DON.SP_MANYPARAMS (
IN I_FUNKTION CHAR(1) ,
65

OUT O_RETURKOD CHAR(4) ,
INOUT IO_SQLCODE INTEGER ,
OUT O_MEDD CHAR(7) ,
OUT O_MEDDTEXT CHAR(70) ,
OUT O_TERMNAMN CHAR(16) ,
IN I_AVISERINGSKANAL CHAR(8) ,
IN I_BENAMNING CHAR(35) ,
INOUT IO_REGDATTID CHAR(26) ,
INOUT IO_REGUSERID CHAR(8) )
LANGUAGE SQL
SPECIFIC DON.SP_MANYPARAMS
NOT DETERMINISTIC
MODIFIES SQL DATA
CALLED ON NULL INPUT
SET OPTION ALWBLK = *ALLREAD ,
ALWCPYDTA = *OPTIMIZE ,
COMMIT = *NONE ,
DECRESULT = (31, 31, 00) ,
DFTRDBCOL = *NONE ,
DYNDFTCOL = *NO ,
DYNUSRPRF = *USER
P1 : BEGIN
SET O_RETURKOD = 'BOB1' ;
SET IO_SQLCODE = 3 ;
SET O_MEDD = 'CHARLES' ;
SET O_TERMNAMN = '16 CHARACTERSOUT' ;
SET IO_REGDATTID = '25 CHARACTERS OUT OF THIS' ;
SET IO_REGUSERID = 'DON' ;
END P1 ;
Test Runs
Five tests were performed as follows:
66
Test 1
In this test, the original XML that was generated was modified as below to match the
input requirements for this stored procedure:
<ns0:HISStoredProcRequest xmlns:ns0="HISStoredProc"><sync><StoredProcedure> <SP_MANYPARAMS10 I_FUNKTION="R" O_RETURKOD="" IO_SQLCODE="3" O_MEDD="" O_MEDDTEXT="" O_TERMNAMN="" I_AVISERINGSKANAL="BREVMOT" I_BENAMNING="" IO_REGDATTID="" IO_REGUSERID="" /></StoredProcedure></sync></ns0:HISStoredProcRequest>
This worked without any problems.
Test 2
In this test, the the first and second parameters were switched:
<ns0:HISStoredProcRequest xmlns:ns0="HISStoredProc"><sync><StoredProcedure> <SP_MANYPARAMS10 O_RETURKOD="" I_FUNKTION="R" IO_SQLCODE="3" O_MEDD="" O_MEDDTEXT="" O_TERMNAMN="" I_AVISERINGSKANAL="BREVMOT" I_BENAMNING="" IO_REGDATTID="" IO_REGUSERID="" /></StoredProcedure></sync></ns0:HISStoredProcRequest>
This seems to work just fine.
Test 3
In this test, the second parameter was deleted, so only nine are being passed to the
stored procedure:
<ns0:HISStoredProcRequest xmlns:ns0="HISStoredProc"><sync><StoredProcedure> <SP_MANYPARAMS10 I_FUNKTION="R" IO_SQLCODE="3" O_MEDD="" O_MEDDTEXT="" O_TERMNAMN="" I_AVISERINGSKANAL="BREVMOT" I_BENAMNING="" IO_REGDATTID="" IO_REGUSERID="" /></StoredProcedure></sync></ns0:HISStoredProcRequest>
This fails with a BizTalk Server 2006 Event ID 5743:
The adapter failed to transmit message going to send port
"SendPort1_StoredProcUpdate" with URL "DB2://DB282:50000/PSS/DON". It will be
67
retransmitted after the retry interval specified for this Send Port. Details:"Index
was out of range. Must be non-negative and less than the size of the collection.
Parameter name: index".
Test 4
In this test, the ten parameters were mixed up, so that they were in the wrong order in
various places.
<ns0:HISStoredProcRequest xmlns:ns0="HISStoredProc"> <sync> <StoredProcedure> <SP_MANYPARAMS10O_RETURKOD=""IO_SQLCODE="3"I_FUNKTION="R"O_MEDDTEXT=""O_MEDD=""O_TERMNAMN=""I_BENAMNING=""IO_REGDATTID=""I_AVISERINGSKANAL="BREVMOT"IO_REGUSERID="" /> </StoredProcedure> </sync></ns0:HISStoredProcRequest>
This fails with the following error:
BizTalk Server 2006 Event ID 5743:
The adapter failed to transmit message going to send port
"SendPort1_StoredProcUpdate" with URL "DB2://DB282:50000/PSS/DON". It will be
retransmitted after the retry interval specified for this Send Port. Details:"The
parameter value for parameter 2 could not be converted to a native data type.
Parameter Name: I_FUNKTION, Data Type: R, Value : Int".
Test 5
The XML file was changed as follows:
<ns0:HISStoredProcRequest xmlns:ns0="HISStoredProc"> <sync> <StoredProcedure> <SP_MANYPARAMS10 ONE="R" TWO="" THREE="3" FOUR="" FIVE="" SIX="" SEVEN="BREVMOT"
68

EIGHT="" NINE="" TEN="" /> </StoredProcedure> </sync></ns0:HISStoredProcRequest>
The XML file was placed in the receive port location. The following is what was received
in the “outbox,” which indicates everything worked as expected.
<?xml version="1.0" encoding="utf-16" ?>
<HISStoredProcResponse xmlns="HISStoredProc">
<Success>
<SP_MANYPARAMS10 I_FUNKTION="" O_RETURKOD="BOB1"
IO_SQLCODE="3" O_MEDD="CHARLES" O_MEDDTEXT="70 CHARACTERS NOT!"
O_TERMNAMN="16 CHARACTERSOUT" I_AVISERINGSKANAL=""
I_BENAMNING="" IO_REGDATTID="25 CHARACTERS OUT OF THIS"
IO_REGUSERID="DON" />
<ResultSets />
</Success>
</HISStoredProcResponse>
Conclusions from the Tests
In Test 1, everything worked as expected.
In Test 2, things worked; however, if the first two parameters had not matched in the type,
the test would have failed. This could have potentially caused problems, if the stored
procedure had actually used those variables.
The first and second parameters of the stored procedure, in this case, are for characters
(IN I_FUNKTION CHAR(1),OUT O_RETURKOD CHAR(4)). However, the stored
procedure would have received nothing (NULL) for the first parameter and ignored the
second parameter because it is an OUT parameter. Also see Test 3.
In Test 3, where a parameter was deleted, it fails because an incorrect number of
parameters was specified in the XML file, and the stored procedure expected 10.
In Test 4, the stored procedure expects:
A character for the first parameter.
A character for the output (anything coming in would be ignored) for the second
parameter.
An integer value for the third parameter.
69

However, in the XML file, a NULL (“”), a “3” (read as a character), and an “R” were sent.
The “R” cannot be converted to an integer, so it fails.
Test 5 shows that the input XML parameter names do not matter, as long as you have the
right number of parameters and they are in the correct order. This is because it is a
parameterized query, so the offset is what matters.
ConclusionThis document addressed using send ports to submit commands to the DB2 database
You used the Data Access Tool to create a data connection. You then configured BizTalk
Server and Visual Studio to use the BizTalk Adapter for DB2, and conducted tests in
various scenarios.
For more information about the BizTalk Adapter for DB2, see
http://go.microsoft.com/fwlink/?LinkId=91515.
CopyrightThe information contained in this document represents the current view of Microsoft
Corporation on the issues discussed as of the date of publication. Because Microsoft
must respond to changing market conditions, it should not be interpreted to be a
commitment on the part of Microsoft, and Microsoft cannot guarantee the accuracy of any
information presented after the date of publication.
This White Paper is for informational purposes only. MICROSOFT MAKES NO
WARRANTIES, EXPRESS, IMPLIED OR STATUTORY, AS TO THE INFORMATION IN
THIS DOCUMENT.
Complying with all applicable copyright laws is the responsibility of the user. Without
limiting the rights under copyright, no part of this document may be reproduced, stored in
or introduced into a retrieval system, or transmitted in any form or by any means
(electronic, mechanical, photocopying, recording, or otherwise), or for any purpose,
without the express written permission of Microsoft Corporation.
Microsoft may have patents, patent applications, trademarks, copyrights, or other
intellectual property rights covering subject matter in this document. Except as expressly
provided in any written license agreement from Microsoft, the furnishing of this document
does not give you any license to these patents, trademarks, copyrights, or other
intellectual property.
Unless otherwise noted, the companies, organizations, products, domain names, e-mail
addresses, logos, people, places, and events depicted in examples herein are fictitious.
No association with any real company, organization, product, domain name, e-mail
address, logo, person, place, or event is intended or should be inferred.
70

© 2007 Microsoft Corporation. All rights reserved.
Microsoft, BizTalk, Visual Studio, and Windows are either registered trademarks or
trademarks of Microsoft Corporation in the United States and/or other countries.
All other trademarks are property of their respective owners.
71