Embed Size (px)
Citation preview

Lab Manual
for
Data Structures Lab
4138
Diploma In Computer Engineering
4 th Semester
By
SITTTR Kalamassery
STATE INSTITUTE OF TECHNICAL TEACHERS TRAINING AND RESEARCH
GENERAL INSTRUCTIONS
Rough record and Fair record are needed to record the experiments conducted in the
laboratory. Rough records are needed to be certified immediately on completion of the experiment.
Fair records are due at the beginning of the next lab period. Fair records must be submitted as
neat, legible, and complete.
INSTRUCTIONS TO STUDENTS FOR WRITING THE FAIR RECORD
In the fair record, the index page should be filled properly by writing the corresponding
experiment number, experiment name , date on which it was done and the page number.
On the right side page of the record following has to be written:
1. Title: The title of the experiment should be written in the page in capital letters.
2. In the left top margin, experiment number and date should be written.
3. Aim: The purpose of the experiment should be written clearly.
4.Apparatus/Tools/Equipments/Components used: A list of the Apparatus/Tools /Equipments
/Components used for doing the experiment should be entered.
5. Principle: Simple working of the circuit/experimental set up/algorithm should be written.
6. Procedure: steps for doing the experiment and recording the readings should be briefly
described(flow chart/programs in the case of computer/processor related experiments)
7. Results: The results of the experiment must be summarized in writing and should be
fulfilling the aim.
8. Inference : Inference from the results is to be mentioned.
On the Left side page of the record following has to be recorded:
1. Circuit/Program: Neatly drawn circuit diagrams/experimental set up.
2. Design: The design of the circuit/experimental set up for selecting the components
should be clearly shown if necessary.
3. Observations: i) Data should be clearly recorded using Tabular Columns.
ii) Unit of the observed data should be clearly mentioned
iii) Relevant calculations should be shown. If repetitive calculations are needed, only show a
sample calculation and summarize the others in a table.
4. Graphs : Graphs can used to present data in a form that show the results obtained, as one or

more of the parameters are varied. A graph has the advantage of presenting large
amounts of data in a concise visual form. Graph should be in a square format.
GENERAL RULES FOR PERSONAL SAFETY
1. Always wear tight shirt/lab coat , pants and shoes inside workshops.
2. REMOVE ALL METAL JEWELLERY since rings, wrist watches or bands, necklaces, etc.
make excellent electrodes in the event of accidental contact with electric power sources.
3. DO NOT MAKE CIRCUIT CHANGES without turning off the power.
4. Make sure that equipment working on electrical power are grounded properly.
5. Avoid standing on metal surfaces or wet concrete. Keep your shoes dry.
6. Never handle electrical equipment with wet skin.
7. Hot soldering irons should be rested in its holder. Never leave a hot iron unattended.
8. Avoid use of loose clothing and hair near machines and avoid running around inside lab .
TO PROTECT EQUIPMENT AND MINIMIZE MAINTENANCE:
DO: 1. SET MULTIRANGE METERS to highest range before connecting to an unknown source.
2. INFORM YOUR INSTRUCTOR about faulty equipment so that it can be sent for repair.
DO NOT: 1. Do not MOVE EQUIPMENT around the room except under the supervision of an
instructor.
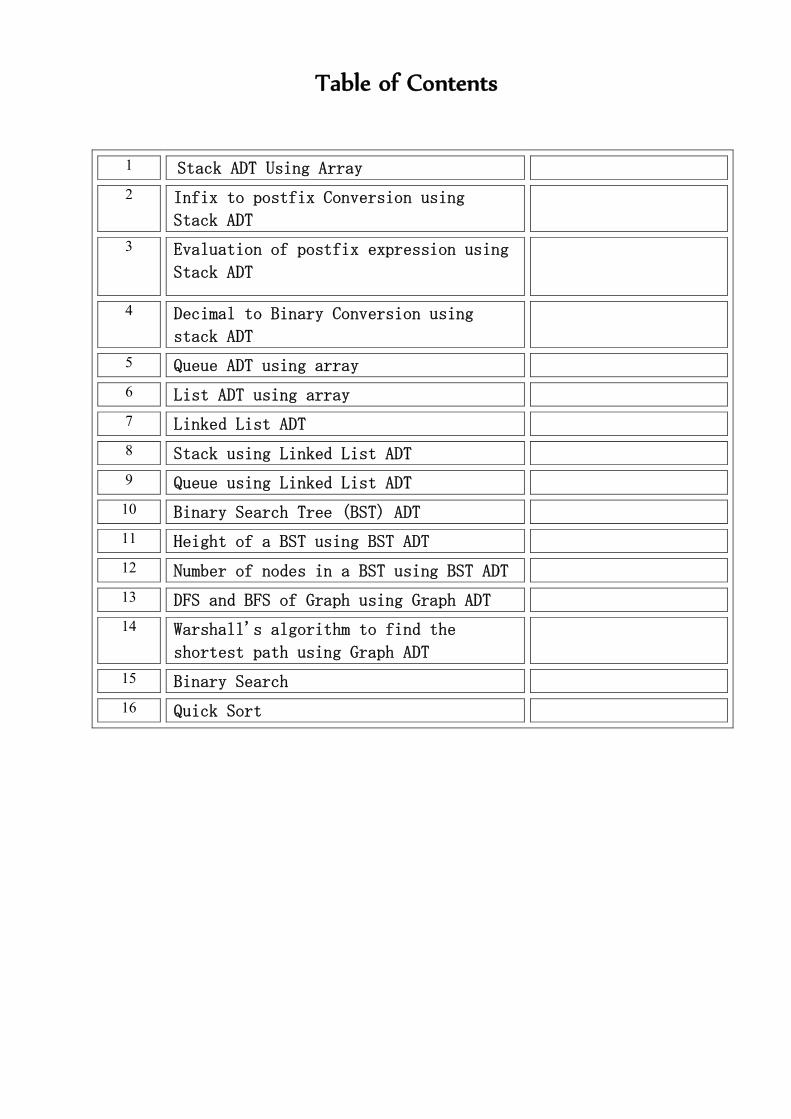
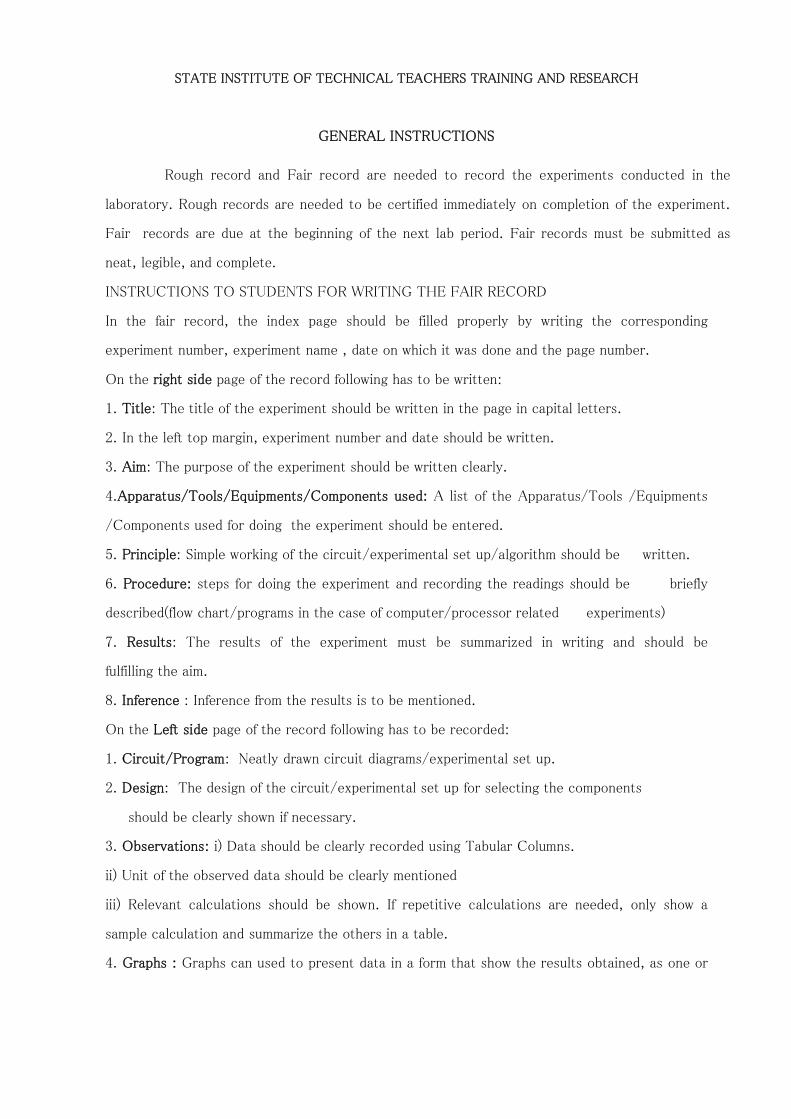
Table of Contents
1 Stack ADT Using Array
2 Infix to postfix Conversion using
Stack ADT
3 Evaluation of postfix expression using
Stack ADT
4 Decimal to Binary Conversion using
stack ADT
5 Queue ADT using array
6 List ADT using array
7 Linked List ADT
8 Stack using Linked List ADT
9 Queue using Linked List ADT
10 Binary Search Tree (BST) ADT
11 Height of a BST using BST ADT
12 Number of nodes in a BST using BST ADT
13 DFS and BFS of Graph using Graph ADT
14 Warshall's algorithm to find the
shortest path using Graph ADT
15 Binary Search
16 Quick Sort

Experiment No: 1
Stack ADT Using Array
Aim: To Write C++ code to implement Stack ADT and understand its basic
operations.
Objectives:
1) Understand the Stack Data Structure and its basic operators.
2) Understand the method of defining stack ADT and implement the basic
operators.
3) Learn how to create objects from an ADT and invoke member
functions.
Software Required: Linux OS with gcc/g++,gdb and gedit. Theory: A Stack is an ordered list in witch insertion and deletion are made
at one end called the Top. The restrictions on the stack imply that if we add
the elements 1,2,3,4,5 to the stack in that order, then 5 is the first element
we delete from the stack. The add operation is called “Push”, and the delete
operation is called “Pop”. Since the last element pushed into the stack is the first element popped, a stack is also known as a Last In First Out (LIFO) List.
Algorithm:
template<class T>
class stack
{
private:
int stacksize, top;
T *astack;
Public:
stack (int size); //constructor
int isFull();//returns 1 if full, 0 if not full
int isEmpty();//returns 1 if Empty, 0 is not empty
void push(T item);//pushes item to stack
T pop(); //pops one item from stack
};
/* Constructor – define & initialize stack */
template<class T>
stack::stack(int size)
{
stacksize=size;
astack=new T[stacksize];
top=-1;

}
/* isFull() function */
template<class T>
int stack<T>::isFull()
{
if (top==stacksize-1)
return 1;
else
return 0;
}
/* isEmpty() function */
template<class T>
int stack<T>::isEmpty()
{
if (top==-1)
return 1;
else
return 0;
}
/* push() function:inserts an item on top of stack */
template<class T>
void stack<T>::push(T item)
{
if (isFull())
Stack is full;
else
stack[++top]=item;
}
/* pop() function:deletes an item from top of stack */
template<class T>
T stack<T>::pop()
{
if(isEmpty())
Stack is empty;
else
{
T x;
x=stack[top--];
return x;
}
}

Program: To be written by the student using the above algorithm.
Observations: To be written by student after implementation of the algorithm.
1)Input:
2)Output:
Experiment No: 2
Infix to postfix Conversion using Stack ADT
Aim: To write C++ code to convert an expression in infix form to postfix form
using Stack ADT.
Objective: 1) Understand the use of Stack.
2) Understand how to import an ADT in an application program.
3) Understand the instantiation of Stack ADT in an application program.
4) Understand how the member functions of an ADT are accessed in an
application program.
Software Required: Linux Os with gcc/g++, gdb & gedit.
Theory: In high level programming languages, we use arithmetic expression in its
infix form. An expression in infix form contains operators in between operands
on which it operates. Parentheses also appear in infix expressions to specify
the order of evaluation. During compilation, the compiler converts the infix
expression to postfix for easy evaluation, since a postfix expression does not
contain any parenthesis. Also, a postfix expression can be evaluated easily by
using a stack.
Postfix notation has the following virtues:
No parenthesis.
The priority of the operations is no longer relevant.
Enables easy evaluation (evaluated by making a left to right scan,
stacking the operands.)
An infix expression can be manually converted to its post-fix form by following
these steps:
Step1: Fully parenthesis the expression.
Step2: Move all operators so that they replace their corresponding right
parenthesis.
Step3: Delete all parentheses.

Algorithm:
/* This algorithm outputs the postfix form of infix expression ‘e’.
nextToken() gives the next token (ie: operand, operator, opening or closing
paranthesis) from the expression 'e'.
The last token in 'e' is ‘#’. Also ‘#’ is used at the bottom of the
Stack. */
/* Stack ADT defined in Exp.No.1 is the content of stackADT.h */
#include “stackADT.h”
void postfix(char* e)
{
Stack<char> stack; // declares a character stack.
char y;
stack.push(‘#’);
for ( char x=nextToken(e) ; x!=’#’; x=nextToken(e) )
{
if(x is an operand)
cout<<x;
else if(x==’)’) //Unstack until’(’
for ( y=stack.pop() ; y!=’(’ ; y=stack.pop() )
cout<<y;
else
{
/* x is an operator */
for ( y=stack.pop() ; isp(y)<=icp(x) ; y=stack.pop() )
cout<<y;
stack.push(x);
}
}
while ( !stack.isEmpty() )
cout<<stack.pop(y);
}
int isp(char c)
{
int r;
switch (c)
{
case '!' : r=1; break;
case '*' : r=2; break;
case '/' : r=2; break;
case '%' : r=2; break;
case '+' : r=3; break;
case '-' : r=3; break;
case '(' : r=8; break;
case '#' : r=8; break;
}
return (r);
}
int icp(char c)
{
int r;
switch (c)
{
case '(' : r=0; break;
case '!' : r=1; break;
case '*' : r=2; break;
case '/' : r=2; break;
case '%' : r=2; break;
case '+' : r=3; break;
case '-' : r=3; break;
case '#' : r=8; break;
}
return (r);
}
Program: To be written by the student using the above algorithm.
Observations: To be written by student after implementation of the algorithm.
1)Input:
2)Output:
Experiment No: 3
Evaluation of postfix expression using Stack ADT
Aim: To write C++ code to evaluate a postfix expression using stack ADT. Objective:
1) Understand the use of Stack.
2) Understand importing an ADT in an application program.
3) Understand the instantiation of Stack ADT in an application program.
4) Understand how the member functions of an ADT are accessed in an
application program.
Software Required: Linux OS with gcc/g++, gdb & gedit.
Theory: An infix expression in a High Level Language program is converted into its
postfix form on its compilation time, since the evaluation of a postfix
expression is much simpler than direct evaluation of an infix expression. The
postfix expression is evaluated using Stack.
Following is the method for evaluation postfix expressions:
1) Create a stack to store operands.
2) Scan the given expression and do following for every scanned element.
a) If the element is a number, push it into the stack.
b) If the element is an operator, pop operands for the operator from
stack. Evaluate the operator and push the result back to the stack.
3) When the expression is ended, the number in the stack is the final answer
Algorithm:
void evaluate(char *e)
/* Evaluate the postfix expression e.
It is assumed that the last token in e is’#’.
A function NextToken is used to get the next token from e. The function uses
the Stack, Stack. */
{
Stack<token> stack;
for ( token x=NextToken(e) ; x!=’#’ ; x=NextToken(e) )
if(x is an operand)
stack.Push(x) //add to stack
else
{
// x is an operator
remove the correct number of operands for operator x
from stack;
perform the operation x and store the result onto the stack;
}
}
Program: To be written by the student using the above algorithm.
Observations: To be written by student after implementing the algorithm.
1)Input:
2)Output:
Experiment No: 4
Decimal to Binary Conversion using stack ADT
Aim: To write C++ code to convert a decimal number to its binary equivalent
using Stack ADT.
Objectives:
1) Understand the use of Stack.
2) Understand the method of importing an ADT in an application program.
3) Understand accessing of member functions of an ADT.
Software Required: Linux Os with gcc/g++, gdb & gedit.
Theory:
As stack is a LIFO data structure, we can retrieve the content of stack in
the reverse order of storing. This property of stack is used in this
application.
To convert a decimal number to its binary equivalent, we repeatedly divide
the decimal number by 2 and the remainder of division (either 0 or 1) is pushed
in to the stack, until the number becomes zero. When the division is completed,
pop out all the elements from the stack, which will give the binary equivalent.
Algorithm:
/ * This algorithm outputs the binary equivalent of a decimal number, num. */
/* Stack ADT is defined in “stackADT.h” */
#include “stackADT.h”
void convert(integer num)
{
stack<integer> stack1;
int rem,n,y,n=num;
while(n>0)
{
//push remainders to stack.
rem = n%2;
stack1.push(rem);
n=n/2;
}

while(!stack1.isEmpty)
{
//pop all remainders from stack
y=stack1.pop();
cout<<y;
}
}
Program: To be written by the student using the above algorithm.
Observations: To be written by student after implementing the algorithm.
1)Input:
2)Output:
Experiment No: 5
Queue ADT using array
Aim: To write C++ code to implement Queue ADT and test its features.
Objective:
1. Understand the Queue data structure and its basis operations.
2. Understand the method of defining Queue ADT and its basic operations.
3. Learn how to create objects from an ADT and member function are
invoked.
Software Required: Linux Os with gcc/g++, gdb & gedit.
Theory: A Queue is an ordered list in which all insertion takes place at one end
and all deletions take place at the opposite end. Since the first element
removed is the first element inserted, queues are also known as First In First
Out (FIFO) lists. The end at which insertions are taken place is called ‘rear’
and the end at which deletions take place is called ’front’.
In a standard queue data structure re-buffering problem occurs for each
dequeue operation. That means, the queue tells it is full even though there are
empty locations. This problem is solved by joining the front and rear ends of
the queue to make the queue as a circular queue. When rear == MaxSize-1 the next element is entered at queue[0] in case that is empty.
Queues are frequently used in computer programming, and one example is the
creation of a job queue by an Operating System. If the OS does not use
priorities, the jobs are processed in the order they enter the system.
Algorithm: template<class T>
class Queue
{
private:
int front,rear;
T *queue;
int qsize;
public:
Queue(int size); //Constructor.
int isFull(); //return 1 for Full,0 for not Full.
int isEmpty(); //return 1 for Empty, 0 for not Empty

void Insert(T item); //Inserts an item at the rear of queue.
T Delete(); //Deletes an item at the front of queue.
}
//constructor
template<class T>
Queue<T>:: Queue(int size)
{
qsize=size;
queue=new T[qsize];
front=rear= -1;
}
// isFull() function
template<class T>
int Queue<T>::isFull()
{
if((rear+1)%qsize==front)
return 1;
else
return 0;
}
//isEmpty()function
template<class T>
int Queue<T>::isEmpty();
{
if(front==rear || front == -1)
return 1;
else
return 0;
}
//Insert () function
template<class T>
void Queue<T>::Insert(T item)
{
if(isFull())
Queue is Full;
else if (front = -1)
{
front = 0;
rear = 0;
}
else
rear=(rear+1)%qsize;
queue[rear]=item;
}
//Delete () function
template<class T>
T Queue<T>::Delete()
{
If(isEmpty())
{
Queue is Empty;
return NULL;
}
T x=queue[front];
front=(front+1)%qsize;
return x;
}
Program: To be written by the student using the above algorithm.
Observations: To be written by student after implementing the algorithm.
1)Input:
2)Output:
Experiment No: 6
List ADT using array
Aim: To write C++ code to implement a List ADT using array with operations
find(), makeEmpty(), printList(), findKth(), insert(), delete() etc.
Objectives: 1) Understand a list data structure and its basic operation.
2) Understand the method of defining list ADT and its basic operation.
3) Learn how to create objects from an ADT and member functions are
invoked.
Software Required: Linux Os with gcc/g++, gdb & gedit.
Theory: Even though an array is usually viewed as a consecutive set of memory
locations, this concept may bring about some implementation issues. For the
purpose of defining a List ADT using array, we consider an array as a set of
pairs, <index, value>, such that each index that is defined has a value
associated with it. With this idea in mind, we can define the basic operations
on an array ADT like find(), findKth(), insert(), delete() etc. as follows.
Algorithm: template<class T>
class List
{
private:
int size;
T *list;
public:
List ( int size, T initvalue );
T Retrieve( int i);
void insert( int i, T item );
int find( T item );
void makeEmpty();
void printList();
T findKth( int k );
}
// Constructor
template < class T >
List<T>:: List( int size, T initval )
{
this.size = size;
list= new T[size];
for (i=0 ; i<=size ; i++)
list [i]= initval;
}
// retrieve function
template<class T>
T List<T>:: Retrieve(int i)
{
return list[i];
}
// Insert Function
void List<T>:: insert (int i, T x)
{
list[i]=x;
}
//Find Function
int List<T>:: find(T item)
{
int found=0;
for(int index =0; index<size; index++)
if(list[index]==item)
{ found=1;
break;
}
return found;
}
//makeEmpty() function
void List<T> :: makeEmpty()
{
for(int index=0; index<size; index++)
list[index]=NULL;
}
//printList() function
void List<T>::PrintList()
{
for( int index =0;index<size; index++ )
print(list[index]);
}
// findKth()function
T List<T>::findKth (int k)
{
return(list[k])
}
Program: To be written by the student using the above algorithm.
Observations: To be written by student after implementing the algorithm.
1)Input:
2)Output:
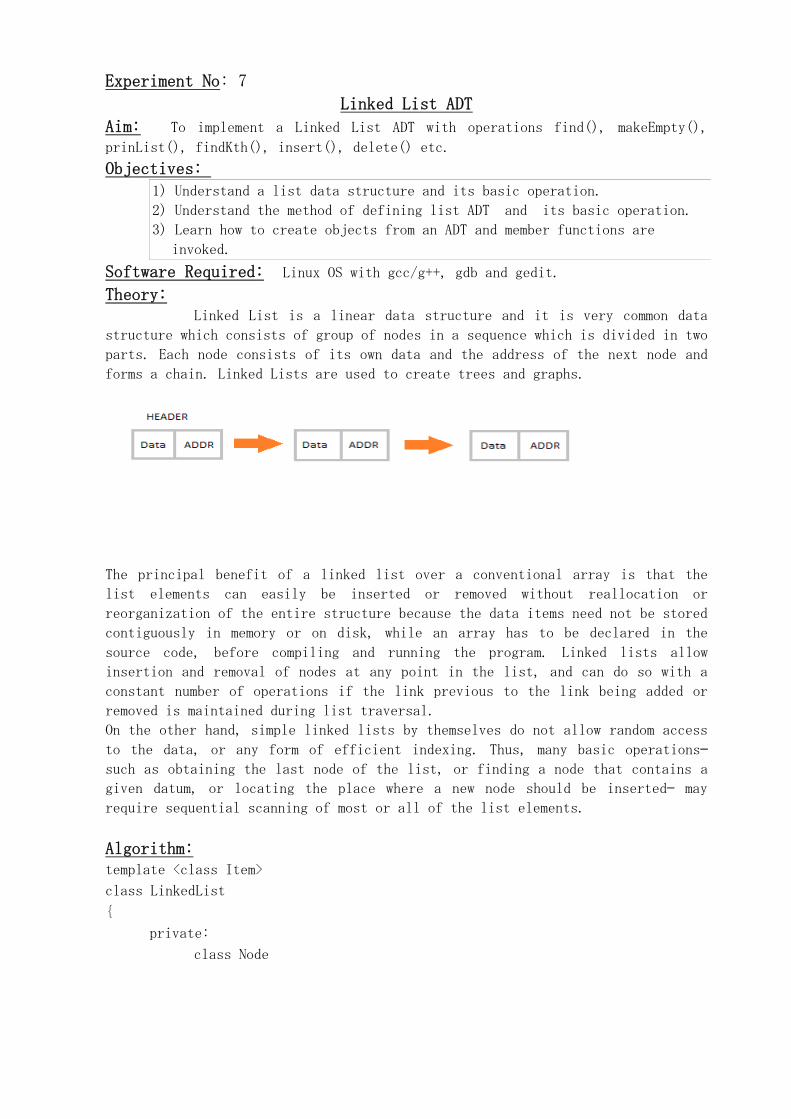
Experiment No: 7
Linked List ADT
Aim: To implement a Linked List ADT with operations find(), makeEmpty(),
prinList(), findKth(), insert(), delete() etc.
Objectives: 1) Understand a list data structure and its basic operation.
2) Understand the method of defining list ADT and its basic operation.
3) Learn how to create objects from an ADT and member functions are
invoked.
Software Required: Linux OS with gcc/g++, gdb and gedit.
Theory: Linked List is a linear data structure and it is very common data
structure which consists of group of nodes in a sequence which is divided in two
parts. Each node consists of its own data and the address of the next node and
forms a chain. Linked Lists are used to create trees and graphs.
The principal benefit of a linked list over a conventional array is that the
list elements can easily be inserted or removed without reallocation or
reorganization of the entire structure because the data items need not be stored
contiguously in memory or on disk, while an array has to be declared in the
source code, before compiling and running the program. Linked lists allow
insertion and removal of nodes at any point in the list, and can do so with a
constant number of operations if the link previous to the link being added or
removed is maintained during list traversal.
On the other hand, simple linked lists by themselves do not allow random access
to the data, or any form of efficient indexing. Thus, many basic operations—
such as obtaining the last node of the list, or finding a node that contains a
given datum, or locating the place where a new node should be inserted— may
require sequential scanning of most or all of the list elements.
Algorithm: template <class Item>
class LinkedList
{
private:
class Node

{
private:
Item value;
Node *next;
public:
Node( Item val, Node *nx=NULL )
{
value = val;
next = nx;
}
} *m_head, * m_tail;
unsigned int m_size;
public:
LinkedList( ); //creates an empty list
~LinkedList( ); //destroys the list
Unsigned int size( ) const; // return number of nodes
int isEmpty( )const; // true if list is empty, false otherwise
void addHead( Item item); // add item to front of list
Item removeHead( ); // remove front node
void addTail( Item item); // add item to end of list
Item removeTail( ); // remove last node
void insert ( unsigned int n, Item item); // Inser a new node
// in position n;
Item delete( unsigned int n ); // Remove the node at pos n
}
template <class Item>
LinkedList<Item> :: LinkedList( )
{
m_head=NULL;
m_tail=NULL;
m_size=0;
}
template <class Item>
LinkedList<Item> :: ~LinkedList( )
{
Node * here = m_head, *nextNode;
while ( here != NULL )
{
nextNode= here->next;
delete here;
here = nextNode;
}
}
template <class Item>
unsigned int LinkedList<Item> :: size( ) const
{
return m_size;
}
template <class Item>
int LinkedList<Item> :: isEmpty( ) const
{
return ( m_size );
}
template <class Item>
void LinkedList<Item> :: addHead( Item item )
{
m_head = new Node( item, m_head );
if (m_tail == NULL)
m_tail = m_head;
m_size++;
}
template <class item>
Item LinkedList<Item> :: removeHead()
{
Node * oldNode=m_head;
Item returnVal=m_head->value;
m_head=m_head->next;
if (m_head== NULL)
m_tail= NULL;
m_size--;
delete oldNode;
return returnVal;
}
template <class Item>
void LinkedList<Item> ::addTail( Item item)
{
if ( isEmpty( ) )
addHead( item );

else {
m_tail=m_tail->next = new Node( item );
m_size++;
}
}
template <class Item>
Item LinkedList<Item> :: removeTail( )
{
if ( m_head== m_tail)
return removeHead( );
Node * preTail= m_head;
Item returnVal= m_tail->value;
while ( preTail->next != m_tail)
preTail= preTail->next;
preTail->next = NULL ;
delete m_tail;
m_tail= preTail;
m_size--;
return returnVal;
}
template <class Item>
void LinkedList<Item> :: insert( unsigned int n, Item item)
{
if ( n == 1 )
addHead( item );
else if ( n == size( ) + 1 )
addTail( item );
else {
Node * here = m_head;
for ( unsigned intk = 1; k < n-1; k++ )
here = here->next;
here->next = new Node(item, here->next);
m_size++;
}
}
template <class Item>
Item LinkedList<Item> :: delete( unsigned intn )
{
if (n == 1)
return removeHead( );
if (n == size( ))
return removeTail( );
Node * here = m_head;
for (unsigned int k = 1; k < n-1; k++ )
here = here->next;
Node * kill = here->next;
Item returnVal= kill->value;
here->next = kill->next;
delete kill;
m_size--;
return returnVal;
}
Program: To be written by the student using the above algorithm.
Observation: To be written by student after implementing the algorithm.
1)Input:
2)Output:
Experiment No: 8
Stack using Linked List ADT
Aim: To write C++ code to implement the Stack using Linked List ADT. Objectives:
1) Understand the Stack data structure and its basic operation.
2) Understand the method of defining stack using Linked List ADT.
3) Learn how to create objects from an ADT and invoke member functions.
Software Required: Linux OS with gcc/g++, gdb and gedit.
Theory: We have already seen how to represent stack using arrays. Such a
representation proves to be efficient if we have only one stack. However when
several stacks co-exit, there is no efficient way to implement them
sequentially. A good solution to this problem is to use Linked List to implement
stack. Such a stack is called Linked Stack. Linked Stacks facilitates easy
insertion and deletion of stack elements. In this experiment, we use the head
of the Linked List for insertion and deletion.
Algorithm: #include “linkedlistADT.h”
/* linkedlistADT.h has the code listed in Exp.No. 7 */
Class Stack
{
private:
LinkedList<int> stack;
public:
void push(const int y); //pushes int y to stack
int pop(); // pops out the topmost item from stack
};
void Stack::push(const int y )
{
stack.addHead(y);
}
int Stack::pop( )
{
int it;
it=stack.removeHead();
return it;
}

Program: To be written by the student using the above algorithm.
Observations: To be written by student after implementing the algorithm.
1)Input:
2)Output:

Experiment No: 9
Queue using Linked List ADT
Aim: To implement the Queue using Linked List ADT.
Objectives: 1) Understand the Queue data structure and its basic operation.
2) Understand the method of defining queue using Linked List ADT.
3) Learn how to create objects from an ADT and invoke member functions.
Software Required: Linux OS with gcc/g++, gdb and gedit. Theory: We have already seen how to represent Queue sequentially using
arrays. Such a representation proves to be efficient if we have only one Queue.
However when several Queues co-exit, there is no efficient way to implement
them sequentially. A good solution to this problem is to use Linked List to
implement Queue. Such a Queue is called Linked Queue. In this algorithm we can
easily add a node at the rear end and delete from the front end of the linked
queue. Algorithm: #include “linkedlistADT.h”
/* linkedlistADT.h has the code listed in Exp.No. 7 */
Class Queue
{
private:
LinkedList<int> queue;
public:
void insert(const int y); // inserts y to the rear end of linked
// queue
int deleteQ(); // delete from the front end of the linked queue
};
void Queue::insert(const int y)
{
queue.addTail(y);
}
int Queue::deleteQ()
{
int it = queue.removeHead();
return it;
}
Program: To be written by the student using the above algorithm.
Observations: To be written by student after implementing the algorithm.
1)Input:
2)Output:
Experiment No: 10
Binary Search Tree (BST) ADT
Aim: To write C++ code to implement BST ADT with operations inOrder(),
preorder(), postOrder(), intsert(), delete() & find() and understand its basic
operations.
Objectives:
1) Understand the data structure BST and its basic operations.
2) Understand the method of constructing the BST ADT and defining its
operations.
Software Required: Linux OS, gcc/gtt, gdk and gedit
Algorithm: template<class T>
class BST;
template<class T>
class treenode*
{
friend class BST<T>;
private: treenode *left;
T data;
treenode* right;
};
template<class T>
class BST
{
private:
treenode<T> *root;
Public:
int isEmpty();
void inOrder(treenode<T> *node);
void preOrder(treenode<T> *node);
void postOrder(treenode<T> *node);
int insert(T item);
int delete(T item);
treenode<T>* find(treenode<T> *tree, T item);
}
template<class T>
int BST<T>::isEmpty()

{
if (root==NULL)
return 1;
else
return 0;
}
template<class T>
void BST<T>::inOrder(treenode<T> *currentnode)
{
if(currentnode!=NULL)
{
inOrder(currentnode->left);
cout<<currentnode->data;
inOrder(currentnode->right);
}
}
template<class T>
void BST<T>::preOrder(treenode<T> *currentnode)
{
if(currentnode!=NULL)
{
cout<<currentnode->data;
preOrder(currentnode->left);
preOrder(currentnode->right);
}
}
template<class T>
void BST<T>::postOrder(treenode<T> *currentnode)
{
if(currentnode!=NULL)
{
postOrder(currentnode->left);
postOrder(currentnode->right);
cout<<currentnode->data;
}
}
template<class T>
treenode<T> *BST<T>::find(treenode<T> *tree, T item)
{
if (!tree)
return NULL;

if (tree->data==item)
return tree;
else if(item<tree->data)
return find(t->left,x);
else
return find(t->right,x);
}
template<class T>
int BST<T>::insert(T item)//inserts item into BST. Returns 1 if successful {
treenode<T>*p=root,*q=NULL;
while(p)
{
q=p;
if (p->data==item)
return 0; //item already in BST
if(item<p->data)
p=p->left;
else
p=p->right;
}
// makes the new BST node
p=new treenode<T>
p->left=p->right=NULL;
p->data=item;
if (!root) // if it is the first BST node
root=p;
else if (item<q->data)
q->left=p;
else
q->right=p;
return 1; //node successfully inserted
}
//deletes node with data equal to item from BST. returns 1 if deleted, else 0
template<class T>
int BST<T>::delete(T item)
{
treenode<T>*p=root,*q=NULL,*r=NULL;
while (p)
{
if(item<p->data)
p=p->left;
else if (item>p->data)
p=p->right;
else break;
}
if (!p) //node with item not found return 0;
q=p->left;
while(q->right)
{
r=q;
T d=q->data;
q=q->right;
}
p->data=q->data;
r->right=q->left;
delete q;
return 1; //BST node deleted successfully
}
Program: To be written by student using the above algorithm.
Observations: To be written by student after implementation of the algorithm.
1)Input:
2)Output:

Experiment No: 11
Height of a BST using BST ADT
Aim: To Write C++ code to implement a Binary Search Tree and find its
height, using the BST ADT created previously (Ref. Experiment No. 10).
Objectives: 1) Understand how to implement a BST using a predefined BST ADT.
2) Understand the method of finding out the height of a binary tree.
Software Required: Linux OS with gcc/g++, gdb and gedit. Theory:
Binary Search tree is a binary tree in which each internal node x stores an element such that the element stored in the left subtree of x are less than or equal to x and elements stored in the right subtree of x are greater than or equal to x. Binary Search Tree can be implemented as a linked data structure in which each node is an object with two pointer fields and a data
field. The two pointer fields left and right point to the nodes corresponding to the left child and the right child respectively. NIL in any pointer field
signifies that there exists no corresponding child.
The height of the Binary Search Tree equals the number of links from the
root node to the deepest node. For example, the height of above BST is 2.
Algorithm: #include “BSTADT.h”
//BSTADT.h contains the code to implement the BST ADT
class BSTree : public BST<int>, public treenode<int>
{
private:
int l,r,h;
public:
int treeHeight(treenode<int> *tree);
};
//implementation of treeHeight function
int BSTree::treeHeight(treenode<int> *tree)
{
int l,r,h;
if (tree==NULL)
return 0;
else
{
l=treeHeight(tree->left);
r=treeHeight(tree->right);
h-maximum(l,r); //maximum of l and r
return h+1;
}
}
Program: To be written by the student using the above algorithm.
Observations: To be written by student after implementing of the algorithm.
1)Input:
2)Output:
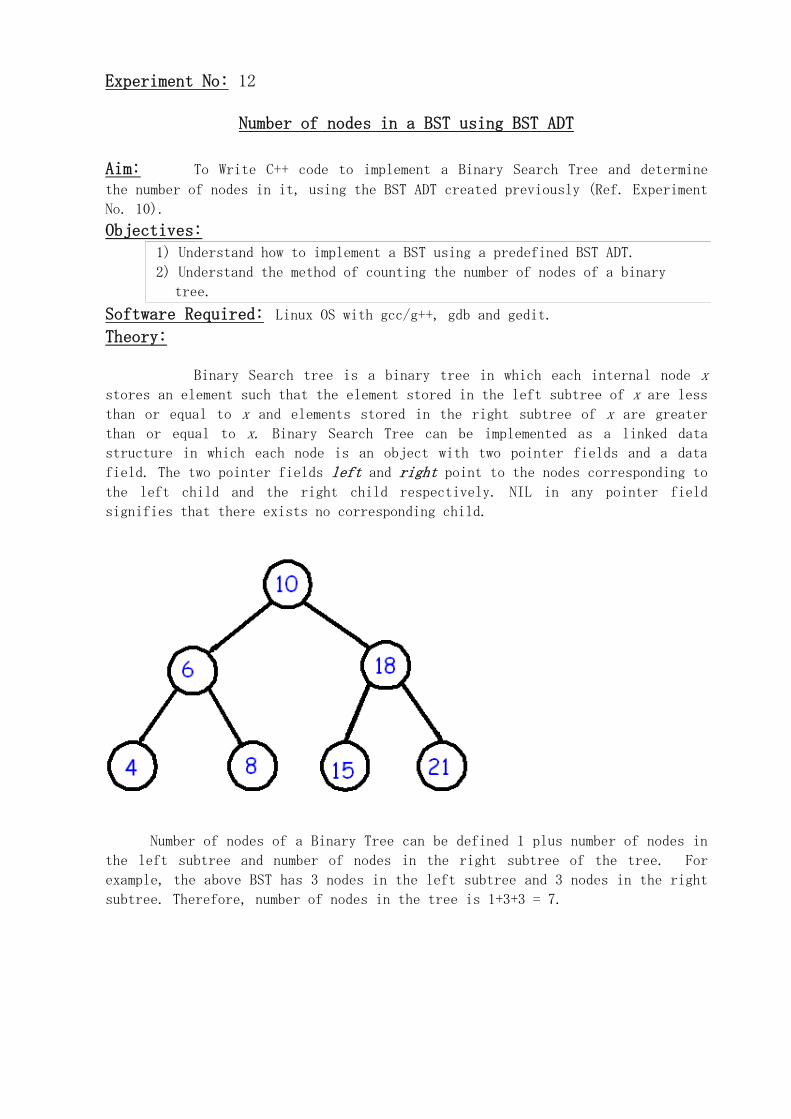
Experiment No: 12
Number of nodes in a BST using BST ADT
Aim: To Write C++ code to implement a Binary Search Tree and determine
the number of nodes in it, using the BST ADT created previously (Ref. Experiment
No. 10).
Objectives: 1) Understand how to implement a BST using a predefined BST ADT.
2) Understand the method of counting the number of nodes of a binary
tree.
Software Required: Linux OS with gcc/g++, gdb and gedit. Theory:
Binary Search tree is a binary tree in which each internal node x stores an element such that the element stored in the left subtree of x are less than or equal to x and elements stored in the right subtree of x are greater than or equal to x. Binary Search Tree can be implemented as a linked data structure in which each node is an object with two pointer fields and a data
field. The two pointer fields left and right point to the nodes corresponding to the left child and the right child respectively. NIL in any pointer field
signifies that there exists no corresponding child.
Number of nodes of a Binary Tree can be defined 1 plus number of nodes in
the left subtree and number of nodes in the right subtree of the tree. For
example, the above BST has 3 nodes in the left subtree and 3 nodes in the right
subtree. Therefore, number of nodes in the tree is 1+3+3 = 7.

Algorithm: #include <BSTADT.h>
//BSTADT.h contains the code to implement the BST ADT
class BSTree : public BST<int>, public treenode<int>
{
public:
int countNodes(treenode<int> *tree);
};
//implementation of countNodes function
int BSTree::countNodes(treenode<int> *tree)
{
int l,r,h;
if (tree==NULL)
return 0;
else
return 1+countNodes(tree->left)+countNodes(tree->right);
}
Program: To be written by the student using the above algorithm.
Observations: To be written by student after implementing the algorithm.
1)Input:
2)Output:
Experiment No: 13
DFS and BFS of Graph using Graph ADT
Aim: To write C++ code to implement a graph with operations dfs() and
bfs().
Objectives:
Understand the Graph data structure and its basic operations.
Understand the method of representing a graph.
3) Understand the method of constructing the Graph ADT and defining
its operations.
Software Required: Linux OS with gcc,gdb and gedit.
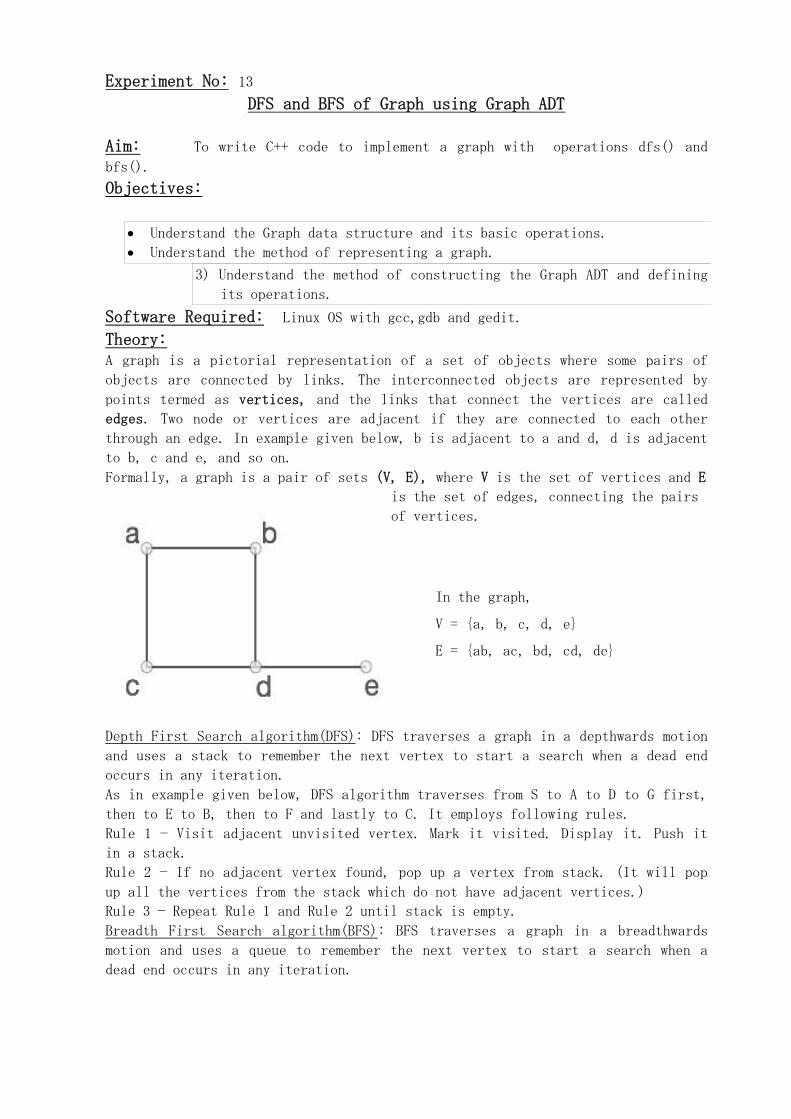
Theory: A graph is a pictorial representation of a set of objects where some pairs of
objects are connected by links. The interconnected objects are represented by
points termed as vertices, and the links that connect the vertices are called
edges. Two node or vertices are adjacent if they are connected to each other
through an edge. In example given below, b is adjacent to a and d, d is adjacent
to b, c and e, and so on.
Formally, a graph is a pair of sets (V, E), where V is the set of vertices and E
is the set of edges, connecting the pairs
of vertices.
In the graph,
V = {a, b, c, d, e}
E = {ab, ac, bd, cd, de}
Depth First Search algorithm(DFS): DFS traverses a graph in a depthwards motion
and uses a stack to remember the next vertex to start a search when a dead end
occurs in any iteration.
As in example given below, DFS algorithm traverses from S to A to D to G first,
then to E to B, then to F and lastly to C. It employs following rules.
Rule 1 − Visit adjacent unvisited vertex. Mark it visited. Display it. Push it
in a stack.
Rule 2 − If no adjacent vertex found, pop up a vertex from stack. (It will pop
up all the vertices from the stack which do not have adjacent vertices.)
Rule 3 − Repeat Rule 1 and Rule 2 until stack is empty.
Breadth First Search algorithm(BFS): BFS traverses a graph in a breadthwards
motion and uses a queue to remember the next vertex to start a search when a
dead end occurs in any iteration.

As in example given above, BFS algorithm traverses from S to A to B to C first,
then to D to E to F and lastly to G. It employs following rules.
Rule 1 − Visit adjacent unvisited vertex. Mark it visited. Display it. Insert it
in a queue.
Rule 2 − If no adjacent vertex found, remove the first vertex from queue.
Rule 3 − Repeat Rule 1 and Rule 2 until queue is empty.
(Dept
h
First
Searc
h)
(Breadth First Search)
Algorithm: template<class T>
class Graph
{
private:
int nodes;
T graph[MAXNODES][MAXNODES];
int visited[MAXNODES];
public:
Graph(int n); //initializes graph with n nodes
void readGraph(); //reads the graph
void dfs(int sNode);
void bfs(int sNode);
void visit(int*visited, int sNode);
};
template<class T>
Graph<T>::Graph(int n)
{
nodes=n;
}
template<class T>
void Graph<T>::dfs(int s)
{
for(i=0;i<nodes;i++)
visited[i]=0; //mark all nodes as unvisited
visit(visited,s);
}
template<class T>
void Graph<T>::visit(int visited[], int v)
{
visited[v]=1;
for(each vertex w adjacent to v)
if(!visited[w])
visit(visited,w);
}
template<class T>
void Graph<T>::bfs(int s)
{
for(i=0;i<n;i++)
visited[i]=0;
Queue<int> q; //q is a Queue.
q.insert(s); // s is inserted to q
while(!q.isEmpty())
{
v=q.delete();
for(all vertices w adjacent to v)
if(! visited[w])
{
q.insert(w);

visited[w]=1;
}
}
}
template<class T>
void Graph<T>::makeGraph()
{
//creating adjacent matrix for the graph.
for(each edge in the graph)
{
read(startNode,endNode,weight);
graph[startNode][endNode]=w;
}
}
Program:
To be written by student using the above algorithm.
Observations:
To be written by student after implementing of the algorithm.
1) Input:
2) Output:
Experiment No: 14
Warshall's algorithm to find the shortest path using Graph ADT
Aim: To write a C++ code to implement Floyd-Warshall algorithm to find the
shortest path between any two pairs of nodes of a graph using the Graph ADT
(Ref. Experiment No.13).
Objectives:
1. Understand the Floyd-Warshall algorithm for finding the shortest path between any two pairs of nodes of a graph.
2. Understand the implementation of Floyd-Warshall algorithm using Graph
ADT.
Software Required: Linux OS with gcc/g++, gdb and gedit.
Theory: Floyd-Warshall algorithm is a procedure, which is used to find the
shortest paths among all pairs of nodes in a graph. The main advantage of Floyd-
Warshall algorithm is its simplicity.
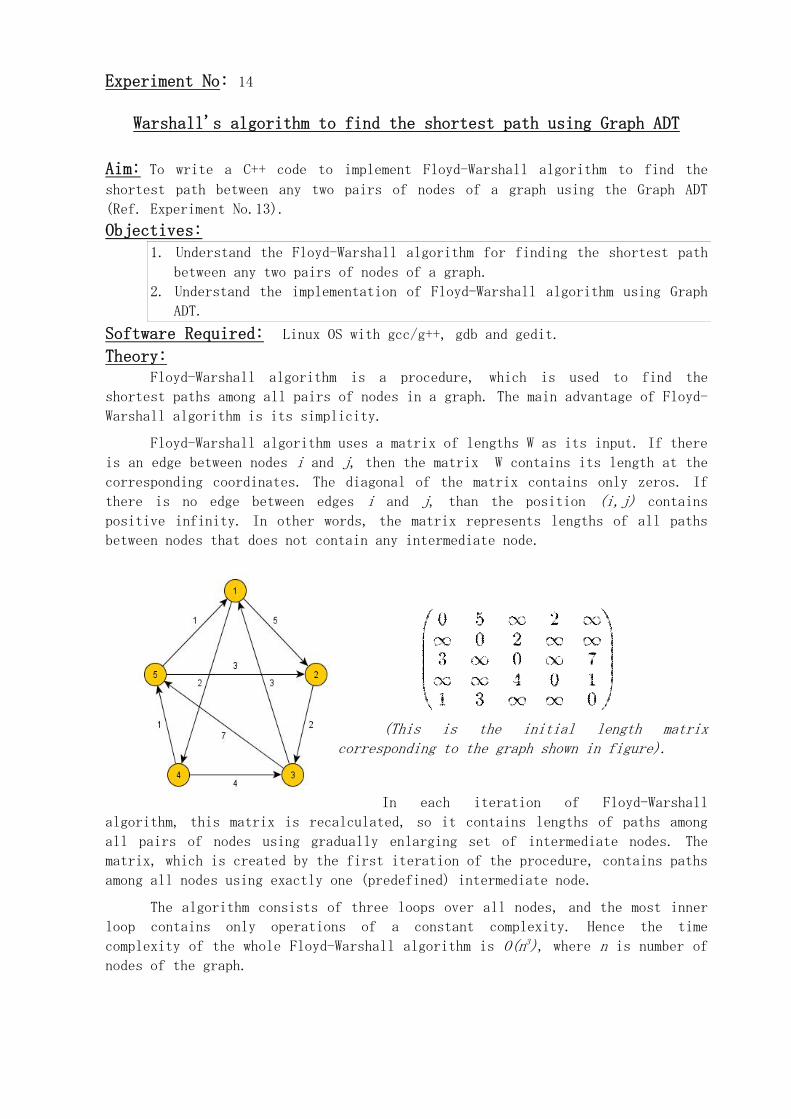
Floyd-Warshall algorithm uses a matrix of lengths W as its input. If there
is an edge between nodes i and j, then the matrix W contains its length at the corresponding coordinates. The diagonal of the matrix contains only zeros. If
there is no edge between edges i and j, than the position (i,j) contains
positive infinity. In other words, the matrix represents lengths of all paths
between nodes that does not contain any intermediate node.
(This is the initial length matrix corresponding to the graph shown in figure).
In each iteration of Floyd-Warshall
algorithm, this matrix is recalculated, so it contains lengths of paths among
all pairs of nodes using gradually enlarging set of intermediate nodes. The
matrix, which is created by the first iteration of the procedure, contains paths
among all nodes using exactly one (predefined) intermediate node.
The algorithm consists of three loops over all nodes, and the most inner
loop contains only operations of a constant complexity. Hence the time
complexity of the whole Floyd-Warshall algorithm is O(n3), where n is number of nodes of the graph.

Algorithm:
/* include the Graph ADT code from GraphADT.h */
#include <GraphADT.h>
class shortest: public Graph <int>
{
private:
int W[MAXNODES][MAXNODES];
public:
void initW(); // initialize the length matrix W
void readGraph(); // read the initial length matrix
void shortestPath(); // Floyd-Warshal algorithm
void output(); // display the final matrix – to be defined
};
void shortest::initW()
{
for (i=0;i<nodes;i++)
for (j=0;j<nodes-1;j++)
if (i==j)
W[i][j]=0;
else
W[i][j]=INFINITY; // substitute a very high value for INFINITY
}
void shortest::readGraph()
{
for each edge in the graph
read(startNode,endNode,weight);
}
void shortest::shortestPath()
{

for (i=0;i<nodes;i++)
for(j=0;j<nodes;j++)
for(k=0;k<nodes;k++)
W[i][j] = min(W[i][j],W[i][k]+W[k][j]);
}
Program:
To be written by student using the above algorithm.
Observations:
To be written by student after implementing the algorithm.
1) Input:
2) Output:
Experiment No: 15
Binary Search
Aim: To Write C++ code to implement Binary Search algorithm.
Objectives: 1) Understand how to implement Binary Search algorithm.
Software Required: Linux OS with gcc/g++, gdb and gedit. Theory: Binary Search is applied on the sorted array or list. In binary
search, we first compare the value with the elements in the middle position of
the array. If the value is matched, then we return the value. If the value is
less than the middle element, then it must lie in the lower half of the array
and if it's greater than the element then it must lie in the upper half of the
array. We repeat this procedure on the lower (or upper) half of the array.
Binary Search is useful when there are large numbers of elements in an array.
Algorithm: class Numbers
{
private:
int *array, size;
public:
//constructor – declares space for the array
Numbers(int asize);
//input numbers to array – to be defined
void readNumbers();
int binSearch(int lower, int upper, int search);
};
//implementation of functions.
Numbers::Numbers(int asize)
{
size=asize;
array=(int*) malloc(size,sizeof(int));
}
int Numbers::binSearch(int lower, int upper, int search)
{
int index,mid;
if(lower>upper)
return -1; //returns -1 when search is unsuccessful.

else
{
mid=(lower+upper)/2;
if (search==array[mid])
index=mid;
else
if (search<array[mid])
index=binSearch(lower,mid-1,search);
else
index=binSearch(mid+1,upper,search);
return index; //returns the index of the search item in the array
}
}
Program: To be written by the student using the above algorithm.
Observations: To be written by student after implementing the algorithm.
1)Input:
2)Output:

Experiment No: 16
Quick Sort
Aim: To write a C++ code to sort a set of elements either in ascending or descending order using Quick Sort algorithm.
Objectives:
Understand the method of sorting array elements using the fastest sorting
algorithm named Quick Sort.
Software Required: Linux OS with gcc/g++, gdb and gedit.
Theory: Quick Sort, as the name suggests, sorts any list very quickly. Quick sort
is very fast and requires very less additional space. It is based on the rule of
Divide and Conquer (also called partition-exchange sort). This algorithm divides the list x[] into three parts :
Elements less than the pivot element Pivot element Elements greater than the pivot element
Notice that if these two conditions hold for a particular pivot element placed at position j, then the pivot element is the jth smallest element in the list so that the pivot remains in position j when the array is completely sorted. If the foregoing process is repeated with the sub-array x[0] through x[j-1] and x[j+1]
though x[n-1] and any sub-arrays created by the process in successive
iterations, the final result is the sorted array.
For example, in the list
of elements 25, 52, 37,
63, 14, 17, 8, 6, we take
the first element, i,e: 25
as the pivot. So after the
first pass, the list will
be changed like this.
6 8 17 14 25 63 37 52
Hence after the first
pass, pivot will be set at
its position, with all the elements smaller to it on its left and all the
elements larger than it on the right. Now 6 8 17 14 and 63 37 52 are considered
as two separate lists, and same logic is applied on them, and we keep doing this
until the complete list is sorted.

The worst case time complexity of quick sort is O(n2), whereas the best
case and average time complexity is O(n log n).
Algorithm:
/* x[] is the array, p is starting index, that is 0, and r is the last index,
that is n-1 of array. */
void quicksort(int x[], int p, int r)
{
if(p < r)
{
int q;
q = partition(x, p, r);
quicksort(x, p, q);
quicksort(x, q+1, r);
}
}
int partition(int x[], int p, int r)
{
int i, j, pivot, temp;
pivot = x[p];
i = p;
j = r;
while(1)
{
while(x[i] < pivot && x[i] != pivot)
i++;
while(x[j] > pivot && x[j] != pivot)
j--;
if(i < j)
interchange (a[i],a[j]);
else
{
return j;
}
}
}
Program:
To be written by student using the above algorithm.
Observations:
To be written by student after implementing the algorithm.
1) Input:
2) Output:
------- * --------


![ADT Stack Implementazione in Linguaggio C - diee.unica.itarmano/LT1/pdf/LT1-7C.pdf · 3 3 Specifica Algebrica dell’ADT Stack STACK type Stack [Item] uses Item, Boolean syntax NEWSTACK](https://img.dokumen.tips/doc/110x75/5c67720509d3f23a018bccde/adt-stack-implementazione-in-linguaggio-c-dieeunicait-armanolt1pdflt1-7cpdf.jpg)