Embed Size (px)
Citation preview

Oracle Retail Data Integrator Planogram Import Installation Guide Release 14.1.2
December 2016

Oracle® Retail Data Integrator Planogram Import Installation Guide, Release 14.1.2
Copyright © 2016, Oracle and/or its affiliates. All rights reserved.
Primary Author: Ashwini Pai
Contributors: Maria Andrew
This software and related documentation are provided under a license agreement containing restrictions on use and disclosure and are protected by intellectual property laws. Except as expressly permitted in your license agreement or allowed by law, you may not use, copy, reproduce, translate, broadcast, modify, license, transmit, distribute, exhibit, perform, publish, or display any part, in any form, or by any means. Reverse engineering, disassembly, or decompilation of this software, unless required by law for interoperability, is prohibited.
The information contained herein is subject to change without notice and is not warranted to be error-free. If you find any errors, please report them to us in writing.
If this is software or related documentation that is delivered to the U.S. Government or anyone licensing it on behalf of the U.S. Government, then the following notice is applicable:
U.S. GOVERNMENT END USERS: Oracle programs, including any operating system, integrated software, any programs installed on the hardware, and/or documentation, delivered to U.S. Government end users are "commercial computer software" pursuant to the applicable Federal Acquisition Regulation and agency-specific supplemental regulations. As such, use, duplication, disclosure, modification, and adaptation of the programs, including any operating system, integrated software, any programs installed on the hardware, and/or documentation, shall be subject to license terms and license restrictions applicable to the programs. No other rights are granted to the U.S. Government.
This software or hardware is developed for general use in a variety of information management applications. It is not developed or intended for use in any inherently dangerous applications, including applications that may create a risk of personal injury. If you use this software or hardware in dangerous applications, then you shall be responsible to take all appropriate fail-safe, backup, redundancy, and other measures to ensure its safe use. Oracle Corporation and its affiliates disclaim any liability for any damages caused by use of this software or hardware in dangerous applications.
Oracle and Java are registered trademarks of Oracle and/or its affiliates. Other names may be trademarks of their respective owners.
Intel and Intel Xeon are trademarks or registered trademarks of Intel Corporation. All SPARC trademarks are used under license and are trademarks or registered trademarks of SPARC International, Inc. AMD, Opteron, the AMD logo, and the AMD Opteron logo are trademarks or registered trademarks of Advanced Micro Devices. UNIX is a registered trademark of The Open Group.
This software or hardware and documentation may provide access to or information about content, products, and services from third parties. Oracle Corporation and its affiliates are not responsible for and expressly disclaim all warranties of any kind with respect to third-party content, products, and services unless otherwise set forth in an applicable agreement between you and Oracle. Oracle Corporation and its affiliates will not be responsible for any loss, costs, or damages incurred due to your access to or use of third-party content, products, or services, except as set forth in an applicable agreement between you and Oracle.

iii
Value-Added Reseller (VAR) Language
Oracle Retail VAR Applications
The following restrictions and provisions only apply to the programs referred to in this section and licensed to you. You acknowledge that the programs may contain third party software (VAR applications) licensed to Oracle. Depending upon your product and its version number, the VAR applications may include:
(i) the MicroStrategy Components developed and licensed by MicroStrategy Services Corporation (MicroStrategy) of McLean, Virginia to Oracle and imbedded in the MicroStrategy for Oracle Retail Data Warehouse and MicroStrategy for Oracle Retail Planning & Optimization applications.
(ii) the Wavelink component developed and licensed by Wavelink Corporation (Wavelink) of Kirkland, Washington, to Oracle and imbedded in Oracle Retail Mobile Store Inventory Management.
(iii) the software component known as Access Via™ licensed by Access Via of Seattle, Washington, and imbedded in Oracle Retail Signs and Oracle Retail Labels and Tags.
(iv) the software component known as Adobe Flex™ licensed by Adobe Systems Incorporated of San Jose, California, and imbedded in Oracle Retail Promotion Planning & Optimization application.
You acknowledge and confirm that Oracle grants you use of only the object code of the VAR Applications. Oracle will not deliver source code to the VAR Applications to you. Notwithstanding any other term or condition of the agreement and this ordering document, you shall not cause or permit alteration of any VAR Applications. For purposes of this section, "alteration" refers to all alterations, translations, upgrades, enhancements, customizations or modifications of all or any portion of the VAR Applications including all reconfigurations, reassembly or reverse assembly, re-engineering or reverse engineering and recompilations or reverse compilations of the VAR Applications or any derivatives of the VAR Applications. You acknowledge that it shall be a breach of the agreement to utilize the relationship, and/or confidential information of the VAR Applications for purposes of competitive discovery.
The VAR Applications contain trade secrets of Oracle and Oracle's licensors and Customer shall not attempt, cause, or permit the alteration, decompilation, reverse engineering, disassembly or other reduction of the VAR Applications to a human perceivable form. Oracle reserves the right to replace, with functional equivalent software, any of the VAR Applications in future releases of the applicable program.


v
Contents Send Us Your Comments ............................................................................................... vii
Preface ............................................................................................................................... 9 Audience .................................................................................................................................. 9 Related Documents ................................................................................................................. 9 Customer Support ................................................................................................................... 9 Review Patch Documentation ............................................................................................... 9 Improved Process for Oracle Retail Documentation Corrections .................................... 9 Oracle Retail Documentation on the Oracle Technology Network................................ 10 Conventions ........................................................................................................................... 10
1 Setting up the Target Bridge .................................................................................... 11 Installation Permissions ....................................................................................................... 11
Deployment Details ....................................................................................................... 11 User Names, Passwords and Other Information ....................................................... 11
Overview of Installation and Configuration ..................................................................... 12 Database Instance .......................................................................................................... 12 File Server ....................................................................................................................... 13
Macro Space Planning .......................................................................................................... 13 Set Planogram Import Style Mappings ....................................................................... 13 Set System Variables ...................................................................................................... 13 Install Oracle Data Integrator ....................................................................................... 13
Import the ODI Master Repository ..................................................................................... 13 Create the ODI Work Repository ........................................................................................ 14 Create Access to the ODI Staging Area .............................................................................. 14
Install Oracle Standalone Agent .................................................................................. 14 Configure the ODI Standalone Agent ......................................................................... 14
Configuring the Database Instance .................................................................................... 15 Purpose ............................................................................................................................ 15 Prerequisites ................................................................................................................... 15
Creating the Schema for the ODI Master Repository ....................................................... 15 Creating the Schema for the ODI Staging Area ................................................................ 15 Running the Upgrade Script against the MSP Database ................................................. 16
Purpose ............................................................................................................................ 16 Prerequisites ................................................................................................................... 16 Running the Upgrade Script ........................................................................................ 16
Creating the Required Data Folders ................................................................................... 17 Purpose ............................................................................................................................ 17 Prerequisites ................................................................................................................... 17 Creating the folders for Import and Archived XML files ......................................... 17
Creating the Folder for and Placing the XSD File ............................................................. 17 Configuring Macro Space Planning ................................................................................... 17
vi
Purpose ............................................................................................................................ 17 Prerequisites ................................................................................................................... 18
Configuring Planogram Import Styles ............................................................................... 18 Purpose ............................................................................................................................ 18 Preparation ..................................................................................................................... 18 Implementing ................................................................................................................. 18
Configuring the System Variables for the Import and Archive Directories ................. 20 Purpose ............................................................................................................................ 20
Configuring the System Variables for Creating AllFileNames.txt file .......................... 20 Purpose ............................................................................................................................ 20
Configuring System Variables for the Default Blocks ..................................................... 20 Purpose ............................................................................................................................ 20 Prerequisites ................................................................................................................... 21 Preparation ..................................................................................................................... 21 Implementing ................................................................................................................. 21
Installing Oracle Data Integrator ........................................................................................ 22 Installing ODI in a Desktop Environment .................................................................. 22
Repository Creation Utility (RCU) ..................................................................................... 27 Configure ODI agent using Config Util ............................................................................. 34 Create and Configure ODI Master Repository ................................................................. 42
Prerequisites ................................................................................................................... 42 Import Master Repository ............................................................................................ 42 Create a Login for the Master Repository................................................................... 43 Configure Topology - Physical Architecture ............................................................. 45 Importing the Scenarios ................................................................................................ 56
Starting and Testing the Stand Alone Agent ..................................................................... 58 Starting the Standalone Agent ..................................................................................... 58 Testing the Agent from ODI Studio ............................................................................ 60
Configuring Access to the ODI Staging Area.................................................................... 60 Encoding the Password ................................................................................................. 61
ODI and Scheduling ............................................................................................................. 62

vii
Send Us Your Comments Oracle Retail Data Integrator Planogram Import, Installation Guide, Release 14.1.2
Oracle welcomes customers' comments and suggestions on the quality and usefulness of this document.
Your feedback is important, and helps us to best meet your needs as a user of our products. For example:
Are the implementation steps correct and complete?
Did you understand the context of the procedures?
Did you find any errors in the information?
Does the structure of the information help you with your tasks?
Do you need different information or graphics? If so, where, and in what format? Are the examples correct? Do you need more examples?
If you find any errors or have any other suggestions for improvement, then please tell us your name, the name of the company who has licensed our products, the title and part number of the documentation and the chapter, section, and page number (if available).
Note: Before sending us your comments, you might like to check that you have the latest version of the document and if any concerns are already addressed. To do this, access the Online Documentation available on the Oracle Technology Network Web site. It contains the most current Documentation Library plus all documents revised or released recently.
Send your comments to us using the electronic mail address: [email protected]
Please give your name, address, electronic mail address, and telephone number (optional).
If you need assistance with Oracle software, then please contact your support representative or Oracle Support Services.
If you require training or instruction in using Oracle software, then please contact your Oracle local office and inquire about our Oracle University offerings. A list of Oracle offices is available on our Web site at www.oracle.com.

9
Preface Oracle Retail Data Integrator Planogram Import Installation Guides contain the requirements and procedures that are necessary for the retailer to install Oracle Retail products.
Audience This Installation Guide is written for the following audiences:
Database administrators (DBA)
System analysts and designers
Integrators and implementation staff
Related Documents For more information, see the following documents in the Oracle Retail Merchandising System Release 14.1.2 documentation set: Oracle Retail Macro Space Planning Installation Guide
Oracle Retail Macro Space Planning Addendum Guide
Oracle Retail Macro Space Planning Release Notes
Oracle Retail Macro Space Planning Data Model
Oracle Retail Licensing Guide
Customer Support To contact Oracle Customer Support, access My Oracle Support at the following
URL:
https://support.oracle.com
When contacting Customer Support, please provide the following:
Product version and program/module name Functional and technical description of the problem (include business impact)
Detailed step-by-step instructions to re-create
Exact error message received
Window shots of each step you take
Review Patch Documentation When you install the application for the first time, you install either a base release (for example, 14.1) or a later patch release (for example, 14.1.2). If you are installing the base release or additional patch releases, read the documentation for all releases that have occurred since the base release before you begin installation. Documentation for patch releases can contain critical information related to the base release, as well as information about code changes since the base release.
Improved Process for Oracle Retail Documentation Corrections To more quickly address critical corrections to Oracle Retail documentation content, Oracle Retail documentation may be republished whenever a critical correction is needed. For critical corrections, the republication of an Oracle Retail document may at
10
times not be attached to a numbered software release; instead, the Oracle Retail document will simply be replaced on the Oracle Technology Network Web site, or, in the case of Data Models, to the applicable My Oracle Support Documentation container where they reside. This process will prevent delays in making critical corrections available to customers. For the customer, it means that before you begin installation, you must verify that you have the most recent version of the Oracle Retail documentation set. Oracle Retail documentation is available on the Oracle Technology Network at the following URL: http://www.oracle.com/technetwork/documentation/oracle-retail-100266.html
An updated version of the applicable Oracle Retail document is indicated by Oracle part number, as well as print date (month and year). An updated version uses the same part number, with a higher-numbered suffix. For example, part number E123456-02 is an updated version of a document with part number E123456-01.
If a more recent version of a document is available, that version supersedes all previous versions.
Oracle Retail Documentation on the Oracle Technology Network Documentation is packaged with each Oracle Retail product release. Oracle Retail product documentation is also available on the following Web site: http://www.oracle.com/technetwork/documentation/oracle-retail-100266.html
(Data Model documents are not available through Oracle Technology Network. These documents are packaged with released code, or you can obtain them through My Oracle Support.)
Conventions Navigate: This is a navigate statement. It tells you how to get to the start of the procedure and ends with a window shot of the starting point and the statement “the Window Name window opens.” This is a code sample It is used to display examples of code

11
1 Setting up the Target Bridge
This section of the Oracle Data Integrator (ODI) Planogram Import Documentation describes how to install and configure the Target Bridge part of the Planogram Import solution.
Installation Permissions Installing the Planogram Import Solution requires the appropriate access rights/permissions to install and make changes to the following objects:
Creating schemas within database instances
Creating folders and adding files on a file server
Changing settings within the Macro Space Planning (MSP) Administration and Configuration Modules
Installing ODI
Installing and Configuring an ODI Standalone Agent
In addition, the following should apply:
At least one DBA has knowledge of Oracle databases.
One individual understands the fundamentals of ODI. An individual with the appropriate MSP skills is available.
Hardware of the correct performance requirements is available.
As any large retail organization will have strict policies on access rights to specific parts of its IT infrastructure, the installation process described in this section groups together actions that can be carried out by an individual with specific access rights.
Deployment Details This section on implementation describes the fundamentals of how to install the ODI Planogram Import solution with default database schema locations, table spaces, etc. It also uses the default passwords for ODI.
It is the responsibility of the implementers to vary these details as required in order to obtain the required performance. It is also the responsibility of the implementers to ensure the installation complies with the security policies for the pertinent organizations.
User Names, Passwords and Other Information During installation and configuration of the ODI Planogram Import solution, a significant number of user names and passwords are involved. Connection details are required for a number of database schemas and other information - such as repository IDs for ODI - is required.
It is recommended that this information be systematically recorded to avoid problems during installation and configuration.
12
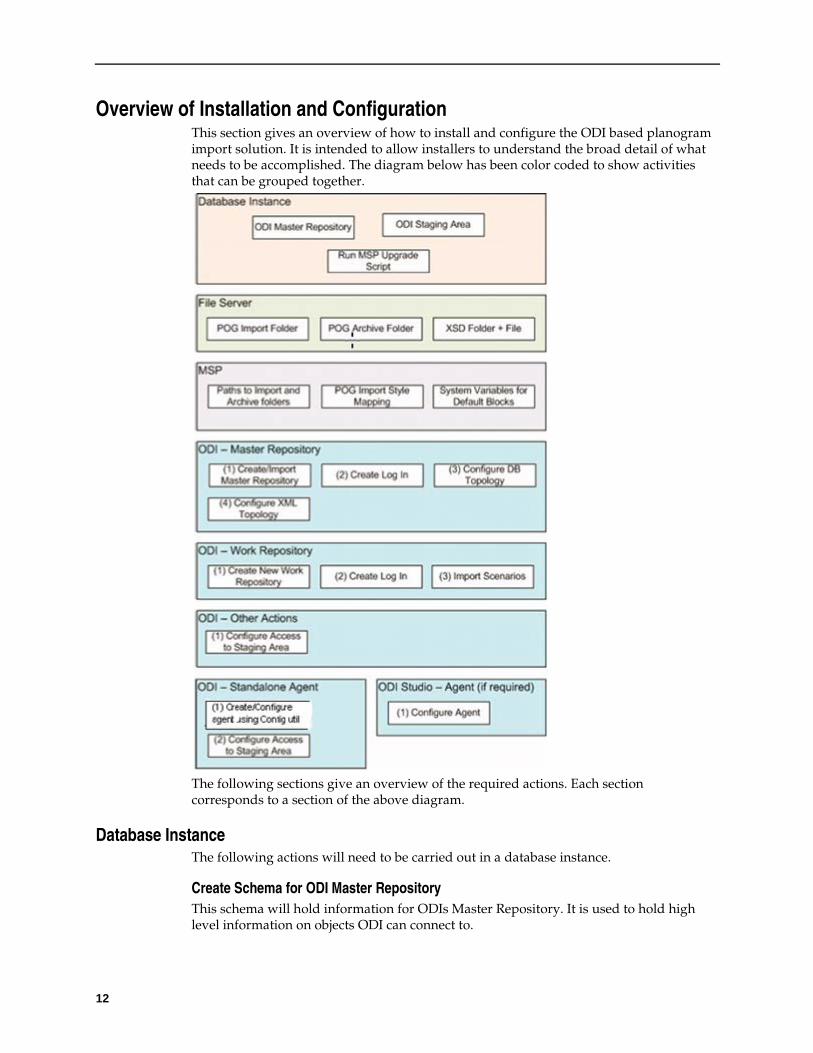
Overview of Installation and Configuration This section gives an overview of how to install and configure the ODI based planogram import solution. It is intended to allow installers to understand the broad detail of what needs to be accomplished. The diagram below has been color coded to show activities that can be grouped together.
The following sections give an overview of the required actions. Each section corresponds to a section of the above diagram.
Database Instance The following actions will need to be carried out in a database instance.
Create Schema for ODI Master Repository This schema will hold information for ODIs Master Repository. It is used to hold high level information on objects ODI can connect to.
13
Create Schema for ODI Staging Area This schema will hold temporary files that created and deleted during the course of a data import.
Run Upgrade Script against MSP Database This upgrade script adds additional tables, stored procedures and functions used for data import.
File Server The following actions need to be carried out on a File Server.
Create an import folder for the XML Files holding data to be processed This folder will serve as a container for the XML files to be processed. The XML files should either be created directly here by the source Bridge, or will be imported here after any Source Bridge validation operations.
Create a folder for the archived XML Files After the data from the XML files has been processed, the XML files will be moved to another folder for storage purposes. This folder will serve as an archive for those files.
Create a folder to hold the XSD file for the XML The XSD file contains a description of the structure for the XML holding the data for import. It is used to validate the integrity of the XML prior to processing by ODI. A folder is created and a copy of the pertinent XSD file placed in it.
Macro Space Planning The following actions need to be carried out in the Administration Module of MSP.
Set Planogram Import Style Mappings The Planogram Import Style Mappings are used as look-ups to associate information specific to MSP with data in the process of being imported.
Set System Variables Specific MSP system variables are referenced by ODI to identify the path to the import and archive directories, together with the default fixture, shelf and product blocks.
Install Oracle Data Integrator ODI Studio (if installing in a desktop environment) or the ODI console (if installing in a WebLogic environment) can now be installed.
Import the ODI Master Repository The Master Repository holds information on objects ODI can connect to. Once ODI is installed, it can be created and configured. The required stages are: 1. Create Login for the Master Repository
14
The login that is created will allow users to connect to the Master Repository during normal ODI operations.
2. Import the Master Registry.
The Master Registry can be imported via the standard ODI tool. During the process, a zip file (supplied by Oracle) is imported containing configuration information for the master registry.
3. Configure Target Database Topology
This action specifies the details for the database ODI are to import data into.
4. Configure XML Topology
This action specifies the location and details of the XSD file used to validate the XML data during import.
Create the ODI Work Repository The Work Repository holds information on how data is to be extracted, loaded and transformed. 1. Create the Work Repository
To create Master Repository and Work Repository, refer the Repository Creation Utility (RCU) section.
2. Create Login for the Work Repository
The login that is created will allow users to connect to the Work Repository during normal ODI operations. 3. Import Scenarios
The scenarios contain detailed instructions as to how data is to be extracted from the XML files supplied by the source bridge, loaded to the target database and transformed. The scenarios are supplied by Oracle.
Create Access to the ODI Staging Area The ODI Staging Area is used to temporarily hold information from the XML files while it is validated against the XSD file.
Access to the Staging Area for ODI Studio or ODI Console is created by putting the ExtXML.properties file in a directory accessed by ODI. Data from this file will enable ODI to connect to the database instance holding the Staging Area schema.
Install Oracle Standalone Agent The standalone agent can be used to run imports at specific times without the need to invoke ODI Studio or ODI Console.
Configure the ODI Standalone Agent The following actions are required to configure the Standalone Agent:
1. To create the ODI agent refer Configure ODI agent using Config Util section 2. Create Access to Staging Area
Access to the Staging Area for the ODI Standalone Agent is created by putting the ExtXML.properties file in a directory accessed by ODI. Data from this file will enable the Agent to connect to the database instance holding the Staging Area schema.

15
Note: Although a different directory is involved, this action is otherwise identical to that required for ODI Studio or ODI Console.
Configuring the Database Instance This section describes the detail of how the database instance is configured.
Purpose ODI requires two database schemas to be created. These are:
Schema to hold the ODI Master Repository
– This Repository will hold high level information how the planogram import solution is configured.
Schema to hold the ODI Staging Area.
– This schema will hold planogram import data being validated after extraction from the source XML file and before it is inserted into the Macro Space Planning database.
Prerequisites The person accomplishing this task must log in as SYS with SYSDBA privileges (or an account with similar privileges) in the database instance that these schemas will be
Configuring the Database Instance created in. If they do not have these privileges, they may not be able to grant all the roles to the users they will create.
Creating the Schema for the ODI Master Repository Open SQL Plus. The users and their associated privileges can be created using the following syntax.
Create [user name] identified by [password] temporary tablespace [name of tablespace] default tablespace [name of table space];
Grant connect, resource, execute on dbms_lock to [username];
Note: When creating the master schema, you must make sure that a prefix is added in the Schema name. This will be used later in RCU util configuration. For example if Master Schema is ODIM, and prefix is defined as TEST, then the Schema name should be TEST_ODIM .
Example:
An example of creating the Master Repository is as follows:
Create ODIM identified by ODI temporary tablespace TEMP default tablespace USERS;
Grant connect, resource, execute on dbms_lock to ODIM;
Creating the Schema for the ODI Staging Area The users and their associated privileges can be created using the following syntax in SQL Plus.
16
Create [user name] identified by [password] temporary tablespace [name of tablespace] default tablespace [name of table space];
Grant connect, resource, execute on dbms_lock to [username]; Example
An example of creating the Staging Area is as follows:
Create XMLHOLD identified by ODI temporary tablespace TEMP default tablespace USERS;
Grant connect, resource, execute on dbms_lock to XMLHOLD;
Note: The schema name for the ODI Staging Area must be exactly seven characters long. This is because the maximum limit for Oracle table names is 30 characters. Oracle will dynamically truncate the table name if it exceeds this value. Oracle databases automatically as the schema name as a prefix to the table name. Having a schema name of fixed size allows the planogram import functionality to cater for this automatic truncation.
WARNING: If the schema name of the ODI stage area is not exactly seven characters long, planogram import could fail.
Running the Upgrade Script against the MSP Database
Purpose The upgrade script adds some additional tables, modifies some existing tables and adds a number of new stored procedures and functions required for planogram import.
The following tables are added:
AVTTB_ODI_IMPORT_MAP: This table is referenced by ODI during the import process.
AVTTB_ODI_LOG: This table holds the results of all attempts to insert data into the database.
PLANOGRAM_TEMP: This table is used to temporarily hold planogram data during planogram import.
PLANOGRAMGROUP_TEMP: This table is used to temporarily hold information on planogram groups (the planogram hierarchy) during planogram import.
Note: A table called SNP_CHECK_TAB will be added by ODI after the first planogram import. It is not added by the script.
Prerequisites The person running the script must have the appropriate privileges in the MSP database schema.
Running the Upgrade Script The upgrade script is supplied with the package supplied with the solution. It is called ODI_GA_POG_Importer.sql and ODI_GA_POG_Importer_Upgrade.sql It can be found in the DB Script folder.
17
The script can be run using any standard query and management tool (such as Oracle’s SQL Developer). After executing the script, verify that it has executed without errors.
Creating the Required Data Folders
Purpose These folders are required to hold the XML files for import, the same files when archived after import and a folder to hold the XSD file used to validate the XML files immediately prior to import.
Prerequisites The person running the script must have the appropriate privileges on the server hosting the folders.
Creating the folders for Import and Archived XML files These files must be created local to the ODI functionality used to execute the ODI import.
If the Planogram Import is executed from ODI Studio, the folders for the Import and Archive files must be local to the machine ODI Studio is installed on.
If the Planogram Import is executed from ODI Standalone Agent, the folders for the Import and Archive files must be local to the machine the Standalone Agent is installed on.
Note: Caution must be exercised with these file locations. If the ODI Planogram Import solution is validated using ODI Studio for test purposes, the files must be local to that machine. If it is decided to use ODI Standalone Agent to bring in ’live’ planogram imports, a new pair of folders must be created and the MSP System Variables changed accordingly.
Creating the Folder for and Placing the XSD File The XSD file will be used to validate the XML immediately prior to import. The folder must be created on a server that will be accessible to the ODI application. Access information will be added to ODI when configuring that application. Create a folder and note the path and name. ADD TO THE FORM.
The XSD file is supplied with the ODI Planogram Import functionality. It is in the folder called Data Model. This contains a file called XMLTemplate.xsd. Place a copy of this file in the folder that has just been created.
Configuring Macro Space Planning
Purpose These changes are required to specify parameters referenced by ODI during planogram import.

18
Prerequisites These changes must be made by a user with Administrators privileges with the Macro Space Management application.
Configuring Planogram Import Styles
Purpose Macro Space Planning uses styles to validate that it is permissible to place one item of equipment onto another. The Planogram Import Styles window is used to assign MSP styles to the classes of equipment being imported from the third party planogram database. During planogram import, the XML file will contain a code used to describe a general class of equipment used in the third party planogram database. During import, a MSP style will be assigned to this third party code, adding an item of data required by MSP functionality.
Preparation Prior to entering the information in the Planogram Import Styles window, implementers may find it useful to create a preliminary table identifying:
The general name of a class of equipment in the third party software design application. Examples include Open shelves, pegs, etc.
The style assigned to the equivalent class of equipment in the MSP database. (Styles are configured using the Styles option from the Merchandising menu in the Administration Module).
A default block to use in case a precise match for an item of equipment is not available in the MSP database.
A code or primary key identifying the class of equipment in the third party planogram design software.
Third Party Equipment Class
MSP Style MSP Default Block Third Party Equipment Code
Open Shelf Shelf I_Stretchable_Shelf ABC123
Single Peg Peg N/A N/A
Implementing The Planogram Import Styles window is accessed via the Merchandising menu in the MSM Administration Module.

19
To configure Planogram Import Styles:
1. Set the name of third party tool in the Options window accessed from the Tools menu in the Planogram Import Style window. This information will appear as a column header.
If more than one planogram design application is in use, multiple import sources can be specified.
Note:if the planogram design application is not in the predefined list, the list can be configured directly in the AVTTB_POG_SOURCE table.
2. The Planogram Import styles window can then be filled in with:
a. The general name of a class of equipment in the third party software design application.
b. The style assigned to the equivalent class of equipment in the MSP database. (Styles are configured using the Styles option from the Merchandising menu in the Administration Module).
c. A default block to use in case a precise match for an item of equipment is not available in the MSP database. This column in the window will contain a drop-down list with all items of equipment assigned that style in the MSP application - the appropriate item of equipment can be selected from it.
d. The item of equipment will be converted to a BLK_ID when stored in the database.
e. A code or primary key identifying the class of equipment in the third party planogram design software.

20
3. After all data has been entered, click Save in the Planogram Styles window. Close the window.
Note: During import, if a default block is not found in the Planogram Import Style window, the block defined in the AVTTB_DEFAULT_IMPORT_FIXEL_BLK_ID system variable will be used.
Information in the Planogram Import Styles window is stored in the AVTTB_STYLE_IMPORT_SOURCE_LINK and AVTTB_STYLE_IMPORT_MAP tables.
Configuring the System Variables for the Import and Archive Directories
Purpose Two directories are required to store the XML files that hold the data for the planogram import. These directories are an Import Directory to hold the XML files prior to processing and an Archive Directory to hold the XML files after processing. The paths to these directories are held in MSP system variables. These are:
DEFAULT_IMPORT_DIR: this data holds the XML files prior to processing. DEFAULT_IMPORT_ARCHIVE_DIR: XML files are automatically transferred
to this directory after processing.
These system variables will be referenced by ODI during the planogram.
Configuring the System Variables for Creating AllFileNames.txt file
Purpose This system variable POG_IMPORTER_RUNON_WINDOWS is introduced in 14.1.2 ODI planogram import version.
When Planogam scenarios are executed in Windows 10 machine the system variable value should be set to 1. This will then create AllFileNames text file in Windows 10 machine which contains the list of planograms XML file names to be imported.
When import scenarios are executed in Linux machine the system variable should be set to 0. This will then create AllFileNames text file in Linux machine which contains the list of planogram XML file names to be imported
Note: By default this value is set to 1 which will create text file in Windows 10 machine.
Configuring System Variables for the Default Blocks
Purpose The System Variables for the default blocks:
21
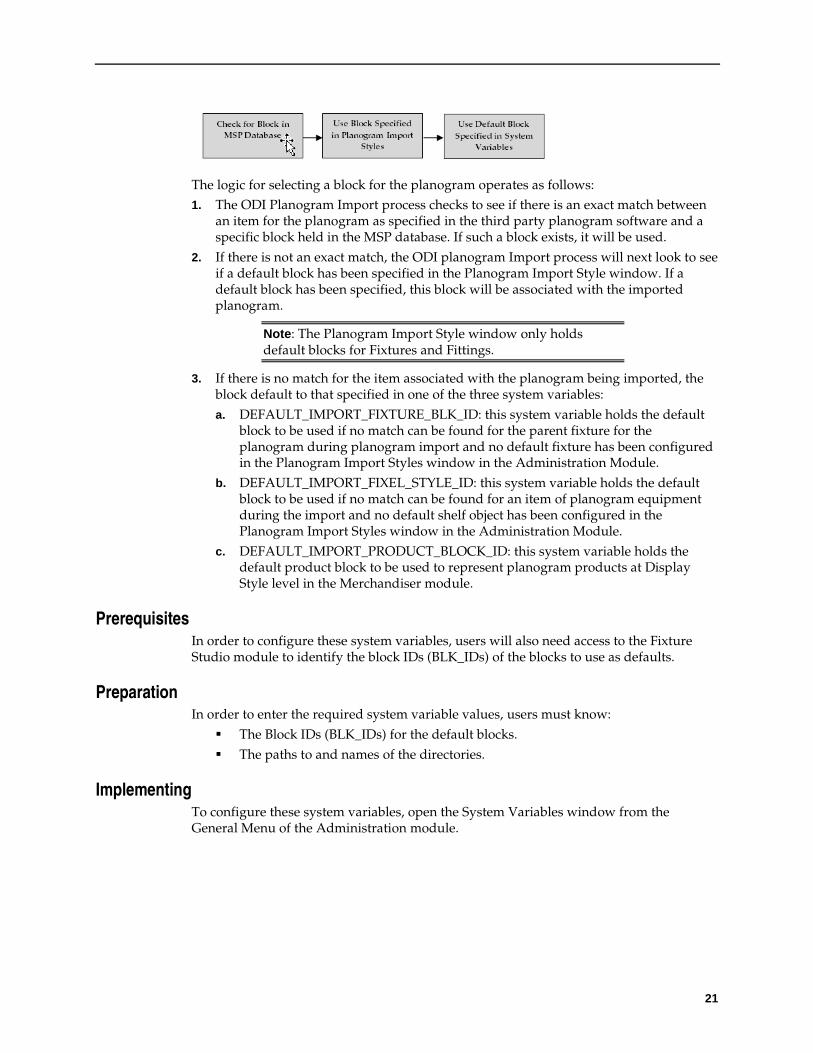
The logic for selecting a block for the planogram operates as follows: 1. The ODI Planogram Import process checks to see if there is an exact match between
an item for the planogram as specified in the third party planogram software and a specific block held in the MSP database. If such a block exists, it will be used.
2. If there is not an exact match, the ODI planogram Import process will next look to see if a default block has been specified in the Planogram Import Style window. If a default block has been specified, this block will be associated with the imported planogram.
Note: The Planogram Import Style window only holds default blocks for Fixtures and Fittings.
3. If there is no match for the item associated with the planogram being imported, the block default to that specified in one of the three system variables:
a. DEFAULT_IMPORT_FIXTURE_BLK_ID: this system variable holds the default block to be used if no match can be found for the parent fixture for the planogram during planogram import and no default fixture has been configured in the Planogram Import Styles window in the Administration Module.
b. DEFAULT_IMPORT_FIXEL_STYLE_ID: this system variable holds the default block to be used if no match can be found for an item of planogram equipment during the import and no default shelf object has been configured in the Planogram Import Styles window in the Administration Module.
c. DEFAULT_IMPORT_PRODUCT_BLOCK_ID: this system variable holds the default product block to be used to represent planogram products at Display Style level in the Merchandiser module.
Prerequisites In order to configure these system variables, users will also need access to the Fixture Studio module to identify the block IDs (BLK_IDs) of the blocks to use as defaults.
Preparation In order to enter the required system variable values, users must know:
The Block IDs (BLK_IDs) for the default blocks.
The paths to and names of the directories.
Implementing To configure these system variables, open the System Variables window from the General Menu of the Administration module.

22
To enter the value for the system variable:
1. Navigate to the row containing the pertinent system variable.
2. Enter the required value in the Type field. Press Return to confirm.
Note: Pressing Return is required to save the value back to the database.
3. When all required items have been entered, exit the window.
Installing Oracle Data Integrator Oracle Data Integrator may be installed in one of two environments:
In a Desktop (Windows) environment - ODI Studio.
In a Java (WebLogic) environment - ODI Console.
Once ODI Studio (or Console) has been installed, it can be used to configure details of the Planogram Import solution. ODI Studio (or Console) can then be used to execute the import, either directly or via a Local or Standalone Agent.
This document currently only describes how to install ODI Studio in a Desktop environment. Prerequisites
The installer must have administrators rights on the machine ODI Studio (or Console) is to be installed on.
Installing ODI in a Desktop Environment The installation for a Desktop Environment is carried out as follows:
Note: This section gives an overview on how to install ODI. For full defaults, please see the ODI documentation.
ODI Installation on Windows 7/10 Desktop: 1. Open command prompt with Admin rights and go to path where Java is installed.
2. Execute below command ..\JDK1.8_77\bin\java.exe –jar ..\softwares\ODI_12.2.1\fmw_12.2.1.0.0_odi_Disk1_1of2\fmw_12.2.1.0.0_odi.jar
23
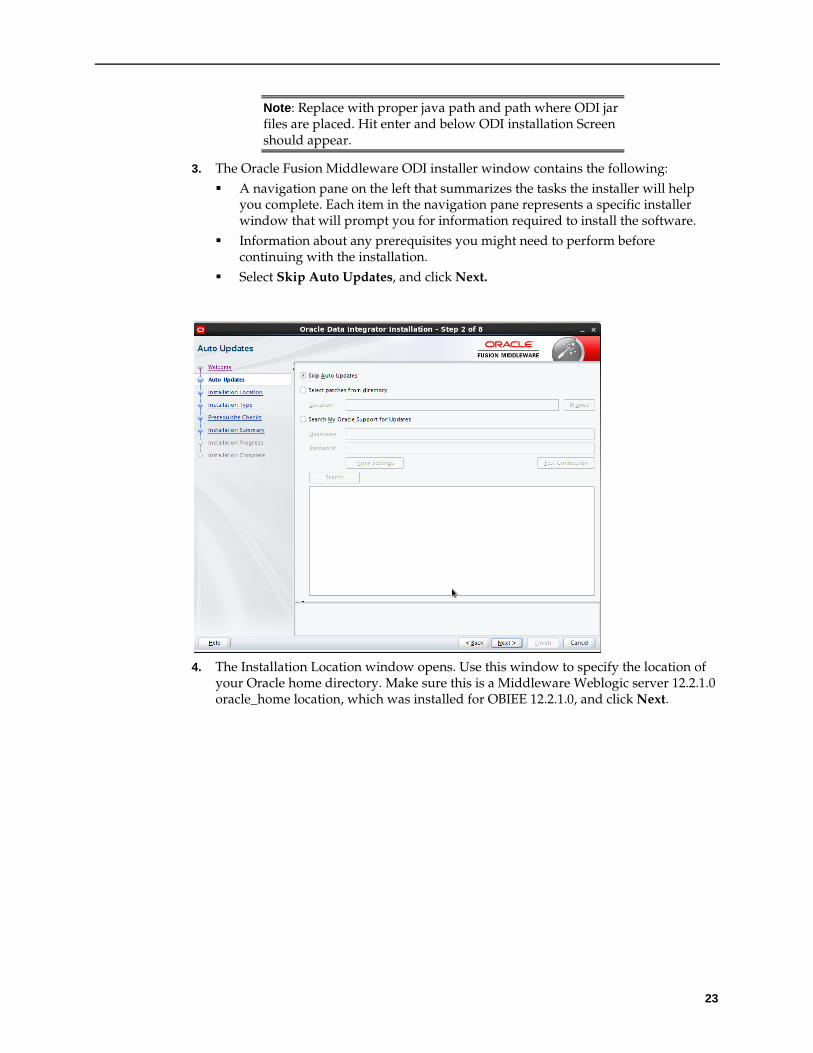
Note: Replace with proper java path and path where ODI jar files are placed. Hit enter and below ODI installation Screen should appear.
3. The Oracle Fusion Middleware ODI installer window contains the following:
A navigation pane on the left that summarizes the tasks the installer will help you complete. Each item in the navigation pane represents a specific installer window that will prompt you for information required to install the software.
Information about any prerequisites you might need to perform before continuing with the installation.
Select Skip Auto Updates, and click Next.
4. The Installation Location window opens. Use this window to specify the location of
your Oracle home directory. Make sure this is a Middleware Weblogic server 12.2.1.0 oracle_home location, which was installed for OBIEE 12.2.1.0, and click Next.

24
5. The Installation Type window opens. Select the Standard Installation radio button,
and Click Next.

25
6. The prerequisite Checks window opens. This window displays the operating system certification and the Java version used to launch the installer. Click Next.
7. The Installation Summary window opens. Click Install.

26
8. This window shows the progress of the installation. When the progress bar reaches 100%, the installation is complete.
9. The Installation Complete window opens. This marks the end of installation, and
provides a summary of the products and features that were installed. Click Finish to dismiss the installer.

27
ODI Installation on Linux machine We need to run the below command in Linux shell script prompt.
1. Use bash command and move to Java folder where Java is installed.
2. Run the following command to start ODI installation /scratch/jdk1.8.0_60/bin/java –jar /scratch/odi_build/fmw_12.2.1.0.0_odi.jar
Note: Replace the above command with correct path.
3. All the steps from here are similar to Screen shots shown in “ODI Installation on Windows 10/7 machine”
Repository Creation Utility (RCU) This section explains how to execute RCU util to create required repositories.
1. Execute RCU util from command prompt (Admin access) in below path …Oracle\Middleware\Oracle_Home\oracle_common\bin
2. Click Next to start creating the repository.
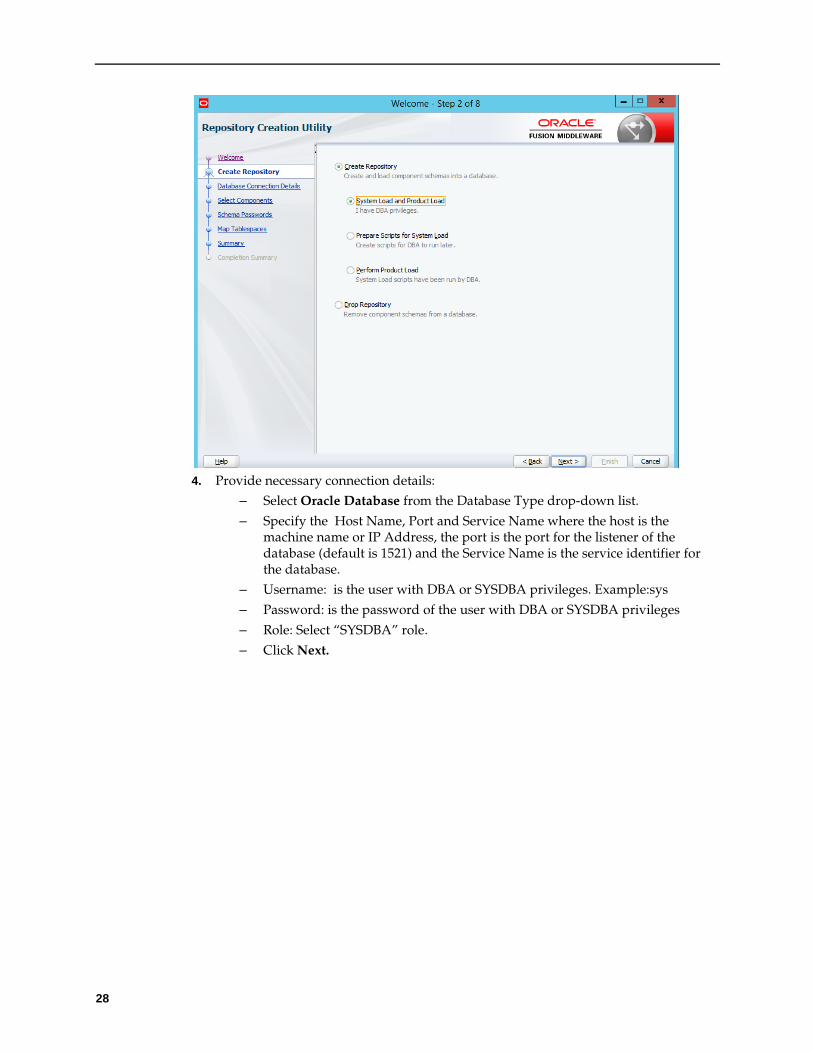
3. Select the Create Repository > System Load and Product Load option from the
window.
Note: Make sure you have a user with DBA privileges before moving to next Window. Example: SYS user
28
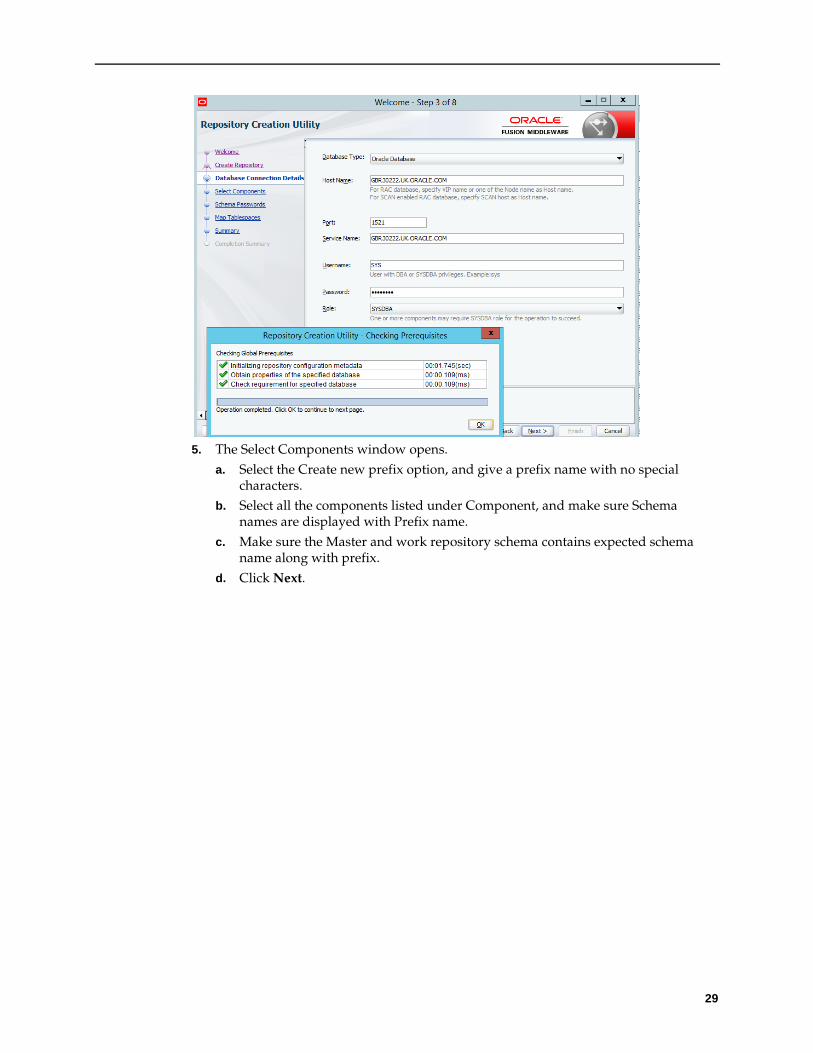
4. Provide necessary connection details:
– Select Oracle Database from the Database Type drop-down list.
– Specify the Host Name, Port and Service Name where the host is the machine name or IP Address, the port is the port for the listener of the database (default is 1521) and the Service Name is the service identifier for the database.
– Username: is the user with DBA or SYSDBA privileges. Example:sys
– Password: is the password of the user with DBA or SYSDBA privileges
– Role: Select “SYSDBA” role.
– Click Next.
29
5. The Select Components window opens.
a. Select the Create new prefix option, and give a prefix name with no special characters.
b. Select all the components listed under Component, and make sure Schema names are displayed with Prefix name.
c. Make sure the Master and work repository schema contains expected schema name along with prefix.
d. Click Next.

30
6. The Repository Creation Utility – Checking Prerequisites pop-up window opens. This checks all prerequisites. Click OK to confirm, and then click Next.
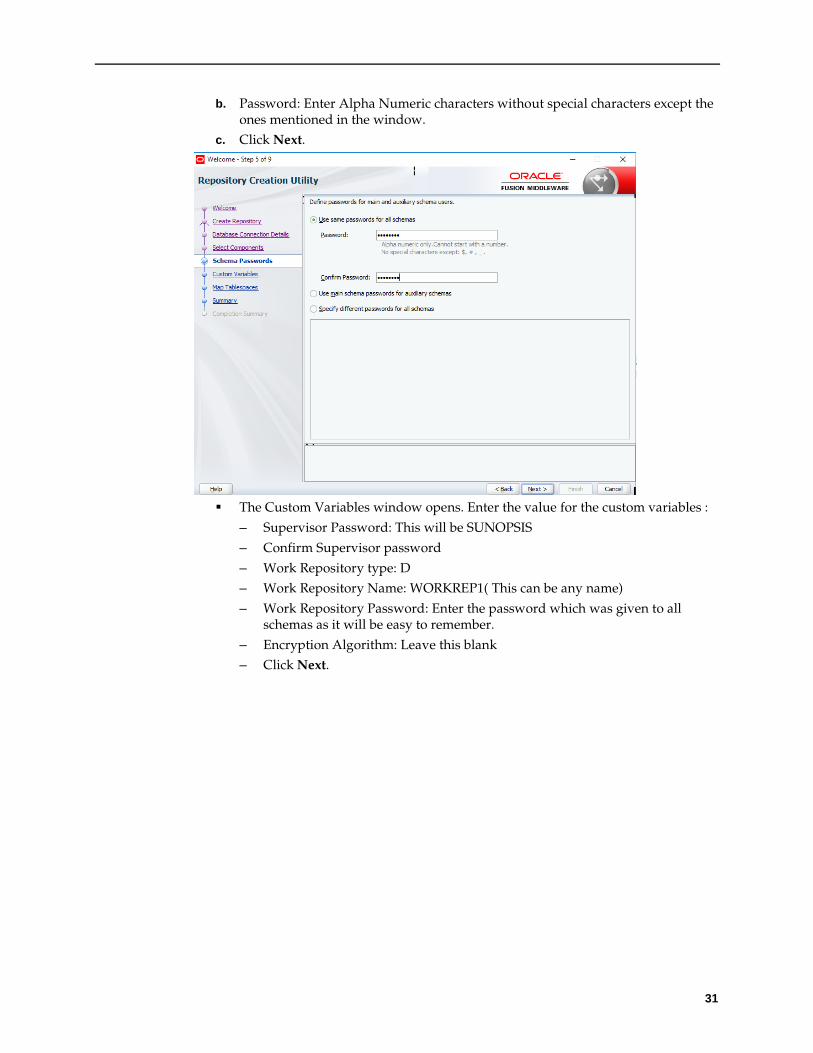
7. The Repository Creation Utility window opens. a. Select the Use same passwords for all schemas option as it is easy to remember
same password for all schemas created related to import.
31
b. Password: Enter Alpha Numeric characters without special characters except the ones mentioned in the window.
c. Click Next.
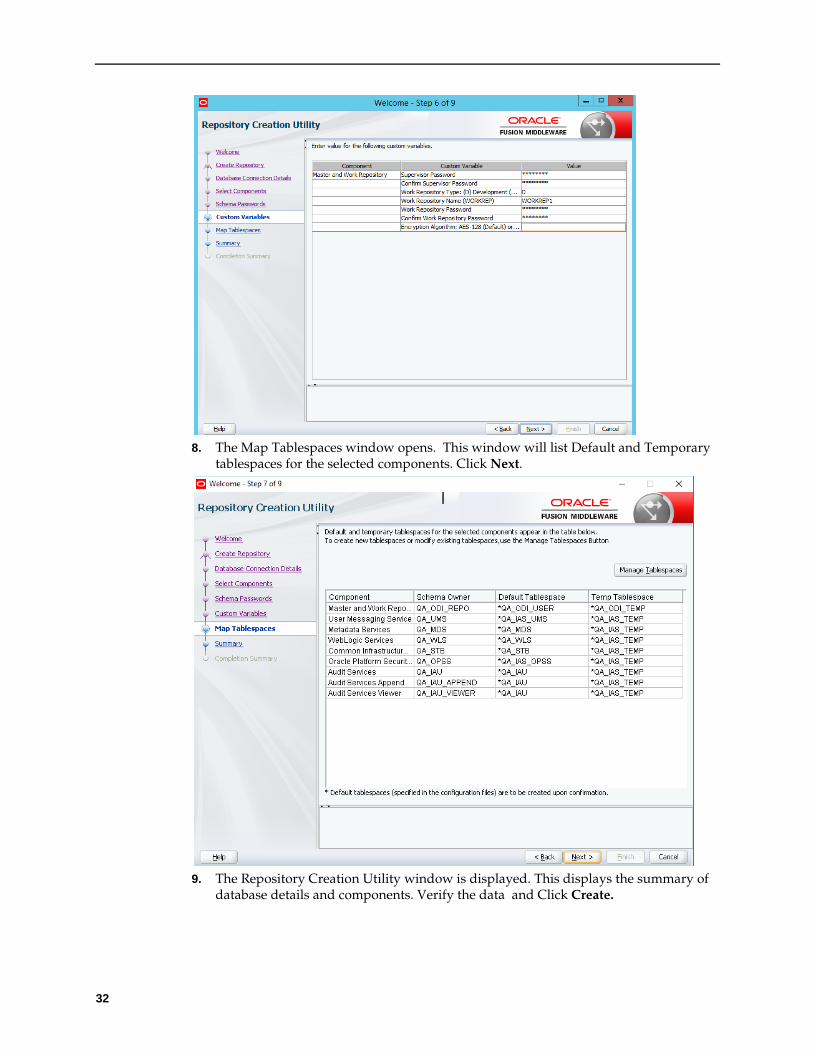
The Custom Variables window opens. Enter the value for the custom variables :
– Supervisor Password: This will be SUNOPSIS
– Confirm Supervisor password
– Work Repository type: D
– Work Repository Name: WORKREP1( This can be any name)
– Work Repository Password: Enter the password which was given to all schemas as it will be easy to remember.
– Encryption Algorithm: Leave this blank
– Click Next.
32
8. The Map Tablespaces window opens. This window will list Default and Temporary
tablespaces for the selected components. Click Next.
9. The Repository Creation Utility window is displayed. This displays the summary of
database details and components. Verify the data and Click Create.

33
10. The Repository Creation Utility - System Load window pop-up window opens. This
will create and load necessary schemas and services. The window will automatically close once it is successfully completed. Click Next.
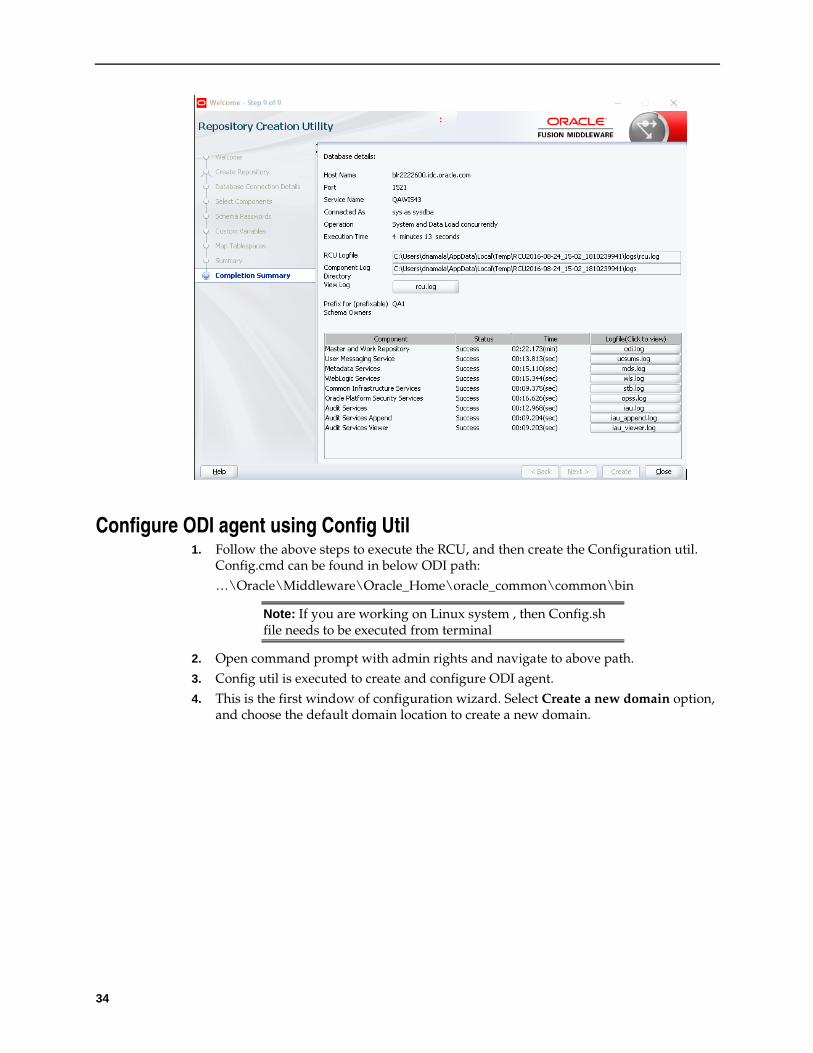
11. The Completion Summary window opens. This window has the summary of
completion. Click Close.
34
Configure ODI agent using Config Util 1. Follow the above steps to execute the RCU, and then create the Configuration util.
Config.cmd can be found in below ODI path:
…\Oracle\Middleware\Oracle_Home\oracle_common\common\bin
Note: If you are working on Linux system , then Config.sh file needs to be executed from terminal
2. Open command prompt with admin rights and navigate to above path.
3. Config util is executed to create and configure ODI agent.
4. This is the first window of configuration wizard. Select Create a new domain option, and choose the default domain location to create a new domain.

35
5. The Templates window opens.
a. Select All Templates from the drop-down list.
b. Select the Oracle Data Integrator-Standalone Agent -12.2.1.1[odi] checkbox. c. Click Next.
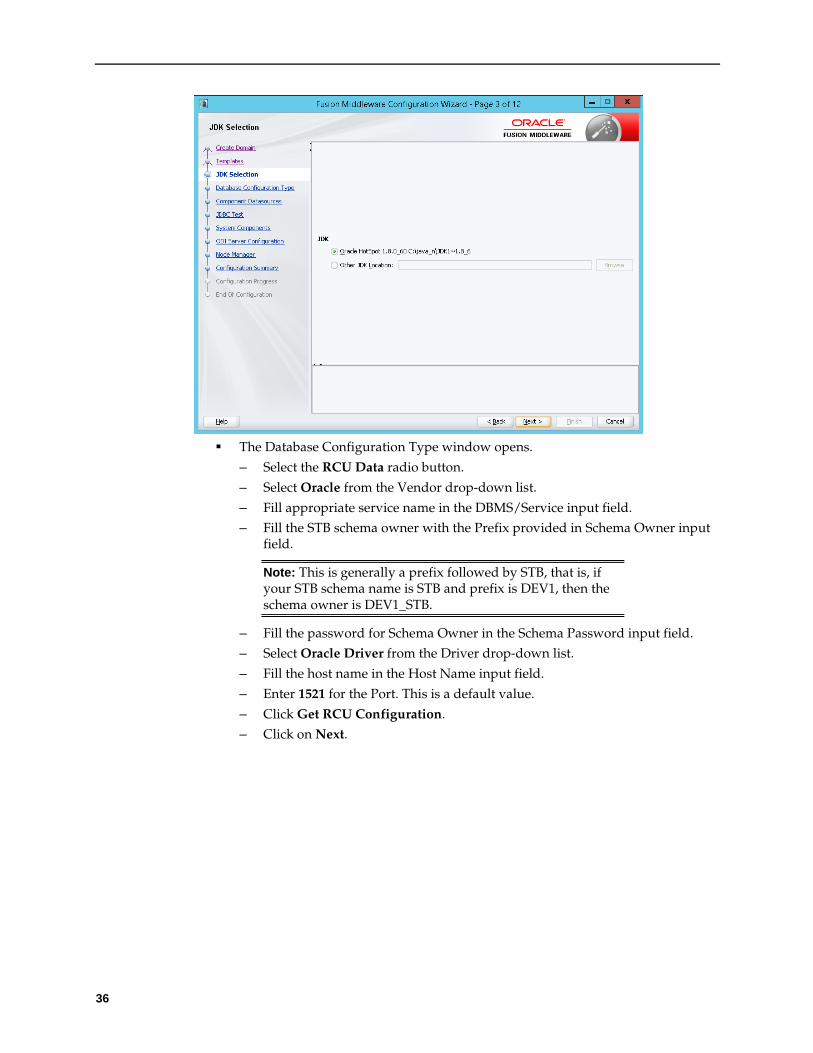
6. The JDK Selection window opens. Select Oracle HotSpot, and click Next.
36
The Database Configuration Type window opens.
– Select the RCU Data radio button.
– Select Oracle from the Vendor drop-down list.
– Fill appropriate service name in the DBMS/Service input field.
– Fill the STB schema owner with the Prefix provided in Schema Owner input field.
Note: This is generally a prefix followed by STB, that is, if your STB schema name is STB and prefix is DEV1, then the schema owner is DEV1_STB.
– Fill the password for Schema Owner in the Schema Password input field.
– Select Oracle Driver from the Driver drop-down list.
– Fill the host name in the Host Name input field.
– Enter 1521 for the Port. This is a default value.
– Click Get RCU Configuration.
– Click on Next.

37
The JDBC Component Schema window opens. Select the required component
schemas, both local and Master repository schema from the Component Schema list. Make sure the connection details and password are entered correctly, and click Next.
The JDBC Component Schema Test window opens. Click the Test Selected
Connections button. Make sure the JDBC connection test is successful, and click Next.

38
The System Components window opens.
– Add the ODIAgent name in the system Component column.
– Select ODI from the Component Type drop-down list.
– Retain the default value of 3600 in the Restart Interval Seconds column.
– Retain the default value of 0 in the Restart Delay Seconds column.
The ODI Server Configuration window opens. Enter the following values to
configure the ODI server:

39
– System component = OracleDIAgent1(The component created in previous window)
– Server Listen Address = host address
– Server Listen Port Number= Specify Agent Port number
– Supervisor Username= SUPERVISOR
– Supervisor Password=SUNOPSIS
– Preferred Datasource = odiMasterRepository
The Node Manager window opens. We will not require this in PogImporter
Agent creation, but this is a mandatory step in this process.
– Select the Per Domain Default Location option.
– Username: Provide a username for Node Manager
– Password: provide a password which is at least 8 characters long and has at least one number or special character.

40
The Configuration Summary window opens. Select the ODI System component
created in the process, and click Create.
The Configuration Process window opens. The percentage of completion is
displayed in the progress bar. Click Next.

41
This is the end of ODI agent configuration. Click Finish.

42
Create and Configure ODI Master Repository After ODI is installed, the next action is to create Login and configure the ODI Master Repository. This holds information on the objects that ODI can connect to.
Prerequisites Refer the Repository Creation Utility (RCU) section, to create Master and Work repositories.
Import Master Repository The Master Repository is imported as follows within ODI:
1. Open New Gallery by choosing File > New. The New Gallery window opens.
2. Select Master Repository Import Wizard.
43
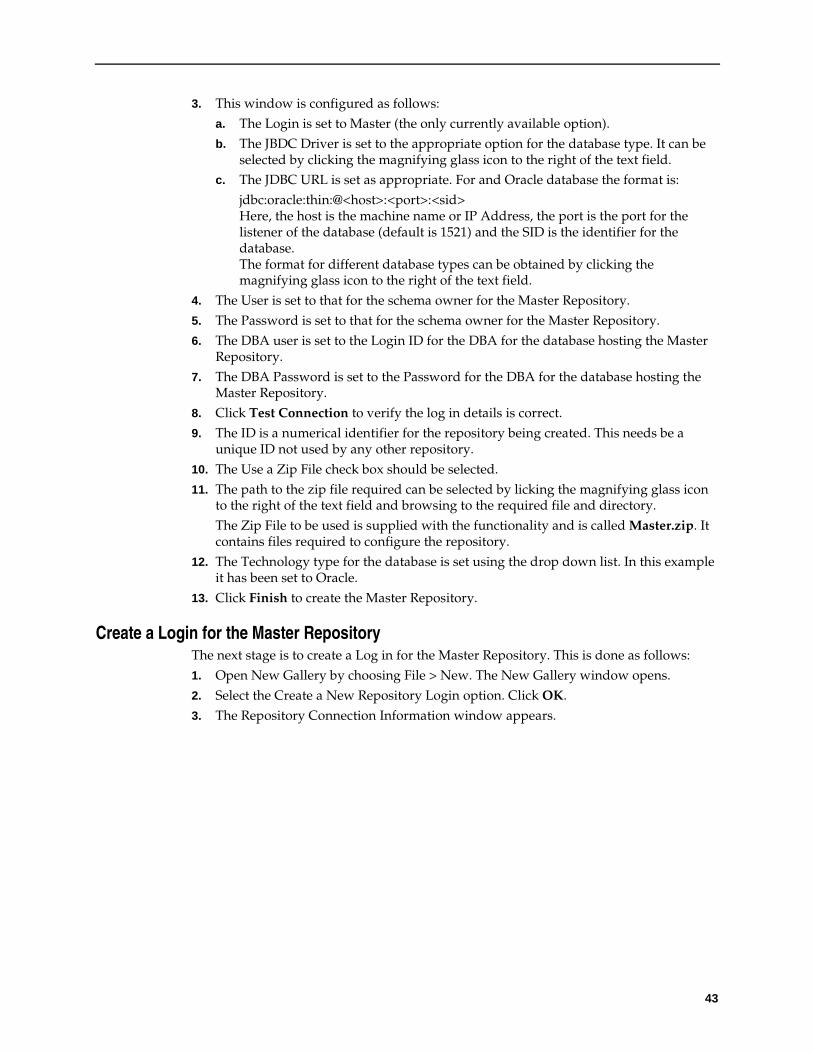
3. This window is configured as follows:
a. The Login is set to Master (the only currently available option).
b. The JBDC Driver is set to the appropriate option for the database type. It can be selected by clicking the magnifying glass icon to the right of the text field.
c. The JDBC URL is set as appropriate. For and Oracle database the format is:
jdbc:oracle:thin:@<host>:<port>:<sid> Here, the host is the machine name or IP Address, the port is the port for the listener of the database (default is 1521) and the SID is the identifier for the database. The format for different database types can be obtained by clicking the magnifying glass icon to the right of the text field.
4. The User is set to that for the schema owner for the Master Repository.
5. The Password is set to that for the schema owner for the Master Repository.
6. The DBA user is set to the Login ID for the DBA for the database hosting the Master Repository.
7. The DBA Password is set to the Password for the DBA for the database hosting the Master Repository.
8. Click Test Connection to verify the log in details is correct.
9. The ID is a numerical identifier for the repository being created. This needs be a unique ID not used by any other repository.
10. The Use a Zip File check box should be selected.
11. The path to the zip file required can be selected by licking the magnifying glass icon to the right of the text field and browsing to the required file and directory.
The Zip File to be used is supplied with the functionality and is called Master.zip. It contains files required to configure the repository.
12. The Technology type for the database is set using the drop down list. In this example it has been set to Oracle.
13. Click Finish to create the Master Repository.
Create a Login for the Master Repository The next stage is to create a Log in for the Master Repository. This is done as follows:
1. Open New Gallery by choosing File > New. The New Gallery window opens.
2. Select the Create a New Repository Login option. Click OK.
3. The Repository Connection Information window appears.

44
4. This window is configured as follows:
a. The Login Name is set to a suitable identifier for this log in. In this case, it has been set to Pog Import Master.
b. The User for the ODI Connection is set to the system login for ODI. In this case the default value of SUPERVISOR is being used.
c. Set the Password for the ODI connection to the system password for ODI. In this case the default password of SUNOPSIS is being used.
d. Set the User for the Database Connection to that created for the Master Repository in the RCU utility section. .
e. Set the Password for the ODI Connection to that created for the Master Repository in the RCU utility section. In this case it is ODI
f. The Driver List (required for connection to the database) is set from the drop down list. In this case it has been set to Oracle JDBC Driver.
g. The Driver Name will populate automatically. h. The JDBC URL is set as appropriate by clicking the magnifying glass icon to the
right. The format is:
jdbc:oracle:thin:@<host>:<port>:<sid> Here, the host is the machine name or IP Address, the port is the port for the listener for the database (default is 1521) and the SID is the identifier for the database. The format for different database types can be obtained by clicking the magnifying glass icon to the right of the text field.
i. Click Test to verify the connection is OK.
j. The Work Repository option is set to Master Repository Only using the radio button.
k. The connection is made the default by checking the Default Connection check box. A confirmation window will appear.
l. Click Yes to confirm.
m. Click OK to create the connection to the Master Repository.

45
Configure Topology - Physical Architecture This section explains how to configure the physical architecture in the ODI Topology tab.
Target Database The target database is where the planogram data will be imported into. this will be the Macro Space Planning database. To set the details:
1. Within ODI, select the Topology tab.
2. Select the Physical Architecture option by clicking on the small triangle to the left of the text. The list of options will open. Expand the hierarchy and select the Oracle option, followed by Target Database.
3. Right-click Target Database and select Open. The Target Database tab will appear.
4. Select the Definition sub-tab.
5. Configure the options as follows:
a. Enter the name of the database in the Instance field. This is the physical name of the data server.
b. Enter the User: this should be the user for the Macro Space Planning database.
c. Enter the Password: this should be the password for the Macro Space Planning database.
Note: The access details for the Macro Space Planning database should confer select, insert and object creation privileges.
6. Select the JDBC sub-tab.

46
7. Configure the Options as follows:
a. The Driver List (required for connection to the database) is set from the drop down list by clicking the magnifying glass icon to the right. In this case it has been set to Oracle JDBC Driver.
b. The JDBC URL is set as appropriate by clicking the magnifying glass icon to the right. The format is:
jdbc:oracle:thin:@<host>:<port>:<sid>
Here, the host is the machine name or IP Address, the port is the port for the listener for the database (default is 1521) and the SID is the identifier for the database.
The format for different database types can be obtained by clicking the magnifying glass icon to the right of the text field.
XML Technology The XML Technology option is used to store the path and file name of the XSD file used to validate the form of the XML being presented for import.
1. Within ODI select the Topology Navigator.
2. Select the Physical Architecture option by clicking on the small triangle to the left of the text. The list of options will open. Expand the hierarchy.
3. In ODI Studio, from the Topology tab, click Physical Architecture > Technologies >
XML -> POG_Import_Xml_Data_Server. The POG_Import_Xml_Data_Server window opens to the right.

47
4. Setup JDBC URL:
Click the JDBC -> JDBC URL ->Specify XML template file path or XSD file path and respective XML Schema name which are used to store the XML data. Example: Jdbc: snps: xml? d=C: \POG_IMPORTER\Template\XML Template for Source File.xsd&f=#POG_IMPORT_3.FileName&s=PMD_XML&dp=ExtXML&re=MSM_IMPORT_DATA_STRUCTURE&ro=true&iue=true In above example, C: \POG_IMPORTER\Template\XML Template for Source File.xsd is the filepath, and PMD_XML is the XML Schema Name.
5. Setup XML Properties:
Click the JDBC -> Properties -> Expand XML Properties -> Set schema value to respective XML schema name -> Click save. Schema is a Database schema used to store the relational schema and the XML data. Example: Schema: PMD_XML
Select the checkboxes as shown in the screenshots below.

48
6. Setup External DB Properties:
Click JDBC -> Properties -> Expand External DB Properties and set the following values: dp_password: Encrypted password of the user. dp_schema: Database schema storing the relational schema and XML data. dp_url: JDBC URL (jdbc: oracle: thin:@<Host Name or IP Address > :< Port> :< Host Name>). dp_user: Login used to connect to XML database. Select the checkboxes as shown in the screenshots below.
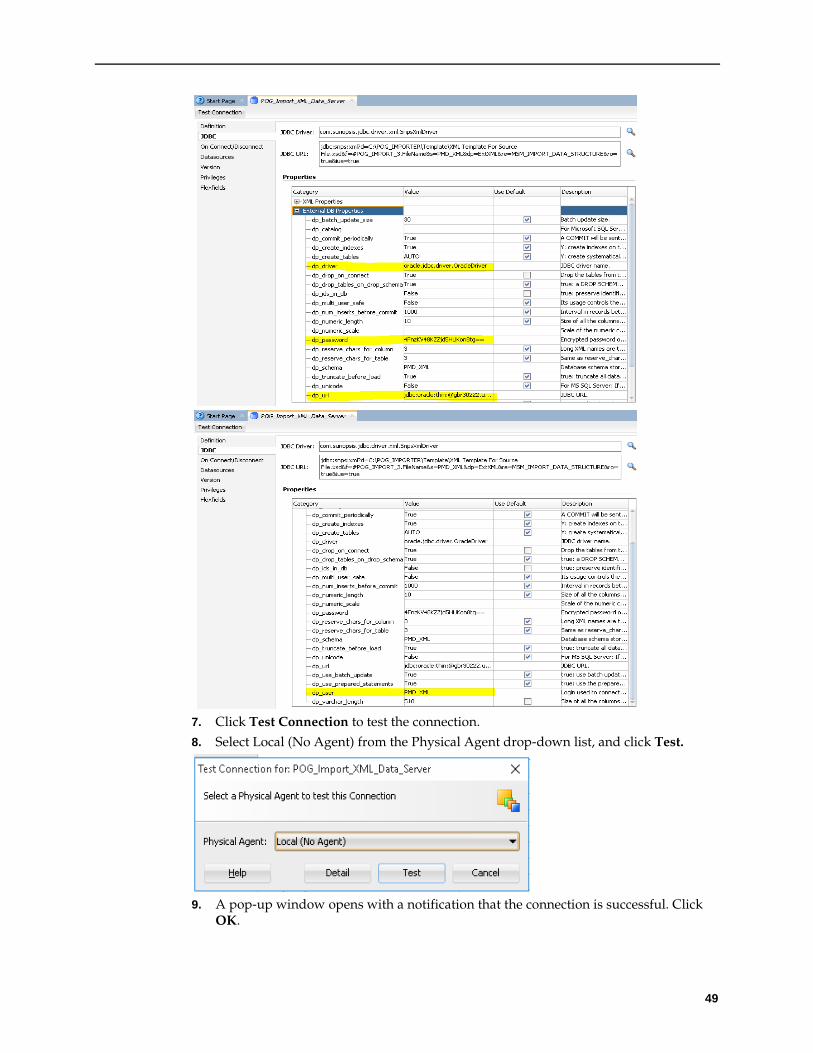
49
7. Click Test Connection to test the connection.
8. Select Local (No Agent) from the Physical Agent drop-down list, and click Test.
9. A pop-up window opens with a notification that the connection is successful. Click
OK.

50
10. Expand POG_Import_XML_Data_Server. Double-click
POG_Import_XML_Data_Server.XML DB (PMD_XML), and select the respective XML schema name for Schema (Schema) and Schema (Work Schema) from drop down list. Click Save.
Configure Topology - Logical Architecture These values should have been set when the master repository was imported. The values can be confirmed as follows:
1. Within ODI, select the Topology Navigator.
2. Select the Logical Architecture option by clicking on the small triangle to the left of the text. The list of options will open. Expand the hierarchy.

51
3. The option under Oracle should be PogImportLogicSchema.
4. The option under XML should be POGIMPORTXMLLOGICSCHEMA.
Configure/Testing the Work Repository 1. Within ODI, select the Topology tab.
2. Select the Repositories option by clicking on the small triangle to the left of the text. The list of options will open. Expand the hierarchy.
3. Open the Work repository that you created as described in the Work Repository
using RCU util section, and test the connection details.
4. The first page of the Create Work Repository window will appear.
52
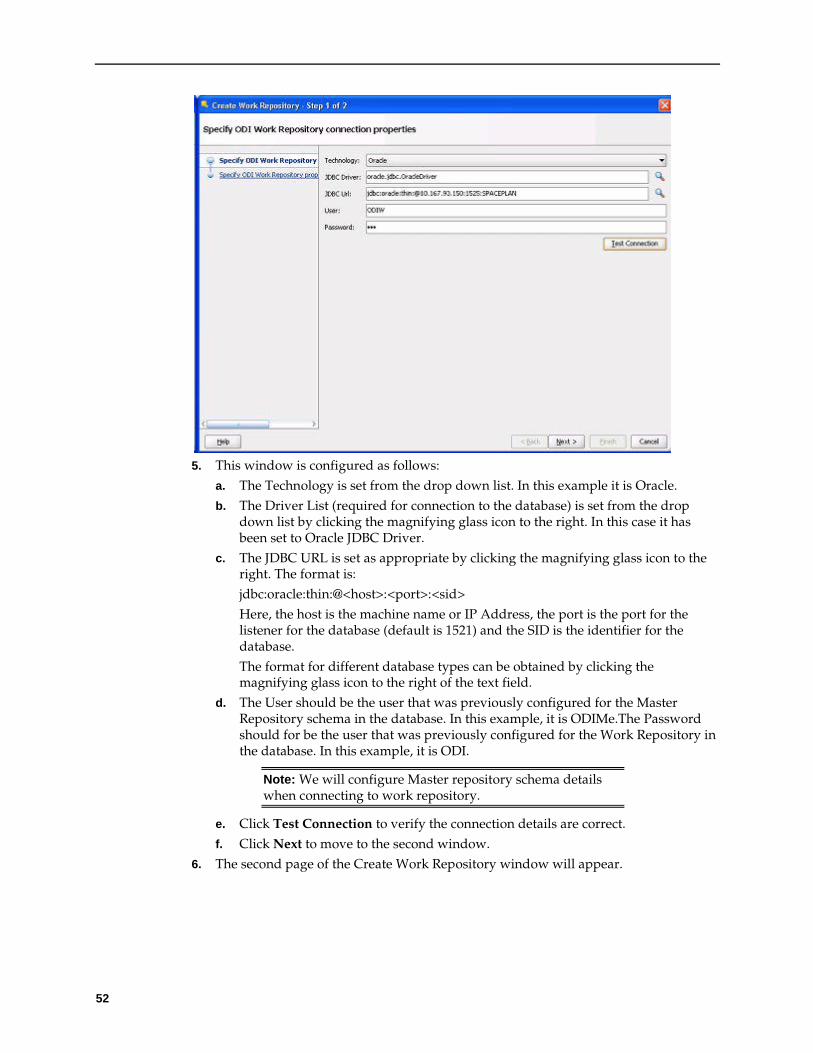
5. This window is configured as follows:
a. The Technology is set from the drop down list. In this example it is Oracle.
b. The Driver List (required for connection to the database) is set from the drop down list by clicking the magnifying glass icon to the right. In this case it has been set to Oracle JDBC Driver.
c. The JDBC URL is set as appropriate by clicking the magnifying glass icon to the right. The format is:
jdbc:oracle:thin:@<host>:<port>:<sid>
Here, the host is the machine name or IP Address, the port is the port for the listener for the database (default is 1521) and the SID is the identifier for the database.
The format for different database types can be obtained by clicking the magnifying glass icon to the right of the text field.
d. The User should be the user that was previously configured for the Master Repository schema in the database. In this example, it is ODIMe.The Password should for be the user that was previously configured for the Work Repository in the database. In this example, it is ODI.
Note: We will configure Master repository schema details when connecting to work repository.
e. Click Test Connection to verify the connection details are correct.
f. Click Next to move to the second window.
6. The second page of the Create Work Repository window will appear.

53
7. This window is configured as follows:
a. Set the ID for the Work Repository to a unique value.
b. Specify the Name for the Work Repository
c. Enter a modified password for the Work Repository. In this case it is ODIM.
d. Set the Work Repository Type from the drop down list. This will allow the loading of scenarios, etc. into the Work Repository at a later stage. This should be set to Development to allow the scenarios to be imported.
Note: Work Repositories of type Execution do not allow the implementers to carry out some subsequent configuration steps including importing the scenarios.
8. Click Finish to the Work Repository.
9. A confirmation window opens asking if you wish to create a login for the work repository. Click OK. The procedure for doing this is described in the next section.
Creating the Login for the Work Repository Creating a Login for the Work Repository is a follow on action from creating the Work Repository itself.
Creating the Work Repository Login Later If it is necessary to create the Login later (and not as a follow up action to creating the Work Repository), the following actions will bring up the required window.
1. If connected to the Master Repository, disconnect using the Disconnect option from the ODI menu.

54
2. Select Connect from the ODI menu.
3. The Repository Connection Information window will appear. Click Edit to open up
the full window. It will currently be showing the connection information for the Master Repository. This can be modified to that for the work Repository.
Creating the Work Repository Login The appearance of the Repository connection window will vary depending on whether the user is editing the detail of the Master Repository or creating a Work Repository Login from scratch as a follow on action from creating the Work Repository.

55
The Login can be configured as follows:
1. The Login Name is set to a suitable identifier for this log in. In this case, it has been set to Pog Import Work Repository.
2. The User for the ODI Connection is set to the system login for ODI. In this case the default value of SUPERVISOR is being used.
3. Set the Password for the ODI connection to the system password for ODI. In this case the default password of SUNOPSIS is being used.
4. Set the User for the Database Connection to that created for the Master Repository in the database schema. In this case, it is ODIW.
5. Set the Password for the ODI Connection to that created for the Master Repository in the database schema. In this case it is ODI
6. The Driver List (required for connection to the database) is set from the drop down list. In this case it has been set to Oracle JDBC Driver.
7. The Driver Name will populate automatically. 8. The JDBC URL is set as appropriate by clicking the magnifying glass icon to the
right. The format is:
jdbc:oracle:thin:@<host>:<port>:<sid>
where the host is the machine name or IP Address, the port is the port for the listener for the database (default is 1521) and the SID is the identifier for the database.
The format for different database types can be obtained by clicking the magnifying glass icon to the right of the text field.
9. Click Test to verify the connection is OK.
10. The Work Repository option is set to Work Repository using the radio button.
11. The required Work Repository is selected by clicking the magnifying glass icon to the right of the text box and selecting from the list.
12. Click OK to create the connection to the Work Repository. The ODI Login window will appear.
13. Click OK.

56
Importing the Scenarios Scenarios contain information on how to process data during the import process.
They are imported as follows:
1. Endure that the Work Registry is the repository currently connected to.
2. Select the Designer Navigator tab.
3. From the Load Plans and Scenarios option, select Import Scenario.
4. The Import Scenario window opens.
5. Populate the Import Scenario window as follows:
a. Set the Import type to Duplication.
b. Click the magnifying glass to the right of the File Import Directory text box. The Open window opens.

57
c. Use the Location drop down list to navigate to where the scenarios are stored.
Note: The Scenarios will not display in the Open window.
d. Click Open. The Open window will close and you will be directed to the Import Scenario window with the OK button grayed out.
e. Highlight the required scenarios. The OK button will become active. Click OK. f. On clicking OK, the scenarios will be imported into ODI. An Import Report will
be displayed.

58
g. Confirm the scenarios have imported satisfactorily, and click Close.
Starting and Testing the Stand Alone Agent This section deals with starting and testing the Standalone agent. The procedure is as follows: 1. Start the ODI Agent
2. Open ODI Studio, connect to the Master Repository and test the connection to the Standalone Agent in the Topology Navigator.
Starting the Standalone Agent In order to run the agent, Open the command prompt and open the directory path where the Agent script is present. For example: C:\Oracle\Middleware\Oracle_Home\user_projects\domains\base_domain\bin where base_domain is the domain created when config util was run.
This directory will contain a agent.cmd or agent.sh file that invokes the Agent.
1. Go to below path from command prompt as “run in Administrator” mode:
C:/oracle/Middleware/Oracle_Home/user_projects/domains/base_domain/bin 2. Enter below command:
agent.cmd -NAME=<Agent Name> -PORT=<Port Number> Where <Agent Name> is the agent name and <Port Number> is port number (default: 20910)configured in Create and Configure ODI agent using Config util section.
Note: When executing agent command on Linux machine use below script:
agent.sh -NAME=<Agent Name> -PORT=<Port Number>

59
3. As the agent starts, a DOS command line window opens.
4. After a brief pause, the agent will start; the required confirmation appearing in the
DOS Command Line window.

60
Testing the Agent from ODI Studio Once configured, the Standalone Agent details can be seen in ODI Studio. To see them connect to the Master Repository and open the Topology Navigator.
1. Right-click the Agent and select Open for more details. The Agent window opens.
Select the Definition Tab.
2. This tab contains the name of the Standalone Agent, the computer hosting it and the
post it is configured to communicate through.
3. Click Test. The connection to the Standalone Agent will now be tested. A window will report the results. a. If the connection is successful, it will be reported in the window.
b. If the connection fails, an error message will result.
Note: The Standalone Agent must have been started before testing. If it is not an error message will result.
Configuring Access to the ODI Staging Area The ODI Staging Area is a schema where data is held temporarily while it is validated prior to import in the MSP database. Data for the connection is held in a file called ExtXML.properties
If ODI Planogram Import is run from ODI Studio, a copy of the file must exist in C:\Oracle\Middleware\Oracle_Home\odi\studio\extensions\oracle.odi.navigator.12
If ODI Planogram Import is run from ODI Standalone agent, a copy of the file must exist in the following directory:
C:\Oracle\Middleware\Oracle_Home\odi\agent\lib
61
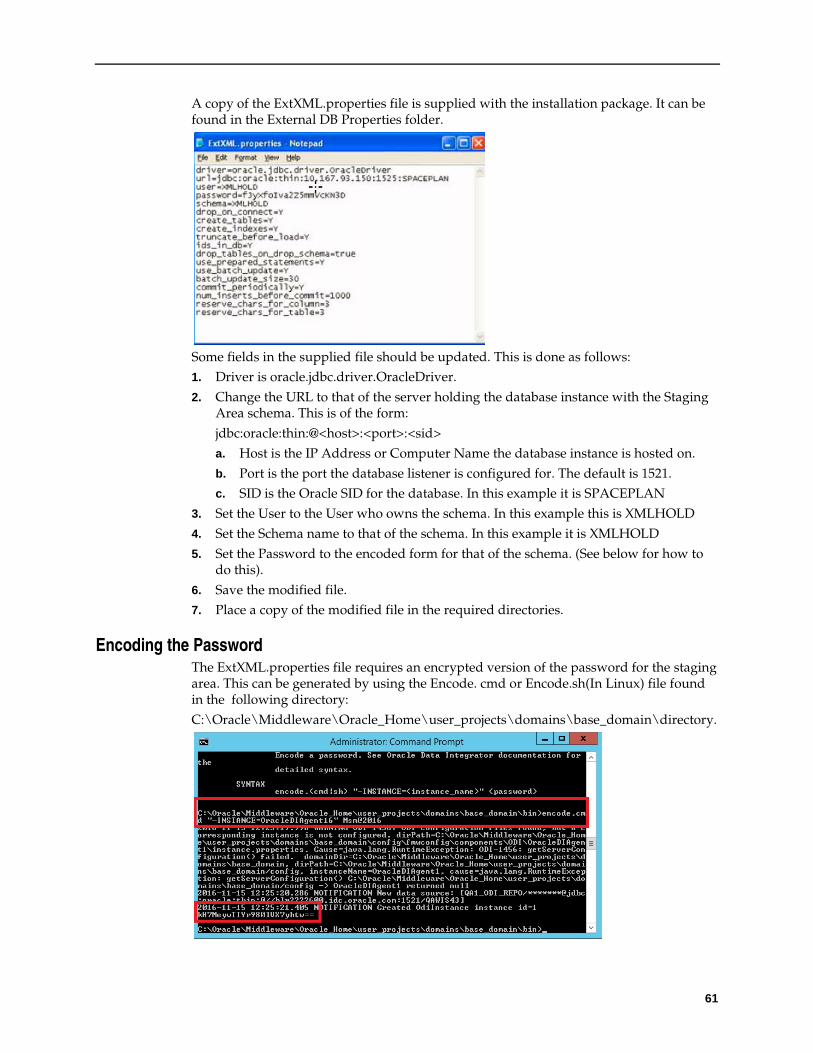
A copy of the ExtXML.properties file is supplied with the installation package. It can be found in the External DB Properties folder.
Some fields in the supplied file should be updated. This is done as follows: 1. Driver is oracle.jdbc.driver.OracleDriver.
2. Change the URL to that of the server holding the database instance with the Staging Area schema. This is of the form:
jdbc:oracle:thin:@<host>:<port>:<sid>
a. Host is the IP Address or Computer Name the database instance is hosted on.
b. Port is the port the database listener is configured for. The default is 1521. c. SID is the Oracle SID for the database. In this example it is SPACEPLAN
3. Set the User to the User who owns the schema. In this example this is XMLHOLD
4. Set the Schema name to that of the schema. In this example it is XMLHOLD
5. Set the Password to the encoded form for that of the schema. (See below for how to do this).
6. Save the modified file. 7. Place a copy of the modified file in the required directories.
Encoding the Password The ExtXML.properties file requires an encrypted version of the password for the staging area. This can be generated by using the Encode. cmd or Encode.sh(In Linux) file found in the following directory:
C:\Oracle\Middleware\Oracle_Home\user_projects\domains\base_domain\directory.

62
To encode the password:
Open a Command Line prompt in “Run as Administrator” mode
Change to the C:\Oracle\Middleware\Oracle_Home\user_projects\domains\base_domain\bin directory
Use the the encode.(cmd|sh) "-INSTANCE=<instance_name>" <password> command
Where “instance name” is the agent Name and password is the password which needs to be encrypted.
Paste the enciphered password into the ExtXML.properties file
Note: The agent should be up and running if you need to execute encode.cmd |encode.sh command
The encode.cmd|encode.sh file will generate alternative versions of the encrypted password each time it is run.
ODI and Scheduling Once the planogram import process is ready to go live, it will probably be set up to execute on a regular schedule. This can be done in three main ways:
Using ODI Studio’s (or ODI Console’s) internal scheduling tool.
ODI Agent
ODI Standalone Agent
If the Agent or Standalone Agent is used, it can be initiated in one of two ways:
By means of a batch file By starting the appropriate Windows Service
This is discussed in more detail in a later section.
.