Embed Size (px)
Citation preview

Dangerous Power G3/IQ Upgrade Board
FEATURES INCLUDE: MULTI COLOR LED BATTERY LEVEL DISPLAY MICRO SWITCH TRIGGER ACTIVATION SOUND ALERTS AND FEEDBACK ONE TOUCH FIRING MODE SELECTION TRIGGER TRAINER MODE TRIGGER PROGRAMMABLE 12 BREAKOUT MODES 5 EYE MODES TOURNAMENT LOCK FORCED SHOT 10 FIRING MODES:
• SEMI (RED) • BURST (GREEN) • REACTIVE (YELLOW) • FULL AUTO (BLUE) • STEP AUTO (TEAL) • BURST RAMP (RED FLASH) • REACTIVE RAMP (GREEN FLASH) • PSP (YELLOW FLASH) • NXL (BLUE FLASH) • MILLENNIUM (TEAL FLASH)
FIRING MODE CONTROL Tap the Power button to select the next mode. No mode changing if Eyes Off or empty breech.
PROGRAMMING MODE To enter Programming Mode, press and hold the trigger while powering on the marker. Release the trigger. Use the trigger to scroll to the Setpoint you wish to change, then tap the Power button. The LED will blink the current value. Tap the Power button again it indicate you wish to change the value. Use trigger pulls to enter the value. Tap the Power button once more to store the new value. The LED will then blink the new stored value. Scroll to another setpoint with the trigger, or exit programming mode via power off.
TRIGGER TRAINER MODE To enter Trigger Trainer Mode, power the marker on and Hold the button for 5 seconds. (LED will faintly flicker WHITE). To use TTM - Pull the trigger as fast as you can. Your per second pull rate is displayed in real time as you pull (Blue - 1 to 5 pulls / Green - 6 to 10 pulls / Yellow - 11 to 15 pulls / Red - 16 to 20 pulls). When the trigger is released, the LED will first blink blue with the average pull rate you achieved, then blink red with the max pull rate you achieved. To exit TTM, power off.
SETPOINT DEFAULT While in programming mode, pull and hold the trigger for 5 seconds to reset all setpoints to default.
MARKER CONTROL SETPOINTS
POWER BUTTON
EYE CONNECTOR
SOLENOID CONNECTOR
BATTERY CONNECTOR
LED
POWER ON/OFF Press the Power button to activate the marker. While pressed the battery level is displayed (Green = above 8.5V, Yellow = above 7.5V, Red = below 7.5V). If a ball is present the marker starts in 1st programmed Firing Mode. If the breech is empty, the Empty Breech alert is displayed (Solid Purple). Tap the power button to start the marker with Eyes Off, or load the breech with paint. To turn the marker OFF, press/hold the power button for 3 seconds.
EYE CONTROL AND STATUS During firing operations, press/hold the Power Button for 1 second to toggle the Eyes On or Off. The Eye status is as follows: (Solid Purple = Empty Breech / Slow Purple Flash = Eyes Off / Fast Purple Flash = iFault Detected).
* A MGRF EYE ON SETTING OF 36 UNCAPS THE FIRING RATE
LED Default(Multicolor) Value
MGRF – Eyes On Red 13 5/36*
MGRF – Eyes Off Red Flash 10 5/20
BPS Fine Tune Red Flicker 1 1/10
Tournament Mode Green 8 1/10
Tournament Mode Ramp Point Green Flash 3 1/8
Breakout Mode Green Flicker 13 1/13
Trigger Debounce (ms) Yellow 10 1/20
Breech Delay (ms) Yellow Flash 3 1/30
Eye Mode Yellow Flicker 2 1/5
Solenoid Dwell (ms) Blue 15 1/30
ABS Dwell (ms) Blue Flash 8 1/8
Bolt Return Delay (ms) Blue Flicker 25 1/40
Burst Rounds Purple 3 2/5
Reactive Pull Rounds Purple Flash 1 1/5
Reactive Release Rounds Purple Flicker 1 1/5
Burst Ramping Point Teal 4 2/8
Reactive Ramping Point Teal Flash 4 2/8
Step Auto Rate Teal Flicker 3 1/10
Firing Mode Group 1 Enable/Disable White 31 1/32
Firing Mode Group 2 Enable/Disable White Flash 31 1/32
Auto Shut Off Timer White Flicker 1 1/20
Min/Max ValueFeature
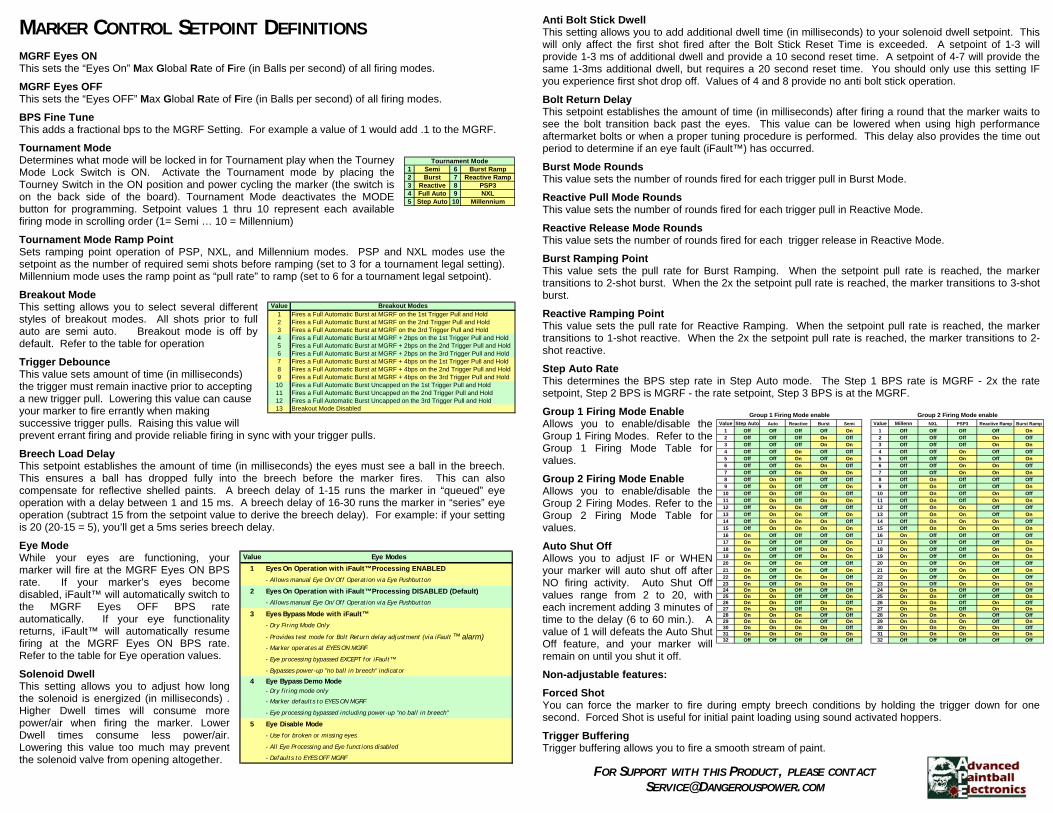
MARKER CONTROL SETPOINT DEFINITIONS MGRF Eyes ON This sets the “Eyes On” Max Global Rate of Fire (in Balls per second) of all firing modes.
MGRF Eyes OFF This sets the “Eyes OFF” Max Global Rate of Fire (in Balls per second) of all firing modes.
BPS Fine Tune This adds a fractional bps to the MGRF Setting. For example a value of 1 would add .1 to the MGRF.
Tournament Mode Determines what mode will be locked in for Tournament play when the Tourney Mode Lock Switch is ON. Activate the Tournament mode by placing the Tourney Switch in the ON position and power cycling the marker (the switch is on the back side of the board). Tournament Mode deactivates the MODE button for programming. Setpoint values 1 thru 10 represent each available firing mode in scrolling order (1= Semi … 10 = Millennium)
Tournament Mode Ramp Point Sets ramping point operation of PSP, NXL, and Millennium modes. PSP and NXL modes use the setpoint as the number of required semi shots before ramping (set to 3 for a tournament legal setting). Millennium mode uses the ramp point as “pull rate” to ramp (set to 6 for a tournament legal setpoint).
Breakout Mode This setting allows you to select several different styles of breakout modes. All shots prior to full auto are semi auto. Breakout mode is off by default. Refer to the table for operation
Trigger Debounce This value sets amount of time (in milliseconds) the trigger must remain inactive prior to accepting a new trigger pull. Lowering this value can cause your marker to fire errantly when making successive trigger pulls. Raising this value will prevent errant firing and provide reliable firing in sync with your trigger pulls.
Breech Load Delay This setpoint establishes the amount of time (in milliseconds) the eyes must see a ball in the breech. This ensures a ball has dropped fully into the breech before the marker fires. This can also compensate for reflective shelled paints. A breech delay of 1-15 runs the marker in “queued” eye operation with a delay between 1 and 15 ms. A breech delay of 16-30 runs the marker in “series” eye operation (subtract 15 from the setpoint value to derive the breech delay). For example: if your setting is 20 (20-15 = 5), you’ll get a 5ms series breech delay.
Eye Mode While your eyes are functioning, your marker will fire at the MGRF Eyes ON BPS rate. If your marker’s eyes become disabled, iFault™ will automatically switch to the MGRF Eyes OFF BPS rate automatically. If your eye functionality returns, iFault™ will automatically resume firing at the MGRF Eyes ON BPS rate. Refer to the table for Eye operation values.
Solenoid Dwell This setting allows you to adjust how long the solenoid is energized (in milliseconds) . Higher Dwell times will consume more power/air when firing the marker. Lower Dwell times consume less power/air. Lowering this value too much may prevent the solenoid valve from opening altogether.
Anti Bolt Stick Dwell This setting allows you to add additional dwell time (in milliseconds) to your solenoid dwell setpoint. This will only affect the first shot fired after the Bolt Stick Reset Time is exceeded. A setpoint of 1-3 will provide 1-3 ms of additional dwell and provide a 10 second reset time. A setpoint of 4-7 will provide the same 1-3ms additional dwell, but requires a 20 second reset time. You should only use this setting IF you experience first shot drop off. Values of 4 and 8 provide no anti bolt stick operation.
Bolt Return Delay This setpoint establishes the amount of time (in milliseconds) after firing a round that the marker waits to see the bolt transition back past the eyes. This value can be lowered when using high performance aftermarket bolts or when a proper tuning procedure is performed. This delay also provides the time out period to determine if an eye fault (iFault™) has occurred.
Burst Mode Rounds This value sets the number of rounds fired for each trigger pull in Burst Mode.
Reactive Pull Mode Rounds This value sets the number of rounds fired for each trigger pull in Reactive Mode.
Reactive Release Mode Rounds This value sets the number of rounds fired for each trigger release in Reactive Mode.
Burst Ramping Point This value sets the pull rate for Burst Ramping. When the setpoint pull rate is reached, the marker transitions to 2-shot burst. When the 2x the setpoint pull rate is reached, the marker transitions to 3-shot burst.
Reactive Ramping Point This value sets the pull rate for Reactive Ramping. When the setpoint pull rate is reached, the marker transitions to 1-shot reactive. When the 2x the setpoint pull rate is reached, the marker transitions to 2-shot reactive.
Step Auto Rate This determines the BPS step rate in Step Auto mode. The Step 1 BPS rate is MGRF - 2x the rate setpoint, Step 2 BPS is MGRF - the rate setpoint, Step 3 BPS is at the MGRF.
Group 1 Firing Mode Enable Allows you to enable/disable the Group 1 Firing Modes. Refer to the Group 1 Firing Mode Table for values.
Group 2 Firing Mode Enable Allows you to enable/disable the Group 2 Firing Modes. Refer to the Group 2 Firing Mode Table for values.
Auto Shut Off Allows you to adjust IF or WHEN your marker will auto shut off after NO firing activity. Auto Shut Off values range from 2 to 20, with each increment adding 3 minutes of time to the delay (6 to 60 min.). A value of 1 will defeats the Auto Shut Off feature, and your marker will remain on until you shut it off.
Non-adjustable features:
Forced Shot You can force the marker to fire during empty breech conditions by holding the trigger down for one second. Forced Shot is useful for initial paint loading using sound activated hoppers.
Trigger Buffering Trigger buffering allows you to fire a smooth stream of paint.
1 Semi 6 Burst Ramp2 Burst 7 Reactive Ramp3 Reactive 8 PSP34 Full Auto 9 NXL5 Step Auto 10 Millennium
Tournament Mode
Value Breakout Modes1 Fires a Full Automatic Burst at MGRF on the 1st Trigger Pull and Hold2 Fires a Full Automatic Burst at MGRF on the 2nd Trigger Pull and Hold3 Fires a Full Automatic Burst at MGRF on the 3rd Trigger Pull and Hold4 Fires a Full Automatic Burst at MGRF + 2bps on the 1st Trigger Pull and Hold5 Fires a Full Automatic Burst at MGRF + 2bps on the 2nd Trigger Pull and Hold6 Fires a Full Automatic Burst at MGRF + 2bps on the 3rd Trigger Pull and Hold7 Fires a Full Automatic Burst at MGRF + 4bps on the 1st Trigger Pull and Hold8 Fires a Full Automatic Burst at MGRF + 4bps on the 2nd Trigger Pull and Hold9 Fires a Full Automatic Burst at MGRF + 4bps on the 3rd Trigger Pull and Hold10 Fires a Full Automatic Burst Uncapped on the 1st Trigger Pull and Hold11 Fires a Full Automatic Burst Uncapped on the 2nd Trigger Pull and Hold12 Fires a Full Automatic Burst Uncapped on the 3rd Trigger Pull and Hold13 Breakout Mode Disabled
Value Eye Modes
1 Eyes On Operation with iFault™ Processing ENABLED- Allows manual Eye On/Off Operation via Eye Pushbutton
2 Eyes On Operation with iFault™ Processing DISABLED (Default)- Allows manual Eye On/Off Operation via Eye Pushbutton
3 Eyes Bypass Mode with iFault™- Dry Firing Mode Only
- Provides test mode for Bolt Return delay adjustment (via iFault ™ alarm)- Marker operates at EYES ON MGRF
- Eye processing bypassed EXCEPT for iFault™
- Bypasses power-up "no ball in breech" indicator
4 Eye Bypass Demo Mode- Dry firing mode only
- Marker defaults to EYES ON MGRF
- Eye processing bypassed including power-up "no ball in breech"
5 Eye Disable Mode
- Use for broken or missing eyes
- All Eye Processing and Eye functions disabled
- Defaults to EYES OFF MGRF
Value Step Auto Auto Reactive Burst Semi Value Millenn NXL PSP3 Reactive Ramp Burst Ramp1 Off Off Off Off On 1 Off Off Off Off On2 Off Off Off On Off 2 Off Off Off On Off3 Off Off Off On On 3 Off Off Off On On4 Off Off On Off Off 4 Off Off On Off Off5 Off Off On Off On 5 Off Off On Off On6 Off Off On On Off 6 Off Off On On Off7 Off Off On On On 7 Off Off On On On8 Off On Off Off Off 8 Off On Off Off Off9 Off On Off Off On 9 Off On Off Off On10 Off On Off On Off 10 Off On Off On Off11 Off On Off On On 11 Off On Off On On12 Off On On Off Off 12 Off On On Off Off13 Off On On Off On 13 Off On On Off On14 Off On On On Off 14 Off On On On Off15 Off On On On On 15 Off On On On On16 On Off Off Off Off 16 On Off Off Off Off17 On Off Off Off On 17 On Off Off Off On18 On Off Off On On 18 On Off Off On On19 On Off Off On On 19 On Off Off On On20 On Off On Off Off 20 On Off On Off Off21 On Off On Off On 21 On Off On Off On22 On Off On On Off 22 On Off On On Off23 On Off On On On 23 On Off On On On24 On On Off Off Off 24 On On Off Off Off25 On On Off Off On 25 On On Off Off On26 On On Off On Off 26 On On Off On Off27 On On Off On On 27 On On Off On On28 On On On Off Off 28 On On On Off Off29 On On On Off On 29 On On On Off On30 On On On On Off 30 On On On On Off31 On On On On On 31 On On On On On32 Off Off Off Off Off 32 Off Off Off Off Off
Group 1 Firing Mode enable Group 2 Firing Mode enable
FOR SUPPORT WITH THIS PRODUCT, PLEASE CONTACT [email protected]