Embed Size (px)
Citation preview

User Guide
Clarity, a Division of Plantronics, Inc.4289 Bonny Oaks Drive,Chattanooga,TN 37406Tel: 800-426-3738 Fax: 800-325-8871E-mail: [email protected] Website: www.clarityproducts.com©2011 Clarity, a Division of Plantronics, Inc.All rights reserved. Clarity, D724, D722, D702HS, D704HS are trademarks or registered trademarks of Plantronics, Inc.Rev.A (04-08)PRINTED IN CHINA
D724™D722™
Button Cordless Photo Phone

1
Important Safety Instructions.........................................................4 INSTALLATIONInstalling your phone - Base............................................................8Installing batteries - Handset...........................................................9 OVERVIEWHandset Overview...........................................................................10Base Overview..................................................................................14Handsest Screen Icons....................................................................16Handset Menu Structure................................................................17Handset - Text Entry Table.............................................................18 HANDSET AUDIO OPERATIONSAudio Tone Settings.........................................................................19Audio Boost......................................................................................19Audio Volume Settings....................................................................20 Mute....................................................................................................20 USING YOUR PHONEMake a Call........................................................................................21Temporary tone dialing...................................................................22 Answer a Call....................................................................................22Ending a Call......................................................................................23Chain Dialing.....................................................................................23Redial List...........................................................................................24Find the Handset..............................................................................25Make an Internal Call.......................................................................25Make a 3-way Conference Call......................................................26
TABLE OF CONTENTS

2 3
DIRECTORYAdd a New Directory Entry..........................................................27View a Directory Entry...................................................................27Search a Directory Entry by Name.............................................28Edit a Directory Entry.....................................................................28Delete a Directory Entry...............................................................29 SPEED DIAL NUMBERSAdd a Speed Dial Number..............................................................30Dial a Speed Dial Number..............................................................31Delete a Speed Dial Number.........................................................31 CALLER ID FEATURESMissed Calls Indicator......................................................................32Reasons for Missing CID information..........................................33View the Call Log Entries...............................................................33Store a Call Log Number into the Directory............................34Delete an Entry in the Call Log....................................................34Delete the Entire List in the Call Log..........................................34 HANDSET SETTINGSLCD Language Settings....................................................................35Voicemail waiting...............................................................................35Clear Voicemail Indication...............................................................35Set Date and Time............................................................................36CID Time Synchronization..............................................................36Set the Ringer Tone..........................................................................37
Set the Ringer Volume.....................................................................37Set Key Tone......................................................................................37 BASE SETTINGSChange the dial mode.....................................................................39Set the Home Area Code...............................................................39 REGISTER/DEREGISTER HANDSETSRegister a Handset...........................................................................40Deregister All Handsets.................................................................41 TROUBLESHOOTINGTroubleshooting................................................................................42
TABLE OF CONTENTS TABLE OF CONTENTS

4 5
Privacy of communications may not be ensured when using this phone.
Warning: To maintain the compliance with the FCC’s RF exposure guideline, place the base unit at least 20 cm from nearby persons.Warning: To reduce the risk of fire or injury to persons, read and follow these instructions.
1. Read and understand all instructions.2. Follow all warnings and instructions marked on the telephone.3. Avoid contact with liquids. Do not locate base unit or handset near water, for example, near a bathtub, wash basin, sink or laundry tub, in a wet basement or near a swimming pool.4. Avoid using a telephone (other than a cordless type) during a storm. There may be a remote risk of electrical shock from lightning.5. Do not use the telephone to report a gas leak in the vicinity of the leak.6. Unplug this telephone from the wall outlets before cleaning. Do not use liquid cleaners or aerosol cleaners on the telephone. Use a damp cloth for cleaning.7. Place this telephone on a stable surface. Serious damage and/or injury may result if the telephone falls.8. Do not cover the slots and openings on this telephone. This telephone should never be placed near or over a radiator or heat register. This telephone should not be placed in a built-in installation unless proper ventilation is provided.9. Operate this telephone using the electrical voltage as stated on the base unit or the owner’s manual. If you are not sure of the voltage in your home, consult your dealer or local power company.10. Do not allow anything to rest on the power cord or locate this product in an area where the power cord is likely to be damaged by furniture or foot traffic.11. Do not overload wall outlets or extension cords as this can increase the risk of fire or electrical shock.12. Never push any objects through the slots in the telephone. They can touch dangerous voltage points or short out parts that could result in a risk of fire or electrical shock. Never spill liquid of any kind on the telephone.
13. To reduce the risk of electrical shock, do not take this phone apart. Opening or removing covers may expose you to dangerous voltages or other risks. Incorrect reassembly can cause electric shock when the appliance is subsequently used. 14. Unplug this product from the wall outlet and refer servicing to the manufacturer under the following conditions: when the power supply cord or plug is frayed or damaged; if liquid has been spilled into the product; if the telephone has been exposed to rain or water; if the telephone has been dropped or the case has been damaged; if the telephone exhibits a distinct change in performance; if the telephone does not operate normally by following the operating instructions. Adjust only those controls that are covered by the operating instructions. Improper adjustment may require extensive work by a qualified technician to restore the telephone to normal operation; if the telephone does not operate normally by following the operating instructions. 15. Never install telephone wiring during a lightning storm.16. Never install telephone jacks in wet locations unless the jack is specifically designed for wet locations.17. Never touch uninsulated telephone wires or terminals unless the telephone line has been disconnected at the network interface.18. Use caution when installing or modifying telephone lines.19. This product should be operated only from the type of power source indicated on the marking label. If you are not sure of the type of power supply to your home, consult your local power company.20. Do not attempt to open the AC adapter. There are potentially dangerous voltages inside, and there are no serviceable parts.21. Discontinue use of product and contact Clarity if the product overheats, has a damaged cord or plug, if the product has been dropped or damaged or if the product has come into contact with liquids.22. Use only the AC adapter provided with this product or a replacement AC adapter provided by Clarity.23. This phone amplifies sound to loud volumes. To prevent hearing damage, all users of the phone should be informed of the high volume capability of the phone and children should only use the phone when supervised by an adult.24. Exposure to high volume sound levels or excessive sound pressure may
IMPORTANT SAFETY INSTRUCTIONS IMPORTANT SAFETY INSTRUCTIONS

6 7
cause temporary or permanent damage to your hearing. Although there is no single volume setting that is appropriate for everyone, you should always use your telephone with the volume set at moderate levels and avoid prolonged exposure to high volume sound levels. The louder the volume, the less time is required before your hearing could be affected. If you experience hearing discomfort, you should have your hearing checked by a doctor. To protect your hearing, you should: A) Set the volume control in a low position and gradually increase the volume as needed. Before pressing the BOOST button, reduce the volume to the lowest level. Use the phone on the lowest volume setting as possible. B) Limit the amount of time you use the telephone at high volume levels.25. If you experience a skin irritation after using this product, discontinue use and contact Clarity.
BATTERY SAFETY INSTRUCTIONS
Dispose of used batteries according to the instructions.1. Do not dispose of the battery in a fire as it may explode. Check with local codes for possible special disposal instructions.2. Do not open or mutilate the battery. Released electrolyte is corrosive and may cause damage to the eyes and skin. It may be toxic if swallowed.3. Exercise care in handling batteries in order not to short the battery with conducting materials such as rings, bracelets and keys. The battery or
conduction material may overheat and cause burns.4. Remove batteries when they are discharged and when the equipment will not be used for an extended period of time. Dispose of batteries according to local environmental laws.5. Do not disassemble, heat, crush, deform or puncture batteries.6. Do not attempt to charge non-rechargeable batteries.
7. Keep batteries out of the reach of children.
The package contains the following items:• 1 Handset• 1 Base station• 1 Belt clip• 1 AC power adapter• 1 Telephone line cord• 2 Rechargeable batteries• 1 User guide
Your package includes all the items as shown here. If there is anything missing, please contact our Customer Care Department immediately. NOTE: PLEASE RETAIN A COPY OF PROOF OF PURCHASE FOR YOUR RECORDS.
LocationFor maximum coverage and reduce the interference, here are some guidelines you should consider when you place the base unit:- place it at a convenient, high,and central location with no obstructions between the handset and base unit in an indoor environment.- place it away from electronic appliances such as televisions, microwave ovens, radios, personal computers, wireless devices or other cordless phones.- avoid facing radio frequency transmitters, such as external antennas of mobile phone cell stations.- avoid plugging it into the same circuit as other major household electrical appliances because of the potential for interference. Try moving the appliance or the base unit to another power outlet.
If the reception for a base unit location is not satisfactory, move it to another location for better reception.Depending on the surrounding conditions as well as spatial and structural factors, the range may be reduced. The range indoors is normally less than outdoors.
PACKAGING CONTENTS/LOCATIONIMPORTANT SAFETY INSTRUCTIONS
8 9
1) Plug the power supply & line cord into the base station.2) Plug the other end of power supply & line cord into the wall
socket, as shown.3) Always use the cables provided in the box.
1) Slide out the battery compartment cover.2) Place the two batteries as indicated. Follow the polarity.3) Slide the battery compartment cover back.4) Put the handset on the base and charge for 16 hours first
time. A beep indicates that the handset is properly placed on the base or charger.
Use only NiMH rechargeable batteries.
NOTE: Please refer to the Battery Safety Instructions on page 6 for proper use and disposal of the batteries.
INSTALLING YOUR PHONE
Line Cord
INSTALLING/CHARGING BATTERIES
Step 1 Step 2 Step 3
We recommend you choose four photos of your most contacted persons into the direct memory keys. Cut the photos to the same shape and size of the protective films.
Using a ready-to-insert photo, insert one end of the protective film into the groove of memory key location, bend and insert the other end into the groove. Ensure the photos are properly installed.
WARNING: Do not place the films within reach of small children!

10 11
HANDSET OVERVIEW
1. RD/P (REDIAL / PAUSE)• In idle mode, press repeatedly to view the last numbers dialed • While entering numbers, press and hold to insert a dialing pause
(P)
2. AUDIO BOOSTDuring a call, press to enhance the clarity and loudness of your caller’s voice.
3. MUTE / X (REMOVE)• During a call, press to mute the microphone• While predialing, press to delete a digit.• While reviewing the redial list, directory, speed dial list or caller
ID history, press to delete and individual entry.• When ringing, press to turn off the handset ringer temporarily.
4. VOLUME UP / DIRECTORY / SCROLL UP• In menu mode, press to scroll up the menu items• During a call, press to increase listening volume.• In idle mode, press to access the directory.• While entering names or numbers in the directory, press to
move the cursor to the right.
5. TALK OFF / CLEAR• During a call, press to end the call.• While using menus, press to cancel an operation, return to the
previous menu, or standby mode.• In idle mode, press and hold to erase the missed calls indicator.• When ringing, press to turn off the handset ringer temporarily.
HANDSET OVERVIEW
2
4
6
8
10
11
9
7
5
3
1
12 15
17 16
14
13

12 13
6. VOLUME DOWN / CALL LOG / SCROLL DOWN• In menu mode: Press to scroll down the menu items.• During a call, press to decrease listening volume.• In idle mode, press to access the call list.• While entering names or numbers in the directory, press to
move the cursor to the left.
7. ALPHANUMERIC KEYPAD, * (STAR), # (POUND)In idle or editing mode, press to insert a digit / character.• 0 key: while entering the directory names, press to insert a
space.• 1 key: While reviewing a caller ID history entry, press repeatedly
to add or remove 1 in front of the telephone number before dialing or saving it in the directory.
• * key during a call, press to send touch-tone signals temporarily.• # key When reviewing a caller ID history entry, press repeatedly
to view the dialing options.
8. MICROPHONE
9. TALK ON / FLASH• Press to make or answer a call.• During a call, press to answer an incoming call when you receive
a call waiting alert.
10. MENU / SELECT• In idle mode, press to access menu items• In menu mode, press to select an items, save an entry or setting.
11. SPEAKER (on/off)• In idle / pre-dial mode: Press to make a call with the
speakerphone.• During a call: Press to toggle between the speakerphone and the
earpiece.• In Call List / directory/redial list entry: Press to make a call with
the speakerphone.• During ringing: Press to answer a call with the speakerphone.
12. TONEDuring a call, press to change the quality of the audio to best suits your hearing.
13. VISUAL RINGER LIGHTFlashes when there is an incoming outside call or the telephone base is paging all handsets.
14. EARPIECE
15. VOLUME UP / DIRECTORY / SCROLL UPRefer to point 4 for the key instruction
16. VOLUME DOWN / DIRECTORY / SCROLL DOWNRefer to point 6 for the key instruction
17. HEADSET JACKWe recommend the Plantronics™ headsets M210C©, M214©.
HANDSET OVERVIEW HANDSET OVERVIEW

14 15
BASE OVERVIEW
1. BASE DISPLAY• In idle: shows the clock status. • "_ _ _ _" will flash if the time is not set; ":" will flash when the time
is set and running.• In base speakerphone volume adjusting mode (during a call): the
middle two digits show the base speakerphone volume level.
BASE OVERVIEW
2. DIRECT MEMORY 2 (Speed Dial "2")• In idle: press to call number stored in Speed Dial location "2" on
your handset.
3. DIRECT MEMORY 3 (Speed Dial "3")• In idle: press to call number stored in Speed Dial location "3" on
your handset.
4. VOL + (VOLUME UP)• During a call: press to increase the base speakerphone volume.• In idle: press to increase base ringer volume.
5. SPEAKERPHONE (backlit, green)• Press to turn speakerphone on or off.• During ringing: press to answer call from the base speakerphone.• During registration: backlight flashes slowly.
6. VOL - (VOLUME DOWN)• During a call: press to decrease the base speakerphone volume.• In idle: press to decrease base ringer volume.
7. DIRECT MEMORY 1 (Speed Dial "1")• In idle: press to call number stored in Speed Dial location "1" on
your handset.
8. DIRECT MEMORY 0 (Speed Dial "0")• In idle: press to call number stored in Speed Dial location "0" on
your handset.
9. FIND• Press the FIND button on the base station to page your registered
handset(s).
2
4 6
9
5
3
1
8
7
16 17
The screen display gives you information on the current status of the telephone.
The speakerphone is turned on.
While reviewing the call list history, missed calls that have not been reviewed. The ringer is switched off.
New voicemail received from the telephone service provide (network subscription is required).
The audio boost feature is on.
The microphone is muted.
2/3 battery power level.
1/3 battery power level.
Flashes when low battery power level is detected, needs charging.
Animation in cycle, battery is charging.
HANDSET SCREEN ICONS
MENU STRUCTURE
In idle mode, press <MENU/SELECT>, then <UP/DOWN> to browse the menu items. Refer to the following for the menu structure.
Main Menu
Directory Call log Intercom
Sub menu
ReviewAdd contactSpeed dial
ReviewDelete all calls
(Displayed only when two or more handsets
registered.)
Main Menu
Ringers Settings Registration
Sub menu
Ringer volumeRinger tone
LCD language Clr voicemail
Key tone Set date / time
Home area codeDial mode
HANDSET MENU STRUCTURE
18 19
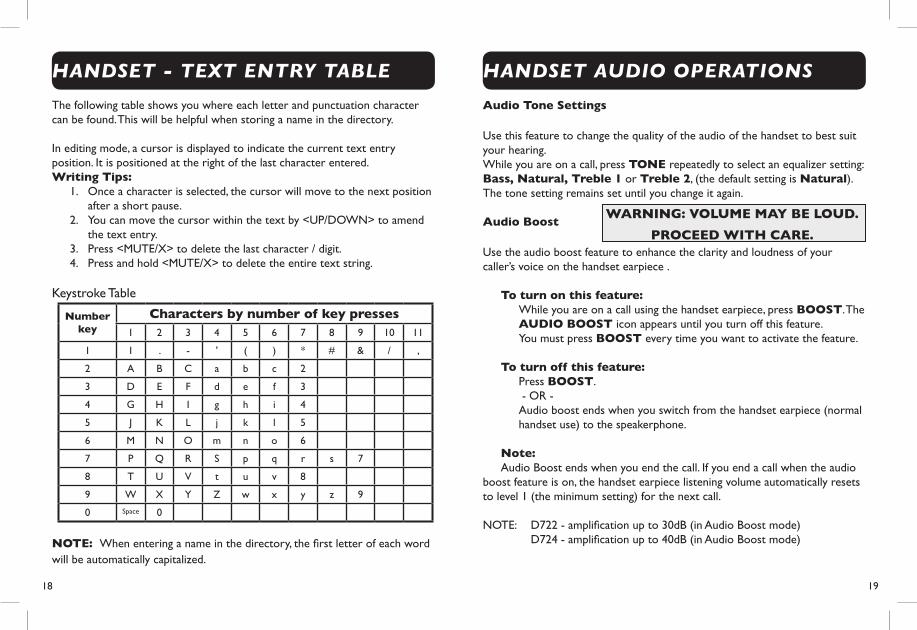
The following table shows you where each letter and punctuation character can be found. This will be helpful when storing a name in the directory.
In editing mode, a cursor is displayed to indicate the current text entry position. It is positioned at the right of the last character entered. Writing Tips:
1. Once a character is selected, the cursor will move to the next position after a short pause.
2. You can move the cursor within the text by <UP/DOWN> to amend the text entry.
3. Press <MUTE/X> to delete the last character / digit. 4. Press and hold <MUTE/X> to delete the entire text string.
Keystroke Table
Numberkey
Characters by number of key presses1 2 3 4 5 6 7 8 9 10 11
1 1 . - ' ( ) * # & / ,
2 A B C a b c 2
3 D E F d e f 3
4 G H I g h i 4
5 J K L j k l 5
6 M N O m n o 6
7 P Q R S p q r s 7
8 T U V t u v 8
9 W X Y Z w x y z 9
0 Space 0
NOTE: When entering a name in the directory, the first letter of each word will be automatically capitalized.
HANDSET - TEXT ENTRY TABLE
Audio Tone Settings
Use this feature to change the quality of the audio of the handset to best suit your hearing.While you are on a call, press TONE repeatedly to select an equalizer setting: Bass, Natural, Treble 1 or Treble 2, (the default setting is Natural).The tone setting remains set until you change it again. Audio Boost
Use the audio boost feature to enhance the clarity and loudness of your caller’s voice on the handset earpiece .
To turn on this feature:While you are on a call using the handset earpiece, press BOOST. The AUDIO BOOST icon appears until you turn off this feature.You must press BOOST every time you want to activate the feature.
To turn off this feature:Press BOOST. - OR -Audio boost ends when you switch from the handset earpiece (normal handset use) to the speakerphone.
Note: Audio Boost ends when you end the call. If you end a call when the audio
boost feature is on, the handset earpiece listening volume automatically resets to level 1 (the minimum setting) for the next call.
NOTE: D722 - amplification up to 30dB (in Audio Boost mode) D724 - amplification up to 40dB (in Audio Boost mode)
HANDSET AUDIO OPERATIONS
WARNING: VOLUME MAY BE LOUD.
PROCEED WITH CARE.

20 21
Volume Control (earpiece and speakerphone)
During a call:Press <UP/DOWN> to increase or decrease the listening volume. The current setting is shown. When the volume reaches the minimum or maximum setting, you hear two beeps. When you end the call, the setting will remain at the last selected level.Note: The handset earpiece volume setting (1-5) and speakerphone volume setting (1-6) are independent.
Mute
Use the mute function to turn off the microphone while on a call. You can hear the caller, but the caller does not hear you.
1. To mute the call
During a call, Press <MUTE/X>. When mute is on, the handset screen shows Muted for a few seconds and the MUTE icon appears until you turn off mute. Or mute is automatically canceled when you end the call.Note: Mute will also be canceled automatically when you press <TALK ON/ FLASH> to answer the second waiting call.
2. To un-mute the call
When mute is on, press <MUTE/X> and then resume speaking. When mute is off, Microphone on appears temporarily on the handset screen.
HANDSET AUDIO OPERATIONS
Make a Call
1. Pre-dialing
Enter the phone number first, then press <TALK ON/FLASH> or <SPEAKER> to dial out the number. Press <TALK OFF/CLEAR> or <MUTE/X> to clear the entry.
2. Direct DialingPress <TALK ON/FLASH> or <SPEAKER> to access dial tone, then enter the phone number.
3. Dial a speed dial number
In idle mode, press and hold a dial pad key (0 through 9) to display the desired speed dial entry. The handset automatically dials out the displayed number. - OR -Press <TALK OFF/CLEAR> to stop dialing the displayed number.Note: You need to set the speed dial number first. If the speed dial location you selected is empty, the screen shows the speed dial list instead.
4. Call using the direct memory keys on base
In idle mode, press one of the Direct Memory Keys on the base, to dial the number pre-stored into the keys. You need to set the Speed Dial Memory keys first. See Speed Dial Numbers.
5. Call from Directory
1. In idle mode, press <UP> to access the directory. Alternatively, press <MENU/SELECT> to access the directory from the main menu.
2. Press <UP> or <DOWN> to select the desired directory entry. 3. Press <TALK ON/FLASH> or <SPEAKER> to dial out to the selected
entry.
USING YOUR PHONE

22 23
6. Call from the Call Log
1. In idle mode, press <DOWN> to access the call log. Alternatively, press <MENU/SELECT> to access the call log from the main menu.
2. Press <UP/DOWN> to select the desired call log entry. 3. Press <TALK ON / FLASH> or <SPEAKER> to dial out to the
selected entry.
7. Call from the Redial List
1. In idle mode, press <REDIAL/PAUSE> to access the redial list. 2. Press <UP> or <DOWN> to select the desired redial number. 3. Press <TALK ON/FLASH> or <SPEAKER> to dial out to the selected
number.Note:Your handset automatically times the duration of every call. The call timer will display a few seconds after the call has been made. It is shown in hours, minutes and seconds format.
Temporary tone dialing
If you have pulse (rotary) dialing service only, you can temporarily switch from pulse to touch-tone dialing during a call.During a call, press <*>. Buttons pressed after this send touch-tone signals. The telephone automatically returns to pulse dialing mode after you end the call.
Answer a Call
When the phone rings, press <TALK ON / FLASH> to use the earpiece - OR -Press <SPEAKER > to use the speakerphone.
USING YOUR PHONE
End a Call
During a call connection on handset, press <TALK OFF/ CLEAR> to end the call. - OR -Put the handset on the base station to end the call.
Chain dialing
This feature allows you to initiate a dialing sequence from numbers stored in the directory, call log or redial list while you are on a call.Chain dialing can be useful if you wish to access numbers other than phone numbers (such as bank account information or access codes) from the directory, call log or redial list.
To access a number in the directory while on a call:1. Press <MENU/SELECT>, then <UP/DOWN> to select Directory.2. Press <MENU/SELECT>, then <UP/DOWN> or press the dial pad keys
(0 through 9) to find the desired entry.3. Press <MENU/SELECT>. The telephone automatically dials the
displayed number.
To access a number in the call log history while on a call:1. Press <MENU/SELECT>, then<UP/DOWN> to select Call log.2. Press <MENU/SELECT>, then<UP/DOWN> to scroll to the desired
entry. (Press # to view the dialing options, if necessary. 3. Press <MENU/SELECT>. The telephone automatically dials the
displayed number.
To access the redial list while on a call:1. Press <RD/P>. The screen shows the number most recently called. If it
is not the desired number, Press <UP/DOWN> to scroll to the desired number.
2. Press <MENU/SELECT>. The handset dials the displayed number.
USING YOUR PHONE
24 25
Note: Press <TALK OFF/CLEAR> to exit the directory, call log history or redial list and return to the call without dialing the displayed number.
Redial list
You can redial up to 20 of the last numbers called. If you have stored a name in the directory to go with the number, the name will be displayed instead. The most recent last number will display at the top of the redial list.
To Seview the redial list entry1. In idle mode, press <RD/P> to access redial list2. Press <UP/DOWN>, or press <RD/P> repeatedly to review the redial
list entry.
To Redial a Number from the Redial List1. Follow the steps in the previous section.2. Press <TALK ON/FLASH> or <SPEAKER> to dial the selected redial
number.
To Store a Redial Number into the Directory1. Follow the steps in the section under “Review the redial list entry”
above.2. Press <MENU/SELECT> twice, then use the keypad to edit the number
if necessary,3. Press <MENU/SELECT> and use the keypad to enter the name4. Press <MENU/SELECT> to save.
To Delete a Redial Number1. Follow the steps in the section under “Review the redial list entry” on
the preceding page.2. While reviewing a number in the redial list, press <MUTE /X> to delete
the selected entry. A confirmation tone sounds.3.
USING YOUR PHONE
Find the HandsetYou can use the handset locator feature to find misplaced handsets.
To start the paging tone:Press <FIND> on the telephone base. All the registered handsets will ring, and the ** Paging** is flashing on handset screen.
To stop the paging tone:• Press <TALK ON / FLASH>, <SPEAKER>, or any dial pad key (0-9 *, or
#) on the handset(s).- OR -
• Press <FIND> on the telephone base or put the handset in the cradle.
Make an Internal CallThis feature is only applicable when there are at least two registered handsets. It allows you to make internal calls, transfer external calls from one handset to another handset and make conference calls.
Intercom Another Handset
1. In idle mode, press <MENU/SELECT>, then <UP/DOWN> to select Intercom.
2. Press <MENU/SELECT>:• If you have two handsets, your handset screen shows Calling
other handset. The other handset rings and its screen shows Other handset is calling.
• If you have more than two registered handsets, your screen shows Intercom to: Use the dial pad keys to select the other handset. Your handset screen shows Calling HANDSET X. The other handset rings and its screen shows HANDSET X is calling.
3. The called handset rings. Press <TALK ON/FLASH> or <SPEAKER> on the called handset to establish the internal call.
USING YOUR PHONE

26 27
Transfer an External Call from Handset to Handset
During an external call:1. Press <MENU/SELECT>, then <UP/DOWN> to select Intercom .2. Press <MENU/SELECT>:
• If you have two handsets, the outside call is put on hold and your handset screen shows Calling other handset . The other handset rings and its screen shows Other handset is calling .
• If you have more than two registered handsets, your screen shows Intercom to: Use the dial pad keys to enter a handset number. The outside call is put on hold and your handset screen shows Calling HANDSET X . The other handset rings and its screen shows HANDSET X is calling .
3. The external call is put on hold automatically and the called handset rings.
4. Press <TALK ON/FLASH> or <SPEAKER> on the called handset to establish an internal call.
5. Press <TALK OFF/CLEAR> on the calling handset or put the calling handset on the charging cradle to end the current call with the external party.
6. The external call is transferred to the called handset.
Make a 3-way Conference Call
The conference call feature allows one external call to be shared with two handsets or a handset and base. The three parties can share the conversation and no network subscription is required.
During an external call:• Press <TALK/FLASH> or <SPEAKER> on the handset to establish the
conference call if another handset or the base has answered the call. - OR -
• Press <SPEAKER> on the base to establish the conference call if another handset answered the call.
USING YOUR PHONE
Your phone can store up to 100 directory entries with names and numbers. Each directory entry can have a maximum of 24 digits for the phone number and 15 characters for the name.
Add a New Directory Entry
1. In idle mode, press <MENU/SELECT>, then <UP/DOWN> to select Directory .
2. Press <MENU/SELECT>, then <UP/DOWN> to select Add contact.3. Press <MENU/SELECT>, then use the keypad to enter the number.
-OR- Copy a number from redial list:• Press <REDIAL/PAUSE>.• Press <UP/DOWN> or press <REDIAL/PAUSE> repeatedly to
locate the number to copy.• Press <MENU/SELECT>to copy the number.
4. Press <MENU/SELECT>, then use the keypad to enter the name.5. Press <MENU/SELECT> to store the directory entry.
Note: When entering the number and name:
• Press <UP> or <DOWN> to move the cursor to the right or left.• Press and hold <REDIAL/PAUSE> to enter a dialing pause (a P appears).• Press <MUTE/X> to erase a digit or character.• Press and hold <MUTE/X> to erase all digits or characters.
View a Directory Entry
1. In idle mode, press <UP> to access the directory.-OR-
Press <MENU/SELECT>, then <UP/DOWN> to select Directory , then press <MENU/SELECT> twice to select Review .
2. Press <UP/DOWN> or to view the directory entries. Entries appear
DIRECTORY

28 29
Search a Directory Entry by Name
1. In idle mode, press <UP> to show the first entry in the directory.2. When an entry appears, press the dial pad keys (0-9) to start a name
search (alphabetical search).The directory shows the first name beginning with the first letter associated with the dial pad key if there is an entry in the directory that begins with that letter. Press <UP/DOWN> to scroll through the entries beginning with that letter.
3. To see other names that start with the letters on the same dial pad key, keep pressing the key until the desired letter is shown. The names appear in alphabetical order.
For example, if you have the names Jennifer, Jessie, Kevin and Linda in your directory:
• If you press 5 (JKL) once, J and then Jennifer displays.• If you press 5 (JKL) once, J displays. Press <DOWN>. Jessie displays.• If you press 5 (JKL) twice, K and then Kevin displays.• If you press 5 (JKL) three times, L and then Linda displays.• If you press 5 (JKL) five times, J displays and then Jennifer displays
again.
Note: If you press a key (0-9) and no name starts with the letters on that key, the directory shows the entry that matches the next letter in the directory.
Edit a Directory Entry
1. In idle mode, press <UP> to access the directory.-OR-
Press <MENU/SELECT>, then <UP/DOWN> to select Directory, then press <MENU/SELECT> twice to select Review.
2. Press <UP/DOWN> to select the directory entry or search a directory entry by name.
DIRECTORY
3. Press <MENU/SELECT>, then use the keypad to edit the number if necessary.
4. Press <MENU/SELECT>, then use the keypad to edit the name if necessary.
5. Press <MENU/SELECT> to save.
Delete a Directory Entry
1. In idle mode, press <UP> to access the directory.-OR-
Press <MENU/SELECT>, then <UP/DOWN> to select Directory, then press <MENU/SELECT> twice to select Review.
2. Press <UP/DOWN> to select the desired directory entry.3. Press <MUTE/X>; the screen shows Delete contact?4. Press <MENU/SELECT> to confirm. Or Press <TALK OFF/CLEAR> to
exit without deleting the selected entry.Note: If the directory entry you deleted is also in the speed dial location, the telephone will automatically clear the speed dial location that entry occupied.
DIRECTORY
30 31
This telephone has 10 speed dial locations where you can assign telephone numbers from the directory you wish to dial numbers by pressing and holding the respective digits keys from idle mode.
Only one handset can access the speed dial locations at a time. If another handset attempts to access the speed dial locations, the screen shows Not available at this time.
Add a Speed Dial Number
1. In idle mode, press <MENU/SELECT>, then <UP/DOWN> to select Directory.
2. Press <MENU/SELECT>, then <UP/DOWN> to select Speed dial.3. Press <MENU/SELECT>, then <UP/DOWN> to select an empty speed
dial location.4. Press <MENU/SELECT> to access the directory list, then press <UP/
DOWN> to select the desired directory entry.5. Press <MENU/SELECT> to save. The name of the desired directory
entry appears in the selected speed dial location.Note:
• If the directory is empty, when you press MENU/SELECT in step 4, the screen shows Directory empty.
• If the speed dial location you selected is occupied, the new directory entry you selected replaces the old one. Take caution not to replace entries you do not wish to delete from the speed dial locations.
Dial the Speed Dial Number
• In idle mode, press and hold a dial pad key (0 through 9) to display the desired speed dial entry. The handset automatically dials out the displayed number.
- OR - • Press <TALK OFF/CLEAR> within one second to stop dialing the
displayed number.
SPEED DIAL NUMBERS
Note: If the speed dial location you selected is empty, the screen shows the speed dial list instead.
Delete the Speed Dial Number
1. In idle mode, press <MENU/SELECT>, then <UP/DOWN> to select Directory.
2. Press <MENU/SELECT>, then <UP/DOWN> to select Speed dial.3. Press <MENU/SELECT>, then <UP/DOWN> to scroll to a speed dial
location.4. Press <MUTE/X> to delete the selected speed dial location. A
confirmation tone sounds.
Note: Deleting the speed dial locations does not affect the entries in the directory.
To dial from the base:
1. Set speed dial numbers in the handset Speed Dial locations 0-3.2. Note the corresponding locations of the memory locations on the
base:• Handset Speed Dial 0 - Base memory location M0• Handset Speed Dial 1 - Base memory location M1• Handset Speed Dial 2 - Base memory location M2• Handset Speed Dial 3 - Base memory location M3
3. Press the base memory location you wish to dial; phone dials from the base, using the base speakerphone.
SPEED DIAL NUMBERS

32 33
CALLER ID DISPLAY (NETWORK DEPENDENT)
This product supports caller ID services offered by most telephone service providers. If you have subscribed to Caller ID service, and provided the identity of the caller is not withheld, the number of the caller will be displayed together with the date and time of the call (if provided by the network).
The telephone stores caller ID information about the last 50 incoming calls in the call log. Each entry may have up to 24 digits for the telephone number and 15 characters for the name. Entries are stored in reverse chronological order. The telephone deletes the oldest entry when the log is full to make room for new calls. If you have more than one handset, this information is common to all
If you answer a call before the information appears on the screen, it does not show in the caller ID history.
Note: The caller ID information might not be available for every incoming call. The callers might intentionally block their names and/or telephone numbers.
Missed (new) calls indicator
When you have calls that have not been reviewed, the handset idle screen shows XX missed calls .All entries that have not been reviewed are counted as missed (new) calls. Each time you review a caller ID history entry marked NEW , the number of missed calls decreases by one. If you do not want to review the missed (new) calls one by one, but you still want to keep them in the caller ID history, you can press and hold <TALK OFF/ CLEAR> for four seconds when the handset is idle. All the entries in the caller ID history are considered old (reviewed), and the missed calls message goes away.
CALLER ID DISPLAY
Reasons for missing caller ID information
Screen message
Reason
Private name The caller prefers not to show the name
Private number The caller prefers not to show the telephone number.
Private caller The caller prefers not to show the name and telephone number
Unknown nameYour telephone service provider cannot determine the caller’s name
U n k n o w n number
Your telephone service provider cannot determine the caller’s telephone number
Unknown callerYour telephone service provider cannot determine the caller’s name and telephone number. Calls from other countries may also generate this message.
View the Call Log Entries
caller’s name and number into your directory. Call log empty appears if there are no records in the call log. When a handset is in idle mode, press <DOWN> to review the call log entries in reverse chronological order starting with the most recent call.
1. Press <DOWN> to access the call log.-OR-
• Press <MENU/SELECT>, then <UP/DOWN> to select Call log• Press <MENU/SELECT> twice to select Review .
2. Press <UP/DOWN> to browse the call log entries.Note:
• When reviewing an entry from the calls list, press KEY# repeatedly to display the number in a different format.
CALLER ID DISPLAY

34 35
• For example, if a caller number is displayed as 123-456-7890, the various formats will be:
• 456-7890• 1-456-7890• 123-456-7890• 1-123-456-7890
You may choose the desired number format for local and long distance numbers before dialing or saving it into the phonebook.• The NEW icon is removed once the new call has been viewed
Store a Call Log number into the Directory
1. Follow Steps 1 and 2 in the View the Call Log Entries section.2. Press <MENU/SELECT>, then use the keypad to edit the number if
necessary.3. Press <MENU/SELECT> to enter the name.4. Press <MENU/SELECT> to confirm.
Delete an Entry in the Call Log
1. Follow Steps 1 and 2 in the View the Call Log Entries section.2. Press <MENU/X> to delete the selected entry. The handset shows
Deleting... with a confirmation tone. Once deleted, you cannot retrieve that entry.
Delete the Entire List of the Call Log
1. In idle mode, press <MENU/SELECT>, then <UP/DOWN> to select Call log.
2. Press <MENU/SELECT>, then <UP/DOWN> to select Del all calls.3. Press <MENU/SELECT> to confirm. It displays Delete all calls?4. Press <MENU/SELECT> to re-confirm.
CALLER ID DISPLAY
Your phone comes with a selection of settings that you can change to personalize your phone the way you like it to work.
LCD Language Settings
You can select the language used for all screen displays.1. In idle mode, press <MENU/SELECT>, then <UP/DOWN> to select
Settings.2. Press <MENU/SELECT>, then <UP/DOWN> to select LCD
language.3. Press <MENU/SELECT>, then <UP/DOWN> to select English,
Français or Español.4. Press <MENU/SELECT> to save.
Voicemail waiting (visual message waiting) indicator
If you subscribe to a voicemail service offered by your telephone service provider, this feature provides a visual indication when you have new voicemail messages. New voicemail and appear on the handset screen.
Clear voicemail indication:Use this feature when the telephone indicates there is new voicemail but there is none. This may occur, for example, when you have accessed your voicemail while away from home. This feature only turns off the displayedNew voicemail message and icon; it does not delete your voicemail messages. As long as you have new voicemail messages, your telephone service provider continues to send the signal to turn on the indicator.
To manually turn off the new voicemail indicator:1. In idle mode, press <MENU/SELECT>, then <UP/DOWN> to select
Settings.2. Press <MENU/SELECT>, then <UP/DOWN> to select Clr
voicemail.3. Press <MENU/SELECT>. The screen shows Turn off indicator?
HANDSET SETTINGS

36 37
4. Press <MENU/SELECT> to turn the voicemail indication off. A confirmation tone sounds. -OR-
Press <TALK OFF/CLEAR> to cancel the procedure.Note: For information about using your voicemail service, contact your telephone service provider for assistance
Set the Date and Time
You will need to set the correct time and date so that you know when you received call list entries.
1. Press <MENU/SELECT>, then <UP/DOWN> to select Settings.2. Press <MENU/SELECT>, then <UP/DOWN> to select Set date /
time.3. Press <MENU/SELECT>, then <UP/DOWN> to select Date & time.4. Press <MENU/SELECT>, then use the keypad to enter the date ( MM/
DD/YY).5. Press <MENU/SELECT>, then use the keypad to enter the time
(HH:MM). Press <UP> or <DOWN> to choose AM or PM.6. Press <MENU/SELECT> to confirm.
CID time synchronization
CID time sync is programmed to be on. If you subscribe to caller ID service, the day, month and time are set automatically with each incoming call. You can turn CID time sync off so the system uses the date and time that you set.
1. In idle mode, press <MENU/SELECT>, then <UP/DOWN> to select Settings.
2. Press <MENU/SELECT>, then <UP/DOWN> to select Set date/time.
3. Press <MENU/SELECT>, then <UP/DOWN> to select CID time sync.
4. Press <MENU/SELECT>, then <UP/DOWN> to select On or Off.5. Press <MENU/SELECT> to save your preference.
HANDSET SETTINGS
Set the Ringer Tone
1. Press <MENU/ SELECT>, then <UP/DOWN> to select Ringers.2. Press <MENU/SELECT>, then <UP/DOWN> to select Ringer tone.3. Press <MENU/SELECT>, then <UP/DOWN> to select the desired
ringer tone (a total of 10 melodies for your selection) for setting ringer tone for external calls. Note: The respective ringer tone will be played while browsing the tone list.
4. Press <MENU/SELECT> to confirm.
Set the Ringer Volume
1. Press <MENU/ SELECT>, then <UP/DOWN> to select Ringers.2. Press <MENU/SELECT>, then <UP/DOWN> to select Ringer
volume.3. Press <MENU/SELECT>, then <UP/DOWN> to set the ringer volume
(Off, Level 1 to Level 6). Note: The respective ringer volume will be played during your selection. If OFF is selected, <Ringer Off> icon will display.
4. Press <MENU/SELECT> to confirm.
Set Key Tone
A single beep is emitted when you press a key. You can turn on or off the key tone.
1. Press <MENU / SELECT>, then <UP/DOWN> to select Settings.2. Press <MENU / SELECT>, then <UP/DOWN>to select Key tone.3. Press <MENU / SELECT>, then <UP/DOWN> to select On or Off.4. Press <MENU/SELECT> to confirm.
HANDSET SETTINGS

38 39
Program the Direct Memory Keys on base
There are four direct memory keys on the base, which share the same phone number with Speed Dial locations under keys 0 through 3 on the handset. The corresponding relastion is as follows:
Direct memory key M0 = Speed Dial location for key "0" on the handsetDirect memory key M1 = Speed Dial location for key "1" on the handsetDirect memory key M2 = Speed Dial location for key "2" on the handsetDirect memory key M3 = Speed Dial location for key "3" on the handset
In idle mode, press any direct memory key on the base to dial out the corresponding number from the base (using the base speaker).
You have to assign numbers to these direct memory keys first (also detailed in section Speed Dial Numbers).
Using the handset, follow the steps below:
1. In idle mode, press <MENU/SELECT>, then <UP/DOWN> to select Directory.
2. Press <MENU/SELECT>, then <UP/DOWN> to select Speed dial.3. Press <MENU/SELECT>, then <UP/DOWN> to select an empty speed
dial location (for the base memory locations, use keys "0", "1", "2" or "3").
4. Press <MENU/SELECT> to access the directory list, then press <UP/DOWN> to select the desired directory entry.
5. Press <MENU/SELECT> to save. The name of the desired directory entry appears in the selected speed dial location.
Note:If the speed dial location you selected is occupied, the new directory entry you selected replaces the old one. Take caution not to replace entries you do not wish to delete from the speed dial locations.
Change the Dial Mode The default dialing mode is suitable for your country and network operator. It is unlikely that you should need to change this setting unless advised to do so.
1. Press <MENU/SELECT>, then <UP/DOWN> to select Settings.2. Press <MENU/SELECT>, then <UP/DOWN> to select Dial Mode.3. Press <MENU/SELECT>, then <UP/DOWN> to select Tone or
Pulse.4. Press <MENU/SELECT> to confirm.
Set the Home Area Code
If you dial seven digits to make a local call (no area code required), enter your area code into the telephone as the home area code. When you receive a call from within your home area code, the caller ID history only displays the seven digits of the telephone number.This feature makes it easy for you to place a call from the caller ID history. If you dial 10 digits to make a local telephone call, do not use this home area code feature. If you do, you will not be able to place calls from your caller ID history as they have only seven digits.
1. Press <MENU/SELECT>, then <UP/DOWN> to select Settings.2. Press <MENU/SELECT>, then <UP/DOWN> to select Home area
code.3. Press <MENU/SELECT>, then enter the home area code. Only three
digits in maximum can be entered.4. Press <MENU/SELECT> to confirm.
Note: If, in the future, your telephone service provider requires you to dial 10 digits to make a local call (area code + telephone number), you will need to delete your home area code. While the home area code is displaying in step 2 above, press and hold MUTE/X. The home area code is now restored to its default setting of _ _ _ (empty).
BASE SETTINGS BASE SETTINGS

40 41
REGISTER/DEREGISTER HANDSETS
Your telephone can support up to five cordless handsets. The additional handset(s) needs to register with the telephone base before use. You must register each additional handset separately.
The handsets provided within your product box are already registered as HANDSET 1 and so forth. Additional handsets are assigned numbers in the order they are registered (HANDSET 2 to HANDSET 5).
When first purchased, all expansion handsets alternately display• Press FIND on base 4 sec and • Then press # on handset.
The new handset should be charged without interruption for at least 30 minutes before registering to the telephone base.
Register a handset1. In idle mode, press <MENU/SELECT>, then <UP/DOWN> to select
Registration.2. Press <MENU/SELECT> and screen will alternately show
• Press FIND on base 4 sec and • Then press # on handset
3. Press and hold <FIND> on the telephone base for about four seconds, until the SPEAKER light turns on; release the <FIND> key.
4. Press # (pound key) on the handset. The screen shows Registering...Please wait.
When the handset is registered successfully, HANDSET registered and then HANDSET X appears on the screen, with X being the handset number (1-5). If the registration is not successful, the handset screen shows Registration failed. Please start again from step 3 above.Note: You cannot register a handset if any other system handset is in use. To register an expansion handset, follow from the step C as above.
Deregister all handsetsYou can deregister handsets. You may need to deregister your handsets if:
You have five registered handsets and need to replace a handset.-OR-
You wish to change the designated handset number of your registered handsets.
You must first deregister ALL the handsets, and then register each handset you wish to use again, one at a time.
1. Press and hold <FIND> on the telephone base for about 10 seconds, until the SPEAKER light starts flashing; release <FIND>.
2. Immediately press <FIND> again; you will hear two quick beep tones.
3. When complete, the handset screen alternately shows • Press FIND on base 4 sec
and • Then press # on handset.
4. To register the handset(s) to the telephone base again, follow the registration instructions in section Register a handset.
Note:• If the deregistration process is not successful, you might need to
reset the system and try again. To reset, unplug the power from the telephone base and plug it back in.
REGISTER/DEREGISTER HANDSETS

42 43
If you have difficulty with your telephone, please try the suggestions below.
My telephone doesn’t work at all• Make sure the power cord is securely plugged in.• Make sure that the battery connector is securely plugged into the
cordless handset.• Make sure the telephone line cord is securely and firmly plugged into the
telephone base and the telephone wall jack.• Charge the battery in the cordless handset for at least 16 hours. For
optimum daily performance, return the cordless handset to the telephone base or charger when not in use.
• If the battery is depleted, it may take approximately 30 minutes to charge the handset before it shows Low battery.
• Reset the telephone base. Unplug the electrical power. Wait for approximately 15 seconds, then plug it back in. Allow up to one minute for the cordless handset and telephone base to reset.
• You may need to purchase a new battery. Use only the supplied rechargeable battery or contact the customer service helpline found in this User Guide to purchase the correct replacement batteries.
I cannot get a dial tone• First try all the suggestions above.• Move the cordless handset closer to the telephone base. You might have
moved out of range.• If the previous suggestions don’t work, disconnect the telephone base
from the telephone wall jack and connect to a different telephone. If there is no dial tone on that telephone either, the problem is in your wiring or telephone service. Contact your telephone service provider (charges may apply).
• Your telephone line cord might be malfunctioning. Try installing a new telephone line cord.
I cannot dial out• First try all the suggestions in the item I cannot get a dial tone.• Make sure you have a dial tone before dialing. The cordless handset may
take a second or two to find the telephone base and produce a dial tone. This is normal. Wait an extra second before dialing.
• Check that all the telephones connected to the same telephone line are hung up.
• Make sure to set the dial mode to the correct setting (pulse dialing or tone dialing) for the service in your area.
• Eliminate any background noise. Noise from a television, radio or other appliances may cause the telephone to not dial out properly. If you cannot eliminate the background noise, first try muting the cordless handset before dialing, or dialing from another room in your home with less background noise.
• If the other telephones in your home are having the same problem, the problem is in your wiring or telephone service. Contact your telephone service provider (charges may apply).
My cordless handset isn’t performing normally• Make sure the power cord is securely plugged into the telephone base.• Plug the power adapter into a different, working electrical outlet not
controlled by a wall switch.• Move the cordless handset closer to the telephone base. You might have
moved out of range.• Reset the telephone base. Unplug the electrical power. Wait for 15
seconds then plug it back in. Allow up to one minute for the cordless handset and telephone base to reset.
• Other electronic products such as HAM radios and other DECT phones can cause interference with your cordless telephone. Try installing your telephone as far away as possible from these types of electronic devices.
TROUBLESHOOTINGTROUBLESHOOTING

44 45
"Out of range or no pwr at base" appears on my cordless handset• Ensure that the telephone base is powered up.• Place the cordless handset in the telephone base for one minute to allow
the cordless handset and base to synchronize.• Move the cordless handset closer to the telephone base. You might have
moved out of range.• Reset the telephone base. Unplug the electrical power. Wait for 15
seconds then plug it back in. Allow up to one minute for the cordless handset and telephone base to reset.
• Other electronic products such as HAM radios and other DECT phones can cause interference with your cordless telephone. Try installing your telephone as far away as possible from these types of electronic devices.
I experience poor sound quality when using the speakerphone• For increased sound quality while using the speakerphone, place the
handset on a flat surface with the dial pad facing up.• When using a speakerphone, controlling background noise in your
environment is essential. While you are listening to your party, press MUTE/X to temporarily turn your microphone off. When it is your turn to speak, remember to press MUTE/X again to turn the microphone on.
• Excessive background noise will cause a speakerphone to fade in and out. Try controlling the background noise by turning off any audio devices near the speakerphone. Also, try to avoid interrupting the person at the other end of the conversation while they are speaking. If background noise cannot be controlled, you should terminate speakerphone operation and return to normal handset mode.
I hear other calls while using my telephone• Disconnect the telephone base from the telephone wall jack, and plug in
a different telephone. If you still hear other calls, the problem is probably in your wiring or telephone service. Call your telephone service provider (charges may apply).
TROUBLESHOOTING
My cordless handset does not ring when I receive a call• Make sure that the ringer is not turned off. • Make sure the telephone line cord is plugged securely into the telephone
base and the telephone wall jack. Make sure the power cord is securely plugged in.
• The cordless handset may be too far from the telephone base.• Charge the battery in the cordless handset for at least 16 hours. For
optimum daily performance, return the cordless handset to the telephone base or charger when not in use.
• You may have too many extension telephones on your telephone line to allow all of them to ring simultaneously. Try unplugging one telephone at a time until the telephone starts ringing.
• The layout of your home or office might be limiting the operating range. Try moving the telephone base to another location, preferably on an upper floor.
• If the other telephones in your home are having the same problem, the problem is in your wiring or telephone service. Contact your telephone service provider (charges may apply).
• Test a working telephone at the telephone wall jack. If another telephone has the same problem, the problem is the telephone wall jack. Contact your telephone service provider (charges may apply).
• Other electronic products such as HAM radios and other DECT phones can cause interference with your cordless telephone. Try installing your telephone as far away as possible from these types of electronic devices.
• Completely remove then replace the battery. Place the cordless handset in the telephone base. Wait for the cordless handset to reestablish its connection with the telephone base. Allow up to one minute for this to take place.
• Your telephone line cord might be malfunctioning. Try installing a new telephone line cord.
TROUBLESHOOTING

46 47
My caller ID isn’t working• Caller ID is a subscription service. You must subscribe to this service
from your telephone service provider for this feature to work on your telephone.
• Your caller must be calling from an area that supports caller ID.• Both your and your caller’s telephone service providers must use caller
ID compatible equipment.• If you subscribe to high-speed Internet service (DSL - Digital Subscriber
Line) through your telephone line, you must install a DSL filter between the telephone line cord and the telephone wall jack. The filter prevents noise and caller ID problems caused by DSL interference. Please contact your DSL service provider for more information about DSL filters.
My telephone does not receive caller ID when on a call• Make sure you subscribe to caller ID with call waiting features provided
by your telephone service provider. Caller ID features work only if both you and the caller are in areas offering caller ID service, and if both telephone service providers use compatible equipment.
New voicemail and icon show on the display and I don’t know why
• Your telephone has voicemail indication. If New voicemail and appear on the display, then your telephone has received a signal from your telephone service provider that you have a voicemail message waiting for you to retrieve from your telephone service provider. Contact your telephone service provider for more information on how to access your voicemail.
TROUBLESHOOTING
To identify the model number of your phone:• Turn the base of your phone upside down.• Locate the colored round label on your base.
• Orange label: D724™, up to 40dB of gain• Green label: D722™, up to 30dB of gain.
Once you identified the model of your phone, you can determine the model name of the additional handset(s) that works with your system. You can have up to 5 handsets total (including the one(s) that was included with your system at the time of purchase).
If the model number of your phone is...
...this is the compatible additional handset model...
...and the level of amplification on your system is up to...
D722™ D702HS™ 30dBD724™ D704HS™ 40dB
Thank you...
,.. for purchasing this Clarity amplified telephone. We hope you will enjoy using your new system.
If you have any questions regarding the operation of this telephone, please contact one of our Customer Service Representatives for prompt and useful information.
Phone: 800-426-3738Fax: 800-325-8871Email: [email protected]: www.clarityproducts.com
ADDITIONAL HANDSETS

48 49
• D722™ - 30dB• D724™ - 40dB
Dimensions
• Handset Size: 7” x2 1/4” x 1 1/2” (H x W x D) • Base Size: 3 1/4” x 5 3/4” x 4” (H x W x D)
Weight• Handset Weight: 6.125 oz. (with batteries)• Base Weight: 8.25 oz.
Power Requirements: • AC Adapter:
Input: 100V - 240V, 200mA Output: 6VDC, 450 mA• Battery: 2 X AAA, 600mAh Ni-MH
Use only NiMH rechargeable batteries.NOTE: DO NOT MIX BATTERIES; REPLACE BOTH BATTERIES WHEN NEEDED.
TECHNICAL INFORMATION