Embed Size (px)
Citation preview

U S E R ’ S G U I D E
EN
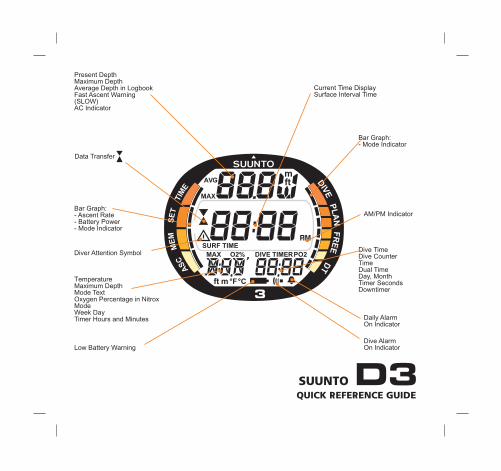
QUICK REFERENCE GUIDESUUNTO
Present DepthMaximum DepthAverage Depth in LogbookFast Ascent Warning(SLOW)AC Indicator
Bar Graph:- Ascent Rate- Battery Power- Mode Indicator
Diver Attention Symbol
TemperatureMaximum DepthMode TextOxygen Percentage in NitroxModeWeek DayTimer Hours and Minutes
Low Battery Warning
Bar Graph:- Mode Indicator
Daily AlarmOn Indicator
Dive TimeDive CounterTimeDual TimeDay, MonthTimer SecondsDowntimer
Dive AlarmOn Indicator
Current Time DisplaySurface Interval Time
AM/PM Indicator
Data Transfer
FR
EE
AC
S
SURF TIME
RMAX DIVE TIME
m
°F°Cmft
MAX
ftAVG
O2% PO2

1
DEFINITION OF WARNINGS, CAUTIONS AND NOTES
Throughout this manual, special references are made when deemed important. Three classifi cations are used to separate these references by their order of im-portance.
WARNING - is used in connection with a procedure or situation that may result in serious injury or death.
CAUTION - is used in connection with a procedure or situation that will result in damage to the product.
NOTE - is used to emphasize important information.
COPYRIGHT, TRADEMARK AND PATENT NOTICE
This instruction manual is copyrighted and all rights are reserved. It may not, in whole or in part, be copied, photocopied, reproduced, translated, or reduced to any media without prior written consent from SUUNTO.
SUUNTO, D3 and their logos are all registered or unregistered trademarks of SUUNTO. All rights are reserved.
Patents have been issued or applied for one or several features of this product.
CE
The CE mark is used to mark conformity with the European Union EMC di-rective 89/336/EEC. The SUUNTO dive instruments fulfi ll all the required EU directives.
FIOH, Laajaniityntie 1, FIN-01620 Vantaa, Finland, notifi ed body no.0430, has

2
EC type-examined this type of personal protective equipment.
This instrument must be serviced by an authorized dealer every second year or after 200 dives (whichever comes fi rst). See chapter 6.
PrEN 13319
PrEN 13319 ”Diving accessories – Depth gauges and combined depth and time measuring devices – Functional and safety requirements, test methods” is a Eu-ropean diving depth gauge standard draft. The D3 is designed to comply with this draft standard.
ISO 9001
SUUNTO Oy’s Quality Assurance System is certifi ed by Det Norske Veritas to be according to the ISO 9001 in all SUUNTO Oy’s operations (Quality Certifi cate No. 96-HEL-AQ-220).
SUUNTO Oy does not assume any responsibility for losses or claims by third parties, which may arise through the use of this device.
Due to continuous product development, the D3 is subject to change without notice.
3
WARNINGRead this manual. Carefully read this instruction manual in its entirety paying close attention to all warnings listed below, including chapter 1.1. ”Safety Precautions”. Make sure that you fully understand the use, displays and limi-tations of the instrument because any confusion resulting from neglecting to follow this instruction manual or from improper use of this device may cause a diver to commit errors that may lead to serious injury or death.
WARNINGSuunto also recommends you to be trained in freediving technique and physi-ology before conducting breath holding dives. No diving instrument can replace the need for proper diving training. Insuffi cient or improper training may cause diver to commit errors that may lead to serious injury or death.
WARNINGSuunto strongly recommends that sport divers limit their maximum depth to 40 m [130 ft] or to the depth calculated by the computer based on the selected O
2%
and a maximum PO
2 of 1.4 bar settings.

4
WARNINGUse back-up instruments. Make sure that you use back-up instrumentation including a depth gauge, submersible pressure gauge, timer or watch, and have access to decompression tables whenever diving with a bottom timer.
WARNINGPerform pre-checks. Always activate and check the device before diving in order to ensure that all Liquid Crystal Display (LCD) segments are com-pletely displayed, that the device has not run out of battery power, and that the oxygen, altitude and personal adjustments are correct. Also, exit the Data Transfer mode before diving, as the computer does not automatically revert to Dive mode from Data Transfer mode.
WARNING
Freediving after scuba diving is not recommended. It is recommended to avoid freediving for at least two hours and not to exceed fi ve meters [16 ft] after scuba diving depending on your diving activity.

5
TABLE OF CONTENTS
1. INTRODUCTION .......................................................................................... 81.1. SAFETY PRECAUTIONS ...................................................................... 8
1.1.1. Emergency Ascents ........................................................................ 91.1.2. Freediving ...................................................................................... 9
2. GETTING ACQUAINTED .......................................................................... 112.1. FUNCTIONS ......................................................................................... 112.2. PUSH BUTTONS .................................................................................. 112.3. WATER CONTACTS ............................................................................ 132.4. TIME MODE [TIME] ........................................................................... 14
2.4.1. Timekeeping Display ................................................................... 142.4.2. Stopwatch [TIMEr UP]................................................................ 152.4.3 Downtimer [TIMEr d].................................................. ............... 17
3. DIVING WITH THE D3 .............................................................................. 183.1 BEFORE DIVING .................................................................................. 19
3.1.1. Activation and Pre-checks .......................................................... 193.1.2. Battery Power Indicator and Low Battery Warning .................... 203.1.3. User Defi nable Functions and Alarms ......................................... 22
3.1.3.1. Presetting Time Alarm .................................................... 233.1.3.2. Presetting Dive Alarms ................................................... 23
3.1.4. Bookmark Function ..................................................................... 233.2. FREEDIVING ....................................................................................... 24
3.2.1 Before Diving in the Free Mode .................................................. 243.2.2 Presetting the Displays in the Free Mode .................................... 24

6
3.2.3 During the Freedive ..................................................................... 253.2.4 Freediving Day History .......... .....................................................26 3.2.5 Surface interval after a Freedive ............... ...................................27
3.3. GAUGE DIVING .................................................................................. 283.3.1. Maximum Operating Depth Planner [MOD] ............................... 283.3.2. Presetting the Displays in the Gauge Mode ................................. 293.3.3. Basic Dive Data ........................................................................... 303.3.4. Ascent Rate Indicator ................................................................... 313.3.5. Surface Interval After a Gauge dive ............................................ 323.3.6. Dive Numbering .......................................................................... 333.3.7. Flying After Diving ..................................................................... 34
3.4. AUDIBLE AND VISUAL ALARMS .................................................... 354. SETTING MODE [SET] .............................................................................. 37
4.1. SETTING TIME, DATE AND DUAL TIME [TIME ] ......................... 374.2. DAILY ALARM SETTING [ALM] ...................................................... 394.3. TIMER SETTINGS [TIMER D] ........................................................... 414.4. DIVE MODE SETTINGS [DIVE] ........................................................ 42
4.4.1. Set Gauge Mode .......................................................................... 424.4.2. Set Free Mode .............................................................................. 44
4.5. DIVE ALARM SETTINGS [DIVE AL] ............................................... 454.6. UNIT ADJUSTMENT SETTINGS[AdJ] .............................................. 47
5. MEMORY AND DATA TRANSFER [MEM] .............................................. 485.1. LOGBOOK AND DIVE PROFILE MEMORY [LOG] ........................ 495.2. DIVE HISTORY MEMORY [HIS] ....................................................... 535.3. DATA TRANSFER AND PC-INTERFACE [TR-PC] .......................... 55

7
5.4. SUUNTOSPORTS.COM ...................................................................... 576. CARE AND MAINTENANCE .................................................................... 61
6.1. CARE OF YOUR D3 ............................................................................ 616.2. MAINTENANCE .................................................................................. 626.3. WATER RESISTANCE INSPECTION ................................................. 636.4. BATTERY REPLACEMENT ................................................................ 64
7. TECHNICAL SPECIFICATION .................................................................. 678. WARRANTY ................................................................................................ 719. GLOSSARY ................................................................................................. 73
8
1. INTRODUCTION
Congratulations on your purchase of the SUUNTO D3 wristop freediving com-puter. The D3 builds on the Suunto tradition of delivering feature-rich dive com-puters, providing different operating modes for different types of diving. Push button controls access a wide selection of choices. The display is optimized for the dive mode chosen and it incorporates a patented user defi nable display fi eld. This freediving computer is a compact and sophisticated multipurpose dive instrument, designed to give you years of trouble-free usage.
CHOICE OF DIVING AND WATCH MODES
User options for the D3 are selected using the push buttons.
Pre dive confi guration and setup options include:
• Choice of operating mode – Gauge diving/ Freediving• Maximum depth alarm• Dive time alarm • Choice of unit – Metric / Imperial • Clock, calendar, daily alarm, stopwatch, downtimer, dual time• User defi nable display fi elds
1.1. SAFETY PRECAUTIONS
Do not attempt to use D3 without reading this instruction manual in its entirety, including all the warnings. Make sure that you fully understand the use, displays

9
and limitations of the instrument. If you have any questions about the manual or the freediving computer, contact your SUUNTO dealer before diving with the D3.
Always remember that you are responsible for your own safety.
When used properly, this freediving computer is an outstanding tool for assisting properly trained, certifi ed divers in planning and executing sport dives. It is not a substitute for certifi ed scuba instruction or freediving training.
1.1.1. EMERGENCY ASCENTSIn the unlikely event that D3 malfunctions during a dive, follow the emergency procedures provided by your certifi ed dive training agency or, alternatively, STEP 1: Assess the situation calmly and then move promptly to less than 18 m
[60 ft].STEP 2: At 18 m [60 ft], slow down your ascent rate to 10 m/min [33 ft/min]
and move to a depth between 3 and 6 meters [10 to 20 ft].STEP 3: Stay there as long as you assess your air supply will safely allow. After
reaching the surface stay out of the water for at least 24 hours.
1.1.2. FREEDIVINGFreediving, and particularly freediving in combination with scuba diving, may have risks that have not been researched and are not commonly known.
10
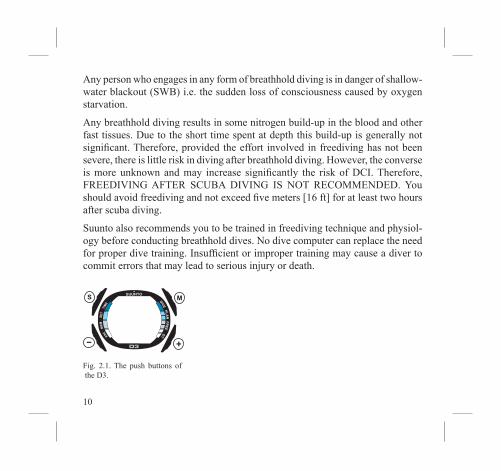
Fig. 2.1. The push buttons of the D3.
Any person who engages in any form of breathhold diving is in danger of shallow-water blackout (SWB) i.e. the sudden loss of consciousness caused by oxygen starvation.
Any breathhold diving results in some nitrogen build-up in the blood and other fast tissues. Due to the short time spent at depth this build-up is generally not signifi cant. Therefore, provided the effort involved in freediving has not been severe, there is little risk in diving after breathhold diving. However, the converse is more unknown and may increase signifi cantly the risk of DCI. Therefore, FREEDIVING AFTER SCUBA DIVING IS NOT RECOMMENDED. You should avoid freediving and not exceed fi ve meters [16 ft] for at least two hours after scuba diving.
Suunto also recommends you to be trained in freediving technique and physiol-ogy before conducting breathhold dives. No dive computer can replace the need for proper dive training. Insuffi cient or improper training may cause a diver to commit errors that may lead to serious injury or death.
11
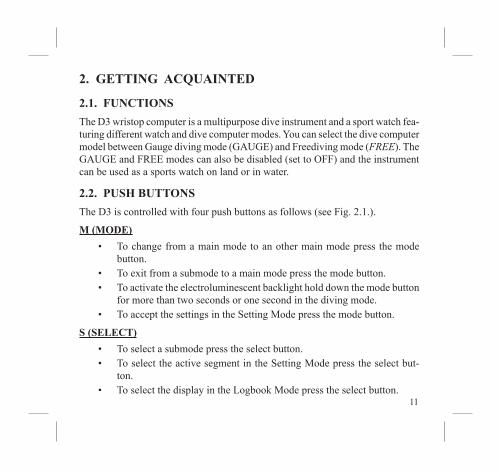
2. GETTING ACQUAINTED
2.1. FUNCTIONS
The D3 wristop computer is a multipurpose dive instrument and a sport watch fea-turing different watch and dive computer modes. You can select the dive computer model between Gauge diving mode (GAUGE) and Freediving mode (FREE). The GAUGE and FREE modes can also be disabled (set to OFF) and the instrument can be used as a sports watch on land or in water.
2.2. PUSH BUTTONS
The D3 is controlled with four push buttons as follows (see Fig. 2.1.).
M (MODE)
• To change from a main mode to an other main mode press the mode button.
• To exit from a submode to a main mode press the mode button.• To activate the electroluminescent backlight hold down the mode button
for more than two seconds or one second in the diving mode.• To accept the settings in the Setting Mode press the mode button.
S (SELECT)
• To select a submode press the select button.• To select the active segment in the Setting Mode press the select but-
ton.• To select the display in the Logbook Mode press the select button.

12
• To select the dive planning mode in the dive surface modes.• To make a special bookmark in the profi le memory during a dive
+, -
• To show the date, seconds or dual time in the time keeping display press the + or - button.
• In the Setting Mode • to increase the value press the + button • to decrease the value press the - button.• To operate the stopwatch see chapter 2.4.2.• To select the dive in the Logbook Mode • press the + button to move forward • press the - button to move backwards.

13
Fig. 2.2. The water contact and depth sensor.
��
��
�� �
Fig. 2.3. Active water contact is indicated by the text AC.
2.3. WATER CONTACTS
The D3 is automatically activated when sub merged in water. This function is made possible by the use of water contacts. The water contacts consist of the PC-interface poles and the four push-buttons of the D3 (Fig. 2.2). When the PC-interface poles and one of the push-buttons are connected by the conductivity of the water the Surface or Diving Mode is automati-cally activated.
Contamination or dirt on the PC-interface poles may prevent this automatic operation. It is, there fore, im-portant that the poles are kept clean. The poles can be cleaned with fresh water and a soft brush (e.g. tooth brush).
NOTE: Water or moisture build-up around the wa-ter contacts may cause the contact to activate auto-matically. This can happen, e.g., when washing your hands or sweating. If the water contact activates in the Time Mode, an AC text will appear on display (Fig. 2.3.), and it will be shown until the water contact deactivates, or the D3 enters the Dive Mode auto-matically. To save the battery power, you should de-activate the water contact by cleaning it and/or drying it with a soft towel.
14
��
��
�� �
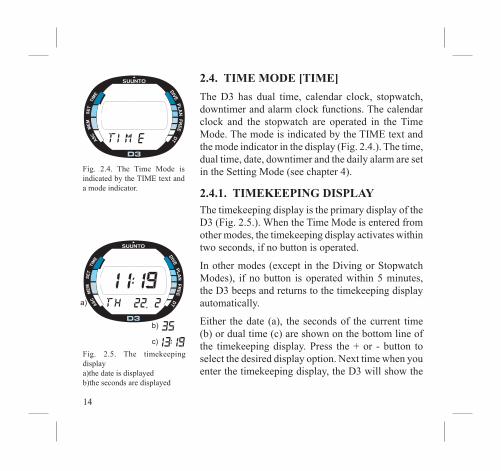
Fig. 2.4. The Time Mode is indicated by the TIME text and a mode indicator.
��
��
��
��
��
�� �
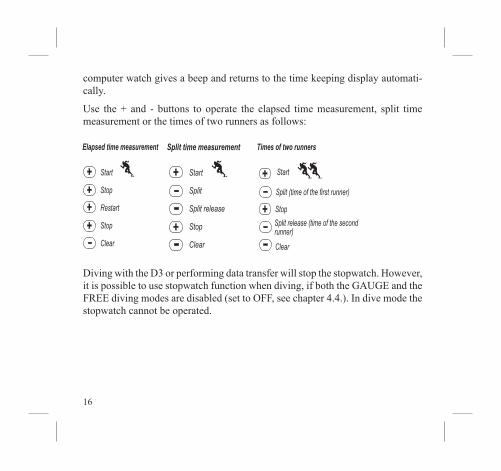
Fig. 2.5. The timekeeping displaya)the date is displayedb)the seconds are displayed
2.4. TIME MODE [TIME]
The D3 has dual time, calendar clock, stopwatch, downtimer and alarm clock functions. The calendar clock and the stopwatch are operated in the Time Mode. The mode is indicated by the TIME text and the mode indicator in the display (Fig. 2.4.). The time, dual time, date, downtimer and the daily alarm are set in the Setting Mode (see chapter 4).
2.4.1. TIMEKEEPING DISPLAYThe timekeeping display is the primary display of the D3 (Fig. 2.5.). When the Time Mode is entered from other modes, the timekeeping display activates within two seconds, if no button is operated.
In other modes (except in the Diving or Stopwatch Modes), if no button is operated within 5 minutes, the D3 beeps and returns to the timekeeping dis play automatically.
Either the date (a), the seconds of the current time (b) or dual time (c) are shown on the bottom line of the timekeeping display. Press the + or - button to select the desired display option. Next time when you enter the timekeeping display, the D3 will show the

15
selected option. The TIMER text blinks on the display if the stopwatch is running.
The display is illuminated by holding down the M button for more than two seconds.
To set the time and date, refer to chapter 4.1 ”Setting Time, Date and Dual Time”.
When diving, the dive entry time and date is regis-tered in the Logbook Memory. Remember always to check before diving that the time and date are cor-rectly set, especially when traveling to different time zones.
2.4.2. STOPWATCH [TIMER UP]The Stopwatch function is entered by pressing the S button, when the time keeping display is shown. The text TIMEr UP at the bottom and the mode indicator (TIME) on the left side of the display indicate that you have entered the Stopwatch [TIMEr UP] func-tion (Fig.2.6.).
The stopwatch of the D3 lets you measure elapsed time, split times and the times of two runners. The range of the stopwatch is 9 hours, 59 minutes, 59.9 seconds (Fig. 2.7.). When the range is exceeded the
�
��
�
�� �
Fig. 2.6. The Stopwatch function is indicated by the TIMEr UP text and a mode indicator.
��
��
�� �
����
Fig. 2.7. The Stopwatch displays hours, minutes and seconds.
16
computer watch gives a beep and returns to the time keeping display automati-cally.
Use the + and - buttons to operate the elapsed time measurement, split time measurement or the times of two runners as follows:
Diving with the D3 or performing data transfer will stop the stopwatch. However, it is possible to use stopwatch function when diving, if both the GAUGE and the FREE diving modes are disabled (set to OFF, see chapter 4.4.). In dive mode the stopwatch cannot be operated.

17
2.4.3 DOWNTIMER [TIMER D]The downtimer function is entered by pressing the S button twice, when the time keeping display is shown. The text Timerd at the bottom and the mode indicator (TIME) on the left side of the display indi-cate that you have entered the Downtimer [TIMEr d] function (Fig.2.8).
The watch shows the preset time set in the SET mode (See Chapter 4.3 Timer Settings). Use the + and - buttons as in the [TIMEr Up] function. When the countdown fi nishes the watch gives three beeps and returns to showing the pre-set time (Fig. 2.9). If the downtimer has been set for a continuous countdown, the watch begins a new countdown after the previous one automatically.
Diving with the D3 or performing data transfer will stop the downtimer. However, it is possible to use downtimer function normally, if the GAUGE and the FREE diving modes are disabled (set to OFF, see chapter 4.4.) In dive mode the down timer cannot be operated.
��
��
�� �
Fig. 2.8. The Downtimer of the Stopwatch is indicated by the TIMEr d text and a mode indicator.
��
��
�� �
����
Fig. 2.9. The Downtimer counts down from a pre-set time and the DT mode indicator fl ashes.

18
3. DIVING WITH THE D3
In order to familiarize yourself with the menu based functions, Suunto recommends you use your Quick Reference Guide supplied with the D3 together with the information in the following chapters.
This section contains instructions on how to operate the freediving computer and interpret its displays. You will fi nd that the D3 is easy to use and read. Each display shows only the data relevant to that specifi c diving situation.
Chapter 3.1. Before Diving contains general instruc-tions for all the dive computer modes. Chapter 3.2. Freediving information for using the D3 in freediving and Chapter 3.3. Gauge Diving for using the D3 to assist in scuba diving.
��
��
�� �
��
��
�� �
��
��
�� �
���������� ��� ���
�
�������
��
�����
��� ���
Fig. 3.1. Gauge Dive Mode selected.
Fig. 3.2. Free Dive Mode selected.
Fig. 3.3. Startup I. All segments shown.
19
3.1 BEFORE DIVING
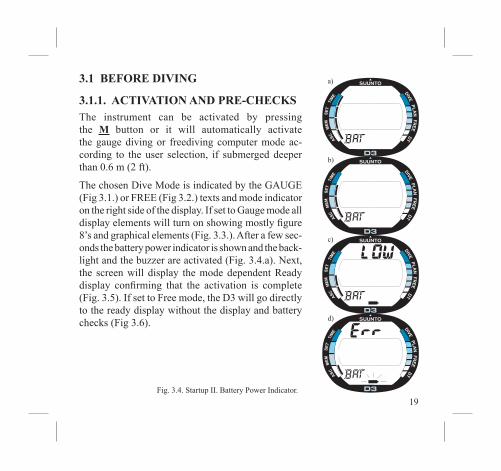
3.1.1. ACTIVATION AND PRE-CHECKS The instrument can be activated by pressing the M button or it will automatically activate the gauge diving or freediving computer mode ac-cording to the user selection, if submerged deeper than 0.6 m (2 ft).
The chosen Dive Mode is indicated by the GAUGE (Fig 3.1.) or FREE (Fig 3.2.) texts and mode indicator on the right side of the display. If set to Gauge mode all display elements will turn on show ing mostly fi gure 8’s and graphical elements (Fig. 3.3.). After a few sec-onds the battery power indicator is shown and the back-light and the buzzer are activated (Fig. 3.4.a). Next, the screen will display the mode dependent Ready display confi rming that the activation is complete (Fig. 3.5). If set to Free mode, the D3 will go directly to the ready display without the display and battery checks (Fig 3.6).
��
��
�� �
��
��
��
��
��
��
�� �
��
��
�� �
��
��
�� �
Fig. 3.4. Startup II. Battery Power Indicator.
20
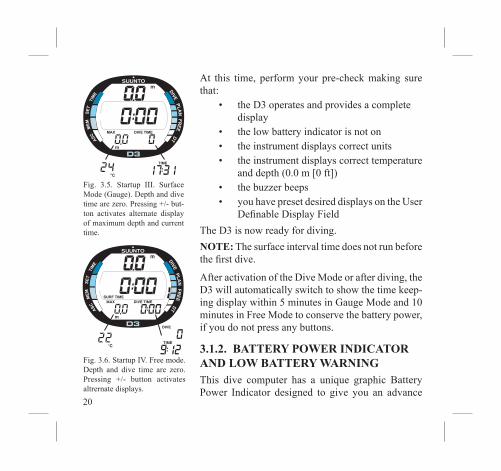
At this time, perform your pre-check making sure that:
• the D3 operates and provides a complete display
• the low battery indicator is not on• the instrument displays correct units• the instrument displays correct tempera ture
and depth (0.0 m [0 ft])• the buzzer beeps• you have preset desired displays on the User
Defi nable Display Field
The D3 is now ready for diving.
NOTE: The surface interval time does not run before the fi rst dive.
After activation of the Dive Mode or after diving, the D3 will automatically switch to show the time keep-ing display within 5 minutes in Gauge Mode and 10 minutes in Free Mode to conserve the battery power, if you do not press any buttons.
3.1.2. BATTERY POWER INDICATOR AND LOW BATTERY WARNINGThis dive computer has a unique graphic Battery Power Indicator designed to give you an advance
��
��
�� �
�
���
��
��� �����
�
�����
��
�
�� �
������
� ����
�
�
� �����������
Fig. 3.6. Startup IV. Free mode. Depth and dive time are zero. Pressing +/- button activates altrernate displays.
Fig. 3.5. Startup III. Surface Mode (Gauge). Depth and dive time are zero. Pressing +/- but-ton activates alternate dis play of maximum depth and current time.
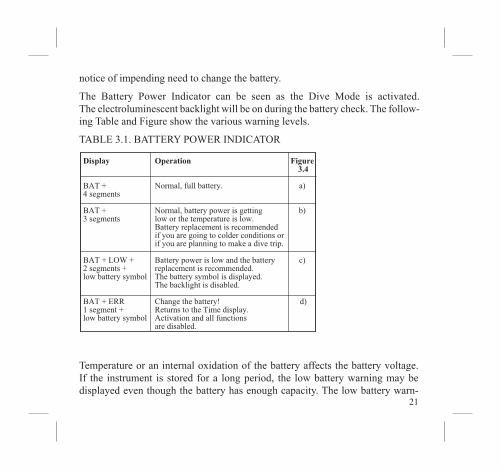
21
notice of impending need to change the battery.
The Battery Power Indicator can be seen as the Dive Mode is activated. The electro luminescent backlight will be on during the battery check. The follow-ing Table and Figure show the various warning levels.
TABLE 3.1. BATTERY POWER INDICATOR
������� ������ ��������
��� �� ������������� �� �����������
��� �� ��������� ����� ��������� ����������� ���� �������� ��� �������
����� � ������������ ���������������� ������������� ����������� ������ ������������� ����!�� ���
���"#$ ����� ����� ���������������� � ��%�������� ������������ ������������������� ������� �������� �������������������
������ ����������������
���&'' (������������� �) ��*������� '��� ��������������������������� ������� ����!��������������������
� ����������
Temperature or an internal oxidation of the battery affects the battery voltage. If the instrument is stored for a long period, the low battery warning may be displayed even though the battery has enough capacity. The low battery warn-

22
ing may also be displayed at low temperatures, even though the battery has enough capacity in warmer conditions. In these cases repeat the battery check procedure.
After the battery check the Low Battery Warning is indicated by the battery symbol (Fig. 3.7.).
If the battery symbol is displayed in the Surface mode or if the display is faded or weak, the battery may be too low to operate the dive computer and battery replacement is recommended.
NOTE: For safety reasons the backlight cannot be activated when the low battery warning is indicated by the battery symbol. The Battery Power Indicator is displayed only in Gauge Mode. The Low Battery symbol is displayed in both Free and Gauge Modes.
3.1.3. USER DEFINABLE FUNCTIONS AND ALARMSThis D3 has several User Defi nable Functions and depth and time related alarms that you can set accord-ing to your personal preference. For example the D3 has a patented presetting system for the User Defi n-able Display Field in the lower part of the display.
��
��
�� �
��
Fig. 3.7. Low Battery Warning.Battery symbol indicates that the battery is low and battery replacement is recommended.
��
��
�� �
�
��
Fig. 3.8. Bookmark activation. An annotation, Bookmark, is placed in the profi le memory during a dive by pressing the S button (Displayed with the Diver attention symbol.)
23
The displays can be preset in the Surface Mode. If it is not active, enter it by selecting the Dive Mode. The preset display will remain active until another display is selected. The preset displays will be the default displays in the Diving Mode. The other available display can be accessed by pressing the + or - but-ton. After fi ve seconds the display changes back to the default preset display automatically.
3.1.3.1. PRESETTING TIME ALARM
The alarm clock is set in the Setting Mode, ALM. For further information see chapter 4.2.
3.1.3.2. PRESETTING DIVE ALARMS
The dive alarms (dive time alarm and maximum depth alarm) are set in the Setting Mode, DIVE AL. For further information see chapter 4.5.
3.1.4. BOOKMARK FUNCTIONIt is possible to make special marks in the profi le memory during a dive. These Bookmarks will be shown as a Diver Attention Symbol when scrolling the profi le memory on the computer display (Fig. 3.8). The Bookmarks will also be shown as annotations in the PC-software, Suunto Dive Manager. To make a bookmark on the profi le memory during a dive press the S button. The Diver Attention Symbol will be displayed to confi rm the bookmark. Pressing the bookmark function will also reset the dive timer in the middle display.

24
3.2. FREEDIVING
3.2.1. BEFORE DIVING IN THE FREE MODEIf set to Free Mode, the dive computer can be used for freediving or snorkeling. In the freediving mode the D3 provides depth, time and profi le information and an accurate 1 second sampling interval for the logbook profi le memory.
The Free Mode is set using the SET DIVE function (See Chapter 4.3 Dive Mode Settings).
If set to Free Mode the text FREE is shown after activation (Fig. 3.9.).
The D3 also provides time and depth alarms that can be set to assist the freediver during the dive (See Chapter 4.5 Dive Alarm Settings).
3.2.2. PRESETTING THE DISPLAYS IN THE FREE MODEThe information shown in the Free Mode can be pre-set before the dive.
��
��
�� �
Fig. 3.9. Free Mode.
����
��
��
�� �
������
� ����
�
�
� �����������
Fig. 3.10. Surface display/Alternative displays.

25
Preset with the - button in the lower left corner of the display (Fig. 3.10.)
• the maximum depth or• the temperature.
Preset with the + button in the lower right corner of the display (Fig. 3.10.)
• the dive time,• the current time or• the dive number.
3.2.3. DURING THE FREEDIVEIn the Freediving mode the present depth is always shown. Maximum depth, temperature, dive time, cur-rent time and dive number are shown in the alterna-tive displays.
In addition to the Dive Time display in the lower right corner of the display, the Free Dive Time in minutes and seconds is shown in the center window (Fig. 3.11.) By pressing the S button you get a bookmark in the dive profi le.
��
��
�� �
�
�
��� �����
Fig. 3.11. Freedive. Present depth is 1.4m and dive time is 2 seconds.

26
3.2.4. FREEDIVING DAY HISTORYIt is possible at any time in the Free Surface Mode to enter the Freediving Day History Mode, simply by pressing the S button. After showing the text DAY HIS and the mode indicator (Fig. 3.12.), the display will show (Fig. 3.13.):
• the deepest free dive made during that day• the longest free dive in minutes and seconds
in the center window and • the total amount of free dives
The Day His Mode can be canceled by pressing the M or the S button.
��
��
�� �
Fig. 3.12. Freediving Day History.
��
��
�� �
����
�
�
Fig. 3.13. Day History display.
27
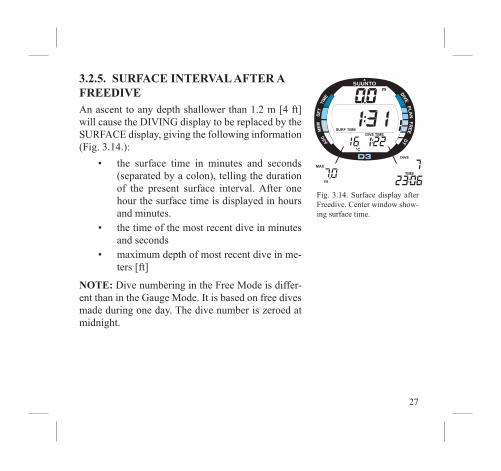
3.2.5. SURFACE INTERVAL AFTER A FREEDIVEAn ascent to any depth shallower than 1.2 m [4 ft] will cause the DIVING display to be replaced by the SURFACE display, giving the following information (Fig. 3.14.):
• the surface time in minutes and seconds (separated by a colon), telling the duration of the present surface interval. After one hour the surface time is displayed in hours and minutes.
• the time of the most recent dive in minutes and seconds
• maximum depth of most recent dive in me-ters [ft]
NOTE: Dive numbering in the Free Mode is differ-ent than in the Gauge Mode. It is based on free dives made during one day. The dive number is zeroed at midnight.
���
���
��
�
��
��
�� �
������� ��� ���
�
��
Fig. 3.14. Surface display after Freedive. Center window show-ing surface time.

28
3.3. GAUGE DIVING
3.3.1 MAXIMUM OPERATING DEPTH PLANNER [MOD]The MOD planner allows a diver using air, nitrox or trimix mixes to determine the maximum depth at which the gas is breathable within selected PO
2
limits.
It is possible at any time in the Gauge Surface Mode to enter the MOD planner, simply by pressing the S button. After showing the text MOD and the plan indicator (Fig. 3.15.), the display will show the Maxi-mum Operating Depth (MOD) value corresponding to the selected O
2% and PO
2 levels (Fig 3.16.).
To use the MOD planner:
1.In the Gauge Surface Mode, press the S button to select the MOD planner.
2. Wait two seconds until the MOD calculator acti-vates automatically. The oxygen level starts to blink on the display (Fig. 3.16.).
3.Press the S to change the selection in the following sequence: ->O
2% level ->PO
2 level
4. While the O2% level is blinking, press the + and
�� �
Fig. 3.15. Maximum Operation Depth Planner. The Planning mode is indicated by the Mod text and mode indicators.
�� �
�
��
��� ���
Fig. 3.16. The Gauge Mod shows the Maximum Operating Depth and the corresponding O
2% and PO
2 values.

29
- buttons to increase and decrease the O2% level. The corresponding MOD is
shown on the display.
5.While the PO2 level is selected, press the + and - to increase and decrease the
PO2 level. Pressing S again returns to O
2% selection.
6. After you have calculated the Maximum Operating Depth, exit the MOD plan-ner by pressing the M button briefl y. Keeping the M button down turns on the light.
3.3.2. PRESETTING THE DISPLAYS IN THE GAUGE MODEPreset with the - button in the lower left corner of the display (Fig. 3.5.):
• the maximum depth or• the temperature.
Preset with the + button in the lower right corner of the display (Fig. 3.5.):
• the dive time or• the current time.
30
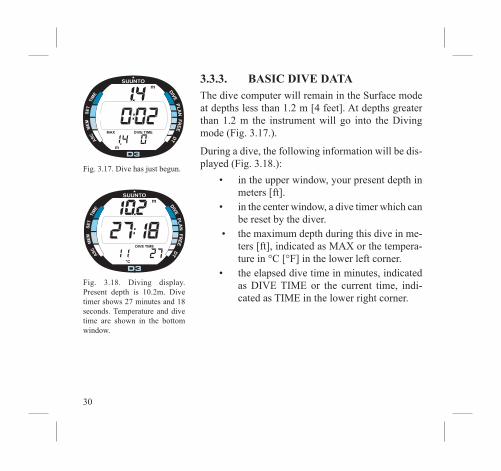
3.3.3. BASIC DIVE DATAThe dive computer will remain in the Surface mode at depths less than 1.2 m [4 feet]. At depths greater than 1.2 m the instrument will go into the Diving mode (Fig. 3.17.).
During a dive, the following information will be dis-played (Fig. 3.18.):
• in the upper window, your present depth in meters [ft].
• in the center window, a dive timer which can be reset by the diver.
• the maximum depth during this dive in me-ters [ft], indicated as MAX or the tempera-ture in °C [°F] in the lower left corner.
• the elapsed dive time in minutes, indicated as DIVE TIME or the current time, indi-cated as TIME in the lower right corner.
��
��
�� �
��� ���
�
��
Fig. 3.18. Diving display. Present depth is 10.2m. Dive timer shows 27 minutes and 18 seconds. Temperature and dive time are shown in the bottom window.
��
��
�� �
�
�
��� �����
Fig. 3.17. Dive has just begun.

31
3.3.4. ASCENT RATE INDICATORThe ascent rate is shown graphically (Fig.3.19) along the left side of the display as follows:
TABLE 3.2. ASCENT RATE INDICATOR
Fig. 3.19. Ascent Rate Indicator. The segments indicate the speed of the ascent.
�� �
�������� �������������
������������������
��� ������� ������ ��������� ����� �����
���������� �������+���,*���+���-
#��������� �./�+���,*�.%0��+���-
����������� /.1�+���,%0.%/��+���-
�� ���������� 1.*0�+���,%/.����+���-
2�� �������� *0.*%�+���,��.�3��+���-
2�� ������������ ���!�*%�+���,�3��+���-� 4"#$������������ ��� ���������������!�*0�+�������� ����������4�#5 ,����+���-������������������� �
When the maximum allowed ascent rate is exceeded, the SLOW warning appears, alternating with the dive depth, indicating that the maximum ascent rate has been exceeded continuously or that the current as-cent rate is signifi cantly above the allowed rate. The watch gives a single beep when the SLOW warning is shown.
32
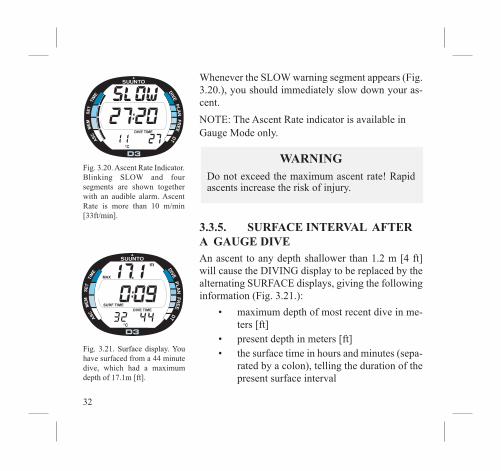
Whenever the SLOW warning segment appears (Fig. 3.20.), you should immediately slow down your as-cent.
NOTE: The Ascent Rate indicator is available in Gauge Mode only.
WARNINGDo not exceed the maximum ascent rate! Rapid ascents increase the risk of injury.
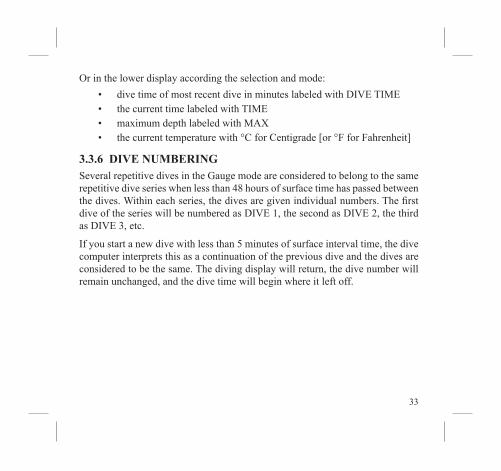
3.3.5. SURFACE INTERVAL AFTER A GAUGE DIVEAn ascent to any depth shallower than 1.2 m [4 ft] will cause the DIVING display to be replaced by the alternating SURFACE displays, giving the following information (Fig. 3.21.):
• maximum depth of most recent dive in me-ters [ft]
• present depth in meters [ft]• the surface time in hours and minutes (sepa-
rated by a colon), telling the duration of the present surface interval
��
��
�� �
������� ��� ���
�
��
��
Fig. 3.21. Surface display. You have surfaced from a 44 minute dive, which had a maximum depth of 17.1m [ft].
��
��
�� �
��� ���
��
Fig. 3.20. Ascent Rate Indicator. Blinking SLOW and four segments are shown together with an audible alarm. Ascent Rate is more than 10 m/min [33ft/min].
33
Or in the lower display according the selection and mode:
• dive time of most recent dive in minutes labeled with DIVE TIME• the current time labeled with TIME• maximum depth labeled with MAX• the current temperature with °C for Centigrade [or °F for Fahrenheit]
3.3.6 DIVE NUMBERINGSeveral repetitive dives in the Gauge mode are considered to belong to the same repetitive dive series when less than 48 hours of surface time has passed between the dives. Within each series, the dives are given individual numbers. The fi rst dive of the series will be numbered as DIVE 1, the second as DIVE 2, the third as DIVE 3, etc.
If you start a new dive with less than 5 minutes of surface interval time, the dive computer interprets this as a continuation of the previous dive and the dives are considered to be the same. The diving display will return, the dive number will remain unchanged, and the dive time will begin where it left off.

34
3.3.7. FLYING AFTER DIVINGThe Suunto D3 provides no calculations for no-fl y times. However, Divers Alert Network (DAN) recommends the following on no-fl ying times:
• A minimum surface interval of 12 hours would be required in order to be reasonably assured a diver will remain symptom free upon ascent to altitude in a commercial jetliner (altitude up to 2400 m [8000 ft]).
• Divers who plan to make daily, multiple dives for several days, or make dives that require decompression stops, should take spe-cial precautions and wait for an extended interval beyond 12 hours before fl ight. Further, the Undersea and Hyperbaric Medical So-ciety (UHMS) suggests divers using standard air tanks and exhib-iting no symptoms of decompression illness wait 24 hours after their last dive to fl y in an aircraft with cabin pressure up to 2400 m [8000 ft]. The only two exceptions to this recommendation are:
• If a diver had less than 2 hours total accumulated dive time in the last 48 hours, then a 12 hour surface interval before fl ying is recommended.
• Following any dive that required a decompression stop, fl ying should be delayed for at least 24 hours, and if possible, for 48 hours.
• Suunto recommends that fl ying is avoided until the DAN and UHMS guidelines are met.
35
3.4. AUDIBLE AND VISUAL ALARMS
The Suunto D3 features audible and visual alarms to advise when important limits are approached or to acknowledge preset alarms.
A short single beep occurs when:
• the dive computer automatically returns to the Time Mode.
Continuous beeps and the backlight activated when:
• the maximum allowed ascent rate, 10 m/min [33 ft/min], is exceeded. SLOW warning will appear (Fig. 3.20.). The Ascent Rate indicator is available in Gauge Mode only.
You are able to preset alarms before the actual dive. The user programmable alarms can be set for maximum depth, dive time and daily time. The alarms activate when:
• The preset maximum depth is reached • continuous beep series for 24 seconds or until any button is
pressed. • the maximum depth blinks as long as the present depth value
exceeds the adjusted value.• The preset dive time is reached in Gauge Mode • continuous beep series for 24 seconds or until any button is
pressed. • the dive time blinks for one minute, if no button is pressed.
36
• The preset dive time is reached in Free Mode
• continuous beep series for 3 seconds. • The preset alarm time is reached • the current time is shown. • continuous beep series for 24 seconds
or until any button is pressed. • the current time blinks for one minute,
if no button is pressed.
��
��
�� �
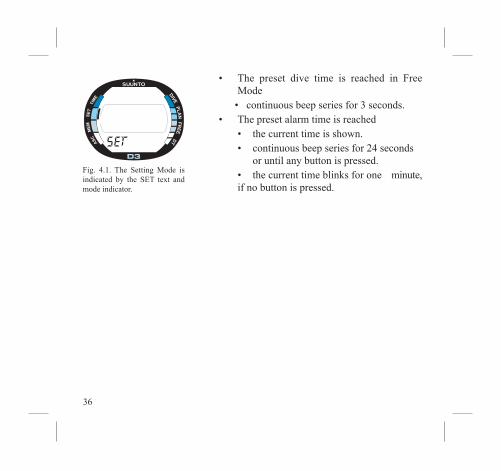
Fig. 4.1. The Setting Mode is indicated by the SET text and mode indicator.

37
4. SETTING MODE [SET]
The time, date, dual time, daily alarm, gauge and free dive selections and settings, dive time and depth alarms and unit adjustments are set in the Setting Mode (Fig. 4.1.).
Enter the Setting Mode from other modes by press-ing the M button. The text SET at the bottom and the mode indicator on the left side of the display indicate the selected mode.
4.1. SETTING TIME, DATE AND DUAL TIME [TIME ]
To set the time and date:
1. In the Setting Mode, press S to select the Time Adjustment Mode (Fig. 4.2.).
2. Wait two seconds until the Time Adjustment Mode activates automatically. The time mode indicator ap-pears and the second digits start to blink on the display (Fig. 4.3.).
��
��
�� �
Fig. 4.2. Time Adjustment Mode.
��
��
�� �
Fig. 4.3. The Time Adjustment Mode is activated and the second digits are blinking.Page I.

38
3. Press S to change the selection in the following sequence:
-> seconds -> hours -> minutes -> 12/24 hour format -> year -> month -> day -> dual (home) time hours -> minutes
4. While the second digits are selected (blinking), press - to reset the seconds to ”00” or press + to in-crease the value.
5. While any other digits (except seconds) are se-lected (blinking), press + to increase the value or - to decrease it. Holding the button the current selection starts to scroll.
6. After you have set the time and date, press the M button to save the settings and to return to the Setting Mode [SET].
NOTE:
• The day of the week is automatically calculated in accordance with the date.
• The date can be set within the range of Jan 1, 1990 to Dec. 31, 2089.
��
��
�� �
Fig. 4.5. Dual time is selected. Page III.
Fig. 4.4. The year, month and day are selected. Page II.
39
NOTE:
• While the selection is blinking and no button is operated within 10 minutes, the blinking stops and the D3 beeps and returns automatically to the time-keeping display.
• The display is illuminated by holding down the M button for more than two seconds.
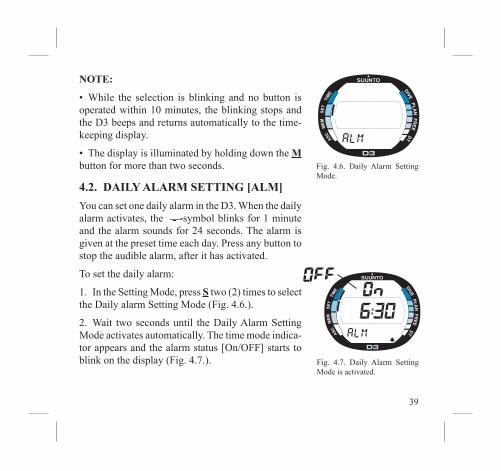
4.2. DAILY ALARM SETTING [ALM]
You can set one daily alarm in the D3. When the daily alarm activates, the -symbol blinks for 1 minute and the alarm sounds for 24 seconds. The alarm is given at the preset time each day. Press any button to stop the audible alarm, after it has activated.
To set the daily alarm:
1. In the Setting Mode, press S two (2) times to select the Daily alarm Setting Mode (Fig. 4.6.).
2. Wait two seconds until the Daily Alarm Setting Mode activates automatically. The time mode indica-tor appears and the alarm status [On/OFF] starts to blink on the display (Fig. 4.7.).
�� �
��
��
Fig. 4.6. Daily Alarm Setting Mode.
�� �
��
��
Fig. 4.7. Daily Alarm Setting Mode is activated.

40
3. Press S to change the selection in the following sequence:
->On/OFF status -> hours -> minutes
4. While the alarm status [On/OFF] is selected (blinking) press + or - to change the status. When the alarm status is On, the daily alarm indicator ( -symbol) in the bottom right corner of the display indicates that the alarm is on.
5. Set the other sections as follows:
• While any other digits (except alarm status) are selected (blinking), press + to increase the value or - to decrease it. Holding down either button starts the scrolling of the current selection.
• The 12-hour or 24-hour format of the alarm matches the format of the time-keeping display, which is selected in the Time Adjustment Mode (see chapter 4.1.). When using the 12-hour format of the alarm, take care to set the time cor-rectly as morning (AM) or afternoon (PM).
6. After you have set the daily alarm, press the M button to save the settings and to return to the Setting Mode [SET].

41
4.3. TIMER SETTINGS [TIMER D]
In this mode you can set the countdown time for the downtimer. The downtimer also has an alarm repeat function for continuous downtimer alarm.
To set the downtimer:
1.In the Setting Mode, press S three (3) times to select the Timer Setting Mode (Fig. 4.8.)
2.Wait two seconds until the Timer Setting Mode activates automatically. The SET mode and DT seg-ments are displayed.
3.Press S to change the selection in the following sequence:
-> minutes -> seconds -> alarm repeat
When the minutes and seconds are selected (blink-ing), press - to decrease and + to increase the value.
4. After the downtimer time selection, the down timer alarm repeat is selected. The alarm repeat function begins a new countdown after the previous one and signals every time when the downtimer begins a new countdown.
�� � ��
Fig. 4.8. Timer Setting Mode.
�� � ��
Fig. 4.9. Downtimer time and alarm repeat are selected.

42
While the enable/disable status [On/OFF] is selected (blinking) press + or - to change the status.
5. After setting the downtimer, press the M button to save the settings and return to setting mode.
4.4. DIVE MODE SETTINGS [DIVE]
In this mode you can select the type of dive mode to be used (Gauge or Free) or turn the dive modes OFF. If the dive modes are turned OFF, the dive computer functions are disabled, thus turning the D3 into a mere water resistant sportswatch.
NOTE: If the DIVE Mode is disabled (set to OFF), the instrument will not activate the selected diving mode (Gauge, Free) when submerged. Turning the dive modes OFF enables the use of stopwatch and downtimer functions underwater.
4.4.1. SET GAUGE MODETo set the Gauge Mode:
1. In the Setting Mode, press S four (4) times to select the Dive Setting Mode (Fig. 4.10.).
2. Wait two seconds until the Dive Setting Mode activates automatically. The enable/disable status [On/OFF] starts to blink on the display and the se-
�� �
Fig. 4.10. Dive Setting Mode.
��
��
�� �
Fig. 4.11. Set Gauge/Free mode. Enable/disable status blinks.

43
lected dive mode (GAUGE or FREE) is dis played (Fig. 4.11.)
While the enable/disable status [On/OFF] is selected (blinking) press + or - to change the status.
3. Press S to change the selection in the following sequence:
->On/OFF status -> GAUGE/FREE Mode
When the GAUGE/FREE dive mode is selected (blinking) press + or - to change the mode to GAUGE.
4. After setting the GAUGE Mode, the Gauge record-ing interval can be set by pressing the S-button once. The interval can be set for 10, 20, 30 or 60 seconds.
5. After you have set the GAUGE Mode, press the M button to save the settings and to return to the Setting Mode [SET].
�� �
Fig. 4.12. Gauge recording interval selected.

44
4.4.2. SET FREE MODE
To set the FREE Mode:
1. In the Setting Mode, press S four (4) times to select the Dive Setting Mode (Fig. 4.10.).
2. Wait two seconds until the Dive Setting Mode activates automatically. The enable/disable status [On/OFF] starts to blink on the display and the selected dive mode (GAUGE or FREE) is displayed (Fig. 4.11.)
While the enable/disable status [On/OFF] is selected (blinking) press + or - to change the status.
3. Press S to change the selection in the following sequence:
->On/OFF status -> GAUGE/FREE Mode
When the dive mode is selected (blinking) press + or - to change the mode to FREE.
4. After you have set the FREE, press the M button to save the settings and to return to the Setting Mode [SET].
45
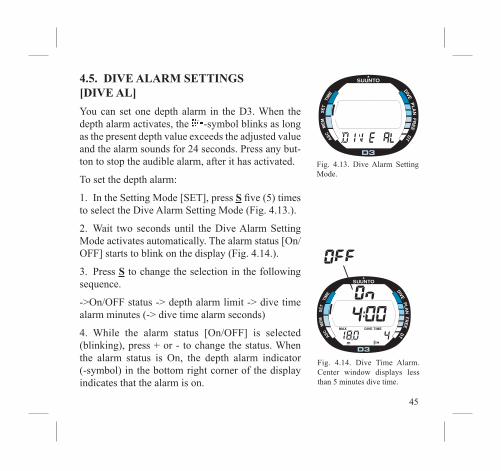
4.5. DIVE ALARM SETTINGS [DIVE AL]
You can set one depth alarm in the D3. When the depth alarm activates, the -symbol blinks as long as the present depth value exceeds the adjusted value and the alarm sounds for 24 seconds. Press any but-ton to stop the audible alarm, after it has activated.
To set the depth alarm:
1. In the Setting Mode [SET], press S fi ve (5) times to select the Dive Alarm Setting Mode (Fig. 4.13.).
2. Wait two seconds until the Dive Alarm Setting Mode activates automatically. The alarm status [On/OFF] starts to blink on the display (Fig. 4.14.).
3. Press S to change the selection in the following sequence.
->On/OFF status -> depth alarm limit -> dive time alarm minutes (-> dive time alarm seconds)
4. While the alarm status [On/OFF] is selected (blinking), press + or - to change the status. When the alarm status is On, the depth alarm indicator ( -symbol) in the bottom right corner of the display indicates that the alarm is on.
��
��
�� �
Fig. 4.13. Dive Alarm Setting Mode.
��
��
�� �
�� ��� ���
�
Fig. 4.14. Dive Time Alarm. Center window displays less than 5 minutes dive time.
46
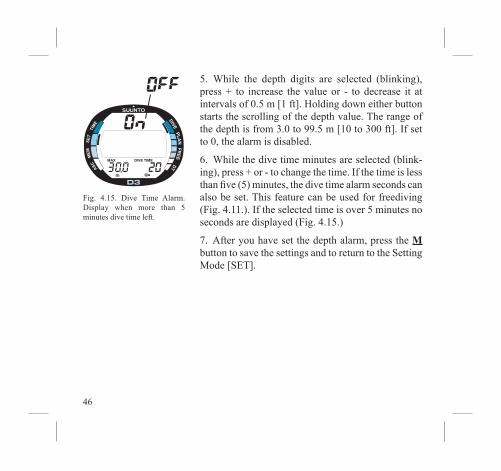
5. While the depth digits are selected (blinking), press + to increase the value or - to decrease it at intervals of 0.5 m [1 ft]. Holding down either button starts the scrolling of the depth value. The range of the depth is from 3.0 to 99.5 m [10 to 300 ft]. If set to 0, the alarm is disabled.
6. While the dive time minutes are selected (blink-ing), press + or - to change the time. If the time is less than fi ve (5) minutes, the dive time alarm seconds can also be set. This feature can be used for freediving (Fig. 4.11.). If the selected time is over 5 minutes no seconds are displayed (Fig. 4.15.)
7. After you have set the depth alarm, press the M button to save the settings and to return to the Setting Mode [SET].
��
��
�� �
�� ��� ���
�
Fig. 4.15. Dive Time Alarm. Display when more than 5 minutes dive time left.

47
4.6. UNIT ADJUSTMENT SETTINGS [AdJ]
In this setting mode also the desired units can be se-lected (metric, m/°C or imperial, ft/°F).
To set the new Unit Adjustments:
1. In the Setting Mode [SET], press S six (6) times to select the Unit Adjustment Mode (Fig. 4.16.).
2. Wait two seconds until the Adjustment Mode ac-tivates automatically. The unit setting starts to blink on the display (Fig. 4.17.).
3. Press S to change the selection of units:
While the units are blinking in the lower part of the display, press + or - to change units (Fig. 4.17.).
After you have set the desired adjustments, press the M button to save the settings and to return to the Setting Mode [SET]).
��
��
�� �
Fig. 4.16. Unit Adjustment Mode.
��
��
����
���
�� �
Fig. 4.17. Setting Unit Adjustment.
48
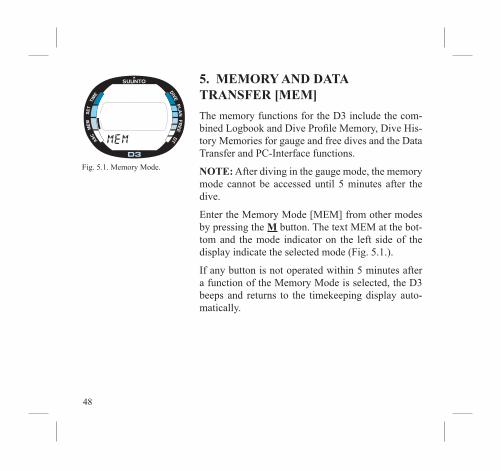
5. MEMORY AND DATA TRANSFER [MEM]
The memory functions for the D3 include the com-bined Logbook and Dive Profi le Memory, Dive His-tory Memories for gauge and free dives and the Data Transfer and PC-Interface functions.
NOTE: After diving in the gauge mode, the memory mode cannot be accessed until 5 minutes after the dive.
Enter the Memory Mode [MEM] from other modes by pressing the M button. The text MEM at the bot-tom and the mode indicator on the left side of the display indicate the selected mode (Fig. 5.1.).
If any button is not operated within 5 minutes after a function of the Memory Mode is selected, the D3 beeps and returns to the timekeeping display auto-matically.
��
��
��
�
Fig. 5.1. Memory Mode.
49
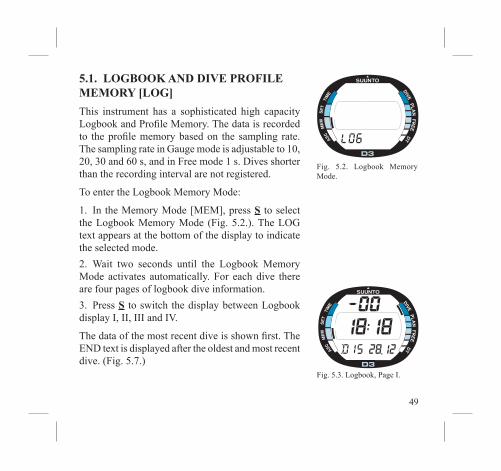
5.1. LOGBOOK AND DIVE PROFILE MEMORY [LOG]
This instrument has a sophisticated high capacity Logbook and Profi le Memory. The data is recorded to the profi le memory based on the sampling rate. The sampling rate in Gauge mode is adjustable to 10, 20, 30 and 60 s, and in Free mode 1 s. Dives shorter than the recording interval are not registered.
To enter the Logbook Memory Mode:
1. In the Memory Mode [MEM], press S to select the Logbook Memory Mode (Fig. 5.2.). The LOG text appears at the bottom of the display to indicate the selected mode.
2. Wait two seconds until the Logbook Memory Mode activates automatically. For each dive there are four pages of logbook dive information.
3. Press S to switch the display between Logbook display I, II, III and IV.
The data of the most recent dive is shown fi rst. The END text is displayed after the oldest and most recent dive. (Fig. 5.7.)
��
��
��
�
Fig. 5.2. Logbook Memory Mode.
��
��
��
�
Fig. 5.3. Logbook, Page I.
50
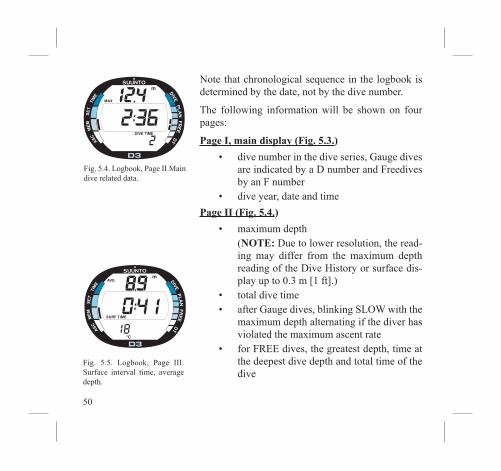
Note that chronological sequence in the logbook is determined by the date, not by the dive number.
The following information will be shown on four pages:
Page I, main display (Fig. 5.3.)
• dive number in the dive series, Gauge dives are indicated by a D number and Freedives by an F number
• dive year, date and time
Page II (Fig. 5.4.)
• maximum depth (NOTE: Due to lower resolution, the read-
ing may differ from the maximum depth reading of the Dive History or surface dis-play up to 0.3 m [1 ft].)
• total dive time• after Gauge dives, blinking SLOW with the
maximum depth alternating if the diver has violated the maximum ascent rate
• for FREE dives, the greatest depth, time at the deepest dive depth and total time of the dive
�
��
���
�������
��
��
��
�
Fig. 5.5. Logbook, Page III. Surface interval time, average depth.
��� ���
�
��
��
��
��
�
Fig. 5.4. Logbook, Page II.Main dive related data.

51
Page III (Fig. 5.5.)
• average depth• surface interval time before the dive• temperature at the maximum depth
Page IV (Fig. 5.6.)
• the profi le of the dive, automatic scrolling during which:
• blinking diver attention symbol when the user has pressed the S button for Book-mark
• blinking SLOW label when registered
The data of the most recent dive is shown fi rst. Press - to call the information from the previous dive. Press the - button consecutively to move backward through the dives. Press + to move forward through the dives. It is possible to scroll trough the dives on all four pages. The END text is displayed after the oldest and the most recent dive (Fig. 5.7.).
The memory will retain approximately the last 36 hours of dive time in Gauge Mode and approximately 2 hours in freediving mode. After that, when new dives are added, the oldest dives are deleted. The contents of the memory will remain even when the
��� ���
��
��
�
��
�
Fig. 5.6. Logbook, Page IV. Profi le of specifi c time.
��
��
�� �
Fig. 5.7. Logbook, end of the memory. END text is displayed between the oldest and the most recent dive.
52
battery is changed (assuming that the replacement has been done according to the instructions).
DIVE PROFILE MEMORY [PRO]
The scrolling of the profi le will start automatically when the Profi le/logbook page IV is entered (Fig. 5.6.).
The dive time is displayed in sampling increments with each display being shown for about two seconds. The depths shown are the maximum values of each sam-pling interval.
After the last depth fi gure of the selected profi le, the D3 automatically returns to Display I of the same dive in the Logbook. If desired, the profi le of the same dive can be recalled again following the above procedure.
The scrolling of the profi le can be stopped by pressing any button.• Press S to stop the scrolling and to return to Display I of the same dive
in the Logbook.• Press + to stop the scrolling and to change to scrolling the next dive in
the Logbook.• Press - to stop the scrolling and to change to scrolling the previous dive
in the Logbook.• Press M to stop the scrolling and to return to the beginning of the Log-
book.• Press M two (2) times to exit the Logbook Memory [LOG] and enter the
Memory Mode [MEM].
53
5.2. DIVE HISTORY MEMORY [HIS]
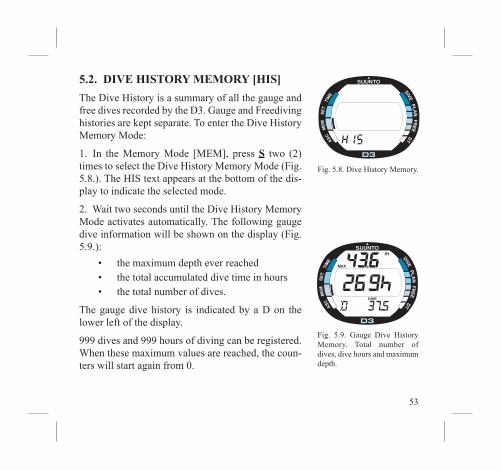
The Dive History is a summary of all the gauge and free dives recorded by the D3. Gauge and Freediving histories are kept separate. To enter the Dive History Memory Mode:
1. In the Memory Mode [MEM], press S two (2) times to select the Dive History Memory Mode (Fig. 5.8.). The HIS text appears at the bottom of the dis-play to indicate the selected mode.
2. Wait two seconds until the Dive History Memory Mode activates automatically. The following gauge dive information will be shown on the display (Fig. 5.9.):
• the maximum depth ever reached• the total accumulated dive time in hours• the total number of dives.
The gauge dive history is indicated by a D on the lower left of the display.
999 dives and 999 hours of diving can be registered. When these maximum values are reached, the coun-ters will start again from 0.
��
��
�� �
Fig. 5.8. Dive History Memory.
��
��
�� �
���
�
��
Fig. 5.9. Gauge Dive History Memory. Total number of dives, dive hours and maximum depth.

54
NOTE: The maximum depth can be reset to 0.0 m [0 ft] using the optional Suunto Dive Manager PC-Interface.
3. To enter the Freedive History Memory Mode press the - or + buttons once when the History Memory is selected. The following Free dive information will be shown on the display (Fig. 5.10.):
• the maximum depth ever reached• the longest free dive time ever reached
The freedive history is indicated by an F on the lower left of the display.
��
��
�� �
�
��
Fig. 5.10. Free Dive History Memory.

55
5.3. DATA TRANSFER AND PC-INTERFACE [TR-PC]The D3 can be connected to an IBM compatible personal computer (PC), us-ing the optional SUUNTO PC-Interface and the SUUNTO DIVE MANAGER software. With the PC-Interface dive data from the D3 can be downloaded to a PC. Data can be added to complete the logbook and paper copies of your dive log and profi les can easily be printed. The PC-Interface software can be used for educational and demonstration purposes, for planning dives, as well as for keep-ing complete record of your dive history with the D3.
The data transfer is carried out using the water contact of the D3. The following data is transferred to the PC:
• depth profi le of the dive• dive time• preceding surface interval time• dive number• type of dive (gauge/free)• temperature at the beginning of the dive, maximum depth and end of the
dive• dive entry time (year, month, day and time)• additional dive information (e.g. SLOW violations, Bookmarks, Sur-
faced Mark)• dive computer serial number• personal 30 character information

56
It is also possible to manually add comments and other personal information to the PC based dive data fi les. The SUUNTO PC-Interface package comes complete with the interface unit, the software on CD-ROM, and an instruction manual.
To enter the Data Transfer Mode:
1. In the Memory Mode [MEM], press S three (3) times to select the Data Transfer Mode The TR-PC text appears at the bottom of the display to indicate the selected mode (Fig. 5.11.).
2. Wait two seconds until the Data Transfer Mode activates automatically.
NOTE: While in the Data Transfer Mode, the water contact is used only for the data transfer, and when connecting the contact by submerging it, the Dive Mode IS NOT automatically activated. Data transfer stops also the stopwatch.
After you have fi nished the data transfer, Press the M to exit Data Transfer Mode [TR-PC] and enter the Memory Mode [MEM]. If no button is operated or no data is transferred within 5 minutes, the D3 beeps and returns to the time-keeping display automatically.
��
��
�� �
Fig. 5.11. Data Transfer and PC- Interface.

57
Using the PC software, you are able to enter setup options such as:
• input a personal, 30 character fi eld into the D3 (i.e. your name)• reset the Dive History’s max depth to zero.
5.4 SUUNTOSPORTS.COM
SuuntoSports.com is an international free web community where you can refi ne and share the data that you have measured with your personal Suunto instrument and analyzed with the sport-specifi c PC interface. SuuntoSports.com offers you a number of features that help you to get the most out of your sport and your Suunto D3.
If you already own a personal Suunto sports instrument you can access all sport-specifi c functions through registration. If you do not yet have an instrument you may either log in as a guest or register yourself. As a guest you can view and read, but registration gives you the right to use other functions and participate to discussions.
SYSTEM REQUIREMENTS
SuuntoSports.com has the following system requirements:
• Internet Connection • Modem: recommended 56k or faster • Browser: IE 4.0 or better, Netscape 4.7x or newer • Resolution: minimum 800 x 600, best viewed with 1024 x 768

58
SUUNTOSPORTS.COM SECTIONS
SuuntoSports.com includes three sections with several functions. The following paragraphs describe only the basic functions of SuuntoSports.com. You can fi nd detailed descriptions of all the site functions and activities and step-by-step instructions for using them from the site Help. The Help is available on each page and its icon is located on the right side of the bar dividing the screen. The Help is frequently updated as the site develops.
SuuntoSports.com offers several possibilities for searching the information on site. In addition to the free search, you can search, for example, for groups, users, resorts, logs and sports.
The information published on the SuuntoSports.com contains internal links so that you do not always have to search for the information from the very beginning. For example, if you view a description of a resort, you can follow the links and view the resort information sender’s personal information, logs related to the resort and charts created from the logs, if the sender has agreed to this information being made public.
MY SUUNTO
The My Suunto section of the site is meant for your personal information. You can store information about yourself, your wristop computer, your sporting and training activities, etc. When you upload your personal logs to SuuntoSports.com they are displayed in your personal information. Here you can also manage them and decide if they can be presented to all other community users or just to limited groups.

59
When you have uploaded logs to SuuntoSports.com, you can create charts from the dive related data in the logs. You can also publish your logs and compare them with other users’ logs.
The My Suunto section also contains a personal calendar that you can use to mark personal events and other useful information.
COMMUNITIES
In the Communities section, SuuntoSports.com users can form or search groups and manage their own groups. For example, you can create a group for all your diving friends, and share information about each other’s trips, give advice and discuss where and when you could go diving together. Groups can be either open or closed—closed groups mean that you have to apply for a membership and be accepted, before you can participate in group activities.
All groups have a home page that displays information about group events and includes news, noticeboard and other information. Group members can also use group-specifi c bulletin boards, chat rooms and group calendars, and add links and create group activities.
SPORT FORUMS
SuuntoSports.com has its own forum for each Suunto sport. The basic features and functions are the same for all sport forums—sport-specifi c news, bulletin boards and chat rooms. Users can also suggest links to sports-related sites and tips regarding the sport and equipment to be published on the site, or publish their own travel reports.

60
Sport forums include presentations of the resorts that are related to the sport. Users can rank the resorts with comments and the results are published next to the resort information. A ranking list can also be created for other things—for example, where are the best diving sites, what group has most members, who has uploaded most logs, and so on.
GETTING STARTED
To join the SuuntoSports.com community, connect to the Internet, open your web browser and go to www.suuntosports.com. When the opening page appears, click the Register icon and register yourself and your Suunto sports instrument. You can change and update your personal and equipment profi les in My Suunto section afterwards.
After the registration you will automatically enter the SuuntoSports.com home page that introduces the site structure and functional principles.
NOTE: SuuntoSports.com is continuously developed further and its content is subject to change.

61
6. CARE AND MAINTENANCE
This Suunto dive computer is a sophisticated precision instrument. Though de-signed to withstand the rigors of scuba diving, you must treat it with proper care and caution as any other precision instrument.
6.1. CARE OF YOUR D3• NEVER try to open the case of the D3.• Every two years or after 200 dives (whichever comes fi rst) have your
D3 serviced by an authorized dealer or distributor. This service will include a general operational check, replacement of the battery and a water resistance check and if needed, replacement of the seals, buttons, or display. The service requires special tools and training. It is advisable to contact an authorized SUUNTO dealer or distributor for this service. Do not attempt to do any service that you are not sure about how to do.
• Should moisture appear inside the D3 have it checked immediately by your SUUNTO dealer or distributor.
• Should you detect scratches, cracks or other such fl aws on the display that may impair its durability, have it replaced immediately by your SUUNTO dealer or distributor.
• Check the bars holding the strap and the buckle for fl aws. If necessary, have them replaced immediately by your SUUNTO dealer or distribu-tor.
• Wash and rinse the unit in fresh water after every use.

62
• Protect the unit from shocks, extreme heat or direct sunlight and chemi-cal attack. The D3 cannot withstand the impact of heavy objects like scuba cylinders, nor chemicals like gasoline, cleaning solvents, aerosol sprays, adhesive agents, paint, acetone, alcohol etc. Chemical reactions with such agents will damage seals, case and fi nish.
• Store your D3 in a dry place when you are not using it.• The D3 will display a battery symbol as a warning when the power gets
too low. When this happens, the D3 should not be used until the battery has been replaced (see chapter 3.1.2.).
• Do not fasten the strap of your D3 too tightly. You should be able to insert your fi nger between the strap and your wrist. Use the extension strap when fastening the D3 on your exposure suit.
6.2. MAINTENANCE
If left without care for an extended period, a thin fi lm (often invisible to the eye) will cover the unit. Much like the buildup on the glass of an aquarium, this fi lm is the result of organic contaminates found in both salt and fresh water. Suntan oil, silicone spray and grease will speed up this process. As a result of this buildup, moisture will be trapped next to the water contact and will not allow your D3 to operate properly.
The water contact can be cleaned with a small brush (e.g. toothbrush).
IMPORTANT: The D3 should be soaked, then thoroughly rinsed with fresh water and then dried with a soft towel after each dive. Make sure that all salt crystals

63
and sand particles have been fl ushed out. Check the display for possible moisture or water. DO NOT use the D3 if you detect any moisture or water inside.
CAUTION!• do not use compressed air to blow water off the unit• do not use solvents or other cleaning fl uids that might cause damage• do not test or use the D3 in pressurized air
6.3. WATER RESISTANCE INSPECTION
Water resistance of the unit must be checked after replacement of the battery, or after other service operations. The check requires special equipment and train-ing.
You must frequently check the display for any sign of leaks. If you fi nd moisture inside your advanced computer watch, there is a leak. A leak must be corrected without delay, as moisture will seriously damage the unit, even beyond repair. SUUNTO does not take any responsibility for damage caused by moisture in the D3, if the instructions of this manual are not carefully followed.
In case of a leak immediately bring the D3 to an authorized SUUNTO dealer or distributor.

64
6.4. BATTERY REPLACEMENT
NOTE: It is advisable to contact an authorized Su-unto dealer for battery replacement. It is imperative that the change is made in a proper manner to avoid any leakage of water into the battery compartment or computer.
CAUTION!• Defects caused by improper battery instal-
lation are not covered by the warranty.
All history and profi le data, as well as the alarm set-tings, will remain in thedive computer memory after the battery change. However, the clock time and time alarm setting is lost.
When working with the battery compartment, clean-liness is extremely important. Even the smallest dirt particles may cause a leakage when you dive.
BATTERY KIT
The battery kit includes a 3.0 V coin type lithium cell battery and a battery compartment lid with a lu-bricated O-ring. When handling the battery do not make contact with both of the poles at the same time. Do not touch the surfaces of the battery with your bare fi ngers.
Fig. 6.1.Battery Compartment Lid

65
BATTERY REPLACEMENT
The battery is located in a separate battery com-partment on the back side of the instrument (Fig. 6.1.). To change the battery, follow the procedure below:
1. Thoroughly rinse and dry the computer.
2. Open the battery compartment lid by carefully but fi rmly turning it counter-clockwise using a coin or a screwdriver. When turned the lid should rise from the compartment. Care should be taken not to damage any of the parts. Use a large enough coin/screwdriver in order not to damage the lid.
3. Remove the battery compartment lid with your fi ngers. Do not use sharp metal objects as they might damage the O-ring or the sealing surfaces.
4. Carefully remove the battery from underneath the battery retainer/contact. The battery can be removed by inserting a screwdriver under the battery and moving the battery with your fi nger. Be careful not to damage the electrical contacts or the sealing surface.
Check for any traces of fl ooding or other damage. In case of a leak or any other damage, bring the dive computer to an authorized SUUNTO dealer or distributor for check and repair.
5. Remove the old O-ring from the battery compartment lid.
6. Check the condition of the old O-ring; a defective O-ring may indicate sealing or other problems. Dispose the old O-ring and battery compartment lid, even if they seem to be in good condition.

66
7. Check that the battery compartment surfaces are clean. Clean with soft cloth if necessary.
8. Gently insert the new battery under the battery retainer/contact. Check the polarity of the battery: the “-” mark should point toward the bottom of the com-partment and the “+” mark upwards.
9. Check that the new battery compartment lid and lubricated O-ring are in good condition. Be very careful not to get any dirt on the o-ring or its sealing sur-faces.
10. Orient the lid properly and carefully press the lid onto the battery compart-ment with your thumb, while making sure that the O-ring is not at any point protruding out on the edge. Make sure that the lid is pressed completely down!
11. Turn the battery compartment lid fi rmly but carefully clockwise until it snaps into its locked position.
12. The dive computer should now active it’s timekeeping mode and show time 18:00 [6:00 PM] and date SA 1.1. Activate the instrument. Check that:
• All display segments work.• The low battery warning is off.• The buzzer beeps and backlight works.• All the settings are correct. Reset if necessary.
67
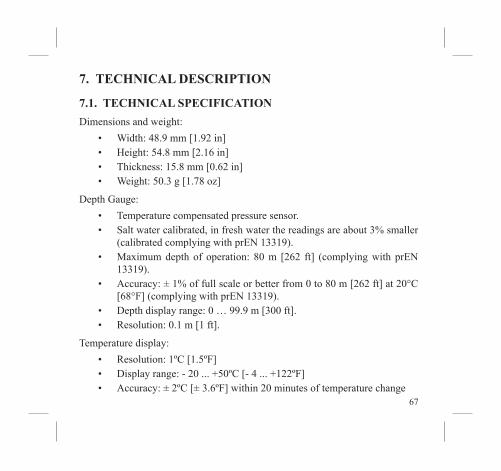
7. TECHNICAL DESCRIPTION
7.1. TECHNICAL SPECIFICATION
Dimensions and weight:
• Width: 48.9 mm [1.92 in]• Height: 54.8 mm [2.16 in]• Thickness: 15.8 mm [0.62 in]• Weight: 50.3 g [1.78 oz]
Depth Gauge:
• Temperature compensated pressure sensor.• Salt water calibrated, in fresh water the readings are about 3% smaller
(calibrated complying with prEN 13319).• Maximum depth of operation: 80 m [262 ft] (complying with prEN
13319).• Accuracy: ± 1% of full scale or better from 0 to 80 m [262 ft] at 20°C
[68°F] (complying with prEN 13319).• Depth display range: 0 … 99.9 m [300 ft].• Resolution: 0.1 m [1 ft].
Temperature display:
• Resolution: 1ºC [1.5ºF]• Display range: - 20 ... +50ºC [- 4 ... +122ºF]• Accuracy: ± 2ºC [± 3.6ºF] within 20 minutes of temperature change
68
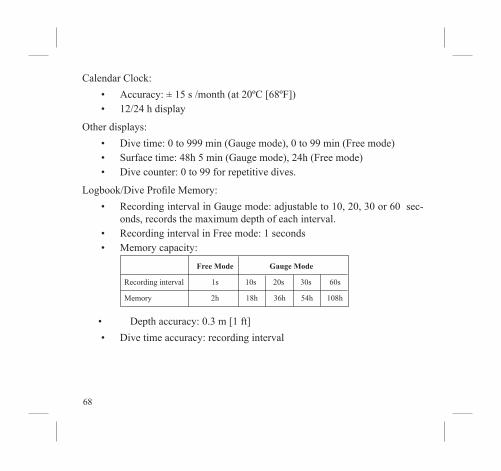
Calendar Clock:
• Accuracy: ± 15 s /month (at 20ºC [68ºF])• 12/24 h display
Other displays:
• Dive time: 0 to 999 min (Gauge mode), 0 to 99 min (Free mode)• Surface time: 48h 5 min (Gauge mode), 24h (Free mode)• Dive counter: 0 to 99 for repetitive dives.
Logbook/Dive Profi le Memory:
• Recording interval in Gauge mode: adjustable to 10, 20, 30 or 60 sec-onds, records the maximum depth of each interval.
• Recording interval in Free mode: 1 seconds • Memory capacity:
• Depth accuracy: 0.3 m [1 ft]
• Dive time accuracy: recording interval
����� ��������
'��� �������� !�� *� *0� %0� �0� /0�
6��� � %� *1� �/� 7�� *01�

69
Operating Conditions
• Normal altitude range: 0 to 3000 m [10000 ft] above sea level.• Operating temperature: 0°C to 40°C [32°F to 104°F].• Storage temperature: -20°C to +50°C [-4°F to +122°F].
It is recommended that the D3 be stored in a dry place at room temperature.
Battery
• One 3 V lithium battery; CR 2032• Battery storage time (shelf life): Up to 18 months.• Replacement: Every 18 months or more often depending on dive activ-
ity.• Life expectancy at 20°C [68°F] with 40 minute Gauge dives:• 0 dives/y -> 16 months• 50 dives/y -> 11 months• 100 dives/y -> 9 months• 200 dives/y -> 6 months• Life expectancy at 20°C [68°F] with 1 minute Free dives:• 0 dives/y -> 16 months• 50 dives/y -> 15 months• 100 dives/y -> 14 months• 200 dives/y -> 12 months
70
The following conditions have an affect on the expected battery lifetime:
• The length and type of the dives.• The condition in which the unit is operated and stored (e.g. temperature/
cold conditions). Below 10°C [50°F] the expected battery lifetime may be 50-75% of that at 20°C [68°F].
• The use of the backlight and audible alarms.• The quality of the battery (some lithium batteries may exhaust unexpect-
edly, which cannot be tested in advance).• The time the dive computer has been stored until it gets to the customer.
The battery is installed into the unit at the factory.
NOTE: Low temperature or an internal oxidation of the battery may cause the battery warning to operate even though the battery has enough capacity. In this case, the warning usually disappears when the Dive Mode is activated again.
71
8. WARRANTY
NOTE: The warranty arrangements vary in different countries. The dive com-puter packaging contains information regarding the warranty benefi ts and require-ments applicable to your purchase.
This Suunto dive computer is warranted against defects in workmanship and materials for a period of two years after purchase to the original owner subject to and in accordance with the terms and conditions set forth below:
The dive computer should be serviced or repaired only by an authorized Suunto dealer or distributor.
This warranty does not cover damage to the product resulting from improper usage, improper maintenance, neglect of care, alteration or unauthorized repair. This warranty will automatically become void if proper preventive maintenance procedures have not been followed as outlined in the use and care instructions for this product.
If a claim under this or any other warranty appears to be necessary, return the product, freight prepaid, to your Suunto dealer or distributor or qualifi ed repair facility. Include your name and address, proof of purchase and/or service registra-tion card, as required in your country. The claim will be honored and the product repaired or replaced at no charge and returned in what your Suunto dealer or distributor determines a reasonable amount of time, provided all necessary parts are in stock. All repairs made, not covered under the terms of this warranty, will be made at the owner’s expense. This warranty is non-transferable from the original owner.

72
All implied warranties, including but not limited to the implied warranties of merchantability and fi tness for a particular purpose, are limited from date of purchase and in scope to the warranties expressed herein. Suunto shall not be liable for loss of use of the product or other incidental or consequential costs, expenses or damage incurred by the purchase. All warranties not stated herein are expressly disclaimed.
Some states do not allow the exclusion or limitation of implied warranties of consequential damages, so the above exclusions or limitations may not apply to you. This warranty gives you specifi c legal rights, and you may also have other rights that vary from state to state.
This warranty does not cover any representation or warranty made by dealers or representatives beyond the provisions of this warranty. No dealer or representa-tion is authorized to make any modifi cations to this warranty or to make any additional warranty.
Battery replacement is not covered by this warranty.
This Instruction Manual should be kept with your D3.
Suunto’s dive computers and wristop computers can be registered online at www.suunto.com. Registering your unit makes it quicker and easier for us to help you if you ever need to send your product for servicing, or if you need information about using your unit from our Global Help Desk.

73
9. GLOSSARY
Altitude dive A dive made at an elevation greater than 300 m [1000 ft] above sea level.
Apnea Absence of breathing. Freedivers are apneic throughout the duration of their dive.
Ascent rate The speed at which the diver ascends toward the surface.
ASC RATE Abbreviation for ascent rate.
Ascent time The minimum amount of time needed to reach the surface on a decompression stop dive.
DAN Divers Alert Network.
DCI Abbreviation for decompression illness.
Decompression illness
Any of a variety of maladies resulting either directly or indirectly from the formation of nitrogen bubbles in tis-sues or body fl uids, as a result of inadequately controlled decompression. Commonly called ”bends” or ”DCI”.
Dive series A group of repetitive dives between which the dive comput-er indicates some nitrogen loading is present. When nitro-gen loading reaches zero the dive computer deactivates.
Dive time Elapsed time between leaving the surface to descend, and returning to the surface at the end of a dive.
74
EAN Abbreviation for enriched air nitrox.
Enriched Air Nitrox
Oxygen-Nitrogen mix, normally with more than 21% oxy-gen.
Freediver A breath-holding diver whose only source of oxygen are his lungs fi lled with surface air.
Hypercapnia Increased amount of carbon dioxide in the blood. A diver who does not rest adequately between breath-hold dives will have elevated carbon dioxide levels. This can pre-dispose hin to carbon dioxide toxicity or blackout.
Hyperventilation An increase in rate and/or volume of breathing. Carbon dioxide blood levels decrease with little corresponding increase in oxygen blood levels. If the diver engages in excessive hyperventilation, he may diminish his desire to breathe, long enough to become unconscious after a long period of apnea.
Hypoxia A condition that occurs when a diver’s tissues do not re-ceive enough oxygen. Freedivers become hypoxic when they hold their breath; they can eventually suffer blackout if they hold their breath too long.
MOD Abbreviation for Maximum Operating Depth. The maxi-m um depth at which gas is breathable with selected PO
2
limit.
75
NITROX In sports diving refers to any mix with a higher fraction of oxygen than standard air.
NOAA United States National Oceanic and Atmospheric Adminis-tration.
No-decompression time
The maximum amount of time a diver may remain at a par-ticular depth without having to make decompression stops during the subsequent ascent.
O2% Oxygen percentage or oxygen fraction in the breathing gas.
Standard air has 21% oxygen.
Oxygen partial pressure
Limits the maximum depth to which the used Nitrox mix-ture can safely be used. The maximum partial pressure limit for enriched air diving is 1.4 bar. The contingency partial pressure limit is 1.6 bar. Dives beyond this limit have the risk for immediate oxygen toxicity.
PO2 Abbreviation for oxygen partial pressure.
Repetitive dive Any dive whose decompression time limits are affected by residual nitrogen absorbed during previous dives.
Residual nitrogen The amount of excess nitrogen remaining in a diver after one or more dives.

76
Shallow - water blackout (SWB)
An unconscious state divers experience when the brain be-comes deprived of oxygen. SWB frequently happens with-out warning, causing death by subsequent drowning.
Static apnea blackout
Unconsciousness due to gradual oxygen depletion caused by holding one’s breath too long. It can occur anywhere, particularly at the surface, and is not associated with depth or pressure changes. It commonly occurs in swimming pools at the surface or during long underwater endurance swims.
SURF TIME Abbreviation for surface interval time.
Surface interval time
Elapsed time between surfacing from a dive and beginning a descent for the subsequent repetitive dive.
Whole-Body Toxicity
Another form of oxygen toxicity, which is caused by pro-longed exposure to high oxygen partial pressures. The most common symptoms are irritation in the lungs, a burning sensation in the chest, coughing and reduction of the vital capacity. Also called Pulmonary Oxygen Toxicity.

77

78

79

80Printed in Finland 03.2006 / Esa Print Oy / 160328
DISPOSAL OF THE DEVICE
Please dispose of the device in an appropriate way, treating it as electronic waste. Do not throw it in the garbage. If you wish, you may return the device to your nearest Suunto dealer.
COPYRIGHT
This publication and its contents are proprietary to Suunto Oy.
Suunto, Wristop Computer, Suunto D3, Replacing Luck and their logos are registered or unregistered trademarks of Suunto Oy. All rights reserved.
While we have taken great care to ensure that information contained in this documentation is both comprehensive and accurate,
no warranty of accuracy is expressed or implied.Its content is subject to change at any time without notice.
MODES AND OPERATIONSSUUNTO
modelightexit
SELECT
selectnext
MODE
S
Date
of
pu
rch
ase
Se
ria
ln
um
be
r:M
od
el
of
Co
mp
ute
r:
Pla
ce
of
pu
rch
ase
/Sto
re n
am
e
Sto
re C
ity
Sto
re C
ountr
y
Sto
re s
tam
p w
ith
date
of
pu
rch
ase
Na
me
Ad
dre
ss
Cit
y
Te
lep
ho
ne
Co
un
try
Sig
natu
re
E-m
ail

TW
O Y
EA
R W
AR
RA
NT
Y
Th
is p
rod
uc
t is w
arra
nte
d to
be
free
of
de
fec
ts in
mate
rial a
nd
/or w
ork
ma
nsh
ip to
the o
rigin
al o
wner fo
r the a
bove
note
d p
erio
d(d
oes n
ot in
clu
de b
atte
ry life
). Keep a
copy
of th
e o
rigin
al p
urc
ha
se
rec
eip
t an
d m
ake
su
re to
ge
t this
wa
rran
ty c
ard
sta
mp
ed
at
the
p
lac
e o
f p
urc
ha
se
. T
he
w
arra
nty
orig
inate
s fro
m th
e d
ate
of p
urc
ha
se
.
All w
arra
ntie
s a
re lim
ited
an
d a
re s
ub
jec
tto
the
restric
tion
s g
ive
n in
the
instru
ctio
nm
an
ua
l. Th
is w
arra
nty
do
es n
ot c
ove
r the
da
ma
ge
to
th
e p
rod
uc
t re
su
lting
fro
mim
pro
pe
r usa
ge
, imp
rop
er m
ain
ten
an
ce
,ne
gle
ct o
f care
, alte
ratio
n, im
pro
per b
atte
ryre
pla
cem
ent o
r unauth
orize
d re
pair. S
uunto
’sdiv
e c
om
pute
rs a
nd w
risto
p c
om
pute
rs c
an
be
reg
iste
red
on
line
at w
ww
.su
un
to.c
om
.

www.suunto.com
Made in Finland© Suunto Oy 06 / 2004, 03 / 2006