Embed Size (px)
Citation preview

CycleCloud Quick Start Guideversion 5.5.1

Contents
CycleCloud Quick Start Guide 1Welcome 1
System Prerequisites 1
AWS Prerequisites 1Generating SSH keys 2
Additional Cloud Providers 2Using this Quick Start for GCP 2
Using this Quick Start for Azure 2
Installation 3Download 3
Install 3
Configuration 3Initial Setup Wizard 4
Add Cloud Provider Account 7
Cluster Creation 7Select a Configuration 8
Specify Configuration 8
Cluster Initialization and Data Configuration 11
Starting the Cluster 13
Submitting Jobs to the HTCondor Cluster 14
Terminating the Cluster 15
Conclusion 15

CycleCloud Quick Start Guide
WelcomeThe purpose of this document is to provide a step-by-step guide to setting up an auto-scalingbatch cluster in Amazon AWS using CycleCloud. After completing the steps in this guide, youwill have a fully functional HTCondor cluster that can automatically scale according to thedemands of your application. The demonstration performed in this guide uses the HTCondorcluster to calculate a Newtonian approximation of Pi.
This Quick Start Guide assumes that you will be running CycleCloud on a 64-bit Linuxmachine and that you are familiar with basic system administration concepts and tools. Theguide assumes that you already have an Amazon AWS account, have access to the AWSconsole, and are not behind a firewall that will block direct access to AWS services.
System PrerequisitesTo complete the instructions in this guide, you must have root or sudo access. In addition,your system needs to meet the following minimum requirements:
• Linux 64-bit operating system (Centos 6, Ubuntu 12.04 LTS, Ubuntu 14.04 LTS, etc.)• 8GB System Memory• 10GB Free Disk Space
Note
CycleCloud may be installed on physical or virtualized hardware.
AWS PrerequisitesTo complete this Quick Start Guide for CycleCloud, you will need to have the following:
• Amazon EC2 Access Key and Secret Key. If you do not have these, contact your systemadministrator or follow the instructions provided in the AWS Documentation.
• Amazon EC2 Key Pair. This file, usually stored with a .pem extension, is used to log in toinstances. It should be available locally on your machine. Please note the location of thisfile for use later in the document. If you do not have a key pair, please contact yoursystem administrator or follow the instructions here.
1

Generating SSH keysTo generate your own SSH key, run the following set of commands:
# Ensure your .ssh directory exists$> mkdir -p ~/.ssh# Generate the key pair$> ssh-keygen -f ~/.ssh/cyclecloud -t rsa -b 2048# Do not enter a passphrase to allow CycleCloud's automated processes to work.# Rename the private key to have a .pem extension$> mv ~/.ssh/cyclecloud ~/.ssh/cyclecloud-private.pem
Once you have generated the SSH key pair:
• Log in to AWS console• Go to the EC2 Dashboard• Select Key Pairs• Import the public key “cyclecloud.pub”
Warning
Use phraseless SSH key
If you enter a passphrase when generating your SSH key, the return proxy feature ofCycleCloud will not work, which may cause node reporting and autoscaling to fail.
Additional Cloud ProvidersThis quick start is oriented towards running in AWS. To use it for other cloud providers (GCPor Azure) you will need to configure an account for the specific provider and make someminor changes to the instructions.
Using this Quick Start for GCPYou can follow these instructions for creating and configuring a GCP Account for use withCycleCloud. When setting up your Cloud Provider Account you will select ‘Google CloudPlatform’ and enter your Account Email and Private Key.
Using this Quick Start for AzureYou can follow these instructions for creating and configuring an Azure Account for use withCycleCloud. When setting up your Cloud Provider Account you will select ‘Microsoft Azure’and enter your Subscription ID, Certificate and Storage Account.
2

Installation
DownloadYou should have received a download link from Cycle Computing to access the installer.Click the link in the email and download the installer to your local hard drive. For theremainder of this section, we assume you have saved the installer to $HOME/Downloads.
InstallTo begin the installation, open a terminal session and unpack the CycleCloud installationusing the following command:
$> tar zxf ~/Downloads/cycle_server-cloud-latest-linux64.tar.gz -C /tmp
This will unpack the CycleCloud installation to /tmp/cycle_server. Once the CycleCloudinstaller is unpacked, execute the following commands to install CycleCloud:
$> cd /tmp/cycle_server$> sudo ./install.sh
Note
You must have write permission to the /opt directory. The CycleCloud installer willcreate a cycle_server user and unix group, install into the/opt/cycle_server directory by default, and assigncycle_server:cycle_server ownership to the directory.
Once the installer has finished running, the terminal session will provide a link to complete theinstallation from your browser. Copy the link provided into your web browser.
ConfigurationAfter CycleCloud is installed, it is configured through a web browser.
3

Initial Setup Wizard
Step 1 - Welcome
Enter a Site Name, Accound ID, and Password, then click "Next".
4
Step 2 - License Agreement
Accept the license agreement and click “Next”.
5

Step 3 - Administrator Account
At this step in the process, you will set up the local administrator account for CycleCloud. Thisaccount is used to administer the CycleCloud application and is not an operating systemaccount. Enter in the desired values and click “Done” to continue. For the remainder of thisguide, we assume the account's user ID is "admin".
Enter License
You received an email with a license and your download link. Copy the license string from theemail and paste it into the form. Click “Install License” to continue.
6
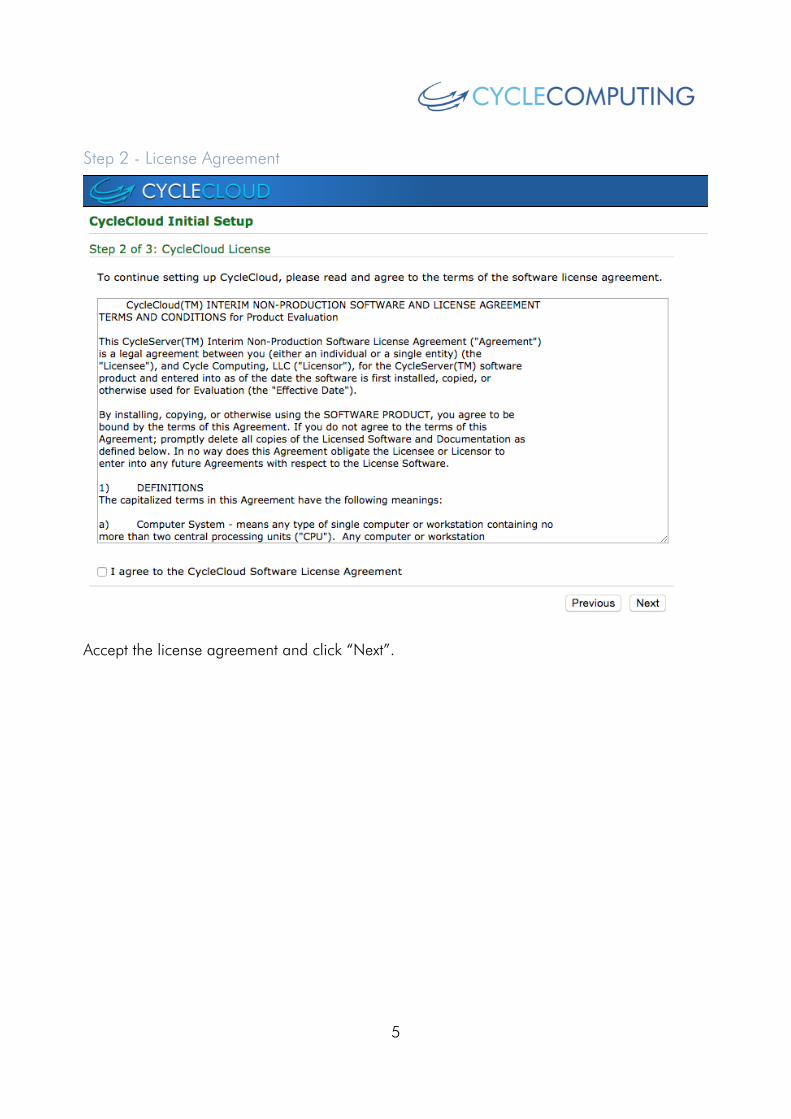
You will see confirmation that the license has been successfully installed.
Add Cloud Provider AccountClick on the “Clusters” menu at the top of the screen to set up your cloud provider account.You will be notified that there are no cloud provider accounts currently set up and provided alink to set up your credentials.
Click the link to add your cloud provider account.
Enter a name for your cloud provider credentials. This is a descriptive name such as “My AWSAccount.” From the drop-down, select “Amazon” and enter your Default Region, Access Key,and Secret Key. If you do not know, or have not generated your AWS credentials, please visitthe AWS Security Credentials documentation to learn how to create your keys.
Enter a Default Bucket name to use for storing your configuration and application datafor your cluster. If it does not already exist, the bucket will be created. Please remember tofollow S3 bucket naming conventions and note that bucket names must be unique. For moreinformation, please visit the AWS Bucket Restrictions documentation for more information.
Once you have completed setting the parameters for your cloud provider account, click“Save” to continue.
CycleCloud is now configured and you are ready to create your first cluster.
Cluster CreationTo add your first cluster to CycleCloud, click the “Clusters” menu in the top level menu. Sincethere are no existing clusters defined, you will be prompted to add a new cluster.
7

Select a ConfigurationClick the “HTCondor” logo from the list of cluster templates. Cluster templates arepre-configured infrastructure definitions that encapsulate the composition and basic attributesof compute environments. These templates can be easily modified by system administratorsand end users to create standard deployments. Cycle Computing supports numerouspre-configured application environments common in industries including life sciences,manufacturing, finance, and more.
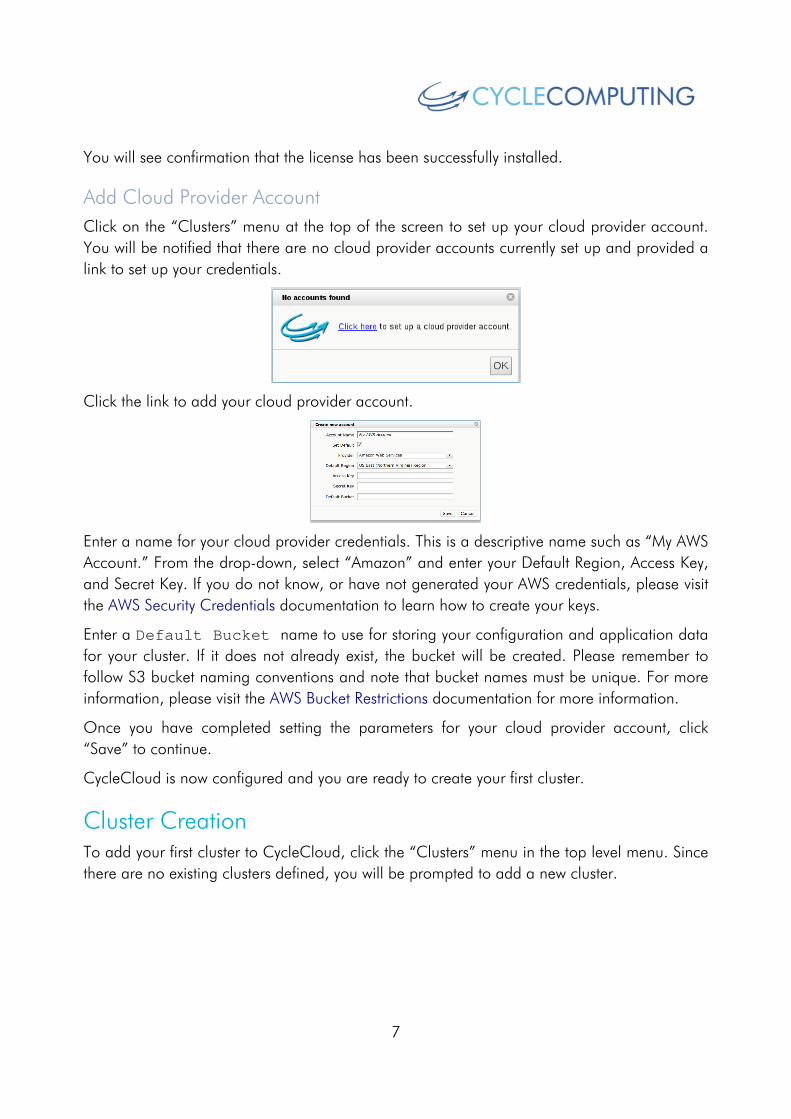
Specify ConfigurationThe cluster templates described in the last section include various parameters that control thecompute cluster’s infrastructure, scaling behavior, and provisioning options. The user interfacefor modifying cluster parameters is data-driven and can be easily customized to adapt tospecific customer requirements. The configuration for the HTCondor cluster type is depictedbelow. Duplicate the cluster parameter settings and then click "save" to create theconfiguration. Your AWS Keypair name will match the name of the keypair imported into AWSearlier.
8

9
Cluster parameters
Parameter Description
Cluster Name The name of the cluster.
10

Credentials Select the credentials created during the 'Add Provider Account'step.
AWS Keypair The public key name imported into AWS earlier.
Keypair Path The location on the machine running CycleCloud where yourprivate key is stored.
Manager OS The operating system to use for the scheduler. For this guide, selectCentOS 6.
Execute OS The operating system to use for the execute nodes. For this guide,select CentOS 6.
Cluster-init The folder in the account bucket associated with your clustercredentials. The process of initialization is discussed in the nextsection. For this guide, enter 'pi'.
CM Type The machine type to use for the scheduler. For this guide, selectm3.large, 2 cores.
Execute Type The machine type to use for the execute nodes. For this guide,select m3.large.
Autoscale Select this checkbox to allow your cluster to dynamically scale-upand scale-down with the workload.
Initial Cores The number of execute cores to start when the cluster is started.When set to ‘0’, it instructs CycleCloud not to start execute nodeson cluster start.
Max Cores The maximum number of execute cores to autostart.
Use Spot Instances When checked, the execute nodes are spot instances. Whenunchecked, the execute nodes are on-demand instances.
Networking Options for Amazon's Virtual Private Cluster service. For this guide,leave blank.
Cluster Initialization and Data ConfigurationYour installation includes a limited version of DataMan, Cycle Computing’s award-winningdata orchestration tool. DataMan provides high-throughput data transfer and orchestrationcapabilities to a variety of user-defined endpoints. For the purposes of this guide, you willconfigure DataMan to set up the cluster’s application executables and data.
11
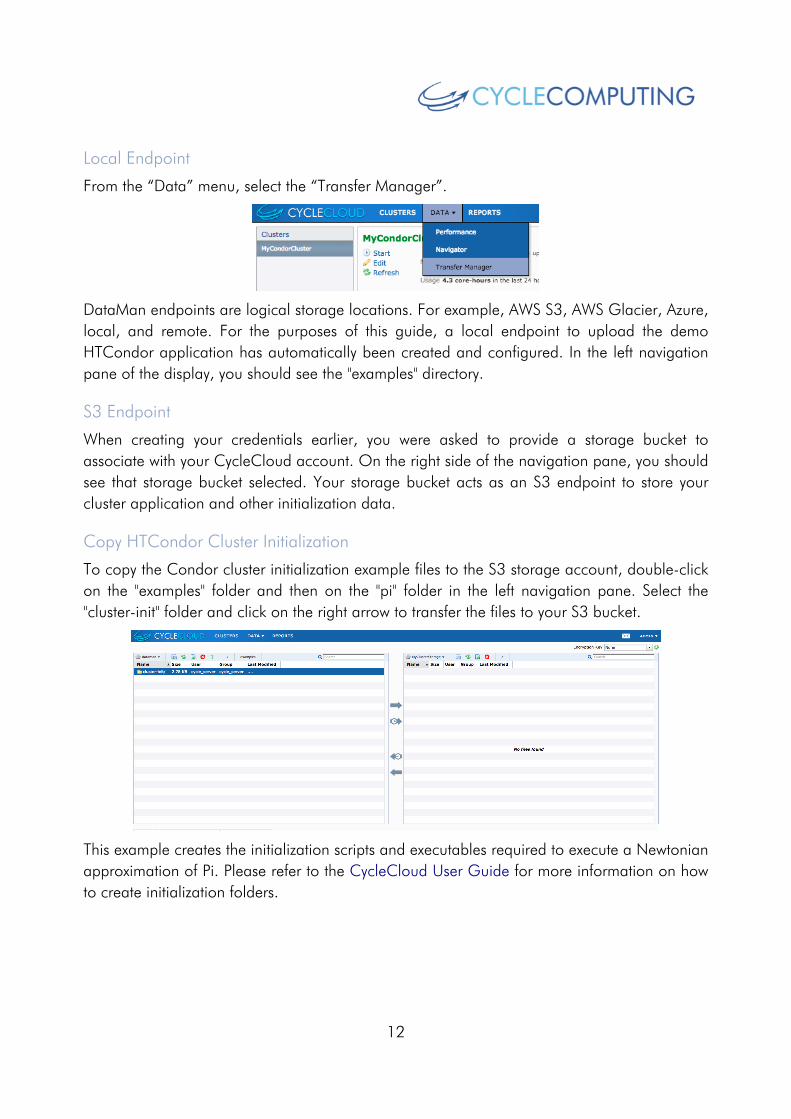
Local Endpoint
From the “Data” menu, select the “Transfer Manager”.
DataMan endpoints are logical storage locations. For example, AWS S3, AWS Glacier, Azure,local, and remote. For the purposes of this guide, a local endpoint to upload the demoHTCondor application has automatically been created and configured. In the left navigationpane of the display, you should see the "examples" directory.
S3 Endpoint
When creating your credentials earlier, you were asked to provide a storage bucket toassociate with your CycleCloud account. On the right side of the navigation pane, you shouldsee that storage bucket selected. Your storage bucket acts as an S3 endpoint to store yourcluster application and other initialization data.
Copy HTCondor Cluster Initialization
To copy the Condor cluster initialization example files to the S3 storage account, double-clickon the "examples" folder and then on the "pi" folder in the left navigation pane. Select the"cluster-init" folder and click on the right arrow to transfer the files to your S3 bucket.
This example creates the initialization scripts and executables required to execute a Newtonianapproximation of Pi. Please refer to the CycleCloud User Guide for more information on howto create initialization folders.
12

Starting the ClusterYou have created a cluster definition for an HTCondor cluster and initialized the applicationsand data required to begin working with the cluster. To start the cluster, select “Clusters” fromthe top navigation menu, and select “MyCondorCluster” in the cluster list on the left side.Click "Start" to provision your new cluster.
When you start the cluster, CycleCloud will begin the process of provisioning yourinfrastructure in AWS. You can view the progress of the provisioning process by viewing the"Details" window in the lower right-hand side of the screen.
When the process completes, you will see the "master" node status turn green, indicating"Ready". At any point in the process, you can hover your mouse over the instances to seepop-up text that indicates the current status of the node.
13

Submitting Jobs to the HTCondor ClusterTo connect to your running cluster, select the "master" node in the lower detail pane and clickthe "Connect" button.
This will launch a window with instructions for connecting to the instance.
Copy and paste the SSH command into a terminal to connect to the instance.
To submit the workload, use the condor_submit command:
$> sudo su - cluster.user$> cd demos/pi$> condor_submit pi.sub
This will submit 1000 iterations of a simple Newtonian approximation of Pi. Initialy, noexecute nodes have been started to run the workload. In the background, CycleCloud ismonitoring the HTCondor scheduler. When idle jobs are in the queue, CycleCloud willrequest execute nodes. You can monitor the actions of CycleCloud in the status window in the
14

lower right panel of the Cluster page. For the configuration provided in this guide, you canexpect CycleCloud to provision five execute nodes to run the workload. Near the end of thebilling hour, if the nodes have been idle for at least 20 minutes, CycleCloud will request thatthe execute nodes be terminated.
To view the current status of the HTCondor cluster, you may find the following commandshelpful.
To list cluster nodes:
$> condor_status
To view job status:
$> condor_q
Terminating the ClusterWhen your workfow is completed, you can terminate the cluster. From the Clusters page,select the "MyCondorCluster" cluster in the left-hand navigation pane. Click the "Terminate"button.
ConclusionThrough the course of this Quick Start Guide, you have installed CycleCloud, created aworking HTCondor cluster, and submitted and executed a simple workflow. This guide,however, only scratches the surface on what CycleCloud can do. CycleCloud can beconfigured to handle virtually any workflow and can be tailored to integrate with mostenterprise configurations. For advanced configurations, in-depth examples, and customimplementations, please consult the User Guide and Administrator Guide or [email protected] for more information.
15