Embed Size (px)
Citation preview

CVP Media Server
• About CVP Media Server, page 1
• Prepare a Media Server, page 1
• Add and Configure Media Servers in CVP, page 3
• Reference a Media Server in CCE Scripts, page 3
About CVP Media ServerMany of the optional features in Packaged CCE require a Cisco Unified Customer Voice Portal (CVP) mediaserver to store and serve supporting .wav files. This chapter describes how to set up a CVP media server. Italso describes expanded call variable settings related to the media server and requirements for accessing amedia server in call routing scripts.
The features that require a CVP media server include Agent Greeting, Courtesy Callback, Post-Call Survey,and Whisper Announcement.
Prepare a Media ServerA media server is installed by default on each of the four CVP servers in a Packaged CCE deployment.
Procedure
Step 1 Ensure that IIS is properly configured and running on the server. It must be listening on port 80. To validateproper configuration of the media server, launch a browser from a remote machine that is able to ping theCVP server and attempt to access and play one of the default media files installed during the CVP installationsuch as http://<cvp_ip>/en-us/app/en_1.wav. If the file is accessible, the media server is installed correctly.
Use Microsoft IIS with Unified CVP. This component is automatically installed as part of the CVPserver package installation.
Note
Step 2 Ensure the server is accessible to CVP, Unified CCE, and your agent desktops.Step 3 Perform the following steps:
a) On the taskbar, click Start, point to Administrative Tools, and then click Server Manager.b) In the Server Manager hierarchy pane, expand Roles, and then clickWeb Server (IIS).
Cisco Packaged Contact Center Enterprise Features Guide, Release 10.0(x) 1
c) In theWeb Server (IIS) pane, scroll to the Role Services section, and then click Add Role Services.d) On the Select Role Services page of the Add Role Services wizard, expand FTP Server.e) Select FTP Service
To support ASP.NET membership or IIS Manager authentication for the FTP service, you needto select FTP Extensibility.
Note
f) Click Next.g) On the Confirm Installation Selections page, click Install.h) On the Results page, click Close.i) In the sites section, click Add FTP Site. Provide a site name and path to the same location as the http
directory c:\inetpub\wwwroot.j) Select your desired binding method, and specify to start immediately.k) On the FTP SSL Settings, select Allow SSL Connections.l) On the Authentication and Authorization section select the type of authentication required. If using
basic, note the name and password of the account.m) Select the authorization; for anonymous select Anonymous users.n) Set the read and write permissions.
Make note of your FTP connection information -- connection type, user name, password, andport number.
Note
Step 4 Make sure that the FTP and the IIS share the same root directory, because the recording application writesthe file to the media server directory structure, and the greeting playback call uses IIS to fetch the file. Theen-us/app directory should be under the same root directory for FTP and IIS.
Step 5 Create a dedicated directory on the server to store your greeting files. This lets you specify a lower cachetimeout of 5 minutes for your agent greeting files that does not affect other more static files you may be servingfrom other directories. By default, the Record Greeting application posts the .wav file to the en-us/appdirectory under your web/ftp root directory. You may create a dedicated directory such as ag_gr under theen-us/app directory, and then indicate this in the Unified CCE script that invokes the recording application.Use the array for the expanded call variable call.user.microapp.ToExtVXML to send the ftpPath parameterto the recording application.Make sure the expanded call variable length is long enough, or it may get truncatedand fail.
Step 6 To allow re-recorded greetings to replace their predecessor in a reasonable amount of time while minimizingrequests for data to the media server from the VXML Gateway, configure a cache expiration value in IISManager. The ideal value varies depending on the number of agents you support and how often they re-recordtheir greetings. Two minutes may be a reasonable starting point.To configure a cache expiration value in IIS Manager:a) Find the site you are using, go to the agent greeting folder you created (ag_gr), and then select HTTP
Response Headers.b) Click Set Common Headers on Actions panel.c) Select Expire Web Content and set the desired value.
What to Do Next
After specifying the cache timeout, it is a good idea to clear the cache on the VXML Gateway. This ensuresthe gateway requests the latest files from the media server. You need only clear the gateway cache once. Opena command prompt on the CVP VXML Gateway, log into IOS, and enter the following command:
my_server(config)# clear http client cache
Cisco Packaged Contact Center Enterprise Features Guide, Release 10.0(x)2
CVP Media ServerPrepare a Media Server
The HTTP client response timeout setting on the gateway must be greater than the time it takes to completethe largest anticipated FTP file transfer. If an FTP file transfer takes longer than the configured duration inseconds for HTTP client response timeout, the FTP transfer completes correctly, but the call drops as soonas the configured timeout duration is met. To change the HTTP client response timeout setting, open a commandprompt on the CVP VXML Gateway, log into IOS, and enter the following commands:
my_server# conf t
my_server(config)# http client response timeout <new value in seconds>
my_server(config)# exit
my_server(config)# wr
By default, the HTTP client response timeout value for CVP VXML Gateway is 30 seconds.
Add and Configure Media Servers in CVPYou can add one or more servers to CVP to act as media servers. If you add multiple media servers, note thefollowing:
• CVP automatically propagates files that are added to one media server out to all media servers in thelist that have FTP enabled. To enable FTP on a media server, use the following procedure.
• You can designate one media server as the default. If a default media server is defined, requests for filesare automatically sent to that server without your having to specify that server in your routing scripts.
Procedure
Step 1 Access the CVP Operations Console by typing https://<OAMP_server_IP>:9443/oamp.Step 2 At the CVP Operations Console, select Device Management >Media Server.Step 3 Add a server to the list of CVP media servers.Step 4 Select FTP Enabled.Step 5 Configure the credentials and port settings that will permit CVP to write files to the server using FTP.Step 6 Optionally, you can designate one of your media servers as the Default Media Server.Step 7 Click the Deploy button to deploy the list of media servers to your CVP Call Servers.
Note: If you deploy the list of media servers and then designate a default, you must redeploy the list.
Reference a Media Server in CCE Scripts
Specify Media Server in Routing ScriptsWhen you configure media servers in CVP, you can specify a default media server. The benefit to specifyinga default media server is that your scripts do not need a Set Variable node to access the default media server.For this to work, you must make sure that the files a script requests are stored on the default server.
Cisco Packaged Contact Center Enterprise Features Guide, Release 10.0(x) 3
CVP Media ServerAdd and Configure Media Servers in CVP
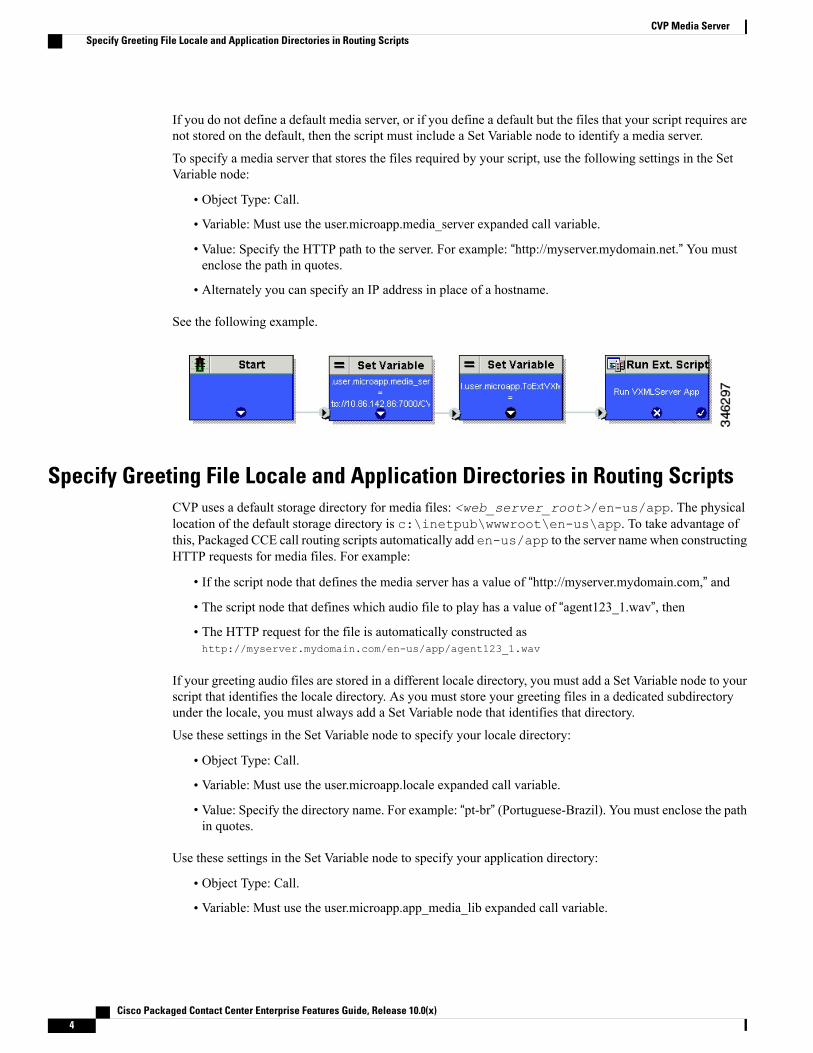
If you do not define a default media server, or if you define a default but the files that your script requires arenot stored on the default, then the script must include a Set Variable node to identify a media server.
To specify a media server that stores the files required by your script, use the following settings in the SetVariable node:
• Object Type: Call.
• Variable: Must use the user.microapp.media_server expanded call variable.
• Value: Specify the HTTP path to the server. For example: “http://myserver.mydomain.net.” You mustenclose the path in quotes.
• Alternately you can specify an IP address in place of a hostname.
See the following example.
Specify Greeting File Locale and Application Directories in Routing ScriptsCVP uses a default storage directory for media files: <web_server_root>/en-us/app. The physicallocation of the default storage directory is c:\inetpub\wwwroot\en-us\app. To take advantage ofthis, Packaged CCE call routing scripts automatically add en-us/app to the server name when constructingHTTP requests for media files. For example:
• If the script node that defines the media server has a value of “http://myserver.mydomain.com,” and
• The script node that defines which audio file to play has a value of “agent123_1.wav”, then
• The HTTP request for the file is automatically constructed ashttp://myserver.mydomain.com/en-us/app/agent123_1.wav
If your greeting audio files are stored in a different locale directory, you must add a Set Variable node to yourscript that identifies the locale directory. As you must store your greeting files in a dedicated subdirectoryunder the locale, you must always add a Set Variable node that identifies that directory.
Use these settings in the Set Variable node to specify your locale directory:
• Object Type: Call.
• Variable: Must use the user.microapp.locale expanded call variable.
• Value: Specify the directory name. For example: “pt-br” (Portuguese-Brazil). You must enclose the pathin quotes.
Use these settings in the Set Variable node to specify your application directory:
• Object Type: Call.
• Variable: Must use the user.microapp.app_media_lib expanded call variable.
Cisco Packaged Contact Center Enterprise Features Guide, Release 10.0(x)4
CVP Media ServerSpecify Greeting File Locale and Application Directories in Routing Scripts
• Value: Specify the directory name. For example: to use a directory “greet” in place of the default directory“app”, enter “greet”. To use a sub-directory “greet” under “app” enter “app/greet”. You must enclose thepath in quotes.
Verify Length for Media Server Locale and Application Directory VariablesIf you include Set Variable nodes for the media server, locale, and/or application directories, make sure thatthe values you set for them do not exceed the Maximum Length settings for their corresponding expandedcall variables.
For example, if you include a Set Variable node for the media server with a value of“http://mysubdomain.mydomain.co.uk”, the string is 33 characters long. Therefore, the Maximum Lengthsetting for the user.microapp.media_server expanded call variable must be 33 or greater. Otherwise, the servername is truncated in the HTTP request for the file and the file is not found.
Cisco Packaged Contact Center Enterprise Features Guide, Release 10.0(x) 5
CVP Media ServerVerify Length for Media Server Locale and Application Directory Variables

Cisco Packaged Contact Center Enterprise Features Guide, Release 10.0(x)6
CVP Media ServerVerify Length for Media Server Locale and Application Directory Variables