Embed Size (px)
Citation preview

Customize CRM on your own
Setup Company Details
You can personalize the application by uploading your Company logo and details to your result, company logo appears on your home page.templates and Inventory tools such as Quotes
Steps to update your Company details in CRM
Go to CRM Settings Icon > On-Demand Adminand click Save.
Steps to upload your company logo in CRM
Go to Branding > Change logo, click Choose Filechanges.
Customize CRM on your own
You can personalize the application by uploading your Company logo and details to your result, company logo appears on your home page. Also, your company logo and address can be used in email
Quotes and Invoice, when exported to PDF files.
CRM:
Demand Admin > Company. Fill up the fields in Company Details
CRM service:
Choose File to browse for your company logo and click
You can personalize the application by uploading your Company logo and details to your CRM service; as a Also, your company logo and address can be used in email
Company Details block
to browse for your company logo and click Upload to save

To enter your company data in CRM open source
under Communication Templates block). Fill up the fields in company logo and click Save to save your details. Make surcompany logo.If you use GIF or PNG format, just change the extension to JPEG because it is required for its use in PDF files.
Choose Modules
CRM includes a flexible framework with over 20 modules covering Projects, Calendar and more. Using the Module Managerfor each module. You can also import new modules from the
Steps to configure modules in CRM: Go to CRM Settings Icon Click on green tick mark icon, highlighted below, to disable the module(s) that you would not plan to use.
Click on red cross mark icon, highlighted below, to enable the module.
CRM open source, go to Settings > Company Details block). Fill up the fields in Company Details block, browse for your
to save your details. Make sure that you upload .jpg or .JPEG images as your company logo.If you use GIF or PNG format, just change the extension to JPEG because it is required for its
includes a flexible framework with over 20 modules covering Sales, Support, Marketing, Inventory, Module Manager, you can enable, disable and configure the settings
You can also import new modules from the Module Manager.
to CRM Settings Icon > CRM Settings > Module ManagerClick on green tick mark icon, highlighted below, to disable the module(s) that you would not plan to use.
Click on red cross mark icon, highlighted below, to enable the module.
(This can be found
block, browse for your e that you upload .jpg or .JPEG images as your
company logo.If you use GIF or PNG format, just change the extension to JPEG because it is required for its
Sales, Support, Marketing, Inventory, , you can enable, disable and configure the settings
Module Manager. Click on green tick mark icon, highlighted below, to disable the module(s) that you would not plan to use.

If you want to limit certain modules to only some users, you can use section.
Configure Fields
Fields
CRM offers a set of default fields. You can add new custom fields, remove fields inside and across blocks.
Steps to configure fields in CRM:
1. Go to Settings > Module Manager.2. Click on module settings icon, highlighted below, at extreme right of e3. Click layout editor.
Configure a specific field; for instance, Organizations
If you want to limit certain modules to only some users, you can use Profiles in the Users Management
You can add new custom fields, re-arrange fields, edit field properties, and
Module Manager. Click on module settings icon, highlighted below, at extreme right of each module.
Organizations
Users Management
arrange fields, edit field properties, and
ach module.

Now click Layout Editor
Re-arrange fields
You can re-arrange fields within a block using the arrows provided for each field as shown below.
Edit field properties
You can change some of the properties of a field by clicking on the edit icon provided for each field.
arrange fields within a block using the arrows provided for each field as shown below.
You can change some of the properties of a field by clicking on the edit icon provided for each field.
arrange fields within a block using the arrows provided for each field as shown below.
You can change some of the properties of a field by clicking on the edit icon provided for each field.

Mandatory field This field will be made mandatory for the Users to fill in. Active If enabled, displays the field or else hides the field. Quick Create The field is available in the quick create of the module. Mass Edit If enabled, the field is available for mass edit. Default Value Used to set a default value in a field.
Some Checkboxes are disabled in some fields, because their properties cannot be edited (which otherwise can lead to inconsistency in the CRM).
Add custom fields
You can add custom fields to any block by clicking on the icon highlighted below.
Move fields
This field will be made mandatory for the Users to fill in. s the field or else hides the field.
The field is available in the quick create of the module. If enabled, the field is available for mass edit. Used to set a default value in a field.
disabled in some fields, because their properties cannot be edited (which otherwise
You can add custom fields to any block by clicking on the icon highlighted below.
disabled in some fields, because their properties cannot be edited (which otherwise

You can move fields from one block to another.will appear which will show the list of fields from other blocks.changes.
Blocks
Blocks contain set of custom Fields. You can hide the unwanted blocks.block and place it at any desired location among blocks.
For instance, create new block 'More info', next to Contact information block.
Modify Picklist Values
As the name itself says, picklist is a dropdown field with list of options available, within which, only one option can be selected. For instance, Lead status
move fields from one block to another. When you click move-field Icon, highlighted below, a popup will appear which will show the list of fields from other blocks. You can select field(s) and click
You can hide the unwanted blocks. Also, you can create a new custom block and place it at any desired location among blocks.
For instance, create new block 'More info', next to Contact information block.
As the name itself says, picklist is a dropdown field with list of options available, within which, only one Lead status in Leads module. Picklist Editor can be used to customize the
field Icon, highlighted below, a popup You can select field(s) and click Apply to save
Also, you can create a new custom
As the name itself says, picklist is a dropdown field with list of options available, within which, only one can be used to customize the

picklist values in different modules. Select a role before performing global actions such as add, edit and, delete; as the picklist values vary across roles.
Steps to customize your picklist values in CRM
Go to Settings > Picklist Editor(This can be found unde
To customize picklist, select desired module from picklist dropdown displays respective picklist fields (available for that module. This dropdown can be used to select the picklist field for performing global actions.
Add new values to picklist
1. Click on the Add button next to the 2. This will bring up a popup with the existing 3. You can add new values in textarea on top
popup accordingly. 4. Click Save to save your changes.
You can add multiple values and assign multiple role
Select a role before performing global actions such as add, edit and, delete; as the picklist values vary across roles.
CRM:
(This can be found under studio block)
To customize picklist, select desired module from Select Module dropdown (ex:Leads); consequently, dropdown displays respective picklist fields (Industry, Lead Source, Lead Status, Rating
This dropdown can be used to select the picklist field for performing global actions.
button next to the Select picklist dropdown. This will bring up a popup with the existing picklist values displayed on the left-hand side. You can add new values in textarea on top-right and assign role(s) on right hand lower side of the
You can add multiple values and assign multiple roles at the same time
Select a role before performing global actions such as add, edit and,
); consequently, Select Rating, Salutation)
This dropdown can be used to select the picklist field for performing global actions.
hand side. right and assign role(s) on right hand lower side of the

For instance, add 'newValue' to Lead source
If you don't select any role for the new picklist values, they will be present in the picklist values but not displayed for any role (other than admin).
Edit picklist values
1. Click on the Edit button next to the 2. This will bring up a popup with the existing picklist values in select box. 3. select a picklist value you intend to edit. 4. you can edit the picklist value in the textbox below the existing picklist values. 5. Once you are done with the changes, click on the
Lead source field in Leads module
If you don't select any role for the new picklist values, they will be present in the picklist values but not
button next to the Select picklist dropdown. This will bring up a popup with the existing picklist values in select box. select a picklist value you intend to edit.
value in the textbox below the existing picklist values. Once you are done with the changes, click on the Apply button to save your changes to the picklist.
If you don't select any role for the new picklist values, they will be present in the picklist values but not
button to save your changes to the picklist.

It cannot be replaced with empty value
Delete existing picklist values
1. Click on the Delete button next to the 2. This will bring up a popup with existing picklist values. 3. Delete one or multiple values and select a value from
with that name.
You cannot select a blankvalue for replacement
For example, delete picklist values(Partner,Public Relations,Direct Mail,other) and replace with 'Other'.
button next to the Select picklist dropdown. This will bring up a popup with existing picklist values. Delete one or multiple values and select a value from Replace with dropdown, to replace all the values
select a blankvalue for replacement
For example, delete picklist values(Partner,Public Relations,Direct Mail,other) and replace with 'Other'.
dropdown, to replace all the values
For example, delete picklist values(Partner,Public Relations,Direct Mail,other) and replace with 'Other'.

Deleted picklist values will be replaced with another value.moved to newly defined value.
You should have at least one value in picklist.
CRM also allows users to create new custom picklist fields using Custom Fields.
Steps to create new custom picklist field in
1. Go to Settings > Module Manager
2. Click on module settings icon, highlighted below, at extreme right of each module.
Deleted picklist values will be replaced with another value. The information stored in deleted values
least one value in picklist.
also allows users to create new custom picklist fields using Custom Fields.
Steps to create new custom picklist field in CRM:
Click on module settings icon, highlighted below, at extreme right of each module.
The information stored in deleted values will be

3. Click on Layout Editor
4. Click on add custom field icon, highlighted below.
5. Select field type as Pick List on left hand side, provide a picklist name in values in Pick list Values textarea on right
Click on add custom field icon, highlighted below.
on left hand side, provide a picklist name in Label on top- hand lower side of the popup.
-right, and provide

Setup Users
CRM provides a dynamic role-based security.restricting user's access to specific modules, fields and to each other's data.control access to specific records and by using those records. CRM system offers a privilege system that is based upon the following simple looking rules:
Who can view certain record? Who can edit certain record? Who can delete certain record? Who can create certain record?
Configure Module Level Sharing Rules
You can configure module specific sharing rules with user's access on records with-in a module. Sharing can be set to public (all users view all the records in the module), or private (only users with higher role than the record owner will be able to view the record).
The table explains different options in
Private Only the owner and the users with higher role than the owner can access the records
Public (Read Only) Other users can read, but cannot edit and delete records.
Public (Read, Create/Edit)
Other users cannot delete, but can read, create and edit all records
Public (Read, Create/Edit, Delete)
All Users can do all operations on all records of this module setting for all modules (except Calendar)
Steps to configure module specific sharing rules in
based security. Managing users is done for the purpose of security by restricting user's access to specific modules, fields and to each other's data. Using Roles, administrators can control access to specific records and by using Profiles, they can control the actions the users can perform on
system offers a privilege system that is based upon the following simple looking rules:
Sharing Rules
You can configure module specific sharing rules with Sharing Access. You can be able to hide or restrict Sharing can be set to public (all users view all the records in the
users with higher role than the record owner will be able to view the record).
The table explains different options in Sharing Access:
Only the owner and the users with higher role than the owner can access the
Other users can read, but cannot edit and delete records.
Other users cannot delete, but can read, create and edit all records
All Users can do all operations on all records of this module setting for all modules (except Calendar)
Steps to configure module specific sharing rules in CRM:
purpose of security by , administrators can
, they can control the actions the users can perform on system offers a privilege system that is based upon the following simple looking rules:
You can be able to hide or restrict Sharing can be set to public (all users view all the records in the
users with higher role than the record owner will be able to view the record).
Only the owner and the users with higher role than the owner can access the
Other users cannot delete, but can read, create and edit all records
All Users can do all operations on all records of this module - this is the default

Go to Settings > Sharing Access > Change Privileges
Select desired setting for each module.
Click Save Permissions and then click Recalculate.
Administrators can also set Custom Sharing Rulesand options do not cover their needs. By using of higher hierarchy accessible to role at lower hierarchy.
Configure Profiles
Change Privileges.
Recalculate.
Custom Sharing Rules from the Sharing Access page, if the module specific rules By using Custom Sharing Rules, admin user can make certain modules
of higher hierarchy accessible to role at lower hierarchy.
page, if the module specific rules , admin user can make certain modules

Profiles can be used to regulate user's access on modules, fields, and records within them.can set the user privileges to delete, create/edit or view data.in ensuring security by limiting the activities on records.are always superior to the other privilege settings.defined profiles (ex: 'Administrator') which you can use and change but not delete.
List of profiles in CRM
Click the name of a profile to see the detailsa new profile click the New Profile button at the list view.
Create new profile
Profiles can be used to regulate user's access on modules, fields, and records within them. can set the user privileges to delete, create/edit or view data. Like Sharing Access, profiles also play vital role in ensuring security by limiting the activities on records. Please note that the settings of the global privileges
o the other privilege settings. Roles are based on profiles.CRM comes with a set of pre(ex: 'Administrator') which you can use and change but not delete.
Click the name of a profile to see the details. You may change the profile by clicking the Editbutton at the list view.
With profiles you , profiles also play vital role
Please note that the settings of the global privileges comes with a set of pre-
Edit button. To create

Edit modules in a profile

Edit fields in a profile
You can edit fields in a module by clicking on icon highlighted below. You can edit fields in a module by clicking on icon highlighted below.
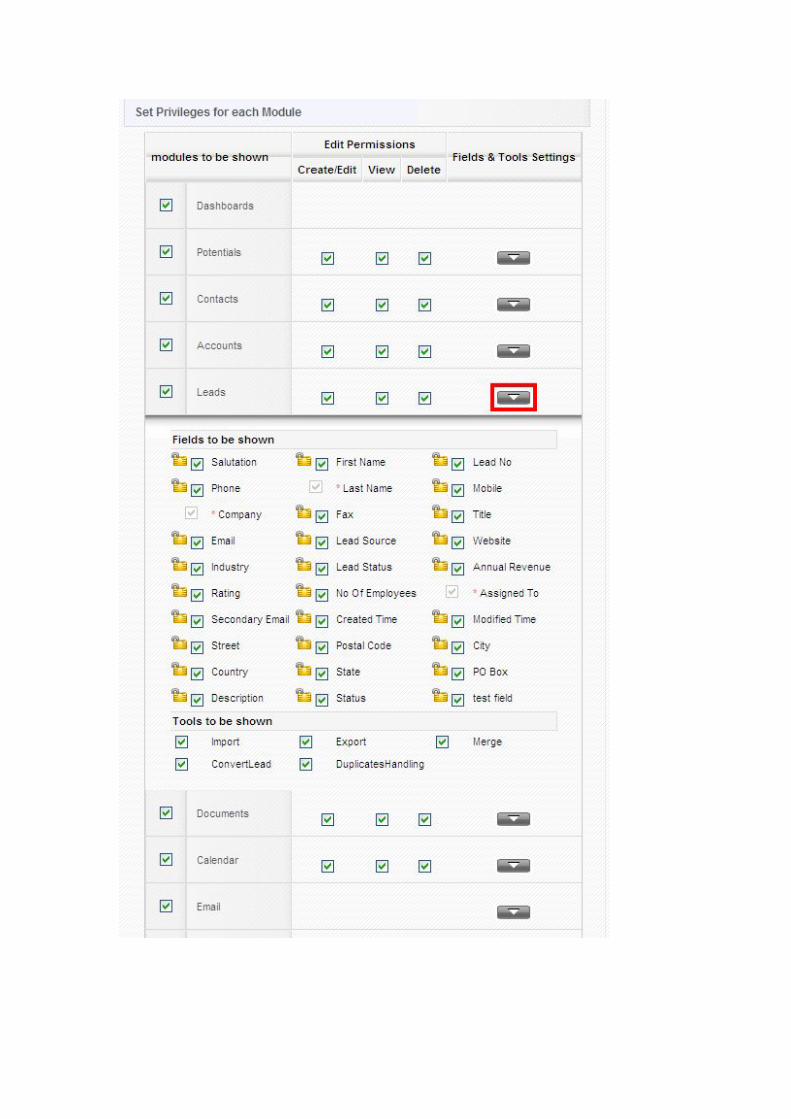

Click Finish to save your settings.
Configure Role Hierarchy
When sharing access for a module is set to private, a user's role in the role hierarchy determines what recorhe/she can access. A user can only view own records (i.e., records assigned to that user), and records assigned to users with a lower role. Role holds a position in a company (ex:multiple users of same functionality. A role can also be assigned to multiple profiles.same person holds two different positions. For instance, 'Rahul' is a Sales manager, but he also participates in support operations; therefore, you could create a role called 'salesupport and sales profiles to him. Each role also specifies who they report to, creating a hierarchy.
By moving your computer mouse pointer over a role entry, you can be able to see set of icons by which can perform operations such as add, edit, move and, delete roles.located in the hierarchical order one level below an existing role.edit view of an existing or new role. You have to give an unique name and assign desirable profile(s) to the role.
When sharing access for a module is set to private, a user's role in the role hierarchy determines what recorhe/she can access. A user can only view own records (i.e., records assigned to that user), and records assigned
Role holds a position in a company (ex: sales manager) and can be assigned to A role can also be assigned to multiple profiles. This can come handy if
For instance, 'Rahul' is a Sales manager, but he also participates in support operations; therefore, you could create a role called 'sales and support manager' and assign both
Each role also specifies who they report to, creating a hierarchy.
By moving your computer mouse pointer over a role entry, you can be able to see set of icons by which can perform operations such as add, edit, move and, delete roles. The "+" function creates a new role which is located in the hierarchical order one level below an existing role. The image below displays a sample for an
You have to give an unique name and assign desirable profile(s) to the
When sharing access for a module is set to private, a user's role in the role hierarchy determines what records he/she can access. A user can only view own records (i.e., records assigned to that user), and records assigned
sales manager) and can be assigned to This can come handy if
For instance, 'Rahul' is a Sales manager, but he also participates in s and support manager' and assign both
Each role also specifies who they report to, creating a hierarchy.
By moving your computer mouse pointer over a role entry, you can be able to see set of icons by which you The "+" function creates a new role which is The image below displays a sample for an
You have to give an unique name and assign desirable profile(s) to the

Add Users
CRM features two types of users: Administratorusers etc; and User, has limited access and you should select the role. Privileges of a user dependprivileges; it then, gives access to Settings page.visible to other users. Access privileges of a user also depend
To add new users in CRM, Go to OD Settings
Fill up the fields in Add User block, and click
Administrator has access to register new users, assign applications, lock can only use applications assigned by admin. When adding a user
Privileges of a user depend upon the role you would assign. You can also set admin page. User privileges are not shown. User information cannot be
Access privileges of a user also depend upon settings enabled in Sharing Access
OD Settings > OD Admin > Add User.
Fill up the fields in Add User block, and click Create account to update your details.
has access to register new users, assign applications, lock When adding a user
You can also set admin User information cannot be
Sharing Access.

To activate CRM service, click on X mark icon, highlighted below, under service and click
Click on edit icon, highlighted below, to edit user information.
service, click on X mark icon, highlighted below, under service and click
Click on edit icon, highlighted below, to edit user information.
service, click on X mark icon, highlighted below, under service and click assign.

Update user information, assign a role and click on nformation, assign a role and click on Save, to save your details.

Each additional user will add $12 to your monthly bill. If the user is deleted monthly bill is reduced by $12
To create a new user in CRM open sourcerole and click Save to update your changes.
Import your existing data
CRM offers a supportive tool to import customer data such as Trouble Tickets, Service Contracts, Products,
Few simple steps to import your customer data in
Go to Sales > Leads.
Click on import icon, highlighted below, to start importing customer data.
Each additional user will add $12 to your monthly bill. If the user is deleted monthly bill is reduced by $12
CRM open source, go to Settings > Users > New User. Fill up the fields, assign a to update your changes.
offers a supportive tool to import customer data such as Leads, Contacts, Accounts, Potentials, Services, Contracts, Products, and Vendors from CSV files.
Few simple steps to import your customer data in CRM(example:Leads)
Click on import icon, highlighted below, to start importing customer data.
Each additional user will add $12 to your monthly bill. If the user is deleted monthly bill is reduced by $12
. Fill up the fields, assign a
Leads, Contacts, Accounts, Potentials, Services,

Click Choose File and browse for the .csv file that you want to upload and click on
Enable Save as Custom Mapping and provide a name if you'll be using identical mapping many times in future; t then, appears in Use Saved Mappingtextbox available for each field. Click on Import
se for the .csv file that you want to upload and click on Next
and provide a name if you'll be using identical mapping many times in Use Saved Mapping picklist. You can provide a default value in the
Import to import the data.
and provide a name if you'll be using identical mapping many times in You can provide a default value in the Default Value

History of number of records imported, created, overwritten, skipped, merged and, failed will be displayed after successful mapping. History of number of records imported, created, overwritten, skipped, merged and, failed will be displayed
History of number of records imported, created, overwritten, skipped, merged and, failed will be displayed

Mandatory fields should not be left unmapped
Create Custom Filters
CRM provides an effective search tool that can rapidly filter records in a module.your search to selected columns and search criteria.
Create a Custom filter
Select a module and click Create Filter link
Mandatory fields should not be left unmapped
provides an effective search tool that can rapidly filter records in a module. You can be able to limit your search to selected columns and search criteria.
link (highlighted below) in the listview of a module.
You can be able to limit
(highlighted below) in the listview of a module.

Provide a name to your filter in View Namefilter is selected.
View Name and select the columns that has to be displayed in list view, when
and select the columns that has to be displayed in list view, when
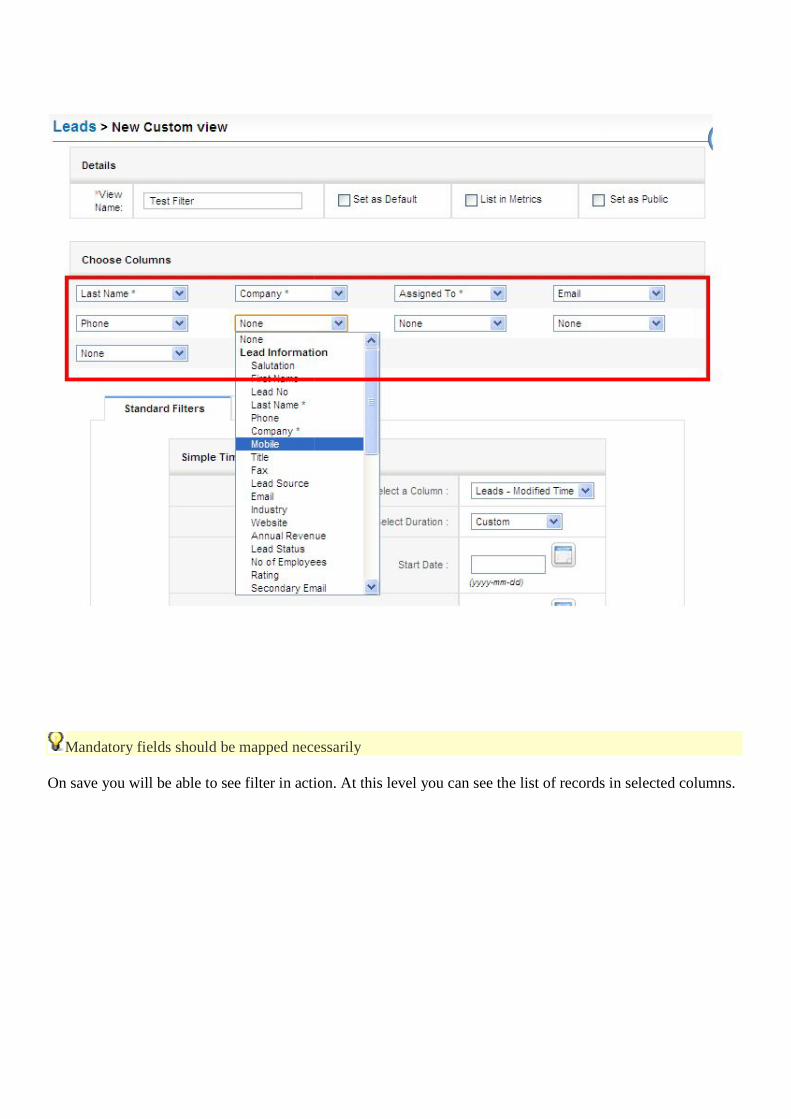
Mandatory fields should be mapped necessarily
On save you will be able to see filter in action.
Mandatory fields should be mapped necessarily
On save you will be able to see filter in action. At this level you can see the list of records in selected columns.
At this level you can see the list of records in selected columns.

Both Standard Filters and Advanced Filters
Standard Filters refine the search depending upon date intervals or particular period.
The options you will find in
Select a Column This picklist allows users to refine search depending upon record
Select Duration This picklist allows users to select time duration in accordance with
Start Date and End Date
You can fill these fields manually or if you will select the duration, these fields will
Advanced Filters are used to enhance and refine your filter.
refine the search depending upon date intervals or particular period.
The options you will find in Standard Filters
allows users to refine search depending upon record or Created Time.
This picklist allows users to select time duration in accordance with Column option above.
You can fill these fields manually or if you will select the duration, these fields will be automatically filled.
allows users to refine search depending upon record Modified Time
This picklist allows users to select time duration in accordance with Select a
You can fill these fields manually or if you will select the duration, these fields will
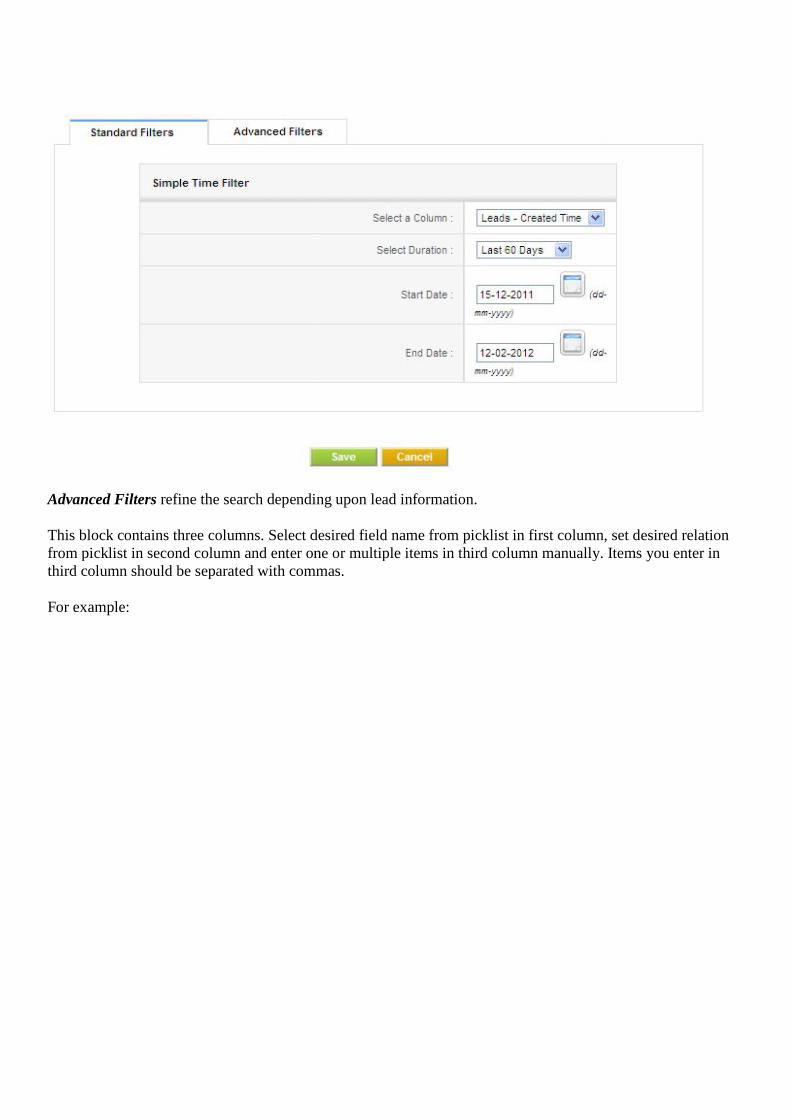
Advanced Filters refine the search depending upon lead information.
This block contains three columns. Select desired field name from picklist in first column, set desired relation from picklist in second column and enter one or multiple items in third column manually.third column should be separated with commas.
For example:
refine the search depending upon lead information.
Select desired field name from picklist in first column, set desired relation from picklist in second column and enter one or multiple items in third column manually. third column should be separated with commas.
Select desired field name from picklist in first column, set desired relation Items you enter in

On Save, listview of items filtered based upon search criteria in
, listview of items filtered based upon search criteria in Advanced Filters.

List in Metrics-
This option if enabled, the count and details of the filter will be shown in the Page.
Set as Default-
If this option is enabled, the view will be made default for the users.
Set as public-
If this option is enabled, every user of CRM, irrespective of role/position can view it.custom filter as public, it should be first approved by admin.it. Admin can see the request under the Pending
This option if enabled, the count and details of the filter will be shown in the Key Metrics
If this option is enabled, the view will be made default for the users.
If this option is enabled, every user of CRM, irrespective of role/position can view it. When a user marks a rst approved by admin. It remains in pending state until admin approves
Pending section.
widget on the Home
When a user marks a It remains in pending state until admin approves