Embed Size (px)
Citation preview

www.connects2.com
CTS-UNI-NISSANNissan Universal Steering Wheel Control Interface
INSTRUCTION MANUAL

www.connects2.com2
ABOUT THIS PRODUCT...
CTS-UNI-NISSANNissan universal steering wheel control interface for analogue vehicles.
Product ContentsInterface, 3 x Harness, Instruction
Application
Prior to installation
Read the manual prior to installation. Technical knowledge is necessary for installa-tion. The place of installation must be free of moisture and away from heat sources. Please ensure you use the correct tools to avoid damage to the vehicle or product.Connects2 can not be held responsible for the installation of this product.
Technical Support
Connects2 want to provide a fast and suitable resolution should you encounter any technical issues. With this in mind, when contacting Connects2, try to provide as much Information as possible. This will speed up the process and help us to help you.
Please use our dedicated online technical support centre: support.connects2.com
Subscribe to our YouTube Channel for installation guides and tips... www.youtube.com/connects2
Harness CX-Trail 2001 - 2008Almera 2000 - 2006Primera 2001 - 2007Terrano 2001 - 2006
For vehicles with 8/16way connector
Harness BNavara 2006>350Z 2003>X-Trail 2001>
For vehicles with 6 & 10 Way connector
Harness AQashqai 2007-2013X-Trail 2009-2014Micra 2007-2010Rogue 2007-2013Juke 2010>Micra 2010>Sunny 2012>March 2010>Pulse 2011>Evalla 2013>Versa 2008>Note 2012>
Frontier 2009>Pathfinder 2013>Versa Note 2013>NV200 2013> Quest 2010>Cube 2009>Xterra 2009-2016Titan 2009>Navara 2009>Sentra 2013>Note 2009-2012Cabstar 2014>

www.connects2.com 3
DIP SWITCH SETTINGS
1 2 3 4 5 6 7
350Z 2003 x Analogue ON ON ON - ON ON -
Almera 2000 2006 x Analogue ON ON ON - ON ON -
Cube 2009 √ Analogue ON - ON ON - - ON
Evalia 2013 √ Analogue ON - ON ON - - ON
Frontier 2009 √ Analogue ON - ON ON - - ON
Juke 2010 √ Analogue ON - ON ON - - ON
March 2010 √ Analogue ON - ON ON - - ON
Micra 2007 2010 √ Analogue - - - ON - ON ON
Micra 2010 √ Analogue ON - ON ON - - ON
Navara 2010 √ Analogue - - - ON - ON ON
Navara 2009 √ Analogue ON - ON ON - - ON
Navara 2006 x Analogue ON ON ON - ON ON -
Note 2012 √ Analogue ON - ON ON - - ON
Note 2009 2012 √ Analogue ON ON ON ON - - ON
NV200 2013 √ Analogue ON - ON ON - - ON
Pathfinder 2013 √ Analogue ON - ON ON - - ON
Primera 2001 2007 x Analogue ON ON ON - ON ON -
Pulse 2011 √ Analogue ON - ON ON - - ON
Qashqai 2007 2013 √ Analogue - - - ON - ON ON
Quest 2010 √ Analogue ON - ON ON - - ON
Sentra 2013 √ Analogue ON - ON ON - - ON
Sunny 2012 √ Analogue ON - ON ON - - ON
Terrano 2001 2006 x Analogue ON ON ON - ON ON -
Tilda 2007 2014 √ Analogue ON ON ON ON - - ON
Titan 2009 √ Analogue ON - ON ON - - ON
Versa 2008 √ Analogue ON - ON ON - - ON
Xterra 2009 √ Analogue ON - ON ON - - ON
X-Trail 2009 2014 √ Analogue - - - ON - ON ON
X-Trail 2013 x Analogue - ON ON ON - - ON
X-Trail 2001 x Analogue ON ON ON - ON ON -
X-Trail 2001 2008 x Analogue ON ON ON - ON ON -
Navara 2006 6 & 10 Way connector √ Analogue ON ON - ON - - ON350Z 2003 7 & 10 Way connector √ Analogue ON ON - ON - - ONX-Trail 2001 8 & 10 Way connector √ Analogue ON ON - ON - - ON
X-Trail 2001 2008 8/16 way connector √ Analogue - - ON ON - - ONAlmera 2000 2008 8/16 way connector √ Analogue - - ON ON - - ONPrimera 2001 2007 8/16 way connector √ Analogue - - ON ON - - ONTerrano 2001 2006 8/16 way connector √ Analogue - - ON ON - - ON
Dipswitch SettingConnector
Nissan
Harness
Harness A
Harness B
Harness C
Make Model Year From Year To Phone Button Support CAN/Analogue
HARNESSES
HARNESS A

www.connects2.com4
HARNESSES
HARNESS B
HARNESS C
www.connects2.com 5
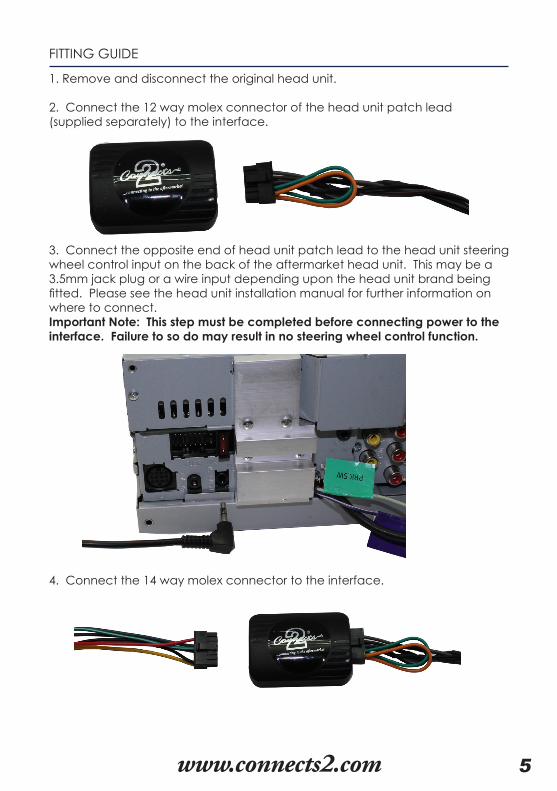
FITTING GUIDE
1. Remove and disconnect the original head unit.
2. Connect the 12 way molex connector of the head unit patch lead (supplied separately) to the interface.
3. Connect the opposite end of head unit patch lead to the head unit steering wheel control input on the back of the aftermarket head unit. This may be a 3.5mm jack plug or a wire input depending upon the head unit brand being fitted. Please see the head unit installation manual for further information on where to connect.Important Note: This step must be completed before connecting power to the interface. Failure to so do may result in no steering wheel control function.
4. Connect the 14 way molex connector to the interface.

www.connects2.com6
FITTING GUIDE
5. Connect the male power/speaker ISO harness to the female power/speaker ISO harness from the aftermarket head unit.
For aftermarket head units which do not have an ISO connector the interface uses the following wiring colours:
6. Connect the female vehicle specific connector to the male vehicleconnector. Test head unit for correct operation.
Wire Colour FunctionYellow Permanent 12VBlack GroundRed 12V IgnitionOrange IlluminationBlue Antenna Remote
Wire Colour FunctionPurple Right Rear Speaker +Purple/Black Right Rear Speaker -Green Left Rear Speaker +Green/Black Left Rear Speaker -Grey Right Front Speaker +Grey/Black Right Front Speaker -White Left Front Speaker +White/Black Left Front Speaker -

www.connects2.com 7
STEERING WHEEL CONTROL FUNCTIONS
Volume -
Volume +
Track +
Track -
Source
Preset
Track +
Track -
Vol +/-
Track +/-
Source

www.connects2.com8


![User Network Interface (UNI) Type 2 Implementation …MEF 11] introduces 3 types of UNIs: UNI Type 1, UNI Type 2, and UNI Type 3. The UNI Type determines the CE’s ability to negotiate](https://img.dokumen.tips/doc/110x75/5aef43ff7f8b9ac57a8d1136/user-network-interface-uni-type-2-implementation-mef-11-introduces-3-types.jpg)