Embed Size (px)
Citation preview
CST8152 – Compilers Page 1 of 13
CST8152 – Compilers
Creating a C Language Console Project
with Microsoft™ Visual Studio .Net 2012
The process of creating a project with Microsoft™ Visual Studio 2012.Net is quite similar to the process
in Visual Studio 2010.Net, but Microsoft™ added a few more options and changed the user interface at
some places.
To create a C Language Console Project, you should follow the steps outlined below.
1. Getting Started
Launch Microsoft™ Visual Studio .Net 2012.After the greeting flash screen disappears you should be
presented with the Microsoft Development Environment [design] window. Depending on the installation
configuration the window can contain different views. By default it should display the Start Page view. If
the Start Page is missing, you can invoke it from the main menu bar – opt for View, Start Page (or
Window, Reset Window Layout, Yes). The screen could look a bit different from the one shown in Figure
1 if you have already created some projects – they will be listed under the Recent list. You can also see
some other views displayed. You may also have VS.Net Professional 2012 instead of Ultimate 2012.
Figure 1. Microsoft Development Environment – Start Page view displayed.

CST8152 – Compilers Page 2 of 13
2. Creating a project - Selecting a Project Type You can use the Start Page view and click on the New Project link or you can close the Start Page view
window and select File, New, Project from the main menu bar. The following New Project window
should appear. Select Visual C++ in the left pane (Installed Templates) and Win32 Console Application
in the right pane. Enter the name of the project in the Name text filed, for example, cdtypes. Choose the
location of the project, You can use the default one, or you can change to something more memorable.
For example, C:\Compiler\Lab0.Uncheck Create directory for solution check box. The screen should look
like the one shown below in Figure 2. Click OK. The Win32 Application Wizard should appear as shown
in Figure 3.
Figure 2. New Project - Selecting the Project Type and Naming the Project.
3. Creating a project - Selecting an Application Type
In the Win32 Application Wizard click the Application Settings on the left. The Application Wizard
window should change as shown in Figure 3a.

CST8152 – Compilers Page 3 of 13
Figure 3. Selecting Application Settings.
Make sure Console application is selected as an Application type. Under Additional options uncheck the
Precompiled header and Security Development options, and then check Empty project as shown in Figure
3a. Click Finish. The Solution Explorer view should appear on the right. If not, choose View, Solution
Explorer from the main menu.
Figure 3a. Selecting Console Application.
CST8152 – Compilers Page 4 of 13
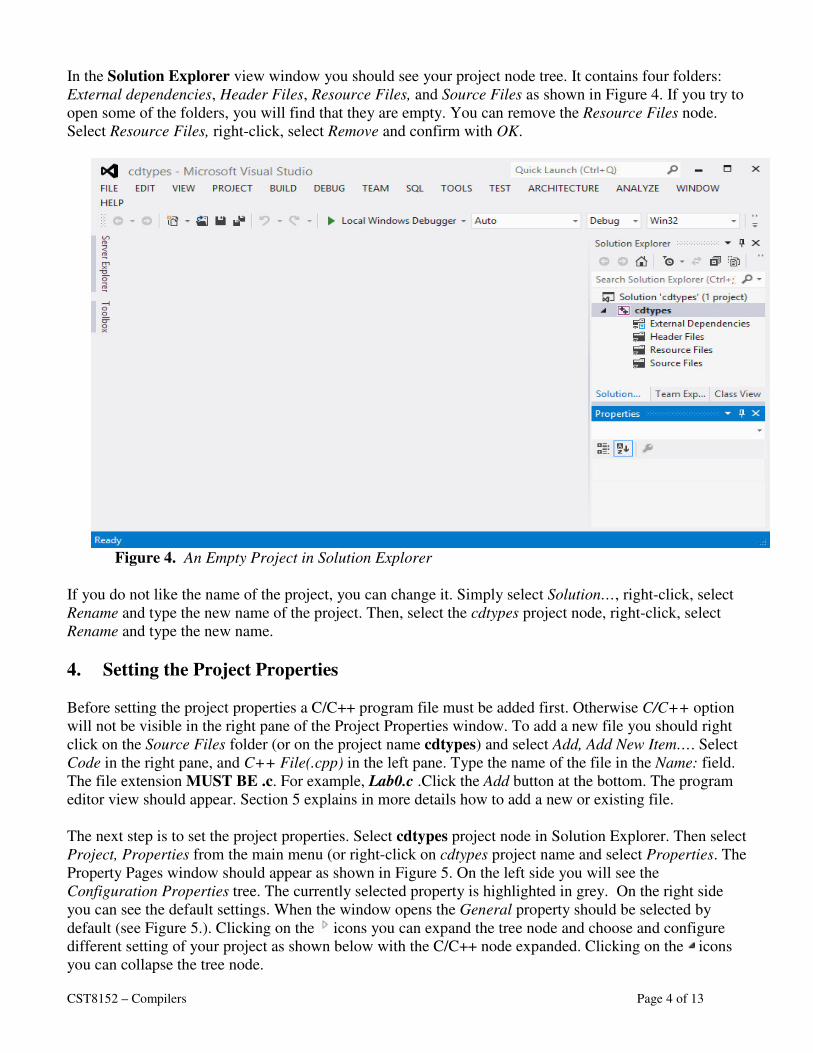
In the Solution Explorer view window you should see your project node tree. It contains four folders:
External dependencies, Header Files, Resource Files, and Source Files as shown in Figure 4. If you try to
open some of the folders, you will find that they are empty. You can remove the Resource Files node.
Select Resource Files, right-click, select Remove and confirm with OK.
Figure 4. An Empty Project in Solution Explorer
If you do not like the name of the project, you can change it. Simply select Solution…, right-click, select
Rename and type the new name of the project. Then, select the cdtypes project node, right-click, select
Rename and type the new name.
4. Setting the Project Properties
Before setting the project properties a C/C++ program file must be added first. Otherwise C/C++ option
will not be visible in the right pane of the Project Properties window. To add a new file you should right
click on the Source Files folder (or on the project name cdtypes) and select Add, Add New Item…. Select
Code in the right pane, and C++ File(.cpp) in the left pane. Type the name of the file in the Name: field.
The file extension MUST BE .c. For example, Lab0.c .Click the Add button at the bottom. The program
editor view should appear. Section 5 explains in more details how to add a new or existing file.
The next step is to set the project properties. Select cdtypes project node in Solution Explorer. Then select
Project, Properties from the main menu (or right-click on cdtypes project name and select Properties. The
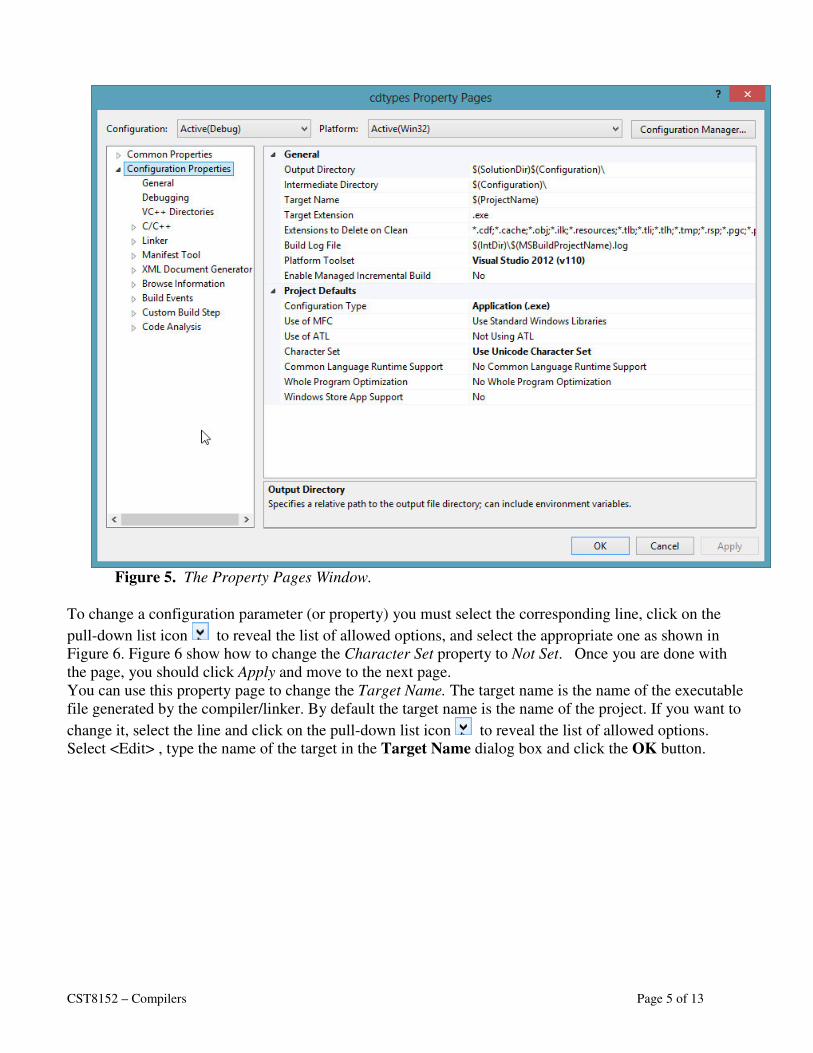
Property Pages window should appear as shown in Figure 5. On the left side you will see the
Configuration Properties tree. The currently selected property is highlighted in grey. On the right side
you can see the default settings. When the window opens the General property should be selected by
default (see Figure 5.). Clicking on the icons you can expand the tree node and choose and configure
different setting of your project as shown below with the C/C++ node expanded. Clicking on the icons
you can collapse the tree node.
CST8152 – Compilers Page 5 of 13
Figure 5. The Property Pages Window.
To change a configuration parameter (or property) you must select the corresponding line, click on the
pull-down list icon to reveal the list of allowed options, and select the appropriate one as shown in
Figure 6. Figure 6 show how to change the Character Set property to Not Set. Once you are done with
the page, you should click Apply and move to the next page.
You can use this property page to change the Target Name. The target name is the name of the executable
file generated by the compiler/linker. By default the target name is the name of the project. If you want to
change it, select the line and click on the pull-down list icon to reveal the list of allowed options.
Select <Edit> , type the name of the target in the Target Name dialog box and click the OK button.

CST8152 – Compilers Page 6 of 13
Figure 6. Configuration Properties, General – changing Character Set property.
4.1. Changing the C/C++ Project Properties (settings) Click on the expand icon in front of the C/C++ node. The C/C++ property nodes will appear as shown
in Figure 7. Select the General property page. Change the default Warning Level property Level 3 (/W3)
to Level 4 (/W4) as shown in Figure 7. No changes are required in Optimization, Preprocessor, Code
Generation, Precompiled Headers, Output Files , and Browse Information. You can peruse the property
pages for further reference.

CST8152 – Compilers Page 7 of 13
Figure 7. C/C++ Property Pages – Warning level changed in General
Go to Language, select Disable Language Extension and select Yes(/Za) as shown in Figure 8. This will
force the compiler to be ANSI C compliant, and if your program contains any non ANSI C language
statements (extensions) the compiler will generate syntax errors or warnings. For example, if you have
C++ type single line comments (//) which are not allowed in ANSI C, the compiler will generate warnings
like the one shown bellow

CST8152 – Compilers Page 8 of 13
Figure 8. Making the compiler ANSI compliant.
Move to the Advanced page. Change Compile As from Compile as C++ Code (/TP) to
Compile as C Code (/TC) as shown in Figure 9.

CST8152 – Compilers Page 9 of 13
Figure 9. Forcing the C++ compiler to work as a C language compiler.
Take a look at the Command Line option. Do not change anything there.
4.2. Changing the Linker Project Properties
No any changes are required for the Linker Properties. In Linker, General you can change the name of the
executable file which will be generated by the linker.
Note: If you want to change the name of the project (output exe file) you must make the change in Linker,
General, Output File using the <Edit…> option. Explore the Linker properties.
4.3. Changing the Other Project Properties
You can explore the rest of the property pages, but there is no need to change any of the default setting for
this particular project. So click Apply and OK to finish with the project properties configuration. From
the main menu select File, Save All to save the project settings.
5. Adding Source Code to your Solution (Project)
To add a C program to your project, select Source Files in Solution Explorer pane, right-click, select Add.
Now you have the option to add a new program file or an existing program file as shown in Figure 10. If
you program or header file dos not exist, you can add a new item to your project. Select Add New Item

CST8152 – Compilers Page 10 of 13
and in the Add New Item window select Code folder icon on the left, select the C++ File or Header File
on the right, type the name of your source file in the Name text filed as shown in Figure 12. Click Add and
the file will be added to your project (Figure 11) and an empty program editor will appear on the screen.
If it has not, double click the cdtypes.c program file name. You can type your program now.
If you program has been already written, before performing the add operation, you should copy the file
into the project directory. After selecting Add Existing Item the Add Existing Item window will appear and
you can select the c-file from the list. Click Add and the file will be added as a subnode to your Source
Files folder as shown in Figure 11.
Now you can start working with your program.
Figure 10. Adding a Source Code Item
Figure 11. A Program is Added to the Project.

CST8152 – Compilers Page 11 of 13
Figure 12. Adding a New Source File.
5. Compiling a C program
In Solution Explorer select the C file you want to be compiled, right-click and select Compile (or press
Ctrl-F7). The result of the compilation will be shown in the Output view. The Compile action creates an
object file only, not an executable. Pay attention to the warnings.
6. Building a Project
To build a project means to make a request to the IDE to compile all your project files (c and h) and to
link the compilation results (the obj file) into an executable (.exe).
To build a project, select the project node (for example, cdtypes) in Solution Explorer view, right-click,
and select Build. You can use the Build option from the main menu for the build the project (or the
solution).The results from the building process will be reported in the Output view.
If the operation of building the project is successful, an executable file will be created in your project
Debug directory. Pay attention to the warnings.
Note: If the compiler gives you a warning C4001 in file sal.h, ignore the warning. This warning is caused
by a bug in one of the Visual studio header files. Pay attention to all other warnings.
7. Running the Program
CST8152 – Compilers Page 12 of 13
You can run your program within the IDE, or as a stand-alone program from the command prompt in a
Command Prompt (DOS or console) window.
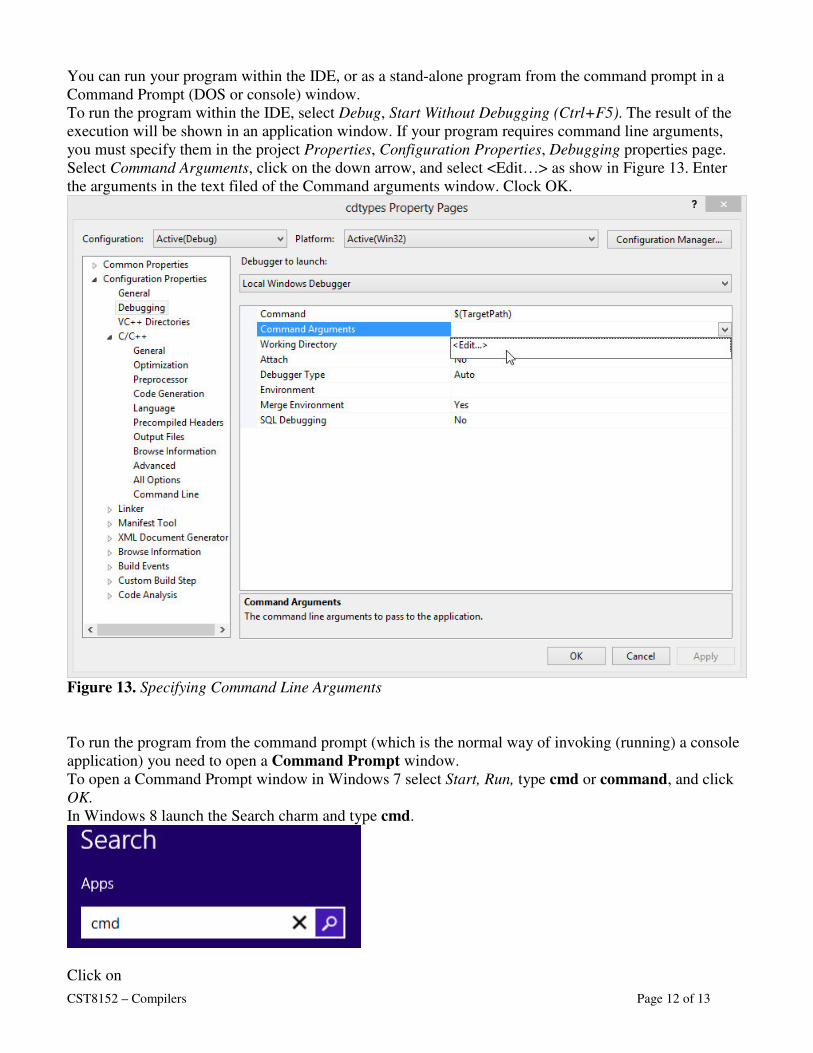
To run the program within the IDE, select Debug, Start Without Debugging (Ctrl+F5). The result of the
execution will be shown in an application window. If your program requires command line arguments,
you must specify them in the project Properties, Configuration Properties, Debugging properties page.
Select Command Arguments, click on the down arrow, and select <Edit…> as show in Figure 13. Enter
the arguments in the text filed of the Command arguments window. Clock OK.
Figure 13. Specifying Command Line Arguments
To run the program from the command prompt (which is the normal way of invoking (running) a console
application) you need to open a Command Prompt window.
To open a Command Prompt window in Windows 7 select Start, Run, type cmd or command, and click
OK.
In Windows 8 launch the Search charm and type cmd.
Click on

CST8152 – Compilers Page 13 of 13
Once you have the command prompt window opened, use the cd command to navigate to the Debug
folder, which is inside your project directory. The standard location of the Visual Studio projects is
c:\Users\<your user name>\Documents\Visual Studio 2012\Projects\. You can see the actual project
path in the Properties window. If you do not see the Properties window within the IDE, select from the
main menu View, Other Windows, Properties Window. You can also right-click on the solution in
Solution Explorer view and select Open Folder in File Explorer from the pop-up menu.
Once you make the Debug folder current, type the name of your executable (for example, cdtypes) and the
command line arguments and press Enter.
Now it is time to close the .Net and count the fish. Enjoy it.
S^R, 2013