Embed Size (px)
Citation preview

CSProX Installation Manual 1
www.serpro.com
CSProX Installation Manual
Resumed Guide for the CSProX Installation
1. Create a Data Base and a DSN
Create a data base in MySql, SqlServer, Oracle or SyBase 12 in which the administration tables will be stored.
Define a DSN for that data base. This DSN must be defined as a “System DSN” (figure 15). For simplicity purposes use “rentry” as DSN name.
2. Install CSProX
The file CSProX.exe can be downloaded from www.serpro.com. You must select the default option: “CSProX+Server (Full Installation)” (figure 2).
3. Initialize the administration tables
Once the installation is done, RStartUp.EXE is automatically run (“ServerSystem Data Base Initialization” shortcut) which is in charge of creating the administration in the specified DSN (figure 3).
Then, the system administrator must be defined (figure 4).
Finally, a name for the server must be defined along with its corresponding address (figure 5 & 6). For simplicity purposes use the following address and port: http://yourhostname:4444. yourhostname corresponds to your computer name (see “My Computer Properties Computer name ).
4. Execute the standalone server
Execute REntrySoapServer.EXE (“ServerStand Alone Soap Server” shortcut).
Specify the port (must be the same used in point 3, that is 4444) and the name/password of the defined administrator.
Enter the DSN information (for the administration tables) defined in point 1 above (figure 3).
Enter the name/password of the administrator defined in point 3 above.
Enter the license information. If you don‟t have a license, use the “trial” license.
5. Connect to the standalone server from the same machine where the server is installed
Once the server is running, execute “CSENTRY rentry.pfr” (CSProXCSEntry shortcut). There is a copy of the rentry pfr in the installation folder.
Enter the administrator‟s user/password (figure 10).
You should be able to see the welcome message defined in figure 6.
6. Connect the standalone server from another machine
CSProX Installation Manual 2
www.serpro.com
Install CSProXClient.exe in a different machine (you can also install CSProX.exe if needed).
Change the line “Address” from the rentry.pfr so that it points to the machine where the server is running. If, for example, the server IP is 192.168.1.200 the address will be : Address=http://192.168.1.200:4444.
Follow the steps listed in point 5 above.
7. Adding projects
When the standalone server is running correctly, you‟re ready to generate and publish new projects (See “Remote Entry Administration” topic for details).

CSProX Installation Manual 3
www.serpro.com
Detailed Guide for the CSProX Installation
The CSProX installation process is divided into two steps: software installation and server configuration. You can follow the second step only once the remote entry server is installed.
Software Installation
1. Execute “CSProX.EXE”. CSProX .EXE can be downloaded from www.serpro.com or found in the CSProX distribution CD.
2. Click “Next” on the first dialog and select the language that will be used by some parts of the system.
Figure 1
The language setting determines:
Small words (Table, and, by, Legend, etc.) generated by tables and maps
Font style, in order to support languages such as Russian, Ukrainian, or Armenian on data entry screens and in tabulation output.
CSProX Installation Manual 4
www.serpro.com
Note that CSProX menu options, dialog boxes, and the help system are only available in English. You can always change the language setting by rerunning the installation program.
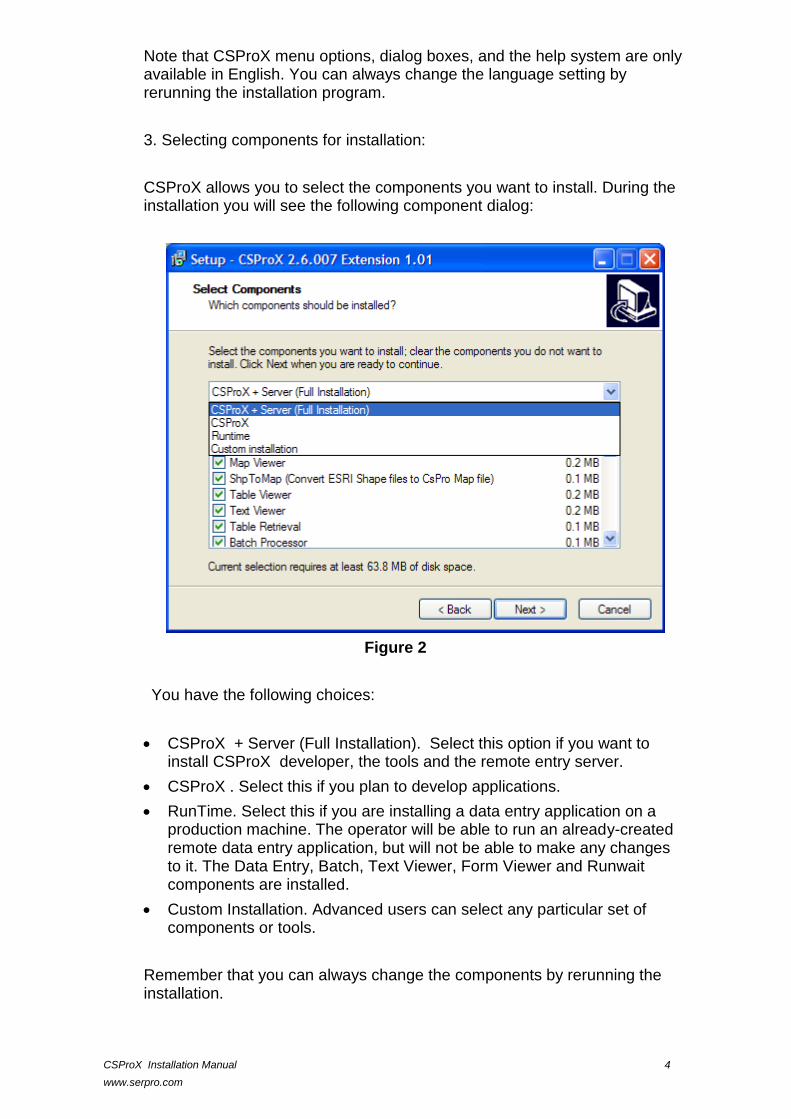
3. Selecting components for installation:
CSProX allows you to select the components you want to install. During the installation you will see the following component dialog:
Figure 2
You have the following choices:
CSProX + Server (Full Installation). Select this option if you want to install CSProX developer, the tools and the remote entry server.
CSProX . Select this if you plan to develop applications.
RunTime. Select this if you are installing a data entry application on a production machine. The operator will be able to run an already-created remote data entry application, but will not be able to make any changes to it. The Data Entry, Batch, Text Viewer, Form Viewer and Runwait components are installed.
Custom Installation. Advanced users can select any particular set of components or tools.
Remember that you can always change the components by rerunning the installation.

CSProX Installation Manual 5
www.serpro.com
Server Configuration
The program RStartup.EXE allows configuring the remote entry server. You can press “Cancel” (see dialog below) and continue with the configuration process later executing directly the program RStartup.EXE from the CSProX installation folder or through the option “Server/System Data Base Initialization” from the program group.
RStartup.EXE is executed at the end of the previous step (“Software Installation”) and you will see the following dialog:
Figure 3
“Dsn”: Is the SYSTEM DSN name where the remote entry tables will be installed. Normally it is named “rentry”. To create a system DSN see “Creating a DSN” topic (below).
“User/Password”: Is a valid user name –and password- having the right permission to connect to the DSN.
After pressing the “Connect” button the following dialog appears:
Figure 4
CSProX Installation Manual 6
www.serpro.com
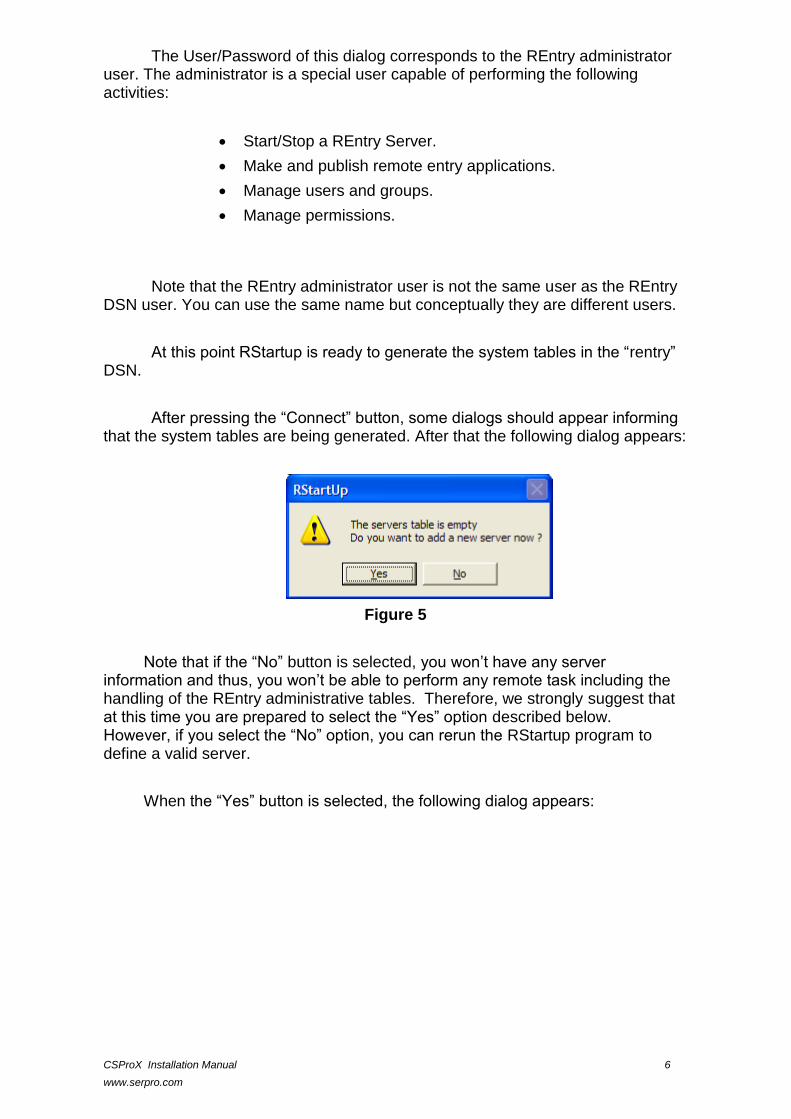
The User/Password of this dialog corresponds to the REntry administrator user. The administrator is a special user capable of performing the following activities:
Start/Stop a REntry Server.
Make and publish remote entry applications.
Manage users and groups.
Manage permissions.
Note that the REntry administrator user is not the same user as the REntry DSN user. You can use the same name but conceptually they are different users.
At this point RStartup is ready to generate the system tables in the “rentry” DSN.
After pressing the “Connect” button, some dialogs should appear informing that the system tables are being generated. After that the following dialog appears:
Figure 5
Note that if the “No” button is selected, you won‟t have any server information and thus, you won‟t be able to perform any remote task including the handling of the REntry administrative tables. Therefore, we strongly suggest that at this time you are prepared to select the “Yes” option described below. However, if you select the “No” option, you can rerun the RStartup program to define a valid server.
When the “Yes” button is selected, the following dialog appears:

CSProX Installation Manual 7
www.serpro.com
Figure 6
The field “Name” corresponds to the internal server name (the system can have more than one server). At this point we have defined the first server named “datacapture1”.
The field “Address” indicates where the server will run. By default the port is “4444” but the user can change it.
There are two kinds of servers: the “Standalone Soap Server” and the “Isapi Soap Server”. The Isapi Server configuration will be explained under “Running the ISAPI REntry Server” topic.
The Standalone server can be a “normal” server (the address starts with “http”) or a “secure” server (the address starts with “https”). The secure server uses SSL.
For example, the address https://local_pc:4455 specifies a “secure” server running on port “4455”. Local_pc corresponds to your computer name (see “My Computer Properties Computer name ).
The Field “Welcome Message” corresponds to the message that clients (Remote Entry Users) will receive when they connect to the server.
Finally, the configuration is finished when the “OK” button is selected.
If you have any problem during the configuration, you can run “RStartup.EXE” again.
Once the configuration is finished, the database “rentry” should have the following tables:

CSProX Installation Manual 8
www.serpro.com
Rdsn, Rdsn_rec
Rgroup, Rgroup_rec
Rgroupuser, Rgroupuser_rec
Rlicense, Rlicense_rec
Rlog, Rlog_rec
Rperms, Rperms_rec
Rserver, Rserver_rec
Ruser, Ruser_rec
Rzie, Rzie_rec
Rzieuser, Rzieuser_rec
These tables are populated with the basic information to allow the administrator to connect to the unique pre-installed remote entry application: RENTRY.ZIE.
“RENTRY.ZIE” contains CSProX applications developed to allow the remote tables administration (e.g.: add users, add applications, set permissions, etc).
To test that everything is working correctly you need to perform the following steps:
Run a Server (StandAlone or Isapi)
Execute CSEntry to connect to a server
The first time it‟s better to run the standalone server in order to check that everything is working correctly. The Isapi server requires some extra configuration in Internet Information Server.
Running the Standalone REntry Server
To run the standalone server you must execute the REntrySoapServer.EXE program located in the installation folder or through the option “Server/Stand Alone Soap Server” from the program group.
The following dialog will be shown:

CSProX Installation Manual 9
www.serpro.com
Figure 7
We need to define the Port number where the server will run. In addition, we need to specify whether we want to run the server in secure mode -selecting the SSL checkbox- or normal.
After clicking on the “Run” button, the dialog described in Figure 3 will be shown. This dialog allows defining the system DSN. After pressing “Connect” in that dialog the following dialog is shown:
Figure 8
This dialog is similar to the one shown on Figure 4 except that conceptually, the “User” field only allows “Administrators”. No other user is allowed to run the server.
After pressing the “Connect” button, the following dialog appears:
Figure 9
This dialog only appears when there is no license information defined. The “Licensee Name” and “Product Key” fields correspond to a valid key provided by the CSProX product seller. See www.serpro.com for further information regarding licenses.

CSProX Installation Manual 10
www.serpro.com
After pressing the “Ok” button –assuming the “Product Key” is correct, the server starts running. An icon should appear on the icon tray bar.
To stop the server just click on the icon located on the icon tray bar and click over the “Stop” and “Exit” buttons.
Connecting to the StandAlone REntry Server
Finally, to test whether the server is running correctly we need to execute some of the two existing client programs: CSEntry or REntryA (Remote Entry Administration).
The most common applications are executed using the CSEntry module either as standalone or connected to the server. CSEntry clients are the most common to connect to the server to run specific applications. The applications that CSEntry clients are able to run are CSProX applications packed in a file called “ZIE”. A “ZIE” file can be defined as a collection of applications and data files related to a project that can be accessed by different users simultaneously.
REntryA on the other hand can be used only by clients of the type administrators. Those clients connect to the server through the “REntryA.EXE” program. REntryA allows defining and publishing ZIES that will be used by CSEntry clients. See the “Remote Entry Administration” topic below for a complete description.
The system ZIE (RENTRY.ZIE) is used to add or modify information in the system tables. To connect to RENTRY.ZIE the creation of a connector file –called “RENTRY.PFR”- is needed.
A “PFR” file is a script file containing basic information to run remote applications. The information is stored in three blocks of data as follows:
[Remote Run Information]:
This block is the file‟s heading block and has one optional entry “Version=” which is the CSProX version used to generate the “PFR” file. The “PFR” file can be generated when you run CSEntry without argument (the connector file), selecting the “REntry” tab and selecting the “Login” option. An empty dialog box like the one illustrated on figure 10 (without the initial information shown) is displayed. Filling up the information related to the “PFR” section and clicking on the “Save” option, the file will be created. The next time we run CSEntry, the PFR file name generated can be used as argument and the dialog box shown on figure 10 will be pre-initialized with the information stored. The “PFR” file can also be

CSProX Installation Manual 11
www.serpro.com
created using any ASCII editor and defining at least the required options as illustrated below.
[Server]: This block is required and should be followed by the following entries:
Address=<Server-Address> this is a required entry specifying the server address.
UseProxy=<true | false> which is an optional entry; if missing, “false” is assumed. This entry tells whether we are behind a Proxy or not.
ProxyAddress=<Proxy-Address> this is also an optional entry specifying the proxy address if it exist.
ProxyUser=<Proxy-User-Name> optional entry showing the proxy user‟s name.
ProxyPassword=<Proxy-Password> specifying the proxy user‟s password.
[Zie]: This block is also required and has only one entry: “ZIE=” followed by the “ZIE-Name”.
[Others]: This block is optional and has two entries:
WorkDir=<Working-Directory> indicates the full path of the folder where we want the ZIE file to be unzipped (project folder).
Comment=<Any Comment>
Together with the CSProX software there is a “REntry.PFR” file that can be used to connect to the REntry server and have access to populate the system‟s administration tables. We just need to copy this file to the working folder where we want to have the REntry applications and double click on this file to execute CSEntry. Note that the REntry.PFR should be modified accordingly providing the server address if we want to connect as a remote user. The address provided is a local address.

CSProX Installation Manual 12
www.serpro.com
EXAMPLE OF A PFR FILE
If you‟re behind a proxy you must add the “ProxyAddress” entry in the [Server] section of the “RENTRY.PFR”:
[Server]
Address=http://local_pc:4444
ProxyAddress=<Proxy-Address>
After double clicking on the REntry.PFR file the CSEntry program will send the connection message to the server running on local_pc on port 4444 according to the address specified above “Address=http://local_pc:4444”.
After executing CSEntry the following dialog is shown:
Figure 10

CSProX Installation Manual 13
www.serpro.com
The client needs to specify the “login” and “password” information. At this moment the only user defined in the system tables is “rentryadmin” (see figure 4).
If the proxy address has been included in the RENTRY.PFR file, it will be shown on the dialog above. However, the user can and should be able to modify it since users might have different addresses or not have at all.
After filling the necessary information, press “Connect/Login” and the following dialog will be shown:
Figure 11
This dialog indicates that the user is connected to the server. The Welcome message was defined during the server configuration process (see figure 6).
After that, the target application (in this case RENTRY.ZIE) starts to work. The application starts showing the following menu:
Figure 12
Running the ISAPI REntry Server
To run the REntry Server under Internet Information Server it is necessary to define the address specified in figure 6 as:
[http | https ] ://local_pc[/<virtual http(s) dir>] /mod_gsoap.dll?rsoap

CSProX Installation Manual 14
www.serpro.com
In the same way as the standalone server, the “https” prefix specifies a secure server.
“<virtual http(s) dir>” is the ISAPI‟s virtual directory where mod_gsoap.dll is located.
Note that the suffix “/mod_gsoap.dll?rsoap” should not be changed.
The Isapi server runs under Internet Information Server. When the prefix “https” is used in the address the Internet Information Server must be a “secure” server.
Example of a typical address:
http://server_hp/rentry_test/mod_gsoap.dll?rsoap
In this case “server_hp” is the name of the server machine and “rentry_test” is the virtual directory.
The DLLs used are: LIBEAY32.DLL, MOD_GSOAP.DLL, RSOAP.DLL, SH.DLL, SSLEAY32.DLL, ZBRIDGEO.DLL, ZCASEO.DLL, ZDCFRDB.DLL, ZDDIO.DLL, ZDICTO.DLL, ZDISAMO.DLL, ZEXECO.DLL, ZFORMO.DLL, ZGRIDO.DLL, ZINDEXO.DLL, ZLIB1.DLL, ZSOAP.DLL, ZTOOLSF.DLL, ZTOOLSO.DLL, ZUTIL2O.DLL, ZUTILO.DLL,ZWBASEO.DLL, ZWMSGO.DLL and ZWSOCKO.DLL. These 24 DLLs should be located in the virtual directory that needs to have enough permission to execute those DLLs. Additionally, it‟s necessary to have a subfolder (under the virtual folder) named “ZIES” that will contain all the ZIES published. That subfolder must contain at least the system zie: RENTRY.ZIE. CSProX release 3.0 needs an additional dll: ZTABLEO.DLL!
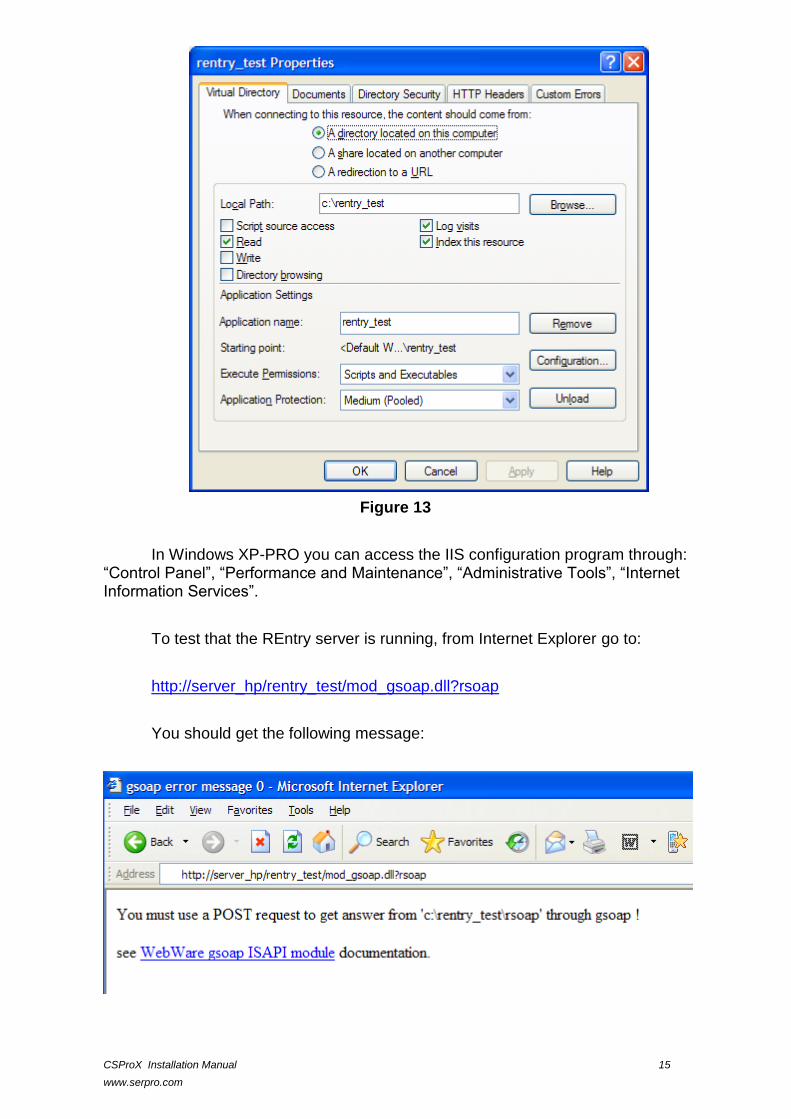
The field “Execute Permissions” (see below) must be set as: “Scripts and Executables”. In Windows XP-PRO the corresponding dialog is:
CSProX Installation Manual 15
www.serpro.com
Figure 13
In Windows XP-PRO you can access the IIS configuration program through: “Control Panel”, “Performance and Maintenance”, “Administrative Tools”, “Internet Information Services”.
To test that the REntry server is running, from Internet Explorer go to:
http://server_hp/rentry_test/mod_gsoap.dll?rsoap
You should get the following message:

CSProX Installation Manual 16
www.serpro.com
Figure 13B
The path “C:\rentry_test” can vary according to your virtual directory definition. In the example, the virtual directory “rentry_test” was mapped to the physical directory “C:\rentry_test”.
The message is indicating that the ISAPI REntry server is waiting for POST requests. Those requests are sent by the REntry clients: CSEntry and REntryA.
If you get a different message you must check the Internet Information Server configuration manual. The most typical problems are related to permissions. Please check the Authentication Methods associated to mod_gsoap.dll. In IIS 6.0 you can reach that dialog (see figure below) through IIS Managermod_gsoap.dll PropertiesFile SecurityEdit Authentication and Access Control. If you have enable the anonymous access be sure that the "User name" and "Password" are correct and the user has enough privileges to load dlls.
Figure 13C
If you are adding a new ISAPI server (different to the defined in figure 6) you will need to register it in the servers table. To register the server, select option 9: “Servers Table Handling", (see figure 12) and specify the server name (for example: “datacapture2”) and the server address (it must end with the suffix “mod_gsoap.dll?rsoap”) as in http://server_hp/rentry_test/mod_gsoap.dll?rsoap. The welcome message is optional.

CSProX Installation Manual 17
www.serpro.com
To activate the Isapi Server you must execute “REntryA.EXE” and select “Off Line” in the Identification Dialog. From the grid you must select the server name and press “Ok”. Then, you need to go to the “Tables Admin” tab (see figure 14) and select the “Servers” table. You will see a grid with a list of the defined servers. Select the desired server and in the column “RSERVER_STATUS” (the status at this moment is “Stopped”) press the mouse right button and select the “Run” option.
Figure 14
The server status (RSERVER_STATUS column) is changed to “Running” when the server is ready to accept requests.
Finally, to test the server, change in the file “rentry.pfr” the line:
“Address=http://local_pc:4444”
to
“Address=http://server_hp/rentry_test/mod_gsoap.dll?rsoap “
Save the new “rentry.pfr” file and execute “CSEntry rentry.pfr”. After displaying the welcome message, the administrator menu should be displayed (Figure 12).
Creating a DSN
The DSN names are defined using the “ODBC Data Source Administrator” program provided with the windows operating system. In Windows XP-PRO this program can be accessed through: “Control Panel”, “Performance and Maintenance”, “Administrative Tools”, “Data Sources (ODBC)”. Make sure you use the System DSN instead of User DSN.

CSProX Installation Manual 18
www.serpro.com
Figure 15
To add a new DSN you must click the “Add” button and the following dialog will appear:
Figure 16

CSProX Installation Manual 19
www.serpro.com
You need to select the driver to the database you want to use. In this manual the MySQL database is going to be used as example. The ODBC dialogs vary according to the database to be configured.
After pressing Finish, the next dialog will appear:
Figure 17
During the installation process it is necessary to define a DSN for the Remote Entry System Tables. It‟s recommended to name both the “Data Source Name” and the “Database Name” as “rentry”. The Database name specified must be an existing database name.
A valid User and Password must be provided. For testing purposes you can use the “root” user without password. Normally that combination is valid in MySql.
Finally, press the “Test Data Source” button.
Most of the problems to connect to a database engine are related to an invalid user name and/or password. If you have a problem you will see the following dialog:

CSProX Installation Manual 20
www.serpro.com
Figure 18
When the database doesn‟t exist, the following dialog appears:
Figure 19
If everything has been properly done, the following message should come up:
Figure 20
At this point the System DSN “rentry” using the database “rentry” has been defined.
Remote Entry Administration
The “REntryA.EXE” program can be executed from the CSProX installation folder or through the option “Server/System Administration” from the program group.
“REntryA.EXE” can work in two modes: On-Line or Off-Line. The On-Line mode requires having either a Stand Alone REntry Server or an ISAPI REntry Server running.

CSProX Installation Manual 21
www.serpro.com
REntryA uses a special folder to keep the published ZIES. This folder is called “RAFILES” (from Remote Administration FILES) and is located under the installation folder.
When we execute “REntryA.EXE” the dialog shown on figure 3 will show up. After filling the correct information, the dialog specified on figure 8 will be displayed. This dialog has 3 buttons instead of 2 (the button “Connect” was replaced by the button “OnLine” and “OffLine”)
REntryA allows doing the following basic functions:
ZIE manipulation.
Import/Export data from the Data Base to CSProX and vice versa.
Create relational tables from a CSProX dictionary.
Tables administration tasks (view tables and start a REntry server).
Queries over the log table.
When REntryA starts in On-Line mode, all the published ZIES not located in the “RAFILES” folder are copied from the server.
ZIEs Admin Panel
This panel shows a tree containing all the ZIEs already published. At the beginning there is no ZIE published and the tree is empty.
To create a new ZIE, select the “Create” button and the following dialog will be displayed:
Figure 21
The “Project Root Folder” should be the node from which the entire project‟s sub-folders are hanging from (as illustrated on the tree below). The system will scan from the “Health” folder down searching for all the “.PFF” files and other relevant files (e.g. “.DCF”, “.ENT”, etc.) to generate the ZIE/project tree as illustrated on figure 26. In our illustration below, we have a “Health” project node from which we have defined three sub-folders named “Apps”, “Data”, and “Dicts”. Each one of them stores, for organization purposes, the application(s), the data that will be used in the project, and the various data dictionaries used by the application(s). Thus, at the time you generate the ZIE the whole project should

CSProX Installation Manual 22
www.serpro.com
have been implemented and properly tested locally by the project administrator. Note that the same folder structure found at the time the ZIE is built will be later reproduced in the clients‟ computers when the ZIE is retrieved and the files exploded/extracted.
Figure 21B
After specifying the project root folder and clicking on the “Next” button, the ZIE tree is built and the following dialog will be displayed:

CSProX Installation Manual 23
www.serpro.com
Figure 22
The dialog shows a tree organized by “.PFF” files. The folder must contain at least one “.PFF” file. In this example we have 12 data entry applications.
The right button click allows defining different parameters for some elements on the tree. The options menu depends on the node type.
We first need to define in the “INI” node the starting directory for the application in the client machine. This directory is a relative path. The default path is „.‟. When there is no folder under the input directory chosen in figure 21, the only option is the current directory („.‟).
Figure 23
The “PFF” node has the following menu options:
CSProX Installation Manual 24
www.serpro.com
Figure 24
The “Include All” and “Exclude All” options allow including or excluding all the files under the PFF node.
In every node under the “PFF” node and ending with “.PFF”, the menu has the following options:
Figure 25
The option “Primary PFF” permits identifying which is the application that will be executed first by the CSEntry client (main application) when the ZIE file is executed. The ZIE node should have one and only one “Primary PFF” file. Any other “.PFF” file must be called by the primary application using the ExecSystem function (launching another CSProX application) and tagged as “Secondary”.
The “DCF” node under each “.PFF” node will contain a list of all the data dictionaries of a particular application divided into two groups: “Input” and “External” dictionaries (figure 26). By right clicking on a “.DCF” we can define the attribute the data file associated to the dictionary will have. The attribute is selected from the list displayed after you right click on the particular “.DCF” node (see the list on the right part of figure 26).
Normally, any input data dictionary (DD) should be either “Remote, Automatic” or “Remote, Manual”. However, an “External” DD can be either “Local” or “Remote”. Tables lookup DD or in general, “Read Only” files are better used as “Local” since the response is faster; however it‟s entirely up to the project administrator how each individual DD or data file will be handled.
Remote files are maintained in the corresponding relational data base (RDB) while local files are normal CSProX ASCII files. Since the connection with

CSProX Installation Manual 25
www.serpro.com
the server can be interrupted at any time due to a variety of reasons, even remote files are written locally and in the database. A client can keep working offline as long as needed and the situation is completely transparent to him/her. When the user connects to the server, the data will be transmitted and synchronized with the server automatically.
A similar situation happens in most CAPI projects since the interviewer should be allowed to work off-line, considering that not always there will be an internet connection available. In these cases, again the data will be automatically transmitted and synchronized with the server once a connection is established.
In each “DCF” node, the menu has the following options:
Figure 26
When the data file (DD) is remote, the necessary relational tables are generated in the server at the time the ZIE is published. The number of tables generated depends exclusively on the data dictionary.
Finally, once we decided which files to include in the ZIE, we defined the “Start In” folder, the primary “.PFF” file and the dictionary attributes, we are ready to build the ZIE (“Build Zie” button). At this moment we must define the ZIE name and the folder where the “.ZIE” file will be saved.
The ZIEs generated during the session will be shown in the ZIEs tree (left pane). When we finish REntryA and we run it again, the tree will not include the ZIEs generated in the previous session (they need to be published to appear on the left pane).
We can load ZIEs in the ZIEs tree from the hard disk using the “Load” button. To delete a ZIE from the ZIEs tree we need to use the “UnLoad” button. Note that the “UnLoad” button will only delete the ZIE from the tree but it won‟t delete the ZIE file from the hard disk.
CSProX Installation Manual 26
www.serpro.com
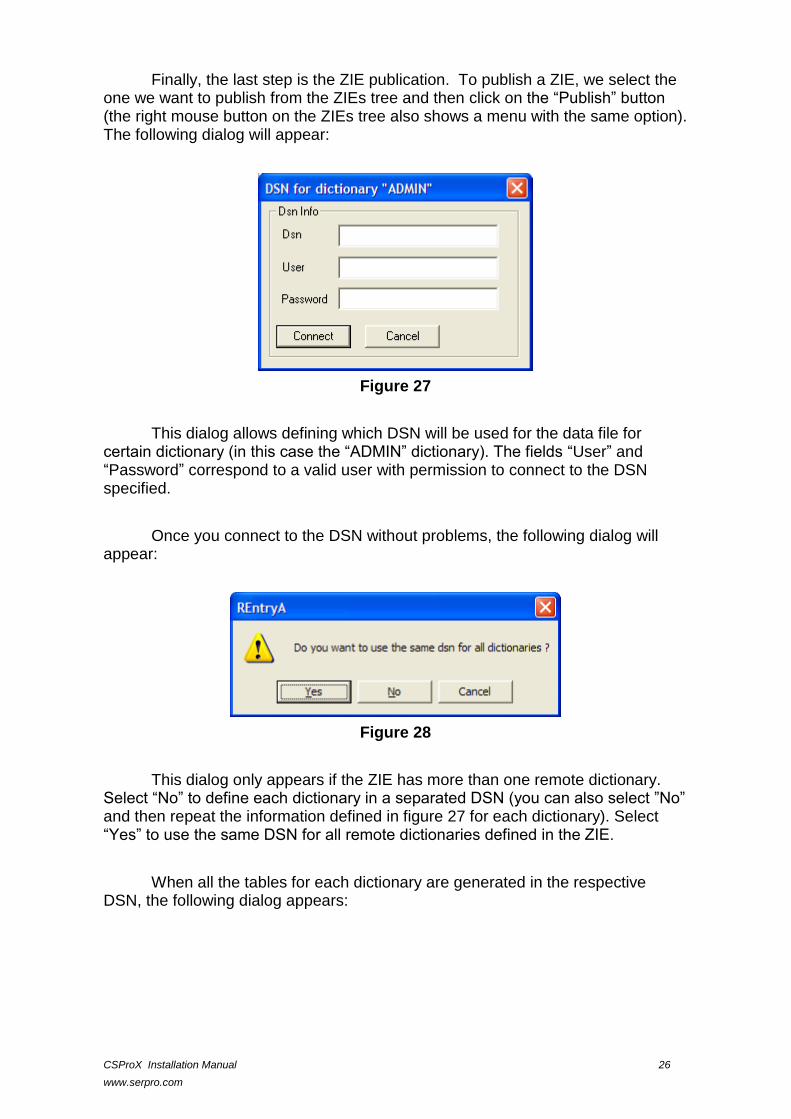
Finally, the last step is the ZIE publication. To publish a ZIE, we select the one we want to publish from the ZIEs tree and then click on the “Publish” button (the right mouse button on the ZIEs tree also shows a menu with the same option). The following dialog will appear:
Figure 27
This dialog allows defining which DSN will be used for the data file for certain dictionary (in this case the “ADMIN” dictionary). The fields “User” and “Password” correspond to a valid user with permission to connect to the DSN specified.
Once you connect to the DSN without problems, the following dialog will appear:
Figure 28
This dialog only appears if the ZIE has more than one remote dictionary. Select “No” to define each dictionary in a separated DSN (you can also select ”No” and then repeat the information defined in figure 27 for each dictionary). Select “Yes” to use the same DSN for all remote dictionaries defined in the ZIE.
When all the tables for each dictionary are generated in the respective DSN, the following dialog appears:

CSProX Installation Manual 27
www.serpro.com
Figure 29
The ZIE published is saved in the “RAFILES” folder. The next time you execute REntryA, the ZIEs tree will show the ZIEs that are located in the “RAFILES” folder.
The DSN allows having databases in different machines, in different operating systems and the database manager can be different. For example: the “City” table (a table that contains the city names and codes) can be located in a “SqlServer” database and the “Product” table (a table that contains the product names and codes) can be in an “Oracle” database.
The system tables changed after publishing the ZIE are:
RDSN, RDSN_REC: One row for each dictionary is added containing the association between dictionary and DSN.
RPERMS, RPERMS_REC: One row is added with the name of the current administrator, the ZIE name and the permissions read-write.
RZIE, RZIE_REC: One row is added with the name of the ZIE and the date of publishing. The ZIE is set as enable.
RZIEUSER, RZIEUSER_REC: One row is added giving access to the administrator to the ZIE.
The next step is to test the ZIE remotely and give access to the other users. To connect to the server execute “CSEntry TEST.PFR” and connect as administrator. To define TEST.PFR see the topic “Connecting to the Stand Alone REntry Server”. The server must be running before to connect as a client.
Tables Admin Panel
This panel allows seeing the content of the system tables. Additionally, positioning over the table “Servers” column “RSERVER_STATUS” with the mouse right click appears a menu that allows changing the server‟s status (Stop, Start and Pause). See the topic “Running the REntry Server” (above) for details.
Queries Log Panel

CSProX Installation Manual 28
www.serpro.com
This panel allows making queries over the log table. The user can select the appropriate filter (type of message, date and open filter).
Upload/Download Data
There are two icons (yellow arrows) on the control REntry toolbar that allow to export CSProX data files to a RDB or to import data from the RDB to a CSProX format.
Figure 30
The first icon (up yellow arrow) allows us to export a CSProX data file to the RDB and is called “Upload” data. If we want to export a data file to an RDB, the CSProX dictionary related to the data file can be part of an existing ZIE or it can be a local dictionary. In the first case, the relational tables are already generated in the DSN associated to the ZIE. On the other hand, in the second case (local dictionary) we need to specify the DSN name where the relational tables have been generated. After clicking on the “Upload” icon, the following dialog appears:

CSProX Installation Manual 29
www.serpro.com
Figure 31
The input data file corresponds to a CSProX data file that will be exported to the RDB and is associated to the data dictionary that we need to specify.
The dialog box shows the two options mentioned before to specify the data dictionary: Server side ZIE embedded data dictionary or local dictionary. The first option is used when the dictionary belongs to a ZIE, in which case, the DSN name is associated to the couple “ZIE + Dictionary Name”. The second option allows selecting any dictionary in which case, it‟s necessary to directly specify the DSN for that dictionary where the RDB tables had been previously generated.
The default behavior for transmitting the cases is case by case. When the “Case by Case” option is not selected, the system will export all cases in only one package.

CSProX Installation Manual 30
www.serpro.com
To download cases click on the download icon (second yellow arrow). The dialog is similar to the previous one but the data file represents a CSProX output data file instead of a CSProX input data file. All the cases that are in the corresponding database are going to be saved in the output file.
Create Relational Tables from a Dictionary
REntryA allows creating relational tables from a CSProX dictionary. To create relational tables click on the blue arrow icon (figure 30). The following dialog will appear:
Figure 32
Similarly to the two previous options (Download/Upload cases) it‟s possible to select the data dictionary from hard disk (Local Source) or from a ZIE (Remote Source).


![RESUMED [11.59 am]](https://img.dokumen.tips/doc/110x75/62321f880a46a972821a0a25/resumed-1159-am.jpg)