Embed Size (px)
Citation preview

Creative ControlDSLR Camera
Instructor: Mary L. Buck, Cr.Photog., CPP
of your
Take
Lightscapes Photography Learning Center

Take Creative Control of Your DSLR Camera • © 2014 Mary L. Buck • www.studio2point8.com 2previous nextcontents
PrefacePhotography is derived from two ancient Greek words:
Photos meaning “light” and Graphos meaning “to write”
Photography…To write with light
Light falls on the landscape and forms the beauty of nature that we
all enjoy. A camera’s shutter is depressed and in a magical moment
an image is captured. The image portrays the sweeping landscape,
and the details which make up the whole: the forms, shapes,
colors, textures and patterns.
Light comes in many forms and can intensify the way we see
things. Backlighting can turn an ordinary flower into a brilliant manifestation. The early
morning light causes the subtle mauves which make up the serenity of a sunrise, while
dusk forms the golds, reds and oranges which create the visual excitement of a sunset.
Light can enhance or invoke a feeling or mood in an ordinary scene and can transform a
simple subject into a fascinating display of nature. A photograph with these elements can
add a visual richness to any setting.
In just a few short hours, days or weeks, you will learn how to “write with light.”
Wishing you the best in photography,
Mary L. Buck
Photographer & Instructor

Take Creative Control of Your DSLR Camera • © 2014 Mary L. Buck • www.studio2point8.com 3previous next
Table of Contents 4 . . . . . . . . . Introduction
5 . . . . . . . . . About the Instructor
6 . . . . . . . . . Lesson 1 – Aperture
9 . . . . . . . . . Lesson 2 – Shutter Speed
11 . . . . . . . . . Lesson 3 – Exposure
13 . . . . . . . . . Lesson 4 – ISO
15 . . . . . . . . . Lesson 5 – Manual Exposure
19 . . . . . . . . . Lesson 6 – Seeing the Light
23 . . . . . . . . . Lesson 7 – Fill Flash
25 . . . . . . . . . Lesson 8 – White Balance
27 . . . . . . . . . Lesson 9 – Lenses & Filters
30 . . . . . . . . . Lesson 10 – Focus
32 . . . . . . . . . Lesson 11 – Metering modes
33 . . . . . . . . . Lesson 12 – The Histogram
36 . . . . . . . . . Lesson 13 – Composition
38 . . . . . . . . . Bonus Definitions
39 . . . . . . . . . Funsessments
42 . . . . . . . . Funsessment Answer Key

Take Creative Control of Your DSLR Camera • © 2014 Mary L. Buck • www.studio2point8.com 4previous nextcontents
IntroductionWelcome to Take Creative Control of your DSLR Camera.
You have taken an important step in improving your
photography skills by enrolling in this course. You will
soon be creating gorgeous photographs of your family,
vacations, pets or whatever you like to photograph.
Practice, practice, practice. How many times have you
heard that when you were growing up? Learning how to
use a camera is not much different than learning a sport
or an instrument. The adage “practice makes perfect,” is
fitting for photography as well. Great photography requires
second nature technical expertise (left brain) and a creative
sense (right brain). This will come in time, however you
must practice, shoot, and keep good records to be a good
photographer.
This booklet is divided into 13 lessons. Each lesson
focuses on one topic only. It is important that you fully
understand a lesson before you proceed to the next one.
This step-by-step lesson plan enhances the learning
process, so you can absorb one concept before you
advance to the next lesson. Each section concludes with a
funsignment, which I highly encourage you to complete.
The hands-on segments are your chance to demonstrate
that you have learned the materials and are ready for the
next section.
My goal in this course is to teach you how to pre-visualize
your photography and make creative control decisions, so
you are the brains behind your camera. I believe in nailing
the proper techniques in the camera, so you will spend less
time tweaking behind the computer. As a classically trained
photographer, I teach the technical sections first before I
teach art & composition. Yes, having the eye is important;
however, capturing images correctly in terms of exposure
and lighting are fundamental to photography.
Let’s go over the equipment you’ll need for this course.
1. A digital SLR camera; any brand will do.
2. A tripod is recommended but not required.
3. A memory card with at least 16 GB of storage.
4. Back up batteries and a portable battery charger.
5. A lens; you can begin the class with just one.
6. A protective covering for your lens; either a lens cap,
skylight filter or UV filter. A lens hood is also needed to
prevent lens flare.
7. Your camera’s manual.

Take Creative Control of Your DSLR Camera • © 2014 Mary L. Buck • www.studio2point8.com 5previous nextcontents
About the InstructorMary Buck started her photography journey when she was just 18 years old. She was
inspired by her older brother, who was already working as a photographer. She worked the
corporate life until 1997 when she decided to open up a portrait studio in Duluth, Georgia
called Lightscapes Photographic Artwork .
In 2003, she started to teach photography classes to just a handful of film
photographers. Ten years later, she continues to teach and has had hundreds
of students in various levels of photography classes — from beginner to
advanced including workshops on lighting, still lifes, and Photoshop. She
teaches classes in person at her Studio 2.8 Lightscapes Learning Center in
Duluth. In 2014 she started her online classrooms.
Mary is a Certified Professional Photographer with the Professional
Photographers of America and was recently awarded the PPA Craftsman
Degree. Her photographs have been published in many well known
publications such as Woman’s Day, Forbes, and Landscape Magazine. She
continues to operate her photography studio as well as teach classes.
Her favorite quote is “Don’t cry because it is over, smile because it
happened.” by Dr. Suess. She lives by that motto of not being afraid to try
new things.Photo by Amryn Soldier

Take Creative Control of Your DSLR Camera • © 2014 Mary L. Buck • www.studio2point8.com 6previous nextcontents
Lesson
Notes1
Understanding and learning the aperture is the first
lesson in creative control of your DSLR camera. Aperture is
defined as: the size of the lens opening through which light
passes to expose your camera’s image sensor. Synonyms
with aperture are: stop, f-stop, lens opening
and diaphragm.
With an DSLR camera you can set your aperture with
either the aperture priority setting or a manual setting. We
will go over the aperture priority setting in this lesson.
Aperture priority: abbreviated as Av (Aperture value) for
Canon and A for Nikon. (Check manual for other camera
brands). In this mode, you set the aperture and the camera
automatically sets the shutter speed to give the correct
exposure. (More on shutter speed in the next section).
The full f-stops (apertures) are:
f/1.4, f/2.0, f/2.8, f/4, f/5.6, f/8, f/11, f/16, f/22, f/32
This is known as the Aperture Scale.
(Some cameras will not have all of these f-stops, but all have
5.6, 8, 11,16, 22. The range of f-stops is a function of the lens,
not the camera.)
This sequence shows a doubling/halving of the amount
of light. For example f1.4 lets in twice as much light as
f2.0 and f22 lets in ½ as much light as f16. The smaller the
number, the larger the lens opening and the more light
reaches the sensor. This is backwards to most thinking, but
think of it as your eyes; your iris will open up in low light
and close down in more light.
One-third stops are also available on most DSLR cameras.
Numbers that appear on your LCD panel in between the
f-stops listed to the left are 1/3 f-stops. These additional
stops make exposures more accurate.
Aperture
Large lens opening f/2.8 Small lens opening f/22
Lens sizes decrease as you close down your lens.

Take Creative Control of Your DSLR Camera • © 2014 Mary L. Buck • www.studio2point8.com 7previous nextcontents
Notes
Lesson
1 Aperture
The main purpose of using aperture priority mode is to
control the depth of field. Depth of field is the amount of
distance between the nearest and farthest objects that
appear in acceptably sharp focus in a photograph. Depth of
field is particularly important in landscapes where a small
aperture (f16 or f22) is necessary if objects in foreground,
middle distance, and background are all to rendered
sharply. A larger aperture (f2.8 or f4) is desired to throw
the background out of focus (known as selective focus)
and make it less distracting. This is effective for portraits of
individuals or for flower photographs (my favorite).
There are three factors which contribute to the depth of
field:
1. The lens opening. The larger the lens opening (f/5.6 or
wider) the blurrier the background will be.
2. The focal length of the lens. The longer the focal
length (if you have an 18-55mm kit lens, 55mm is the
longest) the blurrier the background will be.
3. Distance between the camera and the subject. The
closer you are to your subject (called filling the frame)
the blurrier the background will be.
The inverse is true for sharper foregrounds and backgrounds.
The inverse relationship rule states:
• Large lens opening (f2.8) gives you a small amount of
depth of field known as a shallow depth of field.
• Small lens opening (f22) gives you a large amount of
depth of field known as an extreme depth of field.
Other than controlling depth of field, the aperture has
other creative functions. When shooting in dim lighting,
a photographer may have to open up (f2.8) to let in more
light. In bright sunlight, one may have to close down (f22)
to let in less light.
In order to grasp this section you will need to think in
“stops”. When you open up, you move to a larger aperture
to let in more light and create a shallow depth of field.
When you close down, you move to a smaller aperture to
let in less light and create an extreme depth of field.
Shallow depth of field shot at f/2.8
Maximum depth of field shot at f/16

Take Creative Control of Your DSLR Camera • © 2014 Mary L. Buck • www.studio2point8.com 8previous nextcontents
Notes
Lesson
1 Aperture
Funsignment:Part 1
1. Set the ISO to auto.
2. Set your camera on AV or A for aperture priority using the mode dial. The mode dial is located on the top of your camera on either the right or left side.
3. Move the main dial on the top of your camera (refer to manual) and set the aperture to 5.6. Then turn dial to the right until you go through each full f-stop 5.6, 8, 11, 16, 22.
4. Take five exposures, using the above f-stops, of a flower, pine cone or any object outside, making sure there is background (see photos above). Move in as close as your lens permits.
Part 2
1. Next take five exposures of a landscape and include some foreground, the subject and some background. Use the same f-stops.
2. Look at your images and compare results.
Are you seeing that a larger aperture results in a shallow depth of field making the background blurry? The smaller aperture (f16 & f22) gives you a sharper image all around. Which do you prefer? Study your results and when you are satisfied that you understand aperture you are ready for the next lesson.
Comparison of six different f-stops with the pine cone as the subject.

Take Creative Control of Your DSLR Camera • © 2014 Mary L. Buck • www.studio2point8.com 9previous nextcontents
Lesson
Notes
Understanding and learning shutter speed is the second
lesson in creative control of your DSLR camera. The shutter
speed is the amount of time a camera’s shutter is held open
when taking a photograph. The length of time the shutter is
open allows light to reach the camera’s image sensor.
With an DSLR camera, you can
manually set your shutter speed with
either the shutter priority setting or
a manual setting. We will go over the
shutter priority setting in this lesson.
Shutter priority: often abbreviated Tv (Time value) for
Canon and S for Nikon. (Check your manual for other
camera brands). In this mode you set the shutter speed
and the camera automatically sets the aperture to give the
correct exposure.
The main purpose in setting the shutter speed is to capture
or blur action. The most common shutter speeds are:
1/4, 1/8, 1/15, 1/30, 1/60, 1/125, 1/250, 1/500, 1/1000
This is known as the Shutter Speed Scale.
These units are measured in fractions of a second so 1/30
is “1/30th of a second.” “1/30th of a second” has a slower
shutter speed than “1/60th of a second” so it lets in more
light. “1/125th of a second” is a faster shutter speed than
“1/60th of a second” so it lets in less light and freezes action
more than “1/60th of a sec.”
Let’s go over some real-life situations where you would
choose shutter priority over aperture priority:
1. To stop sports action: a soccer player, a cheerleader or a
runner. Shutter speeds used to stop action are typically
1/250 or faster.
2. To blur action. Waterfalls are more aesthetic when they
are captured with a slow shutter speed. The blurry,
milky look of the water is only achieved with a slow
shutter speed of 1/15 or slower.
3. To capture the ambient light of a sunrise or sunset.
Slow shutter speeds of ¼ sec or less are effective for
capturing these scenes. The longer the shutter is open,
the richer the colors. Think of the sensor as a sponge
which absorbs the ambient light.
BE CAREFUL not to handhold your camera with shutter
speeds of 1/30 or slower, or your photo will be blurry.
Most people have a tolerance level of 1/30th second. You
will need to test this for yourself to see what your tolerance
level is. Try hand-holding your camera and photograph a
still object at 1/15, 1/30 and 1/60 sec. Are all images sharp or
do they become blurry as the shutter speed decreases? If you
Shutter Speed2

Take Creative Control of Your DSLR Camera • © 2014 Mary L. Buck • www.studio2point8.com 10previous nextcontents
Notes
Lesson Shutter Speed2are using a telephoto lens, then the shutter speed that you
can hand-hold will be the reciprocal of the focal length of the
lens. Ex. 200mm lens, you can handhold at shutter speeds
of 1/200 sec or faster. If your lens has Vibration Reduction
(Nikon) or Image Stabilization (Canon) you can hand hold
your camera at slower shutter speeds. 1/3 shutter speeds are
also available on most DSLR cameras.
To fine tune exposures, fractional stops are also provided
in 1/3 stop increments. (Ex. 1/40 sec and 1/50 sec are in
between 1/30 sec and 1/60 sec.) In this lesson we only
talk about the full shutter scale, so that you can better
understand the relationship among shutter speeds, however
full shutter speeds and the ones in between are used in
everyday use.
To fully understand shutter speeds, let’s take a look at the
shutter speeds on your camera. Set your mode dial on top
of the camera to TV or S. Turn the main dial (the same one
you used for the apertures) all the way to the left until you
see 30’’. This stands for 30 seconds. Now with each turn to
the right, you will see a succession of shutter speeds from
30’’ all the way to the last shutter speed, which is the fastest.
(My camera’s fastest shutter speed is 1/8000 second). Go
slowly, through the rotation and notice all the shutter speeds
available on your camera. When you reach a number without
the ’’ second mark, (4, for example) it means ¼ second. (Some
cameras show it as fraction and others don’t.) You’ll see a
lot of shutter speeds on your camera; most of them you will
never use. Shutter speeds are a function of your camera, not
your lens, so your shutter speeds cannot be changed.
Funsignment:Part 1
1. Have someone twirl a two-tone umbrella in front of you and photograph it using the 7 shutter speeds, or
2. Photograph a moving object using 7 shutter speeds starting at 1/15 sec, 1/30, 1/60, 1/125, 1/250, 1/500, 1/1000.
Part 2
3. Photograph a waterfall, fountain or water sprayed out of a hose at the seven shutter speeds.
Compare results. What do you like the best?
Slow shutter speed — 1/15 second.
Fast shutter speed — 1/500 second.
Take Creative Control of Your DSLR Camera • © 2014 Mary L. Buck • www.studio2point8.com 11previous nextcontents
Lesson
Notes
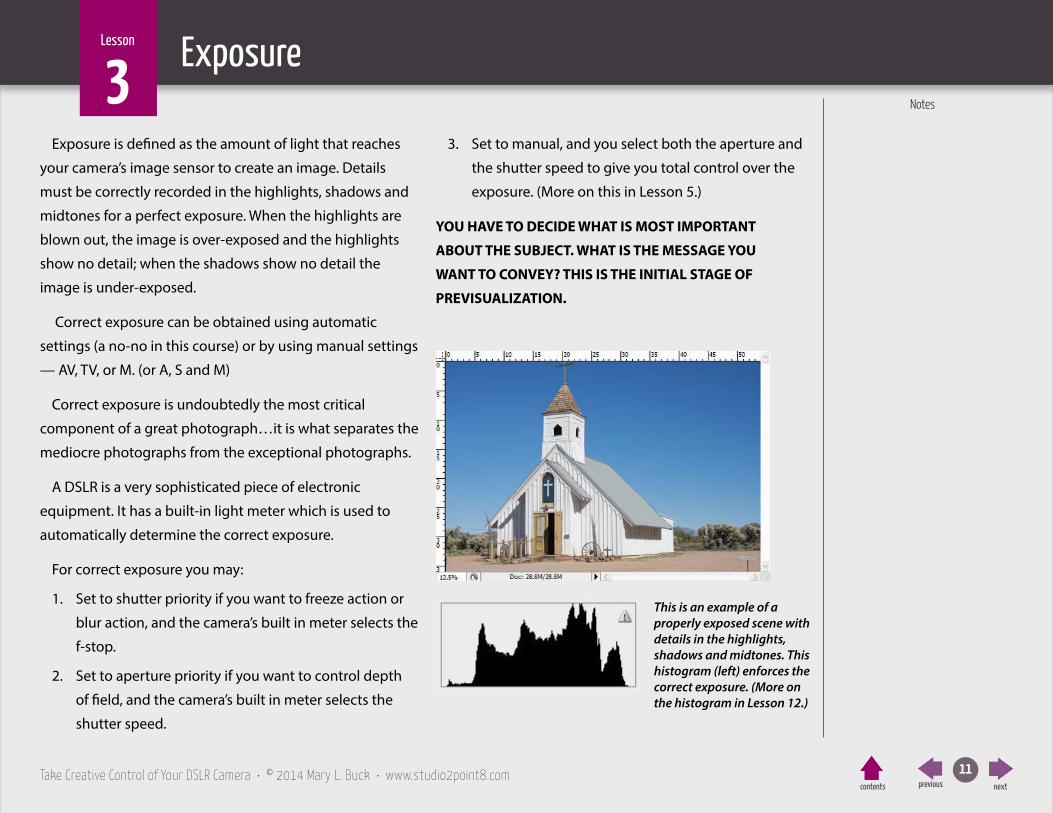
Exposure is defined as the amount of light that reaches
your camera’s image sensor to create an image. Details
must be correctly recorded in the highlights, shadows and
midtones for a perfect exposure. When the highlights are
blown out, the image is over-exposed and the highlights
show no detail; when the shadows show no detail the
image is under-exposed.
Correct exposure can be obtained using automatic
settings (a no-no in this course) or by using manual settings
— AV, TV, or M. (or A, S and M)
Correct exposure is undoubtedly the most critical
component of a great photograph…it is what separates the
mediocre photographs from the exceptional photographs.
A DSLR is a very sophisticated piece of electronic
equipment. It has a built-in light meter which is used to
automatically determine the correct exposure.
For correct exposure you may:
1. Set to shutter priority if you want to freeze action or
blur action, and the camera’s built in meter selects the
f-stop.
2. Set to aperture priority if you want to control depth
of field, and the camera’s built in meter selects the
shutter speed.
3. Set to manual, and you select both the aperture and
the shutter speed to give you total control over the
exposure. (More on this in Lesson 5.)
YOU HAVE TO DECIDE WHAT IS MOST IMPORTANT
ABOUT THE SUBJECT. WHAT IS THE MESSAGE YOU
WANT TO CONVEY? THIS IS THE INITIAL STAGE OF
PREVISUALIZATION.
Exposure3
This is an example of a properly exposed scene with details in the highlights, shadows and midtones. This histogram (left) enforces the correct exposure. (More on the histogram in Lesson 12.)

Take Creative Control of Your DSLR Camera • © 2014 Mary L. Buck • www.studio2point8.com 12previous nextcontents
Notes
Lesson Exposure3Have you figured out that f-stops and shutter speeds go
hand in hand? If you open up a full f-stop, the shutter speed
has to be twice as fast to maintain the same exposure. The
following chart shows the relationship between the two
controls; The following exposures are all equal. Note that
although the exposure will be the same, the results will
differ due to the differences in the depth of field.
Aperture Shutter Speedf/22 1/15f/16 1/30f/11 1/60f/8 1/125
f/5.6 1/250f/4 1/500
f/2.8 1/1000
A change in a number of units of exposure in one
component combined with a change of the same number
of units of exposure in another component will result in the
same exposure.
Light is measured in stops. Start thinking in stops:
• Opening up – adding light on the sensor, using a
larger aperture, using a smaller f/stop number, using a
slower shutter speed.
• Closing down – subtracting light, using a smaller
aperture, using a larger f/stop number, using a faster
shutter speed.
Closing down
f/1.4 f/2 f/2.8 f/4 f/5.6 f/8 f/11 f/16 f/22 f/32
Opening up
Closing down
1/4 1/8 1/15 1/30 1/60 1/125 1/250 1/500 1/1000
Opening up
Funsignment:Photograph a subject outdoors in aperture priority. Set your ISO to 100. You will need to use a tripod. Start at f/5.6 and close down a full stop until you get to f/22:
f/5.6 f/8 f/11 f/16 f/22
Notice how the shutter speed changes each time. It is opening one stop as you close down one stop with the aperture. Look at your results. Each photo will have the same exposure but the result may be different if you have a foreground or background surround the subject.
Aperture:
Shutter Speed:

Take Creative Control of Your DSLR Camera • © 2014 Mary L. Buck • www.studio2point8.com 13previous nextcontents
Lesson
Notes
ISO is an acronym for International Organization for
Standardization, which is a group that sets standards for
all sorts of things. In photography, they set the standard for
how sensitive a camera’s image sensor is to the amount of
light present.
ISO (formerly known as ASA or film speed) has not
changed its meaning since the film days. The only change
with digital photography is that a DSLR camera’s ISO can be
adjusted with every image. With film you were stuck with
the same ISO for the entire roll of film.
In digital photography ISO measures the sensitivity of
the image sensor. The same principles apply as in film
photography—the lower the number, the less sensitive
your camera is to light. So you would use a low ISO on a
sunny day and a high ISO in the shade, early evening or
indoors.
Below is the ISO scale:
100 sunny days200 bright cloudy days400 shade, dark cloudy days, or about one hour
before sunset, one hour after sunrise800 indoors or right before sunset or sunrise1600 indoors ( auditoriums), night scenes. May
result in noise*3200 indoors or outdoors in the evening. May
result in noise**6400 indoors or outdoors in the evening. May
result in noise**
To fine tune exposures, fractional ISO’s are also provided
in 1/3 stop increments. (Ex. ISO 250 and ISO 320 are
between ISO 200 and ISO 400). In this lesson we only talk
about the full ISO scale, so that you can better understand
the relationship among ISO’s however full ISO’s and the
ones in between are used in everyday use.
ISO4
*Noise is a degradation in image quality caused by using an overly high ISO, a poor sensor, a slow shutter speed, or a combination of the three. You will notice noise more on a computer monitor than on your LCD. It will appear pixilated and have discoloration. Noise can sometimes be corrected with imaging software. Your camera may have also have a setting for noise reduction. You want to enable this feature when you shoot with high ISO’s.
**Not all camera models have the higher ISO’s.

Take Creative Control of Your DSLR Camera • © 2014 Mary L. Buck • www.studio2point8.com 14previous nextcontents
Notes
Lesson ISO4Most DSLR cameras offer an auto setting for ISO. You
should not rely on the auto setting if you want to be able to
understand the exposure triangle (next lesson).
ISO is the third part of the puzzle in the exposure formula.
Every exposure will consist of shutter speed, aperture
and an ISO. Now let’s look at the relationship among ISO,
aperture and shutter speed.
The following exposures will all result in the same
exposure but the results could differ.
100 ISO 1/60 sec. f/8200 ISO 1/60 sec. f/11400 ISO 1/60 sec. f/16800 ISO 1/60 sec. f/22
Shot at ISO 800, right before sunset.
An indoor scene shot at ISO 1600.
Funsignment:Photograph the same subject 3 times during the day
1. Right after sunrise
2. Mid-day
3. Right before sunset.
Set camera to aperture priority at f/5.6 and use a shutter speed where you can hand-hold your camera. Change the ISO to maintain the settings and notice how high you will need to raise your ISO for 1 & 3. Enable NR for the late day shot. Shoot one photo without NR and one with NR. Compare results.

Take Creative Control of Your DSLR Camera • © 2014 Mary L. Buck • www.studio2point8.com 15previous nextcontents
Lesson
Notes
So far you have learned how to set the Aperture Priority
(when you control the aperture and the camera sets the
shutter speed) and the Shutter Priority (when you control
the shutter speed and your camera sets the aperture).
There is another method of setting your exposure which
is entirely manual, allowing you to set both the aperture
and the shutter speed. The camera’s light meter still
determines the exposure; your job, as the photographer, is
to center the exposure level indicator in the “0” mark on the
gauge if you want a normal exposure.*
Below is what the exposure gauge looks like in the
viewfinder of a Canon DSLR.
Manual setting: abbreviated as M on the mode dial on
most DSLR cameras. Your camera displays a gauge which you
can view on the LCD or in the viewfinder. The gauge has a
center with several notches to the left and to the right. When
the exposure level indicator is dead center, the image is
exposed correctly per the camera’s light meter reading. That
is fine, unless you are photographing a subject with a bright
background or a subject with a dark background.
A wise photographer chooses manual mode so he
or she can control the light and
intentionally over-expose or under-
expose an image based on his or her
artistic vision.
The best option for new
photographers is to shoot in aperture or shutter priority
until they are comfortable. Then try manual mode, since
shooting in manual requires practice and an understanding
of the exposure triangle. Once you are a seasoned pro, you
will know what types of scenes you prefer to over-expose or
under-expose.
Let’s start with some basic rules. Your camera has a built-
in light meter that reads the light reflected back from the
subject.
RULE #1 - you must point your camera at your subject
while taking a meter reading. Every twist or turn you make
away from your subject could result in a different reading
because the light is different.
WHAT DO I MEAN BY TAKE A METER READING?
Point your camera towards the subject and set the aperture
or shutter so the exposure level indicator is in the middle of
the gauge.
Manual Exposure5
Manual Mode
*Please note: there are several other ways to adjust exposure on a DSLR camera, such as bracketing and adjusting exposure with the +/- button.

Take Creative Control of Your DSLR Camera • © 2014 Mary L. Buck • www.studio2point8.com 16previous nextcontents
Notes
Lesson Manual Exposure5RULE #2 - You must consider what is most important
about the image and set your aperture or your shutter
speed accordingly. If you desire a shallow depth of field
(blurry background), then set your aperture to f/5.6 or
wider. Next set your shutter speed until the exposure level
indicator on the gauge is in the middle. If you desire to stop
action then you set your shutter speed to 1/250 sec and
next set your aperture until the exposure level indicator is
in the middle. Learn how to use the dials on your camera
to do this. Look in your camera manual under “manual
exposure” and practice this until you can do it without
thinking twice about it.
This is a normal exposure with
the exposure level indicator in
the middle on the zero. (Canon)
RULE #3 - You must over-expose when you are
photographing something white and under-expose when
you are photographing something black. A built-in light
meter reads the light as 18% gray for most images that are
average tones. But for white it reads it as 36% and for black
it reads it as 9%. See what happens when I photographed a
white subject and a black subject using a normal exposure.
The white is gray and the black is gray. (Top 2 photos, next
column.)
Now see what happens when I over-expose the white
subject and under-expose the black image. They look
better, don’ t they?
To over-expose, set either your aperture or shutter so
the exposure level indicator is to the right of the zero on
a Canon or to the left on a Nikon. To under-expose set
either the aperture or the shutter so that the exposure level
indicator is to the left on a Canon or right on a Nikon. Do
this while your camera is pointed at your subject.
This is an over-exposure with
the exposure level indicator on
+1. (Canon)
White background with normal exposure.
Black background with normal exposure.
White background taken at +3 over-exposure.
Black background taken at -3 under-exposure.

Take Creative Control of Your DSLR Camera • © 2014 Mary L. Buck • www.studio2point8.com 17previous nextcontents
Notes
Lesson
Notice the aperture is the same as the previous page
but the shutter speed is slower. It is actually about 1 stop
brighter because a slower shutter speed lets in more light.
This is an under-exposure with
the exposure level indicator on
-1. (Canon)
Again the aperture is the same
the aperture is the same as the meter reading in the first
illustration on the previous page, but the shutter speed
is faster. It is about 1 stop darker because a faster shutter
speed lets in less light.
RULE #4 – You can also change the ISO to change the
position of the exposure level indicator. The ISO is the third
part of the exposure triangle. Be careful you do not increase
it too much which will result in noise.
Manual exposure is used in limited situations. It is there
if you need it; however, it is not my preferred method
of shooting. AV and TV (or A and S) are superior, and in
most cases, will provide optimal results. With manual
exposure, the exposure level indicator may waver back and
forth if you change lighting situations frequently. Many
professionals love it and others hate it. You will have to
decide if you can work with a manual setting or if aperture
priority or shutter priority are your thing.
Manual mode allows the photographer to intentionally
over-expose or under-expose for more control in
optimizing images. Examine the images below. Which
exposure do you prefer?
A really good book on exposure is “Understanding
Exposure” by Bryan Peterson. It was written in 1990 and is
about exposure with film cameras, but the fundamentals
are the same.
5 Manual Exposure
Left, normal exposure. Below, under-exposed by 2 stops.

Take Creative Control of Your DSLR Camera • © 2014 Mary L. Buck • www.studio2point8.com 18previous nextcontents
Notes
Lesson Manual Exposure5Left, normal exposure. Right, over-exposed by 1 stop.
Funsignment:Part 1
Over-expose a subject that is against a bright background or that you think would look better lighter. Shoot it an normal exposure and compare the results.
Part 2
Under-expose a subject that is against a dark background or that you think would look better a little darker. Shoot it at normal exposure and compare the results.
Advanced: Photograph a subject using manual mode at f/5.6 and at 1/250 sec. Adjust the ISO until you have a correct exposure
Photograph a subject using manual mode at f/5.6 at 1/15 sec (use a tripod) and adjust the ISO until you have a correct exposure.
f/4.0 at 1/250 sec required a high ISO for a
correct exposure.

Take Creative Control of Your DSLR Camera • © 2014 Mary L. Buck • www.studio2point8.com 19previous nextcontents
Lesson
Notes
Seeing the Light6In this lesson we will study the characteristics of natural
lighting. You will learn how to “see the light”, and by
doing so, you will be able to produce beautiful, well lit
photographs of people and landscapes.
Photography is derived from two ancient Greek words:
“Photos” meaning “light” and “graphos” meaning “to write”.
Photography is to “write with light” or “paint with light”.
Imagine every time you photograph a person or object,
that you have a blank canvas in front of you. You are
painting with light. Light can be added, removed, modified,
reflected or sculpted in order to optimize the lighting for
the subject.
Following are the five major types of outdoor natural
lighting:
1. Top lighting
This type of light is found in the mid-day around high
noon. It is recommended to avoid this time of day for most
photography. In portraits, the overhead sun causes deep
shadows under the subject’s eyes (known as raccoon eyes)
and unsightly highlights on the subject’s forehead and tip
of their nose. Landscape photographs will appear flat in
this type of lighting. This lighting is considered to be the
harshest.
2. Side lighting
Sidelight is found when the sun is above horizon level
but not straight above. The general times when this type of
lighting can be found are before 11AM and after 4PM. Place
your subject with the sunlight illuminating one side of his
or her face. This can cause a dramatic effect and it evokes a
mood. If you do not want a dramatic effect, you can correct
this easily by placing a reflector (you will need an assistant)
which will bounce light back onto the shadow side. A single
piece of foam core can act as a reflector. Landscapes can
appear unbalanced with side lighting.
3. Front lighting
Just as it sounds, this is when
the subject has the sunlight in
his or her face. It can cause a
golden, suntan look; however
the drawback is that most people
squint. This following technique
can be useful if you want to
achieve the sun-goddess look:
Have your subject look down
while you count to three. On the
count of three, have the subject
look up and smile. Hopefully his or her eyes will be mostly
Top light.

Take Creative Control of Your DSLR Camera • © 2014 Mary L. Buck • www.studio2point8.com 20previous nextcontents
Notes
Lesson Seeing the Light6
open. Front lighting can be effective if used properly.
4. Back lighting
This is my favorite type of lighting. Place the subject with
the sunlight on his or her back. The best time of the day for
backlighting is early morning or late afternoon. However,
beware of lens flare: You will need a lens hood to prevent
flare. (See next page for more about lens flare.) You will
notice a beautiful halo effect on the subject’s hair. Now
the subject’s face is in the shadow, so use a little fill flash
(more on this in next lesson) and PRESTO…! You have a
professional looking photograph. Backlighting can also be
used for flowers and pets.
5. Open Shade
You can always play it safe in the shade because the light
is even. You should choose a location where the light is the
same in front of and behind the subject; in other words,
do not place your subject in the shade if the background
is sunny. In this type of light, be prepared to use a tripod
if it is too dark. (Which can result in a slow shutter speed.)
Colorcasts from the green surroundings can arise; therefore,
the white balance preset should be set on shade. Portraits
will usually need to be lit with a fill flash (more on fill flash
and white balance in next lessons).
The best time of the day for portrait and landscape
photography is in the morning before 10am and afternoon
after 4-5pm (depending on the time of the year). For early
birds, landscapes can be captured in their best natural light
right around sunrise. By choosing the correct lighting and
the time of the day you can transform a simple subject into
a fascinating display of nature or a gorgeous portrait of
your family!
Notice how the photograph below portrays a very
effective use of side lighting, shallow depth of field, rule of
thirds and finally, a blending of the elements. Did I
previsualize this shot? You bet!
The “Sun-Goddess” Look

Take Creative Control of Your DSLR Camera • © 2014 Mary L. Buck • www.studio2point8.com 21previous nextcontents
Notes
Lesson Seeing the Light6According to Cambridge in Color, “ Lens flare is created when
non-image forming light enters the lens and subsequently
hits the camera’s film or digital sensor. This often appears as
a characteristic polygonal shape, with sides which depend
on the shape of the lens diaphragm. It can lower the overall
contrast of a photograph significantly and is often an
undesired artifact, however some types of flare may actually
enhance the artistic meaning of a photo. Understanding lens
flare can help you use it—or avoid it —in a way which best
suits how you wish to portray the final image.
How to avoid lens flare
• Always use a lens hood
• Remove the lens filter
• Block the sunlight with a tree or solid object.
At right are some of the pictures that I took that show lens
flare and how I corrected in with a lens hood. I took the
photos at 6:45 pm, about 1 1/2 hours before sunset, when
the sun was low in the horizon. I focused on the bridge as the
subject and shot in vertical format and included the sun in my
viewfinder as it filtered though the trees.
Top left: lens flare due to not using a lens hood.
Top right: lens flare reduced due to using a lens hood.
Left: lens flare further reduced using a lens hood and blocking sun with tree.

Take Creative Control of Your DSLR Camera • © 2014 Mary L. Buck • www.studio2point8.com 22previous nextcontents
Notes
Lesson
6 Seeing the Light
Front light
Funsignment:Photograph a friend or family member throughout the day in the five different types of lighting. In the shade or with back-lighting take an additional photo using fill-flash (just pop up your flash and take the picture). Set your camera to aperture priority at 5.6 for all the portraits. Record your exposure and compare results.
Shade without fill flash.
Shade with fill flash.
Side light no reflector.
Side light with reflector.
Back light no fill flash.
Back light fill flash.

Take Creative Control of Your DSLR Camera • © 2014 Mary L. Buck • www.studio2point8.com 23previous nextcontents
Lesson
Notes
Fill flash is a feature found on almost all DSLR cameras
with its built-in pop-up flash. To pop up your flash, look for
a button with the universal flash lightening symbol on the
side (right side if front of camera is facing you). When you
press it, your flash will pop up. It is called fill flash when
used outdoors with aperture priority, shutter priority or
manual exposures.
Fill flash fills in the shadows for portraits and brightens up
the eyes with a catch light. It is typically used outdoors and
is most effective when the subject is in the shade or is back-
lit. The secret to fill flash is using it sparingly so you don’t
produce an overly lit, harsh look.
Fill flash is most effective when it is under-exposed by
one of two stops. For example: a flash set at -2 gives out
two less units of light than at its default setting of 0 (full
flash). This produces a softer light than full flash and is just
enough light to brighten the eyes with a catch light. Since
this is not the default setting, you will want to make sure to
reset the flash to its normal setting for indoor shots, so they
are not under-exposed.
To set you flash exposure to -2 or -1, refer to your manual
and look up “flash exposure compensation.” On most
cameras you will need to depress the flash button and the
button that has a +/- at the same time, and move a dial to
the -2 mark. On some cameras, you use a menu setting.
Pop-up flashes on DSLR cameras are inadequate because
they do not have enough power to go beyond four to
six feet. An external flash unit is necessary if you have a
need for more power. Flash power is measured by a guide
number. The guide number is a term that has been used
Fill Flash7
No fill flash Fill flash 0
Fill flash -1 Fill flash -2

Take Creative Control of Your DSLR Camera • © 2014 Mary L. Buck • www.studio2point8.com 24previous nextcontents
Notes
Lesson Fill Flash7since flash units were first manufactured. The larger the
guide number, the more powerful the flash.
E-TTL
Digital camera flash units typically feature three
standard modes: E-TTL, Auto and Manual. In this program I
recommend using E-TTL as a beginner. When you are more
advanced, I suggest you dig deeper to learn the automatic
and manual features of a flash.
Evaluative through the lens metering means that a
sensor inside the camera reads the amount of light being
reflected off of the camera sensor during the exposure.
When the sensor determines that the exposure is sufficient,
it terminates the flash pulse. E-TTL fill flash helps fill in the
outdoor shadows and adds a sparkle to the eyes.
Flash has a max sync speed of 1/250 sec for Canon and
1/200 sec for Nikon. You cannot shoot faster than these
shutter speeds with a pop-up flash. With an external flash
unit you can over-ride the settings.
For more advanced flash users, there are several
techniques you can use with an external flash unit. First of
all, you can shoot wireless. An off-camera flash will result
in softer and more controlled lighting. Second, you can
bounce flash off the ceiling or walls when used indoors.
This can also provide a softer, studio type of lighting and
prevent shadows on the wall caused by the subject(s).
Using a bounce flash will result in a longer camera-to-
subject distance so you will need to compensate for this by
having a flash with a large guide number and or modifying
your aperture or distance. The built-in features of your flash
will help you determine this. Lastly, you can add diffusers
or modifiers to your flash unit that will produce studio-like
images.
As with all photography, you will need to take test shots,
and lots of them, to see what system works best for you.
The digital flash unit will have an instruction manual that I
highly recommend reading.
Funsignment:1. Photograph a person in the shade or with back-
lighting.
2. For each scene take 4 shots: -2, -1, 0 and no flash.
3. Compare the results to determine which setting you like the best.
Don’t forget to use a lens hood for the back-lighting.

Take Creative Control of Your DSLR Camera • © 2014 Mary L. Buck • www.studio2point8.com 25previous nextcontents
Lesson
Notes
White balance is a setting in digital photography which
can improve an image. Adjusting white balance was one
technique that was not needed in film photography. In
this lesson I hope to take the mystery out of white balance
settings and to show you how to use this feature to
optimize your photographs.
The definition of white balance is:
A camera setting that compensates for the differences
in color temperature of the surrounding light. In digital
cameras the white balance must be adjusted to ensure that
all colors in the scene will be represented faithfully. It can
be adjusted automatically by the camera or manually, by
selecting presets (tungsten, fluorescent, etc.) or by aiming
the lens at a totally white surface (the white card) and
selecting custom white balance.*
A camera sets its color values (red, green and blue) based
on its value of white. Changes in color temperature can
cause color casts unless a white balance is set. For example,
shade has a high temperature setting (measured in degrees
Kelvin) and therefore has a bluish cast, unless a white
balance is set.
Beginner and amateur photographers can overlook an
off-color photograph because of their lack of knowledge
in evaluating proper color. Building this skill requires some
practice. To achieve the best results in correct color of your
photographs, you will need to shoot a lot of comparisons,
so you begin to educate yourself on the differences
between cool light vs. warm light and various other types
of color casts such as cyan and magenta.
There are four ways to set white balance in your camera,
we are going to cover 2 ways in this lesson.
Automatic white balance – AWB for Canon and AUTO
for Nikon. This setting will work most of the time but will
produce average results. Photographs in the shade will
have a slight bluish cast. The bluish cast may look normal
to you until you see the difference between a pre-set
white balance and AWB. You may also see color casts from
photographs taken indoors with mixed fluorescent and
tungsten lighting. Again, once you see the differences
in photos using custom white balance vs. AWB you will
probably not use this setting anymore.
Manual white balance – you can set the white balance
preset manually to suit the respective light source. The
following modes are found on most digital SLRs:
• Daylight – sun symbol
• Shade – house casting a shadow symbol
White Balance8
*Source: PC Magazine

Take Creative Control of Your DSLR Camera • © 2014 Mary L. Buck • www.studio2point8.com 26previous nextcontents
Notes
Lesson White Balance8
• Cloudy, twilight, sunset – cloud symbol
• Tungsten light – light bulb symbol
• White fluorescent light – fluorescent tube symbol
• Flash – lightning bolt symbol
To access the pre-sets, press the WB button on your
camera. Turn the main dial, and you will be able to view the
symbols and select them. Some cameras have words, along
with symbols. The images pictured to the right illustrate the
AWB and five presets. The basket of brightly colored flowers
was photographed in the shade.
Automatic Cloudy
Fluorescent Shade
Sunny Tungsten
Funsignment:Part 1
Photograph about 6–8 different colored objects in a basket. Place the basket in the shade and photograph it with 6 different presets (you can skip the flash preset)
Part 2
Photograph a person in backlight using fill flash set to your favorite FEC. Take two photographs; first one with white balance set to AWB or AUTO and second one with the flash preset.
Compare results. See if you notice a color cast. Determine the best white balance presets for your camera.
Photo taken in shade on AWB
Photo taken in shade with fill flash and the flash preset

Take Creative Control of Your DSLR Camera • © 2014 Mary L. Buck • www.studio2point8.com 27previous nextcontents
Lesson
Notes
Have you ever wondered what all those numbers are on
your lens barrel? In this lesson we will go over what those
mean, and learn about the different types of lenses and
filters. Understanding what lenses and filters can do, will
add more creative control to your photography.
Most of you probably have a lens that you purchased
as part of your camera kit. Some of you may have just
purchased the camera body and purchased your lens
separately. The following information will help you better
understand your equipment and if you need to upgrade
your lenses.
There are two types of lenses:
• fixed focal length (does not zoom)
• zoom (the focal lengths vary)
The focal length of a lens determines its angle of view,
and thus how much the subject will be magnified for a
given photographic position. Wide angle lenses have small
focal length numbers, while telephoto lenses have larger
focal length numbers.
The most common kit lens is the 18-55mm lens. This
means the focal length ranges from 18mm (wide angle) to
55mm (normal). Take a look at your lens now and see if you
can find its focal length.
The five focal length recommendations for photographers
are:
1. Wide angle: 18mm-35mm
2. Normal: 35mm-70mm
3. Portrait: 70mm-135mm
4. Telephoto: 135mm-300mm
5. Super telephoto: 300mm-500mm
Next, look for another set of
numbers on your lens that looks
something like this: 3.5 – 5.6. If
you have an 18-55mm kit lens,
it means that at 18mm your
lens has a maximum aperture
of 3.5; at 55mm your lens has a
maximum aperture of 5.6. Most
zoom lenses have a range of
apertures throughout the zoom.
Lenses with a greater range
of aperture settings provide greater artistic flexibility
in terms of both exposure options and depth of field.
Remember from Lesson 1: aperture is a function of the lens,
not the camera. The maximum aperture is perhaps the
most important lens aperture specification. A lens that has
Lenses and Filters9
Lens barrel indicates focal length and aperture ranges

Take Creative Control of Your DSLR Camera • © 2014 Mary L. Buck • www.studio2point8.com 28previous nextcontents
Notes
Lesson Lenses and Filters9a maximum aperture of 2.8 or more is known as a “fast”
lens (and is also more expensive) than a lens that has a
maximum aperture of 4 or 5.6.
Depth of field will vary with different focal lengths.
1. Wide angle lenses will have more depth of field at the
same f-stop
2. Telephoto lenses will have less depth of field at the
same f-stop
Good starter lenses should cover focal lengths from
18mm–300mm. The zoom lens is the most versatile, but
don’t rule out the Nifty Fifty, 50mm 1.8 lens which is a great
fixed focal length lens. I recommend that you purchase a
lens with the widest aperture that you can afford. Once you
have a fast lens that opens to 2.8 or wider you will wonder
how you ever lived without it.
Lenses must be dedicated to your camera type. Off-
brands such as Sigma or Tamron are not as expensive
as Canon and Nikon, and are considered adequate
alternatives.
Now let’s throw in a new wrinkle regarding the focal
length. Some DSLRs use a full-frame image sensor, while
most DSLRs use a smaller image sensor, usually APS size (or
roughly half-frame). With a smaller image sensor you will
need to apply a focal length multiplier to obtain the true
focal length of your lens. For example, the Canon 5D has a
full frame sensor so a 55mm lens is a true 55mm. Now, the
Canon 60D has smaller sensor and has a lens factor of 1.6
so the true focal length is 55 x 1.6 This means that a 55mm
lens will appear to have a focal length of 88mm. This means
that objects will appear closer in a camera with a smaller
sensor, than in a camera with a full frame sensor. Going to
22 mm lens 100 mm lens 200 mm lens
Below: you can see how the same object can be rendered differently using different focal lengths.

Take Creative Control of Your DSLR Camera • © 2014 Mary L. Buck • www.studio2point8.com 29previous nextcontents
Notes
Lesson Lenses and Filters9Africa? Use a 200mm lens with a Canon 60D and it will
perform like a 320 mm.
“Camera filters are transparent or translucent optical
elements that alter the properties of light entering the
camera lens for the purpose of improving the image being
recorded. Filters can affect contrast, sharpness, highlight
flare, color, and light intensity, either individually, or in
various combinations. They can also create a variety of
“special effects.“ —Ira Tiffen
Camera filters were used more commonly in film. Now
with post-processing capabilities of Photoshop and other
editing programs, they are rarely used; however I still
recommend three filters.
1. Polarizing filter – must be at right angle to the sun
• prevents glare
• colors appear more vivid
• increases saturation and contrast in cloudy blue
skies.
2. UV filter – provides midday protection from UV rays
and lens protection
3. Graduated neutral density filter – this filter is used
when you have a much lighter or darker foreground
than the background (or vice versa). One-half of the
filter is darker than the other half, so you can use the
darker half on the brightest part of the image (the
sky) to that you can retain some detail in the lighter
parts. It is necessary to use this filter to control the
exposure differences in the lightest and darkest parts
of the image.
Polarizing filter
(Photo courtesy of Sandy Kwas)
Funsignment:Use a zoom lens, and photograph an object using 5 different focal lengths, starting with the widest angle and ending with your most telephoto focal length. If you have more than one lens, use all of them. Record your exposure and focal lengths. Compare the results.

Take Creative Control of Your DSLR Camera • © 2014 Mary L. Buck • www.studio2point8.com 30previous nextcontents
Lesson
Notes
Learning the focusing tools on your DSLR camera will
improve your images dramatically.
Before I discuss focus there
is a very important first step
that you must take as soon
as you take your camera out
of the box. You must adjust
the diopter. The diopter is
adjusted with a dial to the
right side of the viewfinder. Every eye sees differently so
you must adjust it to your eye. Adjust it until you see your
subject in focus in the viewfinder. Go ahead and find your
diopter now and adjust it if needed.
This lesson has been divided into four sections:
1. Manual vs. auto focus
2. Using AF points
3. Selecting AF operation
4. Proper way to hold a DSLR camera
Manual vs. Auto Focus
With most lenses you have the option to shoot in auto
focus or manual focus. The majority of the time you will
shoot in auto focus. To shoot in manual focus look for a
switch on the side of the lens for A
and M (or AF and MF). Change it to
M and rotating the lower part of the
lens barrel (some lenses it is the upper
part) until your subject is in focus.
When you will need to use Manual Focus:
• Low light. Lenses need light for auto focus to work. If
you hear your lens grinding, then it is time to change
to manual focus.
• Low contrast. If you are photographing a subject with
low contrast the lens will not know what to focus on,
so you will have to switch to manual.
• When there are foreground elements in front of your
subject. If you are photographing a child behind a
fence, or an animal behind a cage, you may have to
switch to manual focus so the camera knows the
subject behind the foreground element needs to be
in focus.
Focus10
The camera’s auto focus could not
find this faint, but giant spider web,
so I switched to manual focus.

Take Creative Control of Your DSLR Camera • © 2014 Mary L. Buck • www.studio2point8.com 31previous nextcontents
Notes
Lesson Focus10AF Points:
• Knowing how to use
AF points on your DSLR
camera will help you
create better images.
• Look through your
viewfinder and you will
see a set of red squares
light up when you are using auto focus. These are
called AF points. Some cameras have as little as 7 and
some have an many as 50 or more.
• You can manually select an AF point when your
subject is not centered. This will ensure that your
subject will be in focus.
• Using AF points are most important when you are
desiring a shallow depth of field.
AF Operation:
When you press the AF button you can select:
• One shot – the most common method used to shoot
still subjects. Nikon calls this Single Servo.
• Al Focus - Camera focuses on the object and expects
that the subject is not moving but if and when it does
move the camera begins refocusing to ensure that
the subject is in focus. Is the least reliable of the three.
Nikon does not have this option.
• Al Servo – tracks moving subjects, so if your subject
moves closer or further away it updates the focus.
Nikon calls this Continuous Servo.
Improperly holding a DSLR camera results in camera
shake and blurry photos. All the focus tips in this lesson
are pointless if you
hold your camera
incorrectly. So it is
important that you
support the lens with
one hand and hold
the camera with the
other hand. Proper way to hold a DSLR Camera
Funsignment:Part 1
Practice using manual focus and photograph someone behind a fence. Try shooting in auto focus and manual focus.
Part 2
Draw a tic-tac-toe board on a large piece of foamcore. Draw thick X’s on the intersections. Stand in front of the board and photograph each X by adjusting the AF points on your camera.
AF points button on a Canon

Take Creative Control of Your DSLR Camera • © 2014 Mary L. Buck • www.studio2point8.com 32previous nextcontents
Lesson
Notes
DSLR cameras have several metering modes to select from:
1. Evaluative (Canon) or matrix (Nikon)
2. Spot
3. Center-weighted
Some cameras also have a partial-weighted mode.
The default setting for Canon is Evaluative and for
Nikon is Matrix mode. (Check your manual for other
manufacturers). It is the standard, all-purpose mode that is
used in most situations. The camera’s light meter evaluates
the entire scene and determines the exposure based on the
levels of lightness and darkness in the entire scene.
When your subject is surrounded by a light or dark
background, you will need to
change your metering mode, so
your subject is exposed properly.
The spot-metering mode is a
setting that should be used
when your subject is a tiny spot
in the middle of the frame. The
meter is weighted for the spot.
This mode is effective when you
are photographing a person on a
stage at a concert or auditorium.
The center-weighted metering mode is used when your
subject fills the center of your viewfinder and is larger
than a spot. You would adjust your mode to this type of
metering to prevent the subject from being over-exposed if
it has a dark background or under-exposed if it has a bright
background. The meter is weighed towards the center and
then averaged for the entire scene.
Metering Modes11Left: Used spot metering.
Right: Used evaluative metering mode.
Funsignment:Part 1
Photograph a dark subject against a light background using your evaluative/matrix metering mode and then spot metering mode.
Part 2
Do the same thing as above except photograph a light subject against a dark background.
Compare your results.Spot metering used for this lovely girl on a dark stage.

Take Creative Control of Your DSLR Camera • © 2014 Mary L. Buck • www.studio2point8.com 33previous nextcontents
Lesson
Notes
Have you ever noticed a graph on the back of your
camera when you replay your photos? Have you ever
wondered what it is? It’s called the histogram which is a
graph that shows the distribution of the image’s brightness
level and the brightness level of each primary color - red,
green and blue. Learning how to interpret the histogram
on your digital SLR camera can assist you in determining if
your exposure is correct. The histogram is your friend.
There are two different types of histograms:
• Brightness display shows the exposure level
distribution, overall brightness and gradation.
The horizontal axis indicates the brightness level (darker
on the left and brighter on the right) while the vertical axis
indicates how many pixels exist for each brightness level.
The horizontal axis represents 256 shades of gray from pure
black (0) on the left to pure white (255) on the right. The
darker the image the more spikes you will have on the left,
and the brighter the image the more spikes you will have
on the right. If the spike is too far to the left, you will not
have any details in the shadows and if the spikes are too
far to the right, you may not have detail in the highlights.
This is called clipping and when you lose detail, you lose
pixels which cannot be recovered. This is why I check the
histogram, at least for the first couple images, to see if I
need to adjust my exposure.
• RGB display shows color saturation of red, green and
blue and gradation.
The horizontal and vertical axis work the same way but
relate to the density of the colors. So for example, the more
pixels there are to the left, the darker and less prominent
the color will be and the more pixels to the right the
brighter and denser the color. If the histogram shows a lot
of spikes on the left the respective color information could
be lacking detail. If there are a lot of spikes on the right, the
color information could be too saturated and lacking detail.
Don’t worry if you don’t understand yet. Here is the
The Histogram12
A scene with mid-values showing the detail in the shadows and highlights as shown on the histogram.

Take Creative Control of Your DSLR Camera • © 2014 Mary L. Buck • www.studio2point8.com 34previous nextcontents
Notes
Lesson The Histogram12plain English: A digital camera sensor captures 256 shades
of gray from pure black to pure white. Mid-gray (and all
middle tones) are in the middle. Remember, black is on the
left and has a value of 0, and white is on the right and has a
value of 255. Mid grays have a value of around 128.
It is important to check the brightness level histogram
(you can disregard the RGB histograms for this course) for
clipping. Clipping occurs when a spike extends beyond
the vertical axis on the left or right sides of the graph. If
it extends beyond the left side, you are under-exposing
your image and will lose detail in the shadows. If it extends
beyond the right side you are over-exposing your image
and you may lose detail in the highlights. If you lose detail,
you have lost pixels which cannot be recovered. (You
can shoot in raw and recover some lost pixels, but that’s
another class).
So what do you do if you notice clipping? First of all, you
have to determine if the over-exposure or under-exposure
will result in an inadequate image. If clipping is due to a
bright sky in the background, that might not be a big deal.
If your subject is over-exposed you will want to correct that.
Some cameras have a display called highlight alert, which
is a blinking feature that shows where the over-exposure
is. If you lose detail in the background, (maybe it doesn’t
have any detail) you are okay. However, if lose detail (pixels)
in your subject, you will need to make an adjustment with
your exposure and open up an f-stop for a spike off the left
side and close down an f-stop for a spike off the right side.
Here is an example: You are shooting in AV (or A) mode
and your aperture is set to f/8. You notice a spike off the
left side, you would set your exposure compensation to +1
and +2 to intentionally over-expose your image. Take both
shots and recheck your histogram. If you notice the spike to
the right you would set your exposure compensation to -1
and -2 to intentionally under-expose your image. Take both
shots and check your histogram.
I hope that all makes sense. You can experiment with
different backgrounds and learn how to read your
histogram on your own digital SLR camera.
Shooting a dark background against a bright sky causes over-exposure.
LCD shows clipping and marching ants. The black area is where the over-exposure is.

Take Creative Control of Your DSLR Camera • © 2014 Mary L. Buck • www.studio2point8.com 35previous nextcontents
Notes
Lesson The Histogram12
Funsignment:1. Check you camera manual to find out how to access the
histogram display.
2. Take several photographs of dark, medium and light objects. Read your histograms and become familiar with the graphs displayed. Pay particular attention to the ends of the graph indicating the darkest or lightest shades of gray. If you notice spiking on either side re-adjust your exposure settings.
Do not be intimidated or frightened by this feature. Learning how to interpolate the graph can help you become a better photographer by having correct exposures.

Take Creative Control of Your DSLR Camera • © 2014 Mary L. Buck • www.studio2point8.com 36previous nextcontents
Lesson
Notes
Now that you have completed the technical lessons in this
course, it is time to move on to composition. Composition
is the artful placement of elements within an image to
create a balanced and meaningful photograph. The goal
of composing is to guide the viewer towards the most
important part of the image, usually the subject. Careful
composition can make an ordinary object a piece of artwork.
There are some general composition rules that we will
cover in this lesson.
1. Rule of Thirds
Imagine a tic-tac-toe board over your image. Now look
at the intersections in the upper left, upper right, lower left
and lower right.
A century old rule states that the subject should be
placed in one of these intersections. The theory is that if
you place points of interest in the intersections or along
the lines that your photo becomes more balanced and
will enable a viewer of the image to interact with it more
naturally. Studies have shown that when viewing images
that people’s eyes usually go to one of the intersection
points most naturally rather than the center of the shot.
The first example has the subject is the most logical
place, upper left, because we read from left to right. When
you utilize this space, turn the subject or have the motion
going to the right side of the image. This empty space is
called negative space.
You can also have two subjects in a rule of thirds scenario,
each in their own intersection. This draws an imaginary line
between the two subjects.
Any rule can be broken so experiment with setting your
subject in one of the four intersections and then centering it.
2. B&W Photography
Almost all cameras have a
monochrome setting so you can
shoot in black and white. Find
this setting and start shooting
in monochrome instead of
color. This is a helpful exercise
Composition13

Take Creative Control of Your DSLR Camera • © 2014 Mary L. Buck • www.studio2point8.com 37previous nextcontents
Notes
Lesson Composition13if you want to see how the
subject will appear as a B&W
photograph instantly, rather
than waiting for the post-
processing of the image.
Subjects that have tonality,
gradations of light, middle
and dark gray tones are great
candidates for B&W. Subjects
that have contrast and texture
will also look good as a black and white image.
Shooting straight out of the camera in monochrome will
teach you how to see the world in a black and white. You
will begin to see gentle variations in gray tones as well as
textures and shadows that you might not see in a color
photo. Look for interplay of light and dark, which can result
in interesting shadows. Always shoot the image in both black
and white and color. You cannot change a black and white
image to color, but you can change a color image to black
and white.
A black and white image can be powerful and speak to
you if it has the right combination of tonality, texture and
contrast. Go out for an afternoon and look for subjects that
possess these qualities and photograph them. You will be
amazed at how differently you view a subject.
3. Leading lines.
Leading lines can be found in
nature which lead to the subject.
Leading lines can be accentuated
by changing the angle or
perspective of the photograph.
Leading lines are everywhere and
using them effectively can greatly
enhance a subject. Examples of leading lines are fences,
shorelines, tree branches, streams, docks, and piers. The
most effective leading lines are diagonal lines.
Funsignment:Part 1
Photograph a subject is the 4 quadrants of the image. Compare results. Which do you like best? Do you see a positive impact that the negative space is making.
Part 2
Find a subject that has two of the three qualities: tonality, texture and contrast. Photograph it outdoors using the monochrome setting in your camera. What do you think of the b&w rendition?
Part 3
Photograph a leading line. Look for this feature outdoors or make up your own. Use a shallow depth of field. How do you think this impacts your subject?

Take Creative Control of Your DSLR Camera • © 2014 Mary L. Buck • www.studio2point8.com 38previous nextcontents
Bonus DefinitionsJust in case you haven’t had enough!
Click on term for a more detailed
description.
Jpeg — Joint Pictures Expert Group.
A algorithm for the compression of
digital image files. Jpeg is a standard
format which is used by all digital
cameras and read by all image
processing software.
Histogram — A graph which shows
the range of tones the digital camera
has captured for the shot. The left
edge of the graph represents the
darker tones and the right side of the
graph represents the lighter tones.
Live histograms are available on most
DSLR cameras and are a valuable
tool in assessing tonal range and if
the image has been overexposed or
underexposed. For a detailed article on
the histogram click here.
Aspect Ratio — The ratio between the
width and height of an image. Most
digital cameras produce an aspect
ratio of 4x6. Read more to find out
what this means if your final print is an
8x10.
Zoom lens — A lens which has the
ability to move through a range of
focal lengths.
Pixel — (PIX [picture] ELement)
Generally, the smallest addressable
unit on a display screen or bitmapped
image. Screens are rated by their
number of horizontal and vertical
pixels; for example, 1024x768 means
1024 pixels are displayed in each row,
and there are 768 rows (lines).
Dynamic Range — The range of tones
that can be recorded by the image
sensor on a digital camera. The better
the dynamic range, the more detail will
be in the darker and lighter elements
of the photograph.
Ambient Light — The available light or
the surrounding light. A term used by
professional photographers in lighting
scenarios.
ISO — The measure of the digital
camera’s film sensor or photographic
film to light. The common ISO’s are
100, 200, 400, 800 and 1600.
Shutter Lag — The time between
the moment the camera’s shutter is
pressed to when the actual picture is
recorded on the sensor.
Raw Format — A digital file format
which is uncompressed and
unprocessed (unlike the jpeg file). Also
known as a digital negative.
Sensor — the electronic device on
a digital camera that converts the
light photons into an image. In film
photography it was the film plane
where the image was created. Sensors
are smaller or the same size as a 35mm
film plane. The larger the sensor, the
better the image.

Take Creative Control of Your DSLR Camera • © 2014 Mary L. Buck • www.studio2point8.com 39previous nextcontents
Lesson 1
1. Which aperture would give the shallowest depth of field?a. f/5.6b. f/2.8c. f/16d. f/22
2. Which aperture would be used for photographing landscapes for an extreme depth of field?a. f/5.6b. f/2.8c. f/8d. f/22
3. As the aperture number is larger the lens opening also gets larger.a. Trueb. False
4. As the aperture number gets smaller the sensor receives more light.a. Trueb. False
5. Synonyms for aperture area. f-stopb. lens openingc. diaphragmd. all of the above
Lesson 2
1. To stop action you will need to use a shutter speed of ______ or fastera. 1/30 secb. ¼ secc. 1 secd. 1/250 sec
2. The best shutter speed to photograph a waterfall isa. 1/15 secb. 1/1000 secc. 1/250 secd. 1/500 sec
3. You will need to use a tripod if the shutter speed is slower thana. 1/8 secb. 1/250 secc. 1/30d. Both a and c
4. The main purpose of choosing shutter priority is toa. Freeze or blur actionb. Use a tripodc. Let in more light on the sensord. Be cool
5. A shutter speed of _____ sec is typically used to photography sunrises and sunsetsa. 1/4000 secb. 1/30 secc. ¼ secd. 1/60 sec
Lesson 3
1. Use _________________ if you want to control depth of fielda. Focusb. Shutter priorityc. Aperture priorityd. Auto
2. When highlights are blown out the image isa. Under-exposed
b. Just rightc. Over-exposedd. Ugly
3. When you choose shutter priority the ___________ determines the aperture for the correct exposurea. Compassb. Light meterc. Histogramd. Lens
4. When you “open up” youa. Increase exposureb. Decrease exposurec. Add a new filterd. Let less light on the sensor
5.What exposure is identical to f/5.6; 1/30 sec; ISO 100?a. f/4; 1/60 sec; ISO 100b. f/8; 1/125 sec; ISO 100c. f/2.8; 1/15 sec; ISO 100d. f/2.8; 1/30 sec; ISO100
Lesson 4
1. A degradation in image quality called noise is due toa. A high ISOb. A slow shutter speedc. A poor sensord. All of the above
2. An ISO of _______ is used on sunny daysa. 100b. 400c. 1600d. 800
3. ISO is a new concept in photographya. Trueb. False
4. What makes up the exposure triangle?a. Aperture, shutter speed, focusb. Shutter speed, auto mode, lensesc. ISO, aperture, shutter speedd. f/stops, aperture, shutter speed
5. A camera setting which will reduce noise from using high ISO’s is calleda. ASAb. Noise reductionc. Image reductiond. Sensitivity setting
Lesson 5
1. In manual mode you can set the aperture and shutter speed to whatever you wanta. Trueb. False
2. When you are photographing a white subject with a white background you need to a. Under-exposeb. Focus betterc. Use a tripodd. Over-expose
3. When you look through the viewfinder the two numbers on the left represent thea. ISO and frame numberb. Shutter speed and aperturec. Aperture and shutter speedd. Camera model number
Funsessment Answer Key on page 42

Take Creative Control of Your DSLR Camera • © 2014 Mary L. Buck • www.studio2point8.com 40previous nextcontents
Funsessment4. To create a blacked silhouette you
shoot in manual mode anda. Over-exposeb. Under-exposec. Use a tripodd. Use a high ISO
5. The exposure level indicator must be centered in the gauge to be a correct exposure per the camera’s built-in light meter.a. Trueb. False
Lesson 6
1. What type of lighting requires a lens hood?a. Front lightb. Top lightc. Shaded. Back light
2. What type of lighting is considered the harshest?a. Front lightb. Top lightc. Shaded. Back light
3. What type of lighting causes golden skin-tones?a. Front lightb. Top lightc. Shaded. Back light
4. What type of light is considered the safest to shoot in because the lighting is flat?a. Front light
b. Top lightc. Shaded. Back light
5. What type of light will you need to use fill-flash?a. Back lightb. Shadec. Top lightd. A & B
Lesson 7
1. Flash power is measured by thea. Size of the flashb. The flash diffuserc. Guide numberd. The flash mode
2. The best flash mode to use as a beginner isa. Manualb. Automaticc. ETTLd. None
3. Fill flash is a flash thata. Is effective in shade and back-lightingb. Pops up on your camerac. Adds a catch-light to the subject’s eyesd. All of the above
4. If you see a _________________ in the subjects’ eyes you do not need to use fill flasha. Starb. Catch lightc. Reflection of the photographerd. Iris
5. An external flash unit is more powerful than a pop-up flasha. Trueb. False
Lesson 8
1. A camera sets its color values (red, green and blue) based on its value ofa. Blueb. Whitec. Redd. Green
2. Color temperature is measured ina. Celsius degreesb. Fahrenheit degreesc. Kelvin degreesd. How hot it feels
3. The best white balance pre-set to use when using flash isa. Autob. Sunc. Shaded. Flash
4. The easiest way to adjust color balance isa. Using the pre-setsb. Doing a custom white color balancec. Changing the exposured. Add a camera filter
5. Using the shade pre-set will make the imagea. Warmerb. Coolerc. Sharperd. Shadier
Lesson 9
1. A zoom lens with a focal length of 15-35mm is a a. Telephoto lensb. Portrait lensc. Wide angle lensd. None of the above
2. A polarizing filter is used toa. Prevent glareb. Make colors more vividc. Increase saturation and contrast in clouds and blue skyd. All of the above
3. What does SLR stand for?a. Simple Lens Reflexb. Single Lens Reflexc. Standard Lens Reflexd. Silly Lens Reflex
4. A 55mm focal length on a lens with a 1.6 lens factor will actually have a focal length ofa. 86mmb. 85mmc. 88mmd. 84mm
5. A wide angle lens will have more depth of field than a telephoto lens at the same aperture.a. Trueb. False
Lesson 10
1. Manual focus is only found on more expensive lensesa. Trueb. False
Answer Key on page 42

Take Creative Control of Your DSLR Camera • © 2014 Mary L. Buck • www.studio2point8.com 41previous nextcontents
Funsessment2. You should switch to manual focus in
the darka. Trueb. False
3. Manual focus means the same as shooting in manuala. Trueb. False
4. When your lens is set at auto focus you are still able to focus manuallya. Trueb. False
5. If you are shooting a subject off-center in auto-focus you should adjust thea. Auto focus pointsb. Diopterc. Apertured. Image stabilization
Lesson 11
1. The default metering mode on a Canon DSLR is calleda. Spotb. Partialc. Matrixd. Evaluative
2. When you are photographing a person on a dark stage the best metering mode to use isa. Center-weightedb. Spotc. Partiald. Matrix
3. You adjust the metering mode to correct the color of the subjecta. Trueb. False
4. The default metering mode is used most of the timea. Trueb. False
5. If you were photographing 5 swans on a shaded lake you would use which metering mode?a. Spotb. Evaluativec. Partiald. Center-weighted
Lesson 12
1. A spike on the left vertical axis of the histogram meansa. The image is over-exposedb. The image has a slow shutter speedc. The image is under-exposedd. The image is well exposed
2. An image with a lot of midtones will have a histogram that showsa. A peak in the center of the graphb. A peak on the right side of the graphc. A flat graphd. A peak on the left side of the graph
3. The horizontal axis of the histogram has the ability to show _______ shades of graya. 250b. 256c. 252d. 260
4. When you have an over-exposure or under-exposure the histogram will show ______ on the right and left axisa. Peaksb. Clippingc. Valleysd. Red marks
5. The histogram is your frienda. Trueb. False
Lesson 13
1. Good candidates for B&W photography possessa. Tonalityb. Contrastc. Textured. All of the above
2. Placing the subject in the center is the most interesting compositiona. Trueb. False
3. The most powerful leading lines to photograph area. Straight up and downb. Horizontalc. Diagonald. Crossing
4. Moving in on your subject is calleda. The rule of thirdsb. Filling the framec. Changing the perspectived. Being lazy
5. Learning composition is more important than learning the technical features of a cameraa. Trueb. False
Answer Key on page 42

Take Creative Control of Your DSLR Camera • © 2014 Mary L. Buck • www.studio2point8.com 42previouscontents
Visit Mary’s camera store for all your photography needs.
www.buckcameraandphoto.com
Are you in need of more photography instruction?
Mary offers one-on-one training for the following:
• Beginner, Intermediate and Advanced DSLR Photography
• On location photography/studio photography
• Beginner Photoshop
• How to Start a Photography Business
To register for personalized photography instruction, call Mary
at (770) 623-1040 or email: [email protected]
A 20% discount is given off the regular price of $75 per hour
(5 hour min) to students of the DSLR online or group class.
Expires 6 months from the class date.
Copyright 2014 Mary L. Buck, Lightscapes Photographic Artwork Inc. This document may be copied or reproduced for the purchaser’s use only. It may not be copied or reproduced in any other manner or media without the express written permission from the author.
Lesson 11. B2. D3. B4. A5. D
Lesson 21. D2. A3. D4. A5. C
Lesson 31. C2. C3. B4. A5. A
Lesson 41. D2. A3. B4. C5. B
Lesson 51. B2. D3. B4. B5. A
Lesson 61. D2. B3. A4. C5. D
Lesson 71. C2. C3. D4. B5. A
Lesson 81. B2. C3. D4. A5. A
Lesson 91. C2. D3. B4. C5. A
Lesson 101. B2. A3. B4. B5. A
Lesson 111. D2. B3. B4. A5. D
Lesson 121. C2. A3. B4. B5. A
Lesson 131. D2. B3. C4. B5. B
Funsessment Answer Key