Embed Size (px)
Citation preview

Creating Model Portfolios, Custom Benchmarks,
and Investment Policies
Morningstar DirectSM Cloud Editions
Direct

Copyright © 2019 Morningstar, Inc. All rights reserved.
The information contained herein: (1) is proprietary to Morningstar and/or its content providers; (2) may not be copied or distributed; (3) is not warranted to be accurate, complete or timely; and (4) does not constitute advice of any kind. Neither Morningstar nor its content providers are responsible for any damages or losses arising from any use of this information. Any statements that are nonfactual in nature constitute opinions only, are subject to change without notice, and may not be consistent across Morningstar. Past performance is no guarantee of future results.
Morningstar Direct Cloud Editions January 2019© 2019 Morningstar. All Rights Reserved.

Morningstar Direct Cloud Editions January 2019 3© 2019 Morningstar. All Rights Reserved.
Contents
Overview . . . . . . . . . . . . . . . . . . . . . . . . . . . . . . . . . . . . . . . . . . . . . . . . . . . . . . . . . . . . . . . . 4
Working with Model Portfolios . . . . . . . . . . . . . . . . . . . . . . . . . . . . . . . . . . . . . . . . . . . . . . . . . . 5
Overview . . . . . . . . . . . . . . . . . . . . . . . . . . . . . . . . . . . . . . . . . . . . . . . . . . . . . . . . . . . . . . . . 5Exercise 1: Create a model portfolio . . . . . . . . . . . . . . . . . . . . . . . . . . . . . . . . . . . . . . . . . . 5Exercise 2: Save a model portfolio . . . . . . . . . . . . . . . . . . . . . . . . . . . . . . . . . . . . . . . . . . 10Exercise 3: Add a portfolio object as holdings to a model portfolio . . . . . . . . . . . . . . . . 11Exercise 4: Change the Performance Calculation Start Date. . . . . . . . . . . . . . . . . . . . . . 16Exercise 5: Evaluate company-level ESG data
in an existing model portfolio’s holdings . . . . . . . . . . . . . . . . . . . . . . . . . . . . 19Exercise 6: View holdings’ ESG data points in a scatterplot . . . . . . . . . . . . . . . . . . . . . . 21Exercise 7: Export data from a model portfolio object . . . . . . . . . . . . . . . . . . . . . . . . . . . 22Exercise 8: Export data from multiple model portfolio objects. . . . . . . . . . . . . . . . . . . . . 23
Creating Custom Benchmarks. . . . . . . . . . . . . . . . . . . . . . . . . . . . . . . . . . . . . . . . . . . . . . . . . . 25
Overview . . . . . . . . . . . . . . . . . . . . . . . . . . . . . . . . . . . . . . . . . . . . . . . . . . . . . . . . . . . . . . . 25Exercise 9: Create a custom benchmark. . . . . . . . . . . . . . . . . . . . . . . . . . . . . . . . . . . . . . 25Exercise 10: Save a custom benchmark . . . . . . . . . . . . . . . . . . . . . . . . . . . . . . . . . . . . . . . 27Exercise 11: Apply a custom benchmark to a model portfolio . . . . . . . . . . . . . . . . . . . . . . 28How can I use a second benchmark?. . . . . . . . . . . . . . . . . . . . . . . . . . . . . . . . . . . . . . . . . 32Exercise 12: Create a second benchmark . . . . . . . . . . . . . . . . . . . . . . . . . . . . . . . . . . . . . . 32Exercise 13: Display and hide a benchmark . . . . . . . . . . . . . . . . . . . . . . . . . . . . . . . . . . . . 35
Creating an Investment Policy. . . . . . . . . . . . . . . . . . . . . . . . . . . . . . . . . . . . . . . . . . . . . . . . . . 38
Overview . . . . . . . . . . . . . . . . . . . . . . . . . . . . . . . . . . . . . . . . . . . . . . . . . . . . . . . . . . . . . . . 38What is involved in creating an investment policy?. . . . . . . . . . . . . . . . . . . . . . . . . . . . . . 38Exercise 14: Create an investment policy and its Level 1 asset classes and proxies . . . . 39Exercise 15: Add another level . . . . . . . . . . . . . . . . . . . . . . . . . . . . . . . . . . . . . . . . . . . . . . 40Exercise 16: Create the Level 2 sub-asset classes and proxies . . . . . . . . . . . . . . . . . . . . . 41Exercise 17: Assign weights to the sub-asset classes . . . . . . . . . . . . . . . . . . . . . . . . . . . . 46Exercise 18: Save an investment policy . . . . . . . . . . . . . . . . . . . . . . . . . . . . . . . . . . . . . . . 47Exercise 19: Use an investment policy as a benchmark. . . . . . . . . . . . . . . . . . . . . . . . . . . 48Exercise 20: Apply an investment policy to a model portfolio . . . . . . . . . . . . . . . . . . . . . . 50Exercise 21: Use groupings to replicate a policy’s asset classes. . . . . . . . . . . . . . . . . . . . 52
Analyzing Total Portfolio Attribution . . . . . . . . . . . . . . . . . . . . . . . . . . . . . . . . . . . . . . . . . . . . . 55
Overview . . . . . . . . . . . . . . . . . . . . . . . . . . . . . . . . . . . . . . . . . . . . . . . . . . . . . . . . . . . . . . . 55How is TPA calculated?. . . . . . . . . . . . . . . . . . . . . . . . . . . . . . . . . . . . . . . . . . . . . . . . . . . . 55What asset classes are used for investments? . . . . . . . . . . . . . . . . . . . . . . . . . . . . . . . . . 56What policies are used in weighting assets?. . . . . . . . . . . . . . . . . . . . . . . . . . . . . . . . . . . 56Exercise 22: View a portfolio’s TPA . . . . . . . . . . . . . . . . . . . . . . . . . . . . . . . . . . . . . . . . . . . 57Exercise 23: Include portfolio fees in the Total Portfolio Attribution component . . . . . . . 59Exercise 24: Change the TPA settings . . . . . . . . . . . . . . . . . . . . . . . . . . . . . . . . . . . . . . . . 61Exercise 25: Add a holdings fee to the Total Portfolio Attribution component . . . . . . . . . 64Exercise 26: Save TPA settings . . . . . . . . . . . . . . . . . . . . . . . . . . . . . . . . . . . . . . . . . . . . . . 67Exercise 27: Reuse saved TPA settings. . . . . . . . . . . . . . . . . . . . . . . . . . . . . . . . . . . . . . . . 68

Creating Model Portfolios, Custom Benchmarks, and Investment Policies
OverviewBy now, you should have completed the Creating Lists & Workbooks, Creating Screens, and Creating Column Sets guides, where you learned how to create and leverage those tools. In this guide, you will learn how to create three other tools in Morningstar DirectSM Cloud Editions—model portfolios, custom benchmarks, and investment policies. Additionally, you will learn to conduct total portfolio attribution.
In this guide, you will learn about the following:
gWorking with Model Portfolios (page 5)gCreating Custom Benchmarks (page 25)gCreating an Investment Policy (page 38)gAnalyzing Total Portfolio Attribution (page 55)
Morningstar Direct Cloud Editions January 2019 4© 2019 Morningstar. All Rights Reserved.

Working with Model Portfolios Overview
Working with Model Portfolios
OverviewWith a model portfolio, you can organize and analyze investments. In the exercises in this section, you will learn the basics of building a model portfolio from a list.
In this section, you will learn how to do the following:
gCreate a model portfolio (page 5)gSave a model portfolio (page 10)gNest a portfolio object as holdings (page 11)gChange the performance calculation start date (page 16)g Evaluate company-level ESG is a model portfolio’s holdings (page 19)gView holdings’ ESG data points in a scatterplot (page 21)g Export data from a model portfolio (page 20), andg Export data from multiple model portfolios (page 23).
Exercise 1: Create a model portfolio
In this exercise, you will create a model portfolio from an investment list, using the Income ETFs list you created in the Creating Lists and Workbooks guide. (If you do not already have this list, you can create it now.)
You will offered the option to view the company-level ESG data for the model portfolio. You can also view this data when editing holdings, which is covered in Exercise 5 on page 19.
To learn more about ESG data and how a Morningstar ESG Score is computed, please read Leveraging Morningstar Sustainability Data.
To create a model portfolio, do the following:
1. On the header, click the Create icon and select Model Portfolio. The Creating Model Portfolios window opens.
Select this option
Morningstar Direct Cloud Editions January 2019 5© 2019 Morningstar. All Rights Reserved.

Working with Model Portfolios Exercise 1: Create a model portfolio
2. In the upper-left corner of the Untitled area, click the Add icon. The Add dialog box opens.
3. In the Add dialog box, click From Investment List. The Investment List dialog box opens.
Click here
Click here
Morningstar Direct Cloud Editions January 2019 6© 2019 Morningstar. All Rights Reserved.

Working with Model Portfolios Exercise 1: Create a model portfolio
4. From the investment lists, select Income ETFs. The funds in that list are displayed as follows:
g Financial Select Sector SPDR® ETFg Real Estate Select Sector SPDR®,g Schwab US Dividend Equity ETFTM,g Vanguard Dividend Appreciation ETF, andg Vanguard FTSE Developed Markets ETF.
5. Click away from the dialog box to close it.
6. Click Add All 5 Investments. The investments are listed in the Creating Model Portfolios window.
7. Click away from the dialog box to close it.
Select this list
Click here to add all the funds to the portfolio
Morningstar Direct Cloud Editions January 2019 7© 2019 Morningstar. All Rights Reserved.

Working with Model Portfolios Exercise 1: Create a model portfolio
8. Change the Weight of each fund according to this table:
Note: Press Enter after each entry to move to the next one.
9. In the upper-right corner of the Untitled area, click Recalculate.
Fund Name Weight
Financial Select Sector SPDR ETF 20
Real Estate Select Sector SPDR 20
Schwab US Dividend Equity ETF 20
Vanguard Dividend Appreciation ETF 20
Vanguard FTSE Developed Markets ETF 20
Click here to update the portfolio
Morningstar Direct Cloud Editions January 2019 8© 2019 Morningstar. All Rights Reserved.

Working with Model Portfolios Exercise 1: Create a model portfolio
10. (Optional) If you want to evaluate the company-level ESG data, click the Component Settings icon, then select Column Set < Sustainability.
Scroll right to see the Company Normalized ESG Score and Company Highest Controversy Level columns.
11. Click Save and Close.
Note the highlighted selections.
The company-level ESG data is located at the far-right in the Sustainability column set.
Morningstar Direct Cloud Editions January 2019 9© 2019 Morningstar. All Rights Reserved.

Working with Model Portfolios Exercise 2: Save a model portfolio
Exercise 2: Save a model portfolio
To save a model portfolio, do the following:
1. In the upper-right corner of the Creating Model Portfolios window, click Save As. The Save portfolio as dialog box opens.
2. In the Save portfolio as dialog box, enter Income ETFs Portfolio, then click Save. Upper-left corner of the window, “Untitled” is replaced with the name of the model.
3. In the upper-right corner of the Creating Model Portfolios window, click Close.
The Income ETFs Portfolio is displayed in the list of Model Portfolios on the Home page.
Note: You might have to refresh your browser to see this.
Click here
Enter a name, then click here
Morningstar Direct Cloud Editions January 2019 10© 2019 Morningstar. All Rights Reserved.

Working with Model Portfolios Exercise 3: Add a portfolio object as holdings to a model portfolio
Exercise 3: Add a portfolio object as holdings to a model portfolio
In Exercise 1 on page 5, you created a model portfolio with regular funds as its holdings. You can also add stocks as holdings, as well as these other portfolio objects:
g client accountgmodel portfoliog custom benchmark, andgproposal.
The model portfolio containing other portfolio objects is the nested portfolio. When adding holdings in Portfolio Editor, all custom portfolio objects are available. The portfolio calculation supports up to five levels of nesting.
When generating a comparison report comparing two model portfolios, the associated model portfolio’s benchmarks and policy are automatically used.
In this exercise, you work with model portfolios, but the procedure for client accounts, custom benchmarks, and proposals is the same.
Do the following:
1. On the Home page, hover your cursor over the Menu (in the upper-left corner of the window) and select Workbooks.
Note the highlighted selections.
Morningstar Direct Cloud Editions January 2019 11© 2019 Morningstar. All Rights Reserved.

Working with Model Portfolios Exercise 3: Add a portfolio object as holdings to a model portfolio
2. On the Workbooks page, click the Model Portfolios workbook. The Select a portfolio list to view in this workbook dialog box opens.
3. In the dialog box, click All Model Portfolios.
The Model Portfolios workbook opens, displaying all your model portfolios.
4. Hover the cursor over the empty area to the right of a portfolio name.
Note: This will be the nested portfolio.
Click here.
Click here.
Morningstar Direct Cloud Editions January 2019 12© 2019 Morningstar. All Rights Reserved.

Working with Model Portfolios Exercise 3: Add a portfolio object as holdings to a model portfolio
5. Click the Actions icon and select Edit Holdings. The Portfolio Editor opens.
Note the highlighted selections.
Morningstar Direct Cloud Editions January 2019 13© 2019 Morningstar. All Rights Reserved.

Working with Model Portfolios Exercise 3: Add a portfolio object as holdings to a model portfolio
6. In the upper-left corner, click the Add icon. The Add dialog box opens.
7. Select From User Created Portfolios > Model Portfolios > select a model portfolio. The portfolio is added to the bottom of the list of holdings.
Note: You might need to close the dialog box to see it.
8. Click away from the dialog box to close it.
Note the highlighted selections.
This is the model portfolio you added.
Morningstar Direct Cloud Editions January 2019 14© 2019 Morningstar. All Rights Reserved.

Working with Model Portfolios Exercise 3: Add a portfolio object as holdings to a model portfolio
9. Adjust the weights of the holdings, keeping in mind that they must equal 100.
10. Click Recalculate.
11. Click Save and Close.
Note the highlighted selections.
Morningstar Direct Cloud Editions January 2019 15© 2019 Morningstar. All Rights Reserved.

Working with Model Portfolios Exercise 4: Change the Performance Calculation Start Date
Exercise 4: Change the Performance Calculation Start Date
When you first create a model portfolio, its default performance calculation start date is the first portfolio date, but you can change it. The options are described in this table:
When selecting an option for the performance calculation start date, you should also decide how to handle missing performance data. For instance, in the example portfolio described in the table, if you select Earliest Available (June 1, 2011), the first data available for Fund B is December 1, 2013. Your options are as follows:
gDo Not Calculate Account Level Performance, or gRescale Remaining Holdings.
Components using historical performance data are affected by the performance calculation start date. The components are as follows:
g Investment GrowthgHistorical ReturngScatter Plot, andgRolling Line.
In this exercise, you will learn how to select different options. These options can also be used with the following:
g client accountgmodel portfoliog custom benchmark, andgproposal.
In this exercise, you will work with a model portfolio, but the procedure for client accounts, custom benchmarks, client accounts, and proposals is the same.
Option Description
First Portfolio Date (default)
The first date on which the portfolio reported performance data to Morningstar.
Earliest Common Investments in the Morningstar database have different dates of reported data. For instance, suppose a portfolio contains two funds: Fund A and Fund B. Fund A’s earliest reported performance data is June 1, 2011, but Fund B’s earliest reported performance data is December 1, 2013. Fund A also reported performance data on December 1, 2013. In calculating the portfolio’s performance, the Earliest Common option uses the earliest date on which all the portfolio’s holdings reported data (in this case, December 1, 2013).
Earliest Available Using the same example portfolio as in “Earliest Common,” the Earliest Available option uses the earliest date on which any holding in the portfolio reported data (in this case, June 1, 2011).
Morningstar Direct Cloud Editions January 2019 16© 2019 Morningstar. All Rights Reserved.

Working with Model Portfolios Exercise 4: Change the Performance Calculation Start Date
Do the following:
1. Open the Model Portfolios workbook.
2. Hover the cursor over the empty area to the right of a portfolio’s name.
3. Click the Actions icon and select Settings. The Model Portfolio Settings window opens.
4. Select the Calculation tab.
5. Near the bottom of the window, in the Missing Performance Data area, select one of the following options:
g Do Not Calculate Account Level Performance, org Rescale Remaining Holdings (default).
Note the highlighted selections.
Morningstar Direct Cloud Editions January 2019 17© 2019 Morningstar. All Rights Reserved.

Working with Model Portfolios Exercise 4: Change the Performance Calculation Start Date
6. At the bottom of the window, from the Performance Calculation Start Date menu, select one of these options:
g First Portfolio Date (default)g Earliest Common, org Earliest available.
7. Click Save. The Settings window closes and the portfolio recalculates.
Note the highlighted selections.
Morningstar Direct Cloud Editions January 2019 18© 2019 Morningstar. All Rights Reserved.

Working with Model PortfoliosExercise 5: Evaluate company-level ESG data in an existing model
portfolio’s holdings
Exercise 5: Evaluate company-level ESG data in an existing model portfolio’s holdings
Many clients are concerned about the impact of their investment on the world around them and want to know more about environmental, social, and governance (ESG) factors. If you are licensed to access Systainalytic’s company-level ESG data, the data points Company Normalized ESG Score and Company Highest Controversy Level are available as follows:
gwhen creating a new model portfolio (optional in Exercise 1 on page 5)gwhen editing holdings for an existing model portfolio, andg In the Holdings Analysis component.
To learn more about ESG data and how a Morningstar ESG Score is computed, please read Leveraging Morningstar Sustainability Data.
To display the company-level ESG data points editing holdings for an existing model portfolio, do the following:
1. Open the Model Portfolios workbook.
2. Hover the cursor over the empty area to the right of a portfolio’s name.
3. Click the Actions icon and select Settings. The Model Portfolio Settings window opens.
Note the highlighted selections.
Morningstar Direct Cloud Editions January 2019 19© 2019 Morningstar. All Rights Reserved.

Working with Model PortfoliosExercise 5: Evaluate company-level ESG data in an existing model
portfolio’s holdings
4. In the Editing Holdings window, click the Component Settings icon, then select Column Set < Sustainability.
Note: For display clarity, the main component of the Editing Holdings window has been expanded.
5. Scroll right to see the Company Normalized ESG Score and Company Highest Controversy Level columns.
6. Click Save and Close.
Note the highlighted selections.
The company-level ESG data is located at the far-right in the Sustainability column set.
Morningstar Direct Cloud Editions January 2019 20© 2019 Morningstar. All Rights Reserved.

Working with Model Portfolios Exercise 6: View holdings’ ESG data points in a scatterplot
Exercise 6: View holdings’ ESG data points in a scatterplot
In a Model Portfolios workbook, the Holdings Plot component can display the following ESG data points on a scatterplot:
gPortfolio Sustainability ScoregPortfolio ESG Score, andgPortfolio Controversy Score.
In the scatterplot, the X axis defaults to Portfolio Controversy Score and the Y axis defaults to Portfolio ESG Score. To change these settings, do the following:
1. In a Model Portfolios workbook, select a model portfolio, then select the Sustainability worksheet.
2. In the Holdings Plot component, from the Component Settings menu, select X Axis or Y Axis.
3. Select Sustainability > select a different data point to display.
4. Click away from the Component Settings menu to close it.
Note the highlighted selections.
Note the highlighted selections.
Morningstar Direct Cloud Editions January 2019 21© 2019 Morningstar. All Rights Reserved.

Working with Model Portfolios Exercise 7: Export data from a model portfolio object
Exercise 7: Export data from a model portfolio object
You can export data from a portfolio object (client account, policy, custom benchmark, or model portfolio) and use it for further analysis in Microsoft® Excel® or a similar application.
Keep the following in mind:
g If you have used conditional formatting and/or grouping, those features are also exported with the data
gYou can export the data from more than one object, andgYou can export the data from all objects.
In this exercise, you will export the data from a model portfolio.
Do the following:
1. Open the Model Portfolios workbook.
2. Select a model portfolio by clicking the checkbox at the left of its row.
3. In the Grid header, click the Export icon and select Export .xlsx. An alert opens, displaying “Export in process.” When the export is completed, a system navigation window opens.
Note the use of conditional formatting.
Morningstar Direct Cloud Editions January 2019 22© 2019 Morningstar. All Rights Reserved.

Working with Model Portfolios Exercise 8: Export data from multiple model portfolio objects
4. Navigate to a location on your system, name the file, and click Save.
5. Open the file you just saved.
Exercise 8: Export data from multiple model portfolio objects
You can export data from more than one portfolio object (client account, policy, custom benchmark, or model portfolio) for further analysis in Microsoft® Excel® or a similar application.
You can also export the data from all objects by selecting all or deselecting all, as shown in the following illustration.
Note the conditional formatting was also exported.
Click this checkbox to select or deselect all.
Morningstar Direct Cloud Editions January 2019 23© 2019 Morningstar. All Rights Reserved.

Working with Model Portfolios Exercise 8: Export data from multiple model portfolio objects
In this exercise, you will export the data from three model portfolios.
Do the following:
1. With the Model Portfolios workbook open, select three model portfolios by clicking the checkboxes at the left of their rows.
2. In the Grid header, click the Export icon and select Export .xlsx. An alert opens, displaying “Export in process.” When the export is completed, a system navigation window opens.
3. Navigate to a location on your system, name the file, and click Save.
4. Open the file you just saved.
Note which model portfolios are selected.
The capabilities of Microsoft Excel and the Morningstar Excel Add-In can be used to analyze the data.
Morningstar Direct Cloud Editions January 2019 24© 2019 Morningstar. All Rights Reserved.

Creating Custom Benchmarks Overview
Creating Custom Benchmarks
OverviewA benchmark index gives an investor a point of reference for evaluating a fund's performance. When such comparisons are made in Morningstar Direct Cloud Editions, the S&P 500 Index is the basic benchmark for stock-oriented funds, including domestic-hybrid, international-hybrid, and convertible-bond funds.
In Morningstar Direct Cloud Editions, you can create custom benchmarks for your portfolios. The process of creating and saving benchmarks is identical to that for creating a model portfolio. The platform offers two options for adding investments to a custom benchmark—adding investments from the Search field and adding investments from an existing list.
In this section, you will learn to do the following:
gCreate a custom benchmark (page 25)gSave a custom benchmark (page 27)gApply a custom benchmark to a model portfolio (page 28)gUnderstand the use of a second benchmark (page 32)gCreate a second benchmark (page 32), andgDisplay and hide a benchmark (page 35).
Exercise 9: Create a custom benchmark
In this exercise, you will create a custom benchmark using the Search field. To create a custom benchmark, do the following:
1. On the header, click the Create icon, then select Custom Benchmark. The Creating Custom Benchmarks window opens.
2. In the upper-left corner of the Untitled area, click the Add icon.
Select this option
Click here
Morningstar Direct Cloud Editions January 2019 25© 2019 Morningstar. All Rights Reserved.

Creating Custom Benchmarks Exercise 9: Create a custom benchmark
3. In the Search field, type S&P 500 TR USD.
4. In the search results, click that index. The Search dialog box closes and the S&P 500 TR USD index is added to the list in the Untitled area.
5. Repeat step 2 through step 4 to add each of the following indexes:
g Russell 2000 Growth TR USDg Russell 2000 Value TR USDg BBgBarc Aggregate Bond Treasury TRg MSCI ACWI ex US Momentum NR USDg BBgBarc US Treasury Bill 1-3 Mon TR USD
Note: Allow time for each index to load before adding the next.
6. In the Weight column, change the weight of each index according to this table:
Note: Press Enter after each entry to move to the next row.
Index Name Weight
S&P 500 TR USD 40
Russell 2000 Growth TR USD 5
Russell 2000 Value TR USD 5
BBgBarc Aggregate Bond Treasury TR 25
MSCI ACWI Ex US 20
BBgBarc US Treasury Bill 1-3 Mon TR USD 5
Select this index
Morningstar Direct Cloud Editions January 2019 26© 2019 Morningstar. All Rights Reserved.

Creating Custom Benchmarks Exercise 10: Save a custom benchmark
7. In the upper-right corner of the Untitled area, click Recalculate.
Exercise 10: Save a custom benchmark
To save your custom benchmark, do the following
1. In the upper-right corner of the window, click Save As.
2. In the Save As dialog box, enter Sample Custom Benchmark, then click Save. In the Upper-left corner of the window, “Untitled” is replaced with the name of the benchmark.
3. In the upper-right corner of the Creating Custom Benchmarks window, click Close.
Click here to update the allocation totals
Click here
Enter a name, then click here
Morningstar Direct Cloud Editions January 2019 27© 2019 Morningstar. All Rights Reserved.

Creating Custom Benchmarks Exercise 11: Apply a custom benchmark to a model portfolio
Exercise 11: Apply a custom benchmark to a model portfolio
Now that you have created and saved a custom benchmark, you can apply it to a model portfolio.
To apply a custom benchmark to a model portfolio, do the following:
1. On the header, hover the cursor over Menu, then select Workbooks. The Workbooks page opens.
2. Select Model Portfolios. The Select a portfolio dialog box opens.
Note the highlighted selections.
Click here
Morningstar Direct Cloud Editions January 2019 28© 2019 Morningstar. All Rights Reserved.

Creating Custom Benchmarks Exercise 11: Apply a custom benchmark to a model portfolio
3. Select All Model Portfolios. The Model Portfolios workbook opens, displaying your model portfolios in the Grid component.
4. Hover the cursor over Income ETFs Portfolio (the model portfolio you created in Exercise 2 on page 6). The Actions icon appears to the right of the model portfolio’s name.
Select this option.
Click here.
Morningstar Direct Cloud Editions January 2019 29© 2019 Morningstar. All Rights Reserved.

Creating Custom Benchmarks Exercise 11: Apply a custom benchmark to a model portfolio
5. Click the Actions icon, then select Settings. The Model Portfolio Settings window opens.
6. On the left side of the Model Portfolio Settings window, select Calculation. The Calculation fields appear in the empty area.
7. On the left side of the window, click the Benchmark 1 search field. The Benchmark 1 menu opens.
8. Select User Created > Custom Benchmarks > Sample Custom Benchmark.
9. In the upper-right corner of the Model Portfolio Settings window, click Save. The window closes.
Select this option
Click here
Select this benchmark
Morningstar Direct Cloud Editions January 2019 30© 2019 Morningstar. All Rights Reserved.

Creating Custom Benchmarks Exercise 11: Apply a custom benchmark to a model portfolio
10. In the workbook, select the Performance worksheet.
The Performance worksheet shows Investment Growth data and Historical Return data for the selected portfolio and the custom benchmark you applied to the portfolio. With these components, you can compare the performance of the portfolio with the performance of the benchmark holdings.
Note the benchmark display.
Morningstar Direct Cloud Editions January 2019 31© 2019 Morningstar. All Rights Reserved.

Creating Custom Benchmarks How can I use a second benchmark?
How can I use a second benchmark?
In any portfolio object (model portfolio, client account, or proposal), you can create a second benchmark, which becomes available in all supported components in the portfolio object.
The following supported components default to display both benchmarks:
g Investment Growth, andgScatter Plot.
The Historical Return component is supported but defaults to display only Benchmark 1.
Exercise 12: Create a second benchmark
In this exercise, you will create a second performance benchmark. The Model Portfolios workbook should still be open.
Do the following:
1. Hover the cursor over Income ETFs Portfolio (the model portfolio you created in Exercise 2 on page 6). The Actions icon appears to the right of the model portfolio’s name. Click the Actions icon, then select Settings. The Model Portfolio Settings window opens.
Click the Actions icon to change the settings for a model portfolio.
Morningstar Direct Cloud Editions January 2019 32© 2019 Morningstar. All Rights Reserved.

Creating Custom Benchmarks Exercise 12: Create a second benchmark
2. On the left side of the Model Portfolio Settings window, select Calculation. The Calculation fields appear in the empty area.
3. On the left side of the window, click the Benchmark 2 search field. The Benchmark 2 menu opens.
4. Select User Created > Model Portfolios > G. Gray Portfolio.
Click here.
Select this model portfolio.
Morningstar Direct Cloud Editions January 2019 33© 2019 Morningstar. All Rights Reserved.

Creating Custom Benchmarks Exercise 12: Create a second benchmark
5. In the upper-right corner of the Model Portfolio Settings window, click Save. The window closes. Note how the components’ display has changed.
Both benchmarks are displayed.
Only Benchmark 1 is displayed.
Morningstar Direct Cloud Editions January 2019 34© 2019 Morningstar. All Rights Reserved.

Creating Custom Benchmarks Exercise 13: Display and hide a benchmark
Exercise 13: Display and hide a benchmark
You have assigned a second benchmark to a selected model portfolio. In this exercise, you will display and hide benchmarks.
Do the following:
1. In the Model Portfolios workbook, make sure the model portfolio you used in Exercise 12 on page 32 is selected.
2. Select the Performance worksheet.
Note the following:g In the Investment Growth component, both benchmarks are displayed, andg In the Historical Return component, only Benchmark 1 (Sample Custom Benchmark)
is displayed.
Both benchmarks are displayed.
Only Benchmark 1 is displayed.
Morningstar Direct Cloud Editions January 2019 35© 2019 Morningstar. All Rights Reserved.

Creating Custom Benchmarks Exercise 13: Display and hide a benchmark
3. In the Investment Growth component, suppose you want to compare the model portfolio (Income ETFs) to only Benchmark 2 (G. Gray Portfolio). To do that, you simply hide Benchmark 1. In the Investment Growth component, click the Component Settings icon, then select Benchmark 1 > No Benchmark.
4. Click away from the Component Settings menu to close it.
Click here.
Only Benchmark 2 is displayed.
Morningstar Direct Cloud Editions January 2019 36© 2019 Morningstar. All Rights Reserved.

Creating Custom Benchmarks Exercise 13: Display and hide a benchmark
5. In the Historical Return component, suppose you want to do the same comparison (compare Income ETFs to G. Gray Portfolio). To do that, you simply hide Benchmark 1 and display Benchmark 2. Do the following:
A. In the Investment Growth component, click the Component Settings icon, then select Benchmark 1 > No Benchmark, and
B. Select Benchmark 2 > Portfolio Benchmark 2.
6. Click away from the Component Settings menu to close it.
From the Benchmark 1 menu, select this…
…then, from the Benchmark 2 menu, select this.
Only Benchmark 2 is displayed.
Morningstar Direct Cloud Editions January 2019 37© 2019 Morningstar. All Rights Reserved.

Creating an Investment Policy Overview
Creating an Investment Policy
OverviewInvestment policies serve as blueprints for investment plans. With the Policy tool in Morningstar Direct Cloud Editions, you can create a custom investment policy (the documentation of your investment strategy).
In this section, you will learn to do the following:
gCreate an investment policy and its Level 1 asset classes and proxies (page 39)gAdd Level 2 (page 40)gAdd Level 2 asset classes and proxies (page 41)gAssign weights to the sub-asset classes (page 46)gSave an investment policy (page 47)gUse an investment policy as a benchmark (page 48), andgApply an investment policy to a model portfolio (page 50), andgUse groupings to replicate a policy’s asset classes (page 52).
What is involved in creating an investment policy?
In this section, you will create an investment policy and apply it to a portfolio. The overall steps are as follows:
1. Create an investment policy and select the Level 1 (global category) asset classes and proxies.
2. Add the Level 2 (Morningstar Category) asset class.
3. Select the Level 2 sub-asset classes and proxies.
Note: You can create additional asset-class levels, as needed.
4. Set the weight of each Level 2 sub-asset class.
5. Save the investment policy.
Note: You can also create a third level in an investment policy.
Morningstar Direct Cloud Editions January 2019 38© 2019 Morningstar. All Rights Reserved.

Creating an Investment PolicyExercise 14: Create an investment policy and its Level 1 asset
classes and proxies
Exercise 14: Create an investment policy and its Level 1 asset classes and proxies
In this exercise, you will learn to create an investment policy with four Level 1 asset classes and their proxies.
Do the following:
1. In the header, click the Create icon, then select Policy. The Policy Editor window opens.
2. In the Asset Class Level area, from the Level 1 menu, select Global Broad Category Group.
3. In the Name column, from the menu, select Alternative.
4. In the Proxy column Search field, enter S&P 500 TR USD and select it from the search results.
5. Click the Add Asset Class icon. A new row appears.
6. In the Name column, from the menu, select Equity.
7. In the Proxy column Search field, enter S&P 500 TR USD and select it from the search results.
Select this option.
Note the highlighted selections.
Click here to add an asset class.
Morningstar Direct Cloud Editions January 2019 39© 2019 Morningstar. All Rights Reserved.

Creating an Investment Policy Exercise 15: Add another level
8. Continue adding asset classes and their proxies, as described in this table:
Exercise 15: Add another level
Now that you have created the Level 1 asset classes, you can create sub-asset classes and proxies for the Level 1 asset classes. Do the following:
1. In the Asset Class Level area, click Add Level.
2. From the Level 2 menu, select Morningstar Category.
In the list to the right, the Level 1 asset classes (Name column) and proxies (Proxy column) are displayed. Each Level 1 shows a row in which you will create its Level 2 asset classes (sub-asset classes).
Asset Class Proxy
Fixed Income BBgBarc Aggregate Bond Treasury TR
Money Market BBgBarc US Treasury Bill 1-3 Mon TR USD
The Name and Proxy columns should look like this.
Click here to add a level.
Select Morningstar Category.
Morningstar Direct Cloud Editions January 2019 40© 2019 Morningstar. All Rights Reserved.

Creating an Investment Policy Exercise 16: Create the Level 2 sub-asset classes and proxies
Exercise 16: Create the Level 2 sub-asset classes and proxies
To create the sub-asset classes and proxies, do the following:
1. Under Equity, in the Name column Search field, enter United States Large Growth. Select it from the search results.
2. In the Proxy column Search field, enter Russell 1000 TR USD. Select it from the search results.
3. To add another sub-asset class under Equity, click the Add Asset Class icon, then from the Add Asset Class menu, select Level 2 > Equity. A new row appears under Equity.
4. In the new row, add four more asset classes (rows). (See step 3 if you need help with this step.)
Note the highlighted selections.
Note the highlighted selections.
These are the rows you just created.
Morningstar Direct Cloud Editions January 2019 41© 2019 Morningstar. All Rights Reserved.

Creating an Investment Policy Exercise 16: Create the Level 2 sub-asset classes and proxies
5. In the new rows, search for and select asset classes and their proxies, as shown in this table:
Asset Class Proxy
United States Large Value Russell 1000 TR USD
United States Small Growth Russell 2000 TR USD
United States Small Value Russell 2000 TR USD
United States Foreign Large Blend MSCI ACWI ex US Momentum NR USD
The Equity Name and Proxy columns should look like this.
Morningstar Direct Cloud Editions January 2019 42© 2019 Morningstar. All Rights Reserved.

Creating an Investment Policy Exercise 16: Create the Level 2 sub-asset classes and proxies
6. Under Fixed Income, in the Name column Search field, enter United States Long-Short Equity. Select it from the search results.
7. In the Proxy column Search field, enter S&P 500 TR USD. Select it from the search results.
8. To add another sub-asset class under Fixed Income, click the Add Asset Class icon, then from the Add Asset Class menu, select Level 2 > Fixed Income.
Note the highlighted selections.
Note the highlighted selections.
Morningstar Direct Cloud Editions January 2019 43© 2019 Morningstar. All Rights Reserved.

Creating an Investment Policy Exercise 16: Create the Level 2 sub-asset classes and proxies
9. Under Fixed Income, add one more asset class (row). (See step 8 if you need help with this step.)
10. In the new rows, search for and select asset classes and their proxies, as shown in this table:
Asset Class Proxy
United States Intermediate-Term Bond BBgBarc Aggregate Bond Treasury TR
United States Muni National Interm BBgBarc US Municipal 1-15 Yr TR USD
The Fixed Income Name and Proxy columns should look like this.
Morningstar Direct Cloud Editions January 2019 44© 2019 Morningstar. All Rights Reserved.

Creating an Investment Policy Exercise 16: Create the Level 2 sub-asset classes and proxies
11. Under Alternative and Money Market, search for and select asset classes and proxies, as described in this table:
Level 1 Asset Class Level 2 Name Level 2 Proxy
Alternative United States Long-Short Credit S&P 500 TR USD
Money Market United States Prime Money Market
BBgBarc US Treasury Bill 1-3 Mon TR USD
The Alternative Name and Proxy columns should look like this.
The Money Market Name and Proxy columns should look like this.
Morningstar Direct Cloud Editions January 2019 45© 2019 Morningstar. All Rights Reserved.

Creating an Investment Policy Exercise 17: Assign weights to the sub-asset classes
Exercise 17: Assign weights to the sub-asset classes
Finally, assign a weight to each of the sub-level asset classes. The weights must total 100.
To assign the weights, do the following:
1. If the Weight % column is not displayed to the right of the Proxy column, do one of the following:
g widen your browser window, or g scroll right until you can see it.
2. In the Weight % column (to the right of the Proxy column), enter the weight of each Morningstar Category level (Level 2) according to this table:
Note: The broad category weights will update as you add weights to the sub-categories.
Level 1 Asset Class: Global Broad Category Group Proxy Weight
Level 2 Asset Class: Morningstar Category Proxy Weight
Alternative S&P 500 TR USD -- United States Long-Short Credit
S&P 500 TR USD 10
Equity S&P 500 TR USD -- United States Large Growth Russell 1000 TR USD 17.5
United States Large Value Russell 1000 TR USD 17.5
United States Small Growth Russell 2000 TR USD 5
United States Small Value Russell 2000 TR USD 5
United States Foreign Large Blend
MSCI ACWI Ex US 20
Fixed Income BBgBarc Aggregate Bond Treasury TR
-- United States Long-Short Equity
S&P 500 TR USD 10
United States Intermediate-Term Bond
BBgBarc Aggregate Bond Treasury TR USD
5
United States Muni National Interm
BBgBarc Municipal 1-15 Yr TR USD
5
Money Market BBgBarc US Treasury Bill 1-3 Mon TR USD
-- United States Prime Money Market
BBgBarc US Treasury Bill 1-3 Mon TR USD
5
Morningstar Direct Cloud Editions January 2019 46© 2019 Morningstar. All Rights Reserved.

Creating an Investment Policy Exercise 18: Save an investment policy
Exercise 18: Save an investment policy
To save your policy, do the following:
1. From the top-left corner of the window, click the Untitled drop-down field, then select Save As.
2. In the text field, type Sample Investment Policy, then click Save. In the upper-left corner of the window, “Untitled” is replaced with the name of the policy.
3. An alert opens to tell you that the policy has been saved successfully. Click Close.
4. In the upper-right corner of the Policy Editor window, click the X to close it.
The Weight column should look like this.
Note the highlighted selections.
Name the policy.
Morningstar Direct Cloud Editions January 2019 47© 2019 Morningstar. All Rights Reserved.

Creating an Investment Policy Exercise 19: Use an investment policy as a benchmark
Exercise 19: Use an investment policy as a benchmark
Now that your policy is created and saved, you can apply it to a model portfolio. (You don’t need to do this immediately.) Keep in mind that you can associate this policy with many model portfolios.
Note: If you set an investment policy as an account’s Performance Benchmark (via the Settings window), when editing the account, the Editor window reflects data from the investment policy.
To apply an investment policy to a model portfolio, do the following:
1. In the header, hover the cursor over Menu, then select Workbooks.
2. On the Workbooks page, select Model Portfolios, then in the Select a Model Portfolio dialog box, select All Model Portfolios. The Model Portfolios workbook opens, displaying the Grid component.
Note the highlighted selections.
Morningstar Direct Cloud Editions January 2019 48© 2019 Morningstar. All Rights Reserved.

Creating an Investment Policy Exercise 19: Use an investment policy as a benchmark
3. In the Income ETFs Portfolio row, hover the cursor over the empty area. The Actions icon appears. Click the Actions icon and select Settings. The Model Portfolio Settings window opens.
4. On the left side of the window, select Calculation.
5. On the right side of the window, from the Policy menu, select Sample Investment Policy.
Note the highlighted selections.
Note the highlighted selections.
Morningstar Direct Cloud Editions January 2019 49© 2019 Morningstar. All Rights Reserved.

Creating an Investment Policy Exercise 20: Apply an investment policy to a model portfolio
6. In the upper-right corner of the window, click Save. The window closes.
7. In the Model Portfolios workbook, with Income ETFs Portfolio still selected, select the Allocation worksheet.
On the Allocation worksheet, you can compare your portfolio and your investment policy’s allocation. In this case, because your portfolio consists of equity funds, there is still diversification work to be done to meet the allocation goals outlined by your investment policy.
Exercise 20: Apply an investment policy to a model portfolio
In Exercise 19 on page 48, you used an investment policy as a benchmark in a model portfolio. You can also apply an investment policy to a model portfolio without assigning it as a benchmark. The attached policy is automatically used as the default policy in the TPA component.
Note: To use a policy as a benchmark, select it as Benchmark 1 or Benchmark 2. See Exercise 19 on page 48.
To apply an investment policy to a model portfolio, do the following:
1. In the header, hover the cursor over Menu, then select Workbooks.
Note the highlighted selections.
Morningstar Direct Cloud Editions January 2019 50© 2019 Morningstar. All Rights Reserved.

Creating an Investment Policy Exercise 20: Apply an investment policy to a model portfolio
2. On the Workbooks page, select Model Portfolios, then in the Select a Model Portfolio dialog box, select All Model Portfolios. The Model Portfolios workbook opens, displaying the Grid component.
3. In the Income ETFs Portfolio row, hover the cursor over the empty area. The Actions icon appears. Click the Actions icon and select Settings. The Model Portfolio Settings window opens.
4. On the left side of the window, select Calculation.
5. On the right side of the window, from the Policy menu, select an investment policy.
The policy you select will be used when you analyze the model portfolio’s TPA.
6. In the upper-right corner of the window, click Save. The window closes.
Note the highlighted selections.
The blue text and checkmark indicate the current policy.
Morningstar Direct Cloud Editions January 2019 51© 2019 Morningstar. All Rights Reserved.

Creating an Investment Policy Exercise 21: Use groupings to replicate a policy’s asset classes
Exercise 21: Use groupings to replicate a policy’s asset classes
Suppose you have an investment policy using Global Broad Categories and Morningstar Categories as its asset classes. In a model portfolio, you cannot directly group holdings according to the policy’s groupings, but you can recreate them.
The supported groupings are as follows:
gGlobal Broad CategorygMorningstar Category, andgMorningstar Institutional Category.
You can also create custom groupings. The Holdings Analysis component supports up to five grouping levels.
In this exercise, you will examine a policy and then recreate its groupings in a model portfolio.
Do the following:
1. From the Menu, select Policies.
2. On the Policies page, in the row of the policy you want to examine, from the Actions menu, select Edit. A window opens.
Note the highlighted selections.
Note the highlighted selections.
Morningstar Direct Cloud Editions January 2019 52© 2019 Morningstar. All Rights Reserved.

Creating an Investment Policy Exercise 21: Use groupings to replicate a policy’s asset classes
3. In the upper-left corner of the window, note the asset class levels used in the policy.
4. Click the X in the upper-right corner of the window to close it.
5. Open a Model Portfolio workbook and select the Holdings worksheet.
6. In the Grid, select a model portfolio.
7. In the Holdings Analysis component, select Component Settings > Grouping.
8. From the Select Grouping menu, select the policy’s Level 1 Asset Class.
The policy shown here uses Global Broad Category Group as Level 1, and Morningstar Category as Level 2.
Note the highlighted selections.
In the policy, Global Broad Category was the Level 1 Asset Class.
Morningstar Direct Cloud Editions January 2019 53© 2019 Morningstar. All Rights Reserved.
Creating an Investment Policy Exercise 21: Use groupings to replicate a policy’s asset classes
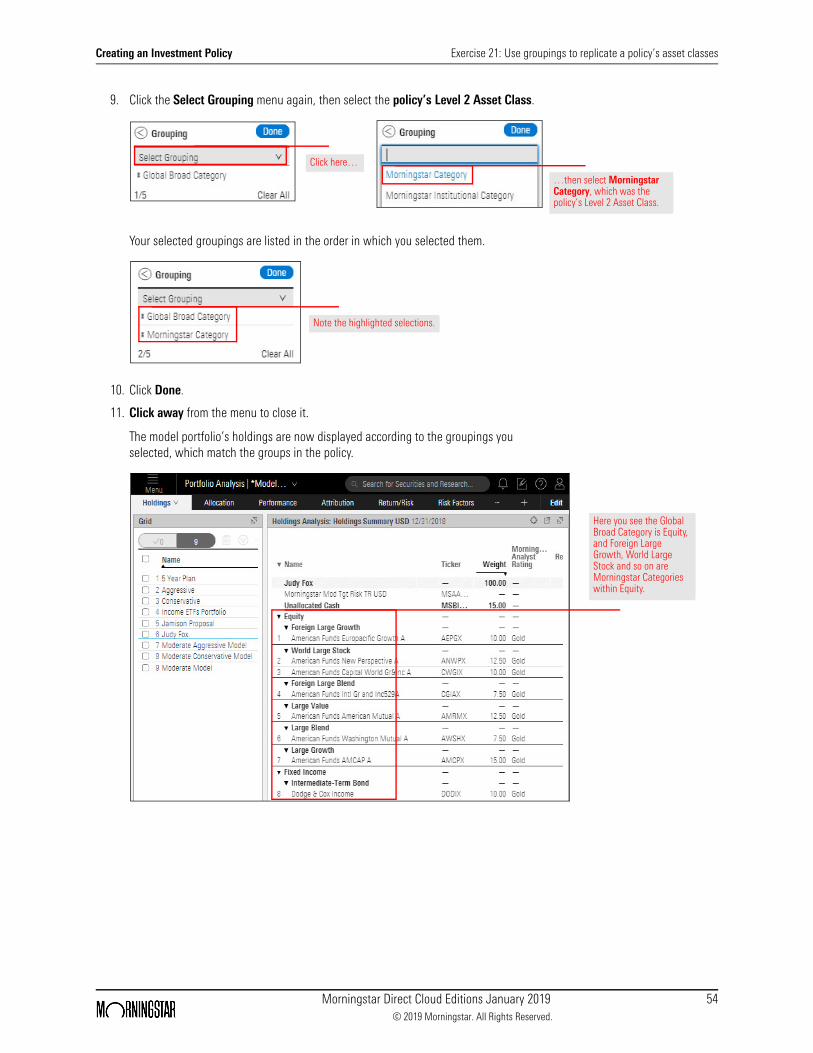
9. Click the Select Grouping menu again, then select the policy’s Level 2 Asset Class.
Your selected groupings are listed in the order in which you selected them.
10. Click Done.
11. Click away from the menu to close it.
The model portfolio’s holdings are now displayed according to the groupings you selected, which match the groups in the policy.
…then select Morningstar Category, which was the policy’s Level 2 Asset Class.
Click here…
Note the highlighted selections.
Here you see the Global Broad Category is Equity, and Foreign Large Growth, World Large Stock and so on are Morningstar Categories within Equity.
Morningstar Direct Cloud Editions January 2019 54© 2019 Morningstar. All Rights Reserved.

Analyzing Total Portfolio Attribution Overview
Analyzing Total Portfolio Attribution
OverviewThe Total Portfolio Attribution (TPA) capability in Morningstar Direct Cloud Editions allows you to measure the impact asset allocation and manager selection have on a client’s account.
To use the TPA capability, you must have a model portfolio with an investment policy assigned to it. If you have followed the instructions in this guide, you have created both.
In this section, you will learn how to do the following:
gunderstand how TPA is calculated (page 55)gunderstand which asset classes are used for the investments in a
model portfolio (page 56)gunderstand what policies are used in weighting assets (page 56)g view a model portfolio’s TPA (page 57)g include portfolios fees in the TPA (page 59)g change the TPA settings (page 61)g save the TPA settings (page 67), andg reuse saved TPA settings (page 68).
How is TPA calculated?In TPA, the value of a portfolio manager’s decisions is known as Active Return. Active Return is calculated by adding together the elements described in the following table:
Contribution is another factor to consider when analyzing TPA. Contribution is an absolute analysis of an account’s performance, while TPA is a relative analysis. Contribution is the weight (of a holding) multiplied by its return. Attribution combines the relative weight and relative return versus the benchmark.
Note: To learn more about how TPA is calculated, read Morningstar Total Portfolio Performance Attribution Methodology.
Element Description
Allocation Effect Allocation Effect measures an advisor’s intentional deviation from the long-term policy to capitalize on his or her views on different asset classes. Overweighting an asset class that has outperformed the total portfolio is a good decision. The reverse is also true.
Selection Effect Selection Effect measures an advisor’s decisions to hire and fire managers, and the timing of such events. The manager selection effect is positive when a manager achieves a positive excess return over his or her benchmark. The reverse is also true.
Misfit Misfit, also know as style bias, occurs when a manager’s benchmark is different than the asset class benchmark. For example, an equity manager might be compared to the Russell 1000 index, but the asset class could be compared to the S&P 500.
Morningstar Direct Cloud Editions January 2019 55© 2019 Morningstar. All Rights Reserved.

Analyzing Total Portfolio Attribution What asset classes are used for investments?
What asset classes are used for investments?
In total portfolio attribution data for a model portfolio in the Morningstar Direct Cloud Editions, investments are grouped into the following global broad categories, which function as the benchmark:
gCommoditiesg Equityg Fixed Income, andgMoney Market.
Note: TPA does not factor in individual stocks and bonds. If these investments are part of a client’s account, they appear under “Unclassified” on the Attribution worksheet.
The following table shows the indexes used for each asset class:
What policies are used in weighting assets?
When viewing total portfolio attribution data for a model portfolio, you can weight assets using a custom investment policy or the following prebuilt policies:
gMorningstar Conservative Target RiskgMorningstar Moderately Conservative Target RiskgMorningstar Moderately Target RiskgMorningstar Moderately Aggressive Target Risk, andgMorningstar Aggressive Target Risk.
If you have attached a policy to a model portfolio, it is automatically used as the default policy in the TPA component. To learn how to attach a policy to a model portfolio, see Exercise 20 on page 50.
The asset allocation breakdown for each prebuilt policy is detailed in the following table:
Asset Class Index
Equity Morningstar Gbl Mkts GR USD
Fixed Income Morningstar US Core Bd TR USD
Commodities Morningstar Lng-Only Cmdty TR USD
Money Market Morningstar Cash TR USD
Policy Fixed Income Equity Commodities Money Market
Morningstar Conservative Target Risk 68% 20% 9% 3%
Morningstar Moderately Conservative Target Risk 52% 40% 6% 2%
Morningstar Moderately Target Risk 34% 60% 4% 2%
Morningstar Moderately Aggressive Target Risk 19% 80% 1% 0
Morningstar Aggressive Target Risk 5% 95% 0 0
Morningstar Direct Cloud Editions January 2019 56© 2019 Morningstar. All Rights Reserved.

Analyzing Total Portfolio Attribution Exercise 22: View a portfolio’s TPA
Exercise 22: View a portfolio’s TPA
To view a portfolio’s TPA, do the following:
Note: If the Model Portfolios workbook is open and Income ETFs Portfolio is selected, begin this exercise at step 4.
1. On the header, hover the cursor over Menu, then select Workbooks. The Workbooks page opens.
2. From the list, select Model Portfolios > All Model Portfolios. The Model Portfolios workbook opens.
3. In the Grid component, click Income ETFs Portfolio to select it.
4. Select the Attribution worksheet. The Total Portfolio Attribution component is displayed.
Select this option
Click this portfolio, then select this tab.
Morningstar Direct Cloud Editions January 2019 57© 2019 Morningstar. All Rights Reserved.

Analyzing Total Portfolio Attribution Exercise 22: View a portfolio’s TPA
5. Scroll right to see the Active Return value for the account. (It is at the far-right of the Total Portfolio Attribution component.) If the Active Return is positive, it means the asset allocation and selection decisions contributed to a better outcome for the client. If the Active Return value is negative, was it due to allocation decisions, manager selection, or a benchmark misfit?
6. Scroll left to see the Weight% column.
The Active Return value for this account is positive, and nearly all of this can be attributed to the manager misfit between this real estate fund and the benchmark.
The Weight% column is to the right of the Name and Benchmark columns.
Morningstar Direct Cloud Editions January 2019 58© 2019 Morningstar. All Rights Reserved.

Analyzing Total Portfolio AttributionExercise 23: Include portfolio fees in the Total Portfolio
Attribution component
Exercise 23: Include portfolio fees in the Total Portfolio Attribution component
To help you understand how portfolio-level fees affect net return in Total Portfolio Attribution (TPA), you can now add and edit portfolio fees in the Total Portfolio Attribution component settings. When you add the fee to the component, rows for fees and net return are added to the table.
The Total Portfolio Attribution component is available only in Model Portfolios workbooks.
Do the following:
1. In a Model Portfolios workbook, select a model portfolio or client setting, then select the Attribution worksheet. The Total Portfolio Attribution component is displayed.
2. From the Component Settings menu, select Portfolio Fee.
3. Enter a Fee Name and Annual Fee %.
4. Do one of the following:
A. If you don’t want to create another fee, click Done. B. If you want to create another fee, click Add Fee. A new row opens. You can create
up to 10 fees.
Note the highlighted selections.
Note the highlighted selections.
Morningstar Direct Cloud Editions January 2019 59© 2019 Morningstar. All Rights Reserved.

Analyzing Total Portfolio AttributionExercise 23: Include portfolio fees in the Total Portfolio
Attribution component
5. Click Done.
In the Total Portfolio Attribution component, the following are now displayed:g Fee row with sub-rows for each fee, andg Net Return row.
The data in these rows is shown under the Net Return% columns (Portfolio, Benchmark, and +/-.
Note the highlighted selections.
Morningstar Direct Cloud Editions January 2019 60© 2019 Morningstar. All Rights Reserved.

Analyzing Total Portfolio Attribution Exercise 24: Change the TPA settings
Exercise 24: Change the TPA settings
In the Total Portfolio Attribution component, look at the following columns nested under Weight%:
gPolicy, andgActual.
If the values in the Policy Weight% column differ significantly from the values in the Actual Weight% column, a different policy might be a better fit for the account.
You can also affect the TPA values by changing any of the following settings in the Component Settings menu:
Setting Options
Time Period Start Date (default: 6 Months Ago)End Date (default: Month End)
Policy Morningstar Conservative Target Risk (default)Morningstar Moderately Conservative Target RiskMorningstar Moderate Target RiskMorningstar Moderately Aggressive Target RiskYour custom policies
Holdings Benchmark Asset Class BenchmarkCategory ETF Index Proxy (default)Primary Prospectus BenchmarkMorningstar Index
Annualized On/Off (default: Off)
Currency All Morningstar-supported currencies
Note the differences between each row’s Actual and Policy Weight Percentages.
Morningstar Direct Cloud Editions January 2019 61© 2019 Morningstar. All Rights Reserved.

Analyzing Total Portfolio Attribution Exercise 24: Change the TPA settings
Depending on the current TPA and the TPA setting(s) you change, the following data points may show different values:
gWeight% +/-gGross Return% +/-gNet Return% +/-gMarket Return% +/-gContribution% +/-gManager Benchmark MisfitgManager Selection, andgActive Return.
In this exercise, you will select a different policy, but the procedure for changing any of the settings is the same. Do the following:
1. In a Model Portfolios workbook, select a model portfolio, then select the Attribution worksheet.
2. In the Total Portfolio Attribution component, click the Component Settings icon. The Component Settings menu opens.
Column Display WeightsGross ReturnNet ReturnMarket ReturnPolicy/BenchmarkRelative +/- (default: all selected)
Output AttributionContribution (default: both selected)
Setting Options
Click this icon.
Morningstar Direct Cloud Editions January 2019 62© 2019 Morningstar. All Rights Reserved.

Analyzing Total Portfolio Attribution Exercise 24: Change the TPA settings
3. From the Component Settings menu, select Policy. The Policy menu opens.
4. From the Policy menu, select a different policy. Your custom policies are displayed in italics at the bottom of the Policy list.
Note: By default, the Morningstar Conservative Target Risk policy is assigned to each account.
5. Click away from the Component Settings menu to close it.
The policy you selected is applied to the component and the displayed data changes to reflect that setting.
Select this option.
Select one of the other policies listed here.
Morningstar Direct Cloud Editions January 2019 63© 2019 Morningstar. All Rights Reserved.

Analyzing Total Portfolio AttributionExercise 25: Add a holdings fee to the Total Portfolio
Attribution component
Exercise 25: Add a holdings fee to the Total Portfolio Attribution component
In the Total Portfolio Attribution component, the holdings fee defaults to Annual Report Net Expense Ratio; however, you can change the fee for an individual holding or for all of the following:
gAnnual Report Gross Expense RatiogProspectus Gross Expense RatiogProspectus Net Expense Ratio, orgCustom.
Do the following
1. In a Model Portfolios workbook, select a model portfolio, then select the Attribution worksheet. The Total Portfolio Attribution component is displayed.
2. From the Component Settings menu, select Holdings Fee. The Holdings Fee window opens.
Note the highlighted selections.
Morningstar Direct Cloud Editions January 2019 64© 2019 Morningstar. All Rights Reserved.

Analyzing Total Portfolio AttributionExercise 25: Add a holdings fee to the Total Portfolio
Attribution component
3. To apply a single fee type to all holdings, from the Type for All Holdings drop-down field, select from the following options:
g Annual Report Gross Expense Ratiog Annual Report Net Expense Ratiog Prospectus Gross Expense Ratio, org Prospectus Net Expense Ratio.
4. To apply a different fee type to an individual portfolio, in the portfolio’s row, from the Fee Type drop-down field, select from the following options:
g Annual Report Gross Expense Ratiog Annual Report Net Expense Ratiog Prospectus Gross Expense Ratiog Prospectus Net Expense Ratio, org Custom.
If you select the same fee type for every holding, that fee type is also displayed in the Type for All Holdings field.
Select a fee type to apply to all holdings.
When all holdings have the same fee type, that is reflected in the Type for All Holdings field.
Morningstar Direct Cloud Editions January 2019 65© 2019 Morningstar. All Rights Reserved.

Analyzing Total Portfolio AttributionExercise 25: Add a holdings fee to the Total Portfolio
Attribution component
If you select a different fee type for a selected holding or holdings, the Type for All Holdings field displays Mixed.
5. To create a custom fee, in the holding’s row, from the Fee Type drop-down field, select Custom, then change the Fee %.
6. Click Done.
When the fee type isn’t the same for all holdings, the Type for All Holdings field displays Mixed.
When a holding’s has a custom fee type, you can change the Fee %.
Morningstar Direct Cloud Editions January 2019 66© 2019 Morningstar. All Rights Reserved.

Analyzing Total Portfolio Attribution Exercise 26: Save TPA settings
Exercise 26: Save TPA settings
Suppose you have customized a portfolio’s TPA setting by selecting a different policy in the Total Portfolio Attribution component. You can save this setting and reuse it in the following situations:
gYou create a new workbook and add the Total Portfolio Attribution to it, orgYou create a new worksheet in an existing workbook and add the Total Portfolio
Attribution to it.
To save the TPA setting, do the following:
1. In the Total Portfolio Attribution component, click the Component Settings icon.
Morningstar Conservative Target Risk is the default policy. If it is the policy in use, there is no need to save the setting. However, if a different policy name is displayed, you can save the setting for reuse.
2. At the top of the Component Settings menu, click Save As.
3. In the Save As dialog box, enter Custom TPA Setting.
4. Click Save.The Save As dialog box closes.
At the top of the Component Settings menu, note that Custom TPA Setting is displayed.
5. Click away from the Component Settings menu to close it.
Click here to save the settings
Enter a name, then click here
Morningstar Direct Cloud Editions January 2019 67© 2019 Morningstar. All Rights Reserved.

Analyzing Total Portfolio Attribution Exercise 27: Reuse saved TPA settings
Exercise 27: Reuse saved TPA settings
Now that you have saved a custom TPA setting, you can apply it to a Total Portfolio Attribution component in the following situations:
gYou create a new workbook and add the Total Portfolio Attribution component to it, or
gYou create a new worksheet in an existing workbook and add the Total Portfolio Attribution component to it.
Do the following:
1. In the Total Portfolio Attribution component, click the Component Settings icon.
2. At the top of the Component Settings, the TPA setting is displayed. Click the arrow to its right. The Settings Set menu opens.
3. Select the saved setting (in this case, Custom TPA Setting).
4. Click away from the Component Settings menu to close it.
The TPA setting you selected is applied to the component and the displayed data changes to reflect that setting.
Click here to change settings.
Select this setting.
Morningstar Direct Cloud Editions January 2019 68© 2019 Morningstar. All Rights Reserved.


![Benchmarks - June, 2013 | Benchmarks Onlineit.unt.edu/sites/default/files/benchmarks-06-2013.pdf · Benchmarks - June, 2013 | Benchmarks Online 4/26/16, 8:52:25 AM] Skip to content](https://img.dokumen.tips/doc/110x75/5f9d6dd4a6e586755376b37d/benchmarks-june-2013-benchmarks-benchmarks-june-2013-benchmarks-online.jpg)