Embed Size (px)
Citation preview

User guide
Create!fax


February 2003
Create!fax
User Guide
Order Number: FX2GN-U13W
This user guide describes how to install and use Create!fax.
Software Version: 2


Copyright Notice
Manual Name: Create!fax 2 User Guide, Edition 3 [Feb 2003]
Order Number: FX2GN-U13W
The information in this document is subject to change without notice and does not represent a commitment on the part of Create!form International, Inc. The software described in this document is furnished under a license or non-disclosure agreement. The software may be used or copied only in accordance with the terms of the agreement. It is against the law to copy the software onto magnetic tape, disk or any other medium for any purpose other than in accordance with the agreement. It is against the law to copy or distribute this document other than in accordance with the agreement. All rights reserved.
© Copyright 1987-2003 Create!form International, Inc. All rights reserved.Create!form, Create!print, Create!flash, Create!stream, Create!fax, Create!email and Create!archive are trademarks of Create!form International, Inc. which may be registered in certain jurisdictions. RightFAX is a trademark of Captaris. J.D. Edwards is a trademark or registered trademark of J.D. Edwards & Company in the United States and other countries. The names of all other products and services of J.D. Edwards are trademarks or registered trademarks of J.D. Edwards World Source Company in the United States and other countries. Adobe, Acrobat, Acrobat Distiller, Acrobat Exchange, Acrobat Reader and PostScript are trademarks of Adobe SystemsIncorporated. LaserJet is a trademark of Hewlett-Packard Company. All other brand/product names are trademarks or registered trademarks of their respective holders.
WARNING. This document is protected by copyright law and international treaties. Unauthorized reproduction or distribution of this document, or any portion of it, may result in civil or criminal liability.
Create!form International, Inc. will prosecute and defend its copyrights to the fullest extent of the law.


Contents
1 Introduction 1
1.1 Who is this Guide for? . . . . . . . . . . . . . . . . . . . . . . . . . . . . . . . . . . . . . . . . . . . . . 21.1.1 Accessing this User Guide . . . . . . . . . . . . . . . . . . . . . . . . . . . . . . . . . . . 2
1.2 User Prerequisites . . . . . . . . . . . . . . . . . . . . . . . . . . . . . . . . . . . . . . . . . . . . . . . . . 2
1.3 Physical and System Requirements . . . . . . . . . . . . . . . . . . . . . . . . . . . . . . . . . . . 2
1.4 Overview of the Create!fax Workflow. . . . . . . . . . . . . . . . . . . . . . . . . . . . . . . . . 3
1.5 Software Requirements. . . . . . . . . . . . . . . . . . . . . . . . . . . . . . . . . . . . . . . . . . . . . 41.5.1 Create!stream . . . . . . . . . . . . . . . . . . . . . . . . . . . . . . . . . . . . . . . . . . . . . 41.5.2 Create!send. . . . . . . . . . . . . . . . . . . . . . . . . . . . . . . . . . . . . . . . . . . . . . . 41.5.3 Create!form/Create!form for JDE OneWorld . . . . . . . . . . . . . . . . . . . . 41.5.4 Create!form server/Create!form server for JDE OneWorld. . . . . . . . . . 41.5.5 Fax Interface Software . . . . . . . . . . . . . . . . . . . . . . . . . . . . . . . . . . . . . . 5
1.6 User Guide Conventions. . . . . . . . . . . . . . . . . . . . . . . . . . . . . . . . . . . . . . . . . . . . 51.6.1 Typographical Conventions . . . . . . . . . . . . . . . . . . . . . . . . . . . . . . . . . . 5
1.7 Glossary of Terms . . . . . . . . . . . . . . . . . . . . . . . . . . . . . . . . . . . . . . . . . . . . . . . . 6
2 Installing and Configuring Create!fax 7
2.1 Installing Create!fax . . . . . . . . . . . . . . . . . . . . . . . . . . . . . . . . . . . . . . . . . . . . . . . 8
2.2 License Keys. . . . . . . . . . . . . . . . . . . . . . . . . . . . . . . . . . . . . . . . . . . . . . . . . . . . . 8
2.3 Log File Settings. . . . . . . . . . . . . . . . . . . . . . . . . . . . . . . . . . . . . . . . . . . . . . . . . . 92.3.1 Removing Log Files . . . . . . . . . . . . . . . . . . . . . . . . . . . . . . . . . . . . . . . . 92.3.2 Disk Space Warnings . . . . . . . . . . . . . . . . . . . . . . . . . . . . . . . . . . . . . . . 92.3.3 Events to be Recorded . . . . . . . . . . . . . . . . . . . . . . . . . . . . . . . . . . . . . . 9
2.4 Specifying a Windows Identity . . . . . . . . . . . . . . . . . . . . . . . . . . . . . . . . . . . . . 11
2.5 Create!fax Printer Queues . . . . . . . . . . . . . . . . . . . . . . . . . . . . . . . . . . . . . . . . . 11
Create!fax v

3 Configuring RightFax 13
3.1 Overview . . . . . . . . . . . . . . . . . . . . . . . . . . . . . . . . . . . . . . . . . . . . . . . . . . . . . . .14
3.2 Installing and Configuring RightFax . . . . . . . . . . . . . . . . . . . . . . . . . . . . . . . . . .143.2.1 Installing PDF Module . . . . . . . . . . . . . . . . . . . . . . . . . . . . . . . . . . . . .143.2.2 Activating the PostScript Service . . . . . . . . . . . . . . . . . . . . . . . . . . . . .143.2.3 The RightFax Printer Queue . . . . . . . . . . . . . . . . . . . . . . . . . . . . . . . . .15
3.3 Creating and Configuring a Create!fax Printer Queue . . . . . . . . . . . . . . . . . . . .15
3.4 Parameters . . . . . . . . . . . . . . . . . . . . . . . . . . . . . . . . . . . . . . . . . . . . . . . . . . . . . .163.4.1 Minimum Parameters . . . . . . . . . . . . . . . . . . . . . . . . . . . . . . . . . . . . . .163.4.2 Providing Values for Parameters. . . . . . . . . . . . . . . . . . . . . . . . . . . . . .163.4.3 List of Common Parameters . . . . . . . . . . . . . . . . . . . . . . . . . . . . . . . . .17
4 Configuring Genifax 19
4.1 Overview . . . . . . . . . . . . . . . . . . . . . . . . . . . . . . . . . . . . . . . . . . . . . . . . . . . . . . .20
4.2 Installing and Genifax . . . . . . . . . . . . . . . . . . . . . . . . . . . . . . . . . . . . . . . . . . . . .20
4.3 Enabling Filescan. . . . . . . . . . . . . . . . . . . . . . . . . . . . . . . . . . . . . . . . . . . . . . . . .20
4.4 Creating and Configuring a Create!fax Printer Queue . . . . . . . . . . . . . . . . . . . .20
4.5 Parameters . . . . . . . . . . . . . . . . . . . . . . . . . . . . . . . . . . . . . . . . . . . . . . . . . . . . . .214.5.1 Minimum Parameters . . . . . . . . . . . . . . . . . . . . . . . . . . . . . . . . . . . . . .214.5.2 Providing Values for Parameters. . . . . . . . . . . . . . . . . . . . . . . . . . . . . .214.5.3 List of Common Parameters . . . . . . . . . . . . . . . . . . . . . . . . . . . . . . . . .22
5 Configuring Zetafax 23
5.1 Overview . . . . . . . . . . . . . . . . . . . . . . . . . . . . . . . . . . . . . . . . . . . . . . . . . . . . . . .24
5.2 Installing Zetafax . . . . . . . . . . . . . . . . . . . . . . . . . . . . . . . . . . . . . . . . . . . . . . . . .24
5.3 Adding a New Zetafax User . . . . . . . . . . . . . . . . . . . . . . . . . . . . . . . . . . . . . . . .24
5.4 Installing the Zetafax API . . . . . . . . . . . . . . . . . . . . . . . . . . . . . . . . . . . . . . . . . .24
5.5 Downloading and Installing Ghostscript . . . . . . . . . . . . . . . . . . . . . . . . . . . . . . .25
vi Create!fax

5.6 Creating and Configuring a Create!fax Printer Queue . . . . . . . . . . . . . . . . . . . . 25
5.7 Parameters . . . . . . . . . . . . . . . . . . . . . . . . . . . . . . . . . . . . . . . . . . . . . . . . . . . . . 265.7.1 Minimum Parameters . . . . . . . . . . . . . . . . . . . . . . . . . . . . . . . . . . . . . . 265.7.2 Providing Values for Parameters . . . . . . . . . . . . . . . . . . . . . . . . . . . . . 265.7.3 List of Parameters . . . . . . . . . . . . . . . . . . . . . . . . . . . . . . . . . . . . . . . . 27
6 Production Faxing 29
6.1 Setting the Print Processor for a Create!fax Printer Queue . . . . . . . . . . . . . . . . 306.1.1 Creating a Create!form server Writer for a Create!fax Printer Queue. 306.1.2 Configuring a Create!fax Printer Queue with the CfOWServer Print
Processor . . . . . . . . . . . . . . . . . . . . . . . . . . . . . . . . . . . . . . . . . . . . . . . 30
6.2 Testing the Configuration. . . . . . . . . . . . . . . . . . . . . . . . . . . . . . . . . . . . . . . . . . 31
6.3 Viewing the Log Files . . . . . . . . . . . . . . . . . . . . . . . . . . . . . . . . . . . . . . . . . . . . 31
6.4 Pausing and Resuming Create!fax . . . . . . . . . . . . . . . . . . . . . . . . . . . . . . . . . . . 32
6.5 Enabling Create!fax . . . . . . . . . . . . . . . . . . . . . . . . . . . . . . . . . . . . . . . . . . . . . . 33
Index 35
Create!fax vii


1 1
IntroductionThis chapter provides an overview of Create!fax.
The following topics are covered:
! Who is this Guide for?
! User Prerequisites
! Physical and System Requirements
! Overview of the Create!fax Workflow
! Software Requirements
! User Guide Conventions
! Glossary of Terms
Create!fax 1

Chapter 1: Introduction
1.1 Who is this Guide for?This user guide is for Administrators of Create!fax. It provides instructions on installing, configuring and using Create!fax. It also explains how to configure fax interface products such as RightFax, Genifax and Zetafax, for use with Create!fax.
1.1.1 Accessing this User Guide
This user guide (Create!fax.pdf) is available online in Portable Document Format (PDF):
• on the installation CD in the \Manuals folder.• from the Create!fax Main menu, by selecting Help!Help Topics.• from the Windows Start menu, by selecting:
Programs!Create!form!Help!Create!fax.
1.2 User PrerequisitesThis user guide assumes you:
• are familiar with basic Windows concepts and terminology. • have an understanding of basic printer operations, including the process used by
the Windows print spooler.• can configure and operate your fax interface software.
1.3 Physical and System RequirementsThe following is a list of requirements for installing and using Create!fax:
• Create!fax installation CD.• Microsoft Windows NT 4.0 or Microsoft Windows 2000• 128 MB RAM or greater.• Approximately 10 MB free hard disk space.• Appropriate hardware to allow fax communication, for example fax board and/or
modem.
Your fax interface will have other system requirements. For more information, refer to the relevant documentation.
2 Create!fax

1.4 Overview of the Create!fax Workflow
1.4 Overview of the Create!fax WorkflowCreate!fax allows you to automatically fax documents to pre-determined destinations without the need for user intervention.
As the application server sends spool files to a Windows printer queue, Create!form server merges it with forms, and sends the resulting documents to Create!fax. Recipient information and other details in the documents are automatically passed to the fax interface, which then faxes the documents to the specified recipients.
The following flowchart displays the process.
Create!form• Form projects are
designed.
Application server• Can be Windows, UNIX, VMS or OS/400.• Create!send can be used to add header information
that determines what script will be used by Create!stream.
Create!fax• Manages and sends the fax files to the fax interface in the appropriate format.
Fax Interface• Faxes documents to recipients specified in the header.
Create!form server• Merges the form projects with the spool files.
Create!stream• Splits spool files into individual documents.• Adds header information which may be mapped
from the spool file.• Outputs spool files to Create!form server printer
queue.
Create!fax 3

Chapter 1: Introduction
1.5 Software RequirementsThe following is a list of software that is required for use with Create!fax.
1.5.1 Create!stream
Create!stream is a required component that enables users to:
• split spool files into individual documents for faxing.• extract information from the spool file and map it to parameters that will be built
into the header.
1.5.2 Create!send
Create!send is a utility provided with Create!form server. Create!send can add header information that determines which Create!stream script will be used. For more information on Create!send, refer to the " Create!form server User Guide.
1.5.3 Create!form/Create!form for JDE OneWorld
To design forms for use with Create!fax, you need Create!form or Create!form for JDE OneWorld installed on the design workstation. For more information, refer to the " Create!form User Guide or the " Create!form for JDE OneWorld User Guide.
Once you have designed your forms, you must transfer them to the e-forms server. For instructions on this, refer to the " Create!form transfer User Guide.
1.5.4 Create!form server/Create!form server for JDE OneWorld
To merge the form project with the spool file, you need Create!form server or Create!form server for JDE OneWorld. Whichever you use, it must already be installed on the e-forms server before you can install Create!fax. For more information refer to the " Create!form server User Guide.
For best results, faxing forms should be designed so they are suitable for low resolution output. For example they should have no fine lines.
4 Create!fax

1.6 User Guide Conventions
1.5.5 Fax Interface Software
Create!fax prepares your documents for faxing by passing merged documents onto your fax interface, ready for sending.
Create!fax works with the following fax interfaces:
• RightFax 7.0 or higher (by Captaris). RightFax is available from your Create!form International distributor.
• Genifax version 3.0.1 (by Omtool)• Zetafax 7.5 (by Equisys)
For instructions on installing and using these products, refer to the relevant fax interface documentation. For instructions on configuring them for use with Create!fax, refer to the relevant chapter in this user guide:
• Configuring RightFax, " Chapter 3 • Configuring Genifax, " Chapter 4 • Configuring Zetafax, " Chapter 5
1.6 User Guide Conventions
1.6.1 Typographical Conventions
The following typographical conventions are used in this document:
Convention Convention Usage
Bold Screen items and buttons.
Italic Notations, references.
"A short-cut or reference to the document, chapter or section described after the symbol. For example: " Section 3.2.1 refers to section 3.2.1 in this user guide.
Courier Font Commands entered by a user.
Additional information relating to the topic.
“click”Place the mouse pointer, , over the item stated and then ‘click’ (press) the left-hand mouse button once.
Create!fax 5

Chapter 1: Introduction
1.7 Glossary of Terms The following tables lists terms used in association with Create!fax.
Item!Sub-ItemMenu selection; i.e. select the menu Item and then select the Sub-Item from the drop-down list, e.g., File!New.
Numbering (1.)Step-by-step procedures. To perform an action, follow these instructions in the sequential order given.
Bullet points (!) Lists a series of points or actions. The order is not important.
Term Definition
Application server The system on which the spool file originates.
Create!form/Create!form for JDE OneWorld
Create!form is the form design component. Custom e-forms are designed using the Create!form application on a Windows system.
Create!form server/Create!form server for JDE OneWorld
The application that merges the spool file with the form project.
Design workstation The Windows PC where Create!form design products are installed.
E-forms serverThe system on which the Create!form production products (including Create!form server and Create!fax) are installed.
Form projectA form project contains all the information required to convert the raw data of a spool file into a form or fax. Form projects are designed on the design workstation.
Printer Printer refers to a physical printer.
Server application The software from which the spool file originates.
Spool fileThe spool file is the original print job sent from the application server.
Fax interfaceExternal software that works with Create!fax to send faxes to recipients. Can be either RightFax, Genifax or Zetafax.
.jtt fileJob Ticket Template file. A .jtt file is a template for how to format the job parameters for the fax interface. Each fax interface has a .jtt file.
Job headerInformation that is attached to a spool file that sets out parameters such the recipient name and number that are used to send faxes.
Convention Convention Usage
6 Create!fax

2 2Chapter
Installing and Configuring Create!faxThis chapter describes how to install and configure Create!fax.
The following topics are covered:
! Installing Create!fax
! License Keys
! Log File Settings
! Specifying a Windows Identity
! Create!fax Printer Queues
Create!fax 7

Chapter 2: Installing and Configuring Create!fax
2.1 Installing Create!fax
To install Create!fax on the e-forms server:
1. Log on to the e-forms server as a user with Administrator rights.
2. Insert the Create!fax installation CD into the CD drive. The Create!fax setup screen should be displayed. If it is not started automatically, run the CFax.exe program located in the root directory of the installation CD.
3. From the Create!fax setup screen, click Install Products, then click Create!fax. The Create!fax installation program will be started.
If you have already installed another Create!form International product on this machine, the installation folder will already be defined and cannot be selected. The default installation folder is C:\Program Files\Create!form.
4. Continue through the remaining installation screens until the install is complete. You will return to the Create!fax setup screen.
5. Once installation is complete, you will return to the Create!fax setup screen. Click Exit to finish, or continue installing additional products if required.
2.2 License KeysYou may be given a temporary license key for evaluating the product, however for continued operation you need a permanent license key. In order to issue you with a permanent license key, you must inform your distributor of your system’s Authorization code. You must then enter your permanent license key.
To view the Authorization code:
1. From the Create!fax Main menu, select Administration!License keys... The Create!form International License Keys dialog will be displayed. The Authorization code will be displayed at the top of the dialog.
Once you have notified your distributor of the Authorization code, you will be given a license key.
8 Create!fax

2.3 Log File Settings
To enter a Create!fax license key:
1. From the Create!fax Main menu, select Administration!License keys... The Create!form International License Keys dialog will be displayed.
2. Click Create. The Create License Key dialog will be displayed.
3. Type the license key you have been given, and click OK.
2.3 Log File SettingsFrom within Create!fax, you can specify where to store Create!fax’s log files and choose which events should be recorded. For information on viewing the logs and using Create!form log viewer, refer to " Section 6.3.
2.3.1 Removing Log Files
Create!fax stores log files and other temporary files it creates for a specified period of time. By default, the period is 7 days, but you can set this. Changes to this setting will affect all Create!form International products.
2.3.2 Disk Space Warnings
To prevent log messages being written after the drive has reached capacity, you can elect to be warned when your disk is a certain percentage full, and/or have Create!faxstop logging when the disk is a certain percentage full. Changes to these settings will affect all Create!form International products.
2.3.3 Events to be Recorded
You can set what events Create!fax records. Changes to these settings do not affect any other Create!form International products.
A permanent product license will require one license key per product. Several products may be enabled with the one license key if you have been issued with a temporary license.
Create!fax 9

Chapter 2: Installing and Configuring Create!fax
To set the Create!fax log file settings:1. From Create!fax Main menu, select Administration!Log File Settings...
The Log File Settings dialog will be displayed.
Figure 2-1: The Log File Settings dialog.
2. In the Path field, type the path where you want the log files to be stored, or click Browse... to locate the folder you want.
3. In the Remove log files after, select how many days you want the log files to remain before Create!fax removes them. Selecting 0 in this field will cause log files to be removed at the end of the day on which they were created.
4. In the Log a warning message if disk is full field, select the percentage of disk space used before you receive a message. The default is 90%.
5. In the Stop logging if disk is full field, select the percentage of disk space used before logging is stopped. The default is 95%.
6. In the Create!fax events to be recorded section, select which events should be recorded within the log files. As a guide:
• The Errors setting is usually appropriate for every day production faxing.• The Errors, Warnings, Successes, Information setting is useful during the
configuration stage, but produces very large log files during production faxing.
7. Click OK.
10 Create!fax

2.4 Specifying a Windows Identity
2.4 Specifying a Windows IdentityThe Create!fax and Cfservice can continue to run, even when you are logged off. For this to happen, Create!fax needs to impersonate a user who has the necessary permission to run the service.
To specify a Windows identity:
1. From the Create!fax Main menu, select Administration!Windows identity... The Windows System Logon Details dialog will be displayed.
2. In the Logon as user field, type the logon name. It is recommended that System Administrator creates a Create!fax user or group with adequate permissions for use as the Windows ID. Alternatively you can type the name of the Administrator of the domain where Create!fax resides.
3. In the Domain field, type the name of the domain you normally logon to.
4. In the Password field, type the password to the account.
5. Click OK. When you are logged off, Create!fax will continue to process fax documents.
2.5 Create!fax Printer QueuesCreate!fax works in conjunction with Create!fax printer queues on the e-forms server. Create!fax printer queues:
• use a Generic/Text Only printer driver.• use the appropriate print processor (A different print processor is required
depending on whether you are using Create!form server or Create!form server for JDE OneWorld).
The printer queues are created via Create!fax, but because their configuration will vary depending on the fax interface, the creation and configuration of queues is dealt with in the relevant fax interface chapter:
• For RightFax, refer to " Chapter 3.• For Genifax, refer to " Chapter 4.• For Zetafax, refer to " Chapter 5.
Create!fax 11


3 1
Configuring RightFaxThis chapter describes how to configure RightFax for use with Create!fax.
The following topics are covered:
! Overview
! Installing and Configuring RightFax
! Creating and Configuring a Create!fax Printer Queue
! Parameters
Create!fax 13

Chapter 3: Configuring RightFax
3.1 OverviewRightFax is a third party product that can be used with Create!fax to send faxes. This chapter explains the steps required to configure version 7.0 or greater of RightFax for use with Create!fax. For full instructions on configuring and using RightFax, refer to the relevant RightFax documentation.
3.2 Installing and Configuring RightFaxTo install and configure RightFax, you must perform the following steps:
• Install RightFax server and client. • Install and configure the board server. • Install the PDF Module (" Section 3.2.1).• Create user accounts. • Ensure the RightFax printer queue is automatically installed and configured
(" Section 3.2.3).
If the information is not contained in this manual, refer to the RightFax documentation for instructions.
3.2.1 Installing PDF Module
In order to successfully fax documents, you must install the RightFax PDF Module. Some versions of RightFax allow you to install the PDF module while you are installing the server. If your version does not do this, you must install it from the RightFax installation CD.
To install the RightFax PDF Module from the CD:
1. Browse the RightFax installation CD.
2. Double click the setup.exe located in the PDF folder. The PDF Module install will start.
3. When prompted to select the workserver that will perform the PDF/PS conversion process, select Workserver 1.
4. Follow the prompts until the installation is complete.
3.2.2 Activating the PostScript Service
When the installation is complete, you must ensure the PostScript service on Workserver 1 is activated.
14 Create!fax

3.3 Creating and Configuring a Create!fax Printer Queue
To activate the PostScript service on Workserver 1:
1. Start the Enterprise Fax Manager. Click Start!Programs!Enterprise Fax Manager.
2. In the left hand directory window, highlight RightFax server.
3. In the bottom right window, double click RightFax Workserver 1. The Workserver Configuration dialog will be displayed.
4. In the left hand directory window, select Workserver 1.
5. In the Services field, ensure PostScript is highlighted.
6. Click OK.
3.2.3 The RightFax Printer Queue
The RightFax printer queue, is the queue that Create!fax will output to. The RightFaxprinter queue will be automatically created and configured when installing RightFaxversion 8.0 or higher. If you use an earlier version, you will have to manually create it using the Windows Add Printer wizard.
The RightFax printer queue must:
• use the Generic/Text Only printer driver.• output to the RightFax port.
3.3 Creating and Configuring a Create!fax Printer QueueAfter you have configured RightFax, you are ready to configure the Create!fax printer queue.
To create and configure a Create!fax printer queue:
1. From the Create!fax Main menu, select Administration!Configure Fax Queues... The Configure Fax Queues dialog will be displayed.
2. Click Create. A message will ask if you want to create a new printer queue.
3. Click Yes. A new queue will be created.
4. In the Interface column of the new queue, select RightFax from the drop down.
Create!fax 15

Chapter 3: Configuring RightFax
5. With the new queue highlighted, click Settings. The RightFax Configuration dialog will be displayed.
6. From the drop down, select the RightFax printer queue. This will direct the output of the Create!fax printer queue to the RightFax queue.
7. Click OK.
8. Click OK to exit the Configure Fax Queues dialog.
3.4 ParametersUsing data from the spool files, Create!stream places fax parameters in each fax job. Fax parameters determine such things as: where the fax is sent, the name of the recipient and the time it is sent.
The Create!fax installation CD includes two sample .jtt files (Cfax_RF.jtt for Create!form server and CfaxJDE_RF.jtt for JDE One World users). When a .jtt file is used in a Create!stream script, it dictates what parameters can be passed through the Create!form products to RightFax.
You can copy the sample .jtt files from the folder called Sample JTTs in the root directory of the installation CD, to the <Create!stream install dir>\JTT directory and modify them to suit your needs. Within Create!stream, you must set the .jtt file for the script you are using.
3.4.1 Minimum Parameters
As a minimum, all faxes must have the following parameters:
• <ToFaxName> (the name of the recipient)• <ToFaxNum> (the fax number of the recipient)
3.4.2 Providing Values for Parameters
You can provide fixed parameter values by hard coding the parameter in the .jtt file, or alternatively you can call a Create!stream script that extracts a value from the spool file.
• A hard coded parameter looks like: <ToFaxNum:(99) 9999-9999>
• A parameter that calls a Create!stream script looks like: <ToFaxNum:#!ReceiverNum!#>, where “ReceiverNum” is the mapping tag.
16 Create!fax
3.4 Parameters
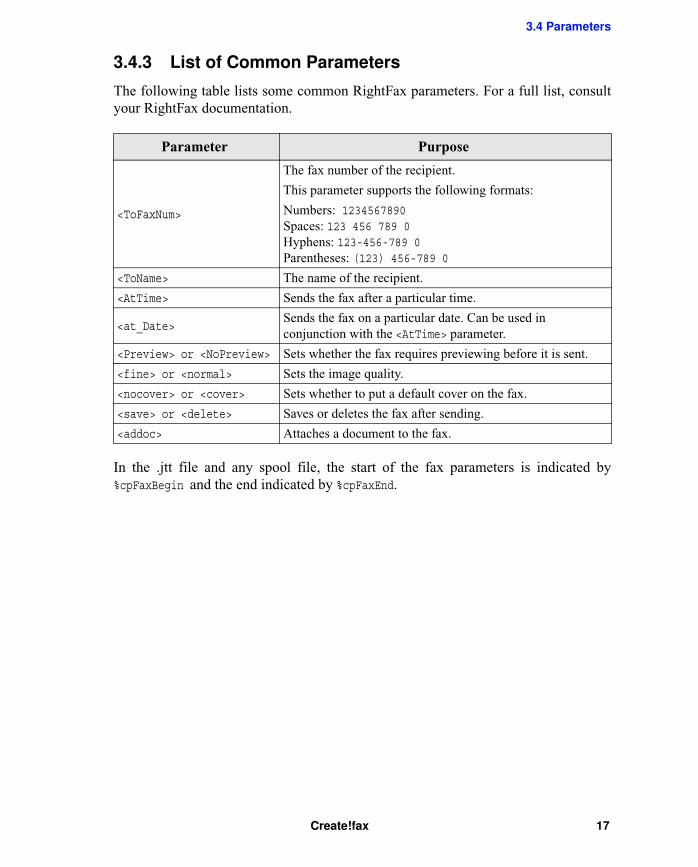
3.4.3 List of Common Parameters
The following table lists some common RightFax parameters. For a full list, consult your RightFax documentation.
In the .jtt file and any spool file, the start of the fax parameters is indicated by %cpFaxBegin and the end indicated by %cpFaxEnd.
Parameter Purpose
<ToFaxNum>
The fax number of the recipient.
This parameter supports the following formats:
Numbers: 1234567890 Spaces: 123 456 789 0 Hyphens: 123-456-789 0 Parentheses: (123) 456-789 0
<ToName> The name of the recipient.
<AtTime> Sends the fax after a particular time.
<at_Date>Sends the fax on a particular date. Can be used in conjunction with the <AtTime> parameter.
<Preview> or <NoPreview> Sets whether the fax requires previewing before it is sent.
<fine> or <normal> Sets the image quality.
<nocover> or <cover> Sets whether to put a default cover on the fax.
<save> or <delete> Saves or deletes the fax after sending.
<addoc> Attaches a document to the fax.
Create!fax 17


4 1
Configuring GenifaxThis chapter describes how to configure Genifax for use with Create!fax.
The following topics are covered:
! Overview
! Installing and Genifax
! Enabling Filescan
! Creating and Configuring a Create!fax Printer Queue
! Parameters
Create!fax 19

Chapter 4: Configuring Genifax
4.1 OverviewGenifax is a third party product that can be used with Create!fax to send faxes. This chapter explains the steps required to configure version 3.0.1 of Genifax for use with Create!fax. For full instructions on installing and using Genifax, refer to the relevant Genifax documentation.
4.2 Installing and GenifaxFor instructions on installing Genifax, refer to the relevant Genifax documentation.
4.3 Enabling FilescanConfiguring Genifax involves enabling Filescan from within Genifax.
To enable Filescan from within Genifax:
1. Start Genifax. The Genifax Administration Window will be displayed.
2. In the Tree section on the left hand side, right click Connectors and select New!Filescan. The Create New Filescan Connector wizard will be displayed.
3. When prompted, type in the license number and the path of the folder you want Create!fax to output to.
4. Complete the wizard.
4.4 Creating and Configuring a Create!fax Printer QueueAfter you have installed Genifax, you can configure the Create!fax printer queue.
To create and configure a Create!fax printer queue:
1. From the Create!fax Main menu, select Administration!Configure Fax Queues... The Configure Fax Queues dialog will be displayed.
2. Click Create. A message will ask if you want to create a new printer queue.
3. Click Yes. A new queue will be created.
20 Create!fax

4.5 Parameters
4. In the Interface column of the new queue, select Genifax from the drop down.
5. With the new queue highlighted, click Settings. The Genifax Configuration dialog will be displayed.
6. Type the path or browse to the output folder that you want Create!fax to output to. This is the same folder you set in " Section 4.2. GeniFax will watch this folder and process any faxes that are placed in it.
7. Click OK.
8. Click OK to exit the Configure Fax Queues dialog.
4.5 ParametersUsing data from the spool files, Create!stream places fax parameters in each fax job. Fax parameters determine such things as: where the fax is sent, the name of the recipient and the time it is sent.
The Create!fax installation CD includes two sample .jtt files (Cfax_Geni.jtt for Create!form server and CfaxJDE_Geni.jtt for JDE One World users). When a .jtt file is used in a Create!stream script, it dictates what parameters can be passed through the Create!form products to Genifax.
You can copy the sample .jtt files from the folder called Sample JTTs in the root directory of the installation CD, to the <Create!stream install dir>\JTT directory and modify them to suit your needs. Within Create!stream, you must set the .jtt file for the script you are using.
4.5.1 Minimum Parameters
As a minimum, all faxes must have the following parameters:
• #SENDER_EMAIL (the email address of sender)• #DESTINATION (the fax number of recipient)
4.5.2 Providing Values for Parameters
You can provide fixed parameter values by hard coding the parameter in the .jtt file, or alternatively you can call a Create!stream script that extracts a value from the spool file.
• A hard coded parameter looks like: #DESTINATION (99) 9999-9999
Create!fax 21

Chapter 4: Configuring Genifax
• A parameter that calls a Create!stream script looks like: #DESTINATION #!ReceiverNum!#, where “ReceiverNum” is the mapping tag.
4.5.3 List of Common Parameters
The following table lists some common Genifax’s parameters. For a full list, consult your Genifax documentation.
In the .jtt file and any spool file, the start of the fax parameters is indicated by %cpFaxBegin and the end indicated by %cpFaxEnd.
Parameter Purpose
#DESTINATION The fax number of the recipient.
#RECIP_NAME The name of the recipient.
#ATTACHMENT Attaches a file to the fax. When Genifax sends a fax job, it consists of two files, a header file containing the parameters, and a TIFF image for faxing.
#PRIORITY Sets the priority of the fax.
#PREVIEW_REQUIRED Sets whether the fax requires previewing before it is sent.
#COVERPAGE Prevents a default cover being put on the fax.
#SENDER_NAME The name of the sender.
#COMMENTS Allows for comments to be placed on cover page.
#BILLING_CODE Allows billing codes to be sent to the fax server.
22 Create!fax

5 1
Configuring ZetafaxThis chapter describes how to configure Zetafax for use with Create!fax.
The following topics are covered:
! Overview
! Installing Zetafax
! Downloading and Installing Ghostscript
! Creating and Configuring a Create!fax Printer Queue
! Parameters
Create!fax 23

Chapter 5: Configuring Zetafax
5.1 OverviewZetafax is a third party product that can be used with Create!fax to send faxes. This chapter explains the steps required to configure version 7.5 of Zetafax for use with Create!fax. For full instructions on installing and using Zetafax, refer to the relevant Zetafax documentation.
5.2 Installing ZetafaxFor instructions on installing Zetafax, refer to the Zetafax documentation.
5.3 Adding a New Zetafax UserOn every PC that you intend to run Zetafax client, you must add a Zetafax user.
To add a new Zetafax user:
1. Start the Zetafax configuration. Click Start!Programs!Zetafax!Zetafax Configuration. The Console Root dialog will be displayed.
2. In the Tree tab on the left hand side, click Zetafax and then User Groups.
3. In the right hand window, click the Add User icon. The Add new Zetafax user dialog will be displayed.
4. Type a user name (up to eight characters long).
5. Click OK. The Zetafax user details dialog will be displayed.
6. In the Network login id field, type in a network login ID for that PC.
7. In the full name field, type the user’s full name.
8. Click OK.
5.4 Installing the Zetafax APIYour Zetafax reseller will provide you with an external interface API that will need to be installed and separately licensed. Consult your Zetafax reseller for details.
24 Create!fax

5.5 Downloading and Installing Ghostscript
5.5 Downloading and Installing GhostscriptBefore you start using Zetafax with Create!fax, you must download Ghostscript 8.0. Ghostscript is a third party utility that converts PostScript files to .tif images, which Zetafax requires for faxing.
To download and install Ghostscript:
1. Open your internet browser.
2. Navigate to http://www.ghostscript.com/doc/AFPL/get800.htm.
3. Download version 8.0. of Ghostscript. This software is Aladdin Free Public License (AFPL).
4. When the download is complete, run the Ghostscript install.
5. When Ghostscript is installed, note down the location of the executable that starts Ghostscript.
5.6 Creating and Configuring a Create!fax Printer QueueAfter you have installed Zetafax, you are ready to configure the Create!fax printer queue.
To create and configure a Create!fax printer queue:
1. From the Create!fax Main menu, select Administration!Configure Fax Queues... The Configure Fax Queues dialog will be displayed.
2. Click Create. A message will ask if you want to create a new printer queue.
3. Click Yes. A new queue will be created.
4. In the Interface column of the new queue, select Zetafax from the drop down.
5. With the new queue highlighted, click Settings. The Zetafax Configuration dialog will be displayed.
6. In the Ghostscript executable field, type in the path of the Ghostscript executable or click Browse... and navigate to it.
7. Click OK.
Create!fax 25

Chapter 5: Configuring Zetafax
8. Click OK to exit the Configure Fax Queues dialog.
5.7 ParametersUsing data from the spool files, Create!stream places fax parameters in each fax job. Fax parameters determine such things as: where the fax is sent, the name of the recipient and the time it is sent.
The Create!fax installation CD includes two sample .jtt files (Cfax_Zeta.jtt for Create!form server and CfaxJDE_Zeta.jtt for JDE One World users). When a .jtt file is used in a Create!stream script, it dictates what parameters can be passed through the Create!form products to Genifax.
You can copy the sample .jtt files from the folder called Sample JTTs in the root directory of the installation CD, to the <Create!stream install dir>\JTT directory and modify them to suit your needs. Within Create!stream, you must set the jtt for the script you are using.
5.7.1 Minimum Parameters
As a minimum, all faxes must have the following parameters:
• %cpToFaxNum: (the name of recipient)• %cpToFaxName: (the fax number of recipient)• %cpuser: (the Zetafax username)
5.7.2 Providing Values for Parameters
You can provide fixed parameter values by hard coding the parameter in the .jtt file, or alternatively you can call a Create!stream script that extracts a value from the spool file.
• A hard coded parameter looks like: <cpToFaxNum:(99) 9999-9999>
• A parameter that calls a Create!stream script looks like: %cpToFaxNum:#!ReceiverNum!#>, where “ReceiverNum” is the mapping tag.
26 Create!fax

5.7 Parameters
5.7.3 List of Parameters
The following table lists Zetafax’s parameters.
In the .jtt file and any spool file, the start of the fax parameters is indicated by %cpFaxBegin and the end indicated by %cpFaxEnd.
Parameter Purpose
%cpToFaxNum: The fax number of the recipient.
%cpToFaxName: The name of the recipient.
%cpToFaxDep: The department name of the recipient.
%cpuser: Indicates the Zetafax user name.
%cpToFaxPriority: Enables you to send the fax now, off-peak or after midnight.
%cpBillingcode Allows billing codes to be sent to the fax server.
%cphold Enables jobs to be held until manually sent.
%cpSendTime: Enables you to send the fax now, off-peak or after midnight.
%cpQualityOfFax: Sets the image quality.
%cpCoverSubject: Sets the subject line on the cover sheet.
Create!fax 27


6 6Chapter
Production FaxingThis chapter explains the final configuration step “Setting the print processor for a Create!fax printer queue”, and how to perform day to day tasks associated with production faxing.
The following topics are covered:
! Setting the Print Processor for a Create!fax Printer Queue
! Testing the Configuration
! Viewing the Log Files
! Pausing and Resuming Create!fax
! Enabling Create!fax
Create!fax 29

Chapter 6: Production Faxing
6.1 Setting the Print Processor for a Create!fax Printer QueueIn order for spool files to be merged correctly, Create!fax printer queues must use the appropriate print processor. If you are using Create!form server, this involves creating a Create!form server writer (" Section 6.1.1). If you are using Create!form server for JDE OneWorld, this involves configuring the printer queue with the CFOWServer print processor (" Section 6.1.2).
6.1.1 Creating a Create!form server Writer for a Create!fax Printer Queue
1. Start Create!form server. Click Start!Programs!Create!form!Create!form server2.
2. From the Create!form server Main menu, click Administration!Create!form server writers... The Create!form server writers dialog will be displayed.
3. Click Create.
4. From the Printer field, select the Create!fax printer queue.
5. Click OK. A prompt will tell you that the print processor is about to be changed.
6. Click OK to the prompt. The Create!form server writer you have created will appear in the list of Create!form server writers.
7. Click Close to exit the Create!form server writers dialog.
6.1.2 Configuring a Create!fax Printer Queue with the CfOWServer Print Processor
1. Start Create!form server for JDE OneWorld. Click Start!Programs!Create!form!Create!form server for JDE OneWorld.
2. From the Main menu, select Administration!Printer Setup... The Printer Information dialog will be displayed.
3. In the Printer Name list, select the Create!fax printer queue.
4. From the Print Processor drop-down, select CfOWServer.
30 Create!fax

6.2 Testing the Configuration
5. Click Close. To register this change with the printer, the Windows Print Spooler needs to be stopped and started.
6.2 Testing the ConfigurationYou should now be ready to commence production faxing. Before you do this, you can test the configuration of the Create!fax printer queue(s).
To test the configuration:
1. From the Create!fax Main menu, select File!Test. The CpPrintFile - Create!fax dialog will be displayed.
2. In the File field, ensure the correct test file is selected. If you are using:
• Create!form server with RightFax select CfRightFaxTest.txt.• Create!form server for JDE OneWorld with RightFax select
JDERightFaxTest.pdf.• Create!form server with Genifax select CfGenifaxTest.txt.• Create!form server for JDE OneWorld with Genifax select JDEGenifaxTest.pdf.• Create!form server with Zetafax select CfZetafaxTest.txt.• Create!form server for JDE OneWorld with Zetafax select JDEZetafax.pdf.All test files will be located in the folder where Create!fax is installed.
3. In the Name field, select the Create!fax printer queue that you want to test.
4. Click Print. The test fax will be sent to the relevant fax interface with the hold or preview parameter enabled. (The destination number of the fax is not a proper number and it cannot be sent anywhere.)
If the test fax is successful you are ready to commence production faxing. If the test fax is not successful, check all your configuration steps.
6.3 Viewing the Log FilesLike all Create!form International products, Create!fax records a daily trace log and service log. These logs record Create!fax activity and help you trouble-shoot errors. The trace log records information about Create!fax. The service log records information about CfService. To set where log files are stored, what events are recorded, and when logs are deleted, refer to " Section 2.3.
Create!fax 31

Chapter 6: Production Faxing
Both logs are viewed through the Create!form log viewer. For information on using and configuring Create!form log viewer, refer to Create!form log viewer’s online help.
To view a log file:
1. From the Create!fax Main menu, select either:
• View!Trace log or,• View!Service Log.
Create!form log viewer will be launched with the log file you selected.
6.4 Pausing and Resuming Create!faxYou can pause Create!fax and/or individual jobs at any time. When Create!fax is paused, the watch folder is still monitored and documents appearing there will be moved to a <Create!fax install dir>\Temp folder until the service is resumed. The documents will be viewable in the processing window of Create!fax.
To pause and resume Create!fax:
1. From the Create!fax Main menu, select Server!Pause, or click on the toolbar. This operation is a global pause and will stop indexing from taking place.
2. From the Main menu select Server!Resume, or click on the toolbar. The indexing process will be resumed for all the jobs except any that you individually paused.
To pause and resume individual jobs:
1. While Create!fax is paused, right click on jobs in the server window and select Pause.
2. To resume an individual job, right click on it and select Resume. You can resume all individually paused jobs by right clicking on one of them and selecting Resume All.
To check documents as they pass through Create!fax:
1. Pause Create!fax.
2. Pause individual documents.
3. Resume Create!fax.
32 Create!fax

6.5 Enabling Create!fax
4. Resume individual documents.
6.5 Enabling Create!faxCreate!fax can be manually disabled and enabled. Create!fax can also be automatically disabled. This would typically occur after an unexpected exception that Create!fax cannot handle. To identify and overcome the problem, refer to the trace log and CfService log file.
To disable Create!fax:
1. From the Create!fax Main menu, select Server!Disable Server.
To enable Create!fax:
From the Create!fax Main menu, select Server!"Disable Server.
If you attempt to exit or close Create!fax while it is paused, a warning will be displayed, informing you that you are about to leave the server in a paused state. The option will be given to leave the server paused and exit, resume the server and exit, or to cancel the exit operation.
Create!fax 33


Index
Index.jtt file, 6
A
application server, 6Authorization code, 8
C
conventions, 5Create!fax
configuring, 11enabling and disabling, 33online help, 2pausing and resuming, 32platform requirements, 2printer queue, 11
Create!fax printer queuefor use with Genifax, 20for use with RightFax, 15for use with Zetafax, 25
Create!form, 6transferring resources, 4
Create!form server, 4, 6printer queue, 3
Create!form server for JDE OneWorld, 4Create!form server writers
configuring, 30Create!form transfer, 4Create!stream, 4cross-references
within this user guide, 5
D
definitions, 6design workstation, 6disabling Create!fax, 33disk space warnings, 9
E
e-forms server, 6enabling Create!fax, 33enabling filescan, 20
F
fax interface, 5, 6fax interface see also RightFax, Genifax or Zetafax, 6
filescan, 20form design
Create!form, 4Create!form for JDE OneWorld, 4
form project, 6
G
Genifax, 5, 20installing, 20parameters, 21
glossary, 6
H
header, 6help
Create!fax help, 2online help, 2
I
InstallationPDF module in RightFax, 14RightFax, 14
Create!fax 35
installationpre-requisites, 4
interface see fax interface, 6
J
job header, 6
L
license keys, 8Create!fax, 8temporary, 9
log filesrecording events, 9removing, 9settings, 9viewing, 31
P
parametersGenifax, 21Genifax minimum, 21RightFax, 16RightFax minimum, 16Zetafax, 26Zetafax minimum, 26
pausing Create!fax, 32printers, 6
R
resuming Create!fax, 32RightFax, 5, 14
configuring, 14installing, 14parameters, 16printer queue, 15
S
server application, 6spool file, 6
T
terms, 6testing, 31
U
user guide online, 2user logon, 11
W
Windows identityspecifying a, 11
Z
Zetafax, 5, 24installing, 24installing Ghostscript, 25parameters, 26
Zetafax user, adding a, 24
36 Create!fax