Embed Size (px)
Citation preview

Create a BizAgiXpress Server using Amazon Web Services
(BizAgi Series) Richard Welke Tim Olsen

Create a BizAgiXpress Server using Amazon Web Services
Copyright © 2011 by Richard Welke
All rights reserved. No part of this book may be reproduced or transmitted in any form or
by any means without written permission of the author.
ISBN-‐10: 098-‐354-‐3909
ISBN-‐13: 978-‐0-‐9835439-‐0-‐9
HowDoUPress.com
Contact info: [email protected]

Acknowledgments
There are many persons deserving a “shout out” for contributing to this “How Do U” book. First are the many students of CIS 4140 and its predecessors who attempted to use various versions of BizAgi Xpress on the Amazon cloud. Secondly, my co-‐author and Ph.D. student, Tim Olsen, has presented on this topic at various conferences and wrote a shorter note on how to do this. Thirdly, Bob Bostrom’s persistent questions stimulated the creation and development of this “How Do U ..” book. Both Bob and Jeff Howell (University of Georgia, Athens) have tested earlier versions of this manuscript on their own and with their students and have provided suggestions and edits. Finally, we acknowledge the assistance of the staff at BizAgi over the last four years; particularly Clara Meneses and Marcel Manser. Thanks to all.
While we’ve benefitted from the input of all the above-‐mentioned individuals, all errors and omissions are ours and ours alone.


Foreword
This is the first of a planned series of books that delve into various aspects of BPM and BPMS. I it’s also the first book in a sub-‐series of books focused on specific aspects of BizAgiXpress and how it can be used and deployed.
The primary driver for these books is the teaching of BPM and BPMS over the past ten years, at both the undergraduate, graduate and executive levels at the Robinson College of Business at Georgia State University, as well as presentations made at various universities and other forums around the world. In doing so, the inevitable question seems to arise – “How do you …” do this or that? Hence the name of the book series and its distribution.


Table of Contents
Creating the AWS Instance ..................................................................................................................................... 1
Select the AWS Image Instance to use ............................................................................................................................. 1
Create a Security Group ......................................................................................................................................................... 3
Logging onto your new instance ........................................................................................................................................ 6
Preparing your AWS Server for BizAgi Xpress .............................................................................................. 9
Renaming your computer ..................................................................................................................................................... 9
Install IIS (Internet Information Sever) ....................................................................................................................... 11
Installing and Testing BizAgiXpress ............................................................................................................... 17
Installing BizAgi Xpress ...................................................................................................................................................... 17
SQL Server Management Studio Express add-‐on .................................................................................................... 21
Other Setup Items .................................................................................................................................................................. 23
Running Windows Update ................................................................................................................................................. 24
Setting up Email Services on your AWS Instance ...................................................................................... 31
What’s covered here ............................................................................................................................................................. 31
Setting up email services on your AWS instance ..................................................................................................... 31
Getting and Setting Up an AuthSMTP account .................................................................................. 31
Setting up BizAgi to use AuthSMTP ............................................................................................................................... 37
Creating the BAX “EmailTest” process ................................................................................................. 37
Setting up the BizAgiXpress “Configuration” settings for using AuthSMTP ........................ 39
Testing ........................................................................................................................................................................................ 40
Uploading, Testing and Using an Existing BizAgi Process ..................................................................... 43
What’s covered here ............................................................................................................................................................. 43
Importing a pre-‐existing BizAgi Xpress Project Result into your AWS instance ....................................... 43
Illustrative example ...................................................................................................................................... 43
Backup ................................................................................................................................................................ 44
Moving the file ................................................................................................................................................ 48

Creating a receiving (empty) DB to receive your .bak file ........................................................... 50
Checking the result on the AWS instance ................................................................................................................... 57
Initializing the project with the restored DB information ........................................................... 57
Updating the WebService integration .................................................................................................. 57
Resetting the Email ....................................................................................................................................... 59
Running the process ............................................................................................................................................................ 59
Persisting your Instance with a Permanent DNS Name ......................................................................... 63
Some FAQ’s on using a permanent DNS name .......................................................................................................... 63
Why do this? .................................................................................................................................................... 63
Why isn’t this done automatically? ........................................................................................................ 63
What do I get? ................................................................................................................................................. 63
Steps involved ......................................................................................................................................................................... 63
Giving your current AMI instance a persistent IP address (and DNS name) ...................... 63
Test your assignment .................................................................................................................................. 65
Creating a “friendly DNS Name for your AWS Instance (Optional) ................................................................. 66
Establishing your own DNS name .......................................................................................................... 66
Create your domain name ......................................................................................................................... 66
Creating a subdomain to link with your AWS Instance ................................................................ 67

Creating the AWS Instance
If you’re already a member of Amazon with a login user ID and password, then this will be the account you can use for using (and being billed for) Amazon Web Services cloud instances. We’ll assume here that you have an Amazon account and can login with those credentials.
The steps here are, in summary, to select an appropriate AWS Instance you can “borrow” as the base operating system, to setup that instance and get it running, and then to login to that instance. We’ll go through the steps in detail below.
Select the AWS Image Instance to use Amazon has a variety of instances to choose from for varying operating systems as well as additional software added into it (e.g. SQL Server). We’re going to choose a very basic one and build it up to what we need for BizAgi Xpress (BAE) ourselves. Aside from this often being less expensive on a per-‐minute basis, it also provides us with more control. The downside is, of course, that we have to upload all of the necessary software we need to our instance, install it, and make sure its working. Later we’ll show a shortcut to this, but for now, we’ll begin with a basic instance using Win2008 Server (32-‐bit).
Let’s assume you’re now logged in to your AWS console, which is at the URL: (https://console.aws.amazon.com/ec2) and might look something like:
We’ll click on “Launch Instance” which begins the dialog to create a new instance of AWS for you.
This brings up a selection box from which you can choose various baseline instance possibilities. You’ll have to scroll down but we’ve chosen the one shown below (a plain vanilla Win 2008 32-‐bit Server instance):

Creating the AWS Instance
2
Select this server image (AMI) and you’ll be shown this screen. Below are the (default) values I used.

Create a BizAgiXpress Server using Amazon Web Services
3
Next, you’ll be asked for a name for your instance. Put in something descriptive for the name. Additional ones are optional and not really needed. As shown in figure below, I named mine BizAgiXpress AWS Server.
Create a Security Group Next you need to specify what AWS refers to as a “Security Group.” A security group is like the firewall in your operating system or router. It says what kinds of Internet messages can pass through to your server, and what kinds will be rejected.
The main consideration here is that multiple individuals should be able to access the executing process (assuming they log in with the correct user name and password for the performers in you BizAgiXpress process(es). The steps to create a security group are:
1. In the left margin of the dashboard, click on the Security Groups link.
2. Click on "Create Security Group" near the top of the screen.
3. A dialog appears, asking for a group name and description. You can call it whatever you want, I called mine "BizAgi4140" and described it as "Server firewall settings."
4. Click Create in the dialog.
5. You should see your security group in the list. Click on it.
6. In the Allowed Connections list (lower part of the same frame) click on the popup that says "Custom..." to reveal a list of protocols. Choose HTTP then click Save. This will make it possible for your server to receive HTTP requests.

Creating the AWS Instance
4
7. Do the same for HTTPS, RDP, SMTP and SSH; allowing your server to receive secure HTTP requests, control the server using Remote Desktop Connection on the Mac or Windows, send email, or use a secure shell.
Note: Remember to click Save after choosing each protocol.
Next, you’ll need to create an RSA encryption KeyPair file that you will subsequently use to decrypt your server admin login password. Give it a name (I’ve used BizAgiAwsKey) and then click on the “Create & Download you Key Pair.” You will receive a .pem file containing this key as a result. Store it somewhere you can remember. It will have the name of your key pair with a .pem ending (e.g., BizAgiAwsKey.pem).
With all of this now behind you, you will see the following screen:

Create a BizAgiXpress Server using Amazon Web Services
5
And, you can “Launch” your new instance on AWS/EBS! You can see it starting up, and then go into a “Running” state on your AWS console. If you select it (click on it) you’ll get all of its runtime information:
To proceed further, you’re going to need a “Default Windows Administrator Password.”
It takes AWS about 15 minutes or so to get to a point where you can actually request this, so be patient.
Right-‐click on the running instance you’ve just created, you’ll see an option to get Win-‐dows Password. If you click on that, you’ll get a dialog asking you to enter the contents of

Creating the AWS Instance
6
the .pem file you previously downloaded. You need to paste the entire contents of it, into the box shown as “private key” below:
To do this, you need to open the .pem file (the key pair file you previously created and downloaded) with a text editor, then cut and paste the content (including the BEGIN … through the END …) lines. If all goes well, you should receive your decrypted “Administra-‐tor” login password from AWS.
Logging onto your new instance
For this, the easiest way is to use Microsoft’s RDC (remote desktop connection). This is already available to you if you’re on a Windows OS (but make sure you have a recent version). If you’re on a Mac (as I am), then you’ll need to download it before using it. It’s free and easy to find from “Mactopia.”

Create a BizAgiXpress Server using Amazon Web Services
7
The preceding dialog contains all the information you’ll need. The “Computer” is the URL of your server instance that’s contained in the first line of the preceding dialog (e.g., ec2-‐50-‐16-‐17 ….amazonaws.com).
Once you connect, you’ll be asked for your username (Administrator) and password (the one you just decrypted using your .pem RSA key). You’ll likely see a caution message such as the one below:
Click on the connect and you should now be connected to your new, working AWS MS Server 2008 instance and you should see the typical Windows splash login image within RDC. Congratulations!


Preparing your AWS Server for BizAgi Xpress
Renaming your computer AWS instances are, by default, are given a new computer name each time you stop, then restart them. When you install software, such as SQL Server or BizAgiXpress, that software will use this assigned computer name to point to the various services it establishes. Once you stop, then restart, your instance, the computer name changes but the registered service pointer names do not, and the software can’t find them.
To keep this from happening, you need to create a more permanent computer name that persists after starting/stopping your AWS instance. To do this, you first need to create a computer name.
To do this, go to Control Panel|System. This brings up your current system environment, including the default computer name and description.
If you click on “Change settings” you’ll see the next screen, and the opportunity to change the computer description and rename the computer:
Click on the “Change …” button and this brings up the dialog to change the computer name. You’ll then change the default name to something that’s descriptive of your instance. I’ve chosen BAX-‐RJW but be creative. You can also change the computer description if you wish.

Preparing your AWS Server for BizAgi Xpress
10
Change this to your selected name and then save by “OK”ing your way out of the dialogs. You’ll get a message saying that to effect this change you need to restart. Don’t restart yet – one more thing to do.
Next, you need to modify a setting in how AWS assigns computer names, so it doesn’t overwrite your name and go back to its default approach. For this, you need to go to the Program Files directory, then to Amazon, and within it to the program (.exe file) called: ec2configservicesettings:
If you click on this, it brings up a dialog box that looks as follows:
Uncheck the first box so it looks like:

Create a BizAgiXpress Server using Amazon Web Services
11
Now you’re done renaming the computer. At this point you need to restart the computer. You can do this from your running instance using “Shutdown/Restart” from the Start menu options, or from your AWS console, initiate a reboot (right-‐click on the instance name and select the reboot option).
Your RDC terminal session will disconnect, so you’ll have to wait until it comes back up (“Running”) and then a few minutes more before re-‐connecting. Note: you’ll have a new DNS name to use with your remote desktop connection. You can cut and paste this new name into your RDC connector software from the AWS description of the running instance (highlighted in blue below):
Once you’re back and connected, you should check to make sure your assigned computer name is the one you gave it in the preceding steps by again going to Control Panel|System. Now you’re ready to install the remaining software.
At this point you should consider clicking on the “Windows Update” option shown in the Start menu below. This will get a lot of the updating needed out of the way. You’ll do it again after you install the additional software. Also, as “best practice” you should consider shutting down and restarting the instance after each major Windows Update.
Install IIS (Internet Information Sever) First, click on Start (i.e. the “Start button” in the Windows task bar) then click the search box right above it and type Server Manager.

Preparing your AWS Server for BizAgi Xpress
12
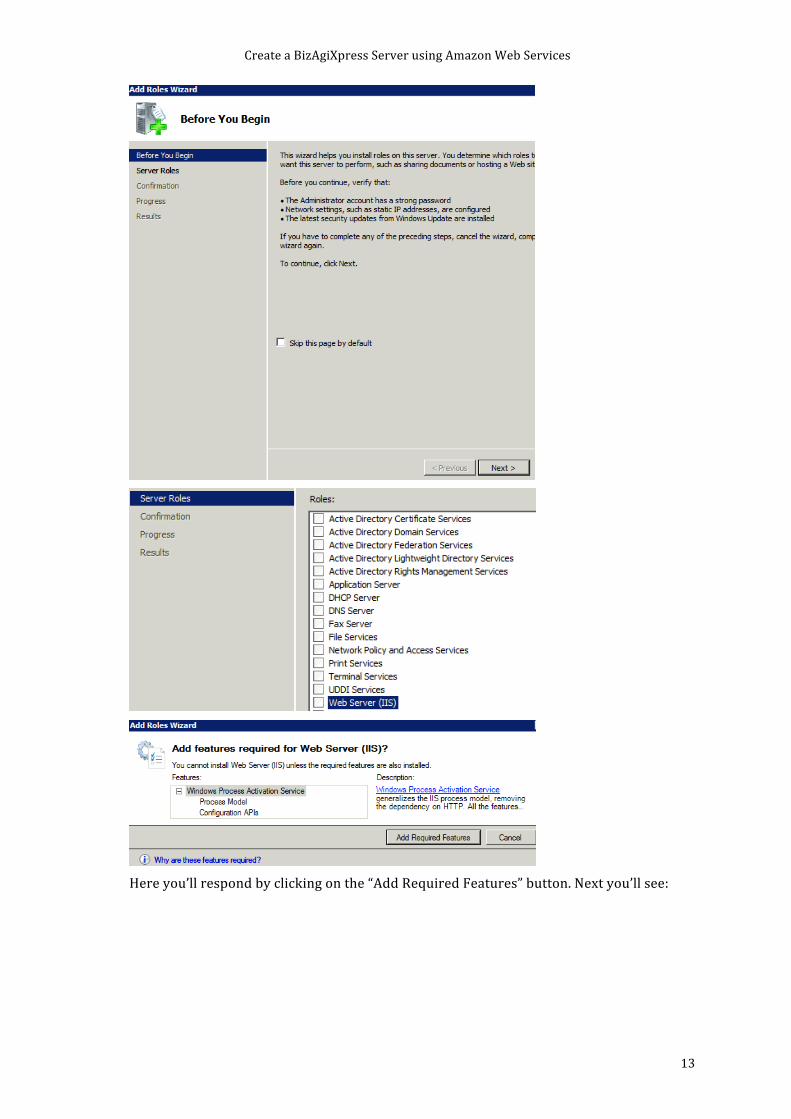
Click on “Server Manager”. Then click “Roles”, then “Add Roles”.
A window will pop up. Read it, then press next, and then select “Web Server (IIS)” out of the list of 17 roles.
Create a BizAgiXpress Server using Amazon Web Services
13
Here you’ll respond by clicking on the “Add Required Features” button. Next you’ll see:

Preparing your AWS Server for BizAgi Xpress
14
A pop up will come up and just answer in the affirmative. Then press Next until you get to a screen that looks like this:
Click on the box next to ASP.NET and check: IIS 6 Management compatibility. Your checked boxes should be the same as the two screens below:

Create a BizAgiXpress Server using Amazon Web Services
15
Then click on Install and you’ll see the following:
Preparing your AWS Server for BizAgi Xpress
16
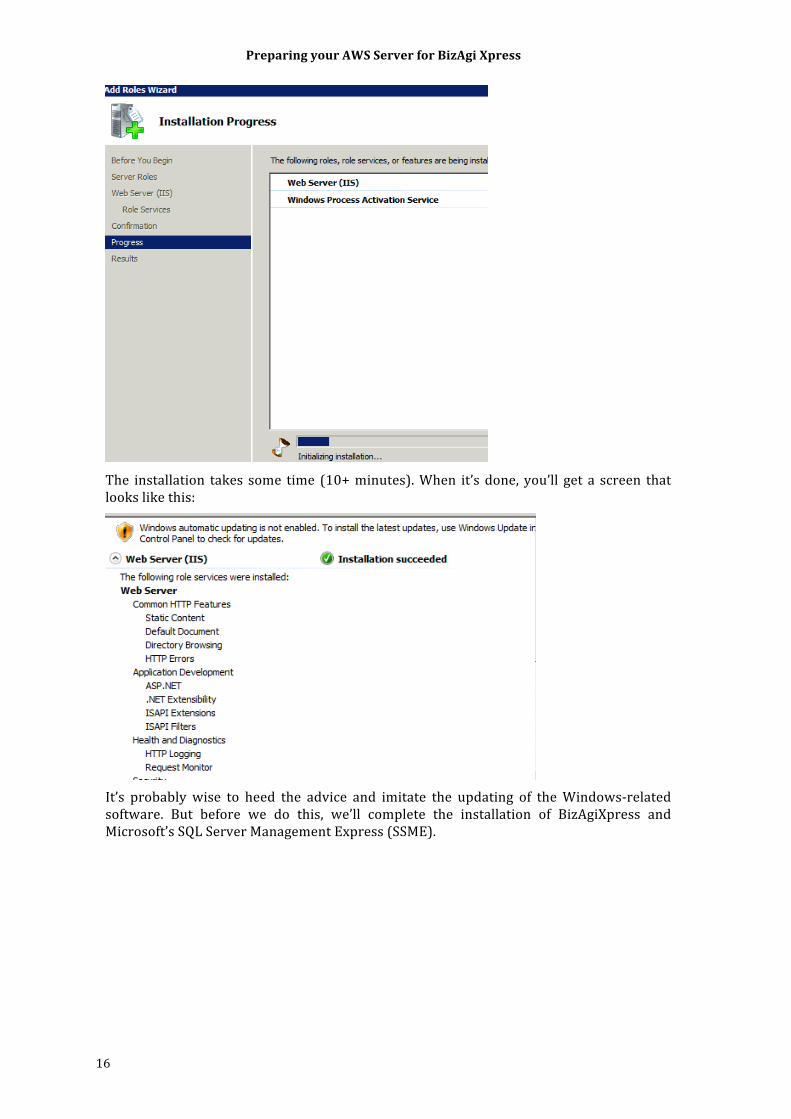
The installation takes some time (10+ minutes). When it’s done, you’ll get a screen that looks like this:
It’s probably wise to heed the advice and imitate the updating of the Windows-‐related software. But before we do this, we’ll complete the installation of BizAgiXpress and Microsoft’s SQL Server Management Express (SSME).

Installing and Testing BizAgiXpress
Installing BizAgi Xpress You can use Internet Explorer (already installed on your AWS instance) to do this. However, it’s rather “protective” and will give you many messages in the process of downloading what you need. An alternative is to first install Google’s Chrome Internet Browser. We’ll stick with IE but be aware that you’ll need to do a lot of click/adds to get by their omnipresent protections. You can also go to IE’s Internet Options|Security settings and change (customize) these to reduce the warning messages. The best bet, however, is to simply download and install Google’s Chrome. Then things go fairly smoothly.
Go to the BizAgi.com site and navigate to the download page for BizAgiXpress. This will get you their current version. This will look something like:
When it’s completed you’ll get a screen like:
NOTE: BizAgi will automatically download and install SQL Server Express 2005 (SP2) for it’s associated database if you haven’t already installed another version of SQL Server on your instance (e.g. SQL Server 2008 Express or similar). If you’re not already using another version of SQL Server on your AWS instance, it’s suggested that you uninstall it

Installing and Testing BizAgiXpress
18
before proceeding, as the instructions below assume that BizAgi will do an auto-‐install of SQL Server Express 2005 and, as part of this installation, set up the necessary SQL Authentication so that BizAgi can “talk” to SQL Server Express. If, on the other hand, you need to retain your current version, then you’ll need to take some different steps to set up the appropriate authentication. Also, the procedure for restoring projects is a bit different. This is not covered in this document but will be available as a supplement at a later date from HowDoUPress.
You’ll also get a message as the following; just click “Run” to get past this.
After clicking “Run” you’ll get several selection pages to tailor BizAgi to your situation. The first is the language choice:
Once chosen, BizAgi will begin the installation process:
Which looks like:

Create a BizAgiXpress Server using Amazon Web Services
19
Next you’ll be asked about the underlying database you’re going to use. As we began with a “clean” install of Win Server 2008, we don’t have one (by choice) so BizAgi will install SQL Server Express 2005 automatically for you. This is what you want.
Next up, you’ll get a chance to say who you are and whom you work for …
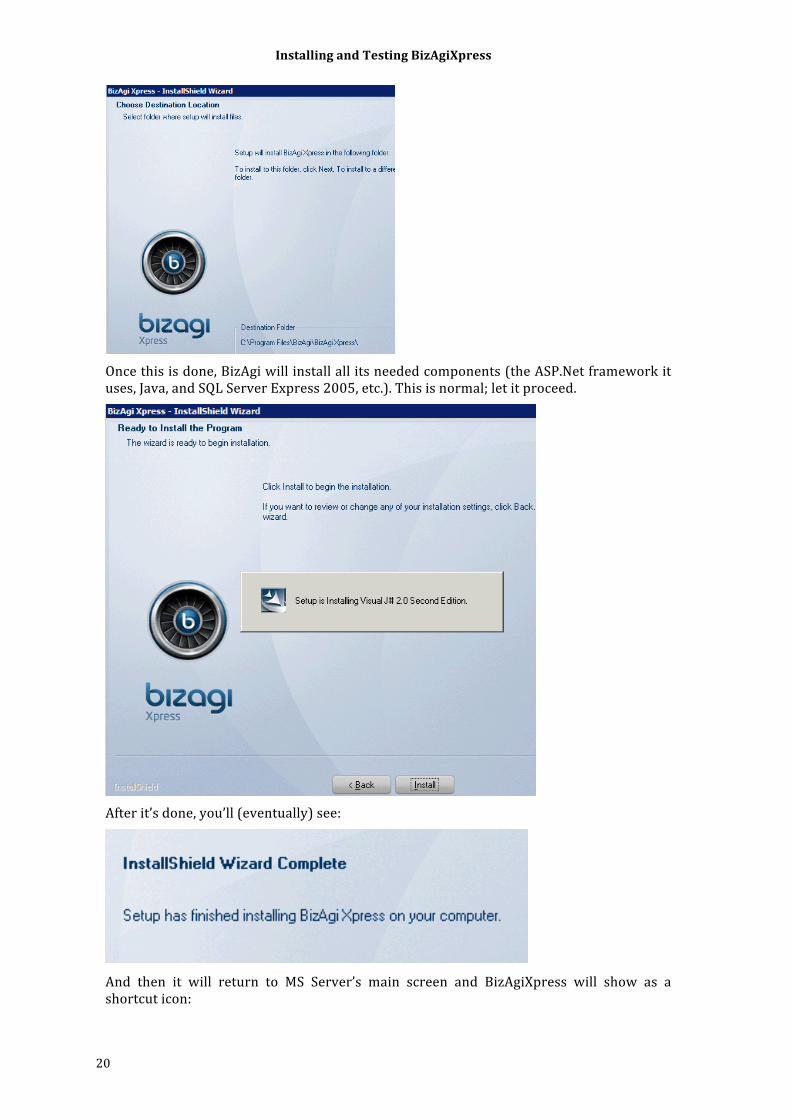
BizAgi then asks you about the folder to install the software in. Go with the default:
Installing and Testing BizAgiXpress
20
Once this is done, BizAgi will install all its needed components (the ASP.Net framework it uses, Java, and SQL Server Express 2005, etc.). This is normal; let it proceed.
After it’s done, you’ll (eventually) see:
And then it will return to MS Server’s main screen and BizAgiXpress will show as a shortcut icon:

Create a BizAgiXpress Server using Amazon Web Services
21
SQL Server Management Studio Express add-‐on Another utility you’re going to need to fully manage your installation is Microsoft’s SQL Server Management Express that allows you to inspect the now-‐installed SQL Server Express 2005 DB server that BizAgi uses to keep all your process instances, descriptions, and meta-‐data. So, you’ll need to download and install it. If you search on SSMSE, you’ll find there are several versions. We’ll take the 2005 version of it, as shown in the default (Bing) search below (second item shown):
Clicking on the second entry brings up:
You want the first (32-‐bit) version to download. Download it and run it from this screen:
It will do the standard installation:

Installing and Testing BizAgiXpress
22
Once it has been installed, you’ll need to have it recognize the SQL Server Express DBMS that BizAgi Xpress has installed. Find it in your programs list and run it. I also suggest that when you’ve located the software, you should right-‐click on it and “pin” it to your Start list so you can find it more easily the next time.
Opening SSMSE brings up this screen the screen below. It will likely have already found your SQL Express (assuming you’ve installed BizAgiXpress). If not you can drop down the server name and have it find it.
It comes up by default in “Windows Authentication” mode, so you need to change this from the “Authentication” drop down to SQL Server authentication, as shown. BizAgi installs SQL Server Express with a user name login of “sa” and a password of “BizAgi2009” so that’s what you should use. If you can then click on the “Connect” button you should connect to the SQL Server Express 2005 DB. Your screen will look something like:
Now you can explore its tables, etc., as well as now backing up and restoring particular BizAgi project databases.

Create a BizAgiXpress Server using Amazon Web Services
23
Other Setup Items Two other things you should consider doing at this point. The first is to make the BizAgi Management Console easily accessible. This utility is contained within the BizAgi program folder along with BizAgiXpress (which already has installed an icon on your desktop). If you click on the Start button, then programs you’ll get a list that looks something like the one shown below to the left. If you then expand BizAgi, then BizAgi Xpress you’ll see “BizAgi Management Console” as shown. Right click on it and you’re given some options where you can “Sent to” the “Desktop,” as shown below:
If you do this, you’ll end up with a Desktop shortcut icon that looks like:
The second recommendation is to setup your Remote Desktop Software so that you can transfer files back and forth from your connecting computer to your AWS instance. To do this, you’ll need to go to the properties of RDC and select “drives” and then state which folder you wish to make available for transferring between your local computer and your AWS instance. I use a Mac so I’m using MacTopia’s (free) RDC software. The screen that selects this looks like:

Installing and Testing BizAgiXpress
24
To make use of this, you will have to close RDC and then re-‐open it. You may also need to make sure your firewall knows about RDC as an application and allows bi-‐directional data traffic with that program.
Once this is setup you should see the local computers folder on the AWS instance in Explorer and can drag-‐drop specific folders and files between the two systems. We’ll use this later to place the BizAgi project on our AWS instance using a database backup created locally.
Another change you may wish to make while you’re at it is changing the default screen size (another property of RDC) to something a bit larger than 1024x768. If you go to “Display” properties, you’ll be given a list of alternatives. This change will take place when you close the connection and then re-‐open it using the “saved” .rdp file associated with this connec-‐tion. I suggest that after you’ve made the Drives and Display changes you “Save as” the resulting file in a place you can quickly retrieve it from and open your connection to AWS using this file.
Running Windows Update Once you’ve installed the software, it’s a good idea to run Windows Update to make sure your software (Microsoft) is up-‐to-‐date. To do this, click on the “Start” button and one of the options will be “Windows Update.”
Click on this and you’ll see:
It then discovers that you need an update downloader that it will provide upon restart:

Create a BizAgiXpress Server using Amazon Web Services
25
When it begins the restart, you’ll lose your connection to the AWS server instance, so you’ll have to reconnect to it before proceeding. Once back in, you can re-‐initiate Windows Update, and it will look as follows:
Click on “Install updates” and you’ll get …
This will do an extensive updating of your sever; expect it to take a while (an hour isn’t unusual).
I would advise at this point to again shutdown and restart your AWS instance.
Testing out and using your BizAgi Xpress AWS Instance
There are two ways to do this and we’ll explore each. The first is to create a simple business process as a test using your AWS instance. The second is to upload an already existing process solution using a .bak file of the project and restoring it to your BizAgi Xpress AWS instance database. The second is obviously more complex, but allows you to develop offline (on your local computer) then push the results to the AWS instance.
Simple process done via direct connection to the AWS instance

Installing and Testing BizAgiXpress
26
Below is a quick way to check out your installation and make sure it’s working correctly without having to do much in the way of specification (about four minutes worth).
To do this, we’ll create a really simple business process. I’ve first created a project called “OneTaskProject”. Next I create a process within this project called “OneTaskProcess”. This is shown below:
Next I create a data model for this process with a few attributes associated with the main process master entity. The attributes created are:
Resulting in this data model:
Next, we move to forms creation (Step 3). We click on the only task in our process (the one shown with the caution triangle below):
And, bring up the forms creation palette and create the following form.

Create a BizAgiXpress Server using Amazon Web Services
27
Here we create our form by dragging and dropping the two fields on the left-‐hand side over to the form:
Then we save it. If everything is working properly with the database connectivity, you should be able to save this without error.
Having saved the form, we can now run the process in its current state as we now have a form to actually begin a case by clicking on the green “Run” button at the top:
This will bring up the “spinning balls” startup of the BAX portal. If this is the first attempt to access the portal (i.e., fresh install; no pending prior cases) then you should get:

Installing and Testing BizAgiXpress
28
Click on “Cases” to create a new “case” (process instance), and you’ll see:
Complete the form …
And you’ll get …

Create a BizAgiXpress Server using Amazon Web Services
29
It’s at the time of first use of BizAgi in “run” mode that the ASP files associated with the BAX portal for our “Simple” project is created. Before this we’ve only created the database for the “Simple” project; now we’re adding the ASP.NET specifics so the project can be run (cases created and processed) via the web portal.
To see this, you can check your Microsoft.Net Frameworks sub-‐directory:
Note the presence of a new sub-‐directory with the name of our project (“OneTaskProject”). This folder wasn’t there prior to our first attempt to run the project. Inside here is all the “mechanics” of how the BAX portal is served up for this particular process.
Efficiently using your AWS BizAgiXpress instance
In this short section we’ll discuss some choices and implications regarding minimizing the cost of running an instance of BizAgiXpress on an AWS instance. In short, this involves “stop”-‐ing and “start”-‐ing your AWS instance.
As long as your instance is running, it’s incurring processing charges. If you stop the instance, then these charges cease. However, there are comparatively minor “S3” charges that are incurred as Amazon stores your instance in their storage cloud and charges you something for this (about $3/mo/instance).
If you want to eliminate all charges, then you must “Terminate” the instance, which removes it completely.
When you stop an instance, then restart it, you’ll find that the URL pointer to the instance (and thus the URL you’ve saved in your RDC connection) has changed. As well, if you’re having someone else uses the running processes, then their URL’s for invoking the BizAgi portal to your process will have changed as well. If this is a major problem, then you’ll either have to:
1. Leave the AWS instance running, or
2. Pay extra to have a permanent IP address assigned to your instance. Whether this is cost-‐effective or not depends upon how long you intend to have others use your

Installing and Testing BizAgiXpress
30
process and the annoyance factor associated with having to email them new URL’s each time you start/stop your AWS instance. We’ll cover this in Part II.
When you stop, the restart the instance from your AWS console, you’ll have to wait until it says “Running.” Then you can click on the instance and at the bottom you’ll see the new DNS name to be used to access it. However, you’ll generally have to wait a few minutes before you can actually log into the instance (patience is a virtue). As well, several other services (SQL Server, IIS, BizAgi Services) have to start up. So, after logging in you may find the first use, either via the web portal or in studio to be a bit slow while they fire up their required services.

Setting up Email Services on your AWS In-‐stance
What’s covered here Previously, you learned how to get BizAgiXpress (BAX) setup and running on AWS, as well as creating a simple test process. In this Chapter, we’ll explore how to:
1. Set up email so that it will work with AWS (and you can then send notifications and the like to any designated email addresses)
2. Move projects that you have created on your local computer so that they can be run and accessed via your AWS instance
3. Create a persistent DNS name for your BAX AWS instance (so that each time you stop your instance you don’t have to send out a new DNS name to everyone who wishes to use the instance).
Setting up email services on your AWS instance A general outline of how this is done can be found at:
http://wiki.bizagi.com/en/index.php?title=SMTP_Service .
We will deviate from this in order to use a forwarding service called AuthSMTP.
Getting and Setting Up an AuthSMTP account
AuthSMTP is a rather inexpensive mail forwarding service that we can use to process outbound email from BizAgiXpress. It relies on your having a bona fide email account(s) already established, which we’ll be the “From” account for any emails generated from BizAgi. As such, I would advise you to create a gmail.com account for this purpose. I created one called [email protected] (which I don’t use for any other purpose and don’t monitor for inbound emails) loosely named after my AWS server instance. Pick whatever name and provider makes sense to you. To proceed, whatever email account you choose to use must be active and accessible, as AuthSMTP must confirm it by sending an email to it.
Next you need to establish and account at AuthSMTP. Go to AuthSMTP.com. There you’ll be able to setup an account. There are various options; take the basic one (currently USD 24/year):
(An alternative to this is that someone else has setup such an account and you can “piggy back” on it with a “From” email address that’s been added to that account).
Once you’ve signed up with AuthSMTP, you’ll receive an email from them that looks some-‐thing like the following:

Setting up Email Services on your AWS Instance
32
Once you’ve received this, you can proceed to AuthSMTP’s control panel with your username and password, and create one or more (up to ten with the basic subscription) email addresses you’ll use as “From” addresses for BizAgiXpress. It’s at: http://control.authsmtp.com/signin.php
When logged in you’ll see:
Click on the highlighted “add authorized ‘from’ addresses” option. This will bring up a page where you can now add the various sanctioned “From” addresses you’ll be using with your BizAgi Xpress AWS instance(s):

Create a BizAgiXpress Server using Amazon Web Services
33
You’ll initially not see any registered emails, but if you click on the “Add” option on the right hand side, you’ll be able to add emails you want AuthSMTP to be able to use as “From” addresses – you can send to whatever “To” addresses you wish to.
Once you add an email address, you’ll be given a message saying AuthSMTP has to confirm the email (i.e. you receive emails there), so you’ll have to login to that email account and await the email from AuthSMTP for confirmation. It will look something like:
Click on the confirmation link and you’ll be set up to use that email as a “From” email.
You can now test your AWS system with AuthSMTP. To do this, you need to download their remote test program. Go to: www.authsmtp.com/support/diag.html and it will let you download a test program. This will allow you to test to see if AuthSMTP is accepting communication from you AWS instance. You’re given four options for ports to use. They recommend port 2525. It appears to work with AWS, so I would adopt that one.
Setting up your AWS’s IIS for email
Below are the steps followed for our AWS instance of BAX running on an AWS instance of Windows Server 2008.
First we have to install the “feature” called SMTP. If you go to the Start menu, at the top you should see “Server Manager.” Open this up and you’ll see:
Click on “Add Features” (link on the right) and this will open up (scroll down until you see “STMP Server”:

Setting up Email Services on your AWS Instance
34
If you click on this, you’ll get:
This is telling you that some additional features are needed in order to install the SMTP “feature.” That’s fine; go ahead. You’ll get a dialog box like below and the option to Install. Click on that to install SMTP and the associated services needed to run it.
Assuming all goes well, you should get a message that looks, in part, like:
Next, you want to check that the SMTP service is, in fact, running. To do this go to Adminis-‐trative Tools|Services to bring up the list of services:

Create a BizAgiXpress Server using Amazon Web Services
35
Here it’s shown that SMTP is “Started” (i.e., running) but also that it’s set to start “Auto-‐matically” whenever you AWS instance starts. The default here is automatic, so you need to click on this line to bring up the details:
And then set this to Automatic from the drop down box, and Save this result.
Next we need to set up IIS to use this service. Return to Administrative Tools from the Start button and this time select IIS Manager (not the IIS 6.0 Manager):
Clicking on the name of your local server (in this case, BAX-‐RJW) brings up:

Setting up Email Services on your AWS Instance
36
Next, click on the “SMTP E-‐mail” icon and this will bring up a dialog box. Initially the fields shown will have different (or no) values. You will be completing them with the values associated with your AuthSMTP account:
If you click on the button for “Specify credentials” then you’ll be asked for your AuthSMTP account number (AC …). Then click the “Set …” button next to “Specify credentials” you’ll be able to enter your AuthSMTP account name (beginning with “AC …”) and the password assigned. I’ve also added a new directory where you can specify an alternative place for sending emails locally to make sure your emails output from BizAgiXpress is formatting things correctly (c:/BizAgiEmail). At this point you’re set up to use AuthSMTP via your AWS instance.

Create a BizAgiXpress Server using Amazon Web Services
37
Setting up BizAgi to use AuthSMTP There’s two parts to this. First, you need to create a small “test” process to test email delivery. To do this, use your previous “OneTaskProject” project, and create a new process within it – we’ll call this “EmailTest.”
Creating the BAX “EmailTest” process
The process diagram looks like the following:
The data model for this is quite simple:
We then use this to create a very simple form to capture to “To” email address by dragging “Send to Email Address” onto the forms screen for the first task:
Finally, we need to create the email send message. We’ll do this by going to Rules, and then clicking on Activity Actions:
Which allows us to click on the Send Test Email task and add a post-‐condition (on exit), by selecting “email” at the bottom:

Setting up Email Services on your AWS Instance
38
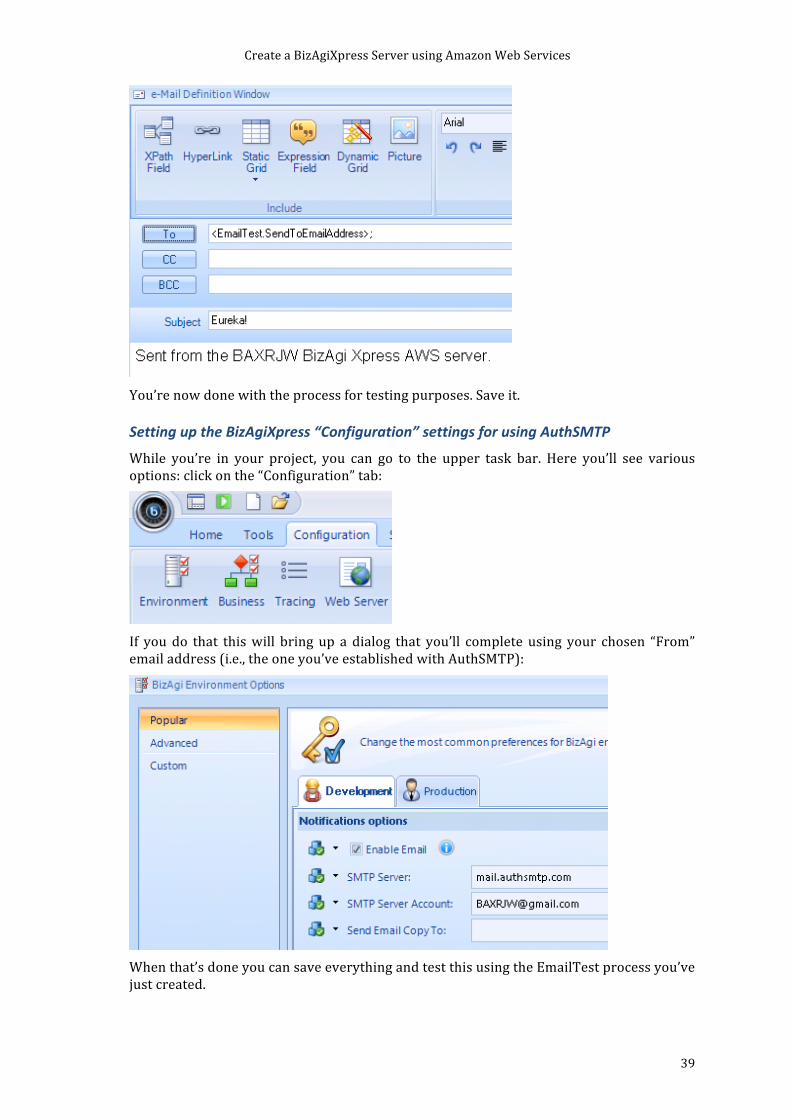
This brings up a blank email:
If you click on the “To” button, a dialog box will open up where you can select the field you previously created containing the “To” email address:
You can then complete the email so it might look something like:
Create a BizAgiXpress Server using Amazon Web Services
39
You’re now done with the process for testing purposes. Save it.
Setting up the BizAgiXpress “Configuration” settings for using AuthSMTP
While you’re in your project, you can go to the upper task bar. Here you’ll see various options: click on the “Configuration” tab:
If you do that this will bring up a dialog that you’ll complete using your chosen “From” email address (i.e., the one you’ve established with AuthSMTP):
When that’s done you can save everything and test this using the EmailTest process you’ve just created.

Setting up Email Services on your AWS Instance
40
Testing Go to the top of the BizAgi screen while you’re in design mode for the EmailTest process, and click on the green arrow to launch the Portal with “Admon” as the default user.
This brings up the familiar BizAgi portal screen. From the toolbar select on “Cases”, then “New Case.”
That will bring up the process selection dialog (assuming you previously did the other “OneTaskProcess” example within this project). Choose “EmailTest” and start the process:
This will take you to your first (and only) form screen, where you can enter a “To” email address (anyone of yours so you can check to see if you receive an email).
After entering the email, and clicking on “Next >>”, you will hopefully see the following, indicating that the email has been sent successfully and your AuthSMTP connection works:

Create a BizAgiXpress Server using Amazon Web Services
41
Then, of course, check the inbox of your destination email address to confirm you actually received the email. Here it is in another Gmail account I have that I sent to via the form above:
And, here’s what it looks like when I open it:
Voila!!


Uploading, Testing and Using an Existing Bi-‐zAgi Process
What’s covered here In Part I of this write-‐up on using BizAgiXpress with AWS, you learned how to get BizAgiXpress (BAX) setup and running on AWS, as well as creating a simple test process. In this second part, we’ll explore how to:
1. Set up email so that it will work with AWS (and you can then send notifications and the like)
2. Move projects that you have created on your local computer so that they can be run and accessed via your AWS instance
3. Create a persistent DNS name for your BAX AWS instance (so that each time you stop your instance you don’t have to send out a new DNS name to everyone who wishes to use the instance).
Importing a pre-‐existing BizAgi Xpress Project Result into your AWS instance This process involves several steps. The first involves exporting (backing up) an existing BizAgiXpress process on your local computer, and then importing and “restoring” that project DB to your AWS SQL Server instance. As such, it embraces two common adminis-‐trative tasks of a BizAgi project: backing up and restoring the database. For more detailed information regarding backing up and restoring SQL databases, you can go to the MSDN Online Library,
Backup: http://msdn.microsoft.com/en-‐us/library/ms191304(SQL.90).aspx
Restore: http://msdn.microsoft.com/en-‐us/library/ms177429(SQL.90).aspx
The second step is to update or re-‐install any external services (web services calls, external –to-‐BizAgi databases) that the process connects with. The third is to adjust the user definitions. The latter two steps are done once the BizAgi database has been moved over to the AWS server and is running.
Illustrative example
We’ll use a previously created solution to the Vacation Request workshop of BizAgi. No claims are made for the completeness and correctness of this solution J.
For those unfamiliar with this workshop, its write-‐up can (currently) be found at: http://wiki.bizagi.com/en/index.php?title=My_First_Process and is referred to as “My First Process.”
The process implemented is shown below:

Uploading, Testing and Using an Existing BizAgi Process
44
The complete solution was developed on a local computer using the current version of BizAgi Xpress and now we’ll move that solution, as a database back up to our AWS BizAgiXpress instance and “restore” it to that system. Once we’re done, and after doing some adjustments for the services and user definitions, we should be able to use this process, as well as modify it on the AWS instance.
Backup
Start up SQL Server Management Studio (we’re using the 2005 version of SSMSE). Point it to the SQL Server you’re currently using for BizAgiXpress. Select the database to back up. It should appear with the SQL Server Authentication and “sa” as the username (unless you’ve changed the default install settings):
After “Connect”-‐ing, expand the “Databases,” find the database name that is the name of the project in BizAgi, right click on that DB name and select Task -‐ Back Up. Please note that at this point the general names shown in the screen shots will likely look quite different from yours because of your computer name and the naming of your BizAgi projects.

Create a BizAgiXpress Instance on Amazon Web Services
45
With the Back Up Database window open, check that the selected Backup type as “Full.” Then add a new destination file by clicking on Add. The Destination box should be clear. If not, first erase the existing destinations using the “Remove” button:
At this point you may want to create a destination directory using Window’s Explorer. Once you’ve created it, point the “Back up to:” this directory using the “Add …” box.

Uploading, Testing and Using an Existing BizAgi Process
46
When the window to select the backup destination file opens, first (1) click the button in this window to browse into the local file system. (2) Select the path where the file would be saved and (3) type a name for the new *.bak file then (4) click on OK. Also (5) click OK on the other window.
Back in the first window click OK so the backup initiates.

Create a BizAgiXpress Instance on Amazon Web Services
47
Note here, the .bak file name extension. It’s not post-‐pended automatically, so you may need to add it yourself.
When the process finishes an informative message would appear, click OK on it.
At this point you’ve created your backup file. You should double-‐check to make sure it’s where you wished to place it. It will be somewhere between 10-‐15 MB in size:

Uploading, Testing and Using an Existing BizAgi Process
48
However, MS’s SSMSE doesn’t like hyphens in the name of its .bak files, so use an under-‐score rather than a hyphen!
Note: Make sure your resulting file has an extension of “.bak” – if it doesn’t, post-‐pend this. You’ll now move this file to your AWS instance, and then “Restore” it to as a DB on your SQL Server there.
Moving the file
You’ll want to use the built-‐in capability of the Remote Desktop Connection for moving files back and forth from your local computer to your AWS instance. Hopefully, you’ve already set this up to work.
If not, then you need to first modify some settings in “Remote Desktop Connection” (RDC). I’ll show here the Windows version but the Mac version is nearly identical in its approach. First open up RDC and there will be a number of tabs. Click on the Local Resources tab and you’ll see:
Click on the “More …” button and here you’ll be able to select your Windows local drive to share with your AWS instance:

Create a BizAgiXpress Instance on Amazon Web Services
49
Once this is selected, and you’re connected to you AWS instance, you should now see, in its Explorer folder, your local C:/ drive:
If you expand it, you’ll be able to navigate to the folder where you stored your .bak file of Workshop 1. You can then copy and paste or drag and drop it into a directory you’ve set up on your AWS instance to receive these files. In my case, I’ve called it (on the AWS in-‐stance): c:\BizAgi\DB backups:

Uploading, Testing and Using an Existing BizAgi Process
50
Copy/paste your file to this destination so you can then have easy access to it on you AWS instance:
You now have the .bak file of workshop 1 on AWS and you can proceed to “Restore” it using SSMSE.
Creating a receiving (empty) DB to receive your .bak file
Note: The following is based on using SQL Server Express 2005. If you choose to use newer versios (2008) then the prompts, etc. will appear different.
As this will be a new BizAgi project and process for your AWS instance, you first need to have BizAgi set up the basic database structure, which you’ll then replace with your previously created project/process (e.g., WS_1.bak).
To do this, open BizAgiXpress and select new project:
Give it a name. We’ve chosen “Travel_Request” but you might better choose a simpler name as this will be the name you’ll have to use to access the running business process using, for example, http://<the AWS IP address of your instance>/Travel_Request.

Create a BizAgiXpress Instance on Amazon Web Services
51
Note the underscore; BizAgi (and SQL Server) doesn’t like blanks (or hyphens for that matter).
BizAgi will now create the basic project framework:
Once done, it will place you into BizAgiXpress and you can exit out of that. Note that you’re project (and associated SQL Server DB) is now called Travel_Request.
Restore
Open up MSSME on your AWS instance. Once open you should see something like:
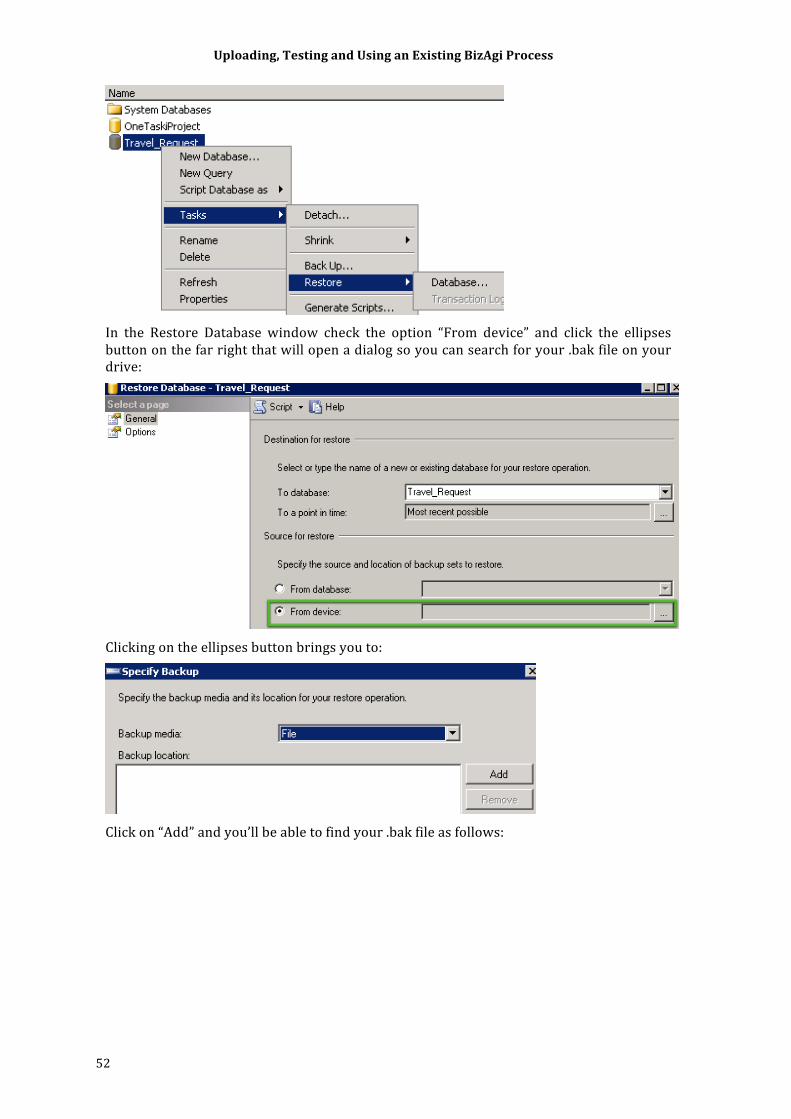
Select the database to restore. Right click on it and select Task -‐ Restore -‐ Database.
Uploading, Testing and Using an Existing BizAgi Process
52
In the Restore Database window check the option “From device” and click the ellipses button on the far right that will open a dialog so you can search for your .bak file on your drive:
Clicking on the ellipses button brings you to:
Click on “Add” and you’ll be able to find your .bak file as follows:

Create a BizAgiXpress Instance on Amazon Web Services
53
Here you search for and find your .bak file. Click on the selected file and you’ll get:
Click “OK” and you’re to the next screen:
Note: The name here may not match your current project name if it has been derived from previous ones. Don’t worry. It will be fine if you chose the correct .bak file.

Uploading, Testing and Using an Existing BizAgi Process
54
Next up, once you select the .bak file to restore, you have to go over to the right hand side and click on “Options” and the screen changes to:
Here you need to place a check mark (select) next to the “Overwrite the existing database:”
Next, you’ll have to re-‐point the two files listed (the …_dat file and …_log file) to their current location under BizAgi. To do this, click on the ellipses button next to the first (_dat) file:
This brings up a directory search box that you will use to go to BizAgi|Projects|<Name of your Project>|Database directory. Here you should see a pre-‐existing _dat file and _log file.
Note: In the current version of BizAgi, you can leave the default location directory and file names and still be fine. However, there’s nothing wrong in proceeding as follows (and you’ll know where the log and mdbs files are stored).
Select the _dat file there as the replacement:

Create a BizAgiXpress Instance on Amazon Web Services
55
Click on OK, and then move to the second _log file, and do the same thing:
Once you’re done making these two substitutions, you can click on OK in the main screen and the updating should occur – you’ll see this in the “Executing” spinning circle on the left-‐hand lower corner. It should look like the following rather quickly:
However, you may also get an error after it spending some time at “Executing (0%) saying in effect that the SQL Server is in use. To cure this problem, you’ll have to shutdown and restart SQL Server Express, then repeat the preceding steps. If you don’t want to take any chances, you can do this at the beginning (before you attempt the Restore). The way to do this is quite simple. First, go to the Start button and in the dialog box, enter “Services.” This will bring up the following:

Uploading, Testing and Using an Existing BizAgi Process
56
Click on the displayed option “Services” (shown at the top here). This brings up:
You may have to scroll down the list to see “SQL Server (SQLEXPRESS). Right-‐Click on it and it will bring up:
Click on “Restart” and let SQLServerExpress to restart. That should solve your restore error problems (if you have them).

Create a BizAgiXpress Instance on Amazon Web Services
57
Checking the result on the AWS instance
Initializing the project with the restored DB information
We can now check to see if this worked by firing up BizAgiXpress and opening up our new project/process:
Next we’ll go to the process diagram and make sure it’s all there:
Updating the WebService integration
Before we go any further, we have to setup the Web Service used in the second task (again). Go to the “Integrate” (Step 6), and choose the first option:
Here we can select the task that uses the web service:
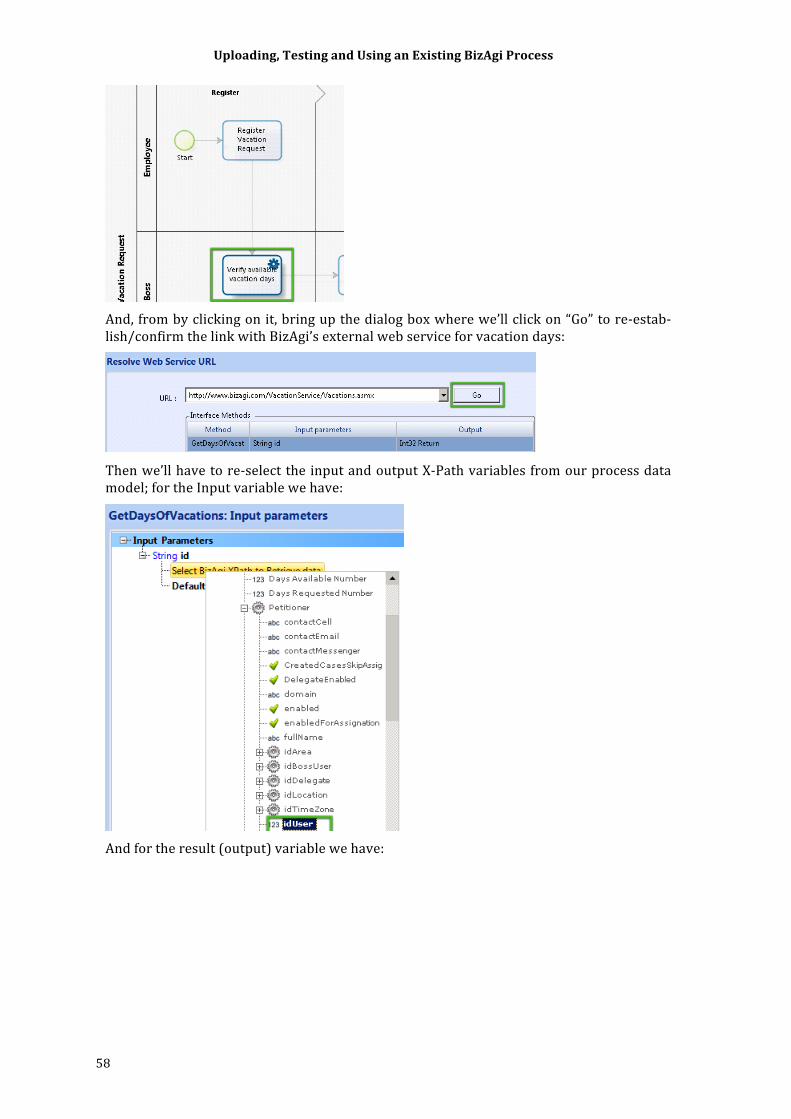
Uploading, Testing and Using an Existing BizAgi Process
58
And, from by clicking on it, bring up the dialog box where we’ll click on “Go” to re-‐estab-‐lish/confirm the link with BizAgi’s external web service for vacation days:
Then we’ll have to re-‐select the input and output X-‐Path variables from our process data model; for the Input variable we have:
And for the result (output) variable we have:

Create a BizAgiXpress Instance on Amazon Web Services
59
In both cases make sure you double-‐click on the selected value to register your choice as the Xpath variable. You can click through the remaining, error-‐handling options.
Resetting the Email
One more thing you will want to do is to set the configuration for this project’s email. Do this the same way you did in Part 2a.
Running the process At this point we should be operational with the default set of users. To test this, click on the green forward button while in BizAgi to bring up the portal associated with this project:
Depending upon how you set this up on your local computer, you may either go directly to the portal (as the Administrator), or you may get a login screen, such as:
Unless you’ve changed the administrator login and password, the default is UN: “admon” and no password. But you do need to drop down the “Domain” and select its default (domain).. Then you should be able to login as the admin. As you haven’t created any cases on this system yet, your start portal screen should look something like:
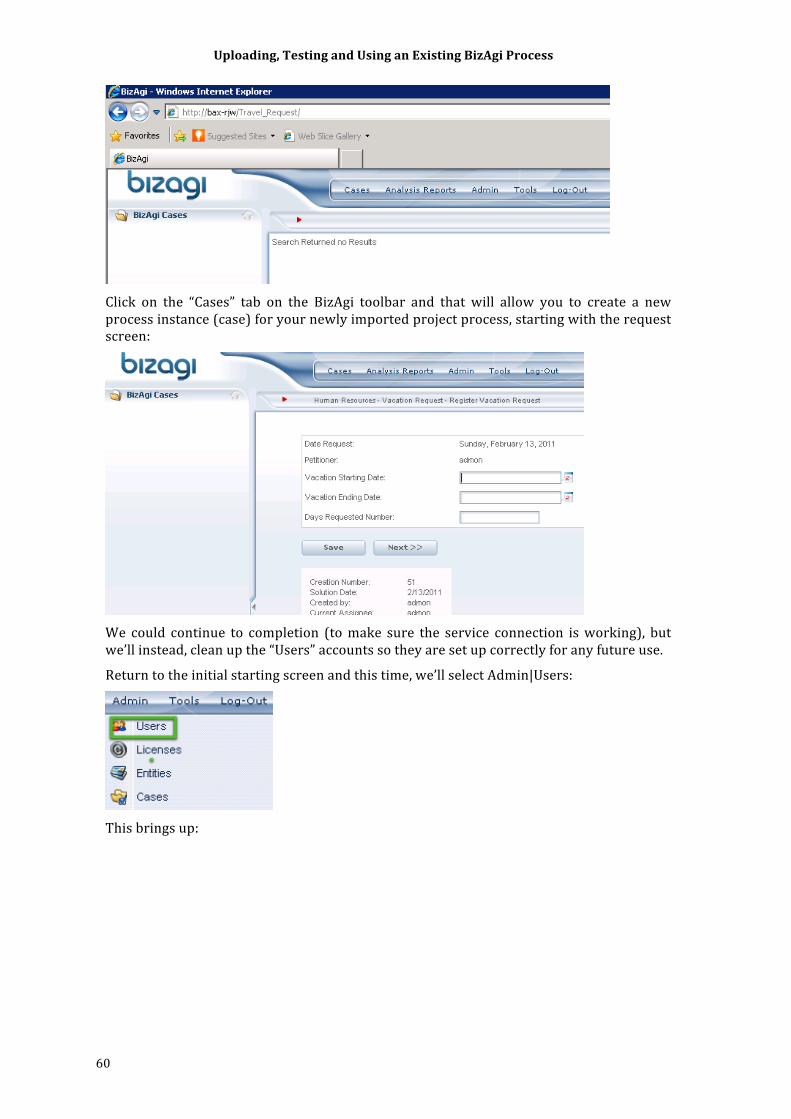
Uploading, Testing and Using an Existing BizAgi Process
60
Click on the “Cases” tab on the BizAgi toolbar and that will allow you to create a new process instance (case) for your newly imported project process, starting with the request screen:
We could continue to completion (to make sure the service connection is working), but we’ll instead, clean up the “Users” accounts so they are set up correctly for any future use.
Return to the initial starting screen and this time, we’ll select Admin|Users:
This brings up:

Create a BizAgiXpress Instance on Amazon Web Services
61
Enter “domain” into that field, leave the rest blank, and you’ll get the current listing of various users for this project:
Here, you’ll want to do some editing on each of the users in terms of their “To” email addresses, as well as their passwords. You’ll also want to set a more robust user name and password for “admon” (the administrator). We’ll leave this up to you.
Of course, with the process running, you can now access the portal using the current AWS DNS name followed by a “slash” and then the project name. So, for example, we are currently running on the AWS instance DNS of:
Ec2-‐50-‐17-‐17-‐127.compute-‐1.amazonaws.com
So, if we go to a web browser and enter:
Ec2-‐50-‐17-‐17-‐127.compute-‐1.amazonaws.com/Travel_Request, you should see the portal:

Uploading, Testing and Using an Existing BizAgi Process
62
So, that’s how you can move your pre-‐existing project (and its associated process(es)) over to AWS for further modification and/or execution.

Persisting your Instance with a Permanent DNS Name
Some FAQ’s on using a permanent DNS name
Why do this?
You will likely want to stop and then re-‐start your running BizAgiXpress AMI instance for a variety of reasons. One is to keep the costs of a running instance down to a reasonable level. Another might be that you wish to do some work on the system and this might occasion a need to stop, then later restart the system. When you do this, Amazon Web Services, re-‐assigns the DNS name they give by default to your instance. You can easily find the new name from your AWS management console, but if others are using the system, then you will have the problem to inform them of the new URL name. And, of course, the name you stored in your remote desktop connection will also have to change. So, in short, it’s a bit of a hassle.
However, it’s possible to maintain a permanent DNS name for your AMI instance, even though you stop and start it from time to time. We refer to this as “persisting” the DNS name although in fact it’s persisting an association between the external DNS name and the internal AWS IP address of your instance.
Why isn’t this done automatically?
The short answer is it costs a bit extra to have AWS persist an EC2/AMI instance. As AWS notes, we generally and they as well, are running out of IPV4 addresses. This problem is fixable with the introduction of the IPV6 IP address numbering space, but this has been slow to take off. And the best way to have people conserve a scarce resource is to tax it. This also costs AWS a bit more processing effort.
What do I get?
The ability to use a permanent IP (and DNS) address to reference and access your running instance. The exact address and name is assigned by AWS but, as we’ll see, can be associat-‐ed with a domain or sub-‐domain that you own, to make it easier to remember and use.
Steps involved
Giving your current AMI instance a persistent IP address (and DNS name)
First, you need to log into your AWS management console. There you’ll see the standard layout. If you look down the right-‐hand column you’ll see Elastic IP’s (AWS’s name for a persistent IP address):

Persisting your Instance with a Permanent DNS Name
64
Click on this option. This brings up the following dialog:
Click on the “Allocate New Address” and you’ll get the following confirmation:
Click on “Yes, Allocate,” and you’ll then get:
Now you have your permanent IP address assigned. Next you need to associate this with your running instance. Click on the Associate Address button at the top of the screen (in green). This brings up a dialog box as:
Drop down the “Select and instance” dialog and it show you all the instances you currently have. Choose the one you wish to associate this (persistent/flexible) IP address with:

Create a BizAgiXpress Instance on Amazon Web Services
65
Click on “Yes, Associate,” and AWS shows a short spinner while it makes the association, then it reports back something like:
Test your assignment
You now have a persistent (elastic) IP address associated with your running instance. So, to test this out, you can enter this IP address (with /travel_request post-‐pended so that you go directly to BizAgi) into your web browser and it should bring up the BizAgiXpress portal:
If you now return to you instance in the AWS management console, you’ll see the equiva-‐lent DNS name for this instance:

Persisting your Instance with a Permanent DNS Name
66
If you type in the “Public DNS” address shown here and add (concatenate) /travel_request to it, you should again seen the BizAgiXpress login screen shown above.
Creating a “friendly DNS Name for your AWS Instance (Optional)
Establishing your own DNS name
While having a permanent (persistent or “elastic”) IP and DNS name is convenient, you can take this one more step by registering a domain with one of the many domain registries, such as GoDaddy.com. This will make the resulting name you use to access much more memorable as well as one tied to you and/or your business.
There are many inexpensive domain types, such as .info that cost very little on a per year basis. Once you’ve registered a domain, you can use it to create sub-‐domains (e.g. bizagix-‐press.myname.info) and then associate that sub-‐domain with the (elastic) IP address you’ve just created in AWS.
At this point, each domain registry operates somewhat differently in its screenshots, etc. Below is shown the sequence of events, using the GoDaddy.com domain registry that I’ve found to be a reasonable compromise between cost, ease of use, and flexibility.
Create your domain name
Assuming you’re using GoDaddy.com, select a domain name that’s not already been used (try your first initial, lastaname.info) such as rsmith.info. If it’s available, select it, then go through the steps, ignoring all the various options/additions presented, opt for one year, then create your .info domain. Within a short while, the general Internet now knows this domain name.
Once set up and created, your primary domain name, you can create subdomains, which are names that precede the domain name, as in: “bizagi.rmsith.info”. Assuming you’ve set up rsmith.info as your primary domain, you can now create sub-‐domains such as bi-‐zagi.rsmith.info using GoDaddy’s domain management features.
What you want to do is to associate the permanent (elastic) IP address we previously created above to bizagi.rsmith.info sub-‐domain.
Create a BizAgiXpress Instance on Amazon Web Services
67
Creating a subdomain to link with your AWS Instance
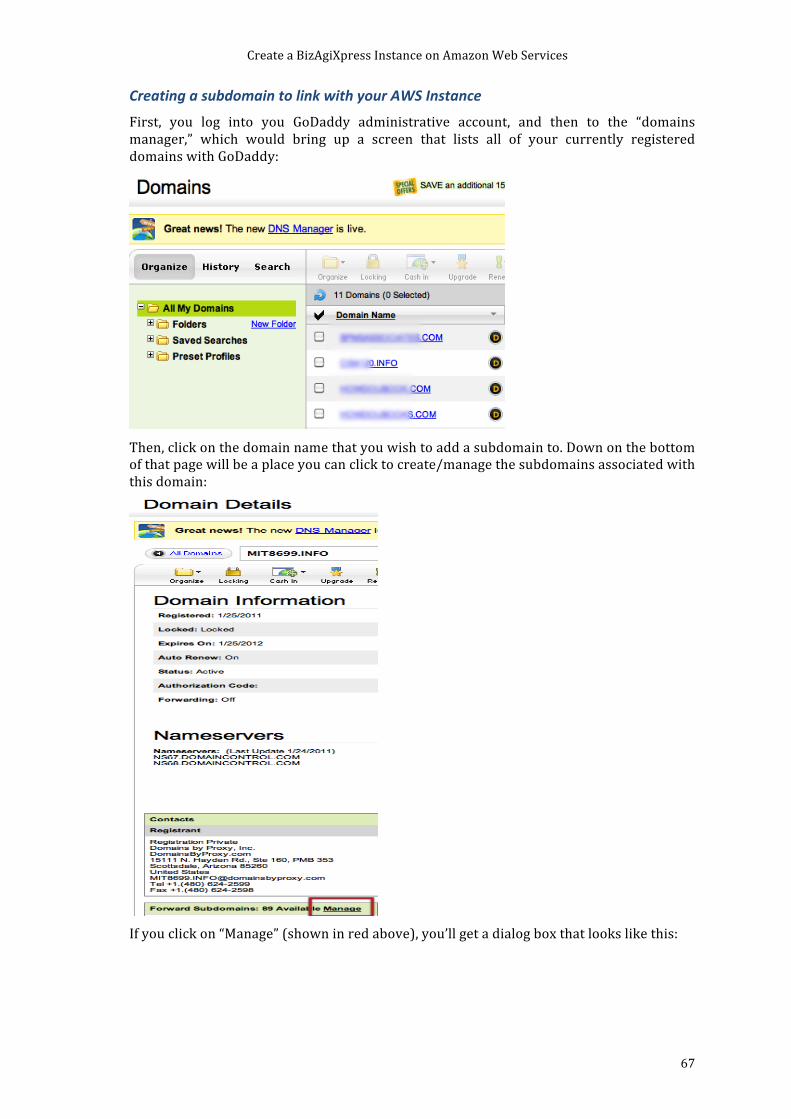
First, you log into you GoDaddy administrative account, and then to the “domains manager,” which would bring up a screen that lists all of your currently registered domains with GoDaddy:
Then, click on the domain name that you wish to add a subdomain to. Down on the bottom of that page will be a place you can click to create/manage the subdomains associated with this domain:
If you click on “Manage” (shown in red above), you’ll get a dialog box that looks like this:

Persisting your Instance with a Permanent DNS Name
68
Here you can enter your subdomain name (e.g., BizAgi), and then in the follow-‐on dialog, you provide the AWS “Elastic” IP address we previously set up:
Click OK, and after a short time, your new subdomain is now associated with your AWS instance. Again, you can check this by entering this URL (with the /<process name> as the URL, e.g., http://bizagi.rsmith.info/travel_request):
You’re now setup for using this subdomain, and you can send this out to others and they’ll be able to log in to your BizAgiXpress instance running on AWS as long as the instance is running.


![Bizagi [Descripción funcional]](https://img.dokumen.tips/doc/110x75/586fdb731a28ab18428b60fd/bizagi-descripcion-funcional-592545212fb1e.jpg)

