Embed Size (px)
Citation preview
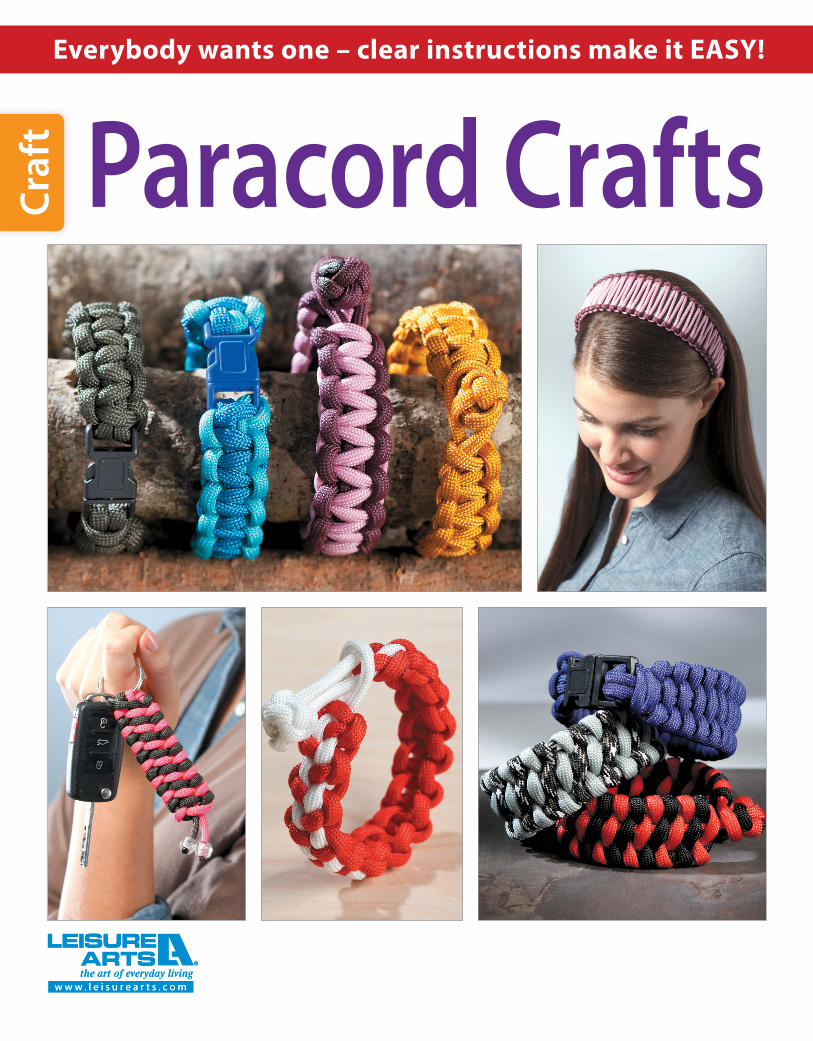
Everybody wants one – clear instructions make it EASY!C
raft
Paracord Crafts
L6144_OFBC.indd 2 12/17/12 2:05 PM

LEISURE ARTS, INC.
Little Rock, Arkansas
Paracord Crafts
4 6
11 11
8
11
201714 16
12
L6144_Body.indd 1 12/17/12 2:06 PM

THINGS YOU NEED TO KNOWTo make your crafting fun and easy, please read Things You Need To Know (pages 2-3)
and How To Trim And Singe (page 24) before beginning your project.
WHAT KIND OF PARACORD TO USEAll the projects in this book are made with #550 paracord.
It is easy to fi nd in craft/hobby, discount, and military surplus stores and comes in different size hanks. The
instructions in this book are based on 16' hanks, but you may not use the whole hank for a project.
When cut lengths are given in the project instructions, the lengths always includes a little extra cord—it’s better
to have too much than to run short. When no cut lengths are given, you will need the entire 16' length.
SAFETY IS IMPORTANT
CAUTION: These projects involve the use of sharp objects and open fl ames. Adult supervision is required at all times.
the entire 16' length.
Paracord, aka parachute cord, is a super-strong nylon
cord that comes in lots of colors and patterns.
For a military person or outdoor enthusiast, a length of paracord makes a handy
survival tool which can be used as a clothesline,
replace a broken shoelace, hold up a makeshift tent, and much more. A long piece of paracord can be tied into a series of knots that reduces the length making it easier to pack or carry. The knots can
be untied to use the cord as needed.
For the rest of us, paracord makes a real fashion
statement when tied into knotted accessories like bracelets and key fobs. It
can even jazz up fl ip fl ops or headbands! The projects in this book are quick and easy to make, cool to use, and a great way to keep
some paracord with you all the time—because you just
never know when you might need a bit of cord.
2 www.leisurearts.com
L6144_Body.indd 2 12/17/12 2:06 PM
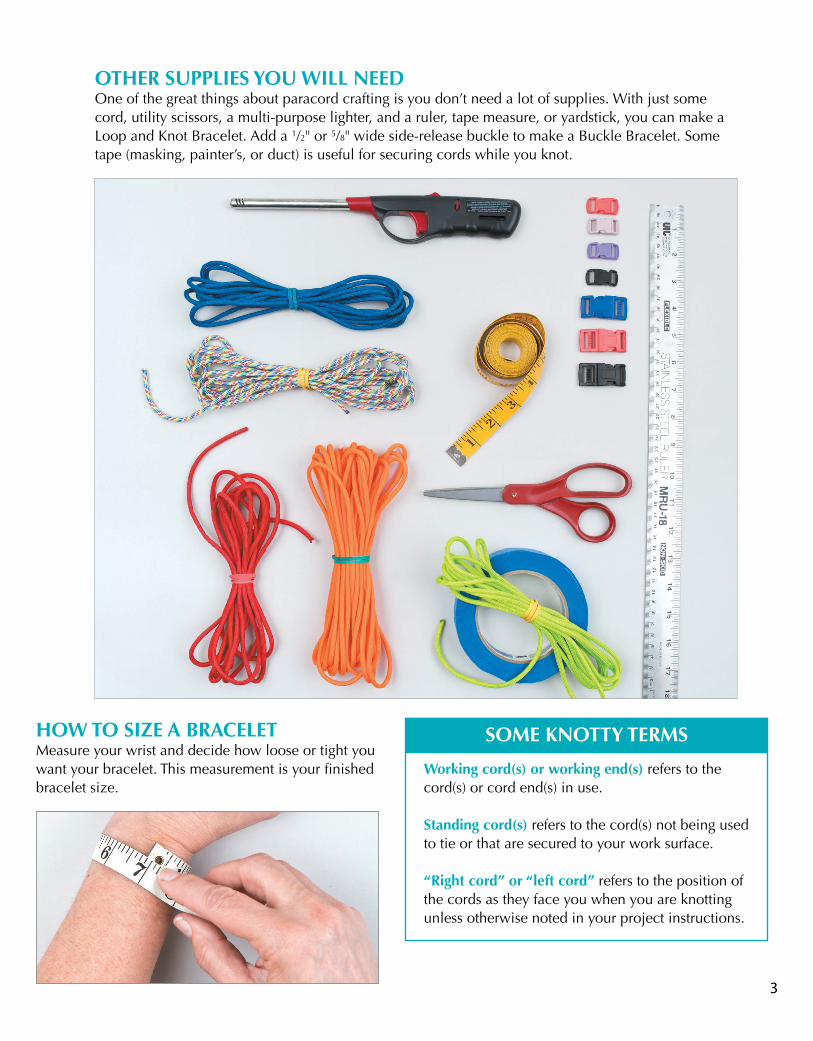
OTHER SUPPLIES YOU WILL NEEDOne of the great things about paracord crafting is you don’t need a lot of supplies. With just some cord, utility scissors, a multi-purpose lighter, and a ruler, tape measure, or yardstick, you can make a Loop and Knot Bracelet. Add a 1/2" or 5/8" wide side-release buckle to make a Buckle Bracelet. Some tape (masking, painter’s, or duct) is useful for securing cords while you knot.
HOW TO SIZE A BRACELETMeasure your wrist and decide how loose or tight you want your bracelet. This measurement is your fi nished bracelet size.
SOME KNOTTY TERMS
Working cord(s) or working end(s) refers to the cord(s) or cord end(s) in use.
Standing cord(s) refers to the cord(s) not being used to tie or that are secured to your work surface.
“Right cord” or “left cord” refers to the position of the cords as they face you when you are knotting unless otherwise noted in your project instructions.
3
L6144_Body.indd 3 12/17/12 2:06 PM

STEP 4 Pull the sliding cord to tighten (Fig. 4).
STEP 5 The cord on the left now becomes the sliding cord. Insert the folded right cord into the sliding cord loop and tighten (Figs. 5-6).
STEP 1 Cut one 8' length of paracord.
STEP 2 Make a loop in the center of the paracord. Wrap the right working cord around the loop and bring the working end under the wrap. Pull the cords to make a loose knot; do not over-tighten. The left cord will become the sliding cord. (Figs. 1-2).
STEP 3 Turn the cords so that the sliding cord is on the right. Insert the folded left cord through the sliding cord loop (Fig. 3).
CHAIN SINNET BRACELETS
£ 550 paracord (one 16' hank will make 2 bracelets)
£ 2 large-hole beads (optional)£ utility scissors£ tape measure, ruler, or
yardstick£ multi-purpose lighter
Note: This bracelet does not
open and close with a loop and
knot or a buckle so it needs to be
loose enough to slip on and off
your hand.
4 www.leisurearts.com
Fig. 5
Fig. 6
SHOPPING LIST
Fig. 2
loopFig. 1
right working cord
Fig. 3
sliding cord
sliding cord
right cord
Fig. 4
sliding cord
sliding cord
left cord
1"
L6144_Body.indd 4 12/17/12 2:06 PM
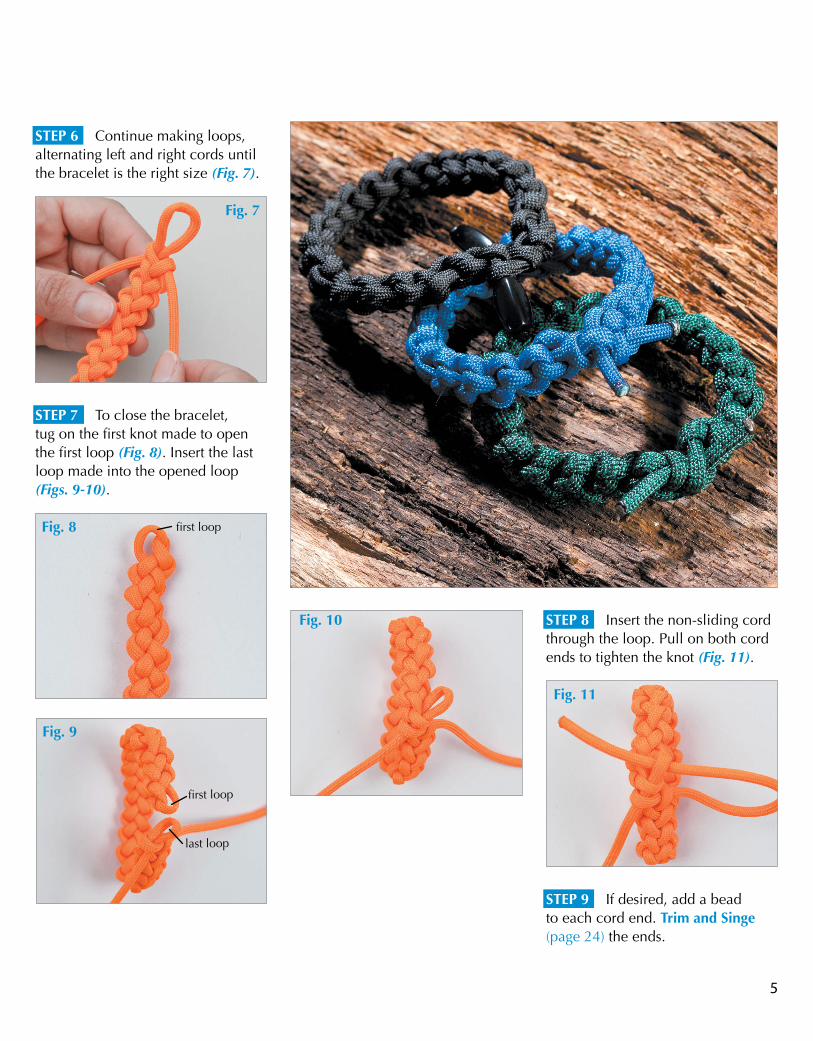
STEP 6 Continue making loops, alternating left and right cords until the bracelet is the right size (Fig. 7).
STEP 7 To close the bracelet, tug on the fi rst knot made to open the fi rst loop (Fig. 8). Insert the last loop made into the opened loop (Figs. 9-10).
STEP 8 Insert the non-sliding cord through the loop. Pull on both cord ends to tighten the knot (Fig. 11).
STEP 9 If desired, add a bead to each cord end. Trim and Singe (page 24) the ends.
5
Fig. 7
Fig. 8
Fig. 10
Fig. 11
Fig. 9
fi rst loop
last loop
fi rst loop
L6144_Body.indd 5 12/17/12 2:06 PM

STITCHED SOLOMAN BAR BRACELETS
£ 550 paracord (one 16' hank for a one color bracelet or one 16' hank of each color for a two color bracelet)
£ 1/2" wide side-release buckle (for a one color bracelet)
£ utility scissors£ tape measure, ruler, or
yardstick£ multi-purpose lighter£ masking, painter’s, or duct
tape (optional)
Tip: Taping down the top loop or
buckle and the standing cord ends
or bottom buckle makes it easier to
tie knots around the standing cords.
LOOP AND KNOT BRACELET
STEP 1 Cut one 11' length of paracord for the working cords and one 5' length of paracord for the standing cords.
STEP 2 Fold the standing cord in half and center it on the working cord (Fig. 1).
STEP 3 Bring the right working cord over the standing cords. Bring the left working cord over and around the right working cord, behind the standing cords, and through the loop on the right side (Fig. 2); pull the cords to tighten.
STEP 4 Bring the left working cord between the standing cords and the right working cord behind the standing cords. Bring the working cord ends through the side loops (Fig. 3); tighten.
STEP 5 Bring the right working cord between the standing cords and the left working cord behind the standing cords. Bring the working cord ends through the side loops (Fig. 4); tighten.
STEP 6 Repeat Steps 4-5 (Fig. 5), stopping when the knotted section is 1" short of your fi nished bracelet size.
SHOPPING LIST
Fig. 5
Fig. 1
standing cord
working cord
Fig. 2
left working cord
right working cord
Fig. 3
right cord
left cordend
right cordend
left cord
Fig. 4
right cordleft cord
left cord endright
cord end
1"
6 www.leisurearts.com
L6144_Body.indd 6 12/17/12 2:06 PM

STEP 7 On the wrong side, thread the working cord ends under the last knot (Fig. 6); tighten. Trim and Singe (page 24) the ends.
STEP 8 Use the standing cords to make a Diamond Knot (page 23).
BUCKLE BRACELET
STEP 1 Fold the cord in half and insert the loop through one buckle piece from front to back. Bring the cords through the loop (Fig. 7); pull to tighten (Fig. 8).
STEP 2 Thread the cord ends through the remaining buckle piece from front to back and position the buckle at your fi nished bracelet size (Fig. 9).
STEP 3 Bring the left working cord over the standing cords and behind the right working cord. Bring the right working cord behind the standing cords and over the left working cord (Fig. 10); tighten.
STEP 4 Repeat Steps 4-5 of Loop And Knot Bracelet, until you reach the beginning buckle.
STEP 5 Referring to Fig. 6, thread the working cord ends under the last knot; tighten. Trim and Singe (page 24) the ends.
Fig. 6
Fig. 7
Fig. 8
Fig. 10
right cordleft cord
Fig. 9
fi nis
hed
bra
cele
t si
ze
7
L6144_Body.indd 7 12/17/12 2:06 PM

COBRA STITCH BRACELETS
£ 550 paracord (one 16' hank for a one color bracelet or one 16' hank of each color for a two color bracelet)
£ 1/2" wide side-release buckle (optional)
£ utility scissors£ tape measure, ruler, or
yardstick£ multi-purpose lighter£ masking, painter’s, or duct
tape (optional)
Tip: Taping down the top loop or
buckle and the standing cord ends
or bottom buckle makes it easier to
tie knots around the standing cords.
ONE COLOR BRACELET WITH A LOOP AND KNOT
STEP 1 Cut one 11' length of paracord for the working cords and and one 5' length of paracord for the standing cords.
STEP 2 Fold the standing cord in half and center it on the working cord (Fig. 1).
STEP 3 Bring the right working cord over the standing cords and behind the left working cord. Bring the right working cord through the loop created on the right side (Fig. 2); pull the cords to tighten.
STEP 4 Bring the right working cord over the standing cords and behind the left working cord. Bring the left working cord behind the standing cords and over the right working cord (Fig. 3); tighten.
STEP 5 Bring the left working cord over the standing cords and behind the right working cord. Bring the right working cord behind the standing cords and over the left working cord (Fig. 4); tighten.
STEP 6 Repeat Steps 4-5, stopping when the knotted section is 1" short of your fi nished bracelet size.
STEP 7 On the wrong side, thread the working cords under the last 2 knots (Fig. 5); tighten. Trim and Singe (page 24) the ends.
STEP 8 Use the standing cords to make a Diamond Knot (page 23).
SHOPPING LISTFig. 3
Fig. 5
Fig. 4
Fig. 1
Fig. 2
working cord
standing cord
right cordleft cord
right cord
loop
8 www.leisurearts.com
L6144_Body.indd 8 12/17/12 2:06 PM

TWO COLOR BRACELET WITH A LOOP AND KNOT
CAUTION: Always keep your fi ngers
away from the fl ame and never
touch a melted cord end until it has
cooled completely.
STEP 1 Cut a 6' length of each paracord color for the working cords. Cut a 5' length of one paracord color for the standing cords.
STEP 2 To join the two 6' cords into a single cord, hold both cords in one hand and Singe (page 24) the ends (Fig. 6). Quickly press the hot ends together and hold until cool and the ends are fused together (Figs. 7-8).
STEP 3 Follow Steps 2-8 of One Color Bracelet With A Loop And Knot to knot and fi nish your bracelet.
Tip: This technique takes a little
practice and might be easier if
one person handles the cords
and another applies the heat.
Continued on page 10.
Fig. 6
Fig. 7
Fig. 8
9
L6144_Body.indd 9 12/17/12 2:06 PM

Cobra Stitch Bracelets continued.
ONE COLOR BRACELET WITH BUCKLE (shown on page 9)
STEP 1 Fold the cord in half and insert the loop through one buckle piece from front to back. Bring the cords through the loop (Fig. 9); pull the cords to tighten.
STEP 2 Thread the cord ends through the remaining buckle piece and position the buckle at your fi nished bracelet size (Fig. 10).
STEP 3 Follow Steps 4-5 of One Color Bracelet With A Loop And Knot (page 8) to tie a series of Cobra Stitch knots (Fig. 11), ending at the beginning buckle.
STEP 4 On the wrong side, thread the working cord ends under the last knot (Fig. 12); tighten. Trim and Singe (page 24) the ends.
TWO COLOR BRACELET WITH A BUCKLE(shown on page 9)
STEP 1 Cut a 12' length of each paracord color.
STEP 2 Insert about 2" of each cord through one end of the buckle. Singe (page 24), then quickly press the hot cord ends to the corresponding cords (Fig. 13).
Tip: An alternative to fusing is to
secure the ends to the cord with
a narrow piece of tape (Fig. 14).
STEP 3 Thread the cord ends through the remaining buckle piece and position the buckle at your fi nished bracelet size (Fig. 15).
STEP 4 Follow Steps 4-5 of One Color Bracelet With A Loop And Knot (page 8) to tie a series of Cobra Stitch knots, ending at the beginning buckle.
STEP 5 Follow Step 4 of One Color Bracelet With A Buckle to fi nish your bracelet.
Fig. 9
Fig. 14
Fig. 15
Fig. 12
Fig. 13
Fig. 11
Fig. 10
fi nis
hed
bra
cele
t si
ze
knot all the way to buckle
fi nis
hed
bra
cele
t si
ze
10 www.leisurearts.com
L6144_Body.indd 10 12/17/12 2:06 PM

To add some bling to your bracelet, follow One Color Bracelet With A Buckle (left) and slide beads onto the standing cords between Cobra Stitch knots as desired.
For the headband, refer to page 9, Step 2, to fuse two 6' cords together. Starting on one end, tie Cobra Stitch knots around the headband. When you get to the other end, refer to page 10, Fig. 12, to fi nish the cord ends.
To jazz up your fl ops, refer to page 13, Fig. 10, to attach two 16' cord lengths to the center of one fl ip fl op with a looped knot. Use one cord of each color to tie Cobra Stitch knots along each strap. When you get to the end of the strap, refer to page 10, Fig. 12, to fi nish the cord ends.
YOU CAN ALSO MAKE
11
L6144_Body.indd 11 12/17/12 2:06 PM
£ 550 paracord (one 8' length of each color)
£ 5/8" wide side-release buckle (optional)
£ utility scissors£ tape measure, ruler, or
yardstick£ multi-purpose lighter£ masking, painter’s, or duct
tape (optional)
Tip: Taping down the top loop or
buckle and the standing cord ends
or bottom buckle makes it easier to
tie knots around the standing cords.
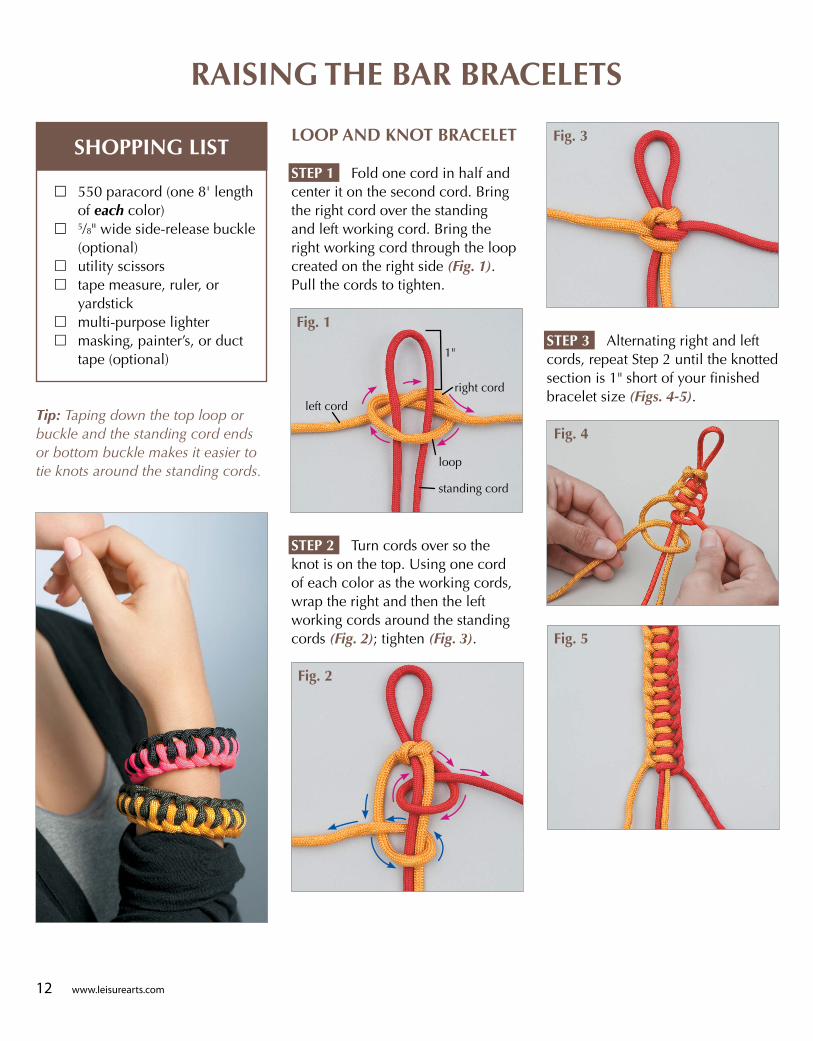
LOOP AND KNOT BRACELET
STEP 1 Fold one cord in half and center it on the second cord. Bring the right cord over the standing and left working cord. Bring the right working cord through the loop created on the right side (Fig. 1). Pull the cords to tighten.
STEP 2 Turn cords over so the knot is on the top. Using one cord of each color as the working cords, wrap the right and then the left working cords around the standing cords (Fig. 2); tighten (Fig. 3).
STEP 3 Alternating right and left cords, repeat Step 2 until the knotted section is 1" short of your fi nished bracelet size (Figs. 4-5).
RAISING THE BAR BRACELETS
12 www.leisurearts.com
SHOPPING LISTFig. 3
Fig. 5
Fig. 4
Fig. 2
Fig. 1
loop
right cord
1"
left cord
standing cord
L6144_Body.indd 12 12/17/12 2:06 PM
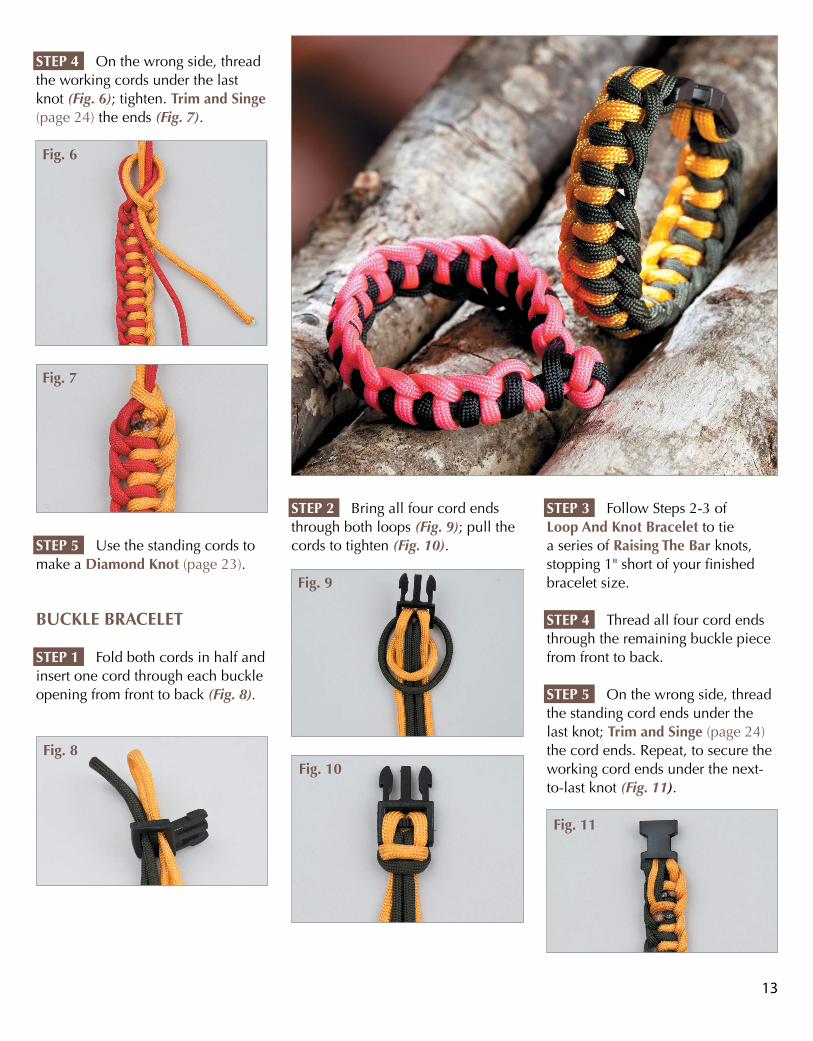
STEP 2 Bring all four cord ends through both loops (Fig. 9); pull the cords to tighten (Fig. 10).
STEP 4 On the wrong side, thread the working cords under the last knot (Fig. 6); tighten. Trim and Singe (page 24) the ends (Fig. 7).
STEP 5 Use the standing cords to make a Diamond Knot (page 23).
BUCKLE BRACELET
STEP 1 Fold both cords in half and insert one cord through each buckle opening from front to back (Fig. 8).
STEP 3 Follow Steps 2-3 of Loop And Knot Bracelet to tie a series of Raising The Bar knots, stopping 1" short of your fi nished bracelet size.
STEP 4 Thread all four cord ends through the remaining buckle piece from front to back.S
STEP 5 On the wrong side, thread the standing cord ends under the last knot; Trim and Singe (page 24) the cord ends. Repeat, to secure the working cord ends under the next-to-last knot (Fig. 11).
13
Fig. 6
Fig. 8
Fig. 9
Fig. 10
Fig. 11
Fig. 7
L6144_Body.indd 13 12/17/12 2:06 PM

TRILOBITE BRACELETS
£ 550 paracord (one 16' hank of each color for a two color loop and knot bracelet) or one 16' hank for a one color buckle bracelet
£ 5/8" wide side-release buckle (optional)
£ utility scissors£ tape measure, ruler,
or yardstick£ multi-purpose lighter£ masking, painter’s,
or duct tape
Tip: Taping down the top loop or
buckle and the standing cord ends
or bottom buckle makes it easier to
tie knots around the standing cords.
LOOP AND KNOT BRACELET
STEP 1 Holding one cord of each color together, fold the cords in half and tape the center loop to your work surface.
STEP 2 Note: You will be working
towards the beginning loop. Using 1 working cord of each color, begin knotting at your fi nished bracelet size minus 1" (Fig. 1).
STEP 3 Bring the right working cord over the standing cords and under the left working cord (Fig. 2).
STEP 4 Bring left working cord under the standing cords and over the right outer standing cord (Fig. 3); pull the working cords to tighten.
Tip: The cord passing from right to
left always crosses over the standing
cords and the one passing from left
to right always crosses under the
standing cords.
STEP 5 Bring the right working cord under the right outer cord, over the standing cords, and under the left outer cord; do not tighten (Fig. 4).
14 www.leisurearts.com
SHOPPING LIST
Fig. 1
Fig. 2
Fig. 3
Fig. 4
fi nis
hed
bra
cele
t si
ze
min
us
1"
left working cord
left outer cord
rightouter standing cord
left working cord
right working cord
right working cord
L6144_Body.indd 14 12/17/12 2:06 PM

STEP 6 Bring left working cord over the left outer cord, under the standing cords and over the right outer cord (Fig. 5); pull the working cords to tighten.
STEP 7 Repeat Steps 5-6 (Figs. 6-7) until the knotted section is 1" short of the beginning loop.
STEP 8 On the wrong side, thread the working cords under the last 2 knots (page 10, Fig. 12); Trim and Singe (page 24) the ends.
STEP 9 Use the standing cords to make a Diamond Knot (page 23).
BUCKLE BRACELET
STEP 1 Cut one 13' and one 3' length of paracord.
STEP 2 Fold both cords in half and insert the 3' cord through the lower buckle opening and the 13' cord through the upper buckle opening from front to back (Figs. 8-9).
Continued on page 16.
15
Fig. 5
Fig. 7
Fig. 6Fig. 8
Fig. 9
left working cord
3' cord
3' cord
13' cord
13' cord
L6144_Body.indd 15 12/17/12 2:06 PM

STEP 5 To fuse the short cord ends to the short cords, fold each short cord end to the wrong side and leaving about 2" from buckle to ends, trim short cords. Singe (page 24), then quickly press the hot cord ends to the corresponding cords (Fig. 13).
Tip: An alternative to fusing is to
secure the ends to the cords with a
narrow piece of tape (see page 10,
Fig. 14).
STEP 6 With the right side facing you, cross the working cords behind the standing cords (Fig. 14).
STEP 7 Follow Steps 5-6, of Loop And Knot Bracelet (page 14) to tie a series of Trilobite knots until you reach the beginning buckle.
STEP 8 On the wrong side, thread the working cords under the last twoknots (page 10, Fig. 12); Trim and Singe (page 24) the ends.
STEP 3 Bring all four cord ends through both loops (Fig. 10); pull cords to tighten (Fig. 11).
STEP 4 Keeping the shorter cords in the center, thread all 4 cord ends through the other buckle piece from front to back and position the buckle at your fi nished bracelet size (Fig. 12).
16 www.leisurearts.com
Fig. 13
Fig. 14
Fig. 11
Fig. 10
Fig. 12
fi nis
hed
bra
cele
t si
ze
For a 31/2" long key fob, cut one 3' length of each cord color. For the standing cords, fold 12" of each cord over a metal split ring. Using the two longer cord ends as the working ends follow Loop And Knot Bracelets, page 14, Steps 2-9, to make your key fob.
Tip: Tape the ring and the
top of the folded cords to
your work surface.
YOU CAN ALSO MAKE
Trilobite Buckle Bracelet continued.
2"
L6144_Body.indd 16 12/17/12 2:06 PM

SWITCHBACK BRACELETS
£ 550 paracord (one 16' hank for a one color bracelet or one 16' hank of each color for a two color bracelet)
£ 5/8" wide side-release buckle (for a two color bracelet)
£ utility scissors£ tape measure, ruler, or
yardstick£ multi-purpose lighter£ masking, painter’s, or duct
tape (optional)
LOOP AND KNOT BRACELET(shown on page 18)
STEP 1 Make a 4" long loopin one end of the cord. Make an 18" loop with the working end. Bring the working end over the left cord and tail and under theright cord, 2" below the top curve. (Fig. 1).
Tip: Taping the 4" loop cord end
to the left cord will make it easier
to hold all the cords as you begin
knotting.
STEP 2 Wrap the working end over and under the right cord and over and under the left cord/tail (Fig. 2).
STEP 3 Adjust and tighten the knots by pulling on the working cord (Fig. 3). Gently slide the knots up the standing cords until the top loop is about 1" long. (Remove the tape, if used.)
STEP 4 Tightening after each wrap (Fig. 4), repeat Step 2 until the knotted section is 1" short of your fi nished bracelet size.
Fig. 4
17
SHOPPING LIST
Fig. 1left cord
18" loop
4" lo
op
working end
Fig. 3
1"Fig. 2
right cord
left cord tail
Continued on page 18.
L6144_Body.indd 17 12/17/12 2:06 PM

STEP 2 Insert about 2" of each cord through one end of the buckle from front to back. Secure the cord ends to the corresponding cords with narrow pieces of tape (Fig. 6).
STEP 5 Thread the working end under the last 2 knots (Fig. 5); tighten. Trim and Singe (page 24) the end.
STEP 6 Cut through the lower loop to make 2 equal length working cords. Use the working cords to make a Diamond Knot (page 23 ).
BUCKLE BRACELET
Tip: Taping down the top and
bottom buckles may make it
easier to tie knots around the
standing cords.
STEP 1 Cut one 8' length of each paracord color.
18 www.leisurearts.com
Fig. 6 Fig. 5
Switchback Bracelets continued.
L6144_Body.indd 18 12/17/12 2:06 PM

Tip: An alternative to taping is to
fuse the ends to the corresponding cords. Refer to Two Color Bracelet With A Buckle, page 10, Step 2.
STEP 3 Thread the cord ends through the remaining buckle piece and position the buckle at your fi nished bracelet size (Fig. 7).
STEP 4 Bring the left working cord over the left standing cord and under the right standing cord (Fig. 8).
STEP 5 Bring the right working cord over the right standing cord, under and around the left standing cord, and back under the right standing cord (Fig. 9).
STEP 6 Bring the right working cord over the right standing cord, under and around the left standing cord, and back under the right standing cord (Fig. 10).
STEP 7 Adjust and tighten the knots by pulling on the working cords and gently sliding the knots up the standing cords.
STEP 8 Alternating cord colors, repeat Steps 5-6 (Fig. 11) until you reach the beginning buckle.
STEP 9 Referring to page 18, Fig. 5, thread both working cord ends under the last knot made; tighten. Trim and Singe (page 24) the cord ends.
19
Fig. 11
Fig. 8 Fig. 10
Fig. 7
fi nis
hed
bra
cele
t si
ze
Fig. 9
L6144_Body.indd 19 12/17/12 2:06 PM
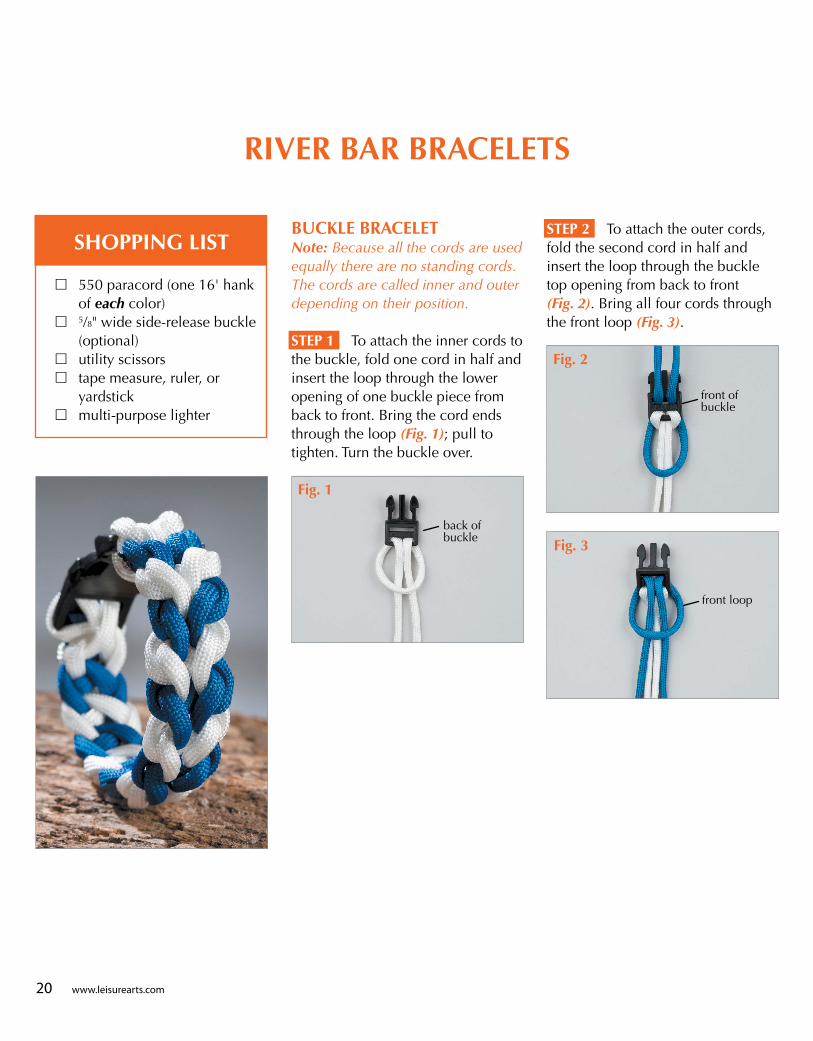
RIVER BAR BRACELETS
£ 550 paracord (one 16' hank of each color)
£ 5/8" wide side-release buckle (optional)
£ utility scissors£ tape measure, ruler, or
yardstick£ multi-purpose lighter
BUCKLE BRACELETNote: Because all the cords are used
equally there are no standing cords.
The cords are called inner and outer
depending on their position.
STEP 1 To attach the inner cords to the buckle, fold one cord in half and insert the loop through the lower opening of one buckle piece from back to front. Bring the cord ends through the loop (Fig. 1); pull to tighten. Turn the buckle over.
STEP 2 To attach the outer cords, fold the second cord in half and insert the loop through the buckle top opening from back to front (Fig. 2). Bring all four cords through the front loop (Fig. 3).
front loop
20 www.leisurearts.com
SHOPPING LIST
Fig. 1
Fig. 2
Fig. 3
front loop
back of buckle
front of buckle
L6144_Body.indd 20 12/17/12 2:06 PM

STEP 3 Cross the outer cords behind the inner cords then bring the ends through the front loop; tighten (Fig. 4).
STEP 4 Loop the inner cords over, then under the outer cords and, crossing behind the inner cords, bring the inner cord ends through the loops and over the outer cords (Fig. 5).
Continued on page 22.
21
Fig. 4
outer cordouter cord
inner cords
Fig. 5
L6144_Body.indd 21 12/17/12 2:06 PM

LOOP AND KNOT BRACELETNote: Because all the cords are used
equally there are no standing cords.
The cords are called inner and outer
depending on their position.
STEP 1 Center one folded cord (inner) on the second cord (outer). Bring the left outer cord over the inner cords and behind the right outer cord. Bring the right outer cord behind the inner cords and through the loop created on the left (Fig. 10).
STEP 2 Follow Buckle Bracelet (page 21, Steps 4-6), stopping when knotted section is 1" short of your fi nished bracelet size.
STEP 3 On the wrong side, thread the outer cords, only, under the last 2 knots; Trim and Singe (page 24) the ends (Fig. 11).
STEP 4 Use the inner cords to make a Diamond Knot (page 23).
River Bar Bracelets continued.
STEP 5 Pull the working cords to tighten the knot (Fig. 6).
STEP 6 Repeat Steps 4-5, to knot the inner cords around the outer cords (Figs. 7-8), until you reach your fi nished bracelet size.
STEP 8 Working from front to back, insert all four cord ends through the remaining buckle piece. On the wrong side, thread the inner cord ends under the last knot made; Trim and Singe (page 24) the cord ends. Repeat to secure the outer cord ends under the next-to-last knot (Fig. 9).
22 www.leisurearts.com
Fig. 11
Fig. 10
right outer
left outer
Fig. 6
Fig. 7
Fig. 8
Fig. 9
L6144_Body.indd 22 12/17/12 2:06 PM

HOW TO TIE A DIAMOND KNOTA Diamond Knot makes a fi rm, round ball that is used
for all bracelets that close with a loop and knot.
Note: When tying a Diamond Knot, the right cord is
always the right cord (shown in green) and the left
cord is always the left cord (shown in red) even if they
move to the opposite side of the knot. The numbers
in () match the numbers on the Figs. where the cords
go over or under each other. The placement for a
Diamond Knot is approximately 1" from the end of
your bracelet.
STEP 1 Make a loop in the left cord. Bring the right cord behind the loop and over the left cord (Fig. 1).
STEP 2 Bring the right cord under the left cord working end (1), over the bottom of the loop of the left cord (2), and under the top of the loop of the right cord (3), forming a diamond in the center of the loops (Fig. 2).
STEP 3 Bring the left working end around the top of the knot (Fig. 3), under all the loops, and through the diamond from the back to the front. Bring the right working end around the bottom of the knot (Fig. 4), under all the loops, and through the diamond from the back to the front (Fig. 5).
23
right cord
left cord
diamond
right cord
left cord
Fig. 5
Fig. 3
diamond
13
2
Fig. 2
right cord
left cord
diamond
Fig. 4
Fig. 1 bracelet
working end
right cord
left cord
Continued on page 24.
L6144_Body.indd 23 12/17/12 3:15 PM
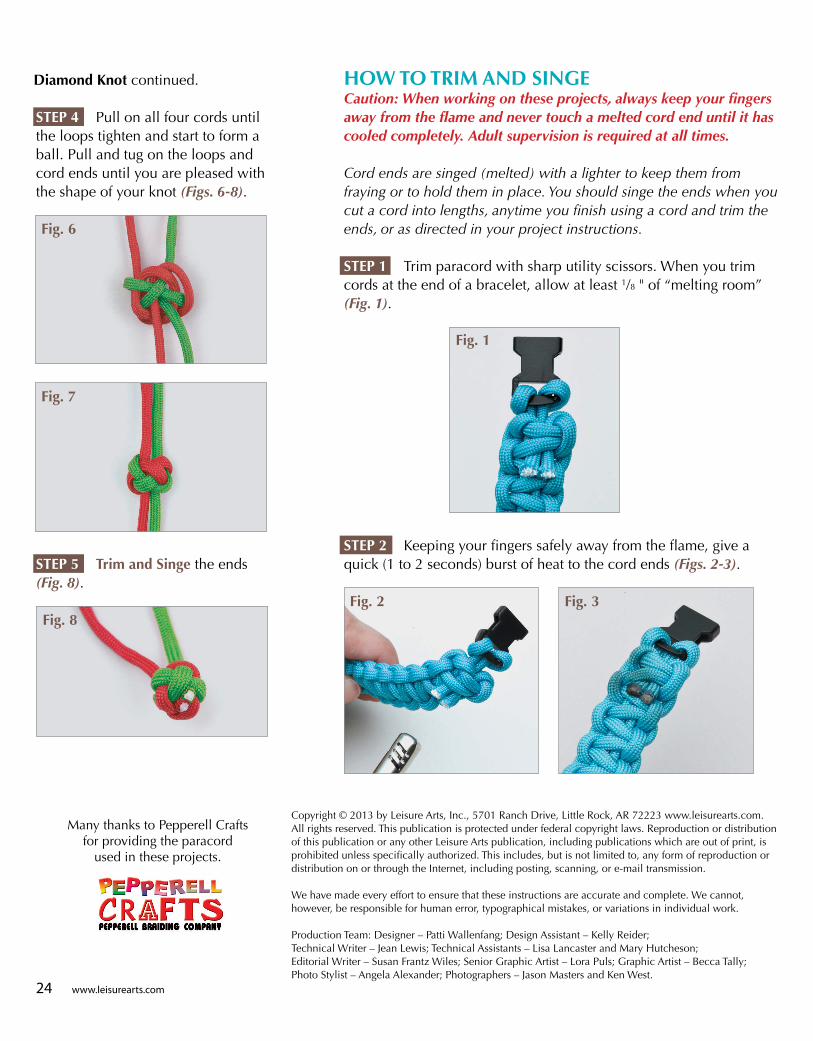
STEP 4 Pull on all four cords until the loops tighten and start to form a ball. Pull and tug on the loops and cord ends until you are pleased with the shape of your knot (Figs. 6-8).
STEP 5 Trim and Singe the ends (Fig. 8).
Cord ends are singed (melted) with a lighter to keep them from
fraying or to hold them in place. You should singe the ends when you
cut a cord into lengths, anytime you fi nish using a cord and trim the
ends, or as directed in your project instructions.
STEP 1 Trim paracord with sharp utility scissors. When you trim cords at the end of a bracelet, allow at least 1/8 " of “melting room” (Fig. 1).
STEP 2 Keeping your fi ngers safely away from the fl ame, give a quick (1 to 2 seconds) burst of heat to the cord ends (Figs. 2-3).
HOW TO TRIM AND SINGECaution: When working on these projects, always keep your fi ngers away from the fl ame and never touch a melted cord end until it has cooled completely. Adult supervision is required at all times.
24 www.leisurearts.com
Fig. 7
Fig. 8
Fig. 6
Fig. 2
Fig. 1
Fig. 3
Many thanks to Pepperell Crafts for providing the paracord
used in these projects.
Copyright © 2013 by Leisure Arts, Inc., 5701 Ranch Drive, Little Rock, AR 72223 www.leisurearts.com. All rights reserved. This publication is protected under federal copyright laws. Reproduction or distribution of this publication or any other Leisure Arts publication, including publications which are out of print, is prohibited unless specifi cally authorized. This includes, but is not limited to, any form of reproduction or distribution on or through the Internet, including posting, scanning, or e-mail transmission.
We have made every effort to ensure that these instructions are accurate and complete. We cannot, however, be responsible for human error, typographical mistakes, or variations in individual work.
Production Team: Designer – Patti Wallenfang; Design Assistant – Kelly Reider; Technical Writer – Jean Lewis; Technical Assistants – Lisa Lancaster and Mary Hutcheson; Editorial Writer – Susan Frantz Wiles; Senior Graphic Artist – Lora Puls; Graphic Artist – Becca Tally; Photo Stylist – Angela Alexander; Photographers – Jason Masters and Ken West.
Diamond Knot continued.
L6144_Body.indd 24 12/17/12 2:06 PM
Cra
ft
EAN
UPC
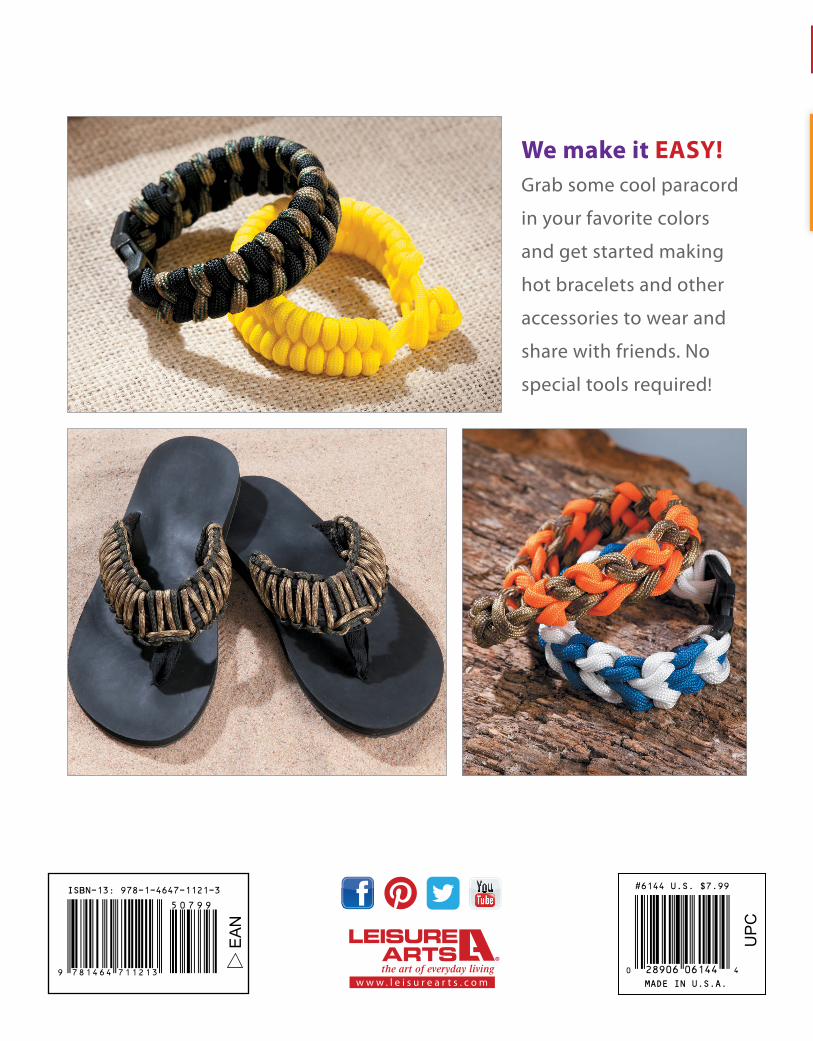
We make it EASY!
Grab some cool paracord
in your favorite colors
and get started making
hot bracelets and other
accessories to wear and
share with friends. No
special tools required!
L6144_OFBC.indd 1 12/17/12 2:05 PM