Embed Size (px)
Citation preview
_______________________________________________ CPS Level 1 Training Workbook
2
CPS Level 1 Training Workbook
Contact Information In addition to this training guide and the CPS software help menu, following are other resources available to support your implementation of CPS.
Sales Support: 800.530.0527
Technical Support: 888.333.4988
Customer Support Home Page: www.einstruction.com/support
Downloadable Files/Videos: www.einstruction.com/downloads
Online Training Information: www.einstruction.com/training/onlinetraining
Online Training Videos: www.einstruction.com/training/videos
Quick Course Guide: www.einstruction.com/downloads
User Community: www.eicommunity.com
User‟s Guide: www.einstruction.com/downloads
Software Versions This workbook is for the following software:
CPS for PC
2009 eInstruction Corporation
_______________________________________________ CPS Level 1 Training Workbook
3
Module 1: Setting Up CPS
Overview This session is designed for the beginner who has never used CPS. Participants will set up the CPS receiver and use CPS clickers. They will also create a CPS database with class and student information to use when engaging CPS lessons and activities.
Objectives
After completing this module, participants will be able to:
Create, name, and save a new CPS database
Navigate the CPS window
Detect the CPS receiver
Create a class roster by following steps in the class wizard
Enter student demographic information into a class roster manually
Edit class and student information
Import a .csv file with a class list
_______________________________________________ CPS Level 1 Training Workbook
4
Databases
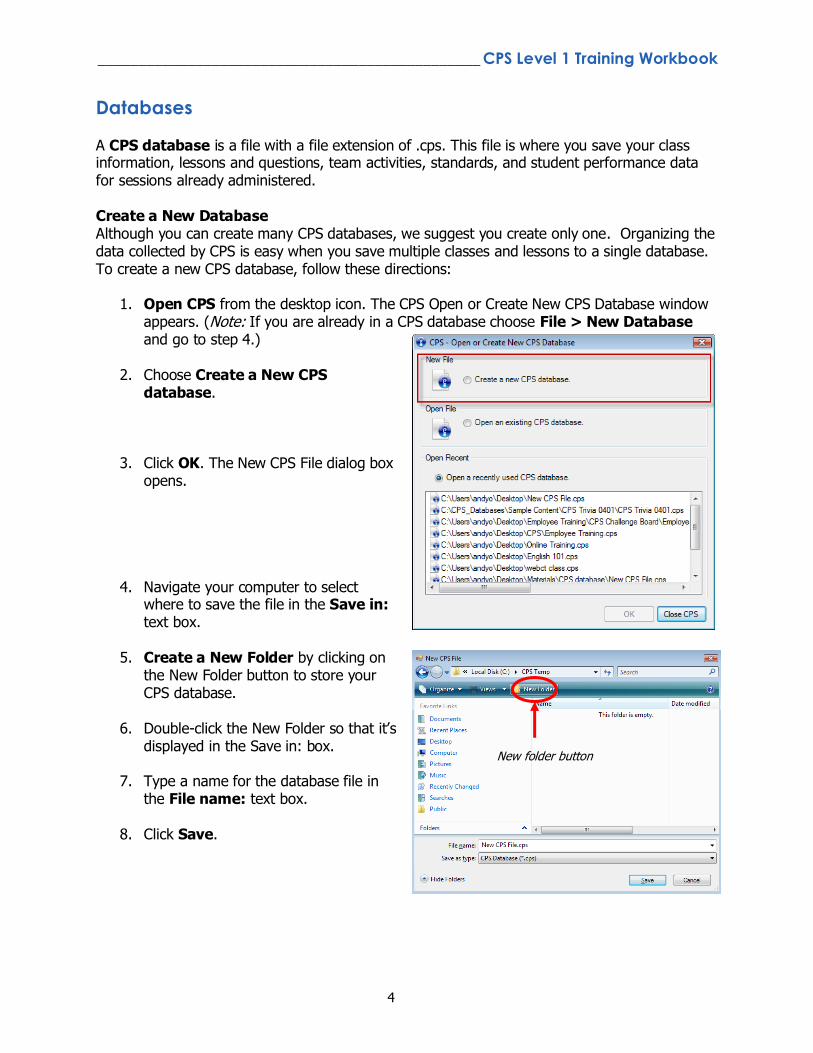
A CPS database is a file with a file extension of .cps. This file is where you save your class information, lessons and questions, team activities, standards, and student performance data for sessions already administered. Create a New Database Although you can create many CPS databases, we suggest you create only one. Organizing the data collected by CPS is easy when you save multiple classes and lessons to a single database. To create a new CPS database, follow these directions:
1. Open CPS from the desktop icon. The CPS Open or Create New CPS Database window appears. (Note: If you are already in a CPS database choose File > New Database and go to step 4.)
2. Choose Create a New CPS
database.
3. Click OK. The New CPS File dialog box opens.
4. Navigate your computer to select where to save the file in the Save in: text box.
5. Create a New Folder by clicking on
the New Folder button to store your CPS database.
6. Double-click the New Folder so that it‟s
displayed in the Save in: box.
7. Type a name for the database file in the File name: text box.
8. Click Save.
New folder button
_______________________________________________ CPS Level 1 Training Workbook
5
CPS Window Tour
Main Window
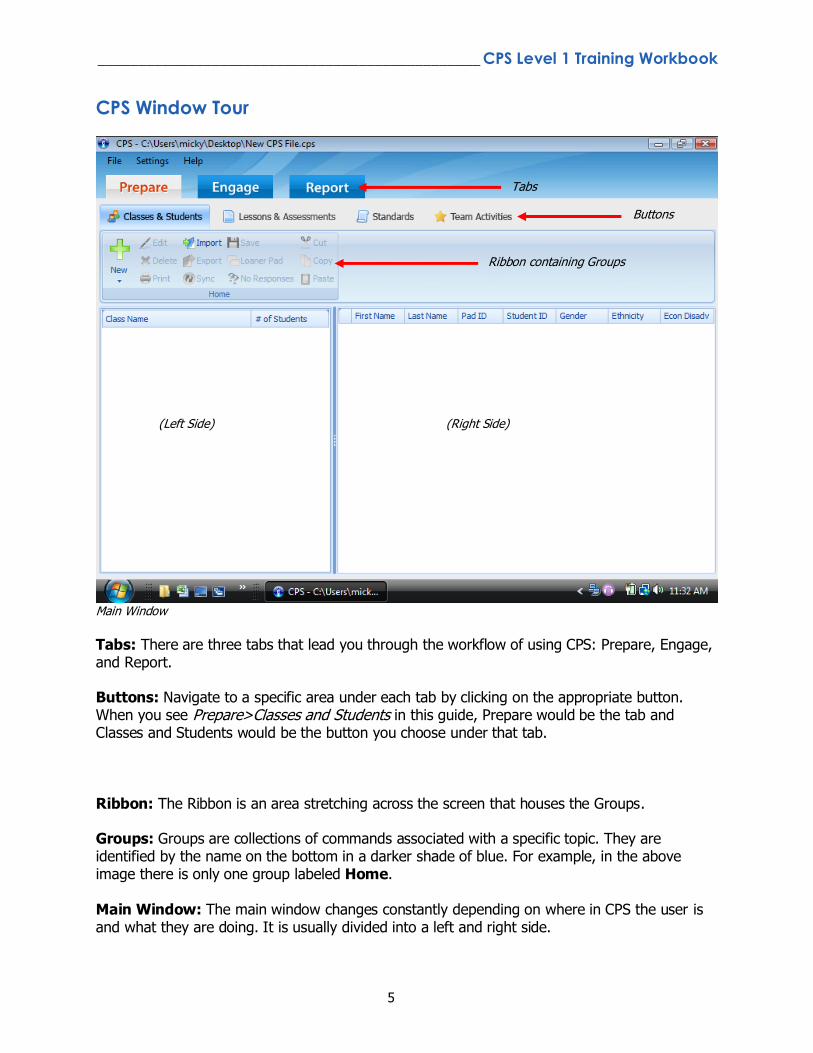
Tabs: There are three tabs that lead you through the workflow of using CPS: Prepare, Engage, and Report. Buttons: Navigate to a specific area under each tab by clicking on the appropriate button. When you see Prepare>Classes and Students in this guide, Prepare would be the tab and Classes and Students would be the button you choose under that tab. Ribbon: The Ribbon is an area stretching across the screen that houses the Groups. Groups: Groups are collections of commands associated with a specific topic. They are identified by the name on the bottom in a darker shade of blue. For example, in the above image there is only one group labeled Home. Main Window: The main window changes constantly depending on where in CPS the user is and what they are doing. It is usually divided into a left and right side.
Tabs
Buttons
Ribbon containing Groups
(Left Side) (Right Side)
_______________________________________________ CPS Level 1 Training Workbook
6
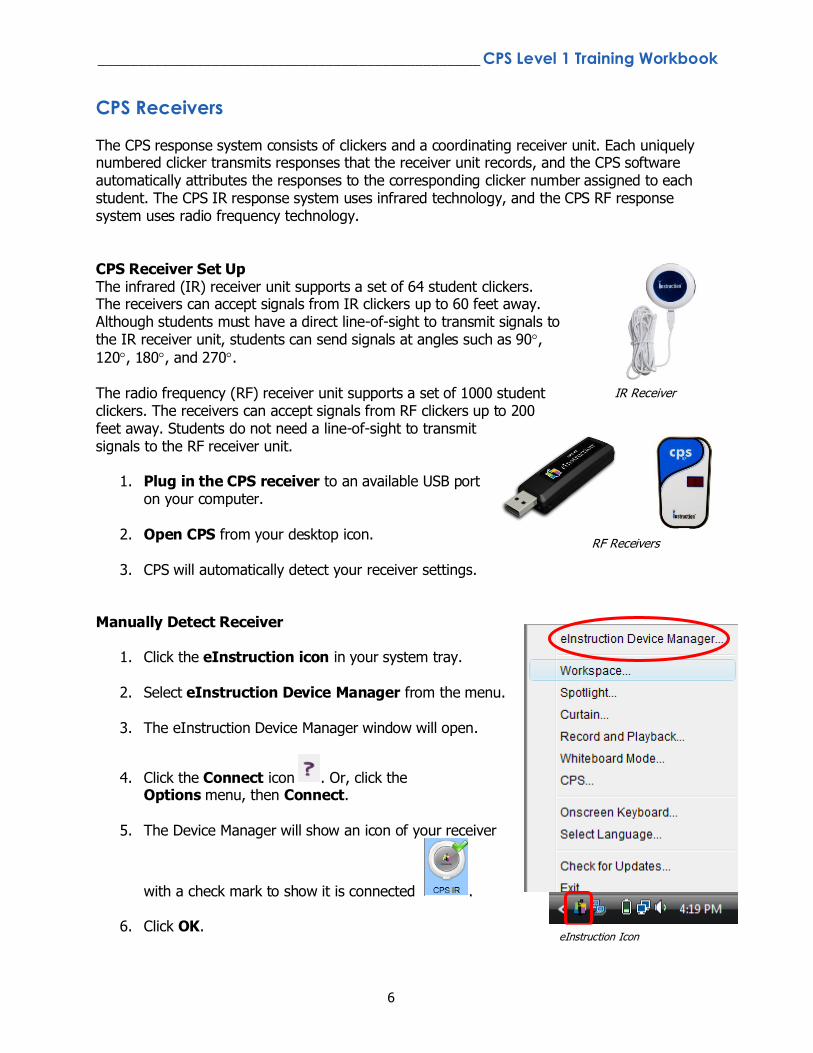
CPS Receivers
The CPS response system consists of clickers and a coordinating receiver unit. Each uniquely numbered clicker transmits responses that the receiver unit records, and the CPS software automatically attributes the responses to the corresponding clicker number assigned to each student. The CPS IR response system uses infrared technology, and the CPS RF response system uses radio frequency technology. CPS Receiver Set Up The infrared (IR) receiver unit supports a set of 64 student clickers. The receivers can accept signals from IR clickers up to 60 feet away. Although students must have a direct line-of-sight to transmit signals to the IR receiver unit, students can send signals at angles such as 90,
120, 180, and 270. The radio frequency (RF) receiver unit supports a set of 1000 student clickers. The receivers can accept signals from RF clickers up to 200 feet away. Students do not need a line-of-sight to transmit signals to the RF receiver unit.
1. Plug in the CPS receiver to an available USB port on your computer.
2. Open CPS from your desktop icon.
3. CPS will automatically detect your receiver settings.
Manually Detect Receiver
1. Click the eInstruction icon in your system tray.
2. Select eInstruction Device Manager from the menu.
3. The eInstruction Device Manager window will open.
4. Click the Connect icon . Or, click the Options menu, then Connect.
5. The Device Manager will show an icon of your receiver
with a check mark to show it is connected .
6. Click OK.
IR Receiver
RF Receivers
eInstruction Icon
_______________________________________________ CPS Level 1 Training Workbook
7
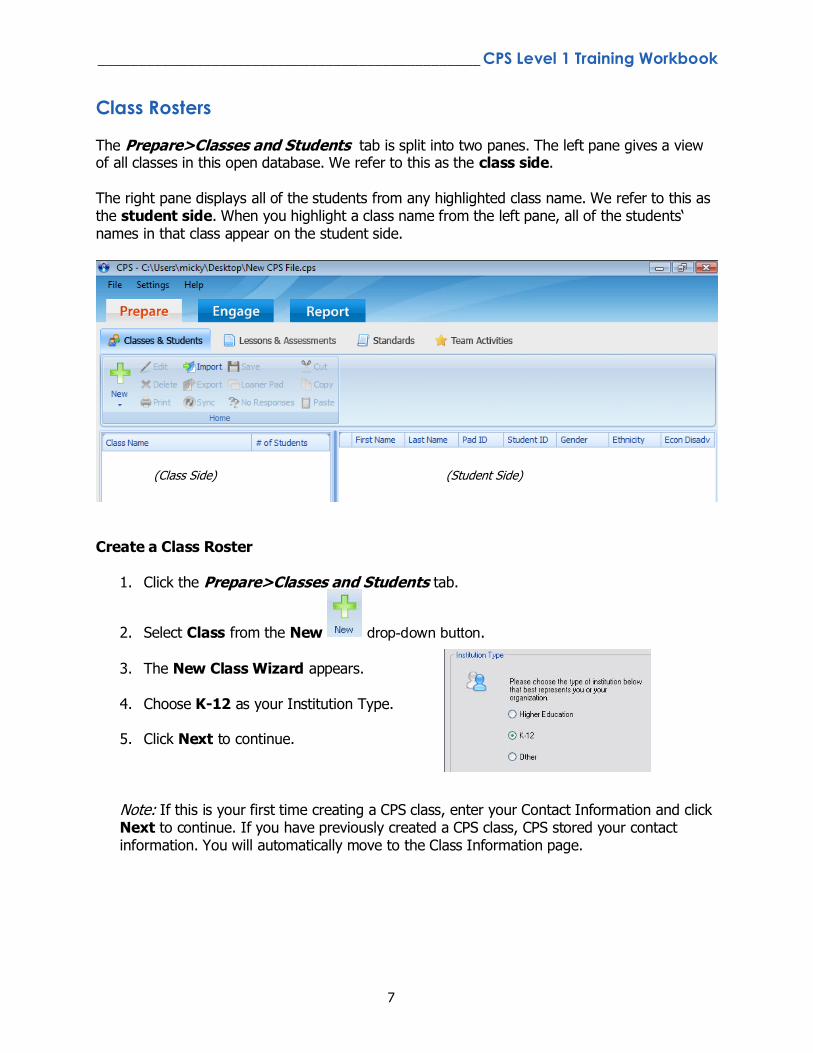
Class Rosters
The Prepare>Classes and Students tab is split into two panes. The left pane gives a view of all classes in this open database. We refer to this as the class side. The right pane displays all of the students from any highlighted class name. We refer to this as the student side. When you highlight a class name from the left pane, all of the students„ names in that class appear on the student side.
Create a Class Roster
1. Click the Prepare>Classes and Students tab.
2. Select Class from the New drop-down button.
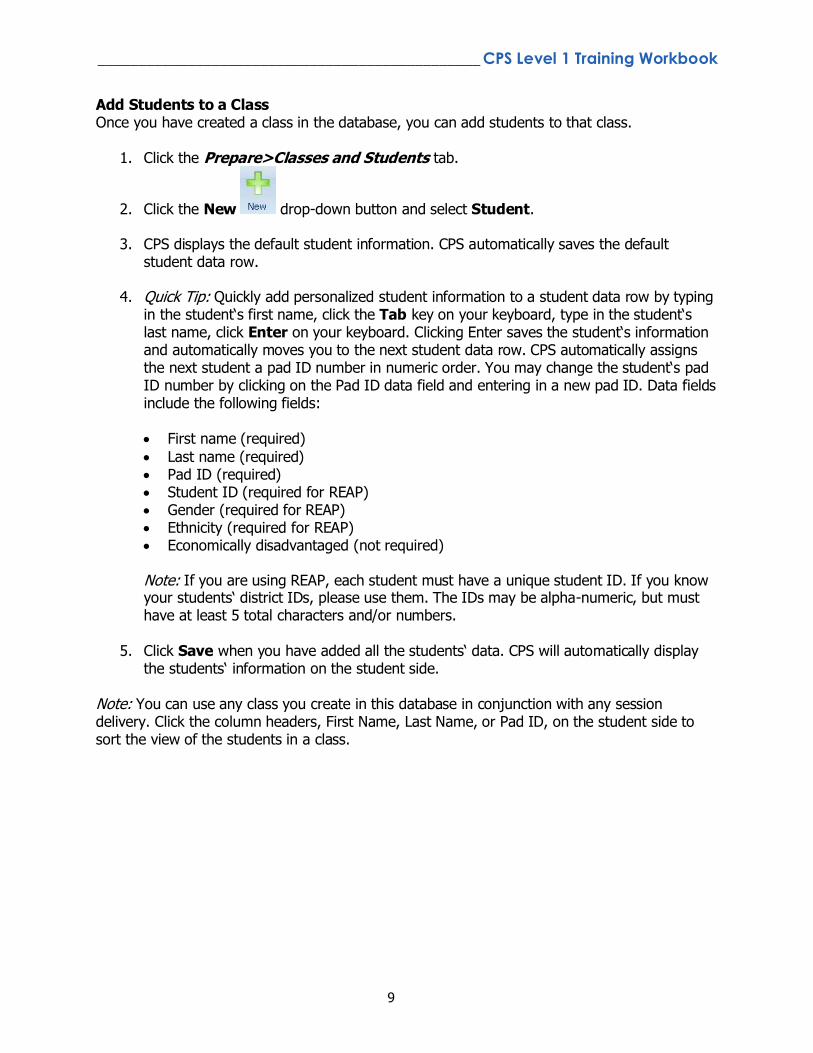
3. The New Class Wizard appears. 4. Choose K-12 as your Institution Type.
5. Click Next to continue.
Note: If this is your first time creating a CPS class, enter your Contact Information and click Next to continue. If you have previously created a CPS class, CPS stored your contact information. You will automatically move to the Class Information page.
(Class Side) (Student Side)

_______________________________________________ CPS Level 1 Training Workbook
8
6. Enter your Class Information:
Class Name: This is the only required information for a class. It will help you differentiate your classes, so choose a unique name.
Course Number: Course number assigned by your school.
Section: Section number for your class.
Period: Period in which you hold your class.
Semester: Semester during which you teach your class.
Campus: Building or campus where you teach your class.
Classroom Number: Room number for your class.
Make this a CPSOnline class (An instructor Setup Code is required): Leave the box in front of this option blank.
Attendance Options: This is the location where you store your attendance records in CPS. You can choose to view the attendance as a grade in the Assessments area of the Report tab or choose to view the attendance as Absent/Present in the Class Info area of the Report>Gradebook tab. Note: By saving attendance records in the Report tab, you can easily export that data. Saving the attendance records in Report>Gradebook allows you to use the internal gradebook within the CPS software.
7. Click Next to continue.
8. Click Next to create your class or click Back to review your information.
9. Click Done to close the New Class Wizard and return to the Prepare>Classes and
Students tab, or create another class by checking the box in front of the I want to make another class option.
Optional Fi
eld
s
_______________________________________________ CPS Level 1 Training Workbook
9
Add Students to a Class Once you have created a class in the database, you can add students to that class.
1. Click the Prepare>Classes and Students tab.
2. Click the New drop-down button and select Student. 3. CPS displays the default student information. CPS automatically saves the default
student data row.
4. Quick Tip: Quickly add personalized student information to a student data row by typing in the student„s first name, click the Tab key on your keyboard, type in the student„s last name, click Enter on your keyboard. Clicking Enter saves the student„s information and automatically moves you to the next student data row. CPS automatically assigns the next student a pad ID number in numeric order. You may change the student„s pad ID number by clicking on the Pad ID data field and entering in a new pad ID. Data fields include the following fields:
First name (required)
Last name (required) Pad ID (required) Student ID (required for REAP) Gender (required for REAP) Ethnicity (required for REAP) Economically disadvantaged (not required) Note: If you are using REAP, each student must have a unique student ID. If you know your students„ district IDs, please use them. The IDs may be alpha-numeric, but must have at least 5 total characters and/or numbers.
5. Click Save when you have added all the students„ data. CPS will automatically display
the students„ information on the student side. Note: You can use any class you create in this database in conjunction with any session delivery. Click the column headers, First Name, Last Name, or Pad ID, on the student side to sort the view of the students in a class.
_______________________________________________ CPS Level 1 Training Workbook
10
Edit Class Information
1. Click the Prepare>Classes and Students tab.
2. Select the class name that you want to edit.
3. Click Edit .
4. Click on the Class Information or Contact Information tab. 5. Edit any of the on-screen options.
6. Click Save to save any changes.
7. Click Done to exit and return to the Prepare>Classes and Students tab.
Edit Student Information
1. Click the Prepare>Classes and Students tab.
2. Select a class from the class side to display the students in this class on the student side.
3. On the student side, click on the student data field that contains the student
information you want to edit. A cursor appears in the selected data field.
4. Edit student information in the data field that contains the cursor.
5. Click Save .
6. Repeat the above steps to edit additional student information.
_______________________________________________ CPS Level 1 Training Workbook
11
Import a .csv File
You can import classes from spreadsheets or other applications as a *.csv (comma delimited or comma separated values) file.
1. Prepare the .csv file from the original software application. Make sure the following
naming conventions are used for each heading. (Note: CPS headings are in all capital letters with no spaces.)
Data Field Required Heading in CPS
First Name FIRST
Last Name LAST
Pad ID # PADID
Student ID # STUDENTID
Ethnicity ETHNICCODE
Gender GENDER
Economically Disadvantaged ECONDISADVANTAGED
2. Click the Prepare>Classes and Students tab.
3. Click Import . The CPS Import Class Wizard appears.
4. Choose Comma Separated Values (*.csv) from the list
5. Click Next.
6. Click Browse. An Open dialog box appears.
7. Navigate your computer to select the .csv file you want to import.
8. Click Open.
9. Select an Instructor from the Select Instructor window.
10. Click OK.
11. Select the class name by clicking the check box before the class name from the list that appears. To select all available classes, click the box next to the Select All option.
12. Click Next. CPS imports your class roster and will display the class information on the
Student side of the screen.
13. Click Done.

_______________________________________________ CPS Level 1 Training Workbook
11
Module 2:
Instant Classroom Interactivity
Overview This session is designed for the beginner who has only used CPS to set up a database and classes. Participants will learn how to use the Verbal and Chalkboard mode to bring interactivity to their lessons. The FastGrade feature will be used to deliver paper-based assessments with a CPS answer key and engage the content in Student Paced and Teacher Led modes.
Objectives
After completing this module, participants will be able to:
Engage a verbal or chalkboard question on the fly with a class
Change verbal mode delivery options for different instructional uses
Create a FastGrade lesson to grade printed homework, assignments, and assessments
quickly with a CPS generated answer key
Engage a FastGrade lesson in Student Paced and Teacher Led modes
Generate, print, and export reports to analyze student performance data
_______________________________________________ CPS Level 1 Training Workbook
12
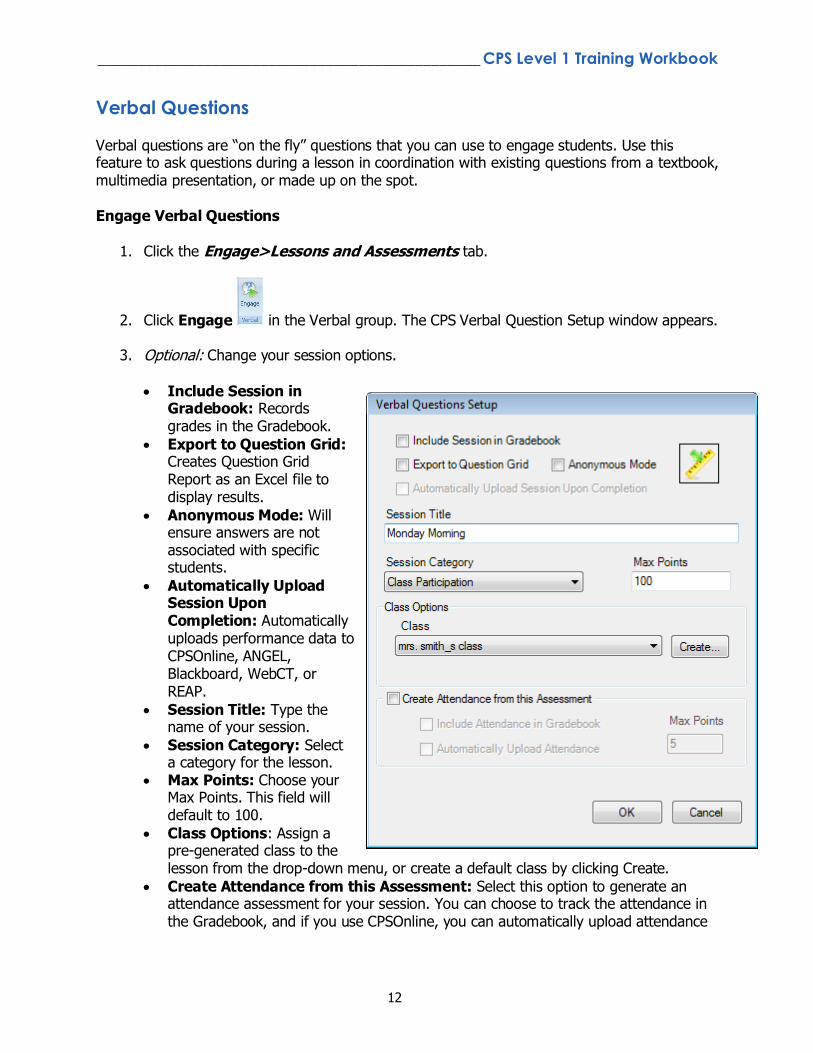
Verbal Questions Verbal questions are “on the fly” questions that you can use to engage students. Use this feature to ask questions during a lesson in coordination with existing questions from a textbook, multimedia presentation, or made up on the spot. Engage Verbal Questions
1. Click the Engage>Lessons and Assessments tab.
2. Click Engage in the Verbal group. The CPS Verbal Question Setup window appears.
3. Optional: Change your session options.
Include Session in Gradebook: Records grades in the Gradebook.
Export to Question Grid: Creates Question Grid Report as an Excel file to display results.
Anonymous Mode: Will ensure answers are not associated with specific students.
Automatically Upload Session Upon Completion: Automatically uploads performance data to CPSOnline, ANGEL, Blackboard, WebCT, or REAP.
Session Title: Type the name of your session.
Session Category: Select a category for the lesson.
Max Points: Choose your Max Points. This field will default to 100.
Class Options: Assign a pre-generated class to the lesson from the drop-down menu, or create a default class by clicking Create.
Create Attendance from this Assessment: Select this option to generate an attendance assessment for your session. You can choose to track the attendance in the Gradebook, and if you use CPSOnline, you can automatically upload attendance
_______________________________________________ CPS Level 1 Training Workbook
13
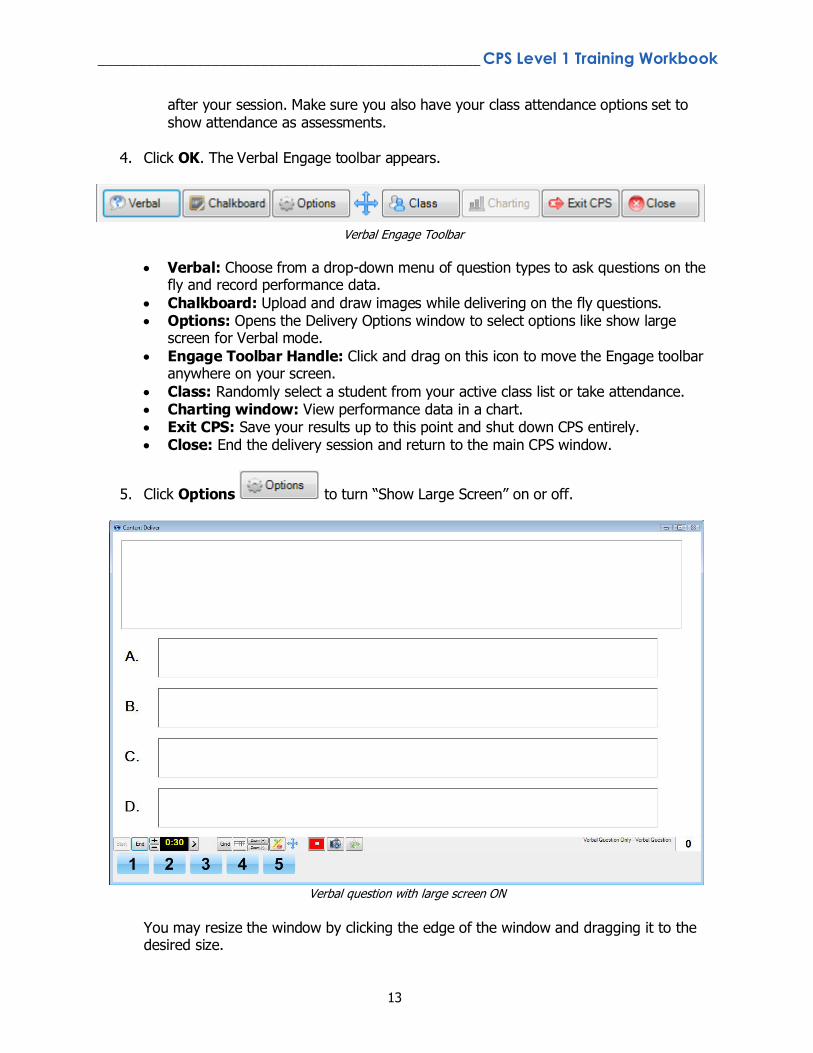
Verbal Engage Toolbar
after your session. Make sure you also have your class attendance options set to show attendance as assessments.
4. Click OK. The Verbal Engage toolbar appears.
Verbal: Choose from a drop-down menu of question types to ask questions on the fly and record performance data.
Chalkboard: Upload and draw images while delivering on the fly questions. Options: Opens the Delivery Options window to select options like show large
screen for Verbal mode.
Engage Toolbar Handle: Click and drag on this icon to move the Engage toolbar anywhere on your screen.
Class: Randomly select a student from your active class list or take attendance. Charting window: View performance data in a chart. Exit CPS: Save your results up to this point and shut down CPS entirely. Close: End the delivery session and return to the main CPS window.
5. Click Options to turn “Show Large Screen” on or off.
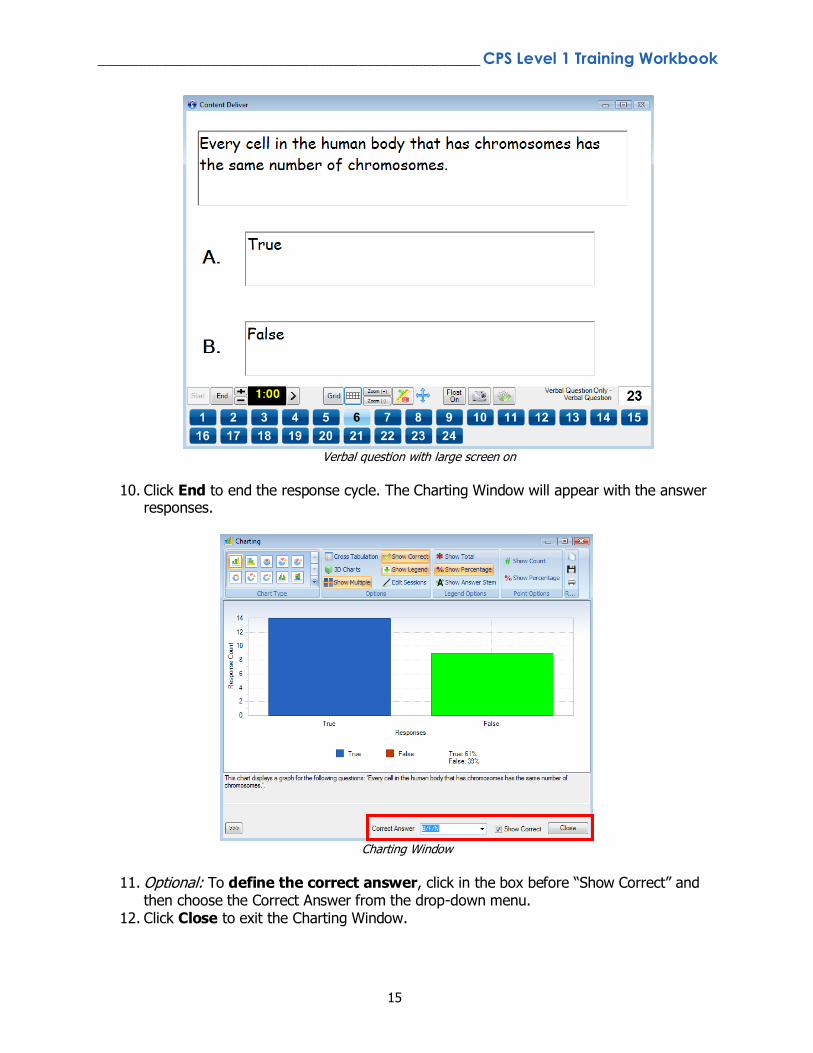
Verbal question with large screen ON
You may resize the window by clicking the edge of the window and dragging it to the desired size.
_______________________________________________ CPS Level 1 Training Workbook
14
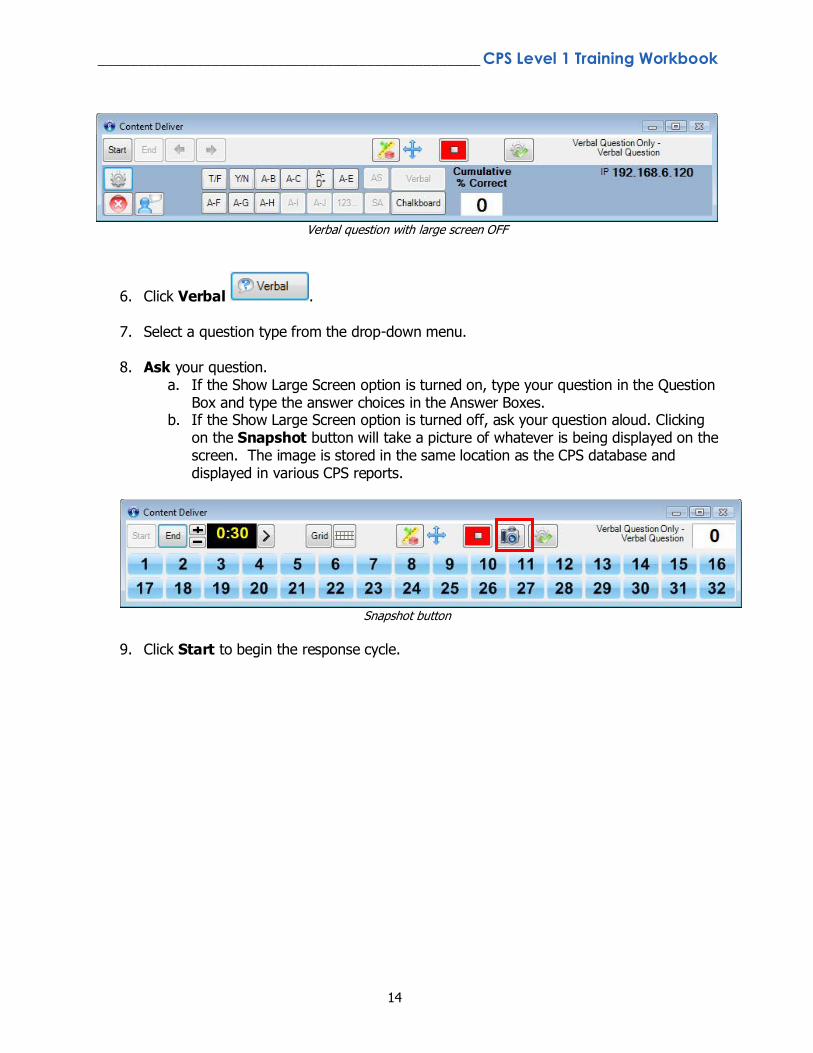
Verbal question with large screen OFF
6. Click Verbal .
7. Select a question type from the drop-down menu.
8. Ask your question. a. If the Show Large Screen option is turned on, type your question in the Question
Box and type the answer choices in the Answer Boxes. b. If the Show Large Screen option is turned off, ask your question aloud. Clicking
on the Snapshot button will take a picture of whatever is being displayed on the screen. The image is stored in the same location as the CPS database and displayed in various CPS reports.
Snapshot button
9. Click Start to begin the response cycle.
_______________________________________________ CPS Level 1 Training Workbook
15
Verbal question with large screen on
10. Click End to end the response cycle. The Charting Window will appear with the answer
responses.
Charting Window
11. Optional: To define the correct answer, click in the box before “Show Correct” and
then choose the Correct Answer from the drop-down menu. 12. Click Close to exit the Charting Window.
_______________________________________________ CPS Level 1 Training Workbook
16
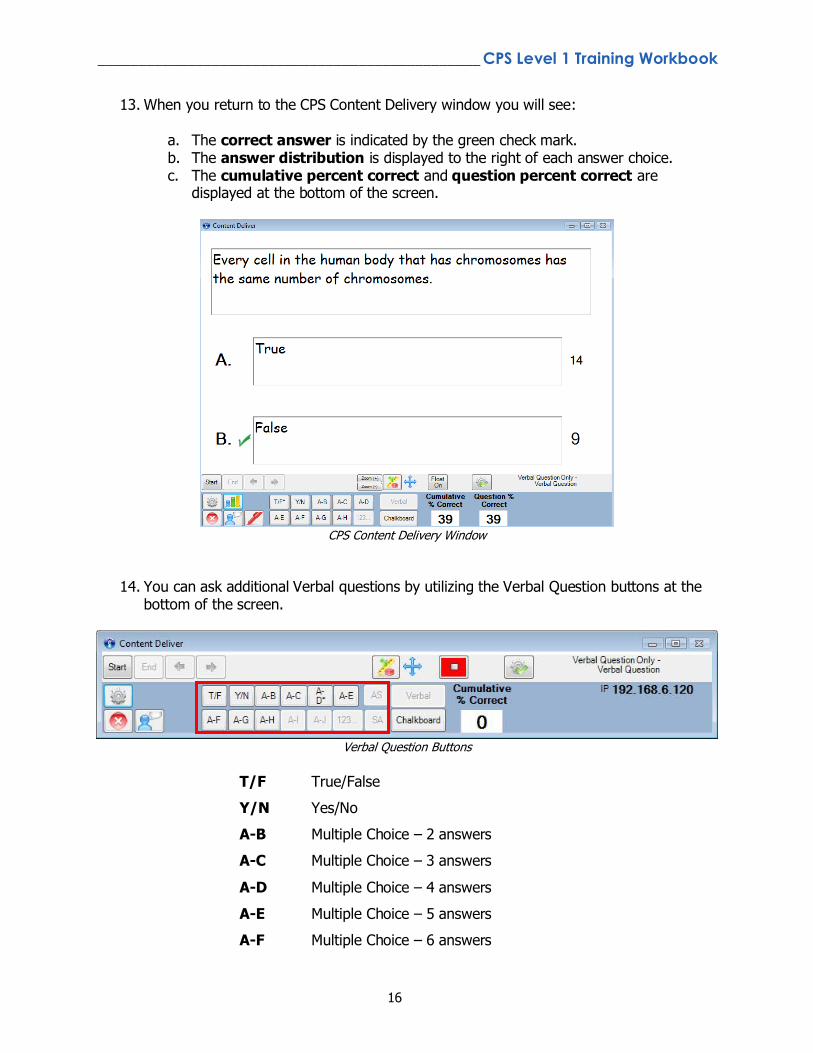
13. When you return to the CPS Content Delivery window you will see:
a. The correct answer is indicated by the green check mark. b. The answer distribution is displayed to the right of each answer choice. c. The cumulative percent correct and question percent correct are
displayed at the bottom of the screen.
CPS Content Delivery Window
14. You can ask additional Verbal questions by utilizing the Verbal Question buttons at the
bottom of the screen.
Verbal Question Buttons
T/F True/False
Y/N Yes/No
A-B Multiple Choice – 2 answers
A-C Multiple Choice – 3 answers
A-D Multiple Choice – 4 answers
A-E Multiple Choice – 5 answers
A-F Multiple Choice – 6 answers

_______________________________________________ CPS Level 1 Training Workbook
17
A-G Multiple Choice – 7 answers
A-H Multiple Choice – 8 answers
A-J Multiple Choice – 10 answers
AS Answer Sequence
123… Numeric (only available with RF pads)
SA Short Answer (up to 20 characters)
_______________________________________________ CPS Level 1 Training Workbook
18
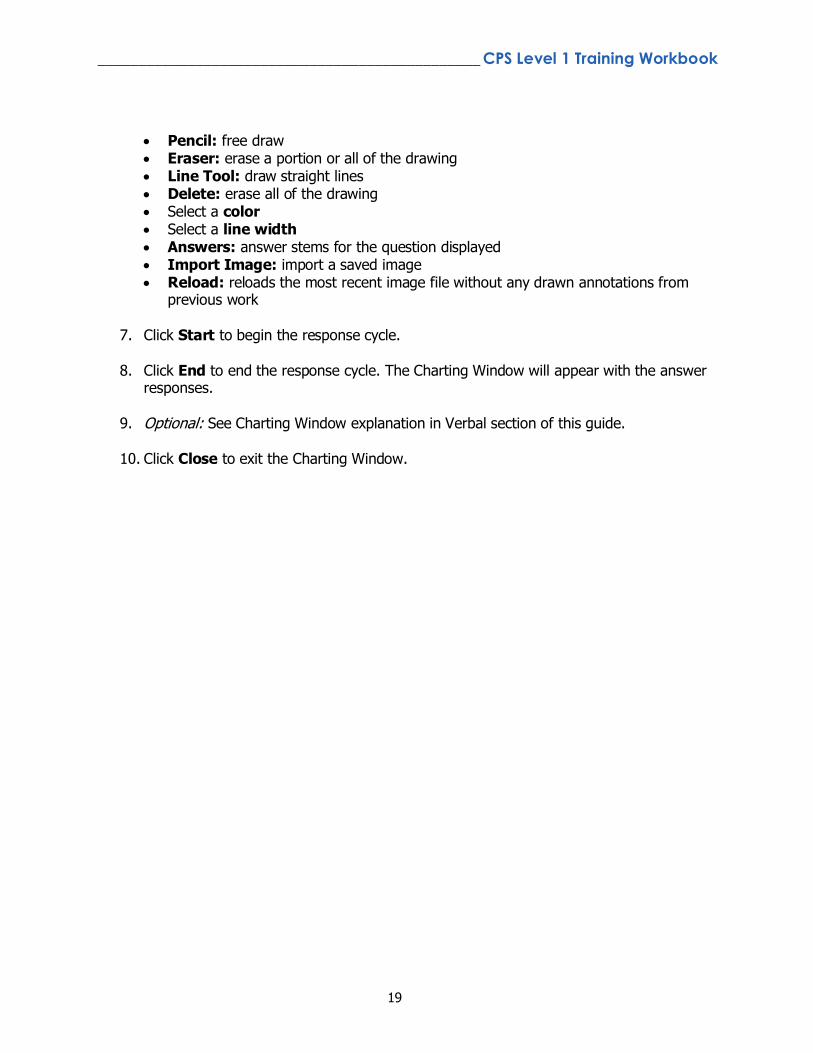
Chalkboard Questions
The chalkboard format gives you the opportunity to draw or load images into the area provided while verbally asking questions for students to answer. Use the CPS Chalkboard to engage these questions from anywhere in the room. Engage Chalkboard Questions
1. Click the Engage>Lessons and Assessments tab.
2. Click Engage in the Verbal group. The CPS Verbal Question Setup window appears.
3. Optional: Change your session options.
4. Click OK. The Verbal Engage toolbar appears.
5. Click Chalkboard .
6. Use the Chalkboard toolbar to create your question and answer stems.
_______________________________________________ CPS Level 1 Training Workbook
19
Pencil: free draw Eraser: erase a portion or all of the drawing Line Tool: draw straight lines Delete: erase all of the drawing Select a color Select a line width Answers: answer stems for the question displayed Import Image: import a saved image Reload: reloads the most recent image file without any drawn annotations from
previous work
7. Click Start to begin the response cycle. 8. Click End to end the response cycle. The Charting Window will appear with the answer
responses.
9. Optional: See Charting Window explanation in Verbal section of this guide.
10. Click Close to exit the Charting Window.
_______________________________________________ CPS Level 1 Training Workbook
20
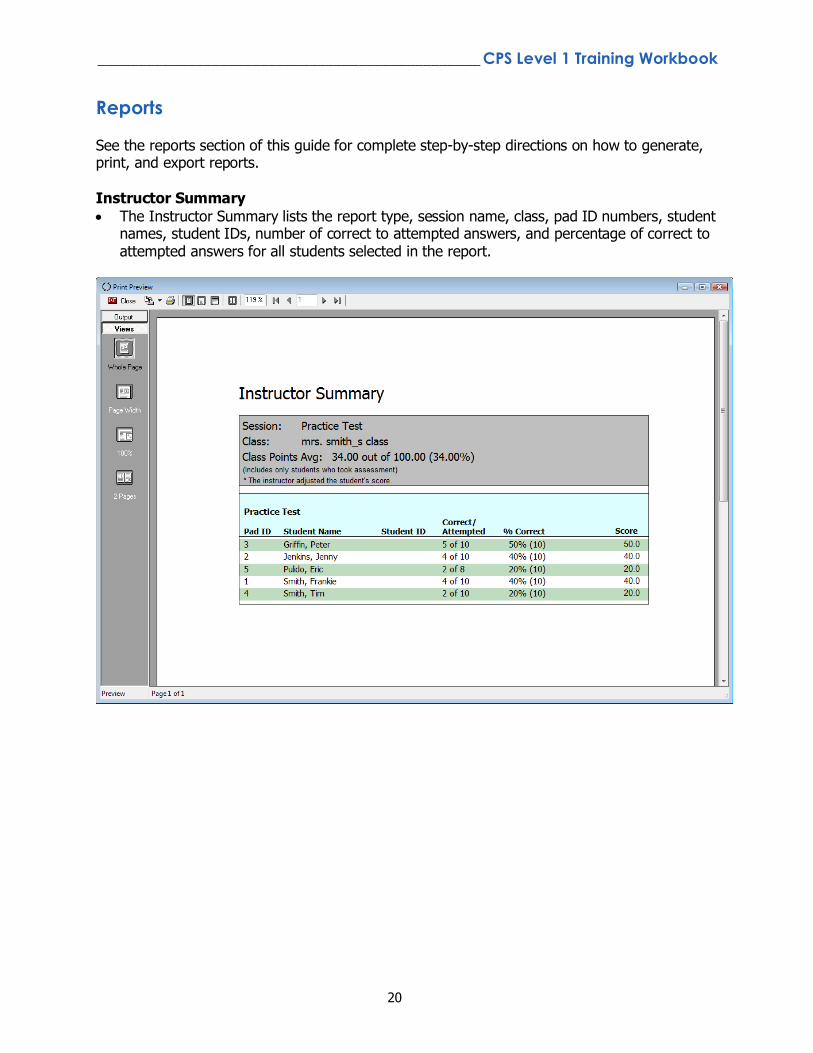
Reports See the reports section of this guide for complete step-by-step directions on how to generate, print, and export reports. Instructor Summary
The Instructor Summary lists the report type, session name, class, pad ID numbers, student names, student IDs, number of correct to attempted answers, and percentage of correct to attempted answers for all students selected in the report.
_______________________________________________ CPS Level 1 Training Workbook
21
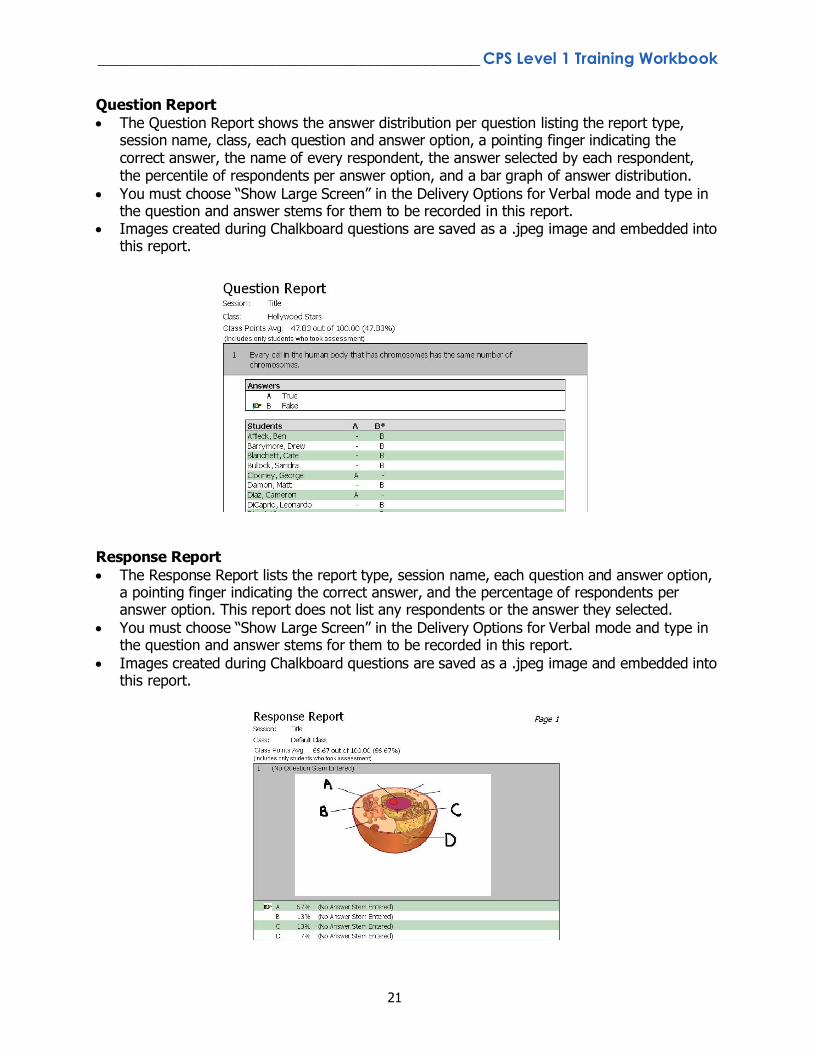
Question Report
The Question Report shows the answer distribution per question listing the report type, session name, class, each question and answer option, a pointing finger indicating the correct answer, the name of every respondent, the answer selected by each respondent, the percentile of respondents per answer option, and a bar graph of answer distribution.
You must choose “Show Large Screen” in the Delivery Options for Verbal mode and type in the question and answer stems for them to be recorded in this report.
Images created during Chalkboard questions are saved as a .jpeg image and embedded into this report.
Response Report
The Response Report lists the report type, session name, each question and answer option, a pointing finger indicating the correct answer, and the percentage of respondents per answer option. This report does not list any respondents or the answer they selected.
You must choose “Show Large Screen” in the Delivery Options for Verbal mode and type in the question and answer stems for them to be recorded in this report.
Images created during Chalkboard questions are saved as a .jpeg image and embedded into this report.
_______________________________________________ CPS Level 1 Training Workbook
22
FastGrade
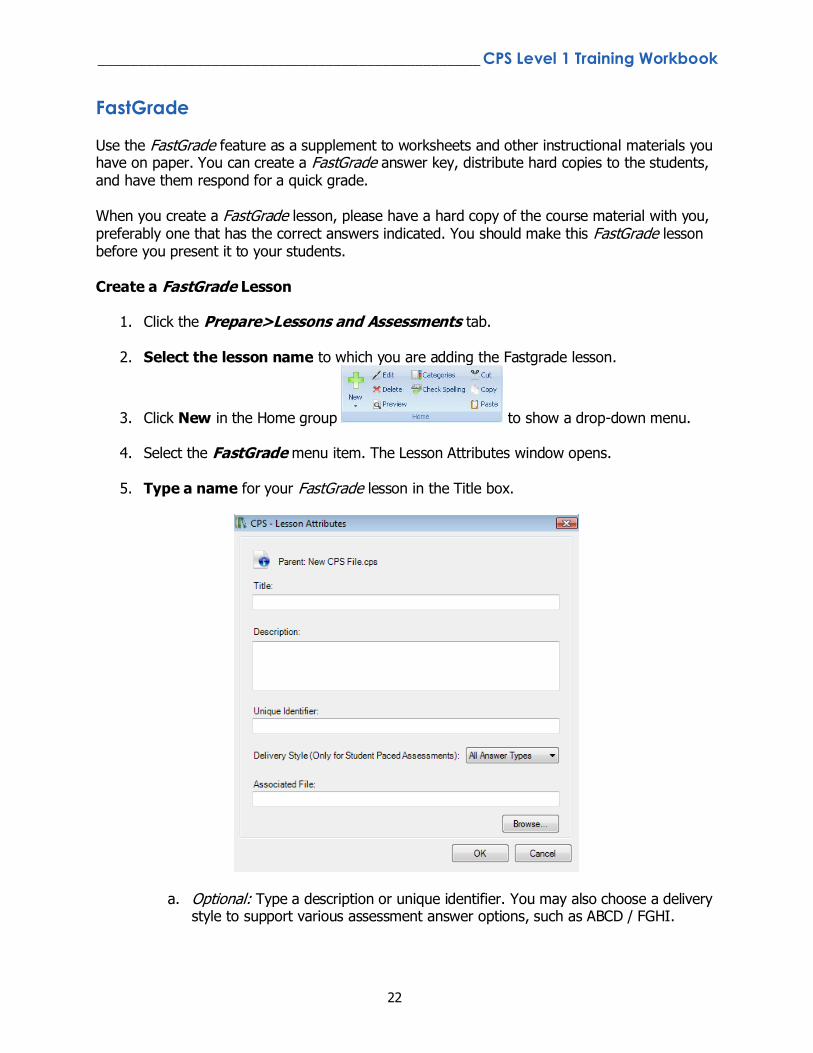
Use the FastGrade feature as a supplement to worksheets and other instructional materials you have on paper. You can create a FastGrade answer key, distribute hard copies to the students, and have them respond for a quick grade. When you create a FastGrade lesson, please have a hard copy of the course material with you, preferably one that has the correct answers indicated. You should make this FastGrade lesson before you present it to your students. Create a FastGrade Lesson
1. Click the Prepare>Lessons and Assessments tab.
2. Select the lesson name to which you are adding the Fastgrade lesson.
3. Click New in the Home group to show a drop-down menu.
4. Select the FastGrade menu item. The Lesson Attributes window opens.
5. Type a name for your FastGrade lesson in the Title box.
a. Optional: Type a description or unique identifier. You may also choose a delivery style to support various assessment answer options, such as ABCD / FGHI.
_______________________________________________ CPS Level 1 Training Workbook
23
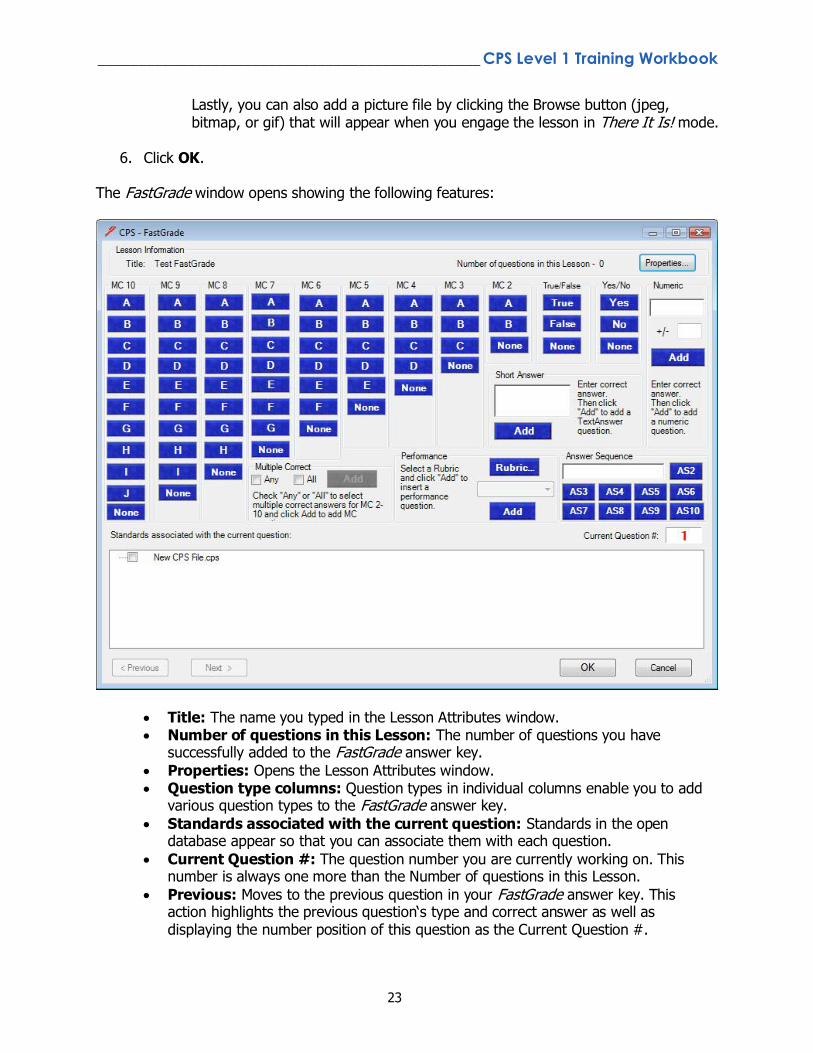
Lastly, you can also add a picture file by clicking the Browse button (jpeg, bitmap, or gif) that will appear when you engage the lesson in There It Is! mode.
6. Click OK.
The FastGrade window opens showing the following features:
Title: The name you typed in the Lesson Attributes window. Number of questions in this Lesson: The number of questions you have
successfully added to the FastGrade answer key.
Properties: Opens the Lesson Attributes window. Question type columns: Question types in individual columns enable you to add
various question types to the FastGrade answer key.
Standards associated with the current question: Standards in the open database appear so that you can associate them with each question.
Current Question #: The question number you are currently working on. This number is always one more than the Number of questions in this Lesson.
Previous: Moves to the previous question in your FastGrade answer key. This action highlights the previous question„s type and correct answer as well as displaying the number position of this question as the Current Question #.
_______________________________________________ CPS Level 1 Training Workbook
24
Next: Moves to the next question in your FastGrade answer key. This action highlights the next question„s type and correct answer as well as displaying the number position of this question as the Current Question #.
Rubric...: Allows you to associate a rubric with an essay or short answer question. Numeric Add: Allows you to add a numeric question. Answer Sequence: Allows you to ask a questions where responses need to be in a
particular order, like a matching exercise.
Short Answer: Allows you to ask questions where a response is a short text response up to 20 characters.
Click the blue answer button that corresponds with the question type and correct answer for each question.
7. Repeat step 8 until you„ve entered every question into the CPS FastGrade window.
8. Click OK. The Prepare>Lessons and Assessments tab appears with the FastGrade lesson
name in the lesson side of the window.
_______________________________________________ CPS Level 1 Training Workbook
25
Student Paced Mode
The Student Paced mode lets you deliver developed lessons, FastGrade lessons, ExamView questions and more in an activity where each student enters their responses at their own pace. The student may change and verify their answers as many times as they wish. The last answer entered is what is scored. Here‟s how it works:
Provide students with a printed copy of the lesson or assessment you want them to take.
Students can either answer the questions on paper and then input the results with their CPS clickers or answer the questions as they go.
Note: In this mode you need a projector for the CPS IR but do not need a projector for CPS RF. Engage Student Paced Mode
1. Click the Engage>Lessons and Assessments tab.
2. Select the lesson you want to engage by clicking in the check box before the lesson name.
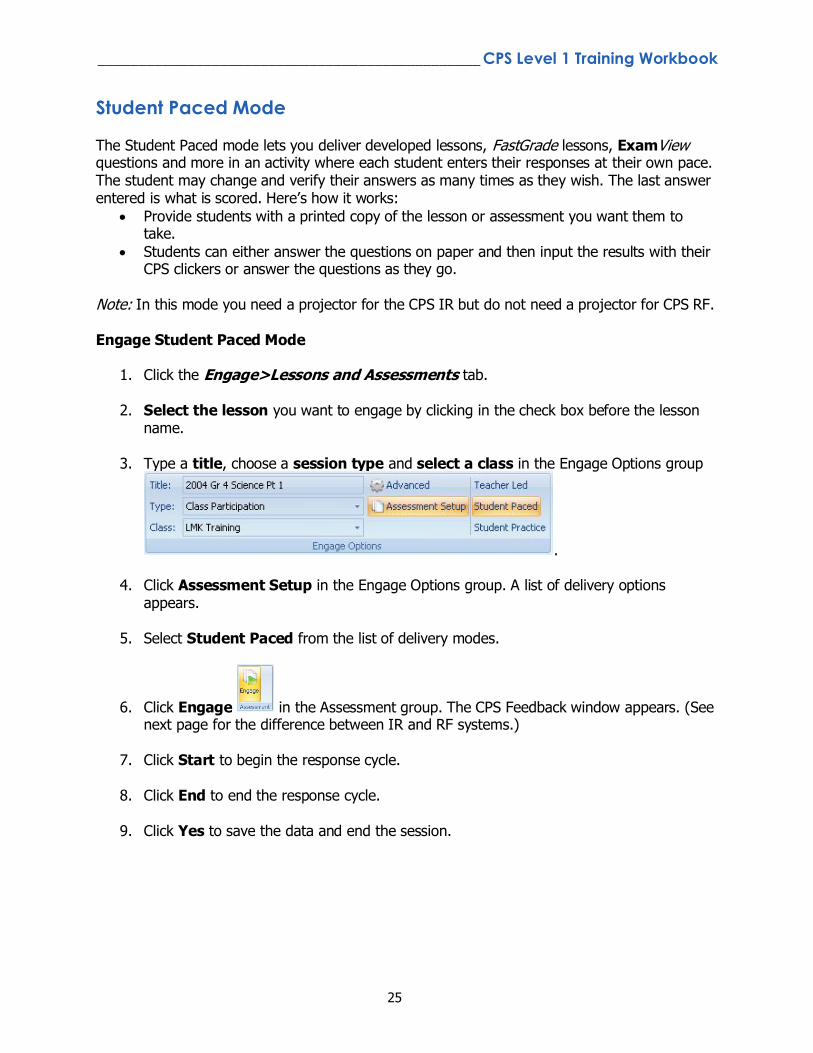
3. Type a title, choose a session type and select a class in the Engage Options group
.
4. Click Assessment Setup in the Engage Options group. A list of delivery options appears.
5. Select Student Paced from the list of delivery modes.
6. Click Engage in the Assessment group. The CPS Feedback window appears. (See next page for the difference between IR and RF systems.)
7. Click Start to begin the response cycle.
8. Click End to end the response cycle.
9. Click Yes to save the data and end the session.
_______________________________________________ CPS Level 1 Training Workbook
26
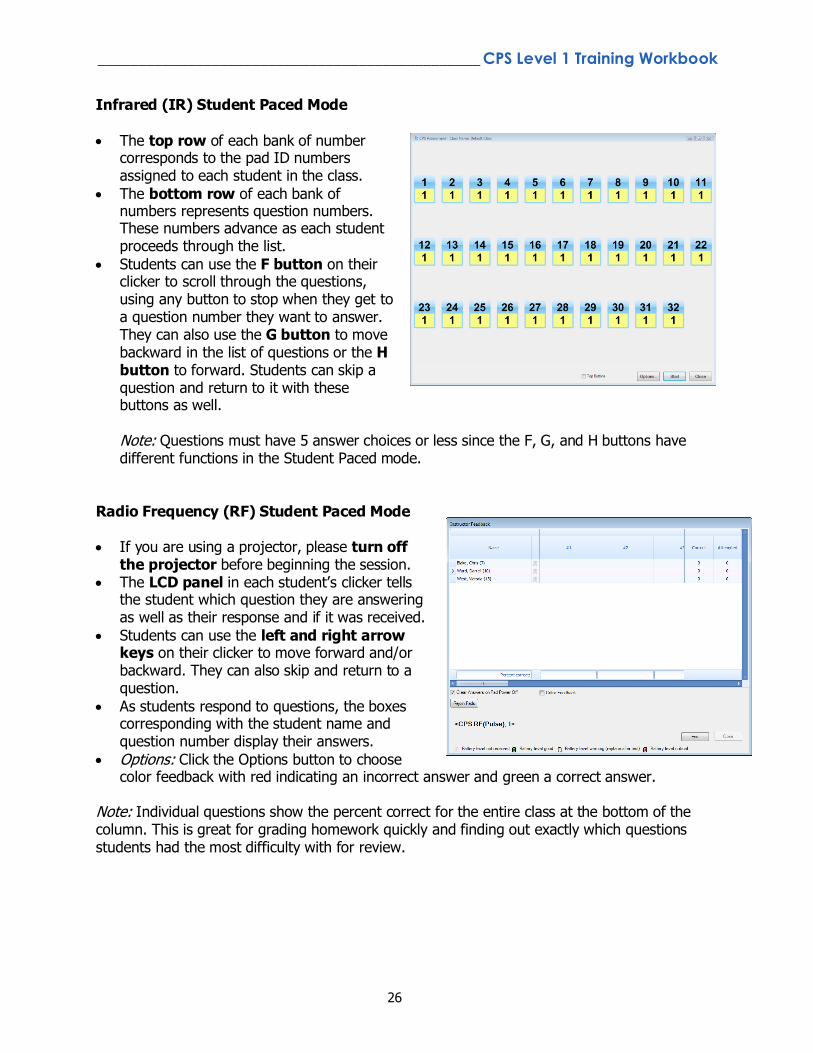
Infrared (IR) Student Paced Mode
The top row of each bank of number corresponds to the pad ID numbers assigned to each student in the class.
The bottom row of each bank of numbers represents question numbers. These numbers advance as each student proceeds through the list.
Students can use the F button on their clicker to scroll through the questions, using any button to stop when they get to a question number they want to answer. They can also use the G button to move backward in the list of questions or the H button to forward. Students can skip a question and return to it with these buttons as well.
Note: Questions must have 5 answer choices or less since the F, G, and H buttons have different functions in the Student Paced mode.
Radio Frequency (RF) Student Paced Mode If you are using a projector, please turn off
the projector before beginning the session. The LCD panel in each student‟s clicker tells
the student which question they are answering as well as their response and if it was received.
Students can use the left and right arrow keys on their clicker to move forward and/or backward. They can also skip and return to a question.
As students respond to questions, the boxes corresponding with the student name and question number display their answers.
Options: Click the Options button to choose color feedback with red indicating an incorrect answer and green a correct answer.
Note: Individual questions show the percent correct for the entire class at the bottom of the column. This is great for grading homework quickly and finding out exactly which questions students had the most difficulty with for review.

_______________________________________________ CPS Level 1 Training Workbook
27
Teacher Led Mode
The Teacher Led mode combines the Student Paced and Standard mode (covered in later modules) for a teacher-led session conducted at the students' pace. In this mode the teacher advances each question one question at a time, but the question is not displayed on the screen. Students use a paper copy of the questions to answer. Engage Teacher Led Mode
1. Click the Engage>Lessons and Assessments tab.
2. Select the lesson you want to engage by clicking in the check box before the lesson name.
3. Type a title, choose a session type and select a class in the Engage Options group
.
4. Click Assessment Setup in the Engage Options group. A list of delivery options appears.
5. Select Teacher Led from the
list of delivery modes.
6. Click Engage in the Assessment group. The Feedback Grid window appears.
7. Click Start to begin the
response cycle.
8. Use the Arrow buttons to advance to the next question, repeating until all questions have been answered.
9. Click End to end the response cycle.
10. Click Yes to save the data and end the session.
Feedback Grid
_______________________________________________ CPS Level 1 Training Workbook
28
Reports
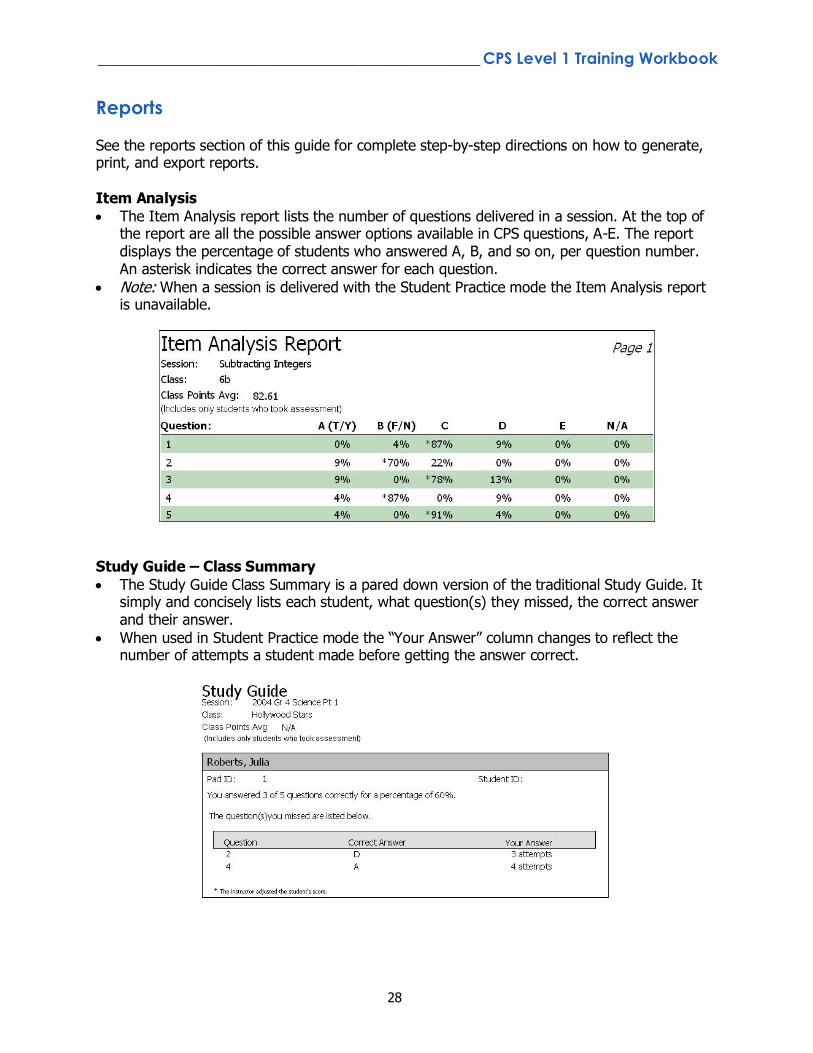
See the reports section of this guide for complete step-by-step directions on how to generate, print, and export reports. Item Analysis
The Item Analysis report lists the number of questions delivered in a session. At the top of the report are all the possible answer options available in CPS questions, A-E. The report displays the percentage of students who answered A, B, and so on, per question number. An asterisk indicates the correct answer for each question.
Note: When a session is delivered with the Student Practice mode the Item Analysis report is unavailable.
Study Guide – Class Summary
The Study Guide Class Summary is a pared down version of the traditional Study Guide. It simply and concisely lists each student, what question(s) they missed, the correct answer and their answer.
When used in Student Practice mode the “Your Answer” column changes to reflect the number of attempts a student made before getting the answer correct.
_______________________________________________ CPS Level 1 Training Workbook
29
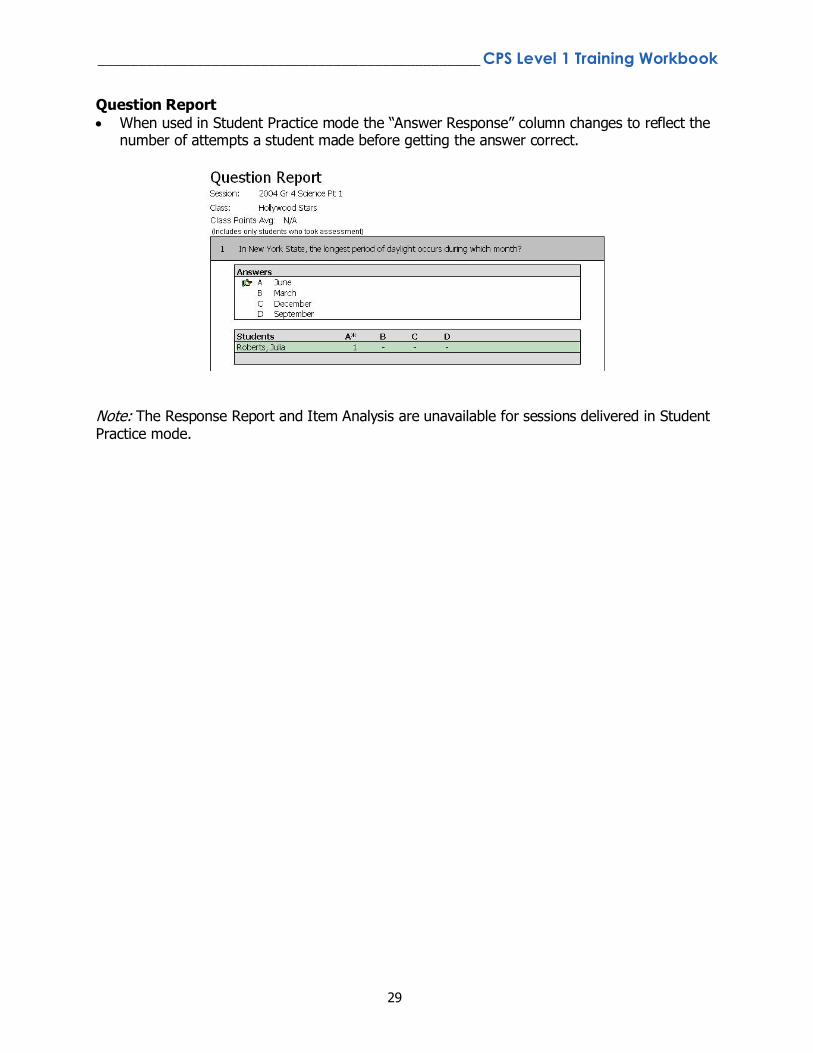
Question Report
When used in Student Practice mode the “Answer Response” column changes to reflect the number of attempts a student made before getting the answer correct.
Note: The Response Report and Item Analysis are unavailable for sessions delivered in Student Practice mode.
_______________________________________________ CPS Level 1 Training Workbook
30
Module 3:
Creating Content in CPS
Overview This session is designed for the beginner who has only used CPS to set up a database and classes. Participants will create lessons and use the question-authoring templates to create their own content within CPS and deliver lessons in a Teacher Paced mode.
Objectives
After completing this module, participants will be able to:
Create folders and parent and child lessons
Change the default font
Create questions using question-authoring templates
Add graphics to questions and answer stems
Add notes and media files to a question
Preview a question in Standard mode
Copy and paste questions for repeated use
Edit questions to make and save changes
Rearrange the order of questions within a lesson
Engage a lesson in Standard mode
Change delivery options to achieve different goals when displaying data
Generate, print, and export reports to analyze student performance data
_______________________________________________ CPS Level 1 Training Workbook
31
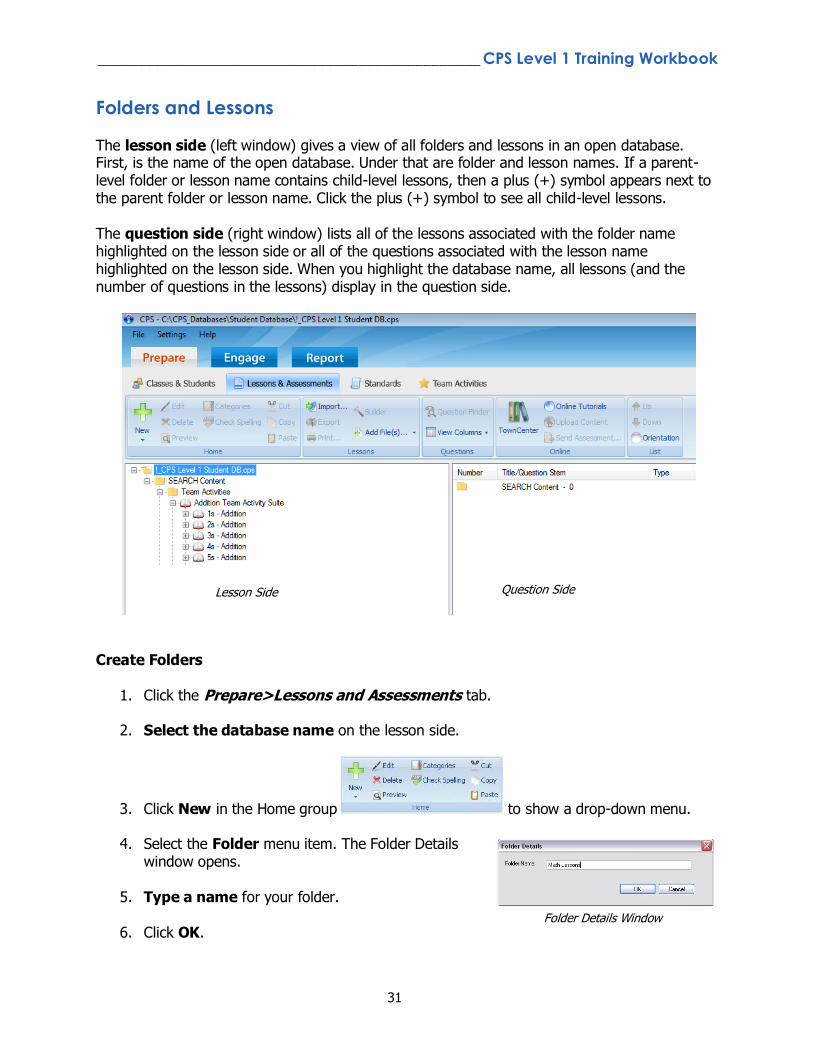
Folders and Lessons
The lesson side (left window) gives a view of all folders and lessons in an open database. First, is the name of the open database. Under that are folder and lesson names. If a parent-level folder or lesson name contains child-level lessons, then a plus (+) symbol appears next to the parent folder or lesson name. Click the plus (+) symbol to see all child-level lessons. The question side (right window) lists all of the lessons associated with the folder name highlighted on the lesson side or all of the questions associated with the lesson name highlighted on the lesson side. When you highlight the database name, all lessons (and the number of questions in the lessons) display in the question side.
Create Folders
1. Click the Prepare>Lessons and Assessments tab.
2. Select the database name on the lesson side.
3. Click New in the Home group to show a drop-down menu.
4. Select the Folder menu item. The Folder Details window opens.
5. Type a name for your folder.
6. Click OK.
Lesson Side Question Side
Folder Details Window
_______________________________________________ CPS Level 1 Training Workbook
32
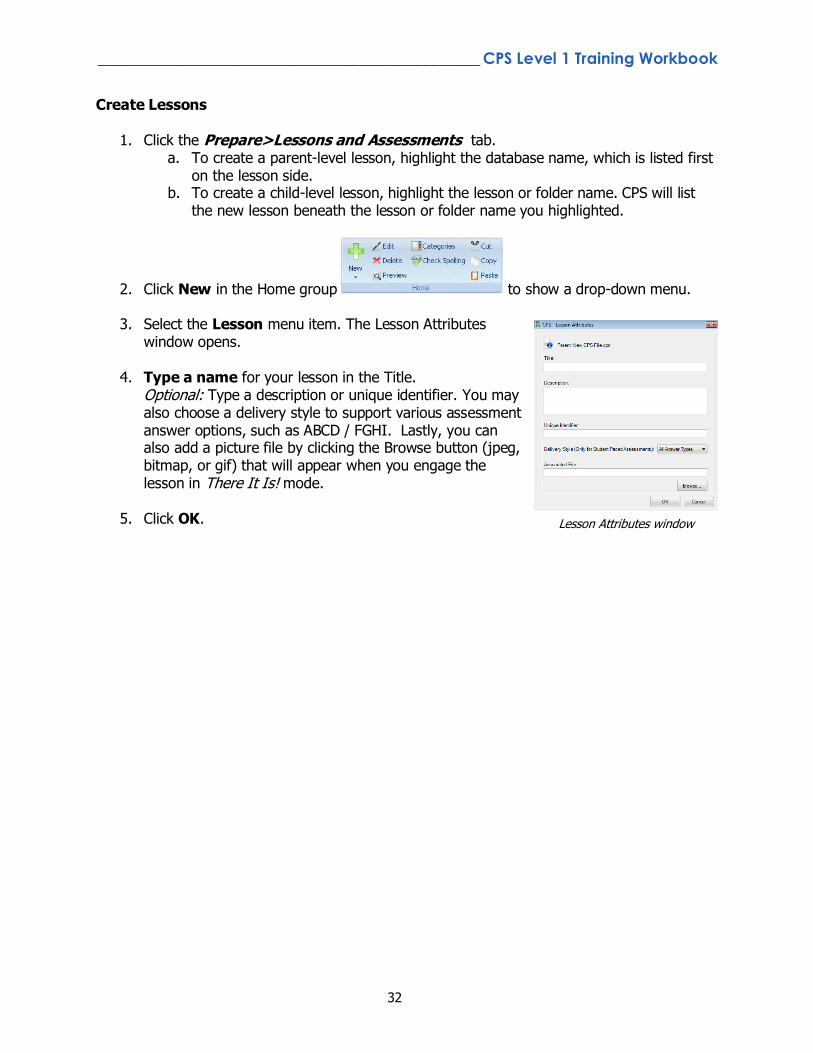
Create Lessons
1. Click the Prepare>Lessons and Assessments tab. a. To create a parent-level lesson, highlight the database name, which is listed first
on the lesson side. b. To create a child-level lesson, highlight the lesson or folder name. CPS will list
the new lesson beneath the lesson or folder name you highlighted.
2. Click New in the Home group to show a drop-down menu.
3. Select the Lesson menu item. The Lesson Attributes window opens.
4. Type a name for your lesson in the Title.
Optional: Type a description or unique identifier. You may also choose a delivery style to support various assessment answer options, such as ABCD / FGHI. Lastly, you can also add a picture file by clicking the Browse button (jpeg, bitmap, or gif) that will appear when you engage the lesson in There It Is! mode.
5. Click OK.
Lesson Attributes window
_______________________________________________ CPS Level 1 Training Workbook
33
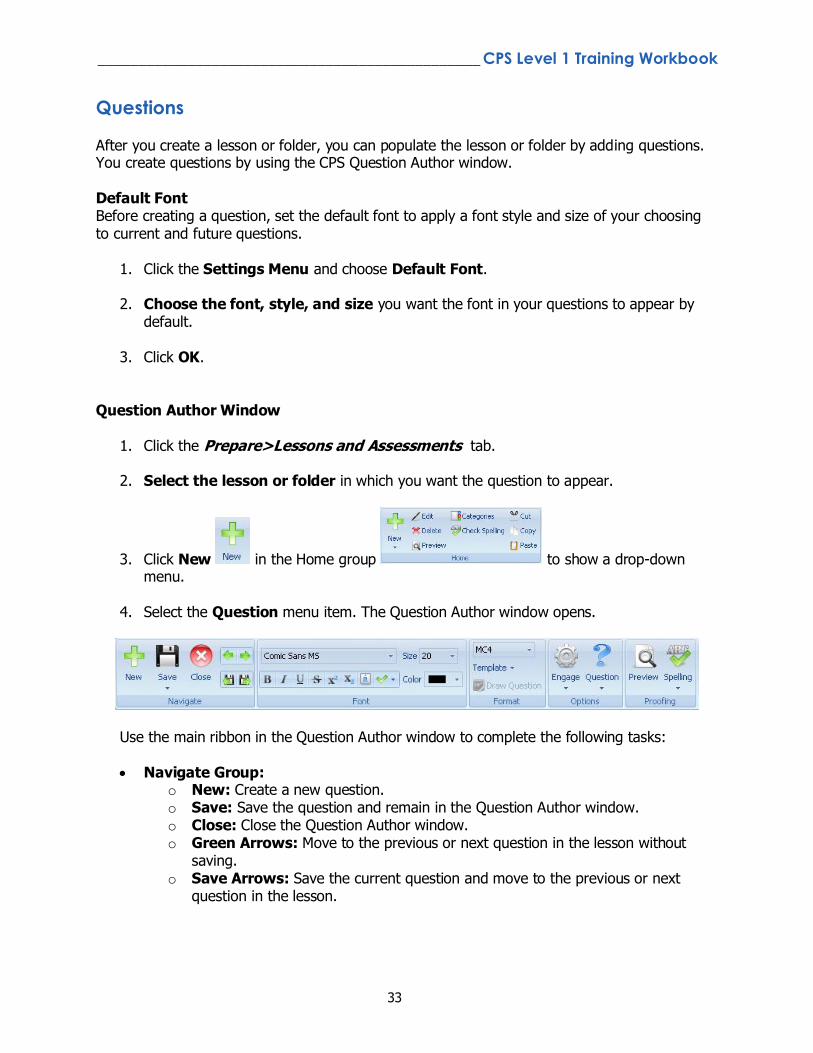
Questions
After you create a lesson or folder, you can populate the lesson or folder by adding questions. You create questions by using the CPS Question Author window. Default Font Before creating a question, set the default font to apply a font style and size of your choosing to current and future questions.
1. Click the Settings Menu and choose Default Font.
2. Choose the font, style, and size you want the font in your questions to appear by
default.
3. Click OK. Question Author Window
1. Click the Prepare>Lessons and Assessments tab.
2. Select the lesson or folder in which you want the question to appear.
3. Click New in the Home group to show a drop-down menu.
4. Select the Question menu item. The Question Author window opens.
Use the main ribbon in the Question Author window to complete the following tasks:
Navigate Group: o New: Create a new question. o Save: Save the question and remain in the Question Author window. o Close: Close the Question Author window. o Green Arrows: Move to the previous or next question in the lesson without
saving. o Save Arrows: Save the current question and move to the previous or next
question in the lesson.
_______________________________________________ CPS Level 1 Training Workbook
34
Font Group: o Utilize the following buttons within the Font group to change the text options for
a question: Font, Font Size, Bold, Italic, Underline, Strikethrough, Superscript, Subscript, Character Map, Select Stems, and Font Color
Format Group: o Question Type: Select from the following question types: MC2-MC10, Numeric
(RF/Pulse only), True/False, Yes/No, Short Answer (Pulse only), Answer Sequence (Pulse only), and Performance Questions.
o Template Style: Select from the following template styles: Chalkboard, No Graphics, and Add Graphics.
Options Group: o Engage: Choose from the following delivery options:
Show question image after response Show image full screen Exclude question from self-paced and practice assessments Engage as freeform
o Question: Choose from the following question options: Standards: Associate the question with a standard Categories: Assign a category to a question Notes and Media: Include notes and media with a question Difficulty: Assign a difficulty level to the question
Proofing Group: o Preview: Preview the question in Standard Mode. o Spelling: Choose from the following spelling options:
Check spelling now Check spelling upon saving the question Select check spelling options
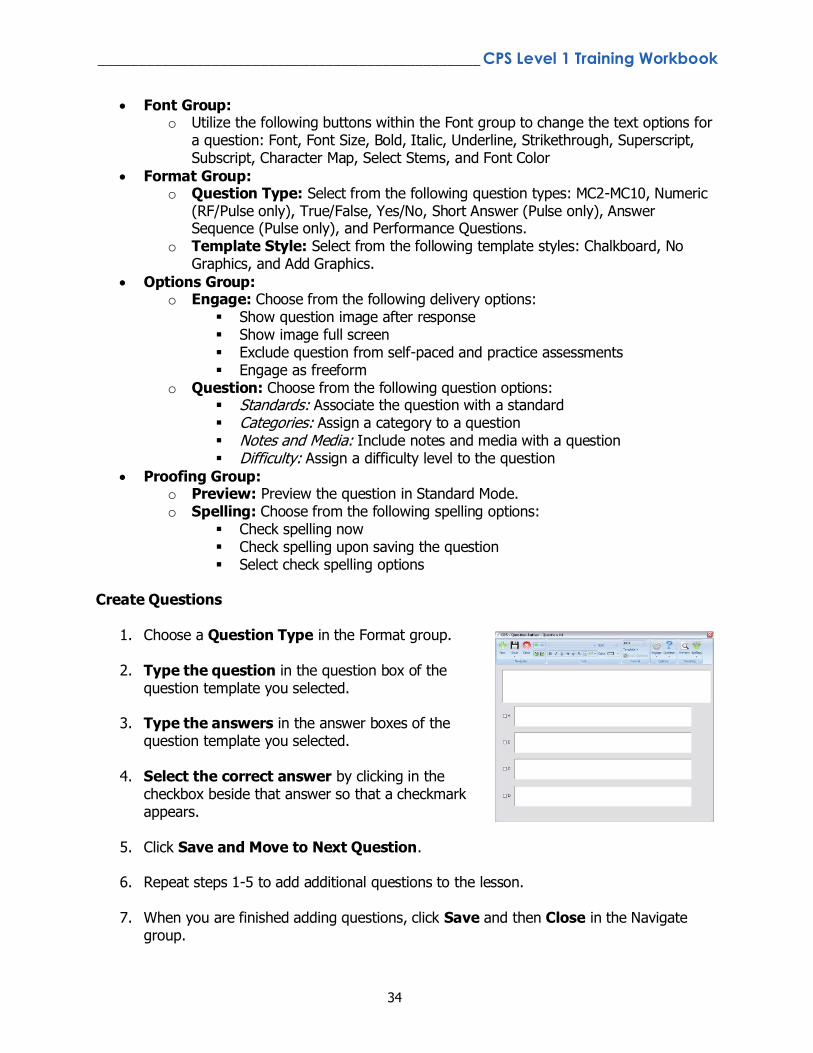
Create Questions
1. Choose a Question Type in the Format group.
2. Type the question in the question box of the question template you selected.
3. Type the answers in the answer boxes of the
question template you selected.
4. Select the correct answer by clicking in the checkbox beside that answer so that a checkmark appears.
5. Click Save and Move to Next Question.
6. Repeat steps 1-5 to add additional questions to the lesson.
7. When you are finished adding questions, click Save and then Close in the Navigate
group.
_______________________________________________ CPS Level 1 Training Workbook
35
Add Graphics to a Question or Answer Stem You can add .jpg, .gif, or .bmp graphics files to questions. Smaller files are usually better, and range from .jpg as the smallest to .bmp as the largest. All question templates with graphics include the pixel size of the graphic area. To create a question with a graphic, follow these directions:
1. Click Template in the Format group. A drop-down menu appears.
2. Click Add Graphics, and select the graphic style.
3. Click inside the graphic area. A shortcut menu appears.
4. Click the Browse command. The Set Image File window opens.
5. Navigate your computer to select the image file you want to add. The graphic appears in the graphic area of the question or answer option you selected.
6. Click Save and Close in the Navigate group.
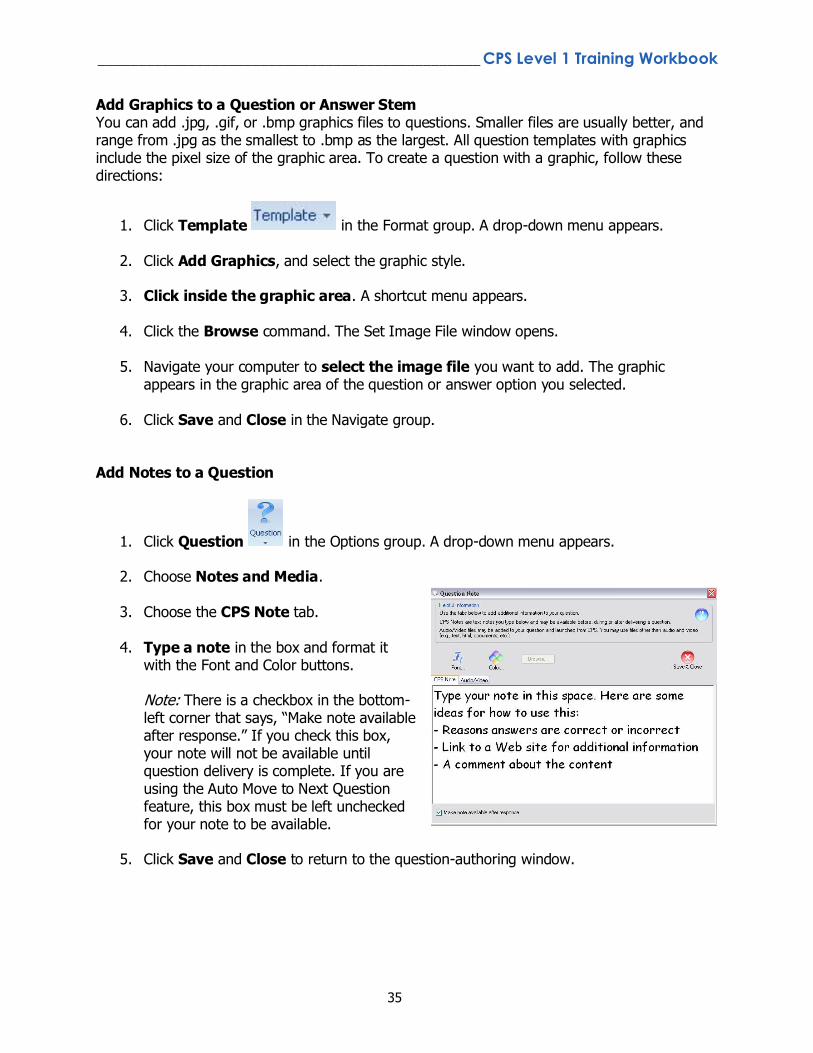
Add Notes to a Question
1. Click Question in the Options group. A drop-down menu appears.
2. Choose Notes and Media.
3. Choose the CPS Note tab.
4. Type a note in the box and format it with the Font and Color buttons.
Note: There is a checkbox in the bottom-left corner that says, “Make note available after response.” If you check this box, your note will not be available until question delivery is complete. If you are using the Auto Move to Next Question feature, this box must be left unchecked for your note to be available.
5. Click Save and Close to return to the question-authoring window.
_______________________________________________ CPS Level 1 Training Workbook
36
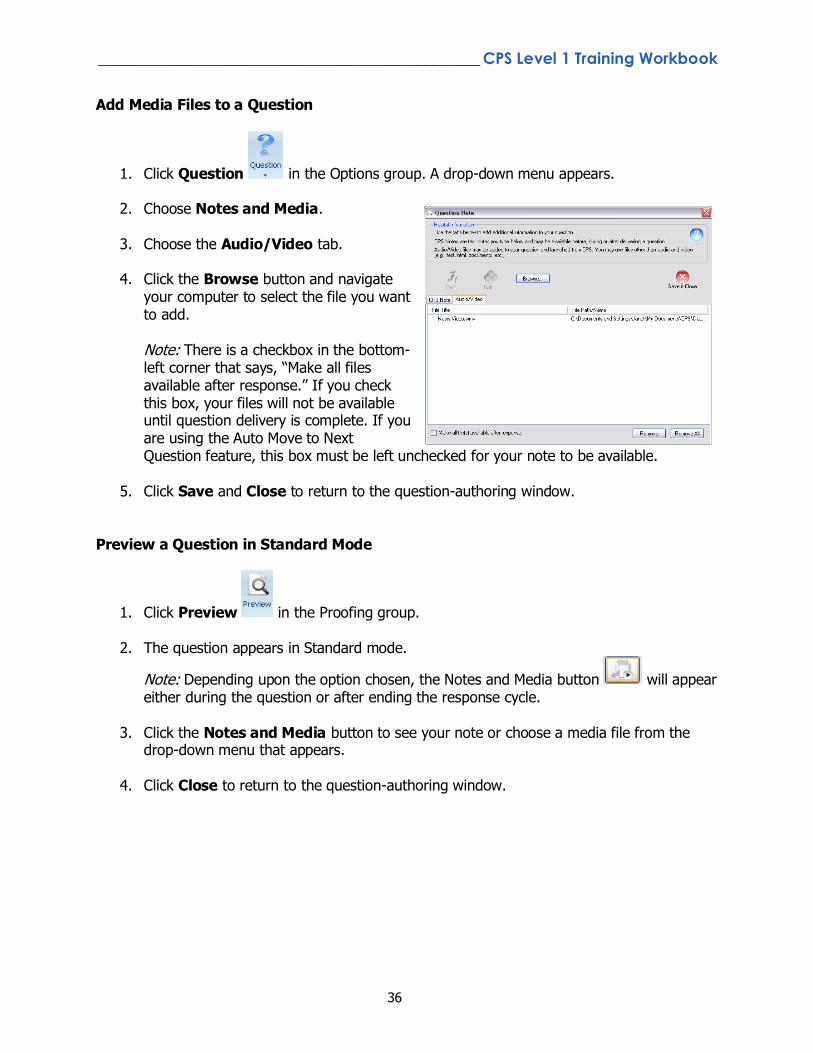
Add Media Files to a Question
1. Click Question in the Options group. A drop-down menu appears.
2. Choose Notes and Media.
3. Choose the Audio/Video tab.
4. Click the Browse button and navigate your computer to select the file you want to add.
Note: There is a checkbox in the bottom-left corner that says, “Make all files available after response.” If you check this box, your files will not be available until question delivery is complete. If you are using the Auto Move to Next Question feature, this box must be left unchecked for your note to be available.
5. Click Save and Close to return to the question-authoring window.
Preview a Question in Standard Mode
1. Click Preview in the Proofing group.
2. The question appears in Standard mode.
Note: Depending upon the option chosen, the Notes and Media button will appear either during the question or after ending the response cycle.
3. Click the Notes and Media button to see your note or choose a media file from the
drop-down menu that appears.
4. Click Close to return to the question-authoring window.
_______________________________________________ CPS Level 1 Training Workbook
37
Copy and Paste Questions
1. Click the Prepare>Lessons and Assessments tab.
2. Select a lesson from the lesson side of the window. Any questions in the lesson appear in the question side of the window.
3. Select a question or a group of questions. (Note: You can select a group of questions
by holding down the CTRL key on your keyboard and simultaneously clicking on each file you want to select.)
4. Select Copy from the Home group .
5. Click your mouse on the question side of the window in the lesson you want to paste the question.
6. Select Paste from the Home group . The copied question appears in the question side of the window.
Edit Questions
1. Click the Prepare>Lessons and Assessments tab.
2. Select a lesson from the lesson side of the window. Any questions in the lesson appear in the question side of the window.
3. Select a question you want to change.
4. Select Edit from the Home group .
5. Make changes to the question.
6. Click Save and then Close in the Navigate group.
_______________________________________________ CPS Level 1 Training Workbook
50
Reorder Questions
1. Click on the Prepare>Lessons and Assessments tab.
2. Select the lesson that contains the question you would like to move. The questions appear in the question side of the window.
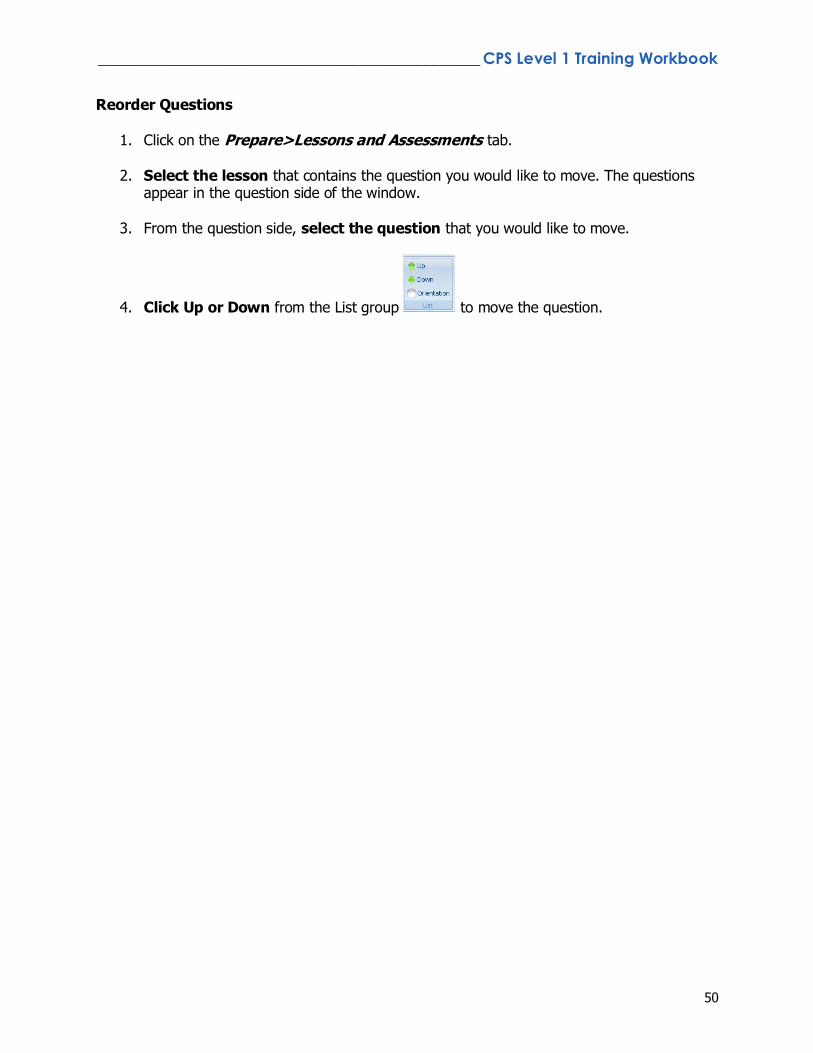
3. From the question side, select the question that you would like to move.
4. Click Up or Down from the List group to move the question.
_______________________________________________ CPS Level 1 Training Workbook
38
Standard Mode
The Standard mode lets the teacher control the pace and progress of students through the questions. CPS will automatically engage a lesson in the Standard mode by default. Engage Standard Mode
1. Click the Engage>Lessons and Assessments tab.
2. Select the lesson you want to engage by clicking in the check box before the lesson name.
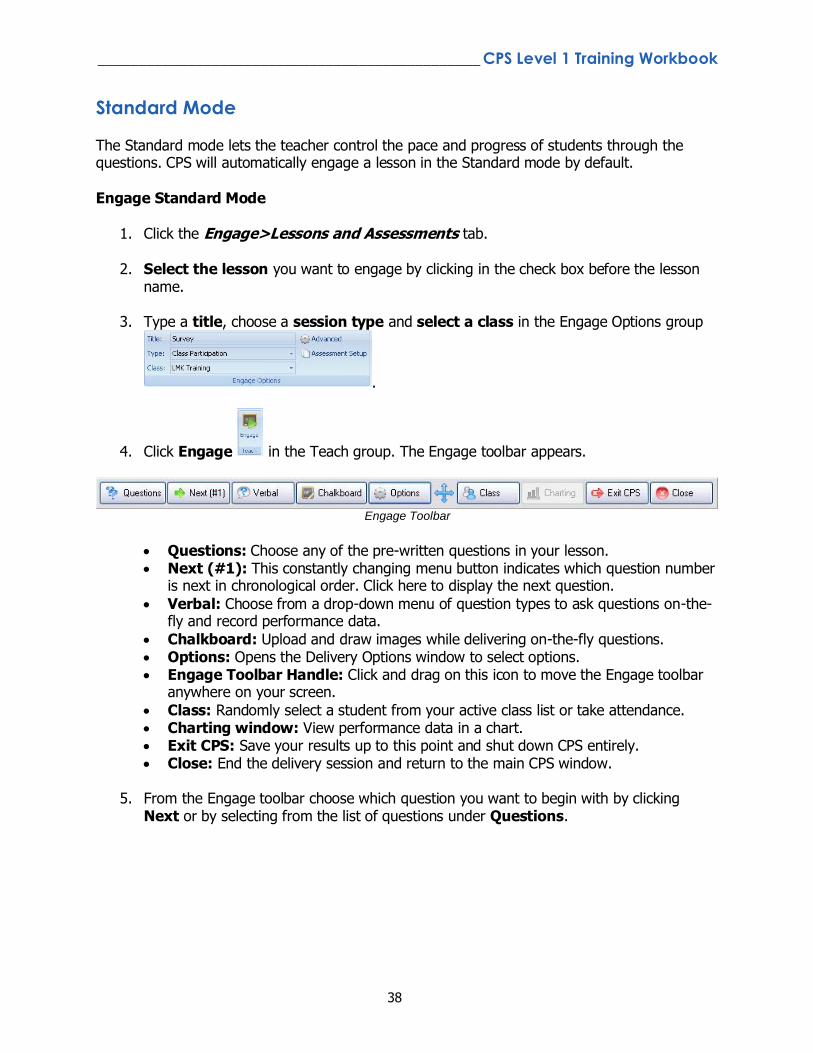
3. Type a title, choose a session type and select a class in the Engage Options group
.
4. Click Engage in the Teach group. The Engage toolbar appears.
Engage Toolbar
Questions: Choose any of the pre-written questions in your lesson. Next (#1): This constantly changing menu button indicates which question number
is next in chronological order. Click here to display the next question.
Verbal: Choose from a drop-down menu of question types to ask questions on-the-fly and record performance data.
Chalkboard: Upload and draw images while delivering on-the-fly questions. Options: Opens the Delivery Options window to select options. Engage Toolbar Handle: Click and drag on this icon to move the Engage toolbar
anywhere on your screen.
Class: Randomly select a student from your active class list or take attendance. Charting window: View performance data in a chart. Exit CPS: Save your results up to this point and shut down CPS entirely. Close: End the delivery session and return to the main CPS window.
5. From the Engage toolbar choose which question you want to begin with by clicking
Next or by selecting from the list of questions under Questions.
_______________________________________________ CPS Level 1 Training Workbook
39
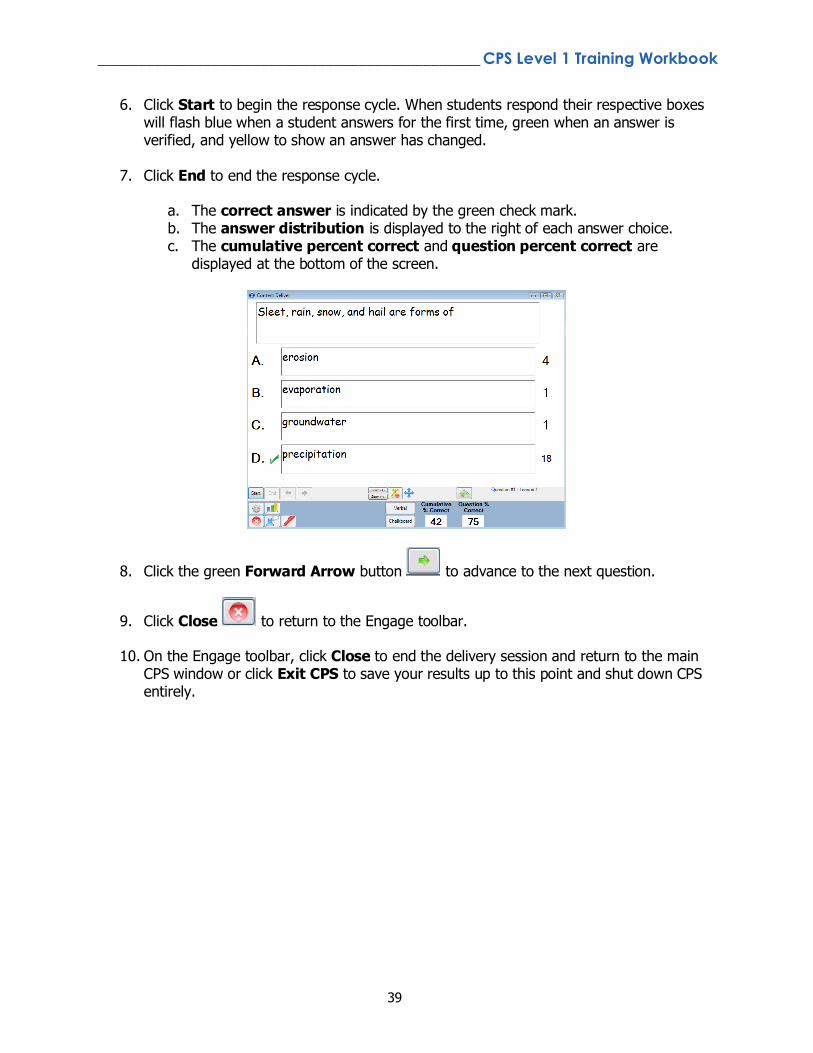
6. Click Start to begin the response cycle. When students respond their respective boxes will flash blue when a student answers for the first time, green when an answer is verified, and yellow to show an answer has changed.
7. Click End to end the response cycle.
a. The correct answer is indicated by the green check mark. b. The answer distribution is displayed to the right of each answer choice. c. The cumulative percent correct and question percent correct are
displayed at the bottom of the screen.
8. Click the green Forward Arrow button to advance to the next question.
9. Click Close to return to the Engage toolbar.
10. On the Engage toolbar, click Close to end the delivery session and return to the main CPS window or click Exit CPS to save your results up to this point and shut down CPS entirely.
_______________________________________________ CPS Level 1 Training Workbook
40
Delivery Options
Each delivery mode has specific features that you can change within CPS. You can make these changes through the CPS Delivery Options window. Accessing Delivery Options Choose any of the following ways to access the Delivery Options Window:
1. In the Settings Menu go to Delivery Options.
2. On the Engage toolbar click Options .
3. In the Standard mode engage window click the Options button .
4. In the Teacher Led engage window click Options .
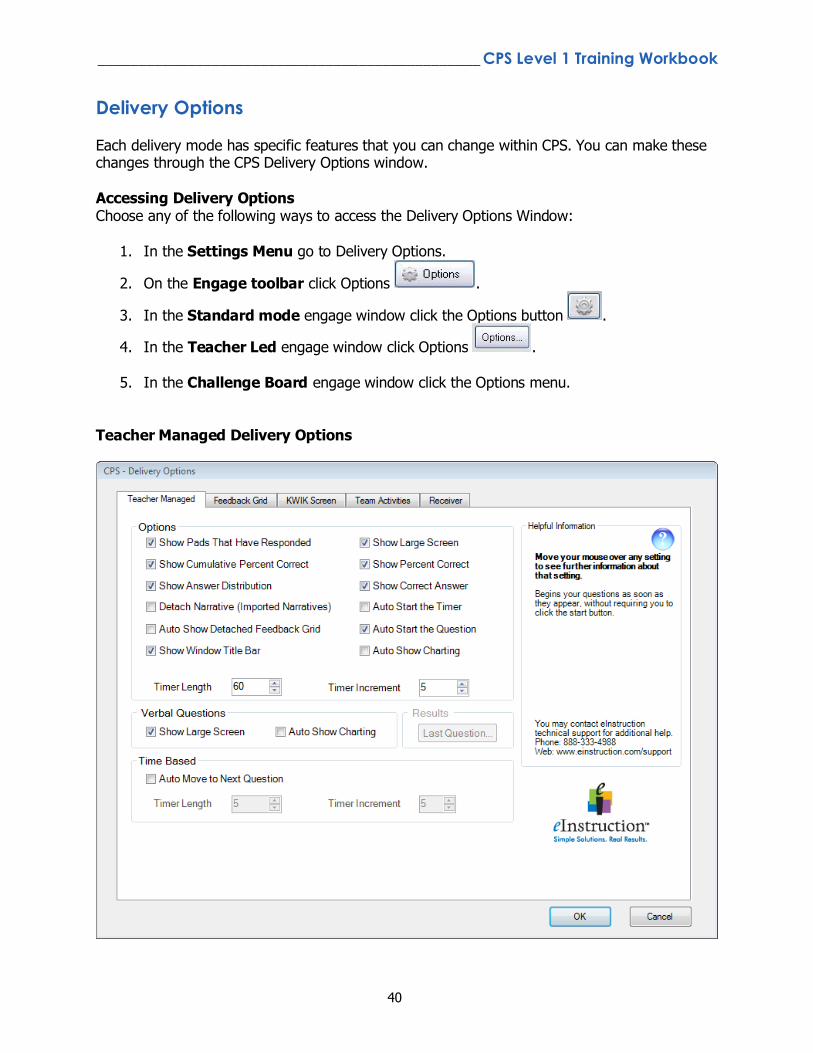
5. In the Challenge Board engage window click the Options menu. Teacher Managed Delivery Options
_______________________________________________ CPS Level 1 Training Workbook
41
Options Show Pads That Have Responded: Alters the on-screen appearance of the response pad numbers
during the response cycle to either remain displayed in blue or just flash when the answer is sent and then remain white.
Show Cumulative Percent Correct: Displays the cumulative percent of correct answers for the session in the Feedback Grid after the response cycle ends.
Show Answer Distribution: Displays the number of students who responded to each answer choice for a question after the response cycle ends.
Detached Narrative: Creates a button on the Feedback Grid for questions with narratives imported
from ExamView so the user can choose whether or not to show the associated Narrative with the question in the Content Delivery window.
Auto Show Detached Feedback Grid: Detaches the Feedback Grid from the Content Delivery window during a response cycle.
Show Large Screen: Displays questions in the Content Delivery window. The Content Delivery window contains the questions and answer choices for each question.
Show Percent Correct: Displays the percentage of students who correctly answered the question after the response cycle ends.
Show Correct Answer: Displays the correct answer to the question as a green check mark in the Content Delivery window after the response cycle ends.
Auto Start the Timer: Automatically begins the question timer when you start the response cycle. Auto Start the Question: Automatically starts the question, so that you do not need to press the
Start button to begin the response cycle. Auto Show Charting: Automatically displays the Charting window after the response cycle ends. Timer Length: Changes the default length of time displayed in the Content Delivery window during
a response cycle. Timer Increment: Changes the default increment of time change when using the + and - sign
displayed in the Content Delivery window during a response cycle. Verbal Questions Show Large Screen: Displays the Content Delivery window when you engage a verbal question to
type in a question and answers so they are recorded. Auto Show Charting: Automatically displays the Charting window after the response cycle ends. Time Based Auto Move to Next Question: Automatically advances to the next question after the response
cycle ends. Timer Length: Changes the length of time a question is displayed in the Content Delivery window
during a response cycle before automatically moving to the next question.
Timer Increment: Changes the increment of time change when using the + and - sign displayed in the Content Delivery window during an automatic advance response cycle.