Embed Size (px)
Citation preview
CPM ReporterAdministrator’s Guide
v6.1
Websense® v6.1 CPM ReporterAdministrator’s Guide©1996–2005, Websense, Inc.All rights reserved.10240 Sorrento Valley Rd., San Diego, CA 92121, USAPublished September 19, 2005Printed in the United States of America
NP33-0003RPTCPMThis document may not, in whole or in part, be copied, photocopied, reproduced, translated, or reduced to any electronic medium or machine-readable form without prior consent in writing from Websense Inc.Every effort has been made to ensure the accuracy of this manual. However, Websense Inc., makes no warranties with re-spect to this documentation and disclaims any implied warranties of merchantability and fitness for a particular purpose. Websense Inc. shall not be liable for any error or for incidental or consequential damages in connection with the furnishing, performance, or use of this manual or the examples herein. The information in this documentation is subject to change with-out notice.
TrademarksWebsense and Websense Enterprise are registered trademarks of Websense, Inc. in the United States and certain interna-tional markets. Websense has numerous other unregistered trademarks in the United States and internationally. All other trademarks are the property of their respective owners.Microsoft, Windows NT, Windows 2000, Windows 2003, Windows XP, Internet Explorer, and Active Directory are trade-marks or registered trademarks of Microsoft Corporation. Solaris is a registered trademark of Sun Microsystems, Inc., in the United States and other countries. Sun, Sun ONE and all Sun ONE based trademarks and logos are trademarks of Sun Microsystems, Inc.Netscape is a registered trademark of Netscape Communications Corporation in the U.S. and other countries. Netscape Navigator and Netscape Communicator are also trademarks of Netscape Communications Corporation and may be regis-tered outside the U.S.The following is a registered trademark of Novell, Inc., in the United States and other countries: Novell Directory Services.Adobe, Acrobat, and Acrobat Reader are either registered trademarks or trademarks of Adobe Systems Incorporated in the United States and/or other countries. Pentium is a registered trademark of Intel Corporation.Red Hat is a registered trademark of Red Hat, Inc., in the United States and other countries. Linux is a trademark of Linus Torvalds, in the United States and other countries.This product includes software distributed by the Apache Software Foundation (http://www.apache.org).Copyright (c) 2000. The Apache Software Foundation. All rights reserved.Other product names mentioned in this manual may be trademarks or registered trademarks of their respective companies and are the sole property of their respective manufacturers.

Contents
Chapter 1 Introduction . . . . . . . . . . . . . . . . . . . . . . . . . . . . . . . . . . . . . . . . . . . . . . . 9
Data Collection and Presentation . . . . . . . . . . . . . . . . . . . . . . . . . . . . . . 10The Reporting Process. . . . . . . . . . . . . . . . . . . . . . . . . . . . . . . . . . . . . . . 11Running Reports: The Basic Steps . . . . . . . . . . . . . . . . . . . . . . . . . . . . . 12
Chapter 2 Getting Started . . . . . . . . . . . . . . . . . . . . . . . . . . . . . . . . . . . . . . . . . . . 13
System Requirements . . . . . . . . . . . . . . . . . . . . . . . . . . . . . . . . . . . . . . . 13Startup Requirements . . . . . . . . . . . . . . . . . . . . . . . . . . . . . . . . . . . . . . . 14Providing Access to CPM Reporter . . . . . . . . . . . . . . . . . . . . . . . . . . . . 14Databases. . . . . . . . . . . . . . . . . . . . . . . . . . . . . . . . . . . . . . . . . . . . . . . . . 15
Websense Enterprise Master Database . . . . . . . . . . . . . . . . . . . . . . . 15CPM Log Database . . . . . . . . . . . . . . . . . . . . . . . . . . . . . . . . . . . . . . 15CPM Inventory Database . . . . . . . . . . . . . . . . . . . . . . . . . . . . . . . . . . 16User Service . . . . . . . . . . . . . . . . . . . . . . . . . . . . . . . . . . . . . . . . . . . . 16
CPM Reporter Activity Logging. . . . . . . . . . . . . . . . . . . . . . . . . . . . . . . 17CPM Reporter Access . . . . . . . . . . . . . . . . . . . . . . . . . . . . . . . . . . . . . . . 17
Administrative Access . . . . . . . . . . . . . . . . . . . . . . . . . . . . . . . . . . . . 17User Roles . . . . . . . . . . . . . . . . . . . . . . . . . . . . . . . . . . . . . . . . . . . . . 18
Assigning User Roles . . . . . . . . . . . . . . . . . . . . . . . . . . . . . . . . . . . . . . . 18Logging on to CPM Reporter . . . . . . . . . . . . . . . . . . . . . . . . . . . . . . . . . 21Using the Report Menu . . . . . . . . . . . . . . . . . . . . . . . . . . . . . . . . . . . . . . 24Using the Toolbar . . . . . . . . . . . . . . . . . . . . . . . . . . . . . . . . . . . . . . . . . . 25Understanding the Symbols. . . . . . . . . . . . . . . . . . . . . . . . . . . . . . . . . . . 25Using Function-specific Menus. . . . . . . . . . . . . . . . . . . . . . . . . . . . . . . . 26Report Templates . . . . . . . . . . . . . . . . . . . . . . . . . . . . . . . . . . . . . . . . . . 27Criteria Sets . . . . . . . . . . . . . . . . . . . . . . . . . . . . . . . . . . . . . . . . . . . . . . . 28
Users/Groups . . . . . . . . . . . . . . . . . . . . . . . . . . . . . . . . . . . . . . . . . . . 30Risk Classes . . . . . . . . . . . . . . . . . . . . . . . . . . . . . . . . . . . . . . . . . . . . 30
Administrator’s Guide 3

Contents
Categories . . . . . . . . . . . . . . . . . . . . . . . . . . . . . . . . . . . . . . . . . . . . . 31Dispositions. . . . . . . . . . . . . . . . . . . . . . . . . . . . . . . . . . . . . . . . . . . . 33
Report Sets . . . . . . . . . . . . . . . . . . . . . . . . . . . . . . . . . . . . . . . . . . . . . . . 33Logging Off . . . . . . . . . . . . . . . . . . . . . . . . . . . . . . . . . . . . . . . . . . . . . . 34
Chapter 3 Report Templates . . . . . . . . . . . . . . . . . . . . . . . . . . . . . . . . . . . . . . . . . 35
Report Template Types . . . . . . . . . . . . . . . . . . . . . . . . . . . . . . . . . . . . . 35Report Templates and Criteria Sets . . . . . . . . . . . . . . . . . . . . . . . . . . . . 36Inventory-Executables . . . . . . . . . . . . . . . . . . . . . . . . . . . . . . . . . . . . . . 37
Executable Inventory by Machine . . . . . . . . . . . . . . . . . . . . . . . . . . 37Executable Inventory by Risk Class–Summary . . . . . . . . . . . . . . . . 38Executable Inventory by Risk Class and Category . . . . . . . . . . . . . . 39
Inventory-Software Applications . . . . . . . . . . . . . . . . . . . . . . . . . . . . . . 39Operating System Summary . . . . . . . . . . . . . . . . . . . . . . . . . . . . . . . 40Software Application Inventory by Machine Name . . . . . . . . . . . . . 41Software Application Inventory by Publisher - Detailed . . . . . . . . . 42Software Application Inventory by Publisher - Summary . . . . . . . . 43Top N Applications . . . . . . . . . . . . . . . . . . . . . . . . . . . . . . . . . . . . . . 44
Removable Media/Launches . . . . . . . . . . . . . . . . . . . . . . . . . . . . . . . . . 45Removable Media Lockdown . . . . . . . . . . . . . . . . . . . . . . . . . . . . . . 45Risk Trend. . . . . . . . . . . . . . . . . . . . . . . . . . . . . . . . . . . . . . . . . . . . . 46
Choosing Reports for Functionality . . . . . . . . . . . . . . . . . . . . . . . . . . . . 48Chapter 4 Criteria Sets . . . . . . . . . . . . . . . . . . . . . . . . . . . . . . . . . . . . . . . . . . . . . 51
Criteria Sets and Inventory. . . . . . . . . . . . . . . . . . . . . . . . . . . . . . . . . . . 52Managing Criteria Sets . . . . . . . . . . . . . . . . . . . . . . . . . . . . . . . . . . . . . . 53
Using the Criteria Set Menu . . . . . . . . . . . . . . . . . . . . . . . . . . . . . . . 53Using the Criteria Set Toolbar . . . . . . . . . . . . . . . . . . . . . . . . . . . . . 55Moving in the Criteria Set Sequence . . . . . . . . . . . . . . . . . . . . . . . . 56
Introducing Predefined Criteria Sets . . . . . . . . . . . . . . . . . . . . . . . . . . . 56Adding a Criteria Set . . . . . . . . . . . . . . . . . . . . . . . . . . . . . . . . . . . . . . . 57
Defining Inventory Executables Criteria Set . . . . . . . . . . . . . . . . . . 58Defining Inventory Software Criteria Sets . . . . . . . . . . . . . . . . . . . . 59Defining Removable Media/Launches Criteria Sets. . . . . . . . . . . . . 59
Setting the Date Range for a Criteria Set . . . . . . . . . . . . . . . . . . . . . . . . 60
4 Websense CPM Reporter

Contents
Setting All Dates . . . . . . . . . . . . . . . . . . . . . . . . . . . . . . . . . . . . . . . .61Setting a Range of Dates . . . . . . . . . . . . . . . . . . . . . . . . . . . . . . . . . .61Setting a Specific Start and End Date and Time . . . . . . . . . . . . . . . .62
Selecting Users, Groups, and Domains . . . . . . . . . . . . . . . . . . . . . . . . . .63Adding Users, Groups, or Domains . . . . . . . . . . . . . . . . . . . . . . . . . .66Removing Users, Groups, or Domains. . . . . . . . . . . . . . . . . . . . . . . .66
Selecting Machines . . . . . . . . . . . . . . . . . . . . . . . . . . . . . . . . . . . . . . . . .67Adding Machines . . . . . . . . . . . . . . . . . . . . . . . . . . . . . . . . . . . . . . . .69Removing Machines. . . . . . . . . . . . . . . . . . . . . . . . . . . . . . . . . . . . . .70
Selecting Risk Classes . . . . . . . . . . . . . . . . . . . . . . . . . . . . . . . . . . . . . . .70Selecting Categories . . . . . . . . . . . . . . . . . . . . . . . . . . . . . . . . . . . . . . . .72Selecting Dispositions . . . . . . . . . . . . . . . . . . . . . . . . . . . . . . . . . . . . . . .74Setting Variables . . . . . . . . . . . . . . . . . . . . . . . . . . . . . . . . . . . . . . . . . . .76Specifying Applications . . . . . . . . . . . . . . . . . . . . . . . . . . . . . . . . . . . . .77
Adding Applications. . . . . . . . . . . . . . . . . . . . . . . . . . . . . . . . . . . . . .79Removing Applications . . . . . . . . . . . . . . . . . . . . . . . . . . . . . . . . . . .79
Identifying Operating Systems . . . . . . . . . . . . . . . . . . . . . . . . . . . . . . . .80Editing a Criteria Set . . . . . . . . . . . . . . . . . . . . . . . . . . . . . . . . . . . . . . . .81Copying a Criteria Set . . . . . . . . . . . . . . . . . . . . . . . . . . . . . . . . . . . . . . .82Renaming a Criteria Set. . . . . . . . . . . . . . . . . . . . . . . . . . . . . . . . . . . . . .83Deleting a Criteria Set . . . . . . . . . . . . . . . . . . . . . . . . . . . . . . . . . . . . . . .83Reviewing a Criteria Set . . . . . . . . . . . . . . . . . . . . . . . . . . . . . . . . . . . . .84
Access the Summary Page from the Manage Criteria Set Sequence .85Access the Summary Page from the Run Sequence. . . . . . . . . . . . . .85Reviewing Criteria Sets for Inventory–Executables . . . . . . . . . . . . .86Reviewing Criteria Sets for Inventory–Software . . . . . . . . . . . . . . . .86Reviewing Criteria Sets for Removable Media/Launches . . . . . . . . .87
Chapter 5 Quick Reports . . . . . . . . . . . . . . . . . . . . . . . . . . . . . . . . . . . . . . . . . . . .89
Working in the Run Sequence . . . . . . . . . . . . . . . . . . . . . . . . . . . . . . . . .89Using the Run Report Menu. . . . . . . . . . . . . . . . . . . . . . . . . . . . . . . .89Using the Run Toolbar . . . . . . . . . . . . . . . . . . . . . . . . . . . . . . . . . . . .90
Selecting a Report Template . . . . . . . . . . . . . . . . . . . . . . . . . . . . . . . . . .90Selecting a Criteria Set . . . . . . . . . . . . . . . . . . . . . . . . . . . . . . . . . . . . . .92
Administrator’s Guide 5

Contents
Formatting a Report . . . . . . . . . . . . . . . . . . . . . . . . . . . . . . . . . . . . . . . . 94Reviewing and Running a Report . . . . . . . . . . . . . . . . . . . . . . . . . . . . . 96
Chapter 6 Report Sets . . . . . . . . . . . . . . . . . . . . . . . . . . . . . . . . . . . . . . . . . . . . . . 99
Working in the Schedule Report Set Sequence . . . . . . . . . . . . . . . . . . . 99Using the Report Set Menu . . . . . . . . . . . . . . . . . . . . . . . . . . . . . . . 101Using the Report Set Toolbar . . . . . . . . . . . . . . . . . . . . . . . . . . . . . 101
Adding A Report Set . . . . . . . . . . . . . . . . . . . . . . . . . . . . . . . . . . . . . . 102Selecting Report Templates . . . . . . . . . . . . . . . . . . . . . . . . . . . . . . . . . 103Selecting Criteria Sets . . . . . . . . . . . . . . . . . . . . . . . . . . . . . . . . . . . . . 105Setting Run Times . . . . . . . . . . . . . . . . . . . . . . . . . . . . . . . . . . . . . . . . 106
Run a Report Set Immediately . . . . . . . . . . . . . . . . . . . . . . . . . . . . 108Schedule a Report Set for a Specific Date and Time . . . . . . . . . . . 109Schedule a Report Set Every N Hours . . . . . . . . . . . . . . . . . . . . . . 111Schedule a Report Set Every N Days . . . . . . . . . . . . . . . . . . . . . . . 112Schedule a Report Set Every N Weeks . . . . . . . . . . . . . . . . . . . . . . 114Schedule a Report Set Every N Months . . . . . . . . . . . . . . . . . . . . . 116
Formatting a Report Set . . . . . . . . . . . . . . . . . . . . . . . . . . . . . . . . . . . . 118Using HTML as the Export Format . . . . . . . . . . . . . . . . . . . . . . . . 119Using XML as the Export Format. . . . . . . . . . . . . . . . . . . . . . . . . . 121Using RTF as the Export Format . . . . . . . . . . . . . . . . . . . . . . . . . . 123Using Comma Delimited Files as the Export Format . . . . . . . . . . . 126
Defining Delivery Options . . . . . . . . . . . . . . . . . . . . . . . . . . . . . . . . . . 127Emailing a Report Set to Others . . . . . . . . . . . . . . . . . . . . . . . . . . . 129
Removing Email Addresses. . . . . . . . . . . . . . . . . . . . . . . . . . . . 131Deleting Email Addresses Completely . . . . . . . . . . . . . . . . . . . 132
Posting a Report Set to a FTP Server . . . . . . . . . . . . . . . . . . . . . . . 132Editing a Report Set . . . . . . . . . . . . . . . . . . . . . . . . . . . . . . . . . . . . . . . 134Reviewing a Report Set . . . . . . . . . . . . . . . . . . . . . . . . . . . . . . . . . . . . 135Copying a Report Set . . . . . . . . . . . . . . . . . . . . . . . . . . . . . . . . . . . . . . 136Renaming a Report Set. . . . . . . . . . . . . . . . . . . . . . . . . . . . . . . . . . . . . 137Deleting a Report Set . . . . . . . . . . . . . . . . . . . . . . . . . . . . . . . . . . . . . . 138
6 Websense CPM Reporter

Contents
Chapter 7 Scheduled Jobs. . . . . . . . . . . . . . . . . . . . . . . . . . . . . . . . . . . . . . . . . . .139
Stopping Jobs. . . . . . . . . . . . . . . . . . . . . . . . . . . . . . . . . . . . . . . . . . . . .141Removing Jobs from the Scheduled Jobs List. . . . . . . . . . . . . . . . . . . .141
Appendix A Troubleshooting . . . . . . . . . . . . . . . . . . . . . . . . . . . . . . . . . . . . . . . . . .143
Why am I having problems generating “quick” reports after I activate pop-up blocking? . . . . . . . . . . . . . . . . . . . . . . . . . . . . . . . . . . . . . . . . . . . . .143Why does my report show more than one user for one client machine?. 143What do I do if it takes a long time to process data?. . . . . . . . . . . . . . .144Why do I receive an error message that reads “Unknown error can not send report through the mail.”? . . . . . . . . . . . . . . . . . . . . . . . . . . . . . . . . . . .144Why won't my foreign language reports display and print the correct fonts? . . . . . . . . . . . . . . . . . . . . . . . . . . . . . . . . . . . . . . . . . . . . . . . . 145Why does my report show several installations of the same application, but when I check the machine, I find only one? . . . . . . . . . . . . . . . . . . . . .145Why do I see several rows containing the same data in a report? . . . . .146Why don’t my inventory-based reports show the range of dates I selected?. . . . . . . . . . . . . . . . . . . . . . . . . . . . . . . . . . . . . . . . . . . . . . 146
Appendix B Technical Support . . . . . . . . . . . . . . . . . . . . . . . . . . . . . . . . . . . . . . . .147
Websense Technical Services Support Center . . . . . . . . . . . . . . . . . . .147Premium Support . . . . . . . . . . . . . . . . . . . . . . . . . . . . . . . . . . . . . . . . . .147Support Options . . . . . . . . . . . . . . . . . . . . . . . . . . . . . . . . . . . . . . . . . . .148
Web Portal . . . . . . . . . . . . . . . . . . . . . . . . . . . . . . . . . . . . . . . . . . . .148Email Questions . . . . . . . . . . . . . . . . . . . . . . . . . . . . . . . . . . . . . . . .148Telephone Assistance . . . . . . . . . . . . . . . . . . . . . . . . . . . . . . . . . . . .148
Customer Care . . . . . . . . . . . . . . . . . . . . . . . . . . . . . . . . . . . . . . . . . . . .149Improving Documentation. . . . . . . . . . . . . . . . . . . . . . . . . . . . . . . . . . .149
Index . . . . . . . . . . . . . . . . . . . . . . . . . . . . . . . . . . . . . . . . . . . . . . . . . . . . . . . . . . . . . . . .151
Administrator’s Guide 7

Contents
8 Websense CPM Reporter

CHAPTER 1 Introduction
Thank you for choosing Websense Client Policy Manager to help manage and monitor machines in your network. Your subscription includes access to CPM Reporter, which provides information access in easy to use formats. While numerous details are available from Websense Manager, you can get the information you want in easy to use formats for one person or machine or thousands.
You can select information based on users, user groups, individual desktops, laptops, servers, ranges of IP addresses and/or domains. You can collect data about application installations, software launches, and information about specific machines
Use CPM Reporter to:
Monitor software launches or network access attempts using categories and risk classes to filter the reports.Locate software installed on networked machines.Track launch requests. Launch requests occur any time an employee or machine tries to run an application or executable.Identify normal and abnormal behavior for network access attempts.
Reports are available in formats including bar graphs, trend reports, and tabular data. You can run one report immediately, or schedule one or many reports for a future time.
These benefits are available as soon as you activate your Client Policy Manager subscription. Custom reports can be generated in a matter of minutes, and contain the specific information you want. If you are comfortable working with SQL, you can use third-party tools to customize reporting even more.
The key reporting options for CPM Reporter are:
Category and Risk class reports: The Websense Enterprise Master Database contains thousands of executables, organized into categories that identify usage, and risk classes that identify potential risk or loss. You
Administrator’s Guide 9

Chapter 1: Introduction
can request reports that use categories and/or risk classes to identify executable launch requests or installed executables.Inventory reports: These reports allow you to better monitor the software installed at each machine.Quick Reports: CPM Reporter includes a Run Now! option that allows you to generate reports quickly, and then view the results in a Web-browser. You can accept the Websense settings or define your own for these one-time reports.Format reports: CPM Reporter allows you to select formats when you schedule reports. You can choose HTML, XML, Rich Text Format, or comma delimited report layouts.Schedule Reports via email: You can schedule one or more reports to run as a single set, schedule them for now or in the future, and have them emailed only to yourself, or emailed to yourself and others in the organization.Post scheduled reports to an FTP server: You can schedule one or more reports to run as a single set, schedule them for now or in the future, and have them posted to an FTP server. This lets you post reports to a central location and make them available to authorized employees—without consuming great amounts of network bandwidth.
We know you will benefit from the functions available in CPM Reporter, and look forward to helping you manage your desktops, in addition to helping you manage your Internet use.
Websense, Inc. welcomes comments and suggestions regarding the product documentation. Please send feedback to [email protected]. Please include your organization’s name in your message.
Data Collection and Presentation
CPM Reporter uses information collected by Client Policy Manager components, and stored in the database. Client Policy Manager components must be fully installed and configured for CPM Reporter operations. Once you subscribe to Websense Client Policy Manager and install Client Agent, you can use CPM Reporter for on-demand and scheduled reports.
You can run a report immediately and view it in a browser, or schedule one or more reports and send them via email, or post them to an FTP server. You can also select the report format if you schedule reports.
10 Websense CPM Reporter

Chapter 1: Introduction
Use Run to quickly generate a one-time report that runs immediately and appears in a browser window.Use Schedule to define a report schedule, and then deliver reports via email or by posting them to an FTP server.
The Reporting Process
CPM Reporter provides tools for configuring and compiling reports for Client Policy Manager. The reporting cycle includes the following:
1. The administrator installs Client Policy Manager components.2. Once Client Agent is installed, the administrator schedules an inventory.
The inventory captures and reports details about all executables and applications installed on machines running Client Agent.
3. CPM Server saves the inventory information to the CPM Inventory Database.
4. Administrators set the appropriate CPM policy rules to control and monitor executable launch requests, and to define who has access to the various executables.
5. CPM Server checks policy rules when desktop clients login and/or users log on, and downloads an.xml file that contains a policy specific to that machine or that user at that machine.
6. An employee attempts to launch an executable.7. Client Agent checks the policy, and then permits or blocks the launch.
The information is then sent to CPM Log Database. The executable details include: the executable name, version number, and publisher. It also saves Client Policy Manager information: category and subcategory assignment, the risk class or classes for the executable, and any action that was taken.
8. A CPM Reporter user schedules or manually requests a report, defining the information he or she wants. Reports contain data defined by criteria sets. Refer to Chapter 4 Criteria Sets for details.
9. For reports showing launch request and/or network access data, CPM Reporter searches the CPM Log Database for any necessary launch information that matches the report request.
10. For reports showing inventory, CPM Reporter searches the CPM Inventory Database.
Administrator’s Guide 11

Chapter 1: Introduction
11. When the report is complete, CPM Reporter displays it as follows:In a browser window if you use the Run sequenceVia email or posts it to an FTP server if you use the Schedule sequence.
Running Reports: The Basic Steps
Regardless of whether you use the Run or Schedule sequence to request reports, the sequential steps are the same:
12. Select the report template.13. Select the criteria set.14. Format the report.15. Run the report.
The selections in the two sequences are different, even though the process is similar. The specifics for each sequence are as follows:
Feature Quick Reports Report Sets
Create custom reports X X
Run a single report X X
Run multiple reports at one time X
Schedule reports X
Schedule repeating reports X
View report in a browser X X
Send reports via email X
Post reports to an FTP Server X
Save report parameters X
12 Websense CPM Reporter
CHAPTER 2 Getting Started
Before installing and using CPM Reporter, it is helpful to understand basic requirements and functions. You can install CPM Reporter when installing other Client Policy Manager components or you can install it later in the cycle. Client Policy Manager and Client Agent must be installed for CPM Reporter to function.
System Requirements
The following are CPM Reporter system requirements.
Report Server PlatformsWindows 2000 Server, Service Packs 3 or higher Windows 2000 Advanced Server, Service Packs 2 and higherWindows 2000 Datacenter Server, Service Packs 2 and higherWindows 2003 Server
DatabaseMicrosoft SQL Server 7 Service Packs 3 and 4Microsoft SQL Server 2000 Service Pack 3
Web BrowserInternet Explorer 5.5 and higher or Apache 2.x and higher
Web ServerMicrosoft Internet Information Services 4, 5, and 6Apache 2.0. Websense, Inc. provides this with your software in case you do not already have a Web Server.
Administrator’s Guide 13

Chapter 2: Getting Started
Startup Requirements
To start CPM Reporter, the following components must already be available:
A Web server must be configured and have a virtual directory named Websense.A Websense configuration server must be installed and running on the network.The SQL Server must be running a database executable.Client Policy Manager components must be installed.A batch queue process must be running on the network. The Schedule option uses this to schedule and run report sets.
These components are configured automatically when you install them. If any are missing, you must re-run the installation, and select them for installation when prompts appear on the screen.
Providing Access to CPM Reporter
Only one CPM Reporter can be installed for each Client Policy Manager installation. Consider the following before installing this component:
If only one or two people will be using CPM Reporter, installing the component at a machine with restricted access may be appropriate. If a number of people will be using CPM Reporter, you should consider installing the component at a machine with shared access. Users are able to enter an IP address in the Web browser, and then access CPM Reporter. This is the suggested installation method for most organizations.
Each user can be assigned an individual user ID and password. This feature provides each user with the ability to save details that are of specific concern. No one else has access to or can modify these report settings.
NOTEYou cannot have multiple copies of any components that point to the same CPM Server or Policy Server. For example, you can install only one instance of CPM Reporter for each CPM Server and Policy Server.
14 Websense CPM Reporter

Chapter 2: Getting Started
For example, John, the Finance manager decides to generate departmental inventory reports once a week. Steve, the Accounting manager, cannot access the reporting parameters that John sets.
Databases
Client Policy Manager stores information in the databases about the following:
ApplicationsExecutables and associated categories and risk classesSoftware inventories and their contentsEmployee launch requests and the results
The Client Policy Manager components populate the databases, and CPM Reporter accesses them to generate reports. For convenience, each database is described separately.
Websense Enterprise Master DatabaseWebsense, Inc. maintains and manages the default Websense Enterprise Master Database. The database contains information about executables and applications, which CPM uses to identify the software it finds during inventory or detects during launch activity.
Additionally, you can use Websense Manager to modify the default database settings to meet corporate requirements, and add files to the database manually if necessary. Your changes always take precedence over the default Websense information.
CPM Log DatabaseThe CPM Log Database contains information about executable launch requests including user ID, machine addresses, and asset tag information; and the actions taken in response to executable launch requests. When CPM Reporter generates activity based reports for application launch requests or network access attempts, the information comes from the CPM Log Database.
Administrator’s Guide 15

Chapter 2: Getting Started
CPM Inventory DatabaseThe CPM Inventory Database contains information about software that is installed on machines that run Client Agent. Population occurs when CPM administrators run inventories for client machines.
Client Policy Manager and CPM Reporter both rely on the CPM Inventory Database for information, but have different access:
Client Policy Manager sees only the last inventory, regardless of the content.CPM Reporter sees any inventory available in the database except those that do not contain any executables or applications.
For example, you have installed Client Policy Manager and deployed Client Agent. You run an inventory on a machine, scanning all hard drives. Using that inventory, you remove unwanted applications, and run a second inventory.
Several weeks later, you run a third inventory, but the hard drives are empty.
The first and second inventory lists all installed executables and applications.The second inventory is empty, because the drive did not contain any executables or applications.
Client Policy Manager identifies the third inventory as current, even though it is empty. CPM Reporter, on the other hand, sees only the first and second inventory: it does not see the third inventory because it is empty.
User ServiceThe User Service provides access to user and group information from a Windows-based directory service, such as Windows NT Directory and Active Directory, and is an integral part of Websense processes. Client Policy Manager relies on the User Service to provide source information for users, groups, and domains from Windows directory services.
If the User Service is not in place, the following occurs:
The logged information from an executable launch request will not contain user, group, or domain details. If you run reports for the time when the User Service is down, the reports will not show executable launch requests for that period of time.
16 Websense CPM Reporter

Chapter 2: Getting Started
You will not be able to generate reports that show details about users, groups, or domains.
Configuration details are available in the Websense Enterprise Client Policy Manager Administrator’s Guide.
CPM Reporter Activity Logging
CPM Reporter automatically logs and reports any problems it encounters while connecting to required Client Policy Manager components, attempting to store or retrieve configuration data, or while generating reports. For all errors, CPM Reporter updates the Windows Event Log. The following table shows specific errors.
CPM Reporter Access
There are two levels of access to CPM Reporter:
Administrators—allows designated Reporter administrators to configure CPM Reporter and define user roles for those individuals selected to run reports in their organization.Users—those users who are designated to run reports within CPM Reporter, but who do not have rights to administrative functions.
Administrative AccessCPM Reporter administrators have access to all administrative functions, including defining user roles and assigning reporting privileges. The administrator’s default logon user name is WebsenseCPMAdminstrator, and the password is the same password established when first connecting to the Policy Server in Websense Manager.
Error Actions
User unable to log onTechnical message presented to userConnection lost
Data storage/retrieval
Reporter cannot run a scheduled report
Email sent to the requesting staff member
Administrator’s Guide 17

Chapter 2: Getting Started
User RolesEach person in your organization who uses CPM Reporter is assigned a role that allows them access to Reporter. There are no restrictions on the number of people who can be assigned to a role, or a limit on users who can access CPM Reporter. There are no restrictions on the number of people who can use CPM Reporter concurrently.
Logon for CPM Reporter users is accomplished with the user’s network name and password. Both the user name and password are case-sensitive. When users enter a password, CPM Reporter masks characters using asterisks ( * * * ). Websense, Inc. recommends passwords between 4 and 25 characters long.
Assigning User Roles
All users who access and run reports for CPM Reporter must be assigned a reporting role by the CPM Reporter administrator. Roles are defined for CPM Reporter in the Websense Manager. CPM Reporter does not install with default roles.
To assign CPM Reporter roles:
1. Start the Websense Manager.For instructions, refer to the Client Policy Manager Administrator’s Guide.
2. Select the Desktop tab and connect to the Policy Server.3. Right-click Report Administration from the navigation pane on the left
side of the Websense Manager.If this is the first time you have accessed the administrative function, there are no roles listed, and the data pane is empty.
4. Select Add Role from the drop-down menu that appears.
5. Enter a name for the new user role in the dialog box displayed.
6. Click OK.7. Expand the tree under Report Administration
and select the new role.
18 Websense CPM Reporter

Chapter 2: Getting Started
The data pane displays the available administrative options and contains a field for listing the members of the role.
8. Click Edit.A dialog box is displayed listing all the visible domains.
List of Available Domains
9. Expand the navigation tree under the desired domain to view the available directory objects (users).
10. Select the users you want to add to the role you created, and then click Add.The selected directory objects are moved into the Selected pane.
Administrator’s Guide 19
Chapter 2: Getting Started
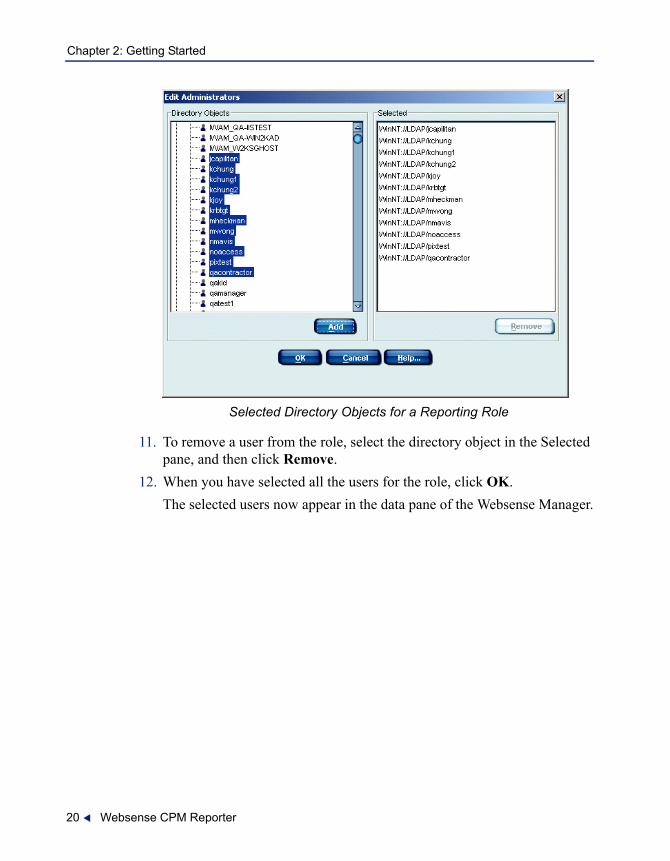
Selected Directory Objects for a Reporting Role
11. To remove a user from the role, select the directory object in the Selected pane, and then click Remove.
12. When you have selected all the users for the role, click OK.The selected users now appear in the data pane of the Websense Manager.
20 Websense CPM Reporter

Chapter 2: Getting Started
Reporting Roles
13. Define the desired permissions for the role you have just created.
Logging on to CPM Reporter
CPM Reporter safeguards your data by requiring the entry of a user ID and a password. If you need assistance, contact your Websense system administrator.
If you enter an incorrect user name or password, CPM Reporter presents an error message and then presents the logon banner again.If you enter an incorrect user name or password three times in a row, CPM Reporter presents an error message and locks you out.
Administrator’s Guide 21

Chapter 2: Getting Started
The lockout period is 20 minutes. If you try to log on again during the lockout period, CPM Reporter does not allow access.
You can wait for 20 minutes, and then try to log on again, or you may call the system administrator and ask him or her to reset the lockout.
To log on to CPM Reporter:
1. Launch Reporter using any of the methods below:From the Websense Manager, select Actions > Launch CPM Reporter.From the Start menu, select Programs > Websense Enterprise > Websense Reporting Tools.Enter the path to CPM Reporter in a browser, using the hostname or the IP address. For example, https://server.domain.com:8081/websense is a hostname, and https://10.1.1.1:8081/websense is an IP address.
The first time you log on, the Websense Logon screen appears with the default user name of WebsenseCPMAdministrator displayed. Subsequent logons display the user name of the last user to log on.
2. Enter the appropriate password.Administrator: Use the password that was defined for connection to the Policy Server from the Websense Manager when you installed CPM.Users: Enter your normal network password.
3. Click Log On.
22 Websense CPM Reporter

Chapter 2: Getting Started
The Reporting Tools menu appears.
4. Select Settings in the upper right portion of the screen to define your email connection specifics.The screen that appears next depends upon your logon status.
Administrator: If you are logged on as the CPM Reporter Administrator, you are asked for your email address and SMTP server.
Administrator’s Guide 23

Chapter 2: Getting Started
User: If you are logged on as a Reporter user, you are asked for your email address only.
5. Click Save.6. Click Back or Home to return to the Reporting Tools menu.7. Click Client Policy Manager Reporter.
The Report Menu appears.
Using the Report Menu
CPM Reporter includes the Report Menu page, which provides access to all selections.Τhe Report Menu appears when you first open CPM Reporter, and any time you select CPM Reporter from the toolbar.
Report Menu
The Report Menu provides access to the following CPM Reporter functions:
Run: Chapter 5: Quick ReportsSchedule: Chapter 6: Report SetsCriteria Sets: Chapter 4: Criteria Sets
24 Websense CPM Reporter

Chapter 2: Getting Started
Jobs Queue: Chapter 7: Scheduled Jobs
The Report Menu also includes a toolbar that appears on all pages in CPM Reporter. For information, refer to the following section, Using the Toolbar.
Using the Toolbar
The toolbar appears on all pages in CPM Reporter and provides links to the following:
Home—opens the Reporting Tools menu, which provides access to CPM Reporter and CPM ExplorerClient Policy Manager Reporter—opens the Report Menu, the link to all CPM Reporter optionsLog Out—closes the CPM Reporter connection to the server.
Understanding the Symbols
When you are working in CPM Reporter, you will encounter various symbols that are designed to let you identify specific information at a glance. The following table contains the symbols you will see, and a brief description of each.
Symbol Description
Add a new criteria set or report set.
Edit an existing criteria set or report set.
Copy an existing criteria set or report set.
Rename an existing criteria set or report set.
Delete an existing criteria set or report set, or stop a scheduled job.
Administrator’s Guide 25

Chapter 2: Getting Started
Using Function-specific Menus
Function-specific menus appear as you access CPM Reporter areas and work in the various sequences. These menus are:
The Criteria Set menu appears on the left side of all pages of the Criteria Set sequence. Your selections define how CPM Reporter filters executable inventory and launch data for the reports. For complete details, refer to Chapter 6: Report Sets.
Save changes to a criteria set, and return to the Format Report page in the Run sequence of pages. In the Schedule sequence, you save changes to the report set, submit the job to the scheduled job queue, and return to the Manage Report Sets page. In the Criteria Sets sequence, you save changes to the criteria set and return to the Manage Criteria Sets page.
Access a help topic specific to the page you are working in.
Refresh the Scheduled Jobs page.
Remove the selected job or jobs from the Scheduled Jobs page.
Move to the next page in a sequence of pages.
Move to the previous page in a sequence of pages.
Examine a criteria set in detail.
Symbol Description
26 Websense CPM Reporter

Chapter 2: Getting Started
Criteria Set Menu Examples
The Run menu appears on the left side of pages in the Run sequence and lets you run one report on-demand, which you view in a browser. You can set minimal report parameters, using predefined report templates and criteria sets. The settings do not save to the database. For information about running a single report and viewing it in a browser, refer to Chapter 5: Quick Reports.
The Report Set menu appears on the left side of pages in the Schedule sequence, and lets you define and schedule report sets. You can set detailed report parameters using new or existing report sets and criteria sets. The settings save to the database. For details, refer to Chapter 6: Report Sets.
Report Templates
Websense, Inc. provides report templates that provide the basic structure for a report. The report template:
Defines how the report plots data. Report types include bar chart, trend chart, and tables. One report template may include a bar chart or trend chart and a table, or only a table.May have predefined selections that may overwrite similar selections in the associated criteria set.Cannot be deleted or edited.
Administrator’s Guide 27

Chapter 2: Getting Started
The Run option lets you associate a report template with a criteria set and immediately view the report in a browser window. The Schedule option lets you associate one or more report templates with one criteria set, manually define a one-to-one association for each report template in the report set, or both.
For complete descriptions of available report templates, refer to Chapter 3: Report Templates. For details about which report templates may benefit specific departments and groups in your company, refer to Choosing Reports for Functionality, page 48.
Criteria Sets
Criteria sets define the information CPM Reporter uses to generate reports. Criteria sets vary, depending on the report template you select.
Possible selections for criteria sets are:
Date Range—settings allow you to show available information by specific dates or by a selected period. For configuration details, refer to Setting the Date Range for a Criteria Set, page 60.
Users/Groups—selections allow you to define reports by the person or people who access executables. The options that are available vary, depending on the report template you select. For descriptions, refer to Users/Groups, page 30. For configuration details, refer to Selecting Users, Groups, and Domains, page 63.
NOTEInventory reports may not include the entire date range that you select. Inventory reports are based on the most recent inventory that was taken, and it is possible your date selection will include dates that are not included in that inventory.
NOTEInventory reports do not include users, groups or domains; therefore, this page does not appear.
28 Websense CPM Reporter
Chapter 2: Getting Started
Machine—selections allow you to define reports by the machine where inventory took place, or where application launch requests originated. For information, refer to Selecting Machines, page 67.Risk classes—identify potential risk or loss associated with running a particular executable. For general information, refer to Risk Classes, page 30. For criteria set configuration, refer to Selecting Risk Classes, page 70. Categories—identify what an application is designed to do. For general details, refer to Categories, page 31. For criteria set configuration, refer to Selecting Categories, page 72.Dispositions—identify how Client Agent handled an employee launch request. For general details, refer to Dispositions, page 33. For criteria set configuration, refer to Selecting Dispositions, page 74.Applications—groups of logically associated files, some that are executables, and some that are not. You can find and add applications by application or publisher names. For configuration details, refer to Specifying Applications, page 77.Operating systems—perform basic tasks required to use a computer, including handling input and output, managing files and directories, and controlling disk drives and printers. In large systems, the operating system controls program access and security. For criteria set configuration, refer to Identifying Operating Systems, page 80.Variables—determine how many executables or applications are included in Top N reports, and the span of time that each data point represents for Risk Trend reports. For configuration details, refer to Setting Variables, page 76.
Websense, Inc. includes predefined criteria sets in CPM Reporter. You may associate them with report templates without having to spend time configuring the exact information you want to include. You may also create custom criteria sets by copying and then modifying the predefined criteria sets, or by creating new criteria sets "from scratch."
CPM Reporter stores custom criteria sets for each administrative account. When you log on, CPM Reporter automatically calls the criteria sets associated with your user name. Anyone else using CPM Reporter cannot use, modify, or delete your criteria sets. For complete details, refer to Chapter 4: Criteria Sets, page 51.
When you associate a criteria set with a report template, the default settings in the report template may overwrite the settings in the criteria set. For example, you select a criteria set that includes the permitted disposition, but the report
Administrator’s Guide 29

Chapter 2: Getting Started
template does not recognize dispositions. When CPM Reporter runs the report, it will not include disposition details, regardless of the settings in the criteria set.
Users/GroupsThe CPM Server gathers end-user and group information from your networks. The data affects impacts both Client Policy Manager and CPM Reporter. The networks group subsets of directory objects as follows:
The largest subsets are domains. A domain typically includes one or more user groups, and any number of individual, non-grouped, end users.The medium-sized subsets are user groups. These often identify a particular department or organizational role, for example, the Finance department or the Management team. Any user group may contain any number of individual users and other user groups.The smallest subsets are users—individual staff members. These users may have the following characteristics:
An entry as a unique individual, without any other connectionOne of many individuals within a user group or domainBelong to any number of user groups or domains
You select the users, groups, and domains the report will include in the Users, Groups, and Domains page in the Manage Criteria Set sequence. For configuration details, refer to Selecting Users, Groups, and Domains, page 63.
Risk ClassesCPM Reporter uses risk classes to identify executables based on their value to a business organization. These risk classes, and the executables within each class, are defined by Websense, Inc., based on internal research and customer input.
An executable may appear in more than one risk class. For example, a graphics executable may appear in both the Business Usage and Network Bandwidth Loss risk classes. As a result, you must closely evaluate reports that include risk classes and show percentages that appear to be greater than 100%.
NOTEUsers, groups, and domains do not affect inventory reports.
30 Websense CPM Reporter

Chapter 2: Getting Started
Risk classes include the following:
Legal Liability: The executables in this risk class may lead to liability issues. Examples include unauthorized P2P file sharing, gambling, and adult-oriented executables.Bandwidth Usage: The executables in this risk class use a significant amount of network bandwidth and may impact network operations. Examples include streaming media players and Peer-to-peer file sharing executables.Non-business Usage: The executables in this risk class are not generally related to business use. Examples include Napster, Windows media player, RealPlayer, and Instant Messaging executables.Security Risk: The executables in this risk class may pose security risk. Examples include password snooping/cracking software, port sniffers, denial-of-service attacks, worms, viruses, Trojan horses, and so forth.
You can select the risk classes your reports will include in the Risk Classes page of the Manage Criteria Set sequence. For configuration details, refer to Selecting Risk Classes, page 70.
CategoriesClient Policy Manager uses categories to divide executables into subsets, providing system administrators greater control over executable access. A category may include one or more subcategories that further divide a main category into even smaller subsets.
CPM administrators can add new categories and subcategories for Client Policy Manager if there is a need to add further granularity. The administrator can also move executables from the predefined categories and subcategories to reflect business requirements.
CPM Reporter allows you to run reports using Websense categories and subcategories, and any additional categories and subcategories that your organization defines.
Websense categories are:
Access/Privacy/Security—represents executables that restrict system access or threaten it. Subcategories include Authentication and Authorization, Encryption and PKI, Firewalls, Hacking, Remote Access, Spyware, and System Audit.
Administrator’s Guide 31

Chapter 2: Getting Started
Audio/Video—contains executables that support audio and video. Subcategories are Media Players and Image Viewers.Communications—represents communication executables. Subcategories include Collaboration, Dedicated Browsers, Email, Instant Messaging, Peer-to-peer file sharing, Telephony, Conferencing and Fax, and Web Browser executables.Critical Functions—represents executables that are never blocked. Subcategories include file management and operating systems.Entertainment—represents executables that have little to no business value. Subcategories include Games, Gambling, Adult, and Screen Savers.Malware—represents executables identified as malicious code, including executables, applets, and scripts. The only subcategory is Malicious Software.Miscellaneous—represents common business executables. Subcategories include Java Files, Other, Scripts, and Temporary Internet Files.Productivity—represents common business executables. Subcategories include Contact Managers; CRM; Data Warehousing, Analytics and Reporting; Database, Document Viewers, ERP and SCM; Graphics; Presentation; Project Managers; Proprietary; Reference and Information tools; Search, Retrieval, and Knowledge Management; Software Development; Spreadsheets; Suites and Integrations; Web and Desktop Publishing; and Word Processing executables.System—represent executables necessary for machine operations. Subcategories include Device Drivers, File Management, Infrastructure, Installers, Miscellaneous Utilities, Operating Systems, and Scripting Hosts.
For the most recent definitions, access http://www.websense.com/global/en/SupportAndKB/. For categories and subcategories that are specific to your company, contact your CPM system administrator.
You will identify the subcategories to include in your reports when you are working in the Categories page of the Manage Criteria Set sequence. For configuration details, refer to Selecting Categories, page 72.
32 Websense CPM Reporter

Chapter 2: Getting Started
DispositionsThe CPM policy use dispositions to identify how Client Agent handles executables when employees try to launch them. When an employee tries to launch an executable, Client Agent sends the executable information and results of the launch request to CPM Log Database.
CPM Reporter lets you run reports on executable launch results. You can select dispositions for reporting in any combination, which are:
Block—identifies executable launch requests that were blocked. This selection also blocks port/network access.Continue-Block—identifies executable launch requests where the employee received a Continue message, and then decided to cancel the request. This selection permits port access if the employee continues. The port options may be limited by CPM settings.Continue-Permit—identifies executable launch requests where the employee received a Continue message, and then decided to open the executable anyway.This selection permits port access if the employee continues. The port options may be limited by CPM settings.Permit—identifies executable launch requests that were permitted to execute normally. This selection permits port access if the employee continues. The port options may be limited by CPM settings. The process is completely transparent to the employee requesting the launch.
Select the dispositions to include in your reports in the Dispositions page of the Manage Criteria Set sequence. For configuration details, refer to Selecting Dispositions, page 74.
Report Sets
Report sets let you select one or more report templates and schedule them as a group. You choose the type or types of reports you want to see, the information they contain, and when you want CPM Reporter to query CPM Log Database and run the report.
For each report set, you can select or define the following:
A unique name.Multiple report templates that CPM Reporter will run at the same time.
Administrator’s Guide 33
Chapter 2: Getting Started
One or more criteria sets that identify the information the report or reports will include. You must associate one criteria set with one report set, but can use the same criteria set with any number of individual reports.Run time set to run immediately, run at a specified time, or run on a recurring basis, including by hour, day, week, or month.Report format and layout.Delivery options for potential email recipients or FTP location.
Report sets are private: only you have access to report sets you create. For complete details, refer to Chapter 6: Report Sets.
Logging Off
The CPM Reporter toolbar includes a Log Off option. This closes your connection to the server, letting you continue working in the browser without keeping an open connection. Open connections may cause other users problems if there are numerous connections. Closing the browser automatically disconnects the session. There is also an automatic log off after 20 minutes of inactivity.
Click Log Off. The Websense Log Off window opens.
If you want to log back into CPM Reporter or open the Real Time Analyzer, click Log Back On. The Log On window opens. Real-Time Analyzer is available only if you subscribe to Websense EIM.
34 Websense CPM Reporter
CHAPTER 3 Report Templates
CPM Reporter includes report templates that provide the layout for reports. Depending on the template, custom criteria can be set, which define the information that appears in the report.
Report templates are identified alphabetically, by report template type, and individually. Individual descriptions identify what the report layout is, default criteria sets, and potential benefits.
Report Template Types
When you run reports, you must first select the type of report you want from the Report Types drop-down menu, which appears in the Run and Schedule sequences. For details, read Chapter 5 Quick Reports, and Chapter 6 Report Sets.
The report types and the individual reports within each report type are:
All—shows all report templates in alphabetic order.Inventory-Executables—reports machine data by machine, risk class, or risk class and category. For a list of available reports, see Inventory-Executables, page 37.Inventory-Software Applications—reports machine data by operating system, or by publisher. Summary reports are available. For a list of available reports, see Inventory-Software Applications, page 39.Removable Media/Launches—reports machine information by date and time; date, time, and file path; groups; users; risk classes; blocked launches; permitted launches; and Top N categories or executables. Summary reports are available. For a list of available reports, see Removable Media/Launches, page 45.
Administrator’s Guide 35
Chapter 3: Report Templates
Report Templates and Criteria Sets
When you run or schedule reports, you can associate a report template—which defines the report layout and delivery—with a criteria set that defines the types of information CPM Reporter includes when it calls information for reports. When you associate a report template and a criteria set, you should make sure the two are compatible: a number of predefined settings in the report template will overwrite similar settings in the criteria set.
For example, if you create a criteria set that includes machine criteria, and then associate it with report that does not include machines, machine details will not appear in the final report. A similar situation may occur with summary reports, where the report template ignores some criteria and uses others.
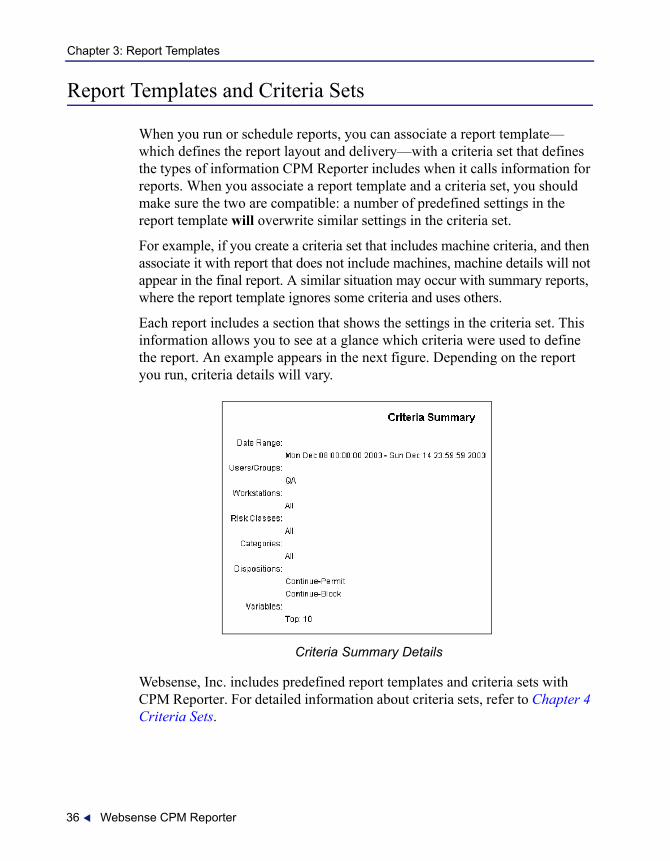
Each report includes a section that shows the settings in the criteria set. This information allows you to see at a glance which criteria were used to define the report. An example appears in the next figure. Depending on the report you run, criteria details will vary.
Criteria Summary Details
Websense, Inc. includes predefined report templates and criteria sets with CPM Reporter. For detailed information about criteria sets, refer to Chapter 4 Criteria Sets.
36 Websense CPM Reporter

Chapter 3: Report Templates
Inventory-Executables
Reports in the Inventory Reports-Software Applications group identify executables found during inventory. These reports display the information by various preset parameters, including machine name, risk class, and categories.
Executable Inventory by MachineThe Executable Inventory by Machine report shows the executables installed on a given machine. The report can help identify what is installed on machines, and determine what can be removed to increase machine and network security. This report ignores the risk classes, dispositions, and variables in the criteria set. The report provides detail in a tabular format.
Executable Inventory by Machine Report
The report contains the following criteria:
Machine names, sorted in ascending orderAsset tag associated with the machineExecutable names, sorted in ascending orderNumber of installations found for the executable
Administrator’s Guide 37
Chapter 3: Report Templates
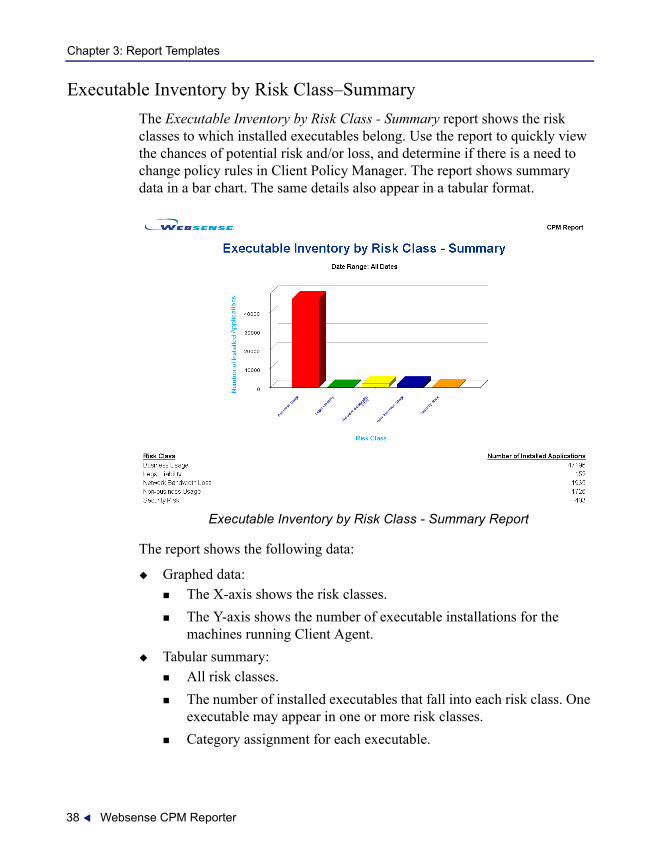
Executable Inventory by Risk Class–SummaryThe Executable Inventory by Risk Class - Summary report shows the risk classes to which installed executables belong. Use the report to quickly view the chances of potential risk and/or loss, and determine if there is a need to change policy rules in Client Policy Manager. The report shows summary data in a bar chart. The same details also appear in a tabular format.
Executable Inventory by Risk Class - Summary Report
The report shows the following data:
Graphed data:The X-axis shows the risk classes.The Y-axis shows the number of executable installations for the machines running Client Agent.
Tabular summary:All risk classes.The number of installed executables that fall into each risk class. One executable may appear in one or more risk classes.Category assignment for each executable.
38 Websense CPM Reporter

Chapter 3: Report Templates
Executable Inventory by Risk Class and CategoryThe Executable Inventory by Risk Class and Category report shows the total number of executable installations over the time range you specify, sorted by risk class and category. The information can help identify what is installed on specific machines, and to help plan for software standardization.
This report ignores the categories, variables, and dispositions in the criteria set. The report provides detail in a tabular format.
Executable Inventory by Risk Class and Category Report
The report contains the following:
Risk classCategory and subcategoryExecutable rangeTotal number of installations for each executable
Inventory-Software Applications
Reports in the Inventory Reports-Software Applications group identify software applications found during inventory. The inventory collects information about the operating system, other applications, and publisher data.
Administrator’s Guide 39
Chapter 3: Report Templates
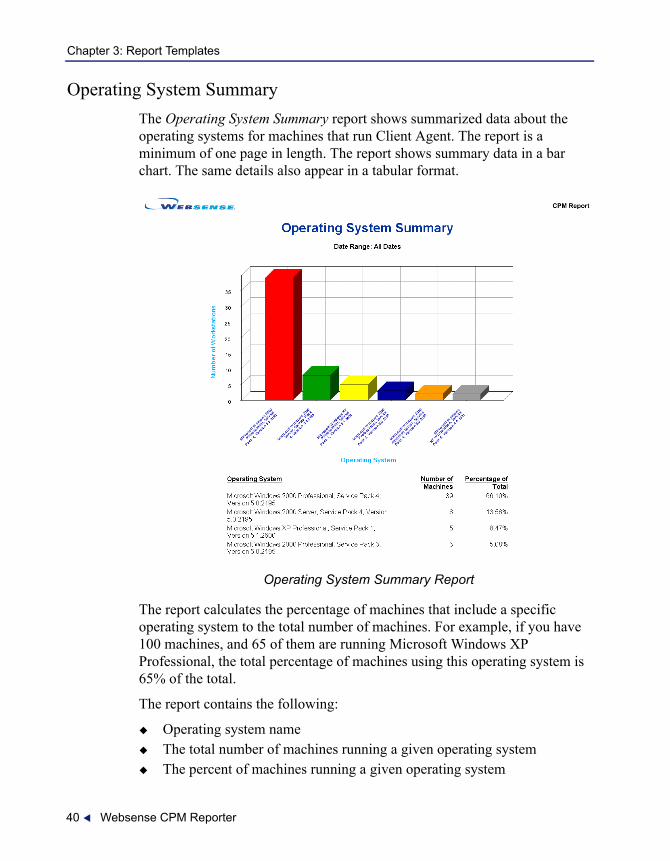
Operating System SummaryThe Operating System Summary report shows summarized data about the operating systems for machines that run Client Agent. The report is a minimum of one page in length. The report shows summary data in a bar chart. The same details also appear in a tabular format.
Operating System Summary Report
The report calculates the percentage of machines that include a specific operating system to the total number of machines. For example, if you have 100 machines, and 65 of them are running Microsoft Windows XP Professional, the total percentage of machines using this operating system is 65% of the total.
The report contains the following:
Operating system nameThe total number of machines running a given operating systemThe percent of machines running a given operating system
40 Websense CPM Reporter
Chapter 3: Report Templates
The total number of machines included in the reportData sorted by the total number of machines that include the same operating system
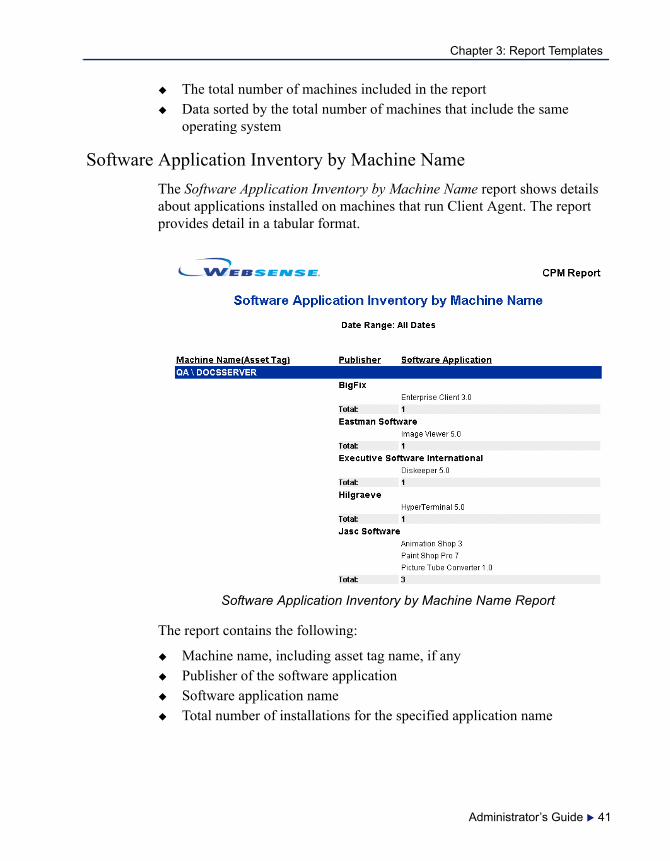
Software Application Inventory by Machine NameThe Software Application Inventory by Machine Name report shows details about applications installed on machines that run Client Agent. The report provides detail in a tabular format.
Software Application Inventory by Machine Name Report
The report contains the following:
Machine name, including asset tag name, if anyPublisher of the software applicationSoftware application nameTotal number of installations for the specified application name
Administrator’s Guide 41

Chapter 3: Report Templates
Software Application Inventory by Publisher - DetailedThe Software Application Inventory by Publisher - Detailed report shows details about applications installed on machines that run Client Agent. The report provides detail in a tabular format.
Software Application Inventory by Publisher - Detailed Report
The report contains the following:
Publisher nameTotal number of software applications associated with the identified publisherTotal number of machines where the identified software is installedTotal number of installations of identified software
The report sorts data by the total number of machines that include the identified application.
42 Websense CPM Reporter
Chapter 3: Report Templates
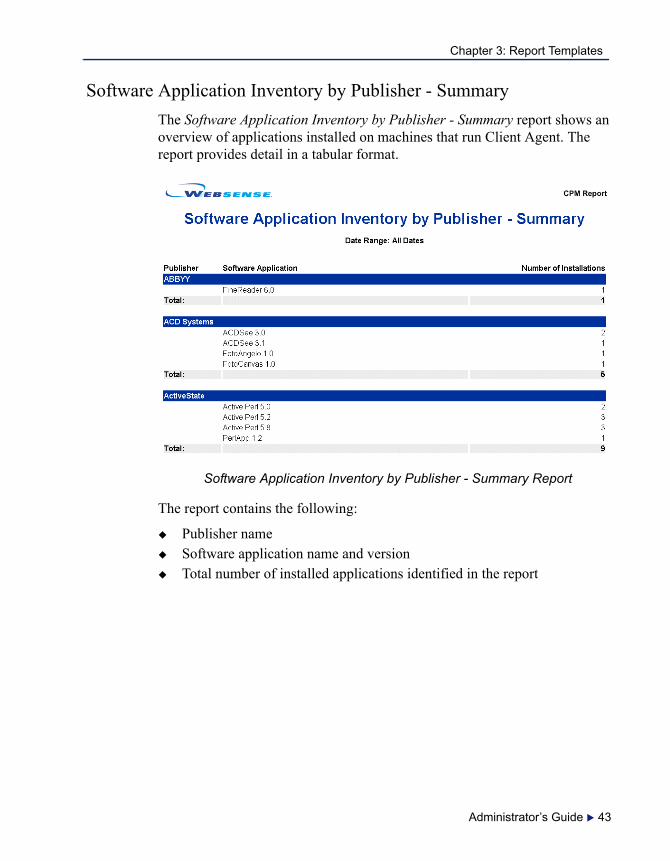
Software Application Inventory by Publisher - SummaryThe Software Application Inventory by Publisher - Summary report shows an overview of applications installed on machines that run Client Agent. The report provides detail in a tabular format.
Software Application Inventory by Publisher - Summary Report
The report contains the following:
Publisher nameSoftware application name and versionTotal number of installed applications identified in the report
Administrator’s Guide 43
Chapter 3: Report Templates
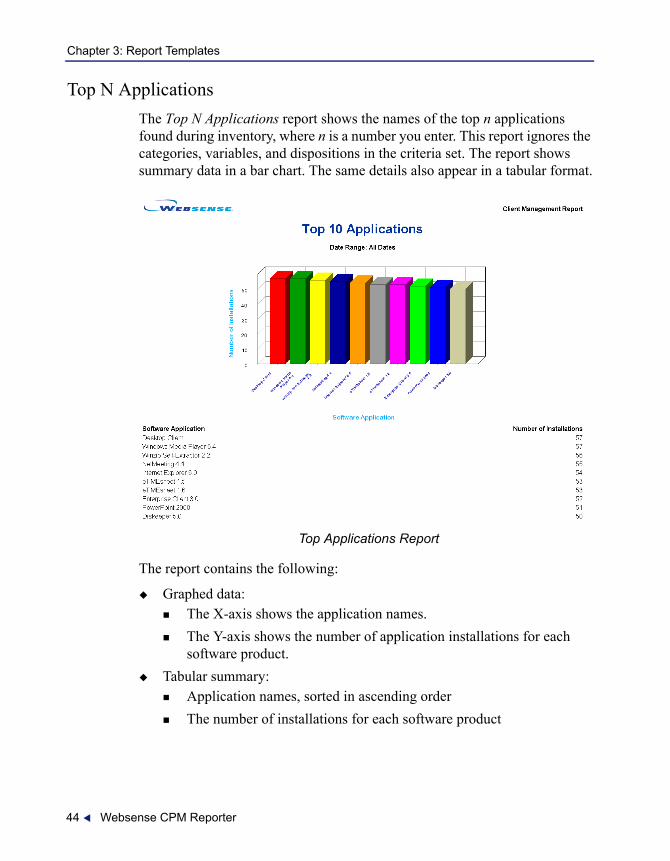
Top N ApplicationsThe Top N Applications report shows the names of the top n applications found during inventory, where n is a number you enter. This report ignores the categories, variables, and dispositions in the criteria set. The report shows summary data in a bar chart. The same details also appear in a tabular format.
Top Applications Report
The report contains the following:
Graphed data:The X-axis shows the application names.The Y-axis shows the number of application installations for each software product.
Tabular summary:Application names, sorted in ascending orderThe number of installations for each software product
44 Websense CPM Reporter

Chapter 3: Report Templates
You can define the number of applications that appear in the report using the Variables page in the Manage Criteria Set sequence. For example, if you select 5, CPM Reporter collects the information for the five applications that were found most frequently during inventory. The default value is 10. For configuration details, read Setting Variables, page 76.
Removable Media/Launches
Reports in the Removable Media/Launches group identify launch attempts and the action taken by Client Agent.
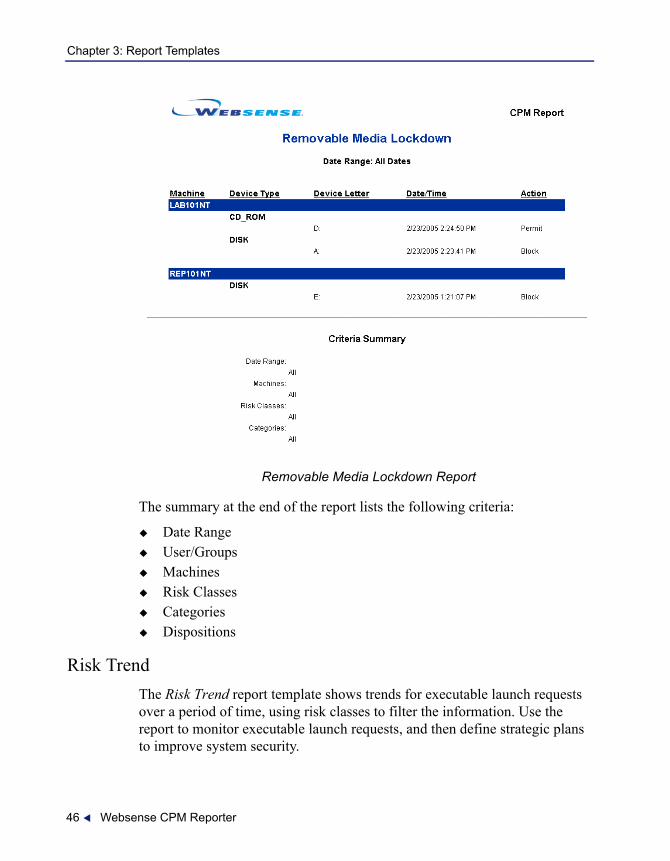
Removable Media LockdownThe Removable Media Lockdown report displays the list of drives (flash drives, CD/DVD burners, floppy drives, external hard drives) that were blocked or permitted on certain dates and times.
The report contains the following:
Machine NameDevice TypeDevice LetterAction (Block or Permit)Date/Time
The only criteria sets that are applicable in this report are Machines, Date Range, and Dispositions. Although other criteria are visible in the Manage Criteria Sets page, selecting these criteria will have no affect.
Administrator’s Guide 45
Chapter 3: Report Templates
Removable Media Lockdown Report
The summary at the end of the report lists the following criteria:
Date RangeUser/GroupsMachinesRisk ClassesCategoriesDispositions
Risk TrendThe Risk Trend report template shows trends for executable launch requests over a period of time, using risk classes to filter the information. Use the report to monitor executable launch requests, and then define strategic plans to improve system security.
46 Websense CPM Reporter

Chapter 3: Report Templates
The Risk Trend report ignores any categories in the criteria set. The report shows summary data in a bar chart; the same details also appear in a tabular format.
Corporate Risk Trend Report
The report contains the following:
Graphed data:The X-axis shows the dates the report includes, which is defined by the date setting you choose.The Y-axis shows the percentage of change for executable launch requests.For each risk class, the chart includes one point for the number of executable launch requests occurring during the time frame the data point defines, where lines connect each data point to show the trend.
Tabular summary:Dates associated with each data pointThe risk classes with which launch requests were associatedThe number of executable launch requests within each risk class for a given period of time
Administrator’s Guide 47
Chapter 3: Report Templates
The average percentage of change that occurred between data points for each risk class
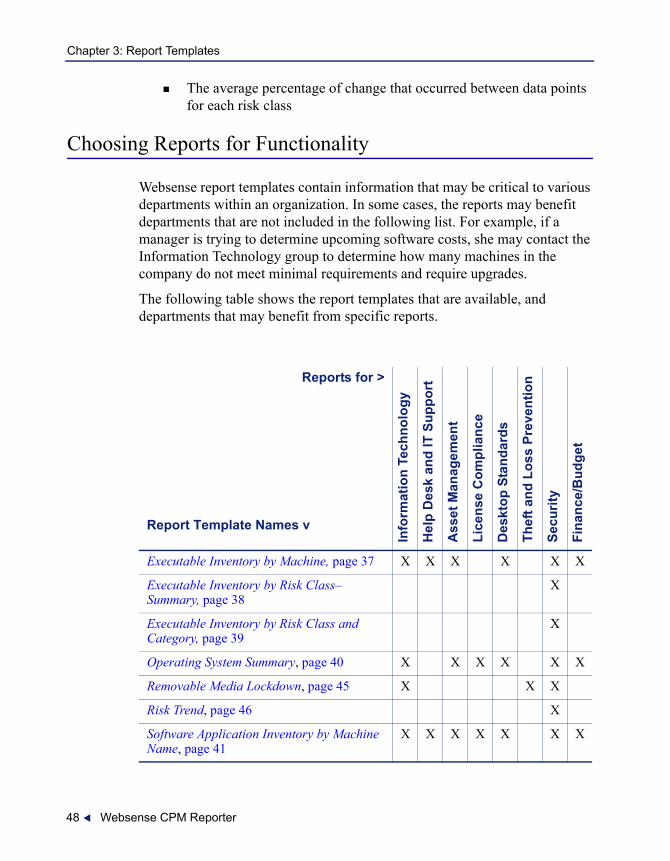
Choosing Reports for Functionality
Websense report templates contain information that may be critical to various departments within an organization. In some cases, the reports may benefit departments that are not included in the following list. For example, if a manager is trying to determine upcoming software costs, she may contact the Information Technology group to determine how many machines in the company do not meet minimal requirements and require upgrades.
The following table shows the report templates that are available, and departments that may benefit from specific reports.
Reports for >
Report Template Names v
Info
rmat
ion
Tech
nolo
gy
Hel
p D
esk
and
IT S
uppo
rt
Ass
et M
anag
emen
t
Lice
nse
Com
plia
nce
Des
ktop
Sta
ndar
ds
Thef
t and
Los
s Pr
even
tion
Secu
rity
Fina
nce/
Bud
get
Executable Inventory by Machine, page 37 X X X X X X
Executable Inventory by Risk Class–Summary, page 38
X
Executable Inventory by Risk Class and Category, page 39
X
Operating System Summary, page 40 X X X X X X
Removable Media Lockdown, page 45 X X X
Risk Trend, page 46 X
Software Application Inventory by Machine Name, page 41
X X X X X X X
48 Websense CPM Reporter
Chapter 3: Report Templates
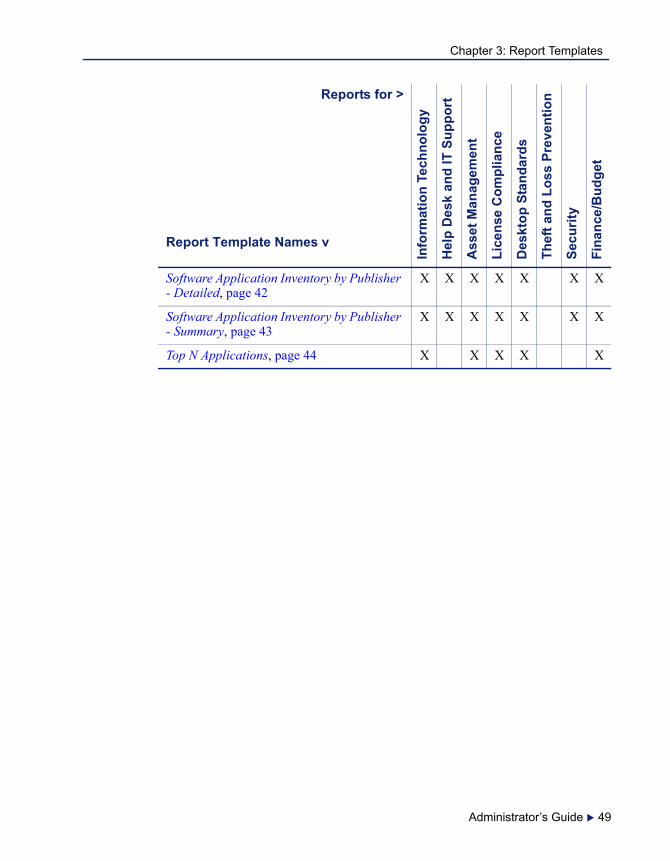
Software Application Inventory by Publisher - Detailed, page 42
X X X X X X X
Software Application Inventory by Publisher - Summary, page 43
X X X X X X X
Top N Applications, page 44 X X X X X
Reports for >
Report Template Names v
Info
rmat
ion
Tech
nolo
gy
Hel
p D
esk
and
IT S
uppo
rt
Ass
et M
anag
emen
t
Lice
nse
Com
plia
nce
Des
ktop
Sta
ndar
ds
Thef
t and
Los
s Pr
even
tion
Secu
rity
Fina
nce/
Bud
get
Administrator’s Guide 49

Chapter 3: Report Templates
50 Websense CPM Reporter
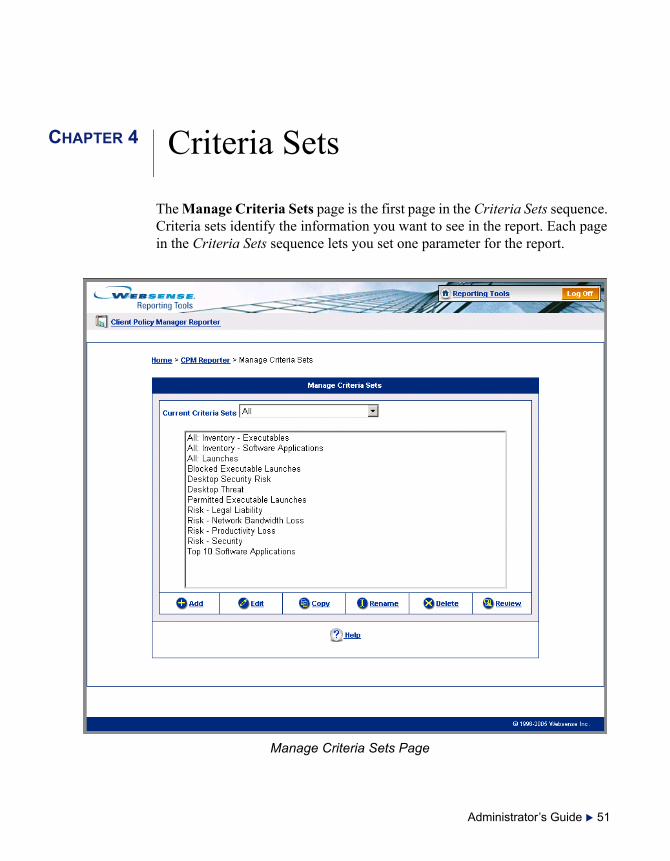
CHAPTER 4 Criteria Sets
The Manage Criteria Sets page is the first page in the Criteria Sets sequence. Criteria sets identify the information you want to see in the report. Each page in the Criteria Sets sequence lets you set one parameter for the report.
Manage Criteria Sets Page
Administrator’s Guide 51

Chapter 4: Criteria Sets
The page includes a list of predefined Websense criteria sets and any custom criteria sets you create, filtered by your selection in the Current Criteria Sets field.
If you change or delete a predefined criteria set, the change or delete affects all CPM Reporter sessions: other CPM Reporter users will not have access to the default criteria sets.Custom criteria sets are unique, linked directly to your user profile, and are not available to others in your organization.
Any report template you select in the Run or Schedule sequences may have predefined values that overwrite selections in the criteria set you associate it with. You should make sure the association you make is logical, and provides the information you want. For information about default values for report templates, read Chapter 3: Report Templates . Each report template description includes a list of the default settings.
To access the Manage Criteria Sets page:
1. Open CPM Reporter using one of the following methods:.Select Start > Programs > Websense > Web Reporting Tools.From the Websense Manager, select Actions > Launch Websense Reporting Tools.
2. Logon when prompted, using the WebsenseCPMAdministrator as the user name and the password you defined for the Websense Manager.
3. Setup the SMTP server when prompted, or select No to skip that step.4. Select CPM Reporter in the Reporting Tools menu.5. Click Criteria Sets in the Report menu.
Criteria Sets and Inventory
A CPM administrator must use Websense Manager to run inventories for machines before you can define criteria sets in CPM Reporter. If inventories are not available, the following pages are not populated:
The Applications page shows executable and publisher names found during inventory. For configuration details, read Specifying Applications, page 77.
52 Websense CPM Reporter
Chapter 4: Criteria Sets
The Operating Systems page shows the operating system names and publishers for operating systems found during inventory. For configuration details, read Identifying Operating Systems, page 80.
Each of the above pages shows only items found during the inventory. For example, if your company runs only Windows 2000 and Windows XP operating systems, these two operating systems are the only selections available in the Operating Systems page.
Managing Criteria Sets
Create and modify criteria set selections in the Manage Criteria Sets page:
Add criteria sets to meet reporting requirements. Read Adding a Criteria Set, page 57.Edit criteria sets to meet changing report requirements. Read Editing a Criteria Set, page 81.Copy criteria sets to create new criteria sets that are similar to what you need, and then make modifications as necessary. Read Copying a Criteria Set, page 82.Rename criteria sets. You can rename criteria sets, which can be useful if organizational changes occur. Read Renaming a Criteria Set, page 83.Delete criteria sets when they become obsolete. Read Deleting a Criteria Set, page 83.Review criteria sets and check the settings. This lets you see what a criteria set contains without having to move through the entire Criteria Sets sequence of pages. Read Reviewing a Criteria Set, page 84.
Using the Criteria Set MenuThe Criteria Set menu provides links to individual pages in the Criteria Sets sequence, and appears to the left of the pages in that sequence.
You do not need to define criteria in a set order even though the Next buttons define a logical path. Criteria are independent of each other, and therefore can be developed in any order you choose.
Administrator’s Guide 53

Chapter 4: Criteria Sets
Available CriteriaSome of the following criteria are presented in different combinations in the default criteria sets.
Date Range—allows you to display available information by specific dates or by a selected period. Inventory reports handle date ranges differently than other reports. For configuration details, read Setting the Date Range for a Criteria Set, page 60.Users/Groups—allows you to display reports by the person or persons who access executables, or are associated with a given machine. The options that are available vary, depending on the type of reports you select. For configuration details, read Selecting Users, Groups, and Domains, page 63.Machines—allows you to display reports by the machine where the inventory took place, or where launch requests originated. For information, read Selecting Machines, page 67.Applications—identifies the software files that can be launched. For details, read Specifying Applications, page 77.Operating systems—identifies the software that machines use to run. For information, read Identifying Operating Systems, page 80.Risk classes—identifies potential risk or loss associated with running a particular executable. For general information, read Risk Classes, page 30. For criteria set configuration, read Selecting Risk Classes, page 70.Categories—identifies what an executable is designed to do. For general details, read Categories, page 31. For criteria set configuration, read Selecting Categories, page 72.Dispositions—identifies how Client Agent handled an executable request. For general details, read Dispositions, page 33. For criteria set configuration, read Selecting Dispositions, page 74.Variables—determines how many executables or applications are included in Top N reports, and the span of time that each data point represents for Risk Trend reports. For criteria set configuration, read Setting Variables, page 76.
54 Websense CPM Reporter

Chapter 4: Criteria Sets
The following table indicates which criteria are contained in each report type.
Using the Criteria Set ToolbarWhen you are following the Manage Criteria Set sequence, a sequence-specific toolbar appears at the bottom of each page showing the following jump options:
Previous—moves back one page. This option does not appear on the Date Range page, the first page in the Criteria Sets sequence.Save & Return—saves any changes to the criteria set you have made.
If you are modifying a criteria set from the Run sequence, clicking Save & Return causes CPM Reporter to display the Format Report page in that sequence.If you are adding or modifying a criteria set using the Criteria Sets sequence, clicking Save & Return causes CPM Reporter to display the Report menu.
Help—calls the help file for the page you are working in, presenting it in a separate window.Next—moves forward to the next page in the sequence, if there is one.
Criteria Inventory—Executables
Inventory—Software Applications
Removable Media/Launches
Date Range X X X
Users/Groups X
Machines X X X
Applications X
Operating Systems
X
Risk Classes X X
Categories X X
Dispositions X
Variables X X
Administrator’s Guide 55
Chapter 4: Criteria Sets
Moving in the Criteria Set SequenceWhen you are working in a Criteria Set sequence, CPM Reporter automatically adjusts the options available, depending on the report type you choose at the start. For most pages, you have three options:
Click Next to move to the next page in the sequence.Select an option in the Criteria Set menu. Read Managing Criteria Sets, page 53.Click Previous to move to the previous page in the sequence.
Introducing Predefined Criteria Sets
Websense, Inc. pre-populates CPM Reporter with criteria sets for all report templates. These enable you to immediately use the CPM Reporter as long as there is data available in CPM Log Database.
If you edit or delete a predefined criteria set, and then decide you need it later, you will have to recreate it. You can copy a predefined criteria set that is similar to one you need, and then modify any of the settings to customize it for your use.
The following predefined criteria sets are available:
All Inventory - Executables: CPM Reporter filters information to include only executable inventory information.All Inventory - Software Applications: CPM Reporter filters information to include only software application inventory information.All Launches: CPM Reporter filters information to include all executable launch information, regardless of how Client Agent handled the request.Blocked Executable Launches: CPM Reporter filters information using only the Blocked disposition.Permitted Executable Launches: CPM Reporter filters information using only the Permitted disposition.Risk - Legal Liability: CPM Reporter filters information using only the Legal Liability risk class. All other risk classes are ignored. Risk - Network Bandwidth Loss: CPM Reporter filters information using only the Network Bandwidth Loss risk class. All other risk classes are ignored. Risk - Productivity Loss: CPM Reporter displays information using only the Productivity Loss (Non-Business Usage) risk class. All other risk classes are ignored.
56 Websense CPM Reporter
Chapter 4: Criteria Sets
Risk - Security: CPM Reporter displays information using only the Security Risk class. All other risk classes are ignored. Top 10 Software Applications: CPM Reporter displays information and show the top 10 applications.
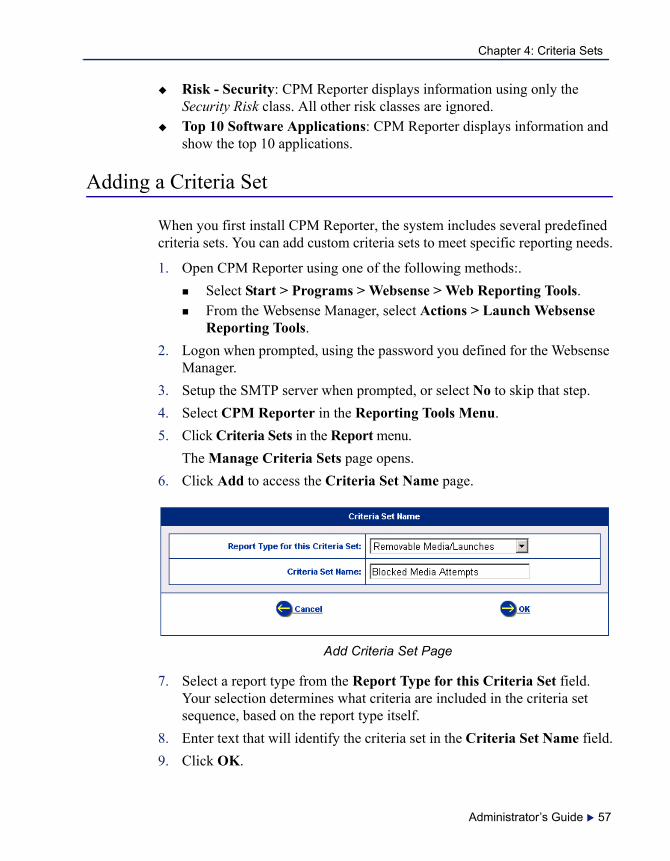
Adding a Criteria Set
When you first install CPM Reporter, the system includes several predefined criteria sets. You can add custom criteria sets to meet specific reporting needs.
1. Open CPM Reporter using one of the following methods:.Select Start > Programs > Websense > Web Reporting Tools.From the Websense Manager, select Actions > Launch Websense Reporting Tools.
2. Logon when prompted, using the password you defined for the Websense Manager.
3. Setup the SMTP server when prompted, or select No to skip that step.4. Select CPM Reporter in the Reporting Tools Menu.5. Click Criteria Sets in the Report menu.
The Manage Criteria Sets page opens.6. Click Add to access the Criteria Set Name page.
Add Criteria Set Page
7. Select a report type from the Report Type for this Criteria Set field. Your selection determines what criteria are included in the criteria set sequence, based on the report type itself.
8. Enter text that will identify the criteria set in the Criteria Set Name field.9. Click OK.
Administrator’s Guide 57

Chapter 4: Criteria Sets
10. Enter your selections in the appropriate pages of the sequence. The series of pages differs, depending on the report type you selected in step 7. If you do not enter values for a criteria, CPM Reporter uses Websense defaults.
11. Click Save & Return when you are done. CPM Reporter returns to the Manage Criteria Sets page.
CPM Reporter saves your criteria set and adds it to the Current Criteria Sets list in the Manage Criteria Sets page. You can select the new criteria set at any time and associate it with any report or report set.
Any report template you select in the Run or Schedule sequences may have predefined values that overwrite selections in the criteria set you associate with it. You should make sure the association you make is logical, and that it provides the information you want. For information about default values for report templates, read Report Templates, page 35. Each report template description includes a list of the potential and default settings.
Defining Inventory Executables Criteria SetIf you are defining a criteria set for inventory-based reports that include only executables, the sequence of criteria set development is:
1. Click Add, select Inventory Reports- Executables in the dialog box that opens, and then enter a criteria set name. Click Next.
2. Select a date range for the criteria set. For details, read Setting the Date Range for a Criteria Set, page 60.
3. Select the machines that will be included in the criteria set. For details, read Selecting Machines, page 67.
4. Select the risk classes that will be included in the criteria set. For details, read Selecting Risk Classes, page 70.
5. Select the categories that will be included in the criteria set. For details, read Selecting Categories, page 72.
6. Click Save & Return when you are done. CPM Reporter returns to the Report menu.
58 Websense CPM Reporter
Chapter 4: Criteria Sets
Defining Inventory Software Criteria SetsIf you are defining a criteria set for inventory-based reports that include only software applications, the sequence of criteria set development is:
1. Click Add, select Inventory–Software Applications in the dialog box that opens, and then enter a criteria set name. Click Next.
2. Select a date range for the criteria set. For details, read Setting the Date Range for a Criteria Set, page 60.
3. Select the machines that will be included in the criteria set. For details, read Selecting Machines, page 67.
4. Select the applications that will be included in the criteria set. For details, read Specifying Applications, page 77.
5. Select the operating systems that will be included in the criteria set. For details, read Identifying Operating Systems, page 80.
6. Select how many entries will appear in reports that use the criteria set. For details, read Setting Variables, page 76.
7. Click Save & Return when you are done. CPM Reporter returns to the Report menu.
Defining Removable Media/Launches Criteria SetsIf you are defining a criteria set for inventory-based reports that include software and applications, the sequence of criteria set development is:
1. Click Add, select Removable Media/Launches in the dialog box that opens, and then enter a criteria set name. Click Next.
2. Select a date range for the criteria set. For details, read Setting the Date Range for a Criteria Set, page 60.
3. Select the users that will be included in the criteria set. For details, read Selecting Users, Groups, and Domains, page 63.
4. Select the machines that will be included in the criteria set. For details, read Selecting Machines, page 67.
5. Select the risk classes that will be included in the criteria set. For details, read Selecting Risk Classes, page 70.
6. Select the categories that will be included in the criteria set. For details, read Selecting Categories, page 72.
Administrator’s Guide 59

Chapter 4: Criteria Sets
7. Select the dispositions that will be included in the criteria set. For details, read Selecting Dispositions, page 74.
8. Select the range of each data point for graphed charts and define how many entries will appear in the final report. For details, read Setting Variables, page 76.
9. Click Save & Return when you are done. CPM Reporter returns to the Report menu.
Setting the Date Range for a Criteria Set
The Date Range page lets you define the time range that a given report covers. The time range may be absolute or relative. Generally, absolute time frames are appropriate for one-time reports, while relative time frames are excellent for reports that will recur on a regular basis.
Once you begin working in a criteria set sequence, there are three ways to access this page:
Click Add or Edit in the Manage Criteria Sets page.Select Date Range on the Criteria Set menu.Click Previous while in the Users/Groups page.
This page appears in both inventory- and launch-based criteria sets.
To set the date range:
1. Click in the Reporting Range field and define the date range. Your selection determines what fields appear and the values you must provide. The selections include the following:
Select Report over all dates if you want a complete report of the database contents, and then click Next.Select Set a range of dates if you want the system to collect data for the past n hours, days, weeks, or months, where n is a user-defined value. This is useful for reports that run on schedule. Read Setting a Range of Dates, page 61.Select Set a specific start and end date to define the exact time frame the report will cover. Read Setting a Specific Start and End Date and Time, page 62.
2. Click Next to move to the next page in the sequence.
60 Websense CPM Reporter
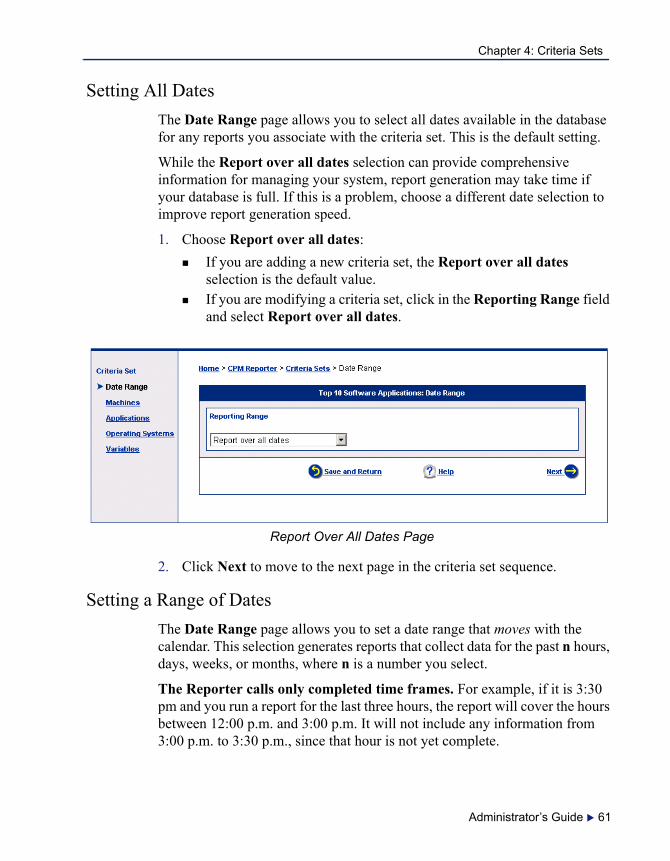
Chapter 4: Criteria Sets
Setting All DatesThe Date Range page allows you to select all dates available in the database for any reports you associate with the criteria set. This is the default setting.
While the Report over all dates selection can provide comprehensive information for managing your system, report generation may take time if your database is full. If this is a problem, choose a different date selection to improve report generation speed.
1. Choose Report over all dates:If you are adding a new criteria set, the Report over all dates selection is the default value.If you are modifying a criteria set, click in the Reporting Range field and select Report over all dates.
Report Over All Dates Page
2. Click Next to move to the next page in the criteria set sequence.
Setting a Range of DatesThe Date Range page allows you to set a date range that moves with the calendar. This selection generates reports that collect data for the past n hours, days, weeks, or months, where n is a number you select.
The Reporter calls only completed time frames. For example, if it is 3:30 pm and you run a report for the last three hours, the report will cover the hours between 12:00 p.m. and 3:00 p.m. It will not include any information from 3:00 p.m. to 3:30 p.m., since that hour is not yet complete.
Administrator’s Guide 61
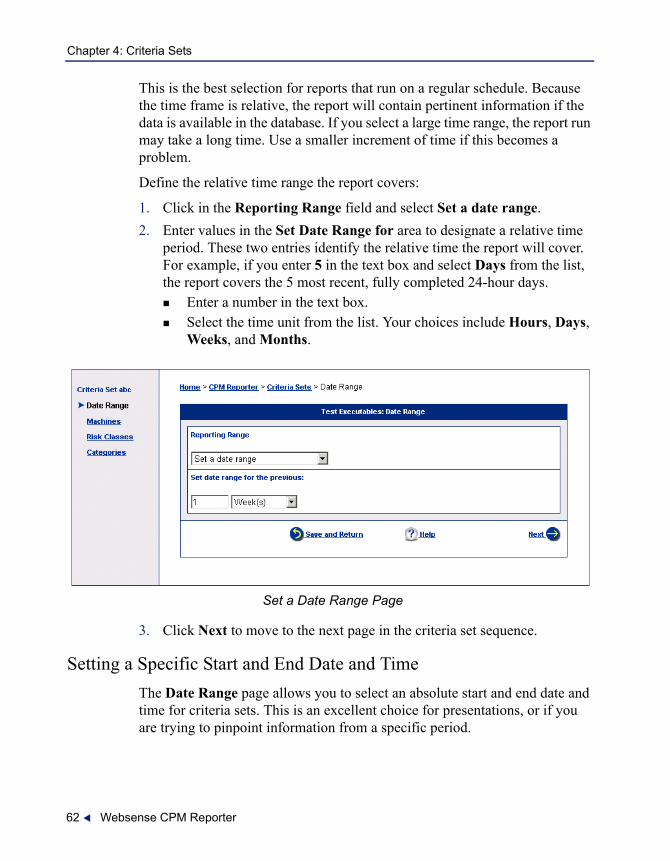
Chapter 4: Criteria Sets
This is the best selection for reports that run on a regular schedule. Because the time frame is relative, the report will contain pertinent information if the data is available in the database. If you select a large time range, the report run may take a long time. Use a smaller increment of time if this becomes a problem.
Define the relative time range the report covers:
1. Click in the Reporting Range field and select Set a date range.2. Enter values in the Set Date Range for area to designate a relative time
period. These two entries identify the relative time the report will cover. For example, if you enter 5 in the text box and select Days from the list, the report covers the 5 most recent, fully completed 24-hour days.
Enter a number in the text box.Select the time unit from the list. Your choices include Hours, Days, Weeks, and Months.
Set a Date Range Page
3. Click Next to move to the next page in the criteria set sequence.
Setting a Specific Start and End Date and TimeThe Date Range page allows you to select an absolute start and end date and time for criteria sets. This is an excellent choice for presentations, or if you are trying to pinpoint information from a specific period.
62 Websense CPM Reporter
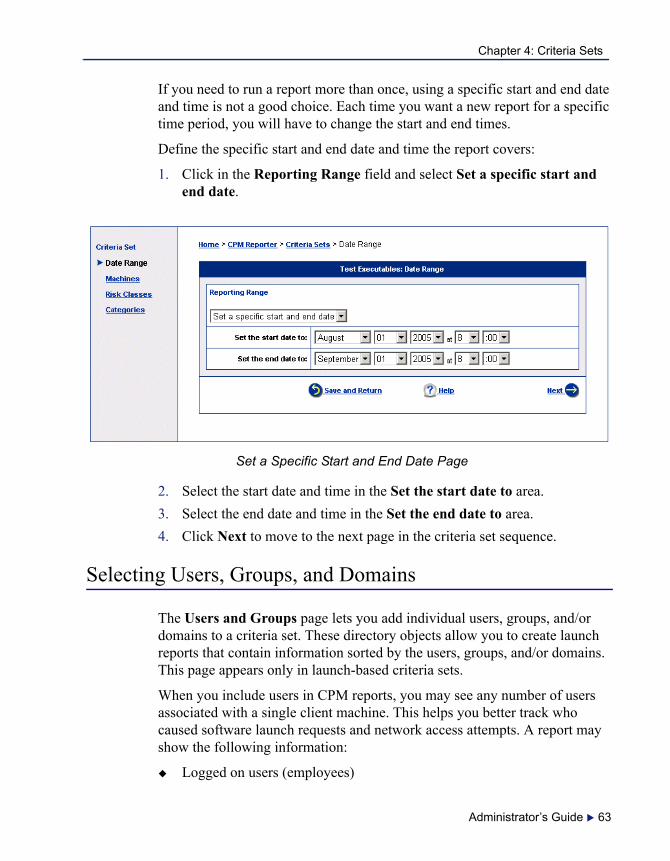
Chapter 4: Criteria Sets
If you need to run a report more than once, using a specific start and end date and time is not a good choice. Each time you want a new report for a specific time period, you will have to change the start and end times.
Define the specific start and end date and time the report covers:
1. Click in the Reporting Range field and select Set a specific start and end date.
Set a Specific Start and End Date Page
2. Select the start date and time in the Set the start date to area.3. Select the end date and time in the Set the end date to area.4. Click Next to move to the next page in the criteria set sequence.
Selecting Users, Groups, and Domains
The Users and Groups page lets you add individual users, groups, and/or domains to a criteria set. These directory objects allow you to create launch reports that contain information sorted by the users, groups, and/or domains. This page appears only in launch-based criteria sets.
When you include users in CPM reports, you may see any number of users associated with a single client machine. This helps you better track who caused software launch requests and network access attempts. A report may show the following information:
Logged on users (employees)
Administrator’s Guide 63
Chapter 4: Criteria Sets
Administrator (system administrators)Local Service (software launches/network access triggered for/by the operating system)System (software launches/network access triggered for/by installed software)
Options and titles in the Users and Groups page vary, depending on the type of reports and report sets you define:
If you are defining criteria sets for any inventory report including software, the Users and Groups page does not appear.If you are defining criteria sets for Removable Media/Launches, the Users and Groups page may or may not appear.
When you are defining a criteria set for report types that may include users, groups, or domains, there are three ways to access this page:
Click Next while in the Date Range page.Select Users/Groups on the Criteria Set menu.Click Previous while in the Machines page.
64 Websense CPM Reporter

Chapter 4: Criteria Sets
Users and Groups Page
Administrator’s Guide 65
Chapter 4: Criteria Sets
Adding Users, Groups, or DomainsTo add directory objects, you must first search for users, groups, and domains. When the search is complete, the results appear in the Search Results list. There are two ways to search:
To locate all users, groups, or domains, click the appropriate Search by radio button, and then click Search. You do not need to enter any values in the Search text box. CPM Reporter returns all available directory objects using the parameter you select.
Users: Click the Users radio button, and then click Search.Groups: Click the Groups radio button, and then click Search.Domains: Click the Domains radio button, and then click Search.
To locate a directory object by a known parameter:1. Select the appropriate radio button to define what CPM Reporter will
look for. Your choices are Users, Groups, and Domains.2. Enter the specific user, group, or domain name in the empty Search
text box, and then click Search. You can also enter a partial string: CPM Reporter returns the directory objects that include that string in their user, group, or domain name.
CPM Reporter populates the Search Results list with the directory objects that match your search parameters. You can now add directory objects to the criteria set:
1. Select the directory object you want to add to the criteria set, and then click Add. The directory object appears in the Selected Users, Groups and Domains list.
2. Continue searching and adding directory objects as necessary.3. Click Next to move to the next page in the criteria set sequence.
Removing Users, Groups, or DomainsThe Users and Groups page lets you remove individual users, groups, and/or domains from a criteria set. This lets you maintain criteria sets that are appropriate to the current situation.
For example, early in the Client Policy Manager development cycle you decided to include only individual employees in criteria sets rather than groups. One Accounting employee is now being transferred out of the
66 Websense CPM Reporter

Chapter 4: Criteria Sets
department. You no longer have any need to include him in the Accounting reports, so you remove his name from the user list in the Accounting criteria set.
To remove users, groups, or domains:
1. In the Selected Users, Groups, and Domains list, select the user, group, or domain you want to remove from the criteria set, and then click Remove.
2. Continue removing users, groups, or domains until your list is appropriate for the criteria set.
3. Click Next to move to the next page in the criteria set sequence.
Selecting Machines
The Machines page allows you to add machines to criteria sets. Machines are defined as the machines on a network that are recognized by CPM Server, and include a copy of the current Client Agent. This page appears in both inventory and launch-based criteria sets.
All report types include machine selections. You may add machines using machine names, IP addresses, or asset tags.
Administrator’s Guide 67
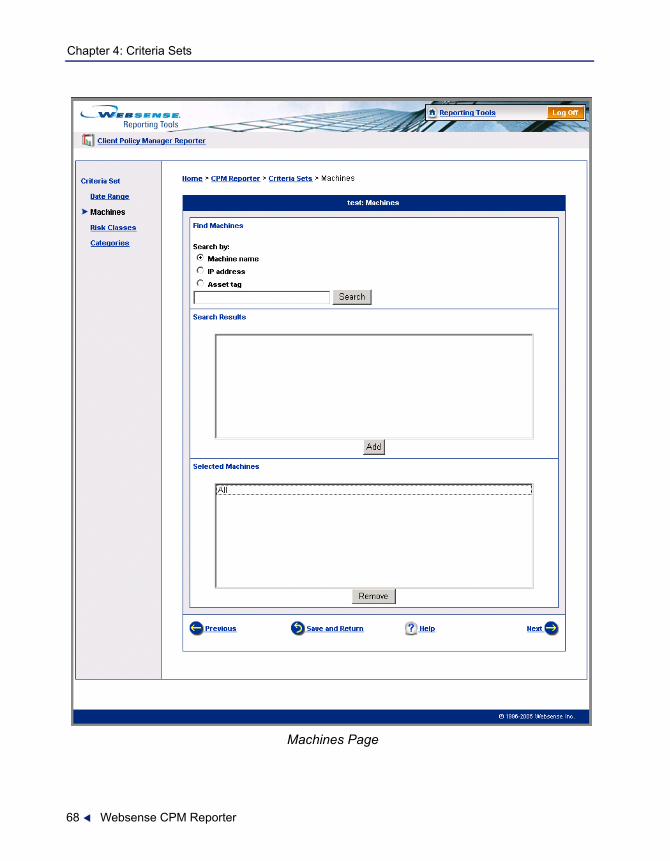
Chapter 4: Criteria Sets
Machines Page
68 Websense CPM Reporter

Chapter 4: Criteria Sets
There are three ways to access this page:
Click Next while in the:Date Range page for many inventory-based criteria sets.Users and Groups page for some inventory-based criteria sets and all launch-based criteria sets.
Select Machines on the Criteria Set menu.Click Previous while in the:
Risk Classes page for launch-based criteria sets.Applications page for inventory-based criteria sets that include software or executables.
Adding MachinesTo add machines, you must first search by machine name, IP address, or asset tag. When the search is complete, the results appear in the Search Results list. There are two ways you can define searches for machines:
To locate all machines by machine names, IP addresses, or asset tags, click the appropriate Search by radio button, and then click Search. You do not need to enter any values in the Search text box. CPM Reporter returns the available machines using the search parameter you select.
Click the Machine Name radio button to find machines or servers by the assigned machine name, and then click Search.Click the IP Address radio button to find machines by the assigned IP address, and then click Search.Click the Asset Tag radio button to find machines by the assigned asset tag, and then click Search.
To locate specific machines by a known parameter:Select the appropriate radio button to define the search parameters used by CPM Reporter. Your choices are Machine Name, IP Address, or Asset Tag.Enter the specific machine name, IP address, or asset tag in the empty Search text box, and then click Search. You can enter a partial string: CPM Reporter returns the machines that include that string in their machine name, IP address, or asset tag.
CPM Reporter populates the Search Results list, based on your selection. For example, if you searched by IP addresses, IP addresses identify the machines in the list box. You can now add the machine to the Selected Machines list.
Administrator’s Guide 69
Chapter 4: Criteria Sets
To add machines:
1. Select the machine you want to include in the criteria set, and then click Add. The machine identification appears in the Selected Machines list.
2. Continue locating and adding machines as appropriate.3. Click Next to move to the next page in the criteria set sequence.
Removing MachinesThe Machines page lets you remove machines from the criteria set. This function enables you to maintain an appropriate list of machines for reporting. For example, your company is redesigning the building layout. There had been a machine in the corporate library but it is being removed. You can remove the machine from the criteria set to keep your reports appropriate.
To remove a machine:
1. Choose the machine you want to remove from the report in the Selected Machines list, and then click Remove.
2. Continue removing machines and servers as appropriate.3. Click Next to move to the next page in the criteria set sequence.
Selecting Risk Classes
The Risk Classes page allows you to include and exclude risk classes for a criteria set. Websense, Inc. assigns executables to risk classes, based on in-house review of the executable. Risk classes include Liability, Security, Bandwidth, and Productivity. For a complete description, read Risk Classes, page 30. This page appears only in criteria sets for executables.
An executable may be assigned to more than one risk class. For example, Instant Messaging may appear in both the Productivity and the Bandwidth risk classes. As a result, your staff must carefully analyze reports that include risk classes and percentages of totals, since an executable can appear more than once.
There are three ways to access this page for report types that include risk classes:
Click Next while in the Machines page.Select Risk Classes on the Criteria Set menu.Click Previous while in the Categories page.
70 Websense CPM Reporter
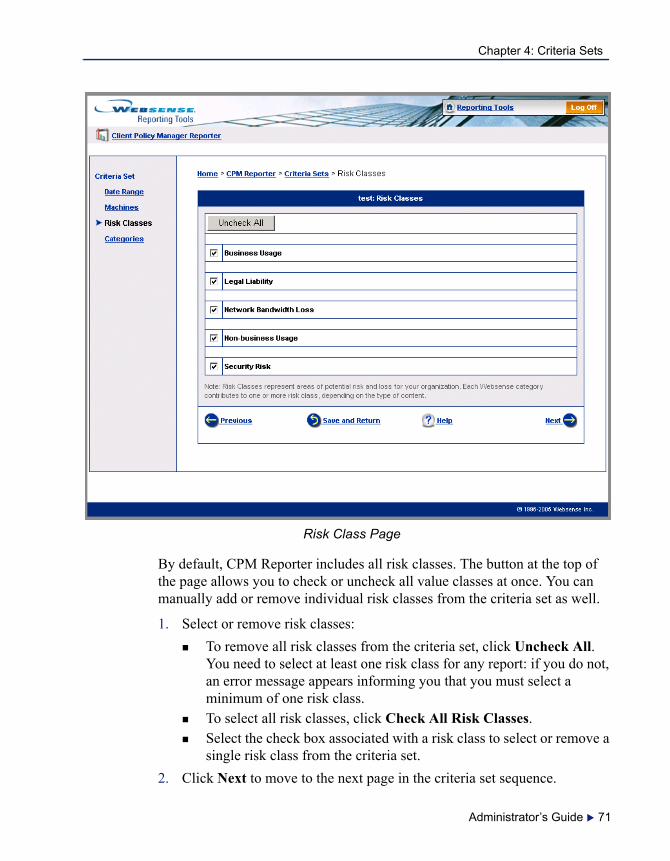
Chapter 4: Criteria Sets
Risk Class Page
By default, CPM Reporter includes all risk classes. The button at the top of the page allows you to check or uncheck all value classes at once. You can manually add or remove individual risk classes from the criteria set as well.
1. Select or remove risk classes:To remove all risk classes from the criteria set, click Uncheck All. You need to select at least one risk class for any report: if you do not, an error message appears informing you that you must select a minimum of one risk class.To select all risk classes, click Check All Risk Classes.Select the check box associated with a risk class to select or remove a single risk class from the criteria set.
2. Click Next to move to the next page in the criteria set sequence.
Administrator’s Guide 71
Chapter 4: Criteria Sets
Selecting Categories
The Categories page allows you to select or remove subcategories. This allows you to fine-tune reports to show executables that fall into specific areas of use. This page appears only in criteria sets that show executables.
For example, you can run a report that shows how many executables or executable launches fall into the Business Usage risk class, but the report will not show what areas of business usage are impacted. By selecting the specific subcategories, you can run reports that specifically limit the report to spreadsheet and project manager executables. For an overview of the various categories, read Categories, page 31.
72 Websense CPM Reporter
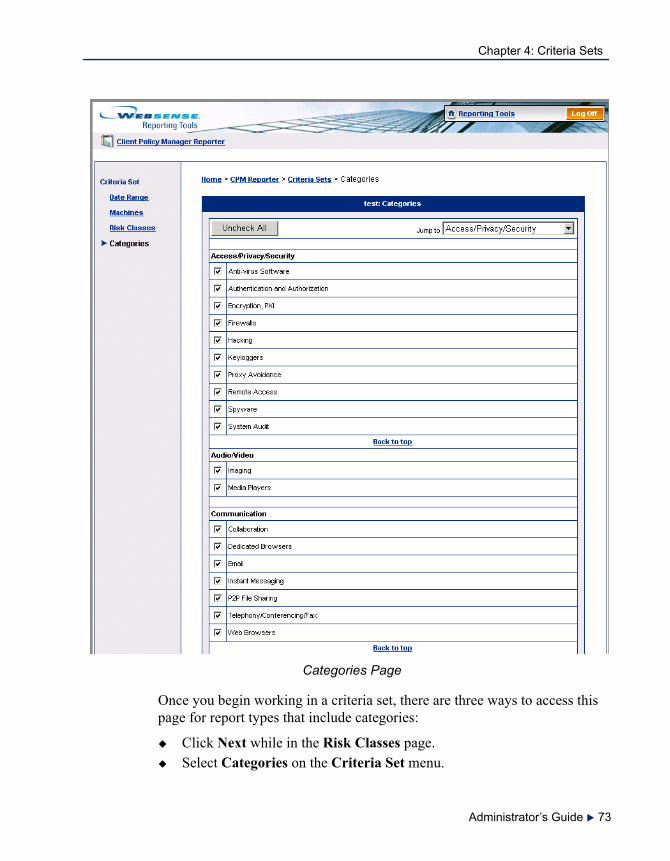
Chapter 4: Criteria Sets
Categories Page
Once you begin working in a criteria set, there are three ways to access this page for report types that include categories:
Click Next while in the Risk Classes page.Select Categories on the Criteria Set menu.
Administrator’s Guide 73

Chapter 4: Criteria Sets
Click Previous while in the Dispositions page if the criteria set is for executable launches. This page does not appear in criteria sets that are specific to inventories.
The default setting includes all categories in the database. Buttons allow you to select and deselect all subcategories in mass. You can also manually select and deselect any or all subcategories:
1. Select or remove categories:Click Uncheck All to remove all category selections. This can be useful if you want a report to include only a few of the categories, which you can then manually select. The button label changes to Check All.Click Check All to select all categories. The button label changes to Uncheck All.Select the check box associated with a risk class to select or remove a single category from the criteria set.
Because the Categories page is long, it includes a Jump to option. You can select a main category in this area, and CPM Reporter automatically moves to that section:
Click in the Jump to field, and then select the category you want to see. CPM Reporter jumps to that section of the Categories page.
A Back to top option appears throughout the list of categories. You can use this option wherever it appears to quickly navigate to the top of the page.
Click Back to top to return to the top of the Categories page.2. Click Next to move to the next page in the criteria set sequence.
Selecting Dispositions
The Dispositions page lets you select dispositions that filter information based on the results of executable launch requests. For example, you can select the Permit disposition to show only those executable launch requests that were allowed, or Block to show only those executable launch requests that were denied. This page appears only for criteria sets that are designed for launches or network lockdowns.
74 Websense CPM Reporter

Chapter 4: Criteria Sets
The available dispositions are:
Block—identifies executable launch requests that were blocked for reports that show launches.Continue-Block—identifies executable launch requests where the employee received a Continue message, and decided to cancel the request. If you are running a network lockdown report, this option is not applicable.Continue-Permit—identifies executable launch requests where the employee received a Continue message and decided to open the executable anyway. If you are running a network lockdown report, this option is not applicable.Permit—identifies executable launch requests that were permitted for reports that show launches. The process is completely transparent to the employee requesting the launch.
Dispositions Page
There are three ways to access this page for report types that include dispositions:
Click Next while in the Categories page.Select Dispositions on the Criteria Set menu.Click Previous while in the Variables page.
Administrator’s Guide 75

Chapter 4: Criteria Sets
All dispositions are selected in a new criteria set by default. You can change these individually if you want. To manually select dispositions:
1. Select the check box associated with a disposition to select or remove it.2. Click Next to move to the next page in the criteria set sequence.
Setting Variables
The Variables page allows you to define the period of time each data point represents in the Corporate Risk Trend report. This page appears in launch-based specific criteria sets.
You can set the variable to show accurate representations by using larger numbers. For example, if you set the Top N variable to 5, the information in the report shows percentages of use within those top five categories or executables, while ignoring the remaining executables that are not in the report. However, if you set the variable to 99, the percentages show a more accurate distribution.
Variables Page
There are two ways to access this page for report templates that include variables:
Click Next while in the Dispositions page.Select Variables on the Criteria Set menu.
CPM Reporter ignores the variables you set if the report template does not support them.
1. Identify the variables for the criteria set.
76 Websense CPM Reporter
Chapter 4: Criteria Sets
For Risk Trend reports, click in the For trend reports, set a data point for each field and select the amount of time that each data point will represent. Selections include Day, Week, and Month. The default value is Day. Select the check box for Make this a Top N report, and then enter a number from 1 to 99 in the text box. The default is 10. Your entry defines how many:• Executables the Top N Executables report includes. • Categories the Top N Categories report shows.
For details about these reports, refer to Removable Media/Launches, page 45.
2. Click Save & Return to save the criteria set and return to the Manage Criteria Sets page.
Specifying Applications
The Applications page allows you to add applications and publishers to, and remove them from, criteria sets. This page appears only in inventory-based criteria sets that include software. Search parameters on this page are defined as:
Applications—software files that perform processes when launchedPublishers—companies that create and sell software
Administrator’s Guide 77

Chapter 4: Criteria Sets
Applications Page
When you are defining a criteria set for report types that may include applications, there are three ways to access this page:
Click Next while in the Machine page.Select Applications on the Criteria Set menu. Click Previous while in the Operating Systems page.
78 Websense CPM Reporter
Chapter 4: Criteria Sets
Adding ApplicationsThe applications and publishers that you select here are those which will appear in the reports when you generate them. CPM Reporter populates the Search Results list, based on your selection. For example, if you searched by publisher name, publisher names identify the applications in the list.
To add applications:
1. Define a search to locate applications.To locate all applications, click the appropriate Search by button, and then click Search. You do not need to enter any values in the Search text box. CPM Reporter returns all available machines using the search parameter you select.• Click Application to find all applications by application name,
and then click Search.• Click Publisher to find all applications by the publisher, and then
click Search.To locate specific applications by a known parameter:• Select the appropriate radio button to define the search parameters
used by CPM Reporter. Your choices are Application or Publisher.
• Enter the specific application or publisher name in the empty Search text box, and then click Search. You can enter a partial string: CPM Reporter returns the applications that include that string in the application or publisher name.
2. Select the item or items you want to include in the criteria set, and then click Add. The machine identification appears in the Selected Applications and Publishers list.
3. Continue locating and adding applications as appropriate.4. Click Next to move to the next page in the criteria set sequence.
Removing ApplicationsThe Applications page lets you remove applications from a criteria set by removing application and publisher parameters from the Selected Applications and Publishers list. This function enables you to maintain an appropriate list of applications for reporting. For example, the Purchasing department is negotiating Microsoft software purchases, and does not need
Administrator’s Guide 79

Chapter 4: Criteria Sets
information about applications created by other publishers. To fine tune the reports, you remove any applications that are not published by Microsoft.
To remove applications:
1. Choose the application parameter you want to remove from the report in the Selected Applications and Publishers list, and then click Remove.
2. Continue removing applications as appropriate.3. Click Next to move to the next page in the criteria set sequence.
Identifying Operating Systems
The Operating Systems page allows you to identify the operating systems you want reports to include. Operating systems perform basic tasks required to use a computer including handling input and output, managing files and directories, and controlling disk drives and printers.
The operating system determines, to a great extent, the executables you can run. In large systems, the operating system controls program access and security. This page appears only in inventory-based criteria sets.
Operating Systems Page
The number of entries in the Operating Systems page is directly related to the types of operating systems that were found during inventory processes set in Client Policy Manager. For example, a startup company purchased machines running only Windows 2000, the Operating Systems page will contain only that entry. Another company however, may have legacy systems
80 Websense CPM Reporter

Chapter 4: Criteria Sets
that include a variety of operating systems. This company may show five or six different operating systems in the list.
To identify the operating systems to include in the report:
1. Select or remove operating systems:Click Uncheck All to remove all operating system selections. This can be useful if you want a report to include only a few of the operating systems, which you can then manually select. The button label changes to Check All.Click Check All to select all operating systems. The button label changes to Uncheck All.Select the check box associated with an operating system to select or remove that operating system.
2. Click Next to move to the next page in the criteria set sequence.
Editing a Criteria Set
You can edit criteria sets to maintain or improve the information a report will include when CPM Reporter runs it. For example, you may need to update the list of users, groups, and domains, or change category and subcategory selections. You can make these changes, and then save the modified criteria set for future use.
When the Manage Criteria Sets page opens, you can edit a criteria set. You can move sequentially through the pages by clicking Next, or you can click Save & Return at any time to save your entries and close the current sequence. You can also use the Criteria Set menu that appears on the left side of the page to jump between pages.
! WARNING
Once you make changes to a criteria set, any report template associated with that criteria set is impacted. As a result, you should carefully consider any changes you might make. If you decide that modifying a criteria set might impact report integrity, you may copy the criteria set, and then edit the copy.
Administrator’s Guide 81
Chapter 4: Criteria Sets
To edit a criteria set:
1. Select CPM Reporter in the Reporting Tools menu.2. Click Criteria Sets in the Report menu. 3. Select the criteria set you want to edit, and then click Edit.4. If the criteria set is already associated with one or more report sets, a
warning message appears. The next figure shows an example.If you want to continue editing the current criteria set, click Next.If you want to stop editing the current criteria set and choose a different one, click Previous.
5. Move through the pages in the Criteria Set sequence, making any necessary changes. Refer to the appropriate topic for information.
6. Click Save & Return to save your changes to the database. The Report menu opens.
Copying a Criteria Set
You can copy any existing criteria set when you want to create a new, similar criteria set with minimal effort. The Copy function lets you keep the original criteria set intact, while modifying values in the copy. This is especially helpful since changes to a criteria set impact any report that is associated with it.
When you copy a criteria set, the previous name appears as the default, with the addition of the word Copy. For example, if the criteria set name is Purchasing, CPM Reporter assigns the name Purchasing Copy.
To copy an existing criteria set:
1. Select CPM Reporter in the Reporting Tools menu.2. Click Criteria Sets in the Report menu.
The Manage Criteria Sets page opens.3. Select the criteria set you want to duplicate, and then click Copy. A page
opens and prompts you to name the new set.4. Accept the default value or enter an entirely new name in the text box,
and then click OK.
The page closes, and the new entry appears in the Current Criteria Sets list on the Manage Criteria Sets page. You can edit any information the new criteria set contains. Read Editing a Criteria Set, page 81.
82 Websense CPM Reporter

Chapter 4: Criteria Sets
Renaming a Criteria Set
You can change the name of criteria sets when appropriate. This can be useful if your company changes departmental names or redefines functional roles.
For example, you create an R & D criteria set, and use it to generate reports on executable launches by the Research and Development department. Several months later, the department is divided into New Product Engineering, Electrical Engineering, and Mechanical Engineering. Only New Product Engineering continues to use the R & D criteria set. As a result of the division, you decide to rename the category set to reflect the new organizational structure.
To rename a criteria set:
1. Select CPM Reporter in the Reporting Tools menu.2. Click Criteria Sets in the Report menu.
The Manage Criteria Sets page opens.3. Select the criteria set name you want to change, and then click Rename.
A message appears asking you to name the new set.4. Enter the new name in the text box, and then click OK.
The dialog closes and the new name appears in the Current Criteria Sets list.
Deleting a Criteria Set
You can remove criteria sets when they no longer are useful. This lets you keep only criteria sets that are appropriate within your work environment.
To delete a criteria set:
1. Select CPM Reporter in the Reporting Tools menu.2. Click Criteria Sets in the Report menu.
The Manage Criteria Sets page opens.3. In the Current Criteria Sets list, select the criteria set you want to
remove.4. Click Delete. A confirmation message appears.5. Click OK to close the message. The Current Criteria Set list no longer
shows the name of the criteria set you just deleted.
Administrator’s Guide 83

Chapter 4: Criteria Sets
Reviewing a Criteria Set
The Summary page shows all settings within a criteria set. You can access the page when you are in the Manage Criteria Sets page in the Criteria Sets sequence, or the Select Criteria Set page in the Run Now sequence. The criteria fields vary, depending upon the type of reports for which the criteria set is designed.
Criteria Summary Page Example
The Summary page is useful if you want to create a new criteria set that is similar to an existing one, or if you want to make sure the criteria set has settings that meet your informational needs for any report runs. You can check the settings and then determine if you want to use the criteria set or if you need to select or create another.
To return to your previous position at any time:
Click Previous to return to the Manage Criteria Sets page.
84 Websense CPM Reporter

Chapter 4: Criteria Sets
Access the Summary Page from the Manage Criteria Set SequenceIn the Criteria Sets sequence, the Review function lets you quickly check the contents of a criteria set. For example, the manager of Information Systems wants a regularly scheduled report that shows inventory for the past month. You have created a criteria set for the department that shows launch information for the past week.
You select the existing criteria set to see if the settings are appropriate for the new criteria set. If the existing criteria set is close to what you need for the new criteria set, copy the original and make the appropriate changes.
1. Select CPM Reporter in the Reporting Tools menu.2. Click Criteria Sets in the Report menu. 3. Select the criteria set you want to check, and then click Review. The
Summary page opens.4. When you are done reviewing the contents, click Back to return to the
Manage Criteria Sets page.
Access the Summary Page from the Run SequenceWhen you are in the Run sequence, you need to associate a report template with a criteria set. Using the Review option, you can select a criteria set and make sure the contents will provide you with the information you need to run the report.
For example, you want to run a report that shows blocked executable launches for the Purchasing department. You check the Purchasing criteria set, and determine that the only change you need to make is on the Dispositions page. You can then modify the existing Purchasing criteria set for that report run, and be assured that the report will contain the information you need.
1. Select CPM Reporter in the Reporting Tools menu.2. Click Run in the Report menu.
The Select Report page opens.3. Select the report you want to run, and then click Next.4. Select the criteria set you want to check, and then click Review. The
Summary page opens.5. When you are done reviewing the contents, click Back to return to the
Select Criteria Set page. You can click Next to accept the criteria set, or select and review other criteria sets to find the one you want to use.
Administrator’s Guide 85

Chapter 4: Criteria Sets
6. Continue working in the Run sequence, or click Run Now to run the report immediately.
Reviewing Criteria Sets for Inventory–ExecutablesIf you review a criteria set for inventory-based reports that show executables, the Summary page shows the following details:
Date Range: Entries show the time frame that may appear in the associated report or report set. If you want to change this criteria, read Setting the Date Range for a Criteria Set, page 60.Machines: Entries show all machines that may appear in the associated report or report set. If you want to change this criteria, read Selecting Machines, page 67.Risk Classes: Entries show the risk classes that may appear in the associated report or report set. If you want to change this criteria, read Selecting Risk Classes, page 70.Categories: Entries show the categories that may appear in the associated report or report set. If you want to change this criteria, read Selecting Categories, page 72.
Reviewing Criteria Sets for Inventory–SoftwareIf you review a criteria set for inventory-based reports that show software executables, the Summary page shows the following details:
Date Range: Entries show the time frame that may appear in the associated report or report set. If you want to change this criteria, read Setting the Date Range for a Criteria Set, page 60.Machines: Entries show all machines that may appear in the associated report or report set. If you want to change this criteria, read Selecting Machines, page 67.Applications: Entries show all applications that may appear in the associated report or report set. If you want to change this criteria, read Specifying Applications, page 77.Operating Systems: Entries show all operating systems that may appear in the associated report or report set. If you want to change this criteria, read Identifying Operating Systems, page 80.Variables: Entries show the variable settings that define how many entries may appear in the associated report or report set. If you want to change this criteria, read Setting Variables, page 76.
86 Websense CPM Reporter
Chapter 4: Criteria Sets
Reviewing Criteria Sets for Removable Media/LaunchesIf you review a criteria set for Removable Media/Launch reports, the Summary page shows the following details:
Date Range: Entries show the time frame that may appear in the associated report or report set. If you want to change this criteria, read Setting the Date Range for a Criteria Set, page 60.Users/Groups: Entries show all user, groups, and/or domains that may appear in the associated report or report set. If you want to change this criteria, read Selecting Users, Groups, and Domains, page 63.Machines: Entries show all machines that may appear in the associated report or report set. If you want to change this criteria, read Selecting Machines, page 67.Risk Classes: Entries show the risk classes that may appear in the associated report or report set. If you want to change this criteria, read Selecting Risk Classes, page 70.Categories: Entries show the categories that may appear in the associated report or report set. If you want to change this criteria, read Selecting Categories, page 72.Dispositions: These criteria identify how Client Agent handled an executable request. If you want to change this criteria, read Selecting Dispositions, page 74.Variables: These criteria determine how many executables or applications are included in Top N reports, and the span of time that each data point represents for Risk Trend reports. If you want to change this criteria, read Setting Variables, page 76.
Administrator’s Guide 87

Chapter 4: Criteria Sets
88 Websense CPM Reporter

CHAPTER 5 Quick Reports
CPM Reporter provides immediate access to reporting functions. Using the Run sequence, you can quickly define and run one report almost immediately. Once you select the report template, Client CPM Reporter can use default settings to automatically assign a criteria set and report format. This lets you generate a report within seconds. Of course, you can also move through the entire sequence if you want. The report appears in a browser window.
Working in the Run Sequence
The Run sequence presents pages in a sequential order, where each page lets you define one specific aspect of the report. The sequence is:
1. Open CPM Reporter.2. Select CPM Reporter on the main toolbar, and then click Run. The Run
sequence of pages opens.3. Enter your selections in the sequential pages, and click Next to move to
the next page.
When running a report:
If the report runs within a few seconds, it appears in a separate browser window immediately.If the report is calling a large amount of information, the Websense Report Loading message opens. When the report is complete, the message window closes and the report appears in a separate browser window.
Using the Run Report MenuThe Run Report menu provides links to the pages in the Run sequence, and appears at the left side of all pages in the sequence. Menu selections become active as you move through the pages.
Administrator’s Guide 89

Chapter 5: Quick Reports
Each option on the menu provides a link to the associated page in the Run sequence, and defines one parameter for the report as follows:
Select Report: Choose the report template you want to run. For configuration information, read Selecting a Report Template, page 90.Select Criteria Set: Select the criteria set to define the kind of information that will appear in the report. For configuration information, read Selecting a Criteria Set, page 92.Format Report: Define the report format. Any report you run using the Run sequence automatically uses the HTML format type. You can define headers and page layout. For configuration information, read Formatting a Report, page 94.Review/Run Report: Review the report settings. This is a one-page summary of the report configuration you defined. For configuration information, read Reviewing and Running a Report, page 96.
Using the Run ToolbarWhen you are within the Run sequence, a sequence-specific toolbar appears at the bottom of each page, and provides the following options:
Previous—moves back one page. This option does not appear on the Select Report page, the first page in the Run sequence.Help—calls the help file for the page you are working in, presenting it in a separate window.Run Now—processes and displays the report. If you have not manually set options in the sequence, the system uses default settings. On the Review/Run page, the label for this option is Run.Next—moves to the next page in the sequence. This option does not appear on the Review/Run page.
Selecting a Report Template
The Select Report page allows you to select a report template for immediate reporting. The page is the first in the Run sequence. For information about the available report templates, read Chapter 3 Report Templates.
90 Websense CPM Reporter

Chapter 5: Quick Reports
Select Report Page
There are three ways to access this page:
Select CPM Reporter on the Reporting Tools Menu, and then click Run.Choose Select Report from the Run Report menu.Click Previous when you are in the Select Criteria Set page.
The Report List contains all report templates. The template determines general report layout, and may include predefined information that overwrites criteria set values.
1. Select a report type from the Report List drop-down menu.All—shows all report templates in alphabetic order.Inventory-Executables—reports sort data by machine, risk class, or risk class and category.
Administrator’s Guide 91

Chapter 5: Quick Reports
Inventory-Software Applications—reports sort data by operating system or by publisher. Summary reports are available.Removable Media/Launches—reports sort information by date and time; date, time, and file path; groups; users; risk classes; blocked launches; permitted launches; and Top n categories or executables. Summary reports are available.
2. Select a specific report template from the report list.3. Click Next to select a criteria set, or click Run Now to accept default
settings and run the report immediately.
Selecting a Criteria Set
The Select Criteria Set page allows you to associate a criteria set with the report template you are preparing to run. The criteria set determines the specific information the report will include. For details, read Criteria Sets, page 51.
The report template you select may have predefined values that will overwrite selections in the criteria set you associate with it. You should make sure the association you make is logical, and provides the information you want.
92 Websense CPM Reporter

Chapter 5: Quick Reports
Select Criteria Set Page
There are three ways to access this page:
Click Next while in the Select Report page.Choose Select Criteria Set from the Run Report menu.Click Previous while in the Format Report page.
The Select Criteria Set page includes all predefined Websense criteria sets and any custom criteria sets you have created. The page includes a link that lets you modify an existing criteria set for the current report, and a link that lets you check what the selected criteria set information includes.
Administrator’s Guide 93
Chapter 5: Quick Reports
To select a criteria set:
1. Choose the criteria set you want to apply to the report. You have several options:
If you want to review a criteria set before use, click Review this criteria set. The Criteria Set Summary page opens. You can review the criteria set selections, and then click Back to return to the Select Criteria Set page. You have the following options:• Modify the criteria set you reviewed, as defined in the next bullet
item.• Select the criteria set you just reviewed and click Next to move to
the Format Report page.• Choose a completely different criteria set.If existing criteria sets are not appropriate, you can temporarily modify any existing criteria set—your changes are not saved, and do not overwrite the original criteria set.• Select the criteria set that is the most similar to the criteria set you
need, and then click Edit this criteria set for this report only. This allows you to modify the criteria set without making numerous changes. CPM Reporter opens the Manage Criteria Set sequence of pages. For configuration details, read Chapter 4: Criteria Sets, page 51.
• When you have made the necessary modifications, click Save & Return. CPM Reporter automatically returns you to the Format Report page, the next page in the Run sequence.
Select the criteria set you want to use, and then click Next to move to the Format Report page.
2. You can click Run Now at any time if you want to skip any further formatting.
Formatting a Report
The Format Report page lets you define how your report will look, and set header and date/time stamp information. Any report you request when in the Run sequence is exported using HTML format—for other formats you need to use the Report Sets option. For details, read Chapter 6 Report Sets.
The details you select appear at the top of the report as shown in the next figure. The exact position depends on your selections in the Format Report page.
94 Websense CPM Reporter

Chapter 5: Quick Reports
Header and Time Stamp Example
In the example, the report includes both header and time stamp data. The requestor decided to center both options.
There are three ways to access the Format Report page:
Click Next while in the Select Criteria Set page.Select Format Report on the Run Report menu.Click Previous while in the Review/Run page.
Format Report Page
Administrator’s Guide 95
Chapter 5: Quick Reports
You are now ready to format the report. All entries are optional:
1. Enter a title for the report in the Header text field. Your entry may be up to 80 alphanumeric characters in length.
2. Define the header position in the Align header text area by clicking the appropriate radio button. Your choices are Left, Center, and Right.
3. Define the date and time stamp in the Date/Time stamp area by clicking the appropriate radio button. Your choices are None, Date only, and Date and Time.
4. Define the time stamp position in the Align Date/Time stamp area by clicking the appropriate radio button. Your choices are Left, Center, and Right.
5. Click Next to review the report settings. You can click Run Now if you are satisfied with your settings.
Reviewing and Running a Report
The Review/Run page is the last in the Run sequence. The page shows a summary of the settings you defined for the current report. You can use this information to make sure the report is set up correctly before you run it.
96 Websense CPM Reporter
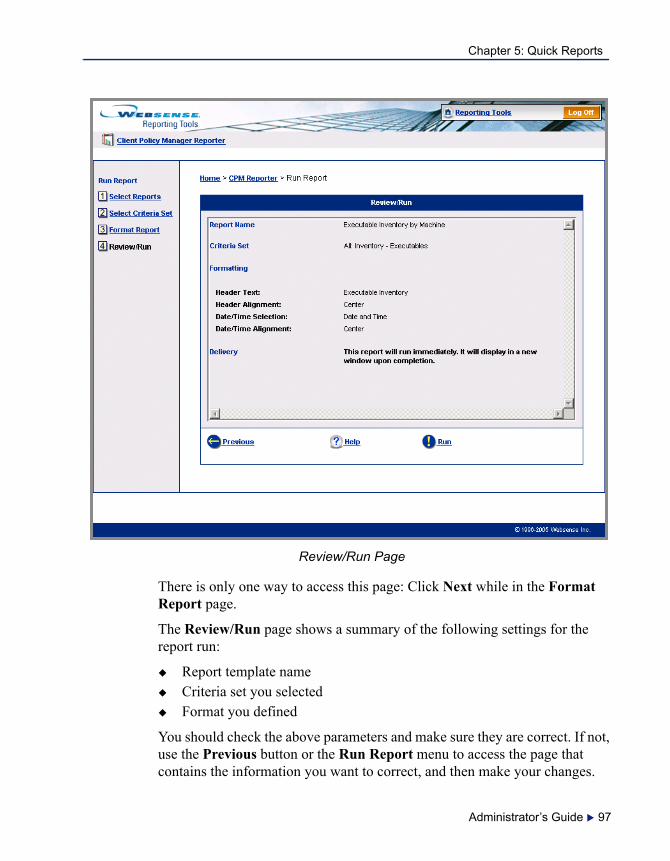
Chapter 5: Quick Reports
Review/Run Page
There is only one way to access this page: Click Next while in the Format Report page.
The Review/Run page shows a summary of the following settings for the report run:
Report template nameCriteria set you selectedFormat you defined
You should check the above parameters and make sure they are correct. If not, use the Previous button or the Run Report menu to access the page that contains the information you want to correct, and then make your changes.
Administrator’s Guide 97

Chapter 5: Quick Reports
After you review the report settings, verify that the information is what you want to see:
1. When you are done checking and/or correcting details, click Run to generate the report.
If the report runs within a few seconds, it appears in a separate browser window immediately.If the report is calling a large amount of information, the Websense Report Loading message opens. When the report is complete, the message window closes, and the report appears in a separate browser window.
2. Close the browser window when you are done reviewing the report.
98 Websense CPM Reporter
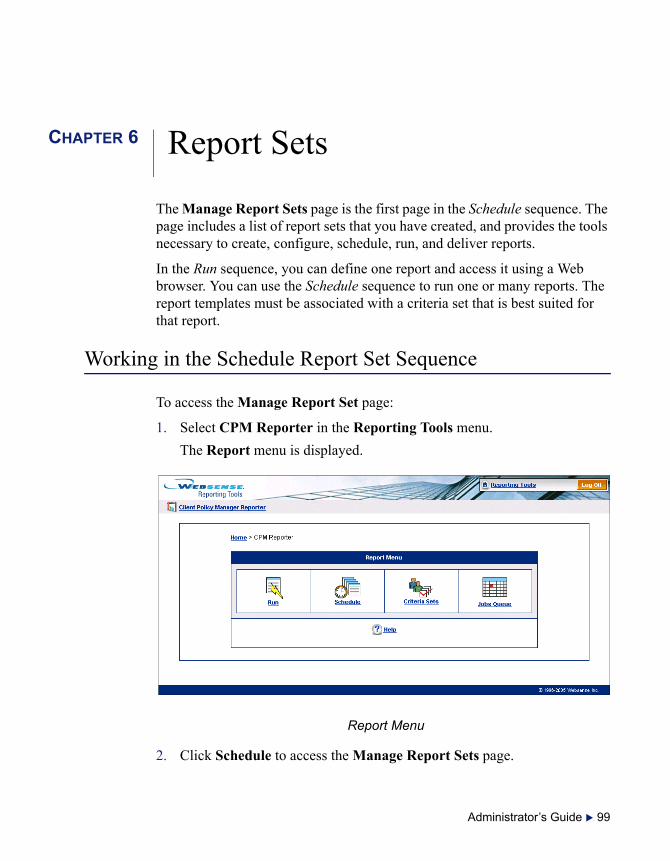
CHAPTER 6 Report Sets
The Manage Report Sets page is the first page in the Schedule sequence. The page includes a list of report sets that you have created, and provides the tools necessary to create, configure, schedule, run, and deliver reports.
In the Run sequence, you can define one report and access it using a Web browser. You can use the Schedule sequence to run one or many reports. The report templates must be associated with a criteria set that is best suited for that report.
Working in the Schedule Report Set Sequence
To access the Manage Report Set page:
1. Select CPM Reporter in the Reporting Tools menu.The Report menu is displayed.
Report Menu
2. Click Schedule to access the Manage Report Sets page.
Administrator’s Guide 99
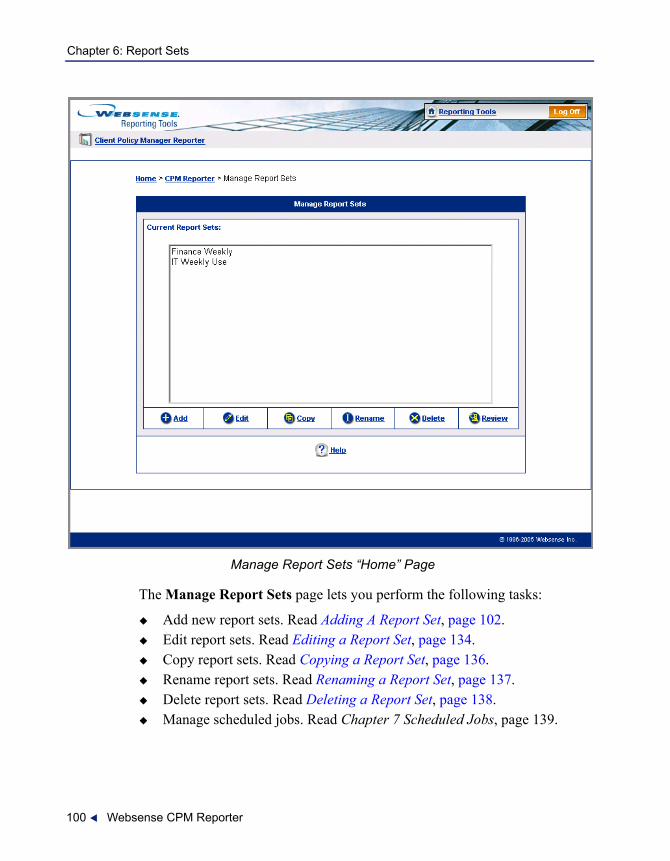
Chapter 6: Report Sets
Manage Report Sets “Home” Page
The Manage Report Sets page lets you perform the following tasks:
Add new report sets. Read Adding A Report Set, page 102.Edit report sets. Read Editing a Report Set, page 134.Copy report sets. Read Copying a Report Set, page 136.Rename report sets. Read Renaming a Report Set, page 137.Delete report sets. Read Deleting a Report Set, page 138.Manage scheduled jobs. Read Chapter 7 Scheduled Jobs, page 139.
100 Websense CPM Reporter

Chapter 6: Report Sets
Using the Report Set MenuThe Report Set menu provides links to individual pages in the Schedule sequence, and appears to the left of the pages in that sequence.
To access the Report Sets menu:
1. Select CPM Reporter in the Reporting Tools menu.The Report menu displays.
2. Click Schedule to open the Manage Report Sets page.3. Add or edit a criteria set.
To add a report set, click Add. Read Adding A Report Set, page 102.To modify a report set, select the report set you want to change, and then click Edit. Read Editing a Report Set, page 134.
The Report Set menu displays.The following selections appear on the menu, where each page you access lets you set one option for the report set.
Select Reports: Choose the report template or templates you want to add to the report set. Read Selecting Report Templates, page 103.Select Criteria: Select the criteria set or sets and associate them with the report template or templates. Read Selecting Criteria Sets, page 105.Set Run Times: Set a schedule for the report set. Read Setting Run Times, page 106.Report Format: Define the report format for the report set. Read Formatting a Report Set, page 118.Delivery Options: Choose the delivery options for the report set. Read Defining Delivery Options, page 127.
Using the Report Set ToolbarWhen you are in the Schedule sequence, a sequence-specific toolbar appears at the bottom of each page and provides the following navigation options:
Previous—moves back one page. This option does not appear on the Select Reports page, the first page in the Manage Report Set sequence.Help—calls the help file for the page you are working in, and presents it in a separate window.
Administrator’s Guide 101
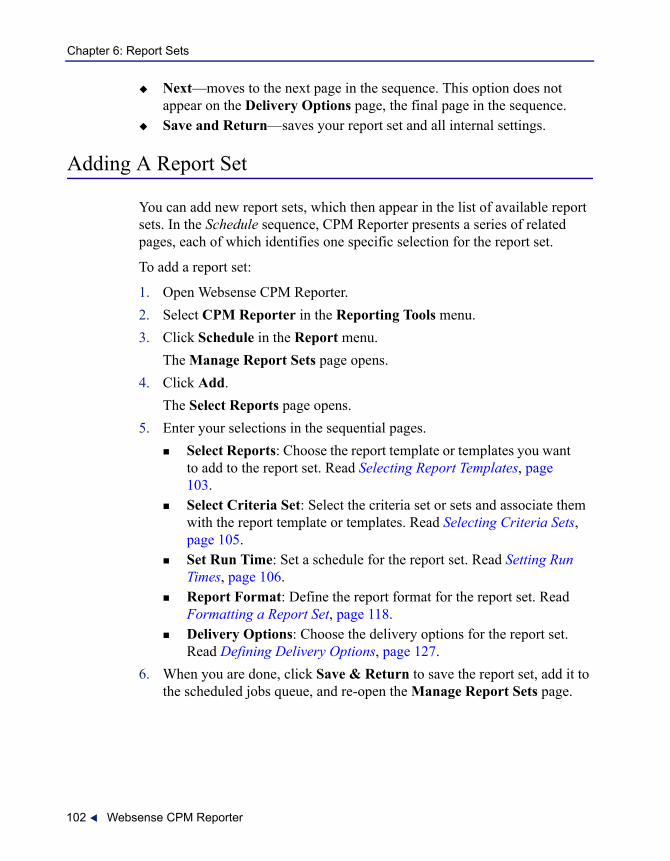
Chapter 6: Report Sets
Next—moves to the next page in the sequence. This option does not appear on the Delivery Options page, the final page in the sequence.Save and Return—saves your report set and all internal settings.
Adding A Report Set
You can add new report sets, which then appear in the list of available report sets. In the Schedule sequence, CPM Reporter presents a series of related pages, each of which identifies one specific selection for the report set.
To add a report set:
1. Open Websense CPM Reporter.2. Select CPM Reporter in the Reporting Tools menu.3. Click Schedule in the Report menu.
The Manage Report Sets page opens.4. Click Add.
The Select Reports page opens.5. Enter your selections in the sequential pages.
Select Reports: Choose the report template or templates you want to add to the report set. Read Selecting Report Templates, page 103.Select Criteria Set: Select the criteria set or sets and associate them with the report template or templates. Read Selecting Criteria Sets, page 105.Set Run Time: Set a schedule for the report set. Read Setting Run Times, page 106.Report Format: Define the report format for the report set. Read Formatting a Report Set, page 118.Delivery Options: Choose the delivery options for the report set. Read Defining Delivery Options, page 127.
6. When you are done, click Save & Return to save the report set, add it to the scheduled jobs queue, and re-open the Manage Report Sets page.
102 Websense CPM Reporter

Chapter 6: Report Sets
Selecting Report Templates
The Select Reports page allows you to select one or more existing report templates for a report set. The page is the first in the Schedule sequence, where each page identifies one setting for a report run.
Websense, Inc. predefines the report templates to meet specific reporting requirements. You can select one or more report templates for any one report set. When CPM Reporter runs the set, it runs all the reports you have included.
Select Report Templates
Administrator’s Guide 103

Chapter 6: Report Sets
To select a report template or templates:
1. Open Websense CPM Reporter.2. Click Schedule in the Report menu.
The Manage Report Sets page is displayed.3. Add or edit a report set.
The Select Reports page opens, listing all existing report sets.4. Enter an appropriate name in the Job Name field.
The entry must be unique, and between 1 and 40 alphanumeric characters in length.
5. Select the report template type you want to run from the Report List. Choose from the following report types:
AllInventory–ExecutablesInventory–Software ApplicationsRemovable Media/Launches
The reports associated with the report template type you select appear.6. Select the report or reports you want to include in the report set. There
are several ways you can make your selection:To select one report template, click a single row.To select multiple consecutive rows, press the left mouse button while dragging the cursor up or down the list.To select multiple consecutive rows without dragging, press and hold the Shift key and select the first row in the range. Scroll to the last row in the range and click it. All rows between the two you click are now selected.To select multiple, non-consecutive rows, press and hold the Ctrl key while clicking the rows you want to include in the report set.
7. Click Next. The Select Criteria Set page opens, allowing you to select a criteria set or sets for the report set. Alternately, click Save & Return to save your changes, send the report set to the scheduled jobs queue, and return to the Manage Report Sets page.
104 Websense CPM Reporter
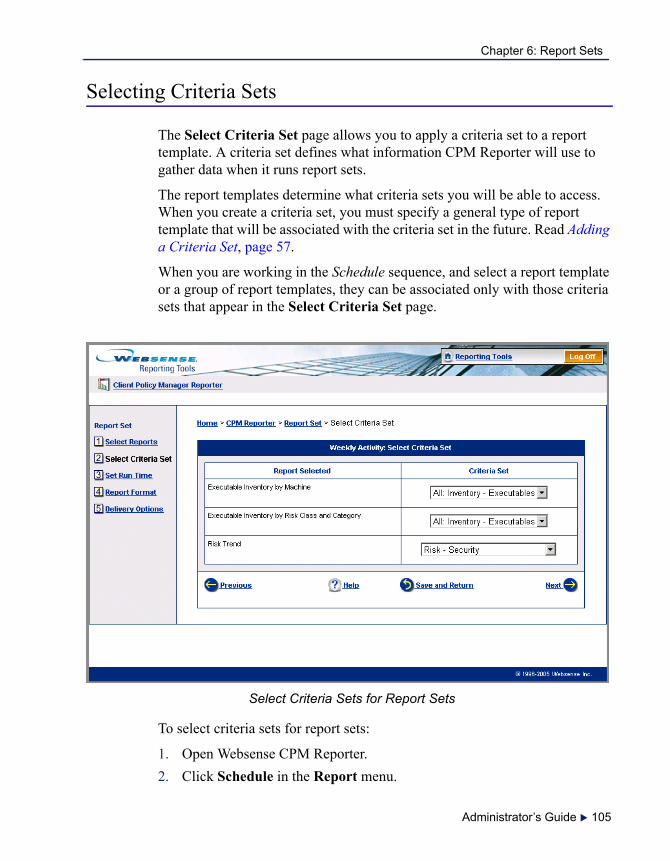
Chapter 6: Report Sets
Selecting Criteria Sets
The Select Criteria Set page allows you to apply a criteria set to a report template. A criteria set defines what information CPM Reporter will use to gather data when it runs report sets.
The report templates determine what criteria sets you will be able to access. When you create a criteria set, you must specify a general type of report template that will be associated with the criteria set in the future. Read Adding a Criteria Set, page 57.
When you are working in the Schedule sequence, and select a report template or a group of report templates, they can be associated only with those criteria sets that appear in the Select Criteria Set page.
Select Criteria Sets for Report Sets
To select criteria sets for report sets:
1. Open Websense CPM Reporter.2. Click Schedule in the Report menu.
Administrator’s Guide 105

Chapter 6: Report Sets
The Manage Report Sets page is displayed.3. Add or edit a report set.
The Select Reports page opens, listing all existing report sets.4. Select one or more report templates. Read Selecting Report Templates,
page 103.5. Select Criteria Set from the Report Set menu at the left of the screen or
click Next while in the Select Reports page.6. Click in the Criteria Set field associated with the first report template,
and select the criteria set you want to associate with it. 7. Continue associating report templates with criteria sets until there is a
criteria set associated with each.8. Click Next. CPM Reporter presents the Set Run Time page. Alternately,
click Save & Return to save your changes, send the report set to the scheduled jobs queue, and return to the Manage Report Sets page.
Setting Run Times
The Set Run Time page allows you to schedule report sets. You can set up a one-time report that runs immediately or on a specific day at a specific time, or you can configure report sets that run on a recurring basis.
Generally, report sets that run once are useful to verify a trend, monitor a specific set of activities, or provide one-time information for upper management. For example, the manager of the Shipping department calls and asks to see inventory for his group and executable launch activity for the past month. You create a report set that includes the Executable Inventory by Machine report and the Executable Launch Requests by Date and Time report and schedule it to run immediately.
Report sets that run on a recurring basis are generally designed to support ongoing analysis and policy development and maintenance. For example, the manager of Information Systems wants recurring reports that show current inventory and executable launch requests that may indicate network bandwidth loss and security risks. You create a report set that includes the Executable Inventory by Machine report and the Executable Inventory by Risk Class and Category report and schedule it to run every week.
106 Websense CPM Reporter

Chapter 6: Report Sets
There are three ways to access this page once you begin defining or editing a report set:
Click Next while in the Select Criteria Set page.Select Set Run Time from the Report Set menu.Click Previous while in the Report Format page.
The Set Run Time page format varies, depending on your selections in it. The page allows you to schedule reports to run immediately, to run on a specific date at a specific time, or to run on a recurring schedule.
Your options include the following:
Run this report set immediately: CPM Reporter runs the report as soon as you save the report set. Read Run a Report Set Immediately, page 108.Run this report set at a specific date and time: CPM Reporter runs the report once, on the date and at the time you specify. Read Schedule a Report Set for a Specific Date and Time, page 109.Schedule this report set to recur at an hourly interval: CPM Reporter runs the report every n hours, at the minute you specify. Read Schedule a Report Set Every N Hours, page 111.Schedule this report set to recur at a daily interval: CPM Reporter runs the report every n days, at the hour you specify. Read Schedule a Report Set Every N Days, page 112.Schedule this report set to recur at a weekly interval: CPM Reporter runs the report every n weeks, on the day or days of the week, and at the hour of the day you specify. CPM Reporter runs the report on the day of the week and at the hour of the day you specify. Read Schedule a Report Set Every N Weeks, page 114.Schedule this report set to recur at a monthly interval: CPM Reporter runs the report every n months, on the day or days of the month and at the hour of the day you specify. Read Schedule a Report Set Every N Months, page 116.
After defining the run option, click Next to open the Report Format page opens. You can define the layout including the export format, headers and footers, and date and time stamps. Alternately, click Save & Return to save your changes, send the report set to the scheduled jobs queue, and return to the Manage Report Sets page.
Administrator’s Guide 107
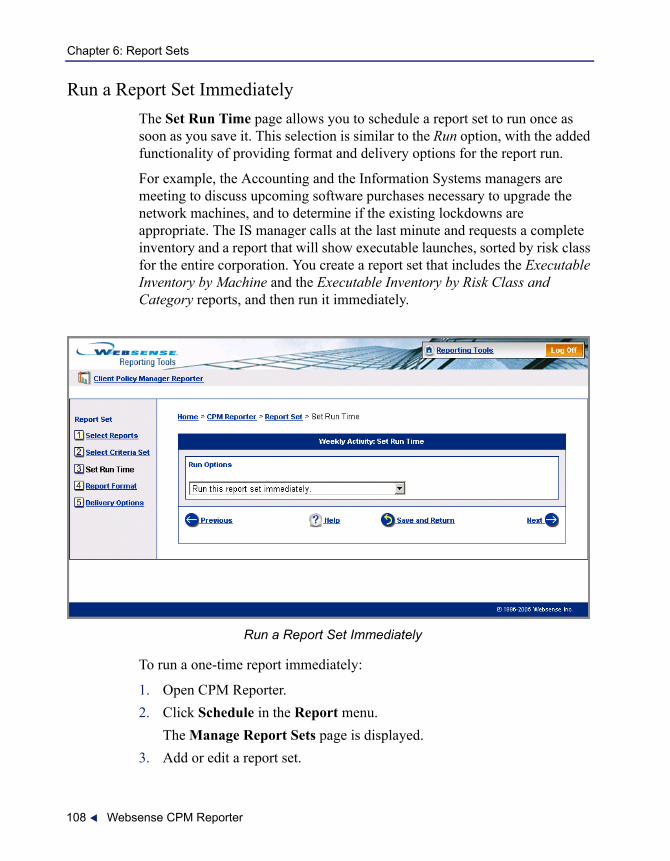
Chapter 6: Report Sets
Run a Report Set ImmediatelyThe Set Run Time page allows you to schedule a report set to run once as soon as you save it. This selection is similar to the Run option, with the added functionality of providing format and delivery options for the report run.
For example, the Accounting and the Information Systems managers are meeting to discuss upcoming software purchases necessary to upgrade the network machines, and to determine if the existing lockdowns are appropriate. The IS manager calls at the last minute and requests a complete inventory and a report that will show executable launches, sorted by risk class for the entire corporation. You create a report set that includes the Executable Inventory by Machine and the Executable Inventory by Risk Class and Category reports, and then run it immediately.
Run a Report Set Immediately
To run a one-time report immediately:
1. Open CPM Reporter.2. Click Schedule in the Report menu.
The Manage Report Sets page is displayed.3. Add or edit a report set.
108 Websense CPM Reporter
Chapter 6: Report Sets
The Select Reports page opens, listing all existing report sets.a. Select one or more report templates. Read Selecting Report
Templates, page 103.b. Associate criteria sets with each report template you included in the
report set. Read Selecting Criteria Sets, page 105.4. Select Set Run Time from the Report Set menu at the left of the screen
or click Next while in the Select Criteria Set page.5. Click in the Run Options field and select Run this report immediately.6. Click Next to access the Report Format page and define the report
layout. Alternately, click Save & Return to save your changes, send the report set to the scheduled jobs queue, and return to the Manage Report Sets page.
Schedule a Report Set for a Specific Date and TimeThe Set Run Time page allows you to schedule a report set to run on a specific date and time. CPM Reporter runs the report set only once.
For example, the CEO is meeting next week with management and wants to determine if there are any risk or loss factors associated with executable use that he should address. You create a report set that includes the Risk Trend report and several Risk Detail reports, and schedule the report set to run at 5:30 am on the morning of the meeting.
Administrator’s Guide 109

Chapter 6: Report Sets
Schedule a Report Set for a Specific Date and Time
To run a report set for a specific date and time:
1. Open CPM Reporter.2. Click Schedule in the Report menu.
The Manage Report Sets page is displayed.3. Add or edit a report set.
The Select Reports page opens, listing all existing report sets.a. Select one or more report templates. Read Selecting Report
Templates, page 103.b. Associate criteria sets with each report template you included in the
report set. Read Selecting Criteria Sets, page 105.4. Select Set Run Time from the Report Set menu at the left of the screen
or click Next while in the Select Criteria Set page.5. Click in the Run Options field and select Run this report on a specific
date and time.
110 Websense CPM Reporter
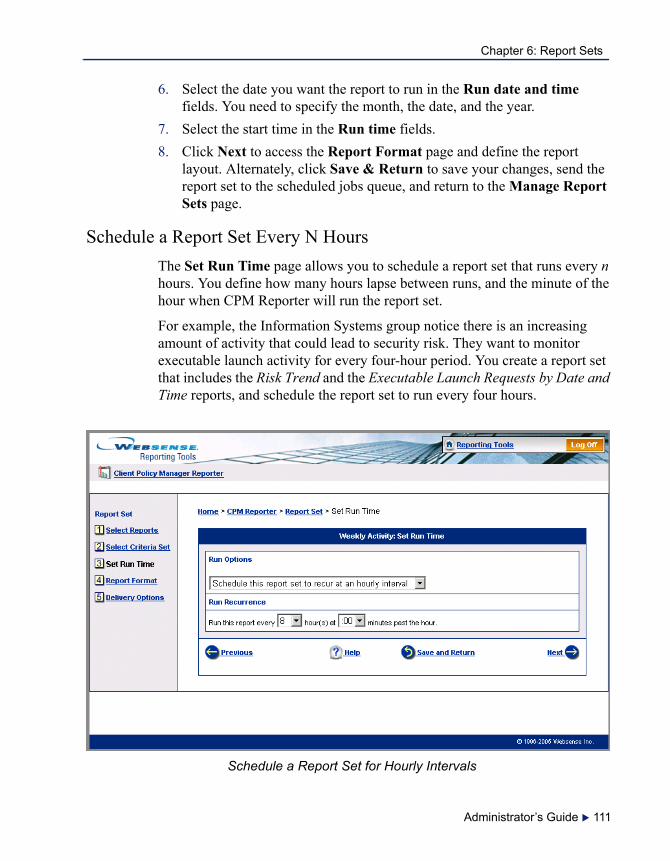
Chapter 6: Report Sets
6. Select the date you want the report to run in the Run date and time fields. You need to specify the month, the date, and the year.
7. Select the start time in the Run time fields.8. Click Next to access the Report Format page and define the report
layout. Alternately, click Save & Return to save your changes, send the report set to the scheduled jobs queue, and return to the Manage Report Sets page.
Schedule a Report Set Every N HoursThe Set Run Time page allows you to schedule a report set that runs every n hours. You define how many hours lapse between runs, and the minute of the hour when CPM Reporter will run the report set.
For example, the Information Systems group notice there is an increasing amount of activity that could lead to security risk. They want to monitor executable launch activity for every four-hour period. You create a report set that includes the Risk Trend and the Executable Launch Requests by Date and Time reports, and schedule the report set to run every four hours.
Schedule a Report Set for Hourly Intervals
Administrator’s Guide 111
Chapter 6: Report Sets
To schedule a report set to run every n hours:
1. Open CPM Reporter.2. Click Schedule in the Report menu.
The Manage Report Sets page is displayed.3. Add or edit a report set.
The Select Reports page opens, listing all existing report sets.a. Select one or more report templates. Read Selecting Report
Templates, page 103.b. Associate criteria sets with each report template you included in the
report set. Read Selecting Criteria Sets, page 105.4. Select Set Run Time from the Report Set menu at the left of the screen
or click Next while in the Select Criteria Set page.5. Click in the Run Options field and select Schedule this report set to
recur at an hourly interval.6. Select the time between reports in the Hours field. You may select any
number of hours between 1 and 24.7. Click in the Minutes field and select the minutes past the hour the report
set will run. For example, if you enter 4 in the Hours field and 30 in the Minutes field, CPM Reporter runs the report every fourth hour, at 30 minutes after the hour.
8. Click Next to access the Report Format page and define the report layout. Alternately, click Save & Return to save your changes, send the report set to the scheduled jobs queue, and return to the Manage Report Sets page.
Schedule a Report Set Every N DaysThe Set Run Time page allows you to schedule a report set that runs every n days. You define how many days lapse between runs, the day of the week when the first scheduled run will occur, and the hour and minute when CPM Reporter runs the report set.
For example, you have just installed Client Agent on machines in your network. You want to see executable launch details by sampling information on various days of the week, so you can analyze activity and help define policy rules.
112 Websense CPM Reporter
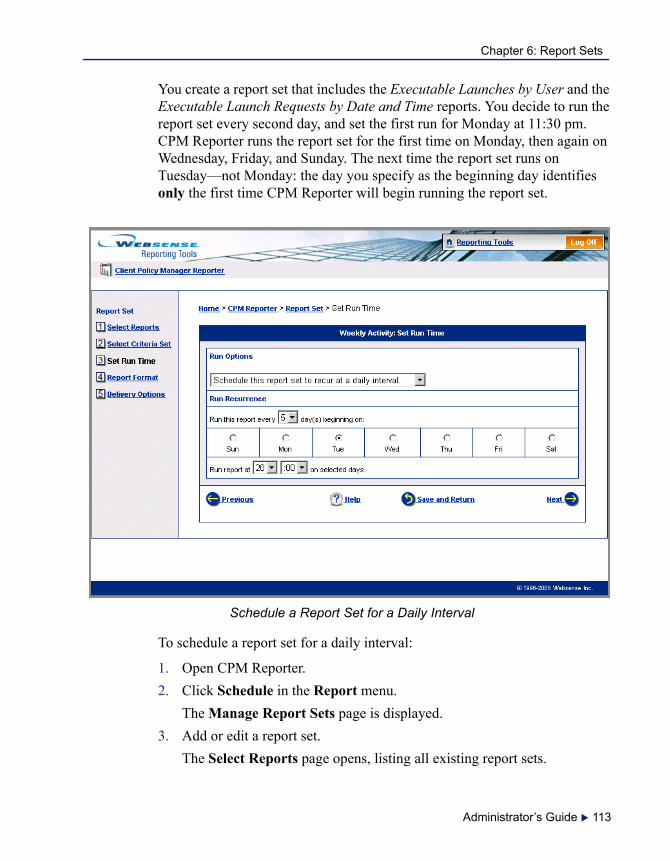
Chapter 6: Report Sets
You create a report set that includes the Executable Launches by User and the Executable Launch Requests by Date and Time reports. You decide to run the report set every second day, and set the first run for Monday at 11:30 pm. CPM Reporter runs the report set for the first time on Monday, then again on Wednesday, Friday, and Sunday. The next time the report set runs on Tuesday—not Monday: the day you specify as the beginning day identifies only the first time CPM Reporter will begin running the report set.
Schedule a Report Set for a Daily Interval
To schedule a report set for a daily interval:
1. Open CPM Reporter.2. Click Schedule in the Report menu.
The Manage Report Sets page is displayed.3. Add or edit a report set.
The Select Reports page opens, listing all existing report sets.
Administrator’s Guide 113
Chapter 6: Report Sets
a. Select one or more report templates. Read Selecting Report Templates, page 103.
b. Associate criteria sets with each report template you included in the report set. Read Selecting Criteria Sets, page 105.
4. Select Set Run Time from the Report Set menu at the left of the screen or click Next while in the Select Criteria Set page.
5. Click in the Run Options field and select Schedule this report set to recur at a daily interval.
6. Select the number of days between reports in the Days field.7. Click the radio button for the day when you want the report set to generate
for the first time—this setting does not affect a report set once it begins the scheduled cycle.
8. Select the hour and minute the report set will run on the selected days. The time is based on a 24-hour clock, where 00:00 is midnight.
9. Click Next to access the Report Format page and define the report layout. Alternately, click Save & Return to save your changes, send the report set to the scheduled jobs queue, and return to the Manage Report Sets page.
Schedule a Report Set Every N Weeks
The Set Run Time page allows you to schedule a report set that runs every n weeks. You define how many weeks lapse between runs, the day of the week, and the time of the day when the run will occur.For example, the Information Systems and Information Technology groups have a staff meeting every second Monday. The managers want to monitor inventory and executable launch risk factors to verify that policy rules and lockdowns have been applied effectively.
You create a report set that includes the Risk Trend and the Executable Inventory by Machine reports. You schedule the report set to run every two weeks, on Sunday at 11:30 pm. Every second Monday, you are able to give the managers a comprehensive look at executable launch activity and client inventories.
114 Websense CPM Reporter

Chapter 6: Report Sets
Schedule a Report Set for a Weekly Interval
To schedule a report set for every n weeks:
1. Open CPM Reporter.2. Click Schedule in the Report menu.
The Manage Report Sets page is displayed.3. Add or edit a report set.
The Select Reports page opens, listing all existing report sets.a. Select one or more report templates. Read Selecting Report
Templates, page 103.b. Associate criteria sets with each report template you included in the
report set. Read Selecting Criteria Sets, page 105.4. Select Set Run Time from the Report Set menu at the left of the screen
or click Next while in the Select Criteria Set page.
Administrator’s Guide 115

Chapter 6: Report Sets
5. Click in the Run Options field and select Schedule this report set to recur at a weekly interval.
6. Click in the Weeks field and select the number of weeks between reports. The value must be between 1 and 8.
7. Select the check box associated with each day you want CPM Reporter to run the report.
8. Select the hour and minute the report is to run on the selected days. The time is based on a 24-hour clock, where 0:00 is midnight. For example, you enter 2 in the Weeks field, check Monday and Friday as report days, and enter the report time as 23:15. Using these entries, CPM Reporter runs the report every other week on Monday and Friday, at 11:15 pm.
9. Click Next to access the Report Format page and define the report layout. Alternately, click Save & Return to save your changes, send the report set to the scheduled jobs queue, and return to the Manage Report Sets page.
Schedule a Report Set Every N MonthsThe Set Run Time page allows you to schedule a report set that runs every n months. When you set up a monthly report, CPM Reporter runs the report every n months, on the days and at the hour and minute you specify.
For example, upper management meets every quarter to review corporate issues. They decide that part of the review should cover executable launch activity and the potential risk and loss factors. You create a report set that includes the Risk Summary—Blocked Executable Launches, Executable Launches by Group, and the Risk Trend reports templates, and schedule the report set to run every third month, on the first of the month.
116 Websense CPM Reporter

Chapter 6: Report Sets
Schedule a Report Set for a Monthly Interval
To schedule a report set for a monthly interval:
1. Open CPM Reporter.2. Click Schedule in the Report menu.
The Manage Report Sets page is displayed.3. Add or edit a report set.
The Select Reports page opens, listing all existing report sets.a. Select one or more report templates. Read Selecting Report
Templates, page 103.
Administrator’s Guide 117

Chapter 6: Report Sets
b. Associate criteria sets with each report template you included in the report set. Read Selecting Criteria Sets, page 105.
4. Select Set Run Time from the Report Set menu at the left of the screen or click Next while in the Select Criteria Set page.
5. Click in the Run Options field and select Schedule this report set to recur at a monthly interval.
6. Enter the number of months between reports in the Months text box. The value must be between 1 and 12.
7. Select the check box associated with the day of the month when CPM Reporter will run the report set. You may make multiple selections.
8. Select the hour and minute the report is to run on the selected days. The time is based on a 24-hour clock, where 0:00 is midnight. For example, you enter 1 in the Month text box, check the 1st and the 15th as the report days, and enter the report time as 23:15. Using these entries, CPM Reporter runs the report set every month on the first and the fifteenth of the month, at 11:15 pm.
9. Click Next to access the Report Format page and define the report layout. If you want, you can click Save & Return to save your changes, send the report set to the scheduled jobs queue, and return to the Manage Report Sets page.
Formatting a Report Set
The Report Format page allows you to define the export format for the report set. The available formats allow you to choose the option that makes the most sense, based on how the report will be delivered and used.
There are three ways to access this page once you begin to define or edit a report set:
Click Next in the Set Run Time page.Select Report Format from the Report Set menu.Click Previous while in the Delivery Options page.
The specifics in the Report Format page change, depending on the selection you make in the File Type field.
To format a report:
1. Select the export type in the File Type field.
118 Websense CPM Reporter
Chapter 6: Report Sets
HTML: Use HTML as the export format to view reports in an Internet browser. Read Using HTML as the Export Format, page 119.XML: Use XML, a format that is useful if you want to manipulate the report information. You can use this format for exporting to spreadsheet or database executables. Read Using XML as the Export Format, page 121.Rich Text Format (RTF): Use RTF as the format. These files are UTF-8 based and include embedded formatting codes that popular word processors and other standard office executables can easily read. Read Using RTF as the Export Format, page 123.Comma Delimited: Use comma delimited format, the simplest report format. This format uses commas between reported details, and is the best choice for importing data directly into spreadsheets or database executables. Read Using Comma Delimited Files as the Export Format, page 126.
2. Click Next to access the Delivery Options page. You are able to define who receives the report set via email, or the FTP server where the report set will be posted. Alternately, click Save & Return to save your changes, send the report set to the scheduled jobs queue, and return to the Manage Report Sets page.
Using HTML as the Export FormatThe Report Format page lets you specify Hyper Text Markup Language (HTML) as the export format for report sets. HTML tags define the structural characteristics of the text, and the browser determines how those elements will be rendered. HTML can support a variety of fonts, font sizes, and colors, and works with all browsers. For the report set, you can define header and footer information, and date and time stamp inclusion and placement. Any selections you make in this page are optional.
Administrator’s Guide 119
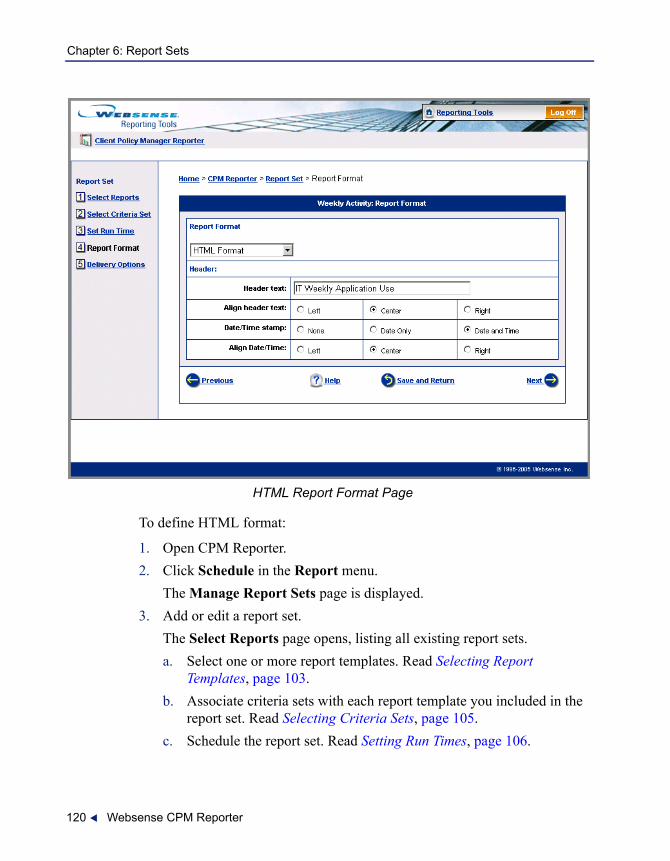
Chapter 6: Report Sets
HTML Report Format Page
To define HTML format:
1. Open CPM Reporter.2. Click Schedule in the Report menu.
The Manage Report Sets page is displayed.3. Add or edit a report set.
The Select Reports page opens, listing all existing report sets.a. Select one or more report templates. Read Selecting Report
Templates, page 103.b. Associate criteria sets with each report template you included in the
report set. Read Selecting Criteria Sets, page 105.c. Schedule the report set. Read Setting Run Times, page 106.
120 Websense CPM Reporter

Chapter 6: Report Sets
4. Select Report Format from the Report Set menu at the left of the screen or click Next while in the Set Run Time page.
5. Select HTML in the Report Format field.6. Enter the text for the header in the Header Text field. The entry may be
between 1 and 80 alphanumeric characters in length.7. Indicate whether the header alignment should be Left, Center, or Right.8. Define how the time stamp should appear on the completed report or
reports. The choices are None, Date only, or Date and time.9. Indicate whether time stamp alignment should be Left, Center, or Right.10. Click Next to access the Delivery Options page. Alternately, click Save
& Return to save your changes, send the report set to the scheduled jobs queue, and return to the Manage Report Sets page.
Using XML as the Export FormatThe Report Format page lets you specify Extensible Markup Language (XML) as the export format for report sets. XML is a machine-understandable, general syntax for describing hierarchical data, and can be used in a wide range of executables. XML is good for transmission of data from server to browser, and for passing data from executable to executable, and from machine to machine, but is not as easy to read as HTML.
In contrast to HTML, which describes document structure and visual presentation, XML describes data in a human readable format with no indication of how the data is to be displayed. Custom tags enable the definition, transmission, validation, and interpretation of data between executables and between organizations. The format is database- and device-neutral.
Administrator’s Guide 121

Chapter 6: Report Sets
XML Report Format Page
To define XML format for the report set:
1. Open CPM Reporter.2. Click Schedule in the Report menu.
The Manage Report Sets page is displayed.3. Add or edit a report set.
The Select Reports page opens, listing all existing report sets.a. Select one or more report templates. Read Selecting Report
Templates, page 103.b. Associate criteria sets with each report template you included in the
report set. Read Selecting Criteria Sets, page 105.c. Schedule the report set. Read Setting Run Times, page 106.
4. Select Report Format from the Report Set menu at the left of the screen or click Next while in the Set Run Time page.
122 Websense CPM Reporter
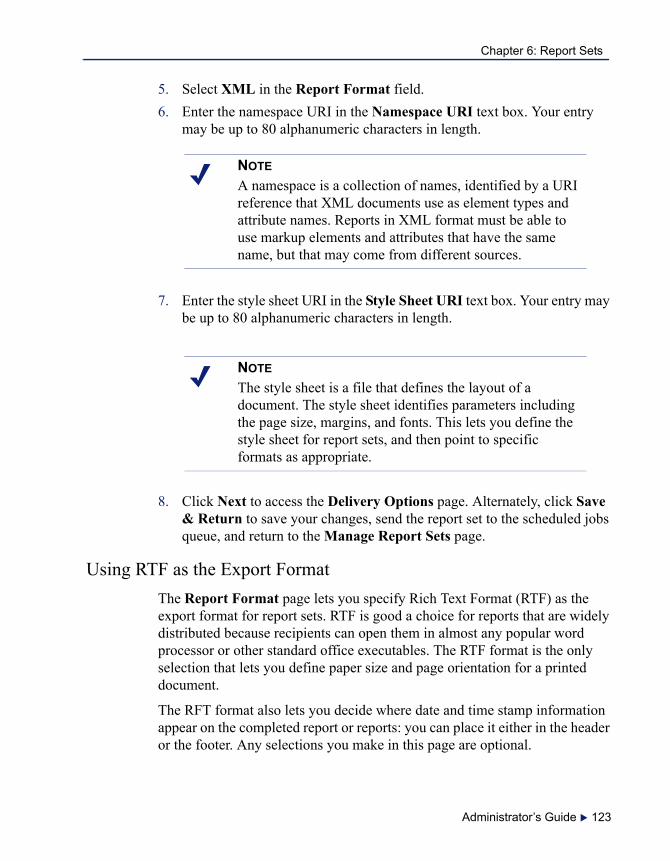
Chapter 6: Report Sets
5. Select XML in the Report Format field.6. Enter the namespace URI in the Namespace URI text box. Your entry
may be up to 80 alphanumeric characters in length.
7. Enter the style sheet URI in the Style Sheet URI text box. Your entry may be up to 80 alphanumeric characters in length.
8. Click Next to access the Delivery Options page. Alternately, click Save & Return to save your changes, send the report set to the scheduled jobs queue, and return to the Manage Report Sets page.
Using RTF as the Export FormatThe Report Format page lets you specify Rich Text Format (RTF) as the export format for report sets. RTF is good a choice for reports that are widely distributed because recipients can open them in almost any popular word processor or other standard office executables. The RTF format is the only selection that lets you define paper size and page orientation for a printed document.
The RFT format also lets you decide where date and time stamp information appear on the completed report or reports: you can place it either in the header or the footer. Any selections you make in this page are optional.
NOTEA namespace is a collection of names, identified by a URI reference that XML documents use as element types and attribute names. Reports in XML format must be able to use markup elements and attributes that have the same name, but that may come from different sources.
NOTEThe style sheet is a file that defines the layout of a document. The style sheet identifies parameters including the page size, margins, and fonts. This lets you define the style sheet for report sets, and then point to specific formats as appropriate.
Administrator’s Guide 123

Chapter 6: Report Sets
RTF Report Format Page
To define RTF as the report set format:
1. Open CPM Reporter.2. Click Schedule in the Report menu.
124 Websense CPM Reporter
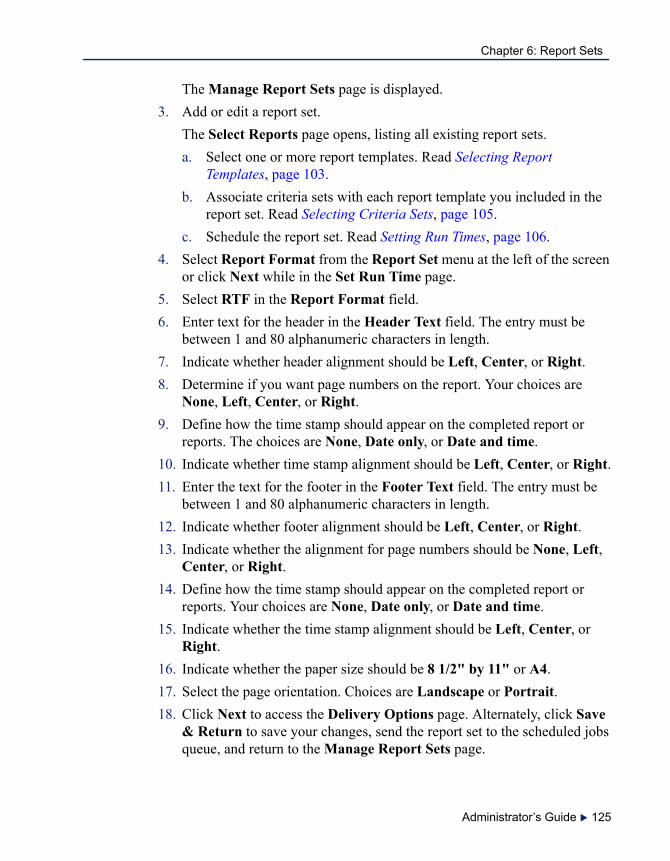
Chapter 6: Report Sets
The Manage Report Sets page is displayed.3. Add or edit a report set.
The Select Reports page opens, listing all existing report sets.a. Select one or more report templates. Read Selecting Report
Templates, page 103.b. Associate criteria sets with each report template you included in the
report set. Read Selecting Criteria Sets, page 105.c. Schedule the report set. Read Setting Run Times, page 106.
4. Select Report Format from the Report Set menu at the left of the screen or click Next while in the Set Run Time page.
5. Select RTF in the Report Format field.6. Enter text for the header in the Header Text field. The entry must be
between 1 and 80 alphanumeric characters in length.7. Indicate whether header alignment should be Left, Center, or Right.8. Determine if you want page numbers on the report. Your choices are
None, Left, Center, or Right.9. Define how the time stamp should appear on the completed report or
reports. The choices are None, Date only, or Date and time.10. Indicate whether time stamp alignment should be Left, Center, or Right.11. Enter the text for the footer in the Footer Text field. The entry must be
between 1 and 80 alphanumeric characters in length.12. Indicate whether footer alignment should be Left, Center, or Right.13. Indicate whether the alignment for page numbers should be None, Left,
Center, or Right.14. Define how the time stamp should appear on the completed report or
reports. Your choices are None, Date only, or Date and time.15. Indicate whether the time stamp alignment should be Left, Center, or
Right.16. Indicate whether the paper size should be 8 1/2" by 11" or A4.17. Select the page orientation. Choices are Landscape or Portrait.18. Click Next to access the Delivery Options page. Alternately, click Save
& Return to save your changes, send the report set to the scheduled jobs queue, and return to the Manage Report Sets page.
Administrator’s Guide 125

Chapter 6: Report Sets
Using Comma Delimited Files as the Export FormatThe Report Format page lets you specify comma delimited files as the export format setting. The comma delimited export setting is the simplest format for report sets. The format uses commas between reported details, and does not support any formatting options.
Comma-delimited reports are not good for printing. They are, however, ideal for importing data into a broad range of office executables. This factor makes the comma-delimited format attractive to organizations that use a wide range of machines and platforms.
Comma Delimited Report Format Page
To define the comma-delimited format:
1. Open CPM Reporter.2. Click Schedule in the Report menu.
The Manage Report Sets page is displayed.3. Add or edit a report set.
126 Websense CPM Reporter

Chapter 6: Report Sets
The Select Reports page opens, listing all existing report sets.a. Select one or more report templates. Read Selecting Report
Templates, page 103.b. Associate criteria sets with each report template you included in the
report set. Read Selecting Criteria Sets, page 105.c. Schedule the report set. Read Setting Run Times, page 106.
4. Select Report Format from the Report Set menu at the left of the screen or click Next while in the Set Run Time page.
5. Select Comma Delimited in the Report Format field.6. Click Next to access the Delivery Options page. Alternately, click Save
& Return to save your changes, send the report set to the scheduled jobs queue, and return to the Manage Report Sets page.
Defining Delivery Options
The Delivery Options page allows you to specify how CPM Reporter delivers report sets once the run is complete. CPM Reporter can email report sets or post them to an FTP server.
Before defining the delivery option, you need to analyze who needs to receive the report, and what the best delivery options are. It is possible that a report set that includes the Executable Launches by User report could contain sensitive information. If so, you probably do not want to distribute the report set to everyone in a group or throughout the organization. Likewise, you may want everyone in the organization to be aware of risk and loss factors associated with executables and decide to post the Risk Trend report on an FTP server.
You also need to consider system resources when selecting delivery options. If you run a report set that contains large amounts of information and distribute it via email to 50 people, you may run into problems due to the size of the files you are distributing. You may need to divide the report set into smaller, more compact report sets, or reduce the number of people who receive the report.
Administrator’s Guide 127

Chapter 6: Report Sets
Delivery Options Page
There are two ways to access this page once you begin to define or edit a report set:
Click Next in the Report Format page.Select Delivery Options from the Report Set menu.
Two delivery options let you email report sets when they have been run. When CPM administrators set up a user name, he or she also enters the email address for that user. CPM Reporter calls this information to populate the email address list. If necessary, you can also enter email addresses manually.
1. Open CPM Reporter.2. Click Schedule in the Report menu.
The Manage Report Sets page is displayed.3. Add or edit a report set.
The Select Reports page opens, listing all existing report sets.a. Select one or more report templates. Read Selecting Report
Templates, page 103.b. Associate criteria sets with each report template you included in the
report set. Read Selecting Criteria Sets, page 105.
128 Websense CPM Reporter

Chapter 6: Report Sets
c. Schedule the report set. Read Setting Run Times, page 106.d. Format the report set. Read Formatting a Report Set, page 118.
4. Select Delivery Options from the Report Set menu at the left of the screen or click Next while in the Report Format page.
5. Click in the Report Set Delivery Options field and select one of the following delivery options.
Email the report set only to me. This is the default setting. The system automatically sends the report to the email address associated with your user ID.Email the report set to me and other email addresses. Select who receives the compiled report. The system automatically adds your email address to the list. Read Emailing a Report Set to Others, page 129.Post the report set to an FTP server. Sends the report to an FTP server. Other users may log onto the server and retrieve the report at any time. Read Posting a Report Set to a FTP Server, page 132.
6. Click Save & Return to save your entries, send the job to the scheduled jobs queue, and return to the Manage Report Sets page.
Emailing a Report Set to OthersYou can deliver scheduled report set jobs to others in your organization via email. When you choose this option, CPM Reporter also delivers a report to you automatically.
CPM Reporter relies on the user name to determine the available email addresses. When CPM system administrators create user names, they also enter an email address for each person. You can also add email addresses manually if necessary.
Administrator’s Guide 129

Chapter 6: Report Sets
Email a Report Set to Yourself and Others
To set email delivery for others:
1. Open CPM Reporter.2. Click Schedule in the Report menu.
The Manage Report Sets page is displayed.3. Add or edit a report set.
The Select Reports page opens, listing all existing report sets.a. Select one or more report templates. Read Selecting Report
Templates, page 103.b. Associate criteria sets with each report template you included in the
report set. Read Selecting Criteria Sets, page 105.
130 Websense CPM Reporter

Chapter 6: Report Sets
c. Schedule the report set. Read Setting Run Times, page 106.d. Format the report set. Read Formatting a Report Set, page 118.
4. Select Delivery Options from the Report Set menu at the left of the screen or click Next while in the Report Format page. Select Email the completed report set to me as well as other email addresses in the Report Set Delivery Options field. The Delivery Options page changes to show a list of available email addresses and a list of those that already receive the report.
5. Click on the email address or addresses in the list on the left.6. Click Add Selected to move the selected email addresses to the list on the
right. This identifies the email addresses to which CPM Reporter will deliver the report set.
7. If there are new staff members who need the report but do not appear in the email list, you need to add them individually.a. Type the email address in the Add a new email address field.b. Click Add New. CPM Reporter does not check email address validity,
so you must make sure your email address entry is correct.8. Click Save & Return to save the report set, send it to the scheduled jobs
queue, and return to the Manage Report Sets page.
Removing Email AddressesYou can remove email addresses from the list of recipients for a report set. This lets you maintain an accurate list of recipients, and reduce the impact of a scheduled report job on system resources.
For example, you have been sending weekly reports to the manager of Information Systems. She has just been promoted and is no longer at your site. You are able to remove her email address from the list.
The list at the right side of Delivery Options page shows those staff members who currently receive the report set.
1. Select the email address for the person who is being taken off the recipients list, and then click Remove. The email address moves from the recipient list to the pane on the left.
2. Continue removing email addresses as appropriate.3. Click Save & Return to save the report set, send it to the scheduled jobs
queue, and return to the Manage Report Sets page.
Administrator’s Guide 131

Chapter 6: Report Sets
Deleting Email Addresses CompletelyWhen you are in the Delivery Options page and have selected Email the completed report set to me as well as other email addresses, you can remove email addresses from the list of potential recipients. This lets you maintain an accurate list of email addresses in the report set, reduce confusion, and improve system performance.
For example, the list contains a number of email addresses for people that are no longer with your organization. You can delete them to reflect this.
Likewise, it is possible that there are email addresses in the list that you will never use. For example, you work directly with Information Technology staff members and never need to send reports to the Finance department. You can delete the email addresses without impacting your ability to perform your job.
When you delete email addresses, you are deleting them only for your view of CPM Reporter. The email addresses are still available to others who are using CPM Reporter unless they also delete them in their view.
To delete email addresses:
1. Select Email the completed report set to me as well as other email addresses in the Report Set Delivery Options field. The Delivery Options page changes to show a list of email addresses and a list of those that already receive the report.
2. Click on an email address in the left pane, and then click Delete. CPM Reporter removes the email address from the list.
3. Continue deleting email addresses or moving email addresses to the recipient's pane.
4. Click Save & Return to save the report set, send it to the scheduled jobs queue, and return to the Manage Report Sets page. Alternately, click Save & Return to save your changes, send the report set to the scheduled jobs queue, and return to the Manage Report Sets page.
Posting a Report Set to a FTP ServerYou can post compiled reports to an FTP server. This selection is useful if you want report sets that are readily available to a large number of employees. Those who want to see the report can access it at will.
For example, your organization wants the employees to be aware of the risks and losses that could occur, based on executable launch requests. You create a
132 Websense CPM Reporter

Chapter 6: Report Sets
report set that includes the Executable Inventory by Risk Class and Category and the Risk Summary—Permitted Executable Launches reports, and then post it to an FTP server. Once CPM Reporter delivers the report set, authorized employees can access the report set at any time.
If you post to an FTP server, you should make sure the reports do not include sensitive information. For example, the Executable Launches by User report shows all permitted launches for individuals. It is conceivable that the information could cause problems within a department or organization, especially if some employees have access to executables such as Games and Instant Messaging that others do not.
Post the Report Set to an FTP Server
To post a report set to an FTP server:
1. Open CPM Reporter.2. Click Schedule in the Report menu.
Administrator’s Guide 133
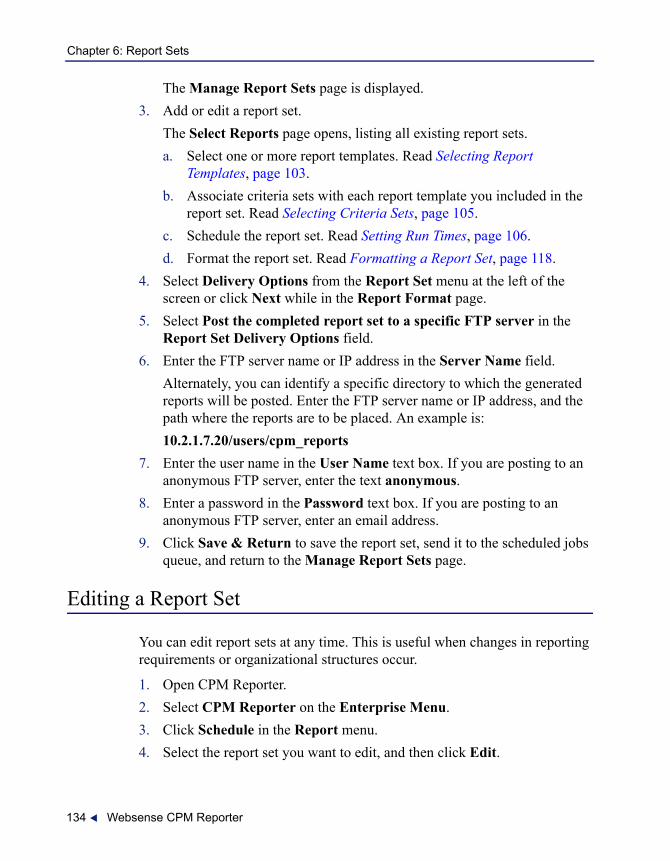
Chapter 6: Report Sets
The Manage Report Sets page is displayed.3. Add or edit a report set.
The Select Reports page opens, listing all existing report sets.a. Select one or more report templates. Read Selecting Report
Templates, page 103.b. Associate criteria sets with each report template you included in the
report set. Read Selecting Criteria Sets, page 105.c. Schedule the report set. Read Setting Run Times, page 106.d. Format the report set. Read Formatting a Report Set, page 118.
4. Select Delivery Options from the Report Set menu at the left of the screen or click Next while in the Report Format page.
5. Select Post the completed report set to a specific FTP server in the Report Set Delivery Options field.
6. Enter the FTP server name or IP address in the Server Name field.Alternately, you can identify a specific directory to which the generated reports will be posted. Enter the FTP server name or IP address, and the path where the reports are to be placed. An example is:10.2.1.7.20/users/cpm_reports
7. Enter the user name in the User Name text box. If you are posting to an anonymous FTP server, enter the text anonymous.
8. Enter a password in the Password text box. If you are posting to an anonymous FTP server, enter an email address.
9. Click Save & Return to save the report set, send it to the scheduled jobs queue, and return to the Manage Report Sets page.
Editing a Report Set
You can edit report sets at any time. This is useful when changes in reporting requirements or organizational structures occur.
1. Open CPM Reporter.2. Select CPM Reporter on the Enterprise Menu.3. Click Schedule in the Report menu.4. Select the report set you want to edit, and then click Edit.
134 Websense CPM Reporter

Chapter 6: Report Sets
5. Select or remove one or more report templates. Read Selecting Report Templates, page 103.
6. Select and/or change the criteria set or sets you want to associate with any report templates. Read Selecting Criteria Sets, page 105.
7. Define the run time for the entire report set. Read Setting Run Times, page 106.
8. Specify the format for the entire report set. Read Formatting a Report Set, page 118.
9. Define delivery options for the entire report set. Read Defining Delivery Options, page 127.
10. Click Save & Return to save the report set, send it to the scheduled jobs queue, and return to the Manage Report Sets page.
Reviewing a Report Set
The Review page allows you to check the internal selections for any existing report set. This can be useful, especially if you are trying to find a report set to use for a specific situation, or if you are going to copy a report set and then edit it to create a new report set.
To review a report set:
1. Open CPM Reporter.2. Click Schedule in the Report menu.
The Manage Report Sets page is displayed.3. Select the report from the Current Report Sets list that you want to see
in detail.4. Click Review.
The Review page opens, and shows the following details.The report set name.The report template or templates, which define the basic information in the generated report.The criteria set or sets, which identify specific information in the generated report.The schedule for running the report set.The format that applies to the report set. The details include any settings that have been made for the output type.
Administrator’s Guide 135

Chapter 6: Report Sets
Review Report Set Page
5. When you are done reviewing the report, click Previous to return to the Manage Report Set page.
Copying a Report Set
You can copy any existing report set when you want to create a new, similar report set with a minimum of effort. This is useful when you are setting up CPM Reporter for the first time or later when you are fine-tuning your procedures.
For example, you created a report set for Accounting when you first began scheduling reports. Several months later, you determine that you want another
136 Websense CPM Reporter

Chapter 6: Report Sets
series of reports for the Accounting Department. You copy the existing report set so you do not need to recreate the basic parameters. You modify the copy, and change only the report templates and associated criteria sets, and keep the report format and delivery options the same.
1. Open CPM Reporter.2. Click Schedule in the Report menu.
The Manage Report Sets page opens, listing all existing report sets.3. Select the report set you want to duplicate, and then click Copy.
A dialog box appears with the name of the previous report set and the word Copy as the default. For example, the original report set is called AP. The copy will be AP Copy.
4. Accept the default name or enter a unique new name in the text box, and then click OK. The new entry appears in the Current Report Sets list.
5. If you need to modify the report set—which is usually the case if you copy an existing report set—choose the report set you just created, and then click Edit. Read Editing a Report Set, page 134.
Renaming a Report Set
You can change the name of report sets when appropriate. For example, you create the R & D report set when you are first setting up your report schedules to generate reports on executable launches by the Research and Development department. Several months later, the department is divided into New Product Engineering, Electrical Engineering, and Mechanical Engineering. Only New Product Engineering continues to use the R & D report set. As a result of the division, you decide to rename the report set to reflect the department name.
1. Open CPM Reporter.2. Click Schedule in the Report menu.
The Manage Report Sets page opens.3. Select the report set name you want to change, and then click Rename.
A dialog box appears with the previous name of the report set as the default.
4. Accept the default name or enter a unique name in the text box, and then click OK.
Administrator’s Guide 137

Chapter 6: Report Sets
The dialog box closes and the new report set name appears in the Current Report Sets list.
Deleting a Report Set
You can delete report sets when they become obsolete. For example, when you first begin working with CPM Reporter, you may be trying to analyze inventory and executable launches to help define policy rules and lockdowns. As a result, you may need a number of reports on a frequent basis.
Later in the cycle, management checks and finds that CPM rules and lockdowns have resulted in a stable environment with little to no risk or loss factors. At that time, you may decide to delete some of the report sets you needed earlier.
1. Open CPM Reporter.2. Click Schedule in the Report menu.
The Manage Report Sets page displays.3. Select the custom report set name you want to remove, and then click
Delete. A confirmation message appears.
4. Click OK to delete the report set. The page closes, and the report set name is no longer included in the Report Sets list.
138 Websense CPM Reporter

CHAPTER 7 Scheduled Jobs
You can view and manage scheduled report sets in the Scheduled Jobs page. The page shows all running or scheduled jobs you have requested from both the Run and the Schedule sequences. You can stop a running job or a single instance of a scheduled job, or you can completely remove all instances of a scheduled job from the queue.
To access the Scheduled Jobs page:
1. Select CPM Reporter in the Reporting Tools menu.The Report menu is displayed.
2. Click Jobs Queue.The Scheduled Jobs window is displayed.
Scheduled Jobs Page
Administrator’s Guide 139
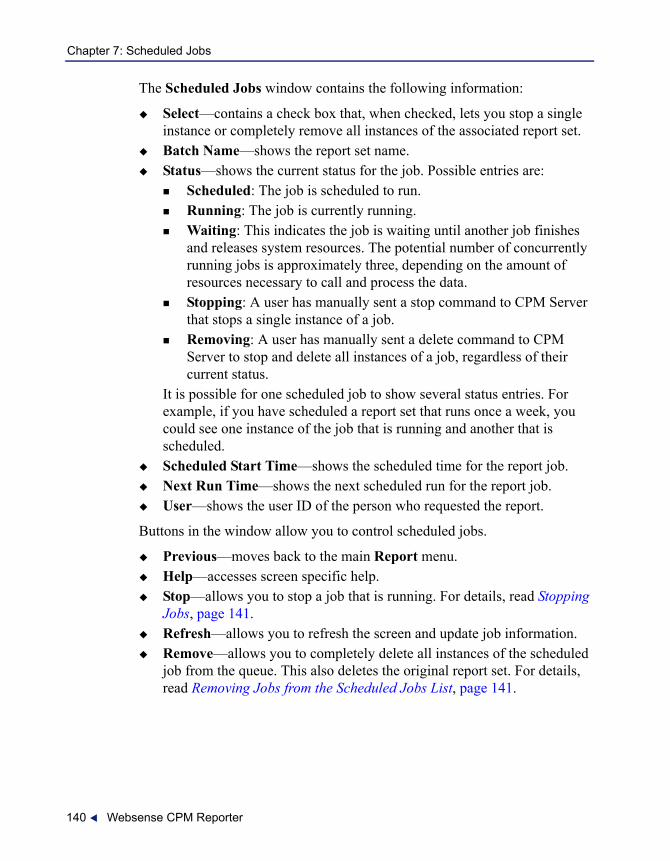
Chapter 7: Scheduled Jobs
The Scheduled Jobs window contains the following information:
Select—contains a check box that, when checked, lets you stop a single instance or completely remove all instances of the associated report set.Batch Name—shows the report set name.Status—shows the current status for the job. Possible entries are:
Scheduled: The job is scheduled to run.Running: The job is currently running.Waiting: This indicates the job is waiting until another job finishes and releases system resources. The potential number of concurrently running jobs is approximately three, depending on the amount of resources necessary to call and process the data.Stopping: A user has manually sent a stop command to CPM Server that stops a single instance of a job.Removing: A user has manually sent a delete command to CPM Server to stop and delete all instances of a job, regardless of their current status.
It is possible for one scheduled job to show several status entries. For example, if you have scheduled a report set that runs once a week, you could see one instance of the job that is running and another that is scheduled.Scheduled Start Time—shows the scheduled time for the report job.Next Run Time—shows the next scheduled run for the report job.User—shows the user ID of the person who requested the report.
Buttons in the window allow you to control scheduled jobs.
Previous—moves back to the main Report menu.Help—accesses screen specific help.Stop—allows you to stop a job that is running. For details, read Stopping Jobs, page 141.Refresh—allows you to refresh the screen and update job information.Remove—allows you to completely delete all instances of the scheduled job from the queue. This also deletes the original report set. For details, read Removing Jobs from the Scheduled Jobs List, page 141.
140 Websense CPM Reporter
Chapter 7: Scheduled Jobs
Stopping Jobs
The Scheduled Jobs page allows you to stop a single instance of a running job. You can stop reports that were requested from both the Run and Manage Report Set sequences.
This can be useful if you do not need a specific report run for some reason. For example, you scheduled a report that is a one-time request. When the job begins running, you realize that it is not the one you need. You can stop the run and conserve valuable system resources.
You might also want to stop one instance of a recurring job if there is no reason to run the job at that time. For example, you might want to stop a scheduled job if the instance will run on a holiday.
To stop a single instance of a scheduled job or jobs:
1. Select CPM Reporter in the Reporting Tools menu.The Report menu is displayed.
2. Click Jobs Queue.The Scheduled Jobs window is displayed.
3. Select the check box associated with one or more running or scheduled jobs that you want to stop.
4. Click Stop. CPM Reporter stops the single instance of the scheduled job or jobs.
Removing Jobs from the Scheduled Jobs List
The Scheduled Jobs page lets you completely remove all instances of a scheduled job or jobs. This can be useful if you do not need a scheduled and recurring report run for some reason.
For example, when you first began using CPM Reporter you scheduled a daily report to provide executable launch information for your entire organization. Now, however, you no longer need the report, since you have developed policy rules to address the problems you encountered earlier. You can completely remove all instances of the scheduled job. This conserves valuable system resources and reduces the frustration of receiving information you no longer need.
Administrator’s Guide 141

Chapter 7: Scheduled Jobs
To stop all instances of a scheduled job or jobs:
1. Select CPM Reporter in the Reporting Tools menu.The Report menu is displayed.
2. Click Jobs Queue.The Scheduled Jobs window is displayed.
3. Click in the check box for one or more scheduled jobs that you want to completely remove from the queue of scheduled jobs.
4. Click Remove. CPM Reporter removes all instances of the scheduled job or jobs. The original report set remains available in the Manage Report Set page. You can schedule it again if the need arises or delete it.
142 Websense CPM Reporter
APPENDIX A Troubleshooting
This chapter describes situations that may be of concern when you use CPM Reporter. You can also check FAQs at www.websense.com/support for the most recent information available.
Why am I having problems generating “quick” reports after I activate pop-up blocking?
If you are no longer able to run reports, and have installed or enabled pop-up blocking for your Web browser, there is a possibility that your reports will not run. You can disable pop-up blocking during the time you need to generate the report to avoid this problem.
Why does my report show more than one user for one client machine?
It is possible to run reports for one machine which show numerous users. This occurs because CPM tracks the actual user who triggers an application launch request or port access attempt.
For example, you may see reports for one machine that show all the following users:
Logged on users (employees)System administratorsProcess users (software)
This granularity makes it easy for you to quickly identify the actual source of a request, which is critical when monitoring software launches and network access attempts. The different user identification is valuable when troubleshooting, or when you are trying to tighten control using your CPM policy.
Administrator’s Guide 143
Appendix A: Troubleshooting
What do I do if it takes a long time to process data?
You may find that it takes a long time to process data when you run reports. Some common reasons appear below, and suggestions for correcting the situation.
1. You may have entered a date selection in the criteria set that covers a large amount of time. You can reduce the date range to improve performance. For example, if you are trying to collect data for a year, the report may take a considerable amount of time to run. You might decide to run a report for each quarter to reduce the time it will take to run the report.
2. You may have included a large number of users in the criteria set. You can reduce the number of users to improve performance. For example, your company has 4,000 employees and you are running usage reports for all of them in a single report set. You might decide to run separate reports for each site or department to reduce the time it takes to run the report, and to improve information retrieval.
3. Other users are running reports at the same time you are. You might stop your report and run it later, or you can let the processing continue. If others have scheduled reports for the same time, and the reports are recurring, you might decide to define a staggered schedule that enables everyone to receive their report requests in a timely manner.
Why do I receive an error message that reads “Unknown error can not send report through the mail.”?
If you receive an error message “Unknown error can not send report through the mail,” the most likely cause is that CPM Reporter tried to email a report that was over the mail size limit set for your SMTP server. SMTP server size ranges from 25M to 100 M in most organizations. If you request reports via email that are larger than the size limit of the SMTP server, you will receive the above error message. You can reduce the amount of information in the report set, or reduce the number of individual reports within the report set to address the problem. Alternately, you can contact the SMTP server administrator and see if the mail size limit can be changed.
144 Websense CPM Reporter

Appendix A: Troubleshooting
Why won't my foreign language reports display and print the correct fonts?
If you are running CPM Reporter, and have not installed the proper font, your reports may not display or print foreign language characters correctly. For example, if you are trying to view a report at a machine running on an English operating system and browser, but some of the executable names in your executable table are derived from Chinese or Japanese executables, you will see this problem.
To fix this, install the font set named arialuni.ttf onto the machine where you are trying to view the report. Alternately, you can add Language and Regional support via Microsoft Control Panel > Regional Options for the language you want to display.
Why does my report show several installations of the same application, but when I check the machine, I find only one?
When you run reports on executables, it is possible that you may see application counts that do not seem match the actual number of applications you find on the machine. This occurs when the contents of several files are the same, but the names of the files are different. This is most often true if you have empty files.
For example, you run an inventory at a machine, and then generate a report that shows you have six installations of autoexec.bat at that machine. However, when you physically go to the machine and perform a search, you find only one installation of that file.
What has occurred is that when the inventory ran, it found a file that was empty, and that was called autoexec.bat. As the inventory proceeded, it found five other files that were also empty.
Even though these files had different names, the inventory process is concerned only about what a file actually contains. Since the files were all empty, the identification process saw them as being the same executable, and grouped them under a single name—autoexec.bat.
Administrator’s Guide 145
Appendix A: Troubleshooting
Why do I see several rows containing the same data in a report?
When you access inventory reports, it is possible that you may see two or more rows of data that seem to show the same information. While the data may seem the same, there are differences in the underlying information.
When Websense, Inc. identifies executables, it uses information from the file itself for that identification. If there are even slight differences between two files, the data collection process identifies two unique executables.
For example, you install greatword.exe, and then later install an upgrade that includes a bug fix. If the upgrade does not remove the original installation, your machine now has two files, both called greatwords.exe. Because the contents of these two files are different, Websense, Inc. sees them as separate executables.
Why don’t my inventory-based reports show the range of dates I selected?
When you run inventory-based reports, the report may not include all of the dates you expect. Because inventory-based reports use the end date to determine which inventory is included in the report, you may not see all the data you might expect.
146 Websense CPM Reporter

APPENDIX B Technical Support
Websense, Inc. is committed to providing excellent service worldwide. Our goal is to provide professional assistance in the use of our software wherever you are located.
Websense Technical Services Support Center
Technical information about Websense Enterprise is available 24 hours a day on the Internet at:
http://www.websense.com/global/en/SupportAndKB/.
You will find here the latest release information, Frequently Asked Questions (FAQ), a Knowledge Base, product documentation, and other information.
Premium Support
Websense offers two premium fee-based support options: Priority One 24x7 Support and Platinum Support.
Priority One 24x7 Support offers a toll-free number and extended 24x7 service to customers.
Platinum Support is our most comprehensive support and education offering. It includes the advantages of Priority One 24x7 Support as well as a dedicated support team, highest priority service, and educational opportunities.
For a complete list of Priority One 24x7 and Platinum Support services, please visit our Web site at:
http://www.websense.com/global/en/ProductsServices/Services/PriorityOne24x7Support.php
For additional information, please contact our Sales Department at 800.723.1166 or 858.320.8000, or send an email to [email protected].
Administrator’s Guide 147
Appendix B: Technical Support
Support Options
Websense Technical Support can be requested 24 hours a day.
Web PortalYou can submit support tickets through the Web Portal 24 hours a day. The response time during business hours is approximately 4 hours. Response to after-hours requests will occur the next business day. Support tickets can be submitted at:
http://www.websense.com/global/en/SupportAndKB/CreateRequest/
Email QuestionsYou may email your questions to us at the addresses listed below. Make sure you include your subscription key. This option is available 24 hours a day, 7 days a week. We will respond during business hours Monday through Friday.
[email protected]—San Diego, California, [email protected]—London, [email protected]—Japan (Asia)
Email support can take up to 24 hours or more for a response. If you need a quicker turnaround, submit your issues through the Web Portal.
Telephone AssistanceBefore you call a Websense Technical Support representative, please be ready with the following:
Websense subscription keyAccess to Websense ManagerAccess to the machine running the Filtering Service, the Websense Reporter server, and the database (MSDE or SQL) serverPermission to access the Websense log databaseFamiliarity with your network's architecture, or access to a person who has this familiaritySpecifications of the machines running the Filtering Service and Websense ManagerA list of other applications running on the Filtering Service machine
148 Websense CPM Reporter

Appendix B: Technical Support
For severe problems, additional information may be needed.
Telephone assistance is available during normal business hours Monday through Friday at the following numbers:
San Diego, California, USA: 858.458.2940 London, England: +44 (0) 1932 796244
Customer Care
Not sure who to call? Contact Customer Care at 1-866-355-0690 for assistance with:
General concernsSubscription key questions or issuesFollow-up on telephone support issuesGeneral service requests
Improving Documentation
Websense, Inc. understands the value of high quality, accurate documentation. If you have any suggestions for improving the documentation, contact us at [email protected]. We appreciate your input.
Administrator’s Guide 149

Appendix B: Technical Support
150 Websense CPM Reporter

Index
Aadd
applications to criteria sets, 77, 79categories to criteria set, 72criteria sets, 57dispositions to criteria sets, 74domains to criteria sets, 66email addresses to report sets, 129groups to criteria sets, 66machines to criteria sets, 69operating systems to criteria sets, 80report sets, 102risk classes to criteria sets, 70users to criteria sets, 66workstations to criteria sets, 69
administrative user accounts, 18administrator
logging on, 22applications
add to criteria sets, 77, 79remove from criteria sets, 79
Bblocked dispositions, 33
Ccategories
description, 31introduction, 31
categories, add to criteria set, 72comma delimited report export, 126continued dispositions, 33copy
criteria sets, 82report sets, 136
CPM inventory database, 16CPM log database, 15criteria set summary page, 84criteria sets
add a criteria set, 57applications, 77associating with report templates, 36copy, 82custom, 29date range page, 60date ranges, 61default selections, 56delete, 83dispositions, 74edit, 81introduction, 28inventory executables, 58inventory software, 59launch executables, 59machines, 67menu, 53operating systems, 80predefined, 29rename, 83review, 84risk classes, 70select for run sequence, 92select for schedule sequence, 105specific date and time, 62toolbar, 55users and groups page (also domains), 63variables, 76
custom criteria sets, 29custom user preferences, 18customer care, 149
Administrator’s Guide 151

Index
Ddaily reports, 112databases, 15
CPM inventory database, 16CPM log database, 15
date rangesinventory reports and, 146page for criteria sets, 60settings for criteria sets, 61
default criteria sets, 56delete
criteria sets, 83email addresses from the potential recipient
list, 132report sets, 138
delivery options, 127email report sets to others, 129post reports to FTP servers, 132
dispositionsintroduction, 33select for criteria sets, 74
domains, 30add to criteria sets, 63in criteria sets, 66remove from criteria sets, 66
Eedit
criteria sets, 81report sets, 134
email deliveryadd addresses to report delivery lists, 129deleting email addresses from the potential
recipient list, 132relation to log on ID, 127removing email addresses from delivery
lists, 131error log, 17error messages, 17Executable Inventory by Machine report
description, 37Executable Inventory by Risk Class - Summary
report description, 38
Executable Inventory by Risk Class and Category report description, 39
export data, 118export format
comma delimited, 126HTML, 119RTF format, 123XML, 121
Ffonts do not display correctly in reports, 145format report
run sequence, 94schedule sequence, 118
FTP servers, 132
Ggroups, 30
add to criteria sets, 63in criteria sets, 66remove from criteria sets, 66
HHourly report schedules, 111HTML report export format, 119
Iintensive processing, 144inventory reports and date ranges, 146
Llog off, 34logging errors, 17logging on, 21
Mmachines
add to criteria sets, 69in criteria sets, 67remove from criteria sets, 70
menuscriteria set menu, 53report menu, 24
152 Websense CPM Reporter
Index
report set menu, 101run report menu, 89
monthly reports, 116
OOperating System Summary report
description, 40operating systems
add to criteria sets, 80remove from criteria sets, 80
Ppasswords
logon, 22permitted dispositions, 33post reports to FTP servers, 132predefined criteria sets, 29process for reporting, 11processes for report generation, 11
Rremove
applications from criteria sets, 79email addresses from report sets, 131machines and workstations, 70operating systems from criteria sets, 80scheduled jobs from the scheduled job
queue, 141users, groups, or domains, 66
renamecriteria sets, 83report sets, 137
report menu, 24report set menu, 101report sets, 33
add a report set, 102comma delimited report export, 126copy, 136create, 102define criteria, 105delete, 138delivery options, 127description, 33
edit, 134email report sets to others, 129HTML export format, 119post reports to FTP servers, 132removing email notification, 131rename, 137RTF report export format, 123schedule reports
every n days, 112every n hours, 111every n months, 116every n weeks, 114
XML export format, 121report templates
associating with criteria sets, 36introduction, 27run sequence selection, 90schedule sequence selection, 103
reporting process, 11reports
generation processes, 11reports for specific date and time, 109review criteria sets, 84review report
run sequence, 96schedule sequence, 135
risk classes, 70define for criteria sets, 70descriptions, 30introduction, 30
Risk Trend report description, 46RTF report export format, 123run immediately in schedule sequence, 108run report menu, 89run report page, 96run sequence
criteria set selection, 92format report, 94report template selection, 90review report, 96toolbar, 90
run times for schedule sequence, 106running reports, descriptions of both run and
schedule sequences, 12
Administrator’s Guide 153
Index
Sschedule reports
report every n days, 112report every n hours, 111report every n months, 116report every n weeks, 114report on a specific date and time, 109
schedule sequenceformat report, 118report template selection, 103review report, 135run report immediately, 108run time selections, 106toolbar, 101
scheduled jobsremoving, 141stopping, 141
Software Application Inventory by Machine Name report description, 41
Software Application Inventory by Publisher - Detailed report description, 42
Software Application Inventory by Publisher - Summary report description, 43
specific date and time for criteria sets, 62specific date and time report schedules, 109stop scheduled jobs, 141summary page, 84symbols, 25
Ttechnical support
customer care, 149documentation feedback, 149email, 148fee-based, 147support center, 147support web site, 147telephone assistance, 148web portal, 148
toolbar
CPM Reporter toolbar, 25criteria sets sequence, 55run sequence, 90schedule sequence, 101
Top N Applications report description, 44troubleshooting
fonts do not display correctly in reports, 145processing taking a long time, 144
Uuser accounts, setting, 18User Service
CPM relationship, 16CPM Reporter relationship, 17description, 16introduction, 16
users, 30account information, 18add to criteria sets, 63add users to report sets, 129in criteria sets, 66logging on, 22remove from criteria sets, 66
users and groups page for criteria sets, 63
Vvariables, select for criteria sets, 76
WWebsense Master Database, 15weekly reports, 114workstations
add to criteria sets, 69in criteria sets, 67remove from criteria sets, 70
XXML export format, 121
154 Websense CPM Reporter