Embed Size (px)
Citation preview
Before Starting
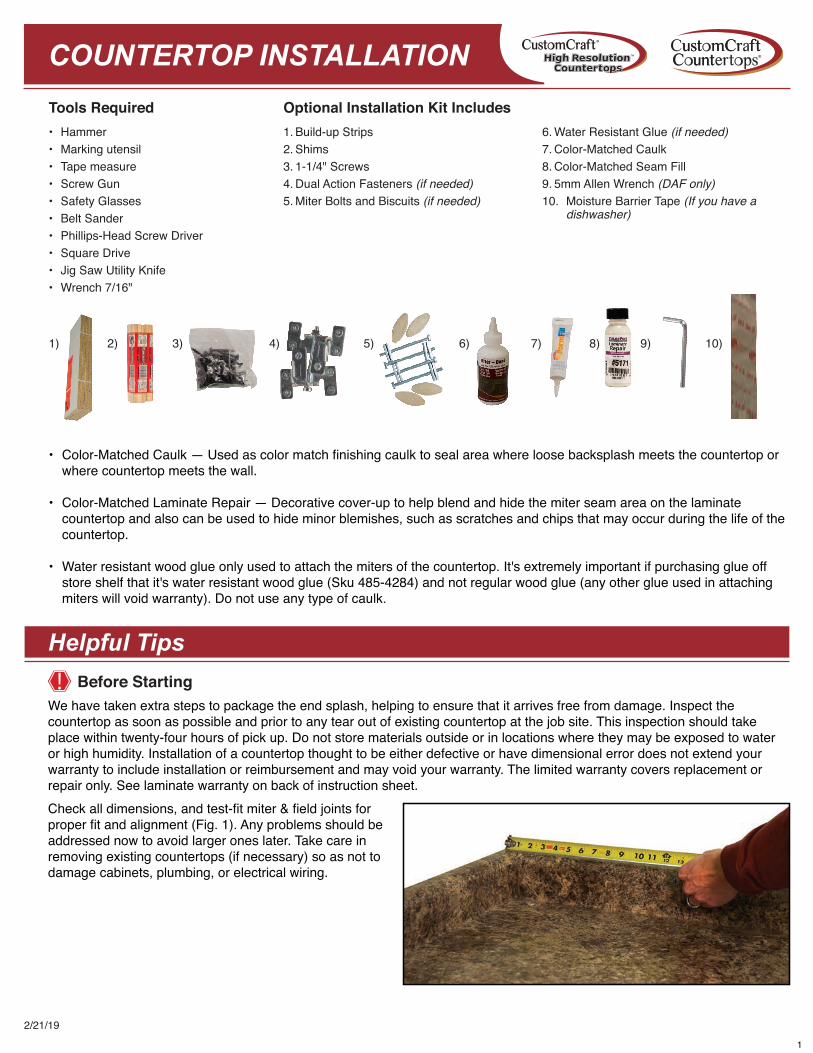
Tools Required Optional Installation Kit Includes
Helpful Tips
• Color-Matched Caulk — Used as color match finishing caulk to seal area where loose backsplash meets the countertop or where countertop meets the wall.
• Color-Matched Laminate Repair — Decorative cover-up to help blend and hide the miter seam area on the laminate countertop and also can be used to hide minor blemishes, such as scratches and chips that may occur during the life of the countertop.
• Water resistant wood glue only used to attach the miters of the countertop. It's extremely important if purchasing glue off store shelf that it's water resistant wood glue (Sku 485-4284) and not regular wood glue (any other glue used in attaching miters will void warranty). Do not use any type of caulk.
We have taken extra steps to package the end splash, helping to ensure that it arrives free from damage. Inspect the countertop as soon as possible and prior to any tear out of existing countertop at the job site. This inspection should take place within twenty-four hours of pick up. Do not store materials outside or in locations where they may be exposed to water or high humidity. Installation of a countertop thought to be either defective or have dimensional error does not extend your warranty to include installation or reimbursement and may void your warranty. The limited warranty covers replacement or repair only. See laminate warranty on back of instruction sheet.
• Hammer• Marking utensil• Tape measure• Screw Gun• Safety Glasses• Belt Sander• Phillips-Head Screw Driver• Square Drive• Jig Saw Utility Knife• Wrench 7/16"
1. Build-up Strips2. Shims3. 1-1/4" Screws4. Dual Action Fasteners (if needed)5. Miter Bolts and Biscuits (if needed)
6. Water Resistant Glue (if needed)7. Color-Matched Caulk8. Color-Matched Seam Fill9. 5mm Allen Wrench (DAF only)10. Moisture Barrier Tape (If you have a
dishwasher)
1) 2) 3) 4) 5) 6) 7) 8) 9) 10)
Check all dimensions, and test-fit miter & field joints for proper fit and alignment (Fig. 1). Any problems should be addressed now to avoid larger ones later. Take care in removing existing countertops (if necessary) so as not to damage cabinets, plumbing, or electrical wiring.
RCOUNTERTOP INSTALLATION
2/21/191

(NOTE: Belt sander and marking utensil required for both action fasteners and miter bolts)With the countertop in position, trace contour of wall onto backsplash with marker (Fig. 7). Move countertop to work area and use belt sander to remove the material up to the marked line. Always make sure the sander is cutting (rotating) into the laminate edge to avoid chipping the laminate (Fig. 7a).• Place the countertop back into position and check for fit. Repeat above steps if necessary.
Scribing Countertops to Contour of Wall
1. Check to see if cabinets are level. Adjust cabinets if possible, shims may be required later if cabinets can not be adjusted.2. Pre-drill holes in the front and back of build-up strips. Attach strips to the top of the cabinets face and back frame using 1-1/4" drywall screws. Place build-up strips every two feet of the cabinet run. Make sure to place the first and last strip 2" from the end of the cabinet run to offset the build-down for any end caps (Fig. 6).3. When installing build-up strips on sink base, measure the opening for the sink to verify that the build-up strip is installed not to impede the installation of the sink.
1B) Standard Cabinets
1A) Frameless Cabinets
1. Check to see if cabinets are level. Adjust cabinets if possible, shims may be required later if cabinets can not be adjusted.2. Measure the width of the build down stick next to the endcap located on the underside of the countertop (Fig. 2).3. Measure in from the end of the cabinet the distance of the build down stick plus 1/4" and mark (Fig. 3). Pre-drill the front and back of the build-up strip where it will fasten to the cabinets. Then pre-drill an additional 3 holes of equal distance in the middle of the build-up strip for screw installation into the bottom of the countertop. Install using 1-1/4" drywall screws at marked spots.4. Install a build-up strip on either side of the joint where two cabinets meet, making sure to leave enough room for installation of screws from the bottom into the countertop (Fig. 4 & 5).5. When installing build-up strips on sink base, measure the opening for the sink to verify that the build up strip is installed far enough away not to impede the installation of the sink.
Follow 1A for Frameless Cabinets / Overhangs, 1B for Standard Cabinets / Overhangs
Additional build-up strips and 1-1/4" screws may be required for installation on a frameless cabinet system. Additional materials can be purchased at any Menards® store.
Additional build-up strips may be required for installation on a frameless cabinet system. 1x4's can be used as longer build-up strips.
2) SCRIBING
1) BUILD-UP STRIP / FRAMELESS & STANDARD CABINETS
Fig. 6
Fig. 7aFig. 7
Any cabinet depth over 24" will need a custom build-up strips to be made. Add support for any overhang over 10".
Fig. 4 Fig. 5
Fig. 2
All overhangs require build-up strips the full depth of the countertop for support.
All overhangs require build-up strips the full depth of the countertop for support.
Any overhangs longer than 15" require support to the floor.
Any overhangs longer than 15" require support to the floor.
Fig. 3
NOTE: Island and Overhang instructions on page 8
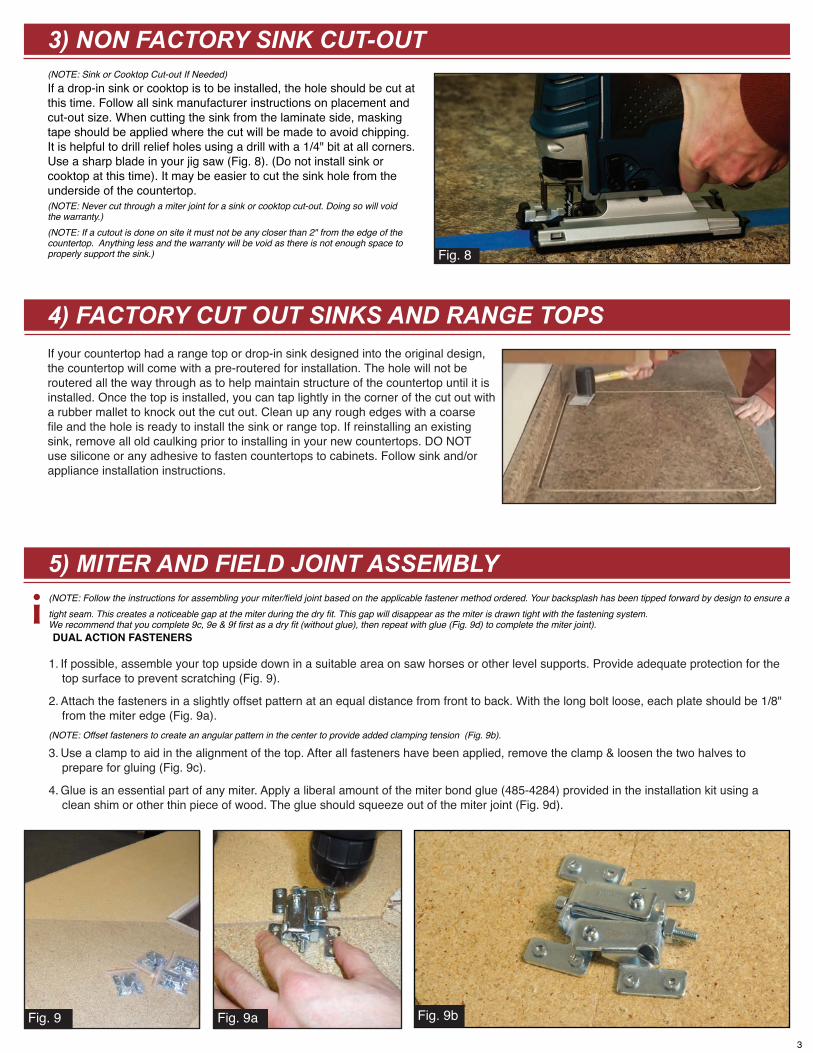
(NOTE: Sink or Cooktop Cut-out If Needed)If a drop-in sink or cooktop is to be installed, the hole should be cut at this time. Follow all sink manufacturer instructions on placement and cut-out size. When cutting the sink from the laminate side, masking tape should be applied where the cut will be made to avoid chipping. It is helpful to drill relief holes using a drill with a 1/4" bit at all corners. Use a sharp blade in your jig saw (Fig. 8). (Do not install sink or cooktop at this time). It may be easier to cut the sink hole from the underside of the countertop.
DUAL ACTION FASTENERS
(NOTE: Follow the instructions for assembling your miter/field joint based on the applicable fastener method ordered. Your backsplash has been tipped forward by design to ensure a tight seam. This creates a noticeable gap at the miter during the dry fit. This gap will disappear as the miter is drawn tight with the fastening system.We recommend that you complete 9c, 9e & 9f first as a dry fit (without glue), then repeat with glue (Fig. 9d) to complete the miter joint).
1. If possible, assemble your top upside down in a suitable area on saw horses or other level supports. Provide adequate protection for the top surface to prevent scratching (Fig. 9).
2. Attach the fasteners in a slightly offset pattern at an equal distance from front to back. With the long bolt loose, each plate should be 1/8" from the miter edge (Fig. 9a).(NOTE: Offset fasteners to create an angular pattern in the center to provide added clamping tension (Fig. 9b).
3. Use a clamp to aid in the alignment of the top. After all fasteners have been applied, remove the clamp & loosen the two halves to prepare for gluing (Fig. 9c).
4. Glue is an essential part of any miter. Apply a liberal amount of the miter bond glue (485-4284) provided in the installation kit using a clean shim or other thin piece of wood. The glue should squeeze out of the miter joint (Fig. 9d).
i
3
Fig. 8
3) NON FACTORY SINK CUT-OUT
5) MITER AND FIELD JOINT ASSEMBLY
(NOTE: Never cut through a miter joint for a sink or cooktop cut-out. Doing so will void the warranty.)(NOTE: If a cutout is done on site it must not be any closer than 2" from the edge of the countertop. Anything less and the warranty will be void as there is not enough space to properly support the sink.)
Fig. 9bFig. 9 Fig. 9a
4) FACTORY CUT OUT SINKS AND RANGE TOPSIf your countertop had a range top or drop-in sink designed into the original design, the countertop will come with a pre-routered for installation. The hole will not be routered all the way through as to help maintain structure of the countertop until it is installed. Once the top is installed, you can tap lightly in the corner of the cut out with a rubber mallet to knock out the cut out. Clean up any rough edges with a coarse file and the hole is ready to install the sink or range top. If reinstalling an existing sink, remove all old caulking prior to installing in your new countertops. DO NOT use silicone or any adhesive to fasten countertops to cabinets. Follow sink and/or appliance installation instructions.
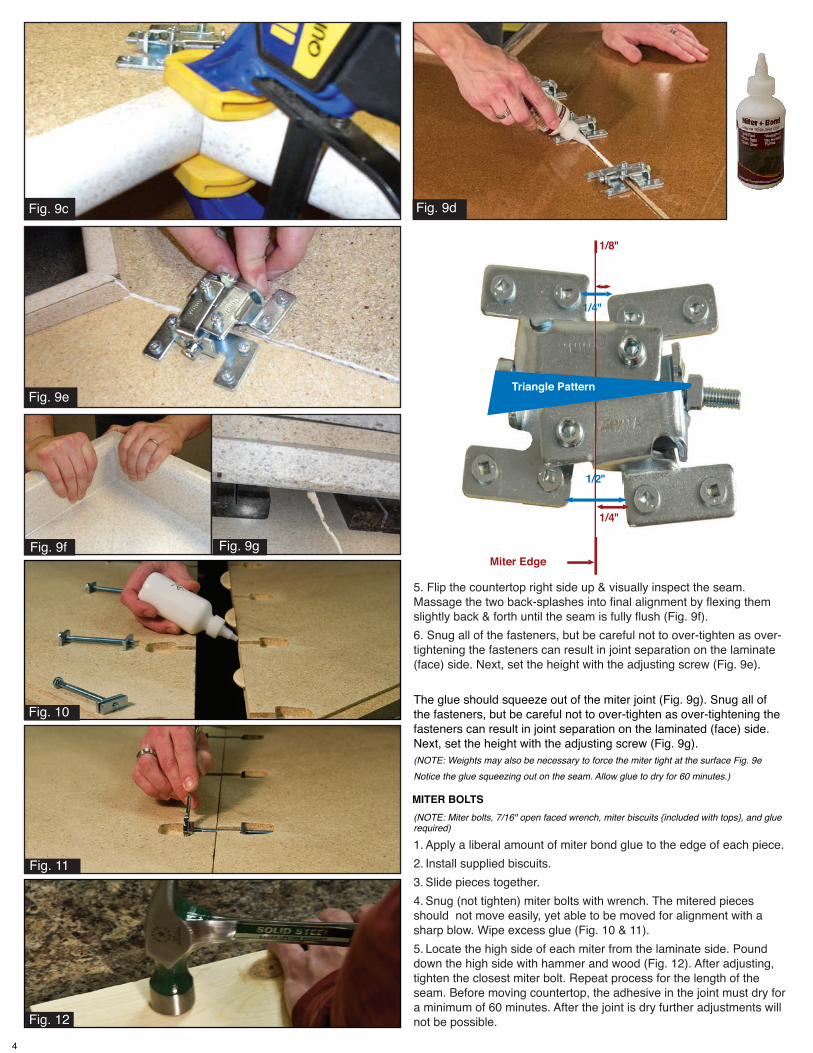
1. Apply a liberal amount of miter bond glue to the edge of each piece.2. Install supplied biscuits.3. Slide pieces together.4. Snug (not tighten) miter bolts with wrench. The mitered pieces should not move easily, yet able to be moved for alignment with a sharp blow. Wipe excess glue (Fig. 10 & 11).5. Locate the high side of each miter from the laminate side. Pound down the high side with hammer and wood (Fig. 12). After adjusting, tighten the closest miter bolt. Repeat process for the length of the seam. Before moving countertop, the adhesive in the joint must dry for a minimum of 60 minutes. After the joint is dry further adjustments will not be possible.
(NOTE: Miter bolts, 7/16" open faced wrench, miter biscuits {included with tops}, and glue required)
MITER BOLTS
5. Flip the countertop right side up & visually inspect the seam. Massage the two back-splashes into final alignment by flexing them slightly back & forth until the seam is fully flush (Fig. 9f). 6. Snug all of the fasteners, but be careful not to over-tighten as over- tightening the fasteners can result in joint separation on the laminate (face) side. Next, set the height with the adjusting screw (Fig. 9e).
The glue should squeeze out of the miter joint (Fig. 9g). Snug all of the fasteners, but be careful not to over-tighten as over-tightening the fasteners can result in joint separation on the laminated (face) side. Next, set the height with the adjusting screw (Fig. 9g).(NOTE: Weights may also be necessary to force the miter tight at the surface Fig. 9e Notice the glue squeezing out on the seam. Allow glue to dry for 60 minutes.)
4
Fig. 9f Fig. 9g
Fig. 10
Fig. 11
Fig. 12
Triangle Pattern
1/8"
Miter Edge
1/4"
1/2"
1/4"
Fig. 9e
Fig. 9c Fig. 9d
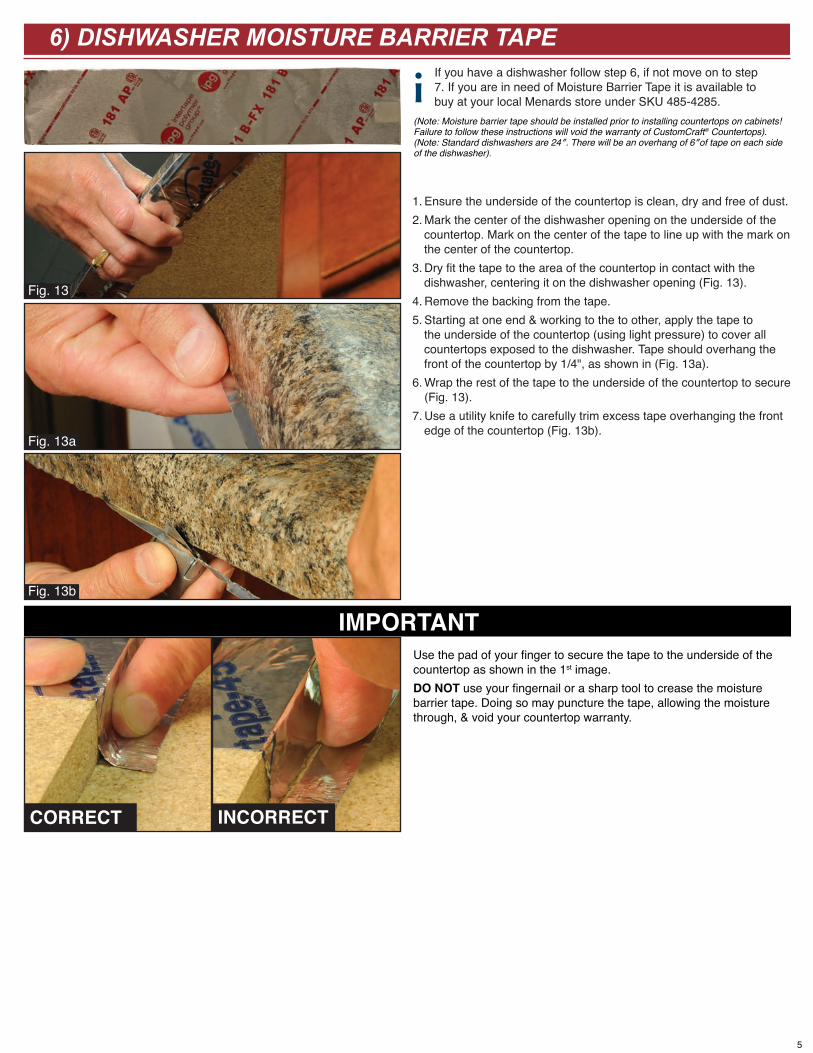
1. Ensure the underside of the countertop is clean, dry and free of dust.2. Mark the center of the dishwasher opening on the underside of the countertop. Mark on the center of the tape to line up with the mark on the center of the countertop.3. Dry fit the tape to the area of the countertop in contact with the dishwasher, centering it on the dishwasher opening (Fig. 13).4. Remove the backing from the tape.5. Starting at one end & working to the to other, apply the tape to the underside of the countertop (using light pressure) to cover all countertops exposed to the dishwasher. Tape should overhang the front of the countertop by 1/4", as shown in (Fig. 13a).6. Wrap the rest of the tape to the underside of the countertop to secure (Fig. 13).7. Use a utility knife to carefully trim excess tape overhanging the front edge of the countertop (Fig. 13b).
Use the pad of your finger to secure the tape to the underside of the countertop as shown in the 1st image. DO NOT use your fingernail or a sharp tool to crease the moisture barrier tape. Doing so may puncture the tape, allowing the moisture through, & void your countertop warranty.
(Note: Moisture barrier tape should be installed prior to installing countertops on cabinets! Failure to follow these instructions will void the warranty of CustomCraft® Countertops).(Note: Standard dishwashers are 24″. There will be an overhang of 6″of tape on each side of the dishwasher).
If you have a dishwasher follow step 6, if not move on to step 7. If you are in need of Moisture Barrier Tape it is available to buy at your local Menards store under SKU 485-4285.
5
Fig. 13
Fig. 13b
Fig. 13a
IMPORTANT
CORRECT INCORRECT
6) DISHWASHER MOISTURE BARRIER TAPE
i
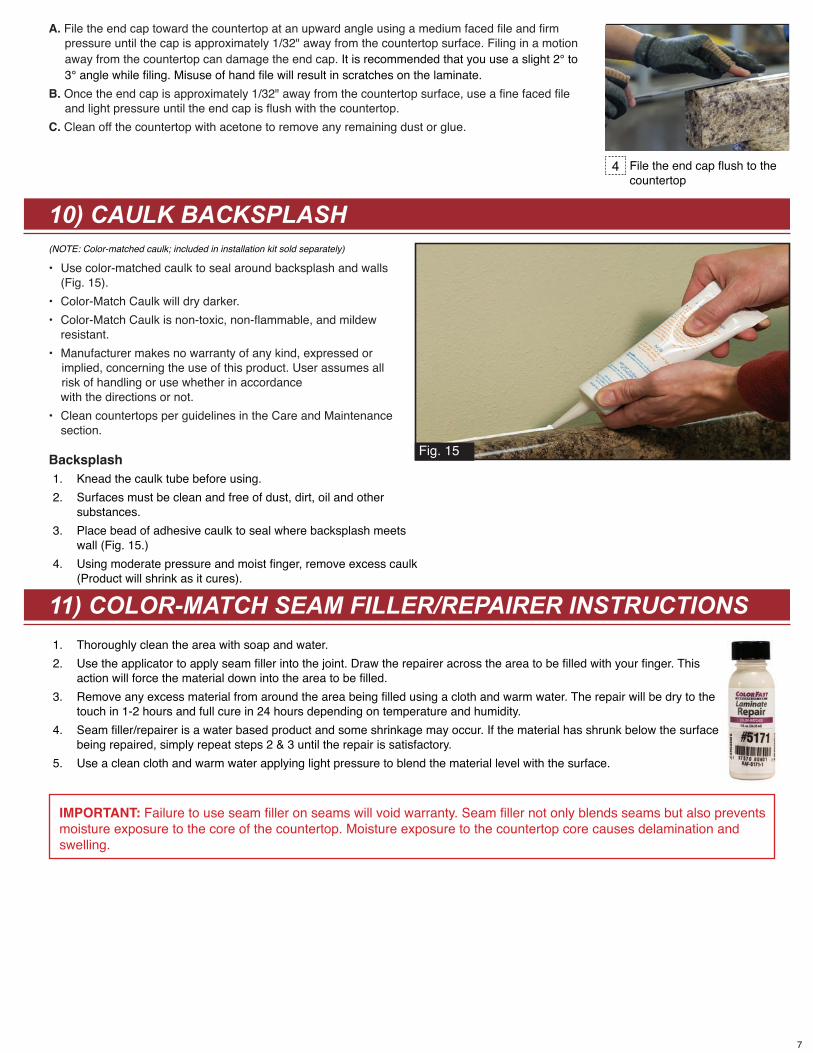
Loose backsplashes are cut to the next foot. If the backsplash needs to be trimmed to the length of the countertop, place a piece of painters tape and make a cut line. Painters tape will aid in seeing line and help reduce chipping. Matching end caps are available when purchasing a backsplash. (NOTE: Wood backsplash (loose splash) is a wood based product and is subject to board movement)
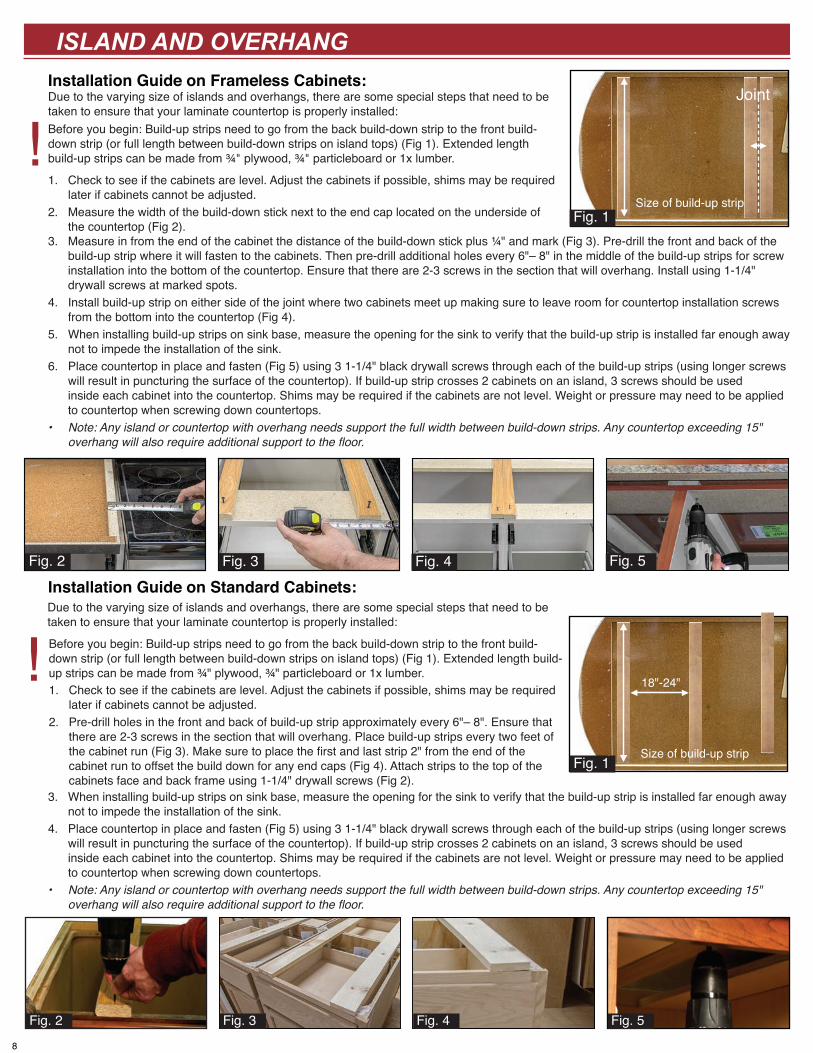
A. Place the build up stick and backing block flush to the edge of the countertop where the end cap will be applied. Use 2 nails to fasten the backing block to the countertop and 4 nails to fasten the buildup stick.
Apply the build up stick and back block
Prepare the end cap profile edge.
Application of the end cap.
A. Line up the end cap to the edge of the countertop leaving 1/8" bottom and back edges of the countertop. B. Trace the countertop profile edge onto the end cap using a maker. For best results lay the maker flat on the countertop. C. Once the profile has been traced trim the access laminate with scissors.(NOTE: You do not need to cut perfectly, as you will file down the excess laminate. Be sure not to over trim)
A. Set iron to 350° and allow time for the iron to warm up. Center the trimmed end cap on the countertop edge with 1/16" overhang on all sides.B. Starting in the middle of the end cap, use the iron to apply heat and firm pressure until the end cap adheres to the countertop. Work from the middle of the end cap to the outer edges holding the iron the same place for approximately 10 seconds. Use a cool damp cloth or sponge and apply pressure to the end cap. This will cool the end cap and set the glue.C. Very lightly pull on the top edge of the end cap to ensure it is firmly attached. If the edge pulls away from the countertop, reheat the end cap with the iron and cool again until proper adhesion is achieved.
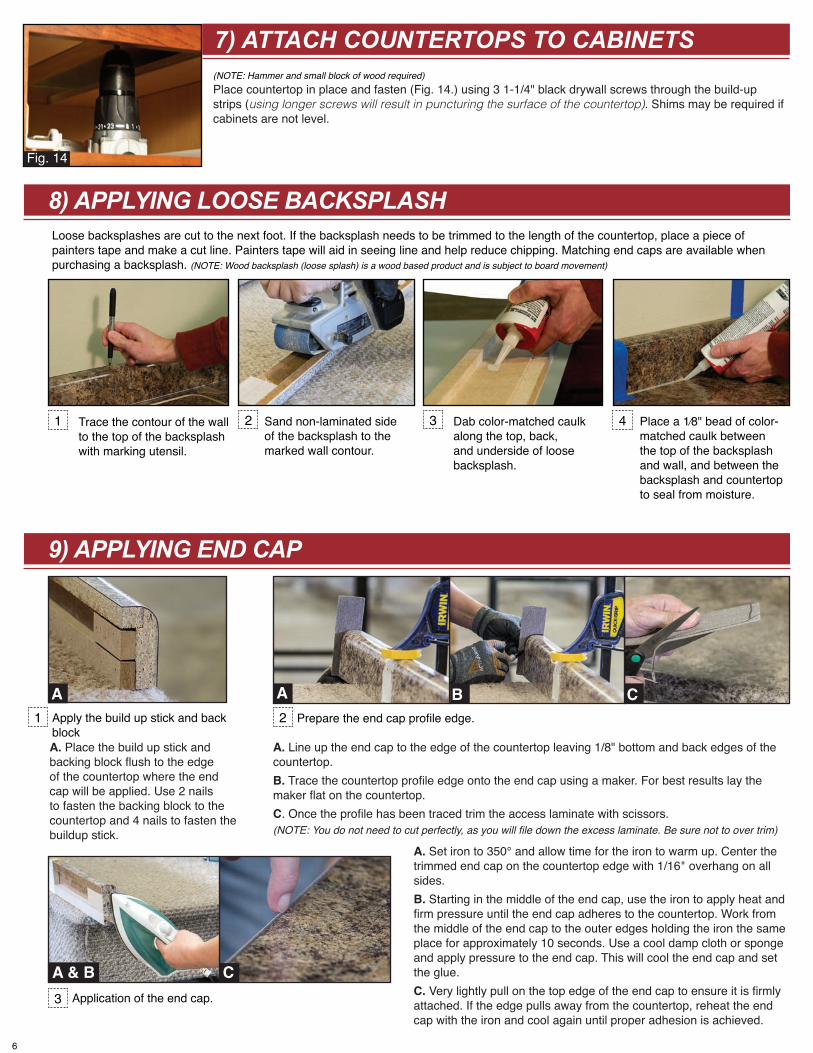
(NOTE: Hammer and small block of wood required)Place countertop in place and fasten (Fig. 14.) using 3 1-1/4" black drywall screws through the build-up strips (using longer screws will result in puncturing the surface of the countertop). Shims may be required if cabinets are not level.
6
8) APPLYING LOOSE BACKSPLASH
9) APPLYING END CAP
1 2
3
1 Trace the contour of the wall to the top of the backsplash with marking utensil.
2 Sand non-laminated side of the backsplash to the marked wall contour.
3 Dab color-matched caulk along the top, back, and underside of loose backsplash.
4 Place a 1⁄8" bead of color-matched caulk between the top of the backsplash and wall, and between the backsplash and countertop to seal from moisture.
Fig. 14
7) ATTACH COUNTERTOPS TO CABINETS
A B CA
A & B C
1. Thoroughly clean the area with soap and water.2. Use the applicator to apply seam filler into the joint. Draw the repairer across the area to be filled with your finger. This
action will force the material down into the area to be filled. 3. Remove any excess material from around the area being filled using a cloth and warm water. The repair will be dry to the
touch in 1-2 hours and full cure in 24 hours depending on temperature and humidity.4. Seam filler/repairer is a water based product and some shrinkage may occur. If the material has shrunk below the surface
being repaired, simply repeat steps 2 & 3 until the repair is satisfactory.5. Use a clean cloth and warm water applying light pressure to blend the material level with the surface.
10) CAULK BACKSPLASH(NOTE: Color-matched caulk; included in installation kit sold separately)
• Use color-matched caulk to seal around backsplash and walls (Fig. 15).• Color-Match Caulk will dry darker.• Color-Match Caulk is non-toxic, non-flammable, and mildew resistant.• Manufacturer makes no warranty of any kind, expressed or implied, concerning the use of this product. User assumes all risk of handling or use whether in accordance with the directions or not.• Clean countertops per guidelines in the Care and Maintenance section.
1. Knead the caulk tube before using.2. Surfaces must be clean and free of dust, dirt, oil and other
substances.3. Place bead of adhesive caulk to seal where backsplash meets
wall (Fig. 15.)4. Using moderate pressure and moist finger, remove excess caulk
(Product will shrink as it cures).
Backsplash
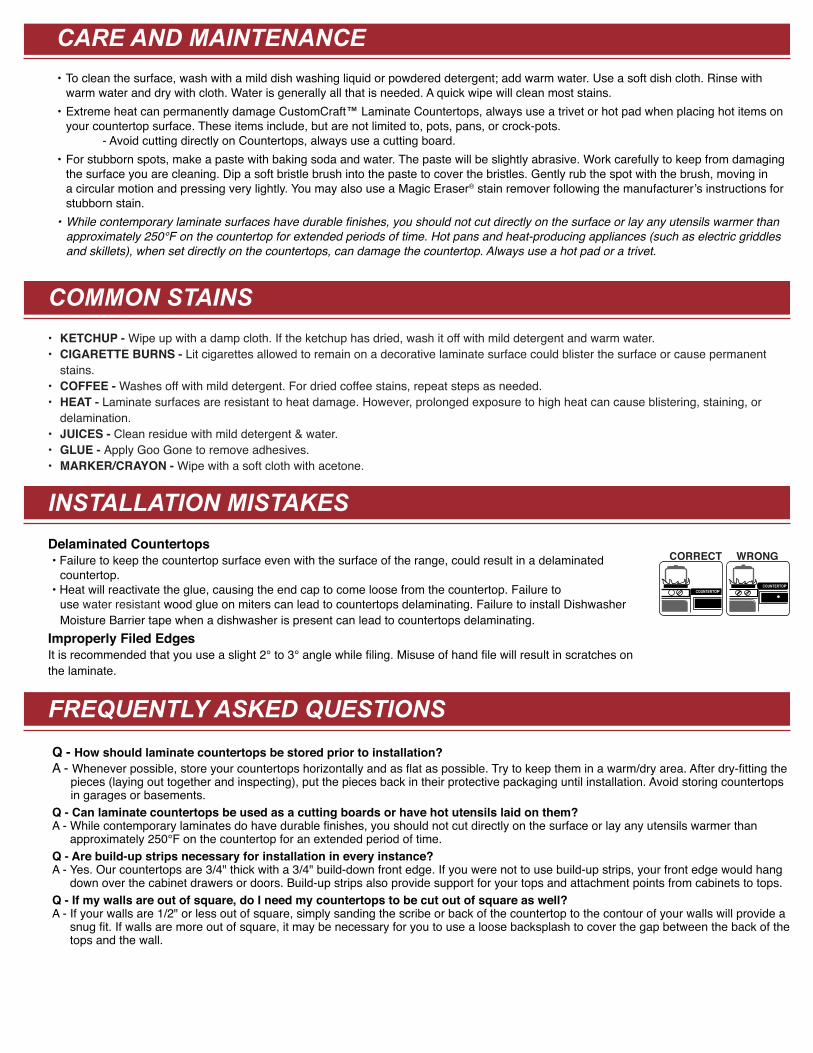
File the end cap flush to the countertop
A. File the end cap toward the countertop at an upward angle using a medium faced file and firm pressure until the cap is approximately 1/32" away from the countertop surface. Filing in a motion away from the countertop can damage the end cap. It is recommended that you use a slight 2° to 3° angle while filing. Misuse of hand file will result in scratches on the laminate.B. Once the end cap is approximately 1/32" away from the countertop surface, use a fine faced file and light pressure until the end cap is flush with the countertop.C. Clean off the countertop with acetone to remove any remaining dust or glue.
IMPORTANT: Failure to use seam filler on seams will void warranty. Seam filler not only blends seams but also prevents moisture exposure to the core of the countertop. Moisture exposure to the countertop core causes delamination and swelling.
7
4
11) COLOR-MATCH SEAM FILLER/REPAIRER INSTRUCTIONS
Fig. 15
8
Fig. 4Fig. 2 Fig. 3
Installation Guide on Frameless Cabinets:
ISLAND AND OVERHANG
Due to the varying size of islands and overhangs, there are some special steps that need to be taken to ensure that your laminate countertop is properly installed:
!
!
Before you begin: Build-up strips need to go from the back build-down strip to the front build-down strip (or full length between build-down strips on island tops) (Fig 1). Extended length build-up strips can be made from ¾" plywood, ¾" particleboard or 1x lumber.
Fig. 5
Fig. 1Size of build-up strip
Joint
Installation Guide on Standard Cabinets:Due to the varying size of islands and overhangs, there are some special steps that need to be taken to ensure that your laminate countertop is properly installed:
Before you begin: Build-up strips need to go from the back build-down strip to the front build-down strip (or full length between build-down strips on island tops) (Fig 1). Extended length build-up strips can be made from ¾" plywood, ¾" particleboard or 1x lumber.
Fig. 1
18"-24"
Size of build-up strip
Fig. 5Fig. 4Fig. 3Fig. 2
1. Check to see if the cabinets are level. Adjust the cabinets if possible, shims may be required later if cabinets cannot be adjusted.2. Measure the width of the build-down stick next to the end cap located on the underside of the countertop (Fig 2).3. Measure in from the end of the cabinet the distance of the build-down stick plus ¼" and mark (Fig 3). Pre-drill the front and back of the build-up strip where it will fasten to the cabinets. Then pre-drill additional holes every 6"– 8" in the middle of the build-up strips for screw installation into the bottom of the countertop. Ensure that there are 2-3 screws in the section that will overhang. Install using 1-1/4" drywall screws at marked spots.4. Install build-up strip on either side of the joint where two cabinets meet up making sure to leave room for countertop installation screws from the bottom into the countertop (Fig 4).5. When installing build-up strips on sink base, measure the opening for the sink to verify that the build-up strip is installed far enough away not to impede the installation of the sink.6. Place countertop in place and fasten (Fig 5) using 3 1-1/4" black drywall screws through each of the build-up strips (using longer screws will result in puncturing the surface of the countertop). If build-up strip crosses 2 cabinets on an island, 3 screws should be used inside each cabinet into the countertop. Shims may be required if the cabinets are not level. Weight or pressure may need to be applied to countertop when screwing down countertops.• Note: Any island or countertop with overhang needs support the full width between build-down strips. Any countertop exceeding 15" overhang will also require additional support to the floor.
1. Check to see if the cabinets are level. Adjust the cabinets if possible, shims may be required later if cabinets cannot be adjusted.2. Pre-drill holes in the front and back of build-up strip approximately every 6"– 8". Ensure that there are 2-3 screws in the section that will overhang. Place build-up strips every two feet of the cabinet run (Fig 3). Make sure to place the first and last strip 2" from the end of the cabinet run to offset the build down for any end caps (Fig 4). Attach strips to the top of the cabinets face and back frame using 1-1/4" drywall screws (Fig 2).3. When installing build-up strips on sink base, measure the opening for the sink to verify that the build-up strip is installed far enough away not to impede the installation of the sink.4. Place countertop in place and fasten (Fig 5) using 3 1-1/4" black drywall screws through each of the build-up strips (using longer screws will result in puncturing the surface of the countertop). If build-up strip crosses 2 cabinets on an island, 3 screws should be used inside each cabinet into the countertop. Shims may be required if the cabinets are not level. Weight or pressure may need to be applied to countertop when screwing down countertops.• Note: Any island or countertop with overhang needs support the full width between build-down strips. Any countertop exceeding 15" overhang will also require additional support to the floor.
Q - How should laminate countertops be stored prior to installation?A - Whenever possible, store your countertops horizontally and as flat as possible. Try to keep them in a warm/dry area. After dry-fitting the
pieces (laying out together and inspecting), put the pieces back in their protective packaging until installation. Avoid storing countertops in garages or basements.Q - Can laminate countertops be used as a cutting boards or have hot utensils laid on them?A - While contemporary laminates do have durable finishes, you should not cut directly on the surface or lay any utensils warmer than
approximately 250℉ on the countertop for an extended period of time.Q - Are build-up strips necessary for installation in every instance?A - Yes. Our countertops are 3/4" thick with a 3/4" build-down front edge. If you were not to use build-up strips, your front edge would hang
down over the cabinet drawers or doors. Build-up strips also provide support for your tops and attachment points from cabinets to tops.Q - If my walls are out of square, do I need my countertops to be cut out of square as well?A - If your walls are 1/2" or less out of square, simply sanding the scribe or back of the countertop to the contour of your walls will provide a
snug fit. If walls are more out of square, it may be necessary for you to use a loose backsplash to cover the gap between the back of the tops and the wall.
• KETCHUP - Wipe up with a damp cloth. If the ketchup has dried, wash it off with mild detergent and warm water.• CIGARETTE BURNS - Lit cigarettes allowed to remain on a decorative laminate surface could blister the surface or cause permanent stains.• COFFEE - Washes off with mild detergent. For dried coffee stains, repeat steps as needed.• HEAT - Laminate surfaces are resistant to heat damage. However, prolonged exposure to high heat can cause blistering, staining, or delamination.• JUICES - Clean residue with mild detergent & water.• GLUE - Apply Goo Gone to remove adhesives.• MARKER/CRAYON - Wipe with a soft cloth with acetone.
INSTALLATION MISTAKESDelaminated Countertops• Failure to keep the countertop surface even with the surface of the range, could result in a delaminated
countertop.• Heat will reactivate the glue, causing the end cap to come loose from the countertop. Failure to
use water resistant wood glue on miters can lead to countertops delaminating. Failure to install Dishwasher Moisture Barrier tape when a dishwasher is present can lead to countertops delaminating. Improperly Filed EdgesIt is recommended that you use a slight 2° to 3° angle while filing. Misuse of hand file will result in scratches on the laminate.
FREQUENTLY ASKED QUESTIONS
COMMON STAINS
COUNTERTOPCOUNTERTOP
WRONGCORRECT
CARE AND MAINTENANCE • To clean the surface, wash with a mild dish washing liquid or powdered detergent; add warm water. Use a soft dish cloth. Rinse with warm water and dry with cloth. Water is generally all that is needed. A quick wipe will clean most stains.• Extreme heat can permanently damage CustomCraft™ Laminate Countertops, always use a trivet or hot pad when placing hot items on your countertop surface. These items include, but are not limited to, pots, pans, or crock-pots. - Avoid cutting directly on Countertops, always use a cutting board.• For stubborn spots, make a paste with baking soda and water. The paste will be slightly abrasive. Work carefully to keep from damaging the surface you are cleaning. Dip a soft bristle brush into the paste to cover the bristles. Gently rub the spot with the brush, moving in a circular motion and pressing very lightly. You may also use a Magic Eraser® stain remover following the manufacturer’s instructions for stubborn stain.• While contemporary laminate surfaces have durable finishes, you should not cut directly on the surface or lay any utensils warmer than approximately 250°F on the countertop for extended periods of time. Hot pans and heat-producing appliances (such as electric griddles and skillets), when set directly on the countertops, can damage the countertop. Always use a hot pad or a trivet.
INSTALLATION MISTAKES
Product Subject to this Limited WarrantyThis Limited Warranty applies only to the CUSTOMCRAFT LAMINATE (the “Product”) sold by Midwest Manufacturing, a division of Menard, Inc., (the “Company”).Who is Entitled to this Limited WarrantyThe Company grants this Limited Warranty solely in favor of the original purchaser of the Product (the “Original Purchaser”), but to no other person or entity whatsoever. No person or entity, other than the Original Purchaser, shall have any right to assert any claim under this Limited Warranty, or otherwise, in connection with the Product.This Limited Warranty is personal to the Original Purchaser and may not be transferred by the Original Purchaser to any other person or entity, by contract, operation of law, transfer of the property into which the Product are installed, or otherwise.Length of this Limited WarrantyThis Limited Warranty shall begin on the date of purchase of the Product and shall continue for a period of 1 year (such period of time, the “Warranty Period”), after which this Limited Warranty shall expire and have no further force or effect. What is WarrantedSubject to the conditions and limitations set forth in this Limited Warranty, the Company warrants to the Original Purchaser that during the Warranty Period the Product will be free from manufacturing and design defects when used under normal conditions and maintained properly.However, the Company shall not be liable under this Limited Warranty for any of the following:
A. Defects in or failure of the Product caused by accidents, physical abuse or misuse of the Products. B. Defects in or failure of the Product caused by installation of the Product not in strict adherence with the written instructions of the Company. C. Defects in or failure of the Product caused by improper care or maintenance of the Products. D. Breakage of the Product that is not due to a defect in the manufacture of the Products. E. Any damage to the Product caused by impact of foreign objects, earthquake, or other acts of God or by fire, explosion or other casualty. F. Defects in, failure of, or damage to the Product caused by materials adjacent to the Product.
G. Any damage due to or resulting from heat.H. Damage to the Product caused by alteration after completion of its installation by anyone who is not authorized by the Company in writing, whether such alteration be by structural additions, changes, replacements or by equipment installation.I. Changes in the Product due to gloss reduction, scratching, staining or alkaline etching of the finish over time due to use, cleaning practices or water conditions, all of which are not manufacturing defects but are indicative of normal wear and tear.
THIS LIMITED WARRANTY IS IN LIEU OF ALL OTHER WARRANTIES, EXPRESS OR IMPLIED, INCLUDING BUT NOT LIMITED TO THE IMPLIED WARRANTIES OF FITNESS FOR A PARTICULAR PURPOSE AND MERCHANTABILITY. IN NO EVENT SHALL THE COMPANY BE LIABLE FOR CONSEQUENTIAL OR INCIDENTAL DAMAGES OF ANY KIND, INCLUDING, BUT NOT LIMITED TO, ANY DAMAGE TO THE PROPERTY IN WHICH A PRODUCT IS INSTALLED, ITS CONTENTS OR ANY PERSON THEREIN. NO FIELD REPRESENTATIVE, DISTRIBUTOR OR DEALER OF THE COMPANY IS AUTHORIZED TO MAKE ANY CHANGE OR MODIFICATION TO THIS LIMITED WARRANTY. THIS LIMITED WARRANTY GIVES YOU SPECIFIC LEGAL RIGHTS, AND YOU MAY ALSO HAVE OTHER RIGHTS THAT VARY FROM STATE TO STATE. SOME STATES DO NOT ALLOW LIMITATIONS ON HOW LONG AN IMPLIED WARRANTY LASTS OR THE EXCLUSION OR LIMITATION OF INCIDENTAL OR CONSEQUENTIAL DAMAGES, SO THE ABOVE LIMITATIONS OR EXCLUSIONS MAY NOT APPLY TO YOU.
The invalidity, illegality or unenforceability of any one or more provisions of this Limited Warranty shall in no way affect or impair the validity, legality or enforceability of the remaining provisions, which shall remain in full force and effect. What the Company Will DoIn the event that the Product fails to comply with this Limited Warranty, the Company shall replace the defective Product with a product of like kind and quality (the “Replacement Product”).
THE EXPENSE OF LABOR, INSTALLATION, DELIVERY OR REMOVAL IS NOT INCLUDED IN THIS LIMITED WARRANTY.THE FOREGOING DESCRIBES THE COMPANY’S SOLE LIABILITY, AND THE ORIGINAL PURCHASER’S SOLE REMEDY, FOR ANY BREACH OF WARRANTY IN RESPECT OF THE PRODUCTS. AS LONG AS THE COMPANY IS WILLING OR ABLE TO REPAIR OR REPLACE THE DEFECTIVE PRODUCT, AS PROVIDED ABOVE, THIS LIMITED WARRANTY SHALL NOT BE DEEMED TO HAVE FAILED OF ITS ESSENTIAL PURPOSE.How to Make a ClaimTo make a claim under this Limited Warranty, the Original Purchaser must notify the Company by submitting an Installed Guest Complaint Form (the “Form”). A copy of the Form can be obtained either online at Menards.com® or directly from your nearest Menards® home improvement store. The Original Purchaser must also submit a copy of the original proof of purchase that includes the date of purchase of the Product claimed to be defective along with photographs showing the claimed defect(s). The completed Form along with the copy of the original proof of purchase and photographs shall be mailed to:Menards Guest Services5101 Menard DriveEau Claire, WI 54703The Company shall then promptly inspect, by means of the photographs supplied by the Original Purchaser, the claimed defect(s) and shall notify the Original Purchase of its decision in writing. If the inspection does disclose a defect covered by this Limited Warranty, the Company shall provide the Original Purchaser with the Replacement Product. The Original Purchaser, at his or her own expense, will be required to return the defective Product when picking up the Replacement Product from the Menards® home improvement store of his or her choice. Dispute ResolutionAny controversies or claims arising out of or relating to this Limited Warranty, or the breach thereof, shall be settled by binding arbitration administered by the American Arbitration Association under its applicable Consumer or Commercial Arbitration Rules. The arbitration proceeding shall be held in Eau Claire, Wisconsin.
LIMITED WARRANTY FOR CUSTOMCRAFT LAMINATE
For Everything CustomCraft® has to Offer,Visit www.midwestmanufacturing.com- Brochures- Videos- Installation Instructions- Detailed Warranty Information- Features and Benefits Guides- New Products- Inspirational Images
Questions or Concerns:For guest assistance contact countertop helpby sending an email to:[email protected]
Share for a chance to win a $100 Gift Card!Proudly share your completed project. Go to and search for My Project Gallery to submit your project!

![Experience the Optional Features 2006 Fifth Wheel Quality...Experience the Amenities! [A] Laminate kitchen countertop with oak edging provides ample work surface. Dual acrylic sink](https://img.dokumen.tips/doc/110x75/5ec742503461017ab76b6546/experience-the-optional-features-2006-fifth-wheel-quality-experience-the-amenities.jpg)