Embed Size (px)
Citation preview

1 | P a g e
School District No. 73 Kamloops Thompson
MyEducationBC Counsellor Training Materials
Part 2
• Equivalency
• Print Student Schedule
• Modifying a current student’s schedule
• Creating a schedule for a new student
• Other useful screens
• Useful Reports (work in progress)
Brad Epp
778-471-6061 local 265

2 | P a g e
Entering Courses for Out of Province Students. 1. Select the student that you want to add the BC Course Equivalent to
2. Click Transcript
3. Click Options, then Add
4. Complete the fields in the image. Use the magnifying glass to show a pick list for your options.
5. Click Save
The Two Views of the Student Schedule
List View:
How to read the schedule:
• FY 1(1) Means the student has this course full year in the first block (A) on day 1
• S1 1(1-2) means the student has this course in semester 1 in the first block on day 1 (A) and 2 (E)
• S1 2(2) means the student has this course in semester 1 in the first block on day 2 (E)
• Q2 1(1) means the student has this course in the 2nd quarter (1/2 semester) in the first block (A)
on day 1

3 | P a g e
The Matrix View:
• The current day (1-1) or (2-2) will be highlighted with a red box. If the days are the same, you
don’t have a day 1/day 2 schedule.
• There will also be a red box around the block that the student is currently in.
• Colours don’t mean anything, just breaking up the courses.
Printing a Student Schedule 1. Click Student top tab
2. Select the student you wish to view via [Ctrl] + F or Options, Query.
3. Click Schedule side tab
4. Click Reports, then students, and select the type of report you wish.
5. Click Run

4 | P a g e
Student Schedules (Sheet)
Student Schedules (Matrix)
5 | P a g e
Modifying a current student’s schedule (Matrix View) 1. Click the student top tab
2. Click the schedule side tab
3. Click the workspace sub side tab
Notes:
1. If a course name is in Black that means it is currently used in the schedule.
2. If a course name is in Red that means that is NOT currently used in the schedule.
3. If you hover over a course name on the left coloured boxes will appear on the matrix to
show where the course lies in the timetable.
Alternate Courses
If there is a course in the Alternate area, click on
the blue course name and select the alternate
course type and choose between substitute and
Auto-fill.
6 | P a g e
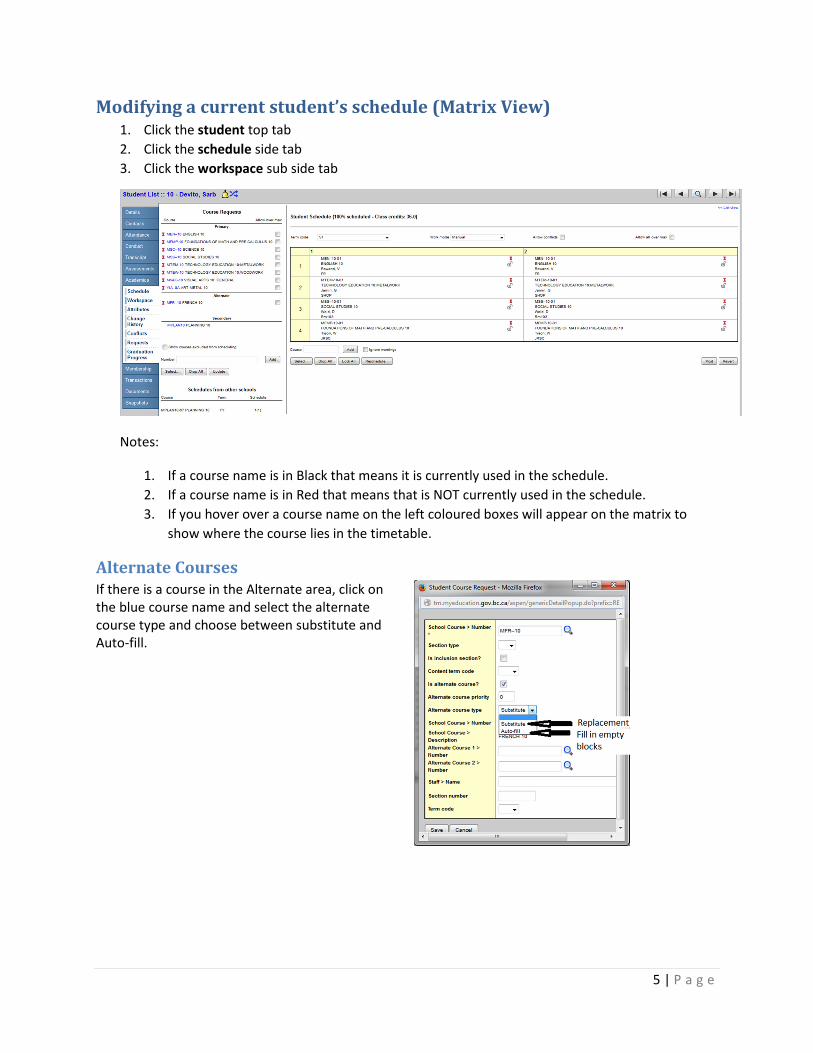
Handling Course Requests (Left Side of Matrix View)
To add course request(s):
Notes: [Ctrl] + F works here
To Drop a course request, click on the icon next to the course.
Notes:
1. Drop All removes all course requests
2. Update brings courses from the right (matrix) back to the course request (except for alternates)
7 | P a g e
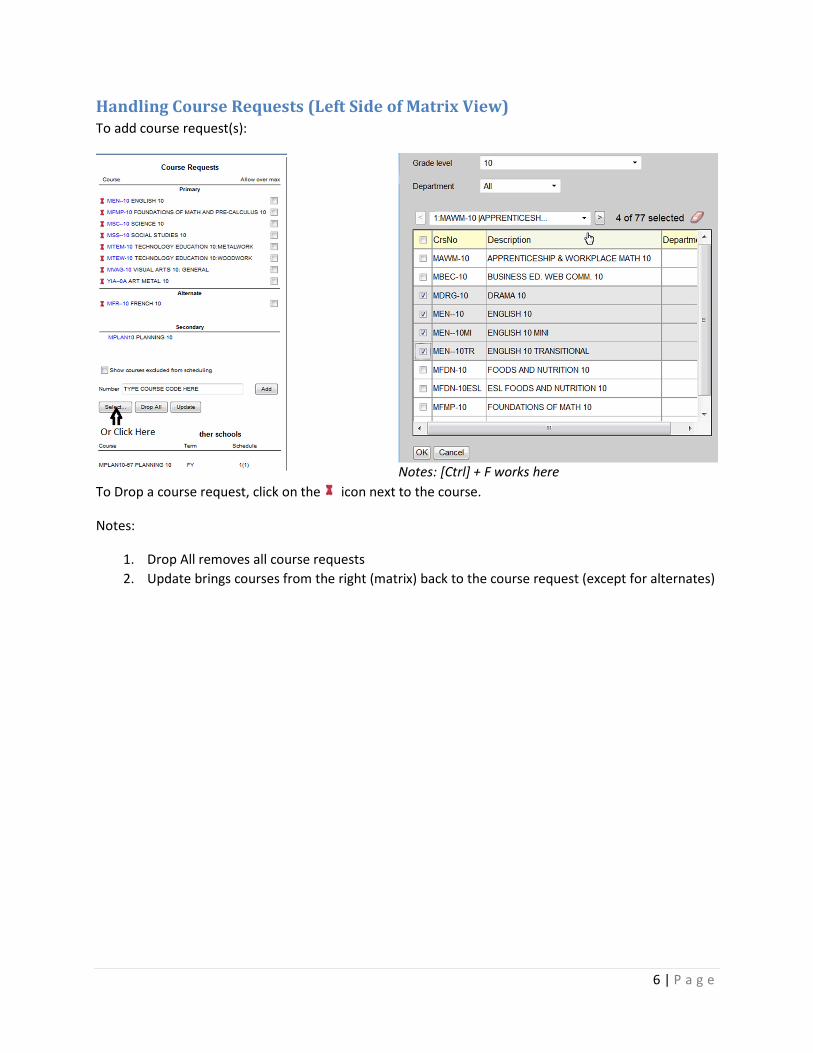
Schedule Matrix (Right Side of Matrix View)
• Toggle Allow conflicts and Allow all over max
Work modes:
1. Manual: You drag and drop the course into the schedule
2. Auto-shuffle: When you drag a course from the left side (course requests) to the right side, the
course will drop into the schedule and bump the other course out.
Note: Student Schedule (XX % scheduled – speaks to the number of blocks filled out of the number of
blocks available). Note a student could be full time and be 75% scheduled, because they are not taking
any off time tabled courses.
1. To lock a course in the schedule, click on the padlock ( ). It will not allow you to change this
course in the schedule until you unlock it.
2. To do drop a course click ( )
3. To add a course, drag it from the course requests on the right or click on

8 | P a g e
a. Complete the table below to see which courses are available in the block.
b. Click ok
Notes:
• In the course window *10 will find all grade 10 courses
• Parent/Child courses – you will see them in all in the same time, schedule
4. If a student has an empty block, click on the block and the pick list from above opens up and
select course(s) that a student can choose from.
5. When finished adding courses, click on the left side of the screen.
6. To start from a blank time table, click
7. will use MyEducation BC’s functionality to re-timetable a student.
8. To undo any changes click on will bring back the last posted (saved) schedule.
9. To FINALIZE (when you are sure that you are DONE) click

9 | P a g e
Creating a schedule for new student 1. Add students course requests via [select] or the number box (course code box) on the left side
of the workspace screen.
2. Click and then manually add courses.
3. Click
4. Click
Change History Keeps historical record of all of the course changes made for a student. If all records are lost, you can
use it to rebuild a student schedule.
Conflict Matrix Screen The current listing of courses the student is enrolled in and alternates to see other course options for
the same courses
Notes:
1. The scheduled course has a red box around it.
2. Open sections start with O:[number of open seats]

10 | P a g e
Useful Reports (Need to Add to Counsellor Security Role) 1. Students with open slots in timetable
2. Class Lists
3. Student Change History