Embed Size (px)
Citation preview

LET’S GET STARTED.
CORDLESS SLIM VAC WITH DETACHABLE HANDHELD
VX50VX51VX52VX53
SlimVacCORDLESS
vax.com.au vax.co.nz

Let’s talk safety
Basic safety precautions
Don’ts
Do’s
This vacuum cleaner is intended for household use only and NOT for commercial or industrial use.READ ALL THE INSTRUCTIONS BEFORE USING THIS APPLIANCE
• It is a battery-operated appliance, the battery being charged whilst inside the appliance.• Only use the vacuum cleaner indoors and keep the area you’re cleaning well lit.• Keep fingers, hair and loose clothing from moving parts and openings whilst using
the vacuum cleaner.• This appliance is not intended for use by persons (including children) with reduced
physical, sensory or mental capabilities or lack of experience and knowledge unless they have been given supervision or instruction concerning use of the appliance by a person responsible for their safety. Children should not play with the vacuum cleaner. Cleaning and user maintenance should not be made by children
• Only Vax recommended tools and accessories should be used with this vacuum cleaner• This vacuum cleaner does not stay upright without constant support, in between uses lie flat on the
floor in a suitable location so it does not become a trip hazard or can be stepped on.• Keep the charger and batteries in a dry place, and use them indoors only.• Do not use charger with damaged cord or plug. If appliance or charger is not working as it should,
has been dropped, damaged, left outdoors or dropped into water, take it to a Vax authorised repair agent prior to continuing use. Please contact our Customer Care Line on: AU: 1300 361 505 / NZ: 0800 800 900 (Mon-Fri 8.30am to 5.00pm) or visit www.vax.com.au / vax.co.nz for your nearest Vax authorised repair agent.
Please keep instructions for further use.
• Do not pull or carry by charger cord, use cord as a handle, close a door on cord, or pull cord around sharp edges or corners. Do not place product on cord. Do not run appliance on cord.
• Don’t handle the charger plug or use the vacuum cleaner with wet hands.• Don’t use this vacuum cleaner if it has been dropped, damaged, immersed in water or
left outdoors.• Don’t leave the vacuum cleaner in one spot for an extended period of time when the
brushbar is activated. This vacuum cleaner is fitted with a rotating brushbar which if left in one place may cause damage to the floor surface.
• Don’t attempt to remove blockages with sharp objects as this may cause damage to the vacuum cleaner.
• Don’t try to short the terminals of the battery and the charger.• Don’t use the vacuum cleaner with incorrect voltage as this may result in damage or injury to the user.
The correct voltage is listed on the rating label.• Don’t vacuum up hot coals, cigarette butts, ash, matches or smoking hot burning items or use in an
area where there may be harmful fluids (chlorine, bleach, and ammonia drain cleaner).• Do not vacuum hard or sharp objects such as glass, nails, screws or coins etc.• Don’t not vacuum plaster dust, concrete dust or any other building or vitreous material.• Do not vacuum flour, baking soda or any other powder-based carpet refresher or deodoriser.
• Always make sure the filter and dirt container are fitted correctly before using your vacuum cleaner.
• Always turn off and unplug from charger and remove the battery before carrying out any maintenance.
• Turn off all controls on the vacuum cleaner before disconnecting or connecting the battery.• Take extra care when cleaning on the stairs.• Always protect the charger cord from heated surfaces or near open flames.• Keep all openings clear and free from debris as this may affect the airflow/suction.• Store your vacuum cleaner in a cool, dry area. If filters have been cleaned as per
user guide instructions ensure they are thoroughly dry before storing away.• Always use the charger supplied with the vacuum cleaner.• Use only SAA approved 10amp extension cords, non-approved extension cords
may overheat. Care should be taken to arrange the extension cord as it can be a trip hazard.
• Always carry the vacuum cleaner by the handle.• Store your vacuum cleaner in a cool, dry area. Store the battery pack in a “charged” condition.
Minimum 30-50% charged for best battery life.
CAUTION: The battery used in this device may present a risk of fire or chemical burn if mistreated.Do not disassemble, heat or incinerate.Replace battery with Vax battery only. Use of another battery may present a risk of fire or explosion. Dispose of used battery promptly. Keep away from children.Do not disassemble and do not dispose of in fire. Do not attempt to disassemble the battery or remove any component projecting from the battery terminals.The battery and charger have no user serviceable parts. Fire or injury may result.Prior to disposal, protect exposed terminals with heavy insulating tape to prevent shorting.WARNING: For best performance terminals on battery, battery charger and vacuum cleaner must be clean and free from dust and dirt.Do not attempt to recharge non-rechargeable batteries.

Contents
Cordless Slim Vac VX50Let’s talk safety
Getting to know your machine
Getting started
Using your machine
Taking care of your machine
Let’s talk technical
Accessories
Notes
What to do if it goes wrong
Getting in touch
Included with your machine
3-in-1 Tool
Pet Tool/Stair Tool
Up Top Tool
Accessory Bag
Hard Floor Tool
Thank you for buying this Cordless Slim Vac.
Taking care of your carpets and hard floorsThe Cordless Slim Vac series is designed to make vacuuming carpets and hard floors regularly, as effective and efficient as possible and this user guide will help you get the most out of your machine. Maintaining your carpets and hard floors will ensure they keep their appearance for longer and Vax will help you take good care of them.
Taking care of your Cordless Slim VacAlso inside this guide are instructions on maintaining your new machine, so that it’s ready when you are to tackle your carpets and hard floors.
Cordless Slim Vac PetVX51
Cordless Slim Vac Pet+ VX52
Cordless Slim Vac Total Home VX53
Cordless Slim Vac Pets & Total Home VX52 / VX53
All models come with a charger, battery, wall mount, 2 wall plugs, 2 screws and user manual.
Contents vary dependant on model purchased.
Taking care of youWe’re here if you need us. For trouble shooting, simply call or visit:
Australia: 1300 361 505 vax.com.au
New Zealand: 0800 800 900 vax.co.nz
Monday-Friday 8.30am to 5.00pm
Calls are charged at the standard local rate. Please make a note of the serial number and model number of the product before calling.

Getting to know your machine Getting started
Assembling your Cordless Slim Vac
Line up the connector on the reach wand with the Powered Head. Push the reach wand down onto the Powered Head until it clicks into place.
Push the handheld down onto the reach wand until it clicks into place.
The upright slim vacuum cleaner is not free standing and in between uses must always be placed in the wall bracket or laid flat on the floor, in a suitable location so it does not become a trip hazard or can be stepped on.
PLEASE READ ‘LET’S TALK SAFETY’ AT THE BEGINNING BEFORE USE
Name Cordless Slim VacBattery voltage 21.6VRun time 22 minutes*
Charge time 5.5 hoursWeight 2 kgDust bin capacity 0.4L
Type Lithium-ion rechargeable battery packBattery model no. VCBS216V Voltage 21.6VCapacity 2Ah / 43.2 wh Use with Vax model YLS0121A - A260040 Charger ONLY
Technical Specification Battery Specification
Subject to technical change without notice. Turn off brushbar on hardfloors. Images are illustrative only.
Charger model no. YLS0121A - A260040 Input 100-240V ~ 50/60Hz 0.5A MaxOutput 26V DC 400mA Use with Vax Li-ion Battery VCSB216V ONLY
Filter Pack VX50F
Charger Specification
Accessories & Consumables
Before you begin CAUTION: Always switch off the vacuum cleaner before connecting or disconnecting the handheld/attachments or removing and emptying the dirt container.
IMPORTANT: The vacuum cleaner is equipped with overheat protection. If for any reason the vacuum cleaner does overheat the thermostat will automatically turn the vacuum cleaner off. If this happens, remove the battery. Remove and empty the dirt container also check the vacuum cleaner for blockages. Allow the vacuum cleaner to cool for approximately 1 hour (if you have washed the filter please wait 24 hours for the filter to fully dry before putting back into the machine).
For best cleaning results, filters require cleaning at least every 3 months and should be replaced every 12 months depending upon use. If the vacuum cleaner is blocked, remove the battery before removing the blockage.
CAUTION: This vacuum cleaner is not free standing. In between uses or when carrying out any maintenance always lie flat on the floor in a suitable location so it does not become a trip hazard or can be stepped on.
Brushbar On/Off button
On/Off and charging light
Handheld release button
Reach wand
Power head/accessory release clip
Powered Head
Brushbar
Battery charger inlet
Filter cover release buttons
Dirt container release button (hidden)
Battery release button
Handle
Dirt release button
Dirt container
On/Off trigger
Battery
Continuous power latch (hidden)
Getting started
Fixing the wall bracket PLEASE READ ‘LET’S TALK SAFETY’ BEFORE USE
Fully assemble the vacuum but do not attach the battery.
Use both screws and wall plugs to secure the wall bracket to the wall. Place covers over the screws.
Attach the wall bracket to the handle.
Firmly press the vacuum handle into the wall bracket to secure.
With the wall bracket attached, stand the vacuum close to the wall, in the upright position with the Powered Head flat on the floor.
The tools and the accessory bag can also be stored on the wall bracket.
Holding the wall bracket firmly in place, carefully remove the vacuum. Using a pencil make a small mark for each screw.
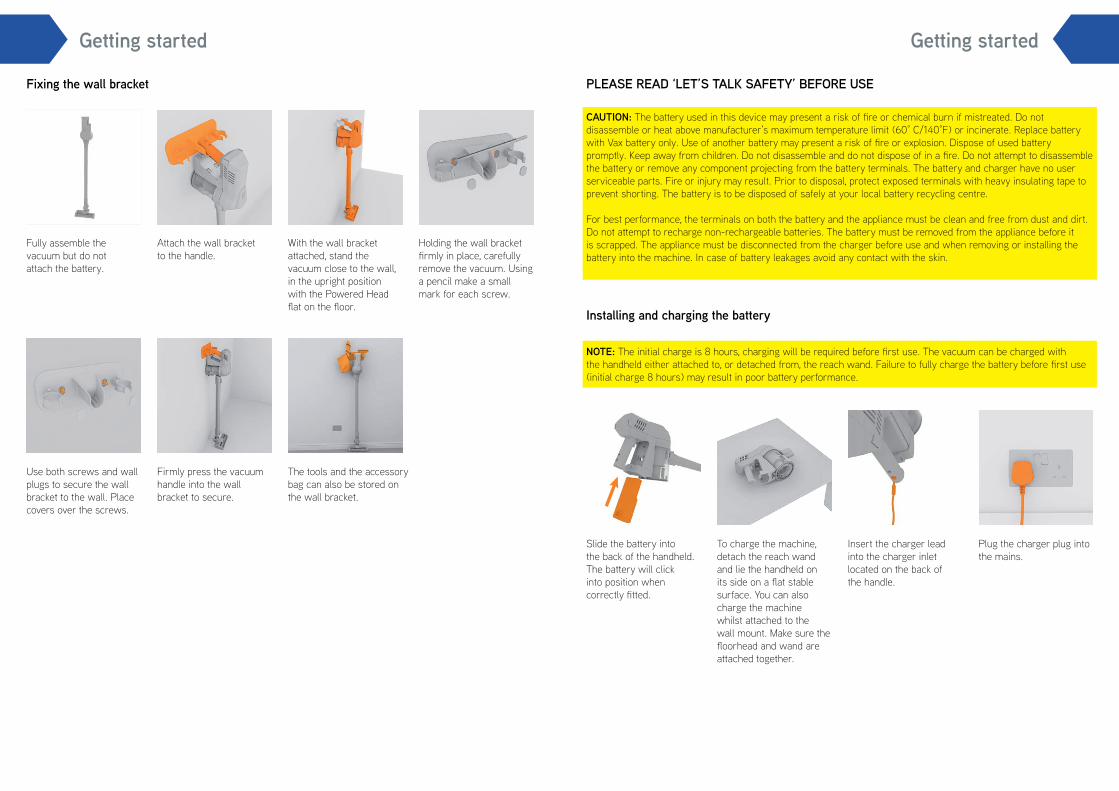
CAUTION: The battery used in this device may present a risk of fire or chemical burn if mistreated. Do not disassemble or heat above manufacturer’s maximum temperature limit (60° C/140°F) or incinerate. Replace battery with Vax battery only. Use of another battery may present a risk of fire or explosion. Dispose of used battery promptly. Keep away from children. Do not disassemble and do not dispose of in a fire. Do not attempt to disassemble the battery or remove any component projecting from the battery terminals. The battery and charger have no user serviceable parts. Fire or injury may result. Prior to disposal, protect exposed terminals with heavy insulating tape to prevent shorting. The battery is to be disposed of safely at your local battery recycling centre.
For best performance, the terminals on both the battery and the appliance must be clean and free from dust and dirt. Do not attempt to recharge non-rechargeable batteries. The battery must be removed from the appliance before it is scrapped. The appliance must be disconnected from the charger before use and when removing or installing the battery into the machine. In case of battery leakages avoid any contact with the skin.
Installing and charging the battery
Slide the battery into the back of the handheld. The battery will click into position when correctly fitted.
To charge the machine, detach the reach wand and lie the handheld on its side on a flat stable surface. You can also charge the machine whilst attached to the wall mount. Make sure the floorhead and wand are attached together.
Insert the charger lead into the charger inlet located on the back of the handle.
Plug the charger plug into the mains.
Getting started
NOTE: The initial charge is 8 hours, charging will be required before first use. The vacuum can be charged with the handheld either attached to, or detached from, the reach wand. Failure to fully charge the battery before first use (initial charge 8 hours) may result in poor battery performance.
Using your machine
Charging the battery
WARNING: Do not use the vacuum cleaner when the machine is plugged in and charging.WARNING: For best performance the terminals on the battery and vacuum cleaner must be clean and free from dust and dirt. The life expectancy of the battery will vary depending on the usage of the vacuum cleaner. CAUTION: When using the vacuum continuously the battery pack will become hot. A hot battery pack should be left to cool before attempting to recharge. When a hot battery pack is placed into the vacuum, the light on the vacuum may indicate the battery pack is not ready to charge. When the battery pack cools, the charger will automatically begin charging.
The On/Off and charging light will illuminate continuously whilst the charger is connected.Red light – The battery is charging. Green light – The battery is charged (after 5.5 hours).
If charging for the first time the initial charge time is 8 hours.
Getting started
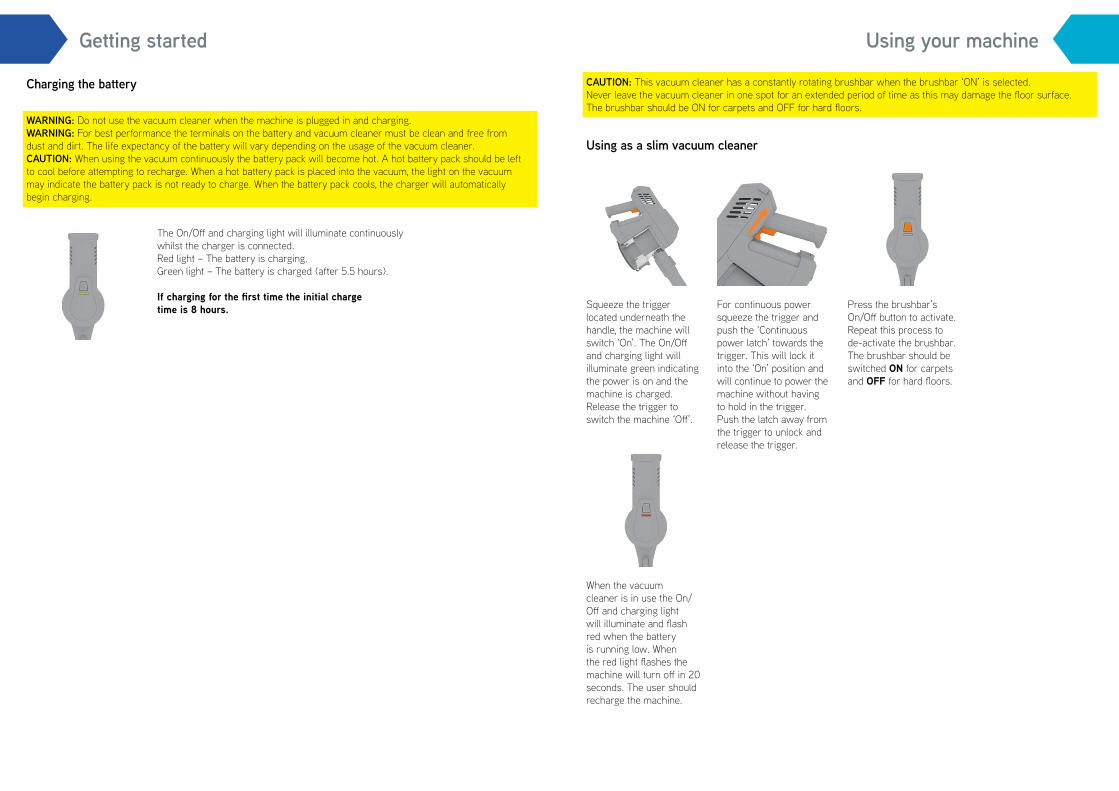
Using as a slim vacuum cleaner
Squeeze the trigger located underneath the handle, the machine will switch ‘On’. The On/Off and charging light will illuminate green indicating the power is on and the machine is charged. Release the trigger to switch the machine ‘Off’.
For continuous power squeeze the trigger and push the ‘Continuous power latch’ towards the trigger. This will lock it into the ‘On’ position and will continue to power the machine without having to hold in the trigger. Push the latch away from the trigger to unlock and release the trigger.
Press the brushbar’s On/Off button to activate. Repeat this process to de-activate the brushbar. The brushbar should be switched ON for carpets and OFF for hard floors.
CAUTION: This vacuum cleaner has a constantly rotating brushbar when the brushbar ‘ON’ is selected. Never leave the vacuum cleaner in one spot for an extended period of time as this may damage the floor surface.The brushbar should be ON for carpets and OFF for hard floors.
When the vacuum cleaner is in use the On/Off and charging light will illuminate and flash red when the battery is running low. When the red light flashes the machine will turn off in 20 seconds. The user should recharge the machine.

Using your machine
Using as a handheld vacuum cleaner
Using your machine
Using as a reach slim vacuum cleaner
Press the Power Head/accessory release clip and pull to remove the Powered Head from the reach wand.
Choose an accessory (pictures illustrated dependent upon model).
Push the chosen accessory into the reach wand until it clicks into place.
Squeeze the trigger located underneath the handle, the machine will switch ‘On’. The On/Off and charging light will illuminate green indicating the power is on and the machine is charged. Release the trigger to switch the machine ‘Off’.
The reach wand can be used for hard to reach places.
For continuous power squeeze the trigger and push the ‘Continuous power latch’ towards the trigger. This will lock it into the ‘On’ position and will continue to power the machine without having to hold in the trigger. Push the latch away from the trigger to unlock and release the trigger.
The reach wand can be used for hard to reach places and at different heights for above floor cleaning.
The upright slim vacuum cleaner is not free standing and in between uses must always be placed in the wall bracket or laid flat on the floor, in a suitable location so it does not become a trip hazard or can be stepped on.
Always take extra care when using the vacuum cleaner on the stairs.
Press the handheld release clip. Pull to separate the handheld from the reach wand.
The reach wand when attached to the Powered Head/accessory is not free standing, place safely and securely to one side.
Choose an accessory (pictures illustrated dependent upon model).
Push the chosen accessory into the handheld until it clicks into place.
All of the accessories including the Powered Head can be attached directly onto the handheld.
For continuous power squeeze the trigger and push the ‘Continuous power latch’ towards the trigger. This will lock it into the ‘On’ position and will continue to power the machine without having to hold in the trigger. Push the latch away from the trigger to unlock and release the trigger.
Squeeze the trigger located underneath the handle, the machine will switch ‘On’. The On/Off and charging light will illuminate green indicating the power is on and the machine is charged. Release the trigger to switch the machine ‘Off’.

Taking care of your machine Taking care of your machine
Removing the battery Cleaning the post-motor filter
Cleaning the filter and separatorEmptying the dirt container
Lie the handheld on its side on a flat stable surface. Press the battery release button.
Press the filter cover release buttons located on both sides of the filter cover and pull to remove the filter from the machine.
Turn the handheld over and press the dirt container release button. Pull the dirt container forward and up away from the handheld to remove.
Twist the mesh filter anti-clockwise to unlock, lift to remove from the separator.
Twist the separator anti-clockwise to unlock, lift to remove from the handheld.
Allow 24hrs or until fully dry before replacing.
Pull to separate the filter from the filter cover/holder. Tap the filter and filter cover/holder over a bin to remove any dirt/debris. Wash the filter under running water if required (40 degrees max).
Press the handheld release clip. Pull to separate the handheld from the reach wand.
Slide the battery out from the back of the handheld.
Ensure the battery has been removed and hold the handheld over a bin, press the dirt release button to allow dirt/debris to fall out.
CAUTION: Always remove the battery from the vacuum cleaner before performing maintenance or troubleshooting checks.
CAUTION: Always remove the battery from the vacuum cleaner before performing maintenance or troubleshooting checks. For continuous best performance the filter requires cleaning at least every 3 months and should be replaced every 12 months depending upon use. Do not use your vacuum cleaner without the filters in place.
CAUTION: Always empty the dirt container before cleaning the separator and filter and remove the battery, reach wand/accessories from the handheld.
WARNING: Don’t over fill the dirt container to avoid blocking the air flow through the vacuum cleaner. Do not exceed the MAX line indicated on the dust container.
24hr

Taking care of your machine Let’s talk technical
Cleaning the filter and separator
Refitting the separator, filter and dirt container
Tap the mesh filter and separator over a bin to remove any dirt/debris. Using a dry cloth wipe away any remaining dirt/debris.
Line up the arrows around the side of the separator with the arrows on the handheld. Twist the separator clockwise locking it into place.
Refit the mesh filter with the rim of the filter at the top. Twist the filter clockwise and lock into place.
Tilt the dirt container slightly forward and line up onto the handheld.
When the dirt container is seated on the handheld push the dirt container backwards to lock into place.
Removing blockages from the Powered Head
The brushbar should be removed from the Powered Head before attempting to remove any blockages. Using scissors, carefully remove any threads or hair from around the brushbar and clear any dirt or debris from Powered Head.
IMPORTANT: If the brushbar has been obstructed, the Motor Protection Sensor may have been activated and the brushbar will seize. Remove the Powered Head from the machine and clear any obstruction. Refit the Powered Head, switch on the vacuum cleaner by pressing the trigger and press the brushbar on/off button.
CAUTION: Incorrect fitting of the separator and filter will reduce suction.
Removing and replacing the brushbar
Slide to release the brushbar. The cover can not be removed.
Lift to remove the left side of the brushbar first.
Clear any threads or hair from both ends of the brushbar and any dirt/debris inside the housing of the Powered Head.
When re-fitting the brushbar fit the right side into the housing first. Then line up and slot into place the left side.
Removing blockages from reach wand
To test for a blockage in the reach wand, drop a small ball of paper into the wand. The paper will drop through if the wand is clear. Use a broom handle or similar blunt object to remove any blockage.

Let’s talk technical
Cleaning terminals
Using a dry cloth or soft dusting brush remove any dust/debris from terminals on battery and inside the handheld.
Pet Tool/Stair Tool An ideal tool to help tackle those pet hairs! Simply clip this tool onto the handheld and begin cleaning. The rubber teeth are designed to agitate fine hair on both carpets and hardfloor. This tool is also great for stair cleaning!
3-in-1 Tool The multi functional 3 in 1 tool is ideal for use all around the home without having to switch between tools. It’s perfect for those tricky corners and crevices, great for upholsteries such as; curtains and sofas, along with dusting furniture and hard surfaces.
Accessories
Refer to ‘using your machine’ section for tool assembly instructions.
Also available Slim Vac Tools Visit www.vax.com.au
Hardfloor Tool Use this tool to safely clean delicate hard floor surfaces without scuffing them.
Up Top Tool This handy tool allows you to tackle those high, hard to reach areas. It’s perfect for reaching the top of curtains, cupboards and wardrobes.

Notes Notes

* Calls are charged at the standard local rate. Please make a note of the serial number and model number of the vacuum cleaner before calling.
• Check the contents panel on the box to make sure the part is included with your vacuum cleaner.
• Check the battery is inserted correctly into the vacuum cleaner.• The battery may not be charged. Go to ‘Getting Started’.• The terminals on the battery and vacuum cleaner may be dirty. Go to ‘Lets talk technical’.• Battery might be too hot, remove and allow to cool for 1 hour. • The vacuum cleaner has overheat protection which will cut the machine out. If this
has happened, switch off the vacuum cleaner. Remove and empty the dirt container and check for blockages. Clean the filters and allow the vacuum cleaner to cool for approximately 1 hour (if you have washed the filters you will need to wait 24 hours for the filters to fully dry before putting them back into the vacuum cleaner).
• The dirt container may not be correctly fitted, remove the dirt container from the vacuum cleaner and check it is assembled correctly, refit ensuring it’s locked into place.
• The separator is not correctly fitted. Go to ‘Taking care of your machine’.• The filters may be clogged, clean the filters. Go to ‘Taking care of your machine’.• The dirt container may be blocked, empty the dirt container. Go to ‘Taking care of
your machine’. • The brush on the Powered Head has not been activated. Go to ‘using your machine’. • There maybe a blockage in the reach wand. Disconnect from the vacuum cleaner
and carefully remove any blockages. Go to ‘Let’s talk technical’.
• Check the battery charger is plugged in. Go to ‘Getting started’.• Check the battery is inserted correctly into the handheld. Go to ‘Getting started’.• The terminals on the battery and vacuum cleaner may be dirty. Go to ‘Lets talk technical’.
SolutionProblem
Is there an accessory missing?
Why does my vacuum cleaner have no power?
Why isn’t the light on the vacuum cleaner lit when the battery is charging?
Why won’t the vacuum cleaner pick up?
What to do if it goes wrong
Why won’t the brushbar turn?
• The brushbar has not been activated. Go to ‘using your machine’.• The Powered Head/brushbar may be obstructed. Go to ‘Let’s talk technical’.
Why is dust escaping from the vacuum?
• The filters may be clogged, clean the filters. Go to ‘Taking care of your machine’.• The separator may be clogged, clean the separator. Go to ‘Taking care of your machine’.• Exhaust filter may be miss-assembled. Go to ‘Taking care of your machine’.
Getting in touch

Distributed by Techtronic Industries Australia Pty. Ltd.31 Gilby Road, Mt Waverley, VIC 3149 Australia.Careline AU: 1300 361 505 www.vax.com.au Careline NZ: 0800 800 900 www.vax.co.nz