Embed Size (px)
Citation preview

CopyToDVD
A Comprehensive Manual
Preface................................................................................................................................2
Key Registration ................................................................................................................3
The Basics on Media .........................................................................................................3 Compatibility................................................................................................................................................ 3 Double Layer................................................................................................................................................ 4
Using the Software ............................................................................................................6 Creating a Data CD/DVD with CopyToDVD............................................................................................... 6 Creating an Audio CD ................................................................................................................................. 9 Creating a DVD Video ............................................................................................................................... 12 Write a DVD Video ..................................................................................................................................... 12 CopyToDVD’s Shell Integration ............................................................................................................... 17 Making an Exact Copy .............................................................................................................................. 17 Menu Guide ................................................................................................................................................ 19 Other Options with CopyToDVD .............................................................................................................. 21
Settings.............................................................................................................................22 General ....................................................................................................................................................... 22 Display........................................................................................................................................................ 22 Label ........................................................................................................................................................... 22 File system ................................................................................................................................................. 23 About .......................................................................................................................................................... 23 Rewritable media ....................................................................................................................................... 23 Event logging............................................................................................................................................. 23 Writing engine ........................................................................................................................................... 24 Multisession............................................................................................................................................... 24 Language.................................................................................................................................................... 25 Audio .......................................................................................................................................................... 25 Media Statistics ......................................................................................................................................... 25
Troubleshooting ..............................................................................................................26
Version Updates ..............................................................................................................26
Technical Support ...........................................................................................................26
Comments and Feedback ...............................................................................................27
Copyright..........................................................................................................................27
Version 3.0.55, July 25th, 2005
1

Preface CopyToDVD is a very simple, easy to use piece of software that allows users to burn copies of their music, data, games, pictures, video files, and much more. CopyToDVD uses the latest technology allowing you to burn without unnecessary complications while benefiting at the same time of the speed and quality of a highly competitive software application. Enjoy using CopyToDVD and know that VSO Software is there for you r comments, questions and feedback. Special features of CopyToDVD:
• Audio: Create Audio CDs from MP3, WMA, Ogg Vorbis, MusePack and APE file formats. • Data: Create CD (s) and DVD (s) using ISO/Joliet/UDF. Multi session feature allows you to add to your
media in stages. • Video: Create high quality DVD Video backups to be played on your PC or home DVD player. Copy DVD
video with high playability. • Settings: Customize the way you wish to use the software by the large number of settings available
including overburning and HD Burn. • Open architecture: Recording Hub works with 3rd party applications such DVD2One, Nero Recode, DVD
Shrink, 1 Click DVD Copy etc. • Compatibility: Supports any CD or DVD writer. • Developers: Add a CD or DVD burning feature to your application using the batch/command line mode of
CopyToDVD (complete SDK on request) • Multilingual support (available languages) • Compatible with Windows 98/Me/2000/XP/.NET • Supports CD-R(W), DVD-R(W), DVD+R(W) and DVD-RAM as well as the new Double Layer format (9
GB on a DVD). • Furthermore you can contact the highly reputed support team for fast assistance on your problems or
advices.
A few notes before getting started
CopyToDVD is a fabulous piece of software and has received many awards for its ease of use, high quality results, and burning speed. However, the good functioning of this software lies on the bases of a couple of things:
• using a relatively new computer and burner, • well maintained hardware • using the latest firmware (check to verify your using the latest firmware:
http://forum.rpc1.org/portal.php) • verify that material is not contaminated by any bugs or virus, etc. • make sure that software, medias (DVDs and CD’s), and burners are compatible before using • and the use of latest version of software in question
With these bases covered you should have reliable burning results!
2

Key Registration After having downloaded (available here: http://www.vso-software.fr/) and gone through the purchasing process, you will receive a license key that will allow you to use the software unlimitedly. How to unlock your software
This license key is sent to your email address. It requires that you double click on the ZIP file sent attached to the email. Then the following will appear:
Then double click on the .reg file (highlighted above). A dialog will appear asking you to confirm whether you really want to import this information, click on Yes. Upgrades
Each key allows one year of free upgrades beginning from the date of purchase. After this year, you should contact us to receive a special renewal offer, or continue to use the last working version. The version doesn't expire after one year for registered users, if you have a license problem after one year, contact us we will provide the latest working update for your license. If you have a Goldmembership subscription, this entitles you to use all current VSO-Software products as well as upcoming ones for your lifetime. The Basics on Media What type of Media (DVD’s or CD’s) used can make a big difference in your burning outcomes. Compatibility Not all software is compatible with every type of media. CopyToDVD is compatible with CD-R(W), DVD-R(W), and DVD+R(W) and DVD-RAM writers and also with the new Double Layer format (9 GB on a DVD). R stands for Recordable RW stands for ReWritable (media can be erased and used again). Simply because CopyToDVD is compatible with these formats does not mean you will be able to burn them, because if your burner is not compatible with the media you are trying to use, the burn will be unsuccessful. Same applies when trying to play your burned CD or DVD. The media player must also be compatible with the format of the media.
3

Statistics and Best Brand of Media to Use
VSO has recently inserted a new function to their software that permits them to collect burning data each time the software is used. Each user is allowed to decide whether he or she permits VSO to collect such information (see section “Media Statistics” under Tools, Settings). VSO has since been able to recognize via the statistical data collected which media is the most reliable. The statistics show much more information, for example, it shows not only the most reliable media but what media works best with what burner, etc. To consult these findings, so as to optimize your burning results feel free to consult the statistics yourself. http://www.vso-software.fr/ (should be available after September 1st 2005) The difference between (+) and (–) DVD Media
(-) media tends to be a tad bit bigger, larger in size than (+) media. If you have a film that is rather larger but should fit onto a 4.7GB DVD it is best to opt for a (-) DVD. During the burning process the data burned onto a media is burned from the inside out (small circumference to larger circumference). Towards the outer parts of the media the burning process tends to be more error prone, one more reason to stick to the (-) in order to have more space to work on. DVD (-) media tends to be the most compatible with standalone DVD players (between 5 and 10% more reliable than (+) media). This quite probably due to the fact that is the first type and thus oldest type of media on the market. For more information on DVD Media check out: http://www.videohelp.com/dvd Faulty media
It can happen to fall upon a bad batch of media and none of them will be good at all. These can basically be tossed into the garbage; you can try and get a refund by the manufacturer. Note on Burners
VSO has noticed that Plextor has been the most reliable drive, although LiteOn is a cheaper alternative, most of the recent drives are completely acceptable and new models are out so frequently we suggest reading the forums for real customer’s feedback or checking our media statistics. Also know that CD burners generally do not Burn DVD’s however, DVD Burners generally burn CD’s. Double Layer What is Double Layer Media?
A Double Layer media is one with two layers where data can be stored. These two layers are found on the same side of the media, (the first layer is semi-transparent to allow the second, underneath to be read). Double layer media can hold twice the amount of data compared to an ordinary single layer disk. This is an evident advantage when trying to burn very long movies. Do note that if you plan on using double layer media do pay attention to compatibility issues. First your DVD Burner must be compatible with double layer media as well the software used to burn the media with. All DVD players are supposed to be able to read double layer media, but as you may find with experience this may not always be the case.
4

Reading the Double Layer Media
Burning a double layer media, the layer change can be made at any point in the data being burned (this does not have to be at an intermission or preset chapter). For double layer media there is no guarantee that there will be no gap when switching from first layer to second layer while viewing the media. This gap can be unnoticeable or freeze for a tenth of a second or more (up to four seconds). This depends on the media player as well as the set up of the double media before burned.
Source of information above in section “double layer”: http://www.dvd-recordable.org/FAQ-Category6-D+Basics-Parent0-myfaq-yes.phtml#28 Double Layer and CopyToDVD
Using double layer media with CopyToDVD is really no different than burning with any other single layer media. The choice of where the layer brake will be is made for you by the software by various criteria allowing for the change between layers to be nearly invisible when watching with a DVD player.
5
Using the Software Creating a Data CD/DVD with CopyToDVD A Data CD or DVD is used to store a make a back up of files, documents, music, photos, and other such things. To Make a Data CD or DVD click the Data button:
Figure 1 The only difference between CD and DVD media here is the amount of information that can be put on to a disk. In the sub-menu click on this button:
6

Then you get this window:
Figure 2 The info area (1) will give you step by step directions on what to do. First step is to add data to your project. To do this either drag and drop pictures, files, documents, music, or other into the bottom right half of the window (2) or use the toolbar buttons (3) to add files and folders. To find out what other icons do slide the mouse over each and a little text box will appear with its function. Once all the files you want to back up have been selected and appear as follows, you can specify a volume name for your disc (1) and verify that the burner you want to use is selected (2), see figure 3.
Figure 3
7

Click on arrow to the right of the current burner (2) to change of burner. If a media is already in the burner, the type of media displayed on the screen (3) should correspond with what type of media is in the burner. In the picture above the media is CDR 74. There is an explanation on Media Size in this manual under section “The Basics on Media”. To the right of that you can select the burning speed (4) in the screen shot above the burn speed is at “Max”. Do note that the burning speed depends on the burner as well as on the Media. To the right of that again you will finally have displayed the size of your project (5). In this case the project will fit onto the selected media (bar is green). If your project is too big for the selected media the bar will turn red. In that case you should either use a media which can hold all the data (3) or remove some files from your project. Now we are ready to burn, project is correct size, burner has been selected. In order to do so click on the burn button (6), or go to menu “Action” and go to “Write”. For more options on the burning process see “Tools/Settings” Here is the image you get during the writing/burning process. The minutes let you know how much time you have to wait until the burning process is over. Clicking on “Details”, will pop down a window to show you the details of the burning process, problems encountered or not, etc.
Figure 4
8

Creating an Audio CD To make an audio CD click the Audio button:
Figure 5 In the sub-menu click on:
Then you get:
Figure 6
9

The info area (1) will give you step by step directions on what to do. First step is to add data to your project. To do this either drag and drop audio files into the bottom right half of the window (2) or use the toolbar buttons (3) to add files and folders. NOTE: Compatible formats are WAV, MP3, WMA, OGG Vorbis, MusePack (MPC) and APE. All other file types will be ignored! To find out what other icons do slide mouse over each and a little text box will appear with its function.
Figure 7 Figure 7 shows that creating an Audio CD had more options than creating a Data CD because there is a audio toolbar, which allows for manipulating the audio files (1). By selecting an audio file and then clicking on one of the blue arrows (1), this will move the audio file up or down in the play list. This can also be down by dragging and dropping. The green play button and red stop button represent an audio player. To listen to an audio file select it with your mouse and click on the green arrow, red to stop the playing. Once all the files you want to back up have been selected and appear in the list as in figure 7 above, verify that the burner you want to use is selected (2). Check to see that your project is not to big to fit onto the CD you have selected (3), by making sure the color in the bar on the bottom right corner (5) is green (will turn red if the project is too large to fit on the media indicated). If you fall into the red zone, you can manually change the media option (3), do note that in doing so you must also tangibly have the corresponding media to insert into your burner or else this will not work. Click on the arrow, and select a larger media (instead of CDR 74 pick 80 and so on until the color bar changes from red to green. If this never happens you must remove some of the audio from the project. NOTE: An Audio CD is a particular format and does not allow for multisession and can only be burned onto a CD. If this bothers you, perhaps it is best to do a Data CD with music on it, which will allow for multisession. Now you are ready to burn your project. In order to burn click on the burn button (6), or go to menu “Action” and go to “Write”. For more options on the burning process see “Tools/Settings”.
10

Here is the image you get during the writing/burning process. The minutes let you know how much time you have to wait until the burning process is over. Clicking on “Details”, will pop down a window to show you the details of the burning process, problems encountered or not, etc.
Figure 8 Common questions about audio CD projects
Q: I would like to burn a live album without pauses between tracks. Which settings are required? A: As most audio files contain short pauses at the end anyway, CopyToDVD places the pauses inside the audio track, so they shouldn’t be audible normally.
Q: I would like to burn an audio file, but the format is not supported. What can I do? A: Please contact us. Maybe we will add support for this format.
Q: I want to create more than one CD of a project. Do I have to start the writing process several times? A: No. Enable the Prompt for another copy of the same CD Option on the Writing engine tab in CopyToDVD settings. Other options under Audio
When clicking on Audio from the main menu, besides creating an Audio CD there are two other options, “Play Music” and “Manange Music”. Play Music
Clicking here opens up VSO Media Player. Clicking on the “play“ arrow opens up a browse menu for your to select an audio file to listen to. Manage Music
Manage Music allows you to access other “non VSO Software” pieces of software that manage music you may have on your computer such as Audio DVD Creator. CopyToDVD within itself does not do this function but offers a portal for you to choose another program in order to do this task. If you do not have any software with this function (of managing music), instead of a window proposing different pieces of software you already have installed on your computer, a note will say “Not Available”
11

Creating a DVD Video To make a DVD Video click on Movie & Pictures:
Figure 9 Now we have two choices. Either we can Write a DVD Video, that is burn a copy of a video that is already on the hard drive or we can Copy a DVD Video, that is, make a copy of a DVD that is in the burner to the hard drive. NOTE: If you wanted to make an exact copy from one burner to another you should click on Copy which is found on the main menu. This will be coved in the following section. Clicking on Create a PhotoDVD opens the software PhotoDVD if it is already installed on your computer. If not installed, then a window will pop up asking if you want to install it with a link that will take you to the VSO website. Write a DVD Video Let’s start with the first. Click here:
12
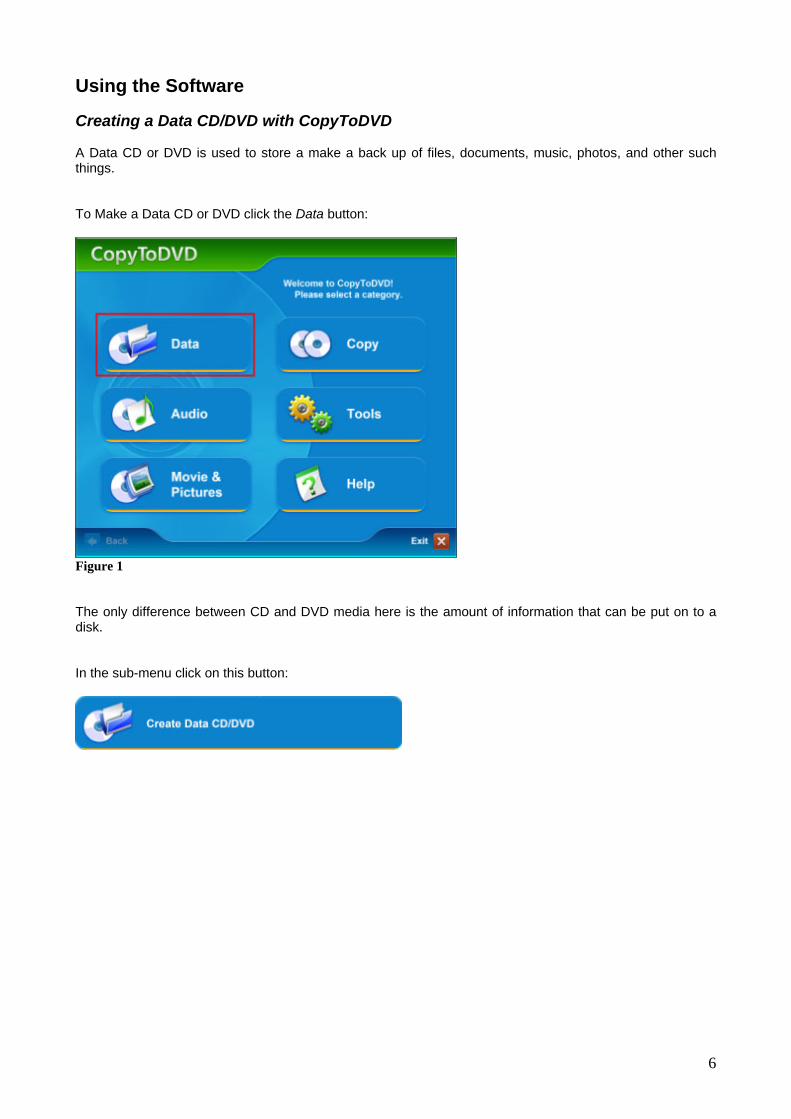
The following window that opens allows you to pick which movie you would like to copy:
Figure 10
Figure 11
Find your video, either in format VIDEO_TS (figure 10) or as an ISO (figure 11), select it and then click Open. If your movie is in VIDEO_TS format, CopyToDVD will load all necessary files into a project, where you can add additional files (similar to “Creating a Data CD/DVD with CopyToDVD”). If your movie is an ISO image, burning will start immediately. NOTE: VIDEO_TS is a special folder on the disc that can only contain files belonging to the DVD title set (.VOB, .IFO and .BUP files)! Below is the image you get during the writing/burning process. The minutes let you know how much time you have to wait until the burning process is over. Clicking on “Details”, will pop down a window to show you the details of the burning process, problems encountered or not, etc.
Figure 12 Questions about Video DVD
Q: On my DVD recordable 4.7 GB is given as the medium’s capacity. Why can I write only 4.37 GB with CopyToDVD? A: A DVD recordable holds 4.699.979.776 bytes. The manufacturer’s statement is insofar misleading, as 1 KB does not consist of 1000 bytes, but of 1024 bytes! If you convert this (4.699.979.776 / 10243), a DVD recordable holds about 4.37 GB.
Q: My movie is larger 4.37 GB. What can I do? A: You either have to use a Double Layer recordable (see section “Double Layer”), or need to transcode the movie, so it fits onto a Single Layer DVD recordable. This is possible with tools like DVDXCopy, DVD2One, or DVD Shrink (described below).
13

Copy a DVD Video Now for the second choice, click Copy DVD Video:
Similar to the option for “Manage Music”, Copy DVD Video is not a function that CopyToDVD lets you do directly, but offers a portal instead that let you use other programs. If you have DVD Shrink installed on your computer this will appear as a choice to use for this function. Your final result however will be burnt with CopyToDVD’s burning engine.
DVD Shrink is a free piece of software. There is a guide to its very basic and simple use here: You must download DVD Shrink for it to become an option in CopyToDVD. To download go here: http://www.dvdshrink.org/ DVDFab Express is a very, very simple piece of software to use. This software is not free but if purchased and installed on your computer this will become another option in CopyToDVD’s portal for “Copy DVD Video”. Both of these tools remove DVD encryption, region codes, etc., permitting you to replicate the DVD. They also compress video files so that large DVDs can fit onto a standard DVD Media. Simply because DVD Shrink is free, here is a guide below; there are many other guides that give much more thorough explanations on all the options DVD Shrink has to offer. Here are the simple basics to allow you to copy a DVD Video. After selecting DVD Shrink this is the window that appears:
Click on “Open Disk” to select the drive where the movie is found that you want to copy onto your hard drive.
14

Here DVD Shrink analyses the film found on the disc.
Here, select what you want to have copied and select automatic under compression settings. This permits the software to choose the necessary options for you, depending on the film you want to copy.
Here you have many options. Under Select backup target you have the option to either create an ISO image file or a DVD file, either one will work. The difference is an .ISO image takes the film and creates one file that contains all the information and or original disk content.
15
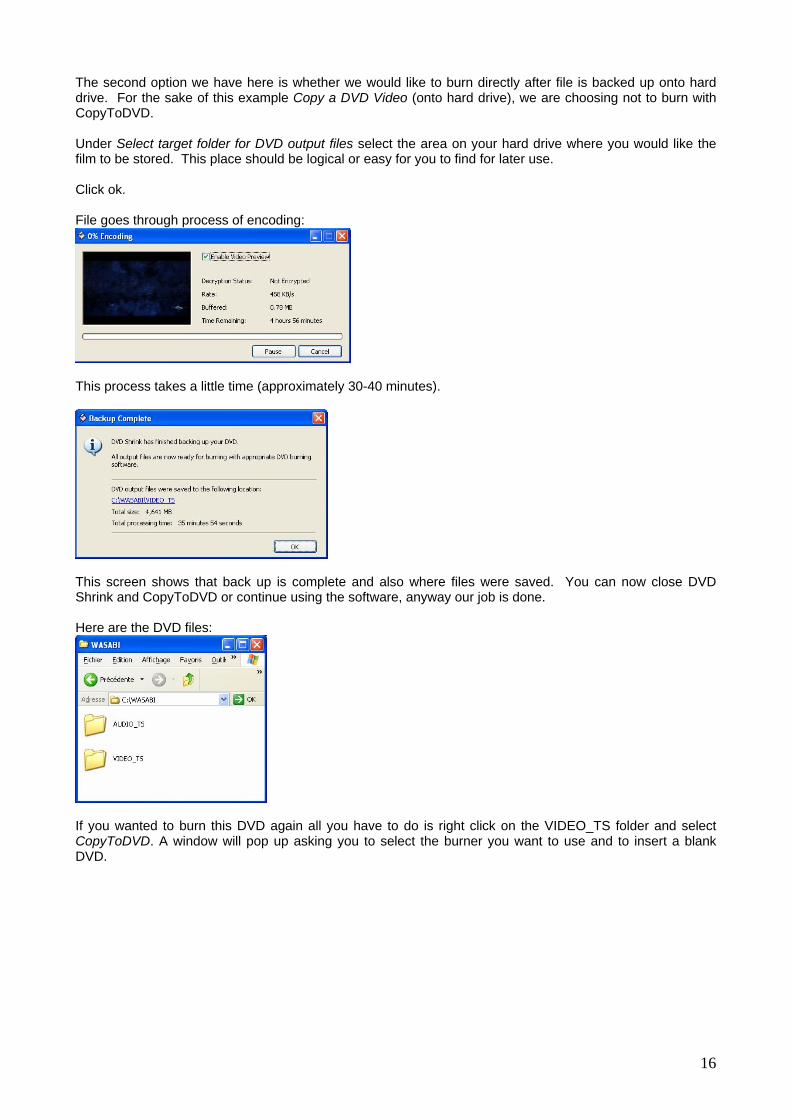
The second option we have here is whether we would like to burn directly after file is backed up onto hard drive. For the sake of this example Copy a DVD Video (onto hard drive), we are choosing not to burn with CopyToDVD. Under Select target folder for DVD output files select the area on your hard drive where you would like the film to be stored. This place should be logical or easy for you to find for later use. Click ok. File goes through process of encoding:
This process takes a little time (approximately 30-40 minutes).
This screen shows that back up is complete and also where files were saved. You can now close DVD Shrink and CopyToDVD or continue using the software, anyway our job is done. Here are the DVD files:
If you wanted to burn this DVD again all you have to do is right click on the VIDEO_TS folder and select CopyToDVD. A window will pop up asking you to select the burner you want to use and to insert a blank DVD.
16

CopyToDVD’s Shell Integration The shell integration allows you to burn files and/or folders from Windows Explorer very quickly without having to run any application. If you wish to backup a folder to a CD, click it with your right mouse button and select CopyToDVD from the context menu. You can select more than one file or folder, of course. The data is now being written to the medium. Questions about Shell Integration
Q: What is the difference between “CopyToDVD” and “CopyToDVD Depot” commands? A: CopyToDVD copies the selected data to a medium immediately. CopyToDVD Depot puts the selected data into a depot, which is loaded once you create a new project with CopyToDVD Manager.
Q: Can I use shell integration to burn audio CDs? A: Yes, this is possible. If you select audio files, which fit onto an audio CD, a choice dialog is shown. You can now choose if you want to write your audio files as data or as audio CD. Making an Exact Copy Sometimes you might want to make an exact copy of a media (i.e. for backup purposes). To do so, click Copy in the main menu:
Then, in the sub-menu click here:
17

The CopyToDVD media copier will appear:
Figure 13 On the left side you will find the tasks Copy, Read, and Write. Each has a corresponding picture and each have different functions. The function of the currently selected task is described in the info area (1).
Makes an exact copy, for this you will need one burner and one CD/DVD drive, or you will be prompted to switch media.
First select the Source, the drive which contains the CD or DVD you want to copy.
Then select the Destination, the burner which should contain a blank media to burn contents onto.
Once all is set, the Copy button at the right bottom side (which was grayed out before) will be available. As soon as you click it, the copy process will begin. The duration of time this will take depends on the size of the original media.
Allows you to extract an image from a CD/DVD to your hard drive.
To do so select the Source, the CD/DVD drive containing the disc to be read.
Then select the Destination, an area on you hard disk which the image of the media will be stored.
Finally, click on Copy (found on the bottom right hand corner of the window). The duration of time this will take depends on the size of the original media.
Allows you to write a hard drive image to a CD or DVD.
To do so select the Source, a CD/DVD image file on your hard drive.
Then select the Destination, the burner you want to use to burn this image with.
Finally, click on Copy (found on the bottom right hand corner of the window). The duration of time this will take depends on the size of the image file.
18

Menu Guide This is a guide for the menu that appears in CopyToDVD Manager: Project Menu The following commands are available in the Project Menu:
New project Opens a new blank project for you to begin creating
Open Allows you to find an already composed or started project saved on hard drive or on disk
Save Allows you to save your project so that if you do not have time to finish it you can pick up where you left off at a later time
Save as Allows you to save project under a new name
Add file This opens your computers directory in order for you to select the files you would like to add to your project
Add folder This opens your computers directory in order for you to select folders you would like to add to your project
Quit Exits and closes program Action Menu The following commands are available in the Action menu:
Write Write the current project to a medium.
Erase Media Opens window allowing you to select one of two ways on how to erase media
Write ISO/CUE With this command you can write an ISO image (.ISO) or a cue sheet (.CUE) to a medium.
File depot Import: If the Use file depot option (see next section) is disabled, you can manually import the depot using this command.
Erase: Clears the file depot. View Menu The following settings and functions are available in the View menu:
Folder Bar If checked this will add a section on left side of window presenting folders.
Wizard style If checked, CopyToDVD Manager appears as a wizard. The upper bar displays a short information text about the current project.
Arrange Icons by Clicking here gives you many choices on different ways in which to view your files and folders in window.
Options Menu The following settings are available in the Options menu:
Close Manager when writing If checked, the manager is closed automatically as soon as you write a project. Provided, that it has been saved already. If not, a save prompt is displayed first.
Use file depot If checked, the file depot is automatically imported during project creation. Files which are copied into file depot via Windows Explorer appear in your project.
Save window position If checked, the position of CopyToDVD Manager is saved, so the window does appear at the same position and with the same size every time.
Don’t prompt to save on quit Disables the warning prompt, if you didn’t save your project before quitting.
Remember last used writer If checked remembers always presents the last burner used, practical if you always use the same one.
19

CopyToDVD settings Open the CopyToDVD settings dialog. More information can be found in the following section.
CopyToDVD Log Shows logs (details) of past CopyToDVD attempted burns Plugins Menu
VSOShow If checked and if burning images to a disc, this application (VSOShow) will be burnt onto the media, allowing the images to be viewed (in a slideshow manner).
VSOMediaPlayer If checked and if burning audio files onto a media, this application will be added to content burned onto media allowing this application be used to listen to audio files once media is burnt and being read.
? Menu
Online Help Opens up quick tutorial
Visit VSO Website Link to VSO website
Info... Shows copyright and version information
20

Other Options with CopyToDVD Schedule a Backup
With CopyToDVD you can set up dates for when you would like to make a back up of a set of files or folders. To do this, from the main menu click on Data, then choose Schedule a Backup. Clicking on add will allow you to give a name to the task you are creating. Then choose what files and/or folders you want to be backed up and also at what interval of time (i.e. daily, weekly, etc). Do note however that if nothing has changed in these files or folders since the time the back of was scheduled the alarm will not go off saying you have a back up to do. Tools Clicking on Tools from the main menu will give you two options. One is Erase and on is Settings. Settings is explained in the section just below. Clicking on Erase (which can also be found in the Action Menu in CopyToDVD Manager) will give you the opportunity to erase a rewritable media (CD-RW, DVD+RW, DVD-RW). Just select the writer where your media to be erased is in. Then select which mode you want to use for erasing: a fast but not thorough method, or a slow extremely thorough method that may take a long time. Click on Erase Media to start procedure.
21

Settings This section describes the numerous settings of CopyToDVD. Here you learn how to customize the software to fit your needs. CopyToDVD’s settings can be accessed either via CopyToDVD Manager or CopyToDVD’s start menu group. This section is divided into the different tabs. General Do not close at completion If checked, CopyToDVD is not closed after a CD/DVD has been burned. Useful if you want to check the details of the burning process afterwards.
Eject media when finished If unchecked, CDs/DVDs are not ejected after writing is complete.
Play sound Here you can specify an audio file, which will be played after a CD/DVD has been written. If unchecked, no sound will be played.
Check latest version every ___ Day(s) Here you can toggle CopyToDVD’s auto update function, and specify the number of days between internet checks.
CD access Open CopyToDVD’s CD access driver configuration dialog.
Default values Set all options on this tab back to factory defaults. Display Dialog is always on top Check, if you want the writing process window to be displayed on top of other windows.
Auto Transparency (Windows 2000 and higher only) If checked, the writing process window is turned transparent after a short delay, when the window loses focus (becomes inactive). Moreover, you can specify the opacity and delay in seconds. Label Prompt to edit the label Before every writing process you are asked to enter a volume name (label) for the CD/DVD.
Auto-assign a label CopyToDVD sets the label automatically. The following options are possible: • Fixed name: The specified text is used as label every time (i.e. CDROM) • Fixed name + date: The specified text is combined with the current date (i.e. CDROM_20030131) • Date: The current date is used as label (i.e. 20030131) • Source name: The name of the containing folder is used as label (i.e. DATA) • Source name + date: The name of the containing folder is combined with the current date (i.e. DATA_20030131)
22

File system Warn user on file change If checked, a warning is displayed in case files have been changed after caching. You should leave this option checked, as the writing process may fail if a file is changed after it has been cached.
Include system files If checked, system files are written to the medium. If unchecked, they will be ignored.
Include hidden files If checked, hidden files are written to the medium. If unchecked, they will be ignored.
Preserve path name If checked, the folder’s full path name will be preserved. For example, if you write folder C:\Data\Projects, the CD will also contain a folder Data with subfolder Projects. If unchecked, only the Projects folder will be written to the CD. File formats
ISO 9660 (MS-DOS) This format is required for the CD to be readable under DOS.
Joliet This format is required for long filenames (Windows 95 and higher) and Asian characters. NOTE: If unchecked, long filenames will not be written correctly.
UDF 1.02 This format is required for very large files. NOTE: If you write a DVD movie using a Video DVD project in CopyToDVD Manager, this option will be used automatically.
CGMS This option is only required for video DVD. NOTE: If you write a DVD movie using a Video DVD project in CopyToDVD Manager, this option will be used automatically.
ISO file version If checked, the file version (normally “;1”) will be written for ISO 9660 file format. About On this tab CopyToDVD’s version number is displayed. Moreover, you may enter your unlock code here, if you have bought CopyToDVD. Rewritable media Erase RW when needed, without warning If checked, rewritable mediums are erased automatically if they contain data.
Erase mode • Quick: Only the table of contents of the RW is erased (Standard) • Slow but safe: The RW will be completely erased (this might take very long) Event logging Save logs If checked, CopyToDVD’s logs are saved to a file.
Keep log history If checked, new logs are written to the beginning of the log file. Old logs are kept. If unchecked, an old log is overwritten with the new one.
Log file Here you can specify the name and path of the log file. NOTE: The log file might be required by the technical support team to solve a problem.
Maximum line count in log file If the specified number of lines is exceeded, old logs will be erased.
23

Writing engine Add “ISO image file” in drive list If checked, ISO image appears as destination choice in the burner selection dialog.
Wipe Delete all ISO images created by CopyToDVD from your hard drive.
Prompt for another copy of the same CD If checked, CopyToDVD will ask after each writing process, if you would like to create another copy.
Automatic temporary folder If checked, CopyToDVD will choose the best place for temporary files automatically. If unchecked, you will need to specify a place yourself.
Cache management options Here you can specify which data will be cached. Before writing, an ISO image will be created on your hard drive for caching. This is recommended for all sources, which cannot be accessed with sufficient speed to burn.
All files All files are cached without exceptions (for slow hard drives).
Files on network Files from network sources are cached (default).
Files from removable media Files from floppy disks, CD-ROM, memory cards, etc. are cached (default).
Files under the following size (KB) Files smaller than the specified size (in KB) are cached (default).
Multisession Create/continue multisession media If checked, data CD’s are not closed. This means other sessions (data and other files) can be written to the medium.
If erasable media is detected, prompt to erase it If checked, CopyToDVD will ask to erase the recordable, if you insert a multisession CD-RW.
If a multisession media is inserted, what shall the engine do? • Ask what to do: When writing to a multisession medium, a choice dialog is displayed. • Eject the media, and require a blank one: CopyToDVD will not write to the medium, but asks for a blank one. • If there is enough space left, write the data and try to keep the media writable: If there is enough free space, data will be written to the medium and it is not closed, to make further sessions possible. • If there is enough space left, write the data and close the media: If there is enough free space, data will be written to the medium and it is closed. There are no further sessions possible.
Keep volume name and description If checked, the old session’s volume name and description are kept.
Import existing data with the following rule If checked, existing files on the CD will be imported into the new session. NOTE: If you uncheck this option, only the files of the new session are present. • Replace file if newer or size changed: When you write files which are already present on the disc, the existing version will be replaced by the new file, if the new one is newer or its size is different. • Always replace file: An existing file will always be replaced by the new version. • Never replace file: The file present on the disc will be kept. The new file is ignored.
24

Language Here you can select your preferred language for CopyToDVD’s user interface. This setting is also used for CopyToDVD Manager. NOTE: To make the changes effective, you may have to restart the Manager. Audio Automatically adjust sound The audio file’s volume will be automatically adjusted to the specified decibel level.
Sample sound Here you may choose an audio file to test the adjusted level. Writing devices Here you can specify your preferred writers for Audio/data CD or DVD and one for DVD Video. Prompt If checked, you will be prompted to select a destination writer before each writing process.
Maximum writing speed for CD/DVD media Specifies the maximum speed CopyToDVD used to write to the corresponding media. Media Statistics Gives you option to choose whether or not you give VSO Software permission to collect your burning information. A description is given of what information is collected and for what purposes.
25

Troubleshooting If you run into problems when using CopyToDVD go through this checklist to rule out any of these factors:
1) Are you using the latest version of CopyToDVD? Go to “Settings“ and the about tab to see what version you are using, then check on http://www.vso-software.fr/ at the top left corner of this webpage to see if your version corresponds with the latest version available. New version release means, better software, fixed bugs, and better overall compatibility. Therefore it is always better to use the latest version available.
2) If you encounter an error, make sure compatibility is not an issue. Check to make sure software and
hardware are compatible, software and media, as well as media and burner.
3) Do you have the latest firmware for your hardware (CD/DVD writer)? If you are not sure, check the information on this page: http://www.cdrinfo.com or http://www.rpc1.org
4) If you get an error “Patin Couffin not present or up to date” or “Can't connect to hardware access
layer” when using BlindWrite and/or CopyToDVD do the following. Click Start>Programs>VSO>CopyToDVD (or BlindWrite)>Drivers then click on Remove and reboot. Now do the same but click on Install and reboot again. Or you can simply re-install the software package.
5) If you need a more detailed checklist go to: http://www.vso-software.fr/checklist.htm
6) You might also want to check the “Frequently Asked Questions” page at VSO software:
http://www.vso-software.fr/faq.htm Version Updates VSO regularly comes out with new versions of their software. For your information, your license key you obtained after purchasing CopyToDVD allows one year of free upgrades beginning from the date of purchase. After this year, you should contact VSO Software to receive a special renewal offer, or continue to use the last working version. The version doesn't expire after one year for registered users, if you have a license problem after one year, contact us and we will provide the latest working update for your license. Technical Support If you are looking for help or have run into a problem using CopyToDVD, first check out the forums to see if a solution might have already been found for your problem; do not hesitate to use the search engine. We have selected a couple of good forums that deal with VSO products directly, where you may find the result to you problem faster than writing to the support team: http://www.vso-software.fr/forums.htm. There are many other great sites that offer great help, forums, best buy lists, etc. Here are just two among them that offer excellent glossaries of computer terminology as well as other guides: http://www.videohelp.com/ and http://www.afterdawn.com/ Otherwise write your problem to our technical support team using the support form on the website, making sure that you select “technical support” as the type of your inquiry and download the “support tool”. This is to insure the fact that VSO will receive precise and adequate information in order to respond to your inquiry. VSO has an excellent support team and well reputed for their response time: http://www.vso-software.fr/support.htm
26

Other products by VSO Software To check out other programs by VSO Software go to http://www.vso-software.fr/products_english.htm. Among the other programs you will find, DivxToDVD, PhotoDVD, and Blindwrite. Comments and Feedback VSO Software is always happy to hear about what you think about their products and any comments or suggestions you may have for them. Feel free to write using the support from selecting “general inquiry” as your message type. Copyright The VSO logo and VSO Software are trademarks of VSO Software SARL, France.
CopyToDVD: © 2002-2005 VSO Software SARL, France. CopyToDVD and the CopyToDVD logo are trademarks of VSO Software SARL, France. All rights reserved. All other trademarks are the property of their respective owners.
27