Embed Size (px)
Citation preview

Copyright © 2014 Dynamsoft. All Rights Reserved. Page 1of 22

Copyright © 2014 Dynamsoft. All Rights Reserved. Page 2of 22
Contents
Introduction ...................................................................................................................................... 3
The Guide .......................................................................................................................................... 3
Server ......................................................................................................................................... 3
Installation Process ........................................................................................................................ 3
Starting the Service ..................................................................................................................... 15
Windows GUI Client .............................................................................................................. 15
Installation Process ...................................................................................................................... 16
Connect to Server ........................................................................................................................ 21
Visual Studio 6 and 2003 IDE Client................................................................................... 22
Visual Studio 2005/2008/2010/2012/2013 IDE Client .................................................... 23

Copyright © 2014 Dynamsoft. All Rights Reserved. Page 3of 22
Introduction
This article is a quick step-by-step guide to be used as an aid for new users of
SourceAnywhere. This article will guide you from installation and server configuration to
enable you to login the server successfully.
If you are having trouble getting SourceAnywhere to work properly and would like some
assistance, please do not hesitate to contact us via:
Phone: 1-877-605-5491 (toll free) or 604-605-5491
Email: [email protected]
LiveHelp: http://www.dynamsoft.com/support/livehelp.aspx
For more detailed information on how to configure SourceAnywhere, we recommend
you to refer to the Help file that comes with the software.
The Guide
Server
Installation Process
To perform the installation, you must be logged in as the system or machine
Administrator and then make sure SQL Server or MSDE is running.
1. Welcome to the Dynamsoft SourceAnywhere Server Installation Wizard
Double click on the installation package to launch Dynamsoft SourceAnywhere Server
Installation Wizard.

Copyright © 2014 Dynamsoft. All Rights Reserved. Page 4of 22
To continue, click Next.
2. Software License Agreement
Please read the license agreement carefully, and then select "I accept the terms in the
license agreement".

Copyright © 2014 Dynamsoft. All Rights Reserved. Page 5of 22
To continue, click Next.
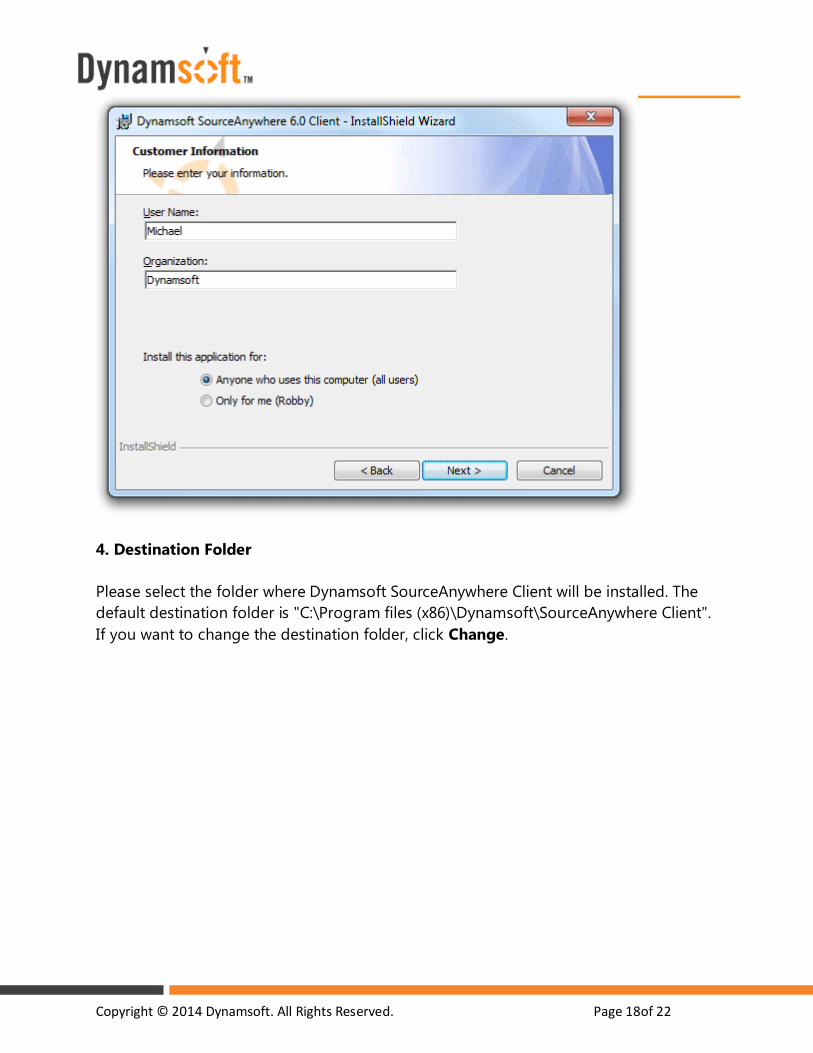
3. Customer Information
Enter your information. To continue, click Next.

Copyright © 2014 Dynamsoft. All Rights Reserved. Page 6of 22
4. Destination Folder
Please select the folder where Dynamsoft SourceAnywhere Server will be installed. The
default destination folder is "C:\Program files (x86)\Dynamsoft\SourceAnywhereServer".
If you want to change the destination folder, click Change.

Copyright © 2014 Dynamsoft. All Rights Reserved. Page 7of 22
To continue, click Next.
5. Install Dynamsoft SourceAnywhere Server

Copyright © 2014 Dynamsoft. All Rights Reserved. Page 8of 22
6. Configure Dynamsoft SourceAnywhere Server
Since version 5.0, Dynamsoft added the build-in database as an option during the
installation of SourceAnywhere Server. The purpose is to provide users with a local
environment that is much easier to install and manage.
Now you can choose either your own SQL Server or the build-in database as the
database backend.
If you go with SQL Server, please select the first option and follow the steps below in #
6.1 to continue the installation.
Otherwise, please select the second option and follow the steps in# 6.2.

Copyright © 2014 Dynamsoft. All Rights Reserved. Page 9of 22
6.1 Choose your own SQL Server
Firstly, here are two definitions.
SQL Server machine: The service machine that have Microsoft SQL Server
installed.
SourceAnywhere Server machine: The service machine that have Dynamsoft
SourceAnywhere installed.
6.1.1 SQL Server Setup
If you are using the Standard Edition
of SQL Server, please enter the
server name only. If you are using
the Express Edition, please enter
{server name}\SQLEXPRESS.

Copyright © 2014 Dynamsoft. All Rights Reserved. Page 10of 22
Dynamsoft SourceAnywhere will create a database named "SourceAnywhere" on SQL
Server installed on the local machine or a different machine on the network. You can
choose Windows Authentication or SQL Server authentication to connect to your
SQL Server. If you are not sure which authentication mode your SQL Server is using,
please contact your SQL Server administrator.
If Windows authentication is selected, you should login to SourceAnywhere
Server machine with full administrative rights and full access to the master
database of SQL Server before installing Dynamsoft SourceAnywhere.
If SQL Server authentication is selected, you should use the “sa” account or
any other accounts that can play System Administrators’ roles in SQL Server.
6.1.2 Dynamsoft SourceAnywhere Administrator
Create a password for the user Admin - the default administrator of Dynamsoft
SourceAnywhere. A blank password is acceptable, but not recommended because of
the security concerns.
This password will be required for the user Admin to login Dynamsoft
SourceAnywhere Server.
6.1.3 Server Configuration
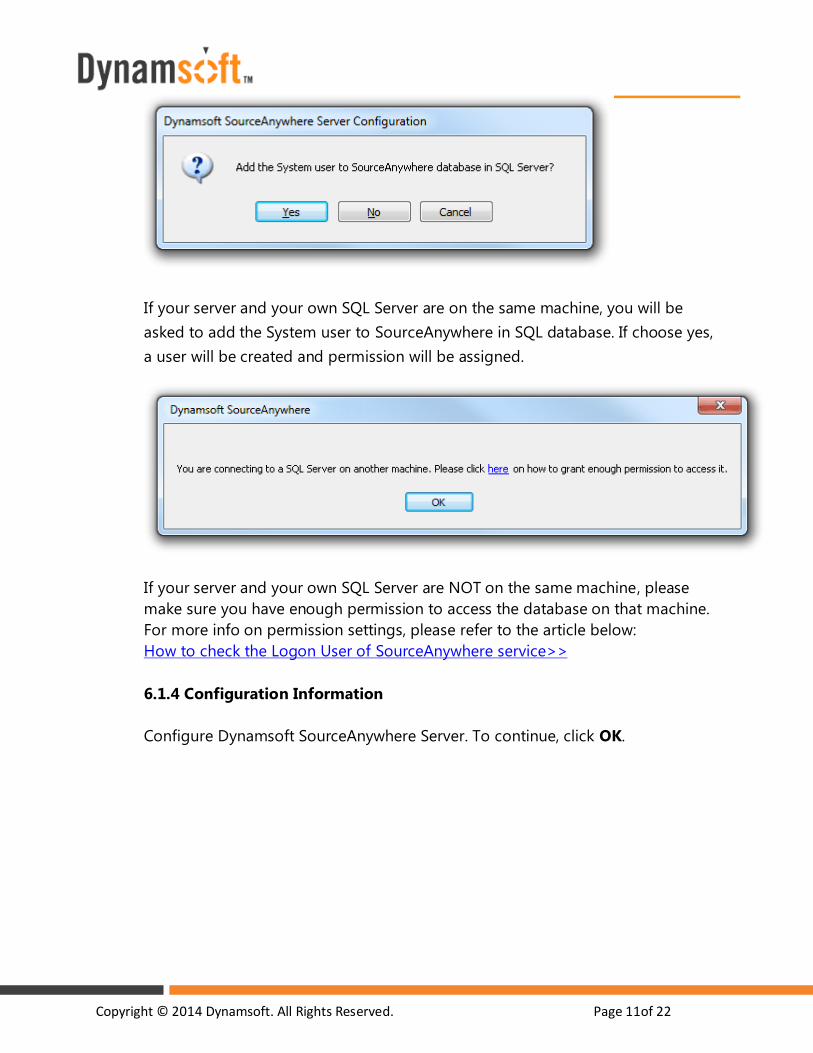
Copyright © 2014 Dynamsoft. All Rights Reserved. Page 11of 22
If your server and your own SQL Server are on the same machine, you will be
asked to add the System user to SourceAnywhere in SQL database. If choose yes,
a user will be created and permission will be assigned.
If your server and your own SQL Server are NOT on the same machine, please
make sure you have enough permission to access the database on that machine.
For more info on permission settings, please refer to the article below:
How to check the Logon User of SourceAnywhere service>>
6.1.4 Configuration Information
Configure Dynamsoft SourceAnywhere Server. To continue, click OK.

Copyright © 2014 Dynamsoft. All Rights Reserved. Page 12of 22
6.1.5 Complete the Installation
Dynamsoft SourceAnywhere Server has been successfully installed in your
computer. To exit, click Finish.

Copyright © 2014 Dynamsoft. All Rights Reserved. Page 13of 22
6.2 Choose the built-in database
If you want to choose LocalDB, please make sure you've installed .NET Framework 3.5 or
above on the server.
And equally importantly, the supported operating systems are as follows:
Windows 7
Windows 8
Windows Server 2008 R2
Windows Server 2008 Service Pack 2
Windows Vista Service Pack 2
Windows Server 2012
6.2.1 Dynamsoft SourceAnywhere Administrator
Create a password for the user Admin - the default administrator of Dynamsoft
SourceAnywhere.
Please note that a blank password is acceptable, but not recommended because of
the security concerns.
This password will be required for the user Admin to log in Dynamsoft
SourceAnywhere Server.
6.2.2 Configuration Information

Copyright © 2014 Dynamsoft. All Rights Reserved. Page 14of 22
Configure Dynamsoft SourceAnywhere Server. To continue, click OK.
6.2.3 Complete the Installation
Dynamsoft SourceAnywhere Server has been successfully installed on your computer.
To exit, click Finish.

Copyright © 2014 Dynamsoft. All Rights Reserved. Page 15of 22
Starting the Service
There are two ways to start the server:
In Service Configurator, click Start Service button in the System Settings window,
or click Service → Start Service menu.
In Control Panel, select Administrative Tools, then Services. Highlight and right-
click Dynamsoft SourceAnywhere and click Start.
If the service failed to be started, you can refer to the SourceAnywhere server log file
first, which may provide you with the useful information for troubleshooting. The log
can be accessed in Service Configurator from Server Info → System Settings→ General
Settings.
If you still have difficulties in solving this issue, please refer to the following FAQ:
http://www.dynamsoft.com/Products/SAWStandalone_FAQ.aspx#T1
After the above configurations are done, you can install and run the client now. The
following sections will demonstrate how to connect to server via the most commonly-
used clients: Windows GUI client and Visual Studio IDE client.
Server Manager
Server Manager is used to manage the 'SourceAnywhere' database which is
automatically created on SQL Server during the installation of Dynamsoft
SourceAnywhere Server.
• Starting the Server Manager
Start Dynamsoft SourceAnywhere Server Manager using the entry created under the
Start menu, and then the Connect to Server dialog box will prompt you with the
server name and port number of the server that Server Manager is connecting to.
This enables you to manage your Dynamsoft SourceAnywhere database both locally
and remotely.
For more information about server manager, please refer to Server Manager.
Windows GUI Client

Copyright © 2014 Dynamsoft. All Rights Reserved. Page 16of 22
Installation Process
Install SourceAnywhere GUI client for Windows. Running the installation wizard of
SourceAnywhere GUI client for Windows will guide you through the installation.
1. Welcome to the Dynamsoft SourceAnywhere Client Installation Wizard
Double click on the installation package to launch Dynamsoft SourceAnywhere Client
Installation Wizard.
To continue, click Next.
2. Software License Agreement
Please read the license agreement carefully, and then select "I accept the terms in the
license agreement".

Copyright © 2014 Dynamsoft. All Rights Reserved. Page 17of 22
To continue, click Next.
3. Customer Information
Enter your information. To continue, click Next.
Copyright © 2014 Dynamsoft. All Rights Reserved. Page 18of 22
4. Destination Folder
Please select the folder where Dynamsoft SourceAnywhere Client will be installed. The
default destination folder is "C:\Program files (x86)\Dynamsoft\SourceAnywhere Client".
If you want to change the destination folder, click Change.

Copyright © 2014 Dynamsoft. All Rights Reserved. Page 19of 22
To continue, click Next.

Copyright © 2014 Dynamsoft. All Rights Reserved. Page 20of 22
5. Install Dynamsoft SourceAnywhere Client
6. Configure Dynamsoft SourceAnywhere Client
If you want to make Dynamsoft SourceAnywhere 6.0 your default Source Code Control
Provider, please click Yes. Otherwise, please click No.
7. Complete the Installation

Copyright © 2014 Dynamsoft. All Rights Reserved. Page 21of 22
Dynamsoft SourceAnywhere Client has been successfully installed in your computer. To
exit, click Finish.
Connect to Server
1. In the “Connect to Server” dialog box, please enter the IP and the port of
SourceAnywhere server. In the“Login information” section, please enter the
username and the password of the SourceAnywhere user.

Copyright © 2014 Dynamsoft. All Rights Reserved. Page 22of 22
If the Error connecting to <IP> :< Port> occurs when connecting to the server, please
refer to the following FAQ for troubleshooting:
http://www.dynamsoft.com/Products/SAWStandalone_FAQ.aspx#T2
2. In the “Repositories” dialog box, please select a repository, and then click OK to
login.
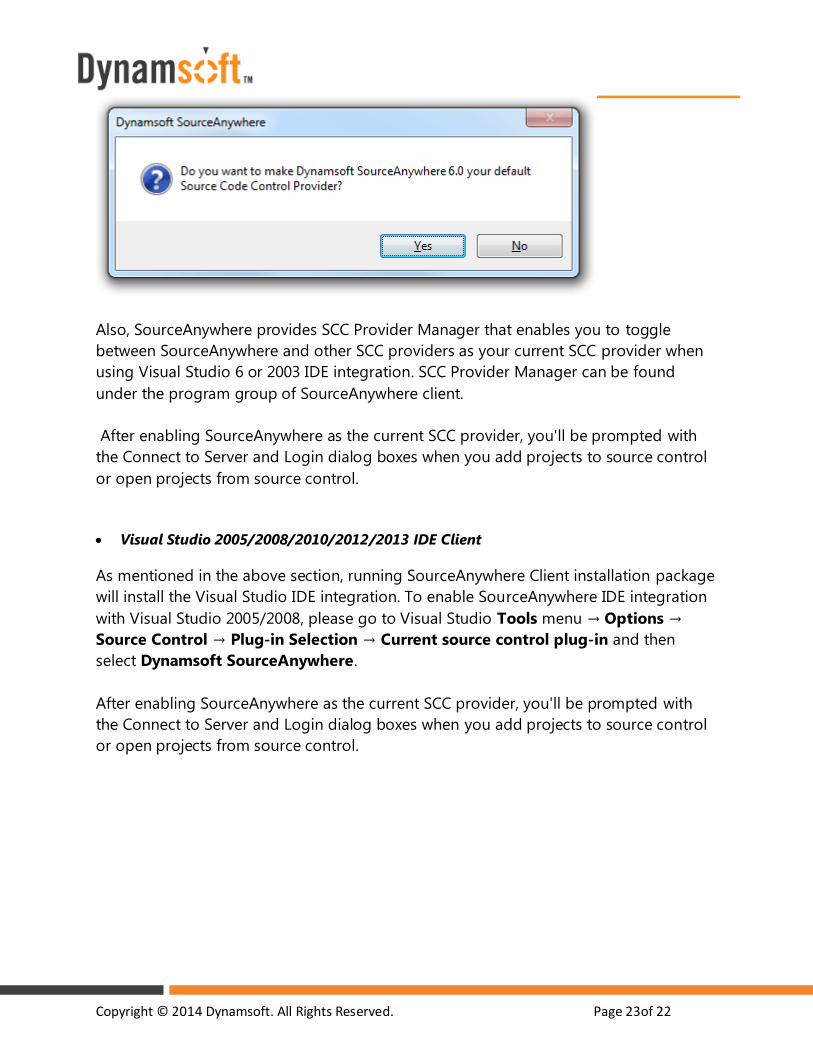
Visual Studio 6 and 2003 IDE Client
Running the installation package of SourceAnywhere GUI Client for Windows will install
the Visual Studio IDE integration. To enable SourceAnywhere IDE integration with Visual
Studio 6 and Visual Studio 2003, click Yes button in response to the following question
during the installation of SourceAnywhere Client:
Copyright © 2014 Dynamsoft. All Rights Reserved. Page 23of 22
Also, SourceAnywhere provides SCC Provider Manager that enables you to toggle
between SourceAnywhere and other SCC providers as your current SCC provider when
using Visual Studio 6 or 2003 IDE integration. SCC Provider Manager can be found
under the program group of SourceAnywhere client.
After enabling SourceAnywhere as the current SCC provider, you'll be prompted with
the Connect to Server and Login dialog boxes when you add projects to source control
or open projects from source control.
Visual Studio 2005/2008/2010/2012/2013 IDE Client
As mentioned in the above section, running SourceAnywhere Client installation package
will install the Visual Studio IDE integration. To enable SourceAnywhere IDE integration
with Visual Studio 2005/2008, please go to Visual Studio Tools menu → Options →
Source Control → Plug-in Selection → Current source control plug-in and then
select Dynamsoft SourceAnywhere.
After enabling SourceAnywhere as the current SCC provider, you'll be prompted with
the Connect to Server and Login dialog boxes when you add projects to source control
or open projects from source control.