Embed Size (px)
Citation preview

Combi steamer Read instructions before use
Convotherm 4 table-top unitsUser manual CE - Original, ENG - GBR
Your meal. Our mission.


Table of Contents
1 General information 51.1 EC Declaration of Conformity for electric appliances 61.2 EC Declaration of Conformity for gas appliances 81.3 Environmental protection 101.4 Identifying your combi steamer 111.5 Structure of customer documentation 121.6 Essential reading relating to safety 131.7 About this user manual 14
2 Design and function 162.1 The functions of the combi steamer 172.2 Design and function of the combi steamer 192.3 Layout and function of the operating panel 22
3 For your safety 233.1 Basic safety code 243.2 Intended use of your combi steamer 253.3 Warning signs on the combi steamer 263.4 Summary of hazards 283.5 Hazards and safety precautions during operation 303.6 Hazards and safety precautions during cleaning 363.7 Hazards and safety precautions during servicing 403.8 Safety devices 413.9 Requirements to be met by personnel, working positions 433.10 Personal protective equipment 44
4 Cooking procedures 464.1 Basic principles for loading the combi steamer 474.1.1 Placing the cooking containers in appliances of size X.10 484.1.2 Placing the cooking containers in appliances of size X.20 494.1.3 Loading capacity for the combi steamer 504.2 Operating principles and instructions for cooking 524.2.1 Working safely with the appliance 534.2.2 Turning the combi steamer on and off 564.2.3 How to cook 574.2.4 How to smoke 594.3 Instructions for handling the appliance for cooking 634.3.1 Working safely with the appliance 644.3.2 Opening and closing the appliance door safely 664.3.3 Loading and removing food 674.3.4 Placing food in the mobile shelf rack 694.3.5 Removing food from the mobile shelf rack 714.3.6 Fitting the roll-in frame for the mobile shelf rack 734.3.7 Taking food in and out using the transport trolley 754.3.8 Putting away and retrieving the core temperature probe 804.3.9 Using a USB stick 814.3.10 Inserting and removing racks 824.3.11 Filling, inserting and removing the smoker drawer 85
5 Cleaning procedures 885.1 Basic principles for cleaning the combi steamer 89
Table of Contents
User manual 3

5.1.1 Cleaning methods 905.1.2 Cleaning instructions 925.1.3 Cleaning agents 945.1.4 Preparing the cleaning agents 965.2 Operating principles and instructions for cleaning 975.2.1 Safe working when cleaning 985.2.2 How to perform fully automatic cleaning of the cooking chamber using connected
cannisters100
5.2.3 How to perform fully automatic oven cleaning using single-measure dispensing 1025.2.4 How to perform semi-automatic cleaning of the cooking chamber for table-top
models fitted with rack104
5.2.5 How to perform semi-automatic cleaning of the cooking chamber for table-topmodels fitted with mobile shelf rack
106
5.2.6 How to clean the cooking chamber without using cleaning agents 1095.2.7 How to clean the double glass door 1105.2.8 How to clean the cooking chamber behind the suction panel 1115.2.9 How to perform intensive cleaning of the hygienic plug-in gasket 1135.3 Instructions for handling the appliance for cleaning 1145.3.1 Working safely with the appliance 1155.3.2 Replacing the rinse-aid canister 1165.3.3 Replacing the cleaning-agent canister 1185.3.4 Adding cleaning agent from single-measure dispensing bottles to the cooking
chamber120
5.3.5 Releasing and securing the suction panel 1225.3.6 Removing and fitting the hygienic plug-in gasket 1245.3.7 Releasing and securing the interior glass door. 125
6 Servicing procedures 1266.1 Basic principles for servicing 1276.1.1 Warranty information and contacting customer service 1286.1.2 Servicing schedule 1296.2 Troubleshooting 1306.2.1 Troubleshooting - Error codes 1316.2.2 Emergency mode 1326.2.3 Rectifying faults - problems in operation 1346.3 Servicing tasks 1366.3.1 Safe working when servicing the appliance 1376.3.2 Replacing the hygienic plug-in gasket 1386.3.3 Replacing the halogen lamp for the oven light 139
Table of Contents
User manual 4

1 General information
Purpose of this chapter
This chapter shows you how to identify your combi steamer and provides guidance on using this man‐ual.
Contents
This chapter contains the following topics:
PageEC Declaration of Conformity for electric appliances 6EC Declaration of Conformity for gas appliances 8Environmental protection 10Identifying your combi steamer 11Structure of customer documentation 12Essential reading relating to safety 13About this user manual 14
1 General information
User manual 5

1.1 EC Declaration of Conformity for electric appliances
Manufacturer
Convotherm Elektrogeräte GmbH, Ovens & Advanced Cooking EMEA, Manitowoc Foodservice, Tal‐straße 35, 82436 Eglfing, Germany
Validity of Declaration of Conformity
This Declaration of Conformity applies to the following electrical appliance models:
C4 6.10 ES C4 6.20 ES C4 10.10 ES C4 10.20 ESC4 6.10 EB C4 6.20 EB C4 10.10 EB C4 10.20 EB
Valid range for serial numbers
Conformity applies to the following range of serial numbers in conjunction with the part-number revi‐sion ID and the combi steamer model:
Serial number:X#11410####, X#11411####, X#11412####, X#21410####, X#21411####, X#21412####,X#31410####, X#31411####, X#31412####, X#41410####, X#41411####, X#41412####Part-number revision ID#########1####, #########2####
Declaration of Conformity with directives
The manufacturer declares that the combi steamer specified above complies with the following direc‐tives:
2006/42/EC (Machinery Directive)2004/108/EC (EMC Directive)2011/65/EU (RoHS Directive)
The safety objectives of European Directive 2006/95/EC (Low Voltage Directive) have been met in ac‐cordance with Annex I, Section 1.5.1 of the Machinery Directive.
Compliance of electrical appliances with standards
The electrical appliances comply with the requirements in the following European standards:DIN EN 60335-2-42: 2012EN 55014-1: 2006 + A1: 2009 + A2: 2011EN 61000-3-11: 2000EN 61000-3-12: 2011EN 62233: 2008EN 55014-2: 1997 + A1: 2001 + A2: 2008
Authorized body for documentation
The following body is authorized to compile the technical documentation in accordance with Annex II ASection 2 of Directive 2006/42/EC: Convotherm Elektrogeräte GmbH, Ovens & Advanced CookingEMEA, Manitowoc Foodservice, Talstraße 35, 82436 Eglfing, Germany
1 General information
User manual 6

Eglfing, 01.10.2014
Dr. Martin BehleVice President & General ManagerOvens & Advanced Cooking - EMEA
pp Lutz IsenhardtTechnical Director ETC - EMEA
pp Gisela RosenkranzManager Technical Documentation
1 General information
User manual 7

1.2 EC Declaration of Conformity for gas appliances
Manufacturer
Convotherm Elektrogeräte GmbH, Ovens & Advanced Cooking EMEA, Manitowoc Foodservice, Tal‐straße 35, 82436 Eglfing, Germany
Validity of Declaration of Conformity
This Declaration of Conformity applies to the following types of gas appliances:
C4 6.10 GS C4 6.20 GS C4 10.10 GS C4 10.20 GSC4 6.10 GB C4 6.20 GB C4 10.10 GB C4 10.20 GB
Valid range for serial numbers
Conformity applies to the following range of serial numbers in conjunction with the part-number revi‐sion ID and the combi steamer model:
Serial number:Y#11410####, Y#11411####, Y#11412####, Y#21410####, Y#21411####, Y#21412####,Y#31410####, Y#31411####, Y#31412####, Y#41410####, Y#41411####, Y#41412####Part-number revision ID#########1####, #########2####
Declaration of Conformity with directives
The manufacturer declares that the combi steamer specified above complies with the following direc‐tives:
2006/42/EC (Machinery Directive)2004/108/EC (EMC Directive)2011/65/EU (RoHS Directive)
The safety objectives of European Directive 2006/95/EC (Low Voltage Directive) have been met in ac‐cordance with Annex I, Section 1.5.1 of the Machinery Directive.
Compliance of gas appliances with standards:
The gas appliances comply with the requirements in the following European standards:EN 203-1: 2014EN 203-2-2: 2006EN 203-3EN 60335-2-102:2006 + A1:2010EN 60335-1: 2012EN 55014-1/A2:2011EN 55014-2:1997 + A1:2001 + A2:2008EN 61000-3-2/A2:2009EN61000-3-3:2008EN 62233:2008
Type examinations carried out
Notified body for gas testing and electrical safety:GASTECC Kiwa, P.O. Box 137, 7300 AC Apeldoorn, The Netherlands
Report no.: 140602245
1 General information
User manual 8

Authorized body for documentation
The following body is authorized to compile the technical documentation in accordance with Annex II ASection 2 of Directive 2006/42/EC: Convotherm Elektrogeräte GmbH, Ovens & Advanced CookingEMEA, Manitowoc Foodservice, Talstraße 35, 82436 Eglfing, Germany
Eglfing, 10.11.2014
Dr. Martin BehleVice President & General ManagerOvens & Advanced Cooking - EMEA
pp Lutz IsenhardtTechnical Director ETC - EMEA
pp Gisela RosenkranzManager Technical Documentation
1 General information
User manual 9

1.3 Environmental protection
Statement of principles
Our customers' expectations, the legal regulations and standards and our company's own reputationset the quality and service for all our products.We have an environmental management policy that not only ensures compliance with all environmen‐tal regulations and laws, but also commits us to continuous improvement of our green credentials.We have developed a quality and environmental-management system in order to guarantee the con‐tinued manufacture of high-quality products, and to be sure of meeting our environmental targets.This system satisfies the requirements of ISO 9001:2008 and ISO 14001:2004.
Environmental protection procedures
We observe the following procedures:Use of residue-free compostable wadding materialsUse of RoHS-compliant productsREACH chemical lawRecommendation and use of bio-degradable cleaning agentsRecycling of electronic wasteEnvironmentally friendly disposal of old appliances via the manufacturer
Join us in our commitment to protect the environment.
1 General information
User manual 10

1.4 Identifying your combi steamer
Position of type plate
The type plate is located on the left-hand side of the combi steamer.
Layout and structure of the type plate
Electrical unit Gas appliance Name1 Name of appliance
Combi Steamer2 Trade name
Element MeaningC4 Convotherm 4 appli‐
ance serieseT easyTouch controlseD easyDial controlsnumbersxx.yy
Appliance size
EB Electrical unit withboiler
ES Electrical unit with wa‐ter injection
GB Gas appliance withboiler
GS Gas appliance withwater injection
3 Part number4 Serial number
Element MeaningHeatingmethod
Electric appliance(X, V)Gas appliance (Y,W)
Steam gener‐ation method
Injection (S)Boiler (B)
Appliancesize
6.10 (1)6.20 (2)10.10 (3)10.20 (4)
Year of man‐ufacture
2014 (14)2015 (15)...
Month ofmanufacture
January (01)February (02)March (03)...
Sequentialnumber
4 digits
5 Gas data BTU/hr, gas type
1 General information
User manual 11

1.5 Structure of customer documentation
Contents of customer documentation
The customer documentation for the combi steamer includes the following documents:Installation manualUser manual (this document)easyTouch operating instructions (extract from the on-screen Help)On-screen Help integrated in easyTouch (full instructions on how to use the software)easyDial operating instructions
Topics in the installation manual
The installation manual is intended for trained professional staff; see 'Requirements to be met by per‐sonnel' in the installation manual.It contains the following topics:
Design and function: describes the components relevant to installing the combi steamerSafety: describes all the hazards and appropriate preventive measures relevant to installation tasksMoving the appliance: contains necessary information on moving the combi steamerSetting up the appliance: lists and describes the options for setting up the combi steamerInstallation: describes all the supply connections that are neededPreparing the appliance for first-time use: describes how to prepare the combi steamer for use forthe first timeTaking the appliance out of operation: describes the tasks that need to be performed at the end ofthe combi-steamer life cycleTechnical data, dimensional drawings and connection points: contains all the relevant technical da‐ta for the combi steamerChecklists: contains checklists for installing the combi steamer in compliance with the warranty
Topics in the user manual
The user manual is intended for trained staff and trained professional staff; see 'Requirements to bemet by personnel on page 43' in the user manual.It contains the following topics:
Design and function: describes the components relevant to operating the combi steamerSafety: describes all the hazards and appropriate preventive measures relevant to operating thecombi steamerCooking: describes the rules, working procedures, operating steps and appliance usage instruc‐tions for cookingCleaning: lists and describes cleaning processes, cleaning fluids, working procedures, operatingsteps and appliance usage instructions for cleaningServicing: contains warranty information, the servicing schedule, information about faults, errorsand emergency use, plus working procedures, operating steps and appliance usage instructionsfor servicing
Topics in the operating instructions and the on-screen help (easyTouch only)
The operating instructions and the on-screen help (easyTouch only) are intended for trained staff andtrained professional staff; see 'Requirements to be met by personnel on page 43' in the user manual.For easyTouch models, the operating instructions are an extract from the on-screen help.The Operating instructions and online help (easyTouch only) include the following topics:
Layout of the user interface: explains the combi-steamer user interfaceUsing the software: contains instructions for entering and opening cooking profiles, for openingcleaning profiles, for starting cooking and cleaning processes; describes how to make settings andhow to import and export dataSelected cooking profiles: lists tried and tested cooking profiles
1 General information
User manual 12

1.6 Essential reading relating to safety
Safety information in the customer documentation
Safety information relating to the combi steamer appears only in the installation manual and the usermanual.The installation manual contains the safety information for the tasks covered by the manual and whichare performed when moving, setting up and installing the appliance and when preparing the appliancefor first-time use and taking the appliance out of operation.The user manual contains the safety information for the tasks covered by the manual and which areperformed during cooking, cleaning and servicing work.The safety information contained in the user manual and installation manual must always be consid‐ered to be part of the operating instructions. The safety information contained in the user manual andinstallation manual must always be observed when performing tasks that go beyond merely operatingthe software.
Parts of this document that must be read without fail
If you do not follow the information in this document, you risk potentially fatal injury and property dam‐age.To guarantee safety, all people who work with the combi steamer must have read and understood thefollowing parts of this document before starting any work:
the chapter 'For your safety on page 23'the sections that describe the activity to be carried out
Danger symbol
Danger symbol MeaningWarns of potential injuries. Heed all the warning notices that appear af‐ter this symbol to avoid potential injuries or death.
Form of warning notices
The warning notices are categorized according to the following hazard levels:
Hazard level Consequences LikelihoodDeath / serious injury (irreversible) Immediate risk
Death / serious injury (irreversible) Potential risk
Minor injury (reversible) Potential risk
NOTICE Damage to property Potential risk
1 General information
User manual 13

1.7 About this user manual
Purpose
This user manual is intended for all people who work with the combi steamer, and provides them withthe necessary information for carrying out operating tasks, cleaning jobs and minor servicing workproperly and safely.
Who should read this manual
Name of target group TasksChef Essentially performs organizational tasks such as
Entering the cooking profile dataEditing existing cooking profiles in the cookbookDeveloping new cooking profilesAdjusting appliance settings
May also perform all user tasks if applicable.User Performs specific operating tasks such as
Loading the combi steamerStarting cooking profilesRemoving foodCleaning the combi steamerFitting accessories in the combi steamer, for example changing be‐tween racks and a mobile shelf rackMinor servicing tasks
Chapters in the user manual
Chapter/section Purpose Targetgroup
General information Shows you how to identify your combi steamerProvides guidance on using this user manual
Chef
Design and function Describes the functions of the combi steamerDescribes specific components of the combi steamerand specifies their position
ChefUser
For your safety Specifies the intended use of the combi steamerDescribes the hazards posed by the combi steamer andsuitable preventive measures
You should read this chapter carefully in particular.
ChefUser
Cooking procedures Describes what loading options are available and themaximum loads allowed for the combi steamerExplains how to switch on the combi steamerContains the instructions for working procedures duringcooking and regeneratingContains the instructions for handling operations on thecombi steamer regularly performed during cooking andregenerating
ChefUser
1 General information
User manual 14

Chapter/section Purpose Targetgroup
Cleaning procedures Explains the principles of the cleaning methodsContains the cleaning instructionsDescribes the cleaning fluids and how to prepare themfor useContains the instructions for working procedures duringcleaningContains and refers to the instructions for handling oper‐ations on the combi steamer regularly performed duringcleaning
User
Servicing procedures Contains the servicing scheduleProvides advice on what emergency mode is possiblewhen faults occurContains a catalogue of possible errors and faults andspecifies the required actionsContains the instructions for servicing tasks that the usercan personally carry out.Refers to the instructions for handling operations on thecombi steamer required for servicing tasks
User
Notation for decimal points
A decimal point is always used in order to achieve international standardization.
1 General information
User manual 15
2 Design and function
Purpose of this chapter
This chapter describes the design and construction of the combi steamer and explains its functions.
Contents
This chapter contains the following topics:
PageThe functions of the combi steamer 17Design and function of the combi steamer 19Layout and function of the operating panel 22
2 Design and function
User manual 16

2.1 The functions of the combi steamer
The cooking operating modes
In your combi steamer you can cook a range of food. The combi steamer can work in the followingoperating modes to achieve this:
SteamCombi-steamConvectionSmoker (optional)
Standard cooking techniques
You can use the cooking operating modes in conjunction with the ACS+ extra functions HumidityPro, Crisp&Tasty, fan speed and BakePro to perform the following cooking techniques for instance:
BoilingBlanchingRoastingScallopingPreserving
SteamingPoachingGrillingGratinateSmoking (optional)
StewingBraisingBakingDefrosting
Special cooking techniques
By combining operating modes and extra functions you can perform the following special cookingtechniques with easyTouch:
Low-temperature cookingCook & Hold
DT cookingOvernight cooking
ecoCookingLow-oxygen slow cooking
The regenerating operating modes
In your combi steamer you can regenerate a range of dishes. The combi steamer can work in the fol‐lowing three operating modes to achieve this:
Regenerating à la carteBanquet regenerating (easyTouch only)Plate regenerating (easyTouch only)
Cooking profiles and cookbook
A cooking profile is a combination of cooking parameters such as cooking temperature and cookingtime. You can create your own cooking profiles and manage them in the 'cookbook'. You can also findready-made cooking profiles in the 'cookbook'.
Cleaning the cooking chamber for an easyTouch appliance
There are three operating modes available for cleaning the cooking chamber:Cleaning without using cleaning agentsFully automatic cleaning using ConvoClean+: any combination can be selected from 4 cleaning lev‐els, 3 cleaning-program lengths plus the extra steam-disinfection and drying functionsSemi-automatic cleaning
2 Design and function
User manual 17

Cleaning the cooking chamber for an easyDial appliance
There are ten cleaning profiles available for cleaning the cooking chamber:Rinse-with-water cleaning profileFully automatic cleaning using ConvoClean: eight cleaning profiles can be selected for different lev‐els of soiling, some including steam disinfection and dryingSemi-automatic cleaning profile
2 Design and function
User manual 18
2.2 Design and function of the combi steamer
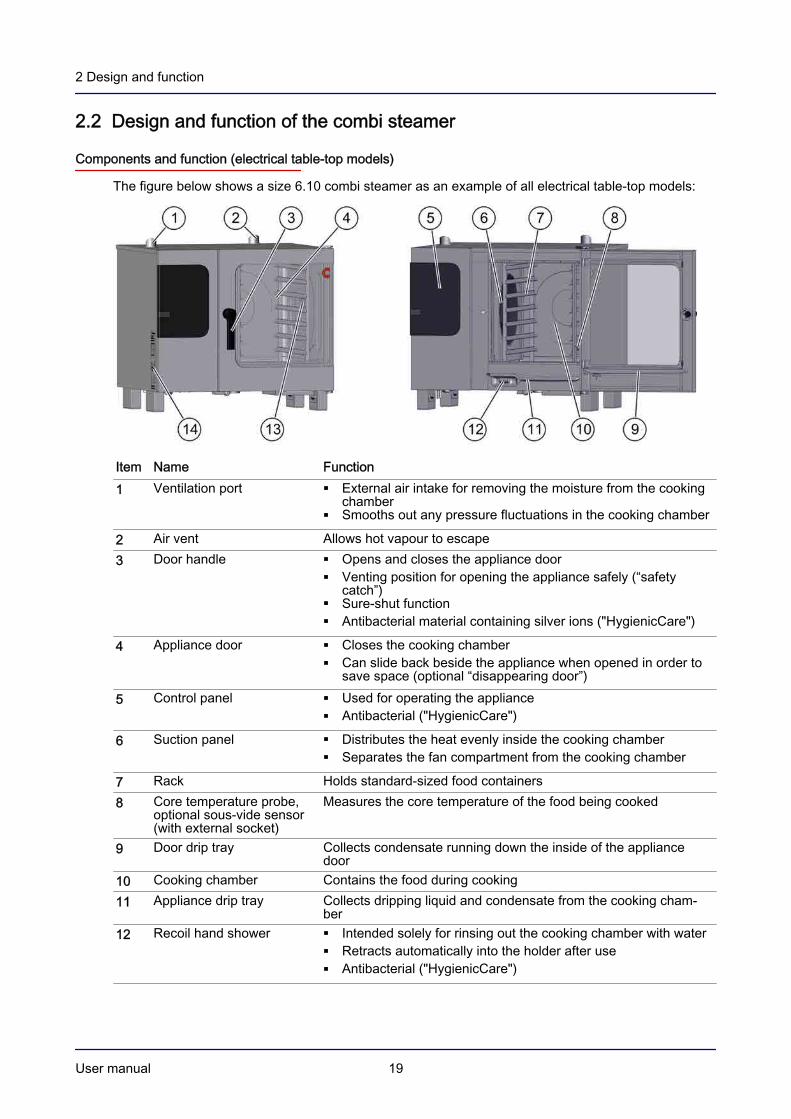
Components and function (electrical table-top models)
The figure below shows a size 6.10 combi steamer as an example of all electrical table-top models:
Item Name Function1 Ventilation port External air intake for removing the moisture from the cooking
chamberSmooths out any pressure fluctuations in the cooking chamber
2 Air vent Allows hot vapour to escape3 Door handle Opens and closes the appliance door
Venting position for opening the appliance safely (“safetycatch”)Sure-shut functionAntibacterial material containing silver ions ("HygienicCare")
4 Appliance door Closes the cooking chamberCan slide back beside the appliance when opened in order tosave space (optional “disappearing door”)
5 Control panel Used for operating the applianceAntibacterial ("HygienicCare")
6 Suction panel Distributes the heat evenly inside the cooking chamberSeparates the fan compartment from the cooking chamber
7 Rack Holds standard-sized food containers8 Core temperature probe,
optional sous-vide sensor(with external socket)
Measures the core temperature of the food being cooked
9 Door drip tray Collects condensate running down the inside of the appliancedoor
10 Cooking chamber Contains the food during cooking11 Appliance drip tray Collects dripping liquid and condensate from the cooking cham‐
ber12 Recoil hand shower Intended solely for rinsing out the cooking chamber with water
Retracts automatically into the holder after useAntibacterial ("HygienicCare")
2 Design and function
User manual 19

Item Name Function13 Oven light Illuminates the cooking chamber
Program-controlled
14 Type plate Identifies the appliance
Components and function (gas table-top units)
The following illustration shows a size 6.10 combi steamer as an example of all gas table-top models:
Item Name Function1 Ventilation port External air intake for removing the moisture from the cooking
chamberSmooths out any pressure fluctuations in the cooking chamber
2 Air vent Allows hot vapour to escape3 Exhaust outlet Takes away hot exhaust gases4 Door handle Opens and closes the appliance door
Venting position for opening the appliance safely (“safetycatch”)Sure-shut functionAntibacterial material containing silver ions ("HygienicCare")
5 Appliance door Closes the cooking chamberCan slide back beside the appliance when opened in order tosave space (optional “disappearing door”)
6 Control panel Used for operating the applianceAntibacterial ("HygienicCare")
7 Suction panel Distributes the heat evenly inside the cooking chamberSeparates the fan compartment from the cooking chamber
8 Rack Holds standard-sized food containers9 Core temperature probe,
optional sous-vide sensor(with external socket)
Measures the core temperature of the food being cooked
10 Door drip tray Collects condensate running down the inside of the appliancedoor
11 Cooking chamber Contains the food during cooking12 Appliance drip tray Collects dripping liquid and condensate from the cooking cham‐
ber
2 Design and function
User manual 20

Item Name Function13 Recoil hand shower Intended solely for rinsing out the cooking chamber with water
Retracts automatically into the holder after useAntibacterial ("HygienicCare")
14 Oven light Illuminates the cooking chamberProgram-controlled
15 Type plate Identifies the appliance
2 Design and function
User manual 21

2.3 Layout and function of the operating panel
Layout and elements of the easyTouch operating panel
Item Name Function1 ON/OFF
applianceswitch
Switches the combi steamer on and off
2 Fulltouchscreendisplay
Central controls for applianceAppliance operated by touching iconson the control panel (full touchscreendisplay)Status displays
3 USB port For connecting a USB stick
Layout and elements of the easyDial control panel
Item Name Function1 ON/OFF
applianceswitch
Switches the combi steamer on and off
2 Control panel Central controls for applianceButtons for entering the cooking pro‐gramsDisplays showing the values you havesetPrompts for the user
3 USB port For connecting a USB stick4 C-Dial Combined rotary knob and pushbutton for
adjusting and setting the cooking parame‐ters.
2 Design and function
User manual 22

3 For your safety
Purpose of this chapter
This chapter provides you with all the information you need in order to use the combi steamer safelywithout putting yourself or others at risk.This is a particularly important chapter that you should read through carefully.
Contents
This chapter contains the following topics:
PageBasic safety code 24Intended use of your combi steamer 25Warning signs on the combi steamer 26Summary of hazards 28Hazards and safety precautions during operation 30Hazards and safety precautions during cleaning 36Hazards and safety precautions during servicing 40Safety devices 41Requirements to be met by personnel, working positions 43Personal protective equipment 44
3 For your safety
User manual 23

3.1 Basic safety code
Object of this safety code
This safety code aims to ensure that all persons who use the combi steamer have a thorough knowl‐edge of the hazards and safety precautions, and that they follow the warning notices given in the usermanual and on the combi steamer. If you do not follow this safety code, you risk potentially fatal injuryand property damage.
Referring to the user manuals included in the customer documentation
Follow the instructions below:Read in full the chapter 'For Your Safety' and the chapters that relate to your work.Always keep to hand the manuals included in the customer documentation for reference.Pass on the user manuals included in the customer documentation with the combi steamer if itchanges ownership.
Working with the combi steamer
Follow the instructions below:Only those persons who satisfy the requirements stipulated in this user manual are permitted touse the combi steamer.Only use the combi steamer for the specified use. Never, under any circumstances, use the combisteamer for other purposes that may suggest themselves.Take all the safety precautions specified in this user manual and on the combi steamer. In particu‐lar, use the prescribed personal protective equipment.Only stand in the working positions specified.Do not make any changes to the combi steamer, e.g. removing parts or fitting un-approved parts.In particular, you must not disable any safety devices.
Related topicsIntended use of your combi steamer 25Warning signs on the combi steamer 26Summary of hazards 28Hazards and safety precautions during operation 30Hazards and safety precautions during cleaning 36Safety devices 41Personal protective equipment 44
3 For your safety
User manual 24

3.2 Intended use of your combi steamer
Intended use
The combi steamer is designed and built solely for cooking different foodstuffs in standard-sizedfood containers (e.g. Gastronorm containers, standard baking sheets). Steam, convection andcombi-steam (non-pressurized superheated steam) are used for this purpose.The food containers can be made of stainless steel, ceramic, plastic, aluminium, enamelled steel orglass. Glass food containers must not exhibit any form of damage.The combi steamer is intended solely for professional, commercial use.
Restrictions on use
Some materials are not allowed to be heated in the combi steamer:No dry powder or granulated materialNo highly flammable objects with a flash point below 270°C, such as highly flammable oils, fats,plasticsNo food in sealed tins or jars
Requirements to be met by operating personnel
The combi steamer must only be operated by personnel who satisfy specific requirements. Pleaserefer to 'Requirements to be met by personnel, working positions on page 43' for the training andqualifications requirements.Personnel must be aware of the risks and regulations associated with handling heavy loads.
Requirements relating to the operating condition of the combi steamer
The combi steamer must only be operated when all safety devices and protective equipment arefitted, in working order and fixed properly in place.The manufacturer regulations for operation and servicing of the combi steamer must be observed.The combi steamer must not be loaded over the maximum permissible loading weight for the givenmodel; see 'Loading capacity for the combi steamer on page 50'.
Requirements relating to the operating environment of the combi steamer
Specified operating environment for the combi steamerThe ambient temperature lies between +4°C and +35°CNot a toxic or potentially explosive atmosphereDry kitchen floor to reduce the risk of accidents
Specified properties of the installation locationNo fire alarm, no sprinkler system directly above the applianceNo flammable materials, gases or liquids above, on, beneath or in the vicinity of the appliance
Mandatory restrictions on useShelter from rain and wind must be provided if operated outdoorsAppliance must not be shifted or moved during use
Cleaning requirements
Use only cleaning agents that have been approved by the manufacturer.High-pressure cleaners must not be used for cleaning.Water jets must not be used for cleaning the exterior. The water jet from the recoil hand showermust only be used for cleaning the cooking chamber.The combi steamer must not be treated with acids or exposed to acid fumes, except for the pur‐pose of descaling the cooking chamber and the boiler by an authorized service company in accord‐ance with the manufacturer's instructions.
3 For your safety
User manual 25

3.3 Warning signs on the combi steamer
Fixed supporting structure
A fixed supporting structure for the combi steamer is a permanently fixed worktable or stand. Thesesupporting structures are not intended to be mobile and so are not equipped with features that wouldhelp to move them.
Mobile supporting structure
A mobile supporting structure for the combi steamer is, for example, a wheeled worktable or a stand orstacking kit on castors.
Positioning of warning notices
The following illustration shows a size 6.10 electric combi steamer on a mobile platform as an exampleof all table-top models:
Transport trolley (optional)
Obligatory warning signs
The following warning signs must be attached to the combi steamer and optional accessories in thearea indicated so as to be easily visible at all times.
Area Warning sign Description1 Warning of dangerous electric voltage / electric shock
There is a risk of electric shock from live parts if the safety cover isopened.
2 Warning of hot steam and vapourThere is a risk of scalding from hot steam and vapour escaping whenthe appliance door is opened.
3 For your safety
User manual 26

Area Warning sign Description2 and 3 Warning of hot liquids
Spillage of hot liquid foods can result in scalds if the upper shelvesare loaded with liquids or foods that produce liquid during cooking.Shelves that lie above the sightline of the user must not be used forliquid foodstuffs or food that will liquefy during cooking.
2only for amobileplatform
Tipping or toppling warning for combi steamerThere is a risk of the combi steamer toppling over if moved. Alwaystake great care when moving the combi steamer.
3 Tipping or toppling warning for transport trolleyThere is a risk of the transport trolley toppling over if moved. Alwaystake great care when moving the transport trolley. When moving thetransport trolley, watch out for objects in the way or unevenness in thefloor.
2only for amobileplatform
Damage or detachment warning for appliance connectionsThere is a risk of the appliance connections being damaged or de‐tached if the combi steamer is moved. Always ensure there is enoughlength in the supply cables and pipes when moving the combi steam‐er. After moving, always secure the combi steamer against rollingaway.
3 For your safety
User manual 27

3.4 Summary of hazards
General rules for dealing with hazards and safety precautions
The combi steamer is designed to protect the user from all hazards that can reasonably be avoided bydesign measures.The actual purpose of the combi steamer, however, means that there are still residual risks; you musttherefore take precautions to avoid them. A safety device can provide you with a certain degree of pro‐tection against some of these hazards. You must ensure, however, that these safety devices are inplace and in working order.The nature of these residual risks and what effect they have are described below.
Hazard points
The following illustration shows a size 6.10 gas combi steamer as an example of all table-top models:
Heat generation (1)
The combi steamer becomes hot inside the cooking chamber, on the inside of the appliance door andon the vents and pipes on the top of the combi steamer. This poses:
A fire risk from heat given off by the combi steamer.A risk of burns on hot surfaces outside and inside the combi steamer, and also on hot applianceparts, food containers and other accessories used for cooking.A risk of burns on the vents and pipes on the top of the appliance.Risk of burns on hot accessories and fittings used during cooking if they have been removed fromthe appliance after cooking and set down elsewhere. This applies in particular to mobile shelfracks.
Hot steam / vapour (2)
The combi steamer generates hot steam and vapour, which escapes when the appliance door isopened, and which is removed through the air vent on the top of the combi steamer when the appli‐ance door is sitting closed. This poses:
A risk of scalding from hot steam when the appliance door is opened. You are protected from thehot steam by the appliance door and its safety catch, provided you use the venting position whenopening the appliance door and generally make sure that the appliance door is intact. Take particu‐lar care when opening the appliance door if the top door edge is below your field of vision, which isthe case for an appliance in a stacking kit.A risk of scalding from hot steam and hot fat if a water jet is sprayed into hot fat.A risk of scalding from the high temperatures of the vents and pipes on the top of the appliance.
3 For your safety
User manual 28

Hot liquids
Foodstuffs are cooked in the combi steamer. These foodstuffs may also be liquid, or liquefy duringcooking. This poses:
A risk of scalding from hot liquids, which may be spilled if not handled properly.
Live components (3)
The combi steamer contains live parts. This means:A risk from live parts if the cover is not in place.A risk of electric shock if the combi steamer is cleaned externally using a hand shower.
Fan (4)
The combi steamer contains either one or two fans, depending on the appliance size. This poses:A risk of hand injuries from the fan in the oven chamber behind the suction panel if the suctionpanel is not fitted in place properly.
Contact with cleaning agents
The combi steamer must be cleaned using special cleaning agents. This poses:A risk from cleaning agents, some of which can cause skin burns.
Parts moving against each other (5)
For various actions, such as opening/shutting the appliance door or cleaning the appliance door, thereis the risk that you will crush or cut your hand.
Hand shower (6)
There is a hand shower on the combi steamer that can result in various hazards:A risk of scalding if water is sprayed into the hot oven using the hand shower, e.g. for cleaning.A risk of scalding when the combi steamer is located in the immediate vicinity of equipment forheating liquid fat, and water is sprayed into this equipment with the hand shower.A risk of scalding if a container of hot fat is standing in the oven into which water is sprayed withthe hand shower.A risk of electric shock if the combi steamer is cleaned externally using the hand shower.
Break in the cold chain
When loading the oven ahead of time, e.g. when pre-setting the start time of the cooking program, or ifcooking is interrupted, the cold chain of chilled foodstuffs may be broken. This poses:
A risk to your guests from microbiological contamination of foodstuffs.
Gas (7)
This combi steamer is a gas appliance. This incurs additional risks:Risk of explosion if a gas pipe is faulty or leakingA risk of burns from hot exhaust gas at the exhaust outletA fire risk from hot exhaust gas above the gas applianceA risk of lack of oxygen in the kitchen if a burner is poorly adjusted, there is an insufficient supplyof air for combustion and/or insufficient removal of exhaust gases.
3 For your safety
User manual 29
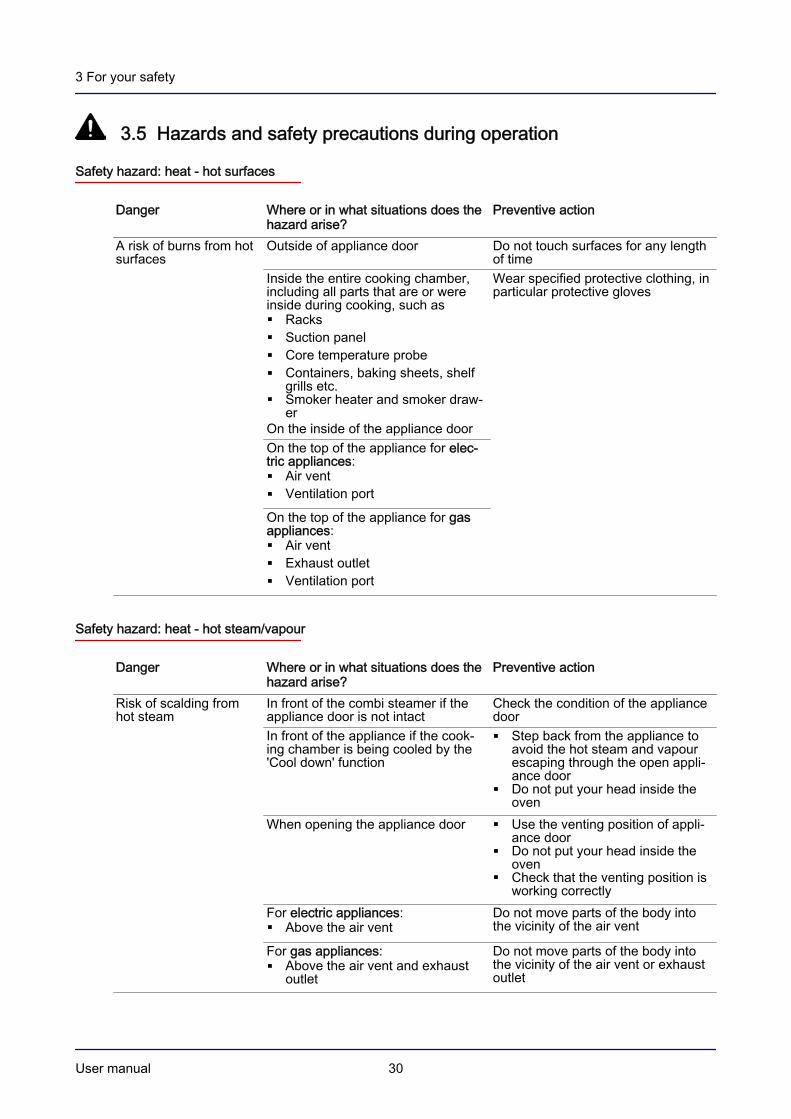
3.5 Hazards and safety precautions during operation
Safety hazard: heat - hot surfaces
Danger Where or in what situations does thehazard arise?
Preventive action
A risk of burns from hotsurfaces
Outside of appliance door Do not touch surfaces for any lengthof time
Inside the entire cooking chamber,including all parts that are or wereinside during cooking, such as
RacksSuction panelCore temperature probeContainers, baking sheets, shelfgrills etc.Smoker heater and smoker draw‐er
On the inside of the appliance door
Wear specified protective clothing, inparticular protective gloves
On the top of the appliance for elec‐tric appliances:
Air ventVentilation port
On the top of the appliance for gasappliances:
Air ventExhaust outletVentilation port
Safety hazard: heat - hot steam/vapour
Danger Where or in what situations does thehazard arise?
Preventive action
Risk of scalding fromhot steam
In front of the combi steamer if theappliance door is not intact
Check the condition of the appliancedoor
In front of the appliance if the cook‐ing chamber is being cooled by the'Cool down' function
Step back from the appliance toavoid the hot steam and vapourescaping through the open appli‐ance doorDo not put your head inside theoven
When opening the appliance door Use the venting position of appli‐ance doorDo not put your head inside theovenCheck that the venting position isworking correctly
For electric appliances:Above the air vent
Do not move parts of the body intothe vicinity of the air vent
For gas appliances:Above the air vent and exhaustoutlet
Do not move parts of the body intothe vicinity of the air vent or exhaustoutlet
3 For your safety
User manual 30

Safety hazard: heat - hot liquid
Danger Where or in what situations does thehazard arise?
Preventive action
Risk of scalding fromhot liquid
Inside the chamberOutside the appliance
Only use containers of appropriatesize: GN dimensions for racks withU-rails (standard model) or bakingsheet dimensions for racks with L-rails (bakery model).Do not exceed the maximum loadingweightInsert the food containers correctlyin accordance with the rules onPage 48 for an appliance of sizeX.10 or on Page 49 for an appli‐ance of size X.20Only load containers holding liquidor liquefying food into shelves thatallow a proper view inside the con‐tainer, and always hold horizontallywhen removingWear protective glovesWhen using racks:
Clip racks correctly in placeWhen removing baking sheetsfrom bakery racks, do not pullthem forwards too far or theymight tip out of the rack.
When using the mobile shelf rackand transport trolley:
Make sure that the transport se‐curing mechanism on the mobileshelf rack is engaged duringloading and when pushing thetransport trolleyFix the shelf-securing bar inplace on the mobile shelf rackwhen pushing the transport trol‐leyAlways cover hot liquids whenconveying them on the transporttrolley.Take care not to let the transporttrolley tip over. This may occur ifthe transport trolley is moved ona steep slope, bumps into an ob‐stacle or has a top-heavy load.
3 For your safety
User manual 31

Safety hazard: heat - smoker operation
Danger Where or in what situations does thehazard arise?
Preventive action
Risk of burns from igni‐tion of smoker materialand smoke gas; risk ofbreathing difficultiesfrom inhaling smoke
When the appliance door isopened, air flows into the cookingchamber, causing the smokermaterial and/or smoke gas to ig‐nite explosivelyIf smoke is inhaled when openingthe appliance door
Never open the appliance door dur‐ing smoking
Risk of burns or firefrom flying sparks
If air meets the hot smoker mate‐rial
Do not remove the lid from thesmoker drawer until the smokerdrawer has cooled down com‐pletely in a fireproof location shel‐tered from the wind.Always keep the lid on the smok‐er drawer during smokingAlways leave the smoker-materi‐al ashes to cool before disposal
Safety hazard: heat - miscellaneous
Danger Where or in what situations does thehazard arise?
Preventive action
Risk of fire from heatgiven off by the appli‐ance
If flammable materials, gases or liq‐uids are stored near or on the appli‐ance.
Do not store flammable materials,gases or liquids beside or on top ofthe appliance.
Risk of scalding fromwater jet
If a container of hot fat is standing inthe oven into which water is sprayedthrough a water jet.
Do not spray into hot fat
3 For your safety
User manual 32
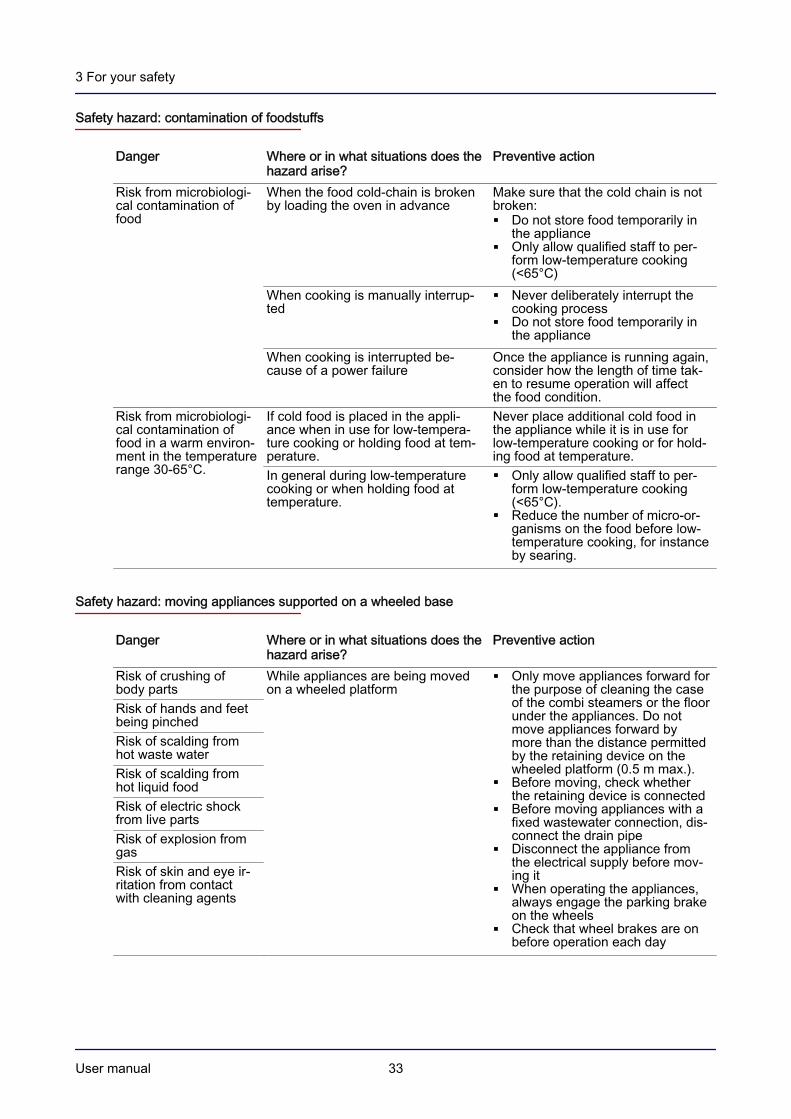
Safety hazard: contamination of foodstuffs
Danger Where or in what situations does thehazard arise?
Preventive action
Risk from microbiologi‐cal contamination offood
When the food cold-chain is brokenby loading the oven in advance
Make sure that the cold chain is notbroken:
Do not store food temporarily inthe applianceOnly allow qualified staff to per‐form low-temperature cooking(<65°C)
When cooking is manually interrup‐ted
Never deliberately interrupt thecooking processDo not store food temporarily inthe appliance
When cooking is interrupted be‐cause of a power failure
Once the appliance is running again,consider how the length of time tak‐en to resume operation will affectthe food condition.
Risk from microbiologi‐cal contamination offood in a warm environ‐ment in the temperaturerange 30-65°C.
If cold food is placed in the appli‐ance when in use for low-tempera‐ture cooking or holding food at tem‐perature.
Never place additional cold food inthe appliance while it is in use forlow-temperature cooking or for hold‐ing food at temperature.
In general during low-temperaturecooking or when holding food attemperature.
Only allow qualified staff to per‐form low-temperature cooking(<65°C).Reduce the number of micro-or‐ganisms on the food before low-temperature cooking, for instanceby searing.
Safety hazard: moving appliances supported on a wheeled base
Danger Where or in what situations does thehazard arise?
Preventive action
Risk of crushing ofbody parts
While appliances are being movedon a wheeled platform
Only move appliances forward forthe purpose of cleaning the caseof the combi steamers or the floorunder the appliances. Do notmove appliances forward bymore than the distance permittedby the retaining device on thewheeled platform (0.5 m max.).Before moving, check whetherthe retaining device is connectedBefore moving appliances with afixed wastewater connection, dis‐connect the drain pipeDisconnect the appliance fromthe electrical supply before mov‐ing itWhen operating the appliances,always engage the parking brakeon the wheelsCheck that wheel brakes are onbefore operation each day
Risk of hands and feetbeing pinchedRisk of scalding fromhot waste waterRisk of scalding fromhot liquid foodRisk of electric shockfrom live partsRisk of explosion fromgasRisk of skin and eye ir‐ritation from contactwith cleaning agents
3 For your safety
User manual 33

Safety hazard: electrical power
Danger Where or in what situations does thehazard arise?
Preventive action
Risk of electric shockfrom live parts
If appliances on wheeled standsstart moving unintentionally and thepower supply is pulled off
Before operation, check that theretaining device is connected,which restricts the range ofmovement of the platform plusappliance.When operating the appliances,always engage the parking brakeon the wheelsCheck that wheel brakes are onbefore operation each day
Safety hazard: water
Danger Where or in what situations does thehazard arise?
Preventive action
Risk of falling on wetfloor
If appliances on wheeled platformsstart moving unintentionally and thewater supply is pulled off
Before operation, check that theretaining device is connected,which restricts the range ofmovement of the platform plusappliance.When operating the appliances,always engage the parking brakeon the wheelsCheck that wheel brakes are onbefore operation each day
3 For your safety
User manual 34

Safety hazard: gas
Danger Where or in what situations does thehazard arise?
Preventive action
Risk of explosion fromgas
If the appliance is moved Never move appliance during useFor appliances on a wheeled plat‐form and with a flexible connectionpipe:
Only move the appliance forwardfor the purpose of cleaning thecase or cleaning the floor underthe appliance. Do not move theappliance forward by more thanthe allowed range of movement.The range of movement is set bythe retaining device used to se‐cure the appliance in place (typi‐cally 0.5 m).Before operating the appliance,always engage the parking brakeon the wheelsCheck that wheel brakes are onbefore operation each day
Risk of suffocation fromlack of air
Where appliance is installed Do not obstruct lower area ofequipmentOnly operate appliance in adraught-free environmentEnsure that the fitted ventilationand air supply equipment is work‐ing properly, and that the ventila‐tion requirements stipulated bythe installation engineer are met.Have the appliance serviced an‐nually
Safety hazard: mechanical parts of the appliance
Danger Where or in what situations does thehazard arise?
Preventive action
Risk of injuries from ro‐tating fan
If the cooking chamber is beingcooled using 'Cool down' with the ap‐pliance door open and the fan wheelis exposed because the suction pan‐el is not fitted
Make sure that the suction panel isfitted and secured in place
Risk of slipping fromescaping condensate
In front of the appliance Ensure that the floor around the ap‐pliance is dry at all times
Risk of hands beingpinched
When pushing the transport trolley Always use the transport-trolley han‐dle when moving the transport trol‐ley
When inserting the mobile shelf rack Always use the handles when mov‐ing the mobile shelf rack into or outof the cooking chamber
3 For your safety
User manual 35

3.6 Hazards and safety precautions during cleaning
Safety hazard: cleaning agent
Danger Where or in what situations does thehazard arise?
Preventive action
Risk of chemical burnsor irritation to skin, eyesand respiratory systemfrom contact with clean‐ing agents and theirfumes
During fully automatic cleaning: Infront of the appliance door
Do not open the appliance doorduring fully automatic oven clean‐ing using connected canisters.During fully automatic ovencleaning using single-measuredispensing, only open the appli‐ance door after being promptedby the software
For all cleaning actions Do not let cleaning fluids comeinto contact with your skin oreyesDo not heat up the appliance ifthere are cleaning fluids inside.This is only permitted under thecontrol of a cleaning program forsemi-automatic or fully automaticcleaning.Only ever spray cleaning fluidsinto the appliance after beingprompted by the cleaning pro‐gram or if the cooking chambertemperature is no higher than60 °CDo not breathe in sprayWear personal protective equip‐ment
When handling the cleaning-fluidcanisters
Wear personal protective equipment
When handling the single-measuredispensing bottles
Wear personal protective equipment
When corrosive cleaning agents areused
Only use those cleaning agentsspecified under 'Cleaning agents' onpage 94.
Safety hazard: contamination of foodstuffs
Danger Where or in what situations does thehazard arise?
Preventive action
Risk of food contamina‐tion from cleaning fluids
If the single-measure dispensingbottles for the cleaning agent andrinse aid are not handled correctly
Take care not to get cleaningagent or rinse aid on the worksurfaceDo not place empty single-meas‐ure dispensing bottles on thework surface, because the clean‐ing agent or rinse aid could dripdown the outside
Risk of food contamina‐tion from cleaning fluids
If the cooking chamber has not beenrinsed out properly after semi-auto‐matic cleaning on appliances withouta hand shower.
To rinse out, use an external waterjet instead of the hand shower torinse the cooking chamber, fittingsand the area behind the suction pan‐el thoroughly with plenty of water,then wipe with a soft cloth.
3 For your safety
User manual 36

Safety hazard: heat
Danger Where or in what situations does thehazard arise?
Preventive action
A risk of burns from hotsurfaces
Outside of appliance door Before starting cleaning tasks,wait until the cooking chamberhas cooled to below 60°C or usethe 'Cool down' function to coolthe cooking chamberWear specified protective cloth‐ing, in particular protective gloves
Inside the entire cooking chamber,including all parts that are or wereinside during cooking, such as
RacksSuction panelCore temperature probeContainers, baking sheets, shelfgrills etc.Smoker heater and smoker draw‐er
On the inside of the appliance doorOn the top of the appliance for elec‐tric appliances:
Air ventVentilation port
On the top of the appliance for gasappliances:
Air ventExhaust outletVentilation port
Risk of scalding fromhot steam if water issprayed into the hotcooking chamber
In the entire cooking chamber Before starting cleaning work,wait until the cooking chamberhas cooled to below 60°C or usethe 'Cool Down' function to coolthe cooking chamberWear specified protective cloth‐ing, in particular protective gloves
Risk of scalding fromhot steam
In front of the appliance if the cook‐ing chamber is being cooled by the 'Cool Down' function
Step back from the appliance toavoid the hot steam and vapourescaping through the open appli‐ance doorDo not put your head inside thecooking chamber
Risk of scalding fromwater jet
If a jet of water is sprayed into theappliance in which a container of hotfat is standing.
Do not spray into hot fat
3 For your safety
User manual 37

Safety hazard: moving appliances supported on a wheeled base
Danger Where or in what situations does thehazard arise?
Preventive action
All specified hazards While appliances are being movedon a wheeled platform
Before moving appliances with afixed wastewater connection, dis‐connect the drain pipeBefore moving (for instance toclean the case of the combisteamers or to clean the floor),check whether the retaining de‐vice which restricts the radius ofmovement of the platform plusappliance is connected.When moving the appliance, takecare not to wheel over the electri‐cal supply cables or the gas andwater pipes
Risk of crushing ofbody parts
While appliances are being movedon a wheeled platform
Watch out for the connecting ca‐bles and pipesUse at least two people to moveit
Risk of hands and feetbeing pinched
While appliances are being movedon a wheeled platform
Keep the appliance doors closed
Risk of scalding fromhot waste water
While appliances are being movedon a wheeled platform
Let the appliance cool downWipe up immediately any waterspillagesWear protective clothing
Risk of scalding fromhot liquid food
While appliances are being movedon a wheeled platform
Always remove any food from theappliances before moving them
Risk of electric shockfrom live parts
While appliances are being movedon a wheeled platform
Watch out for connected electricalcables and water pipes
Risk of explosion fromgas
While appliances are being movedon a wheeled platform
Watch out for the gas supply pipe
Risk of skin and eye ir‐ritation from contactwith cleaning agents
While appliances are being movedon a wheeled platform
Make sure that the connectinglines and pipes are long enoughKeep cleaning-agent canistersclosed when moving the base
Risk of tripping from ex‐posed cables and pipes
While cleaning behind applianceswhen pulled forward
Exercise caution when performingthis action
Risk of falling on wetfloor caused by wastewater
While cleaning behind applianceswhen pulled forwardIn front of the appliances
Wipe up immediately any waterspillagesMake sure that the connectinglines and pipes are long enough
Risk of falling on wetfloor caused by clean‐ing agents
While cleaning behind applianceswhen pulled forwardIn front of the appliances
Keep the cleaning-agent canistersclosed when moving appliances
3 For your safety
User manual 38

Safety hazard: electrical power
Danger Where or in what situations does thehazard arise?
Preventive action
Risk of electric shockcaused by a short-cir‐cuit
If the appliance comes into contactwith water
Do not wash down the outer casewith waterAlways keep the USB coverclosed during cleaning
Risk of electric shockfrom live parts
If appliances on wheeled standsstart moving unintentionally and thepower supply is pulled off
Before operation, check that theretaining device is connected,which restricts the range ofmovement of the platform plusappliance.When operating the appliances,always engage the parking brakeon the wheelsCheck that wheel brakes are onbefore operation each day
Safety hazard: gas
Danger Where or in what situations does thehazard arise?
Preventive action
Risk of explosion fromgas
If the appliance is moved For appliances on a wheeled plat‐form and with a flexible connectionpipe:
Do not move the appliance for‐ward beyond its range of move‐ment when cleaning the case orthe floor. The range of movementis set by the retaining deviceused to secure the appliance inplace (typically 0.5 m).Never strain the connecting ca‐bles or pipes.
Safety hazard: mechanical parts of the appliance
Danger Where or in what situations does thehazard arise?
Preventive action
Risk of injuries from ro‐tating fan
If the cooking chamber is beingcooled using 'Cool down' with the ap‐pliance door open and the fan wheelis exposed because the suction pan‐el is not fitted
Make sure that the suction panel isfitted and secured in place
Risk of crushing tohands and pinching offingers
When opening and closing the dou‐ble glass door
Exercise caution when performingthis action
3 For your safety
User manual 39

3.7 Hazards and safety precautions during servicing
Safety hazard: heat
Danger Where or in what situations does thehazard arise?
Preventive action
A risk of burns from hotsurfaces
Outside of appliance door Before starting servicing work,wait until the cooking chamberhas cooled to below 60°C or usethe 'Cool down' function to coolthe cooking chamberWear specified protective cloth‐ing, in particular protective gloves
Inside the entire cooking chamber,including all parts that are or wereinside during cooking, such as
RacksSuction panelCore temperature probeContainers, baking sheets, shelfgrills etc.
On the inside of the appliance doorOn the top of the appliance for elec‐tric appliances:
Air ventVentilation port
On the top of the appliance for gasappliances:
Air ventExhaust outletVentilation port
Safety hazard: electrical power
Danger Where or in what situations does thehazard arise?
Preventive action
Risk of electric shockfrom live parts
Under the coverUnder the operating panelOn the mains power lead
Servicing work carried out underthe cover, behind the control pan‐el or on the power supply cablemust only be performed by quali‐fied electricians from an author‐ized service companyDo not remove the cover or theoperating panel
Safety hazard: mechanical parts of the appliance
Danger Where or in what situations does thehazard arise?
Preventive action
Risk of cuts from sharpedges
During servicing work Exercise caution when perform‐ing this actionWear personal protective equip‐ment
3 For your safety
User manual 40

3.8 Safety devices
Meaning
The combi steamer has a number of safety devices to protect the user from hazards. It is absolutelyessential that all safety devices are fitted and in working order when operating the combi steamer
Position and function
The following illustration shows a size 6.10 electric combi steamer as an example of all table-top mod‐els:
Item Safety device Function Check1 Cover can only be re‐
moved using toolPrevents live parts frombeing touched accidentallyPrevents access to themoving fan from the wiringcompartment
Check that the cover is inplace
2 Operating panel canonly be removed usinga tool
Prevents live parts from beingtouched accidentally
Ensure that the operatingpanel is in place
3 Appliance door withmagnetic door switch
Appliance door:Protects the user and outsideenvironment from hot steam
Check the door pane regularlyfor scratches, cracks, indenta‐tions etc. and replace it if anyare found
Magnetic door switch (electri‐cal door sensor):
When the appliance dooris opened, the switchstops:
rotation of the fan(comes to a stop after afew seconds)operation of the heatingelementdistribution of thecleaning fluids by thefully automatic ovencleaning system
Prompt to close the appli‐ance door
Check magnetic door switchat low temperature:Action:
Open the appliance doorfullyPress Start
Result:Motor must not start up
3 For your safety
User manual 41

Item Safety device Function Check4 Suction panel in cook‐
ing chamber; can onlybe removed using atool
Prevents access to the mov‐ing fan and ensures goodheat distribution
See 'Releasing and securingthe suction panel on page122'
5 Venting position of ap‐pliance door
Prevents scalding of user'sface and hands from escapingsteam
When appliance is cool, checkdoor positions as described in'Opening and closing the ap‐pliance door safely on page66'
6(no picture)
Safety thermostatBoilerCooking chamber
Switches off the appliance iftemperature too high
An error code is output in theevent of a fault(Please contact an authorizedservice company to reset thesafety thermostat)
7(no picture)
Restart or forced rins‐ing after power failurein case cleaning fluidwas left in the appli‐ance
Re-starts fully automatic ovencleaning in a defined state af‐ter power failure
None
8(installed bycustomer)
Disconnection device Used to disconnect the appli‐ance from the power supplyduring cleaning, repair andservicing work and in case ofdanger
There is no need for the userto perform a test.
9(installed bycustomer)
Gas shut-off device Used to disconnect the appli‐ance from the gas supply dur‐ing cleaning, repair and serv‐icing work and in case of dan‐ger
There is no need for the userto perform a test.
10(no picture)
Only when installingon a wheeled stand:Retaining device
Restricts the range of move‐ment of the assembly (plat‐form plus appliance) at thecustomer's site.
Check that the retaining de‐vice is connected
3 For your safety
User manual 42

3.9 Requirements to be met by personnel, working positions
Requirements to be met by operating personnel
The table shows the skills required to perform the specified roles. One person may perform more thanone role depending on need and organization of work, provided this person has the skills required forthe role concerned.
Role Skills required TasksChef Has relevant professional training
Knows relevant national food legisla‐tion and regulations, plus hygienelegislation and regulationsMust keep records in accordance withHACCPTrained in how to operate the combisteamer
Essentially performs organizational taskssuch as
Entering the cooking profile dataEditing existing cooking profiles in the cookbookDeveloping new cooking profilesAdjusting appliance settings
May also perform all user tasks if applica‐ble.
User Semi-skilledTrained in how to operate the combisteamerWorks under supervisionKnows the regulations associatedwith handling heavy loads
Performs specific operating tasks such asLoading the combi steamerStarting the cooking profileRemoving foodCleaning the combi steamerFitting accessories in the combisteamer, for example changing be‐tween racks and a mobile shelf rackMinor servicing tasks
Working positions during operation
The working position for personnel when operating the combi steamer is in front of the appliance door.
Working positions during cleaning and servicing
The working position for staff during cleaning and servicing is the entire appliance area.
3 For your safety
User manual 43

3.10 Personal protective equipment
Operation
Activity Materials used Personal protective equipmentLoading / removing food None Work wear as specified in country-specific stand‐
ards and directives (BGR 111 in Germany) forkitchen work, in particular:
Protective clothingHeat protective gloves (compliant with EN 407in European Union)Safety boots
Handling the core tem‐perature probe
None Work wear as specified in country-specific stand‐ards and directives (BGR 111 in Germany) forkitchen work, in particular:
Protective clothingHeat protective gloves (compliant with EN 407in European Union)
Removing and fittingparts
Tools and equipmentdepend on the task
Work wear as specified in country-specific stand‐ards and directives (BGR 111 in Germany) forkitchen work, in particular:
Protective clothingHeat protective gloves (compliant with EN 407in European Union)Safety boots
Cleaning
Activity Used cleaning fluids Personal protective equipmentFully automatic ovencleaning using clean‐ing fluids suppliedfrom connected can‐isters.Semi-automatic ovencleaningCleaning the cookingchamber by handHandling spray bot‐tlesHandling cleaning-agent canistersMixing the ready-to-use solution fromconcentrate
ConvoClean forteConvoClean newConvoCare K (con‐centrate)
Items of protection equipment, depending oncleaning fluid being used:
Breathing maskSafety gogglesProtective glovesProtective clothing/apron
The EC safety datasheet for the relevant cleaningfluid contains a more precise specification ofthese items. An up-to-date copy can be obtainedfrom the manufacturer.Refer to the label on the cleaning fluid con‐cerned.
Fully automatic ovencleaning using sin‐gle-measure dis‐pensingHandling the bottlesfor single-measuredispensing of clean‐ing fluids
ConvoClean forte SConvoClean new SConvoCare S
Cleaning the doubleglass door
Common householdglass cleaner
Follow the instructions given by the manufacturerof the cleaning fluid you are using
3 For your safety
User manual 44

Activity Used cleaning fluids Personal protective equipmentCleaning componentsand accessories accord‐ing to relevant instruc‐tions
Common householddetergent: mild onskin, alkali-free, pH-neutral and odourless
Follow the instructions given by the manufacturerof the cleaning fluid you are using
Cleaning the outside ofthe appliance case
Common householdstainless steel cleaner
Follow the instructions given by the manufacturerof the cleaning fluid you are using
3 For your safety
User manual 45

4 Cooking procedures
Purpose of this chapter
This chapter shows you the correct way to place food in your combi steamer. It shows you how to op‐erate the combi steamer for cooking and what procedures to follow for cooking and regenerating.The 'Operating principles and instructions for cooking' is a step-by-step guide to the cooking and re‐generating procedures. This chapter does not explicitly discuss using the software or handling the ap‐pliance parts.Please read the operating instructions for the combi steamer to find out about using the software andthe software routines.'Instructions for handling the appliance for cooking' explains the specific handling operations for thecombi steamer and relevant accessories.
Contents
This chapter contains the following topics:
PageBasic principles for loading the combi steamer 47Operating principles and instructions for cooking 52Instructions for handling the appliance for cooking 63
4 Cooking procedures
User manual 46
4.1 Basic principles for loading the combi steamer
Contents
This section contains the following topics:
PagePlacing the cooking containers in appliances of size X.10 48Placing the cooking containers in appliances of size X.20 49Loading capacity for the combi steamer 50
4 Cooking procedures
User manual 47

4.1.1 Placing the cooking containers in appliances of size X.10
GN containers/baking-sheet sizes 1/1, 1/2; shelf grill; in U-rails (standard design)
Rules for handlingThe containers or the shelf grill must be inser‐ted as far as they will go between the twoarms of each U-rail (1).The containers or the shelf grill must be inser‐ted in the U-rails at the same height on the leftand right sides.The containers or shelf grill must not rest onthe top arm of a U-rail.Containers must not be placed on the shelfgrill.
600 x 400 baking sheet in L-rails (bakery model)
Rules for handlingThe baking sheet must be inserted on the armof each L-rail (1) as far as it will go.The baking sheet must be inserted on the L-rails at the same height on the left and rightsides.Containers must not be placed on the bakingsheet.
4 Cooking procedures
User manual 48

4.1.2 Placing the cooking containers in appliances of size X.20
GN containers/baking-sheet sizes 2/1, 1/1; shelf grill; in U-rails (standard design)
Rules for handlingThe containers or the shelf grill must be inser‐ted as far as they will go between the twoarms of each U-rail (1).The containers or the shelf grill must be inser‐ted in the U-rails at the same height on the leftand right sides.The containers or shelf grill must not rest onthe top arm of a U-rail.Containers must not be placed on the shelfgrill.
600 x 400 baking sheet in L-rails (bakery model)
Rules for handlingThe baking sheet must be inserted on the armof each L-rail (1) as far as it will go.The baking sheet must be inserted on the L-rails at the same height on the left and rightsides.Containers must not be placed on the bakingsheet.
4 Cooking procedures
User manual 49

4.1.3 Loading capacity for the combi steamer
Maximum load for cooking
C4 ES / EB 6.10 6.20 10.10 10.20Applies to GN containers and for standard-sized bakingsheetsMaximum load per appliance [kg] 30 60 50 100Maximum load per shelf [kg] 15 15 15 15
Maximum load for regenerating
C4 ES / EB 6.10 6.20 10.10 10.20Applies to GN containers and for standard-sized bakingsheetsMaximum load per appliance [kg] 9 18 15 30Maximum load per food container GN 1/1 (65 mm) [kg] 1.5 1.5 1.5 1.5Applies to plates of diameter Ø 32 cmMaximum number of plates per appliance [Qty] 20 33 32 57Maximum load per plate [g] 360 360 360 360
Maximum number of food containers for cooking and regenerating
C4 ES / EB 6.10 6.20 10.10 10.20GN 1/1 rack, shelf spacing 68 mmNumber of GN containers / baking sheets [Qty] 7 14 11 22Number of GN containers / baking sheets when shelf spac‐ing fully utilized
[Qty] 6 12 10 20
GN 1/1 mobile shelf rack, shelf spacing 67 mmNumber of GN containers / baking sheets [Qty] 6 12 10 20GN 2/1 rack, shelf spacing 68 mmNumber of GN containers / baking sheets [Qty] - 7 - 11Number of GN containers / baking sheets when shelf spac‐ing fully utilized
[Qty] - 6 - 10
GN 2/1 mobile shelf rack, shelf spacing 67 mmNumber of GN containers / baking sheets [Qty] - 6 - 10600x400 baking-sheet rack, shelf spacing 94 mmNumber of baking sheets [Qty] 5 10 8 16600 x 400 baking-sheet mobile shelf rack, shelf spacing 81 mmNumber of baking sheets [Qty] 5 - 8 -Plate rack, ring spacing 66 mmNumber of plates, maximum diameter 32 cm [Qty] 20 33 32 57Plate rack, ring spacing 79 mmNumber of plates, maximum diameter 32 cm [Qty] 15 27 26 48
Maximum number of food holders when smoking food
C4 ES / EB 6.10 6.20 10.10 10.20GN 1/1 rack, shelf spacing 68 mmNumber of GN containers / baking sheets [Qty] 6 12 10 20
4 Cooking procedures
User manual 50
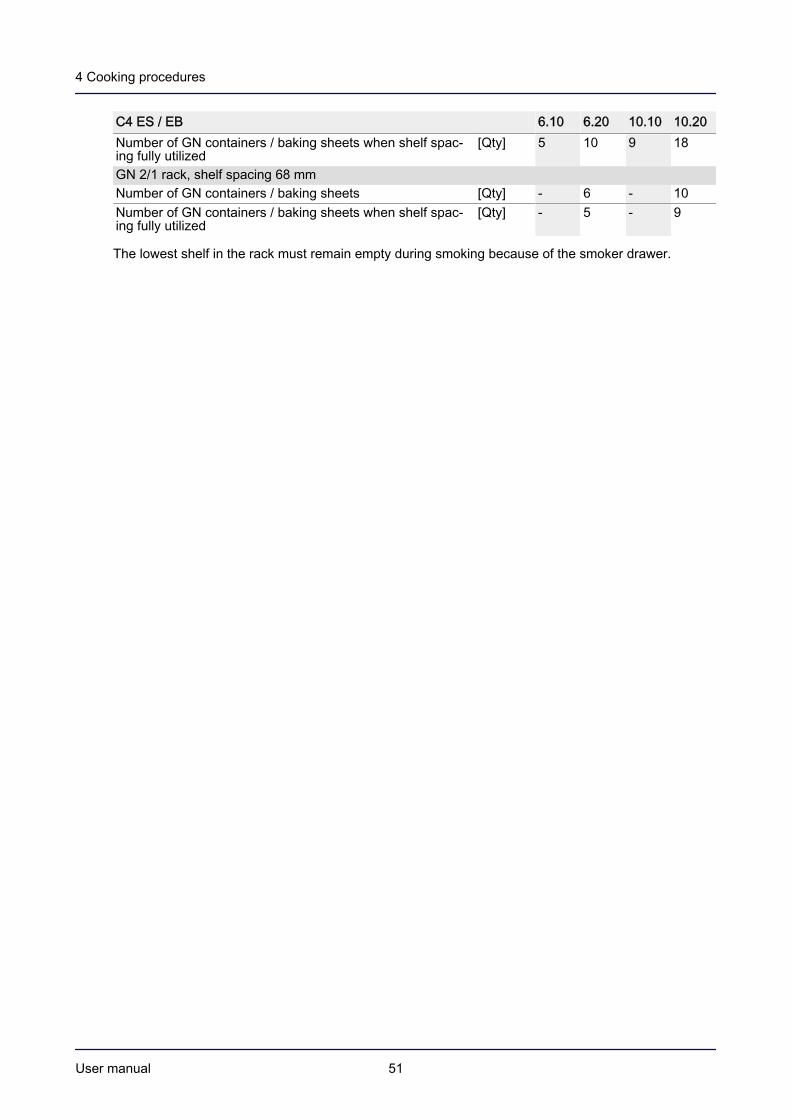
C4 ES / EB 6.10 6.20 10.10 10.20Number of GN containers / baking sheets when shelf spac‐ing fully utilized
[Qty] 5 10 9 18
GN 2/1 rack, shelf spacing 68 mmNumber of GN containers / baking sheets [Qty] - 6 - 10Number of GN containers / baking sheets when shelf spac‐ing fully utilized
[Qty] - 5 - 9
The lowest shelf in the rack must remain empty during smoking because of the smoker drawer.
4 Cooking procedures
User manual 51
4.2 Operating principles and instructions for cooking
Contents
This section contains the following topics:
PageWorking safely with the appliance 53Turning the combi steamer on and off 56How to cook 57How to smoke 59
4 Cooking procedures
User manual 52

4.2.1 Working safely with the appliance
Your safety and the safety of your staff
Before your personnel start working with the combi steamer for the first time, familiarize yourself withthe information contained in the chapter 'For your safety on page 23' and make relevant safety ar‐rangements.Instruct your personnel to learn the safe-working rules given in this section before starting work, and tofollow them strictly.Instruct your personnel to familiarize themselves with the hazard warnings listed in this section and infurther instructions below, and instil in them the importance of taking the specified precautions.
Personal protective equipment for your personnel
Instruct your personnel to wear the correct personal protective equipment specified in the section 'Per‐sonal protective equipment on page 44' of the 'For your safety' chapter for the relevant tasks.
On smelling gas
If you smell gas, take the following actions:Cut off the gas supply immediately.Ventilate the room carefully.Do not operate any electrical equipment. Do not create a spark.Evacuate the building.Notify the gas supply company and if necessary the fire brigade using a phone located outside thehazardous area.
Rules for safe operation of table-top units
To avoid hazards, the following rules must be observed during operation:The air vent and exhaust outlet on the top of the appliance, and the ventilation holes in the appli‐ance base must not be covered, obstructed or blocked.The racks must be attached securely.The food containers must be inserted correctly in accordance with the regulations specified in Plac‐ing the cooking containers in appliances of size X.10 and X.20' in the user manual.The suction panel must be locked properly in place.
Additional rules for safe operation of table-top units on a mobile platform
To avoid hazards, the following rules must be observed when operating appliances positioned on awheeled platform:
The parking brakes on the front wheels must always be engaged when operating the appliances.Check that the wheel brakes are on before operation each day.
Hot surfaces
Risk of burns from high temperatures inside the cooking chamber and on the inside of the appliancedoorYou may get burnt if you touch any of the interior parts of the cooking chamber, the inside of theappliance door or any parts that are or were inside the oven during cooking.
Wear personal protective equipment.
4 Cooking procedures
User manual 53

Hot steam / vapour
Risk of scalding from hot steam and vapourEscaping hot steam and vapour can cause scalding to face, hands, feet and legs.
When opening the appliance door, always use the ventilation position as specified in theinstructions for safe opening, and never put your head inside the oven.When you are cooling the cooking chamber using the ‘Cool down’ function, step back from theappliance to avoid the hot steam and vapour escaping through the open appliance door.
Break in the cold chain
Risk of microbiological contamination of foods by breaking the cold chainIf the oven is loaded ahead of time or if cooking is interrupted, the cold chain of chilled foodstuffs maybe broken.
When planning the loading times, e.g. when pre-setting the start time of the cooking program,always ensure there is no break in the cold chain.Never use the appliance for temporary storage of food.Never intentionally interrupt the cooking process.Once the appliance is running again after a power failure, consider how the length of time taken toresume operation will affect the food condition.Only qualified staff are allowed to perform low-temperature cooking ( < 65°C).
Growth of micro-organisms at 30-65°C
Risk of food going bad as a result of micro-organism growth in a warm environment (temperaturerange 30 – 65 °C)When the appliance is being used for holding food or low-temperature cooking, placing cold food inthe cooking chamber may reduce the temperature in the cooking chamber so far that micro-organismscan grow to a critical level.
Never place cold food in the appliance while it is in use for low-temperature cooking or for holdingfood at temperature.Reduce the number of micro-organisms on the food before low-temperature cooking, for instanceby searing.Only qualified staff are allowed to perform low-temperature cooking (<65°C).
Escaping gas
Risk of explosion from escaping gasEscaping gas can ignite and cause an explosion.
Never move the appliance during useFor appliances on a wheeled platform with flexible supply pipe, in order to secure the appliance inplace, make sure that the retaining device which restricts the range of movement of the platformplus appliance is connected.
4 Cooking procedures
User manual 54
Lack of oxygen
Risk of suffocation from lack of air suitable for breathingInadequate ventilation at the installation location can lead to suffocation while the appliance is running.
Do not obstruct lower area of appliance.Only operate the appliance in a draught-free environmentEnsure that the fitted ventilation and air supply equipment is working properly, and that theventilation requirements stipulated by the installation engineer are met.Have the appliance serviced annually.
4 Cooking procedures
User manual 55

4.2.2 Turning the combi steamer on and off
For your safety when using the combi steamer
Before starting work, it is essential that you familiarize yourself with the rules and hazard warningsspecified in 'Working safely with the appliance on page 53', and follow the instructions given there.
Switching on the combi steamer
1. Switch on the combi steamer.
2. Check that the oven light comes on while the appliance isrunning the self-diagnostics test.
3. Wait until the software is ready for use.
Switching off the combi steamer at the end of the working day
1. Perform the necessary cleaning tasks as specified in thecleaning and servicing schedule.
2. Switch off the combi steamer.
3. Leave the appliance door ajar in order to let moisture es‐cape.
Switching off the combi steamer before prolonged breaks in use
Switch off the water and power on site before prolonged breaks in use.
4 Cooking procedures
User manual 56

4.2.3 How to cook
For your safety when using the combi steamer
Before starting work, it is essential that you familiarize yourself with the rules and hazard warningsspecified in 'Working safely with the appliance on page 53', and follow the instructions given there.
Prior knowledge required
You need to know these operations:Opening and closing the appliance door safely 66Loading and removing food 67Placing food in the mobile shelf rack 69Taking food in and out using the transport trolley 75Putting away and retrieving the core temperature probe 80Using a USB stick 81
Rules
Using plates in the combi steamer is only permitted for regenerating.
Requirements
You are sufficiently familiar with using the software to be able to select saved cooking profiles orenter new cooking profiles that are suitable for the food you wish to cook, and to run these profiles.(See operating instructions)The combi steamer and accessories and fittings used have been cleaned properly.There are no foreign objects in the cooking chamber.The oven drain is not blocked or clogged with any residues. The filter is fitted in place on the ovendrain.The interior glass door of the appliance door is secured properly in place.The suction panel is properly locked in place.The USB cover is covering the USB port.If the appliance sits on an open stand, there is no hot food in the stand giving off steam.When using racks:The racks are fitted and secured.You have the food prepared ready to place in the combi steamer.When using the mobile shelf rack:The racks are removed.The roll-in frame for the mobile shelf rack is installed in the cooking chamber.The core temperature probe is put away in the holder.You have the food prepared in the mobile shelf rack or in the plate rack on the transport trolleyready to place in the combi steamer.
How to cook
1. Select a cooking profile from the cookbook or enter a newcooking profile.
2. Follow the prompts displayed by the software.
4 Cooking procedures
User manual 57
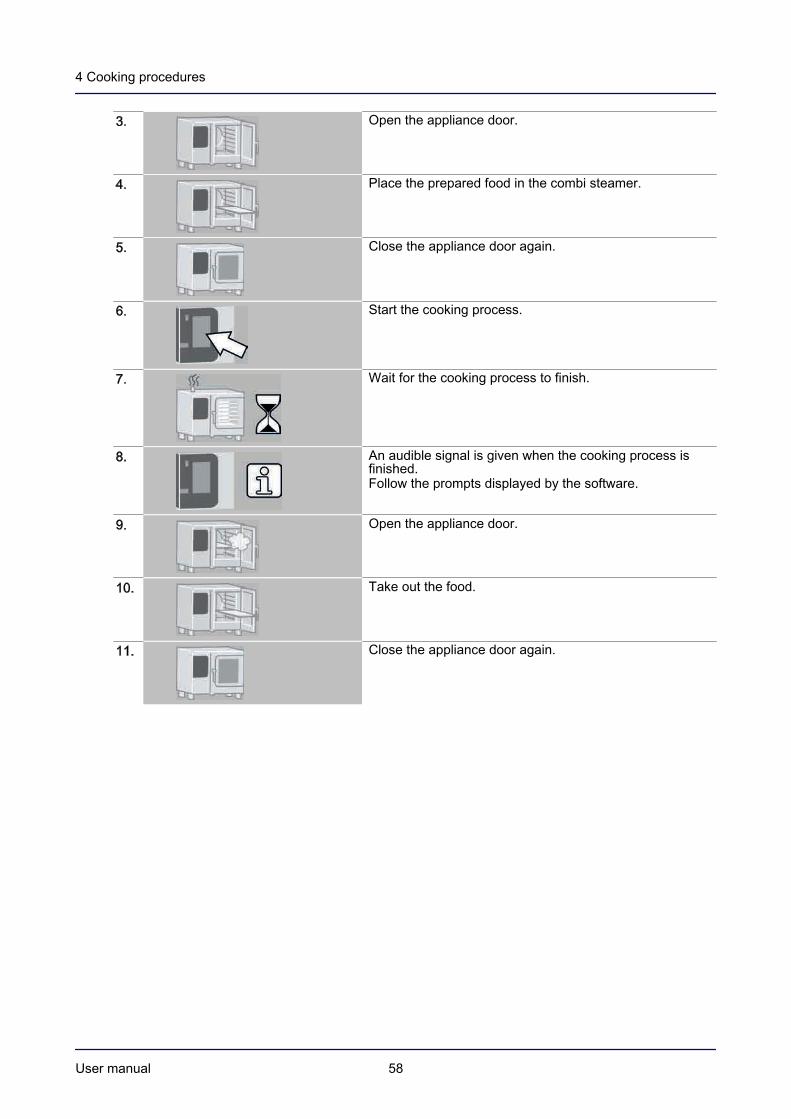
3. Open the appliance door.
4. Place the prepared food in the combi steamer.
5. Close the appliance door again.
6. Start the cooking process.
7. Wait for the cooking process to finish.
8. An audible signal is given when the cooking process isfinished.Follow the prompts displayed by the software.
9. Open the appliance door.
10. Take out the food.
11. Close the appliance door again.
4 Cooking procedures
User manual 58

4.2.4 How to smoke
For your safety when using the combi steamer
Before starting work, it is essential that you familiarize yourself with the rules and hazard warningsspecified in 'Working safely with the appliance on page 53', and follow the instructions given there.
Opening the appliance door
Risk of burns from ignition of smoker material and smoke gas; risk of breathing difficulties frominhaling smokeAir flowing into the cooking chamber can result in explosive ignition of the smoker material and/or thesmoke gas; inhaling smoke can result in breathing difficulties.
Never open the appliance door during the smoking process.
Prior knowledge required
You need to know these operationsOpening and closing the appliance door safely 66Filling, inserting and removing the smoker drawer 85Loading and removing food 67Using a USB stick 81
Requirements
You are sufficiently familiar with using the software to be able to select saved cooking profiles orenter new cooking profiles for smoking that are suitable for the food you wish to cook, and to runthese profiles. (See operating instructions)The combi steamer and accessories and fittings used have been cleaned properly.The oven drain is not blocked or clogged with any residues.The interior glass door of the appliance door is secured properly in place.The smoker drawer has been filled and prepared properly.The suction panel is properly locked in place.The racks are fitted and secured.The USB cover is covering the USB port.If the appliance sits on an open stand, there is no hot food in the stand giving off steam.You have the food prepared ready to place in the combi steamer.
How to smoke if your cooking profile contains only smoking
1. Select a cooking profile from the cookbook or enter a newcooking profile.
2. Follow the prompts displayed by the software.
3. Open the appliance door.
4 Cooking procedures
User manual 59

4. Insert the prepared smoker drawer.
5. Place the prepared food in the combi steamer.The lowest shelf must remain empty because of thesmoker drawer.
6. Close the appliance door again.
7. Start the smoker process.
8. Wait for the smoker process to finish.
9. An audible signal is given when the smoking process isfinished.Follow the prompts displayed by the software.
10. Open the appliance door.
11. Remove the smoked food.
12. Remove the smoker drawer.
13. Close the appliance door again.
How to smoke if your cooking profile contains cooking and smoking
1. Select a cooking profile from the cookbook or enter a newcooking profile.
2. Follow the prompts displayed by the software.
3. Open the appliance door.
4 Cooking procedures
User manual 60

4. Place the prepared food in the combi steamer.The lowest shelf must remain empty because the smokerdrawer will be inserted later.
5. Close the appliance door again.
6. Start the cooking process.
7. Wait for the cooking process to finish.
8. A signal beeps once the cooking steps prior to smokinghave finished.Follow the prompts displayed by the software:
The cooking chamber is cooled using 'Cool down'.You are prompted to insert the smoker drawer.
9. Open the appliance door.
10. Insert the prepared smoker drawer.
11. Close the appliance door again.
12. Start the smoker process.
13. Wait for the smoker process to finish.
14. An audible signal is given when the smoking process isfinished.Follow the prompts displayed by the software.
15. Open the appliance door.
16. Remove the smoked food.
4 Cooking procedures
User manual 61

17. Remove the smoker drawer.
18. Close the appliance door again.
4 Cooking procedures
User manual 62

4.3 Instructions for handling the appliance for cooking
Contents
This section contains the following topics:
PageWorking safely with the appliance 64Opening and closing the appliance door safely 66Loading and removing food 67Placing food in the mobile shelf rack 69Removing food from the mobile shelf rack 71Fitting the roll-in frame for the mobile shelf rack 73Taking food in and out using the transport trolley 75Putting away and retrieving the core temperature probe 80Using a USB stick 81Inserting and removing racks 82Filling, inserting and removing the smoker drawer 85
4 Cooking procedures
User manual 63

4.3.1 Working safely with the appliance
Your safety and the safety of your staff
Before your personnel start working with the combi steamer for the first time, familiarize yourself withthe information contained in the chapter 'For your safety on page 23' and make relevant safety ar‐rangements.Instruct your personnel to learn the safe-working rules given in this section before starting work, and tofollow them strictly.Instruct your personnel to familiarize themselves with the hazard warnings listed in this section and infurther instructions below, and instil in them the importance of taking the specified precautions.
Personal protective equipment for your personnel
Instruct your personnel to wear the correct personal protective equipment specified in the section 'Per‐sonal protective equipment on page 44' of the 'For your safety' chapter for the relevant tasks.
On smelling gas
If you smell gas, take the following actions:Cut off the gas supply immediately.Ventilate the room carefully.Do not operate any electrical equipment. Do not create a spark.Evacuate the building.Notify the gas supply company and if necessary the fire brigade using a phone located outside thehazardous area.
Handling heavy loads
Inform your personnel that lifting heavy containers and moving heavy transport trolleys may result intiredness and discomfiture, and faults may occur with the moving equipment.
Hot surfaces
Risk of burns from high temperatures inside the cooking chamber and on the inside of the appliancedoorYou may get burnt if you touch any of the interior parts of the cooking chamber, the inside of theappliance door or any parts that are or were inside the oven during cooking.
Wear personal protective equipment.
Hot steam / vapour
Risk of scalding from hot steam and vapourEscaping hot steam and vapour can cause scalding to face, hands, feet and legs.
When opening the appliance door, always use the ventilation position as specified in theinstructions for safe opening, and never put your head inside the oven.When you are cooling the cooking chamber using the ‘Cool down’ function, step back from theappliance to avoid the hot steam and vapour escaping through the open appliance door.
4 Cooking procedures
User manual 64

Damp kitchen floor
Risk of slipping from escaping condensateCondensate that drips onto the floor when the appliance door is opened can cause the user to slip infront of the appliance.
Always keep the floor dry around the appliance
Escaping gas
Risk of explosion from escaping gasEscaping gas can ignite and cause an explosion.
Never move the appliance during useFor appliances on a wheeled platform with flexible supply pipe, in order to secure the appliance inplace, make sure that the retaining device which restricts the range of movement of the platformplus appliance is connected.
Lack of oxygen
Risk of suffocation from lack of air suitable for breathingInadequate ventilation at the installation location can lead to suffocation while the appliance is running.
Do not obstruct lower area of appliance.Only operate the appliance in a draught-free environmentEnsure that the fitted ventilation and air supply equipment is working properly, and that theventilation requirements stipulated by the installation engineer are met.Have the appliance serviced annually.
4 Cooking procedures
User manual 65

4.3.2 Opening and closing the appliance door safely
For your safety when using the appliance
Before starting work, it is essential that you familiarize yourself with the rules and hazard warningsspecified in 'Working safely with the appliance on page 64', and follow the instructions given there.
Requirements
Make sure that the appliance is secured against slipping if placed on a worksurface.
Opening the appliance door safely
1. Turn the door handle to the right.Result:The appliance door goes into the venting position and thedoor handle automatically returns to the latch position.
2. Wait a moment to make sure that all the steam can es‐cape.
3. Turn the door handle to the left and open the appliancedoor slowly.
4. For appliances with a right-hinged door stop:Open the appliance door fully.For appliances with a disappearing door:Slide the appliance door back along the side of the combisteamer.
Closing the appliance door safely
For table-top units with a right-hand door stop:Close the appliance door with a gentle slam.For table-top units with a disappearing door:Pull the appliance door forwards along the side of the combi steamer and then close it with a gentleslam.
4 Cooking procedures
User manual 66

4.3.3 Loading and removing food
For your safety when using the appliance
Before starting work, it is essential that you familiarize yourself with the rules and hazard warningsspecified in 'Working safely with the appliance on page 64', and follow the instructions given there.
Hot liquids
Risk of scalding from hot liquidsSpilling liquid foods can result in scalds to face and hands.
During loading, make sure that the racks are fixed in place properly.Do not exceed the maximum loading weight during loading.Only use containers of appropriate size: GN dimensions for racks with U-rails (standard model) orbaking sheet dimensions for racks with L-rails (bakery model).Insert the food containers correctly in accordance with the rules on Page 48 for an appliance ofsize X.10 or on Page 49 for an appliance of size X.20Always place containers holding liquids or holding food that will liquefy during cooking on shelvesthat allow a proper view into the container for all users. Always take out horizontally any containersholding liquids or holding food that will liquefy during cooking.Wear personal protective equipment.
Prior knowledge required
You need to know these operations:Opening and closing the appliance door safely 66
Placing food in the combi steamer (racks)
1. Open the appliance door.
2. Place the food onto the required shelf levels.Start from the bottom.Always slide in containers, trays or grids as far as theywill go.
Check that you have inserted the containers, bakingsheets and shelf grills correctly, as specified in 'Placingthe cooking containers in appliances of size X.10' onpage 48 or 'Placing the cooking containers in appliancesof size X.20' on page 49.
4 Cooking procedures
User manual 67

Removing food (racks)
1. Open the appliance door.
2. Hold the food horizontally when removing it.WARNING Risk of scalding from hot liquids
When removing baking sheets from bakery racks, donot pull them forwards too far or they might tip out ofthe rack.
4 Cooking procedures
User manual 68
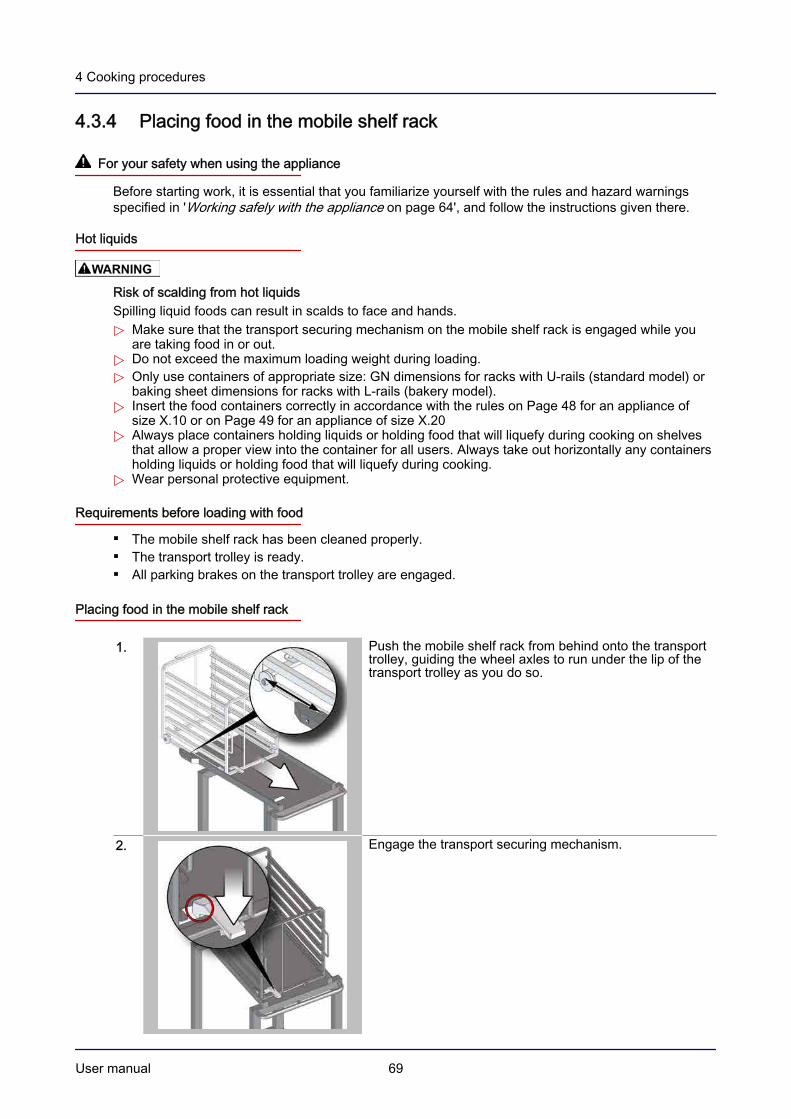
4.3.4 Placing food in the mobile shelf rack
For your safety when using the appliance
Before starting work, it is essential that you familiarize yourself with the rules and hazard warningsspecified in 'Working safely with the appliance on page 64', and follow the instructions given there.
Hot liquids
Risk of scalding from hot liquidsSpilling liquid foods can result in scalds to face and hands.
Make sure that the transport securing mechanism on the mobile shelf rack is engaged while youare taking food in or out.Do not exceed the maximum loading weight during loading.Only use containers of appropriate size: GN dimensions for racks with U-rails (standard model) orbaking sheet dimensions for racks with L-rails (bakery model).Insert the food containers correctly in accordance with the rules on Page 48 for an appliance ofsize X.10 or on Page 49 for an appliance of size X.20Always place containers holding liquids or holding food that will liquefy during cooking on shelvesthat allow a proper view into the container for all users. Always take out horizontally any containersholding liquids or holding food that will liquefy during cooking.Wear personal protective equipment.
Requirements before loading with food
The mobile shelf rack has been cleaned properly.The transport trolley is ready.All parking brakes on the transport trolley are engaged.
Placing food in the mobile shelf rack
1. Push the mobile shelf rack from behind onto the transporttrolley, guiding the wheel axles to run under the lip of thetransport trolley as you do so.
2. Engage the transport securing mechanism.
4 Cooking procedures
User manual 69

3. Lift up and rotate to the right the shelf-securing bar on therear of the mobile shelf rack.
4. Load shelf rack with food.Start from the bottom.Always slide in containers, baking sheets or shelf grillsas far as they will go against the other shelf-securingbar.
Check that you have inserted the containers, bakingsheets and shelf grills correctly, as specified in 'Placingthe cooking containers in appliances of size X.10' onpage 48 or 'Placing the cooking containers in appliancesof size X.20' on page 49.
WARNING Risk of scalding from hot liquidsDo not make the transport trolley top heavy by placingtoo much food at the top, because the transport trolleymight then topple over when moved.
5. Lock the opened shelf-securing bar back in place.
Placing food in the baker’s mobile shelf rack
1. Position the baker’s mobile shelf rack on the transporttrolley in the same way as for the standard mobile shelfrack, and engage the transport securing mechanism (see'Placing food in the mobile shelf rack' on page 69)
2. Place food in the baker’s mobile shelf rack.Start from the bottom.Always insert baking sheets as far as they will go.Check that you have inserted the containers, bakingsheets and shelf grills correctly, as specified in 'Plac‐ing the cooking containers in appliances of size X.10'on page 48 or 'Placing the cooking containers in appli‐ances of size X.20' on page 49.
WARNING Risk of scalding from hot liquidsDo not make the transport trolley top heavy by placingtoo much food at the top, because the transport trolleymight then topple over when moved.
4 Cooking procedures
User manual 70

4.3.5 Removing food from the mobile shelf rack
For your safety when using the appliance
Before starting work, it is essential that you familiarize yourself with the rules and hazard warningsspecified in 'Working safely with the appliance on page 64', and follow the instructions given there.
Hot liquids
Risk of scalding from hot liquidsSpilling liquid foods can result in scalds to face and hands.
Make sure that the transport securing mechanism on the mobile shelf rack is engaged while youare taking food in or out.Do not exceed the maximum loading weight during loading.Only use containers of appropriate size: GN dimensions for racks with U-rails (standard model) orbaking sheet dimensions for racks with L-rails (bakery model).Insert the food containers correctly in accordance with the rules on Page 48 for an appliance ofsize X.10 or on Page 49 for an appliance of size X.20Always place containers holding liquids or holding food that will liquefy during cooking on shelvesthat allow a proper view into the container for all users. Always take out horizontally any containersholding liquids or holding food that will liquefy during cooking.Wear personal protective equipment.
Requirements before removing food
The mobile shelf rack is set down securely in a suitable position.If the mobile shelf rack is still on the transport trolley, ensure that:
The transport securing mechanism on the mobile shelf rack is engaged in the transport trolley.All parking brakes on the transport trolley are engaged.
4 Cooking procedures
User manual 71

Removing food from the mobile shelf rack
1. Lift up and rotate to the right the shelf-securing bar on therear of the mobile shelf rack.
2. Hold the food horizontally when removing it.
Removing food from the baker’s mobile shelf rack
1. Hold the food horizontally when removing it.
4 Cooking procedures
User manual 72

4.3.6 Fitting the roll-in frame for the mobile shelf rack
For your safety when using the appliance
Before starting work, it is essential that you familiarize yourself with the rules and hazard warningsspecified in 'Working safely with the appliance on page 64', and follow the instructions given there.
Hot surfaces
Risk of burns from high temperatures on interior and exterior parts of the applianceYou may get burnt if you touch any of the interior parts of the cooking chamber, the inside of theappliance door or any parts that are or were inside the oven during cooking.
Before starting the conversion work, wait until the cooking chamber has cooled to below 60°C oruse the 'Cool down' function to cool the cooking chamber.Wear personal protective equipment.
Prior knowledge required
You need to know these operations:Opening and closing the appliance door safely 66Inserting and removing racks 82
Accessories required
Roll-in frame
Requirements
The racks are removed.The appliance door is open.
4 Cooking procedures
User manual 73

Fitting the roll-in frame for the mobile shelf rack
1. Fix the roll-in frame in the cooking chamber by locatingthe holes in the base struts of the frame over the pins onthe appliance floor.
2. Slide the core temperature probe into the spiral holder onthe right-hand side of the roll-in frame.
4 Cooking procedures
User manual 74

4.3.7 Taking food in and out using the transport trolley
For your safety when using the appliance
Before starting work, it is essential that you familiarize yourself with the rules and hazard warningsspecified in 'Working safely with the appliance on page 64', and follow the instructions given there.
Prior knowledge required
You need to know these operations:Placing food in the mobile shelf rack 69Fitting the roll-in frame for the mobile shelf rack 73
Accessories required
Transport trolleyMobile shelf rack or plate rack
Requirements
The roll-in frame for the mobile shelf rack is installed in the cooking chamber.The combi steamer was installed at the same height as the loading height of the transport trolley.The roll-in frame inserted in the cooking chamber and the surface on which the mobile shelf racksits on the transport trolley must be at the same height when the transport trolley is attached to thecombi steamer.The appliance door is open.The food is provided properly in the mobile shelf rack on the transport trolley:
The transport securing mechanism on the mobile shelf rack is engaged.The shelf-securing bar on the mobile shelf rack is locked in place.
4 Cooking procedures
User manual 75

Loading food using the transport trolley
1. Release the parking brake on the transport trolley andwheel the transport trolley in front of the combi steamer.
2. Fix the transport trolley onto the combi steamer.Push back the knob under the transport trolley handleto raise up the securing plate on the back of the trans‐port trolley.Then release the button again to let the plate dropdown so that it engages on the mouth of the cookingchamber.
3. Reapply the brake on all the transport trolley casters.
4. Release the transport securing mechanism of the shelfrack.
4 Cooking procedures
User manual 76

5. Slide the mobile shelf rack from the transport trolley intothe cooking chamber.
6. Release the parking brake on the transport trolley.
7. Detach the transport trolley from the mouth of the cook‐ing chamber and move the transport trolley away.
8. Close the appliance door.
4 Cooking procedures
User manual 77

Taking food out using the transport trolley
1. Open the appliance door and wheel the transport trolleyin front of the combi steamer.
2. Fix the transport trolley onto the combi steamer.Push back the knob under the transport trolley handleto raise up the securing plate on the back of the trans‐port trolley.Then release the button again to let the plate dropdown so that it engages on the mouth of the cookingchamber.
3. Apply the brake on all the transport trolley casters.
4. Pull the mobile shelf rack out of the cooking chamber on‐to the transport trolley.
WARNING Risk of burns from high temperatures insidethe cooking chamber, on the inside of the appliance doorand on the mobile shelf rack.
Wear personal protective equipment.Use the handles to pull the mobile shelf rack out of thecooking chamber.
4 Cooking procedures
User manual 78

5. Engage the transport securing mechanism.
6. Release the parking brake on the transport trolley.
7. Detach the transport trolley from the mouth of the cookingchamber and move the transport trolley away.
WARNING Risk of scalding from hot liquidsDuring movement, cover containers holding hot liq‐uids.Make sure that the transport trolley containing the mo‐bile shelf rack does not tip up. This may occur if thetransport trolley is moved on a steep slope or bumpsinto an obstacle.
8. Apply the brake on all the transport trolley casters.
9. Close the appliance door.
4 Cooking procedures
User manual 79

4.3.8 Putting away and retrieving the core temperature probe
For your safety when using the appliance
Before starting work, it is essential that you familiarize yourself with the rules and hazard warningsspecified in 'Working safely with the appliance on page 64', and follow the instructions given there.
Prior knowledge required
You need to know these operations:Opening and closing the appliance door safely 66
Purpose
The core temperature probe must be stowed away when it is not needed for the cooking process. Oth‐erwise the probe risks getting damaged.
Stowing away the core temperature probe on table-top models
1. Slide the core temperature probe into the spiral holder onthe right-hand rack.
NOTICE Keep the cable tidy.Do not let the cable get trapped between the appliancedoor and the hygienic plug-in gasket when closing the ap‐pliance door.
Retrieving the core temperature probe on table-top models
Pull the core temperature probe out of the holder on the right-hand rack.
4 Cooking procedures
User manual 80
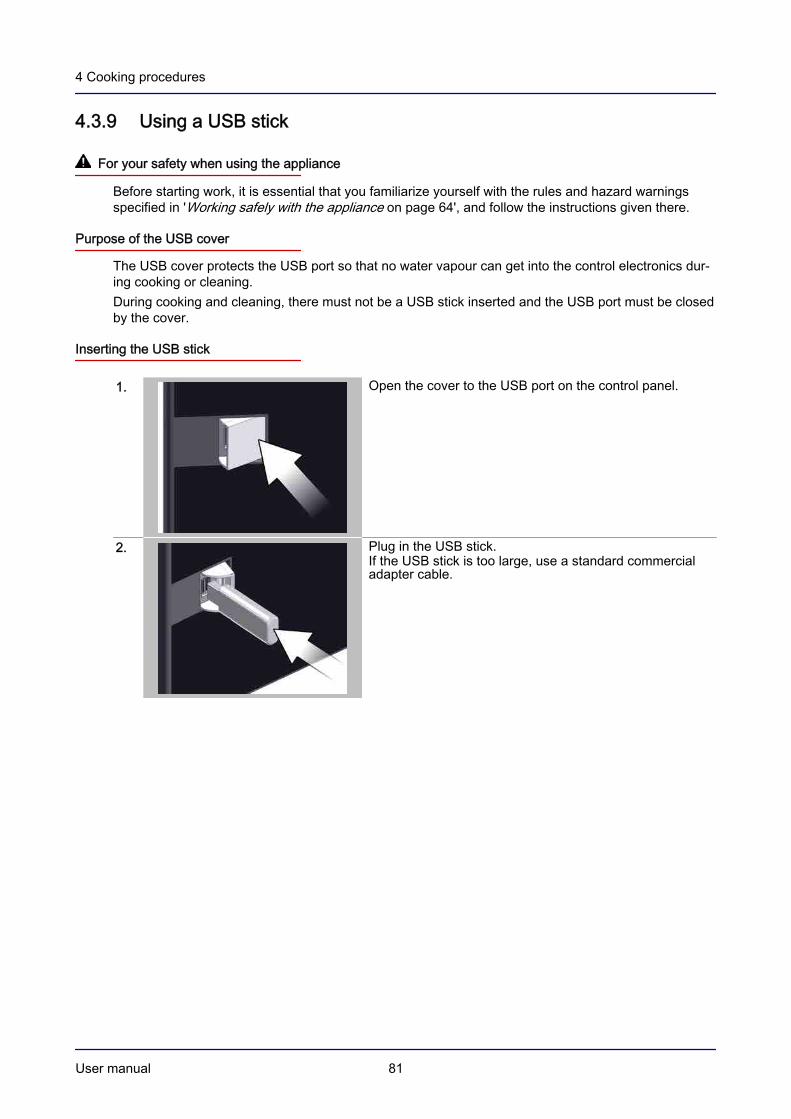
4.3.9 Using a USB stick
For your safety when using the appliance
Before starting work, it is essential that you familiarize yourself with the rules and hazard warningsspecified in 'Working safely with the appliance on page 64', and follow the instructions given there.
Purpose of the USB cover
The USB cover protects the USB port so that no water vapour can get into the control electronics dur‐ing cooking or cleaning.During cooking and cleaning, there must not be a USB stick inserted and the USB port must be closedby the cover.
Inserting the USB stick
1. Open the cover to the USB port on the control panel.
2. Plug in the USB stick.If the USB stick is too large, use a standard commercialadapter cable.
4 Cooking procedures
User manual 81

4.3.10 Inserting and removing racks
For your safety when using the appliance
Before starting work, it is essential that you familiarize yourself with the rules and hazard warningsspecified in 'Working safely with the appliance on page 64', and follow the instructions given there.
Hot surfaces
Risk of burns from high temperatures on interior and exterior parts of the applianceYou may get burnt if you touch any of the interior parts of the cooking chamber, the inside of theappliance door or any parts that are or were inside the oven during cooking.
Before starting the conversion work, wait until the cooking chamber has cooled to below 60°C oruse the 'Cool down' function to cool the cooking chamber.Wear personal protective equipment.
Prior knowledge required
You need to know these operations:Opening and closing the appliance door safely 66Putting away and retrieving the core temperature probe 80
Requirements
All food containers and other accessories used for cooking have been removed from the cookingchamber.
4 Cooking procedures
User manual 82

Removing the rack
1. Lift up (1) the rack and pivot it (2) into the cooking cham‐ber.
2. Release the top rear clip on the rack.
3. Push (1) the rack upwards and detach (2) it.
4 Cooking procedures
User manual 83
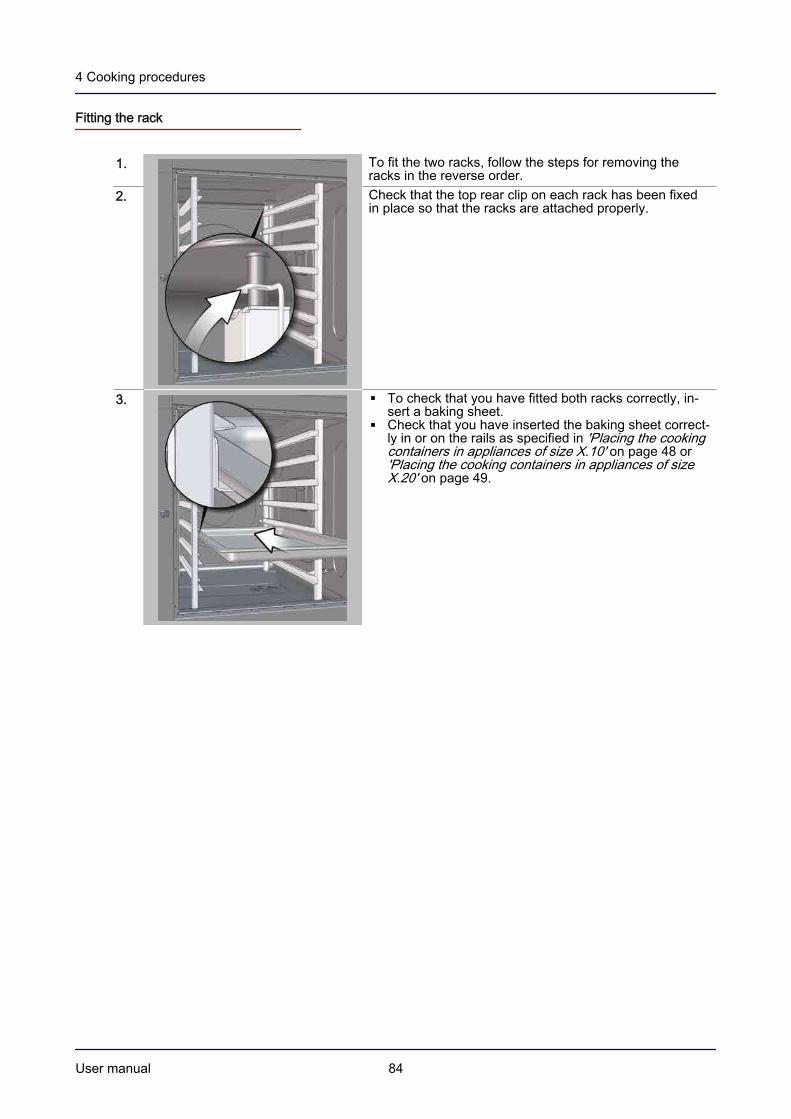
Fitting the rack
1. To fit the two racks, follow the steps for removing theracks in the reverse order.
2. Check that the top rear clip on each rack has been fixedin place so that the racks are attached properly.
3. To check that you have fitted both racks correctly, in‐sert a baking sheet.Check that you have inserted the baking sheet correct‐ly in or on the rails as specified in 'Placing the cookingcontainers in appliances of size X.10' on page 48 or'Placing the cooking containers in appliances of sizeX.20' on page 49.
4 Cooking procedures
User manual 84

4.3.11 Filling, inserting and removing the smoker drawer
For your safety when using the appliance
Before starting work, it is essential that you familiarize yourself with the rules and hazard warningsspecified in 'Working safely with the appliance on page 64', and follow the instructions given there.
Inflowing air
Risk of burns or fire from flying sparksAir flowing onto the hot smoker material can result in flying sparks.
Do not remove the lid from the smoker drawer until the smoker drawer has cooled down completelyin a fireproof location sheltered from the wind. Always keep the lid on the smoker drawer duringsmoking.Always leave the smoker-material ashes to cool before disposal.
Prior knowledge required
You need to know these operationsOpening and closing the appliance door safely 66
Smoker material
Always use as smoker material only briquettes made of hardwood chips intended for this purpose.The manufacturer recommends using the brand "BRADLEY FLAVOUR BISQUETTES" as smokerpucks, which you can obtain online (http://www.bradleysmoker.co.uk) or from relevant dealers.Smoker materials such as loose saw dust, loose wood shavings, loose wood chips or wooden slatsmust not be used.
Requirements
The cooking chamber has cooled down to ambient temperature after its last use.orWhile a cooking profile is running, the software prompts you to insert the smoker drawer.In this case, the software automatically runs 'Cool down' to cool the cooking chamber beforeprompting to insert the smoker drawer.The smoker heater is fitted in the cooking chamber.The racks are fitted and secured.The case, including smoker grille and lid to the smoker drawer, have been cleaned and dried prop‐erly.
4 Cooking procedures
User manual 85

Filling the smoker drawer
1. To fill the smoker drawer, place up to eight smoker puckson the smoker grille in the smoker drawer.
2. Slide the lid from the rear onto the smoker drawer as faras it will go.Make sure you guide the lip on the case in the foldededge of the lid.
3. Fit the handle on the front of the smoker drawer.
Inserting the smoker drawer
1. Hold the filled smoker drawer by the handle and slide thesmoker drawer onto the smoker heater in the cookingchamber as far as it will go.Make sure that the heating coil is guided into the slot forthe smoker heater on the smoker drawer.
2. Detach the handle from the smoker drawer.
WARNING Risk of burns from high temperatures insidethe cooking chamber, on the inside of the appliance doorand on the smoker drawer
Wear personal protective equipment.After inserting the smoker drawer, take the smoker-drawer handle out of the cooking chamber so that thesmoker drawer can be taken out again using a coolhandle.
4 Cooking procedures
User manual 86
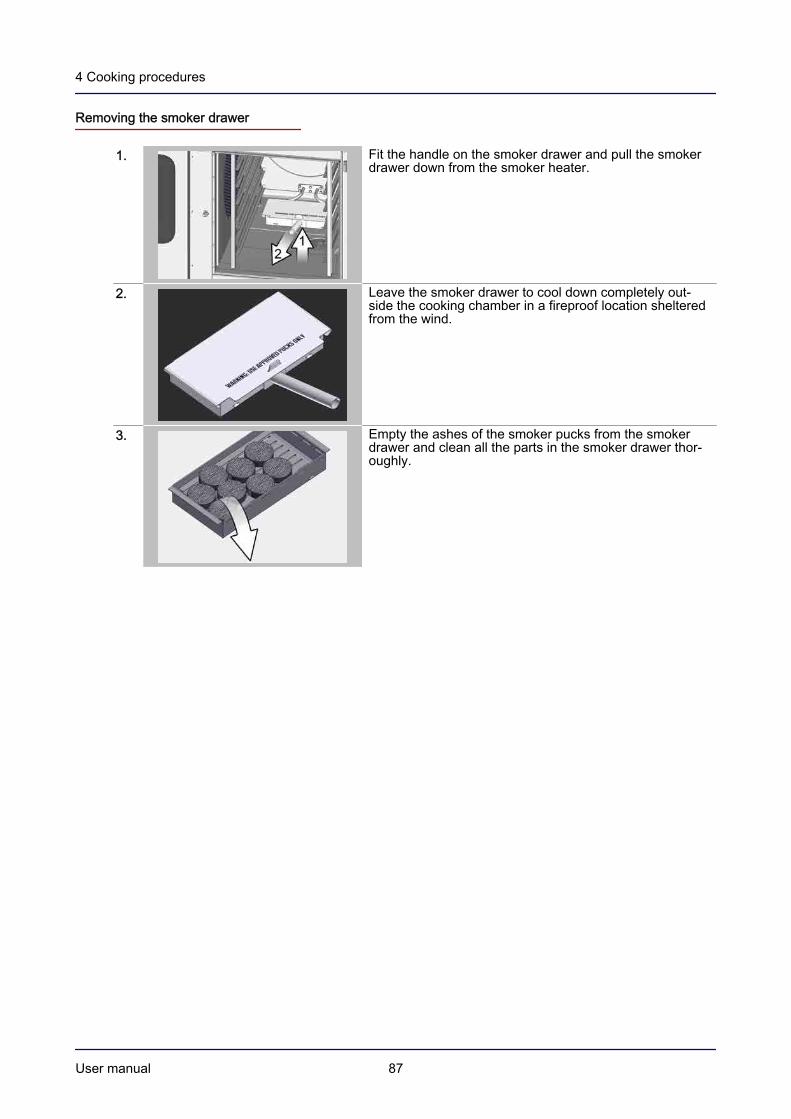
Removing the smoker drawer
1. Fit the handle on the smoker drawer and pull the smokerdrawer down from the smoker heater.
2. Leave the smoker drawer to cool down completely out‐side the cooking chamber in a fireproof location shelteredfrom the wind.
3. Empty the ashes of the smoker pucks from the smokerdrawer and clean all the parts in the smoker drawer thor‐oughly.
4 Cooking procedures
User manual 87

5 Cleaning procedures
Purpose of this chapter
This chapter summarizes the cleaning methods, the cleaning agents and how to handle them, and thecleaning instructions. It explains how to handle the combi steamer for cleaning and the correct proce‐dure to follow during cleaning.The 'Operating principles and instructions for cleaning' is a step-by-step guide to the various cleaningprocedures. This chapter does not explicitly discuss using the software or handling the applianceparts.Please read the operating instructions for the combi steamer to find out about using the software andthe software routines.'Instructions for handling the appliance for cleaning' explains the specific handling operations for thecombi steamer and relevant accessories.
Contents
This chapter contains the following topics:
PageBasic principles for cleaning the combi steamer 89Operating principles and instructions for cleaning 97Instructions for handling the appliance for cleaning 114
5 Cleaning procedures
User manual 88

5.1 Basic principles for cleaning the combi steamer
Contents
This section contains the following topics:
PageCleaning methods 90Cleaning instructions 92Cleaning agents 94Preparing the cleaning agents 96
5 Cleaning procedures
User manual 89

5.1.1 Cleaning methods
Cleaning methods
Cleaning methods Description Criteria for useOven cleaning withoutusing cleaning fluids
A fully automatic process inwhich the temperature and pro‐gram length are software-control‐led.The cooking chamber is rinsedsolely with water without usingcleaning fluids
To remove very light soiling orodours between separate cook‐ing operations.To remove dust, for instance,from the intensively cleaned com‐bi steamer after a prolonged peri‐od out of use
Fully automatic ovencleaning using connec‐ted canisters(ConvoClean for easyDialorConvoClean+ for easy‐Touch)
A fully automatic process inwhich the temperature, programlength, use of cleaning fluids andrinsing are software-controlled.The software controls how muchcleaning fluid is dispensed, withthe cleaning fluids supplied auto‐matically to the cooking chamberfrom connected canisters.For easyDial (ConvoClean):
The user must choose one offour preconfigured cleaningprofiles (CL1 to CL4 and CL1d to CL4d)
For easyTouch (ConvoClean+):The user must choose acleaning level (1 to 4)Then the user must select aprogram length (eco, regular, express)The user can also opt to addsteam disinfection and/orcooking-chamber drying
Daily cleaning after all cookingoperations are finished for thedayBefore putting the combi steamerinto operation for the first time, toclean the cooking chamber of alldirt accumulated during transpor‐tation, setting-up and installation.After servicing work on the combisteamer to remove all dirt fromthe cooking chamber
Fully automatic ovencleaning using single-measure dispensing(ConvoClean for easyDialorConvoClean+ for easy‐Touch)
A fully automatic process inwhich the temperature, programlength, use of cleaning fluids andrinsing are software-controlled.The software prompts the user tosupply cleaning fluids to thecooking chamber from single-measure dispensing bottles.For easyDial (ConvoClean):
The user must choose one offour preconfigured cleaningprofiles (CL1 to CL4 and CL1d to CL4d)
For easyTouch (ConvoClean+):The user must choose acleaning level (1 to 4)Then the user must select aprogram length (eco, regular, express)The user can also opt to addsteam disinfection and/orcooking-chamber drying
Daily cleaning after all cookingoperations are finished for thedayBefore putting the combi steamerinto operation for the first time, toclean the cooking chamber of alldirt accumulated during transpor‐tation, setting-up and installation.After servicing work on the combisteamer to remove all dirt fromthe cooking chamber
5 Cleaning procedures
User manual 90

Cleaning methods Description Criteria for useSemi-automatic ovencleaning
A semi-automatic process inwhich the temperature and pro‐gram length of individual cleaningstages are software-controlled.The cleaning fluids are sprayedinto the cooking chamber byhand.The cooking chamber is rinsedout manually using the handshower
Daily cleaning after all cookingoperations are finished for thedayAs an extra cleaning process af‐ter fully automatic oven cleaningif some of the dirt still remainsBefore putting the combi steamerinto operation for the first time, toclean the cooking chamber of alldirt accumulated during transpor‐tation, setting-up and installation.After servicing work on the combisteamer to remove all dirt fromthe cooking chamber
Oven cleaning only us‐ing rinse aid from con‐nected canister or sin‐gle-measure dispensing(only for easyTouch,using ConvoCarecleaning profile)
A fully automatic process inwhich the temperature, programlength, use of rinse aid and rins‐ing are software-controlled.The rinse aid is either dispensedautomatically into the cookingchamber from connected canis‐ters or is added to the cookingchamber by the user from single-measure dispensing bottles afterprompting by the software.
As an extra cleaning process af‐ter fully automatic or semi-auto‐matic oven cleaning oven clean‐ing if some of the dirt still remainsIf there is a white deposit or darkdiscolouration in the cookingchamber
Cleaning the cookingchamber by hand
An entirely manual process with‐out software support
The cooking chamber is notheatedThe user controls how longthe cleaning fluids are left toact.
The cleaning fluids are sprayedinto the cooking chamber byhand.The cooking chamber is rinsedout manually using the handshower
To remove dirt or odours be‐tween separate cooking opera‐tions after the cooking chamberhas cooled down.As an extra cleaning process af‐ter fully automatic or semi-auto‐matic oven cleaning oven clean‐ing if some of the dirt still remainsFor specific, localized cleaning inthe cooking chamber, for in‐stance the oven drainIf there is a white deposit or darkdiscolouration in the cookingchamber
5 Cleaning procedures
User manual 91

5.1.2 Cleaning instructions
Overview
The following illustration shows a size 6.10 gas combi steamer as an example of all table-top models:
Item Name1 Outside of appliance2 Cooking chamber3 Hygienic plug-in gasket4 Double-glass door5 Appliance door6 Door drip tray7 Oven drain with filter8 Appliance drip tray9 Fluff filter
Daily cleaning tasks
What must be cleaned? Procedure Cleaning fluidsCooking chamber How to perform semi-auto‐
matic cleaning of the cookingchamber for table-top mod‐els fitted with rack on page104How to perform semi-auto‐matic cleaning of the cookingchamber for table-top mod‐els fitted with mobile shelfrack on page 106
ConvoClean new or forte
How to perform fully automaticoven cleaning using connectedcanisters on page 100
ConvoClean new or forteandConvoCare
How to perform fully automaticoven cleaning using single-measure dispensing on page102
ConvoClean new S or forte SandConvoCare S
Oven drain Remove any residuesRinse out to prevent block‐ageSpray the cleaning agent in‐to the drain and rinse withwater
Use the recoil hand showerConvoClean new or forte
Outside of appliance Clean by hand with a soft cloth Common household stainlesssteel cleaner
5 Cleaning procedures
User manual 92

What must be cleaned? Procedure Cleaning fluidsContainers, baking sheets, shelfgrills and other accessories usedfor cooking
Clean by hand with a softnon-abrasive spongeRinse off with water
Common household detergent
Check the cooking chamber dai‐ly for signs of a white deposit ordark discolouration
Clean only when needed
By hand:Spray on cleaner whenoven is coldLeave to work for 10 mi‐nutesPolish with a soft, non-abrasive spongeRinse out
orUse the ConvoCare cleaningprofile (only for easyTouch)
ConvoCare
Weekly cleaning tasks
What must be cleaned? Procedure Cleaning fluidsInterior double glass door How to clean the double glass
door on page 110Common household glasscleaner
Cooking chamber behind suctionpanel
How to clean the cooking cham‐ber behind the suction panel onpage 111
ConvoClean new or forte
Hygienic plug-in gasket aroundappliance door
Wipe all around by hand witha soft cloth and cleaningagentWipe off thoroughly with asoft cloth and clean waterDry with a soft cloth.To let the hygienic plug-ingasket dry, leave the appli‐ance door ajar (do not shut ittight).
Common household detergent
Appliance door, door drip trayand appliance drip tray
Clean by hand using a softcloth and cleaning agentWipe off thoroughly with asoft cloth and clean waterDry with a soft cloth.
ConvoClean new or forte
Fluff filter/fan, left side of ovenfloor
Clean by hand with a dampcloth
Common household detergent
Monthly cleaning tasks
What must be cleaned? Procedure Cleaning agentsIntensive cleaning of hygienicplug-in gasket
How to perform intensive clean‐ing of the hygienic plug-in gas‐ket on page 113
Common household detergent
Stand (optional) Clean by hand with a soft cloth Common household stainlesssteel cleaner
5 Cleaning procedures
User manual 93

5.1.3 Cleaning agents
Cleaning fluids
Use solely the cleaning fluids specified here to clean the combi steamer and its accessories.
Product Use ContainerConvoClean newfor light soiling
Not intended for cleaningcontainers, baking sheets,shelf-grills or other accesso‐ries
Cleaning inside the ovenBy handSemi-automatic
Spray bottle
Fully automatic oven cleaning Cleaning-fluid canisters locatedunder the combi steamer andconnected to the cleaning sys‐tem
ConvoClean fortefor normal to heavy soiling
Not intended for cleaningcontainers, baking sheets,shelf-grills or other accesso‐ries
Cleaning inside the ovenBy handSemi-automatic
Spray bottle
Fully automatic oven cleaning Cleaning-fluid canisters locatedunder the combi steamer andconnected to the cleaning sys‐tem
ConvoCare K (concentrate) For mixing a ready-to-use Con‐voCare solution in the specifiedmixture ratio
-
ConvoCareRinse aid in the specified mixingratio
Not intended for cleaningcontainers, baking sheets,shelf-grills or other accesso‐ries
Fully automatic oven clean‐ingOven cleaning using rinseaid only (only for easyTouch,using ConvoCare cleaningprofile)
Cleaning-fluid canisters locatedunder the combi steamer andconnected to the cleaning sys‐tem
Manual aftercare of oven interi‐or
Spray bottle
ConvoClean new Sfor light soiling
Fully automatic oven cleaning 125 ml single-measure dispens‐ing bottle
ConvoClean forte Sfor normal to heavy soiling
Fully automatic oven cleaning 125 ml single-measure dispens‐ing bottle
ConvoCare S Fully automatic oven clean‐ingOven cleaning using rinseaid only (only for easyTouch,using ConvoCare cleaningprofile)
125 ml single-measure dispens‐ing bottle
Common household stainlesssteel cleaner
Caring for the external surfacesof the combi steamer
-
Common household glass clean‐er
Cleaning the double glass door -
Common household detergent:mild on skin, alkali-free, pH-neu‐tral and odourless
Cleaning components andfittings according to relevantinstructionsCleaning containers, bakingsheets, shelf grills and otheraccessories used for cooking
-
5 Cleaning procedures
User manual 94
Handling the cleaning fluids
You must wear personal protective equipment when using certain cleaning agents.Follow the instructions given in the chapter 'Personal protective equipment on page 44' and the currentEC safety datasheets pertaining to the ConvoClean forte, ConvoClean new, ConvoCare K (concen‐trate), ConvoClean forte S, ConvoClean new S and ConvoCare S cleaning fluids.Personnel must be trained regularly by the owner of the combi steamer.
5 Cleaning procedures
User manual 95

5.1.4 Preparing the cleaning agents
Preparing the cleaning fluids
Preparation form Handling / Usage Cleaning fluidsSpray bottle Never leave the spray bottle unused under
pressure for prolonged periods. Open thepump head slowly to release the pressurizedair.Rinse out the spray bottle weekly.Rinse out the nozzle, nozzle extension andnozzle pipe after each use.Do not store the spray bottles containingcleaning agents in the immediate vicinity ofthe combi steamer but keep in dedicated stor‐age areas away from food.
ConvoClean newConvoClean forteConvoCare
Canister Connect the canisters containing the cleaningagents to the combi-steamer cleaning system.Before every fully automatic oven cleaningprogram, check that there is enough cleaningagent in each canister.Do not store the spare canisters containingcleaning agents in the immediate vicinity ofthe combi steamer but keep in dedicated stor‐age areas away from food.
ConvoClean newConvoClean forteConvoCare
Only use ConvoCare K (concentrate) for mix‐ing the ready-to-use ConvoCare solution (inthe specified mixture ratio) in an empty canis‐ter.Do not store canisters containing ConvoCareK in the immediate vicinity of the combisteamer but keep in dedicated storage areasaway from food.
ConvoCare K (con‐centrate)
125 ml single-measuredispensing bottle
Do not take the bottles out of the storage boxin which they were supplied until just beforeusing the cleaning fluid.Do not screw the cap onto the bottle until justbefore using the cleaning agent.After rinsing out with water and replacing thecap, place the empty bottle in the recycling.Always store spare bottles containing cleaningfluid in the box they were supplied in. Do notstore the boxes containing the cleaning fluidsin the immediate vicinity of the combi steamerbut keep them in dedicated storage areasaway from food.
ConvoClean new SConvoClean forte SConvoCare S
5 Cleaning procedures
User manual 96

5.2 Operating principles and instructions for cleaning
Contents
This section contains the following topics:
PageSafe working when cleaning 98How to perform fully automatic cleaning of the cooking chamber using connected cannisters 100How to perform fully automatic oven cleaning using single-measure dispensing 102How to perform semi-automatic cleaning of the cooking chamber for table-top models fitted with rack104How to perform semi-automatic cleaning of the cooking chamber for table-top models fitted with mo‐bile shelf rack 106How to clean the cooking chamber without using cleaning agents 109How to clean the double glass door 110How to clean the cooking chamber behind the suction panel 111How to perform intensive cleaning of the hygienic plug-in gasket 113
5 Cleaning procedures
User manual 97

5.2.1 Safe working when cleaning
Your safety and the safety of your staff
Before your personnel start working with the combi steamer for the first time, familiarize yourself withthe information contained in the chapter 'For your safety on page 23' and make relevant safety ar‐rangements.Instruct your personnel to learn the safe-working rules given in this section before starting work, and tofollow them strictly.Instruct your personnel to familiarize themselves with the hazard warnings listed in this section and infurther instructions below, and instil in them the importance of taking the specified precautions.
Personal protective equipment for your personnel
Instruct your personnel to wear the correct personal protective equipment specified in the section 'Per‐sonal protective equipment on page 44' of the 'For your safety' chapter for the relevant tasks.
Rules for moving and setting up the wheeled base safely
To avoid hazards, the following rules must be observed when moving the wheeled base that carriesthe appliances:
Before moving, the drain pipe must be disconnected if a fixed wastewater connection is used.Watch out for all connecting cables and pipes when moving appliances. Never wheel over the con‐necting cables or pipes. Never stretch let alone pull off the connecting cables or pipes. The lengthsof the electrical supply cables and gas and water pipes are chosen to accommodate the range ofmovement of the retaining device. Even so, it is essential to watch out for the position and run of allconnecting cables and pipes when moving appliances.The appliances must be disconnected from the electrical supply before moving the stacking kit.The appliances must be left to cool down on the base before being moved.There must not be any food left in the appliances.The appliance doors must be closed.Protective clothing must be worn when moving the base that carries the appliances.At least two people must be used to move the base that carries the appliances.It is important to ensure that the unit is level once is back in place.Once the unit is back in place, the parking brakes must be engaged again.Whatever the position, care must be taken to ensure that the base carrying the appliance does nottip over.
Spraying down the appliance with water
Risk of electric shock from live partsWater on the exterior of the appliance can cause a short-circuit, which may result in electric shock ontouching the appliance.
Do not spray the exterior of the appliance with water.Always keep the USB cover closed during cleaning.
5 Cleaning procedures
User manual 98

Hot surfaces
Risk of burns from high temperatures on interior and exterior parts of the applianceYou may get burnt if you touch any of the interior parts of the cooking chamber, the inside of theappliance door or any parts that are or were inside the oven during cooking. In addition, touching theair vent can result in burns.
Before starting cleaning tasks, wait until the cooking chamber has cooled to below 60°C or use the 'Cool down' function to cool the cooking chamber.Wear personal protective equipment.
Spraying water into a hot cooking chamber
Risk of scalding from hot steamIf water is sprayed into the hot cooking chamber (e.g. using the hand shower), steam will be producedthat may scald.
Before starting cleaning tasks, wait until the cooking chamber has cooled to below 60°C or use the 'Cool down' function to cool the cooking chamber.
Contact with cleaning agents
Risk of chemical burns or irritation to skin, eyes and respiratory system.Direct contact with the ConvoClean new (S) cleaning agent or ConvoCare (S) rinse aid will irritate theskin, eyes and respiratory system. Direct contact with the ConvoClean forte (S) cleaning agent willresult in chemical burns to the skin, eyes and respiratory organs.
Do not inhale the vapours or spray mist from the cleaning agent and rinse aid.Do not let the cleaning agent or rinse aid come into contact with skin, eyes or mucous membranes.Do not spray cleaning agent or rinse aid into a cooking chamber that is at a temperature of higherthan 60°C, because this will increase the caustic and irritating fumes given off by the cleaningagent.Do not open the appliance door during fully automatic oven cleaning using connected canisters.During fully automatic oven cleaning using single-measure dispensing, only open the appliancedoor after being prompted by the softwareWear personal protective equipment.
Escaping gas
Risk of explosion from escaping gasEscaping gas can ignite and cause an explosion.
For appliances on a wheeled platform and with a flexible connection pipe, you can move theappliance forward within its range of movement when cleaning the case or the floor. The range ofmovement is set by the retaining device used to secure the appliance in place (typically 0.5 m).Never strain the connecting cables or pipes.
5 Cleaning procedures
User manual 99

5.2.2 How to perform fully automatic cleaning of the cooking chamber usingconnected cannisters
For your safety when cleaning
Before starting cleaning work, it is essential that you familiarize yourself with the rules and hazardwarnings specified in 'Safe working when cleaning on page 98', and follow the instructions given there.
Prior knowledge required
You need to know these operations:Opening and closing the appliance door safely 66Taking food in and out using the transport trolley 75Replacing the rinse-aid canister 116Replacing the cleaning-agent canister 118
Requirements
You are sufficiently familiar with using the software to be able to select and run different cleaningprofiles. (See operating instructions for the combi steamer)No food has been left in the cooking chamber. There are no foreign objects in the cooking cham‐ber.All containers, baking sheets, shelf grills and any other accessories have been removed from thecooking chamber.The oven drain is not blocked or clogged with any residues. The filter is fitted in place on the ovendrain.The interior glass door of the appliance door is secured properly in place.The suction panel is properly locked in place.The appliance door is closed.You have provided the necessary cleaning resources for your cleaning program; see 'Preparing thecleaning fluids on page 96'.For table-top models with mobile shelf rack: the roll-in frame is fitted in place and the empty mobileshelf rack (optionally plate rack) is in the cooking chamber.
How to perform fully automatic oven cleaning using connected canisters
1. Select the cleaning profile and start the cleaning process.
2. Wait for the cleaning program to finish.
3. An audible signal is given when the cleaning program isfinished.Follow the prompts displayed by the software.
5 Cleaning procedures
User manual 100

4. Open the appliance door and check the cleaning re‐sult. The cooking chamber should look clean and notsmell of leftover food or cleaning fluids.Check the cooking chamber for any foreign matter thatmay have entered with the rinse water. Remove anyforeign matter.If the cleaning result is not good enough, either cleanand rinse the cooking chamber manually or run acleaning profile again.
5. Leave the appliance door ajar to let the cooking chamberdry out.
5 Cleaning procedures
User manual 101

5.2.3 How to perform fully automatic oven cleaning using single-measuredispensing
For your safety when cleaning
Before starting cleaning work, it is essential that you familiarize yourself with the rules and hazardwarnings specified in 'Safe working when cleaning on page 98', and follow the instructions given there.
Prior knowledge required
You need to know these operations:Opening and closing the appliance door safely 66Taking food in and out using the transport trolley 75Adding cleaning agent from single-measure dispensing bottles to the cooking chamber 120
Requirements
You are sufficiently familiar with using the software to be able to select and run different cleaningprofiles. (See operating instructions for the combi steamer)No food has been left in the cooking chamber. There are no foreign objects in the cooking cham‐ber.All containers, baking sheets, shelf grills and any other accessories have been removed from thecooking chamber.The oven drain is not blocked or clogged with any residues. The filter is fitted in place on the ovendrain.The interior glass door of the appliance door is secured properly in place.The suction panel is properly locked in place.The appliance door is closed.You have provided the necessary cleaning resources for your cleaning program; see 'Preparing thecleaning fluids on page 96'.For table-top models with mobile shelf rack: the roll-in frame is fitted in place and the empty mobileshelf rack (optionally plate rack) is in the cooking chamber.
How to perform fully automatic oven cleaning using single-measure dispensing
1. Select the cleaning profile and start the cleaning process.
2. Wait for the soaking stage to finish (about 5 to 10 minutesdepending on the cleaning profile).
3. An audible signal is given when the soaking stage isfinished.You are prompted to add the cleaning agent.The software displays for you the number of single-measure dispensing bottles required.
4. Open the appliance door.
5. Add the cleaning agent from the single-measure dispens‐ing bottles to the cooking chamber.If necessary for this procedure, pull the mobile shelf rackout of the cooking chamber and then push it back into thecooking chamber after adding the cleaning agent.
5 Cleaning procedures
User manual 102

6. Close the appliance door.
7. Wait for the cleaning stage to finish (about 30 to 60 mi‐nutes depending on the cleaning profile).
For easyTouch controls, selecting the 'Express' cleaningprogram length will skip steps 8 to 12 of these instructions.
8. An audible signal is given when the cleaning stage isfinished.You are prompted to add the rinse aid.The software displays for you the number of single-measure dispensing bottles required.
In exceptional cases, you may be able to skip this step ofadding rinse aid depending on the water hardness andthe amount of limescale in the appliance.
9. Open the appliance door.
10. Add the rinse aid from the single-measure dispensing bot‐tles to the cooking chamber.If necessary for this procedure, pull the mobile shelf rackout of the cooking chamber and then push it back into thecooking chamber after adding the rinse aid.
11. Close the appliance door.
12. Wait for the final cleaning stage to finish (about 20 to 30minutes depending on the cleaning profile).
13. An audible signal is given when the final cleaningstage is finished.Follow the prompts displayed by the software.
14. Open the appliance door and check the cleaning re‐sult. The cooking chamber should look clean and notsmell of leftover food or cleaning fluids.Check the cooking chamber for any foreign matter thatmay have entered with the rinse water. Remove anyforeign matter.If the cleaning result is not good enough, either cleanand rinse the cooking chamber manually or run acleaning profile again.
15. Leave the appliance door ajar to let the cooking chamberdry out.
5 Cleaning procedures
User manual 103
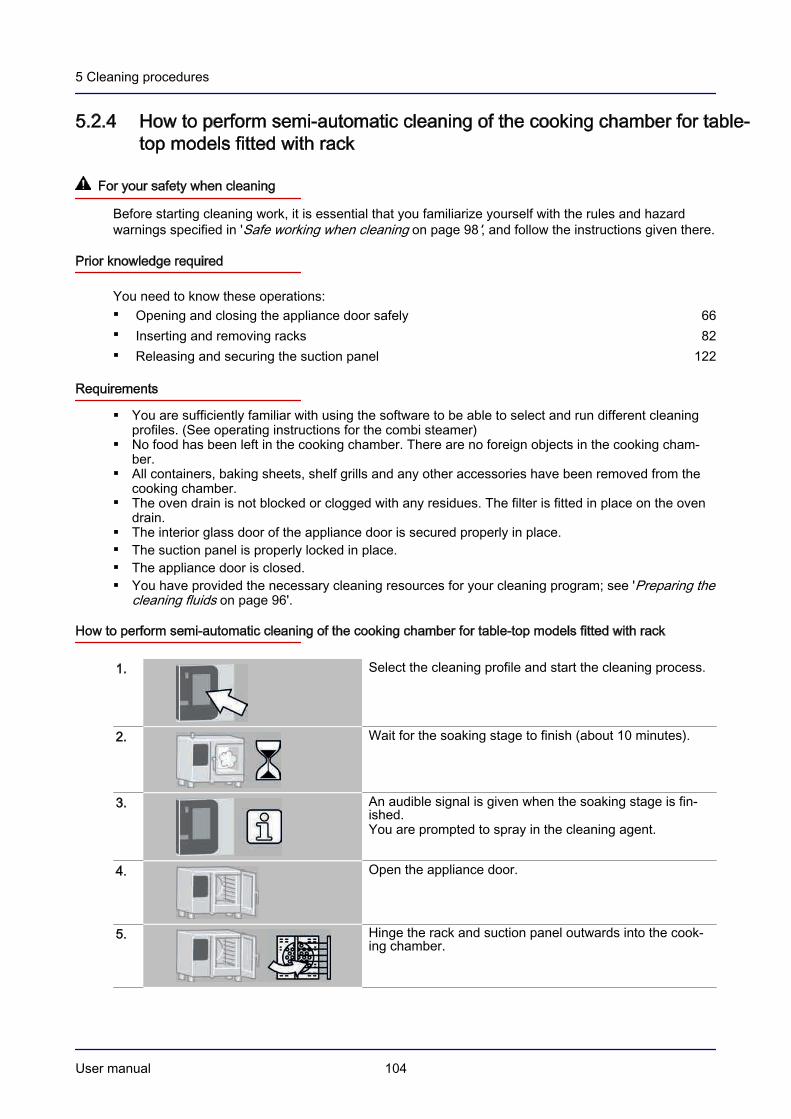
5.2.4 How to perform semi-automatic cleaning of the cooking chamber for table-top models fitted with rack
For your safety when cleaning
Before starting cleaning work, it is essential that you familiarize yourself with the rules and hazardwarnings specified in 'Safe working when cleaning on page 98', and follow the instructions given there.
Prior knowledge required
You need to know these operations:Opening and closing the appliance door safely 66Inserting and removing racks 82Releasing and securing the suction panel 122
Requirements
You are sufficiently familiar with using the software to be able to select and run different cleaningprofiles. (See operating instructions for the combi steamer)No food has been left in the cooking chamber. There are no foreign objects in the cooking cham‐ber.All containers, baking sheets, shelf grills and any other accessories have been removed from thecooking chamber.The oven drain is not blocked or clogged with any residues. The filter is fitted in place on the ovendrain.The interior glass door of the appliance door is secured properly in place.The suction panel is properly locked in place.The appliance door is closed.You have provided the necessary cleaning resources for your cleaning program; see 'Preparing thecleaning fluids on page 96'.
How to perform semi-automatic cleaning of the cooking chamber for table-top models fitted with rack
1. Select the cleaning profile and start the cleaning process.
2. Wait for the soaking stage to finish (about 10 minutes).
3. An audible signal is given when the soaking stage is fin‐ished.You are prompted to spray in the cleaning agent.
4. Open the appliance door.
5. Hinge the rack and suction panel outwards into the cook‐ing chamber.
5 Cleaning procedures
User manual 104

6. Use the spray bottle to spray cleaning agent around thecooking chamber, the suction panel and the area behindthe suction panel, the rack and the oven drain.
7. Clip the suction panel and rack back into place.
8. Close the appliance door.
9. Wait for the cleaning stage to finish (about 10 minutes).
10. An audible signal is given when the cleaning stage is fin‐ished.You are prompted to rinse off the cooking chamber.
11. Open the appliance door.
12. Hinge the rack and suction panel outwards again into thecooking chamber.
13. Use the hand shower to rinse out thoroughly the cookingchamber, the accessories, the area behind the suctionpanel and the oven drain.
WARNING Risk of food contamination from cleaningagent or rinse aid resulting from inadequate rinsing
If the appliance does not have a hand shower, use anexternal water spray instead of the hand shower orwipe down the cooking chamber, fittings and the areabehind the suction panel thoroughly with plenty of wa‐ter and a soft cloth.
14. Check the cleaning result. The cooking chamber shouldlook clean and not smell of leftover food or cleaning flu‐ids.If the cleaning result is not good enough, either clean andrinse the cooking chamber manually or run a cleaningprofile again.
15. Clip the suction panel and rack back into place.
16. Leave the appliance door ajar to let the cooking chamberdry out.
5 Cleaning procedures
User manual 105

5.2.5 How to perform semi-automatic cleaning of the cooking chamber for table-top models fitted with mobile shelf rack
For your safety when cleaning
Before starting cleaning work, it is essential that you familiarize yourself with the rules and hazardwarnings specified in 'Safe working when cleaning on page 98', and follow the instructions given there.
Prior knowledge required
You need to know these operations:Opening and closing the appliance door safely 66Taking food in and out using the transport trolley 75Releasing and securing the suction panel 122
Requirements
You are sufficiently familiar with using the software to be able to select and run different cleaningprofiles. (See operating instructions for the combi steamer)No food has been left in the cooking chamber. There are no foreign objects in the cooking cham‐ber.All containers, baking sheets, shelf grills and any other accessories have been removed from thecooking chamber.The oven drain is not blocked or clogged with any residues. The filter is fitted in place on the ovendrain.The roll-in frame is fitted in place and the empty mobile shelf rack (optionally plate rack) is in thecooking chamber.The interior glass door of the appliance door is secured properly in place.The suction panel is properly locked in place.The appliance door is closed.You have provided the necessary cleaning resources for your cleaning program; see 'Preparingthe cleaning fluids on page 96'.
How to perform semi-automatic cleaning of the cooking chamber for table-top models fitted with mobile shelfrack
1. Select the cleaning profile and start the cleaning process.
2. Wait for the soaking stage to finish (about 10 minutes).
3. An audible signal is given when the soaking stage is fin‐ished.You are prompted to spray in the cleaning agent.
4. Open the appliance door.
5. Take out the mobile shelf rack (optionally plate rate) andthe roll-in frame.
5 Cleaning procedures
User manual 106

6. Hinge out the suction panel into the cooking chamber.
7. Use the spray bottle to spray cleaning agent around thecooking chamber, the suction panel and the area behindthe suction panel, and the oven drain.
8. Secure the suction panel back in place.
9. Fit the roll-in frame and slide back in the mobile shelf rack(optionally plate rack)
10. Use the spray bottle to spray the mobile shelf rack (op‐tionally the plate rack) and the roll-in frame with cleaningagent.
11. Close the appliance door.
12. Wait for the cleaning stage to finish (about 10 minutes).
13. An audible signal is given when the cleaning stage is fin‐ished.You are prompted to rinse off the cooking chamber.
14. Open the appliance door.
15. Use the hand shower to rinse off thoroughly the mobileshelf rack (optionally the plate rack) and the roll-in frame.
16. Take out the mobile shelf rack (optionally plate rate) andthe roll-in frame.
17. Hinge out the suction panel into the cooking chamber.
5 Cleaning procedures
User manual 107

18. Use the hand shower to rinse out thoroughly the cookingchamber, the suction panel and the area behind the suc‐tion panel, and the oven drain.
WARNING Risk of food contamination from cleaningagent or rinse aid resulting from inadequate rinsing
If the appliance does not have a hand shower, use anexternal water spray instead of the hand shower orwipe down the cooking chamber, fittings and the areabehind the suction panel thoroughly with plenty of wa‐ter and a soft cloth.
19. Secure the suction panel back in place.
20. Fit the roll-in frame and slide back in the mobile shelf rack(optionally plate rack)
21. Check the cleaning result. The cooking chamber shouldlook clean and not smell of leftover food or cleaning flu‐ids.If the cleaning result is not good enough, either clean andrinse the cooking chamber manually or run a cleaningprofile again.
22. Leave the appliance door ajar to let the cooking chamberdry out.
5 Cleaning procedures
User manual 108

5.2.6 How to clean the cooking chamber without using cleaning agents
For your safety when cleaning
Before starting cleaning work, it is essential that you familiarize yourself with the rules and hazardwarnings specified in 'Safe working when cleaning on page 98', and follow the instructions given there.
Prior knowledge required
You need to know these operations:Opening and closing the appliance door safely 66Taking food in and out using the transport trolley 75Putting away and retrieving the core temperature probe 80
Requirements
You are sufficiently familiar with using the software to be able to select and run different cleaningprofiles. (See operating instructions for the combi steamer)No food has been left in the cooking chamber. There are no foreign objects in the cooking cham‐ber.The oven drain is not blocked or clogged with any residues. The filter is fitted in place on the ovendrain.The interior glass door of the appliance door is secured properly in place.The suction panel is properly locked in place.The appliance door is closed.For table-top models with mobile shelf rack: the roll-in frame is fitted in place and the mobile shelfrack (optionally plate rack) is in the cooking chamber.
How to clean the cooking chamber without using cleaning agents
1. Select the cleaning profile and start the cleaning process.
2. Wait for the cleaning program to finish.
3. An audible signal is given when the cleaning program isfinished.Follow the prompts displayed by the software.
4. Open the appliance door and check whether the ex‐pected cleaning result has been achieved.Check the cooking chamber for any foreign matter thatmay have entered with the rinse water. Remove anyforeign matter.If necessary, either clean and rinse the cooking cham‐ber manually or run another cleaning profile.
5. Leave the appliance door ajar to let the cooking chamberdry out.
5 Cleaning procedures
User manual 109

5.2.7 How to clean the double glass door
For your safety when cleaning
Before starting cleaning work, it is essential that you familiarize yourself with the rules and hazardwarnings specified in 'Safe working when cleaning on page 98', and follow the instructions given there.
Prior knowledge required
You need to know these operations:Opening and closing the appliance door safely 66Releasing and securing the interior glass door. 125
Requirements
You have household glass cleaner available as the necessary cleaning product.You have several (at least three) soft clean cloths available for use.The appliance door has cooled to room temperature after the last operation.
How to clean the double glass door
1. Open the appliance door and hinge the interior glass pan‐el away from the double glass door.
2. Use a soft clean cloth and the cleaning product to cleaneach side of both the interior and exterior glass panels ofthe double glass door.Take care not to scratch the glass as you clean.
3. Use a soft clean cloth and clean water to wipe off eachside of both the interior and exterior glass panels of thedouble glass door.
4. Use a soft clean cloth to dry off each side of both the inte‐rior and exterior glass panels of the double glass door.
5. Hinge the interior glass panel of the appliance door backand secure in place.
5 Cleaning procedures
User manual 110

5.2.8 How to clean the cooking chamber behind the suction panel
For your safety when cleaning
Before starting cleaning work, it is essential that you familiarize yourself with the rules and hazardwarnings specified in 'Safe working when cleaning on page 98', and follow the instructions given there.
Prior knowledge required
You need to know these operations:Opening and closing the appliance door safely 66Inserting and removing racks 82Taking food in and out using the transport trolley 75Releasing and securing the suction panel 122
Requirements
You have the required cleaning agent available for use: spray bottle containing ConvoClean new orConvoClean forte; see 'Preparing the cleaning fluids on page 96'.The oven drain is not blocked or clogged with any residues.For table-top models with rack: the left-hand rack has been removed.For table-top models with mobile shelf rack: The mobile shelf rack and the roll-in frame have beenremoved from the cooking chamber.
How to clean the cooking chamber behind the suction panel
1. Hinge out the suction panel into the cooking chamber.
2. Use the spray bottle to spray the cleaning agent onto allsides of the suction panel and onto the area behind thesuction panel.
3. Leave the cleaning agent to work for 10 to 20 minutes.
4. Use the hand shower to rinse off thoroughly the suctionpanel from all sides, the area behind the suction panel,and the entire cooking chamber.For heavy soiling, you can repeat the cleaning process.
WARNING Risk of food contamination from cleaningagent or rinse aid resulting from inadequate rinsing
If the appliance does not have a hand shower, use anexternal water spray instead of the hand shower orwipe down the cooking chamber, fittings and the areabehind the suction panel thoroughly with plenty of wa‐ter and a soft cloth.
5 Cleaning procedures
User manual 111

5. Secure the suction panel back in place.
6. Leave the appliance door ajar to let the cooking chamberdry out.
5 Cleaning procedures
User manual 112

5.2.9 How to perform intensive cleaning of the hygienic plug-in gasket
For your safety when cleaning
Before starting cleaning work, it is essential that you familiarize yourself with the rules and hazardwarnings specified in 'Safe working when cleaning on page 98', and follow the instructions given there.
Prior knowledge required
You need to know these operations:Opening and closing the appliance door safely 66Removing and fitting the hygienic plug-in gasket 124
Requirements
You have household detergent available as the necessary cleaning product.You have several (at least three) soft clean cloths available for use.
How to perform intensive cleaning of the hygienic plug-in gasket
1. Open the appliance door and remove the hygienic plug-ingasket.
2. Use a soft clean cloth and the cleaning product to cleanthe hygienic plug-in gasket in a sink.
3. Use a soft clean cloth and clean water to rinse off the hy‐gienic plug-in gasket in a sink.
4. Use a soft clean cloth to dry the hygienic plug-in gasketthoroughly.
5. Refit the hygienic plug-in gasket around the mouth of thecooking chamber.
6. Leave the appliance door open to let the hygienic plug-ingasket dry off completely.
5 Cleaning procedures
User manual 113

5.3 Instructions for handling the appliance for cleaning
Contents
This section contains the following topics:
PageWorking safely with the appliance 115Replacing the rinse-aid canister 116Replacing the cleaning-agent canister 118Adding cleaning agent from single-measure dispensing bottles to the cooking chamber 120Releasing and securing the suction panel 122Removing and fitting the hygienic plug-in gasket 124Releasing and securing the interior glass door. 125
5 Cleaning procedures
User manual 114

5.3.1 Working safely with the appliance
Your safety and the safety of your staff
Before your personnel start working with the combi steamer for the first time, familiarize yourself withthe information contained in the chapter 'For your safety on page 23' and make relevant safety ar‐rangements.Instruct your personnel to learn the safe-working rules given in this section before starting work, and tofollow them strictly.Instruct your personnel to familiarize themselves with the hazard warnings listed in this section and infurther instructions below, and instil in them the importance of taking the specified precautions.
Personal protective equipment for your personnel
Instruct your personnel to wear the correct personal protective equipment specified in the section 'Per‐sonal protective equipment on page 44' of the 'For your safety' chapter for the relevant tasks.
Hot surfaces
Risk of burns from high temperatures on interior and exterior parts of the applianceYou may get burnt if you touch any of the interior parts of the cooking chamber, the inside of theappliance door or any parts that are or were inside the oven during cooking. In addition, touching theair vent can result in burns.
Before starting cleaning tasks, wait until the cooking chamber has cooled to below 60°C or use the 'Cool down' function to cool the cooking chamber.Wear personal protective equipment.
Contact with cleaning agents
Risk of chemical burns or irritation to skin, eyes and respiratory system.Direct contact with the ConvoClean new (S) cleaning agent or ConvoCare (S) rinse aid will irritate theskin, eyes and respiratory system. Direct contact with the ConvoClean forte (S) cleaning agent willresult in chemical burns to the skin, eyes and respiratory organs.
Do not inhale the vapours or spray mist from the cleaning agent and rinse aid.Do not let the cleaning agent or rinse aid come into contact with skin, eyes or mucous membranes.Do not spray cleaning agent or rinse aid into a cooking chamber that is at a temperature of higherthan 60°C, because this will increase the caustic and irritating fumes given off by the cleaningagent.Do not open the appliance door during fully automatic oven cleaning using connected canisters.During fully automatic oven cleaning using single-measure dispensing, only open the appliancedoor after being prompted by the softwareWear personal protective equipment.
Escaping gas
Risk of explosion from escaping gasEscaping gas can ignite and cause an explosion.
For appliances on a wheeled platform and with a flexible connection pipe, you can move theappliance forward within its range of movement when cleaning the case or the floor. The range ofmovement is set by the retaining device used to secure the appliance in place (typically 0.5 m).Never strain the connecting cables or pipes.
5 Cleaning procedures
User manual 115

5.3.2 Replacing the rinse-aid canister
For your safety when using the appliance
Before starting work, it is essential that you familiarize yourself with the rules and hazard warningsspecified in 'Working safely with the appliance on page 115', and follow the instructions given there.
Materials required
One empty canister (10 litres) for the ConvoCare rinse aidEnough soft water (approx. 10 litres); (for specification see the 'Water quality' section of the 'Tech‐nical data' in the Installation manual)ConvoCare K concentrate (0.33 l)
Mix up the ConvoCare rinse aid in the canister
To avoid excessive foaming, follow the procedure below when mixing the ConvoCare K concentratewith soft water to produce the rinse aid:
1. Open the empty canister (1).2. Fill the canister with soft water (2) until it reaches just be‐
low the 10 litre mark (4).3. Then pour 0.33l of the ConvoCare K concentrate (3) care‐
fully into the canister (1).4. Check the fluid level in the canister:
If the level is below the 10 litre mark (4), carefully addthe extra amount of soft water (2) required.If the level is above the 10 litre mark (4), the rinse aidis a little less concentrated than specified. You can stilluse the rinse aid at the lower concentration.
5. Replace the cap on the canister and tip it up to mix theliquids together thoroughly.
Replacing the rinse-aid canister
1. Remove the cap from the ConvoCare rinse-aid mixingcanister.
2. Locate the canister that is connected by the (green)tube to the rinse-aid connector (F) underneath the ap‐pliance on the left-hand side.Unscrew the (green) supply tube (2) plus suction noz‐zle from the located canister.Remove the empty rinse-aid canister.
5 Cleaning procedures
User manual 116

3. Place ready the new canister (1) filled with rinse aid.Feed the (green) supply tube plus suction nozzle (2)into the full canister (1) and screw it on.Make sure that there are no kinks in the tube and thatthe vent hole on the canister cap is unobstructed.
4. Check the position of the canisters:The canisters must not sit above the level of thesurface on which the appliance stands.The level of the surface on which the canister sitsmust not lie more than 1 meter below the tube con‐nections on the appliance.
Check that you have connected the tube to the correctconnector.
The rinse aid must be attached to appliance con‐nector F.(The colour green is used throughout.)
5 Cleaning procedures
User manual 117
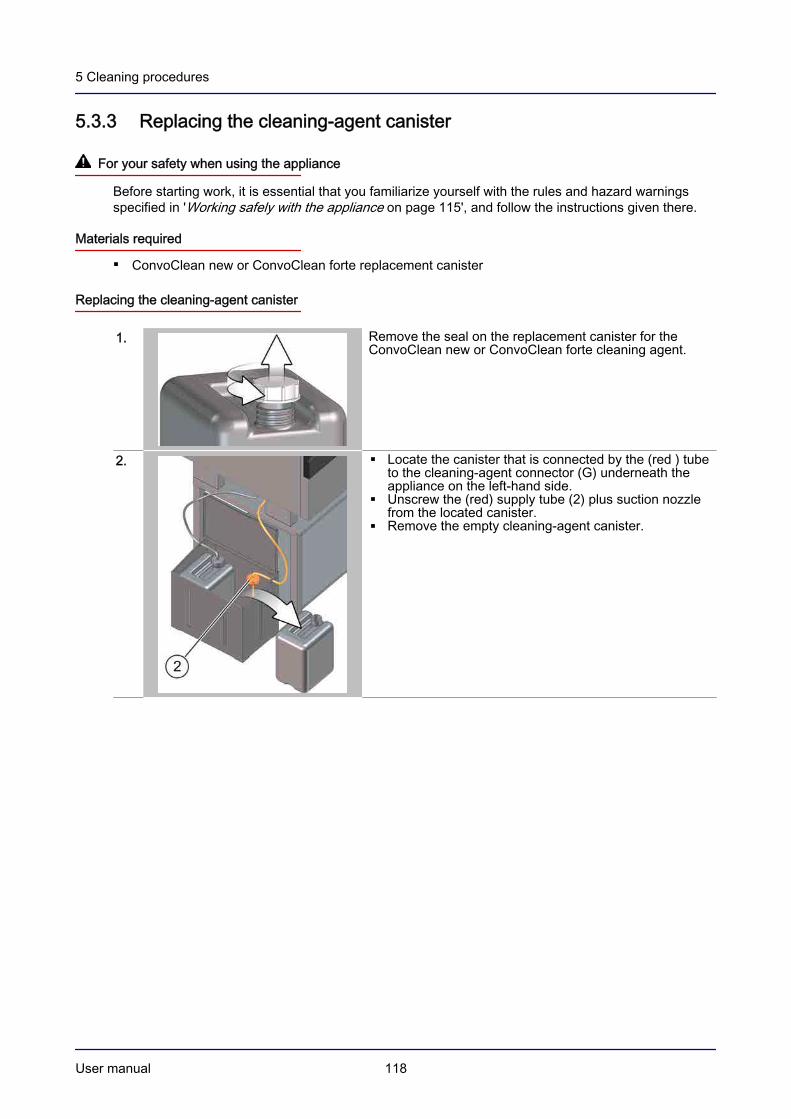
5.3.3 Replacing the cleaning-agent canister
For your safety when using the appliance
Before starting work, it is essential that you familiarize yourself with the rules and hazard warningsspecified in 'Working safely with the appliance on page 115', and follow the instructions given there.
Materials required
ConvoClean new or ConvoClean forte replacement canister
Replacing the cleaning-agent canister
1. Remove the seal on the replacement canister for theConvoClean new or ConvoClean forte cleaning agent.
2. Locate the canister that is connected by the (red ) tubeto the cleaning-agent connector (G) underneath theappliance on the left-hand side.Unscrew the (red) supply tube (2) plus suction nozzlefrom the located canister.Remove the empty cleaning-agent canister.
5 Cleaning procedures
User manual 118

3. Place ready the new canister (1) filled with cleaningagent.Feed the (red) supply tube plus suction nozzle (2) intothe full canister (1) and screw it on.Make sure that there are no kinks in the tube and thatthe vent hole on the canister cap is unobstructed.
4. Check the position of the canisters:The canisters must not sit above the level of thesurface on which the appliance stands.The level of the surface on which the canister sitsmust not lie more than 1 meter below the tube con‐nections on the appliance.
Check that you have connected the tube to the correctconnector.
The cleaning agent must be attached to applianceconnector G.(The colour red is used throughout.)
5 Cleaning procedures
User manual 119

5.3.4 Adding cleaning agent from single-measure dispensing bottles to thecooking chamber
For your safety when using the appliance
Before starting work, it is essential that you familiarize yourself with the rules and hazard warningsspecified in 'Working safely with the appliance on page 115', and follow the instructions given there.
Prior knowledge required
You need to know these operations:Opening and closing the appliance door safely 66Preparing the cleaning agents 96
Requirements
You have started a cleaning profile for fully automatic oven cleaning using single-measure dispens‐ing. The software is prompting you to add either cleaning agent or rinse aid from the single-meas‐ure dispensing bottles to the cooking chamber.You have provided the necessary single-measure dispensing bottles containing cleaning agentand rinse aid for your cleaning program; see 'Preparing the cleaning fluids on page 96'.
Adding cleaning agent from single-measure dispensing bottles to the cooking chamber
1. Do not open the appliance door until the softwareprompts you to do so during the fully automatic ovencleaning process.Follow the guidance displayed by the software.Depending on where you are in the cleaning process,pick up a single-measure dispensing bottle containingeither cleaning agent or rinse aid.
WARNING Risk of chemical burns or irritation to skin,eyes and respiratory system.
Take care not to come into contact with cleaning agentor rinse aid when adding the contents of the single-measure dispensing bottles to the cooking chamber.Wear personal protective equipment.
2. Unscrew the cap from the single-measure dispensingbottle.Take care not to damage the foil seal on the bottle.
3. Press the bottle approximately vertically onto the spike inthe centre of the oven drain in order to pierce the foil.
5 Cleaning procedures
User manual 120

4. Leave the bottle sitting upright on the spike for about10 seconds so that the liquid drains out completely.Look to check that the fluid has drained out complete‐ly. You can see the fluid level through the transparentmaterial used for the single-dose dispensing bottles.If necessary, squeeze the rest of the fluid out of thesingle-measure dispensing bottle while the bottle isstill on the spike.
5. Then pull the bottle carefully off the spike.Remove the bottle from the cooking chamber.Repeat steps 2 to 5 if the software prompts you to addmore than one single-measure dispensing bottle ofcleaning agent or rinse aid.
WARNING Risk of food contamination from cleaningagent or rinse aid
Take care not to get cleaning agent or rinse aid on thework surfaceDo not place empty single-measure dispensing bottleson the work surface, because the cleaning agent orrinse aid could drip down the outside
6. Close the appliance door.
5 Cleaning procedures
User manual 121

5.3.5 Releasing and securing the suction panel
For your safety when using the appliance
Before starting work, it is essential that you familiarize yourself with the rules and hazard warningsspecified in 'Working safely with the appliance on page 115', and follow the instructions given there.
Prior knowledge required
You need to know these operations:Opening and closing the appliance door safely 66Inserting and removing racks 82Taking food in and out using the transport trolley 75
Materials required
Suitable tool for undoing the fasteners e.g. slotted screwdriver
Requirements
The cooking chamber has cooled down to <60°C after its last use.For table-top models with rack: the left-hand rack has been removed.For table-top models with mobile shelf rack: the mobile shelf rack and the roll-in frame have beenremoved from the cooking chamber.
Releasing and hinging out the suction panel
1. Use the tool to release the fasteners, top and bottom.
2. Hinge out the suction panel into the cooking chamber.
5 Cleaning procedures
User manual 122

Securing the suction panel
1. To secure the suction panel, follow the steps in the re‐verse order that you performed to release it.
2. Make sure that the top and bottom fasteners are securedin place.
5 Cleaning procedures
User manual 123

5.3.6 Removing and fitting the hygienic plug-in gasket
For your safety when using the appliance
Before starting work, it is essential that you familiarize yourself with the rules and hazard warningsspecified in 'Working safely with the appliance on page 115', and follow the instructions given there.
Prior knowledge required
You need to know these operations:Opening and closing the appliance door safely 66
Requirements
The combi steamer has cooled down to <60°C after its last use.The appliance door is open.
Removing the hygienic plug-in gasket
1. Pull off the hygienic plug-in gasket from around themouth of the appliance door. starting from the corners.
Fitting the hygienic plug-in gasket
1. Refit the hygienic plug-in gasket first in the four corners,starting from one of the top corners.
2. Once all the corner sections are fitted, press the hygienicplug-in gasket carefully into the straight sections of theguide.Make sure that the hygienic plug-in gasket is seatedtightly against the door and does not contain any kinks orcurves.
5 Cleaning procedures
User manual 124

5.3.7 Releasing and securing the interior glass door.
For your safety when using the appliance
Before starting work, it is essential that you familiarize yourself with the rules and hazard warningsspecified in 'Working safely with the appliance on page 115', and follow the instructions given there.
Prior knowledge required
You need to know these operations:Opening and closing the appliance door safely 66
Requirements
The cooking chamber has cooled down to <60°C after its last use.
Releasing and hinging away the interior glass door
1. Open the appliance door.
2. Push back the top and bottom spring clips.
3. Hinge the interior glass panel away.
Securing the interior glass door
1. To secure the interior glass door, follow the steps in thereverse order that you performed to release it.
2. Check that the spring clips are securing the interior glasscorrectly at top and bottom. The appliance door cannotclose until this is the case.
5 Cleaning procedures
User manual 125

6 Servicing procedures
Purpose of this chapter
This chapter shows you what servicing tasks need to be carried out on the combi steamer at what in‐tervals.It explains how to handle the combi steamer for servicing and the correct procedure to follow duringservicing.It also summarizes possible faults with the appliance and errors that may arise during operation.
Contents
This chapter contains the following topics:
PageBasic principles for servicing 127Troubleshooting 130Servicing tasks 136
6 Servicing procedures
User manual 126

6.1 Basic principles for servicing
Contents
This section contains the following topics:
PageWarranty information and contacting customer service 128Servicing schedule 129
6 Servicing procedures
User manual 127

6.1.1 Warranty information and contacting customer service
Warranty information
In order to be able to claim under the warranty for the combi steamer, the appliance must be installedin accordance with the instructions in the installation manual by a qualified service engineer from anauthorized service company. The manufacturer must be in receipt of a fully completed checklist fromthe Installation manual before a warranty claim can be dealt with.The warranty does not cover damage resulting from improper setup, installation, use, cleaning, use ofcleaning fluids, servicing, repair or descaling.To extend the spare parts warranty to 2 years, you need to register the appliance on the manufactur‐er's homepage (www.convotherm.de) after installing the appliance.
Required information
Please have the following appliance data to hand when contacting our customer service:Part number of your appliance (see 'Identifying your combi steamer on page 11')Serial number of your appliance (see 'Identifying your combi steamer on page 11')
Contact data
Convotherm Elektrogeräte GmbHOvens & Advanced Cooking EMEA, Manitowoc FoodserviceTalstraße 3582436 EglfingGermany
ReceptionPhone (head office) (+49) (0) 8847 67-0Fax (+49) (0) 8847 414Internet www.convotherm.com
www.manitowocfoodservice.comApplication supportHotline (+49) (0) 8847 67-899e-mail [email protected]
[email protected], appliances/accessories [email protected], spare parts [email protected] serviceTechnical hotline (office hours) (+49) (0) 8847 67 541Technical Hotline (outside office hours) (+49) (0) 175 405 41 09e-mail [email protected]
6 Servicing procedures
User manual 128

6.1.2 Servicing schedule
Requirements
Servicing must be performed regularly by the customer service department.
Servicing tasks that the user can perform
What must be serviced? When? Parts requiredReplacing the hygienic plug-ingasket
If the hygienic plug-in gasket iscracked or greasy
As listed in the spare parts list:1 hygienic plug-in gasket
Replacing the halogen lamp forthe oven light
If the halogen lamp does notcome on in any operating mode
As listed in the spare parts list:1 halogen lamp 12V
Servicing tasks that customer service must perform
What must be serviced? How often / When?General servicing AnnuallyWater treatment must be adjus‐ted correctly
If there is a white deposit in the oven chamber
Boiler descaling When prompted
6 Servicing procedures
User manual 129

6.2 Troubleshooting
Contents
This section contains the following topics:
PageTroubleshooting - Error codes 131Emergency mode 132Rectifying faults - problems in operation 134
6 Servicing procedures
User manual 130

6.2.1 Troubleshooting - Error codes
Errors and required responses
The following table lists the errors that you may be able to resolve yourself. If the combi steamer con‐tinues to display the error after you have tried to resolve it, please contact customer service.Always contact customer service for help if any error messages appear that are not listed here.
Error no. Description of error Required responseE01.x Low water Open water supplyE02 Temp. electrical area too high Clean fluff filter located outside on
the appliance baseClear air intake in base of appliance
E03.x Fan malfunction Check fuse in buildingE34.0 Boiler pump error Unplug the appliance for approx.
10 seconds then restartE61.0 Cleaning: Steam error Unplug the appliance for approx.
10 seconds then restartE62.0 Pressure switch error Unplug the appliance for approx.
10 seconds then restartE63.0 Pressure switch error Unplug the appliance for approx.
10 seconds then restartE81.0 Cooking mode error Download cooking profile again
Import cooking profiles stored onthe IDM
E89.x PM error Switch the appliance off and back onagain
E91.x SD error Switch the appliance off and back onagain
E92.x SD error Switch the appliance off and back onagain
E96.0 Connection error Unplug the appliance for approx.10 seconds then restart
E99 Communication lost Unplug the appliance for approx.10 seconds then restart
E99.9 Initialization error Unplug the appliance for approx.10 seconds then restart
6 Servicing procedures
User manual 131

6.2.2 Emergency mode
Operating the combi steamer in emergency mode
Your combi steamer has an emergency mode that lets you continue to use it when it has a fault thatcannot be resolved quickly.This gives you continued but limited use of the appliance even though it has a fault.
Always notify your customer service office however.
Requirements
The appliance is in emergency mode.An audible signal is given.An error code is shown in the display.
Operating the appliance in emergency mode
1. Confirm the displayed error and start a cooking profile or acleaning profile that is based on an available operatingmode.
Limitations
Cooking times may be longer and uneven cooking may result. So pay particular attention to thecooking process and the cooked condition of your product.Water consumption may increase.Fully automatic and semi-automatic cleaning may not be possible or only have limited functionsavailable.The core temperature probe and the optional sous-vide sensor may not work.Only those functions can be selected that will not be impaired by the active fault in question.
Cooking programs that can be used in emergency mode
The following table lists the errors under which the appliance can still work, albeit with limitations, inemergency mode when the error cannot be resolved quickly.
Errorno.
Limitations / Action
E01.x - - up to140°C
No preheating of boilerCleaning not possible
E02 x up to140°C
up to140°C
up to140°C
Let the appliance cool downLet the product finish cooking fully at low cookingtemperature for a longer cooking timeCleaning not possible
E03.x at100°C
- - - Longer cooking timeUneven cooking results possible (meals in the up‐per shelves are ready first)
E21.1 at100°C
- - - Longer cooking timeUneven cooking results possibleCleaning not possible
E21.3 at100°C
- - - Cleaning not possible
E22.x x x x x Core temperature probe or sous-vide sensor not active
6 Servicing procedures
User manual 132

Errorno.
Limitations / Action
E23.1E23.3
- - x - No preheating of boilerCleaning not possible
E24.1E24.3
at100°C
- x - Cleaning not possible
E25.1E25.3
- - up to140°C
- Increased water consumption through constantcooling of the collector boxCleaning not possible
E26.1E26.3
- - x - No preheating of boilerCleaning not possible
E28.1.1E28.1.3
at100°C
- - - Cleaning not possible
E28.2.1E28.2.3
- - x - Cleaning not possible
E30.x x x x x Only affects the cleaning processE33.0 - - x - No preheating of boilerE34.0 x x x x Boiler not rinsed
Affects the cleaning process
E35.0 x x x x Affects the cleaning process and Crisp&TastyE58.0E59.0E60.0 x x x x Only affects the cleaning processE61.0E62.0E63.0 - - x - No preheating of boiler
Cleaning not possible
E91.x x x x xE92.x x x x x
x Emergency mode possible- Emergency mode not possible
6 Servicing procedures
User manual 133

6.2.3 Rectifying faults - problems in operation
Problems with the food being cooked
Problem Possible cause Required response.Uneven browning Suction panel not closed correct‐
lyReleasing and securing the suctionpanel on page 122
Cooking chamber not preheated Preheat the cooking chamberOven temperature too high Select a lower oven temperature
and extend the cooking timeHeater has failed completely orpart of heater is faulty
Contact customer service
Problems with the appliance
Problem Possible cause Required responseAppliance does not re‐spond to any input for10-20 seconds
Software crash Press ON/OFF for 5 seconds or dis‐connect the appliance from themains supply for 5 seconds
No longer able to switchthe appliance on or off
ON/OFF is blocked for 3 seconds Try again after 3 seconds.
Water runs out underneaththe appliance when closingthe appliance door
Whatever the cause Caution! Contamination hazardDiscard any food that has come intocontact with this water.
Blockage or constriction in thedrain pipe or wastewater system
Check the drain pipe and cus‐tomer’s wastewater system andclean out if necessaryFit funnel waste trap if necessaryPermanent drain connection on
appliances equipped with fullyautomatic, automatic or semi-au‐tomatic oven cleaningAir vent blocked or covered Remove obstructionAppliance drain clogged Appliance drain
For EB:Water is being sprayed in‐to the oven compartmentduring operation
For EB:Automatic boiler rinsing programhas not been run every day
For EB:Emptying and rinsing the boiler
Water standing in cookingchamber
Oven drain is blocked Rinse out oven drain
Problems with cleaning
Problem Possible cause Required responseBlack marks in the cookingchamber
Incorrect cleaning agent Use ConvoClean forte forfully automatic oven cleaningusing connected canistersUse ConvoClean forte S forfully automatic oven cleaningusing single-measure dis‐pensingUse ConvoClean forte orConvoClean new for semi-automatic oven cleaning
Water too hard Adjust water hardness; see'Technical data' in the installa‐tion manual
6 Servicing procedures
User manual 134

Problem Possible cause Required responsePoor cleaning result Incorrect soiling level set Select a higher cleaning level
Incorrect cleaning agent used Use ConvoClean forte orConvoClean new for fully au‐tomatic oven cleaning usingconnected canistersUse ConvoClean forte S orConvoClean new S for fullyautomatic oven cleaning us‐ing single-measure dispens‐ingUse ConvoClean forte orConvoClean new for semi-automatic oven cleaning
6 Servicing procedures
User manual 135

6.3 Servicing tasks
Contents
This section contains the following topics:
PageSafe working when servicing the appliance 137Replacing the hygienic plug-in gasket 138Replacing the halogen lamp for the oven light 139
6 Servicing procedures
User manual 136

6.3.1 Safe working when servicing the appliance
Your safety and the safety of your staff
Before your personnel start working with the combi steamer for the first time, familiarize yourself withthe information contained in the chapter 'For your safety on page 23' and make relevant safety ar‐rangements.Instruct your personnel to learn the safe-working rules given in this section before starting work, and tofollow them strictly.Instruct your personnel to familiarize themselves with the hazard warnings listed in this section and infurther instructions below, and instil in them the importance of taking the specified precautions.
Personal protective equipment for your personnel
Instruct your personnel to wear the correct personal protective equipment specified in the section 'Per‐sonal protective equipment on page 44' of the 'For your safety' chapter for the relevant tasks.
Live parts
Risk of electric shock from live partsTouching live parts under the cover and behind the operating panel can result in electric shock.
Make sure that the cover and operating panel are fitted.Make sure that any servicing work carried out under the covers, behind the control panel or on thepower cord is performed solely by a qualified electrician from an authorized service company.
Hot surfaces
Risk of burns from high temperatures on interior and exterior parts of the applianceYou may get burnt if you touch any of the interior parts of the cooking chamber, the inside of theappliance door or any parts that are or were inside the oven during cooking. In addition, touching theair vent can result in burns.
Before starting servicing tasks, wait until the cooking chamber has cooled to below 60°C or use the 'Cool down' function to cool the cooking chamber.Wear personal protective equipment.
Sharp-edged sheet-metal parts
Risk of cuts from sharp-edged sheet-metal partsWorking with or behind sharp-edged sheet-metal parts may result in cuts to hands.
Exercise caution.Wear personal protective equipment.
6 Servicing procedures
User manual 137

6.3.2 Replacing the hygienic plug-in gasket
For your safety when performing servicing work
Before starting servicing work, it is essential that you familiarize yourself with the rules and hazardwarnings specified in 'Safe working when servicing the appliance' on page 137, and follow the instruc‐tions given there.
Prior knowledge required
You need to know these operations:Opening and closing the appliance door safely 66Removing and fitting the hygienic plug-in gasket 124
Spare parts contents
Spare part required as listed in the spare parts list:1 hygienic plug-in gasket
Requirements
Check that the following requirements have been met:The combi steamer has cooled down to <60°C after its last use.The appliance door is open.The newly supplied gasket has been checked for damage and is intact.
Replacing the hygienic plug-in gasket
To remove the old hygienic plug-in gasket and to fit the new hygienic plug-in gasket, follow the instruc‐tions given in 'Removing and fitting the hygienic plug-in gasket on page 124'.
6 Servicing procedures
User manual 138
6.3.3 Replacing the halogen lamp for the oven light
For your safety when performing servicing work
Before starting servicing work, it is essential that you familiarize yourself with the rules and hazardwarnings specified in 'Safe working when servicing the appliance' on page 137, and follow the instruc‐tions given there.
Prior knowledge required
You need to know these operations:Opening and closing the appliance door safely 66Inserting and removing racks 82Taking food in and out using the transport trolley 75
Spare parts contents
Spare part required as listed in the spare parts list:1 halogen lamp 12V
Materials required
You will need the following materials:Socket wrench, size 8
Handling the halogen lamp
Always wear clean gloves or use a cloth to handle the working halogen lamp. Never touch the glassbulb of new or reusable halogen lamps with bare fingers.If it is not possible to remove the halogen lamp intact e.g. the contact pins are left behind, contact aservice engineer immediately.
Requirements
Check that the following requirements have been met:The combi steamer has been disconnected from the power supply and protective measures takento ensure the power cannot be switched on again.The cooking chamber has cooled down to <60°C after its last use.For table-top models with rack: the right-hand rack has been hinged into the cooking chamber.For table-top models with mobile shelf rack: the mobile shelf rack and the roll-in frame have beenremoved from the cooking chamber.The halogen lamp has cooled down.The new halogen lamp has been checked for damage and is intact.
6 Servicing procedures
User manual 139

Removing the halogen lamp
1. Use the socket wrench to remove the four hex bolts onthe oven light.The special construction means that the assembly ofscrews, trim, glass panel and gasket including mount re‐mains in one piece when the screws are undone.
2. Take the complete assembly off the cooking chamberwall .
3. Reach through the hole in the cooking chamber wall intothe reflector housing and pull the halogen lamp out up‐wards in a straight line.
Fitting the halogen lamp
1. To fit the halogen lamp, follow the steps in the reverse or‐der that you performed when removing it.When you have finished the job, remove all objects fromthe cooking chamber and wipe down or rinse out thecooking chamber.
6 Servicing procedures
User manual 140


CONVOTHERM ELEKTROGERÄTE GMBH, OVENS & ADVANCED COOKING EMEA, MANITOWOC FOODSERVICE,TALSTRASSE 35, 82436 EGLFING | GERMANY, T +49 8847 6 0, F +49 8847 414
WWW.CONVOTHERM.COM, WWW.MANITOWOCFOODSERVICE.COM
Combi steamerConvotherm 4 table-top models
Serial no.Item no.Order no.
Manitowoc Foodservice is a global company dedicated to bringing value to foodservice operators by equipping
them with highly individualized real-world answers that enhance menus, service, pro�ts, and e�ciency.
To learn how Manitowoc Foodservice and its leading brands can equip you, visit our global web
site at www.manitowocfoodservice.com then �nd the regional or local resources available to you.
© 2014 Manitowoc Foodservice Inc. except where explicitly stated otherwise. All rights reserved. 9761632_02 ENG - GBR 11/14