Embed Size (px)
Citation preview

For Service Information call 1.888.673.4639
Please provide following information:
• Model Number • Serial Number• Part description and number as shown in parts list.
DO NOT DISCARD
DINEX4711 E. Hefner Rd. (73131) • PO Box 53006 • Oklahoma City, OK 73152-3006(800) 654-8210 • Fax (800) 872-4701 • www.dinex.com
Manual No. CONVEYORMAIN Rev-06/13
Introduction . . . . . . . . . . . . . . . . . . . . . . . . . . . . . . . . . . . . . . . 2Installation . . . . . . . . . . . . . . . . . . . . . . . . . . . . . . . . . . . . . . . . 2Maintenance . . . . . . . . . . . . . . . . . . . . . . . . . . . . . . . . . . . . . . 5Troubleshooting . . . . . . . . . . . . . . . . . . . . . . . . . . . . . . . . . . . 6
Bandveyor, Band Welding Instructions . . . . . . . . . . . . . . . . . . 7Replacement Parts . . . . . . . . . . . . . . . . . . . . . . . . . . . . . . . . 10Dinex® Warranty . . . . . . . . . . . . . . . . . . . . . . . . . . . . . . . . . . 17
Models: IESB IESFB IESSB IESRC IESSW IESR
Conveyor Maintenance Manual

Conveyor Maintenance Manual | 2
Introduction
Congratulations! You have just purchased one of the finest pieces of equipment on the market today. Before installing or operating your new Dinex® Products equipment you should read through this material. This manual should be retained for further reference as it contains installation and operating instructions, service tips, part list and warranty information. Should you have any questions concerning the Equipment, please call the Dinex® Hotline at 1-888-673-4639 (Monday through Friday from 8 am to 5 pm, Eastern Standard Time).
IMPORTANT: For your safety, read and follow all cautions, ! information and warnings.
FReIghT DAMAge ClAIMs
Your Dinex® Products equipment was carefully inspected and packed before leaving our factory. The transportation company assumes full responsibility for safe delivery of this equipment. Dinex® Products cannot assume responsibility for damage or loss incurred in transit. Visible damage or loss should be noted on freight bill and signed by person making delivery.
A freight claim should be filed immediately with the trans-portation company. If damage is unnoticed or concealed until equipment is unpacked, notify the transportation company immediately and tell them you want to file a concealed damage claim. This must be done within fifteen (15) days after delivery was made. Be sure to retain all packing material and cartons.
! WARNINg: Installation of this equipment should be performed only by persons qualified or licensed to install electrical equipment.
• Adjustmentsandserviceworkshouldbeperformedonlybyaqualifiedservicetechnician.ServiceisavailablethroughAuthorizedDinexProductsParts&ServiceDistributorsthroughouttheUnitedStates.ForacompletelistingoftheseconsultyourdistributorlistingorwriteDinexProductsforthenameofthenearestdistributor.
• Thisequipmentinintendedforcommercialuseonly.Notfor household use.
• UseofotherthangenuineDinex®ProductsreplacementspartsorserviceworkperformedbyotherthanauthorizedDinex®Productsserviceagentswillvoidthewarranty.
• Donotuseanycorrosivecleaners.Useonlycleanersapprovedforstainlesssteel.
Installation
General Warranty & Maintenance StatementInstallation., periodic leveling, belt & band adjustments, gear box oil changes, tightening of loose bolts/fasteners and installation of the bands are the responsibility of the customer. Mechanical installation is to be performed by qualified personal. Electrically work is to be performed by qualified electricians.
general safety Rules1. NeVeR put fingers, hands or objects in or under moving
belts.
2. NeVeR operate conveyor with access panels removed.
3. NeVeR spray water into the drive housing/drive motor or control box area. Excessive water can damage the electrical and mechanical components and could create a shock hazard.
4. NeVeR attempt to clean the belts or any other moving part on the conveyor while it is running.
Installation TipsCarefully uncrate the equipment. Any shipping damage must be reported to the freight carrier immediately. If damage is found, keep all cartons and crating material for the freight carrier.
Carefully move the equipment into place. The use of fork trucks can damage the conveyor under structure, electrical raceways and other components. Their use should be limited. Damage during transport and installation will invalidate the equipment warranty.
Each conveyor is factory tested. However, bolts, set screws and other fasteners may have worked loose during shipment. Check set screws on all sprockets and pulley collars and tighten as needed with an Alien wrench prior to starting the conveyor for the first time.
Check all of the adjustable feet located in the legs. Properly level the conveyor by adjusting theses legs.
Conveyor Field Joints1. Welded Field Joints To maintain the integrity and proper
appearance of the equipment, the welding procedure must be performed by a welder who is knowledgeable and certified in the welding of stainless steel.
2. Bolted Field Joints All bolts and fasteners are supplied with the equipment.
(See Fig. 1)
electrical Raceway Field InstallationIf the e lectrical raceway is in two (2) sections, butt the two sections together. Bolt the these sections together using hardware supplied. It may be necessary to strip the insulation from the electrical wiring prior to making the final connection. Connect the wiring from the two sections together. Please note that the wiring in each section of the raceway is numbered. It is very important to connect the like wires together using electrical connectors that comply with local and state electrical codes.

Conveyor Maintenance Manual | 3
3" to 5" recommended while operating belt must not be tight while operating
Figure 3
Fabric Belt TensionIf the conveyor belt slips on the drive pulley, first check your conveyor belt to be sure it has been correctly routed through the drive during installation.
Secondly, check the drive pulleys and underside of the belts for cleanliness. Clean all slime and goop from the face of the pulleys and belts. Remove gummy or dried spillage from the pan and underside of the belt and alert the operating/cleaning crew to perform better housekeeping. (See Fig. 4)
Manual take upFigure 4
BelT CARe & AlIgNMeNT
Belt startup Start with slack belt and adjust about 1/32" for each running foot of light-duty conveyor or approximately 1/16" for each foot of heavy-duty conveyor (See Fig. 5).
Adjust both sides evenly
Figure 5
If conveyor belt slips, check the following according to your belt type and location.
Check the slack on the drive pulley for signs of wear or accumulated debris. If a clean belt slips, an increase in belt tension is required. Adjust the belt at the tail pulley (both sides evenly) in 1/4" intervals until the slipping stops. Also check for belt jam-ups, caused by misalignment of the pulleys.
! NOTe: Allmanufacturingfabricconveyorsarefurnishedwithstabilizedfabricbelts,whichcompensatefortheshrinkandstretchfoundinthebeltsusedbyotherconveyormanufacturers.
Tack weld at factory
Seal withsilicone on job
Isometric View at Joint
Exploded Section “X-X”
S/S Top
S/S Top
“X”
“X”
Studs weldedto undersideof top at factory
Figure 1
Bolts, angles & nuts furnishedloose for field
install
ChAIN AND BelT TeNsION
Drive Chain TensionCheck the slack. All drive chains should be visually inspected, inspected, on a regular basis, to monitor accumulative wear between the links. Adjust the drive chain to remove excessive slack and prevent possible damage from a jumping chain.
The importance of this inspection is illustrated by the arrow (See Fig. 2) when the slack (load-free) strand is above the taut (load-carrying) strand.
Tight
RightWrong
Loose
Shift reducer or remove shims belowFigure 2
slatted Belt TensionSlatted conveyor belts are linked and subject to the same accumulative ware between links as chain belts. Check the belt visually on a regular basis, to maintain the recommended catenary loop. (See Fig. 3) The return belt must have some slack for correct belt tension. Remove the slats or slat carrier chain link(s) to prevent an excessive catenary loop from causing damage to the belt or mechanism (the belt will jump or jam if it is too loose). Do not operate the belts under tight tension.

Conveyor Maintenance Manual | 4
Tab BeltingTo remove the plastic snap-on slats from the S.S. carrierChain belts use a screwdriver to pry them off from the bottom, above a sprocket as shown.
Remove links as required to shorten the 5.3. carrier chain. First remove three (3) or more plastic snap-on slats, then pry off the outer side bar links with a wide blade screwdriver, above a sprocket as shown (See Fig. 8). Drive the plastic slats into place above a sprocket with a mallet to reassemble the S.S. carrier chain and the links.
Hold down tabs
Snap on slates
Set screwsMetal chain
Outer sidebar link
Figure 8
Fabric BeltsThe most serious cause of pulley misalignment is usually the well-intentioned worker attempting to track the belt by adjusting or realigning only the head and tail pulleys, instead of the belt tracking rollers. The following instructions will remove the guesswork:
1. When correctly installed in-line and properly leveled, all conveyor pulleys, idlers, return rollers, pans and slider beds will be in-line and aligned. This initial field alignment will be very close to the original factory tested alignment. (See Fig. 9)
2. Check the pulley and roller alignment thoroughly before and during the break-in period to prevent belt damage at startup. Level the conveyor pan and check for correct pulley alignment by sighting the lower and upper reaches of the belt from either end while operating as shown.
3. When sighted from below, the lower belt reach should ride aligned and reasonably centered on the return rollers, toward the tail pulley in a straight line — snot curved. (See Fig. 10)
slatted Belts Regularly check the alignment of slatted belts through the top openings. The belts should ride centered in the conveyor pan through the head and tail openings. Realign the sprockets, when required, to guide the slats through the openings and re-tighten the set screws securely. (See Fig. 6)
Belt must be evenly spaced thru opening - each side
Retighten belt sprocket setscrews during break-in period
Figure 6
Check the catenary loop occasionally and adjust the 3" to 6" loop, while operating, to prevent the belt from snagging on the return ways. Tour conveyor is designed to tolerate the catenary loop sag as indicated. If the sag becomes excessive, it should be readjusted by removing the carrier chain linkage and/or slats as detailed below. (See Fig. 7).
Refer to the next page for slatted belt care in conveyor turns.
Non-Tab BeltingTo shorten the belt, which has molded lug hinging remove the slats by driving the pins through, with a small rod as shown, in the direction noted on the bottom of the slats. To reassemble the slats, drive the pins into place in a similar manner (See Fig. 7).
In center
Left out slatted chain without hold down tabs
Remove those with tabs at sprocketsFigure 7
Head & tail pulley faces checked for square 90º alignment to pan & belt
Leveled across pan - all points
Center line of belt path
Belt travels in straight line (not curved) parallel with pan
CL
Figure 9
Installed: Square field joints
Maintained Factory Alignment Pans, Rollers & Pulleys All pans lined - Not skewed
Tracking control
All shafts for pulleys - idlers - return rollers aligned at 90º to belt patch
Aligned tail & head pulleys does not allow belt to leave or approach tail and head pulleys in a hooked or sliced curve
90º Tracking control 90º

Conveyor Maintenance Manual | 5
D.C. Motor electronically Variable “e” Drive The standard variable speed "SCR" drives operate on 115 Volt, single phase, silicone rectified current. Permanent magnet motors are used. The basic belt speed is determined by the number of sprockets used. The basic belt speed is determined by the number of sprockets used.
The speed is altered by turning a knob, which changes resistance in the control box (located on the rear of the motor), which is connected to the transistorized circuits. The standard belt speed is approximately 5 to 40 F.P.M. (See Fig. 12)
Potentiometer speed control box
“Off - On” switch A.C.
Speed control D.C.
Silicone diode & transistor circuits
D.C. motor
Figure 12
Single worm reducer
D.C. Motor electronically Variable “e” Drive The standard variable speed "SCR" drives operate on 115 Volt, single phase, silicone rectified current. Permanent magnet motors are used. The basic belt speed is determined by the number of sprockets used. The basic belt speed is determined by the number of sprockets used.
The speed is altered by turning a knob, which changes resistance in the control box (located on the rear of the motor), which is connected to the transistorized circuits. The standard belt speed is approximately 5 to 40 F.P.M. (See Fig. 12)
Maintenance
ReDUCeR & DRIVe MAINTeNANCe
Regularly check the following and disregard the information which does not apply to your particular reducer or drive type.
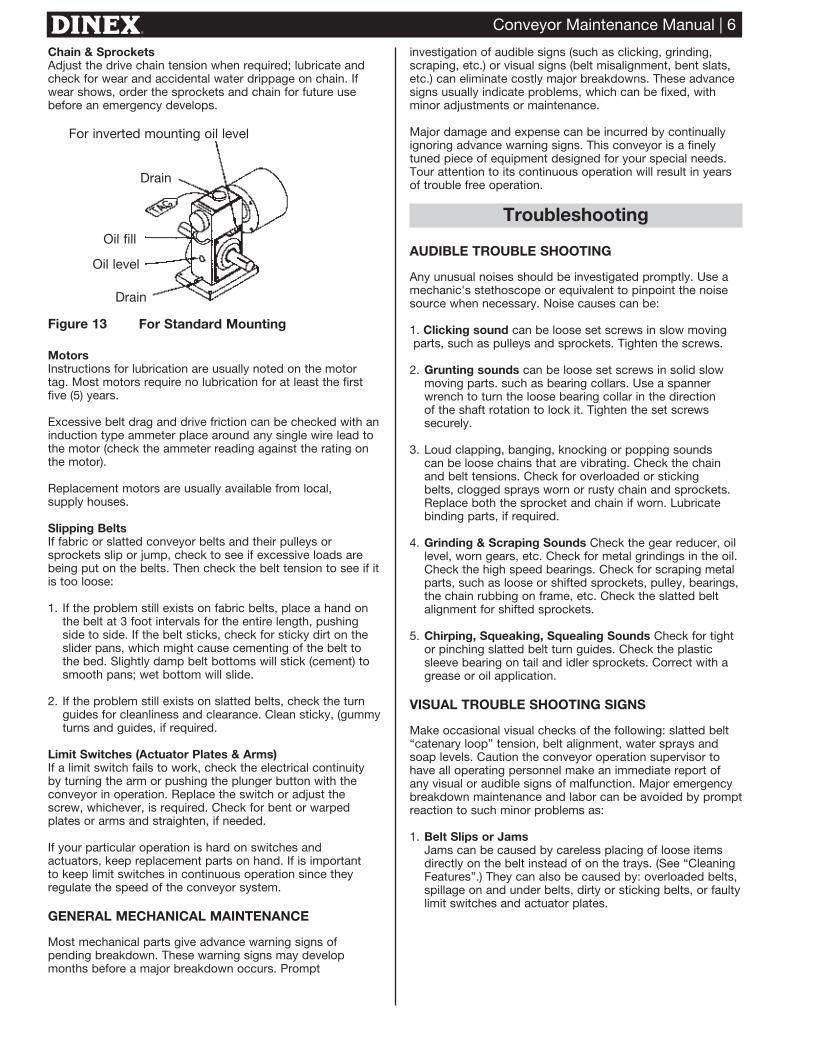
single Worm Reducers Change the oil during the break-in period to reduce the possibility of worm-wheel wear due to metallic abrasion. Service occasionally thereafter as recommended on the reducer tag. (See Fig. 13)
! NOTe: Theoillevelmustbemaintainedandfilledinbothboxesondoublefearwormreducers.
Figure 10
Must be relatively level through out length
Curves in belt indicates pulley misalignment
Note: Twisted or unlevel pan can cause belt to sway to low side
Belt must not ride hard on
either side of opening
4. When sighted from above, the upper belt reach from either end of the belt should ride relatively straight in a line from tail to head. No noticeable hooked or sliced curves should be seen in the belt as it leaves or approaches the tail or head pulleys. (See Fig. 10)
5. Correct the pulley alignment by adjusting the pulleys and bearings in the direction opposite of that causing the curve. Always check the alignment after belt tension adjustments. The corrected pulley alignment will remain permanent under normal conditions unless it is tampered with.
The belt is ready for tracking, after alignment of the pulley, rollers, etc., is completed. This is easily done with the conveyor in operation. The belt tracking should be frequently checked by looking at the top of the belt at the tail and drive openings, and adjusting the upper and lower belt tracking controls. These roller controls should be adjusted to guide the belt centered through both the tail and head openings.
Adust tension here only (Do not make belt taut)
Note that belt is not completely tauts But rather has a slight slackness
View At head section
View At Tail section
Adust this roller for proper tracking
Figure 11
! NOTe: Therollersthrough-outentirelengthofconveyorserveoneoftwofunctions.Toassistinproperbeltoperation, belt tracking and belt tension,(SeeFig.11).
Conveyor Maintenance Manual | 6
investigation of audible signs (such as clicking, grinding, scraping, etc.) or visual signs (belt misalignment, bent slats, etc.) can eliminate costly major breakdowns. These advance signs usually indicate problems, which can be fixed, with minor adjustments or maintenance.
Major damage and expense can be incurred by continually ignoring advance warning signs. This conveyor is a finely tuned piece of equipment designed for your special needs. Tour attention to its continuous operation will result in years of trouble free operation.
Troubleshooting
AUDIBle TROUBle shOOTINg
Any unusual noises should be investigated promptly. Use a mechanic's stethoscope or equivalent to pinpoint the noise source when necessary. Noise causes can be:
1. Clicking sound can be loose set screws in slow moving parts, such as pulleys and sprockets. Tighten the screws.
2. grunting sounds can be loose set screws in solid slow moving parts. such as bearing collars. Use a spanner wrench to turn the loose bearing collar in the direction of the shaft rotation to lock it. Tighten the set screws securely.
3. Loud clapping, banging, knocking or popping sounds can be loose chains that are vibrating. Check the chain and belt tensions. Check for overloaded or sticking belts, clogged sprays worn or rusty chain and sprockets. Replace both the sprocket and chain if worn. Lubricate binding parts, if required.
4. grinding & scraping sounds Check the gear reducer, oil level, worn gears, etc. Check for metal grindings in the oil. Check the high speed bearings. Check for scraping metal parts, such as loose or shifted sprockets, pulley, bearings, the chain rubbing on frame, etc. Check the slatted belt alignment for shifted sprockets.
5. Chirping, squeaking, squealing sounds Check for tight or pinching slatted belt turn guides. Check the plastic sleeve bearing on tail and idler sprockets. Correct with a grease or oil application.
VIsUAl TROUBle shOOTINg sIgNs
Make occasional visual checks of the following: slatted belt “catenary loop” tension, belt alignment, water sprays and soap levels. Caution the conveyor operation supervisor to have all operating personnel make an immediate report of any visual or audible signs of malfunction. Major emergency breakdown maintenance and labor can be avoided by prompt reaction to such minor problems as:
1. Belt slips or Jams Jams can be caused by careless placing of loose items directly on the belt instead of on the trays. (See “Cleaning Features”.) They can also be caused by: overloaded belts, spillage on and under belts, dirty or sticking belts, or faulty limit switches and actuator plates.
Chain & sprockets Adjust the drive chain tension when required; lubricate and check for wear and accidental water drippage on chain. If wear shows, order the sprockets and chain for future use before an emergency develops.
Figure 13
Drain
Oil fill
Oil level
Drain
For inverted mounting oil level
For standard Mounting
MotorsInstructions for lubrication are usually noted on the motor tag. Most motors require no lubrication for at least the first five (5) years.
Excessive belt drag and drive friction can be checked with an induction type ammeter place around any single wire lead to the motor (check the ammeter reading against the rating on the motor).
Replacement motors are usually available from local, supply houses.
slipping Belts If fabric or slatted conveyor belts and their pulleys or sprockets slip or jump, check to see if excessive loads are being put on the belts. Then check the belt tension to see if it is too loose:
1. If the problem still exists on fabric belts, place a hand on the belt at 3 foot intervals for the entire length, pushing side to side. If the belt sticks, check for sticky dirt on the slider pans, which might cause cementing of the belt to the bed. Slightly damp belt bottoms will stick (cement) to smooth pans; wet bottom will slide.
2. If the problem still exists on slatted belts, check the turn guides for cleanliness and clearance. Clean sticky, (gummy turns and guides, if required.
limit switches (Actuator Plates & Arms) If a limit switch fails to work, check the electrical continuity by turning the arm or pushing the plunger button with the conveyor in operation. Replace the switch or adjust the screw, whichever, is required. Check for bent or warped plates or arms and straighten, if needed.
If your particular operation is hard on switches and actuators, keep replacement parts on hand. If is important to keep limit switches in continuous operation since they regulate the speed of the conveyor system.
geNeRAl MeChANICAl MAINTeNANCe
Most mechanical parts give advance warning signs of pending breakdown. These warning signs may develop months before a major breakdown occurs. Prompt

Conveyor Maintenance Manual | 7
Bandveyor, Band Welding Instructions
A proper butt weld will yield 100% of the belt's ultimate tensile strength. With the tools provided and these instructions, proper welding technique can be achieved.
! NOTe: Acleanenvironmentcontributestowardensuringaproperweld.Makesuretheareaiswellventilatedandfreeof dirt, dust and draft.
1. Examine the hot knife for scratches in the surface of the coated blade. A damaged hot knife can affect weld results.
2. Plug the hot knife into 110/120v outlet and preheat for approximately ten minutes. Once hot, use a clean, dry cloth and gently remove from the coated surface any urethane residue from previous welding.
! WARNINg: Donotuseahardobjecttoscrapeurethanefromhotknifeblade.
3. Using the cutting shears provided or a pair of sharp scissors, cut each end of the belt perfectly square.
! NOTe: ContactFennerDrivesforinstructionsondetermining correct belt length.
4. Slide the spacer toward the mounting clamps, squeeze the handles closed, and finger tighten the thumb nut located to the right of the right side mounting clamp. (See Fig. 14)
Figure 14
5. Figure 15 illustrates belt clamp mounting positions. Starting on on one side, loosen the clamp nuts and place belt in desired clamping position. Slide belt in clamp so that the end is halfway between the two mounting clamps. Tighten damp nuts.
! NOTe: Forroundandridgetopprofiles,removebottomplate.
2. Jerking Belts Look for careless loading, spillage on the belts, dirty belts and return guides.
3. Miscellaneous Occasionally check for signs of chain/sprocket rust or wear. Check the reducer lubricant. Place your band on the reducer to check for excessive temperature.
lUBRICATION
Bearings All flow speed bearings are sealed for life. They require no additional lubrication.
Worm gear Reducers Change the original oil after the first 5000 hours of operation. Check the oil level occasionally thereafter, changing the oil as required. After 5000 hours change to Mobil synthetic oil SHC634.
Motor Most motors require no lubricant for at least five (5) years. See the tag on the motor.
Belt Lubrication and cleaning on slatted belts is normally the responsibility of the operating and cleaning crew.
Motor won’t run 1. Power off 2. Limit switch activated
3. Blown fuse
1. Restore power2. Remove object &
adjacent linkage3. Replace fuse
Motor runs;Belt does not
1. Set screw on drive pulley loose
2. Gear box oil
3. IR comp. on speed board set to low
4. Set screws thru bearing to drive shaft loose
1. Tighten screw
2. Check oil & refill if required - Repair leak & inspect gears
3. Turn IR comp. clockwise until belt runs steady
4. Tighten set screws
Motor runs intermittently
1. Loose wire connection2. IR comp. on speed
board set to high
1. Check wires2. Turn IR comp. counter
clockwise until motor stabilizes
Belts do not run smoothly
1. Excessive slack
2. Drive chain has excessive slack
3. Object under belt
1. Remove slack by adjusting
2. Remove slack
3. Remove object
Belt squeals while running
1. Slider pan surface dirty 1. Clean with shela shine polish
Belt does not move 1. Speed control knob loose
1. Tighten knob
PROBleM ReMeDYPOssIBle CAUse
Conveyor Maintenance Manual | 8
6. On the opposite clamp, loosen nuts and place belt in the same clamping position. Warning: Make sure belt does not contain any twist. Slide belt in clamp until the two belt ends butt together. Make sure that ends are properly aligned on all sides, ( See Fig. 16). Tighten clamp nuts.
! NOTe: Trytokeepbothclampingplatesparalleltothegroovedbaseblocks.
Figure 16
7. Loosen thumb nut on right approximate 1-1/2 turns and allow the handles to open. With your left thumb, hold the spacer forward and with your right hand, insert the blade of hot knife between belt ends and squeeze handles together. (See Fig. 17)
8. As the belt ends begin to melt, the handles will contact the spacer. Hold handles tight against the spacer. After the appropriate time, (See Table on right), quickly release the handles, slide the spacer toward yourself, withdraw the hot knife blade, and squeeze the handles together.
9. Tighten the thumb nut on the right and allow the welded joint to cure. Small cross section belts should be left in the clamp for a minimum of one minute to allow for initial cooling. Belt cross sections over 1/4" wide should be left in the clamp a minimum of three minutes.
Figure 15
ROUND BelT sIzes
INChes MM
3/32" - 1/8"
3/16" - 5/16"
3/8" - 3/4"
2mm - 3mm
4mm - 8mm
Small
Medium
Large
Use V-gROOVe
VARIOUs BelT ClAMP MOUNTINgs
Figure 17
INChes MM TYPe
BelT sIzes
.055" Thick Flats
All 3L.06" x .75".06" x 1.5".08" x .75".09" x 1.0".13" x .63"
5/16"
3/32" - 1/4"
1/2" - 9/16"
7mm - 9mm 10-20 sec
All A (except Hi-Ridge Top).06" x 1.75".06" x 2.0"
.09" x 1.25"
.09" x 1.50".13" x 1.0"
All Twin (except
Hi-Ridge Top).06" x 1.75".06" x 2.0"
.09" x 1.25"
.09" x 1.50".13" x 1.0".25" x .63"
3/8" 10mm 21-30 sec
31-50 sec
<10 sec2mm - 3mm
C, D5/8" - 3/4" >50 sec16mm - 19mm
12mm - 15mm
esTIMATeDheATINg
TIMe

Conveyor Maintenance Manual | 9
! WARNINg: Allowthebelttocureforaminimumof1/2hour prior to installing, tensioning, or putting strain on the belt weld.
! NOTe: While the belt is cooling, this is a good time to use aclean,dryclothtoremoveanyresiduefromthehotknifeblade.
10. Loosen clamp nuts and remove belt from clamp. Using the flash cutters, remove the bead from the splice (See Fig. 18).
! NOTe: Theflashcuttershavebeendesignedspecificallyfor urethane trimming and are not to be used for cutting metal, wire, etc.
Figure 18
Replacement Parts
To obtain parts, please call the Dinex® Parts & Service line at 888-673-4639 with the conveyor model number, serial number and the part required.

Conveyor Maintenance Manual | 10
Parts IesB Bandveyor
PARTs lIsT
S7 - 1 Adjustable bullet feet
S7 - 2 5" O.D. polyurethane tire swivel stem caster (specify with or with out brake and swivel or plate)
S7 - 3 Control panel - contact dealer for parts (parts vary)
S7 - 4 Micro switch (pan type limit switch)
S7 - 5 2" O.D. P.V.C. roller (band return)
S7 - 6 1/2" diameter poly-core bands - specify O.A. length or conveyor.
S7 - 7 S.S. lift-off hinges (specify quantity)
S7 - 8 Magnetic catch
S7-4
S7-6
S7-1
S7-2S7-7
S7-3
S7-6S7-5
S7-8

Conveyor Maintenance Manual | 11
Parts IesB Bandveyor
PARTs lIsT
S7 - 9 Conveyor drive motor
S7 - 10 Conveyor gear reducer
S7 - 11 Gear reducer sprocket
S7 - 12 S.S. drive chain
S7 - 13 10" diameter drive pulley
S7 - 14 Drive pulley sprocket
S7 - 15 Pillow block bearings
S7 - 16 1"1" O.D. S.S. shaft with key way - drive end
S7 - 17 1"1" O.D. S.S. shaft with key way - tail end
S7 - 18 Tensioner arm
S7 - 19 Tensioner arm sprocket
NOTe: When ordering parts for powered conveyors, please specify the conveyor model. This is located on the conveyor drive house. Parts may vary from conveyor to conveyor.
S7-15
S7-17
S7-13 S7-16
S7-15
S7-14
S7-18
S7-19
S7-12
S7-10
S7- 9
S7-11

Conveyor Maintenance Manual | 12
Parts IesFB Fabric Belt Conveyor
PARTs lIsT
S4 - 1 Adjustable bullet feet
S4 - 2 5" O.D. polyurethane tire swivel stem caster (specify with or without brake)
S4 - 3 Control panel - contact dealer for parts (parts vary)
S4 - 4 Micro switch (pan type limit switch)
S4 - 5 2" O.D. P.V.C. roller (fabric belt return)
S4 - 6 10" wide fabric belt - specify width & O.A. length or conveyor
S4-4
S4-6
S4-1
S4-2
S4-3
S4-5

Conveyor Maintenance Manual | 13
Parts IesFB Fabric Belt Conveyor
PARTs lIsT
S4 - 7 Conveyor drive motor
S4 - 8 Conveyor gear reducer
S4 - 9 Gear reducer sprocket
S4 - 10 S.S. drive chain
S4 - 11 10" diameter large drive wheel
S4 - 12 Large drive wheel sprocket
S4 - 13 4" diameter idler wheel
S4 - 14 Pillow block bearings
S4 - 15 4" diameter guide rollers
S4 - 16 2" diameter P.V.C. rollers
S4 - 17 1" O.D. S.S. shaft - drive end
S4 - 18 1" O.D. S.S. shaft - tail end
NOTe: When ordering parts for powered conveyors, please specify the conveyor model. This is located on the conveyor drive house. Parts may vary from conveyor to conveyor.
S4-14S4-16
S4-15
S4-17
S4-8
S4-15
S4-18
Belting must be on top or rollers
S4-16
S4-7
S4-9S4-10
S4-12S4-11
S4-14
S4-13S4-14

Conveyor Maintenance Manual | 14
Parts IessB slat Belt Conveyor
PARTs lIsT
S6 - 8 Conveyor drive motor
S6 - 9 Conveyor gear reducer
S6 - 10 Gear reducer sprocket
S6 - 11 S.S. drive chain
S6 - 12 S.S. drive chain tensioner arm
S6 - 13 Tensioner sprocket
S6 - 14 Conveyor drive sprocket
S6 - 15 1" O.D. drive shaft
S6 - 16 Belt sprocket (picture behind slat belt)
S6 - 17 Conveyor drive bearing
S6 - 18 S.S. chain located on underside of slat belt
S6 - 19 Tail sprocket pillow block bearing
S6 - 20 1" O.D. tail shaft
S6 - 21 Tail belt sprocket
NOTe: When ordering parts for powered conveyors, please specify the conveyor model. This is located on the conveyor drive house. Parts may vary from conveyor to conveyor.
S6-15
S6-19
S6-21
S6-20
S6-17
S6-16
S6-14S6-12
S6-13
S6-11
S6-9S6-10
S6-8
S6-18

Conveyor Maintenance Manual | 15
Parts IesR & IesRC Roller Wheel Conveyor
PARTs lIsT
S1 - 1 Adjustable bullet feet
S1 - 2 5" O.D. polyurethane tire swivel stem caster (specify with or without brake)
S7 - 3 1.9” diameter P.V.C. rollers with S.S. shafts – (specify inside frame dimension)
S1-2
S1-1
S1-3

Conveyor Maintenance Manual | 16
Parts IessW skate Wheel Conveyor
PARTs lIsT
S2 - 1 Adjustable bullet feet
S2 - 2 5" O.D. polyurethane tire swivel stem caster (specify with or without brake)
S2 - 3 5/16" - 18" x 1-1/4" S.S. hex head bolt
S2 - 4 2" O.D. nylon metzgar skatewheels
S2 - 5 S.S self-locking nut
S2-2
S2-1
S2-3
S2-4
S2-5
DINEX® Warranty
These Warranties cover the following CARLISLE | DINEX (“Dinex”) equipment products (the “Warranted Products”):
•RethermalizationEquipmentProducts
•InductionHeatingSystemProducts(excludingInductionBasescoveredunderseparatewarranty)*
•MilkCoolerProducts
•IceCreamFreezerProducts
•AirCurtainRefrigeratorProducts
•BlastChillerProducts
•Hot/ColdFoodCounterProducts
•Plate,RackandTrayDispenserProducts
•PlateHeaterProducts
•BaseHeaterProducts
•DryingandStorageRackProducts
•StarterStationProducts
•ConveyerProducts
•TrayandOtherCartProducts
WarrantedProductsalsoincludesanyotherEquipmentSystemProducts identified on Dinex’s website (www.dinex.com) from time to time.
Standard Warranty.Exceptasindicatedotherwisebelow,Dinexwarrants that the Warranted Products will be free from defects in title,materialandworkmanshipundernormaluseandserviceandwillperformsubstantiallyinaccordancewithDinex’swrittentechnicalspecifications for the Warranted Products (as such specifications exist on the date the Warranted Products are shipped) (the “Product Specifications”).Thiswarrantycoversbothpartsandlaborandisavailableonlytoend-users(the“Customers”)thatpurchasetheWarrantedProductsfromDinexoritsauthorizeddistributors.Forthepurposeofthesewarranties,adefectisdeterminedbyDinexafteritsgood faith investigation.
Dinex Software.Inadditiontotheotherwarrantiessetforthherein,withrespecttoDinex’slicensedsoftware,Dinexwarrantsthatithasthe right to license or sublicense the software to Customer for the purposes and subject to the terms and conditions set forth in Dinex’s standard terms and conditions.
Supplies and Accessories.Dinex’swarrantyforitssuppliesandaccessoriesthatareshippedwithWarrantedProductsiscoveredbyaseparatewarrantystatement,whichisavailableatwww.dinex.com.Services.DinexwarrantsthatanyserviceitprovidestoCustomerwillbeperformedbytrainedindividualsinaworkmanlikemanner.
DURATIONDinexprovidesaoneyearwarrantyfortheWarrantedProducts*.ThewarrantyperiodbeginsonthedatetheWarrantedProductsareshippedtoCustomer.ThewarrantyperiodforanyWarrantedProductorpartfurnishedtocorrectawarrantyfailurewillbetheunexpiredtermofthewarrantyapplicabletotherepairedorreplacedWarranted Product.*Turbo•TempandSmart•ThermInductionChargersareWarrantedfortwoyears.
REMEDIESIfCustomerpromptlynotifiesDinexofCustomer’swarrantyclaimandmakestheWarrantedProductavailableforservice,Dinexwill,atitsoption,eitherrepairorreplace(withneworexchangereplacementparts)thenon-conformingWarrantedProductorparts of the Warranted Product. With respect to Dinex’s licensed software,Dinexwill,atitsoption,eithercorrectthenon-conformityorreplacetheapplicablelicensedsoftware.Warrantyservicewillbeperformedwithoutchargefrom8:00a.m.to5:00p.m.CST,Monday-Friday,excludingDinexholidays,andoutsidethosehours
atDinex’sthenprevailingserviceratesandsubjecttotheavailabilityofpersonnel.WithrespecttoDinex’swarrantyfortheservicesitprovidestoCustomer,Customer’sexclusiveremedyshallbethere-performanceoftheservicesbyDinex.TheforegoingremediesareCustomer’sexclusiveremediesandDinex’ssoleliabilityforwarrantyclaimsunderthiswarrantystatement.Thisexclusiveremedyshallnot have failed of its essential purpose (as that term is used in the Uniform Commercial Code) as long as Dinex remains willing to repair orreplacedefectiveWarrantedProductswithinacommerciallyreasonabletimeafterbeingnotifiedofCustomer’swarrantyclaim.
LIMITATIONSTHESEWARRANTIESAREEXCLUSIVEANDINLIEUOFALLOTHERWARRANTIES,WHETHERWRITTEN,ORAL,EXPRESSED,IMPLIEDORSTATUTORY.EXCEPTASPROVIDEDHEREIN,NOEXPRESSORIMPLIEDWARRANTIES,INCLUDINGBUTNOTLIMITEDTOIMPLIEDWARRANTIESOFMERCHANTABILITY,FITNESSFORAPARTICULARPURPOSE,QUIETENJOYMENT,SYSTEMINTEGRATIONANDDATAACCURACY,WILLAPPLY.THEREARENOWARRANTIESTHATEXTENDBEYONDTHOSEDESCRIBEDINTHISDOCUMENTANDNOPRIORSTATEMENTSBYANYOFDINEX’SREPRESENTATIVESSHALLMODIFYOREXPANDTHESEWARRANTIES.DINEXANDDINEX’SAFFILIATESANDREPRESENTATIVESSHALLHAVENOLIABILITYTOCUSTOMERFOR(1)ANYSPECIAL,PUNITIVE,INCIDENTAL,INDIRECTORCONSEQUENTIALDAMAGESARISINGOUTOFORINCONNECTIONWITHTHEWARRANTEDPRODUCTS,REGARDLESSOFWHETHERSUCHLIABILITYSHALLBECLAIMEDINCONTRACT,TORT,EQUITYOROTHERWISE,(2)ANYASSISTANCENOTREQUIREDUNDERDINEX’SQUOTATIONOR(3)ANYTHINGOCCURRINGAFTERTHEWARRANTYPERIODENDS.
DINEX’SSTANDARDWARRANTIESONLYAPPLYTOEND-USER-PURCHASERSLOCATEDINTHEUNITEDSTATESANDCANADA.ANYSALETOEND-USER-PURCHASERSOUTSIDETHEUNITEDSTATESANDCANADAWILLBESUBJECTTOCOMMERCIALTERMSSPECIFICALLYAGREEDBYDINEXANDTHEEND-USERPURCHASER.DINEXMAKESNOWARRANTY,EXPRESSORIMPLIED,TOEND-USER-PURCHASERSOUTSIDETHEUNITEDSTATESORCANADAUNLESSOTHERWISEEXPRESSLYAGREEDINWRITING.
Thesewarrantiesdonotapplyto,andDinexshallnothaveanyobligationtoCustomerhereunderwithrespectto,anywarrantyclaim resulting from or arising out of: (i) normal wear and tear; (ii) damagecausedbyshippingoraccident;(iii)damagecausedbyimproperinstallation,repairoralterationnotperformedbyDinex;(iv)theuseoftheWarrantedProductincombinationwithanysoftware,tools,hardware,equipment,supplies,accessoriesoranyothermaterialsorservices,notfurnishedbyDinexorrecommendedinwritingbyDinex;(v)theuseoftheWarrantedProductinamannerorenvironment,orforanypurpose,forwhichDinexdidnotdesignorlicenseit,orinconsistentwithDinex’srecommendationsorinstructionsonuseincluding,butnotlimitedto,powersupplyrequirementsidentifiedinProductSpecifications;(vi)anyalteration,modificationorenhancementoftheWarrantedProductbyCustomeroranythirdpartynotauthorizedorapprovedinwritingbyDinex;(vii)Warranted Product manufactured to meet customer specifications or designs;or(viii)anyaccessoriesorsuppliesorotherequipmentorproductsthatmaybedeliveredwiththeWarrantedProduct.
Inaddition,thesewarrantiesdonotcover:(i)Anydefectordeficiency(includingfailuretoconformtoProductSpecifications)thatresults,inwholeorinpart,fromanyimproperstorageorhandling,failureto maintain the Warranted Products in the manner described in anyapplicableinstructionsorspecifications,inadequatebackuporvirusprotectionoranycauseexternaltotheWarrantedProductsorbeyondDinex’sreasonablecontrol,including,butnotlimitedto,powerfailureandfailuretokeepCustomer’ssitecleanandfreeofdust,sandandotherparticlesordebris;(ii)thepaymentorreimbursementofanyfacilitycostsarisingfromrepairorreplacementoftheWarrantedProducts;(iii)anyadjustment,suchasalignment,calibration,orothernormalpreventativemaintenancerequiredofCustomer;and(iv)expendablesupplyitems.
Conveyor Maintenance Manual | 17

NOTES _____________________________________________________________________________________________
________________________________________________________________________________________________________
________________________________________________________________________________________________________
________________________________________________________________________________________________________
________________________________________________________________________________________________________
________________________________________________________________________________________________________
________________________________________________________________________________________________________
________________________________________________________________________________________________________
________________________________________________________________________________________________________
________________________________________________________________________________________________________
________________________________________________________________________________________________________
________________________________________________________________________________________________________
________________________________________________________________________________________________________
________________________________________________________________________________________________________
________________________________________________________________________________________________________
________________________________________________________________________________________________________
________________________________________________________________________________________________________
________________________________________________________________________________________________________
________________________________________________________________________________________________________
________________________________________________________________________________________________________
________________________________________________________________________________________________________
________________________________________________________________________________________________________
________________________________________________________________________________________________________
________________________________________________________________________________________________________
________________________________________________________________________________________________________
________________________________________________________________________________________________________
________________________________________________________________________________________________________
________________________________________________________________________________________________________
________________________________________________________________________________________________________
________________________________________________________________________________________________________
________________________________________________________________________________________________________
________________________________________________________________________________________________________
________________________________________________________________________________________________________
________________________________________________________________________________________________________
________________________________________________________________________________________________________
________________________________________________________________________________________________________
Conveyor Maintenance Manual | 18

NOTES _____________________________________________________________________________________________
________________________________________________________________________________________________________
________________________________________________________________________________________________________
________________________________________________________________________________________________________
________________________________________________________________________________________________________
________________________________________________________________________________________________________
________________________________________________________________________________________________________
________________________________________________________________________________________________________
________________________________________________________________________________________________________
________________________________________________________________________________________________________
________________________________________________________________________________________________________
________________________________________________________________________________________________________
________________________________________________________________________________________________________
________________________________________________________________________________________________________
________________________________________________________________________________________________________
________________________________________________________________________________________________________
________________________________________________________________________________________________________
________________________________________________________________________________________________________
________________________________________________________________________________________________________
________________________________________________________________________________________________________
________________________________________________________________________________________________________
________________________________________________________________________________________________________
________________________________________________________________________________________________________
________________________________________________________________________________________________________
________________________________________________________________________________________________________
________________________________________________________________________________________________________
________________________________________________________________________________________________________
________________________________________________________________________________________________________
________________________________________________________________________________________________________
________________________________________________________________________________________________________
________________________________________________________________________________________________________
________________________________________________________________________________________________________
________________________________________________________________________________________________________
________________________________________________________________________________________________________
________________________________________________________________________________________________________
________________________________________________________________________________________________________
Conveyor Maintenance Manual | 19

Manual No. CONVEYORMAIN Rev-06/13
Please confirm that you have the most current specification sheet by visiting www.carlislefsp.com.Dinex reserves the right to change specifications and product design without notice.Such revisions do not entitle the buyer to corresponding changes, improvements,additions or replacements for previously purchased equipment.
Printed in USA
© 2013 Carlisle FoodService ProductsOklahoma City, OK 73131www.carlislefsp.com | 800-654-8210