Embed Size (px)
Citation preview

Content Management System 8.0
Administrator Guide Revision 2

2
CMS 8.0 Administrator Guide
2
Table of Contents List of Tables ......................................................................................................................... 4
1 Introduction ....................................................................................................................... 6
1.1 New and Updated Features ......................................................................................... 6
1.2 About This Guide ......................................................................................................... 6
2 CMS Architecture ............................................................................................................... 7
2.1 XML Content ............................................................................................................... 7
2.2 The Ingeniux CMS Environment ................................................................................... 8
2.3 Updating DSS Site Content........................................................................................... 9
2.4 CMS Client .................................................................................................................. 9
2.5 CMS File Structure ....................................................................................................... 9
2.6 Structure of CMS Site Files ......................................................................................... 11
2.7 File Structure of the \xml Directory ............................................................................ 12
2.8 File Structure of \xml\pub ......................................................................................... 13
2.9 File Structure of \xml\users ....................................................................................... 14
2.10 File Structure of \xml\Custom ................................................................................. 14
2.11 File Structure of \xml\versions ................................................................................ 14
2.12 Registry Values ........................................................................................................ 15
2.13 CMS Configuration Files ........................................................................................... 18
2.14 Back-Up Frequency .................................................................................................. 20
2.15 users.xml File Structure ........................................................................................... 20
2.16 Version Control ....................................................................................................... 21
2.17 Editing resource.inc ................................................................................................. 22
2.18 CustomHooks.inc .................................................................................................... 22
2.19 TaxonomyEvents.inc ................................................................................................ 26
3 Authentication, Authorization, and Security ...................................................................... 28
3.1 Authentication .......................................................................................................... 28
3.2 Role of ASP.NET ........................................................................................................ 28
3.3 Authentication Models .............................................................................................. 28
3.4 Troubleshooting Authentication and Start Up ............................................................ 37
3.5 Authorization ............................................................................................................ 40
3.6 Node-Level Security .................................................................................................. 41
3.7 Managing Assets and Asset Security .......................................................................... 45
4 Users and Groups ............................................................................................................. 47
4.1 Groups Tab ............................................................................................................... 47
4.2 Users Tab .................................................................................................................. 52
4.3 Advanced Tab ........................................................................................................... 54
5 Workflows ....................................................................................................................... 56

3
CMS 8.0 Administrator Guide
3
5.1 Workstates ............................................................................................................... 57
5.2 Transitions ................................................................................................................ 58
5.3 Actions ..................................................................................................................... 60
5.4 Check-in .................................................................................................................... 62
5.5 Mark/Unmark for Publish .......................................................................................... 63
5.6 Revert to Version ...................................................................................................... 64
5.7 Send Mail .................................................................................................................. 65
5.8 Permissioned Workflow ............................................................................................ 67
6 Page Creation Rules ......................................................................................................... 68
6.1 Info Tab .................................................................................................................... 69
6.2 Parent Pages Tab ....................................................................................................... 70
6.3 Node Level Rule Application ...................................................................................... 70
7 Publishing Overview ......................................................................................................... 72
7.1 Dependencies ........................................................................................................... 72
7.2 Dependency Calculations........................................................................................... 72
7.3 Navigations ............................................................................................................... 72
7.4 Publishing a Page ...................................................................................................... 73
7.5 Task Queue Serialization ........................................................................................... 73
7.6 Publishing in Detail.................................................................................................... 74
7.7 Performance Suggestions for Publishes ...................................................................... 75
7.8 Publishing from a Workflow Action............................................................................ 76
7.9 Post-Publish Synchronization ..................................................................................... 76
7.10 Dynamic Publishing System ..................................................................................... 76
7.11 Site Sync Overview .................................................................................................. 79
8 Publishing System ............................................................................................................ 82
8.1 Configuring a Publishing Target ................................................................................. 82
8.2 Configuring Dynamic Publishing ................................................................................. 85
8.3 Configuring Replication ............................................................................................. 86
8.4 Security for Publishing Targets ................................................................................... 92
8.5 Propagate Publishes Feature ..................................................................................... 93
8.6 Publishing Profiles Tab .............................................................................................. 95
8.7 User Agents and Sites Tab ......................................................................................... 96
8.8 Device Manager ........................................................................................................ 98
8.9 Configuring Mobile Preview .................................................................................... 100
8.10 Structured URLs .................................................................................................... 103
8.11 Troubleshooting Publishing and Replication ........................................................... 114
9 System Options .............................................................................................................. 119
9.1 settings.xml ............................................................................................................ 119

4
CMS 8.0 Administrator Guide
4
9.2 Configuring Options for Groups ............................................................................... 120
9.3 In-Context Editing ................................................................................................... 121
9.4 Configuring Custom Tabs ......................................................................................... 124
9.5 XHTML Editor .......................................................................................................... 128
9.6 Spell-Check Settings ................................................................................................ 141
9.7 Publishing ............................................................................................................... 143
9.8 Changing the Application Name ............................................................................... 147
9.9 Disabling Auto-Save ................................................................................................ 147
9.10 Configuring a Reverse Proxy .................................................................................. 147
9.11 WorldView ............................................................................................................ 147
9.12 Email ..................................................................................................................... 153
9.13 Logging ................................................................................................................. 155
9.14 Configuring External File Locations ......................................................................... 163
9.15 Setting Time Zones ................................................................................................ 164
9.16 Configuring DSS Variables ...................................................................................... 165
9.17 DSS Caching .......................................................................................................... 166
10 Administration Tools .................................................................................................... 168
10.1 Search ................................................................................................................... 168
10.2 Find and Replace ................................................................................................... 170
10.3 Schema Designer ................................................................................................... 171
10.4 Publish Monitor .................................................................................................... 183
10.5 Taxonomy ............................................................................................................. 185
10.6 Redirects ............................................................................................................... 187
10.7 Reports ................................................................................................................. 188
10.8 Analytics ............................................................................................................... 193
10.9 Database Query Components ................................................................................ 194
11 Glossary of Terms ......................................................................................................... 196
List of Tables
Table 1: Custom Hooks ................................................................................................................................. 25
Table 2: Custom Hook parameters ............................................................................................................... 26
Table 3: Taxonomy events ........................................................................................................................... 27
Table 4: Taxonomy events parameters ........................................................................................................ 27
Table 5: XHTML Toolbar ............................................................................................................................. 133
Table 6: Firefox Smart Paste Functionality ................................................................................................. 138
Table 7: Safari Smart Paste Functionality ................................................................................................. 138
Table 8: Internet Explorer 6 Smart Paste Functionality ............................................................................. 138
Table 9: Internet Explorer 7 Smart Paste Functionality ............................................................................. 139

5
CMS 8.0 Administrator Guide
5
Table 10: XHTML Cleaning ......................................................................................................................... 140
Table 11: Workflow States ......................................................................................................................... 150
Table 12: Workflow Transitions ................................................................................................................. 151
Table 13: DSS Traffic Tokens ...................................................................................................................... 163

6
CMS 8.0 Administrator Guide
6
1 Introduction
Welcome to Ingeniux CMS 8.0! This latest version of the Content Management System introduces new developer features, an enhanced publishing system, and improved mobile display capabilities.
Section 1.1 provides a brief overview of new features. For more on improvements in CMS 8.0, see the New and Updated Features guide.
1.1 New and Updated Features
Nicknamed the “developer build,” CMS 8.0 makes it easier to implement custom solutions on the platform. It also reinforces Ingeniux CMS as a leading mobile solution.
One core update is the deployment of a new runtime server, the Dynamic Site Server (DSS), which is built on the Microsoft .NET platform. With the DSS, developers can take advantage of cutting-edge Microsoft technologies, including ASP.NET 4.0, MVC 3, and the Razor view engine. The DSS also provides out-of-the-box support for XSLT-based legacy implementations.
With improved mobile device detection and MVC-backed mobile templating, CMS 8.0 is specifically designed to deliver HTML5 mobile websites. CMS 8.0 leverages the 51Degrees.mobi Framework to provide custom displays for all major mobile platforms and devices. Users can preview mobile displays in the CMS.
The publishing system has also been redesigned. The new Dynamic Publishing System, built on Microsoft .NET 4, offers a dramatic improvement in performance and quality. It also includes a new file replication system. In place of the old PeerSync model, CMS 8.0 uses Ingeniux Site Sync to replicate files from the CMS to the DSS. Seamlessly integrated with existing publishing features, the new Site Sync system makes the site publishing process more straightforward and reliable.
In previous versions of the CMS, Schema Designer functioned as a stand-alone application, and files created from it had to be manually copied into the CMS site directory. CMS 8.0 includes a new, integrated Schema Designer that helps you create and update schemas within the CMS. The new Schema Designer makes it possible to edit schemas, review previous versions of schemas, and sync schemas to existing pages – all within the CMS UI.
With CMS 8.0, you can efficiently manage your organization’s web experience across the whole spectrum of platforms and devices. This guide provides an overview of new features and shows you how to make the most of the new functionality in CMS 8.0.
1.2 About This Guide
This guide is written for CMS administrators and power users. Some of the technical material is intended primarily for IT professionals, though many topics will be useful to anyone who manages content in the CMS. To get the most out of this guide, you should be familiar with the CMS Client, the primary tool for working in the CMS.
This guide describes the configuration, management, and maintenance of the CMS. It provides an overview of the CMS architecture and describes in detail how to set security, manage users, create workflows and page creation rules, configure a site, publish content, change system settings, and use various administration tools. The glossary defines key terms used to describe the CMS environment.

7
CMS 8.0 Administrator Guide
7
2 CMS Architecture
This section provides an overview of the CMS software architecture, with an emphasis on the XML data model.
2.1 XML Content
The CMS system stores content in XML pages. These XML pages are generated by schemas and displayed by view templates, which provide HTML markup for the content. Prior to CMS 8.0, the CMS used XSLT to display XML, rather than view templates.
These technologies are explained in detail below.
Schemas – Schemas employ elements and attributes to define the type of data contained in particular page types. Schemas are created during the implementation of a site and are used as templates for instantiating XML documents of certain types: news articles, detail pages, etc. Elements define and contain data; attributes describe elements. For example, a human resources schema might contain elements for an employee name, ID, date of hire, etc. These elements would also define how the data is stored: A name would be stored as text; an ID would be a number, etc. Attributes provide additional information about element values. For example, an attribute might indicate that a name element is a required value.
XML documents – XML documents result from populating the elements and attributes of schemas (or page types). Each document has an xID generated when the document is created. From this document, a web page can be published for display within a browser. Once a document has been created, its connection to the schema is severed. Changes to a schema will only affect documents created after the changes have been implemented. Changes to the specific document do not change the original schema from which it was created.
Views – View templates handle the display logic for an ASP.NET MVC solution. Views are used to create a user interface (UI) – in this case a web site. When a client requests a page, a view retrieves XML data and returns it with HTML markup to be consumed by a browser.
Style sheets – Style sheets describe the format used to display XML documents. Typically, style sheets apply formatting to elements and their attributes. In some cases, a style sheet may also process the data within elements or attributes. By design, style sheets do not apply formatting to the CDATA element data type. Data types contain their own formatting instructions. The Data Type element appears in the CMS client as a body copy section in which a user can apply formatting with a text editor.
To get a sense for how the CMS turns XML data into a web page, consider an example. Let’s say a schema called employeeSchema.xml defines the following elements:
Employee Name
Employee ID
Department
Phone Number
Supervisor

8
CMS 8.0 Administrator Guide
8
The schema provides the user with a template for creating a new employee page. In the CMS Client, each element of the schema is displayed as a data field for the user to fill out.
By entering data and saving a page, a user generates an XML document containing the schema elements and populated with the user data. This XML document is published along with site-specific information. Once published, the XML document replicates from the CMS to the Dynamic Site Server, which hosts the live site. When the XML page is requested, the view layer returns the content as HTML to be consumed by a web browser.
2.2 The Ingeniux CMS Environment
The Ingeniux CMS consists of two servers: the Content Management Server (CMS) and the Dynamic Site Server (DSS).
The CMS site is used by content creators to build, manage, and publish content. Once content has been published, it is replicated to the DSS site. The CMS site only runs on a Microsoft Windows server.
Figure 1: The Ingeniux CMS environment
2.2.1 CMS
The CMS provides an environment in which users can create, update, and publish content. As content is published, it is replicated to the DSS, where site visitors can view it.
One server environment can have several CMS instances installed. Each instance can manage one or more websites.
The CMS API—called the CSAPI, or Content Store Application Programming Interface—is the interface for programmatically managing a CMS instance, its settings, and all of its content. The CSAPI runs behind an IIS web server. Every feature available in the CMS web application user interface is available through the CSAPI.
The CSAPI also provides the interface for several extensibility features that are often used by customers. Extensibility features include the CMS event model (called Custom Hooks) and various customer-specific UI components (called Custom Tabs).
All content in the CMS is stored in native XML documents, and the CMS and DSS applications manage and process this content using internal XML processors. Content can be published from the CMS in several formats:

9
CMS 8.0 Administrator Guide
9
As XML to be consumed by a DSS instance
As Multi-Format Output (MFO) content for other technologies
As static HTML
The CMS can be implemented in each of the following configurations:
With a standard TCP connection over port 80
Using a TCP port other than port 80 for TCP traffic
Using a secure SSL connection (HTTPS)
Behind a reverse proxy The CMS requires additional configuration to support a reverse proxy. To specify the URL for a reverse proxy server, go to Administration > System Options > CMS > Reverse Proxy.
2.2.2 DSS
A Dynamic Site Server site is a public-facing website (whether to a department, company, university, or the Internet) that serves content published by the CMS. A DSS site is hosted by a Windows server. Built on the Microsoft .NET Framework, the DSS supports ASP.NET 4.0, MVC 3, and mobile device detection.
2.3 Updating DSS Site Content
Updating content on the DSS is a two-step process. First, content is published on the CMS. Then the published content is replicated to the DSS. This two-step process ensures the availability of the DSS and prevents complications that could arise if the DSS accessed files as they are being published.
The two-step model works as follows:
Publishing – Performed by the CMS. Publishing is the process of creating XML files from the pages in the site tree and sending these files to a publishing target folder. This folder is always located on the CMS server in the \xml\pub\ directory.
Replication – The process of copying XML from a publishing target on the CMS to a target directory on the DSS. On the DSS, the replicated XML functions as the model (the data store) for the MVC site. For a single-server implementation, the XML can also be replicated to another directory on the CMS.
2.4 CMS Client
The CMS Client is a browser client providing administrative and content-contributor functions independent of operating system. It communicates with the CMS server through HTTP requests for specific ASP pages. These pages return XML content to the client. The client is highly customizable. It can be set to show all or a subset of features to the end user.
2.5 CMS File Structure
The initial CMS installation establishes a default directory structure. This structure and the files in it should not be modified.

10
CMS 8.0 Administrator Guide
10
Figure 2: A default file structure in the CMS
Other Ingeniux applications may store files in the Ingeniux folder, too. In the directory above, Cartella 3.0 and CMS 7.5 also have files installed here.
A CMS directory contains the following folders:
Documentation – Contains documentation for the CMS.
Server – Contains the DLLs for the CMS. There may be many sites on a single machine, but only one registered instance of the DLLs in this directory. The following are some of the files that may be included here:
AspUpload.dll – An ASP page used by the CMS Client to upload files to the server.
EFTidy.dll – A supporting code library providing HTML reporting and cleaning functions for the XHTML editor.
Igxauthfilter80.dll – A code library used to support connection to an LDAP server and authentication of users against it.
Igxcomex80.dll – A code library used to support COM execute commands originating from within the CMS.
Igxcsapi80.dll – A code library supporting the majority of CMS site functions such as publishing, etc.
IGXcsapidotnet80.dll – Provides functional support for the taxonomy and categorization infrastructure and the reference element.
IGXcsapidotnet80.tlb – Exposes the IGXcsapidotnet80.dll to the COM interface. This file is created at installation. The absence of this file may indicate an issue with the installation and the permissions necessary to create and register this file.
IGXImageControl2.dll – Provides functional support for the asset management functionality.
IGXImageControl2.tlb – Exposes the IGXImageControl2.dll to the COM interface. This file is created at installation. The absence of this file may indicate an issue with the installation and the permissions necessary to create and register this file.
Igxldap80.dll – A supporting code library for LDAP authentication.
Igxors80.dll – A supporting code library used for DSS site search.
Igxxmlsvr80.dll – A code library supporting the majority of DSS functions, including applying stylesheets to XML pages in legacy runtime implementations.

11
CMS 8.0 Administrator Guide
11
sqlite3.dll – A code library supporting the dependency graph database (depgraph*.db) used to track and manage page dependencies.
Sites – Contains a default CMS site.
Tools – Contains site setup and upgrade wizards.
IGX_CMS_Site_Setup.exe – Installs a default CMS site.
IGX_CMS_Site_Upgrade.exe – Upgrades an existing CMS site to the current version.
IGX_Dynamic_Site_Server_Setup.exe – Installs a default DSS site.
IGX_Run-Time_Site_Setup.exe – Installs a classic XSLT Run-Time site.
IGX_Run-Time_Site_Upgrade.exe – Upgrades an existing Run-Time site to the current version.
tools_readme.txt – Describes the contents of the \Tools directory.
WinTail.exe – A utility that displays the contents of a log file in real time as the specified log file is being written to.
2.6 Structure of CMS Site Files
The CMS site structure gives the client a way to communicate with the server and the server file system. This structure and the files contained in these directories should not be modified unless otherwise noted.
Figure 3: The CMS site structure
Site Directory Structure
[Site]\APP_Code – Provides additional support for various authentication mechanisms.
[Site]\Bin – Provides additional support for authenticating client requests.
[Site]\dxml – Contains the majority of supporting files needed to support client functions. This directory is common to all CMS sites.
[Site]\help – Location used to hold the Client Help as well as any custom help files. This directory is common to all CMS sites.

12
CMS 8.0 Administrator Guide
12
[Site]\images – Contains all the images associated with the CMS Client. This directory is common to all CMS sites.
[Site]\Inc – Contains include files that support the functions contained in the DXML directory. This directory is common to all CMS sites.
[Site]\Remote – Contains the supporting files needed for Mac Client connectivity (the Mac Client is deprecated).
[Site]\Scripts – Contains supporting script files for the functions contained in the DXML directory. This directory is common to all CMS sites.
[Site]\secured – Contains files that support logging into the CMS site.
[Site]\upgrade – Contains a log detailing the site upgrade process. This log differs from the ComEx upgrade log located above the [sitedirectory].
[Site]\xml – Contains site-specific content such as images, documents, and XML content. In addition, this directory contains site-specific configuration files such as users.xml, reference.xml etc.
2.7 File Structure of the \xml Directory
The XML directory contains site-specific content and configurations. While other directories and files can be reinstalled if necessary, the\xml directory and its subdirectories should be backed up.
Figure 4: XML file structure
[site]\xml\backup – Contains a periodic backup of the site XML. Scheduling backups is discussed later in this document. This directory is not published and does not need to be included in backups.
[site]\xml\Custom – Contains customized files used to add additional functions to the site such as the CustomHooks.inc and resource.inc files. This directory can be published by any number of publish processes.
[site]\xml\documents – Stores uploaded document files for use with the DSS site. Normally, this directory is published to the publishing target.

13
CMS 8.0 Administrator Guide
13
[site]\xml\errors – Stores files to be displayed for specific error conditions on the DSS site. This directory is published to a publishing target during full publishes.
[site]\xml\Images – Stores uploaded image files for use with the DSS site. This directory is normally published to the publishing target.
[site]\xml\media – Stores uploaded media files for use with the DSS site. This directory is normally published to the publishing target.
[site]\xml\prebuilt – Stores uploaded support files (scripts, etc.) for use with the DSS site. This directory is normally published to the publishing target.
[site]\xml\pub – Contains publishing logs, the configured publishing target directories, and any published files. This directory does not need to be included in backups.
[site]\xml\Schemas – Contains the site-specific page templates used by content contributors to create content. This directory is not published to publishing targets.
[site]\xml\settings – Contains the settings.xml file, which is used to store CMS and DSS specific configurations, including log file locations. This directory is published to publishing targets.
[site]\xml\StyleSheets – Contains site-specific style sheets (XSL files) and their supporting files such as include files and cascading style sheets (CSS files). This directory is published to publishing targets.
[site]\xml\versions – Contains, when enabled, prior checked-in versions of pages. Each page has a corresponding directory containing previous versions of the page.
[site]\xml\users – Contains a directory for each user in the CMS system. User directories store users’ checked-out XML pages. This directory is not published to publishing targets.
2.8 File Structure of \xml\pub
The \xml\pub directory contains all publishing logs and a directory for each publishing target configured in the CMS system. The directory structure for a publishing target folder is typically the same as that of a DSS site.
Figure 5: Pub directory structure
[site]\xml\pub\[PubTarget] – Contains the XML and supporting files generated by a publishing job. One publishing target directory exists for each publishing target configured in the CMS.
[site]\xml\pub\[PubTarget]\Documents – Contains the contents of the \xml\Documents directory that have been copied over during publish.

14
CMS 8.0 Administrator Guide
14
[site]\xml\pub\[PubTarget]\errors – Contains the contents of the \xml\errors directory that have been copied over during publish.
[site]\xml\pub\[PubTarget]\Images – Contains the contents of the \xml\Images directory that have been copied over during publish.
[site]\xml\pub\[PubTarget]\Media – Contains the contents of the \xml\Media directory that have been copied over during publish.
[site]\xml\pub\[PubTarget]\PreBuilt – Contains the contents of the \xml\PreBuilt directory that have been copied over during publish.
[site]\xml\pub\[PubTarget]\settings – Contains the contents of the \xml\settings directory that have been copied over during publish.
[site]\xml\pub\[PubTarget]\Stylesheets – Contains the contents of the \xml\Stylesheets directory that have been copied over during publish.
2.9 File Structure of \xml\users
The \users directory contains a separate folder for each user added to the CMS. The name of this directory corresponds to the name of the user as created in the Users/Groups Manager. Within each user directory, an XML directory contains all pages currently checked out to the specific user. The current edits on the page are available within this directory. Only the current user will see these changes. All other users will see the corresponding page located in the [site]\xml directory (i.e., other users will see the last checked-in version of the page).
Each user’s recently visited pages and favorite pages are stored in the [site]\xml\users\[username]\prefs.xml file. Removing this file will clear this information.
2.10 File Structure of \xml\Custom
The Custom directory contains the majority of the CMS site customizations, support for these customizations, and support for the XXHTML Editor configuration files. Important files contained in this directory structure include resource.inc, CustomHooks.inc, localstyles.css, and tinymceconfig.xml.
2.11 File Structure of \xml\versions
When enabled, the \xml\versions directory contains a directory corresponding to each page.
Each time a page is checked in, a version of the page is created with the following syntax:
X[id]v[versionnumber].xml
For example:

15
CMS 8.0 Administrator Guide
15
X5v7.xml
In addition, a file labeled xid_history.xml (where xid represents the page number) contains the listing of versions. For example:
<PageHistory ID="x1003" NextVersion="4">
<Version VersionNumber="1" Name="360 Site Audit Program"
Date="20070315T03:14:54" User="ingeniux\seanp" />
<Version VersionNumber="2" Name="360 Site Audit Program"
Date="20070319T19:15:36" User="ingeniux\seanp" />
<Version VersionNumber="3" Name="360 Site Audit Program"
Date="20070321T21:58:01" User="ingeniux\paulm" />
</PageHistory>
The maximum number of versions retained before older ones are deleted is configured by a system-wide setting in Administration > System Options > CMS > Versioning. The oldest versions of a given page are removed first.
2.12 Registry Values
All registry entries created by the CMS are located in a directory path that will look something like the following: HKEY_LOCAL_MACHINE\SOFTWARE\INGENIUX\CMS\8.0.
Figure 6: Directory of registry values

16
CMS 8.0 Administrator Guide
16
The version key (here 8.0) contains the following application-wide values:
Figure 7: CMS registry values
DebugPort – A specialized setting to be used by Ingeniux in the event remote debugging is required. This value should not be set unless Ingeniux Support requests it.
IgnoreEmptyComponents – {TRUE/FALSE} – Indicates whether empty component elements should generate an error. A FALSE value will generate an Igxerror in the resulting XML if a component does not contain a value. This value should be set to TRUE unless you are debugging an issue.
IGXClassPath – Specifies the path to the XALAN parser for use with Tomcat running on a Windows platform.
InstallDir – Stores the location of the CMS application files.
MediaServerDirectories – A comma-separated list of static directories not to be published. To configure the media server directories, go to Administration > System Options > CMS > Publishing > Media Server Directory and add or remove directories.
PublishDependencyQueryDepth – Determines the level of dependents to query when publishing a page. The default is two (2) and should remain so unless otherwise noted.
TrafficLogDateFormat – {%Y/%m/%d} – Specifies a logging date format for the DSS traffic log. The default values should not be changed.
TrafficLogEnable – {TRUE/FALSE} – Enables DSS traffic logging.
TrafficLogFile – Specifies a file path location for the DSS traffic log.
TrafficLogStyle – Specifies the DSS traffic log format. There are only two choices for this value. By default, it is an IIS standard W3C log format. If you enter XML as the registry value, the log uses the Ingeniux XML format, which is easy to query.
TrafficLogRollover – Specifies a period for the DSS traffic log.
TrafficLogTimeFormat – {%H:%M.%S} – Specifies a logging time format for DSS traffic log. The default values should not be changed.
TrafficLogTokens – Specifies information to log. Values need to be separated by a space.

17
CMS 8.0 Administrator Guide
17
VerboseError – {TRUE/FALSE} – Turns on/off verbose logging. This value should be set to False unless you are debugging a particular issue.
The Sites key contains an entry for each CMS site set up by the site utility (IGX_CMS_Site_Setup for CMS sites or IGX_Dynamic_Site_Server_Setup for DSS sites). These values can also be entered manually:
Figure 8: Site-specific registry values
catalog – Lists the name of the Index Service catalog used to index the site. This key uses a text string. (The Index Service catalog is deprecated as of CMS 7.5.)
contentType – {1,2} – Describes the content type. This value should always be set to 1 unless the site is used solely for wire feed content.
disableSearching – {TRUE/FALSE} – Disables the Ingeniux interface with the Index Service if set to TRUE. This key uses a text string.
hostname – Specifies the hostname used to access the site. This value must be valid in order for the search mechanism to work. This key uses a text string. For example, the hostname for http://www.university.com/publisher would be as follows: www.university.com
ipaddress – Deprecated registry value.
remotePassword – Specifies the password for a “super” account used to provide access to other CMS sites for Cross-Site Copy, Cross-Site Search, LDAP authentication, and/or custom authentication. This key uses a text string.
remoteTimeout – Specifies a timeout value for accessing remote resources.
remoteUserName – Specifies the user account for a “super” account used to provide access to other CMS sites for Cross-Site Copy, Cross-Site Search, LDAP authentication, and/or custom authentication. This key uses a text string specifying domain\account.
sitename – Specifies the virtual directory name for a CMS site. This value must be valid in order for the search mechanism to work. This key uses a text string. For example, the sitename for http://www.university.com/publisher would be publisher. If the CMS site is not configured as a virtual directory, this key should be left empty.

18
CMS 8.0 Administrator Guide
18
sitepath – Specifies the path to the XML directory for the CMS site or the [site] directory for the DSS site. This value must be valid in order for the search mechanism to work. This key uses a text string (for example, d:\igxsites\sites\seattle\xml).
2.13 CMS Configuration Files
The following list provides a brief snapshot of critical CMS site configuration files. Unless otherwise specified, these files should never be manually modified. Instead, the site should be configured by an administrator using the CMS Client. Manually editing these files may result in data corruption or unpredictable application actions.
AssetSecurity.xml – [siteDirectory]\xml\ – Contains user group access levels and permissions to the five static directories accessible via the Asset Manager: Documents, Images, Media, Prebuilt, and Stylesheets. This file should not be edited unless you are directed to do so by Ingeniux support.
AutomatedTasks.xml – [siteDirectory]\xml\ – Stores settings for automated tasks such as archiving, publishing, and emptying the recycle folder. These tasks run automatically on the server. This file must be manually edited. An IIS reset is required for these settings to take effect.
CustomHooks.inc – [siteDirectory]\xml\Custom\ – Defines various JScript functions that occur as the result of particular events in the CMS. This file must be manually edited. An IIS reset is required for these settings to take effect.
depgraph*.db – [siteDirectory]\xml\ – Tracks the page dependencies during publish, check-ins, and preview. A depgraph file exists for each publishing target configured. This database should not be edited unless you are directed to do so by Ingeniux support.
depgraph*.db-journal – [siteDirectory]\xml\ – A temporary file that exists while a publish is taking place. If the file persists, it indicates that there was a problem with publish, page preview, or check-in.
local-appsettings.config – [siteDirectory]\ – Defines a default user domain for the purposes of authentication.
local-connection-strings.config – [siteDirectory]\ – Defines one or more connection strings, including the server name and a search base, used to connect to an authenticating body.
local-membership.config – [siteDirectory]\ – Defines one or more standard membership providers used to establish a connection to an authenticating body.
localstyles.css – [siteDirectory]\xml\Custom\editor\ – Defines the available style formatting that populates the formatting drop-down in the XXHTML Editor for PC clients. This file must be manually edited. An IIS reset is required in order for these settings to take effect.
Options.xml – [siteDirectory]\xml\ – Stores settings for running reports within the CMS client. This file should not be edited unless you are directed to do so by Ingeniux support.
pagecreationrules.xml – [siteDirectory]\xml\ – Stores the settings for the page creation rule group assignment. This file should not be edited unless you are directed to do so by Ingeniux support.
pcr_descriptors.xml – [siteDirectory]\xml\ – Stores the specifics of each page creation rule. This file should not be edited unless you are directed to do so by Ingeniux support.

19
CMS 8.0 Administrator Guide
19
prefs.xml – [siteDirectory]\xml\users\[userdirectory]\ – Stores user info about recently visited pages and favorite pages.
publishingTargets.xml – [siteDirectory]\xml\ – Stores settings for each publishing target.
reference.xml – [siteDirectory]\xml\ – Stores information about each page (creator, time created, check-out status, assigned user, etc.). This file should not be edited unless you are directed to do so by Ingeniux support.
ReferencesMapping.xml – [siteDirectory]\xml\ – Stores all node associations created by the various reference elements. This file should not be edited unless you are directed to do so by Ingeniux support.
resource.inc – [siteDirectory]\xml\Custom\ – Contains various resource settings that affect the display and behavior of the application. These settings are required and should not be deleted. This file must be manually edited. An IIS reset is required in order for these settings to take effect.
SecurityDescriptors.xml – [siteDirectory]\xml\ – Stores the specifics of each node-level security setting not using the default “Everyone” with full access. This file should not be edited unless you are directed to do so by Ingeniux support.
settings.xml – [siteDirectory]\xml\settings\ – Stores server settings such as the location of log files, the detail level for logs, cache size, etc.
ShowContexts.aspx – [siteDirectory]\secured\ – Provides contextual information for authentication and is used to troubleshoot a connection to an authenticating body (e.g. http://[siteUrl]/secured/showcontexts.aspx).
siteSchema.xml – [siteDirectory]\xml\ – Stores information about the site, as well as information for elements such as <Site> and <Page>. This file should not be edited unless you are directed to do so by Ingeniux support.
Tasks.xml – [siteDirectory]\xml\ – When enabled, this file lists the queued tasks that have been serialized during a graceful shutdown of the IIS application pool supporting the CMS site. This file should not be edited unless you are directed to do so by Ingeniux support.
TaxonomyAssociations.xml – [siteDirectory]\xml\ – Stores all node/taxonomical term associations created by taxonomy elements. This file should not be edited unless you are directed to do so by Ingeniux support.
TaxonomyTree.xml – [siteDirectory]\xml\ – Stores the taxonomy hierarchy used by the Categorize tab. This file should not be edited unless you are directed to do so by Ingeniux support.
tinymceConfig.xml – [siteDirectory\xml\Custom\editor\ – Configures the XHTML Editor by user group, including the buttons and CSS classes available to the various user groups within the Edit Form of the CMS Client.
UrlMap.xml – [siteDirectory]\xml\ – When enabled, this file stores the structured associations of xIDs to friendly names.

20
CMS 8.0 Administrator Guide
20
users.xml – [site directory]\xml\users.xml – Stores all users and groups entered in the CMS site. In addition, this file defines each group’s permissions and its member users.
Web.config – [siteDirectory]\ – Contains the essential settings required to authenticate using the ASP.NET infrastructure. This file pulls in the values defined in the local-appsettings.config, local-connection-strings.config, and local-membership.config files.
workflows.xml – [siteDirectory]\xml\ – Stores information about which pages are in workflow and where pages are within a particular workflow. This file is used by the Workflow History dialog. This file should not be edited unless you are directed to do so by Ingeniux support.
workflowdefs.xml – [siteDirectory]\xml\ – Stores configuration information about each workflow, including all associated transitions, actions, and workstates. This file should not be edited unless you are directed to do so by Ingeniux support.
workflowlog.db – [siteDirectory]\xml\ – Returns the workflow data associated with the site. The log is stored as a database file (workflowlog.db) in the XML directory of the site. This database should not be edited unless you are directed to do so by Ingeniux support.
2.14 Back-Up Frequency
The reference.xml file and XML pages are backed up in the \xml\backup directory in the following situations:
Changing the name of a page in the tree, etc.
Emptying the Recycle folder.
Moving a page in the tree or updating the folder list view in the UI.
Checking out a page.
Checking in a page.
Copying a page.
Rolling back a page.
Marking a page for publish.
Creating a child page file.
Undoing check out.
Editing the page properties dialog.
2.15 users.xml File Structure
The users.xml file contains three sections:
The Users/Groups Manager settings specify the next group ID, the default domain, the default SMTP domain, and the default workflow notification value.
<UserManager nextID="" NTDomain="domain" SMTPDomain="mail.com"
SendWorkFlowNotificationMail="False">
The users section contains an entry for each user of the CMS and specifies the user name (display name), user ID, email address, and a workflow notification value for each user. User name and user ID are required values.
21
CMS 8.0 Administrator Guide
21
<Users>
<User UserID="domain\user" Name="user" [email protected]"
ReceiveWorkFlowNotificationMail="False"/>
</Users>
The group section specifies a group ID, a group name, the users who are members of this group, and the permissions associated with this group.
<Group Name="Group" ID="1">
<Users>
<User UserID="domain\user"/>
</Users>
<UserRights>
<UserRight Name=""/>
</UserRights>
</Group>
2.16 Version Control
Ingeniux provides support for the versioning of pages. When enabled, a version of the page is saved to the <sitedirectory>\xml\versions directory corresponding to the page xID number each time the page is checked in. For example, the application might create a directory called x556 for page x566.xml. This directory would contain a page history file and number of versions up to the limit-per-page value unless the unlimited option has been selected. Ingeniux recommends not using the unlimited option because page versions take up server disk space.
Figure 9: The Version Control dialog
This setting creates script similar to the following in \xml\settings\settings.xml:
<VersionControl>
<VersioningOn>true</VersioningOn>
<VersionLimitOn>true</VersionLimitOn>

22
CMS 8.0 Administrator Guide
22
<VersionLimit>7</VersionLimit>
</VersionControl>
2.17 Editing resource.inc
The resource.inc file resides in the custom directory and is a text file that can be modified in Notepad or any other text editor. The variable declarations hold values of 0 (false), -1 (true), or a string.
The variables function as follows:
g_applicationName – Defines the title bar name displayed in the CMS client.
g_applicationIcon – Determines the icon displayed in the CMS client.
g_authorHelpURL – Specifies the location of site-specific help files visible to authors.
g_helpURL – Specifies the location of site-specific help files.
g_displayContextMenu – Enables/disables the right-click menu in the site tree for users in the CMS (recommendation: -1).
g_autoSave – Enables/disables the automatic save function for nodes in the document tree. If this setting is enabled, a given node in the document tree will automatically be saved when another node is clicked (recommendation: 0).
g_filterInsertText – Enables/disables the filtering of inserted text (text and XHTML elements only). The filter looks for extraneous tags. Filter strings can be set up to strip out certain content, like offensive words (recommendation: 0).
g_createComponentOnUpload – Determines whether or not the default Create Component checkbox is checked in the file upload dialog (recommendation: -1).
g_switchToEditOnNewPage – This functionality is deprecated in CMS 4.2 and above.
g_useHTMLTidy – This functionality is deprecated in CMS 5.0 and above.
g_maxChildPages – Specifies the number of child nodes to display in the site tree when a node is expanded. Remaining nodes can be seen when 'More' is clicked.
g_maxReportsPages – Specifies the number of report results to display in the site tree when a node is expanded. Remaining nodes can be seen when 'More' is clicked.
g_editXPowerProperties – Determines whether or not the properties of a node in the site tree can be edited (recommendation: true).
g_customAuthentication – Controls the custom authentication hook GetUserIDCustom. This functionality is deprecated in CMS 7.0 and above.
2.18 CustomHooks.inc
The CustomHooks.inc file (xml\Custom\CustomHooks.inc) provides the ability to extend the functionality of a core set of CMS functions. These application actions are as follows:
Publish
Check-in/out
Undo Check-out

23
CMS 8.0 Administrator Guide
23
Rollback
Create New Page
Assign a Page
Move
Copy
Delete
Empty Recycle Bin
Page Rename
Paste Special
Each of these application actions has one or more functions that can be invoked to execute custom script whenever a client makes a request for the CMS to perform the given action.
The process is as follows:
1. The client makes a request to the CMS server to perform an action.
2. The associated onBefore custom hook executes.
3. The CMS server executes the request sent by the client.
4. The associated onAfter custom hook executes.
For example:
A user selects the check-in option within the CMS Client.
A request is sent to the CMS on the CMS server.
Any script within the onBeforeCheckin function executes.
The CMS executes the check-in request.
Any script within the onAfterCheckin function executes.
The syntax for all functions in the CustomHooks.inc file is as follows:
function [functionname](parameterlist)
{
[Script]
}
The CMS expects all functions listed in the custom hooks table (below) to be in the CustomHooks.inc file even if the custom hook is empty. If a particular custom hook is missing from the CustomHooks.inc file, the associated CMS function will fail.
In addition, if a script executed by a custom hook encounters an error, the associated CMS action will generate a similar error any time a user tries to perform that action. The quickest way to address the error message and allow the system action to execute properly is to comment-out any script (the code between the curly braces { } ) in the offending custom hook.
Note that taking this action may break other site functions. Before taking this action, consult the site runbook or site designer for details on a given custom hook script.

24
CMS 8.0 Administrator Guide
24
Available custom hooks are listed in the table below:
Custom Hook Parameters Execution
onBeforePublish None Executes prior to the execution of a publishing request.
onAfterPublish strPublishError Executes after the execution of a publishing request.
onBeforeCheckOut objPage, bRecursive Executes before the request to check-out the specified page object is processed. The parameter bRecursive is true if the user selected Check Out, Page And Children.
onAfterCheckOut objPage, bRecursive Executes after the request to check-out the specified page object is processed. The parameter bRecursive is true if the user selected Check Out, Page And Children.
onBeforeCheckIn objPage, bRecursive Executes before the request to check-in the specified page object is processed. The parameter bRecursive is true if the user selected Check In, Page And Children.
onAfterCheckIn objPage, bRecursive Executes after the request to check-in the specified page object is processed. The parameter bRecursive is true if the user selected Check In, Page And Children.
onBeforeUndoCheckOut objPage, bRecursive Executes before the request to undo a check-out for the specified page object is processed. The parameter bRecursive is true if the user selected Check In, Page And Children.
onAfterUndoCheckOut objPage, bRecursive Executes after the request to undo a page check-out for the specified page object is processed. The parameter bRecursive is true if the user selected Check In, Page And Children.
onBeforeRollback objPage Executes before the request to rollback the specified page object is processed.
onAfterRollback objPage Executes after the request to rollback the specified page object is processed.
onNew objPage Executes after a new page, specified by the objPage parameter, has been created.
onRename strOriginalName, strNewName, objPage
Executes after the request to rename the specified page object is processed.
onBeforeAssign objPage Executes before the request to assign the specified page object is processed.
onAfterAssign objPage Executes after the request to assign the specified page object is processed.
onBeforeMove sourcePage, targetPage, relation
Executes before the request to move a page is processed. The sourcePage parameter is the page being moved. The targetPage parameter is the parent of the page’s new location in the site tree.
onAfterMove sourcePage, targetPage, relation
Executes after the request to move a page is processed. The sourcePage parameter is the page being moved. The targetPage parameter is the parent of the page’s new location in the site tree.

25
CMS 8.0 Administrator Guide
25
OnBeforeCopy sourcePage, targetPage, relation
Executes before the request to copy a page is processed. The sourcePage parameter is the page being copied. The targetPage parameter is the parent of the page’s new location in the site tree.
onAfterCopy sourcePage, targetPage, relation
Executes after the request to copy a page is processed. The sourcePage parameter is the page being copied. The targetPage parameter is the parent of the page’s new location in the site tree.
onBeforePasteSpecial origPage, targetPage, relation
Executes before a Ctrl + Paste operation is processed within the client.
onAfterPasteSpecial origPage, newPage, targetPage, relation
Executes after a Ctrl + Paste operation is processed within the client.
onBeforeDelete objPage Executes before the request to delete the specified page object is processed.
onAfterDelete objPage Executes after the request to delete the specified page object is processed.
onBeforeEmptyRecycleFolder
objRecycleFolder Executes before the request to empty the recycle bin is processed.
onAfterEmptyRecycleFolder
objRecycleFolder Executes after the request to empty the recycle bin is processed.
onBeforeMarkForPublish objPage, bRecursive, markForPublish, PubTargetsMarkData
Called before any other action when a page is marked for publish.
onAfterMarkForPublish objPage, bRecursive, markForPublish, PubTargetsMarkData
Called immediately after a page has been marked for publish.
onBeforeClaimPage objPage, claimUser Executes before a page-claim request processes. A page claim occurs when a user clicks the Assign to me button on a page assigned to a group.
onAfterClaimPage objPage Executes after a page-claim request processes. A page claim occurs when a user clicks the Assign to me button on a page assigned to a group.
onBeforeCrossLocaleCopy sourcePage, targetPage, relation
Executes before a page under a region root is copied to another region root.
onAfterCrossLocaleCopy sourcePage, targetPage, relation
Executes after a page under a region root is copied to another region root.
onBeforeRegionRootCopy sourcePage, targetPage, relation, targetLocale
Executes before a region root is copied.
onAfterRegionRootCopy sourcePage, targetPage, relation, targetLocale
Executes after a region root is copied.
Table 1: Custom Hooks

26
CMS 8.0 Administrator Guide
26
The following table lists the various parameters used by the custom hooks:
Parameter Definition
bRecursive A Boolean value (true | false) indicating whether or not the function should execute recursively through all child pages. Typically, this indicates that the “Page And Children” option was selected.
claimUser The user to whom a page is assigned. This is an IUser object.
markForPublish A Boolean value (true | false) indicating whether or not a page is marked for publish.
newPage A copy of the selected page created at the time the onPasteSpecial hook is invoked.
objPage A page object from which page properties can be derived (e.g. objPage.id).
objRecycleFolder A page object specifically for the recycle folder page from which page properties can be derived (e.g. objRecycleFolder.id).
origPage The originally selected, unmodified page at the time the onPasteSpecial hook is invoked.
pubTargetsMarkData A JScript object that uses the pubTarget ID as a key and the marked version of the pubTarget as a value. When a page is not marked for publish the value is -1. When the latest version of the page is marked for publish the value is 0.
relation The relationship between a copied page and a target page (child, insert before, or insert after). There are three possible values for this field: IGX_MAKE_CHILD = 0; IGX_INSERT_BEFORE = 1; IGX_INSERT_AFTER = 2.
sourcePage A page object from which page properties can be derived (e.g. sourcePage.id). When given, the sourcePage is the page that is being operated on.
str A string object.
strNewName A string object containing the new name for a page.
strOriginalName A string object containing the original name for a page.
strPublishError Used to execute associated script based on a specific error message. If no error has occurred, then this is an empty string value “”.
targetPage A page object from which page properties can be derived (e.g. target Page.id). When given, the targetPage is the parent sourcePage’s new location in the site tree.
targetLocale Locale name – a combination of language name and region name (US English would be en-us).
Table 2: Custom Hook parameters
2.19 TaxonomyEvents.inc
Ingeniux provides a script file to tailor the behavior of taxonomy events. The file, similar to the custom hooks file documented above, is called TaxonomyEvents.inc and can be found in the xml\Custom directory of the CMS site. The following tables list custom hooks for taxonomy events and taxonomy events parameters, respectively.

27
CMS 8.0 Administrator Guide
27
Custom Hook Parameters Execution
onApplyCategory objPage, addedCategories, removedCategories
Executes when a category is assigned to a page.
onRemoveCategory category Executes when a category is removed from a page.
onBeforeMoveCategory dragCategory, newParentCategory
Called before a category is moved to a new place in the taxonomy tree.
onAfterMoveCategory dragCategory, newParentCategory
Called after a category has been moved to a new position in the taxonomy tree.
onBeforeCopyCategory category, newParentCategory
Called before a category is copied.
onAfterCopyCategory category, clonedCategory, newParentCategory
Called after a category has been copied.
onChangeCategory oldInfo, newInfo, category
Called when a category is changed.
onTranslateCategory oldInfo, newInfo, category
Called when a category is translated.
onUnApplyCategory pages, category Called when a category is removed from a page.
Table 3: Taxonomy events
Parameter Definition
objPage A page object with properties.
Category A taxonomy element. Used as category, addedCategory, removedCategory, newParentCategory, dragCategory, clonedCategory, and cat.
Info Information about the particular page. Used as oldInfo, newInfo.
pages An object called pagelist.
Table 4: Taxonomy events parameters
Custom hooks should be used with care and only in scenarios where additional functions are not provided in the CMS or the site structure. Executing as scripts, custom hooks do not run as fast as functions native to the CMS and may lead to performance issues on the CMS site, especially if a given custom hook acts upon a large number of pages.

28
CMS 8.0 Administrator Guide
28
3 Authentication, Authorization, and Security
The Ingeniux security model for the CMS server is divided into the following two pieces:
1. Authentication – Determines whether a user’s credentials are valid.
2. Authorization – Determines the user’s access to resources along with what the user can
do with those resources.
3.1 Authentication
The CMS relies on one of three mechanisms to authenticate users:
1. Windows Domain
2. LDAP directory
3. Custom authentication mechanism
In each case, the CMS captures the user’s credentials, passes them to the authenticating agent, and authorizes the user based on a successful authentication. The application requires that the user ID match the user ID in the authenticating database to authorize a particular user to work with content inside the CMS. In a Windows Domain environment, the domain\user account syntax must be used when creating users in the Users/Groups Manager.
For LDAP or a custom authentication mechanism, the user account syntax must match the syntax used with these methods.
DSS servers rely on IIS with a Windows server to determine access to published content. Typically, this entails the use of anonymous access in conjunction with an account such as the IUSR.
Lastly, both CMS and DSS servers can be configured in IIS to use the SSL protocol. The web server application handles this level of security and will not impact the CMS as long as client requests can reach it.
For details on setting up authentication for a CMS server, please see the Installation Guide.
3.2 Role of ASP.NET
The ASP.NET infrastructure is used to intercept all requests to the CMS site and check for a valid session cookie. If the cookie is not present, the request is routed to the login screen.
3.3 Authentication Models
Ingeniux supports three authentication models:
Single Windows Domain – Utilizes a single Windows NT domain containing all users to provide authentication services to a CMS site.
LDAP – Provides authentication services to a CMS site via a single non–Windows based LDAP service provider (e.g., Open LDAP) in which all users are contained in a single section of the directory structure.
Multi-Provider – Utilizes several different authenticating bodies containing users to provide authentication services to a CMS site.

29
CMS 8.0 Administrator Guide
29
Model Type Domain Configuration Membership Providers
Single Windows Domain Yes Site Upgrade or Manual No
LDAP No Manual No
Multi-provider No Manual No
3.3.1 Single Windows Domain Configuration
To configure a Single Windows Domain model:
1. Define the Windows Domain. Typically, this is the string users add prior to their
usernames to login. For example, for the following user the domain would be
‘university’:
university\imculloch
2. Identify the path to a Windows Domain Controller. Ideally, this server should be
dedicated to authentication and should not be providing additional services such as
DHCP, DNS, etc. Performance of CMS authentication may be impacted if the
authenticating server must provide additional services. A typical path:
pdc.university.edu
3. Identify a search base. A search base describes the path within the Windows Active
Directory to the container containing the users. An example of a search:
DC=university;DC=edu
To implement the configuration, an administrator can use the site upgrade wizard to populate the Authentication dialog (see the Installation guide) or edit the files manually.
To implement the configuration manually:
1. Edit local-appsettings.config so the following element attribute matches the string
defined in step 1:
<appSettings>
<add key="userdomain" value="" />
</appSettings>
The element should look something like this:
<appSettings>
<add key="userdomain" value="university" />
</appSettings>
Save the changes to the file.
Note that the string defined by the value attribute will automatically be added in front of the user name entered in the login screen. The combination of these two values must match the string defined in [siteDirectory]\xml\users.xml.

30
CMS 8.0 Administrator Guide
30
2. Edit local-connection-strings.config so that the connectionString attribute
matches the server path followed by the search base:
<connectionStrings>
<add name="" connectionString="" />
</connectionStrings>
Use the following syntax:
LDAP://[serverPath]/[searchBase]
An example for a server path of pdc.university.edu and a search base of DC=university;DC=edu would look like this:
LDAP://pdc.university.edu/DC=university;DC=edu
The element would be:
<connectionStrings>
<add name="IGXADConnectionString"
connectionString="LDAP://pdc.university.edu/DC=university,DC=edu" />
</connectionStrings>
Save the changes to the file.
3. Edit local-membership.config so the connectionStringName attribute equals the
connection string name used in step two, and the defaultProvider and name
attributes equal ADMembershipProvider:
<membership defaultProvider="">
<providers>
<clear />
<add connectionStringName="" attributeMapUsername="sAMAccountName"
name="" type="System.Web.Security.ActiveDirectoryMembershipProvider,
System.Web, version=2.0.0.0,Culture=neutral,
PublicKeyToken=b03f5f7f11d50a3a" />
</providers>
</membership>
For example:
<membership>
<membership defaultProvider="ADMembershipProvider">
<providers>
<clear />
<add connectionStringName="IGXADConnectionString"
attributeMapUsername="sAMAccountName"
name="ADMembershipProvider"
type="System.Web.Security.ActiveDirectoryMembershipProvider,

31
CMS 8.0 Administrator Guide
31
System.Web, version=2.0.0.0,Culture=neutral,
PublicKeyToken=b03f5f7f11d50a3a" />
</providers>
</membership>
Save the changes to the file.
Under a single Windows Domain model, only the <add> element should be defined in the <providers> element. Additional <add> elements may interfere with authentication.
The authentication mechanism attempts to connect to all membership providers (as defined in the <add> elements) and stops any authentication from occurring if one provider fails.
Additional attributes are available for the membership provider. Please refer to the Microsoft MSDN Library for a complete listing and explanation of available attributes.
3.3.2 LDAP Configuration
To configure an LDAP authentication model, follow these steps:
1. Identify the path to the LDAP server. If this is a Windows Active Directory
implementation, please see 3.3.1 above. Ideally, this server should be dedicated to
authentication and should not provide additional services such as DHCP, DNS, etc.
Performance of CMS authentication may be impacted if the authenticating server must
provide additional services. The path may vary widely but a typical path looks like this:
ldap.college.edu
2. Identify a search base. A search base describes the path within the Windows Active
Directory to the container containing the users. An example of a search base follows:
ou=people,dc=college,dc=edu
3. Identify whether the LDAP server supports anonymous bindings or requires a specific
account to bind to the LDAP directory and authenticate users. For credentialed
bindings, identify the bindUsername and bindPassword. A bind user might resemble
something like the following:
cn=reader,dc=college,dc=edu
4. Implement the configuration by manually editing the following files:
local-appsettings.config
Edit the following element so that the value attribute does not have a string defined:
<appSettings>
<add key="userdomain" value="" />
</appSettings>
local-connection-strings.config

32
CMS 8.0 Administrator Guide
32
Edit the following element so that the connectionString attribute matches the server
path followed by the search base in steps two and three, and the name attribute
matches an anonymous or credentialed LDAP binding:
<connectionStrings>
<add name=""
connectionString="" />
</connectionStrings>
The syntax for the LDAP server path and search base will be as follows: LDAP://[serverPath]/[searchBase].
The anonymous LDAP binding name value would be name=“AnonLDAPConnection”.
The credentialed LDAP binding name value would be name=“CredLDAPConnection”.
An example for a server path of ldap.college.edu and a search base of ou=people,dc=ingeniux,dc=com would look as follows: LDAP://ldap.college.edu/ou=people,dc=college,dc=edu
And the element would look as follows for anonymous LDAP binding connections:
<connectionStrings>
<add name="AnonLDAPConnectionString"
connectionString="LDAP://ldap.college.edu/ou=people,dc=college,dc=edu"
/>
</connectionStrings>
Or the element would look as follows for credentialed LDAP binding connections:
<connectionStrings>
<add name="CredLDAPConnectionString"
connectionString="LDAP://ldap.college.edu/ou=people,dc=college,dc=edu"
/>
</connectionStrings>
Save the changes to the file.
local-membership.config
Edit the <membership> element so that the connectionStringName attribute equals
the connection string name used above, and the defaultProvider and name attributes
equal AnonLDAPMembershipProvider or CredLDAPMembershipProvider based on the
binding type:
Here is the syntax for an anonymous LDAP binding:

33
CMS 8.0 Administrator Guide
33
<membership defaultProvider="">
<providers>
<clear />
<add connectionStringName="" connectionSecurity="anonymous"
ldapFilter="(objectClass=person)" name="AnonLDAPMembershipProvider"
type="IGX.LDAPMembershipProvider" />
</providers>
</membership>
For example:
<membership defaultProvider="AnonLDAPMembershipProvider">
<providers>
<clear />
<add connectionStringName="AnonLDAPConnectionString"
connectionSecurity="anonymous"
ldapFilter="(objectClass=person)" name="AnonLDAPMembershipProvider"
type="IGX.LDAPMembershipProvider" />
</providers>
</membership>
When you’re done editing the script, save the changes to the file.
Note: Under a single LDAP provider model, only one <add> element should be defined in the <providers> element. Additional <add> elements may interfere with authentication. The authentication mechanism attempts to connect to all membership providers (as defined in the <add> elements) and stops any authentication from occurring if one provider fails.
Here’s the syntax for a credentialed LDAP binding:
<membership defaultProvider="">
<providers>
<clear />
<add connectionStringName=""
bindUsername=""
bindPassword="" ldapFilter="(objectClass=person)"
ldapUserAttribute="uid"
name=""
type="IGX.LDAPMembershipProvider" />
</providers>
</membership>
For example:
<membership defaultProvider="CredLDAPMembershipProvider">
<providers>
<clear />

34
CMS 8.0 Administrator Guide
34
<add connectionStringName="CredLDAPConnectionString"
bindUsername="cn=reader,dc=college,dc=edu"
bindPassword="imcculloch" ldapFilter="(objectClass=person)"
ldapUserAttribute="uid"
name="CredLDAPMembershipProvider" type="IGX.LDAPMembershipProvider" />
</providers>
</membership>
The bindPassword attribute value is the password for the bind user.
When you’re finished editing the script, save the changes to the file.
Under a single LDAP provider model, only one <add> element should be defined in the <providers> element. Additional <add> elements may interfere with authentication. The authentication mechanism attempts to connect to all membership providers (as defined in the <add> elements) and stops any authentication from occurring if one provider fails.
Additional attributes are available for the membership provider. Refer to the Microsoft MSDN Library for a complete listing and explanation of available attributes.
3.3.3 Multi-Providers
The CMS authentication infrastructure can be configured to utilize multiple authenticating applications. The process works as follows:
1. The user provides credentials.
2. The credentials are validated against the authenticating application that has been
defined as the default provider.
3. The user is authenticated, or a failure notice is returned.
4. If the default provider fails to authenticate the user, additional membership providers
are queried until the user is authenticated or all providers have been tried.
Ingeniux recommends using no more membership providers (and their corresponding authenticating applications) than necessary. Having many membership providers can cause delays in authentication.
To configure multiple membership providers, follow these steps:
1. Identify all authenticating applications and determine if they are LDAP or Active
Directory based. Next, determine the default authenticating application for the default
membership provider. Typically, this will be the application that contains the majority of
the users to be authenticated.
2. For each authentication application, identify the server path. (See Section 3.3.1 for
examples.)
3. For each authentication application, identify the search base. (See Section 3.3.1 for
examples.)
4. Implement the configuration by manually editing the following files:

35
CMS 8.0 Administrator Guide
35
local-appsettings.config
Edit the <add> element so that the value attribute does not have a string defined:
<appSettings>
<add key="userdomain" value="" />
</appSettings>
local-connection-strings.config
In the <connectionStrings> element, add an <add> element for each authenticating
application, using the format and attributes specific to the type of authentication. (See
Section 3.3.1 for examples of connection strings.) Multiple connection strings might
look like this:
<connectionStrings>
<add name="AnonLDAPConnectionString"
connectionString="LDAP://ldap.college.edu/ou=people,dc=college,dc=edu"
/>
<add name="IGXADConnectionString"
connectionString="LDAP://pdc.university.edu/DC=university,DC=edu" />
</connectionStrings>
In the example above, two authenticating applications are used:
An OpenLDAP server using an anonymous binding. This will be the default provider.
An Active Directory associated with the “university” domain.
local-membership.config
In the <membership> element, set the defaultProvider value to the default membership provider (determined in step one). The defaultProvider value will match the name value in the <add> element for the default membership provider.
<membership defaultProvider="AnonLDAPMembershipProvider">
<providers>
<clear />
<add connectionStringName="AnonLDAPConnectionString"
connectionSecurity="anonymous"
ldapFilter="(objectClass=person)" name="AnonLDAPMembershipProvider"
type="IGX.LDAPMembershipProvider" />
<add connectionStringName="IGXADConnectionString"
attributeMapUsername="sAMAccountName" name="university"
type="System.Web.Security.ActiveDirectoryMembershipProvider,

36
CMS 8.0 Administrator Guide
36
System.Web, version=2.0.0.0,Culture=neutral,
PublicKeyToken=b03f5f7f11d50a3a" />
</providers>
</membership>
Note that the first connectionStringName matches the name of the first <add> element contained in the <connectionStrings> element of local-connection-strings.config (see above).
In this arrangement, entered credentials will be validated against the LDAP server ldap.college.edu and then, if necessary, against the Active Directory pdc.university.edu. Users in the Active Directory must log in using the syntax university\username and this syntax must be matched in the users.xml file for these users.
3.3.4 Local Credentials
In the Web.config file, you can implement credentials that override defined membership providers. Ingeniux recommends using this configuration for only two purposes:
1. Troubleshooting authentication to determine if the CMS authentication infrastructure is
installed and functioning
2. Working in test environments
Ingeniux does not recommend using this setup in a production environment.
To configure this override:
1. Edit Web.config and locate the <authentication mode="Forms"> element.
2. For encrypted passwords, paste the following script inside the <forms> element:
<credentials passwordFormat="SHA1"></credentials>
For clear text passwords, paste the following script into the <forms> element:
<credentials passwordFormat="clear"></credentials>
3. Define login credentials using the following syntax:
<user name="" password="" />
For example, the following script would create a user called “admin1” with the password “admin1”:
<user name="admin1" password="admin1" />
The encrypted version might be:
<user name="admin1" password="6C7CA345F63F835CB353FF15BD6C5E052EC08E0u65
?" />
A third party utility must be used to generate an encrypted password string.
The entire authentication element might look like this:
<authentication mode="Forms">

37
CMS 8.0 Administrator Guide
37
<forms name="IGXAuth" path="/" loginUrl="secured/login.aspx"
protection="All" timeout="30" slidingExpiration="true">
<credentials passwordFormat="SHA1">
<user name="admin1"
password="6C7CA345F63F835CB353FF15BD6C5E052EC08E0u65 ?"/>
<user name="author1"
password="E725849BE93B37A83D960B9B13F37530D4F6C6D3"/>
</credentials>
</forms>
</authentication>
4. When you’re finished editing, save Web.config.
3.4 Troubleshooting Authentication and Start Up
Authentication failures generally fall into two categories:
1. Issues with connection strings and/or the authentication server
2. Issues with the CMS site or server configuration
Connection strings and attributes are environment-dependent and rely on settings specific to the authenticating application. There are several steps that can be taken to eliminate potential roadblocks:
Ensure that both the server hosting the CMS site and the server running the
authenticating application are running the latest service packs.
Confirm the functionality of connection strings within different applications. There are
many LDAP browsers that can be used to test connectivity and browse an LDAP or
Active Directory server.
Review the Installation Guide for more information on site and server configuration,
authentication, etc.
Common configuration issues and the associated symptoms are listed below:
ASP.NET is disabled as a Web Service within IIS.
Possible Symptoms:
No login screen
An HTTP 404 error message
Resolution:
Enable ASP.NET support as a Web Service within IIS. (See the Installation Guide for details.)
ASP page support is disabled as a Web Service within IIS.
Possible symptom:
Blank page

38
CMS 8.0 Administrator Guide
38
Resolution:
Enable ASP page support as a Web Service within IIS. (See the Installation Guide for details.)
The CMS server is not configured to use the .NET Framework 3.5
Symptom:
An error in the application
Figure 10: Wrong .NET framework configuration symptom
Resolution:
Confirm that .NET Framework 3.5 is installed and that the CMS site is configured to use the .NET Framework. To install .NET Framework 3.5, open Server Manager and go to Features, Add Features, and install the platform.
ASP.NET wild card mapping is not configured for the CMS site.
Possible symptoms:
404 page cannot be found
Continuously redirects to rooturl/default.asp
Resolution:
Create a wild card mapping to [windir]\Microsoft.NET\Framework\v3.5\aspnet_isapi.dll. (See the Installation Guide for details.)
Parent pathing for the CMS site is not enabled.
Symptom:
An IGX500 error

39
CMS 8.0 Administrator Guide
39
<?xml version="1.0" ?>
<igx500Error>
<Category>Active Server Pages</Category>
<Description>Disallowed Parent Path</Description>
<ASPDescription>The Include file '../xml/Custom/resource.inc'
cannot contain '..' to indicate the parent directory.</ASPDescription>
<ASPCode>ASP 0131</ASPCode>
<File>/seattle/Inc/init.inc</File>
<Line>1</Line>
<Column>-1</Column>
<Number>0x80004004</Number>
<Source />
</igx500Error>
Resolution:
Enable Parent paths for the CMS site. See the Installation Guide for details.
The file default.asp is not set as the default document for the CMS site.
Symptom:
An error message
Resolution:
Configure the default.asp page as the default document for the CMS site.
Improper user permissions are configured for the site directory.
Symptom:
An initialization error
Resolution:

40
CMS 8.0 Administrator Guide
40
Ensure that the account associated with the CMS application pool and the anonymous user account configured for the CMS site are configured with full access to [sitedirectory]\.
Permission to write to the .NET filter is not configured.
Symptom:
An error message indicating that permission to write to the .NET Framework temp file is denied
Resolution:
Ensure that the account associated with the CMS application pool and the anonymous user account configured for the CMS site are configured with Read & Execute, Read, and Write access to the <windir>\Microsoft.NET\Framework\v3.5 directory.
The connection strings are not valid.
Symptom:
An error message on the login page indicating that the user’s credentials are invalid
Resolution:
Confirm that local-connection-strings.config and local-membership.config point to valid authentication applications, and confirm that these applications are accessible. The error message may indicate that these files contain invalid connection strings and membership providers, or that the connection strings and membership providers point to an authenticating application that is unavailable or no longer accessible.
3.5 Authorization
Authorization defines the actions a given user can perform on a particular content asset. The CMS uses the following pieces of data to provide authorization:
User account – A unique account for each user of the CMS. This account must match the account used for authentication. For example, if the user Marcel Duchamp uses the Windows domain account university\mduchamp to authenticate, the Ingeniux account must also be university\mduchamp.
User groups – Sets of users organized by function and assigned permission to access content.
Group permissions – Enable system actions by group. For example, an entire group might have permission to add a page type to workflow.
Node-level security – Defines, by group, who may access and modify a particular node in the site tree. Node-level access can be inherited from parent pages.
Workflows – Define the way pages move from user to user through the CMS. A particular workflow manages one type of page.
Page creation rules – Define the process of page creation. These rules can determine which groups may use a particular rule, the page schema from which to create the page, the stylesheet the page should use, where the page should be created, and whether the page

41
CMS 8.0 Administrator Guide
41
should be entered into a particular workflow. A page creation rule is associated with a particular node in the site tree.
Node-level rules application – Defines the Page creation rules that apply to particular nodes. Page creation rules can be inherited from parent nodes.
The CMS uses the following utilities to manage authorization:
Users/Groups Manager – Manages users, groups, and group permissions.
Page Properties dialog – Defines access to nodes in the site tree based on user group and page creation rule. The Page Properties dialog provides access to the Page Creation Rules tab and the Page Security tab.
Workflow Manager – Manages workflows, which define the process of moving a page through the CMS from creation to publication.
Page Creation Rules Manager – Manages page creation rules, which define the creation of new pages.
3.6 Node-Level Security
The CMS has three levels of security that can be applied to any node in the content tree:
1. Full access
2. Read-only access
3. No access (which hides the node entirely).
Security is set on a per-group basis so that different groups can be granted different access levels on the same node.
A child node inherits the security settings of a parent node by default, unless the security of the child node is configured. For a given user, the security of a child node may be equal to, less restrictive, or more restrictive than that of the parent. Thus, a parent node may allow full access while its child node allows read-only access, or the parent node may allow read-only access while the child node allows full access.
If a parent node has no access set, all of the child nodes will be inaccessible, regardless of their security settings.
3.6.1 How Security Works
Before each node of the tree is expanded, the CMS checks the access rights for each listed group at each security level. If security has been set for a group to which the user belongs, the user is assigned that security level. If the member is found to belong to more than one group, the user is granted the least restrictive security.
Administrators are a special case. Any group with administrative rights (defined as a group that has the permission to change system settings) has unrestricted access to all nodes. Any user in an administrative group will always have complete access regardless of membership in other groups.
The Everyone group is also a special case. If the user is a member of a group that has more restrictive security than the Everyone group, the user is assigned the more restrictive security level. If no group is found for which the user is a member, the user is granted the

42
CMS 8.0 Administrator Guide
42
security specified for the Everyone group. By default, this group has full access to a page until it is explicitly revoked.
Security in the tree overrides group-based permissions. If a particular group has permission to edit and delete content, but only has read-only access on a particular node, a user in that group will not be able to edit that node.
If a page is assigned to a user who has no access to that page, the user will not be able to access the page.
3.6.2 Using Node-by-Node Security
To view or edit a page's security settings, right-click the page and select the Page Properties option. Users with administrative privileges will be able to select and edit the Page Security tab in the Page Properties dialog.
By default, pages inherit their security from their parents. To change the security of a page in the tree, uncheck Inherit security settings from parent page and then add or remove groups.
Figure 11: The Page Security tab
To add a group to security, select Add and then select a group. You can set the type of access in the Security Access Level menu. The two possible values are Read Only and Full Access. To give a group no access to a node, remove the Everyone group, and add back other groups as desired, but leave out the group that should have no access. To delete a group from the security settings, select the group and click Remove.
3.6.3 Configuring Node-Level Security
Administrators can configure security on a node-by-node basis in the site tree. The security settings determine which groups can access and modify a node. To configure node-level security, right-click on a node and select Page Properties > Page Security.

43
CMS 8.0 Administrator Guide
43
Page Security Tab – Lets you specify which user groups can access the selected page and what kind of access each group will have. The Everyone group, by default, has full access to all pages in the site.
Security Access Level – Provides the option to specify two access levels:
Full Access – Allows the user group to perform all of its defined permissions on the selected page.
Read Only – Allows the user group to see the selected page. By default, a user group possesses a “No Access” access level unless otherwise specified or the Everyone group has access to the selected page.
Add – Provides a listing of available user groups to add to the selected page. Once a group has been added, its access level must be defined in the Security Access Level drop-down.
Remove – Provides the option to remove a selected user group’s access to the page.
Inherit security settings from parent page – Determines whether the selected page will use access level settings from its parent page. The selected page will no longer inherit access level settings from its parent page if this box is not checked. The existing access level settings are still applied to the selected page but can be removed.
If the page has been configured to only inherit access levels from parent pages, specific access levels cannot be specified for this page. By default, the page will inherit access levels from its parent pages. Deselecting the Inherit security settings from parent page option allows additional access levels to be added while maintaining the originally inherited access levels. Deselecting this option also allows the originally inherited access levels to be removed.
3.6.4 Examples of Node-by-Node Security
The following image shows a site map for a member of the Administrators group:
The administrator can see all the nodes in the site tree, regardless of their security settings.

44
CMS 8.0 Administrator Guide
44
The following image shows how the tree looks to a user logged in as a member of the Authors group, with the following security settings in place:
Admissions node: The Authors group has been removed.
Components, Pages, and CMS 101 folders: The Authors group has read-only access.
Here the Admissions node is no longer visible to a user in the Authors group. The other children of Admissions are also invisible because they have inherited the “No Access” setting for members of the Authors group.
In the following image, the settings are as follows:
Admissions node: the Authors group has been removed, and no other groups have been added.
Academics node: the Authors group has full access.
In this case, the Admissions node is visible but grayed out, and so are its children, even though the children have less restrictive permissions for the Authors group. If a parent node is not accessible, its children won’t be either.

45
CMS 8.0 Administrator Guide
45
3.7 Managing Assets and Asset Security
The CMS provides an interface for managing static content contained in the Documents, Images, Media, Prebuilt, and Stylesheets directories and their subdirectories. Administrators can give user groups the ability to manage this content by assigning them the following permissions:
Allowed to manage asset security – Provides the ability to define security on a group level for the five static directories.
Allowed to delete assets – Provides the ability to delete a subdirectory or its contents.
Allowed to manage asset folders – Provides the ability to create and delete new folders within the static directories and their subdirectories. A given user’s permissions aggregate the most permissive settings assigned to the groups to which the user belongs.
In addition, by right-clicking a folder icon and selecting Security, you can set group access to the five static directories and their subdirectories. There are four access levels for the assets directories:
Read Only – At this level, users can see the directory and its contents, and they can link to files within the directory. But the New Folder, Upload, and Delete buttons will be grayed out. A user with read-only access will not be able to create new folders within the selected directory, upload to the selected directory, or delete the selected directory.
Upload – Users at this level can see the directory and its contents, link to files within the directory, and upload files to the directory. However, the New Folder and Delete buttons will be grayed out, preventing the user from creating new folders within the selected directory or deleting the selected directory.
When a user at this level uploads a file that has the same name as an existing file in the directory, the name of the newly uploaded file will be modified slightly to prevent the existing file from being over-written.
Full Access – At this level, users have full access to the selected directory. They can create new folders, upload files, and delete folders, provided that these options are enabled.
When a user with full access uploads a file that has the same name as an existing file in the directory, the user is prompted to choose between overwriting the existing file and uploading the file with a modified name to prevent the original file from being overwritten.
No Access – Users without access can’t see the directory. This access level is not set in the drop-down menu. If a user is not a member of any groups associated with the selected folder, and the Everyone group is not associated with the folder, and the user is not a member of the Administrators group, then the user receives this level of access.
A given user receives the aggregate of the most permissive access levels of all user groups to which the user belongs.
3.7.1 Asset File Types
Below is a list of the file types that may be uploaded to the various asset directories and sub-directories (provided that the user has appropriate security):
Documents
Any file type (.*)

46
CMS 8.0 Administrator Guide
46
Images
.jpg
.bmp
.gif
.png
Media
.mov
.mp4
.mpeg
.rm
.avi
.xvid
.3gp
.m4v
.mkv
.swf
.flv
.mp3
.wma
.wmv
.wav
.qt
.ram
Prebuilt
Any file type (.*)
Schemas
.xml
Stylesheets
.xsl
3.7.2 Resetting Permissions
The AssetSecurity.xml file located in [sitedirectory]\xml stores the configured asset security. In the event of access difficulties, the asset security can be set to the default by following these steps:
1. Stop IIS.
2. Rename AssetSecurity.xml as AssetSecurity.lmx.
3. Restart IIS.
4. Connect to the CMS Client as an administrator and reconfigure the static access levels.

47
CMS 8.0 Administrator Guide
47
4 Users and Groups
The Users/Groups Manager provides a user interface for modifying the users.xml file. This file is used to authorize access to the CMS site as well as to perform specific application functions. The Users/Groups Manager gives an administrator the ability to create new users and organize them into groups. In the Users/Groups Manager, administrators can also define the actions that members of a group are authorized to perform within the CMS.
To get to the Users/Groups Manager, select Administration > Users/Groups.
Figure 12: The Users/Groups Manager in the CMS
4.1 Groups Tab
The Users/Groups Manager defaults to the Groups tab, where administrators can create, populate, configure, and export groups. If you arrive at the Groups tab and no groups are selected, you’ll see the Excel button, the New Group button, and the Delete Selected button. You’ll also see a list of groups.
If you select a group from the list, you’ll see two additional buttons (Save and Cancel), as well as five additional tabs: Info, Members, Page Creation Rules, Workflows, and Security Root Pages. Depending upon the action you’re performing, the buttons and tabs will be visible in various combinations in the Users/Groups Manager.

48
CMS 8.0 Administrator Guide
48
Figure 13: The Groups tab in the Users/Groups Manager
Excel icon – Exports a group list to Excel in XML format. This button lives to the left of the New Group button.
New Group – Adds an empty new group to which users may be added and permissions assigned. This button is grayed out when a group is selected. To create a new group if the button is grayed out, click Cancel, then click New Group. A tag similar to the following tag is added to users.xml when a new group is added:
<Group Name="Authors" ID="7">
<Users />
<UserRights/>
<Group Name/>
The ID above is a unique number. As users and permissions are added to the group, the <Users> and <UserRights> tags are populated.
Delete Selected – Deletes a group selected from the Group Name list.
Save – Saves changes made to a group.
Cancel – Cancels changes made to a group.
Info – Displays the group name and the permissions available to a given group.
Group Name – Lists the name of the group. With the exception of the Administrators group, you can change the group name in this field.
Permissions – Lists the specific actions a group is authorized to perform on a given page or node to which the group has full access. Some permissions also relate to administrative actions within the CMS.
To modify permissions, select a group and check and uncheck boxes in the Permissions list. Note that a user may be a member of multiple groups and possess a combination of

49
CMS 8.0 Administrator Guide
49
permissions from those groups. Also note that the Administrators group automatically has full permissions, and these permissions cannot be modified in the Permissions list.
The following permissions are available for each group:
Permissions on page manipulations – Assigns or removes the following block of permissions related to modifying pages.
Allowed to edit pages – Enables the group to edit existing pages assigned to the current user. Tag added to users.xml: <UserRight Name="Edit" />
Allowed to delete pages – Enables the group to delete pages. Tag added to users.xml: <UserRight Name="Delete" />
Allowed to check-in pages assigned to others – Enables the group to check-in pages that are currently assigned to another user. Tag added to users.xml: <UserRight Name="CheckIn" />
Allowed to rollback changes – Enables the group to rollback to a prior version of the page. Tag added to users.xml: <UserRight Name="Rollback" />
Allowed to assign pages not assigned to them to others – Enables members of this group to assign pages to other users, even though these pages are not currently assigned to the group members. Tag added to users.xml: <UserRight Name="Assignment" />
Allowed to create pages – Enables the group to create a new page via page creation rules or page types depending upon which additional permissions are selected. Tag added to users.xml: <UserRight Name="Create" />
Allowed to create new pages using page types – Enables the group to create new pages by specifying the page type (as opposed to using page creation rules). Tag added to users.xml: <UserRight Name="PageTypes" />
Allowed to checkin and checkout pages outside of workflow – Enables the group to check-in/out pages that are not a part of a workflow. Groups with this permission can also check-in/out pages inside a workflow. Tag added to users.xml: <UserRight Name="CheckinCheckOut" />
Permissions on page content viewing and manipulations – Assigns or removes the following block of permissions related to viewing and modifying pages.
Allowed to edit the layout attribute on pages – Enables the group to change the default stylesheet applied to the current page. Tag added to users.xml: <UserRight Name="EditSS" />
Permission to edit password elements – Enables the group to edit password elements. Tag added to users.xml: <UserRight Name="EditPasswords" />
Allowed to view elements marked as “hidden” in Edit form – Enables the specified group to view hidden elements in the edit form. Tag added to users.xml: <UserRight Name="ViewHiddenElements" />
Allowed to add words to dictionary during spellcheck – Enables the specified group to add words to the default dictionary during a spellcheck. Tag added to users.xml: <UserRight Name="CanAddWordsToDictionary"/>
Allowed to see Edit Form for page edit – Enables the specified group to access the Edit Form. Tag added to users.xml: <UserRight Name="CanViewEditForm"/>
Allowed to see page history – Enables a specified group to see the Workflow History info for a page.

50
CMS 8.0 Administrator Guide
50
Allowed to view XML tab – Enables a specified group to access the XML tab in order to review the XML corresponding to a specific page or component. Tag added to users.xml: <UserRight Name="ViewXmlTab" />
Permissions on site tree manipulations – Assigns or removes the following block of permissions related to modifying the site tree.
Allowed to reorder pages in the tree – Enables group members to move pages assigned to them, provided that the group has full access to the beginning and ending locations of the pages in the site tree. Tag added to users.xml: <UserRight Name="Reorder" />
Allowed to see the tree – Enables the group to view the site tree in the CMS Client. Tag added to users.xml: <UserRight Name="Tree" />
Allowed to reorder pages in the tree that are assigned to others – Enables the group to relocate pages assigned to other users. Provided that a member of a group with this permission has full access to the beginning and ending location of a given page in the site tree, the member can move another user’s page to a new location in the site tree. Tag added to users.xml: <UserRight Name="ReorderAssignedOthers" />
Permissions on publishing – Assigns or removes the following block of permissions related to publishing site content.
Allowed to mark and unmark pages for publishing – Enables the group to mark/unmark pages to be published. Tag added to users.xml: <UserRight Name="Mark" />
Allowed to execute a full publish – Enables the group to execute full publishes including a site publish. Tag added to users.xml: <UserRight Name="Publish" />
Allowed to execute an incremental publish – Enables the group to execute incremental publishes. Tag added to users.xml: <UserRight Name="IncrementalPublish" />
Allowed to repeat a publish to the same root page and Publishing Target – Enables the group to repeat a publish request before a previous, identical publish has completed. Tag added to users.xml: <UserRight Name="CanPublishDuplicated"/>
Permissions on workflow – Assigns or removes the following block of permissions related to workflow.
Allowed to add pages to, and remove pages from, workflow – Enables the group to add a page to, or remove a page from, a workflow. Tag added to users.xml: <UserRight Name="Workflow" />
Allowed to transition pages assigned to others – Enables the group to move a page assigned to another user to the next workstate in a workflow. Tag added to users.xml: <UserRight Name="Transition" />
Permissions on taxonomy system – Assigns or removes the following block of permissions related to taxonomy.
Allowed to categorize pages and components – Enables the Categorize tab for the specified user group for the purpose of categorizing pages and components. Tag added to users.xml : <UserRight Name="Categorize" />

51
CMS 8.0 Administrator Guide
51
Allowed to manage taxonomy system – Enables the Taxonomy tab for the specified user group so that the group can manage the site taxonomy. Tag added to users.xml: <UserRight Name="ManageTaxonomy" />
Permissions on assets system – Assigns or removes the following block of permissions related to managing assets.
Allowed to manage asset security – Enables the specified group to configure security settings for directories exposed in the Manage Assets dialog: Documents, Images, Media, Prebuilt, Schemas, and Stylesheets. Tag added to users.xml: <UserRight Name="ManageAssetSecurity" />
Allowed to delete assets – Enables the specified group to delete files to which the group has access in the Manage Assets dialog: Documents, Images, Media, Prebuilt, Schemas, and Stylesheets. Tag added to users.xml: <UserRight Name="DeleteAssetFiles" />
Allowed to manage asset folders – Enables the specified group to delete and create new folders within the directories exposed by the Manage Assets dialog: Documents, Images, Media, Prebuilt, Schemas, and Stylesheets. Tag added to users.xml: <UserRight Name="ManageAssetFolders" />
Allowed to make changes to assets – Enables the group to modify assets. If this check box is cleared for a given group, the group won’t be able to edit images via the Asset Manager.
Permissions on languages and localization – Assigns or removes the following block of permissions related to language localization.
Allowed to localize Schemas, Page Creation Rules, and Workflow Definitions/States – Enables the specified group to localize labels in the Site Definitions Localization pane. Tag added to users.xml: <UserRight Name="LocalizeSiteDefinitions" />
Allowed to set page language – Enables the specified group to set page language at Page Properties > Language. Tag added to users.xml: <UserRightName="SetPageLocale" />
Miscellaneous – Assigns or removes the following block of miscellaneous permissions.
Allowed to change system settings – Enables the group to modify and configure site-specific settings such as adding users, user groups, creating workflows, etc. Tag added to users.xml: <UserRight Name="Admin" />
Allowed to use “Find and Replace” utilities – Enables the group to use the find and replace function at Administration > Find and Replace. Tag added to users.xml: <UserRight Name="CanViewSearch"/>
Allowed to see Apps pane – Enables the group to access the Apps pane. Tag added to users.xml: <UserRight Name="CanViewApps"/>
Allowed to manage schemas – Enables the group to access the Schema Designer in the Administration pane. Tag added to users.xml: <UserRight
Name="CanManageSchema"/>
Note: When you create a new group, a minimum set of permissions is automatically applied (though these permissions can be changed). The minimum permissions are:
Allowed to edit pages
Allowed to assign pages not assigned to them to others

52
CMS 8.0 Administrator Guide
52
Allowed to create pages
Allowed to checkin and checkout pages outside of workflow
Allowed to reorder pages in the tree
Allowed to see the tree in the authoring client
Allowed to reorder pages in the tree that are assigned to others
Allowed to transition pages assigned to others
Allowed to categorize pages and components
Members – Displays the user names and user IDs of members of a selected group. You can add and remove members by dragging them between the Members pane and the Users pane. You can also limit the number of users displayed in the Users pane by filtering with the search field.
Figure 14: A users list in the Users tab
Page Creation Rules – Shows any page creation rules (PCRs) associated with a given group. The tab also indicates whether a PCR is set as default (if so, it’s followed by an “X”) and what workflow, if any, a PCR is associated with. A group cannot be deleted as long as it’s associated with a page creation rule.
Workflows – Shows all the workflows and transitions with which a selected group is associated. A group cannot be deleted when a workflow is associated with it.
Security Root Pages – Lists the pages to which a selected group has access, and the type of access that the selected group has for each page. The access level of a root page will extend to its child pages if no further security is configured at the child level. Clicking on a page name will take you to the page and, at the same time, “pin” the Users/Groups Manager tab so that it remains open.
4.2 Users Tab
The Users tab gives administrators the option to add users to, and delete users from, a CMS site. Once added, the user must also be added to at least one group in order to gain access to the CMS site. At the Users tab, administrators can also view and configure user actions within the CMS.
If you arrive at the Users tab and no user is selected, you’ll see the Excel button, the New User button, and the Delete Selected button.

53
CMS 8.0 Administrator Guide
53
If you select a user from the list, you’ll see two additional buttons (Save and Cancel), as well as four additional tabs: Info, Member of, Effective Permissions, and Pages Assigned to.
Figure 15: The Users tab of the Users/Groups Manager, with a user selected
Excel icon – Exports a user list to Excel in XML format. This button lives to the left of the New User button.
New User – Opens a new Info tab where you can create a new user. (For more on new user values, see Info below.)
The New User button is grayed out when a current user is selected. To create a new user if the button is grayed out, click Cancel, New User.
Each user added to the CMS will have an entry something like this in users.xml:
<User Name="John" UserID="domain\john" [email protected]
ReceiveWorkFlowNotificationMail="False" />
Delete Selected – Deletes a user selected from the User Name list.
Save – Saves changes made to a user.
Cancel – Cancels changes made to a user.
Info – Displays information about a user account. The User ID field and Integrated Account check box are disabled for existing users, but you can modify the values for User Name, Email, and Receive Workflow Notifications.
To create a new user, enter values for User ID, User Name, Email, Receive Workflow Notifications, and Integrated Account.
User ID – Windows Domain account (domain\username) or LDAP directory account name. Once created, the User ID cannot be modified from this field.
User Name – Friendly name used to identify the user.

54
CMS 8.0 Administrator Guide
54
Email – Email address used by the system to send email to the user from Send To or Workflow notifications.
Receive Workflow Notifications – Notifies the user when a page with which the user is associated moves through workflow. The system must be configured to use a valid local or remote email SMTP server.
Integrated Account – Enables integrated authentication via a SQL Server database. When this box is checked, the Account Type, Password, and Confirm Password fields are displayed. To create a user with an integrated account, check Integrated Account and choose an account type and password for the user. After logging in, the new integrated user will be able to set a new password using the Change Password button on the top toolbar.
Member of – Lists the groups of which the selected user is a member. Add or remove the user from groups by dragging the groups between the Group Name pane and the Groups pane. You can limit the number of groups displayed in the Groups pane by filtering with the search field.
Effective Permissions – Shows which permission sets apply to a given user and which groups govern these permission sets.
Assignments – Displays pages assigned to the selected user. Clicking on the name of a page will take you to the page and pin open the Users/Groups Manager. Right-clicking a page will bring up a context menu with options to assign the page to another user or group.
4.3 Advanced Tab
At the Advanced tab, administrators can configure default settings for newly created users.
Figure 16: The Advanced tab in the Users/Groups manager
These settings are written to the users.xml file in a tag like the following:
<UserManager nextID=“8” NTDomain=“ingeniux” SMTPDomain=“mydomain.com”
Version=“8.0”>
Administrators can also import users and groups at the Advanced tab.

55
CMS 8.0 Administrator Guide
55
Default AD Domain – Specifies the default domain for creating new users. For example: Domain\
SMTP Domain – Specifies the default SMTP domain for creating new users. For example: mydomain.com
Send Workflow Notification Emails – Specifies the default notification setting for new users.
Save Settings – Saves changes to the default settings.
Perform Import – Imports groups and users from Active Directory. The import feature is only available when Active Directory is the default membership provider type (though it doesn’t have to be the only provider available). Clicking Perform Import will launch a dialog prompting you for your active directory user and password info. After connecting successfully, you’ll see a dialog prompting you to choose users and groups to import. When you’re finished selecting users and groups, click Begin Import. All imported groups will be configured with default permissions, which you can change in the Users/Groups Manager.

56
CMS 8.0 Administrator Guide
56
5 Workflows
Workflows implement content-management processes in the CMS. By automating the movement of pages through the CMS, workflows simplify the process of content creation and reduce the likelihood of error. Workflows consist of three parts:
Workstates
Transitions
Actions
To create and edit workflows, click Workflows in the Administration pane and select New to create a new workflow. To edit or delete a workflow, select it and click Edit or Delete. If you choose New or Edit, the Workflow Manager will open.
Figure 17: The Workflow Manager in the CMS
Alternatively, with the new Clone feature in Workflows, you can copy an existing workflow and use it to create a new workflow.
To clone a workflow:
1. Select a workflow from the workflow list and click Clone. The Clone Workflow Definition dialog opens.
2. Enter a name in place of the default name and, optionally, enter a description. Then click Create to finish cloning the workflow.

57
CMS 8.0 Administrator Guide
57
Figure 18: The Clone Workflow Definition dialog
Also, you can now edit a workstate in the Design pane (the middle pane) of the Workflows tab. To do so, double-click the workstate. The Edit Workstate dialog opens.
Figure 19: The Edit Workstate dialog
Any changes to the workstate apply everywhere the workstate is used. If the workstate is part of several workflows, make sure that any changes to the name and description are appropriate for other workflows too.
The active status of a workstate can’t be disabled from the Design pane.
5.1 Workstates
A workstate is the name given to an identifiable task or set of tasks in the lifecycle of content. Examples of workstates might be “content creation,” “fact checking,” “editing,” and “approval.” Workstates may designate the particular condition of a page (“awaiting further action” or “published”).

58
CMS 8.0 Administrator Guide
58
To create a new workstate, click New in the Workstates pane. To edit or delete an existing workstate, select the workstate in the Workstates pane and click Edit or Delete. Clicking New or Edit will open the workstate dialog.
To add a workstate to a workflow, drag it from the Workstates pane to the middle Design pane. To remove a workstate, drag it back to the workstate pane. The first workstate that you drag into the design pane will by default be the starting workstate (the workstate with an arrow on it). To make a different starting workstate, right-click a workstate and select Make Start Node.
Workstates have the properties Name, Description, and Active (Boolean).
Name – Labels the workstate with a friendly name.
Description [Optional] – Provides a brief description of the workstate.
Active – Indicates whether or not pages in this workstate will display in users’ assignment lists. The Active property specifies whether the workstate is one that requires attention (active) or one that requires no further immediate action (inactive). A workstate called “Published,” for example, might be applied to pages that have been marked for publish and require no further action. By marking this state as inactive, the administrator ensures that published pages won’t appear in users' assignment lists.
A line of script similar to the following is added to the workflowdefs.xml file whenever a workstate is created:
<WorkState ID="12" Name="Create Content" IsActive="true" Description=""
/>
Note that the default workstate is called Initial: <WorkState ID="1" Name="Initial" />
5.2 Transitions
A transition describes the movement of a page from one workstate to another. Examples of transitions are “send for approval” and “send back for fact checking.” A transition defines what workstate a page enters once a user’s tasks have been completed and the user advances the page. Transitions define what system actions occur prior to moving to the next workstate.
A typical transition entry in workflowdefs.xml might be:
<Transition ID="1" Name="To Author" CurrentStateID="1" NextStateID="12"
Trigger="OnCreate" NextGroupID="2" Description="Task: Write Article"
AllowNextGroupToAdvance="true" IsDefault="false"
OnEnterPrompt="Success!" OnEnterHide="true" OnEnterTime="5"
OnExitPrompt="Ever Onward!" OnExitHide="true" OnExitTime="5"
ToolbarIcon="" DefaultUserID="">
To create or edit transitions between workstates, you can use the New and Edit buttons in the right pane. The transition dialog will open.

59
CMS 8.0 Administrator Guide
59
Figure 20: The Edit Transition dialog
Alternately, you can create a new transition by dragging the cursor between the orange nodes that appear when you mouse over a workstate. To redirect a transition, click on it and then drag the green nodes between workstates.
When you create new transitions by dragging between workstates, the transitions will be given default names (“Transition1,” “Transition2,” etc.). You can rename the transitions later by editing them in the right pane.
Note: If you create transitions by dragging between workstates, you should edit the transitions to ensure that the default configurations are correct.
A transition has the following properties:
Name – Labels the transition.
Description [Optional] – Describes the transition.
Current Workstate – Defines the starting (or current) workstate for the page. The list of workstates in the drop-down menu is populated with the workstates contained in workflowdefs.xml. CMS uses the workstate ID assigned to determine the workstate.
Next Workstate – Defines the workstate to which the page is moved after the transition concludes. The list of workstates in the drop-down menu is populated with the workstates contained in workflowdefs.xml. The CMS uses the workstate ID to determine the next workstate.
Is Default – Configures the current transition to be the default transition for a given workstate. Note that a workstate can use multiple transitions.

60
CMS 8.0 Administrator Guide
60
Next Group – Defines the group to which the page is assigned after the transition has completed. The list of groups in the drop-down menu is populated with the list of groups contained in users.xml. Groups must be created prior to creating a transition. The CMS uses the group ID defined in users.xml and assigned to each user group to determine the next group. When a page is assigned to a group, all users in the group will see the page on their assignment lists. A user can claim the page using the Assign to Me button on the Edit Form. The page will then be assigned to that user and not the group as a whole.
Figure 21: The Assign to Me button in the Edit Form
When a page is assigned to a group and checked out, it won’t live in the XML folder of any individual user (e.g. xml/users/[user]/xml). Instead, the page will be copied to the xml/groups/[group]/xml folder and remain checked out.
Default User – Defines the user to whom the page is assigned after the transition has completed. The list of users in the drop-down menu is filtered by the group selected in Next Group. Users must be created prior to creating a transition.
Allow Next Group to Advance – Permits the members of the next group to advance the page to the next workstate. Otherwise, an administrator with sufficient permissions must advance the page.
5.3 Actions
Transitions may also have actions associated with them. An action represents a task to be completed when a transition is executed. There are actions for the most common operations normally accomplished through the UI. If the built-in actions are not adequate, there is a custom action that can execute a user-defined component object model (COM).
The actions associated with a transition are executed in order. If an action fails, the transition will not complete and the workflow will remain in the workstate it was in before the transition was executed.
To add actions to a transition, open the Actions tab in the transition dialog. For each new action, click the “+” button, choose from the drop-down menu, and click the “+” or “-” button to confirm or cancel the action, respectively.
To reorder actions, use the up and down arrow buttons. To remove an action, click the “-” button to the right of the arrow buttons. To further define an action, open the action by clicking the arrow icon to the left of its name. Then follow the prompts. When you’re finished adding and editing actions, click Save and Close.

61
CMS 8.0 Administrator Guide
61
Figure 22: Adding actions to a transition in the Edit Transition dialog
When you add an action to a transition, the CMS generates an action element in the workflowdefs.xml file. Here, for example, is an action element for a check-in action.
<Action ID="1" Type="CheckIn" Description="" CheckInPubTargets="" />
The possible transition actions are listed below.
Mark for Publish – Marks the page for publish prior to moving to the next workstate. Unmark for Publish – Unmarks the page for publish prior to moving to the next workstate. Check in – Checks in the page prior to the transition to the next workstate. Check out – Checks out the page prior to moving it to the next workstate. Publish – Performs a single-page incremental publish (the current page and all dependencies that were modified since the last publish). The incremental publish occurs before the page is transitioned to the next workstate. Open the action and select publishing targets from the menu. Custom – Creates a custom action that will execute before transition. The action is invoked via the COM interface. A custom action requires a ProgID and a Method value, which you can enter by opening the action and completing the appropriate fields. If a custom DLL requires that additional information be passed on, additional attributes and their values can be added via the Add Custom Attribute field. Send Mail – Sends a notification email prior to transition to a user group not otherwise associated with the transition. This action requires that the CMS be configured to use a valid SMTP server. To select the user group, open the action and choose from the Group ID drop-down menu.

62
CMS 8.0 Administrator Guide
62
External Client – Provides an option to call an ASP or other web-based file to execute prior to the completion of the transition. The default attributes are as follows:
URL – Specifies the relative or absolute URL of the page to execute during the transition. A failure in this URL may prevent the transition and its actions from completing. Size – Specifies the size of the window in pixels (“W” = width; “H” = height).
To configure the default attributes, open the action and fill in the appropriate fields.
Modify Page Lifetime – Allows modification of the life cycle of the page. This action requires two attributes, StartDate and EndDate. These values can be standard ISO dates (e.g., 20030615) or variable expressions processed by the CMS macro engine. For example, a page with the following values would be published immediately and would live on the site for 7 days:
StartDate = %now% EndDate = %now+168:00%
You can also select start and end dates from the graphical calendar interface.
Archive Page – Archives the page after the transition with which the action is associated.
Bridge to Another Workflow – Transitions the page into a different workflow. This action effectively cancels the original transition. To select the new workflow, open the action and choose from the Workflow drop-down menu. Revert to Version – Reverts to a previous version of the page.
5.4 Check-in
In the Workflow Manager, you can configure a Check-in action that checks in a page toward specific publishing targets. By checking in a page only toward specific targets, you can select the environments to which you’ll publish content. For example, you could check in an updated page to a test environment without sending it to production.
To define the publishing target(s) toward which a page will be checked in during workflow, open the New Transition dialog or the Edit Transition dialog and add a new Check-in action at the Actions tab.
If you expand the Check-in action and click Change you’ll see the Check in pages to be published dialog, where you can select publishing profiles.
Publishing profiles are useful for large sites with multiple staging environments, because they define multiple publishing targets toward which a given page can be checked in.
By default, the Check in pages to be published dialog opens in Basic view. If you select a publishing profile and choose Advanced in the drop-down menu, you can view side-by-side the Publishing Profiles pane and the Publishing Targets pane.

63
CMS 8.0 Administrator Guide
63
Figure 23: Choosing publishing profiles in the Advanced view
The blue highlighting indicates which profiles will publish to which targets.
5.5 Mark/Unmark for Publish
Like the Check-in action, the Mark-for-Publish action lets you publish content automatically as a part of workflow. To configure a Mark-for-Publish action, add the action at the Actions tab. Then expand the Mark-for-Publish action and click Pick. The Mark for Publish Action dialog will open.
Figure 24: The Mark for Publish Action dialog
Use the Marked for Publish check box(es) and the Version to Publish drop-down menu(s) to configure publishing target and page version settings. When you’re finished, click OK.
When initiating the Mark-for-Publish action outside of workflow, you can now mark and unmark pages for publish in the same dialog.
To mark or unmark a page for publish, right-click a page in the site tree and select Mark/Unmark for Publish.

64
CMS 8.0 Administrator Guide
64
Then choose whether to publish the page alone or to publish the page and its children. The Mark/Unmark pages for publish dialog will appear.
Figure 25: The Mark/Unmark pages for publish dialog
In this dialog, you can also choose to publish different versions of pages to different publishing targets. This functionality is particularly useful for sites that employ test environments, because you can test new content in one environment while an older version of the content remains marked for publish to the live environment.
Note: You can also initiate a mark-for-publish action outside of workflow by right-clicking a page in the site tree, selecting Page Properties, and configuring the action at the Mark for Publish tab.
Figure 26: The Mark for Publish tab
5.6 Revert to Version
In certain workflow scenarios, it may be useful to revert to a previous version of a page. For example, a content approver might want to dismiss a revised page in favor of the last published version of a page. To facilitate this scenario, you can include a Revert to Version action in a workflow transition.
The Revert to Version action points to a selected publishing target. When the action is invoked by a given page, the page will be checked out and its content will revert to that of the previous version marked for the publishing target. When the action is finished, the page will remain

65
CMS 8.0 Administrator Guide
65
checked out to the current user. (If there is no previous version of the page marked for the publishing target, the action won’t do anything.)
To create a Revert to Version action, open the New Transition or Edit Transition dialog and go to the Actions tab. Click + to add an action and, in the New Action drop-down menu, select Revert to version. Then click +.
To configure the action, click Revert to version and, in the Publishing Target drop-down, choose a publishing target. A given page will revert to the previous version marked for this publishing target.
Figure 27: Reverting to a previous version in the Edit Transition dialog
After you’ve chosen the publishing target, save your changes.
5.7 Send Mail
The Send Mail action sends a default email notification to a selected group or groups when a page moves through a transition. You can customize the email message by configuring the XML file. To customize the workflow email template, go to [site]\xml\Custom\emailNotifications and open the language folder of the email you want to edit. To edit an English-language email notification, open en-us\workflowNotifications.xml in a text editor. Here is the standard workflow notification XML document:
<?xml version="1.0" encoding="utf-8" ?>
<EmailTemplate>
<Subject>%siteName% - %workflowName% Notification - %pageName% -
%pageId%</Subject>
<Body>

66
CMS 8.0 Administrator Guide
66
<![CDATA[
<p><strong>Workflow Notification</strong></p>
<p><em><a
href="mailto:%workingUserEmail%">%workingUserName%</a> </em>advanced
the item <em><a href="%siteUrl%?ID=%pageId%">%pageName% (%pageId%)</a>
</em>through the "<em>%transitionName%</em>" transition in the
"<em>%workflowName%</em>" workflow, and assigned it to <em><a
href="mailto:%nextUserEmail%">%nextUserName%</a></em></p>
<p> </p>
<p><strong>Comments from Assigning User:</strong>
<br /><em>%comments%</em></p>
<p> </p>
<p><strong>View Item:</strong><br/><a
href="%siteUrl%?ID=%pageId%">%siteUrl%?ID=%pageId%</a></p>
]]>
</Body>
</EmailTemplate>
The email template is contained in the CDATA section of the document. You can modify the HTML in this section, and you can also modify the variables contained within % signs. (The syntax for these variables is the same as it is for report variables.)
The following variables and constants can be used in the email template.
Variables:
pageId
pageName
siteName
siteUrl
workingUserName
workingUserEmail
lastUserName
lastUserEmail
nextUserName
nextUserEmail
nextGroupName
workflowName
transitionName
Constants:
now
today
Note: To function, all variables need to be wrapped in % signs.

67
CMS 8.0 Administrator Guide
67
5.8 Permissioned Workflow
The Permissioned Workflow feature filters the list of users to whom a page can be assigned based on their access to the node where the page resides. Specifically, users who don’t have access to the node where a particular page lives will not be displayed as options within the Workflow Advance dialog.
Figure 28: The Permissioned Workflow feature in System Options
The following tag is added to the \xml\settings\settings.xml file:
<PermissionedWorkflow>
<UsePermissionedWorkflow>true</UsePermissionedWorkflow>
</PermissionedWorkflow>

68
CMS 8.0 Administrator Guide
68
6 Page Creation Rules
Page creation rules (PCRs) are used to specify default properties for newly created pages. The properties may describe what types of pages can be created, what user groups are allowed to create them, where the new pages will be created in the tree, and what the default workflow will be.
PCRs also enable users who don’t have permission to see the site tree to create content that automatically appears at the appropriate place in the site hierarchy. Without page creation rules, users without permission to see the site tree can’t create pages.
Users with access to page creation rules will see them in the Create Content section of the Dashboard.
Figure 29: Page Creation Wizards
Each “Wizard” listed in the Create Content menu invokes a PCR. Users will only see PCRs that they have permission to use.
To create and configure PCRs, go to Administration > Page Creation Rules. This will open the Page Creation Rules Manager.
Figure 30: The Page Creation Rules Manager
In the Page Creation Rules toolbar, you can use the New Rule button to create a PCR, the Delete Selected button to delete a PCR, and the Excel icon to export a list of PCRs to Excel.

69
CMS 8.0 Administrator Guide
69
6.1 Info Tab
When you select a PCR from the list, or when you click New Rule, you’ll arrive at the Info tab.
Figure 31: The Info tab for configuring page creation rules
The Info tab provides most options for creating and configuring PCRs.
Excel Icon – Exports a PCR list to Excel in XML format. This button lives to the left of the New Rule button.
New Rule – Creates a PCR.
Delete Selected – Removes the selected PCR and its settings.
Save – Saves the current PCR.
Cancel – Cancels the process of creating a PCR.
Name – Labels the PCR. In general, the name should reference the group that will use the PCR (e.g. “Math Department Page”).
Schema – Defines the page type used to create new pages from this rule. The drop-down options are pulled from the contents of the xml\schemas directory.
“+” – Launches the Select Groups and/or Users dialog, where you can select the individual users and groups that will use the PCR. The list of users and groups is pulled from the users.xml file.
“-” – Deletes the selected user or group from the PCR properties. Once removed, the user or group will no longer be able to use the PCR.
Workflow [optional] – Associates a workflow with the selected PCR. The drop-down options are loaded from workflowdefs.xml.

70
CMS 8.0 Administrator Guide
70
Advanced – Opens additional options if checked:
Default Rule – Marks the selected rule as the default rule that displays in a user’s page creation dialog.
Override Stylesheet – Defines the style sheet to be applied to new pages from this rule. The drop-down options are pulled from the contents of the xml\stylesheets directory.
The properties for an existing PCR can be modified at anytime by selecting the PCR and modifying the appropriate property.
6.2 Parent Pages Tab
At the Parent Pages tab, you can add parent pages to, and remove parent pages from, a page creation rule.
Figure 32: The Parent Pages tab in the Page Creation Rules Manager
By assigning parent pages to PCRs, you define the places in the site tree where PCRs can be used to create pages. For example, if we make a PCR called “Create a News Story” and then define a folder called “News Articles” as the only parent of this PCR, the “Create a News Story” PCR will only be able to place pages under “News Articles.”
Use the “+”button to add a parent page to a PCR and the “-” button to remove a selected parent page from a PCR. Alternately, you can drag and drop a parent page from the site tree into the Parent Pages field.
The Parent Only check box to the right of the parent page path further restricts the places where the PCR can be applied. If the box is checked, pages can only be created under the parent page itself. If not, the PCR can be applied to all descendants of the parent page as well.
6.3 Node Level Rule Application
To add a page creation rule to a particular node on the site tree, right-click the node and select Page Properties > Page Creation Rules.

71
CMS 8.0 Administrator Guide
71
Figure 33: Managing PCRs via the Page Properties dialog
Inherit page creation rules from parent page – Determines whether the selected page will use rules from its parent page. Note that if a page has been configured to inherit rules only from parent pages, rules cannot be specified for the page. By default, the page will inherit the PCRs from its parent page. Deselecting Inherit page creation rules from parent page allows additional rules to be added, and inherited rules to be removed.
Parent – Makes the selected rule the inheritance point for nodes below the selected node.
Add – Provides a list of PCR rules from which to choose to apply the selected page.
Remove – Removes a particular rule from the selected page.

72
CMS 8.0 Administrator Guide
72
7 Publishing Overview
The publishing process prepares XML pages and components to be consumed as content (usually Web content, but other formats are also supported). When a publish is initiated, the XML files marked for publish are sent to a specified publishing target. Then the replication process copies these files to a directory on the DSS. This two-step process separates the files used to display the production site from the publishing work conducted on the CMS server.
The entire process of moving content from the CMS to the DSS works like this:
1. A publish is submitted.
2. Dependencies are determined.
3. XML files are created in the publishing target.
4. Newly published files are replicated from the publishing target to the DSS server.
7.1 Dependencies
In the CMS, the site tree displays the information architecture of a site. The site tree describes hierarchical relationships among pages, components, and folders; these relationships can be described in terms of a family tree. That is, pages, components, and folders – depending on their relative places in the site tree – relate to each other as ancestors, parents, siblings, and children. The Reference.xml file stores this tree structure.
Pages can also be related to each other through links, navigations, components, and co-brands. These relationships are called dependencies. Files called dependency graphs maintain the dependencies between pages. Each publishing target has a corresponding dependency graph. Pages may also have dependencies that span publishing targets.
7.2 Dependency Calculations
The CMS application calculates dependencies in the following circumstances:
A page is checked in.
A page is marked for publish.
A page is published (incremental or full).
A site is published (incremental or full).
A page is previewed.
Starting one of these processes prepares the CMS for calculating dependencies. During this preparation time, a “publish” animation is displayed and the user client is locked. The server then completes the dependency calculations in the background. Before a publish starts, the dependency calculations must be completed.
Publish times listed in the Publish Monitor and the log do not include dependency calculations. While making dependency calculations, the Publish Monitor displays “Calculating page dependencies….”
7.3 Navigations
Navigations are the most common dependencies. Navigations pull in information about the pages and components they reference.
Listed below are the attributes used by a navigation element:

73
CMS 8.0 Administrator Guide
73
Generation Order – Value: Down | Up – Indicates the order in which the navigations are listed.
Max Nodes – Integer – Indicates the maximum number of tree nodes to pull into the current page’s navigation. Ancestor navigation goes up the hierarchy of the site tree; child navigation goes down; sibling navigation pulls in pages on the same level (i.e., pages that have the same parent).
Start Page – xID – For ancestor navigations, the start page indicates where to stop navigation, including pages up to (but not including) the page entered. For all other navigation types, the start page indicates the page at which to start navigation (not including the start page itself).
Max Depth – Integer – Indicates the number of levels in the tree to be pulled into a navigation. For performance optimization, this number should never be more than four (4).
Query – XPath Query – A query filtering out the set of pages in the navigation. When a query is used, the navigation structure is discarded in favor of a flat structure of page nodes.
Exports – Export code includes portions of a page’s data in the navigation. Exports are included on <Page> tags in name/value pairs.
Navigations stop at the first limit. For instance, if the start page is three levels above the current page and the max depth is set to 1, the ancestor navigation will only pull the page one level above the current page. Navigations should be used with care, as they can dramatically impact the number of dependencies the system is required to calculate; the calculation of dependencies affects the performance of check-ins, previews, publishes, and run-time viewing of the site.
7.4 Publishing a Page
In order for any page or component to be published, the page must be checked in and marked for publish.
Incremental publish – An incremental publish publishes the selected pages and components along with their dependent pages and components. Content published in this fashion overwrites earlier versions of the content in the publishing target. Publishing content incrementally should normally be quicker than doing a full publish. Incremental publishes are ideal for small amounts of content published on a day-to-day basis.
Full publish – A full publish publishes all pages and components that have been marked for publish, and any dependent pages as well. In a full publish, pages and components are published whether or not they have been modified. A full publish of the site deletes all files in the publishing target and then publishes the new content.
Because unmodified pages are published, a full publish usually publishes more pages and takes longer to complete than an incremental publish. Full publishes should be used for large-scale changes and should not be conducted during peak hours.
7.5 Task Queue Serialization
Task queue serialization helps prevent lost publishing and replication jobs. Whenever the IIS Application Pool shuts down gracefully, task queue serialization (if enabled) records CMS tasks currently in the queue. When the Application Pool restarts and the CMS is accessed (by a user logging into the site, for example), these tasks are reloaded and resume running.

74
CMS 8.0 Administrator Guide
74
The task queue serialization feature won’t work for IIS resets and catastrophic stoppages.
Tasks are serialized into an XML file called tasks.xml located in [sitedirectory]\xml. Once IIS and the site become available, the tasks are queued up by the application. This action is denoted in the application log in a format similar to the line below:
[INFO] [20070402T09:31:57] Site: successfully loaded automated tasks file:
configured 4 tasks
When task queue serialization is enabled, recycling or stopping the Application Pool will not clear the CMS task queue. The tasks.xml file must be cleared to prevent tasks queued up prior to recycle or stoppage. To do so, edit the tasks.xml file manually, clearing all tags between the <tasks></tasks> tags.
This should result in the \xml\settings\settings.xml containing only:
<TaskQueue>
<UseSerialization>true</UseSerialization>
</TaskQueue>
To enable Task Queue Serialization, go to Administration > System Options > CMS > Site Properties.
Figure 34: Configuring site properties in System Options
Check Turn Task Queue Serialization On.
7.6 Publishing in Detail
A publish job begins when a user with sufficient permissions initiates it, or when a workflow action triggers it.
A standard publish proceeds as follows:
1. A publish is triggered manually or by a workflow action.

75
CMS 8.0 Administrator Guide
75
2. A publishing target is selected and an incremental or full publish is indicated (a
workflow action always initiates an incremental publish to all publishing targets
associated with a page).
3. The client submits a publishing request to the server.
4. The server calculates dependencies (Publish Monitor displays “Calculating page
dependencies…” while calculating dependencies).
[Optional] Pages are deleted from the publishing target directory if the application is performing a full publish. An incremental publish does not remove pages that have been unmarked for publish or deleted from the CMS site.
5. Collateral resources (images, documents, media, prebuilt files, stylesheets, settings, and
errors) are copied to the publishing target.
6. [Optional] Pages are transformed to HTML if the option is set for the publishing target.
7. Published pages are sent to the publishing target.
8. If structured URLs are enabled, the CMS creates or updates UrlMap.xml when a publish
is performed.
9. The Publish Monitor provides a snapshot of the activity of a given publishing target
pulled from the PublishTargets.xml file. This file updates after a given step in the
publishing process has completed.
10. The log file igxcsapi.log is updated with a detailed log of publishes. This file resets by
default after it reaches 10 MB in size.
7.7 Performance Suggestions for Publishes
Adhering to the following site-design recommendations will help you maximize publishing system performance.
7.7.1 Use Start Pages on all Ancestor Navigations
Start pages limit the number of ancestor pages pulled by an ancestor navigation, which in turn limits the number of dependent pages. Limiting the number of dependent pages decreases the number of dependency calculations and the number of pages to be published.
7.7.2 Limit the use of Sibling Navigations
Limiting sibling navigation limits the number of dependent pages. This decreases dependency calculations and the number of pages to be published.
7.7.3 Limit the Depth of Navigations
Limiting the depth of navigation (or the number of dependent pages pulled into navigation) decreases dependency calculations and the number of pages to be published. As depth increases, the size of the navigation increases exponentially.

76
CMS 8.0 Administrator Guide
76
7.7.4 Limit the Number of Publishing Targets
Each publishing target’s corresponding Depgraph should be checked for dependent pages when dependencies are calculated. Each publishing target and its corresponding Depgraph increases the time taken to calculate dependencies.
7.7.5 Avoid Publishing Targets within Publishing Targets
Creating a publishing target within an existing publishing target duplicates information. Each Depgraph is reviewed during dependency calculations, duplicating work and extending the time needed to complete a dependency calculation.
7.8 Publishing from a Workflow Action
Any standard publish initiated by a workflow should do the following:
1. Perform an incremental publish of the page (provided the page has been checked out,
checked in, and marked for publish previous to the action) and any dependent pages
that are marked for publish and checked in.
2. Publish to all publishing targets containing the xID of the page.
7.9 Post-Publish Synchronization
The post-publish synchronization setting determines whether a new publish can begin before replication is finished for the current publish. This setting only affects the next publish to a different target. Publishing to the same target will always be blocked until replication is finished.
To select post-publish synchronization, go to Administration > System Options > CMS > Publishing > Post-Publish Synchronization and check the Enable… box.
7.10 Dynamic Publishing System
CMS 8.0 introduces the Dynamic Publishing System, a new publishing framework built on Microsoft .NET 4. The Dynamic Publishing System offers a dramatic performance and quality improvement. Specific updates include:
Substantially improved publish times
Faster preview rendering
Simplified implementation
Increased reliability
Improved troubleshooting and debugging
Fewer dependent items published
At the core of Dynamic Publishing is just-in-time rendering of all content, including dependencies. When a page pulls content from elsewhere in the site via a link, navigation, or component, a dependency is created. Previously, for every publish, the publishing system had to process all dependencies for every page to be published. This meant that even an incremental publish could entail a lot of data processing to update other pages that included the shared content
With Dynamic Publishing, the data for each dependent item is pulled when a page is first rendered on the DSS, and navigation results are cached in memory. Thus, the CMS doesn’t have

77
CMS 8.0 Administrator Guide
77
to process dependencies when content is published. The end result is a substantially faster publishing process.
The Dynamic Publishing System comprises two separate but related features: Dynamic Publishing and Dynamic Preview. These features work together to provide faster rendering of content on both the CMS and the DSS. 7.10.1 Dynamic Publishing
Dynamic Publishing modifies the old CMS publishing model in several ways:
The dependency graph is no longer queried before a publish. Instead, a publish includes all pages marked for the publishing target and all content in the Global Content Location, a folder for content shared among publishing targets.
A publish doesn’t involved any content expansion. The correct version of a page file is simply copied to the pub target folder.
During a publish, several additional files are copied to the publishing target to help with navigation and link building:
o A processed version of Reference.xml that only includes pages marked for publish, content from the Global Content Location, and nodes with children
o TaxonomyAssociations.xml and Taxonomy Tree.xml o ReferencesMapping.xml o Options.xml, which contains global export definitions
There are no dependency graph updates during a publish.
In an incremental publish, assets (documents, images, media files, etc.) are only published and replicated if the file on the server has been modified more recently than the target file. During a full publish, all files and folders—including assets—are deleted from the pub target and then republished.
7.10.2 Dynamic Preview
The Dynamic Publishing System employs a Dynamic Preview provider to render previews of page and XML content. Dynamic Preview is designed to render substantially faster previews in the CMS.
Dynamic Preview uses a local instance of the DSS to generate previews. When you install or upgrade a CMS site, a local instance of the DSS called “DSS_Preview” is automatically installed in the CMS directory.

78
CMS 8.0 Administrator Guide
78
This local instance is the default preview provider when you set up Dynamic Publishing.
For XSLT sites, no further configuration is necessary. Once Dynamic Publishing is enabled, Dynamic Preview works too. For an MVC site, you need to set up a local instance of your DSS and then point Preview Virtual Directory Path to that instance.
There are a few changes to the way preview works in Dynamic Preview mode:
Navigation nodes generated in Dynamic Preview Mode don't use structured URLs. Instead, they look like this:
x123.xml?Preview=true&PubTgt=1&Site=&IncludeAllPages+true
A page preview is always generated for a specific publishing target. All navigation nodes are generated for that target as well. If All Publishing Targets is selected, and there are both dynamic and non-dynamic targets configured, the preview defaults to non-dynamic mode.
The check-in status and version status of a page determine the page file rendered for preview. To ensure that the correct page file is rendered, make sure that the version of the page you want to preview is checked in and marked for publish.
Apart from these changes, the local DSS instance works in Dynamic Preview mode just like it does in a runtime environment on the DSS.

79
CMS 8.0 Administrator Guide
79
7.11 Site Sync Overview
Previous versions of the CMS used PeerSync, a third-party application, to replicate files from the CMS server to the DSS. CMS 8.0 introduces Ingeniux Site Sync, a new replication system that is fully integrated with the CMS software.
Site Sync features a number of updates and improvements:
The replication process is now an integral part of the publishing process.
You can configure unique replication settings for each publishing target.
Site Sync features a simple, web-based user interface.
Site Sync is a plug-in, so developers can deploy other syncing methods in the future.
Replication is now more reliable than it was with a third-party application. 7.11.1 Replication as Part of the Publishing Process
In the new model, replication is an integral part of the publishing process. Each pub target is associated with a replication provider (or several providers), and the provider replicates files to a specific deployment location. The following diagram shows the flow of the integrated publishing-replication process.

80
CMS 8.0 Administrator Guide
80
Figure 35: The integrated publishing-replication process
7.11.2 Microsoft Sync Framework
The Ingeniux Site Sync system is built on Microsoft Sync Framework, a plugin-based system that complements the CMS software architecture. Microsoft Sync Framework comes with a file sync provider that covers most replication scenarios. CMS 8.0 implements additional FTP, SFTP, and WCF (Windows Communication Foundation) providers.
To learn more about Microsoft Sync Framework, go to http://msdn.microsoft.com/en-us/sync.
7.11.3 Replication Rules
Replication proceeds according to the following rules (to learn more about configuring the settings mentioned here, see Configuring Dynamic Publishing
Dynamic Publishing has to be enabled and configured for each publishing target that will use the system. To configure Dynamic Publishing, go to Administration > Publishing System, open a publishing target, and select Enable Dynamic Publishing.
Some CMS sites have a components folder that isn’t located under any single publishing target. This folder contains content that is shared among publishing targets. If your site has such a folder, enter the name or xID of the folder in the Global Content Location field.
Global content should only be configured for sites where a single shared components folder needs to be published to many targets. When a components folder only needs to be published under a single pub target root, make sure that the components folder is under the pub target root xID and leave the Global Content Location empty.
With Dynamic Publishing configured, the option to enable structured URLs is checked and becomes uneditable because the DSS needs this setting to be selected.
The Preview Provider option is automatically set to Dynamic Site Server, and the preview path points to DssPreview, a default preview provider that works automatically for XSLT sites.

81
CMS 8.0 Administrator Guide
81
Note that you can still select and configure an external preview provider.
Configuring Replication):
Replication works in one direction only – from pub target folder to deployment location.
Exempt locations in the pub target will be excluded from replication.
For File System Replication, only changed files from the source location will be replicated. This rule accommodates incremental publishes. Other replication target types don't employ change tracking.
You can specify additional locations to be replicated. An additional location points to a folder to be replicated from outside a given pub target. The target folder of an additional location will be not replicated from the pub target. For example, if you configure an additional location to be replicated to the media folder in the target location, the media folder in the pub target will be excluded. Thus, additional locations eliminate the need to configure media server directories.
The replication system can replicate to targets one-by-one or simultaneously. Simultaneous replication can impact server performance, so if a server doesn't have optimal hard drive speed, it’s usually a good idea to turn off simultaneous replication.
A system option, Enable Post-Publish Synchronization, determines whether or not a new publish can begin before replication is finished for the current publish. This setting only affects the next publish to a different target. Publishing to the same target will always be blocked until replication is finished.

82
CMS 8.0 Administrator Guide
82
8 Publishing System
In the Publishing System Manager, you can define multiple locations to which the site or portions of the site can be published. You can also define user groups with permission to publish content, and you can configure multi-format publishing via user agents.
To access the Publishing System Manager, go to Administration > Publishing System. The Publishing System Manager will open to the Publishing Targets tab.
8.1 Configuring a Publishing Target
A publishing target defines the physical directory to which XML pages are published and the root page from which to start a publish. It also determines whether or not the XML is transformed to HTML upon publication. The CMS does not limit the number of publishing targets, but a large number of publishing targets could negatively affect performance.
Publishing targets can be used to exclude certain portions of a site from a full-site publish. This is useful if different organizational units, represented by different sections in the content tree, are on different publishing schedules.
At the Publishing Targets tab, you can configure the process whereby a CMS site (or some portion of it) is sent to a publishing folder and then replicated to the DSS.
Figure 36: The Publishing Targets tab
Before creating a new publishing target, note the xID number of the page that will be the root node of the publishing target. Then click the New Publishing Target button in the Publishing Targets tab. An empty Info tab will open.

83
CMS 8.0 Administrator Guide
83
Figure 37: The Info tab in the Publishing Targets Manager
Enter a Name for the publishing target. This will be the display name in the CMS and also the name of the physical directory to which XML files are published (e.g. \[designsitedirectory]\xml\pub\[pubtargetname]).
In the Root Page field, enter the top-level node of the publishing target. The root page is the page/folder/component from which to start the publish. A publish begins at this xID and publishes any sibling pages marked for publish following this xID, any child pages and nodes marked for publish below this xID, and any dependent pages of the pages to be published. Usually, the root page is the homepage.
Then specify the Publish Folder to which the content will be published.
Next, determine whether or not the XML pages to be published should be transformed on the server. If a page requires processing (such as pulling information from a database) at the time the user requests it, the pages should not be transformed. If the pages are to be transformed, check Transform pages on server during publish and select values from the User Agent and Site drop-downs.
When a page is requested through a hypertext transfer protocol (HTTP) request, the user agent and site are obtained from information in the HTTP request header and the site map file (ssmap.xml). When publishing a site to static files, the pages are not requested through a browser, so these settings must be configured in advance. (See User Agents and Sites Tab below for more on multi-format publishing and server-side page transformation).
Checking Enable Structured URL for Publishing Target expands the Structured URL Settings field, where you can configure friendly, semantic URLs (see section 8.10).
Selecting Enable Analytics for Publishing Target makes it possible to connect a Google Analytics account to the DSS site to which the publishing target will be replicated (see section 10.8). Note that the Analytics Settings section will not be visible until you save a new publishing target.

84
CMS 8.0 Administrator Guide
84
Checking Use External Preview Provider opens a field where you can configure the In-Context Editing system to display Multi-Format Output pages in the Page View and Preview windows.
Note: A publishing target must be set up before a publish can be executed. Also, a full publish must be performed before an incremental publish.
8.1.1 DSS Preview
To accommodate the .NET technology behind the DSS, the Publishing System Manager features a Preview Provider menu. In this menu, you can select the method for rendering previews in the CMS.
To select and configure a Preview Provider:
1. Open the Publishing System Manager and select a publishing target or create a new one.
2. On the Info tab, scroll to the bottom of the page and, in the Preview Provider menu, select Stylesheet, Dynamic Site Server, or External. (To use the sample MVC solution included with the CMS, select Dynamic Site Server and make sure that Enable Dynamic Publishing is selected.)
3. If necessary, enter additional URL or directory path info. (To use the sample MVC solution as the preview provider, leave the default value, DssPreview, as the virtual directory path.)
Figure 38: Enabling Dynamic Site Server preview
Selecting Stylesheet enables the legacy preview system, in which XML pages are transformed by XSLT style sheets.

85
CMS 8.0 Administrator Guide
85
Selecting Dynamic Site Server opens an additional field, Preview Virtual Directory Path.
Here you’ll enter the virtual directory path of the DSS to preview. The site must be a virtual directory under the CMS, or under the parent site of the CMS, to prevent cross-site scripting. The path starts with a slash and can be several levels deep (for example, /preview/dsspreview).
Figure 39: Site preview settings
Selecting External enables the external preview system introduced in CMS 7.5. You’ll need to define both the URL of the preview provider and the URL for the in-context editing system.
Figure 40: Enabling in-context editing markup
8.2 Configuring Dynamic Publishing
Dynamic Publishing has to be enabled and configured for each publishing target that will use the system. To configure Dynamic Publishing, go to Administration > Publishing System, open a publishing target, and select Enable Dynamic Publishing.
Some CMS sites have a components folder that isn’t located under any single publishing target. This folder contains content that is shared among publishing targets. If your site has such a folder, enter the name or xID of the folder in the Global Content Location field.
Global content should only be configured for sites where a single shared components folder needs to be published to many targets. When a components folder only needs to be published under a single pub target root, make sure that the components folder is under the pub target root xID and leave the Global Content Location empty.

86
CMS 8.0 Administrator Guide
86
With Dynamic Publishing configured, the option to enable structured URLs is checked and becomes uneditable because the DSS needs this setting to be selected.
The Preview Provider option is automatically set to Dynamic Site Server, and the preview path points to DssPreview, a default preview provider that works automatically for XSLT sites.
Note that you can still select and configure an external preview provider.
8.3 Configuring Replication
In CMS 8.0, the Publishing System contains a new Replication tab for configuring replication settings.
To enable replication:
1. Open the Administration pane and click Publishing System. 2. Select a publishing target from the list, and then click the Replication tab. 3. Select Enable Replication for Publishing Target.
To enable replication to all targets at once, select Simultaneous replication on all targets.
Figure 41: Configuring replication in the Publishing System tab
To add a new replication target, click Add a New Replication Target . A menu opens with a list of protocols for replicating files. To create a new replication target, select a replication type:
File Replication Target – Copies files using standard Microsoft Windows functionality.
FTP Replication Target – Copies files using the File Transfer Protocol (FTP).
FTP/SSL Replication Target – Copies files via FTP-SSL (FTP using SSL encryption for security). This is also referred to as FTPS.
Secure FTP Replication Target – Copies files via SFTP, a file transfer protocol that employs the Secure Shell (SSH) protocol for security.
When you select a replication protocol, a new form opens in the Replication tab.

87
CMS 8.0 Administrator Guide
87
Figure 42: Configuring replication for a publishing target
To configure replication, fill out the appropriate fields for the replication type.
8.3.1 File Replication Target
To set up a standard file replication target, configure the following values, as necessary.
Name [Required] – The name of the replication target.
Description – An optional description of the replication target.
Target Location [Required] – A UNC path or a file path on a local drive.
Change-tracking with content comparison – Enables or disables content comparison. By default, the replication system detects changes by comparing the last-modified dates of the source and the target. When change tracking is on, the system also compares content and eliminates file transfer if the content hasn’t changed. Normally, change tracking should not be enabled, because it slows the replication process.
Disabled – Disables the replication target. This setting is useful for testing purposes, because you can temporarily remove a target without deleting it.
To use impersonation settings, click Advanced Settings and configure the following options:
Connect to location with a different account – Enables impersonation settings. You can use these settings to connect to the UNC path with a different user account. If you’re replicating files to a different server, you’ll need to configure a user account with access to the server.
Figure 43: Enabling impersonation settings
To enable access to the target server, configure the following fields:
o Connecting User – The user with access to the UNC path o User Domain – The domain name (e.g., “ingeniux”) o Password – The user’s password (encrypted)
88
CMS 8.0 Administrator Guide
88
8.3.2 FTP Replication Target
To set up an FTP replication target, configure the following values, as necessary.
Name [Required] – The name of the replication target.
Description – An optional description of the replication target.
FTP Server Address [Required] – URL of the FTP server (for example, ftp://ftp.ingeniux.com).
Port – Holds a default value of 21.
User Name – User name for establishing the FTP session.
Password – Password for establishing the FTP session.
Root Path – Server location to which files will be replicated. The root path begins at the root of the FTP site and uses forward slashes as delimiters.
Disabled – Disables the replication target. This is useful for testing purposes, because you can temporarily remove a target without deleting it.
To configure advanced FTP options, click Advanced Settings and select one or both of the following options:
Passive Mode – Enables a passive FTP connection. A passive connection can be used to avoid issues with NAT devices and firewalls, if the FTP server employs these technologies.
Compressed Transfer – Enables on-the-fly data stream compression. Data is then decompressed on the FTP server. Turning on compressed transfer can speed up file transfer in some cases. For example, some text and image files may be transferred more quickly. But for .jpg files, .zip files, and large movies, the process won’t be noticeably faster. Compressed transfer can cause a bottleneck, so use it with caution.
8.3.3 FTP/SSL Replication Target
The basic settings for an FTP/SSL replication target are the same as those for an FTP replication target. Thus, to configure basic settings for FTP/SSL replication, set the values described above in FTP Replication Target.
The advanced settings are a little different. To configure advanced FTP/SSL options, click Advanced Settings and select the following options, as necessary:
Implicit Mode on TLS/SSL – Enables implicit FTP negotiation of TLS/SSL and changes the port to 990.
Passive Mode – Enables a passive FTP connection. A passive connection can be used to avoid issues with a NAT device or a firewall, if the FTP server employs these technologies.
Compressed Transfer – Enables on-the-fly data stream compression. Data is then decompressed on the FTP server. Turning on compressed transfer can speed up file transfer in some cases. For example, some text and image files may be transferred more quickly. But for .jpg files, .zip files, and large movies, the process won’t be noticeably faster. Compressed transfer can cause a bottleneck, so use it with caution.
8.3.4 Secure FTP Replication Target
The settings for a Secure FTP replication target are nearly identical to those for an FTP replication target (above), with these differences:

89
CMS 8.0 Administrator Guide
89
The server to be configured is an SFTP server.
The default port is 22.
There is only one advanced option: Compressed Transfer.
With these differences in mind, you can configure a Secure FTP replication target using the instructions above for FTP Replication Target.
8.3.5 Advanced Settings
To configure advanced replication settings, open the Advanced Settings form.
Figure 44: Configuring advanced replication settings
A few advanced settings are available only for specific replication types, and are described in previous sections. The following advanced settings are available for all replication types:
Exempt Locations – Folders that are excluded from replication to the deployment location. You can use this collection of settings to exclude files by folder and by file extension. To add an exemption, click Add a New Exempt Location , and then configure the settings described below.
Figure 45: Exempt locations

90
CMS 8.0 Administrator Guide
90
o Exempt Location [Required] – The folder to be excluded from replication. Select a folder from the menu.
o Exempt all files in this location – Excludes from replication all files in the exempt location. If you clear this setting, you can use two more fields to filter exemptions.
Exempt Search Patterns – Excludes files containing a given string pattern or patterns. By entering wildcards and file extensions, you can exclude certain file types. For example, entering *.wmv would exclude from replication all Windows Media Video files in the exempt location. Use a pipe | to separate values. You can also exclude partial matches. For instance, p*.pdf excludes all PDF files starting with the letter “p”.
Exemption covers descendant directories – Applies the excluded pattern to subfolders of the exempt location.
Additional Locations – Folders to be replicated from outside the pub target folder. These are folders from outside the standard CMS directory structure that need to be piggybacked on the replication. For instance, if a site stores media files outside the standard media folder, it might be useful to include an external media folder here.
To replicate an additional location, complete the following fields:
o Source Location [Required] – A hard drive path or UNC path. This location must exist before you enter it here. The CMS will not create it automatically.
o Target Location [Required] – The folder into which the additional files will be replicated. Choose a target location from the menu. The CMS will replicate the source location into the target location. It will also exclude from replication the folder corresponding to the target location in the pub target. In other words, if the source location is c:\media and the target location is /media/, the CMS doesn’t replicate media from the pub target, but it does replicate c:\media into a new target location called media. No file merging occurs in the process.
Cleanup Exclusions – Files or folders not to be removed during a full publish. During a full publish, all content is deleted from the replication target before published content is replicated. Items listed as cleanup exclusions are excluded from deletion. Normally, these excluded items are not contained in the pub target folder, since that content will be overwritten by replication even if it’s excluded from cleanup. Commonly excluded files are Web.config and favicon.ico. To add an exclusion, click Plus (+).
The Location to Exclude field opens.

91
CMS 8.0 Administrator Guide
91
Files to be excluded begin with a forward slash (/favicon.ico), and folders to be excluded begin and end with a forward slash (/folder/). Enter an excluded location and, for a folder, select or clear Exclude all files in this location from cleaning up. If you clear Exclude all files…, additional settings become available.
o Exclude files Search Patterns – Search patterns to be excluded. Items that fit
the search patterns (delimited with a |) will be excluded from cleanup, meaning that they won’t be deleted. You can use wildcards to create search patterns (for example, k*.* excludes any file starting with a “k”).
o Exclusion covers descendant directories – Excludes all folders under the excluded folder. If this setting is cleared, descendant folders will be deleted.
Any folder that has excluded items under it is automatically excluded from deletion too. Conversely, any folder that doesn’t have excluded items under it, and that is not itself under a folder that excludes all descendants, will be removed during cleanup.
Custom Commands – Custom commands invoked before and after replication. Custom commands make it possible to customize the replication process. For example, a custom command could be used to send out an email pertaining to the replication process. In most cases, a custom command points to a batch file, but any file type executable under Windows shell (for example, .exe) can be used. Enabling this setting opens additional configuration options.
o Custom command to execute before/after replication – File path to the
custom command. o Timeout – Time to wait (in seconds) before the command times out. Some
replication tasks take a while. If there’s no response after this specified timeout period, the command process terminates.

92
CMS 8.0 Administrator Guide
92
8.3.6 Performing a Replication
With replication enabled for a publishing target, a replication job happens automatically as part of a publish. But there may be times when you want to replicate files without publishing any content.
To perform a manual replication on a publishing target:
Click New Publish, select Replicate Only, and select a replication type: Standard or Clean.
Manual replication options are only available in this menu, and only for administrators. Also, they’re only available when there is content in the pub target folder, and the pub target has been published at least once.
The two replication types work as follows:
Standard – Only replicates files that have changed since the last replication. This replication type doesn’t remove files. Thus, even after a full publish, files that haven’t been deleted from the replication source will not be deleted from the replication target.
Clean – Deletes everything from the target folder before starting replication. This essentially wipes out all metadata from the replication system. A clean replication is useful if, for example, IIS resets in the middle of replication and data is corrupted. By performing a clean replication, you ensure the integrity of all replicated files.
8.4 Security for Publishing Targets
At Publishing Targets > Security, you can configure security settings on a group-by-group basis for a given publishing target.

93
CMS 8.0 Administrator Guide
93
Figure 46: The Security tab in the Publishing System Manager
The center Security pane shows the groups that have the ability to publish to the selected publishing target. The Available Groups pane on the right lists groups that have not been enabled to publish to the selected target. To enable a given group to publish to the selected target, drag it from the Available Groups pane to the main security pane. To deny a group access to the selected publishing target, drag the group from the Security pane back to the Available Groups pane.
You can use the search field and the Filter and Clear buttons to find available groups.
8.5 Propagate Publishes Feature
If two or more publishing targets are configured, a drop-down menu appears at the top of the Site pane.
Figure 47: The Site pane drop-down menu
By default, the menu shows All Publishing Targets. But if you select a single publishing target from the menu, the publish icon (an orange arrow on a blue sphere) will indicate the root page

94
CMS 8.0 Administrator Guide
94
of the publishing target. Also, the site tree will display in bold all pages marked for publish to the selected target.
For example, in the image below, Home is the root page of the publishing target Test Target, and only the Academics page is marked for publish to Test Target.
If a page is marked for publish to multiple targets but not checked in to all of them, a new command, Propagate publishes to latest version, will appear on the context menu when you right-click the page in the site tree.
Selecting this command will give you the option to send the page or the page and its children to additional publishing profiles or publishing targets.

95
CMS 8.0 Administrator Guide
95
Figure 48: The Propagate pages for publishes dialog
You can select a publishing profile and click OK to check in the page toward a publishing profile. The number to the right of each profile name indicates the number of publishing targets toward which the page is not yet checked in. In the image above, there is one publishing target in Production toward which the page is not checked in. You can also select publishing targets directly by choosing Custom picks of Publishing Targets.
If a page is checked in toward all the targets for which it is marked for publish, the propagate command will not appear on the context menu.
8.6 Publishing Profiles Tab
At the Publishing Profiles tab, you can configure a publishing profile that will automatically publish to multiple targets. You can also determine which user groups will have access to this profile.
8.6.1 Creating a Publishing Profile
To configure a new publishing profile, go to Publishing Profiles > Info and enter a name for the new profile.

96
CMS 8.0 Administrator Guide
96
Figure 49: The Info subtab in the Publishing Profiles tab
Then, add Publishing Targets using the Add button, which will open a dialog where you can select targets. Use the “x” button to delete publishing targets.
8.6.2 Security for Publishing Profiles
The Publishing Profiles > Security tab is nearly identical to the Publishing Targets > Security tab (see above). To add groups to, and remove groups from, the selected publishing profile, drag the groups between the Security pane and the Available Groups pane.
When you’re finished configuring the Info and Security tabs, click Save to save your new publishing profile.
8.7 User Agents and Sites Tab
The CMS supports Multi-Format Output, which lets you customize your site for different clients—including mobile. Each instance of MFO requires a new user agent and site configuration. At the User Agents and Sites tab, you can configure these values.

97
CMS 8.0 Administrator Guide
97
Figure 50: The User Agents and Sites tab
8.7.1 Multi-Format Output
Multi-Format Output (MFO) is a feature that extends the static publishing capabilities of the CMS. A basic static publish only renders HTML files; MFO allows content to be published with any file extension (e.g. “aspx”, “php”, “jsp”, etc.).
Since MFO is an extension of the static publishing feature, it renders (meaning the XSL is applied to the XML) all content at publish. Rendered pages need no further processing before being deployed to a web server. An MFO-compatible XSL template can apply server-specific markup to content managed in the CMS.
MFO publishing is also compatible with the use of structured URLs in links, navigations, and XHTML content, provided that the structured URLs function without using the DSS server software. MFO requires a dedicated CMS publishing target.
Configuring MFO is a three-part process:
1. The XSL stylesheets for a site must be configured to transform CMS content into valid
markup for the targeted server technology.
2. The CMS site must be configured to support each desired file type.
3. A publishing target must be configured for the desired file type.
The sections below cover the second and third steps. The first step is covered in developer documentation.
8.7.2 Configuring User Agents and Sites
Each instance of MFO requires a new user agent and site configuration. This configuration will associate a particular file extension with a publishing target. Follow these steps to create a new user agent and site configuration:

98
CMS 8.0 Administrator Guide
98
1. From the CMS Client, go to Administration > Publishing System > User Agents and
Sites.
2. Click “+” to add a new user agent.
3. Create a User Agent by entering the following values:
Name – Provides a friendly name to associate with the specific user agent. For Multi-Format Output, this value should match the file extension to be used.
Search String – Defines a search string value for content associated with a particular publishing target. For Multi-Format Output, this value should match the file extension to be used.
Content Type – Defines the output type of the files created on publish. For Multi-Format Output, the value should be text/html.
Here is a sample User Agent for the ASP file format:
4. The new user agent will be saved automatically when you navigate away. To delete a
user agent, click “-”.
5. Click “+” to add a new site. Fill out the Name, Search String, and Site Group fields.
6. The new site will be saved automatically when you navigate away. To delete a site from
the Sites list, click “-”.
7. Go to the Publishing Targets tab and click New Publishing Target. In the Transform
Options section, check Transform pages on server during publish and select values for
User Agent and Site. When you’re finished, click Save.
8.8 Device Manager
CMS 8.0 features a new Device Manager for configuring mobile preview. Using the Device Manager, you can create device bundles that group mobile devices by manufacturer and screen size. Users can then preview mobile displays by selecting device bundles from a menu.
To turn on mobile preview, open the Publishing System Manager, click the Device Manager tab, and select the check box labeled Enable Mobile Devices Emulation.
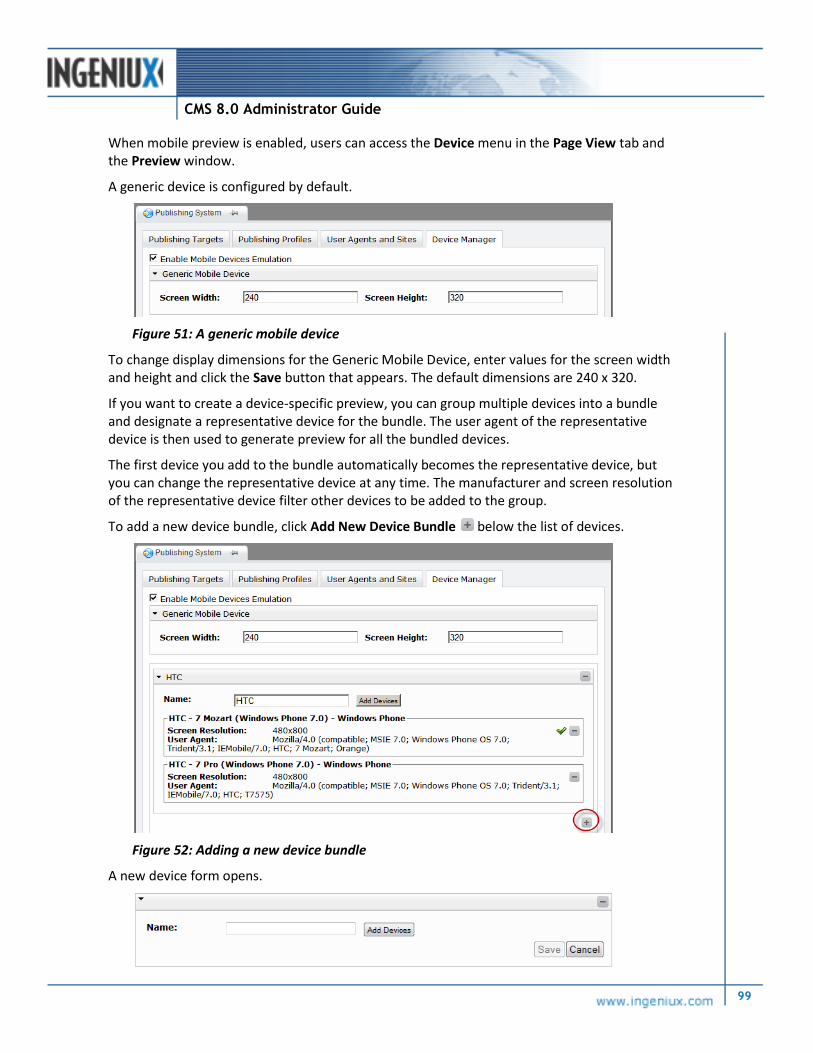
99
CMS 8.0 Administrator Guide
99
When mobile preview is enabled, users can access the Device menu in the Page View tab and the Preview window.
A generic device is configured by default.
Figure 51: A generic mobile device
To change display dimensions for the Generic Mobile Device, enter values for the screen width and height and click the Save button that appears. The default dimensions are 240 x 320.
If you want to create a device-specific preview, you can group multiple devices into a bundle and designate a representative device for the bundle. The user agent of the representative device is then used to generate preview for all the bundled devices.
The first device you add to the bundle automatically becomes the representative device, but you can change the representative device at any time. The manufacturer and screen resolution of the representative device filter other devices to be added to the group.
To add a new device bundle, click Add New Device Bundle below the list of devices.
Figure 52: Adding a new device bundle
A new device form opens.

100
CMS 8.0 Administrator Guide
100
Enter a name for the device in the name field. Then click Add Devices and select a device (or multiple devices) from the Select Mobile Devices dialog. To filter results, type a device name in the Search field and click Search.
Figure 53: Searching for mobile devices
To add the selected device(s), click Select. To add additional devices, click Add Devices and repeat the process above.
The green check mark indicates the representative device.
To change the representative device, point the cursor at the device that you want to make representative. When the check mark appears, click it.
When you’re finished adding devices to a bundle, click Save. To remove a device or an entire device bundle, click the appropriate Remove or Delete button .
8.9 Configuring Mobile Preview
Without Mobile Devices Emulation enabled, users see a User Agent menu in the Page View tab and the Preview window.
When mobile devices are enabled and configured in the Device Manager, users have access to a Device menu instead of the User Agent menu.

101
CMS 8.0 Administrator Guide
101
Although the User Agent menu is no longer available, you can simulate a user agent by entering a query string in the Query Strings field in preview mode.
In the Device menu, you can select a mobile device to preview. The device options are drawn from the mobile devices configured in the Device Manager. For example, if you configure device bundles called “iPhone” and “HTC 7”, your users will see the following options:
The options “<No Device Simulation>” and “Generic Mobile Device” will be available by default when mobile device preview is enabled. If no device simulation is selected, a standard desktop preview is displayed.
Four display types are available in Page View and Preview modes: iPhone, iPad, generic phone, and generic tablet. For example, the following image shows an iPhone-optimized display in an iPhone skin.

102
CMS 8.0 Administrator Guide
102
You can also simulate device rotation in preview mode. To change the orientation of the mobile display, click the Rotate button.
The images above show displays from the Page View tab. The preview options are the same in Preview mode.

103
CMS 8.0 Administrator Guide
103
Note the Query Strings field, where you can enter a user agent string with mobile device preview enabled.
8.10 Structured URLs
The CMS stores all XML content in a flat file structure (i.e., a single directory). Site hierarchy is maintained virtually within the CMS. Since the site hierarchy is virtual and CMS content is not nested in physical subdirectories within the file system, the website’s URLs normally use the following format:
http://domain/xid
For example:
http://support.ingeniux.com/x441.xml
These default URLs don’t provide semantic page names, nor do they indicate the virtual site structure that’s defined in the site tree of the CMS site.
To give site visitors a more user-friendly browsing experience, the CMS provides a structured URL feature. This feature generates semantic URLs for all pages in the site tree and for all site navigations and link elements.
8.10.1 Structured URLs Overview
The structured URL feature maps requested URL paths to specific CMS xIDs. When structured URLs are enabled, the CMS site creates the URL mappings during a full publish and stores the information in an XML file.
Because structured URLs are configured for individual publishing targets and not for the CMS as a whole, there is a file named /site/xml/UrlMap_#.xml for each publishing target (with # representing the unique identifying number of each publishing target). Each UrlMap_#.xml file mirrors the structure of a subset of the site tree starting at a specified xID (normally the site’s home page).
At the time of publish, a given UrlMap_#.xml file is updated with any changes and then copied to a publishing target in the xml/pub/[targetname]/settings/ folder and renamed urlmap.xml. (On DSS sites configured for structured URLs, this file name—urlmap.xml—will

104
CMS 8.0 Administrator Guide
104
always be the same.) The DSS server uses the urlmap.xml file to process incoming requests and to identify the xID that is mapped to the friendly URL path.
Note that there are length limitations on structured URLs:
URLs cannot be over 259 characters long. This length includes the virtual directory path (starting with the slash) and the extension (starting with the dot).
Extensions vary in character length (e.g. .xml, .html).
The virtual directory begins with the base URL of the publishing target. If a base URL is not set, it will by default be computed at 50 characters.
If a URL exceeds 259 characters, it will be truncated and end with -xid-ml (where id is a number), indicating that the URL has reached maximum length.
Renamed URLs
Each UrlMap_#.xml file holds the settings for structured URLs in its root <Site> node as a set of attributes. Each UrlMap_#.xml file also contains a history of all the URLs previously associated with a given xID.
If two different xIDs are both mapped to the same structured URL, both structured URLs will be renamed with their xIDs appended:
/structuredURLpath-xID
The page with the smaller xID will redirect to the shared structured URL. In other words, the older page “wins.” For example, in the sample script below, x117 will redirect to the canonical page.
<Page ID="x117" Path="/news/kelly-russell-wins-big-x117">
<Renamed Path="/news/kelly-russell-wins-big" Canonical="true" />
</Page>
<Page ID="x167" Path="/news/kelly-russell-wins-big-x167" />
All former URLs for a given page are marked as <Renamed> and redirected to the canonical URL. (In the example above, the renamed URL is the canonical URL.)
Reassigning a Structured URL
Each xID added to a UrlMap_# file is contained in a <Page> element. These <Page> elements are never automatically removed. But if you manually delete a page, and then you associate that page’s structured URL with a new xID, the mapping between the deleted page and the structured URL will be removed. In this way, the structured URL associated with one xID may be taken over by another xID.
For example, consider the following scenario:
1. You create a page named “Departments” at the top level of the site hierarchy. This page has the following xID: x24.
2. You publish x24, and its structured URL is /Departments.htm. 3. Then you move x24 under another top-level page named “Academics,” and you once
again perform a publish. 4. Now x24's structured URL is /Academics/Departments.htm. 5. Then you delete x24.

105
CMS 8.0 Administrator Guide
105
6. You create and publish a new top-level page called “Departments”; this new page has the following xID: x30.
7. The structured URL for x30 is now /Departments.htm, and the <Renamed> element under the <Page> node for x24 (the element that used to contain the value "/Departments") is removed.
Structured URLs in Action
The figure below shows a simple site tree as seen in the CMS Client.
Sample Site Tree
After structured URLs are configured, a series of mappings will be created for the home page and the pages below it using the page names and site structure. The following URLs will point to the Customer List page:
http://www.ingeniux.com/Customers/Customer-List.htm
http://www.ingeniux.com/Customers/customer-List.html
http://www.ingeniux.com/Customers/Customer-List.xml
By default, a dash ( - ) is inserted for spaces in the page. Spaces can also be replaced with an underscore, or strings can be concatenated (i.e. spaces are removed and not replaced by separators). The CMS will create similar mappings for all the pages underneath the Home page.
By default, structured URLs will not be created for components or for pages that are not children of the Home page. However, custom mappings can be created for pages that are not descendants of the Home page (see Custom URLs).
The next figure provides an example of how structured URLs change navigation. Hovering over the Customer List link displays the URL for this link in the bottom left corner of the browser:
http://www.ingeniux.com/Customers/Customer_List.xml
It contains a domain name (www.ingeniux.com), the path beneath the domain name (/Customers), and the specific file (Customer_List.xml).

106
CMS 8.0 Administrator Guide
106
Figure 54: Structured URL, as they appear in a browser
If structured URLs were not enabled, the URL might be:
http://www.ingeniux.com/x435.xml
8.10.2 Custom URLs
Additional custom entries can be configured for URLs that are not descendants of the home page. Moreover, custom URLs can be temporarily assigned to pages and later removed. This feature can be particularly useful for marketing and promotional campaigns, during which it might make sense to shorten or modify a URL.
A custom URL can be set as a page's canonical (current) URL. If a custom URL is set to canonical status, this URL value will appear in links, navigations, references, and so forth. If a custom URL is not canonical, then it will create a redirect to the canonical URL.
Custom URLs and MFO
A page’s custom URL can be marked for Multi-Format Output (MFO) without changing the rest of the pages designated for a given publishing target. Using this feature, you can configure a few pages for MFO (e.g., as ASP.NET or PHP files) while the rest of the site still publishes XML.
This functionality differs from that of MFO configured per publishing target. When MFO is configured for an entire publishing target, all published pages will be rendered in the non-standard format. For the custom-MFO feature to work, a DSS server has to be implemented, and each MFO page has to contain a file extension (e.g., .aspx, .php).
8.10.3 Additional Notes
Once structured URLs have been implemented, a site should function as follows:
Navigation elements, internal link elements, and XHTML links/anchors generate structured URLs seamlessly in published content.
Customer List
Link
Structured URL

107
CMS 8.0 Administrator Guide
107
Anchor tags use a structured URL value (friendlyName.ext#anchor) only in published content.
Link and document components support structured URLs, but the structured URLs must be manually entered and maintained.
A page’s xID URL (e.g. /176.xml) still works and will redirect to the current canonical URL if the canonical setting is configured.
Structured URLs are only generated for pages, not for components. You can choose to include folder names in URLs, though by default they won’t be included.
The Publish As feature continues to be backwards compatible, but after you have implemented structured URLs, you should avoid using Publish As.
Windows DSS servers allow non-CMS content (third-party XML files, static HTML or HTM files, etc.) to be served with the DSS Server.
CMS content is only supported in the physical folder root (not in physical subfolders).
Structured URLs are not generated in Preview. Specifically, Preview continues to use xIDs in navigation, link elements, and XHTML content.
If a structured URL is used in a link/document component’s URL text field, this link will no longer work in Preview.
Entering TFRM=4 in Preview will not display structured URL values.
8.10.4 Best Practices
Before implementing structured URLs, you should consider the following best practices. (As of CMS 7.0, new implementations of the CMS will have structured URLs enabled by default.)
New Sites
Avoid link/document components and use CMS link elements when possible.
Keep all “container-type” content items (e.g., cover, section, detail) as children of the
home page.
Components/pages not under the home page xID do not automatically generate
structured URLs. For example, a navigation that iterates a folder of components will not
generate structured URL values for those components.
Existing Sites
Existing sites require the same structural considerations as new sites.
Sites upgrading from CMS 6 and below require ASP.NET wildcard mapping, a
[site]\Bin folder, and a [site]\Web.config file.
Full structured URL coverage may be difficult without site modification if the site
structure does not lend itself to the feature. It may be necessary to reorganize the site
tree.
Choosing Settings
The Administration pane of the CMS Client provides an interface for configuring structured URLs. The following values can be configured:

108
CMS 8.0 Administrator Guide
108
1. Home Page – Used to determine the base point in the site tree where structured URLs
begin. Pages that are not beneath this xID do not automatically receive a structured
URL mapping. The location of this base point impacts site trees that contain multiple
websites within one tree.
2. 404 Error Handling Page – Specifies an internal page or the default CMS “File not
Found” error page if no page is entered. If a specific xID page is specified, the page
must be published and available on the DSS site. This page does not need to be beneath
the Home Page xID.
3. URL File Extension – Specifies what extension the structured URL will use: .htm, .html,
or .xml. Although a page can be reached using any of the three extensions, the
extension specified will be the one visible in navigations, etc.
4. URL Word Separator – Selects either the underscore ( _ ), the dash ( - ) or
concatenation (removal of spaces) to replace the spaces contained in a file name. The
default is the dash.
5. Site Base URL – Used primarily for writing XSLT stylesheets. A developer can choose to use the value of this field as the base tag value. The value must be a full URL starting with http:// or https://.
6. Publish lower case URLs – If checked, specifies that all links published in site pages will display in lower case.
7. Redirect all requests to canonical URL automatically – If checked, automatically uses a 301 redirect to send users to the canonical URL of a given page if the page is requested with a different URL.
8. Include folder names in URLs – If checked, allows the tree structure of the site, including folder names, to be reflected in the URLs generated.
9. Normalize URL Separators – If checked, prevents separators from being repeated in
structured URLs. For example, in an environment where a dash is enabled as a word
separator, the page name “Student - Life” would not be displayed as the structured URL
“Student---Life.” Rather, the extra spaces would be removed: “Student-Life.”
8.10.5 Installation and Configuration
Configuring and implementing structured URLs requires administrator-level access to the CMS client and file-level access to the site style sheets. Ingeniux recommends implementing structured URLs in a test environment (especially when changing stylesheets) prior to implementing any changes in a production environment.
8.10.6 Step 1: Pre-Configuration Steps
1. Identify and record the xID of the home page.
2. Create a “File Not Found” page and record the xID of this page (optional).
3. Determine what file extension to use with links and navigation elements.
4. Determine whether the site’s style sheets require a separate attribute
(@StructuredURL) for structured URLs.

109
CMS 8.0 Administrator Guide
109
5. Identify the main style sheet used by the site.
8.10.7 Step 2: Configuring the CMS Server
1. Launch the CMS Client.
2. Go to Administration > Publishing System > Publishing Targets and select the
publishing target to be configured.
3. Check Enable Structured URL for Publishing Target. The Structured URL Settings field will expand. Configure the values described above.
Figure 55: Structured URL settings
8.10.8 Step 3: Configuring the DSS Server
Note: The DSS Setup Wizard provides the option to configure the DSS site to support structured URLs. If you do so, you can use the section below to confirm the configuration. Otherwise, this section can be used to configure the DSS site manually.
1. Launch IIS Manager and navigate to the location of the DSS site.
2. Right-click the site (whether it is an IIS website or virtual directory); select Properties.
3. Select the Home Directory tab (for IIS websites) or the Virtual Directory tab (for IIS
virtual directories).

110
CMS 8.0 Administrator Guide
110
4. Click the Configuration Button.
5. On the Mappings tab, Click the Add… button.
6. Select Browse and navigate to the DSS server DLL (igxxmlsvr80.dll) typically located
in the \Ingeniux\cms80\Server directory.

111
CMS 8.0 Administrator Guide
111
7. In the Browse dialog, select All files (*.*) in the Files of type drop-down.
8. Select igxxmlsvr80.dll and select Open.
9. Enter .htm in the Extensions option.
10. Uncheck Verify that the file exists.
11. Select OK.
12. Repeat this process using the .html extension.
8.10.9 Step 4: [For XSLT Run-Time Servers] Modify the Default Style Sheet(s)
Prior to changing any style sheet, you should back up the original.

112
CMS 8.0 Administrator Guide
112
1. Locate the main style sheet (root template) for your site. Typically, for CMS
implementations, this will be the default.xsl file. Any style sheet containing a <head>
tag must be modified.
2. Locate the <head> tag within the stylesheet.
3. Add the following script into the <head> element:
<xsl:if test="not(contains($thispage/@URL, '?'))">
<xsl:text disable-output-escaping="yes"><![CDATA[<base
href="]]></xsl:text><xsl:value-of select="$siteURL"/><xsl:text disable-
output-escaping="yes"><![CDATA["></base>]]></xsl:text>
</xsl:if>
Please note that this line must precede any link tags (e.g., links for CSS files). A typical tag structure would look as follows:
<head>
<xsl:if test="not(contains($thispage/@URL, '?'))">
<xsl:text disable-output-escaping="yes">
<![CDATA[<base href="]]></xsl:text><xsl:value-of
select="$siteURL"/><xsl:text disable-output-
escaping="yes"><![CDATA["></base>]]></xsl:text>
</xsl:if>
<link rel="stylesheet" type="text/css" href=”prebuilt/styles.css” />
</head>
In addition, the following code has to be added just above the root template match:
<!-- Variables needed for structured urls -->
<xsl:variable name="base" select="substring-before(normalize-
space(/*/IGX_Info/REQUEST_INFO/URL),/*/@ID)"/>
<!-- Remove the port if it is present. -->
<xsl:variable name="shortbase" select="concat(substring-before($base,
':80'),substring-after($base, ':80'))"/>
<xsl:variable name="siteURL">
<xsl:choose>
<xsl:when test="string($shortbase)">
<xsl:value-of select="$shortbase"/>
</xsl:when>
<xsl:when test=" string($base)">

113
CMS 8.0 Administrator Guide
113
<xsl:value-of select="$base"/>
</xsl:when>
<!-- Design-Time URL with XML and trailing slash "xml/" added to the
URL
-->
<xsl:when test="contains(/*/IGX_Info/REQUEST_INFO/URL,
'.xml?Preview')">http://www.exampledomain.com/CMSVirtualDirectory/xml/<
/xsl:when>
<!-- Run-Time Url -->
<xsl:otherwise>http://www.site.com/</xsl:otherwise>
</xsl:choose>
</xsl:variable>
8.10.10 Step 5: [Optional] Configure Custom Structured URLs
Custom URLs are managed on a page-by-page basis. To configure a custom URL, follow these steps:
1. Select a publishing target at the top of the Site pane if more than one publishing target has been configured.
2. Right-click a page in the site tree and select Page Properties. You will see the URL Settings area at the bottom of the Page Properties dialog.
3. Click Add to enter a new custom URL for the page. When you’ve entered the URL, click
Add again. 4. To make the custom URL canonical, select Current. To enable Multi-Format Output,
select MFO (this will automatically make the page canonical). Note: If you enable MFO, you’ll need to enter the appropriate file extension as part of the URL.
8.10.11 Step 6: [Optional] Configure SSL
Some sites have pages – typically, pages containing forms – that are only accessed with SSL. To make it easier to implement SSL security, CMS pages now feature a Requires SSL setting.

114
CMS 8.0 Administrator Guide
114
To enable the Requires SSL setting:
1. If necessary, select a publishing target above the site tree. 2. In the site tree, right-click a page and, on the context menu, click Page Properties. 3. On the System Attributes tab, select Requires SSL.
If the Requires SSL setting is enabled on a page, the DSS redirects requests for the page’s URL to the same URL with HTTPS enabled. Conversely, if a site visitor is currently on an HTTPS page and navigates to a non-secure page, the user is redirected to the requested URL without HTTPS. This redirection feature is only available for a .NET MVC site.
8.10.12 Step 7: Conduct a Full Publish.
1. Conduct a full publish of the site.
2. Verify that [site]\settings\urlmap.xml is replicated to the DSS site.
3. Verify that any updated style sheets located in the [site]\Stylesheets directory are
copied.
8.11 Troubleshooting Publishing and Replication
The following section details the causes of, and solutions to, problems that can prevent the publishing process from functioning correctly.
8.11.1 Troubleshooting Steps
1. Verify that the page is checked-in and marked for publish. Files referenced in the
Images, Prebuilt, Documents, and Media folders require a full publish in order to be
published.
2. Verify that the start date and end date don't exclude a publish:
a. Right-click the page, left click Page Properties.
b. Select System Attributes
3. Verify the range and location of the publishing target:

115
CMS 8.0 Administrator Guide
115
a. Go to Administration > Publishing System > Publishing Targets
b. Select the publishing target and verify that the root page ID is not smaller than the
page ID. For example, if the page ID is X12 and the root page ID is X16, this page will
not be published as a part of this publishing target unless another page references it.
c. Verify that the publish folder name corresponds to the correct folder under the
[sitename]\xml\pub\ directory.
4. Check Publish Monitor for publishing problems:
a. Go to Administration > Monitor Publishes and verify that there are no pending
publishes. If the publish remains in the pending state for an inordinate amount of
time, proceed to the next step.
b. Click View Publishing Logs and select the publishing target in the drop-down menu.
c. Select the publish from the Publish Date pane.
d. Verify that the relevant the page is listed.
5. Check the dependency graphs for activity:
a. Go to [sitedirectory]\xml\.
b. Look for depgraph*.db.journal where * represents a two-digit number.
c. Refresh your browser.
d. Look for depgraph*.db.journal where * represents a two-digit number.
e. Identify the modified date for depgraph*.db.
The presence of depgraph*.db.journal files or recent modification dates on those files indicates that publishing is still in progress and must be allowed to finish. If the files do not change their modified dates after a few minutes, publishing may have stopped before completion.
6. Check the CMS application Log
a. Go to \[sitedirectory] (see logging information for the exact location of log files).
b. Open the log file igxcsapi80.log
c. Scroll to the bottom of the log and look for an entry for the start of publish and the
completion of publish:
[INFO] [20100131T14:02:05] Publishing 7774 pages. Settings [Transform:
no, ExpandOnly: no, Incremental: no, Directory:
c:\sites\kbci\xml\pub\kbcipub\]
[INFO] [20100131T14:23:39] Finished publishing pages. Time in seconds
to complete: 7774

116
CMS 8.0 Administrator Guide
116
7. Compare the dates of the XML files in the publish target folder to the dates on the DSS
server site directory. The dates should be within a few minutes of one another. If the
DSS XML file dates are older, replication may not have occurred.
8.11.2 Common Causes of Publishing Failures
Permissions Problems
Insufficient file permissions to the \XML directory will cause publishes to fail. If the CMS has insufficient file permissions to the \XML directory and its subdirectories, errors similar to those below will appear.
The Publish Monitor displays the following:
Completed with Errors
The Publishing Log displays something similar to:
<PublishError PublishStatus="6">
Description="File: .\PublishTask.cpp, Line: 121: COM Error: FILE:
.\file_utils.cpp
LINE: 425 IGX_DESCRIPTION: rCopyDir Access is denied.
e:\bigboxy\xml\Images\\* ." />
The CMS log file, typically located in the \[site directory], displays something like:
[ERROR] [20041230T16:17:47] TaskWorker( PublishTask )::run() task
execute threw an exception: File: .\PublishTask.cpp, Line: 526: COM
Error:
FILE: .\PublishingTarget.cpp LINE: 1746 IGX_DESCRIPTION:
FILE: .\dom_utils.cpp LINE: 672 IGX_DESCRIPTION:
FILE: .\dom_utils.cpp LINE: 576 IGX_DESCRIPTION: SetFileAttributes
Access is denied.
To resolve this issue, ensure the following permissions are configured for the \XML and \ingeniux\cms80\server directories:
Windows 2003
Ingeniux ISAPI files (Generally, these files are located in the \ingeniux\CMS80\Server folder:
igxcsapi80.dll, igxxmlsvr80.dll, igxors80.dll: Administrators: Full Control Account used by the Application Pool: Full Control System: Full Control IUSR_ComputerName: Full Control
Website Files (XML directory)
Administrators: Full Control Account used by the Application Pool: Full Control System: Full Control IUSR_ComputerName: Full Control

117
CMS 8.0 Administrator Guide
117
Steps to Resolution
1. Navigate to \[site_directory].
2. Right-click the \XML directory; select Properties.
3. Select the Security tab and verify the settings and/or add permissions as indicated
above.
4. Select the Advanced button.
5. Check Replace permission entries on all child objects with entries shown here that
apply to child objects.
6. Click OK; click OK. This ensures that the permissions are propagated to all files and
folders below the \XML directory.
7. Navigate to the directory containing the CMS DLLs, typically \ingeniux\cms80\server.
8. Right-click on the \server directory; select Properties.
9. Select the Security tab and verify the settings and/or add permissions as indicated
above.
10. Select the Advanced button.
11. Check Replace permission entries on all child objects with entries shown here that
apply to child objects.
12. Click OK; click OK. This procedure ensures that these permissions are propagated to all
files and folders below the \server directory.
This problem can be caused by moving a file into one of these directories and retaining its original permissions instead of inheriting the permissions of the \XML or \Server directories.
Stalled Publish
In some circumstances, publishing may stall or otherwise fail to complete, generally as a result of system interruption. For example, resetting IIS during a check-in or publish may corrupt the dependency graph.
Steps to Resolution
1. Ensure that no clients are connected to the CMS.
2. Ensure that no page check-ins or publishes are in progress.
3. Go to Start > Run and type in the following command: iisreset /stop
4. After the window has disappeared, navigate to the [site directory]\xml directory,
the physical directory containing the CMS site. This path can be found through the IIS
properties of the virtual directory for the site.
5. Locate the file(s) labeled depgraph*.db where * represents a number, e.g.
depgraph01.db.

118
CMS 8.0 Administrator Guide
118
6. Highlight and delete the depgraph*.db file(s).
7. Highlight and delete tasks.xml, if present.
8. After the files are deleted, go to Start > Run, and type in the following command: iisreset /start
9. After the window has disappeared, launch the CMS Client.
10. Go to Administration > Publishing System > Publishing Targets and select the
publishing target to which you want to publish.
11. Select New Publish > Full Publish.
12. After the full publish has completed, repeat steps nine and ten for each publishing
target until a full publish has been completed for each publishing target.
Important note: Once the dependency graphs have been deleted, a full publish must be completed before any pages are checked in or published. Unexpected results may occur if pages are checked in or published before a full publish is completed. If a page is checked in or published while the site is being published, the dependency graphs will need to be rebuilt.

119
CMS 8.0 Administrator Guide
119
9 System Options
In the System Options pane, administrators can access and configure many of the settings that govern site management, user experience, and content deployment. Some system options are discussed elsewhere in this guide. This section documents various settings available in the System Options tree.
To access the System Options settings, go to Administration > System Options.
Figure 56: The System Options pane
The main division in the System Options hierarchy is between CMS and DSS settings. In general, CMS settings affect the production environment, and DSS settings affect the deployment (or run-time) environment.
9.1 settings.xml
Many of the settings exposed in System Options are stored in settings.xml. This file defines settings and behaviors for both the CMS and DSS sites. The settings.xml file is located in [sitedirectory]\xml\settings on the CMS server. Copies of the file also exist at any associated publishing targets for the CMS site, and in [sitedirectory]\settings on the DSS server.
Almost all of the settings contained in settings.xml can be configured at Administration > System Options in the CMS client. Ingeniux recommends using the System Options dialog to modify settings.xml whenever possible.
However, there are scenarios when it would be necessary to edit the settings.xml file directly. For example, if an XML folder were copied from one site into another, the directory paths contained in the <logging> element would likely be incorrect for the new site. In this case, it would be necessary to replace the directory path values.
To modify the settings.xml file directly, follow these steps:
1. Stop IIS (or the Application Pool associated with the site).
2. Modify settings.xml.

120
CMS 8.0 Administrator Guide
120
3. Restart IIS (or the Application Pool associated with the site).
9.2 Configuring Options for Groups
In System Options, you can customize many aspects of the user experience, and you can apply customized options to the default profile for all users or to specific group profiles. In other words, you can customize the user interface on a group-by-group basis. For example, you can configure toolbar options, context menu commands, and text editing features according to the groups using them. This flexibility allows you to tailor the UI to specific use cases.
Consider the following example. In your implementation of the CMS, there is a group of content authors who will revise pages, but will never need to add or remove pages from workflow. You might decide that, for the sake of simplicity, these authors should never see the Add to Workflow and Remove from Workflow options in the context menu when they right-click a node in the site tree. To effect this customization, you’d go to System Options > CMS > Site Tree Context Menu, select the Content Author group from the drop-down menu, de-select the appropriate workflow options from the list of available context menu items, and save the group profile.
Figure 57: Configuring the site tree context menu
Later, if you wanted to restore the default options for this group, you could do so in the context menu by clicking the Restore Defaults button that appears when you position the cursor over the checkbox to the right of the group name.

121
CMS 8.0 Administrator Guide
121
Group profiles can be configured for the following system options:
Toolbar Buttons
Site Tree Context Menu
XHTML Editor o Group Button Layout o Plugin Selection o Block Format Selection o Fonts Selection o Table CSS Classes o Image CSS Classes o Link CSS Classes o Smart Paste o Custom Content CSS
9.3 In-Context Editing
The In-Context Editing (ICE) feature provides a number of useful features for content creators:
A click-and-edit system that launches the editor in real-time when a user clicks on the
presentation area of a text element in Preview mode.
On-the-fly processing of XSL style sheet templates, adding field information to the
HTML output.
The use of Dojo 1.3 in the Preview frame, allowing parsing of marked-up HTML and the
creation of edit-field widgets.
Support for various elements on pages that meet schema guidelines. These may be
string, DHTML/XHTML, enumeration, date/time, image, and document elements.

122
CMS 8.0 Administrator Guide
122
When a user clicks the Edit button in the Preview of a checked-out file, each editable field will be highlighted on mouse-over. Clicking a highlighted field opens the editor. Clicking Preview saves the changes and redisplays the page. Pressing the ESC key cancels the changes.
ICE provides keyboard access. When ICE is brought up, the first editable element is always selected. Hit space to edit this element, hit "ESC" to confirm edit, then hit Tab/Shift + Tab again to move to the next/previous element.
After edits are made in ICE, the updated content element (already transformed to HTML by the XSL) is sent back to the server and retrieved (and transformed) again as updated markup in the preview. In order for this process to work, ICE must be enabled; the file must be checked-out and assigned to the user; and the XSL stylesheets must conform to Ingeniux requirements.
9.3.1 Enabling ICE
To enable In-Context Editing (ICE), go to System Options > InContext Editing and configure the ICE settings.
Figure 58: Enabling In-Context Editing
The following settings can be configured:
Enable In-Context Editing – Enables ICE by adding the following script to [site]\xml\settings\settings.xml:
<InContextEditing>
<Enabled>true</Enabled>
<FieldMarkerColor>#3064b7</FieldMarkerColor>
<InvokedFieldMarkerColor>#ff8000</InvokedFieldMarkerColor>
</InContextEditing>
Most important is the <Enabled> field. It must be set to “true” for ICE to function.
HTML Editor to match the look and field of page Preview HTML – Causes the HTML editor to apply the CSS from the preview page in order to match the look of the preview field. This feature doesn't work with HTML that employs CSS filters. If the styling in the HTML editor appears unusual, this feature should be disabled.

123
CMS 8.0 Administrator Guide
123
Field Marker Color – Determines the highlight color used to indicate an editable field on mouse-over. Values must be either standard CSS color names or else conform to the “#xxxxxx” or “#xxx” hexadecimal color code.
Invoked Field Marker Color – Specifies the color used to outline an editable field once it has been selected with a mouse click. Values must be either standard CSS color names or else conform to the “#xxxxxx” or “#xxx” hexadecimal color code.
Base Z-Index of Field Marker – Can be configured to make field markers visible when an HTML template depends on Z-Index for layout.
9.3.2 Previewing MFO Pages in ICE View
The In-Context Editing (ICE) feature gives users the ability to edit text and replace images in the Page View tab, where they can see XML content transformed to HTML, as it will appear to site visitors. In CMS 8.0, you can also configure Page View to return a preview from an external URL. This makes it possible to edit Multi-Format Output (MFO) content via the ICE system.
To configure the ICE preview for MFO, go to Administration > Publishing System > Publishing Targets and select the publishing target that you want to configure. In the Info tab, check Use External Preview Provider and enter URLs for the external preview provider and for the ICE system. Note that as of CMS 7.5 SR1, the external preview feature supports URLs starting with “/”. This means that the preview URL can be a path relative to the default site root. It’s usually a good idea to use a relative path in the External Preview Provider URL field.
The URL for the external preview provider will replace the built-in previewpage.asp file. The URL for the ICE system will be fed updated element values and will return rendered markup.
When the correct URLs are entered, you will be able to preview MFO content in both the Page View and the Preview windows.
9.3.3 ICE XSLT Requirements
In the CMS environment, there are very few constraints upon XSLT stylesheets. Failure to adhere to Ingeniux guidelines will not “break” a page in the CMS. It may, however, prevent ICE from working as described.
Here are the Ingeniux recommendations for XSLT:
The ICE system works by transforming XML files into HTML. This means that if a
stylesheet uses xsl:output method=”xml”, the ICE editor will not function. Either
specify method=”html” (the preferred way) or leave it out and default to “html”.
Use xsl:template match=”xyz” for editable fields (substituting the field name for the
“xyz” here). Any other method will prevent ICE from functioning.
Apply the template. Use xsl:apply-template select=”xyz”.

124
CMS 8.0 Administrator Guide
124
Within the template element, use either xsl:value-of or xsl:apply-template. Do
not use xsl:call-template.
Ingeniux also recommends, as a best practice, keeping all templates for editable elements in one XSLT stylesheet, usually include-common.xsl. ICE creates transient working files in xml\StyleSheets\inContext; these files are dynamic and should not be edited or altered in any way.
9.4 Configuring Custom Tabs
With the Custom Tabs feature, you can give users quick access to internal and external URLs. The feature is especially useful for hosting CMS apps and displaying web pages that help users create and manage content. For example, you could use a custom tab to host an app for creating newsletters. Or you could configure a tab to display a wiki or an online dictionary in the Apps pane. The target URLs may be static HTML pages or dynamic pages of any kind (e.g. ASP pages).
The Ingeniux Development Services team can provide you with a variety of custom tab-based CMS apps that are helpful for reporting statistics and managing various types of pages. Contact Ingeniux Support at [email protected] for information on how to purchase these modules. To obtain training for building your own custom apps, please contact your Ingeniux project manager.
You can define as many custom tabs as you wish. But if enough are defined, the tabs will wrap to multiple lines in the CMS. This won’t cause technical problems, but the display may not be aesthetically pleasing.
Out of the box, the CMS has two standard tabs configured: Analytics and Redirects.
All custom tabs will be displayed in order to the right of the standard tabs.
Some attributes of a tab element restrict when the tab will be displayed. If multiple restrictions are set for a tab, all restrictions must be met in order for the tab to appear.
You can configure the display options and permissions of custom tabs at Administration > System Options > CMS > Custom Tabs. There are two configuration nodes to choose from: Display and Permissioning.
9.4.1 Configuring the Custom Tabs Display
At Custom Tabs > Display, you can configure display options for custom tabs.

125
CMS 8.0 Administrator Guide
125
Figure 59: Configuring the custom tabs display
Available tabs are listed in the drop-down menu. To configure a custom tab, select it and enable or disable the following options:
Auto Select [Optional] – A true/false value, with the default set to “false.” If set to “true,” the tab will be automatically selected when the page is selected in the CMS client. This is for user convenience only. When more than one custom tab has this attribute set to “true,” the first one will be selected and the setting for the rest of the tabs will be ignored.
Allow Pinning [Optional] – A true/false value that allows the tab to be pinned. This setting applies to global tabs, which appear in the Apps pane.
Disable [Optional] – A true/false value. When set to “true,” this attribute temporarily disables a tab without removing it from the customTabs.xml file.
9.4.2 Permissioning Custom Tabs
At Custom Tabs > Permissioning, you can configure visibility options for custom tabs.
Figure 60: Setting visibility for custom tabs
Available tabs are listed in the drop-down menu. To configure a custom tab, select it and configure the following settings:
Admin Only [Optional] – A true/false value, with a default of “false.” If set to “true,” the tab will only be visible for users with administrator permissions.
Schemas … [Optional] – A delimited list of schema-friendly names for which the tab should appear. Be sure to use the friendly names of the schemas in this list. If not specified, all schemas will display the tab. The delimiter used is a pipe “|”.

126
CMS 8.0 Administrator Guide
126
Pages … [Optional] – A delimited list of page IDs (e.g. “x123|x456”) for which the tab should appear. If not specified, all pages will display the tab. The delimiter used is a pipe “|”.
Groups … [Optional] – A delimited list of user group names that will have permission to view the tab. If none are specified, all user groups will be able to view the tab. The delimiter used is a pipe “|”.
9.4.3 Working in customTabs.xml
There are additional custom tabs settings that are not exposed in the CMS. These can be configured directly in customTabs.xml. In this file, you can also create additional custom tabs. After the App Pool is recycled in IIS, new custom tabs will be available in the CMS.
The customTabs.xml file can be found in \xml\Custom on the CMS server.
Custom tabs follow the syntax below:
<customtabs>
<tab />
<tab />
...
</customtabs>
Here, for example, is a custom tab configured to show the Ingeniux support page:
<customtabs>
<tab name="IGX Support" url="http://support.Ingeniux.com/"
global="true" />
</customtabs>
The tab’s global attribute is set to “true”, meaning that it will appear in the Apps pane. Here’s how this custom tab will look in the CMS:

127
CMS 8.0 Administrator Guide
127
Figure 61: An example of how a custom tab displays in the CMS
For each custom tab entry in customTabs.xml, attributes can be configured. Attributes exposed in the UI – adminonly, schemas, pages, and usergroups – are described in the preceding section. The following attributes are configured manually in the customTabs.xml file:
name [Required] – The text that will be displayed on the tab. This must be unique for each tab. Only alpha-numeric and space characters are allowed. The name must begin with a letter.
url [Required] – The link that will be loaded in the edit pane of the CMS. Relative URLs are relative to the site’s custom directory. Examples:
http://www.mysite.com/siteinfo.jsp or customReportsTab.asp (in the site’s custom folder)
icon [Optional] – The icon to be displayed in the tab. If not specified, ingeniux.jpg is used. Images will be displayed to the left of the tab name at 16 x 16 pixels. Relative image links are relative to the site’s custom directory.
appendpageid [Optional] – A true/false value, with the default set to “false”. If set to “true”, the current page ID in the CMS will be appended to the end of the URL. The URL parameter will be named “pageid”. If the URL given already has query string parameters, then the pageid parameter will be appended with an “&” (e.g. “&pageid=x123”). This value needs to be set to “true” for page-level apps.
autoselect [Optional] – A true/false value, with the default set to “false”. If autoselect is set to “true”, the tab will be automatically selected when the page is selected in the CMS client. This is for user convenience only. When more than one custom tab has this attribute set to true, the first one will be automatically selected and the setting for the rest of the tabs will be ignored.
tabsToHide [Optional] – A delimited list of default tab names. The listed default tabs are to be hidden on the edit form. The possible values for this attribute are: “edit|preview|history|xml”. This attribute does not control the display of custom tabs;

128
CMS 8.0 Administrator Guide
128
it only affects the default tabs. If not specified, or if the specified names don't exist, the edit form tabs will display normally. The delimiter used is a pipe “|”.
global [Optional] – A true/false value. If set to “true”, the app or page will appear on a tab in the Apps pane.
resourceID [Optional] – References a data name from a language file (e.g. en-us.resx) contained in [site]\10n\server\. This attribute refers to a string in the resource file that is available in all UI languages. As a general rule, Ingeniux does not recommend adding or modifying resource entries in locale-specific resources, because a site upgrade will remove all custom edits to resource files.
9.5 XHTML Editor
In the CMS Client, site administrators can configure XHTML Editor options on a group-by-group basis. In this way, you can choose the toolbar buttons, plugins, and CSS classes available to various user groups.
XHTML Editor customization is defined in an XML file. A profile associated with a specific group defines the XHTML Editor options for that group. A ”default” profile defines the editor options for all groups not otherwise associated with a profile.
To configure the XHTML Editor, go to Administration > System Options > CMS > XHTML Editor.
The following options can be customized for the XHTML Editor:
HTML5 Support – Enables the XHTML Editor to support HTML5 features. The editor can support HTML5 elements and attributes, HTML5 custom data attributes, or both.
Template Button Layout – Specifies the toolbar buttons that can be enabled or disabled for user groups. You can make buttons available by dragging and dropping them within a graphic user interface. (For a list of available buttons, see XHTML Toolbar Buttons below.)

129
CMS 8.0 Administrator Guide
129
Figure 62: Configuring the button layout of the XHTML Editor
Group Button Layout – Determines the toolbar buttons that are available for the default group and for the other user groups. You can make buttons available by dragging and dropping them within the graphic user interface. For a list of available buttons, see XHTML Toolbar Buttons below.
Plugin Selection – Indicates the plugins that will be loaded for the XHTML Editor. Most of these plugins come from the TinyMCE text editor framework. To learn more about TinyeMCE plugins, visit http://www.tinymce.com/wiki.php/Plugins. Note that the following plugins are not supported in the CMS:
save
cancel
emotions
template
fullpage
preview
iespell
Block Format Selection – Specifies the HTML block formats that a given user group can apply in the XHTML Editor.
Font Selection – Specifies the fonts that a given user group can apply in the XHTML Editor.
Font Sizes Selection – Specifies the font sizes that a given user group can apply in the XHTML Editor.
Table CSS Classes – Determines the CSS classes that a given user group can apply to tables in the XHTML Editor.
Image CSS Classes – Determines the CSS classes that a given user group can apply to images in the XHTML Editor.

130
CMS 8.0 Administrator Guide
130
Link CSS Classes – Determines the CSS classes that a given user group can apply to links in the XHTML Editor.
Smart Paste – Defines the pasting formats available to various user groups in the XHTML Editor (see Smart Paste below).
Custom Content CSS – Identifies the custom CSS file that will be applied to content created in the XHTML Editor. (For more on applying CSS to content generated in the text editor, see Using Cascading Style Sheets to Control Formatting and Configuring the XHTML Editor to Use CSS Classes.)
9.5.1 XHTML Toolbar Buttons
The formatting toolbar appears across the top of the XHTML control when a page is in an editable state. The available icons depend upon the permissions of the user.
The following controls are available:

131
CMS 8.0 Administrator Guide
131
Button/ Drop-down
Name Inserted HTML Sample Function
pasteword (added via the paste plug-in)
NA Pastes text from a Word document without Word-specific formatting.
pastetext (added via the paste plug-in)
NA Pastes text from a previous cut or copy action without any formatting from the original version.
paste (added via the paste plug-in)
NA Pastes content from a previous cut or copy action, including all formatting, into the XHTML Editor.
cut NA Cuts selected text.
copy NA Copies selected text.
justifyleft <p style="text-align:
left;">content</p> Aligns selected text with the left margin.
justifycenter <p style="text-align:
center;">content</p> Aligns selected text in the center.
justifyright <p style="text-align:
right;">content</p> Aligns selected text with the right margin.
justifyfull <p style="text-align:
justify;">content</p> Aligns selected text so that both margins are even and the text is distributed between them.
bold <strong>content</strong> Bolds selected text.
italic <em>content</em> Italicizes selected text.
underline <span style="text-decoration:
underline;">content</span> Underlines selected text.
strikethrough <span style="text-decoration:
line-through;">content</span>
Strikes through selected text.
sup <sup>content</sup> Formats selected text as superscript.
sub <sub>content</sub> Formats selected text as subscript.
indent <p style="padding-left:
30px;">content</p> Indents selected text.
outdent Removes P Tag or subtracts
from padding attribute relative to left margin.
Outdents selected text.
undo NA Undoes previous action.
redo NA Reapplies previous action.

132
CMS 8.0 Administrator Guide
132
table (added via the table plug-in)
Inserts table HTML markup based on the settings configured in the dialog.
Opens the Insert/Modify Table dialog.
row_props (added via the table plug-in)
NA Opens the Table Row Properties dialog.
cell_props (added via the table plug-in)
NA Opens the Table Cell Properties dialog.
row_before (added via the table plug-in)
NA Inserts a row above the selected row.
row_after
(added via the table plug-in)
NA Inserts a row below the selected row.
delete_row (added via the table plug-in)
NA Deletes the selected row.
col_before (added via the table plug-in)
NA Inserts a column to the left of the selected column.
col_after (added via the table plug-in)
NA Inserts a column to the right of the selected column.
delete_col (added via the table plug-in)
NA Deletes the selected column.
merge_cells (added via the table plug-in)
NA Merges a previously split cell.
split_cells (added via the table plug-in)
NA Splits the selected table cell.
Anchor <a name="content"></a> Opens the Insert/edit anchor dialog.
Blockquote <blockquote>
<p>content</p>
</blockquote>
Wraps the selected text with <blockquote> tags. This identification can be used to apply styling and to identify the content as a quotation to browsers, web crawlers, screen readers, etc.
code NA Opens the HTML Source Editor dialog.
image <img height="101"
src="Images/6.jpg" width="108" />
Attributes depend upon which settings have been selected in the dialog.
Opens the Insert/Edit Image dialog.
media (added via the media plug-in)
Attributes depend upon which settings have been selected in the dialog.
Opens the Insert/Edit Embedded Media dialog.
link <a
href="x17.xml">content</a> Opens the Insert/Edit Link dialog.

133
CMS 8.0 Administrator Guide
133
HTML will vary depending upon the type of link.
unlink NA Removes the link from the selected text.
bullist <ul> <li></li> </ul> Inserts a bulleted (unordered) list.
numlist <ol><li></li></ol> Inserts a numbered (ordered) list.
charmap Inserts a character entity (e.g.
a Euro symbol inserted as &euro)
Opens the Select custom character dialog.
hr <hr /> Inserts a horizontal line.
search (added via the searchreplace plug-in)
NA Opens the Find/Replace dialog.
replace (added via the searchreplace plug-in)
NA Opens the Find/Replace dialog.
selectall (added via the paste plug-in)
NA Selects all objects in the XHMTL Editor.
visualaid NA Displays visual guidelines in the edit view.
forecolor, forecolorpicker
<span style="color: #339966;">content</span>
Opens the Select text color drop-down.
backcolor, backcolorpicker
<p style="background-color: #008000;">Content</p>
Opens the Select background color drop-down.
styleselect <span
class="taskNavigation">content</span>
Opens a drop-down of CSS classes that can be applied to the text in the editor. Classes are defined in localstyles.css, located on the server hosting the CMS site.
formatselect Varies based on selected
option:
<h1>content</h1>
Opens a drop-down of format selections (heading 1, etc.) that can be applied to selected text. Classes are defined in localstyles.css, located on the server hosting the CMS site.
fontselect <span style="font-family:
andale mono;">content</span>
Opens a drop-down of font selections that can be applied to the selected text.
fontsizeselect <span style="font-size: x-
small;">content</span> Opens a drop-down of font sizes that can be applied to the selected text.
Table 5: XHTML Toolbar
Note that the following toolbar buttons are not supported in the CMS:
newdocument
help
cleanup
removeformat
9.5.2 Using Cascading Style Sheets to Control Formatting
It’s a good idea to use cascading style sheets (CSS) to maintain a consistent design on all pages of your site. This is especially useful when working with content in the XHTML Editor, because

134
CMS 8.0 Administrator Guide
134
CSS styles allow for flexible formatting and consistent style choices. Use classes from the formatting toolbar drop-down to maintain consistency of style.
For example, assume the following entry exists in the site CSS styles file:
FONT.H1
{
COLOR: #333333;
FONT: 11px/16px Verdana, Arial
}
To apply a style to text within the editor, highlight the text, click on the drop-down list, and select Heading 1. This wraps the paragraph in <h1></h1> tags, which are recognized by the CSS file.
Styles not contained in the drop-down list can be referenced as well. Suppose the following CSS code is contained in the XSL style sheet:
<STYLE>
FONT.yourstyle
{
COLOR: #333333;
FONT: 11px/16px Verdana, Arial
}
</STYLE>
If the text in the XHTML Editor is to have this style, edit the source and place a <font class="yourstyle"> tag in the beginning.
The localstyles.css file provides the default CSS options for the XHTML Editor in the styles drop-down. You can edit these options, and you can also add more styles for content creators to use in the XHTML Editor.
Note that the CSS classes listed in localstyles.css must be duplicated in a CSS file in the \xml\stylesheets directory.
Listed below are the default classes in localstyles.css:
html {
margin: 0px;
padding: 0px;
}
body { color: #555753; font: 9pt/17pt georgia; background-color: #fff;
margin: 0px; padding: 0px }
p {
font: 9pt/17pt georgia;
margin-top: 0px;
}
h3 {
font: italic normal 12pt georgia;

135
CMS 8.0 Administrator Guide
135
letter-spacing: 1px;
margin-bottom: 0px;
color: #7D775C;
}
a:link {
font-weight: bold;
text-decoration: none;
color: #B7A5DF;
}
a:visited {
font-weight: bold;
text-decoration: none;
color: #D4CDDC;
}
a:hover, a:active {
text-decoration: underline;
color: #9685BA;
}
acronym {
border-bottom: none;
}
#container { margin: 0px; padding: 0px 175px 0px 110px; position:
absolute; top: 0px; left: 0px }
.underline {
text-decoration: underline;
}
9.5.3 Configuring the XHTML Editor to Use CSS Classes
The file localstyles.css contains a list of all CSS classes displayed in the XHTML Editor. This file can be modified to include additional classes. It already contains the most common HTML classes (H1, H2, etc). For standard classes, it’s best to modify the existing ones instead of creating new classes.
To make changes, open the file ([site directory]\xml\custom\editor\localstyles.css) and add or modify the classes as needed. Then save the file. Any changes are loaded when the application next starts.
Note that all new or modified classes must be added to the CSS file used by the site’s XSL style sheets.
9.5.4 Smart Paste
The Smart Paste feature lets users determine what formatting is retained for text pasted into an XHTML element. The Smart Paste feature provides three options for pasting content:
Paste (Paste as Source) – Pastes content from a previous cut or copy action, including
all formatting, into the XHTML Editor.

136
CMS 8.0 Administrator Guide
136
Paste Text – Pastes text from a previous cut or copy action, without retaining any
formatting from the original version.
Paste Word – Pastes text from a Word document, without retaining any Word-specific
formatting.
The Smart Paste feature can be invoked in the following ways:
Pressing Ctrl+V (PCs) or Cmd+V (Macs)
Using the Paste command in the context menu
Clicking the Paste button in the XHTML Editor
Clicking the Paste from Word button in the XHTML Editor
Clicking the Paste as Plain Text button in the XHTML Editor
A site can be configured to perform one of four Smart Paste actions automatically according to user group. The four options are as follows:
Prompt – Launches the Smart Paste dialog when a user pastes content into the XHTML
editor. The prompt option is provided by default unless another option is explicitly
specified for a group.
Source – Pastes formatted content into the XHMTL Editor, without prompting. This
option corresponds to the Paste command.
Destination – Pastes content into the XHMTL Editor and removes Word formatting,
without prompting. This option corresponds to the Paste from Word command.
Text – Pastes content into the XHMTL Editor as plain text, without prompting. This
option corresponds to the Paste as Plain Text command.
The Smart Paste feature behaves differently in various browser/operating system combinations. The tables below describe these differences:

137
CMS 8.0 Administrator Guide
137
9.5.5 Firefox:
Operating System
Requires Re-Paste
Requires Additional Paste Switching to/from Text First Time Paste Button
Paste from Word Button
Paste as Plain Text Button
Default Smart Paste Option: Prompt
WinXP Yes Yes
Launches Optioned Smart Paste Dialog
Launches Paste Word Dialog
Launches Paste Text Dialog
Vista Yes Yes
Launches Optioned Smart Paste Dialog
Launches Paste Word Dialog
Launches Paste Text Dialog
Mac OSX 10.4.x Yes Yes
Launches Optioned Smart Paste Dialog
Launches Paste Word Dialog
Launches Paste Text Dialog
Default Smart Paste Option: Text
WinXP Yes NA Launches Paste Text Dialog
Launches Paste Word Dialog
Launches Paste Text Dialog
Vista Yes NA Launches Paste Text Dialog
Launches Paste Word Dialog
Launches Paste Text Dialog
Mac OSX 10.4.x Yes* NA
Launches Paste Text Dialog
Launches Paste Word Dialog
Launches Paste Text Dialog
Default Smart Paste Option: Destination
Yes NA
Launches Simple Dialog for Paste as Source
Launches Paste Word Dialog
Launches Paste Text Dialog Yes
Yes NA
Launches Simple Dialog for Paste as Source
Launches Paste Word Dialog
Launches Simple Dialog for Paste as Text Yes
Yes NA
Launches Simple Dialog for Paste from Word
Launches Paste Word Dialog
Launches Paste Text Dialog Yes
Default Smart Paste Option: Source
WinXP Yes NA Launches Paste Text Dialog
Launches Paste Word Dialog
Launches Paste Text Dialog
Vista Yes NA Launches Paste Text Dialog
Launches Paste Word Dialog
Launches Paste Text Dialog
Mac OSX 10.4.x Yes* NA
Launches Paste Text Dialog
Launches Paste Word
Launches Paste Text Dialog

138
CMS 8.0 Administrator Guide
138
Dialog
Table 6: Firefox Smart Paste Functionality
9.5.6 Safari:
Operating System
Requires Re-Paste
Requires Additional Paste Switching to/from Text First Time
Paste Button
Paste from Word Button
Paste as Plain Text Button
Default Smart Paste Option: Prompt
Mac OSX 10.4.x No Not Enabled Not Enabled Not Enabled Not Enabled
Default Smart Paste Option: Text
Mac OSX 10.4.x No Not Enabled Not Enabled Not Enabled Not Enabled
Default Smart Paste Option: Destination
Mac OSX 10.4.x No Not Enabled Not Enabled Not Enabled Not Enabled
Default Smart Paste Option: Source
Mac OSX 10.4.x No Not Enabled Not Enabled Not Enabled Not Enabled
Table 7: Safari Smart Paste Functionality
9.5.7 Internet Explorer 6:
Operating System
Requires Re-Paste
Requires Additional Paste Switching to/from Text First Time Paste Button
Paste from Word Button
Paste as Plain Text Button
Default Smart Paste Option: Prompt
WinXP No No Yes
Launches Optioned Smart Paste Dialog
Pastes w/o Word Formatting
Default Smart Paste Option: Text
WinXP No NA Pastes as Source
Pastes w/o Word Formatting Pastes as Text
Default Smart Paste Option: Destination
WinXP No NA Pastes as Source
Pastes w/o Word Formatting Pastes as Text
Default Smart Paste Option: Source
WinXP No NA Pastes as Source
Pastes w/o Word Formatting Pastes as Text
Table 8: Internet Explorer 6 Smart Paste Functionality

139
CMS 8.0 Administrator Guide
139
9.5.8 Internet Explorer 7:
Operating System
Requires Re-Paste
Requires Additional Paste Switching to/from Text First Time
Paste Button
Paste from Word Button
Paste as Plain Text Button
Default Smart Paste Option: Prompt
WinXP No Yes
Launches Optioned Smart Dialog
Pastes w/o Word Formatting Pastes Text
Vista No Yes
Launches Optioned Smart Dialog
Pastes w/o Word Formatting Pastes Text
Default Smart Paste Option: Text
WinXP No NA Paste as Source
Pastes w/o Word Formatting Pastes as Text
Vista No NA Paste as Source
Pastes w/o Word Formatting Pastes as Text
Default Smart Paste Option: Destination
WinXP No NA
Pastes w/o Word Formatting
Pastes w/o Word Formatting Pastes as Text
Vista No NA
Pastes w/o Word Formatting
Pastes w/o Word Formatting Pastes as Text
Default Smart Paste Option: Source
WinXP No NA Paste as Source
Pastes w/o Word Formatting Pastes as Text
Vista No NA Paste as Source
Pastes w/o Word Formatting Pastes as Text
Table 9: Internet Explorer 7 Smart Paste Functionality
9.5.9 XHTML Compliance
The XHTML editor is designed to ensure all content entered into an XHTML element complies with the W3C XHTML Transitional Standard. As a result, upgraded and/or entered content may be modified to meet this standard. This section describes additional options related to this compliance feature.
Cleaning Option Terms:
HTML Validation – A utility that checks for invalid HTML code and attempts to correct it.
XHTML Editor Validation – A set of functions in the XHTML Editor that check for invalid HTML code and then attempt to correct it.

140
CMS 8.0 Administrator Guide
140
Action XHTML Cleaning XHTML Validation
Creating Content in the XHTML Editor No Yes
Smart Paste – Source Option Yes No
Smart Paste – Destination Option Yes No
Smart Paste – Text Option No No
Clicking “Update” in the HTML Code Window Yes Yes
Table 10: XHTML Cleaning
JavaScript
The XHTML Editor supports HTML and ensures the operational integrity of the application. It provides limited support for JavaScript as that language could modify content or functions that would conflict with the XHTML Editor or the application. Any script that references or modifies the document object or the window object could damage the function of TinyMCE.
Ingeniux cannot guarantee or support the function of any script added to the XHTML Editor. All JavaScript added is required to meet ECMA Compliance. Review all JavaScript for that compliance.
<Applet> Tags
The XHTML Editor does not prevent the use of Java Applets within the editor content, but it’s possible that some Applets may not function as expected.
If an Applet attempts to control the browser or is in some way unstable, the application may encounter difficulties. The stability of the CMS Client cannot be guaranteed when linking to content via Applets within an XHTML section.
Unsupported Tags or Tag Configurations
An XHTML section represents only the content inside the <body> tag of an HTML document. For this reason, a number of tags are not supported within the editor. Any tag required to be in the header of an HTML document, including the <head> tag itself, is not supported in the XHTML Editor.
Here’s a partial listing of unsupported tags:
<base> <basefont> <body>
<center> <dir> <Head>
<HTML> <frame> <frameset>
<Menu> <s> <strike>
<Title> <u> <xmp>
Additionally, a number of tags require attributes, content, and/or nested tags to form valid XHTML. The XHTML Editor may delete or otherwise alter these tags to maintain compliance.
Here’s a partial listing of tags that may be altered:
<col> <colgroup> <caption>
<object> <optgroup> <param>
<script> <style> <tbody>
<td> <tr> <thead>

141
CMS 8.0 Administrator Guide
141
9.6 Spell-Check Settings
The CMS employs an open-source spell-check system called NHunspell. It features customizable OpenOffice dictionaries that can be downloaded from http://wiki.services.openoffice.org/wiki/Dictionaries. Many of the specialty dictionaries (e.g., medical, legal) are also available for free in a variety of languages. OpenOffice provides a step-by-step tutorial on how to create your own dictionary at http://lingucomponent.openoffice.org/dictionary.html.
Note: The NHunspell spell-check system is compatible with both OpenOffice.org 2.x and 3.x dictionaries.
The NHunspell system provides the following functionalities:
1. Check Words – Receives a list of words to be spell-checked and returns a list of words that are misspelled. Two types of words are ignored: words in full caps, and words with more than two capital letters.
2. Get Suggestions – Provides a list of suggestions for each misspelled word. Suggestions include added custom words.
3. Learn – Adds words to a dictionary extension for a given language. Words stored in the dictionary extension are removable.
4. Remove – Deletes a custom word from a dictionary extension for a given language. Only custom words can be removed.
9.6.1 Using Spell-Check
To use the spell-check feature in the CMS, open the Edit Form for the page you’d like to review and click Spellcheck on the toolbar at the top of the CMS Client. In all spell-check enabled fields (text or HTML), red lines will appear under misspelled words.
For each misspelled word, a drop-down menu will provide options to choose a suggested replacement word, add the word to the dictionary, ignore the word, ignore all instances of the word, or move to the next or previous misspelled word:

142
CMS 8.0 Administrator Guide
142
Figure 63: The Spell-Check context menu
When you’ve made a selection from the drop-down, the suggestion menu will open for another misspelled word. To spell-check a particular misspelled word, click on it. When spell-checking the title field, you can type in your own custom spelling in the drop-down menu, but this will not add the custom word to the dictionary. Also, if a suggested word comes from the list of custom added words, it will appear in the drop-down beside a delete icon. Using this icon, you can delete the custom word from the dictionary.
To stop the spell-check before it has completed, click Cancel Spellcheck.
9.6.2 Managing Spell-Check and Dictionaries
To manage spell-check settings, go to Administration > System Options > CMS > Spellcheck Settings > Manage Spellcheck Dictionaries.

143
CMS 8.0 Administrator Guide
143
Figure 64: The Dictionaries Manager
In the Manage Spellcheck Dictionaries pane, an administrator can add new language dictionaries or upload updates for existing dictionaries.
OpenOffice dictionaries always contain two files: the .dic file and the .aff file. Both files need to be uploaded in order for the dictionary to work. (Note: OpenOffice dictionary file downloads are always compressed. If a download comes with the extension .oxt, it’s a .zip file and needs to be renamed accordingly and expanded.)
To add a custom dictionary, locate the appropriate .dic and .aff files. Then ensure that their file names match the file name for the dictionary. For example, for the American English dictionary “en-us,” you would need to upload files named en_us.dic and en_us.aff (not case-sensitive).
To add or remove a dictionary, use the + or - buttons. Clicking + below the list of dictionaries will bring up the Select language for which to add dictionary field. Choose the appropriate language from the drop-down menu and then click Update Dictionary File. Use the Upload Dictionary and Upload Affix buttons to select and upload the appropriate .dic and .aff files. (You can also add files to existing dictionaries using the same procedure.) When you’re finished making changes, click Save.
9.7 Publishing
Several aspects of publishing can be configured in System Options.
9.7.1 Exports
The following attributes and their values are returned with a page pulled into a navigation:
Name
xID
URL
Schema
These attribute values are obtained from the referenced file. In addition to these, the following system elements are also available:
MarkedForPublish
PublishAs
StartDate
EndDate
Additional information can be pulled from a page by exports. The CMS uses two types of exports: global and local. Global exports apply to all pages in the site. Local exports apply to the specific navigation containing the local export.
Global exports are defined for an entire site via System Options > Publishing > Navigation Exports. Global exports define a case-sensitive term corresponding to an <element> in the XML file. Once a global export has been added, all navigations will include the element value wherever the element has a value.
Local exports are defined in the Edit Pane for specific navigations. Local exports can use complex XPath queries to read the values of attributes, metadata, and components that are not available to global exports.

144
CMS 8.0 Administrator Guide
144
The global exports option manages global elements. Global elements allow additional elements to be pulled into a navigation beyond the standard four (Name, ID, URL, and Schema) for all navigations in a site.
Consider the following factors when using Global elements:
A global element not should be duplicated in a local element.
Global elements are case sensitive and must match exactly to function.
Global elements will not pull in elements from a component. This export must be done
locally.
Figure 65: The global exports option
New – Adds a global element to the system. To add an element, select New, enter the text for the element, and click Save.
Remove – Deletes the selected global element. To remove an element, select the element and select Remove.
Export Performance Notes
Standard navigations are slightly faster than global exports but the difference is negligible. The steps to process standard navigations and navigations with global exports are similar. In general, navigations:
1. Determine a list of pages in the navigation.
2. Open but do not expand each page in the navigation list.
3. Read the page attributes and any additional system attributes.
4. Pull any global export values.
The difference in performance stems from the additional step of collecting the values of the global exports. Standard navigations and navigations using global exports are both cached during publish.
Local exports take longer to process. Local exports:
1. Determine a list of pages in the navigation.

145
CMS 8.0 Administrator Guide
145
2. Open and expand each page in the navigation list.
3. Query the reference file and read the four page attributes and any additional system
attributes.
4. Query the page and read any global export values.
5. Execute any local export XPath queries against the XML and then populate it with the
results of the query.
The second step in the process above is the source of the difference in performance between global and local exports. The page and all of its dynamic elements must be expanded to ensure the accuracy of the local export query. This includes reading any dynamic content such as content pulled from a database. The time to render a navigation with local exports increases dramatically with the number of pages pulled into a navigation.
Best Practices for Exports
Use global exports over local exports.
Use local exports for cases when a rich set of data is required for the navigation. The
page set should be small (fewer than 20). The pages within the navigation should not
contain database queries, inserts, or other dynamic content.
Local exports should never be used on site-wide structures such as site controls.
9.7.2 XSL-FO Processor
The XSL-FO Processor makes it possible to generate a PDF file derived from a site’s published pages. The XSL-FO server is separate from the CMS and DSS servers and must be installed and configured independently of the CMS and DSS servers.
Figure 66: The XSL-FO processor

146
CMS 8.0 Administrator Guide
146
Server – Specifies the host name or the IP address of the XSL-FO server used to process the published XML and convert the output into a PDF file. This setting creates a line in \xml\settings\settings.xml:
<FOPServer>FO.ingeniux.com</FOPServer>
Port – Specifies the port number used by the XSL-FO server to listen for requests to process published XML. This setting creates a line in \xml\settings\settings.xml:
<FOPPort>8080</FOPPort>
Additional Configuration File – Specifies the location of a configuration file used to pass additional configuration information to the XSL-FO server. This setting creates a line in \xml\settings\settings.xml:
<ConfigFile>c:\windows\foconfig\config.txt</ConfigFile>
No Copy – Encrypts the file and removes copy content permissions. This setting creates a line in \xml\settings\settings.xml:
<NoCopy>True</NoCopy>
No Print – Encrypts the file and removes edit content permissions. This setting creates a line in \xml\settings\settings.xml:
<NoPrint>True</NoPrint>
No Edit – Encrypts the file and removes printing permissions. This setting creates a line in \xml\settings\settings.xml:
<NoEdit>True</NoEdit>
No Annotations – Removes edit annotation permission. This setting creates a line in \xml\settings\settings.xml:
<NoAnnot>True</NoAnnot>
Quiet Mode – Suppresses FOP output information such as page sequence generation, warnings, and informational outputs. This setting creates a line in \xml\settings\settings.xml:
<QuietMode>True</QuietMode>
Debug Mode – Provides more detailed error reporting and end-of-generation metrics. This setting creates a line in \xml\settings\settings.xml:
<DebugMode>True</DebugMode>
9.7.3 URL Map Versioning
In CMS 8.0, you can limit the number of versions of Structured URL Maps.
To set the version limit for Structured URL Maps:

147
CMS 8.0 Administrator Guide
147
1. On the System Options menu, open CMS > Publishing and click Structured URL Maps Version Control.
2. Enter a version limit in the Upper Limit box and click Save.
9.8 Changing the Application Name
In the System Options tree, you can change the application name that appears in the upper-left corner of the CMS.
To do so, go to Administration > System Options > CMS > Application Name, enter a new name in the text field, and click Save.
After refreshing the browser, the new application name will appear.
9.9 Disabling Auto-Save
By default, the CMS saves a page when a user navigates away from the Edit Form. This auto-save feature is designed to prevent users from accidentally losing changes. If you’d like to disable this feature, navigate to Administration > System Options > CMS > Auto-Save, uncheck Enable Auto-Save, and click Save.
9.10 Configuring a Reverse Proxy
To configure a reverse proxy server, navigate to Administration > System Options > CMS > Reverse Proxy, enter the URL for the server, and click Save.
9.11 WorldView
The WorldView feature in the CMS controls globalization and localization settings, language mapping, and page translation workflows. Using WorldView, you can customize your content so that visitors and contributors can interact with your site in different languages. Only administrators can change WorldView settings.
9.11.1 Configuring WorldView
To enable WorldView, go to Administration > System Options > CMS > WorldView and check Enable WorldView.

148
CMS 8.0 Administrator Guide
148
Figure 67: Configuring Worldview in System Options
To change the UI language of the CMS, first ensure that Enable Top Language Selection Menu is checked. If it’s not, check it and refresh the browser.
With the language selection menu enabled, you can click Language on the top menu bar and choose English, Spanish, French, German, Chinese, or Japanese as the language to be displayed in the CMS. This setting will not affect the content displayed on the live site. It will only change the labels and dialogs within the CMS.
WorldView comes with prebuilt localization workflows to help streamline the process of translating content in the CMS. To deploy WorldView workflows, click Create Workflows for WorldView Content Localization System.
Use the + and - buttons to add languages to, or remove languages from, the list of Available languages for page language settings (these will be the language options available for your site content).
9.11.2 Criteria for Translating Pages
To be translated via the Worldview feature, a page has to meet the following criteria:
The page must be a clone (see Master and Clone Pages below).
The page must be assigned to the current user.
The current user must be configured with the ability to write in the language into which the page will be translated (see Setting User Language Abilities below).
Master and Clone Pages
In the CMS, a master page is essentially the original version of a page, while a clone is a copied version intended for translation. Master and clone pages are mapped to each other and exist in relation to each other. That is, a master page is always mapped to a clone page, and vice versa. Master/clone mappings are displayed in the expanded page properties of a given page.

149
CMS 8.0 Administrator Guide
149
Figure 68: Page Properties showing master and clone mappings
The languages of the master and clone pages are recorded when the mapping is created.
You can create mappings by copying and pasting from one region root to another.
If you copy a page and try to paste to a different locale (i.e., a different page language) the context menu will display a new option in the drop-down: Paste new Region Root. This option will create a mapping between the files.
If you drag a page from one locale to another, you will be prompted to confirm that you want to create a new localized version of a page. You cannot copy from one locale to another and keep the same page language.
Setting Page Language
If not specifically set, the language property for a given page is by default inherited from its parent. Page-level changes to default language settings are stored in the locale attribute of Page elements in the reference.xml file.

150
CMS 8.0 Administrator Guide
150
To change the language of a page, right-click the page in the site tree and open the Language tab. Then select a language from the Page Language drop-down menu.
Figure 69: Changing the language of page in the Page Properties dialog
If a page already has a lingual mapping, its language can’t be changed.
9.11.3 Translation Workflows
The CMS comes with two prebuilt translation workflows: Master Page Workflow for Translation and Clone Page Workflow for Translation. These workflows are designed to make the translation process straightforward and transparent.
The following tables outline the workstates, transitions, and actions that constitute the translation workflows:
State Name Master workflow
Clone workflow
Ready for Translation X X
Translating X X
Translation Complete X
Proofreading X
Implementing Proofreading Feedback X
Reviewing X
Implementing Review Feedback X
Translation Project Complete X X
Table 11: Workflow States

151
CMS 8.0 Administrator Guide
151
Name Start State End State Master Clone Actions
Start Translation Project Ready for Translation
Translating X Cannot advance if any of its clones are not in "Ready for Translation" or in "Translation Complete" state.
Will push all clone pages to clone workflow and into the "Ready for Translation" state.
Handout to Translator Ready for Translation
Translating X Check out
Translator Finished Translation
Translating Translation Complete
X
Handout to Proofreader Translation Complete
Proofreading X
Proofreading Feedback to Translator
Proofreading Implementing Proofreading Feedback
X
Handout to Reviewer Proofreading Reviewing X
Re-proofread Implementing Proofreading Feedback
Proofreading X
Review Feedback to Translator
Implementing Review Feedback
Reviewing X
Re-review Implementing Review Feedback
Reviewing X
Finalize Translation Reviewing Translation Project Complete
X Check in.
Check master page; if all clone pages are in this state, advance master page via “Finalize Project” transition
Finalize Project Translating Translation Project Complete
X Custom
Content Ready for Translation
Translation Project Complete
Ready for Translation
X Custom
Ready for Translation Translation Project Complete
Ready for Translation
X Checks if master page is in ready state. If not, won’t allow advance.
Table 12: Workflow Transitions
9.11.4 Setting User Language Abilities
To translate a page in the CMS, a user needs to be able to see the Translate tab. Users can only see this tab if their user settings show that they can write in the translation target language (i.e., to access the Translate tab for a page that is to be translated into French, you need to be defined as a user who can write in French).

152
CMS 8.0 Administrator Guide
152
To define a user’s language abilities, go to Administration > Users/Groups > Users and use the + buttons to add languages that users can read and write.
Figure 70: Defining a user’s language abilities
9.11.5 Translate Tab
The actual work of translation takes place at the Translate tab, which appears to the right of the Edit Form in an open page.
Figure 71: The Translate tab in the Edit Form
The Translate tab will only appear under the following conditions:
The page is a clone.

153
CMS 8.0 Administrator Guide
153
The page is checked out and assigned to the current user.
The current user is an administrator or is configured with the ability to write in the language of the page locale.
The Translate tab features side-by-side text fields designed to make the work of translation as efficient as possible. The grayed-out left fields display the master page text. The white fields on the right show the clone text, which the translator will translate into the target language.
If the master page and clone page have different schemas, the Translate tab view will always be based on the clone page schema.
9.11.6 Translating a Site
To translate the content of a site, follow the steps below:
1. Set the master site’s root page to a specific language and make sure that all descendants inherit the parent language.
2. Create a new language branch. 3. Create a new root page and set its locale to the target language. 4. Copy the desired pages from the master site and paste them into the new region root.
The pages will automatically become the clones of the master pages, while maintaining their locale inheritance in the new root.
5. Translate the pasted pages and approve them.
9.12 Email
The CMS uses the Microsoft Collaboration Data Object (CDO) application programming interface within Windows Server 2003 and 2008 to send email notifications as part of the Send Mail and Workflow notification features.
This interface supports the standard SMTP mail service. By default, all email messages are sent using Integrated Windows Authentication (NTLM) via the Application Pool account for the CMS website. Typically, this is the Network Service account.
Mail can be sent to a local SMTP service configured on the same server as the CMS server or to a remote SMTP server. Typically, external SMTP servers are used in order to prevent agents external to the network from using SMTP as an email relay and to consolidate email functions in one server. (An SMTP service installed on the same server can also be secured to prevent outside agents from using it.)

154
CMS 8.0 Administrator Guide
154
Figure 72: Email settings in System Options
Email settings can be configured at System Options > CMS > Email.
Compatibility with other SMTP servers depends upon the implementation of these standards by Microsoft and other SMTP servers. Incompatibilities may exist.
9.12.1 Securing SMTP Service
Ingeniux recommends securing the SMTP server against malicious attempts to use it as a relay for email originating outside the local network.
To secure SMTP service:
1. Launch IIS 6.0 Manager.
2. Right-click on the SMTP virtual server used by the CMS (typically, this will be the
“Default SMTP Virtual Server”); left-click Properties.
3. Select the Access tab and click the Connection button in the Connection Control
section.
4. Select the option “Only from the list below.”
5. Enter the IP or host name for the website.
6. Click OK. These settings prevent any email originating from an outside IP address or
domain unless specifically added via the Add button. Leaving this option blank ensures
only email originating from the server itself will be sent.
7. Returning to the Access tab, click the Relay button in the “Relay restrictions” section.
8. Select the option “Only from the list below.”
9. Uncheck the option “Allow all computers which successfully authenticate to relay,
regardless of the list above.”
10. Enter the IP or host name for the website.

155
CMS 8.0 Administrator Guide
155
11. Click OK. These settings prevent any SMTP server from using the local SMTP service as a
relay.
12. Click OK at the bottom of the Properties window to save the settings.
13. If possible, review Microsoft recommendations for securing an SMTP server.
9.13 Logging
The CMS system provides robust logging of both the CMS and DSS servers. The CMS logs publishes and content previews. The DSS logs page transformations.
CMS publishing actions are logged in two places:
Publish logs – Located in [site]\xml\pub and named for the date and time of the publish (for example, publishLog2-2012-06-19-16-24.xml. These logs can be viewed in the Publish Monitor.
igxcsapi.log – Located, by default, in the [site] directory. The log file name can be configured, but it defaults to igxcsapi.log. After the log file reaches a specified size, a new log file is opened and the old log file is renamed to add the date/time to the name. These log files cannot be accessed through the CMS Client.
9.13.1 Publishing Logs
Publishing logs produce output similar to the following:
<?xml version="1.0" ?>
<PublishLog StartedAt="07/12/2006 20:57:52">
<PublishSucceeded ID="x1" />
<PublishSucceeded ID="x224" />
<PublishSucceeded ID="x234" />
<PublishSucceeded ID="x237" />
<PublishSucceeded ID="x238" />
<PublishSucceeded ID="x334" />
<PublishSucceeded ID="x335" />
<PublishSucceeded ID="x336" />
<PublishSucceeded ID="x417" />
<PublishSucceeded ID="x424" />
<PublishProfile TotalTimeMillis="844" TotalTimeSeconds="0.844"
AvgPagePublishMillis="0.736842" AvgPagePublishSeconds="0.000736842"
TotalPagesPublished="19" />
</PublishLog>
Depending on the frequency of publishes, Ingeniux recommends archiving publishing log files once a week. You can automate this process with a scheduled task using a Windows script or command file.
To automate log archiving, follow these steps, making appropriate modifications for your server environment:
1. Create an archive folder in [site]\xml\pub.
2. Create a Windows command file:

156
CMS 8.0 Administrator Guide
156
a. Open Notepad.
b. Copy and paste the following into a new document:
@echo off
[drive letter of CMS]
cd [path to the site]\xml\pub\
Xcopy *.xml [archive directory]\
attrib –r publishlog*.xml
Del publishlog*.xml
c. Change [drive letter of CMS] to the letter of the drive containing the CMS site.
d. Change [path to the site] to the path to the CMS site directory.
e. Change [archive directory] to the path to the archive folder.
f. The complete text of the file should look something like this:
@echo off
c:
cd C:\igxsites\CMS80\xml\pub\
Xcopy *.xml archive\
attrib –r publishlog*.xml
Del publishlog*.xml
3. Go to File > Save and navigate to the location where you’d like to save the task file.
4. In the Save as type menu, choose All Files.
5. For a file name, enter publishlogarchive.cmd. Click Save.
6. Go to Start > All Programs > Accessories > System Tools > Task Scheduler and, from
the Action menu select Create Basic Task. (Note: These steps describe setting up a
scheduled task in Windows Server 2008. The steps will be slightly different for other
versions of Windows Server.)
7. Enter a name and, optionally, a description for the task and click Next.
8. Select Weekly and click Next.
9. Select a start date, a time, and a day of the week for the task. Click Next.
10. Select Start a program and click Next.
11. Browse to, and select, publishlogarchive.cmd. Click Next.
12. Click Finish.

157
CMS 8.0 Administrator Guide
157
9.13.2 Configuring CMS and DSS Logging
You can configure logging for the CMS and DSS in the Administration pane of the CMS Client. You can also make manual edits at \xml\settings\settings.xml.
Both the user and the Application Pool account used by the CMS must have full access to the directory and the log file. Without sufficient access, the CMS will encounter an error. If the DSS site is located on a separate server – and in most implementations it is – then you need to ensure full access on the DSS too.
9.13.3 <Logging> Element
Ingeniux recommends that logging be configured via the System Options user interface. However, it’s also possible to configure logging manually in settings.xml. To configure logging manually, open settings.xml in a text editor and enter values for the child elements of the <Logging> element.
Here, listed under their elements, are the default values and value types that can be configured:
<DesignTimeLogFile>
Default value: none
Value type: [DirectoryPath]\[FileName].log . For example,
d:\igxlogs\corpsite\igxcsapi80.log
<RunTimeLogFile>
Default value: none
Value type: [DirectoryPath]\[FileName].log. For example,
d:\igxlogs\livesite\igxsvrxml80.log
<DesignTimeLogLevel>
Default value: 2
Value type: integer value 0-3 *
<RunTimeLogLevel>
Default value: none
Value type: integer value 0-3 *
*These values represent CMS logging levels:
0 = Errors – Logs only publishing errors.
1 = Warnings – Logs publishing errors and warning messages.
2 = Info – Logs publishing errors, warnings, and general information.
3 = Debug – Logs publishing errors, warnings, general information, and each action taken by igxcsapi80.dll and igxxmlsvr80.xml.
9.13.4 CMS Logging
To configure CMS logging, go to Administration > System Options > CMS > CMS Logging and configure the Log File Name and Logging Level.

158
CMS 8.0 Administrator Guide
158
Figure 73: CMS logging in System Options
Log File Name – Defines the log file name and the directory to which the log file will be written. This setting is separate for the CMS and DSS.
Logging Level – Defines the level of logging for the CMS server:
Errors – Logs only publishing errors.
Warnings – Logs publishing errors and warning messages.
Informational – Logs publishing errors, warnings, and general information.
Debug – Logs publishing errors, warnings, general information, and each action taken by igxcsapi80.dll.
More information is written to the log file as the logging levels increase. Depending upon the environment and the size of the site, the Debug logging level can impact performance. Ingeniux recommends using Informational logging unless more information is required for debugging an issue. If the Debug level is used, it should be on a temporary basis.
Here are some sample log entries produced by the various logging levels:
Errors:
[ERROR] [20060712T20:56:24] Could not write publish log: COM Error:
SetFileAttributes The system cannot find the file specified
Warnings:
[WARNING] [20060315T12:02:30]
Line: 1635
File: .\xml_processor_base.cpp
Description: COM E
Error: Invalid class string
.
Source: <xPower Name="AreasofExpertise" label="Areas of Expertise"
EditForm="MultiSelect.asp" Values="Management|Biotechnology

159
CMS 8.0 Administrator Guide
159
Clusters|Corporate Governance" Query_PageType="Expertise"
Query_LocationRoot="x160" method="ReturnRaw"
progid="IGX_dotNetComponents.ReturnRawClass" Query_Split="false"
Query_ElementAttributeName="Values" Type="ComExecute"
EditFormFlags="center:yes;resizable:yes;dialogWidth:500px;help:no;statu
s:no;dialogHeight:600px;"/>
Info:
[INFO] [20060315T12:02:10] Site Startup Successful.
Debug:
[DEBUG] [20060320T11:39:01] FileSystemLog::initLogFileWithSettings
called
To set the log file size for both CMS and DSS logging, go to Administration > System Options > CMS > Log File Size and enter a value for Max Log File Size.
Figure 74: Setting log file size in System Options
Max Log File Size defines the size of the log file in KB before a new file is created. This setting applies to both CMS and DSS servers.
9.13.5 DSS Logging
To configure DSS logging, go to Administration > System Options > Dynamic Site Server > Dynamic Site Server Logging.

160
CMS 8.0 Administrator Guide
160
Figure 75: DSS logging
The DSS has four logging levels:
Errors – Logs only publishing errors.
Warnings – Logs publishing errors and warning messages.
Informational – Logs startup and shutdown of the application, search errors, search-related messages, errors in site configuration, traffic data, and other general information.
Debugs – Logs files returned from cache, errors occurring with DSS expansion of pages, and the igxxmlsvr80.dll.
As with the CMS, more information is written to the DSS log file as the logging levels increase. Depending upon the environment and the size of the site, the Debug logging level can impact performance. Ingeniux recommends using Informational logging unless more information is required for debugging an issue, in which case Debug logging can be temporarily enabled.
Listed below are some sample entries of the various logging levels:
Informational:
[INFO] [20060726T12:53:56] Starting Runtime Server [ProcessID: 2924
ThreadID: 1988]
Debug:
[DEBUG] [20060726T12:53:56] CXMLProcessorBase::doSequentialNav()
9.13.6 Windows DSS Traffic Logs
Using registry values on the DSS, you can configure DSS traffic logs. The logging configuration applies to all DSS sites running on the same server.
Here are the registry values for logging:

161
CMS 8.0 Administrator Guide
161
TrafficLogDateFormat {%Y/%m/%d} – Specifies a logging date format for the DSS traffic log. The default values should not be changed.
TrafficLogEnable {TRUE/FALSE} – Enables DSS traffic logging.
TrafficLogFile – Specifies a file path location for the DSS traffic log. Note that the default value is invalid and should be modified.
TrafficLogRollover – Specifies a period for the DSS traffic log.
TrafficLogTimeFormat {%H:%M.%S} – Specifies a logging time format for the DSS traffic log. The default values should not be changed.
TrafficLogTokens – Specifies information to log. Values need to be separated by a space. The available logging options are listed below:

162
CMS 8.0 Administrator Guide
162
Token Sample Output Description
date date="2006-07-26" Records the date of the requests.
time time="10:45:48" Records the time of a request to the DSS site.
server_name server_name="t03-2003srv"
Records the domain server name.
remote_host remote_host="000.000.000.000” Records the hostname or IP address of the client making the request.
remote_addr remote_addr="000.000.000.000" Records the IP address of the client making the request.
server_port server_port="80" Records port of request, normally 80 unless otherwise specified or 443 if SSL/HTTPS is used.
status_code status_code="200" Returns HTTP Status code: 200 = OK, 403 = Access Denied, 500 = Internal Error, etc.
referrer referrer="" Records the HTTP referrer, as available in the Request object (e.g. the site containing the link to the requested page).
user_agent user_agent="Mozilla/4.0 (compatible; MSIE 6.0; Windows NT 5.1; SV1; .NET CLR 1.1.4322)"
Records the user agent of the requesting browser.
request_method request_method="GET" HTTP protocol method for the request, e.g. GET, POST, etc.
content_type content_type="text/html" Records the content type of the response, e.g. “text/xml”, “text/html”, etc.
page_name page_name="Home" Records the name attribute of the document element of the XML page that was requested.
page_type page_type="" Records the type attribute of the document element of the XML page that was requested.
page_path page_path="/Content Store/BAC/Pages/Home"
Records the XPowerPath attribute of the document element of the XML page that was requested.
script_name script_name="/baclive/x41.xml" Records the SCRIPT_NAME value in the Request object.
server_software server_software="Microsoft-IIS/6.0"
Records the Web server version implemented on the server.
path_info path_info="/baclive/x41.xml" Records the PATH_INFO value in the Request object.
document_root document_root="" Records the DOCUMENT_ROOT value in the Request object.
path_translated path_translated="E:\IGXSites\bac\xml\pub\BAClive\x41.xml"
File path to the requested file, e.g. http://www.site.com/x123.xml becomes D:\site\xml\x123.xml
content_length content_length="0" Records the length (in bytes) of the response.

163
CMS 8.0 Administrator Guide
163
Table 13: DSS Traffic Tokens
With the exceptions of date, time, status_code, content_type, page_name, page_type, and page_path, all tokens are taken directly from the IIS Request object’s ServerVariables collection. An API for this object can be found online at the Microsoft site.
The IIS process controls the traffic.xml log file, which cannot be opened with an application with write access to the file. To monitor the file in real time, use the Wintail application available with the CMS:
1. Go to Start > All Programs > Ingeniux CMS 8.0 > Wintail.
2. Navigate to traffic.xml and select it.
The traffic.xml file is reset after the first HTTP request following an IIS reset.
Here is a short sample traffic log:
<?xml version="1.0"?>
<TrafficLog>
<HttpRequest time="12:42:00" date="2006-07-26" server_name="t03-
2003srv" remote_host="10.10.2.188" remote_addr="10.10.2.188"
status_code="200" referrer="" user_agent="Mozilla/4.0 (compatible; MSIE
6.0; Windows NT 5.1; SV1; .NET CLR 1.1.4322)" request_method="GET"
content_type="text/html" page_name="Home" page_type=""
page_path="/Content Store/BAC/Pages/Home"
script_name="/baclive/x41.xml" server_software="Microsoft-IIS/6.0"
server_port="80" path_info="/baclive/x41.xml" document_root=""
path_translated="E:\IGXSites\bac\xml\pub\BAClive\x41.xml"
content_length="0" />
<HttpRequest date="12:42:08" time="2006-07-26" server_name="t03-
2003srv" remote_host="10.10.2.188" remote_addr="10.10.2.188"
status_code="200" referrer="" user_agent="Mozilla/4.0 (compatible; MSIE
6.0; Windows NT 5.1; SV1; .NET CLR 1.1.4322)" request_method="GET"
content_type="text/html" page_name="Admission" page_type=""
page_path="/Content Store/BAC/Pages/Home/Admission"
script_name="/baclive/x245.xml" server_software="Microsoft-IIS/6.0"
server_port="80" path_info="/baclive/x245.xml" document_root=""
path_translated="E:\IGXSites\bac\xml\pub\BAClive\x245.xml"
content_length="0" />
</TrafficLog>
9.14 Configuring External File Locations
Some CMS implementations store documents and media files on external servers. For example, a site that provides media streaming would typically store media files on an external streaming server. (Note: Images are not typically stored externally, because they tend to be smaller and more frequently accessed than other assets.)

164
CMS 8.0 Administrator Guide
164
When documents and media are stored externally, separate URLs are pushed into the IGX_Info element to tell the style sheet where to find the external files. For both document and media files, two values need to be configured:
Location – This can be a hard drive on the local server or a UNC path, as long as the App Pool identity can access it. The file browser will go to this location to look for and upload documents.
URL Prefix: This is the URL reserved for runtime and preview. The style sheet will combine this URL with the actual asset path to construct the full asset path.
To configure external file storage locations, navigate to Administration > System Options > CMS > File Locations.
Figure 76: Configuring external file locations
Enter appropriate values in the text fields and click Save.
9.15 Setting Time Zones
The time zone setting works in conjunction with the local time element in the edit form of the CMS. When no time zones are configured in System Options, the local time element doesn’t have any time zone options available.
Figure 77: The local time element without time zones enabled
When time zones are configured, time zone options are available.
Figure 78: Time zone options
To configure time zones, navigate to Administration > System Options > CMS > Time Zones. A list of available time zones appears in the edit pane.

165
CMS 8.0 Administrator Guide
165
Figure 79: Configuring time zones in System Options
Select the time zones that will be available to users; then click Save. (Clicking Available Time Zones reorders the list.)
9.16 Configuring DSS Variables
There are dozens of HTTP server variables that can be included in a page’s expanded XML. Including all potential variables would make the XML unnecessarily large, so the CMS lets you select the server variables to include in site pages at runtime. These variables are contained in the IGX_Info element and stored in settings.xml.
Most of the default server variables provide access to client-side information about page requests. You can also configure custom variables to be included on request. Please note that including custom variables via System Options does not create new variables. It simply includes the value of custom variables if they already exist.
To configure default variables, go to Administration > System Options > Dynamic Site Server > Server Variables > Default Variables.
Figure 80: Configuring DSS variables
Select the default server variables to be included in the IGX_Info element of the expanded page XML. When you’re finished making selections, click Save. To reorder options, click Available Default Server Variables at the top of the list.
To configure custom variables, go to Administration > System Options > Dynamic Site Server > Server Variables > Custom Variables.

166
CMS 8.0 Administrator Guide
166
Figure 81: Custom server variables
To add a custom variable, click New, enter the name of the variable, and press Enter. To remove a custom variable, select it and click Remove. When you’re finished configuring variables, click Save.
9.17 DSS Caching
To set up DSS caching of XML pages, go to System Options > Dynamic Site Server > Cache and configure the following values:
Figure 82: Setting up DSS caching
1. Enable Cache – A check box that enables DSS server-side caching.
2. Trigger File – Identifies the file path and file used by the server to indicate that files
have been published and the cache should be cleared. This is often set to
publishdone.txt located in the \[publishingTargetDirectory]\publishdone.txt.
This setting creates a line in \xml\settings\settings.xml:
<TriggerFile>publishdone.txt</TriggerFile>
3. Cached Page Size – Defines the maximum size (in bytes) for all pages cached. This
number should not exceed the amount of free memory in the system or be so large as
to overwhelm the system processor. This value should be adjusted over time to
determine the best cache size for the specific environment. This setting creates a line in
\xml\settings\settings.xml:

167
CMS 8.0 Administrator Guide
167
<CachePageSize>10240</CachePageSize>
4. Cache Page Count – Defines the maximum number of pages cached before the cache is
cleared. This setting creates a line in \xml\settings\settings.xml:
<CachePageCount>30</CachePageCount>
5. Never Expire / Expire in (Seconds) – Defines the length of time a page is cached
without being requested if it is not otherwise cleared from the cache due to a publish,
its size, or the file number threshold. This setting creates a line in
\xml\settings\settings.xml:
<ExpireTime>0</ExpireTime>

168
CMS 8.0 Administrator Guide
168
10 Administration Tools
The CMS provides many tools to help site administrators and power users manage content. Some of these administration tools are discussed elsewhere in this guide. This section provides an overview of the remaining administration tools, many of which can be accessed in the Administration pane.
10.1 Search
CMS 8.0 features a new CMS search system that replaces the Microsoft Indexing Server used in previous versions of the CMS. The new search engine, accessed via Search in the accordion pane, provides indexing of individual text fields and can be configured to search for recycled pages and previous versions of pages.
Figure 83: The Search feature in the CMS
To search the CMS site, enter keywords or queries in the search field. Queries follow the syntax field:value and can be joined by and / or. For example, the following string would return pages with “academics” in either the title field or the abstract field:
title:academics or abstract:academics
There are a few details to keep in mind about the search functionality:
Search is not case sensitive.
Only whole and hyphenated words are searchable. The strings “academics” and “academic-s” will return pages and folders with the word “academics” in them. But “aca” or “academic” will not return “academics.”
The search feature takes into account a list of stop words. These are common words that will be automatically filtered out of a search string. The search feature recognizes the following stop words: a, an, and, as, at, be, but, by, do, for, in, is, it, no, not, of, on, or, that, the, this, to, will, with, you.
Depending on the size of the site, there may be up to a ten-second delay between content updates and indexing.
A search will only return the 200 highest-ranked matches.
The search results table can be sorted by column, in ascending or descending order.
To open the advanced search options, check Advanced.

169
CMS 8.0 Administrator Guide
169
Figure 84: Conducting an advanced search
With advanced search enabled, you can choose to search checked-out pages, recycled pages, and previous versions of pages.
Figure 85: Advanced search with all check boxes checked and the pane expanded
Use checked-out page content is selected by default. With this setting selected, a search returns content from checked-out pages if a) the pages are checked out to the user or b) the user is an administrator. Also, the Checked out column appears in the search table results.
When Include recycled pages is selected, searches include pages that have been deleted to the recycle bin, and the Deleted column appears in the search results table.
If you select Include content from page’s previous versions, searches will include content from older versions of pages, and the Version column will appear in the search results table.
You can also narrow your search using the Page Type and Field drop-down menus. The field values available are dependent upon the page type selected.

170
CMS 8.0 Administrator Guide
170
10.2 Find and Replace
The Find and Replace feature provides a convenient way to search for and modify text values, media assets, and page and component references. Using Find and Replace, you can easily update site-wide content in one place.
To open the Find and Replace feature, navigate to Administration > Find and Replace.
Figure 86: The Find and Replace feature in the Administration pane
Clicking the drop-down menu in the Search for field gives you four options: Text, Asset References, Page/Component References, and Broken References. No matter which option you search for, you’ll use the Start at field to select a node to begin searching from and the Include Child Items checkbox to decide whether or not to search the child nodes of the starting node.
Depending on the value selected in the Search for field, additional search criteria will need to be configured:
Text – Fill out the Search Text field to choose the text string to search for; use the Match Case checkbox to decide whether or not the search will be case sensitive.
Asset References – Use the Browse button to locate the appropriate Asset Path value. By default, assets are located in the Documents, Images, Media, Prebuilt, Schemas, and Stylesheets directories.
Page/Component References – In the Search Page field, enter the xID of the page being referenced.
Broken References – Use the Search External References checkbox to choose whether or not to search for broken references outside the site architecture.
After filling out the search settings, use the Search button to retrieve results.

171
CMS 8.0 Administrator Guide
171
Figure 87: Search results
Select a result and use the Remove and Fix/Replace buttons to remove or replace values. To change multiple pages at once, use Ctrl-click to multi-select pages and then make changes.
10.2.1 Exportable Reports for Broken Links
You can export search results from the Find and Replace feature. With exportable results, it’s easy to share a list of assets or broken references.
When a search completes in Find and Replace, an Export Results button appears to the left of the Search button.
To download an Excel table containing the search results, click Export Results and follow the prompts in the dialog. Results are exported as a Microsoft Excel file.
10.3 Schema Designer
In the CMS, each new page or component is generated from an XML schema. The schema defines the types of content that can appear on a given page or component. Essentially, an XML

172
CMS 8.0 Administrator Guide
172
schema functions as a template for the creation (sometimes referred to as the “instantiation”) of a new page or component. Thus, before end users can add content to a site, a developer has to build schemas for the site.
Typically, XML schemas are built during the initial site implementation process. But over time site needs change, and a CMS implementation may require new schemas to generate new page and component types. Schema Designer provides a simple interface for creating and editing schemas.
In previous versions of the CMS, Schema Designer functioned as a stand-alone application, and files created from it had to be saved or copied into the CMS file structure. CMS 8.0 includes a new, integrated Schema Designer that you can use to create and update schemas within the CMS. The new Schema Designer makes it easy to edit schemas, review previous versions of schemas, and sync schemas to existing pages.
10.3.1 Permission to Use Schema Designer
A new permission setting, Allowed to manage schemas, determines whether or not a user can access Schema Designer. Administrators have this permission by default.
10.3.2 Working in Schema Designer
To access Schema Designer, open the Administration pane and click Schema Designer. The Schema Designer interface will open in the Edit pane.
Figure 88: The Schema Designer in the Administration pane
Schema Designer’s features are distributed among three main tabs: Management, Create/Edit, and Synchronization.
10.3.3 Managing Schemas
In the Management tab, you can work with existing schemas. Schemas are listed according to type: Page Types, Component Types, and Invalid Schemas.

173
CMS 8.0 Administrator Guide
173
The number on each tab indicates the total number of schemas of that type.
Page and component schemas are laid out in identically structured tables.
Columns are sorted alphabetically. To sort by a column, click the header (Name, Root Element, etc.). To reverse the order, click the heading a second time.
When no schema is selected, the Actions box to the right of the table shows one available option, New.
Clicking New opens the New Schema form, which you can also reach by clicking the Create/Edit tab. When you select a schema from either the page or component table, additional options become available in the Actions menu.
Clicking New, Edit, or Clone opens the Create/Edit tab (see Creating and Editing Schemas). Clicking Sync opens the Synchronization tab (see Synchronizing Pages and Schemas).
To delete a schema, select it, click Delete and – in the dialog that opens – click OK. If there are pages associated with a schema, it can’t be deleted.
Schemas can contain errors. There are two types of schema error: salvageable and unsalvageable. If a page schema refers to a style sheet that doesn’t exist, that’s a salvageable error. A schema with a salvageable error still appears in the Page Types table, but it’s marked with a red warning icon.

174
CMS 8.0 Administrator Guide
174
Figure 89: Schemas that contain errors are marked with a warning icon
A schema that doesn’t validate as XML (or doesn’t validate as an XML schema) is said to contain an unsalvageable error. Unsalvageable errors can also be caused by duplication of another schema’s friendly name or root name.
Schemas with unsalvageable errors appear on the Invalid Schemas tab, with the cause of the error listed in the Error column.
When you select an invalid schema, the Delete command becomes available in the Actions menu.
10.3.4 Creating and Editing Schemas
In the Create/Edit tab, you can build new schemas and make changes to existing ones.
Creating a Schema
To create a new schema, click Schema Designer in the Administration pane, and then click the Create/Edit tab. The tab opens to the New Schema form.

175
CMS 8.0 Administrator Guide
175
Figure 90: Creating a schema in the New Schema form
Enter a Display Name for the schema. The Root Name field will automatically use this name, with any spaces removed. In the Content Type menu, choose either Component or Page. Then pick an icon to represent the schema.
To create a page schema, you also need to indicate whether content will be rendered with an XSLT style sheet or an MVC managed view.
If you select Managed View, enter a name for the view in the View Name field. If you select XSLT Stylesheet, choose a style sheet using the Ellipsis (…) button.
Clicking Group opens more configuration options.
With the form open, you can configure taxonomy and workflow options for the schema.

176
CMS 8.0 Administrator Guide
176
Figure 91: Configuring taxonomy and workflow options for a schema
Two types of taxonomy associations are available, and each has its own tab:
Allowed Root Categories – Only these categories and their descendants can be associated with pages instantiated from the given schema. If you want to predetermine the categories from which users can choose, you can do so on this tab.
Default Categories – These categories are applied by default to pages instantiated from the given schema.
To choose Allowed or Default categories, click the appropriate tab, click Pick Categories, and select categories in the dialog.
You can also associate a workflow with the schema, so that pages created from the schema automatically enter the workflow. (In most CMS implementations, this configuration is superseded by page creation rules.)
To associate a workflow with a schema, select a workflow from the Choose Workflow menu.
To add elements to a schema, make sure that the Elements tab is open and drag elements from the Fields Tab into the Elements tab. When you drag an element into the Elements tab, it expands.

177
CMS 8.0 Administrator Guide
177
Configure values for the element using the check boxes (Hidden, Read Only, and Required) and text boxes.
To add attributes to a schema, open the Attributes tab and drag attributes from the Fields tab to the Attributes tab. When you drag an attribute onto the Attributes tab, it expands.
Using the check boxes and text boxes, configure values for the attribute.
When you’re finished adding elements and attributes, you can reorder, clone, and delete them using commands in the Field Actions menu.
When you’re finished creating (or modifying) the schema, you can save, clone, revert, or sync it using commands from the Schema Actions menu.
You can’t delete a schema if any pages created from it still exist.

178
CMS 8.0 Administrator Guide
178
Editing a Schema
Editing a schema is similar to creating a new schema, except that element and attribute fields already exist.
To edit a schema, select the schema on the Management tab, click Edit, and make changes as described in the previous section. When you’re finished updating the schema, click Save. The Save Schema dialog will confirm that you want to create a new version of the schema.
To create the new version, click Save new version.
To preserve your changes without creating a new version of the schema, click Save draft.
By saving in draft mode, you make changes to a schema without applying them. When you save a schema as a draft, it’s taken out of circulation, and you can’t use it to create a page until you save a new version. However, the draft schema still appears in the schema table.
Cloning a Schema
To clone a schema:
1. Select a schema on the Management tab and click Clone. The Create/Edit tab will open to an unnamed schema containing the same element/attribute configuration as the cloned schema.
2. Enter a Display Name for the new schema and configure the content type and icon. 3. Make any desired changes and save the schema (a dialog prompts you to save the
schema as either a new version or a draft). The new schema appears on the Management tab after a browser refresh.
Reverting to a Previous Version of a Schema
Each time you save a schema, a new version is created. The version number of a schema appears in the Versions column in the schema table.
To revert to a previous version of a schema:
1. Select the schema on the Management tab and click Edit. 2. In the Create/Edit tab, click Revert. A dialog prompts you to select the schema version
to which you want to revert.

179
CMS 8.0 Administrator Guide
179
3. Select a version from the menu and click Revert. Then save the schema to complete the
reversion process.
10.3.5 Favorite Element Groups
You can streamline the process of creating and editing schemas by saving frequently used element groups in the Favorites tab.
To add an element or group of elements to Favorites:
1. Select a schema on the Management tab, click Edit, and (if necessary) click the Favorites tab.
2. Select an element on the Elements tab (or multi-select elements by holding down Shift and clicking), and drag the selected element(s) to the Favorites tab. A dialog prompts you to name the new group.
3. Enter a name and click Create Favorite Fields Group.
To make the new favorite field(s) available to all CMS users with appropriate permissions, select Public.
If you don’t select Public, the favorite field(s) will only be available to you.
10.3.6 Synchronizing Pages and Schemas
Making changes to a schema doesn’t automatically affect already existing pages instantiated by that schema. For example, you can add a new text element to a schema, but that new field won’t be available on existing pages until the schema and pages are synced. Thus, depending on your site requirements, you may need to perform a sync when you’re done editing a schema.
Performing a schema sync against a given page creates a new version of that page, so that prior content can be viewed or restored.
A schema sync produces the following results on pages selected for the sync:
Any elements added during the schema update are added to selected pages.
Any elements removed during the schema update are removed from selected pages.

180
CMS 8.0 Administrator Guide
180
Any elements reordered during the schema update are reordered on selected pages.
Any renamed elements are updated by a two-step process. First, the old element is removed. Then a new element with default values is added in place of the old element. The new element does not have the content of the old element. (This process will be further developed in future versions of the CMS.)
A schema sync does not update the attributes of an element (for example, the max depth of a navigation or the available component types in a component element) on existing pages to reflect changes to that element in an updated schema.
The schema table in the Management tab indicates how many pages or components are out of sync with a given schema.
To sync a schema, select it from the table and click Sync in the Actions menu. The Synchronization tab opens.
Click Find out-of-sync pages to see pages that are out of sync with the currently selected schema.

181
CMS 8.0 Administrator Guide
181
Figure 92: Viewing out-of-sync pages
To generate an Excel spreadsheet based on the list, click Download report.
Schema Designer can compare each page’s structure to the schema version and score the differences. The score indicates the number of steps involved in syncing the page and schema. For instance, removing an old title and adding a new one requires two steps, with a change effort of “2”.
To determine the numbers of steps required to sync the page and schema, click Analyze change efforts. The result appears in the Change Effort column.
To sync a page or component, select it from the list and click Sync selected. You can select multiple schemas by pressing Ctrl and clicking. To sync all of the pages or components, click Sync all.
A green check mark indicates a successful sync.
When a user runs a schema sync, all affected pages are automatically saved, unassigned, and checked in and then reassigned and checked out to the user performing the sync. In other words, the user who initiates the schema sync effectively takes the out-of-sync pages away from other users. After the sync, pages have to be reassigned manually.

182
CMS 8.0 Administrator Guide
182
Performing a schema sync sends the CMS into maintenance mode, thereby preventing changes to content. To prevent lost work, make sure that other users log out of the CMS before you run a sync.
To undo a schema sync for an individual page or component, go to the History tab for the item and revert it. Pages and components are automatically saved at the time of a schema sync, so a pre-sync version will be available.

183
CMS 8.0 Administrator Guide
183
10.4 Publish Monitor
In the Publish Monitor, you can view publishing logs and the real-time status of pending publishes and replications. To open Publish Monitor, go to Administration > Publish Monitor.
10.4.1 Publishing Tab
The Publishing tab displays publishing and replication jobs that are currently in process. It also shows recently completed publishes.
Figure 93: The Publishing tab
If post-publish synchronization is not turned on in System Options, multiple publishing targets can replicate simultaneously. If it is turned on, replication tasks will occur sequentially, and there will never be more than one replication task listed in the Publish Monitor.
In the Recently Completed section, replications are listed by publishing target and associated with a preceding publishing job. This is true even for a manual replication.
10.4.2 Pending Tab
When no publishing jobs are currently underway or pending, the Publish Monitor displays the message “No Ongoing Publish,” and the Pending Publishes view is empty. If a job is currently underway, the Publish Monitor will display the message “Publishing to” and the name of the publishing target. If other publishing jobs are queued behind the current job, the details of the queued jobs will display in the Pending Publishes view.
All users of the CMS will be able to view ongoing and pending publishing jobs, and users will also be able to remove pending publishing jobs that they’ve submitted. Administrators have the additional ability to remove any pending publishes and to reorder jobs by dragging and dropping in the Pending Publishes view.

184
CMS 8.0 Administrator Guide
184
10.4.3 Publishing Logs
To view publishing logs, click View More on the Publishing tab and select a publishing target from the drop-down menu. You can select publishes and replications by date in the Publish Date pane on the left. Publishes are listed in chronological order with the newest log at the top.
Figure 94: Viewing publish statistics
In either the Publishes or Replications tab, click View Log XML to see an XML document containing log data for the publish or replication in question. The log data will be displayed in a new window.

185
CMS 8.0 Administrator Guide
185
Note: Changing dependencies can impact the accuracy of log information in the Publish Monitor. If dependencies are changed, the Publish Monitor may report that the target has a pending publish even if no publish process has been initiated on the target.
If no logs are available, check the igxcsapi.log file usually located in the \[site directory] (the location of this file is specified in \[site directory]\xml\settings.xml). This occurrence indicates a failure before publishing could commence.
10.5 Taxonomy
The Taxonomy system provides a way to tag pages with categories and then pull content into new contexts on a category-by-category basis. For example, a university athletics department could aggregate all news stories tagged “Sports” and display them in a feed on the athletics home page.
To access the Taxonomy manager, go to Administration > Taxonomy. The Taxonomy manager features a language selection drop-down, a search field, a category tree, and four tabs: Category, Associations, Security, and Synonyms. These four tabs become accessible when a category is selected in the tree.
Figure 95: The Administration pane’s Taxonomy manager
In the Category tab, users with appropriate permissions can create and edit taxonomy categories. To select a category to edit, click on it in the category tree. To create a new category, mouse over a node in the tree and use the + button. To delete a category, use the – button.
The Associations tab displays the pages that have been tagged with a selected category. To tag a page with a category selected in the tree, use the + button. To cancel the association between a selected category and a page, mouse over the page and click the – button.
Beginning with CMS 7.5, two additional tabs are available in Taxonomy: Security and Synonyms.

186
CMS 8.0 Administrator Guide
186
Figure 96: The Taxonomy Security tab
At the Security tab, you can restrict on a category-by-category basis the user groups that can apply taxonomy categories to pages. By default, the Everyone group will have full access to categories, and child categories will inherit security settings from parents. This means that, by default, if a group has access to a site node, the group will be able to apply any taxonomy category at that node.
In some cases, you may want to limit the groups that can use a given taxonomy category. To do so, you’ll need to configure the taxonomy tree via the Security tab.
To configure security for a parent category, uncheck Use default security settings. To configure security for an individual child category, uncheck Inherit security settings from parent category. Then, for each user group, select Full Access or Read Only from the drop-down. These settings will determine whether a group can apply or only view a given category.
By default, only the Everyone group displays in the Security tab. To configure security for an additional group, use the Add button and choose a group from the dialog. Then choose Full Access or Read Only. Repeat for additional groups.
When you’re finished configuring taxonomy security, click Apply.
At the Synonyms tab in the Taxonomy Manager, you can associate synonyms with nodes in the taxonomy tree. Synonyms can be used to display other names for a given category.

187
CMS 8.0 Administrator Guide
187
Figure 97: Adding synonyms to a taxonomy category
To add a synonym to a category, go to the Synonyms tab and select a category from the taxonomy tree. Then enter a synonym into the Add/Remove Synonyms for the Category field and click “+”. Use the “-“ button to remove synonyms. When you’re finished making changes, click Save.
10.6 Redirects
The Redirects application in the CMS creates mappings between page requests received by the CMS and particular pages in the site. It provides the equivalent of custom “301” mapping within the CMS.
The Redirects feature allows a site to preserve a popular URL (perhaps a bookmarked page or one tagged by search engines) and redirect a browser to a new page. It also lets a user request an abbreviated page title (e.g. http://www.site.com/news) and receive the page without typing the full name (e.g. http://www.site.com/news_and_event_frontpage.html).
The From/To pair creates a map between the page requested (From) and the site page that will be delivered (To). The content of the From field is appended to the URL of the site. If that combined address matches an HTTP request, the page in the To field is delivered. This is true even if structured URLs are enabled. The To field may hold a specific XID (e.g. x217.xml) or a structured URL label (e.g. About_Us) if structured URLs are enabled.
The site keeps the redirect mappings in [site]\xml\settings\redirects.xml. Here is a simple example:
<Site>
<!-- sample
<redirect id="0" from="sourcepath/" to="targetpath/" />
-->
<virtual />
<redirect id="2" from="index.html" to="x217.xml" />
<redirect id="4" from="news" to="x220.xml" />
<redirect id="5" from="x203.xml" to="About_Us" />

188
CMS 8.0 Administrator Guide
188
</Site>
In this example, the first redirect maps index.html to x217.xml; the second declares that any request for [site]/news will return [site]/x220.xml; the third example, using structured URLs, maps x203.xml to the page titled “About Us”.
If your site uses redirects, it’s important to understand the significance of the trailing slash ‘/’ in the From and To fields. A From field that ends with a slash matches only complete strings. For instance:
<redirect id=”2” from=”news/” to=”x220.xml” />
This example maps [site]/news, [site]/news/, and [site]/news/today to page x220.xml. It would not match [site]/news_articles since the key element of the request (news_articles) does not exactly match the field (news).
If the From field did not have the trailing slash (from=”news”), any request that began with news (e.g. [site]/news_articles) would deliver x220.xml.
Placing a trailing slash in the To field allows extended path elements to be passed from the From field.
<redirect id=”2” from=”news/” to=”http://www.news.com/” />
In this example, a request for [site]/news/today would return www.news.com/today.
10.7 Reports
The CMS features a report system that provides a number of internal analytics tools, including:
• Queries against multiple documents • Customizable report parameters • Report scheduling • Excel spreadsheet generation
The basic reporting model for the CMS involves running an XPath query against one or more XML documents.
To access the report manager, go to Administration > Reports. At the Overview tab you can view general site statistics, and at the Scheduling tab you can start and stop forthcoming reports.

189
CMS 8.0 Administrator Guide
189
Figure 98: The Reports tab in the Administration pane
In the left pane, In the Reports tree structure, you’ll see report folders and report nodes. The folders and reports have different context menus. Right-clicking report folders will present two options: Paste and New Report. Right-clicking an individual report will present options to Cut, Copy, or Delete the report.
To open a report, expand a report folder and select a report from the second level of the tree structure. There are three available tabs for most reports:
• View Results • Configure • Schedules
10.7.1 View Results Tab
In the View Results tab, you can view reports and export the results to an Excel spreadsheet.
Figure 99: The View Results tab

190
CMS 8.0 Administrator Guide
190
Clicking Get Results (the blue-and-white arrow button) will run the report and return the results. After the results are returned, the Excel icon will appear. Click the Excel icon to export results to an Excel spreadsheet.
10.7.2 Configure Tab
In the Configure tab, you can configure a report and view the XML documents against which the report query will run.
Figure 100: The Configure tab
To modify the name of the report, enter text in the Name field. To select the XML documents against which the report will run, use the checkboxes in the Documents to Be Queried section. To create or modify the XPath query for the report, enter text in the Query field. To view the combined XML document against which the XPath query will run, click View Combined Document for Query (the orange-and-white page icon in the upper-right corner of the tab). To configure the results table for the report, modify values in the Setup Results Table Columns section. When you’re finished, use the blue save icon to save your report configuration.
10.7.3 Schedules Tab
To schedule a report, go to the Schedules tab and click the “+” button. The Schedule Entry form will open. (Note: Advanced reports cannot be scheduled.)

191
CMS 8.0 Administrator Guide
191
Figure 101: The Schedules tab
Enter a name for the report in the Name field and use the date and time pickers to enter a Start Date and Time of Execution, respectively. In the Recurrence fields, set the frequency with which the report will run. To select users to receive the report, use the “+” button to the right of Users to receive exported report. You can select groups or individual users, and you can remove them using the “-” button.
When you’re finished, click the save button to save your scheduled report. To schedule the report to run at additional times, use the “+” button at the bottom of the Schedules view.
10.7.4 Report Types
There are three types of report:
• Simple reports • Parameterized reports • Advanced reports
To create a new report, right-click a report folder, select New Report, and select the report type you’d like to create.
Or
Select a folder under reports and, on the Folder Information tab, click the New Report button.

192
CMS 8.0 Administrator Guide
192
Simple Report
Simple reports run via an XPath query against a single XML document that is built by combining other XML documents. Simple reports run without parameters and display in list form only. You can refresh the list by clicking the View Results tab.
Configuring a simple report is a three-part process. The following values need to be set:
Documents to Be Queried – The XML documents against which the query will run. These documents are combined into a single meta-document before the query runs. When the number of documents involved increases, report generation slows down.
Query – The XPath query to run against the combined XML document.
Setup Results Table Columns – The table in which report data will be returned. Use the Attribute Name checkboxes to determine which attributes to show in the table. Use the Column Label fields to set the names of table columns. Use the Data Type drop-down menus to select the format of the data to be displayed. And use the Width field to set the width of each table column.
The icons in the top menu bar let you preview the combined XML document and save the report setup, respectively.
Each report can have multiple schedules with specific reporting times and recurrences. Also, each schedule can have its own list of recipients. To configure report schedules, use the Schedules tab.
Parameterized Report
A parameterized report requires additional parameters in order to run. In the View Results tab, you’ll need to input or select one or more values in order to run a report. For example, to run a report on the page descendants of a given page, you would need to enter the page ID as a value.
Parameterized Report > View Results Tab
The Configure tab has an additional section, Parameters, for parameterized reports. Here you can configure the parameters to be added to the query.

193
CMS 8.0 Administrator Guide
193
Figure 102: Parameterized reports in the Configure tab
To add new parameters, click the “+” button and select Add New Text Parameter or Add New Drop-Down Parameter. If you choose Add New Text Parameter, you’ll need to enter a name and label, and you’ll have the option of entering a default value as well. If you choose Add New Drop-Down Parameter, you’ll also need to add choices and input a Choice Value and Choice Label for each of them.
Figure 103: Parameter drop-down choices
There is no way to dynamically populate a drop-down parameter. The choices are always hard-coded.
To schedule a parameterized report also involves an additional step. At the Schedules tab, you’ll need to complete the Execution Parameters section.
Figure 104: Execution parameters in the Schedules tab
Advanced Report
Advanced reports don’t leverage the XPath-based technology of XML meta-documents. Instead, an advanced report looks for a URL to define its parameters.
To configure a URL for an advanced report, go to the Configure tab and enter the appropriate URL (e.g. asp/reports/workflowUsageReport.asp) in the Data Provider URL field. This URL will provide parameter definitions and report results. The provider URL only receives form posts. Each Advanced Report has to reference a specific URL.
Because advanced reports require special authentication and remote access, they cannot be scheduled. No Schedule tab will be visible for an advanced report.
10.8 Analytics
The CMS can be configured to display data from Google Analytics, an enterprise-class application that measures web traffic and provides customizable reports. When Analytics is configured, users can access it by selecting a page in the site-tree and opening the Analytics tab in the edit pane.
Configuring Analytics is a three-step process: 1) implementing Google Analytics within the code of your web pages; 2) enabling the publishing target; 3) linking the site. The sections below detail steps two and three. To learn more about implementing Google Analytics on individual pages of your site, go to http://www.google.com/analytics/.

194
CMS 8.0 Administrator Guide
194
10.8.1 Enabling the Publishing Target
To track live site traffic, the Analytics feature has to be enabled for the site’s publishing target. If no publishing targets have Analytics enabled, Analytics will display the following message in the edit pane:
Figure 105: A No Data Available message, indicating that Analytics is not enabled
To enable Analytics for a publishing target, go to Administration > Publishing System and select the publishing target that you want to monitor with Google Analytics. In the Info tab, check Enable Analytics for Publishing Target and leave Google Analytics Provider as the selected data provider. (The other option, Sample Provider, is for demonstration purposes.)
Repeat this process for any other publishing targets you want to link to Analytics.
10.8.2 Linking the Site
To link your site to a Google Analytics account, follow the steps below:
1. In the Apps pane, select Analytics.
2. Click Connect Analytics Account. If necessary, log in to the Google account that has access to the Analytics profile the site is configured to use.
3. Approve access, allowing communication between the site and Google Analytics.
4. Select the profile that corresponds to this CMS content and click Save Profile.
It may be necessary to publish the site to the appropriate publishing target before analytics results become available. With analytics enabled and the site linked and published, you will be able to monitor analytics for a given page via the Analytics tab or monitor site-wide analytics at Apps > Analytics.
10.8.3 Revoking Access to the Site
To revoke Google Analytics’ access to the site, follow these steps:
1. Go to Apps > Analytics and select the Profile link. 2. In Google Analytics Setup, click Revoke Access Token.
10.9 Database Query Components
The DBQuery component supports database SELECT queries to populate a component with data through an ODBC connection. The DBQuery within an XML page pulls data from a database into an XML page. If the page is published as XML, the DBQuery executes at runtime – the time the page is requested from the live site by the end-user. However, if the page containing the DBQuery component is published as HTML, the DBQuery executes at the time the page is published.
10.9.1 Requirements:
Prior to creating a DBQuery component, you’ll need to configure a system DSN on the CMS and DSS servers.
To create a DBQuery:

195
CMS 8.0 Administrator Guide
195
1. Select the node in the site tree where you want to create the DBQuery. Click New and
choose Component.
2. In the Create New Component dialog, enter a name for the component. Check Page
Types, and choose DBQuery in the Select Type drop-down. Click Create.
3. In the Query field of the Edit Form, enter the SELECT statement for the data set to be
pulled into the page. For example: SELECT * from Faculty WHERE Department =
"English". Consult your SQL reference for syntax appropriate to your database.
4. Enter the DSN value in the DSN input box. For Microsoft Access, the format is [system
dsn name]. For Microsoft SQL Server, the format is User ID=[db username];Password=[dbpassword];Initial Catalog=[database name];Data
Source=[system dsn name].
5. Save the component by clicking the Save icon.
6. Add the DBQuery component to a page containing a component element.
Note that the DBQuery component can only execute SELECT queries against the specified database. It cannot be used to write, modify, or delete data from a database.
The steps above are suggestions only and are intended as samples to be modified for specific implementations. Queries may require significant modification to achieve the desired goal.
Warning: do not implement any code in a live environment unless it has been thoroughly tested within a testing environment.

196
CMS 8.0 Administrator Guide
196
11 Glossary of Terms
Action A specific step the system takes during a workflow transition (e.g., sending mail to specified users).
Ancestor A page existing on a level higher in the site tree than the selected page.
Ancestor Navigation A mechanism for pulling content from all nodes, depending upon the depth, above the current page in the site hierarchy.
Application Pool An area in system memory used by IIS to run one or more IIS applications.
Application Pool Account A Windows account assigned to an application whose credentials are used by IIS to access system resources.
Archive The store of CMS pages in a Microsoft SQL database.
ASP.NET MVC A Microsoft technology for developing dynamic websites. With ASP.NET MVC, you can combine various coding and scripting languages (C#, HTML, CSS, JavaScript, etc.) into a single web application. ASP.NET MVC is part of the .NET Framework. MVC stands for “model view controller,” a design pattern used in web development.
Assign To An administrative function that assigns the selected page to a user.
Assignment List A list of pages currently assigned to the logged-in user.
Attributes Additional data contained within element tags. Attributes describe an element.
Authentication The process by which a user’s credentials are confirmed, specifically that the user exists and that the user’s password is valid. In the CMS environment, this validation is provided by another application such as a Windows Domain Controller or an OpenLDAP server.
Authorization The process whereby the CMS determines what privileges a given authenticated user possesses.
Categorization An association between a taxonomical term and a particular node.
Check-in The process of submitting changes to the CMS, prior to publishing a page.
Check-out The process of requesting permission to make changes to a page.
Child A page existing one level below the current page in the site tree.
Child Navigation A mechanism for pulling content from nodes below the current page.
CMS Client A web-based user interface for building, managing, and publishing content. The CMS Client connects to the CMS.
CMS Site A website where content creators build, manage, and publish content. Multiple CMS sites can be hosted by a CMS installation.
Components Content designed to be used in multiple pages of the site. Content contained in a component cannot be transformed until the component is pulled into a page.
Content Management Server (CMS)
Server software for hosting a CMS site
Content Store XML pages that make up the site.
CSS (Cascading Style Sheets)
A simple style sheet language used to manage the presentation of content for a browser. This language is often used in conjunction with XSLT to render XML for a requesting browser.
DB Query A specific type of component or element used to pull data from an external database.
Dependencies The connections between pages.

197
CMS 8.0 Administrator Guide
197
Dependency graph A database specific to the publishing target that contains the list of dependencies for each page.
Dynamic Site Server (DSS) Server software for hosting a public-facing website published by the CMS. Built on the .NET Framework, the DSS replaces the classic XSLT run-time server.
Edit Pane Displays the selected page in the site tree and provides the interface for editing if the page is checked out and assigned to the user or the user has administrative rights to the page.
Elements The smallest logical divisions of an XML file, represented by tags (e.g., <TAG>).
Exports XML data beyond xID, URL, Schema, and Name, configured to be included within a navigation. Local exports apply to the specific element; global exports apply across all pages in the site.
Full Access Gives a specified group the ability to modify the node (and the nodes inheriting this permission).
Full Publish Publishes all checked-in pages marked for publish for a given publishing target; deletes the contents of the publishing target before publishing.
Groups Collections of users, to which permissions are assigned.
Incremental Publish Sends selected pages to the publishing target.
Index Catalog The file storing the content indexes used by the Index Service.
Index Service A Windows server utility providing indexing of the CMS site for search functionality.
Mark for Publish Designates a selected page for publish; pages marked this way are published on the next full publish.
Multi-Format Output Support for publishing files using file extensions other than .xml.
Navigation A mechanism for pulling in content from other nodes based on the site hierarchy.
Page Creation Rules Automate the creation of new pages and components as well specifying where within the site tree the new page or component is created. Page creation rules are used in conjunction with workflow to simplify the creation and management of content.
Page Types Page templates used to create a new page.
Pages XML files that contain site content or components; they are identified by a unique xID and are associated with a schema that determines how the page is to be rendered in the browser.
Parent A page existing one level above the current page in the site tree.
Permissions The functions a given user group is able to perform (e.g., see the site tree, delete pages, create pages, etc.).
Preview Applies the specified style sheet to the current page, providing a view of what the page will look like on the DSS.
Publish The processing of a page by the CMS, readying it for replication to the DSS.
Publishing Target A subdirectory of the [site]\xml\pub directory to which pages are published; specified during an incremental or full publish.
Read Only Access Allows a specified group the ability to view the node (and the nodes inheriting this permission).
Recursive An operation applied to the page and its descendants.

198
CMS 8.0 Administrator Guide
198
Recycle Bin Holds deleted pages. Pages can be restored if the recycle bin has not been emptied.
Replication The process of copying published pages from the CMS to the DSS.
Revert (to Prior Version) An action to restore a previous version of a page via the History tab and the Versioning function.
Rollback An action that returns a page to the currently checked in version, deleting any changes made since the last check in.
Rule ID The ID associated with a particular page creation rule.
Schema An XML template from which pages or components can be instantiated. A schema defines the elements and attributes of a given page or component.
Sibling A page existing on the same level of the site tree as the current page.
Sibling Navigation A mechanism for pulling content from nodes on the same level in the site hierarchy as the current page.
Site Map The logical tree structure (hierarchy) for the CMS site or site(s); maintained by the reference.xml file, which exists over the flat file structure in the \XML directory.
Site Tree A visual representation of pages organized using ancestors, siblings, and children.
Start Page An attribute of an ancestor navigation element which indicates the highest node of the tree; navigation stops one page below the page specified.
Static Directories Directories containing content that isn’t dynamically updated in the CMS. The five static directories are Documents, Images, Media, Stylesheets, and Prebuilt.
Structured URLs Friendly URLs mapped to xIDs. For example, http://www.ingeniux.com/Solutions/Higher_Education/Case_Studies.xml.
Style Sheet A file used to format an XML document for a classic run-time site.
Transition A workflow object that defines the movement of a page between two specific workstates and the actions that occur during the movement between workstates.
Taxonomy A hierarchical naming convention used to create navigation based on category/node associations.
Unmark for Publish Prevents a selected page from being published.
Upload A function that allows the user to put documents, images, media, and other binaries onto the CMS server.
User Agent Determines which style sheet renders content for a particular client. For example, if a mobile client requests a page, a mobile style sheet could be used to render the content.
Users/Groups Manager An interface to manage users and user groups on the site.
Users Accounts with access to the CMS system; a user must be a member of a user group to be able to perform any functions.
Versioning The storage of a predefined maximum of previously checked-in versions of a page.
View A template that converts XML content to HTML, so that the content can be consumed by a browser. Beginning with CMS 8.0, views replace XSLT style sheets as the technology for rendering XML pages for display.
Workflow An automated mechanism for moving content through the CMS system. A workflow process is defined by a sequence of work states that a page must move through as work is completed.
Workflow log The workflow data associated with the site. The log is stored as a database file (workflowlog.db) in the XML directory of the site.

199
CMS 8.0 Administrator Guide
199
Workflow Manager An interface used to perform administrative tasks related to workflows.
Workstate The location of a given page within a workflow.
XHTML Editor Provides an editing environment to format rich content within a CDATA block.
XML A mark-up language using tags to structure content. An XML document does not contain any formatting information.
XML Processor An application used to transform XML and style sheets into complete documents, usually to be consumed by an Internet browser.
XSLT A style sheet language used to format an XML document.