Embed Size (px)
Citation preview
Overview Guide
Contents:Installation…………………………...….. 1-2LED Indicators….……………….....…… 3-5Home Screens……..……….…..…….... 5-7Soft Keys……….……………..…..…….. 7-15Hot Keys…….……………..…….…….. 16-19Replay Function (OPTICS RE)………… 20Specifications……..……….…..………… 22
IMPORTANT Signal degradation can result if cable is run in conduit with AC wiring or in other electrically “noisy” environments; these can affect the maximum length the cable can run without incurring transmission errors.
CAUTION: EQUIPMENT DAMAGE The MATE3s is intended for indoor installations only.
NOTES The MATE3s voltage is less than 30 Vdc and is thus considered a “limited energy” circuit normally requiring no conduit. CAT5 cable is not as strong as house wiring and must be handled carefully. Avoid kinking the cable or tearing its outer sheathing. Use plastic standoff cable staples, J-hooks, or cable trays to support long runs of CAT5 cable. Do not splice cables.
IMPORTANT: Not intended for use with life support equipment.
7 1/8" (17.9 cm)
2 3/8" (6.0 cm)
7 ¼” (18.4 cm)6 5/8" (16.8 cm)5/16" (0.79 cm)
9/16" (1.4 cm)
1 5/8" (4.2 cm)
7 1/2” (19 cm)
!
F
F
E
F
A
B
C D
G
FF
FF
F
D
H
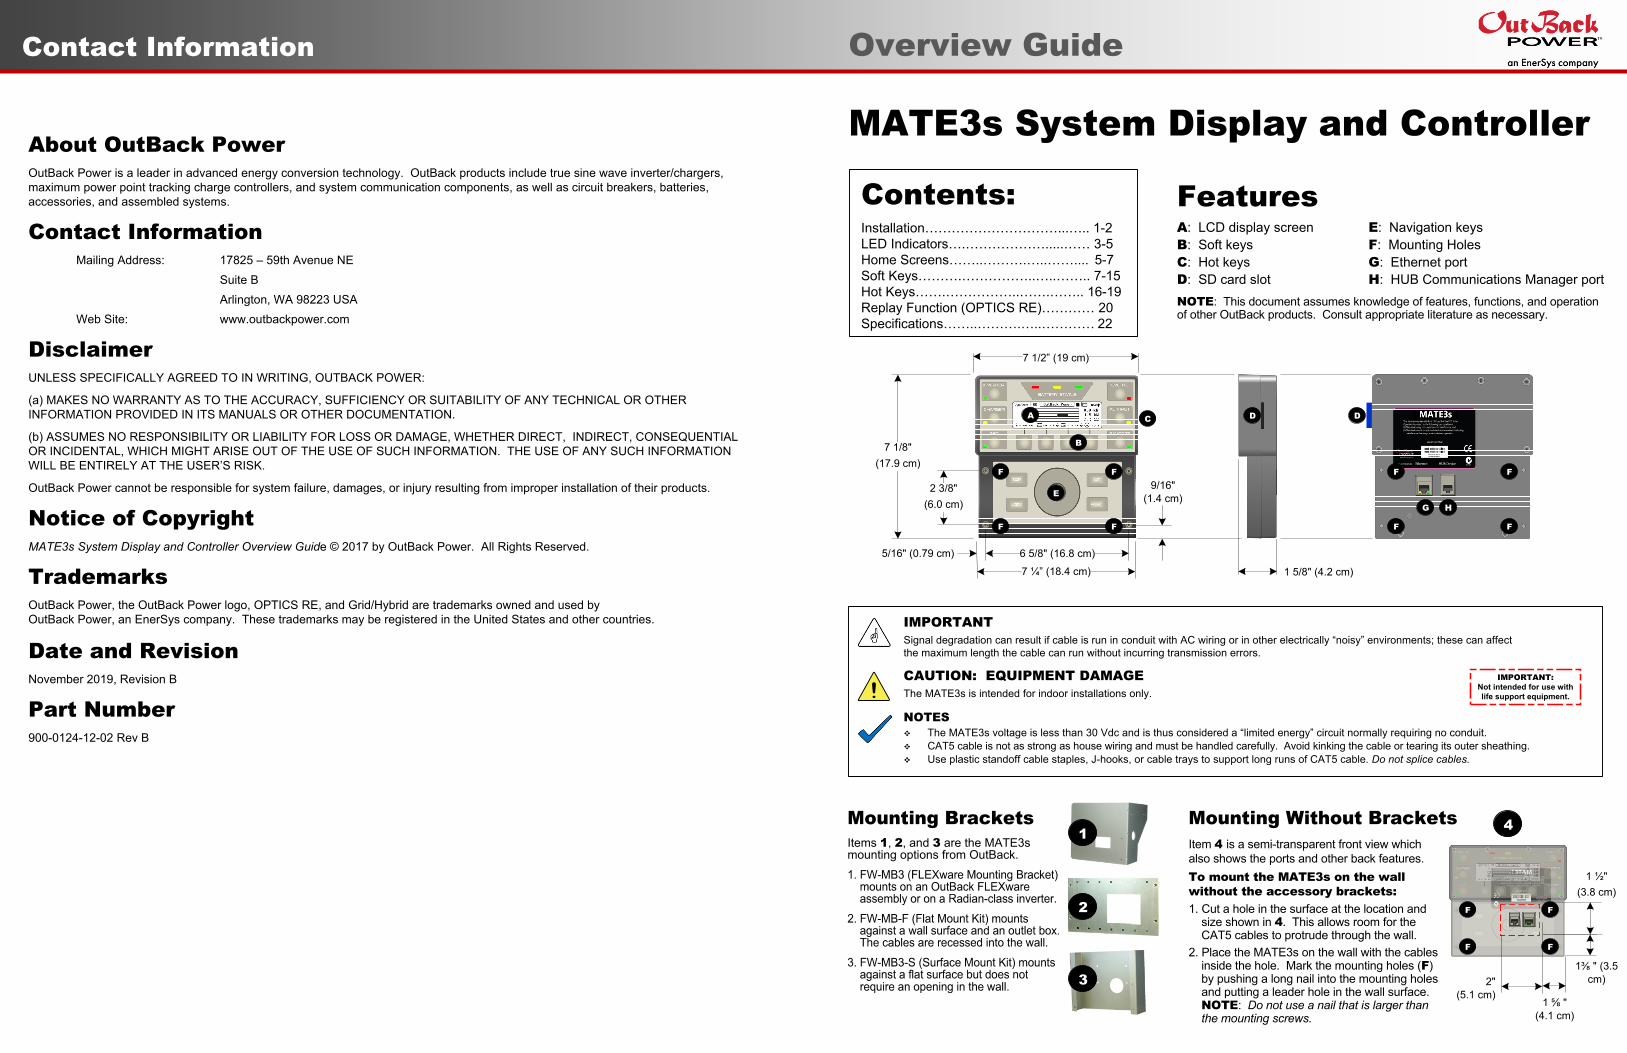
FeaturesA: LCD display screen E: Navigation keysB: Soft keys F: Mounting HolesC: Hot keys G: Ethernet portD: SD card slot H: HUB Communications Manager portNOTE: This document assumes knowledge of features, functions, and operation of other OutBack products. Consult appropriate literature as necessary.
Items 1, 2, and 3 are the MATE3s mounting options from OutBack.
Item 4 is a semi-transparent front view which also shows the ports and other back features.To mount the MATE3s on the wall without the accessory brackets:1. Cut a hole in the surface at the location and size shown in 4. This allows room for the CAT5 cables to protrude through the wall.2. Place the MATE3s on the wall with the cables inside the hole. Mark the mounting holes (F) by pushing a long nail into the mounting holes and putting a leader hole in the wall surface. NOTE: Do not use a nail that is larger than the mounting screws.
1 ⅝ " (4.1 cm)
2" (5.1 cm)
1 ½" (3.8 cm)
1⅜ " (3.5 cm)
F
F
F
F
1
2
3
4
Contact Information
About OutBack Power OutBack Power is a leader in advanced energy conversion technology. OutBack products include true sine wave inverter/chargers, maximum power point tracking charge controllers, and system communication components, as well as circuit breakers, batteries, accessories, and assembled systems.
Contact Information Mailing Address: 17825 – 59th Avenue NE
Suite BArlington, WA 98223 USA
Web Site: www.outbackpower.com
DisclaimerUNLESS SPECIFICALLY AGREED TO IN WRITING, OUTBACK POWER:
(a) MAKES NO WARRANTY AS TO THE ACCURACY, SUFFICIENCY OR SUITABILITY OF ANY TECHNICAL OR OTHERINFORMATION PROVIDED IN ITS MANUALS OR OTHER DOCUMENTATION.
(b) ASSUMES NO RESPONSIBILITY OR LIABILITY FOR LOSS OR DAMAGE, WHETHER DIRECT, INDIRECT, CONSEQUENTIALOR INCIDENTAL, WHICH MIGHT ARISE OUT OF THE USE OF SUCH INFORMATION. THE USE OF ANY SUCH INFORMATIONWILL BE ENTIRELY AT THE USER’S RISK.
OutBack Power cannot be responsible for system failure, damages, or injury resulting from improper installation of their products.
Notice of CopyrightMATE3s System Display and Controller Overview Guide © 2017 by OutBack Power. All Rights Reserved.
TrademarksOutBack Power, the OutBack Power logo, OPTICS RE, and Grid/Hybrid are trademarks owned and used by OutBack Power, an EnerSys company. These trademarks may be registered in the United States and other countries.
Date and RevisionNovember 2019, Revision B
Part Number900-0124-12-02 Rev B

MATE
RTS
PV +
PV –
BAT–
BAT +
MATE Port
(RJ45)
RTS Port
(RJ11)
In 23.2 V 0.0 AOut 27.6 V 0.0 A 0.000 kW 0.0 kWHAUX: OFF Sleeping
Ethernet Port
1st MATE12345678910
MATE3s
Inverter
Additional (Stacked) Inverters
HUB10.3 Communications Manager
The MATE3s connects to other OutBack products using the HUB port. To learn what configurations are available, see the appropriate manual. To make MATE3s settings for a configuration, see the MATE3s Programming Guide.
FLEXmax Charge
Controller (FM80)
MATE
RTS
MATE3s Inverter
PV +
PV –
BAT–
BAT +
MATE Port
(RJ45)
RTS Port
(RJ11)
MATE3s
FLEXmax Charge Controller
(FM80)Product Configurations (examples)
Communications Interfacing (examples)
Wireless Router Wireless Access Point
Wired
Cellular Modem
HUB Port
The MATE3s interfaces with other devices using a wired connection to the Ethernet port. The connections here are used for Internet access with the OPTICS RE interface. Other connections are possible. The MATE3s can connect using a network switch or a wireless network router.
NOTE: All communications use
CAT5 (non-crossover) cable.
Battery LED IndicatorsThree LED indicators indicate the condition of the battery bank.
GREEN means the batteries have an adequate charge at that time. It does not always mean they are full. If the FLEXnet DC battery monitor (FN-DC) is installed, this means the batteries are 80% State of Charge (SOC). YELLOW means the batteries are somewhat discharged. If the FN-DC is installed, this means the battery SOC is between 60% and 70%.RED means the batteries are greatly discharged and may require attention. If the FN-DC is installed, this means the battery SOC is less than 60%. This indicator may be accompanied by a Low Battery V error and the EVENTS indicator. (See page 5.)
BATTERY STATUS
INVERTER
GEN
CHARGER
EVENTS
FAVORITE
AC INPUT1.5 kW0.1 kW115
V1.5 kW
28.5 V
0.00 kW
0.0 kW
G
G
OutBack Power
1.5 kW1.5 kW
115 V1.5 kW
85%
28.5 V
System OK
0.00 kW
0.0 kW
G
G
Battery Status Indicators
NOTES: Gaps in the table (higher-voltage units) are due to the resolution of the inverter’s DC meter. These voltage settings are not the same as the inverter’s Low Battery Cut-Out voltage. The Battery LED settings cannot be changed. Voltages higher than shown in the GREEN row usually means that the batteries are charging.
Displays
Power Up Device Identification
Port Assignment
Home Screen
When the MATE3s is plugged into a powered OutBack product, it immediately powers up and cycles through the startup screens. It will proceed to locate and identify the attached components and the ports they occupy on the HUB. It will then stop on the “Home” screen.
RED 11.4 Vdc or lower 22.8 Vdc or lower 34.2 Vdc or lower 45.6 Vdc or higher Low
YELLOW 11.5 to 12.4 Vdc 23.0 to 24.8 Vdc 34.5 to 37.2 Vdc 46.0 to 49.6 Vdc Usable
GREEN 12.5 Vdc or higher 25.0 Vdc or higher 37.5 Vdc or higher 50.0 Vdc or higher Acceptable
24 Vdc Unit ± 0.2 VdcColor 12 Vdc Unit 36 Vdc Unit
± 0.3 Vdc48 Vdc Unit ± 0.4 Vdc
Battery Status
Page 2
Communications
900-0124-12-02 Rev B©2017 OutBack Power. All Rights Reserved. Page 3
LED Indicators
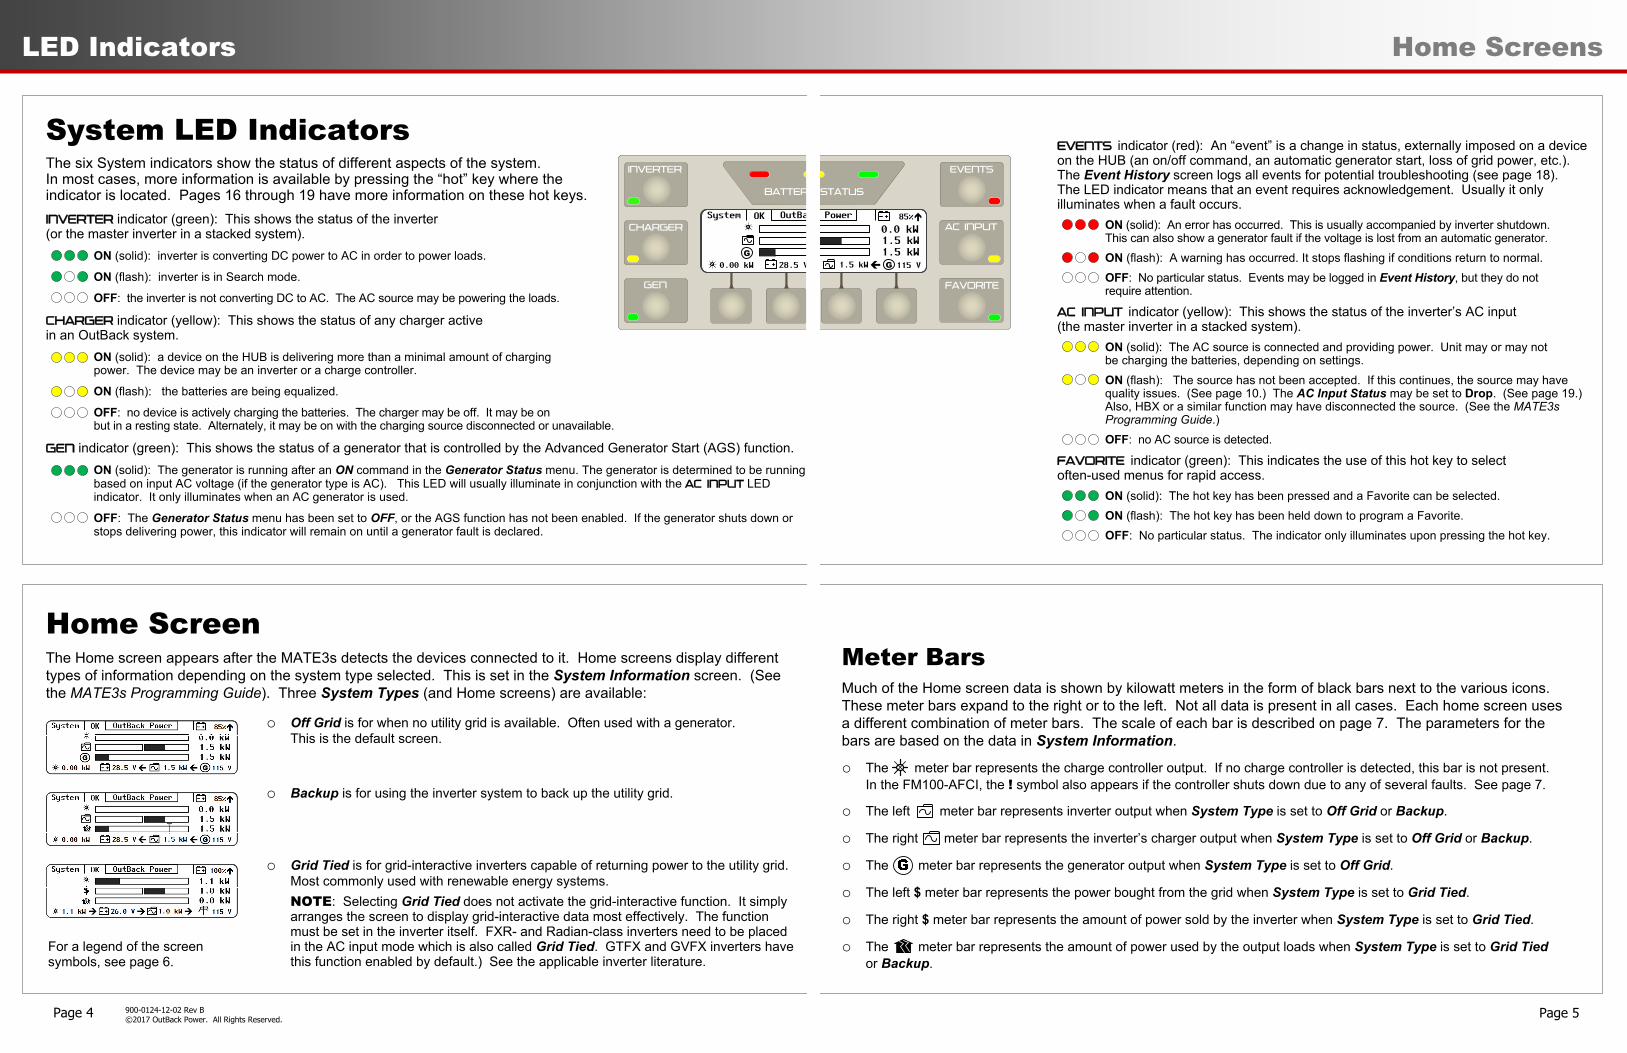
EVENTS indicator (red): An “event” is a change in status, externally imposed on a device on the HUB (an on/off command, an automatic generator start, loss of grid power, etc.). The Event History screen logs all events for potential troubleshooting (see page 18). The LED indicator means that an event requires acknowledgement. Usually it only illuminates when a fault occurs.
ON (solid): An error has occurred. This is usually accompanied by inverter shutdown. This can also show a generator fault if the voltage is lost from an automatic generator. ON (flash): A warning has occurred. It stops flashing if conditions return to normal.OFF: No particular status. Events may be logged in Event History, but they do not require attention.
AC INPUT indicator (yellow): This shows the status of the inverter’s AC input (the master inverter in a stacked system).
ON (solid): The AC source is connected and providing power. Unit may or may not be charging the batteries, depending on settings. ON (flash): The source has not been accepted. If this continues, the source may have quality issues. (See page 10.) The AC Input Status may be set to Drop. (See page 19.) Also, HBX or a similar function may have disconnected the source. (See the MATE3s Programming Guide.)OFF: no AC source is detected.
FAVORITE indicator (green): This indicates the use of this hot key to select often-used menus for rapid access.
ON (solid): The hot key has been pressed and a Favorite can be selected.ON (flash): The hot key has been held down to program a Favorite.OFF: No particular status. The indicator only illuminates upon pressing the hot key.
Meter Bars Much of the Home screen data is shown by kilowatt meters in the form of black bars next to the various icons. These meter bars expand to the right or to the left. Not all data is present in all cases. Each home screen uses a different combination of meter bars. The scale of each bar is described on page 7. The parameters for the bars are based on the data in System Information.
o The meter bar represents the charge controller output. If no charge controller is detected, this bar is not present.In the FM100-AFCI, the ! symbol also appears if the controller shuts down due to any of several faults. See page 7.
o The left meter bar represents inverter output when System Type is set to Off Grid or Backup.
o The right meter bar represents the inverter’s charger output when System Type is set to Off Grid or Backup.
o The meter bar represents the generator output when System Type is set to Off Grid.
o The left $ meter bar represents the power bought from the grid when System Type is set to Grid Tied.
o The right $ meter bar represents the amount of power sold by the inverter when System Type is set to Grid Tied.
o The meter bar represents the amount of power used by the output loads when System Type is set to Grid Tied or Backup.
BATTERY STATUS
INVERTER
GEN
CHARGER
EVENTS
FAVORITE
AC INPUTOutBack Power
1.5 kW0.1 kW
115 V1.5 kW
85%
28.5 V
System OK
0.00 kW
0.0 kW
G
G
OutBack Power
1.5 kW1.5 kW
115 V1.5 kW
85%
28.5 V
System OK
0.00 kW
0.0 kW
G
G
Page 4
LED Indicators
900-0124-12-02 Rev B©2017 OutBack Power. All Rights Reserved. Page 5
Home Screens
System LED IndicatorsThe six System indicators show the status of different aspects of the system. In most cases, more information is available by pressing the “hot” key where the indicator is located. Pages 16 through 19 have more information on these hot keys.INVERTER indicator (green): This shows the status of the inverter (or the master inverter in a stacked system).
ON (solid): inverter is converting DC power to AC in order to power loads.
ON (flash): inverter is in Search mode.
OFF: the inverter is not converting DC to AC. The AC source may be powering the loads.
CHARGER indicator (yellow): This shows the status of any charger active in an OutBack system.
ON (solid): a device on the HUB is delivering more than a minimal amount of charging power. The device may be an inverter or a charge controller.
ON (flash): the batteries are being equalized.
OFF: no device is actively charging the batteries. The charger may be off. It may be on but in a resting state. Alternately, it may be on with the charging source disconnected or unavailable.
GEN indicator (green): This shows the status of a generator that is controlled by the Advanced Generator Start (AGS) function.ON (solid): The generator is running after an ON command in the Generator Status menu. The generator is determined to be running based on input AC voltage (if the generator type is AC). This LED will usually illuminate in conjunction with the AC INPUT LED indicator. It only illuminates when an AC generator is used.
OFF: The Generator Status menu has been set to OFF, or the AGS function has not been enabled. If the generator shuts down or stops delivering power, this indicator will remain on until a generator fault is declared.
Home ScreenThe Home screen appears after the MATE3s detects the devices connected to it. Home screens display different types of information depending on the system type selected. This is set in the System Information screen. (See the MATE3s Programming Guide). Three System Types (and Home screens) are available:
o Off Grid is for when no utility grid is available. Often used with a generator.This is the default screen.
o Backup is for using the inverter system to back up the utility grid.
o Grid Tied is for grid-interactive inverters capable of returning power to the utility grid.Most commonly used with renewable energy systems.NOTE: Selecting Grid Tied does not activate the grid-interactive function. It simplyarranges the screen to display grid-interactive data most effectively. The functionmust be set in the inverter itself. FXR- and Radian-class inverters need to be placedin the AC input mode which is also called Grid Tied. GTFX and GVFX inverters havethis function enabled by default.) See the applicable inverter literature.
For a legend of the screen symbols, see page 6.

LEGEND
Icon(s) Description
G
G
B
A
C
D
E
G
H
F
J
I
K
L
M
N
Backup
D
N
D E G HF J
A B C
L
Grid Tied
D
I K
M
D E GF
A B C
N
A B C
D E G H
D
F J
L
J
Off GridBasic NavigationSoft KeysFour “soft” keys are located directly below the display. Soft key functions will vary depending on the location. These functions are identified by icons or text directly above the key. Occasionally not all four soft keys are used.
o In all cases where displayed, the <Back> soft key returns to the previous screen. The <Port> soft key cycles through each deviceconnected to the network. When a specific port is selected, the device on that port can be individually programmed with whateveroptions are available. (Programming is often global unless assigned to a particular port.) Other soft keys are described as appropriate.
Home Screen Soft KeysSee the following pages for displays and descriptions.
The <Charge Controller> soft key (O) displays information on all FLEXmax chargecontrollers. If no controllers are detected by the HUB Communications Manager, O isinoperative. (The symbol and meter bar are not present.) See page 14.
The <Battery> soft key (P) displays information on the battery bank. The informationavailable depends on whether the FLEXnet DC battery monitor is installed. See page 12.
The <Inverter> soft key (Q) displays information on any inverters present on the HUB.If no inverters are present, Q is inoperative. (The symbol is not present.) See page 8.
For FX-class inverters: In the Off Grid system type, R is <Input Select>. It may not havea symbol. The symbol only appears if a generator is running. (See J.) In Grid Tied, R is <Grid Status>. will appear. In Backup, R is inoperative. See page 8.
In the Off Grid system type: For FXR-class inverters, S is the <Input Select> soft key. For Radian-class inverters, S is the<Input Priority> soft key. It may not have a symbol. The symbol only appears if a generator is running. (See J.)For both FXR- and Radian-class: In Grid Tied or Off Grid, S is the <Grid Status> soft key. will appear. See page 8.
Meter Bar or Metering Notes In the Off Grid or Backup system types:“OK” is replaced with ! (with an eventmessage) during a generator fault.
In the Grid Tied system type: “OK” isreplaced with ! (with an event message) during a grid fault.
In any system type:
“OK” is replaced with ! or X (with an event message) if the FN-DC is present and registers a battery problem.
“OK” is replaced with ! (with an event message) during an inverter fault.
In the FM100-AFCI, if an AFCI, GFDI, rapid shutdown, or input fault occurs, the meter bar also displays !.
In the Backup system type, the System Information menu must have an AC generator selected. Otherwise this field is blank. (See the MATE3s Programming Guide.)
If Gen Type is set to DC, then the left meter bar is scaled according to the Max Inverter kW setting.
A
J
L
O P Q R
SO P QG
G
Page 6
Home Screen Legend
900-0124-12-02 Rev B©2017 OutBack Power. All Rights Reserved. Page 7
Soft Keys
D

o The Input Select screen (A1) allows two AC sources of different sizes whenswitched externally to a single input. (FX-class and FXR-class)
o The Input Priority screen (A2) selects which of two AC sources is accepted ifboth are active at the same time. It also shows the present source. (Radian-class)
Screen Items (A1 and A2): AC Input – Gen or Grid
Input Current Limit* – xx.x to xx.x Aac (varies with inverter model)
In screen A1, the <Input> soft key (D) selects between the utility grid ora generator. Each selection has a pre-set value for the Input Current Limit.
In screen A2, the <Input> soft key (E) chooses either the utility grid or the generator totake priority. Each selection has a pre-set value for the Input Current Limit.
The <Less> or <More> soft keys (B and C) can adjust these values in either screen.
A1
System Type: Off Grid Grid Tied BackupFX-class A1 A3 —FXR-class A1 A3 A3Radian-class A2 A3 A3
Input Select, Input Priority, and Grid Status Soft Keys
Inverter Soft Key
Screen Items (some items apply only to A or B as indicated):
The upper left corner of the screen shows the present mode of operation (Sell, Charging, or other modes). In RMS: the power factor and input current of the AC source. Invert (shown in A) or Charge (shown in B):
Invert displays the kilowatts and AC current produced for loads, offsetting, or (when grid-interactive) sold back to the utility grid. Charge displays the kilowatts and AC current used to charge the battery bank. This line also shows the charge mode.
Load: the kilowatts and AC current used by devices on the inverter’s output. This may or may not be the same as Invert. Sell (A) or Buy: the kilowatts and AC current either exported or brought into the inverter for both charging and loads.
Buy is usually a total of the Charge and Load items and may equal In RMS. Gen (B): replaces Buy if the AC mode is Generator or Support. The readings are the same. (FXR-and Radian-class only) Battery: the battery voltage. This reading is not compensated for temperature. AC Out and AC In: the AC voltage measured at the inverter’s output and input. If an AC source is present, these
readings are generally the same. However, they may not be identical due to meter tolerances. (In Radian-classinverters, each item is the sum of the L1 and L2 readings.)
AUX: the status of the inverter’s Auxiliary 12-volt output. Relay (B): the status of the inverter’s Auxiliary relay contacts. (Radian-class only)
Soft key screens by inverter class and system type
A and B are two different variations of the same screen showing different screen elements. Many other variations are possible. All screen elements are summarized below.
A
B C D
E
F
B C
A B
A B C D C D
Ao The <Grid Status> soft key (A3) brings up AC input data. If the inverter is not in the
Grid Tied AC input mode or connected to the utility grid, not all items will function.Screen Items (A3): Grid: the present AC voltage from the source (the utility grid). Min and Max: the lowest and highest daily AC voltage and the time each was recorded. Mode: the inverter’s present operating status (either buying or selling) and the number of
kilowatts begin bought or sold. This is blank if an AC source is not present. The <Sell Status> soft key (F) brings up possible reasons for not selling to the utility grid. The <Input Select> soft key (G) returns to screens A1 (FXR-class) or A2 (Radian-class).
It is not present in FX-class inverters.Screen Items (F): Selling Disabled: the Offset Enable (or Grid-Tie Enable) command is
set to N (no). (See the MATE3s Programming Guide.) Frequency or Voltage Too Low or Too High: the AC voltage or
frequency are outside the acceptable limits for selling. Qualifying Grid: the time to reconnection once all limits are met. (If the
inverter is not a grid-interactive model, a random number may appear.) Battery < Target: the battery voltage is below the target for that stage
(Float, Offset, etc). No excess energy is available to sell. AC2 (gen) Selected: The Input Type has been set to Gen.
The inverter will not sell to a source that it identifies as a generator.(FX-class and FXR-class inverters only.)
o The <Next> soft key (C) displays aseries of screens with information on theinverter’s charger and other battery-relatedfunctions, and on any inverter warnings orerrors present. (See the next page.)
o The <Graph> soft key (D) displays a series of screens that plot various data overtime. The graphs include inverter and charger wattage, power imported from anAC source, battery voltage, and others. The inverter wattage screen is shown here.
o The <Next> soft key (E) brings upa Graph screen with changes incharger wattage over time.
o Continuing to press <Next> bringsup Graph screens for AC source(Buy) wattage, grid-interactive (Sell)wattage, and battery voltage.
o The battery voltage graph may alsobe used by other soft keys.
F G
D
E
Page 8
Soft Keys: Input
900-0124-12-02 Rev B©2017 OutBack Power. All Rights Reserved. Page 9
Soft Keys: Inverter
Support Sell (A)
INVERTER MODES:This section shows all possible modes. Some may not be available with all OutBack inverters. Incompatible or unavailable modes will not be displayed. See the inverter literature to determine which functions are available and their definitions.
Inverting Searching
NOTES:Charger Off and Silent are not used in FXR models. If the inverter is a master or subphase master in Silent mode with AC input, the mode is PassThru. If an FXR inverter is used as a stacked slave, its only modes are Slave On, Slave Off, Error, Inverting, and Off.
Slave On: The slave inverter is assisting the master’s activity (Sell, Charging, etc.).
Slave Off: The slave inverter is not assisting or performing any active function. Slave Off is also used if the master status isPassThru. Master and slave inverters may both be transferring (passing power through).
Slave On and Slave Off only appear when the AC input is in use. When no AC input is in use: If the master is Inverting, the slave also displays Inverting while assisting with the inverting function. If the slave is not actively assisting, it will display Off (not Slave Off).
Charging (B) Charger Off
Offsetting Silent
PassThru Error
Off
NOTE:When A1 or A2 are set to Grid and the inverter is in the Grid Tied AC input mode, the <Inverter> soft key (see below) will also display a GT number, often 74. This number is used to control the energy harvest of a charge controller in GT mode. See the applications note titled FM Series GT Mode at www.outbackpower.com

NOTES: There are several other variations on C, the <Inverter> soft key screen.A diode symbol may be present to show “diode charging”, a low-power mode that allows fine control of charging, selling, and load support.
o In North American Radian-class inverters, Inverter is split into L1 Phase and L2Phase screens (reached using the <Next> soft key F). The screens are almostidentical, but the AC voltage readings are the individual L1 and L2 phases.
o From these screens, the <Next> soft key (F) brings up the Inverter Battery screen.
Screen Items (F):
Actual: The battery voltage. This item is not compensated for temperature. See below.
Absorb and Float: The inverter’s primary charger settings for the three main batterycharging stages.
Equalize: The inverter’s Equalization voltage setting. It is used during the batteryequalization cycle.
Temp Comp: The battery voltage after compensation from the Remote TemperatureSensor (RTS). If no RTS is present, Temp Comp and Actual will read the same.
Batt Temp: The battery temperature in degrees Celsius as measured by the RTS.If the RTS is measuring on an incorrect port, ### will be displayed. See the literaturefor the inverter, charge controller, or other product to determine the correct port.
Re-Float: The inverter’s Re-Float setting. It is used to return the charger from Silentmode to the float stage.
Offset (I): The inverter’s voltage used during Offset activities, including selling.This item is labeled Sell RE in older systems.
NOTE: If an arrow (J) appears next to Absorb, Float, or Equalize, it indicates the charger is in that stage. The arrow will not appear if the charger is in the bulk stage or Silent mode.
Screen Items (G) which may appear: AC Freq Too High or Too Low: The AC source is above or below the acceptable frequency limit.
Voltage Too High or Too Low: The AC source is above or below the upper acceptable voltage limit.
Input Amps > Max: AC loads are drawing more current from the AC source than allowed by the input setting.
Temp Sensor Bad: An internal inverter temperature sensor may be malfunctioning. This is also indicated by an unusualreading on the Inverter Temps screen (K). It may be called Temperature Sensor Fault.
Comm Fault: See the entry under Errors. It only appears on this screen in older models. It may be called Comm Error.
Phase Loss: A stacked inverter was ordered to transfer to an AC input source, but the source is the wrong phase or does notappear on the input.
Fan Failure: The internal cooling fan is not operating properly. Lack of cooling may derate the inverter’s output wattage.
o The <Warn> soft key (G) displays a series of screens with a list of non-criticalfaults and other information. When an inverter suffers a warning, one or moreitems in G will change from N to Y.A warning is also accompanied by an event message and the red EVENTSindicator (see pages 5 and 18). Some warnings can become errors if leftunattended. Frequency and voltage warnings are meant to warn of aproblematic AC source. See the inverter Operator’s Manual for moreinformation on troubleshooting a specific warning.
Inverter Soft Key (continued)
Warnings
C
F
G
H
F
G H
J
I
LK
M
M
Bullet styles (from PRG):o Main headings
Page 10
Soft Keys: Inverter
900-0124-12-02 Rev B©2017 OutBack Power. All Rights Reserved. Page 11
Soft Keys: Inverter
o The <Error> soft key (H) displays a screen with a list of critical faults.When an error occurs, the inverter will usually shut down. One or morescreen items will change from N to Y. An error is also accompanied byan event message and the red EVENTS indicator (see pages 5 and 18).See the inverter Operator’s Manual to troubleshoot a specific error.
Screen Items (H) which may appear: Low Output Voltage: Inverter AC regulation is decreasing due to high load. AC Output Shorted: Inverter maximum surge current exceeded due to severe overload. AC Output Backfeed: Another AC power source (out of phase with the inverter) was
connected to the AC output. Stacking Error: A programming problem among stacked units. (This often occurs if no master was assigned.) Low Battery V: DC voltage is below the Low Battery Cut-Out (LBCO) point. (See the MATE3s Programming Guide.) High Battery V: DC voltage is above the inverter’s maximum allowed level. Over Temperature: Maximum operating temperature was exceeded. Comm Fault: Inverter suffered an internal communication failure and may need service. Phase Loss: See the entry under Warnings. It only appears on this screen in older models.
NOTE: The <Next> soft key (M) appears in FXR and Radian (A and E model) inverters with additional items.Screen Items (M) which may appear: Loose DC Neg Terminals: Loose DC connection on internal power module. May read Loose DC Neg Terminals (L) or (R). Battery Voltage Sense: Internal sensing has detected voltages that are grossly outside the normal range. AC Relay Fault: AC transfer relay damaged.
Errors
o The <Temps> soft key (K) displays the Inverter Temps screen.The internal temperature sensor readings are shown in degrees Celsius.The sensors are located on the main transformer, the heat sink for theField Effect Transistors (FETs), and the filter capacitors. Normally allthree read approximately the same. An unusual reading can indicate adefective sensor.
o K1 shows these three readings for FX-class and FXR-class inverters.K2 shows a total of six readings for Radian-class inverters. Radianinverters have twin (right and left) power modules. Each module hasindependent sensors and three separate readings.
o The <GT> soft key (L) displays the GT Warnings screen. It showsreasons why the inverter might stop selling power. If any reasons arevalid, one or more items will change from N to Y. It is only available inRadian-class and FXR-class inverters in Grid Tied input mode. It is notvisible in FX-class inverters. The screen may be called IEEE Warnings.
Temperatures
L
NOTE: The GT Warnings have the same names as the Disconnect messages shown on page 19, but they are not the same. GT Warnings have to do specifically with selling (or not selling) power, while the Disconnect messages are general reasons for disconnecting from any source.

Battery Soft Key
o The <Next> soft key (B) brings up a series of screens that showmore detailed information on the battery. These screens also showdata from individual shunts used with the FN-DC battery monitor.
Screen Items (B): Bat: The battery voltage, net current flow (positive or negative), battery
temperature, and daily net amp-hour accumulation .
Min and Max: The lowest and highest recorded battery voltage and SOCfor that day and the time each was recorded.
Days Since Parms Met: The elapsed time since the “fully charged” parameters were met.
Screen Items (J): Returned to Battery and Removed from Battery: These show the accumulated
total amp-hours that have been delivered to the battery bank (charging) or removedfrom the battery bank (loads). Similarly, Max Charge Rate and Max DischargeRate show the highest current entering or leaving the batteries.
The <Reset Max> soft key (N) resets both current readings at the same time.
The <Next> soft key (M) opens the Historical Data screen for the next shunt inalphabetical order (not shown).
Screen Items (A1): The upper left corner of the screen shows the measured battery
voltage. This reading is not compensated for temperature. Theupper right corner shows the measured State of Charge (SOC).
In: The total current and kilowatts from all DC sources. It alsoshows the total amp-hours and kilowatt-hours delivered that day.
Out: The total current and kilowatts removed from the batteriesfor inverting, DC loads, or other uses. It also shows the totalamp-hours and kilowatt-hours removed that day.
Screen Items (F):
A, B, and C: These display individual readings from up to three shunts(shunts A, B, and C). Each line shows the current and kilowatts measured at thattime. It also shows the amp-hours and kilowatt-hours accumulated that day.
The <Shunt A> soft key (J) opens the Shunt A Historical Data screen to displaylong-term statistics. Soft keys for <Shunt B> and <Shunt C> are also present.If a shunt is not enabled, its statistics will read 0.
A
H
E
B
GF
CB
M N
F
J
Bat: The net total current and kilowatts sent to ortaken from the batteries. It also shows the net totalamp-hours and kilowatt-hours collected or takenfrom the batteries that day.
The last line shows both the highest and lowestrecorded battery SOC for that day, and the timeeach was recorded.
AUX: The current status of the battery monitor’sAuxiliary relay (also known as AUX mode or Relaymode). See the MATE3s Programming Guide andthe FLEXnet DC manual.
o If the FLEXnet DC (FN-DC)battery monitor is installed, the<Battery> soft key (A)opens screen A1.
o If the FLEXnet DC (FN-DC) battery monitor is not present, the <Battery>soft key (A) opens screen A2.Screen Items (A2): Bat: The measured battery voltage. This reading is not compensated for
temperature. Min and Max: The lowest and highest recorded voltages that day. These lines
also show the time the voltages were recorded.
o From the Battery Status screen, the <Stats> soft key (E) opens the BatteryStats screen. This shows long-term battery statistics.
Screen Items (E):
Cycle Charge Factor: A percentage comparison of amp-hours removed andthose added by charging. It shows charging efficiency if compared to theprogrammed charge factor. Similarly, Cycle kWH Charge Efficiency comparesremoved kilowatt-hours to those returned to the battery from any activity (floatcharging etc.). It can be used to judge overall battery efficiency.
Total Days at 100%: The time since the batteries reached 100% SOC(according to the FLEXnet DC). If the batteries have not reached 100%, thiswill read 0. The time at 100% SOC is a running total which continues toaccumulates until reset by the user. The <Reset Days> soft key (H) resets this total.
Lifetime kAH Removed shows an accumulation of the total amp-hours thathave ever been drained from the batteries.
The <Reset kAH> soft key (I) resets this total.
o From the Battery Status screen, the <DataLog> soft key (G) opens the FLEXnet DC DataLog screen. It maintains acontinuous daily log (up to 400 days) of amp-hour, watt-hour, and SOC statistics. One day can be displayed at a time.Screen Items (G): Minimum SOC: The lowest SOC for that day.
Input and Output: The number of amp-hours and kilowatt-hours brought into or removed from the batteries that day.
Net: The net gain or loss in amp-hours or kilowatt-hours that day. This is the difference between the Input and Output fields.
The upper left corner shows the date of the selected DataLog screen. (The current DataLog screen reads Today.)
The <-Day> soft key (L) brings up the previous day’s log. Instead of Today, a date is shown. Similarly, the <+Day> soft key(K) advances the log by one day. If Today is displayed, it does nothing.
o The <Graph> soft key (C) brings up a single graph showing changes inbattery voltage over time. This graph may be used by other soft keys.
o The <Next> soft key (D) brings up a Graph screen with changes in batterySOC over time (not shown). D and the following screens are only accessible fromscreen A1 (if the FN-DC is installed).
o Continuing to press <Next> brings up Graph screens for shunts A, B, and C (if present).
C
E
G
H I
K L
C
D
Page 12
Soft Keys: Battery
900-0124-12-02 Rev B©2017 OutBack Power. All Rights Reserved. Page 13
Soft Keys: Battery

E
o The <Charge Controller> soft key(A) brings up status data. If nocontroller is present, the PV icon isblank and this soft key is inoperative.The reading above this key shows thePV kilowatts used to charge the battery.
Screen Items (A): The upper left corner of the screen shows the present mode of
operation (Bulk, Absorb, Float, EQ, or Silent).
In: The present PV array operating voltage and the currentharvested from the array.
VOC: The available PV open-circuit voltage (Voc).
Out: The present battery voltage and the battery charging currentfrom the charge controller(s). This line also displays the dailyaccumulated kilowatt-hours and amp-hours.
Charge Controller Soft Key
A CB
A
Page 14
Soft Keys: Charge Controller
900-0124-12-02 Rev B©2017 OutBack Power. All Rights Reserved. Page 15
o The <Reset> soft key (F) brings up a series of screens (not shown) that can reset Charge Controller Stats.Two soft keys are available, Maximums and Totals. Each key brings up a separate screen with Yes and Nocommands. If Yes is pressed, the appropriate statistics in B will be reset to zero.
o The <DataLog> soft key (G) brings up the Charge Controller Datalog screen. It maintains a continuous daily log(up to 128 days) of amp-hour and watt-hour statistics, as well as maximum current, wattage, and maximum and minimum voltage figures. One day can be displayed at a time.Screen Items (G):
Max Output: The maximum daily current and wattage.
Absorb and Float: The amount either of these timers ran that day.
High VOC: The highest daily open-circuit voltage (VOC).
Min Batt and Max Batt: The lowest and highest daily battery voltage.
The upper left corner shows the date of the selected DataLog.(The present DataLog screen reads Today.) This line also displays thedaily accumulated kilowatt-hours and amp-hours.
The <–Day> soft key (J) brings up the previous day’s datalog display.Instead of Today, a date is shown.
Similarly, the <+Day> soft key (I) advances the datalog by one day.(If Today is displayed, it does nothing.)
o The <Temps> soft key (H) brings up the Charge Controller Tempsscreen. This screen shows the controller’s internal temperature.The measurement is used for fan control, temperature derating,or to trigger a shutdown in extremely hot temperatures.Screen Items (H):
Output FETs: The internal temperature as measured on the controller’sField Effect Transistor (FET) heatsink.
H
C
o The <Next> soft key (B) brings up the Charge Controller Stats screen. This screen shows data accumulated since thesystem went online or since the last reset. Note that the Maximum statistics are not incremental. They are updated onlyif a higher value is measured. The Total statistics are incremental. These items are updated daily with higher totals.Screen Items (B): [Maximum] VOC: The highest measured Voc.
[Maximum] Battery: The highest measured battery voltage.
[Maximum] Wattage: The highest measured power harvested from the PV.
[Total] kWh: A historical accumulation of the kilowatt-hours harvested by the controller.
[Total] kAh: A historical accumulation of the kiloamp-hours used to charge the batteries.
o The <Next> soft key (D) brings up the Charge Controller Error screen with a list of critical faults. When an erroroccurs, one or more items will change from N to Y. Some errors accompany a shutdown; others simply report status.Not all errors are present in all models. See the charge controller manual for more information.Screen Items (D): VOC Too High: The controller has shut down because the array Voc
exceeded its upper limit. This error can clear automatically.
Over Temperature: The FLEXmax 100 is too hot to operate and hasshut down. This error can clear automatically. See Charge Controller Temps.
Shorted RTS: The Remote Temperature Sensor (RTS) has malfunctioned.The controller will not shut down, but it cannot compensate for temperature.
GFDI Fault: The GFDI (Ground Fault Detector-Interrupter) function has shut down the charge controller.
Fault Input Active: The Rapid Shutdown terminals have detected an open circuit and shut down the chargecontroller. This is not a charge controller error but a deliberate action. It requires a reset of the rapid shutdown device.
Reduced Performance: The internal temperature sensor has failed. See Charge Controller Temps.
Over Current Fault: The controller has shut down because more than 120 Adc was sensed flowing to the batteries(or more than 80 Adc from the array). This requires a manual reset.
ARC Fault: The AFCI (Arc Fault Circuit Interrupter) function has shut down the charge controller.
D
H
D
o The <Graph> soft key (C) brings up screens that plot different kinds ofcharge controller information. Shown here is the first Graph screen.This screen shows changes in PV wattage over time. The <Next> soft key (D) brings up a Graph screen with changes in
battery voltage over time. This graph may be used by other soft keysas well.
Continuing to press the <Next> soft key brings up a Graph screen withchanges in PV voltage over time (not shown).
Operating: The total hours the charger has operatedthat day in any stage.
Float and Absorb: The timer count in either stage.
Maximum: The maximum daily PV current and wattageand the recorded times.
The lower right corner shows the current status of thecontroller’s Auxiliary (AUX) output. (See the MATE3sProgramming Guide and the charge controller manual.)
G
E
B
F G
JI
H
K
G
FB
Page 16
Hot Keys: INVERTER
900-0124-12-02 Rev B©2017 OutBack Power. All Rights Reserved. Page 17
Hot Keys: CHARGER
C D
Hot Keys
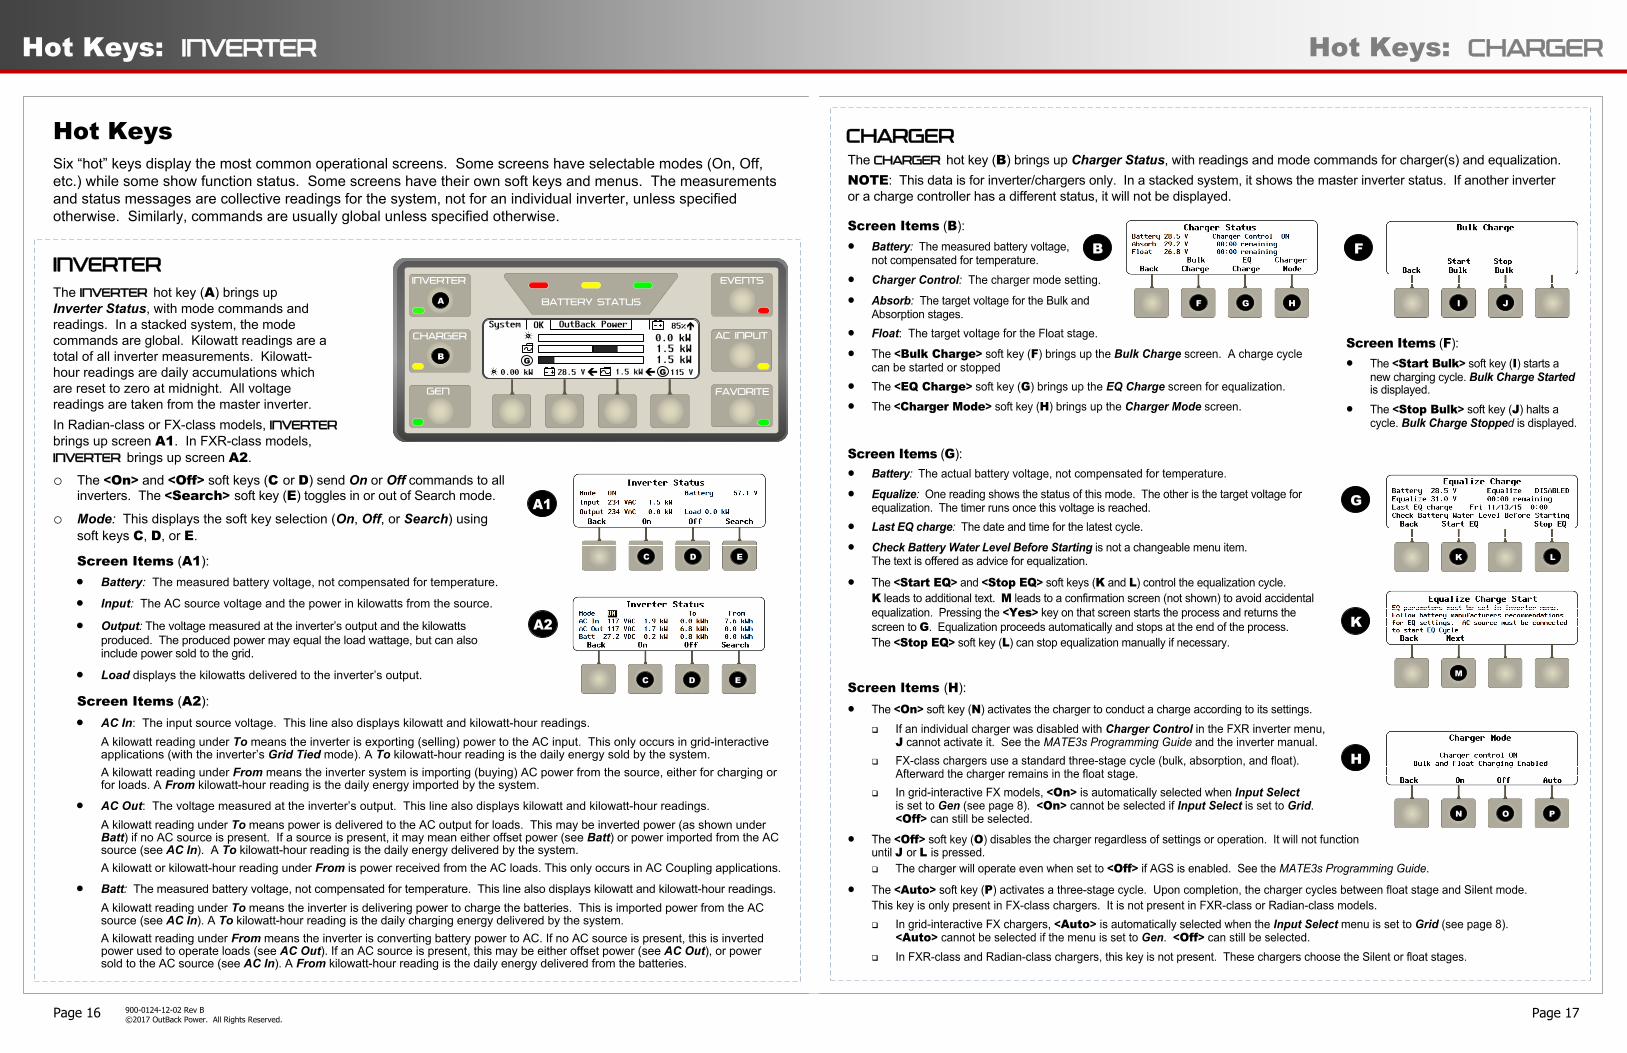
INVERTERThe INVERTER hot key (A) brings up Inverter Status, with mode commands and readings. In a stacked system, the mode commands are global. Kilowatt readings are a total of all inverter measurements. Kilowatt-hour readings are daily accumulations which are reset to zero at midnight. All voltage readings are taken from the master inverter.
Six “hot” keys display the most common operational screens. Some screens have selectable modes (On, Off, etc.) while some show function status. Some screens have their own soft keys and menus. The measurements and status messages are collective readings for the system, not for an individual inverter, unless specified otherwise. Similarly, commands are usually global unless specified otherwise.
BATTERY STATUS
INVERTER
GEN
CHARGER
EVENTS
FAVORITE
AC INPUT1.5 kW0.1 kW
115 V1.5 kW
85%
28.5 V
System OK
0.00 kW
0.0 kW
G
G
85%
G
G
Screen Items (A2): AC In: The input source voltage. This line also displays kilowatt and kilowatt-hour readings.
A kilowatt reading under To means the inverter is exporting (selling) power to the AC input. This only occurs in grid-interactiveapplications (with the inverter’s Grid Tied mode). A To kilowatt-hour reading is the daily energy sold by the system.A kilowatt reading under From means the inverter system is importing (buying) AC power from the source, either for charging orfor loads. A From kilowatt-hour reading is the daily energy imported by the system.
AC Out: The voltage measured at the inverter’s output. This line also displays kilowatt and kilowatt-hour readings.A kilowatt reading under To means power is delivered to the AC output for loads. This may be inverted power (as shown underBatt) if no AC source is present. If a source is present, it may mean either offset power (see Batt) or power imported from the ACsource (see AC In). A To kilowatt-hour reading is the daily energy delivered by the system.A kilowatt or kilowatt-hour reading under From is power received from the AC loads. This only occurs in AC Coupling applications.
Batt: The measured battery voltage, not compensated for temperature. This line also displays kilowatt and kilowatt-hour readings.A kilowatt reading under To means the inverter is delivering power to charge the batteries. This is imported power from the ACsource (see AC In). A To kilowatt-hour reading is the daily charging energy delivered by the system.A kilowatt reading under From means the inverter is converting battery power to AC. If no AC source is present, this is invertedpower used to operate loads (see AC Out). If an AC source is present, this may be either offset power (see AC Out), or powersold to the AC source (see AC In). A From kilowatt-hour reading is the daily energy delivered from the batteries.
Screen Items (A1): Battery: The measured battery voltage, not compensated for temperature.
Input: The AC source voltage and the power in kilowatts from the source.
Output: The voltage measured at the inverter’s output and the kilowattsproduced. The produced power may equal the load wattage, but can alsoinclude power sold to the grid.
Load displays the kilowatts delivered to the inverter’s output.
C D
B
In Radian-class or FX-class models, INVERTER brings up screen A1. In FXR-class models, INVERTER brings up screen A2. o The <On> and <Off> soft keys (C or D) send On or Off commands to all
inverters. The <Search> soft key (E) toggles in or out of Search mode.
o Mode: This displays the soft key selection (On, Off, or Search) usingsoft keys C, D, or E.
A
CHARGERThe CHARGER hot key (B) brings up Charger Status, with readings and mode commands for charger(s) and equalization.NOTE: This data is for inverter/chargers only. In a stacked system, it shows the master inverter status. If another inverter or a charge controller has a different status, it will not be displayed.
G HF I J
N O P
E
M
K L
E

B
J
O
C
The AC INPUT hot key (C) brings up AC Input Status, with information on the AC source. It also has commands that can connect or disconnect from the source.
AC INPUT
Screen Items (C):
AC Input Select (Radian-class only): This displays which of two inputs was set as firstpriority for the inverter. (See the MATE3s Programming Guide to make this selection.)This item is not present in FX-class or FXR-class inverters.
The top line also displays the present AC voltage and frequency from the input source.
Input Mode: Allows soft key options to change the mode. This may be overridden by other commands. For example, a system setto Drop will automatically switch to Use if AGS starts the generator.
Next to AC Input Select is the last reason the status was changed. In C, the change is due to an HBX-SOC event. Other possiblereasons are Manual, AGS, Grid-Time, Load Grid, or HBX-Voltage. See the MATE3s Programming Guide for more information.
AC Input Status: This displays the current interaction with the AC input. This screen will usually change to match AC Input Modeonce a soft key command is given. In Radian-class inverters, the displayed AC voltage is the sum of the L1 and L2 phases.
The <Drop> and <Use> soft keys (M and N) manually disconnect or connect to the AC source.
The <Discon> soft key (O) displays a screen with the reason for the last AC disconnect.
Screen Items (O):This screen shows the reason for the inverter’s last automatic disconnection from the AC source. The possible reasons include Input Frequency Too High, Input Frequency Too Low, Input Voltage > Maximum, or Input Voltage < Minimum. Radian-class and FXR-class inverters have Backfeed, Phase Lock, or Island Detect. Most items show N (no). If an item shows Y (yes), the inverter disconnected for that reason.
FAVORITEThe FAVORITE hot key (D) allows the user to program and select up to four frequently used (or “favorite”) screens for rapid access. It includes a green LED indicator.To program the FAVORITE hot key:1. Navigate to the desired screen.2. Press and hold the FAVORITE hot key until thegreen indicator flashes.3. Press one of the four programmable soft keys toselect it for recalling that particular screen. Thegreen FAVORITE LED indicator will stop flashing.4. Repeat Steps 1-3 to program three more favoritescreens (if desired).
To use the FAVORITE hot key to recall the desired screen(s):1. Press and release the FAVORITE hot key. The green FAVORITE indicator willilluminate and stay on.2. Press the soft key for the desired screen to be recalled.If no selection is made after pressing the FAVORITE hot key, the function will deactivate and the green indicator will turn off.
NM O
Page 18
Hot Keys: GEN & EVENTS
900-0124-12-02 Rev B©2017 OutBack Power. All Rights Reserved. Page 19
Hot Keys: AC INPUT & FAVORITE
The GEN(erator) hot key (A) brings up Generator Status, with readings and start/stop commands for the Advanced Generator Start (AGS) mode.
GEN
EVENTS
BATTERY STATUS
INVERTER
GEN
CHARGER
EVENTS
FAVORITE
AC INPUTOutBack Power
1.5 kW0.1 kW
115 V1.5 kW
85%
28.5 V
System OK
0.00 kW
0.0 kW
G
G
OutBack Power
1.5 kW1.5 kW
115 V1.5 kW
85%
28.5 V
System OK
0.00 kW
0.0 kW
G
G
A
A1 is the screen as it appears with no generator activity.
E F
D
G
M2 is the screen as it appears with generator activity.
H
K
I
L
J
11/13/15
IMPORTANT Only one favorite screen can be programmed per soft key. Attempting to program more than one screen to the same soft key will overwrite the first screen.Password-protected screens cannot be saved as favorites. This means that the screens described in the MATE3s Programming Guide cannot be saved this way. (These include any screens accessed with the LOCK key.)
C
B

Page 20
Replay Function
900-0124-12-02 Rev B©2017 OutBack Power. All Rights Reserved. Page 21
Notes
OPTICS RE (OutBack Power Technologies Intuitive Communication System) is an application allowing control and monitoring of an OutBack system using an Internet-enabled computer, tablet, or phone. OPTICS RE communicates with the MATE3s System Display and Controller or the AXS Port SunSpec Modbus Interface, and the rest of the system, using Ethernet. See Communications Interfacing on page 2.
The Replay function allows the MATE3s to act as a data backup in case connectivity with OPTICS RE is lost. The MATE3s can store up to seven days of data on an SD card. Upon re-establishing a connection with theOPTICS RE application, the MATE3s will upload all saved data to OPTICS RE. All graphs and event history will be re-populated.
Replay
IMPORTANT: The SD card must be inserted in the MATE3s prior to losing connectivity or all data will be lost. See below.
8

Page 22
Specifications
900-0124-12-02 Rev B©2017 OutBack Power. All Rights Reserved.
MATE3sMechanical Specifications
Dimensions (H × W × L) 7½ × 7 1/16 × 1⅝" (19 × 17.9 × 4.2 cm)
Shipping Dimensions (H × W × D) 3¼ × 9 × 13½” (33.7 × 22.9 × 34.3 cm)
Weight 1.4 lb (0.64 kg)
Shipping Weight 3.0 lb (1.36 kg)
Ports RJ45 for proprietary OutBack HUB communication (×1) RJ45 Ethernet port (×1)
Nonvolatile Memory 64 Mb (for internal data logs and MATE3s configuration settings)
Interface Display Liquid Crystal Display (LCD)
Control Keypad 4 soft keys, 6 hot keys 4 navigation keys, 1 control wheel with Enter button
Status Indicators 9 LED indicators
Battery (for real-time clock and internal memory) CR2032
Communication Protocol Proprietary OutBack network
Interconnection Cabling Standard Category 5 OutBack proprietary
PC Interface Category 5
Environmental Rating Indoor only
Warranty 5-year standard
Regulatory Specifications
Emissions Indoor only
Compliance CE Conformance European EN 55022 Class B
Firmware RevisionThis manual applies to MATE3s System Display and Controllers with a firmware version of 001.004.003 or higher.
Page 23
FCC
FCC Information to the UserThis equipment has been tested and found to comply with the limits for a Class B digital device when powered by a DC source, pursuant to part 15 of the FCC Rules. These limits are designed to provide reasonable protection against harmful interference in a residential installation. This equipment generates uses and can radiate radio frequency energy and, if not installed and used in accordance with the instructions, may cause harmful interference to radio communications. However, there is no guarantee that interference will not occur in a particular installation. If this equipment does cause harmful interference to radio or television reception, which can be determined by turning the equipment off and on, the user is encouraged to try to correct the interference by one or more of the following measures:
o Reorient or relocate the receiving antenna.
o Increase the separation between the equipment and the receiver.
o Consult the dealer or an experienced radio/TV technician for help.