Embed Size (px)
Citation preview

CONSTRUCTION PLANS AND BASIC ASSEMBLY INSTRUCTIONS
https://www.facebook.com/StopBelievingStartKnowing
Dollhouse Technical Drawing and Instructions by Matt PalmerQuestions regarding the interpretation of these directions or general construction of this dollhouse may be directed to Captain Matt Palmer at: [email protected] on Twitter @MattP351. All other questions regarding the presentation and use of this dollhouse for training purposes should be directed to Deputy Chief P.J.Norwood orLieutenant Sean Gray at: [email protected] or on Facebook at: https://www.facebook.com/StopBelievingStartKnowing/info

Hello and again thank you for requesting the plans for the doll house small scale live fire behavior prop.
We are more than willing to you share with you. However we ask forsomething in return.
In return we only ask for a few things!
1. Share it with others2. Give the credit to the right people. Don’t steal ideas, borrow them,expand, share, and give appropriate credit where credit is due3. Go to and like the Stop Believing and Start Knowing (SBSK)Facebook, Instagram, and Twitter pages4. Share your success and photos using this prop on the SBSK pages
As you saw in the video and will see when training, door control and controlling the openings are a necessity. We have included a few articles below that you may want to read and share. When using the prop there will be many factors that you will need to practice, learn and overcome that will enhance or turn your drill into a disaster. Wind, temperature, humidity, etc. will all play a role in how the prop behaves. Its important to build it as listed. Many have asked if lining with sheetrock would be beneficial to take the prop from a single use prop to a multiple use prop. Sheetrock will not work as the box itself becomes part of the fuel load. You need to use OSB to heat up and off-gas to provide an environment that creates the needed fire behavior. The sheet rock will not allow that. However, please feel free to make this prop even better and then share your results with us.
PLEASE also do not take for granted the necessity to wear an SCBA when operating the box. The OSB gives off toxic smoke! We have experienced first hand the negative impact of the smoke from this prop. Do not take it lightly and wear your air at all times during this training

event. We have a DVD titled The Evolving Fireground- Research Based Tactics, that explains it in detail and will be followed by a book. If you're interested go to: http://www.pennwellbooks.com/shop-fire-books-videos/the-evolving-fireground-research-based-tactics/
We would also urge you to consider Tempest PathMaster smoke control devices. It's a great device to control the openings and keep your firefighters safe. http://www.tempest.us.com/other/pathmaster.cfm
Fire Engineering Training Minutes video - http://www.fireengineering.com/articles/2016/07/firefighter-training-video-fire-behavior.html
Check out this article on a live fire that we evaluated the PathMaster on in CT. Evaluation of flow path control — http://www.fireengineering.com/articles/2014/12/draft-curtain-tactics.html
Keep it rich — vent limited fires http://www.fireengineering.com/articles/2014/01/ventilation-limited-fire-keeping-it-rich-and-other-tactics-based-off-science.html
Controlling the openings — http://www.fireengineering.com/articles/print/volume-167/issue-10/features/controlling-the-openings-is-this-the-future-of-ventilation.html
Flow Path Control - http://community.fireengineering.com/m/blogpost?id=1219672%3ABlogPost%3A596619
Searching in the flow path — http://www.fireengineering.com/articles/print/volume-168/issue-6/features/searching-in-the-flow-path.html
Lastly, remember the prop and live fire demo is only one piece of the puzzle. Firefighters and officers must have a better understanding of fire

behavior and fire dynamics. Training should start in the classroom and then move to the live fire demo. Any questions please let us know. We are more than willing to travel to your department to deliver training programs.
Sincerely,
P.J. Norwood and Sean Gray
SeanGrayandP.J.Norwood–StopBelievingStartKnowing
DollhouseFireBehaviorDemonstrationSeanGrayandP.J.Norwood
LessonPlan
1. MaterialsNeededa. FourCompartmentBox(seestepbystepdirectionstobuild)b. Straworhayc. Smallthinpiecesofwood(pinedoorshimsworkwell)d. Propanetorche. Waterspraybottlef. Extinguishment–gardenhoseorthree2.5gallonpressurizedwater
extinguishersg. SixtotenStyrofoamcupsh. Tableorsimilaritemtoplaceboxonthatraisesthebox4-5’offthe
ground(6palletsworkswell)i. Twofirefighterswithselfcontainedbreathingapparatus
2. Setupa. Placeboxontableorplatformb. Placeallotherequipmentnearboxc. Turnwateronandfillspraybottled. Buildasmallfuelpackageoutofthestrawandwoodstripsinthe
lowerleftcompartment(compartment#2)
3. Starttrainingsessiona. Startwithallcompartmentsclosedandisolatedfromeachotherand
thetworoofslidedoorsclosedb. Usingtorchlightthestrawandwoodstripsonfire
i. Discussionpoints1. Smokecolor,velocity,densityandpressure
ii. Oncethefireislightyouneedtocontroltheopeningofthecompartmentandallowthefiretogrowslowly.Youcanopenandshutthecompartmentdemonstratinghowyoucanchokethefireoutwithsimplyeliminatingtheair.
iii. Oncethecompartmentitselfstartstoburn(notjusttheaddedfuel)youwanttoshutdownthecompartment90%.Thiswillallowfordemonstrationofthesmoke“puffing”and“breathing”attheopening.Openandclosethecompartmentatdifferentpercentagesanddiscusthedifferencesinthesmokeandvolumeoffirebasedontheamountofoxygenavailable
SeanGrayandP.J.Norwood–StopBelievingStartKnowing
c. Utilizingthetorchattempttolightoffsmokeoutsideofthebox.Atthis pointthesmokeshouldnotlight offorevensustaincombustion
i. Discussionpoints1. Smokeisfuel
ci. PlaceStyrofoamcupsintothecompartmenti. Discussionpoints
1. Smokecolor,velocity,densityandpressure
*NOTE–fromthispointyouwillwanttoopenandcloseeachcompartmentatdifferentpercentagesandtimes.Attimesjustonecompartmentisolatedfromtheothers.Attimesmultiplecompartmentsnotisolated.Trytheclosuresatdifferenttimesanddifferentpercentages.Themoreyouplaywithcontrollingtheopeningsthemorefirebehavioryouwillgenerate.Ittakestimeandpracticetomanagethebox.Burningtheboxiseasy.Managingtheboxtocreateventpointignition,ventilationinducedbackdrafts,neutralplane,unidirectionalandbidirectionalflowarethechallengingpieces.Duringthedemonstrationyouneedtoutilizethespraybottletoextinguishanyfireburningaroundthelowerleftcompartmentandanyfireontheexteriorofthebox.It’salsoagoodideatoapplywatertotheexterioroftheboxinthebackandsideofthelowerleftcompartment(compartment#2).Havepatienceandpractice!
e. Takeoffdoortothelowerrightcompartment(compartment#3)i. Discussionpoints
1. Smokecolor,velocity,densityandpressuref. Openupdoorthatseparateslowerleft(compartment#2andlower
rightcompartment(compartment#3)i. Discussionpoints
1. Smokecolor,velocity,densityandpressureg. Thiscompartmentyouwillwanttoopenandcloseatdifferent
percentagesandintervals.Closeofflowerleft(compartment#2)completely
i. Discussionpoints1. Smokecolor,velocity,densityandpressure2. Identificationofneutralplane
h. Closethebottomright(compartment#3)completelyandslightlyopenthelowerleft(compartment#2)
i. Utilizingthetorchattempttolightoffsmokeoutsideofthebox.Atthispointthesmokeshouldlightoffbutwillnotsustaincombustion
a. Discussionpointsi. Smokeisfuel
j. Openupthefrontofupperright(compartment#4)i. Discussionpoints
1. Smokecolor,velocity,densityandpressure2. Neutralplane

k. Openupdoorintheflooroftopright(compartment#4)andbottomright(compartment#3)
i. Discussionpoints1. Smoke volume, velocity, density, and color2. Identificationofneutralplane
l. Openupthepeakedroofdoorandremovethegableendventcoversi. Discussionpoints
1. Smoke volume, velocity, density, and colorm. Openuptheceilinginatticspace
i. Discussionpoints1. Identificationofneutralplane2. Ventilationdoesn’tequalcooling3. Ventpointignition
n. Nowworkbackwards–closetheroofandtheneachcompartment.Thiswillincreasepressureandheatwithinthebox
i. Discussionpoints1. Smoke volume, velocity, density, and color2. Identificationofneutralplane3. Ventilationdoesn’tequalcooling4. Ventpointignition5. Sizinguptheopenings
o. Utilizingthetorchattempttolightoffsmokeoutsideofthebox.Atthispointthesmokeshouldlightandwillsustaincombustion
i. Discussionpoints1. Smokeisfuel
*Note–duringthedemonstrationthegoalistopointoutanddiscussfirebehavioranditsrelationshipwithfiregroundtactics.Alltoooftenweteachfirebehaviorandtacticsasseparatelessons.Duringthisseparationwedonoteducatefirefightersontherelationshipsbetweenfirebehaviorandourtactics.Ourtacticshavebothapositiveandnegativeimpactonthefirebehavioranditisuptousutilizingthissmall-scalefirebehaviorproptooutlineboththepositiveandnegative.
IfyouhaveanyadditionalquestionspleasecontactSeanGrayandP.J.Norwoodatstopbelievingstartknowing@gmail.com
PleasepostanyphotosandvideosduringyourtrainingontheStopBelievingStartKnowingFacebookpage.
SeanGrayandP.J.Norwood–StopBelievingStartKnowing

CONSTRUCTION PLANS AND BASIC ASSEMBLY INSTRUCTIONS
https://www.facebook.com/StopBelievingStartKnowing
Dollhouse Technical Drawing and Instructions by Matt PalmerQuestions regarding the interpretation of these directions or general construction of this dollhouse may be directed to Captain Matt Palmer at: [email protected] on Twitter @MattP351. All other questions regarding the presentation and use of this dollhouse for training purposes should be directed to Deputy Chief P.J.Norwood orLieutenant Sean Gray at: [email protected] or on Facebook at: https://www.facebook.com/StopBelievingStartKnowing/info

CONSTRUCTION PLANS AND BASIC ASSEMBLY INSTRUCTIONS
MaterialsNeeded:
• 2sheetsof4’x8’7/16”orientedstrandboard (OSB)
• 1”staplesforusewithapneumaticstaplegun
• Caulkorconstructionadhesive(tosealanygaps)
ToolsNeeded:
• Tablesaworwormdrivesaw(tocutandripOSB)
• Mitersaw
• Jigsaworoscillatingmulti-tool stylesaw
• Pneumaticstaplerwithcompressor
• Cordlessdrillwithspadestylewooddrillbit
• FilesorsandpaperTimeRequiredtoCutandAssemble:
• Depending onyourskilllevelandpatience,you
shouldallow3to4hourstocompletethisproject.
• Although youwillultimatelyburn thisdollhouse,
theskillandaccuracyusedtoassemblethishouse
willensureatighterfitandsealbetweenrooms
andallowforgreaterresultsduring thetraining
exercise.
WARNINGThis drawing is for reference and construction
purposes only and NOT designed to serve as a guide
on how to conduct training sessions involving any live
fire scenario. Any and all training associated with the
use of the plans contained herein are done at the
user’s own risk.
2
CONSTRUCTION PLANS AND BASIC ASSEMBLY INSTRUCTIONS
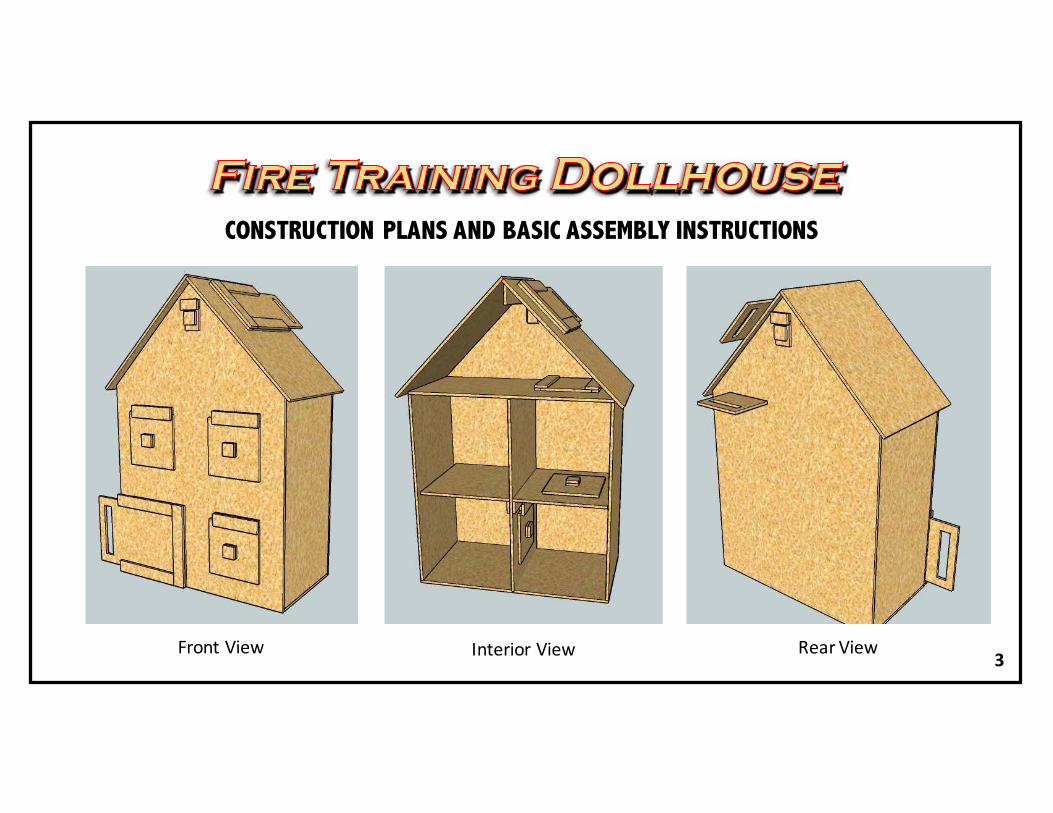
3FrontView InteriorView RearView

CUTTING DIAGRAM – SHEETS OF 7/16” OSB
4

CUTTING DIAGRAM – SHEETS OF 7/16” OSB
5
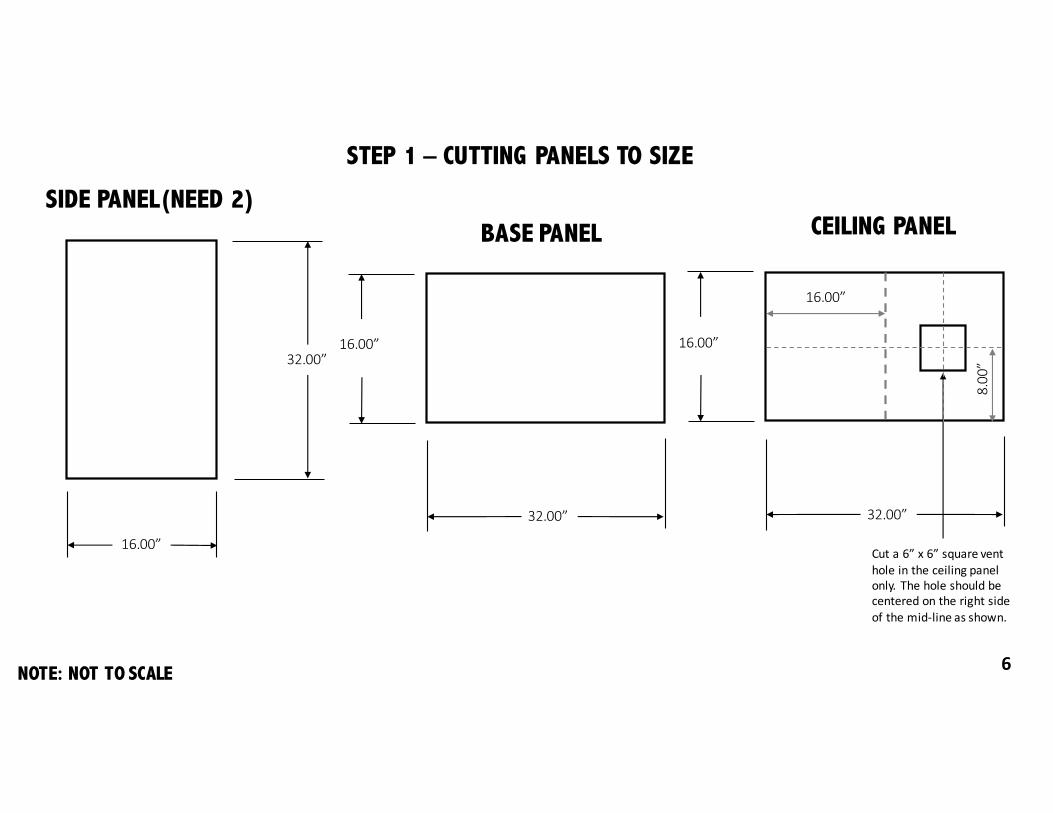
32.00”
16.00”
SIDE PANEL(NEED 2)
32.00”
16.00”
BASE PANEL
32.00”
16.00”
CEILING PANEL
Cuta6”x6”squarevent
holeintheceilingpanel
only.Theholeshouldbe
centeredontherightside
ofthemid-lineasshown.
16.00”
8.00”
STEP 1 – CUTTING PANELS TO SIZE
NOTE: NOT TO SCALE 6

15.00”
16.00”
RIGHT FLOOR PANEL
15.00”
16.00”
LEFT FLOOR PANEL
32.00”
16.00”
CENTER PANEL
Cutan8”x8”squareventholeintherightfloor
panel.Theholeshouldbecenteredinthefloor
panel. THISISACRITICALSTEP.DONOTFORGETTOCUTTHE8”x8”SQUAREOUT.
16.00”
16.00”
STEP 1 – CUTTING PANELS TO SIZE
NOTE: NOT TO SCALE 7
Cutan8”x8”squarevent
holeinthecenterpanel.
Theholeshouldbe
centeredinthelowerhalfof
thecenterpanel. THISISACRITICALSTEP.DONOTFORGETTOCUTTHE8”x8”
SQUAREOUT.
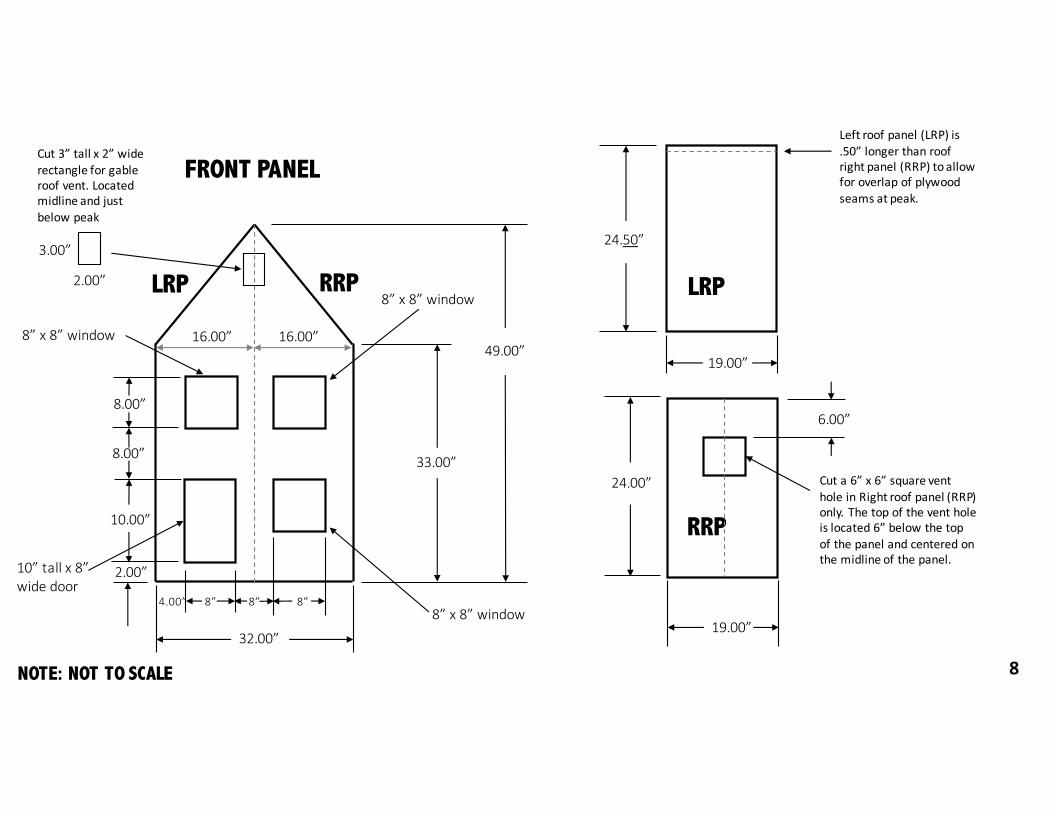
33.00”
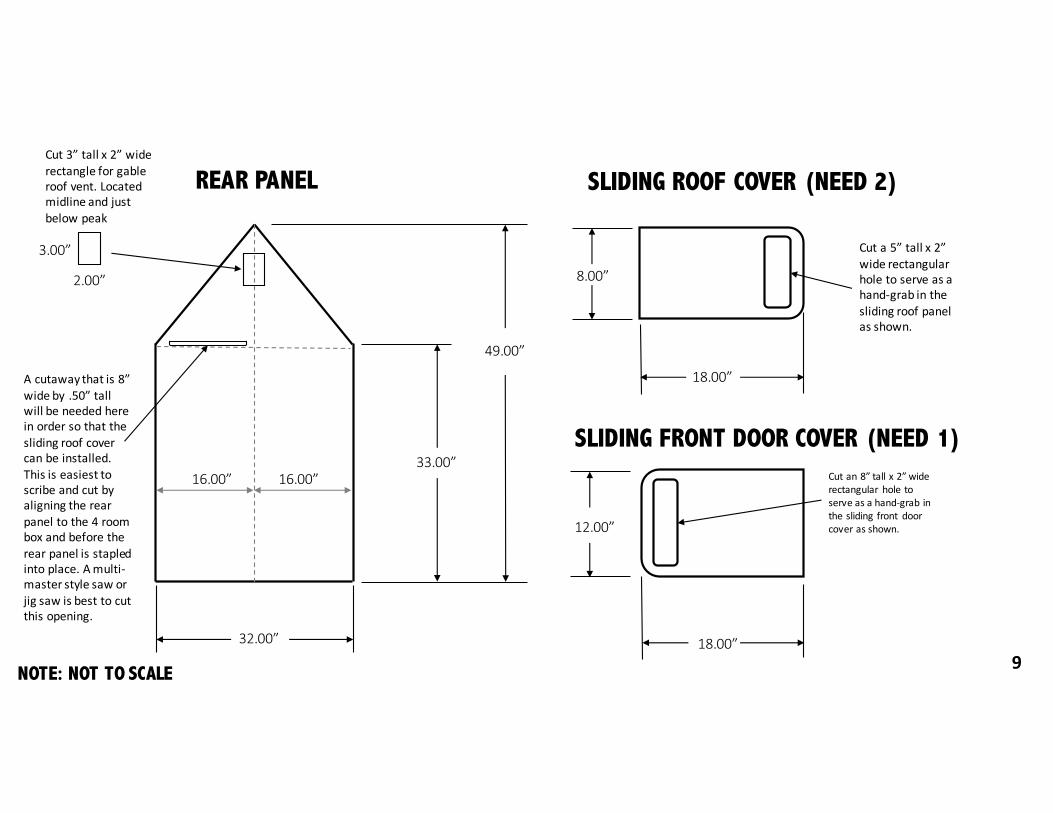
49.00”
32.00”
16.00” 16.00”
2.00”
3.00”
Cut3”tallx2”wide
rectangleforgable
roofvent.Located
midlineandjust
belowpeak
8”x8”window
8”x8”window
8”x8”window
2.00”10”tallx8”widedoor
10.00”
8.00”
8.00”
4.00” 8” 8” 8”
24.50”
24.00”
LRP RRP LRP
RRP
Leftroofpanel(LRP)is
.50”longerthanroof
rightpanel(RRP)toallow
foroverlapofplywood
seamsatpeak.
19.00”
19.00”
6.00”
Cuta6”x6”squarevent
holeinRightroofpanel(RRP)
only.Thetopoftheventhole
islocated6”belowthetop
ofthepanelandcenteredon
themidlineofthepanel.
FRONT PANEL
NOTE: NOT TO SCALE 8
33.00”
49.00”
2.00”
3.00”
Cut3”tallx2”wide
rectangleforgable
roofvent.Located
midlineandjust
belowpeak
32.00”
REAR PANEL
16.00” 16.00”
18.00”
8.00”
Cuta5”tallx2”
widerectangular
holetoserveasa
hand-grabinthe
slidingroofpanel
asshown.
SLIDING ROOF COVER (NEED 2)
18.00”
12.00”
Cutan8”tallx2”wide
rectangular holeto
serveasahand-grabin
theslidingfront door
coverasshown.
SLIDING FRONT DOOR COVER (NEED 1)
NOTE: NOT TO SCALE
Acutawaythatis8”
wideby .50”tall
willbeneededhere
inordersothatthe
slidingroofcover
canbeinstalled.
Thisiseasiestto
scribeandcutby
aligningtherear
paneltothe4room
boxandbeforethe
rearpanelisstapled
intoplace.Amulti-
masterstylesawor
jigsawisbesttocut
thisopening.
9
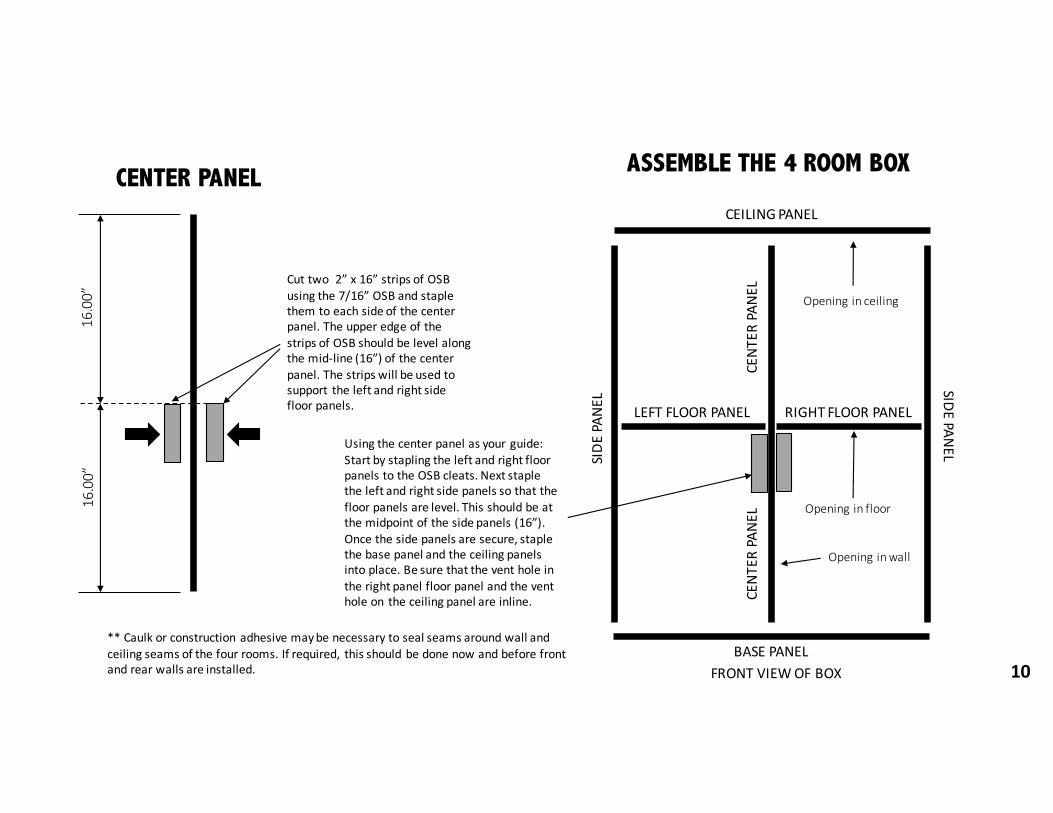
Cuttwo2”x16”stripsofOSB
usingthe7/16”OSBandstaple
themtoeachsideofthecenter
panel.Theupperedgeofthe
stripsofOSBshouldbelevelalong
themid-line(16”)ofthecenter
panel.Thestripswillbeusedto
support theleftandrightside
floorpanels.
16.00”
16.00”
CENTER PANEL
LEFTFLOORPANEL RIGHTFLOORPANEL
BASEPANEL
CEILINGPANEL
SIDEPANEL
SIDEPA
NEL
CENTERPANEL
CENTERPANEL
ASSEMBLE THE 4 ROOM BOX
Usingthecenterpanelasyourguide:
Startbystaplingtheleftandrightfloor
panelstotheOSBcleats.Nextstaple
theleftandrightsidepanelssothatthe
floorpanelsarelevel.Thisshouldbeat
themidpointofthesidepanels(16”).
Oncethesidepanelsaresecure,staple
thebasepanelandtheceilingpanels
intoplace.Besurethattheventholein
therightpanelfloorpanelandthevent
holeon theceilingpanelareinline.
Openinginwall
Openinginfloor
Openinginceiling
FRONTVIEWOFBOX
**Caulkorconstructionadhesivemaybenecessarytosealseamsaroundwalland
ceilingseamsofthefourrooms.Ifrequired, thisshouldbedonenowandbeforefront
andrearwallsareinstalled. 10

Stapletherearwalltothe4
roombox.Besurethatyou
havescribedandcutthe
openingforthesliding
ceilingventcoverandthatit
isalignedwiththe
ventilationopeninginthe
ceilingpanel.
REAR PANEL ASSEMBLED 4 ROOM BOXREAR VIEWOFBOX
LEFTFLOORPANELRIGHTFLOORPANEL
Openinginfloor
Openinginceiling
RIGHTSIDEWALL
LEFTSIDEWALL
Openinginwall
INSTALL THE REAR PANEL
11

LEFTFLOORPANEL RIGHTFLOORPANEL
FRONTSIDEOFBOX
Staplethefrontwallof
thehousetothefront
sideofthebox.Besure
thattheventilation
openingsareon the
rightsideofthe4room
box.
Openinginceiling
Openinginfloor
Openinginwall
ASSEMBLED 4 ROOM BOX
FRONT PANEL
INSTALL THE FRONT PANEL
12
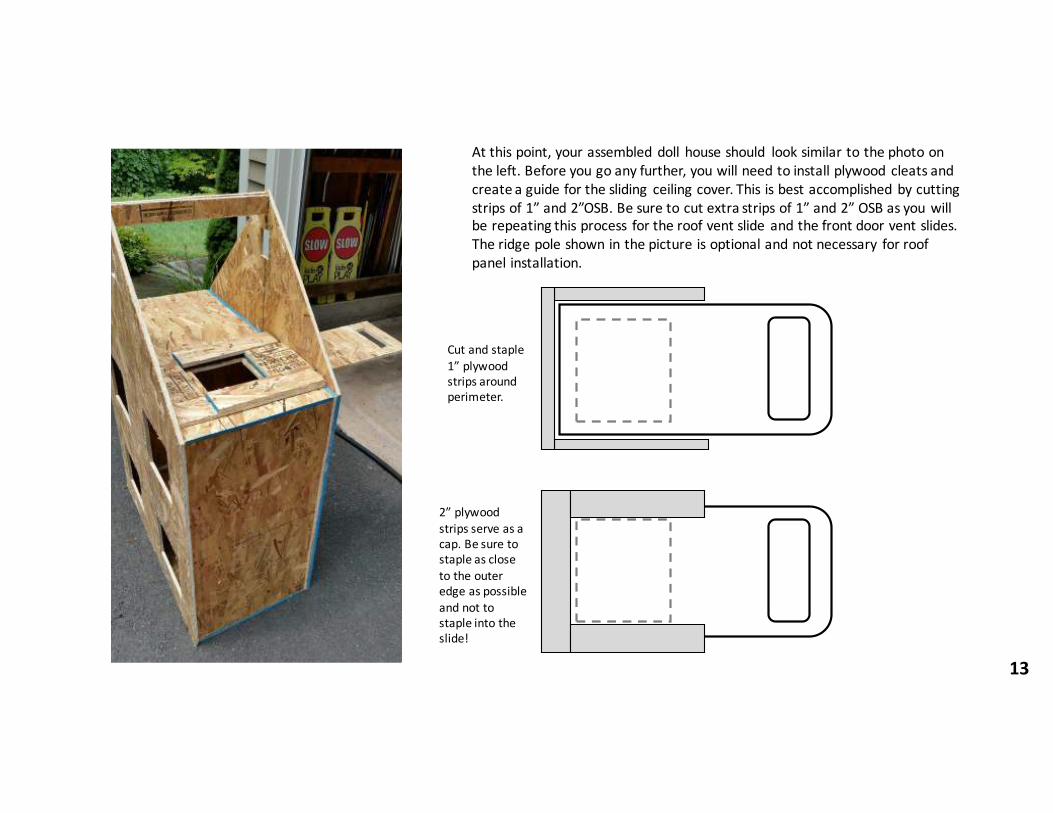
Atthispoint,yourassembleddoll houseshould looksimilartothephotoon
theleft.Beforeyougoanyfurther,youwillneedtoinstallplywood cleatsand
createaguideforthesliding ceilingcover.Thisisbestaccomplishedbycutting
stripsof1”and2”OSB.Besuretocutextrastripsof1”and2”OSBasyouwill
berepeatingthisprocess fortheroofventslide andthefrontdoorventslides.
Theridgepoleshowninthepictureisoptionalandnotnecessary forroof
panelinstallation.
Cutandstaple
1”plywood
stripsaround
perimeter.
2”plywood
stripsserveasa
cap.Besureto
stapleasclose
totheouter
edgeaspossible
andnotto
stapleintothe
slide!
13

Onceyouhavetheceilingslidecoveroperatingproperly, youarenowreadytoinstall
theleftandrightroofpanels.Centertheroofpanelsfronttobackastoallowan
equaldistanceofroofoverhang(approx.1”infrontandback).Besurethattheroof
venthole isontherightside ofthedollhouse andinlinewiththeceilingopening
below.Whenthepanels aresecuredandstapledtothegableends, followthesame
stepstocreateatrackforthesliding roofventcover.
Cutandstaple
1”plywood
stripsaround
perimeter.
2”plywood
stripsserveasa
cap.Besureto
stapleasclose
totheouter
edgeaspossible
andnotto
stapleintothe
slide!
INSTALL THE ROOF PANELS
14
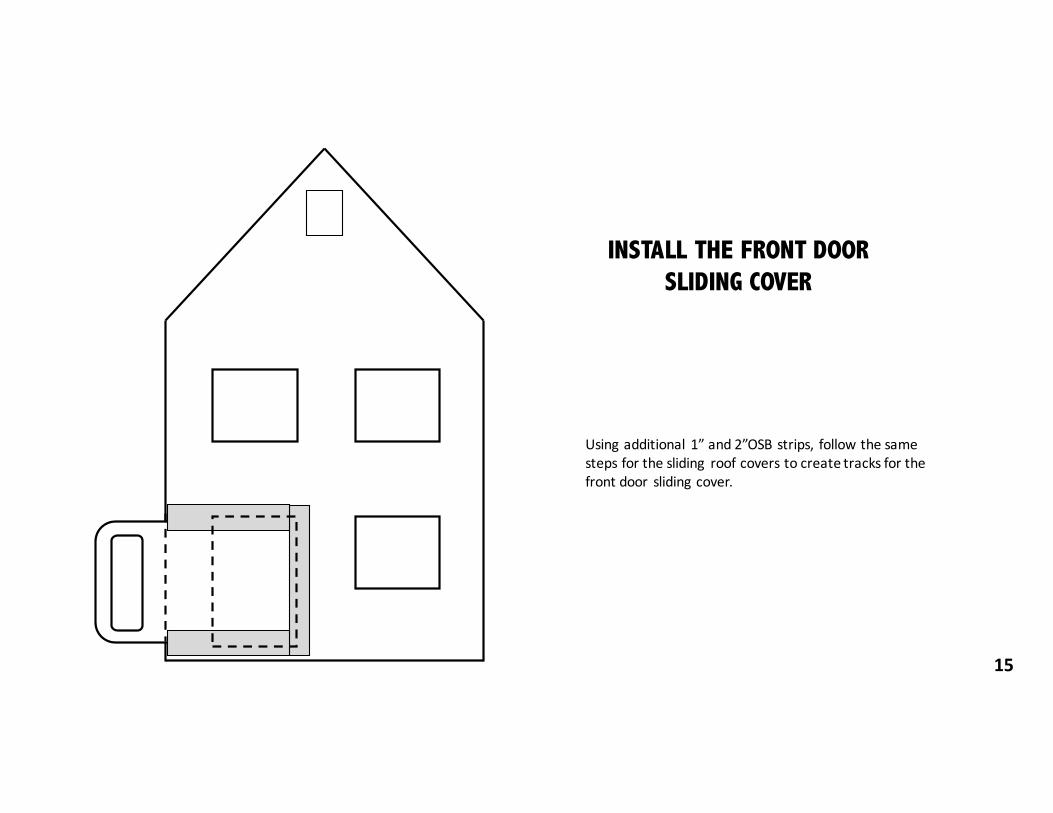
Usingadditional 1”and2”OSBstrips, followthesame
stepsforthesliding roofcoverstocreatetracksforthe
frontdoor slidingcover.
INSTALL THE FRONT DOORSLIDING COVER
15

At this point, you should have plenty of scrap 7/16” plywood around. Before you start
throwing it in the scrap pile, you will need to create five (5) covers in order to control
smoke and fire gases through interior and exterior openings. Covers are needed for the
following openings: windows (3), interior floor/ceiling (1), interior wall openings (1).
**Note: The portion of this cover that fits into the window or wall opening must be cut and
fit as precise as possible or it will not stay seated inside the window opening.
Thecoversmaybemadebycreatingaplywood sandwichusingplywood squares,whichis
stapledtogetherinthemannershownbelow:
LAST STEP – CREATE WINDOW, WALL, AND FLOOR OPENING COVERS
9”x9”outercover
8”x8”innercover
4”x4”handle
3”x3”spacer
Coverlocations(5 Total):
• 3windowsopenings inthefront.
• Wallopening onfirstfloorbetween
leftandrightsiderooms.
• Flooropening betweenfirstand
second floorsontherightside.
16
THIS ISACRITICALSTEP.DONOTFORGETTOBUILDA
TOTALOFFIVE(5) COVERS.YOUWILLNEEDALL5
COVERSINORDERTO
CONTROLTHESPREADOF
SMOKE,GASES,ANDFIRE.

Someotherchallengesthatyoumayface:
• If you do not cut the window or door opening covers precisely, they will
want to fall forward and not work as designed. If this happens, you can
add an OSB guard as shown in the photo to the left to keep the covers
from falling out. The guard may be fabricated at your discretion and
design.
• Several people have asked about using other types or a wider thickness
OSB or conventional types of plywood. The 7/16” OSB that is
recommended and will provide ample burn time in order to facilitate the
training exercise and has been found to be the best option for this type
of training exercise.
• The gable end vents do not need a cover in order to conduct the burn
and demonstrate smoke and gasmovement. However, if you would like a
cover for the gable end, a 2” x 3” plug fabricated in the same fashion as
the other covers will work.
• This completes the instructions for the dollhouse. Good luck with your
training. Questions or problems with the interpretation of these plans
may be directed toMatt Palmer at [email protected] . Thank you.
MattPalmer
Captain,Stamford(CT)FireDepartment
DirectorofTraining,Cheshire(CT)FireDepartment
CONGRATULATIONS! THIS COMPLETES YOUR NEW DOLLHOUSE
17- END

Modification to the Small Scale Fire Behavior “Palmers Dollhouse”
This modification is to change the opening size and control mechanism
located in the center panel. Following these direction will alter the middle panel
opening between the lower left and lower right
compartment.
We thank Lt. OJ Kolodziej,Lt. Brannon Vernon, FF. Drew Gargus and
FF. Luke Ahl from Birmingham Fire and Rescue station 1 for this
modification.
We have Lt. OJ Kolodziej’s video of this modification being used located here - https://youtu.be/7Q2-8bHwvKc