Embed Size (px)
Citation preview

1 | P a g e B e n t l e y C o n f i d e n t i a l – D o N o t D i s t r i b u t e
CONNECT Project Configuration Settings Overview
Technology Previews provide users preliminary access to features currently in development and not QA
certified and therefore not yet ready for production. These features are provided at no additional charge to
promote awareness of a feature or technology to be deployed in a future release. Users are encouraged to
provide feedback and suggestions. To learn more about Technology Previews or to gain access, please create
a Service Request (be sure to include “Technology Preview” in the Description field).
1. Overview
Historically it has always been a challenge to ensure that consistent project specifications and settings are used
across a team of engineers working on a project. Project managers have tried hard to enforce project settings
through manual workflow best practices and periodic audits with limited success. In the modern world with a
distributed workspace, such manual approaches are proving to be impractical. For example you will need to
conduct audits to confirm everyone is conforming to a common set of specifications /settings. Another example
would be if a network location is mandated to be used as a single source - that may not work outside the
boundaries of a VPN (e.g. in consulting and outsourcing scenarios).
Specifically for AutoPIPE Vessel, project managers previously created project configurations on shared network
locations and encouraged teams to point to those locations or copy the same settings to local machines before
starting work on new projects. This process allows for potential human error and intentional/unintentional non-
compliance to intended specifications. This also makes it difficult to make a correction/change to a specification
during a project and ensure it is updated on each team member’s workstation.
With introduction of Bentley CONNECT, AutoPIPE Vessel leverages the CONNECT Technology to enable project
managers to enforce project settings in a seamless and consistent manner. This removes the burden placed on
project managers as well as team members to manually ensure that their settings are in sync. This also ensures
that the projects being worked on are always in compliance with the guidelines (project settings). Updating
existing project settings is also convenient as the enforcement part is now handled automatically by Bentley
CONNECT and the AutoPIPE Vessel program.
2. General Information 1. This feature is available with Vessel Enterprise licenses only.
2. AutoPIPE Vessel integration with Bentley CONNECT is leveraged to synchronize and enforce project
settings defined on the project portal with pressure vessel models on user workstations.
3. All team members and project managers must have a Bentley CONNECT profile and should be signed
into the CONNECT client.
4. If a team member has been working offline, project settings will be synced after:
a. Signing into the CONNECT client.

2 | P a g e B e n t l e y C o n f i d e n t i a l – D o N o t D i s t r i b u t e
b. Opening an existing model/saving a model already opened.
5. Project Managers can manually create a zip file (standard Windows zip format) of application project
settings.
6. Project Manager can decide which files to include in the project settings compressed file.
7. The following project specification files are included in the shared project configuration; however, the
final decision lies with project manager on what to include or exclude (no checking will be made by
AutoPIPE Vessel or the CONNECT portal).
a. Project Specification file (*.empd)
b. Standards (*.emsd)
c. Cost Estimate Settings (Param*.cfg)
d. Drawing View Manager Settings (*.emav)
e. Report Templates
f. Work Files (*.emsd)
g. AutoCAD / Microstation (2D/3D Drawing Project Files)
8. The material library is not supported as a project setting.
9. Project Managers can upload project settings to the CONNECT project portal.
10. Project Managers can update existing project settings on the CONNECT project portal by uploading a
new/updated zip file.
11. Synchronization of project settings (AutoPIPE Vessel local cache) is not real-time and will occur on any of
the following events:
a. New
b. Open
c. Save
d. Associate Project
12. AutoPIPE Vessel maintains a local cache of project settings (e.g., C:\Users\Public\Documents\AutoPIPE
Vessel_x.x.x.x\). The root folder is named CONNECTProject which contains a sub-folder name based on
the project GUID.
13. The local cache of project settings (e.g., C:\Users\Public\Documents\AutoPIPE Vessel_x.x.x.x\) is located
in the same path as the default configuration/customizable database file path.

3 | P a g e B e n t l e y C o n f i d e n t i a l – D o N o t D i s t r i b u t e
14. New models require the CONNECT project to be selected first so that the appropriate project settings
are available to set up the new model.
15. If the project settings applied from the CONNECT portal do not contain valid project settings applicable
to AutoPIPE Vessel:
a. For a new model, AutoPIPE Vessel uses the default program configurations (installed with
program).
b. For an existing model, there is no impact and it will continue to use the existing settings.
c. If the default configurations are not available, the program displays an error message.
3. Enforced Settings Project Managers can enforce the following dialog values/options. If these project settings are managed by a
CONNECT project, users can not modify/change the values/options and the field displays the following message.
NOTE: Enforced fields/buttons appear disabled (grayed-out) when a project specification (.empd file) is
used and a model is associated with a CONNECT project. If all fields in a dialog are enforced settings,
only the OK button appears as disabled.

4 | P a g e B e n t l e y C o n f i d e n t i a l – D o N o t D i s t r i b u t e
3.1 Design Parameters
Design Code Div. 2 Use PED
Local Load Method Flange Standard Pipe Standard
Check Flange Rigidity Apply DIN 18800 Part 4 Including Associated Shell
Include Trays Minimum Space between Stiffeners Material – Year
Material – Specific Gravity Material – ASME II D Metric
3.2 Global Accessories
Width – Ladders Weight – Ladders
5 | P a g e B e n t l e y C o n f i d e n t i a l – D o N o t D i s t r i b u t e
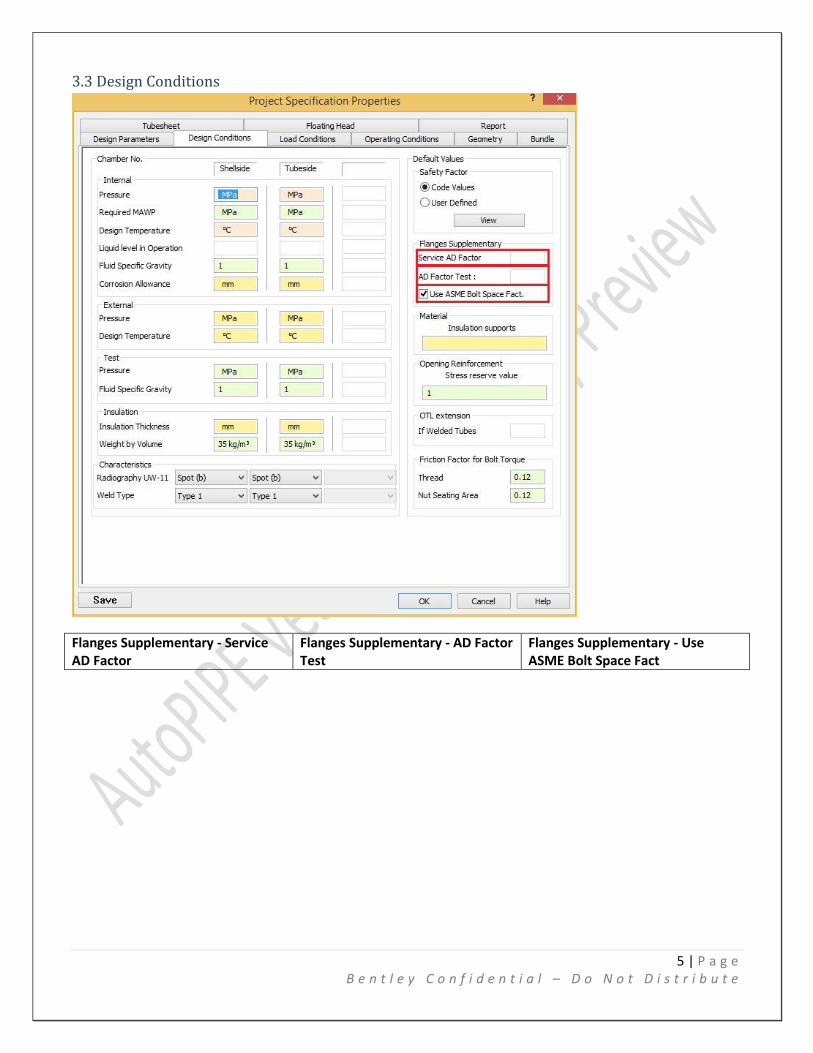
3.3 Design Conditions
Flanges Supplementary - Service AD Factor
Flanges Supplementary - AD Factor Test
Flanges Supplementary - Use ASME Bolt Space Fact

6 | P a g e B e n t l e y C o n f i d e n t i a l – D o N o t D i s t r i b u t e
3.4 Safety Factors
All Safety Factor Fields User-defined values for Design Conditions only. Only the existing chambers are updated. Because only the first chamber is available in a Project Specification, the safety factors of the first chamber are used for all chambers.

7 | P a g e B e n t l e y C o n f i d e n t i a l – D o N o t D i s t r i b u t e
3.5 Wind Load Conditions
All Wind Load Factors Fields All values for Operating Case only.

8 | P a g e B e n t l e y C o n f i d e n t i a l – D o N o t D i s t r i b u t e
3.6 Earthquake Conditions
All Earthquake Factors Fields All values for Operating Case only.

9 | P a g e B e n t l e y C o n f i d e n t i a l – D o N o t D i s t r i b u t e
3.7 Bundle
Class Type

10 | P a g e B e n t l e y C o n f i d e n t i a l – D o N o t D i s t r i b u t e
3.8 Tubesheet
Design Code Div. 2

11 | P a g e B e n t l e y C o n f i d e n t i a l – D o N o t D i s t r i b u t e
3.9 Report
Language Unit Systems
4. Sample Workflow
1. Define the Local Project Specification Settings
NOTE: It is a best practice to create a copy of your local Config folder before proceeding with the
following steps.

12 | P a g e B e n t l e y C o n f i d e n t i a l – D o N o t D i s t r i b u t e
a. Launch AutoPIPE Vessel.
b. Ensure you are logged into the CONNECTION Client.
c. Select File > New to display the Specification dialog.
d. Set any of the fields documented in Section 3 to the required value(s).
e. Press OK.
2. Create a Project Settings Package
a. Select Bentley Cloud Services > Save Project Settings to display the Create Customizable Files
Zip Archive dialog.
b. Type the location of an existing configuration folder that contains the configuration files that will
be used as a shared project configuration in the Source folder for archive creation field. You can
also use the Browse button to select an existing configuration folder.
NOTE: This field defaults to the current working directory.
c. Type the path where the configuration files zip file will be created in the Archive save location
field. You can also use the Browse button to select an existing directory.
d. Press Create Archive to create a zip file of the configuration folder specified in the Source folder
for archive creation field and places the zip file in the location specified in the Archive save
location field.
3. Create a New CONNECT Project
a. Select Bentley Cloud Services > Personal Portal to launch your personal portal, which provides
access to personalized information via the Bentley LEARNserver, Bentley Communities, as well
as CONNECTED Projects and related ProjectWise CONNECTION Services and content.
b. Within the Recent Projects pane, press +New to display the Register a Project page.
c. Complete the required fields, then press Save to save the project details on the Project Portal
page.
4. Upload the Project Settings Package to the CONNECT Project Portal.
a. From the Project Portal page, Press Settings to display the pop-up menu, then select
Application Settings to display the Application Settings page.
b. Press Add Setting to display the Add an Application Setting page.
c. Select AutoPIPE Vessel from the Supported Products drop-down pick-list.
d. Select Connect Edition from the Generation drop-down pick-list.

13 | P a g e B e n t l e y C o n f i d e n t i a l – D o N o t D i s t r i b u t e
e. Press Browse from the Configuration File field to display the Choose File to Upload dialog.
f. Navigate to the zip file created in Step 1, then press Open.
g. Press Upload.
h. Once the zip file is uploaded, the Settings Uploaded Successfully message will display.
5. Create a New Model Using Shared Project Settings
a. Ensure users are logged into the CONNECTION Client.
b. Select File > New to display the CONNECT Projects dialog.
NOTE: Press Refresh to update the list of available projects.
c. Navigate to the project created in Step 3, then select Assign.
d. AutoPIPE Vessel checks if project settings are available for this project. It will also retrieve those
project settings if available and set them up in a local cache folder.
NOTE: A sub-folder for each project being accessed/used is created inside the
CONNECTProject folder. These folders act as a local cache of the project settings
downloaded from the CONNECT project portal. The CONNECTProject folder contains a
sub-folder name based on the project GUID. By default, project settings are refreshed
every 30 minutes.
e. The AutoPIPE Vessel Status Bar displays the Project settings sync completed message once the
project settings are setup in the local cache.
f. Create your model.
4.1 Opening an Existing Model with No Associated Project
When opening an existing model with no associated project, AutoPIPE Vessel prompts you to select a CONNECT
Project to associate with the model. If you select a project to associate with the model, AutoPIPE Vessel ensures
that the project settings are synchronized and available in the local cache folder. The Status Bar will display the
following message:
AutoPIPE Vessel compares the settings saved in the model with the project settings retrieved from the CONNECT
project. If updates to the model are enforced, the Update of Project Data dialog displays the relevant
information.
4.2 Opening an Existing Model with an Associated Project – Up-to-Date Settings
When opening an existing model with an associated project, AutoPIPE Vessel first ensures that the applicable
project settings are synchronized and available in the local cache folder.
AutoPIPE Vessel compares the model with the project specifications to verify they are in agreement. Any
differences will be displayed in the Update of Project Data dialog and the model will be updated to ensure
compliance.

14 | P a g e B e n t l e y C o n f i d e n t i a l – D o N o t D i s t r i b u t e
4.3 Saving Changes to a Model with an Associated Project
When saving an existing model with an associated project, AutoPIPE Vessel first ensures that the applicable
project settings are synchronized and available in the local cache folder.
AutoPIPE Vessel compares the model with the project specifications to verify they are in agreement. Any
differences will be displayed in the Update of Project Data dialog and the model will be updated to ensure
compliance.
4.4 Disassociating a Project from a Model
Disassociating a Project from a model removes the configuration path of the project directory from the model.
No further updates will be made to model.


![SAP BW Configuration - Basic System Settings[1]](https://img.dokumen.tips/doc/110x75/544ed97fb1af9f2f638b5356/sap-bw-configuration-basic-system-settings1.jpg)


