Embed Size (px)
Citation preview
Configuring Your Computer and Network Adapters for Best
Performance
eBUS Universal Pro and User Mode Data Receiver eBUS SDK Application Note
This application note covers the basic configuration of a network adapter (NIC) to ensure the best possible performance of the eBUS Universal Pro driver and the eBUS SDK’s user mode data receiver. It also covers other factors, like firewall and antivirus software, which could affect system performance. Finally, it describes the proper IP configuration for multiple NICs in one PC.
The eBUS Universal Pro driver can be installed on any brand of NIC and hooks itself on top of the manufacturer’s driver.
This publication provides configuration guidelines to assist in achieving maximum system performance. However, we recommend that you experiment with the parameters outlined in this publication to select the configuration that provides you with the best system performance. To simplify this publication, only Intel® NICs are covered. Most of these features can be found in other manufacturers’ products, and the configuration changes outlined in this publication are minor. This publication explains how to configure the NIC using either the Windows® 7 operating system or Red Hat® Linux.
The following topics are covered in this application note:
• “Selecting a NIC” on page 2
• “Selecting the Appropriate Version of the Manufacturer’s Driver” on page 2
• “Configuring Jumbo Packets, Receive Buffers, and the Interrupt Moderation Rate” on page 2
• “Configuring Socket Buffer Size (Linux Operating System Only)” on page 6
• “Minimizing the Impact of Windows Firewall and Other Filter Drivers” on page 7
• “Configuring Multiple NICs in a Single Computer” on page 7
• “Configuring Power Management (Windows Operating System Only)” on page 10
• “Configuring Your Computer’s Video and Graphic Card” on page 12

EX001-017-0006 Version 1.0 Configuring Your Computer and Network Adapters for Best Performance 2
Selecting a NIC
In general, we recommend the PRO 1000 line of Intel NICs. These NICs are affordable, receive data well, and are easy to find.
In cases where it is difficult to find an Intel NIC that suits your needs (for example, for some laptops) or where you already have a non-Intel NIC, we also support all other brands of NICs, with some limitations.
In high data rate applications, for example the total instantaneous bandwidth is larger than100MB/s (possibly from multiple cameras), we recommended that you to use a PCIe NIC.
Selecting the Appropriate Version of the Manufacturer’s Driver
The latest version of a driver is most often the best version, since it has the latest bug fixes from the manufacturer. The driver that is distributed with the operating system is often not the most recent and a later version can be obtained from the manufacturer. We generally suggest using the latest version of the driver provided by the manufacturer.
Configuring Jumbo Packets, Receive Buffers, and the Interrupt Moderation Rate
You can configure the NIC to ensure the best possible performance. The following table lists the NIC settings that you can adjust to maximize performance.
Table 1: Configuring Jumbo Packets, Receive Buffers, and Interrupt Moderation Rate Setting When to change Details Recommendations
Jumbo packets (jumbo frames)
High data rate Allows for a larger Ethernet frame size, which corresponds to a larger data payload per Ethernet frame, and allows each block to be transferred using fewer packets. As a result, this setting decreases the amount of interrupts that the PC has to service and results in lower overall CPU usage. When a system reaches 9K Ethernet frame size, the gain in CPU savings becomes negligible.
If the image size will be smaller than the size of the jumbo frame, the use of jumbo frames should be avoided. If devices across the network support jumbo frames, then jumbo frames should be enabled and configured to support the desired frame size. Before you enable jumbo frames, ensure that all of your NICs, switches, and devices/cameras support jumbo frames (most new devices do).
Receive buffers (receive descriptors)
High data rate or high frame rate
Sets the number of receive buffers used by the adapter when copying data to memory. If the system runs out of receive descriptors, the NIC will drop packets (older packets will be overwritten).
We recommend that you increase the receive descriptors to the maximum possible value. While an increased number of receive buffers allows you to store more packets and improves stability (that is, fewer older packets are overwritten), more memory is required. Note: The number of receive descriptors does not affect your system’s CPU usage.
EX001-017-0006 Version 1.0 Configuring Your Computer and Network Adapters for Best Performance 3
Setting When to change Details Recommendations
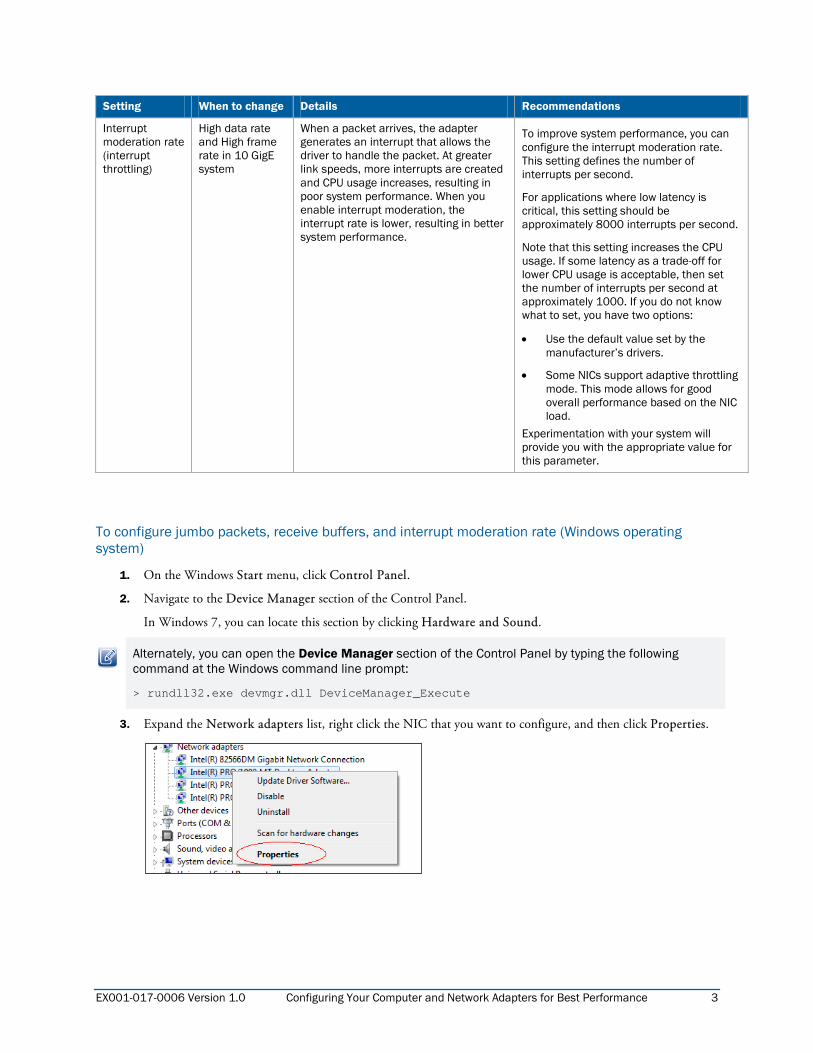
Interrupt moderation rate (interrupt throttling)
High data rate and High frame rate in 10 GigE system
When a packet arrives, the adapter generates an interrupt that allows the driver to handle the packet. At greater link speeds, more interrupts are created and CPU usage increases, resulting in poor system performance. When you enable interrupt moderation, the interrupt rate is lower, resulting in better system performance.
To improve system performance, you can configure the interrupt moderation rate. This setting defines the number of interrupts per second.
For applications where low latency is critical, this setting should be approximately 8000 interrupts per second.
Note that this setting increases the CPU usage. If some latency as a trade-off for lower CPU usage is acceptable, then set the number of interrupts per second at approximately 1000. If you do not know what to set, you have two options:
• Use the default value set by the manufacturer’s drivers.
• Some NICs support adaptive throttling mode. This mode allows for good overall performance based on the NIC load.
Experimentation with your system will provide you with the appropriate value for this parameter.
To configure jumbo packets, receive buffers, and interrupt moderation rate (Windows operating system)
1. On the Windows Start menu, click Control Panel.
2. Navigate to the Device Manager section of the Control Panel.
In Windows 7, you can locate this section by clicking Hardware and Sound.
Alternately, you can open the Device Manager section of the Control Panel by typing the following command at the Windows command line prompt:
> rundll32.exe devmgr.dll DeviceManager_Execute
3. Expand the Network adapters list, right click the NIC that you want to configure, and then click Properties.

EX001-017-0006 Version 1.0 Configuring Your Computer and Network Adapters for Best Performance 4
4. Click the Advanced tab in the Adapter Properties dialog box.
5. In most cases, you do not need to change the network adaptor’s default settings. However, you can adjust the
following settings depending on your data rate and frame rate. For a description of each setting, tips on when to adjust it, and recommended settings, see Table 1 on page 2.
• Jumbo Packets (also known as Jumbo Frames) • Receive Buffers (also known as Receiver Descriptors) • Interrupt Moderation Rate (also known as Interrupt Throttling). The default setting
(Adaptive) adjusts the interrupt rates dynamically, depending on traffic type and network usage. Choosing a different setting can improve network and system performance. At higher data rates, a High interrupt moderation setting may improve system performance. At lower data rates, a Low interrupt moderation setting is preferred, since delayed interrupts cause additional latency.
Because the procedures for configuring these options vary from one manufacturer to another (including the way the value is interpreted), we recommend that you refer to the documentation accompanying the NIC for instructions.
6. Click OK.

EX001-017-0006 Version 1.0 Configuring Your Computer and Network Adapters for Best Performance 5
To enable jumbo packets (Linux operating system)
• You can change the frame size using the following commands:
ifconfig eth[INDEX] mtu [SIZE]
ifconfig eth[INDEX] up
where, [INDEX] = 0,1,2,…,n (depending on the number of NICs present)
[SIZE] = desired frame size
For example,
ifconfig eth0 down
ifconfig eth0 mtu 8164
ifconfig eth0 up
- Or -
The configuration can be done at boot time by modifying the etc/sysconfig/network-scripts/ifcfg-eth[INDEX] file with the line:
MTU = [SIZE]
To configure receive descriptors (Linux operating system)
The Intel PCI driver is named e1000 and the PCIe version is named e1000e.
• For the PCI version of the driver, for example (e1000):
You can customize the Intel driver using the RxDescriptors parameter on the modprobe command line. This can be done by loading the driver with:
modprobe e1000 RxDescriptors = 512
If you have more than one NIC that you are configuring, the parameter for each adapter must be comma-delimited:
modprobe e1000 RxDescriptors = 512, 512, 512
Alternately, the configuration can be performed at boot time by modifying the /etc/modprobe.conf file with the line:
options e1000 RxDescriptors = 512
• For the PCI Express version of the driver, for example ( e1000e ):
The tool ethtool provided by many Linux distributions can be used to configure the number of receive descriptors (buffers), as per the following command:
ethtool -G ethX rx 512
where, ethX represents your NIC (for example, eth0)

EX001-017-0006 Version 1.0 Configuring Your Computer and Network Adapters for Best Performance 6
To configure interrupt coalescing (Linux operating system)
• You can customize the Intel driver using the InterruptThrottleRate parameter on the modprobe command line. This can be done by loading the driver with:
modprobe e1000 InterruptThrottleRate = 8000
• If you have more than one NIC that you are configuring, the parameter for each adapter must be comma-delimited:
modprobe e1000 InterruptThrottleRate = 8000, 8000, 4000
• The configuration can be performed at boot up by modifying the /etc/modprobe.conf file with the line:
options e1000 InterruptThrottleRate = 8000
Configuring Socket Buffer Size (Linux Operating System Only)
When you configure the socket buffer size, you are increasing the number of UDP datagrams that the operating system can buffer before delivering them to the network stack.
You must configure the socket buffer size to ensure that it is large enough to allow the application to survive normal CPU scheduling latency without dropping packets. For high bandwidth applications (for example, streams of 800 Mbps or higher), the default value is too small and should be increased.
If the value is too small, the side effect is lost packets, which could have negative side effects on your system. This should be avoided at all times.
If the value is too large, the application may use excessive amounts of memory. It may also increase the latency in the system after the connection is lost.
Pick this number with caution. In-house testing shows good results when this value is set to 10,485,760. This is a good starting value if you need to configure the socket buffer size.
Manual configuration of the socket buffer size is not available in the Windows operating system. It is only used on the Linux operating system.
To configure the socket buffer size (Linux operating system)
• You can change the socket buffer size with the following command:
sysctl -w net.core.rmem_max=10485760
sysctl -w net.core.wmem_max=10485760
• The configuration can be performed at boot up by modifying the /etc/sysctl.conf file with the lines:
net.core.rmem_max=10485760
net.core.wmem_max=10485760
EX001-017-0006 Version 1.0 Configuring Your Computer and Network Adapters for Best Performance 7
Minimizing the Impact of Windows Firewall and Other Filter Drivers
Firewalls, anti-virus software, third-party filter drivers, Wireshark, and Windows networking traffic monitoring software can affect the performance of your system because they monitor the incoming packets at different network stack layers. For powerful systems or a low bandwidth stream, the impact of these filters may be negligible. For other systems, the impact can be significant and needs to be handled appropriately.
To minimize the impact of Windows Firewall and other filter drivers, ensure you:
• Turn off the Windows firewall.
• Disable the anti-virus scan.
• Disable third-party filter drivers (on the NIC’s properties page).
• Do not open the Networking tab in Windows Task Manager.
• Do not run the Windows Performance Monitor (perfmon.exe).
• Do not run Wireshark. Only use Wireshark when it is needed for debugging purposes.
Configuring Multiple NICs in a Single Computer
When there are multiple NICs installed in the same computer, we recommend that you configure each NIC with an IP address on a unique subnet. The following scenario shows a computer with three NICs:
NIC #1
• IP address: 192.168.128.135
• Subnet mask: 255.255.255.0. For example, an office network.
NIC #2:
• IP address: 192.168.3.85
• Subnet mask: 255.255.255.0. For example, connected to one GigE Vision device.
NIC #3:
• IP address: 192.168.4.10
• Subnet mask: 255.255.255.0. For example, connected to another GigE Vision device.
With the configuration above, NIC #1 is on an office network with a DHCP server, which provides an IP address on the 192.168.128.x subnet. NIC #2 and NIC #3 use a static IP address.

EX001-017-0006 Version 1.0 Configuring Your Computer and Network Adapters for Best Performance 8
To configure a static IP address for a NIC
1. In the Windows Control Panel, click Network and Internet.
2. Click Network and Sharing Center.
3. In the left-hand panel, click Change adapter settings.
4. Right-click the NIC and then click Properties.

EX001-017-0006 Version 1.0 Configuring Your Computer and Network Adapters for Best Performance 9
5. Click Internet Protocol Version 4 (TCP/IPv4) and then click Properties.
6. Select Use the following IP address and give the NIC an IP address. We recommend you leave the Default
gateway box empty.
7. Close the open dialog boxes to apply the changes.
If NIC #2 and #3 both use Obtain an IP address automatically (the default Windows setting) and there is no DHCP server on either network, both NICs automatically get an LLA IP address of 169.254.x.y and a subnet mask of 255.255.0.0. In this situation, the IP addresses are on the same subnet, which is an incorrect configuration.
If there is an unused NIC in your computer and it is not connected to a network, then you do not need to configure its IP address.

EX001-017-0006 Version 1.0 Configuring Your Computer and Network Adapters for Best Performance 10
Configuring Power Management (Windows Operating System Only)
For image streaming applications that run for an extended period of time, we recommend that you change the Windows power plan settings to ensure the computer and NIC never go to sleep. If you do not change the power plan settings, the computer or NIC may go to sleep when there is no activity from the keyboard or mouse for certain amount of time and the image stream may be interrupted.
To configure the power plan settings
1. In the Windows Control Panel, click Hardware and Sound and then click Power Options.
2. Beside the selected power plan, click Change plan settings.
3. In the Put the computer to sleep list, click Never.

EX001-017-0006 Version 1.0 Configuring Your Computer and Network Adapters for Best Performance 11
4. You do not need to change the Turn off the display option. You can leave it at its current setting.
To configure the power settings for the NIC
1. In the Windows Control Panel, click Network and Internet.
2. Click Network and Sharing Center.

EX001-017-0006 Version 1.0 Configuring Your Computer and Network Adapters for Best Performance 12
3. In the left-hand panel, click Change adapter settings.
4. Right-click the NIC and then click Properties.
5. Click Configure.
6. Configure the power management settings for the NIC to ensure the computer does not turn off the device to save power.
7. Click OK.
8. Repeat steps 4-7 for each NIC on your computer.
Configuring Your Computer’s Video and Graphic Card
It is important that you update the version of the video card adapter driver. This component is often used during the viewing process and may directly impact the overall system performance through CPU usage and the sharing of buses.

EX001-017-0006 Version 1.0 Configuring Your Computer and Network Adapters for Best Performance 13
Copyright Information
Copyright © 2012 Pleora Technologies Inc.
These products are not intended for use in life support appliances, devices, or systems where malfunction of these products can reasonably be expected to result in personal injury. Pleora Technologies Inc. (Pleora) customers using or selling these products for use in such applications do so at their own risk and agree to indemnify Pleora for any damages resulting from such improper use or sale.
Trademarks
PureGEV, eBUS, iPORT, vDisplay, and all product logos are trademarks of Pleora Technologies. Third party copyrights and trademarks are the property of their respective owners.
Notice of Rights
All information provided in this manual is believed to be accurate and reliable. No responsibility is assumed by Pleora for its use. Pleora reserves the right to make changes to this information without notice. Redistribution of this manual in whole or in part, by any means, is prohibited without obtaining prior permission from Pleora.
Document Number
EX001-017-0006 Version 1.0