Embed Size (px)
Citation preview

Cisco IOL-28278-01
C H A P T E R 4
Configuring SAP Targets and Runtime UsersBefore you can create or run processes in your SAP environment, you must create the targets on which the processes will run. Targets are used to define specific environments where activities, triggers and processes will be executed. Use the Definitions—Targets view to define the targets.
When creating targets, a runtime user account must be specified to be used to connect to the target. The runtime user account stores the information about the user security context for the target. You can create the runtime user accounts during the process of creating the targets or prior to creating the targets using the Runtime Users workspace in the Console.
This chapter provides instructions for creating and managing the SAP targets. It includes the following sections:
• SAP Target and Runtime User Types, page 4-2
• Creating SAP System Targets, page 4-3
• Creating SAP Solution Manager Targets, page 4-10
• Creating and Configuring HANA Targets, page 4-13
• Creating and Configuring SAP BOBJ DS Targets, page 4-22
• Creating and Configuring BOBJ XI Targets, page 4-26
4-1ntelligent Automation for SAP 3.0 Installation Guide

Chapter 4 Configuring SAP Targets and Runtime Users SAP Target and Runtime User Types
SAP Target and Runtime User TypesThe type of target that is required depends on the adapter that supports the automation pack. For the SAP-related automation packs, the following targets and corresponding runtime user account types are used:
Target Description Runtime User Type
SAP System SAP system SAP User
SAP ABAP connection SAP User
SAP Java application server Runtime User
SAP database Runtime User
SAP Solution Manager Connects to an SAP Solution Manager system.
SAP User
SAP HANA (Service target)
Use the service target to reference all the targets in the SAP HANA environment. The following targets are referenced in the HANA System target:
• Generic Data Source (OLEDB)—database target
• Web Target
• Unix/Linux System Target
Runtime User
SAP BOBJ DS (Service target)
Use the service target type for the BOBJ DS environment. The following targets must also be created and referenced in the BOBJ DS Service target:
• Web Target
• BOBJ DS Database Target
• BWA Unix/Linux target
Runtime User
SAP BOBJ XI (Service target)
Use the service target type for the BOBJ XI environment. The following targets must also be created and referenced in the BOBJ XI Service target:
• JMX Server Target
• Web Target
Runtime User
4-2Cisco Intelligent Automation for SAP 3.0 Installation Guide
OL-28278-01
Chapter 4 Configuring SAP Targets and Runtime Users Creating SAP System Targets
Creating SAP System TargetsThis section guides you through creating SAP System targets. You can create a target for an SAP system that uses an ABAP connection to the application server, an ABAP and Java connection to the application server, or a Java connection to application server.
Note The SAP ABAP and Java targets require that certain files be installed on the Process Orchestrator server prior to creating the targets. Refer to the following sections to ensure the prerequisite files are installed:
• Installing SAP .NET Connector Files, page 2-4
• Installing SAP Java Library Files, page 2-5
Note Only one target for each SAP system can be created. For multi-tenant environments, you can create targets for different SAP systems but use the same system ID (SID).
When using the same SID for different SAP systems, you must enter the organization for each SAP system so Process Orchestrator can differentiate the alerts and incidents for each system.
The New SAP System wizard is used to create SAP system targets.
Step 1 On the Definitions workspace, right-click Targets and choose New > SAP System to open the Welcome to the New SAP System Wizard panel.
Step 2 Click Next to continue.
System Setup Panel
The System Setup panel displays for all types of SAP system targets. Use this panel to specify the system information for the target.
Field Description
Display name Enter a name for the SAP system. This is the name that will display in the Targets pane.
System Components
ABAP application servers Check this check box if the SAP system uses an ABAP connection to the application server.
Java application servers Check this check box if the SAP system uses a Java connection to the application server.
SAP database Check this check box if you want to configure the SAP database that is associated with the SAP ABAP system.
4-3Cisco Intelligent Automation for SAP 3.0 Installation Guide
OL-28278-01

Chapter 4 Configuring SAP Targets and Runtime Users Creating SAP System Targets
Step 3 Click Next to continue.
ABAP Connection Panel
This panel displays if you are creating a target for an SAP ABAP system and is used to specify the connection information for the SAP ABAP system.
Monitor as production system This check box is checked by default. Certain processes will run only on production systems.
If you want to monitor the system as a non-production system (development or sandbox), uncheck the check box.
Organization Enter the group or organization within the company that owns the target.
Note If you are configuring multiple SAP systems with the same SID, you must specify the organization for each SAP system target.
Field Description
Field Description
Connect using Choose the connection method from the drop-down list. The fields that display on the panel depend on the connection method selected.
Application server Choose this option to connect to the SAP system using the SAP application server connection information.
Specify the information in the following fields:
• Server name—Enter the name of the SAP application server.
• System number—Enter the SAP system number.
Logon group Choose this option to establish a connection using a logon group, which contains a group of SAP system instances. When a user logs on to a logon group, the message server directs the users to the server of this group that currently has the lightest load.
Specify the information in the following fields:
• System ID—Enter the SAP system ID (SID).
• Message server—Enter the name of the server a user logs on to and that handles the communication between the application servers. For example, transport of update requests and lock requests.
• Group name—Enter the name of the Logon Group to be accessed. The name entered in this field is case-sensitive.
4-4Cisco Intelligent Automation for SAP 3.0 Installation Guide
OL-28278-01
Chapter 4 Configuring SAP Targets and Runtime Users Creating SAP System Targets
Step 4 Click Next to continue.
Server Availability Panel
This panel displays if you are creating a target for an SAP ABAP system. The Server Availability panel is used to specify the SAP application servers that you want to monitor for availability and the ability to log in a user.
All detected servers are checked by default.
a. Verify the check box next to each server to be monitored is checked.
b. Perform the following tasks to add or remove a server from the list:
– If a server is offline during configuration, it will not be displayed in the list of available servers. To manually add the server, click Add and enter the name of the server.
– If you want to remove a server from the list, select the server and click Remove.
Step 5 Click Next to continue.
Database Connection Panel
If you are configuring an SAP database, the Database Connection panel displays.
a. Choose the Database type from the drop-down list to display the fields for the specific type of database.
b. Specify the information for the type of database that is being configured. The fields that display depend on the database type.
Router string (optional) Enter the router string for accessing the SAP systems via SAPRouter. If you do not specify a router string, Process Orchestrator accesses the SAP system directly.
The router string must be formatted as:
/H/host01/H/host02/H/
where host01 and host02 are the SAP systems that you want to access through the SAPRouter.
Default runtime user Choose the user account that contains the credentials to connect to the target from the drop-down list.
• To view the properties for the selected runtime user, click the Properties tool.
• To create a new SAP User, click New > SAP User. See Creating an SAP User Account, page 4-2.
Field Description
Field Description
SQL Server Database
Server Enter the name of the SAP application server where the database resides.
Database name Enter the name of the SAP database that is associated with the SAP system.
Database owner Enter the name of the user that owns the rights to the database.
4-5Cisco Intelligent Automation for SAP 3.0 Installation Guide
OL-28278-01

Chapter 4 Configuring SAP Targets and Runtime Users Creating SAP System Targets
Step 6 Click Next to continue.
Oracle Database
Hostname Click this radio button to specify the information for connecting to the database using the server host name or IP address.
• SID—System ID for the server where the Oracle database resides.
• Port Number—Enter the port number used to connect to the database.
RAC via TNS Click this radio button to connect to an Oracle RAC cluster using the TNS alias.
Enter the tnsname for the data source in the text field.
Note For additional information on using this option, see the Oracle Adapter online help.
Database owner Enter the name of the user that owns the rights to the database.
Generic Data Source (OLEDB)
Hostname or data source Name of the host server or data source for the Generic database.
Database owner Enter the name of the user that owns the rights to the database.
Common Fields for all Databases
Default timeout for activities (seconds) Enter the number of seconds before the activity times out. The default timeout period is 120 seconds.
Default runtime user Choose the user account that contains the credentials to connect to the database from the drop-down list.
• To view the properties for the selected runtime user, click the Properties tool.
• To create a new runtime user, click New > Runtime User.
Connection string If the database has a custom connection string label appended to the name, check the check box and modify the string in the text field.
Field Description
4-6Cisco Intelligent Automation for SAP 3.0 Installation Guide
OL-28278-01
Chapter 4 Configuring SAP Targets and Runtime Users Creating SAP System Targets
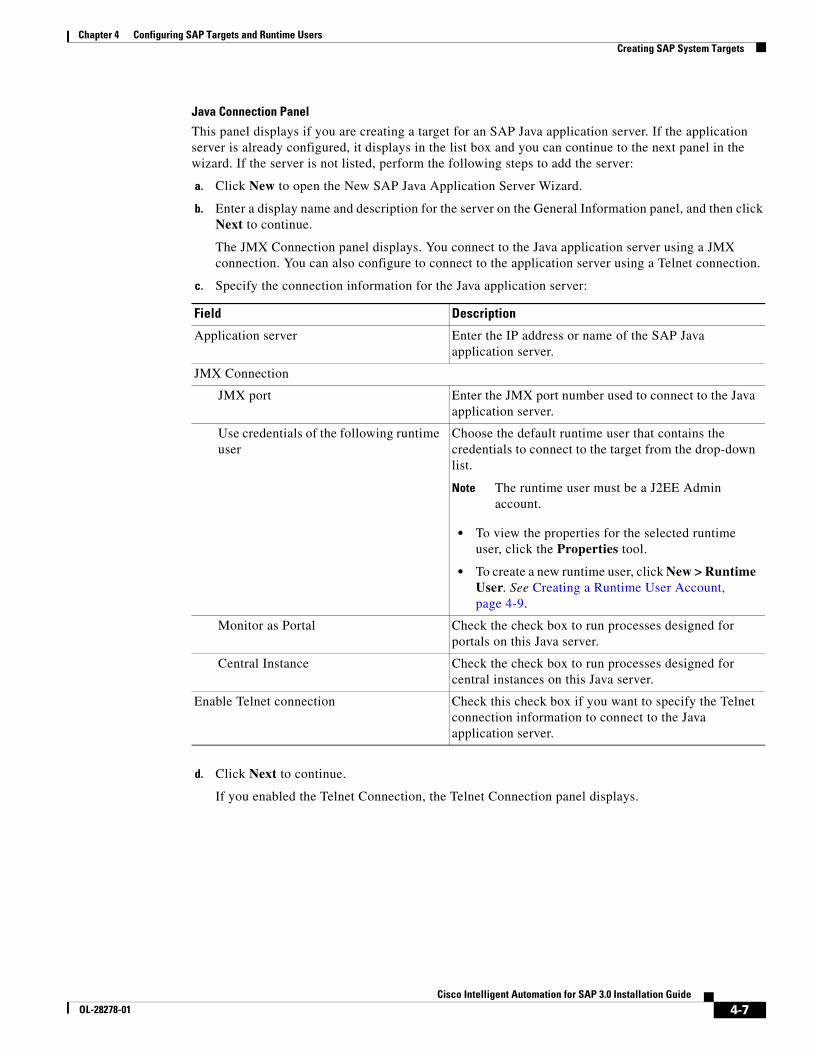
Java Connection Panel
This panel displays if you are creating a target for an SAP Java application server. If the application server is already configured, it displays in the list box and you can continue to the next panel in the wizard. If the server is not listed, perform the following steps to add the server:
a. Click New to open the New SAP Java Application Server Wizard.
b. Enter a display name and description for the server on the General Information panel, and then click Next to continue.
The JMX Connection panel displays. You connect to the Java application server using a JMX connection. You can also configure to connect to the application server using a Telnet connection.
c. Specify the connection information for the Java application server:
d. Click Next to continue.
If you enabled the Telnet Connection, the Telnet Connection panel displays.
Field Description
Application server Enter the IP address or name of the SAP Java application server.
JMX Connection
JMX port Enter the JMX port number used to connect to the Java application server.
Use credentials of the following runtime user
Choose the default runtime user that contains the credentials to connect to the target from the drop-down list.
Note The runtime user must be a J2EE Admin account.
• To view the properties for the selected runtime user, click the Properties tool.
• To create a new runtime user, click New > Runtime User. See Creating a Runtime User Account, page 4-9.
Monitor as Portal Check the check box to run processes designed for portals on this Java server.
Central Instance Check the check box to run processes designed for central instances on this Java server.
Enable Telnet connection Check this check box if you want to specify the Telnet connection information to connect to the Java application server.
4-7Cisco Intelligent Automation for SAP 3.0 Installation Guide
OL-28278-01

Chapter 4 Configuring SAP Targets and Runtime Users Creating SAP System Targets
e. Specify the Telnet connection information for connecting to the Java application server:
f. Click Next to continue.
g. Verify that the information is correct on the Completing the New SAP Java Application Server Wizard panel, and then click Finish to add the SAP Java application server on the Java Connection panel.
Step 7 Click Next on the Java Connection panel.
Step 8 Verify that the information is correct on the Completing the New SAP System Wizard panel, and then click Finish to complete the procedure.
The newly added SAP targets display in the Targets pane.
Creating an SAP User AccountThe SAP User is the runtime user account type that connects to an SAP ABAP application server, SAP system, or SAP Solution Manager target.
Step 1 Use one of the following methods to open the New SAP User Properties dialog box:
• When configuring a target, click New > SAP User in the Default runtime user field.
• In the Definitions workspace, right-click Runtime Users and choose New > SAP User.
Step 2 On the General tab, specify the following information:
Field Description
Telnet port Enter the Telnet port number used to connect to the Java application server.
Use credentials of the following runtime user
Choose the default runtime user that contains the credentials to connect to the target from the drop-down list.
Note The runtime user must be a J2EE Admin account.
• To view the properties for the selected runtime user, click the Properties tool.
• To create a new runtime user, click New > Runtime User. See Creating a Runtime User Account, page 4-9.
Field Description
Display name Name for the user account.
User name User name assigned to the SAP user account that connects to the SAP system or ABAP application server.
Password Password assigned to the SAP user account that connects to the SAP system or ABAP application server.
Client SAP client number assigned to the user account.
Description Optional. A description of the user account.
4-8Cisco Intelligent Automation for SAP 3.0 Installation Guide
OL-28278-01

Chapter 4 Configuring SAP Targets and Runtime Users Creating SAP System Targets
Step 3 Click OK to close the dialog box.
Creating a Runtime User AccountThe Runtime User is the runtime user account type that will be used to connect to an SAP Java application server, SAP database, or SAP BI Warehouse server target.
Step 1 Use one of the following methods to open the New SAP User Properties dialog box:
• When configuring a target, click New > Runtime User in the Default runtime user field.
• In the Definitions workspace, right-click Runtime Users and choose New > Runtime User.
Step 2 On the General tab, specify the following information:
Step 3 Click OK to close the dialog box.
Field Description
Display name Name for the user account. This field can be populated with the information specified in the Domain and User name text fields, or you can enter a different name to display for the user account.
User name User name assigned to the user account that connects to the SAP target.
Password Check the check box and enter the password assigned to the user account.
Note No password verification is done for the simple (generic) runtime user.
Description Optional. A description of the user account.
4-9Cisco Intelligent Automation for SAP 3.0 Installation Guide
OL-28278-01
Chapter 4 Configuring SAP Targets and Runtime Users Creating SAP Solution Manager Targets
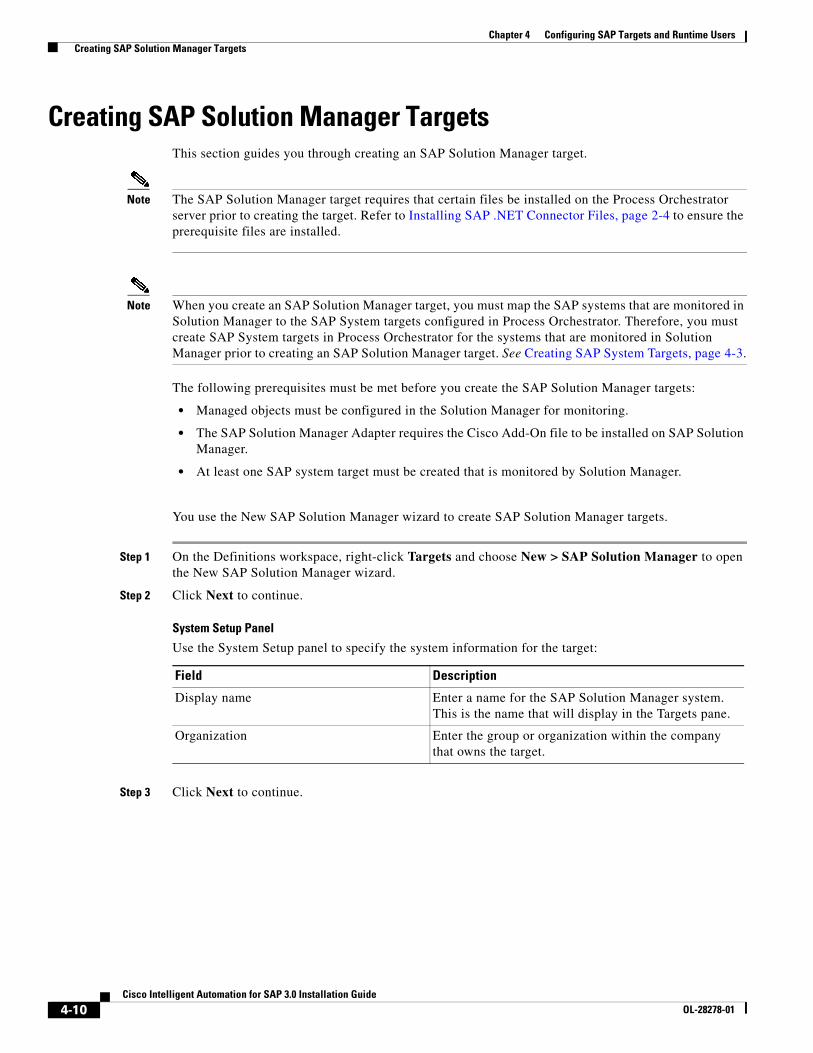
Creating SAP Solution Manager TargetsThis section guides you through creating an SAP Solution Manager target.
Note The SAP Solution Manager target requires that certain files be installed on the Process Orchestrator server prior to creating the target. Refer to Installing SAP .NET Connector Files, page 2-4 to ensure the prerequisite files are installed.
Note When you create an SAP Solution Manager target, you must map the SAP systems that are monitored in Solution Manager to the SAP System targets configured in Process Orchestrator. Therefore, you must create SAP System targets in Process Orchestrator for the systems that are monitored in Solution Manager prior to creating an SAP Solution Manager target. See Creating SAP System Targets, page 4-3.
The following prerequisites must be met before you create the SAP Solution Manager targets:
• Managed objects must be configured in the Solution Manager for monitoring.
• The SAP Solution Manager Adapter requires the Cisco Add-On file to be installed on SAP Solution Manager.
• At least one SAP system target must be created that is monitored by Solution Manager.
You use the New SAP Solution Manager wizard to create SAP Solution Manager targets.
Step 1 On the Definitions workspace, right-click Targets and choose New > SAP Solution Manager to open the New SAP Solution Manager wizard.
Step 2 Click Next to continue.
System Setup Panel
Use the System Setup panel to specify the system information for the target:
Step 3 Click Next to continue.
Field Description
Display name Enter a name for the SAP Solution Manager system. This is the name that will display in the Targets pane.
Organization Enter the group or organization within the company that owns the target.
4-10Cisco Intelligent Automation for SAP 3.0 Installation Guide
OL-28278-01

Chapter 4 Configuring SAP Targets and Runtime Users Creating SAP Solution Manager Targets
Connection Panel
Use the Connection panel to specify the information required to connect to the SAP Solution Manager target:
Field Description
Connect using Choose the connection method from the drop-down list. The fields that display on the panel depend on the connection method selected.
Application server Choose this option to connect to the SAP Solution Manager target using the SAP application server connection information.
Specify the information in the following fields:
• Server name—Enter the name of the SAP Solution Manager application server (for example, sap-sol.xxx.domain.local).
• System number—Enter the SAP Solution Manager system number.
Logon group Choose this option to establish a connection using a logon group, which contains a group of SAP Solution Manager system instances. When a user logs on to a logon group, the message server directs the users to the server of this group that currently has the lightest load.
Specify the information in the following fields:
• System ID—Enter the SAP Solution Manager system ID (SID).
• Message server—Enter the name of the server a user logs on to and that handles the communication between the application servers. For example, transport of update requests and lock requests.
• Group name—Enter the name of the Logon Group to be accessed. The name entered in this field is case-sensitive.
Router string (optional) Enter the router string for accessing the SAP Solution Manager systems via SAPRouter. If you do not specify a router string, Process Orchestrator accesses the SAP Solution Manager system directly.
The router string must be formatted as:
/H/host01/H/host02/H/
where host01 and host02 are the SAP Solution Manager systems that you want to access through the SAPRouter.
Default runtime user Choose the user account that contains the credentials to connect to the target from the drop-down list.
• To view the properties for the selected runtime user, click the Properties tool.
• To create a new SAP User, click New > SAP User. See Creating an SAP User Account, page 4-8.
4-11Cisco Intelligent Automation for SAP 3.0 Installation Guide
OL-28278-01

Chapter 4 Configuring SAP Targets and Runtime Users Creating SAP Solution Manager Targets
Step 4 Click Next to continue.
Options Panel
Use this panel to specify polling intervals and to map the systems that are being monitored by the Solution Manager target to the SAP System targets configured in Process Orchestrator. The list box displays the systems that are mapped.
Note The matching SAP System targets must already be created in Process Orchestrator.
Step 5 Click Next to continue.
Step 6 Verify that the information is correct on the Completing the New SAP Solution Manager Wizard panel, and then click Finish to complete the procedure.
The SAP Solution Manager target displays in the Targets pane.
Field Description
Poll Solution Manager alert not older than Specify the value (in minutes, hours or days) to indicate which SAP Solution Manager alerts to retrieve. Any alerts older than the specified value will be ignored.
Select a system monitored by Solution Manager
Choose the SAP system that is monitored by Solution Manager from the drop-down list.
Select a matching system monitored by Process Orchestrator
Choose the SAP system target that is configured in Process Orchestrator from the drop-down list. This target must already be defined in Process Orchestrator.
Add to List Click this button to add the mapped configuration to the list of systems to be monitored.
Refresh Click this button to refresh the list of systems to be monitored.
4-12Cisco Intelligent Automation for SAP 3.0 Installation Guide
OL-28278-01

Chapter 4 Configuring SAP Targets and Runtime Users Creating and Configuring HANA Targets
Creating and Configuring HANA TargetsThe Automation for SAP HANA automation pack includes a SAP HANA target template that can be used to create a service target for the HANA environment. The service target will hold the reference to all of the connections to HANA that are needed for automation.
Before you can reference the connections in the SAP HANA target, you must create the targets that will be referenced (Web target, Linux/Unix targets, Database target, SAP System target). After you create these targets, you create a unique SAP HANA target using the template and reference them.
This section guides you through creating the targets in the HANA environment, creating a HANA System system target using the template, and then referencing the target using the Target Properties feature.
Creating SAP HANA Database TargetYou must create a database target for the SAP HANA database using the Generic Data Source (OLEDB) target type. Use the New Generic Data Source (OLEDB) Properties dialog box to create the database target.
Step 1 On the Definitions workspace, right-click Targets and choose New > Generic Data Source (OLEDB) to open the New Generic Data Source (OLEDB) Properties dialog box.
Step 2 On the General tab, specify the following information:
Step 3 Click the Connection tab and specify the following connection information for the target:
Field Description
Display name Name for the target. This is the name that will display in the Targets pane.
Owner User name of the owner of the target. This is typically the person who created the target.
Organization Name of the group or organization within the company that owns the target.
Description Optional. Information that describes the target.
Field Description
Hostname or Datasource Name of the server or data source where the HANA database resides. Enter the information in the following format:
<server name>:port
Note Port number will be 3XX15, where XX is the HANA System Number.
Database Owner Principal owner of the database.
Default time out for activities (seconds) Length of time to wait before a command is complete.
4-13Cisco Intelligent Automation for SAP 3.0 Installation Guide
OL-28278-01

Chapter 4 Configuring SAP Targets and Runtime Users Creating and Configuring HANA Targets
Step 4 Click the Permission tab, and then click the Execute SQL command radio button.
Step 5 Click OK to close the dialog box and complete the procedure.
Creating Web TargetsIf you want to configure Process Orchestrator to monitor the Web targets in your HANA environment, you must create a Web target using the using the New Web Target Properties dialog box.
Step 1 On the Definitions workspace, right-click Targets and choose New > Web Target to open the New Web Target Properties dialog box.
Step 2 On the General tab, enter the information in the following text fields:
Runtime User Choose the runtime user account that is used to connect to the data source from the drop-down list.
Note To view the properties for the selected runtime user, click the Properties tool.
To create a new runtime user account, click New and then choose Runtime User. See Creating a Runtime User Account, page 4-9.
Note The HANA User account created for Process Orchestrator should have the following authorizations:MONITORING HANA: This role authorizes the read monitoring activities.SESSION ADMIN: This role adds system privileges to the accounts to support the corrective actions in the content.
These two authorizations cover all authorized content shipped in the automation pack for HANA.
Connection string Check the check box and enter the DSN connection string to the data source. For example:
DSN=DH1;
Field Description
Field Description
Display name Name for the target. This is the name that will display in the Targets pane.
Owner User name of the owner of the target. This is typically the person who created the target.
4-14Cisco Intelligent Automation for SAP 3.0 Installation Guide
OL-28278-01

Chapter 4 Configuring SAP Targets and Runtime Users Creating and Configuring HANA Targets
Step 3 Click the Connection tab and then specify the following connection information for the target:
Step 4 Click OK to close the dialog box and complete the procedure.
Organization Name of the group or organization within the company that owns the target.
Description Optional. A description for the target.
Field Description
Base Url Enter the appropriate target URL to use as a base for the execution. For example:
http://<hanahostname>:5XX13/?wsdl
where XX=HANA System Number
Runtime User Click one of the following radio buttons to indicate which runtime user account to use to connect to the target:
• No runtime user—Click this radio button to indicate that no runtime user is required to execute a process or activity against the target.
• Default runtime user—Click this radio button and then choose the default runtime user account that contains the credentials to connect to the target.
Note To view the properties for the selected runtime user, click the Properties tool.
To create a new runtime user account, click New and then choose Runtime User. See Creating a Runtime User Account, page 4-9.
Note The runtime user for this target should be the HANA OS SIDADM user.
Ignore certificate errors Check or uncheck the check box to indicate whether the target should ignore any certificate errors on the specified web site. If the check box is checked, all errors will be ignored.
Field Description
4-15Cisco Intelligent Automation for SAP 3.0 Installation Guide
OL-28278-01

Chapter 4 Configuring SAP Targets and Runtime Users Creating and Configuring HANA Targets
Creating Unix/Linux System TargetIf you want to monitor the HANA Linux systems in your environment, you must create the Unix/Linux System targets. The Automation for SAP HANA content requires that two different Unix/Linux System targets be created with different runtime user accounts:
• HANA.SAP Administration Unix Target—This target is used for SAP command line applications and uses the HANA OS SIDADM runtime user account.
• HANA.Linux Administration Unix Target—This target is used for LINUX command line administration applications and uses a Linux user with OS administration permissions as the runtime user account.
Note If you want to monitor all Linux hosts, you must configure Auto-SSH login proxy. See Configuring Auto-SSH Login Proxy, page 4-19.
Step 1 On the Definitions workspace, right-click Targets and choose New > Unix/Linux System to open the New Unix/Linux System Properties dialog box.
Step 2 On the General tab, specify the following information:
Step 3 Click the Connection tab and then specify the connection information to connect to the Unix/Linux server:
Field Description
Display name Enter a name for the Database target. This is the name that will display in the Targets pane.
Owner User name of the owner of the target. This is typically the person who created the target.
Organization Name of the group or organization within the company that owns the target.
Description Optional. A description for the target.
Enabled Check or uncheck the check box to enable or disable the target. The check box is checked by default.
Field Description
Host name Host name or IP address of server.
Port Port number used to access the server.
4-16Cisco Intelligent Automation for SAP 3.0 Installation Guide
OL-28278-01
Chapter 4 Configuring SAP Targets and Runtime Users Creating and Configuring HANA Targets
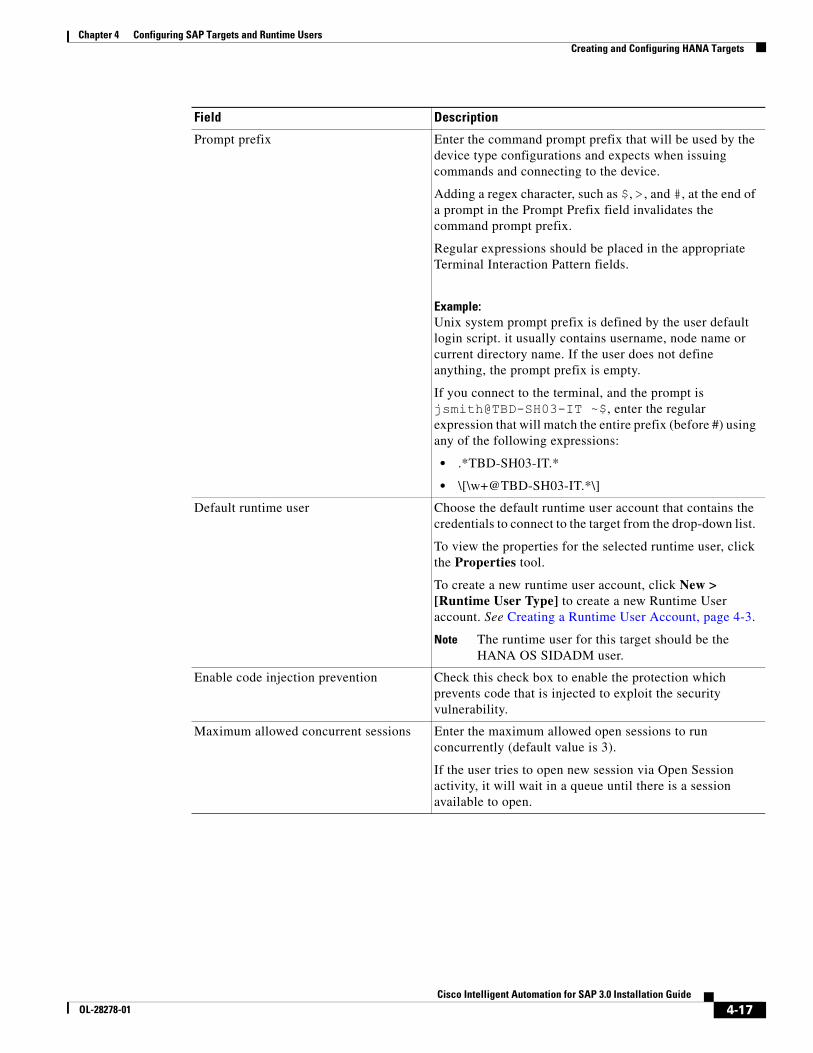
Prompt prefix Enter the command prompt prefix that will be used by the device type configurations and expects when issuing commands and connecting to the device.
Adding a regex character, such as $, >, and #, at the end of a prompt in the Prompt Prefix field invalidates the command prompt prefix.
Regular expressions should be placed in the appropriate Terminal Interaction Pattern fields.
Example:Unix system prompt prefix is defined by the user default login script. it usually contains username, node name or current directory name. If the user does not define anything, the prompt prefix is empty.
If you connect to the terminal, and the prompt is jsmith@TBD-SH03-IT ~$, enter the regular expression that will match the entire prefix (before #) using any of the following expressions:
• .*TBD-SH03-IT.*
• \[\w+@TBD-SH03-IT.*\]
Default runtime user Choose the default runtime user account that contains the credentials to connect to the target from the drop-down list.
To view the properties for the selected runtime user, click the Properties tool.
To create a new runtime user account, click New > [Runtime User Type] to create a new Runtime User account. See Creating a Runtime User Account, page 4-3.
Note The runtime user for this target should be the HANA OS SIDADM user.
Enable code injection prevention Check this check box to enable the protection which prevents code that is injected to exploit the security vulnerability.
Maximum allowed concurrent sessions Enter the maximum allowed open sessions to run concurrently (default value is 3).
If the user tries to open new session via Open Session activity, it will wait in a queue until there is a session available to open.
Field Description
4-17Cisco Intelligent Automation for SAP 3.0 Installation Guide
OL-28278-01

Chapter 4 Configuring SAP Targets and Runtime Users Creating and Configuring HANA Targets
Step 4 Click the Authentication tab to and specify the following information to indicate whether the target should allow authentication based on the host system:
Step 5 Click the Advanced tab and specify the interaction patterns for the target.
Step 6 Click OK to close the dialog box and complete the procedure.
Field Description
Use host-based authentication Check this check box to indicate that host-based authentication will be used with this target.
If this check box is unchecked, then host-based authentication will not be used.
Use the default host keys This check box becomes enabled after the Use host-based authentication check box is checked.
Check this check box to indicate the host keys defined on the Terminal Adapter property page will be used for this target.
If this check box is unchecked, then the user will need to load the appropriate private key to be used to validate this target.
Private key This box becomes enabled only if the Use the default host keys check box is unchecked.
To the right of the display-only field, click the Browse tool to launch the Load Private Key dialog box and select a private key.
Field Description
Use patterns common for the following device
Click the radio button one of the pre-defined device targets from the drop-down list.
• Cisco IOS Device—Select this option to use the default pattern values used by the device during the completion of a session command.
• Unix/Linux System—Select this option to use the default pattern values indicated for a Unix or Linux system during the completion of a session command.
To view the properties for the selected device, click the Properties tool.
To create a new device, click New > Expect Template to create a new expect template.
Customize patterns for this target Select this radio button to enable the display-only sections in order to customize the default values for the selected device type.
4-18Cisco Intelligent Automation for SAP 3.0 Installation Guide
OL-28278-01

Chapter 4 Configuring SAP Targets and Runtime Users Creating and Configuring HANA Targets
Configuring Auto-SSH Login Proxy
If you want to monitor all Linux hosts in your environment, you must configure an Auto-SSH login proxy.
Note If you choose not to set up auto login proxy, only the Process Orchestrator Linux system target will be monitored.
Step 1 Create a Linux user with permissions for the following Linux commands:
• top
• iostat
• mpstat
• vmstat
• df
Step 2 Perform SSH login to the HANA Unix/Linux system target configured in Process Orchestrator using the Linux user account created in Step 1.
Step 3 Execute the command ssh-keygen -t rsa.
a. Enter passphrase as empty.
b. Note the file location of the key.
Step 4 Execute the command ssh-copy-id -i <file path to key> < remote host> and replace the <remote host> with the hostname for all HANA hosts in the instance.
Step 5 Test the remote connection by executing the command ssh <remote host> and confirm that you are no longer prompted for a password.
Step 6 In Cisco Prime Process Orchestrator, enter the new Linux user name in the target property HANA.Linux Configuration (HANA Linux Shell User column).
Creating SAP System TargetIf you want to use the Landscape Transformation (LT) processes, you must create the SAP System (ABAP) targets for the LT replication servers that replicate data into HANA. The SAP System Wizard is used to create these targets.
See Creating SAP System Targets, page 4-3 for instructions on creating the SAP System (ABAP) targets.
4-19Cisco Intelligent Automation for SAP 3.0 Installation Guide
OL-28278-01
Chapter 4 Configuring SAP Targets and Runtime Users Creating and Configuring HANA Targets
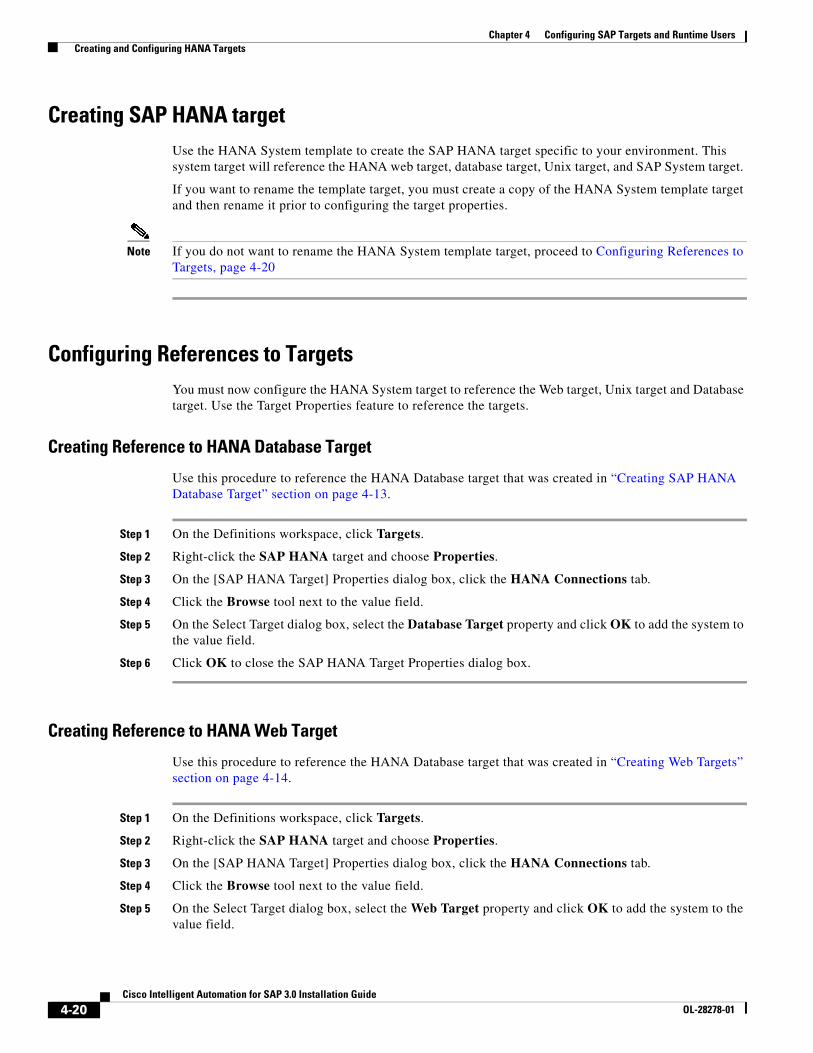
Creating SAP HANA targetUse the HANA System template to create the SAP HANA target specific to your environment. This system target will reference the HANA web target, database target, Unix target, and SAP System target.
If you want to rename the template target, you must create a copy of the HANA System template target and then rename it prior to configuring the target properties.
Note If you do not want to rename the HANA System template target, proceed to Configuring References to Targets, page 4-20
Configuring References to TargetsYou must now configure the HANA System target to reference the Web target, Unix target and Database target. Use the Target Properties feature to reference the targets.
Creating Reference to HANA Database Target
Use this procedure to reference the HANA Database target that was created in “Creating SAP HANA Database Target” section on page 4-13.
Step 1 On the Definitions workspace, click Targets.
Step 2 Right-click the SAP HANA target and choose Properties.
Step 3 On the [SAP HANA Target] Properties dialog box, click the HANA Connections tab.
Step 4 Click the Browse tool next to the value field.
Step 5 On the Select Target dialog box, select the Database Target property and click OK to add the system to the value field.
Step 6 Click OK to close the SAP HANA Target Properties dialog box.
Creating Reference to HANA Web Target
Use this procedure to reference the HANA Database target that was created in “Creating Web Targets” section on page 4-14.
Step 1 On the Definitions workspace, click Targets.
Step 2 Right-click the SAP HANA target and choose Properties.
Step 3 On the [SAP HANA Target] Properties dialog box, click the HANA Connections tab.
Step 4 Click the Browse tool next to the value field.
Step 5 On the Select Target dialog box, select the Web Target property and click OK to add the system to the value field.
4-20Cisco Intelligent Automation for SAP 3.0 Installation Guide
OL-28278-01

Chapter 4 Configuring SAP Targets and Runtime Users Creating and Configuring HANA Targets
Step 6 Click OK to close the SAP HANA Target Properties dialog box.
Creating Reference to HANA Unix Target
Use this procedure to reference the HANA Unix target that was created in “Creating Unix/Linux System Target” section on page 4-16.
Step 1 On the Definitions workspace, click Targets.
Step 2 Right-click the SAP HANA target and choose Properties.
Step 3 On the [SAP HANA Target] Properties dialog box, click the HANA Connections tab.
Step 4 Click the Browse tool next to the value field.
Step 5 On the Select Target dialog box, select the SAP Administration Unix Target property and click OK to add the system to the value field.
Step 6 Click OK to close the SAP HANA Target Properties dialog box.
4-21Cisco Intelligent Automation for SAP 3.0 Installation Guide
OL-28278-01

Chapter 4 Configuring SAP Targets and Runtime Users Creating and Configuring SAP BOBJ DS Targets
Creating Reference to HANA ABAP Target
Use this procedure to reference the HANA ABAP target that was created in “Creating SAP System Target” section on page 4-19.
Step 1 On the Definitions workspace, click Targets.
Step 2 Right-click the SAP HANA target and choose Properties.
Step 3 On the [SAP HANA Target] Properties dialog box, click the HANA Connections tab.
Step 4 Click the Browse tool next to the value field.
Step 5 On the Select Target dialog box, select the ABAP Target property and click OK to add the system to the value field.
Step 6 Click OK to close the SAP HANA Target Properties dialog box.
Creating and Configuring SAP BOBJ DS TargetsThe Automation for SAP BOBJ Accelerator automation pack includes a BOBJ DS Target Template that can be used to create service targets for the BOBJ DS environment. The service target will hold the reference to all of the connections to BOBJ DS that are needed for automation. Once the service target is created, you then create the Web and Database targets, and reference them in the BOBJ DS service target using the Target Properties feature.
In addition, you must create a BWA Unix/Linux target if you want to use the BWA TREX atomic processes that are included in the Core Automation for SAP BW, BOBJ and In-Memory Computing automation pack.
This section guides you through creating the targets and then configuring the target properties.
Creating an SAP BOBJ DS TargetUse the BOBJ DS Target Template as a basis for creating a BOBJ DS service target specific to your environment. You must first create a copy of the template target and then rename it.
Step 1 On the Definitions workspace, click Targets.
Step 2 Right-click the BOBJ DS Target Template target and choose Copy from the shortcut menu, and then right-click in a white area of the Targets pane and choose Paste.
Step 3 Right-click Copy of BOBJ DS Target Template and choose Properties.
Step 4 On the General tab, enter a name for the BOBJ DS target in the Display name text field.
Step 5 Click OK to save the target and close the dialog box.
Step 6 In the Targets pane, right-click the newly created BOBJ DS target and choose Enable to enable the target.
4-22Cisco Intelligent Automation for SAP 3.0 Installation Guide
OL-28278-01

Chapter 4 Configuring SAP Targets and Runtime Users Creating and Configuring SAP BOBJ DS Targets
Creating Web TargetTo monitor the BOBJ DS server, you need to a Web target and then reference it in the BOBJ DS service target properties.
Use the New Web Target Properties dialog box to create the Web target.
Step 1 On the Definitions workspace, right-click Targets and choose New > Web Target to open the New Web Target Properties dialog box.
Step 2 On the General tab, enter a name for the Web target in the Display name text field.
Step 3 Click the Connection tab and then specify the connection information for the target:
Step 4 Click OK to close the dialog box and complete the procedure.
The Web target displays in the Targets pane.
Field Description
Base Url Enter the appropriate target URL to use as a base for the execution. For example,
http://doc-bobj-xidev.domain.local:8080/BOE/CMC
Runtime User Click one of the following radio buttons to indicate which runtime user account to use to connect to the target:
• No runtime user—Select this radio button to indicate that no runtime user is required to execute a process or activity against the target.
• Default runtime user—Select this radio button and then choose the default runtime user account that contains the credentials to connect to the target.
Note To view the properties for the selected runtime user, click the Properties tool.
To create a new runtime user account, click New and then choose Runtime User or Windows User. See Creating a Runtime User Account, page 4-9.
Ignore certificate errors Check or uncheck the check box to indicate whether the target should ignore any certificate errors on the specified web site. If the check box is checked, all errors will be ignored.
4-23Cisco Intelligent Automation for SAP 3.0 Installation Guide
OL-28278-01

Chapter 4 Configuring SAP Targets and Runtime Users Creating and Configuring SAP BOBJ DS Targets
Creating an SAP BOBJ DS Database TargetUse the New Database Properties dialog box to create the BOBJ DS Database target.
Note The screens in this section will differ depending on the type of database you are creating. See the online help for additional information on creating database targets.
Step 1 On the Definitions workspace, right-click Targets and choose New > [Database Type] to open the New Database Properties dialog box.
Step 2 On the General tab, enter a name for the database target in the Display name text field.
Step 3 Click the Connection tab and then specify the connection information for the database.
Step 4 Click OK to close the dialog box.
The database target displays in the Targets pane.
Field Description
Server Name or the IP address for the database server.
Database name Name of the database.
Database owner Principal owner of the database.
Default timeout for activities (seconds) Length of time to wait before a command is complete.
Default runtime user Choose the user account that contains the credentials to connect to the target from the drop-down list.
• To view the properties for the selected runtime user, click the Properties tool.
• To create a new Runtime User, click New > Runtime User. See Creating a Runtime User Account, page 4-9.
Connection string Check the check box to enter the connection string for connecting to the database.
4-24Cisco Intelligent Automation for SAP 3.0 Installation Guide
OL-28278-01

Chapter 4 Configuring SAP Targets and Runtime Users Creating and Configuring SAP BOBJ DS Targets
Creating Unix/Linux TargetIf you want to run the BWA TREX atomic processes that are included in the Core Automation for SAP BW, BOBJ and In-Memory Computing automation pack, you must create the BWA Unix/Linux System target.
See Creating Unix/Linux System Target, page 4-16 for instructions about creating the Unix/Linux target.
Configuring References to TargetsYou must now configure the BOBJ DS target to reference the Web target and Database target. Use the Target Properties feature to reference the targets.
Creating Reference to BOBJ DS Web Target
Step 1 On the Definitions workspace, click Targets.
Step 2 Right-click the BOBJ DS target and choose Properties.
Step 3 On the BOBJ DS Service Target Properties dialog box, click the BOBJ DS tab.
Step 4 Select the BOBJ DS Web Target property and click Edit.
Step 5 On the Target Property Value dialog box, click the Browse tool next to the Value field.
Step 6 On the Select Target dialog box, select the BOBJ DS Web target and click OK.
Step 7 If you have completed adding target references, click OK to close the BOBJ DS Target Properties dialog box.
Creating Reference to BOBJ DS Database Target
Step 1 On the Definitions workspace, click Targets.
Step 2 Right-click the BOBJ DS target and choose Properties.
Step 3 On the BOBJ DS Service Target Properties dialog box, click the BOBJ DS tab.
Step 4 Select the BOBJ DS Database Target property and click Edit.
Step 5 On the Target Property Value dialog box, click the Browse tool next to the Value field.
Step 6 On the Select Target dialog box, select the Web target and click OK.
Step 7 Click OK to close the Target Property Value dialog box.
Step 8 If you have completed adding target references, click OK to close the BOBJ DS Target Properties dialog box.
4-25Cisco Intelligent Automation for SAP 3.0 Installation Guide
OL-28278-01

Chapter 4 Configuring SAP Targets and Runtime Users Creating and Configuring BOBJ XI Targets
Creating and Configuring BOBJ XI TargetsThe Automation for SAP BOBJ Enterprise automation pack includes a BOBJ XI Service Target Template that can be used to create a service target the BOBJ XI environment. The system target will hold the reference to all of the connections to BOBJ XI that are needed for automation. Once the service target is created, you then create the JMX Server and Web targets, and reference them in the BOBJ XI service target using the Target Properties feature.
This section guides you through creating the targets and then configuring the target properties.
Creating BOBJ XI Service TargetUse the BOBJ XI Service Target Template as a basis for creating a BOBJ XI service target specific to your environment. You must first create a copy of the template target and then rename it.
Step 1 On the Definitions workspace, click Targets.
Step 2 Right-click the BOBJ XI Target Template target and choose Copy from the shortcut menu, and then right-click in a white area of the Targets pane and choose Paste.
Step 3 Right-click Copy of BOBJ XI Target Template and choose Properties.
Step 4 In the Display name text field, enter a name for the BOBJ XI target.
Step 5 Click OK to save the target and close the dialog box.
Step 6 In the Targets pane, right-click the newly created BOBJ XI target and choose Enable to enable the target.
Creating JMX Server TargetUse the New JMX Server Wizard to create JMX Server targets.
Step 1 On the Definitions workspace, right-click Targets and choose New > JMX Server to open the New JMX Server Wizard.
Step 2 On the General Information panel, enter a Display name and description for the target, and then click Next to continue.
Step 3 On the JMX Server Connection panel, specify the connection information for connecting to the JMX server:
Field Description
Application server Enter the name or the IP address for the JMX server.
JMX port Enter the port number used to connect to the JMX server.
Transport protocol The Sun RMI protocol is the default protocol used for connecting to a standard MBean server.
Note This is the only option available and is selected by default.
4-26Cisco Intelligent Automation for SAP 3.0 Installation Guide
OL-28278-01

Chapter 4 Configuring SAP Targets and Runtime Users Creating and Configuring BOBJ XI Targets
Step 4 Click Next to continue.
Step 5 Verify that the information is correct on the Completing the New JMX Server Wizard panel, and then click Finish to complete the procedure.
The JMX Server displays in the Targets pane.
Creating Web TargetIf you want to configure Process Orchestrator to monitor the Central Management Server URL availability, you need to create a Web target and then reference it in the BOBJ XI target properties.
See Creating Web Target, page 4-23 for instructions about creating a Web target.
Configuring References to TargetsYou must now configure the BOBJ XI target to reference the JMX target and Web targets. Use the Target Properties feature to reference the targets.
Creating Reference to BOBJ XI JMX Target
Step 1 On the Definitions workspace, click Targets.
Step 2 Right-click the BOBJ XI target and choose Properties.
Step 3 On the BOBJ XI Service Target Properties dialog box, click the BOBJ XI tab.
Step 4 Select the BOBJ XI JMX Target property and click Edit.
Step 5 On the Target Property Value dialog box, click the Browse tool next to the Value field.
Step 6 On the Select Target dialog box, select the JMX Server target and click OK.
Override URL Path Check this check box if you want to override the default URL path and enter a different URL path to the JMX server. For example,
service:jmx:rmi://doc-bobj-xidev:9090/jndi/rmi://doc-bobj-xidev:9090/doc-bobj-xidev:6400
Credentials of the following runtime user Choose the user account that contains the credentials to connect to the target from the drop-down list.
• To view the properties for the selected runtime user, click the Properties tool.
• To create a new Runtime User, click New > Runtime User. See Creating a Runtime User Account, page 4-9.
Field Description
4-27Cisco Intelligent Automation for SAP 3.0 Installation Guide
OL-28278-01

Chapter 4 Configuring SAP Targets and Runtime Users Creating and Configuring BOBJ XI Targets
Step 7 If you have completed adding target references, click OK to close the BOBJ XI Target Properties dialog box.
Creating Reference to BOBJ XI Web Target
Step 1 On the Definitions workspace, click Targets.
Step 2 Right-click the BOBJ XI target and choose Properties.
Step 3 On the BOBJ XI Service Target Properties dialog box, click the BOBJ tab.
Step 4 Select the BOBJ XI Central Management Console Web Target property and click Edit.
Step 5 On the Target Property Value dialog box, click the Browse tool next to the value field.
Step 6 On the Select Target dialog box, select the Web target and click OK.
Step 7 If you have completed adding target references, click OK to close the BOBJ XI Target Properties dialog box.
4-28Cisco Intelligent Automation for SAP 3.0 Installation Guide
OL-28278-01