Embed Size (px)
Citation preview

BS; Reviewed: SPOC 10/3/2006
Solution & Interoperability Test Lab Application Notes ©2006 Avaya Inc. All rights reserved.
1 of 28 IM-IP-Agent.doc
Avaya Solution & Interoperability Test Lab
Configuring Instant Messaging and Presence capability for Avaya IP Agent using Avaya SIP Enablement Services - Issue 1.0
Abstract These Application Notes describe how to configure Instant Messaging and Presence capability for Avaya IP Agent clients served by Avaya Communication Manager using Avaya SIP Enablement Services in a contact center environment. The Presence capability can help a contact center supervisor track the availability of the agents when the supervisor as well as the agents use the Avaya IP Agent application to handle the contact center calls.

BS; Reviewed: SPOC 10/3/2006
Solution & Interoperability Test Lab Application Notes ©2006 Avaya Inc. All rights reserved.
2 of 28 IM-IP-Agent.doc
1. Introduction These Application Notes describe how to configure Instant Messaging (IM) and Presence capability for Avaya IP Agent clients served by Avaya Communication Manager using Avaya SIP Enablement Services (SES) in a contact center environment. With appropriate IM configuration, the IP Agent clients can exchange instant messages. The Presence capability can help a contact center supervisor track the availability of the agents when the supervisor as well as the agents use the Avaya IP Agent application to handle the contact center calls.
1.1. Presence States The presence state can indicate an agent’s current availability to other users. The following list provides the presence states that are available in Avaya IP Agent:
Online - This state indicates that an agent is available and idle. Busy - This state indicates that an agent is busy and may not be available to participate in
other tasks such as an instant messaging session. Away - This state indicates that an agent is not available at the agent desktop. On the Phone - This state indicates that an agent is currently participating in a telephone
conversation. Appear Offline - This state provides the appearance that an agent is not registered to the
Avaya SES. This state does not prevent the agent from receiving instant messages. Offline – This state indicates the user is not registered to the Avaya SES and cannot
receive instant messages. :
For performance reasons, it is recommended that a supervisor track only 50 or fewer contacts. Exceeding this limit could result in delayed presence state changes.
1.2. Reference Test Network Figure 1 shows the reference test network configuration for IP Agent clients with the Instant Messaging and Presence capability, simulating a service provider data center and the enterprise sites. The service provider data center site consists of an Avaya SES server, and an Avaya SBS3100 Media Server with Avaya G700 Media Gateway. The PSTN access for the enterprise customers was provided by a SIP trunk using Avaya Communication Manager, Avaya SES, Acme Packet Net-Net Session Director, and a Cisco AS5400 SIP/PSTN Gateway. The enterprise site includes Avaya IP Agent clients and Avaya 4600 Series H.323 IP telephones in telecommuter mode. Avaya IP Agent clients and Avaya 4600 Series H.323 IP telephones registered directly with Avaya Communication Manager for call control. Avaya IP Agent clients also registered with Avaya SES for presence.

BS; Reviewed: SPOC 10/3/2006
Solution & Interoperability Test Lab Application Notes ©2006 Avaya Inc. All rights reserved.
3 of 28 IM-IP-Agent.doc
The administration of the MPLS VPN network, the SIP trunking, and the data infrastructure such as routers and firewalls in Figure 1 are not the focus of these Application Notes and will not be described.
Figure 1: Reference Test Configuration

BS; Reviewed: SPOC 10/3/2006
Solution & Interoperability Test Lab Application Notes ©2006 Avaya Inc. All rights reserved.
4 of 28 IM-IP-Agent.doc
2. Equipment and Software Validated The following table shows the equipment and software/firmware relevant to the Instant Messaging and Presence application used for the test configuration provided in Figure 1.
Equipment Software/Firmware Avaya SBS3100 Media Server Avaya Communication Manager
R3.0.1 (R013x.00.1.353) Avaya G700 Media Gateway 24.21.0 Avaya SIP Enablement Services Server 3.1 (3.1.0.0-018.0) Avaya 4620 SW IP Telephones (H.323) 2.3 Avaya IP Agent 6.0.6 Avaya C363T Converged Stackable Switch 4.5.14
3. Configure Avaya Communication Manager This section describes the necessary configuration on Avaya Communication Manager to support Avaya IP Agent. It is assumed that the call center configuration such as Automatic Call Distribution (ACD) and Expert Agent Selection resources, and the SIP trunking to Avaya SES is already in place. Adding a station extension and agent login ID that will be used by an IP Agent will be described in this section. The following configuration of Avaya Communication Manager was performed using the System Access Terminal (SAT). After completion of the configuration in this section, perform a save translation command to make the changes permanent.
BS; Reviewed: SPOC 10/3/2006
Solution & Interoperability Test Lab Application Notes ©2006 Avaya Inc. All rights reserved.
5 of 28 IM-IP-Agent.doc
Step Description
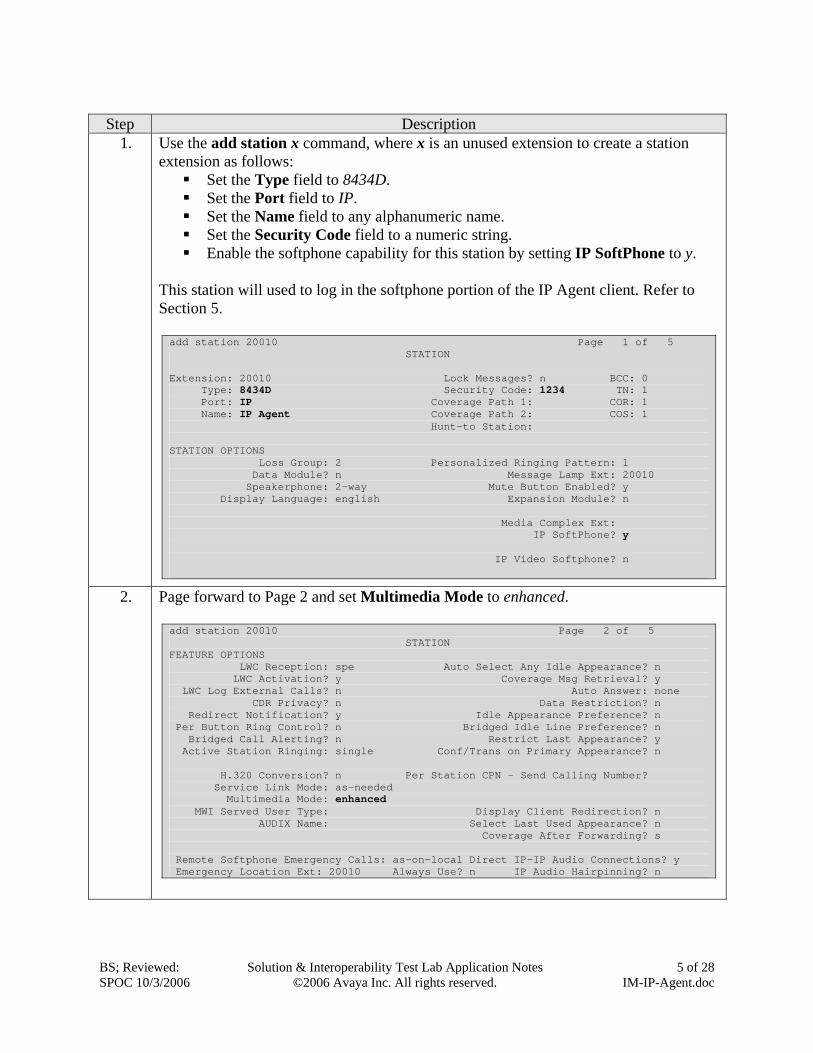
1. Use the add station x command, where x is an unused extension to create a station extension as follows:
Set the Type field to 8434D. Set the Port field to IP. Set the Name field to any alphanumeric name. Set the Security Code field to a numeric string. Enable the softphone capability for this station by setting IP SoftPhone to y.
This station will used to log in the softphone portion of the IP Agent client. Refer to Section 5. add station 20010 Page 1 of 5 STATION Extension: 20010 Lock Messages? n BCC: 0 Type: 8434D Security Code: 1234 TN: 1 Port: IP Coverage Path 1: COR: 1 Name: IP Agent Coverage Path 2: COS: 1 Hunt-to Station: STATION OPTIONS Loss Group: 2 Personalized Ringing Pattern: 1 Data Module? n Message Lamp Ext: 20010 Speakerphone: 2-way Mute Button Enabled? y Display Language: english Expansion Module? n Media Complex Ext: IP SoftPhone? y IP Video Softphone? n
2. Page forward to Page 2 and set Multimedia Mode to enhanced. add station 20010 Page 2 of 5 STATION FEATURE OPTIONS LWC Reception: spe Auto Select Any Idle Appearance? n LWC Activation? y Coverage Msg Retrieval? y LWC Log External Calls? n Auto Answer: none CDR Privacy? n Data Restriction? n Redirect Notification? y Idle Appearance Preference? n Per Button Ring Control? n Bridged Idle Line Preference? n Bridged Call Alerting? n Restrict Last Appearance? y Active Station Ringing: single Conf/Trans on Primary Appearance? n H.320 Conversion? n Per Station CPN - Send Calling Number? Service Link Mode: as-needed Multimedia Mode: enhanced MWI Served User Type: Display Client Redirection? n AUDIX Name: Select Last Used Appearance? n Coverage After Forwarding? s Remote Softphone Emergency Calls: as-on-local Direct IP-IP Audio Connections? y Emergency Location Ext: 20010 Always Use? n IP Audio Hairpinning? n

BS; Reviewed: SPOC 10/3/2006
Solution & Interoperability Test Lab Application Notes ©2006 Avaya Inc. All rights reserved.
6 of 28 IM-IP-Agent.doc
Step Description 3. Page forward to Page 3 and assign ACD related buttons (auto-in, manual-in, aux-work,
after-call, and release) under BUTTON ASSIGNMENTS as shown below: add station 20010 Page 3 of 5 STATION SITE DATA Room: Headset? n Jack: Speaker? n Cable: Mounting: d Floor: Cord Length: 0 Building: Set Color: ABBREVIATED DIALING List1: List2: List3: BUTTON ASSIGNMENTS 1: call-appr 6: manual-in Grp: 2: call-appr 7: aux-work RC: Grp: 3: call-appr 8: after-call Grp: 4: release 9: 5: auto-in Grp: 10:
4. Repeat Steps 1-3 to create station extensions for additional IP Agent clients, including the one for a supervisor. In the test configuration, extension 20010 was configured for an IP Agent client and an extension 20011 was configured for a supervisor’s IP Agent client.
BS; Reviewed: SPOC 10/3/2006
Solution & Interoperability Test Lab Application Notes ©2006 Avaya Inc. All rights reserved.
7 of 28 IM-IP-Agent.doc
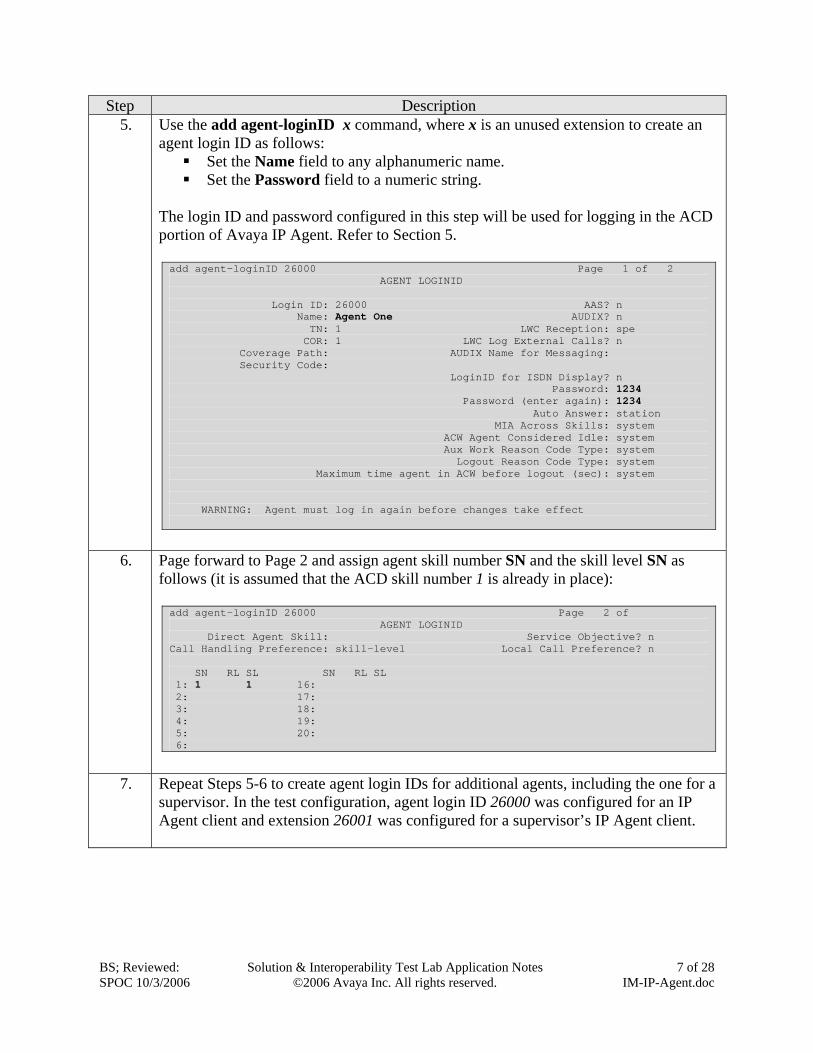
Step Description 5. Use the add agent-loginID x command, where x is an unused extension to create an
agent login ID as follows: Set the Name field to any alphanumeric name. Set the Password field to a numeric string.
The login ID and password configured in this step will be used for logging in the ACD portion of Avaya IP Agent. Refer to Section 5. add agent-loginID 26000 Page 1 of 2 AGENT LOGINID Login ID: 26000 AAS? n Name: Agent One AUDIX? n TN: 1 LWC Reception: spe COR: 1 LWC Log External Calls? n Coverage Path: AUDIX Name for Messaging: Security Code: LoginID for ISDN Display? n Password: 1234 Password (enter again): 1234 Auto Answer: station MIA Across Skills: system ACW Agent Considered Idle: system Aux Work Reason Code Type: system Logout Reason Code Type: system Maximum time agent in ACW before logout (sec): system WARNING: Agent must log in again before changes take effect
6. Page forward to Page 2 and assign agent skill number SN and the skill level SN as follows (it is assumed that the ACD skill number 1 is already in place): add agent-loginID 26000 Page 2 of AGENT LOGINID Direct Agent Skill: Service Objective? n Call Handling Preference: skill-level Local Call Preference? n SN RL SL SN RL SL 1: 1 1 16: 2: 17: 3: 18: 4: 19: 5: 20: 6:
7. Repeat Steps 5-6 to create agent login IDs for additional agents, including the one for a supervisor. In the test configuration, agent login ID 26000 was configured for an IP Agent client and extension 26001 was configured for a supervisor’s IP Agent client.

BS; Reviewed: SPOC 10/3/2006
Solution & Interoperability Test Lab Application Notes ©2006 Avaya Inc. All rights reserved.
8 of 28 IM-IP-Agent.doc
4. Configure Avaya SES This section covers the configuration of Avaya SES. Avaya SES is configured via an Internet browser using the administration web interface. It is assumed that Avaya SES software and the license file have already been installed on the server. During the software installation, the installation script is run from the Linux shell of the server to specify the IP network properties of the server along with other parameters. For additional information on these installation tasks, refer to [3]. It is assumed that the configuration for SIP trunking to Avaya Communication Manager and the call routing is already in place. Adding a user that will be used by an IP Agent to register with Avaya SES and the setting of the appropriate permissions for the user to enable the presence feature will be described in this section.
Step Description 1. Access the Avaya SES administration web interface, by entering
http://<ip-addr>/admin as the URL in an Internet browser, where <ip-addr> is the IP address of Avaya SES. Log in with the appropriate credentials and then select the Launch Administration Web Interface link from the main page as shown below.

BS; Reviewed: SPOC 10/3/2006
Solution & Interoperability Test Lab Application Notes ©2006 Avaya Inc. All rights reserved.
9 of 28 IM-IP-Agent.doc
Step Description 2. The Avaya SES Administration Home Page shown below will be displayed.
BS; Reviewed: SPOC 10/3/2006
Solution & Interoperability Test Lab Application Notes ©2006 Avaya Inc. All rights reserved.
10 of 28 IM-IP-Agent.doc
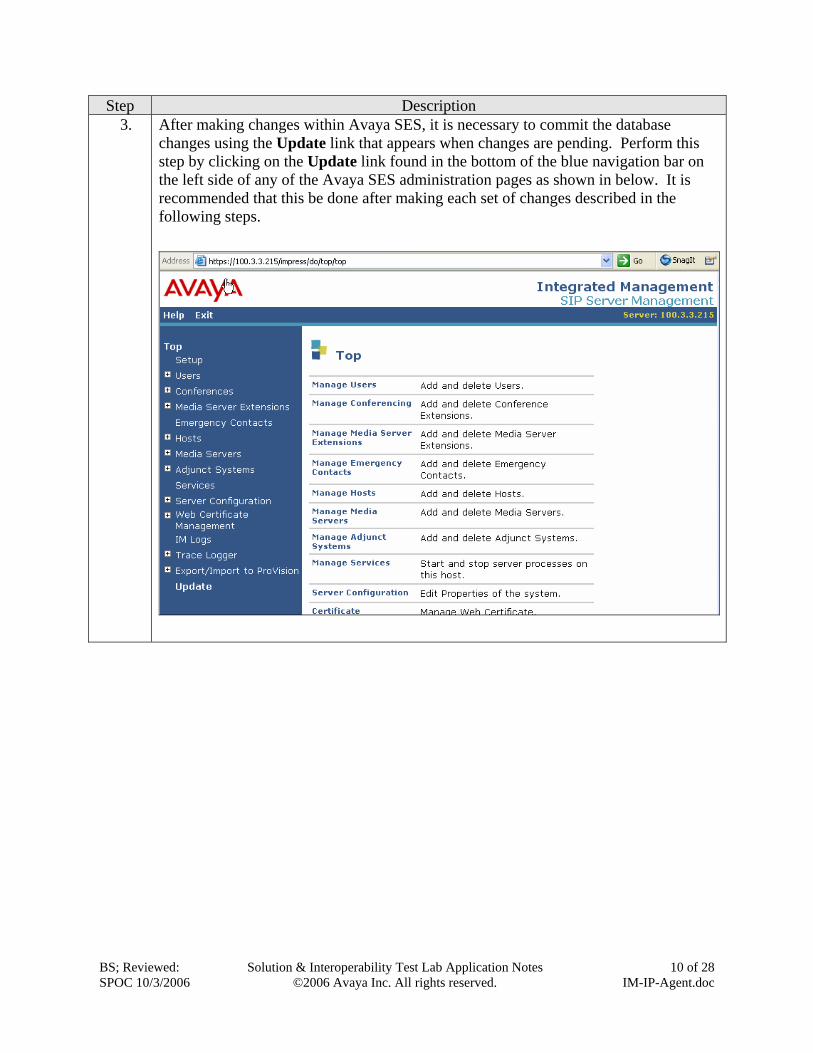
Step Description 3. After making changes within Avaya SES, it is necessary to commit the database
changes using the Update link that appears when changes are pending. Perform this step by clicking on the Update link found in the bottom of the blue navigation bar on the left side of any of the Avaya SES administration pages as shown in below. It is recommended that this be done after making each set of changes described in the following steps.

BS; Reviewed: SPOC 10/3/2006
Solution & Interoperability Test Lab Application Notes ©2006 Avaya Inc. All rights reserved.
11 of 28 IM-IP-Agent.doc
Step Description 4. From the left pane of the administration web interface, expand the User option and
select Add to add a user. Specify a Primary Handle and User ID. A handle specifies a user on Avaya
SES. The User ID must be same as the User ID configured in the IM tab of Avaya IP Agent. Refer to Section 5, Step 4.
Specify a Password and Confirm Password in these fields. The Password and User ID are used to authenticate a user on Avaya SES. The Password must be the same as the Password configured in the IM tab of Avaya IP Agent. Refer to Section 5, Step 4.
The Host field is pre-populated with the Avaya SES Host name since there is only one Avaya SES in the test configuration.
Enter any descriptive First Name and Last Name. Select Add Media Server Extension to add an extension for the user. Click the Add button.

BS; Reviewed: SPOC 10/3/2006
Solution & Interoperability Test Lab Application Notes ©2006 Avaya Inc. All rights reserved.
12 of 28 IM-IP-Agent.doc
Step Description 5. The following Continue page appears, confirming that the user was added
successfully. Click Continue.
6. The Add Media Server Extension page will appear as shown below.
Enter the Extension, same as the extension configured in Avaya Communication Manager. Refer to Section 3, Step 1.
Select the appropriate Media Server. Click Add.
7. Repeat Steps 4-6 to add the users and associated extensions to support additional
Avaya IP Agent clients.

BS; Reviewed: SPOC 10/3/2006
Solution & Interoperability Test Lab Application Notes ©2006 Avaya Inc. All rights reserved.
13 of 28 IM-IP-Agent.doc
Step Description 8. From the left pane of the administration web interface, expand the Users option and
select List. The List Users page will appear as shown below. Check mark the User ID configured in Step 4. Select Permissions from the Task drop-down list to set the presence permissions for this user. Click Submit.

BS; Reviewed: SPOC 10/3/2006
Solution & Interoperability Test Lab Application Notes ©2006 Avaya Inc. All rights reserved.
14 of 28 IM-IP-Agent.doc
Step Description 9. The Permissions for user: 20010 page appears as follows. Select Allow All from the
Change Permissions Type drop-down list to allow all SIP users to be able to watch this user’s presence in the system, using any presence-enabled SIP client like Avaya IP Agent. Click Change Permissions. Note: As an alternative, select Contact List Only from the Change Permissions Type drop-down list to permit only those administered SIP users that have been added to the contact list to be able to watch this user’s presence. For example, if the contact list has the user id of a supervisor user, then only the supervisor can watch the presence of this agent.
10. Repeat Steps 8-9 to assign the permission for additional users.

BS; Reviewed: SPOC 10/3/2006
Solution & Interoperability Test Lab Application Notes ©2006 Avaya Inc. All rights reserved.
15 of 28 IM-IP-Agent.doc
5. Configure Avaya IP Agent This section covers the configuration of the presence capability on Avaya IP Agent. It is assumed that Avaya IP Agent software has already been installed on an agent’s or supervisor’s desktop. For additional information on these installation tasks, refer to [5]. The Avaya IP Agent “log in” process has two steps. First, the agent logs in the softphone portion by registering to Avaya Communication Manager and Avaya SES. The second step is to log in to the ACD using agent login ID credentials to make the agent available for an ACD call. Both steps are described here.
Step Description 1. From the Microsoft Windows desktop, start the Avaya IP Agent application by
navigating to Start Programs Avaya Avaya IP Agent Avaya IP Agent - English.

BS; Reviewed: SPOC 10/3/2006
Solution & Interoperability Test Lab Application Notes ©2006 Avaya Inc. All rights reserved.
16 of 28 IM-IP-Agent.doc
Step Description 2. Enabling Instant Messaging and Presence
From the Avaya IP Agent main window as shown in Step 1, select Tools Program Options General Settings. Place a check mark in the Enable Instant Messaging Feature check box. Click the OK button. The Instant Messaging and Presence feature is enabled.

BS; Reviewed: SPOC 10/3/2006
Solution & Interoperability Test Lab Application Notes ©2006 Avaya Inc. All rights reserved.
17 of 28 IM-IP-Agent.doc
Step Description 3. Avaya Communication Manager Registration
From the Avaya IP Agent main window as shown in Step 1, select File Station Login… to log in the softphone portion of the Avaya IP Agent. The Login screen appears as shown below. Configure the fields as follows:
Enter the extension of the agent station in the Extension field configured in Section 3, Step 1. The Instant Messaging and Presence feature uses the agent’s actual extension for presence tracking, not the extension of the agent’s login ID.
Select a configuration mode, for example Telecommuter mode from the Configuration drop-down list. Other configuration modes, such as road warrior mode, can also be used.
For telecommuter mode, enter the telephone number in the Telephone At field for the voice portion of the Avaya IP Agent call.
Enter the processor IP address of Avaya SBS3100 server (or CLAN IP address when CLAN is present in an Avaya Communication Manager configuration) in the Call Server Address field. The agent softphone portion of the Avaya IP agent will register to the specified server.
Click Settings… to configure the Instant Messaging server settings to enable the presence feature for Avaya IP Agent.

BS; Reviewed: SPOC 10/3/2006
Solution & Interoperability Test Lab Application Notes ©2006 Avaya Inc. All rights reserved.
18 of 28 IM-IP-Agent.doc
Step Description 4. Avaya SES Registration
Click the IM tab for Instant Messaging and Presence server settings. Avaya IP Agent clients register with the Avaya SES to use the Instant Messaging and Presence features. Enter the User ID and Password configured in Avaya SES (refer to Section 4, Step 4) in the User Name and Password fields respectively. In the example below, the User Name is the combination of User ID and the host IP address of Avaya SES. Enter the Avaya SES IP Address in the Server Address field. Click the OK button. This will bring back the Login screen as shown in Step 3. Click Login to log in and register the Avaya IP Agent client with Avaya Communication Manager and Avaya SES.
BS; Reviewed: SPOC 10/3/2006
Solution & Interoperability Test Lab Application Notes ©2006 Avaya Inc. All rights reserved.
19 of 28 IM-IP-Agent.doc
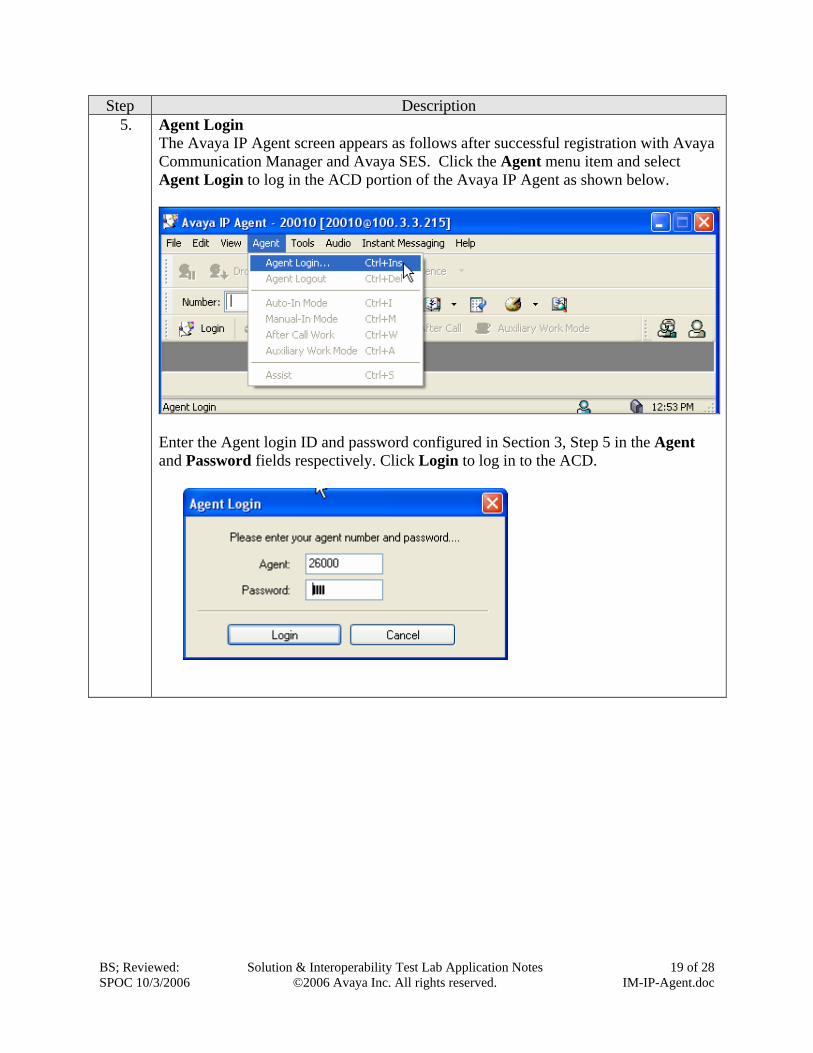
Step Description 5. Agent Login
The Avaya IP Agent screen appears as follows after successful registration with Avaya Communication Manager and Avaya SES. Click the Agent menu item and select Agent Login to log in the ACD portion of the Avaya IP Agent as shown below.
Enter the Agent login ID and password configured in Section 3, Step 5 in the Agent and Password fields respectively. Click Login to log in to the ACD.
BS; Reviewed: SPOC 10/3/2006
Solution & Interoperability Test Lab Application Notes ©2006 Avaya Inc. All rights reserved.
20 of 28 IM-IP-Agent.doc
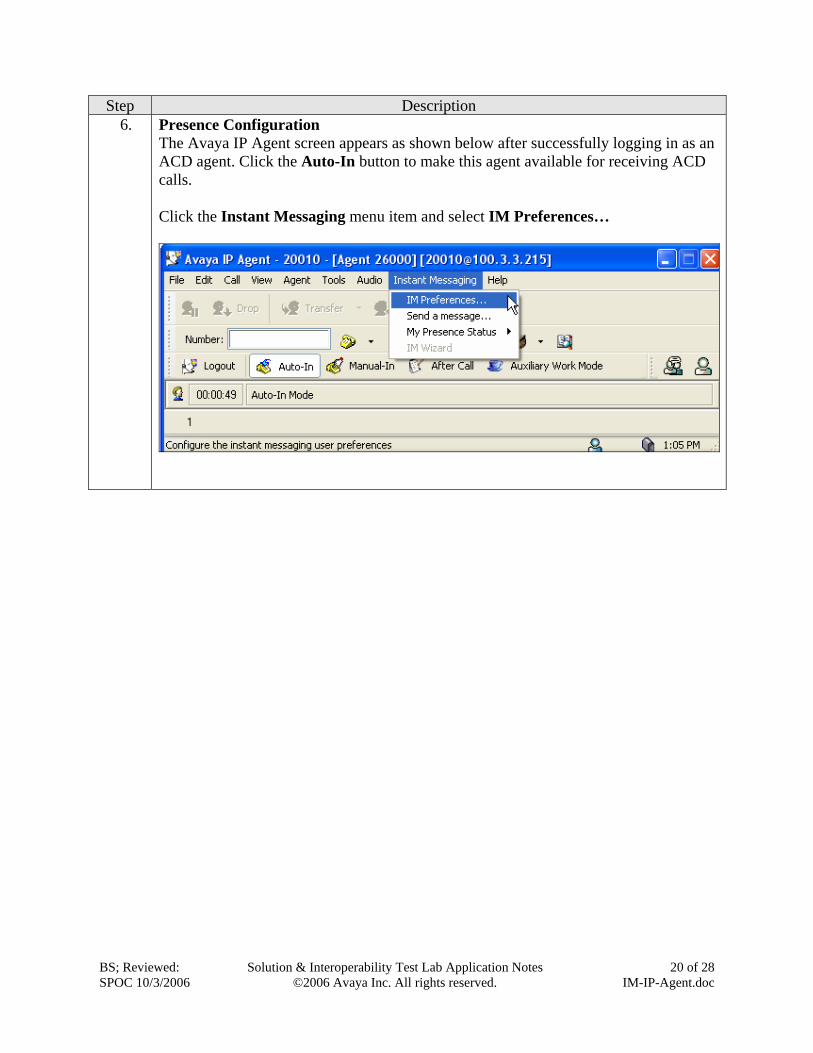
Step Description 6. Presence Configuration
The Avaya IP Agent screen appears as shown below after successfully logging in as an ACD agent. Click the Auto-In button to make this agent available for receiving ACD calls. Click the Instant Messaging menu item and select IM Preferences…

BS; Reviewed: SPOC 10/3/2006
Solution & Interoperability Test Lab Application Notes ©2006 Avaya Inc. All rights reserved.
21 of 28 IM-IP-Agent.doc
Step Description 7. Presence Permission
The Instant Messaging Preferences screen appears. Select the Privacy tab. To allow other Avaya IP Agent clients to view the presence status of this client, enable the checkbox for Allow all users to send me instant messages and view my online status option. Click OK.

BS; Reviewed: SPOC 10/3/2006
Solution & Interoperability Test Lab Application Notes ©2006 Avaya Inc. All rights reserved.
22 of 28 IM-IP-Agent.doc
Step Description 8. Presence Status
From the Instant Messaging Preferences screen, select the Status tab and configure the options as shown below:
Allow Avaya IP Agent to automatically change your status to "On the phone" when you are on the phone - Enable this check box to have the presence state changed to On the phone when the agent receives a call through Avaya IP Agent.
Note: If the agent uses Telecommuter mode and places a call through the telephone directly instead of using Avaya IP Agent, the presence state will not change.
Allow Avaya IP Agent to automatically change your status to "Away"
when you are idle more than - Enable this check box to have the presence state changed to Away when the agent has not used the keyboard or mouse for the amount of time specified in the minutes field.
Minutes field - Use this field to set the amount of time that the agent must not provide keyboard or mouse input for Avaya IP Agent to set the presence state to Away.
Click OK.

BS; Reviewed: SPOC 10/3/2006
Solution & Interoperability Test Lab Application Notes ©2006 Avaya Inc. All rights reserved.
23 of 28 IM-IP-Agent.doc
Step Description 9. Repeat Steps 1-8 for additional Avaya IP Agent clients, including the Avaya IP Agent
client used by the supervisor.
10. Tracking from Supervisor’s Avaya IP Agent In the test configuration, the supervisor’s IP agent logged in with extension 20011 and agent login ID 26001. Click the Tools menu item and select Contacts.
The Contact Directory screen appears as follows. Expand the File menu item and select New.

BS; Reviewed: SPOC 10/3/2006
Solution & Interoperability Test Lab Application Notes ©2006 Avaya Inc. All rights reserved.
24 of 28 IM-IP-Agent.doc
Step Description 11. Tracking from Supervisor’s Avaya IP Agent
The Properties screen appears. Enter the contact information of the Avaya IP Agent (e.g., extension 20010) to be tracked by the supervisor as shown below.
Enter an alphanumeric name in the Name field. In the Instant Message field, enter the User Name of the Avaya IP Agent as
specified in the IM tab in the Settings (refer to Step 4) Check the Track Availability check box to enable the tracking of this agent.
Click OK. The Contact Directory now shows an entry for the new contact with the IM Status column showing the presence status.
12. Repeat Steps 10-11 to enable tracking of additional Avaya IP Agent clients.

BS; Reviewed: SPOC 10/3/2006
Solution & Interoperability Test Lab Application Notes ©2006 Avaya Inc. All rights reserved.
25 of 28 IM-IP-Agent.doc
6. Verification Steps This section provides verification steps that may be performed to verify that the solution described in these Application Notes is configured properly.
6.1. Presence Make an inbound ACD call and let it route to the agent login ID 26000 with extension 20010. Refer to Sections 3-5 on how to configure agents and the presence feature. Answer the call. Verify that the presence state (IM Status) of the agent on the supervisor’s Contact Directory displays On the phone.
On Avaya IP Agent with login ID 26000 and extension 20010, from the Instant Messaging toolbar (located in the right hand corner), click the Change instant messaging status button (button label not shown) and then select Busy as shown below.

BS; Reviewed: SPOC 10/3/2006
Solution & Interoperability Test Lab Application Notes ©2006 Avaya Inc. All rights reserved.
26 of 28 IM-IP-Agent.doc
Verify that the presence state (IM Status) of the agent on the supervisor’s Contact Directory displays Busy as shown below.
6.2. Instant Messaging From the supervisor’s Contact Directory, select an agent contact. Right click and select Send Instant Message… to send an instant message to an agent as shown below.
The following Instant Messaging Session screen appears. Enter IM text in the bottom part of the screen and click Send. Verify that an Instant Messaging Session screen appears on the agent’s desktop with an IM message sent from the supervisor. Let the agent enter an IM text message and click Send. Verify that the agent can send IM to the supervisor’s desktop.

BS; Reviewed: SPOC 10/3/2006
Solution & Interoperability Test Lab Application Notes ©2006 Avaya Inc. All rights reserved.
27 of 28 IM-IP-Agent.doc
7. Conclusion The Presence feature of Avaya IP Agent and Avaya SES can help a contact center supervisor track the availability of the agents when the supervisor as well as the agents use the Avaya IP Agent application to handle the contact center calls.
8. Additional References The following Avaya product documentation can be found at http://support.avaya.com. [1] Feature Description and Implementation For Avaya Communication Manager, Issue 4.0, February 2006, Document Number 555-245-205. [2] Administrator Guide for Avaya Communication Manager, Issue 2.1, May 2006, Document Number 03-300509. [3] Installing and Administering SIP Enablement Services Release 3.1, February 2006, Issue 1.5, Document Number 03-600768. [4] SIP Support in Release 3.1 of Avaya Communication Manager Running on the Avaya S8300, S8500, S8500B, S8700, and S8710 Media Server, February 2006, Issue 6, Document Number 555-245-206. [5] Avaya IP Agent Installation and User Guide, December 2005.
BS; Reviewed: SPOC 10/3/2006
Solution & Interoperability Test Lab Application Notes ©2006 Avaya Inc. All rights reserved.
28 of 28 IM-IP-Agent.doc
©2006 Avaya Inc. All Rights Reserved. Avaya and the Avaya Logo are trademarks of Avaya Inc. All trademarks identified by ® and ™ are registered trademarks or trademarks, respectively, of Avaya Inc. All other trademarks are the property of their respective owners. The information provided in these Application Notes is subject to change without notice. The configurations, technical data, and recommendations provided in these Application Notes are believed to be accurate and dependable, but are presented without express or implied warranty. Users are responsible for their application of any products specified in these Application Notes. Please e-mail any questions or comments pertaining to these Application Notes along with the full title and filename, located in the lower right corner, directly to the Avaya Solution & Interoperability Test Lab at [email protected].