Embed Size (px)
Citation preview

1
Configuring AD authentication with SmartCache Service Pack 12
Introduction
With the release of SmartCache Service Pack 12, an additional authentication option is
available for use. The Kerberos authentication option has been added to resolve an issue
where Windows 7 clients were overloading the SmartCache with NT LAN Manger (NTLM)
authentication requests. This is detailed further in TEC2483024. The Kerberos authentication
protocol improves security for user authentication and provides additional support for newer
operating systems.
Requirements
This update is available on demand and has been developed for RM SmartCache 2A or greater
with Service Pack 12 applied. If Service Pack 12 has not been applied to your SmartCache,
please contact your support representative to request it. Please supply the serial number of the
SmartCache when requesting the update. The serial number can be found on a label on your
RM SmartCache and is usually preceded by the letters WO or TO.
Pre-requisite for install
A number of prerequisites must be fulfilled before you can enable Kerberos authentication on
your RM SmartCache.
Note: Networks vary significantly and as such, RM are unable to provide step-by-step
instructions on completing these prerequisites. We recommend that these steps are completed
with the assistance of your Network Manager.

2
Verify DNS configuration on the DNS servers
There must be a DNS server available that can resolve all Forward and Reverse Lookups for
your entire domain by using its own Reverse Lookup Zones or by using its forwarders. This
DNS server will be needed during the SmartCache domain join operation.
To verify the DNS, on your DNS server (usually this is function is performed on the domain
controller servers), perform the following.
1. At the DNS server desktop, select Start, Programs, Administrative Tools, DNS.
2. Verify that the SmartCache is located in the Forward Lookup zone under the domain name
folder.
3. Under the Reverse Lookup Zones, verify that the AD domain controller server(s) must have,
or be part of a DNS Reverse Lookup Zone that can be reached via a DNS server accessible
from the SmartCache. Usually the DNS and Domain Controller functions are hosted on the
same server(s). In this example the domain controller is str-sr-001. The AD domain
controllers must have a PTR record in the reverse lookup.
4. From the tool bar menu select ‘View’ and ensure ‘Advanced’ is ticked. Right click the DNS
entry for the SmartCache under the Forward Lookup Zones and select ‘Properties’. Ensure
that the ‘Delete this record when it becomes stale’ option is not ticked.
5. Repeat the procedure in set 4 for the SmartCache entry in the Reverse Lookup Zones’.
6. Every workstation in your domain that you wish to apply the computer based filtering policies
must have an up-to-date PTR record in a DNS Reverse Lookup Zone. Browse through the
Reverse Lookup Zone to verify that these records exist.

3
Verify NTP and Proxy configurations on computers
For the workstations, some (or all) of the following settings may be applied by group policies
rather applying them on each individual workstation.
1. For non-Community Connect networks, every workstation in the domain that you wish to use
Kerberos authentication with, must have their clocks synchronized with an NTP server used to
set the clock on your AD domain controller.
2. Every workstation in your domain that will use the SmartCache as its Internet proxy must
have the SmartCache's fully qualified domain name as the proxy server address in its Internet
settings (i.e. if your SmartCache is named sc12345678 and your domain is named
ourschool.net, the proxy server address should be set to sc12345678.ourschool.net). If a
workstation's proxy server address is set to the SmartCache's IP address, the workstation will
use NTLM authentication, which may cause issues on your network. (For more information
see TEC2483024 in the Other Useful Articles below).

4
3. Every application on a workstation that has its own proxy settings defined must also use the
SmartCache's fully qualified domain name as its proxy server address. Applications using the
SmartCache's IP address as its proxy server address can cause issues for all users on your
network. See TEC2483024 in the Other Useful Articles below for more information.
Examples of applications with their own proxy settings are:
o Mozilla® Firefox®
o Microsoft Outlook®
o LogMeIn
Once the prerequisite checks have been completed you can request SmartCache Service Pack
12. When you do so please supply the serial number of the SmartCache to your support
contact. Once the update has been allocated and installed the additional Kerberos options will
appear. You will not need to install any software yourself.
Configuring Kerberos authentication on your SmartCache
Access your RM SmartCache home page by navigating to https://<SmartCacheIP>/ where
<SmartCacheIP> is your RM SmartCache's IP address. Ensure you use https and not http.
Your manager login credentials to log on should be known to you. If not, the default can be
the username manager with the password as the eight digit serial number of your RM
SmartCache.
Setting up Kerberos Authentication on your RM SmartCache
Note: Make sure you review all of the prerequisite section fully before proceeding with the
following set-up.
You should be able to access your RM SmartCache home page by navigating to
https://<SmartCacheIP>/ where <SmartCacheIP> is your RM SmartCache's IP address.
Ensure you use https and not http. Your manager login credentials to log on should be known
to you. If not, the default can be the username manager with the password as the eight digit
serial number of your RM SmartCache. The serial number can be found on a label on your
RM SmartCache and is usually preceded by the letters WO or TO
Check your RM SmartCache version
For Kerberos authentication to work and be available, your RM SmartCache must be version
2a.12 or above and have SafetyNet Universal component version 2C.u2 or above. To check
this, from your RM SmartCache home page select the Status option:
At the bottom of the page, the RM SmartCache and RM SafetyNet Universal component
versions will be displayed. Check that the versions are 2a.12 and SNU-2C.u2.
If you have versions that appear lower than these, it may be that RM have not assigned the
latest SmartCache service packs to your SmartCache. It can take 24 hours for your RM

5
SmartCache to receive the updates from RM. If you are unsure, or if your RM SmartCache
does not seem to be updating, contact RM Support.
Set the RM SmartCache NTP server
For Kerberos authentication to work, your RM SmartCache must have its internal clock
closely synchronized with your AD domain controller and KDC. Therefore, it is strongly
advised that your RM SmartCache and these servers share the same NTP server. From your
RM SmartCache home page, click the Maintenance icon, as shown in the image below:
Set the NTP server in the Maintenance page. It is advised that you use your AD domain
controller's fully qualified domain name in the New NTP Server field.
Set RM SmartTracker to No Identification
From your RM SmartCache home page, click the Maintenance icon to access the Maintenance
page. Click the link to access the SmartTracker Options page, as shown in the image below:
Note: If your RM SmartCache was joined to the domain before the Kerberos authentication
option was available, you will see a message box as shown in the image below:

6
• If you see the message box as shown above, follow the below instructions:
• Click the 'No identification' radio button.
Warning: The next step will interrupt Internet browsing for all proxy users for a few minutes.
Please ensure that this step is completed at a time where there is minimal disruption to your
Internet users.
• Click the Apply Changes link at the bottom of the page. This will cause your RM SmartCache
proxy to be reset and will interrupt Internet browsing for all clients who use the proxy for a
few
minutes. While the proxy is being reset, you will see a similar page as shown in the image
below.
• Follow the instructions on that page. After a few minutes, the RM SmartTracker Options page
should again become available to you.
(Re-) join the RM SmartCache to your AD domain
When the RM SmartTracker Options page becomes available after following the above steps,
click the link shown below to access the 'Join an Active Directory Domain' page
7
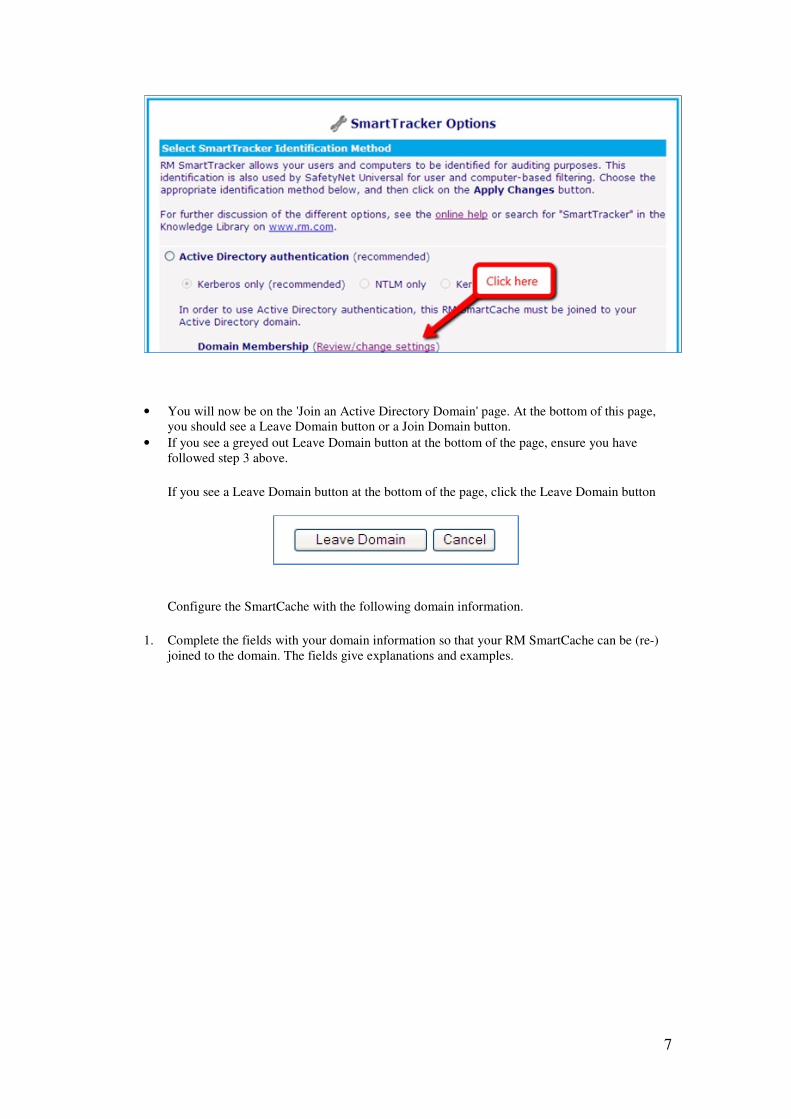
• You will now be on the 'Join an Active Directory Domain' page. At the bottom of this page,
you should see a Leave Domain button or a Join Domain button.
• If you see a greyed out Leave Domain button at the bottom of the page, ensure you have
followed step 3 above.
If you see a Leave Domain button at the bottom of the page, click the Leave Domain button
Configure the SmartCache with the following domain information.
1. Complete the fields with your domain information so that your RM SmartCache can be (re-)
joined to the domain. The fields give explanations and examples.

8
Important: If you have any Windows 2008 DNS servers select the Windows Server 2008+
option.
2. Once you have completed the fields on the form, click the Join Domain button at the bottom
of the page. You will see a warning that the domain join operation may take a few minutes to
complete. If you do not receive this warning, check the top of the page to see if you have a
message alerting you to some incomplete form fields.
3. Once the page reloads after attempting to join the domain, if you see a Leave Domain button
at the bottom of the page, your domain join was successful. Verify that the scavenging
configuration for the SmartCache in the DNS forward and reverse lookups has not changed
(see section ‘Verify DNS configuration on the DNS servers’). You can then skip to Set
SmartTracker to AD Kerberos authentication
4. If your page reloads with an error message in red at the top of the page, make any
checks/changes suggested and retry your join. If you cannot resolve the failure, click the link
given provided to obtain a detailed log output of the join attempt. This detailed log can be
passed to RM Support to assist in diagnosing the issue. Below is an example of the Domain
Join error message with the link to a detailed log file underlined. In this example, the cause of
the issue is likely to be that the external prerequisites (above) were not met, a DNS Reverse
Lookup Zone does not exist or the domain controller has no PTR record in the DNS Reverse
Lookup Zone.
• Occasionally, you may see a 'domain join failed' on your first attempt simply because of some
slow network process/communications, but a second attempt will succeed. Try the 'domain
join' again if it fails the first time.

9
• After attempting to join the domain, if you see a Leave Domain button at the bottom of the
page, your domain join was successful.
Set SmartTracker to AD Kerberos authentication
1. From your RM SmartCache home page, click the Maintenance icon to access the Maintenance
page. Click the following link to access the RM SmartTracker Options page as shown in the image
below:
2. On the RM SmartTracker Option page, click the 'Active Directory authentication' radio button and
ensure that the enable 'Kerberos only (recommended)' box is ticked (it is by default).
Set authentication exclusions
Identify which computer IPs/ranges on your domain and target web domains you wish to be excluded
from Kerberos proxy authentication. For more information, refer to TEC2873455 in Other Useful
Articles.
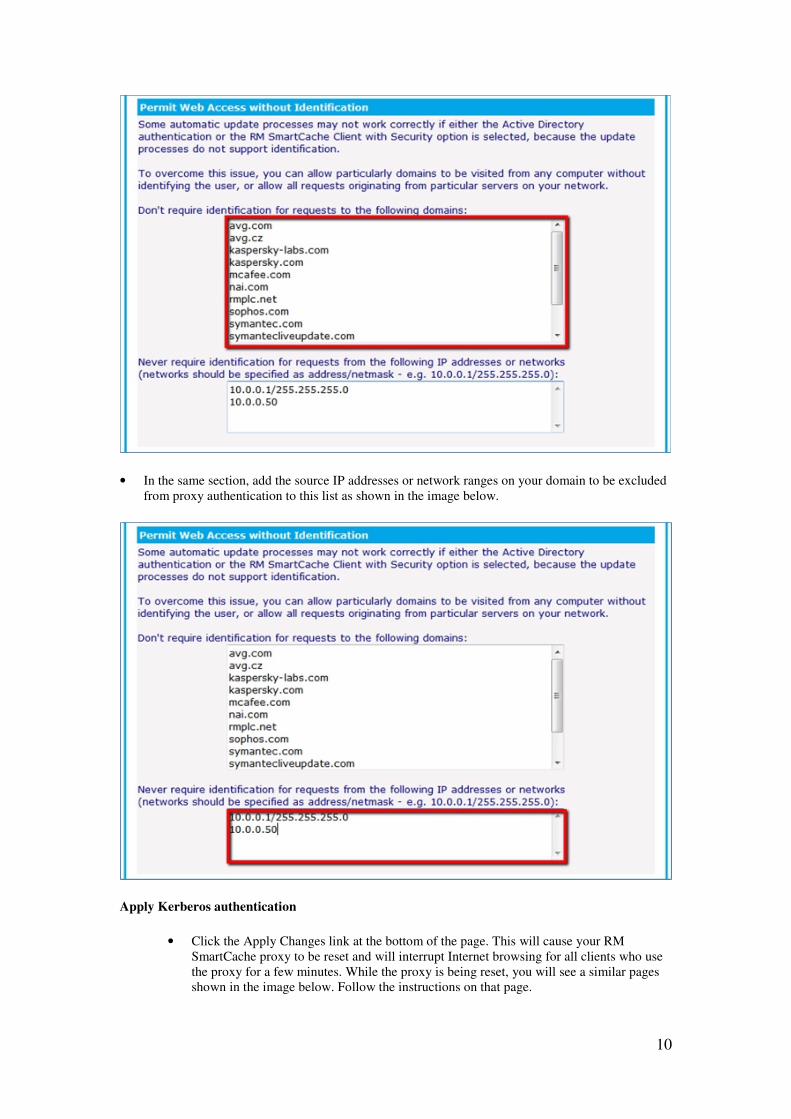
Under the 'Permit Web Access without Identification' section, add the target web domains you wish to
exclude from proxy authentication to this list as shown in the image below
10
• In the same section, add the source IP addresses or network ranges on your domain to be excluded
from proxy authentication to this list as shown in the image below.
Apply Kerberos authentication
• Click the Apply Changes link at the bottom of the page. This will cause your RM
SmartCache proxy to be reset and will interrupt Internet browsing for all clients who use
the proxy for a few minutes. While the proxy is being reset, you will see a similar pages
shown in the image below. Follow the instructions on that page.

11
• After a few minutes, the RM SmartTracker Options page should again become available
to you.
Check RM SmartCache settings and status
• From your RM SmartCache home page, click the Maintenance icon to access the Maintenance
page. Check that your RM SmartTracker Identification Method section looks the same as
shown in the image below
From your RM SmartCache home page, click the Status icon. Check that the Statistics section looks
similar to the following image, with green or blue dots for all sections.