Embed Size (px)
Citation preview

Revision 1.0 Configuring Bria 3 for Virtual Contact Center
1
Configuring a Softphone for Windows for Virtual Contact Center
8x8 issues softphone licenses to Virtual Contact Center customers allowing them to manage all contact center communication from the desktop replacing or complementing a hard phone.
Product Discontinuation
Effective June 2012, 8x8 stopped issuing eyeBeam licenses to Virtual Contact Center customers owing to product discontinuation by Counterpath. Counterpath replaces eyeBeam for Windows with Bria for Windows. For all softphone orders, 8x8 currently issues licenses of Bria for Windows and Bria for Mac.
Purpose
This document discusses how to install and configure the following softphone clients to work with Virtual Contact Center:
• Bria for Windows • EyeBeam for Windows
For instructions on configuring Bria 3 for Mac, refer to ‘Configuring Bria 3 Mac for Virtual Contact Center’.
Revision 1.0 Configuring Bria 3 for Virtual Contact Center
2
Configuring Bria for Windows
Counterpath’s Bria 3 is a softphone application that enables you to manage Virtual Contact Center VoIP calls from your desktop replacing or complementing your hard phone. This section discusses how to install and configure Bria 3 on your Windows. For instructions on configuring Bria 3 for Mac, refer to ‘Configuring Bria 3 Mac for Virtual Contact Center’.
Note: If you have a previous version of Bria installed on your system, you need to uninstall the previous version before proceeding with the new version.
Technical Prerequisites
1. Ensure basic system requirements • Processor Minimum: Pentium 4® 2.4 GHz or equivalent • Memory Minimum: 1 GB RAM • Hard Disk Space: 100MB • Operating System:
o Microsoft Windows XP Service Pack 3 o Microsoft Windows Vista, 32-bits and 64-bits arch o Microsoft Windows 7
• Connection: IP network connection (broadband, LAN, wireless) • Additional:
o Microsoft Windows Installer 3.1 o Microsoft .NET 4.0 o Microsoft VC C++ 2010 Note: The installer takes care of installing these if you do not have them.
• Sound Card: Full-duplex, 16-bit or use USB headset
• Web browser: Microsoft Internet Explorer® 8.0 or later. 2. Allocate Network Bandwidth required for VoIP calls
• G.711 aLaw/uLaw – approximately 80-Kbps per VoIP call • G.729 – approximately 32 Kbps per VoIP call
3. Enable VoIP calls to pass through your network’s firewall. • 8x8 VoIP server: port 5060 • Real-Time Transfer Protocol(RTP): UDP port 35000-65000 • Disable SIP Application Layer Gateway(ALG) service in router
4. Install Bria with administrative rights and allow it to be run by all users.

Revision 1.0 Configuring Bria 3 for Virtual Contact Center
3
Configuring and testing Bria is a three step process:
1. Step One: Download and Install the Bria software. 2. Step Two: Configure the Bria phone. 3. Step Three: Verify the Bria phone works with Virtual Contact Center.
Step One: Download the Bria Software
8x8 communicates the Bria PC installation URL and the license key via email. Clicking the installation URL in the email guides you through the Bria installation process using a Setup Wizard.
To install Bria 3:
1. Click the link in your email to download the Bria software for Windows. http://www.contactual.com/download/clients/Bria_Win32_3.3.2_65843.exe
2. At the browser prompt, click Run to run the executable file. 3. Follow the prompts to initiate the Setup Wizard.
4. Follow the wizard and install Bria on your desktop.

Revision 1.0 Configuring Bria 3 for Virtual Contact Center
4
5. After installing the program, launch the Bria application.
6. At the prompt, enter the license key provided in the email.
You are now ready to configure Bria to process Virtual Contact Center calls.

Revision 1.0 Configuring Bria 3 for Virtual Contact Center
5
Step Two: Configure the Bria Phone
Configuring Bria softphone involves:
• Setting up a new SIP account
• Enabling Audio Codecs
Setting up a New SIP Account
To set up a new SIP Account:
1. From the Bria menu, select Softphone > Account Settings. The SIP Accounts window appears.
2. Uncheck the option to disable account for IM/Presence. 3. Enter the User Details as follows:
a. User ID: is the same as the User ID required to login to the Agent Console. For example, jsmith
b. Domain: Domain can be any name. 8x8 recommends using your company’s domain. Your company’s domain can be found in your email address. The domain is everything to the right of the “@” sign.
c. Display Name: You may use any name that you like as the Display Name, but 8x8 recommends using your company’s naming conventions for login id, such as first initial and last name.

Revision 1.0 Configuring Bria 3 for Virtual Contact Center
6
d. Domain Proxy: Check box to Register with domain and receive incoming calls. e. Proxy Address: Check the Proxy button and enter the URI address. The address varies based
on the platform your tenant is hosted on. • If your tenant is based in US Platform, enter sip1.mycontactual.com • If your tenant is based in UK Platform, enter sip.mycontactual.co.uk • If your tenant is based in Canada Platform, enter sip. mycontactual.ca Note: Please do not remove any information in Dial Plan field and do not enter any
information in Password and Authorization Name fields.
4. Click OK to enable the account.
A message indicates the account is enabled if you provided the right account details.
Revision 1.0 Configuring Bria 3 for Virtual Contact Center
7
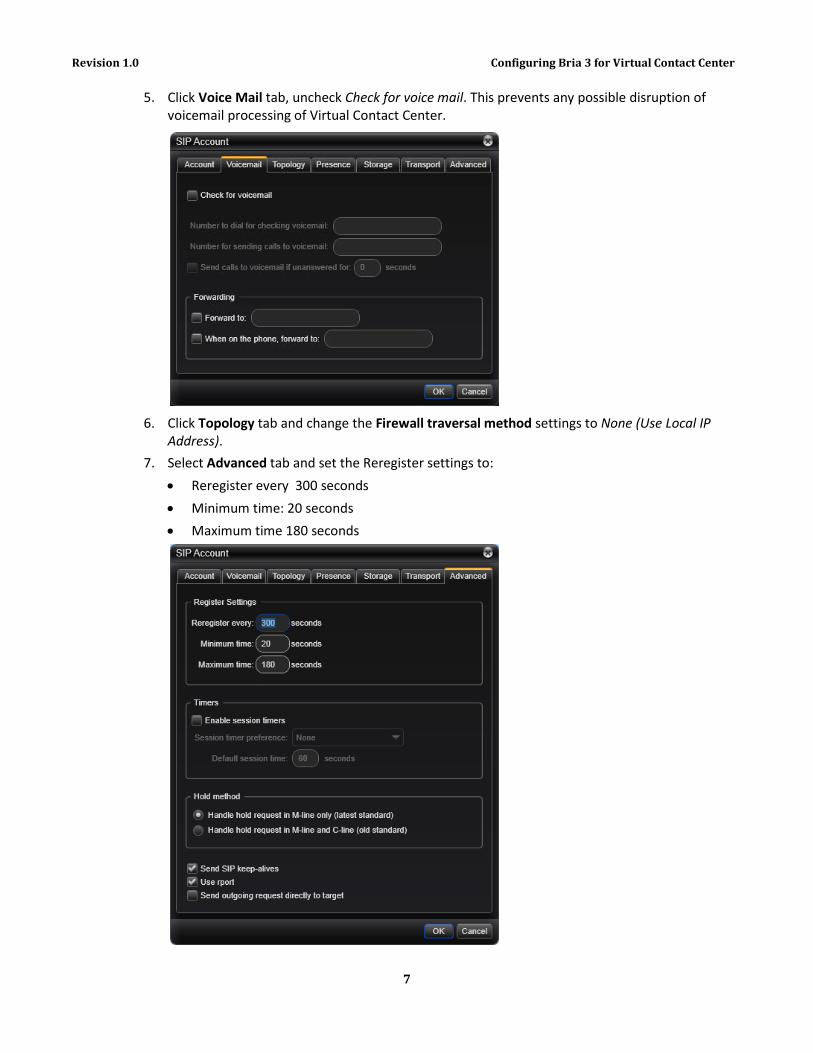
5. Click Voice Mail tab, uncheck Check for voice mail. This prevents any possible disruption of voicemail processing of Virtual Contact Center.
6. Click Topology tab and change the Firewall traversal method settings to None (Use Local IP
Address). 7. Select Advanced tab and set the Reregister settings to:
• Reregister every 300 seconds • Minimum time: 20 seconds • Maximum time 180 seconds

Revision 1.0 Configuring Bria 3 for Virtual Contact Center
8
8. Click OK to save the properties of Account 1. Note: Account 1 is chosen as the default account for your Bria.
Enabling Audio Codecs
To configure audio codecs for Bria:
1. From the Bria menu, select Softphone > Preferences. a. To enable a codec, highlight the codec in Available Codecs list and click . b. To disable a codec, highlight the codec in Enabled Codecs list and click .
For better voice quality, 8x8 recommends using G711 (uLaw or aLaw). Note: If you enable both G711 and G729 codecs, the server application negotiates and selects the
most suitable codec from the list.
Revision 1.0 Configuring Bria 3 for Virtual Contact Center
9
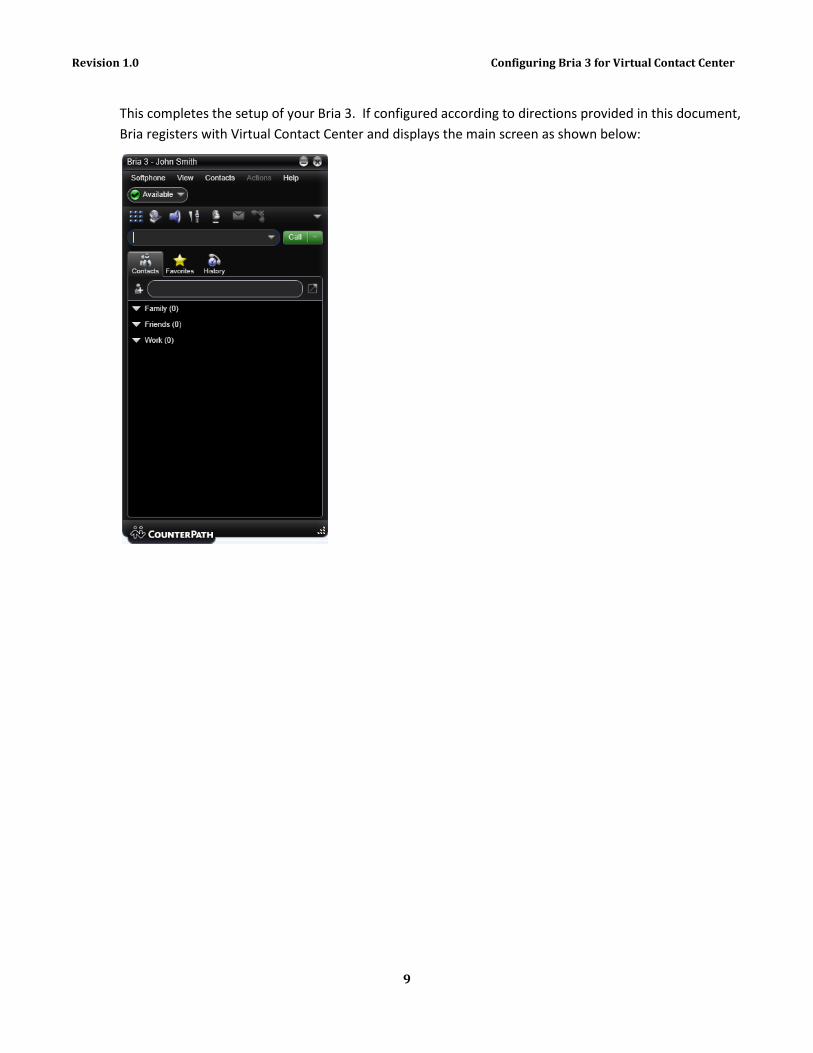
This completes the setup of your Bria 3. If configured according to directions provided in this document, Bria registers with Virtual Contact Center and displays the main screen as shown below:

Revision 1.0 Configuring eyeBeam for Virtual Contact Center
10
Configuring eyeBeam for Virtual Contact Center
Counterpath’s eyeBeam 1.5 for Windows is a softphone application that enables you to manage Virtual Contact Center VoIP calls from your desktop replacing or complementing your hard phone. The configuration procedure for eyeBeam discussed here applies to Windows users only. For a Mac compatible softphone application, please consider Bria 3 for Mac. For instructions on configuring Bria 3 for Mac, refer to ‘Configuring Bria 3 Mac for Virtual Contact Center’.
Note: If you have a previous version of eyeBeam installed on your system, you need to uninstall the previous version before proceeding with the new version.
Technical Prerequisites
1. Ensure basic system requirements • Processor Minimum: Pentium II 400 MHz or equivalent • Memory Minimum: 128 MB RAM • Hard Disk Space: 15MB • Operating System:
o Microsoft Windows 2000 o Microsoft Windows XP Service Pack 3 o Microsoft Windows Vista, 32-bits and 64-bits arch o Microsoft Windows 7
• Connection: IP network connection (broadband, LAN, wireless) • Sound Card: Full-duplex, 16-bit or use USB headset
2. Allocate Network Bandwidth required for VoIP calls
a. G.711 aLaw/uLaw – approximately 80-Kbps per VoIP call b. G.729 – approximately 31 Kbps per VoIP call
3. Enable VoIP calls to pass through your network’s firewall. c. 8x8 VoIP server: port 5060 d. Real-Time Transfer Protocol(RTP): UDP port 35000-65000 e. Disable SIP Application Layer Gateway(ALG) service in router
4. Install eyeBeam with administrative rights and allow it to be run by all users.

Revision 1.0 Configuring eyeBeam for Virtual Contact Center
11
Configuring and testing eyeBeam phone is a three step process:
1. Step One: Download the eyeBeam software. 2. Step Two: Configure the eyeBeam phone. 3. Step Three: Verify the eyeBeam phone works with Virtual Contact Center.
Step One: Download the eyeBeam software
8x8 communicates the eyeBeam PC installation URL and the license key via email. Clicking the installation URL in the email guides you through the installation process using a Setup Wizard.
1. Click the link below to download the eyeBeam software for Windows. http://www.contactual.com/download/clients/eyeBeam_Win32_1104a_54680.exe
2. At the browser prompt, click Run to run the executable file. 3. Follow the prompts to initiate the Setup Wizard. 4. Follow the wizard and install eyeBeam on your desktop. 5. After installing the phone, launch eyeBeam. 6. At the prompt, enter the license key provided in the email.

Revision 1.0 Configuring eyeBeam for Virtual Contact Center
12
Step Two: Configure the eyeBeam phone
Configuring the eyeBeam phone involves:
• Configuring a new SIP account
• Selecting Audio Codec • Disabling Call Alert pop up
Configuring a SIP Account
To configure a new SIP Account:
1. Click on the down arrow button on the eyeBeam interface to display the menu.
2. Select SIP Account Settings from the menu. The SIP Accounts window appears.
3. Click ADD to add a new SIP account. Enter the following properties in the Properties
window. a. User Name and Display Name: User Name is the name displayed on the softphone. It can be
set to any character string, but 8x8 recommends using the Agent’s Virtual Contact Center Login id as the User Name. For example, jsmith Display Name may match your User name.
Revision 1.0 Configuring eyeBeam for Virtual Contact Center
13
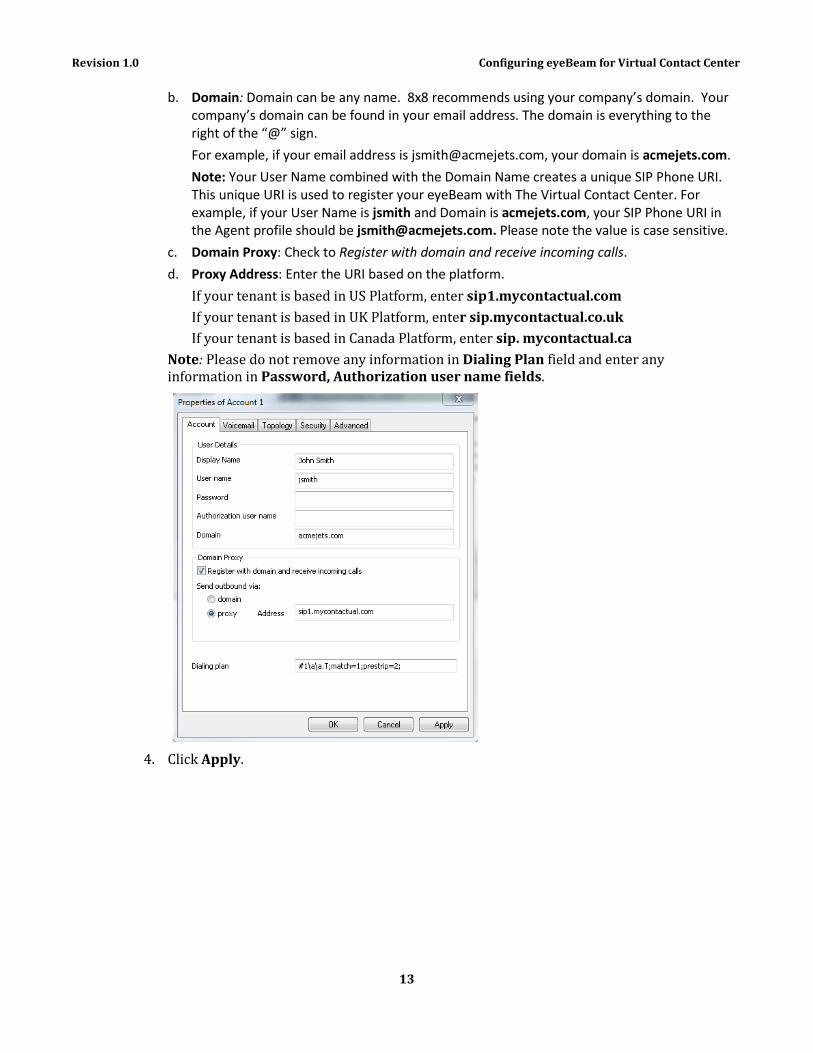
b. Domain: Domain can be any name. 8x8 recommends using your company’s domain. Your company’s domain can be found in your email address. The domain is everything to the right of the “@” sign. For example, if your email address is [email protected], your domain is acmejets.com. Note: Your User Name combined with the Domain Name creates a unique SIP Phone URI. This unique URI is used to register your eyeBeam with The Virtual Contact Center. For example, if your User Name is jsmith and Domain is acmejets.com, your SIP Phone URI in the Agent profile should be [email protected]. Please note the value is case sensitive.
c. Domain Proxy: Check to Register with domain and receive incoming calls. d. Proxy Address: Enter the URI based on the platform.
If your tenant is based in US Platform, enter sip1.mycontactual.com If your tenant is based in UK Platform, enter sip.mycontactual.co.uk If your tenant is based in Canada Platform, enter sip. mycontactual.ca
Note: Please do not remove any information in Dialing Plan field and enter any information in Password, Authorization user name fields.
4. Click Apply.

Revision 1.0 Configuring eyeBeam for Virtual Contact Center
14
5. Click Voice Mail tab, uncheck Check for voice mail.
6. Select Advanced tab, change the value of Reregister every to 300 seconds.
7. Click OK to save the properties of Account 1.

Revision 1.0 Configuring eyeBeam for Virtual Contact Center
15
Note: Account 1 is chosen as the default account for your eyeBeam.
Selecting Audio Codecs
To select audio codecs for your eyeBeam:
1. Click the down arrow on the eyeBeam interface and select Options from the menu.

Revision 1.0 Configuring eyeBeam for Virtual Contact Center
16
2. Click Advanced in the lower left-hand corner of the Options screen.
This brings up the advanced menu.
3. Click Audio Codecs icon in the Advanced Menu.
a. To enable a codec, highlight the codec in Disabled Codecs list and click .
b. To disable a codec, highlight the codec in Enabled Codecs list and click .

Revision 1.0 Configuring eyeBeam for Virtual Contact Center
17
For better voice quality, 8x8 recommends using G711 (uLaw or aLaw). Note: If you enable both G711 and G729 codecs, the server application negotiates and selects the most suitable codec from the list.
Disabling Call Alert Pop-Up
To disable Call Alert:
1. Click the down arrow on the eyeBeam interface and select Options.
The Options window appears.
2. Select Alerts and Sounds in the General Tab of the Options screen.

Revision 1.0 Configuring eyeBeam for Virtual Contact Center
18
3. Check Pop up the phone if it is not in focus. 4. Uncheck Show a ‘Call Alert’ and Keep Showing during a call.
This completes the setup of your eyeBeam phone. If configured properly your eyeBeam registers with Virtual Contact Center and displays the following information:

Revision 1.0 Testing Softphone Configuration
© 2012 8x8 Inc | 810, W.Maude Avenue, Sunnyvale, CA - 94085 - USA www.8x8.com Sales: 1-877-725-2621 Support: 1-866-975-2273 [email protected]
Step Three: Verify the Softphone works with Virtual Contact Center
1. Navigate to your Virtual Contact Center Agent Console link. They can be: • http://www.mycontactual.com/AGUI/login.php
• http://na2.mycontactual.com/AGUI/login.php
• http://na3.mycontactual.com/AGUI/login.php
• http: //na4.mycontactual.com/AGUI/login.php
• http://www.mycontactual.ca/AGUI/login.php
• http://www.mycontactual.co.uk/AGUI/login.php
2. Log in to the Agent Console. 3. Navigate to your profile.
In the Personal area, select the SIP Phone URI button and enter the SIP Phone URI: User ID@Domain Name. For example, [email protected]
4. Click Make Verification Call to verify your softphone is registered and configured for Virtual Contact Center. Your softphone rings if you followed the configuration as documented here. You can answer the call and follow the prompts to record a greeting message or simply disconnect the call.
Important: If you are an eyeBeam user, please be advised not to decline calls from the eyeBeam softphone. Decline calls from the Agent Console – Control Panel only.