Embed Size (px)
Citation preview

Configuring a RAID Set
Configuring SATA Controllers ........................................................................................ 2Installing the RAID/AHCI Driver and Operating System ............................................. 16Installing an Intel® Optane™ Memory ........................................................................... 19Configuring Intel® Virtual RAID on CPU (Intel® VROC) ................................................ 21

- 2 -
To create a RAID set, follow the steps below:A. Install SATA hard drive(s) or SSDs in your computer. B. Configure SATA controller mode in BIOS Setup.C. Configure a RAID array in RAID BIOS. (Note 1)
D. Install the RAID/AHCI driver and operating system.
Before you begin, please prepare the following items: • At least two SATA hard drives or SSDs (Note 2) (to ensure optimal performance, it is recommended that you
use two hard drives with identical model and capacity). (Note 3) • A Windows setup disk. • Motherboard driver disk. • A USB thumb drive.
RAID Levels
Configuring SATA Controllers
A. Installing hard drivesInstall the hard drives/SSDs in the Intel® Chipset controlled connectors on the motherboard. Then connect the power connectors from your power supply to the hard drives.
RAID 0 RAID 1 RAID 5 RAID 10Minimum Number of Hard Drives
≥2 2 ≥3 4
Array Capacity Number of hard drives * Size of the smallest drive
Size of the smallest drive
(Number of hard drives -1) * Size of the smallest drive
(Number of hard drives/2) * Size of the smallest drive
Fault Tolerance No Yes Yes Yes
(Note 1) Skip this step if you do not want to create RAID array on the SATA controller.(Note 2) An M.2 PCIe SSD cannot be used to set up a RAID set either with an M.2 SATA SSD or a SATA hard
drive.(Note 3) Refer to Chapter 1, "Internal Connectors," for the installation notices for the M.2 and SATA connectors.

- 3 -
The BIOS Setup menus described in this section may differ from the exact settings for your motherboard. The actual BIOS Setup menu options you will see shall depend on the motherboard you have and the BIOS version.
B. Configuring SATA controller mode in BIOS SetupMake sure to configure the SATA controller mode correctly in system BIOS Setup.
Step 1:Turn on your computer and press <Delete> to enter BIOS Setup during the POST (Power-On Self-Test). Go to Peripherals\SATA And RST Configuration, make sure SATA Controller(s) is enabled. To create RAID, set SATA Mode Selection to Intel RST Premium With Intel Optane System Acceleration (Figure 1).
Step 2: To use the EZ RAID feature, follow the steps in "C-1." To configure UEFI RAID, follow the steps in "C-2." To enter the legacy RAID ROM, refer to "C-3" for more information. Finally, save the settings and exit BIOS Setup.
Figure 1

- 4 -
C-1. Using EZ RAIDGIGABYTE motherboards provide you with the EZ RAID feature, allowing you to quickly configure a RAID array with simplified steps.Step 1:After restarting the computer, enter the BIOS Setup and go to Peripherals. Press <Enter> on the EZ RAID item. Select the type of hard drives you use for RAID in the Type tab and then press <Enter>. (Figure 2)
Figure 2
Figure 3
Step 2:Go to the Mode tab to select a RAID level. RAID levels supported include RAID 0, RAID 1, RAID 10, and RAID 5 (the selections available depend on the number of the hard drives being installed). Then press <Enter> to move to the Create tab. Click Proceed to begin (Figure 3).

- 5 -
Figure 4
After completing, you'll be brought back to the Intel(R) Rapid Storage Technology screen. Under RAID Volumes you can see the new RAID volume. To see more detailed information, press <Enter> on the volume to check for information on RAID level, stripe block size, array name, and array capacity, etc. (Figure 4).
Figure 5
Delete RAID VolumeTo delete a RAID array, press <Enter> on the volume to be deleted on the Intel(R) Rapid Storage Technology screen. After entering the RAID VOLUME INFO screen, press <Enter> on Delete to enter the Delete screen. Press <Enter> on Yes (Figure 5).

- 6 -
C-2. UEFI RAID Configuration
Step 1:In BIOS Setup, go to BIOS and set CSM Support to Disabled (Figure 6). Save the changes and exit BIOS Setup.
Step 2:After the system reboot, enter BIOS Setup again. Then enter the Peripherals\Intel(R) Rapid Storage Technology sub-menu (Figure 7).
Figure 6
Figure 7

- 7 -
Step 3:On the Intel(R) Rapid Storage Technology menu, press <Enter> on Create RAID Volume to enter the Create RAID Volume screen. Enter a volume name with 1~16 letters (letters cannot be special characters) under the Name item and press <Enter>. Then, select a RAID level (Figure 8). RAID levels supported include RAID 0, RAID 1, RAID 10, and RAID 5 (the selections available depend on the number of the hard drives being installed). Next, use the down arrow key to move to Select Disks.
Step 4:Under Select Disks item, select the hard drives to be included in the RAID array. Press the <Space> key on the hard drives to be selected (selected hard drives are marked with "X"). Then set the stripe block size (Figure 9). The stripe block size can be set from 4 KB to 128 KB. Once you have selected the stripe block size, set the volume capacity.
Figure 8
Figure 9

- 8 -
Step 5:After setting the capacity, move to Create Volume and press <Enter> to begin. (Figure 10)
After completing, you'll be brought back to the Intel(R) Rapid Storage Technology screen. Under RAID Volumes you can see the new RAID volume. To see more detailed information, press <Enter> on the volume to check for information on RAID level, stripe block size, array name, and array capacity, etc. (Figure 11)
Figure 10
Figure 11

- 9 -
Delete RAID VolumeTo delete a RAID array, press <Enter> on the volume to be deleted on the Intel(R) Rapid Storage Technology screen. After entering the RAID VOLUME INFO screen, press <Enter> on Delete to enter the Delete screen. Press <Enter> on Yes (Figure 12).
Figure 12

- 10 -
C-3. Configuring Legacy RAID ROMEnter the Intel® legacy RAID BIOS setup utility to configure a RAID array. Skip this step and proceed with the installation of Windows operating system for a non-RAID configuration.
Step 1:In BIOS Setup, go to BIOS and set CSM Support to Enabled and Storage Boot Option Control to Legacy. Save the changes and exit BIOS Setup. After the POST memory test begins and before the operating system boot begins, look for a message which says "Press <Ctrl-I> to enter Configuration Utility" (Figure 13). Press <Ctrl> + <I> to enter the RAID Configuration Utility.
Figure 13
Step 2:After you press <Ctrl> + <I>, the MAIN MENU screen will appear (Figure 14).
Create RAID VolumeIf you want to create a RAID array, select Create RAID Volume in MAIN MENU and press <Enter>.
Figure 14
Intel(R) Rapid Storage Technology - Option ROM - 15.7.0.2925Copyright (C) Intel Corporation. All Rights Reserved.
RAID Volumes :None defined.
Physical Devices :ID Device Model Serial # Size Type/Status(Vol ID)1 TOSHIBA DT01ACA1 763ZLL4FS 931.5GB Non-RAID Disk2 TOSHIBA DT01ACA1 763ZM7MFS 931.5GB Non-RAID Disk
Press <CTRL - I> to enter Configuration Utility...
Intel(R) Rapid Storage Technology - Option ROM - 15.7.0.2925Copyright (C) Intel Corporation. All Rights Reserved.
4. Recovery Volume Options5. Acceleration Options6. Exit
RAID Volumes :None defined.
Physical Deivces :ID Device Model Serial # Size Type/Status(Vol ID)1 TOSHIBA DT01ACA1 763ZLL4FS 931.5GB Non-RAID Disk2 TOSHIBA DT01ACA1 763ZM7MFS 931.5GB Non-RAID Disk
[hi]-Select [ESC]-Exit [ENTER]-Select Menu
[ DISK/VOLUME INFORMATION ]
[ MAIN MENU ]1. Create RAID Volume2. Delete RAID Volume3. Reset Disks to Non-RAID
- 11 -
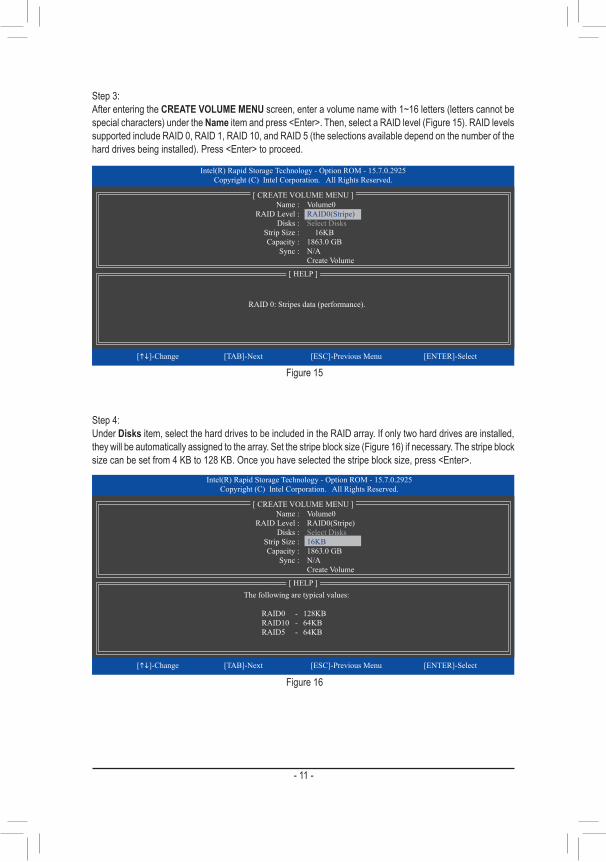
Step 3: After entering the CREATE VOLUME MENU screen, enter a volume name with 1~16 letters (letters cannot be special characters) under the Name item and press <Enter>. Then, select a RAID level (Figure 15). RAID levels supported include RAID 0, RAID 1, RAID 10, and RAID 5 (the selections available depend on the number of the hard drives being installed). Press <Enter> to proceed.
Step 4:Under Disks item, select the hard drives to be included in the RAID array. If only two hard drives are installed, they will be automatically assigned to the array. Set the stripe block size (Figure 16) if necessary. The stripe block size can be set from 4 KB to 128 KB. Once you have selected the stripe block size, press <Enter>.
Figure 15
Figure 16
Intel(R) Rapid Storage Technology - Option ROM - 15.7.0.2925Copyright (C) Intel Corporation. All Rights Reserved.
RAID 0: Stripes data (performance).
[hi]-Change [TAB]-Next [ESC]-Previous Menu [ENTER]-Select
[ HELP ]
Name : Volume0 RAID Level : RAID0(Stripe) Disks : Select Disks Strip Size : 16KB Capacity : 1863.0 GB Sync : N/A Create Volume
[ CREATE VOLUME MENU ]
Intel(R) Rapid Storage Technology - Option ROM - 15.7.0.2925Copyright (C) Intel Corporation. All Rights Reserved.
The following are typical values:
RAID0 - 128KB RAID10 - 64KB RAID5 - 64KB
[hi]-Change [TAB]-Next [ESC]-Previous Menu [ENTER]-Select
[ HELP ]
[ CREATE VOLUME MENU ] Name : Volume0 RAID Level : RAID0(Stripe) Disks : Select Disks Strip Size : 16KB Capacity : 1863.0 GB Sync : N/A Create Volume
- 12 -
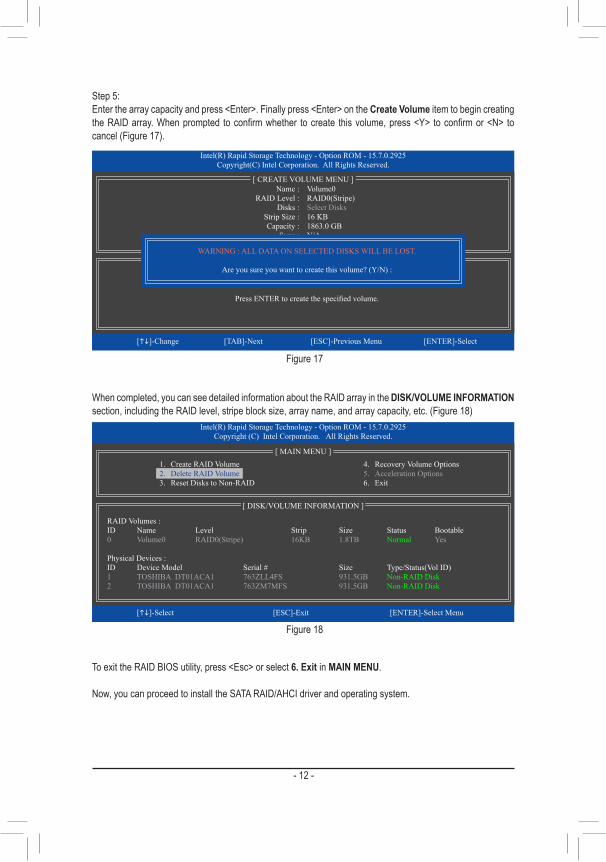
Step 5:Enter the array capacity and press <Enter>. Finally press <Enter> on the Create Volume item to begin creating the RAID array. When prompted to confirm whether to create this volume, press <Y> to confirm or <N> to cancel (Figure 17).
When completed, you can see detailed information about the RAID array in the DISK/VOLUME INFORMATION section, including the RAID level, stripe block size, array name, and array capacity, etc. (Figure 18)
To exit the RAID BIOS utility, press <Esc> or select 6. Exit in MAIN MENU.
Now, you can proceed to install the SATA RAID/AHCI driver and operating system.
Figure 17
Figure 18
Intel(R) Rapid Storage Technology - Option ROM - 15.7.0.2925Copyright(C) Intel Corporation. All Rights Reserved.
Press ENTER to create the specified volume.
[hi]-Change [TAB]-Next [ESC]-Previous Menu [ENTER]-Select
[ HELP ]
Name : Volume0 RAID Level : RAID0(Stripe) Disks : Select Disks Strip Size : 16 KB Capacity : 1863.0 GB Sync : N/A Create Volume
[ CREATE VOLUME MENU ]
WARNING : ALL DATA ON SELECTED DISKS WILL BE LOST.
Are you sure you want to create this volume? (Y/N) :
Intel(R) Rapid Storage Technology - Option ROM - 15.7.0.2925Copyright (C) Intel Corporation. All Rights Reserved.
RAID Volumes :ID Name Level Strip Size Status Bootable0 Volume0 RAID0(Stripe) 16KB 1.8TB Normal Yes
Physical Devices :ID Device Model Serial # Size Type/Status(Vol ID)1 TOSHIBA DT01ACA1 763ZLL4FS 931.5GB Non-RAID Disk2 TOSHIBA DT01ACA1 763ZM7MFS 931.5GB Non-RAID Disk
[hi]-Select [ESC]-Exit [ENTER]-Select Menu
[ DISK/VOLUME INFORMATION ]
[ MAIN MENU ]4. Recovery Volume Options5. Acceleration Options6. Exit
1. Create RAID Volume2. Delete RAID Volume3. Reset Disks to Non-RAID

- 13 -
Recovery Volume OptionsIntel® Rapid Recover Technology provides data protection by allowing users to easily restore data and system operation using a designated recovery drive. With the Rapid Recovery Technology, which employs RAID 1 functionality, users can copy the data from the master drive to the recovery drive; if needed, the data on the recovery drive can be restored back to the master drive.
Before you begin: • The recovery drive must have equal or greater capacity than the master drive. • A recovery volume can be created with two hard drives only. A recovery volume and a RAID array cannot co-exist in the system at the same time, that is, if you have already created a recovery volume, you are unable to create a RAID array.
• By default, only the master drive can be viewed in the operating system; the recovery drive is hidden.
Step 1:Select Create RAID Volume in MAIN MENU and press <Enter> (Figure 19).
Figure 19
Figure 20
Step 2:After entering the volume name, select Recovery under the RAID Level item and press <Enter> (Figure 20).
Intel(R) Rapid Storage Technology - Option ROM - 15.7.0.2925Copyright (C) Intel Corporation. All Rights Reserved.
RAID Volumes :None defined.
Physical Disks :ID Drive Model Serial # Size Type/Status(Vol ID)1 TOSHIBA DT01ACA1 763ZLL4FS 931.5GB Non-RAID Disk2 TOSHIBA DT01ACA1 763ZM7MFS 931.5GB Non-RAID Disk
[hi]-Select [ESC]-Exit [ENTER]-Select Menu
[ DISK/VOLUME INFORMATION ]
[ MAIN MENU ]4. Recovery Volume Options5. Acceleration Options6. Exit
1. Create RAID Volume2. Delete RAID Volume3. Reset Disks to Non-RAID
Intel(R) Rapid Storage Technology - Option ROM - 15.7.0.2925Copyright (C) Intel Corporation. All Rights Reserved.
Recovery: Copies data between a master and a recovery disk.
[hi]-Change [TAB]-Next [ESC]-Previous Menu [ENTER]-Select
[ HELP ]
Name : Volume0 RAID Level : Recovery Disks : Select Disks Strip Size : N/A Capacity : 931.5 GB Sync : Continuous Create Volume
[ CREATE VOLUME MENU ]

- 14 -
Figure 21
Step 3:Press <Enter> under the Select Disks item. In the SELECT DISKS box, press <Tab> on the hard drive you want to use for the master drive and press <Space> on the hard drive you want to use for the recovery drive. (Make sure the recovery drive has equal or larger capacity than the master drive.) Then press <Enter> to confirm (Figure 21).
Step 4:Under Sync, select Continuous or On Request (Figure 22). When set to Continuous, changes made to the data on the master drive will be automatically and continuously copied to the recovery drive when both hard drives are installed in the system. On Request allows users to update data from the master drive to the recovery drive manually using the Intel® Rapid Storage Technology utility in the operating system. On Request also allows users to restore the master drive to a previous state.
Figure 22
Step 5:Finally press <Enter> on the Create Volume item to begin creating the Recovery Volume and follow the on-screen instructions to complete.
Intel(R) Rapid Storage Technology - Option ROM - 15.7.0.2925Copyright (C) Intel Corporation. All Rights Reserved.
Choose the RAID level:RAID0: Stripes data (performance).RAID1: Mirrors data (redundancy).
Recovery: Copies data between a master and a recovery disk.RAID10: Mirrors data and stripes the mirror.
RAID5: Stripes data and parity.
[hi]-Change [TAB]-Next [ESC]-Previous Menu [ENTER]-Select
[ HELP ]
[ CREATE VOLUME MENU ] Name : Volume0 RAID Level : Recovery Disks : Select Disks Strip Size : 128KB Capacity : 223.6 GB Create Volume
[ SELECT DISKS ]
[hi]-Prev/Next [TAB]-(M)aster [SPACE]-(R)ecovery [ENTER]-Done
ID Drive Model Serial # Size StatusM1 TOSHIBA DT01ACA1 763ZM7MFS 931.5GB Non-RAID DiskR2 TOSHIBA DT01ACA1 763ZLL4FS 931.5GB Non-RAID Disk
Select 1 Master and 1 Recovery disk to create volume.
Intel(R) Rapid Storage Technology - Option ROM - 15.7.0.2925Copyright (C) Intel Corporation. All Rights Reserved.
Select a sync option:On Request: volume is updated manually
Continuous: volume is updated automatically
[hi]-Change [TAB]-Next [ESC]-Previous Menu [ENTER]-Select
[ HELP ]
Name : Volume0 RAID Level : Recovery Disks : Select Disks Strip Size : N/A Capacity : 0.0 GB Sync : Continuous Create Volume
[ CREATE VOLUME MENU ]

- 15 -
Delete RAID VolumeTo delete a RAID array, select Delete RAID Volume in MAIN MENU and press <Enter>. In the DELETE VOLUME MENU section, use the up or down arrow key to select the array to be deleted and press <Delete>. When prompted to confirm your selection (Figure 23), press <Y> to confirm or <N> to abort.
Figure 23
Acceleration OptionsThis option allows you to view the status of your accelerated drive/volume (Figure 24) created using the Intel® IRST utility. In case you are unable to run the Intel® IRST utility due to an application error or operating system issue, you will need to remove acceleration or manually enable synchronization (Maximized mode only) using this option in the RAID ROM utility. Steps:Select Acceleration Options in MAIN MENU and press <Enter>. To remove the acceleration, select the accelerated drive/volume, press <R>, and press <Y> to confirm.To synchronize data from the cache device to the accelerated drive/volume, press <S> and press <Y> to confirm.
Figure 24
Intel(R) Rapid Storage Technology - Option ROM - 15.7.0.2925Copyright (C) Intel Corporation. All Rights Reserved.
Deleting a volume will reset the disks to non-RAID.WARNING: ALL DISK DATA WILL BE DELETED.
(This does not apply to Recovery volumes)
[hi]-Select [ESC]-Previous Menu [DEL]-Delete Volume
[ HELP ]
[ DELETE VOLUME MENU ]Name Level Drives Capacity Status BootableVolume0 RAID0(Stripe) 2 1.8TB Normal Yes
ALL DATA IN THE VOLUME WILL BE LOST!(This does not apply to Recovery volumes)
Are you sure you want to delete "Volume0"? (Y/N) :
[ DELETE VOLUME VERIFICATION ]
Intel(R) Rapid Storage Technology - Option ROM - 15.7.0.2925Copyright (C) Intel Corporation. All Rights Reserved.
Press 's' to synchronize data from the cache device tothe Accelerated Disk/Volume
Press 'r' to remove the Disk/Volume AccelerationWARNING: IT IS RECOMMENDED THAT YOU PERFORM A SYNCHRONIZATION
BEFORE REMOVING ACCELERATION
[hi]-Select [ESC]- Previous Menu
[ HELP ]
[ ACCELERATION OPTIONS ]Name Type Capacity Mode Status DISK PORT 3 Non-RAID Disk 931.5GB Enhanced In Sync

- 16 -
Installing the RAID/AHCI Driver and Operating SystemWith the correct BIOS settings, you are ready to install the operating system.
A. Installing Windows As some operating systems already include Intel® RAID/AHCI driver, you do not need to install separate RAID/AHCI driver during the Windows installation process. After the operating system is installed, we recommend that you install all required drivers from the motherboard driver disk using "Xpress Install" to ensure system performance and compatibility. If the operating system to be installed requires that you provide additional SATA RAID/AHCI driver during the OS installation process, please refer to the steps below:
Step 1: Copy the IRST folder under Boot in the driver disk to your USB thumb drive.
Step 2: Boot from the Windows setup disk and perform standard OS installation steps. When the screen requesting you to load the driver appears, select Browse.
Step 3: Insert the USB thumb drive and then browse to the location of the driver. The location of the driver is as follows:\IRST\f6flpy-x64
Step 4: When a screen as shown in Figure 1 appears, select Intel Chipset SATA RAID Controller and click Next to load the driver and continue the OS installation.
Figure 1

- 17 -
B. Rebuilding an ArrayRebuilding is the process of restoring data to a hard drive from other drives in the array. Rebuilding applies only to fault-tolerant arrays such as RAID 1, RAID 5 or RAID 10 arrays. The procedures below assume a new drive is added to replace a failed drive to rebuild a RAID 1 array. (Note: The new drive must have equal or greater capacity than the old one.)
Turn off your computer and replace the failed hard drive with a new one. Restart your computer.
• Performing the Rebuild in the Operating SystemWhile in the operating system, make sure the chipset driver has been installed from the motherboard driver disk. Then launch the Intel® Rapid Storage Technology utility from the Start menu.
Step 1:Go to the Manage menu and click Rebuild to another disk in Manage Volume.
The Status item on the left of the screen displays the rebuild progress. After the RAID 1 volume rebuilding, the Status will display as Normal.
Step 2:Select a new drive to rebuild the RAID and click Rebuild.

- 18 -
Step 2:Go to the Manage menu of the Intel® Rapid Storage Technology utility and click Recover data in Manage Volume.
The Status item on the left of the screen displays the recovering status. After the recovery volume is completed, the Status will display as Normal.
Step 3:Click Yes to begin the data recovery.
• Restoring the Master Drive to a Previous State (for Recovery Volume only)When two hard drives are set to Recovery Volume in Update on Request mode, you can restore the master drive data to the last backup state when needed. For example, in case the master drive detects a virus, you can restore the recovery drive data to the master drive.
Step 1:Select 4. Recovery Volume Options in the MAIN MENU of the Intel® RAID Configuration Utility. On the RECOVERY VOLUMES OPTIONS menu, select Enable Only Recovery Disk to show the recovery drive in the operating system. Follow the on-screen instructions to complete and exit the RAID Configuration Utility.
Intel(R) Rapid Storage Technology - Option ROM - 15.7.0.2925Copyright (C) Intel Corporation. All Rights Reserved.
Choose the RAID level:RAID0: Stripes data (performance).RAID1: Mirrors data (redundancy).
Recovery: Copies data between a master and a recovery disk.RAID10: Mirrors data and stripes the mirror.
RAID5: Stripes data and parity.
[hi]-select [ESC]-Previous Menu [ENTER]-Select
[ HELP ]
[ RECOVERY VOLUME OPTIONS ] 1. Enable Only Recovery Disk 2. Enable Only Master Disk
[ SELECT RECOVERY VOLUME ]
[hi]-Up/Down [SPACE]-Selects [ENTER]-Done
Name Level Capacity Status Bootable}Volume0 Recovery(OnReq) 465.7GB NeedsUpdate Yes
Select a Recovery volume to do the operation.

- 19 -
Installing an Intel® Optane™ MemoryA. System Requirements1. Intel® Optane™ memory2. The Optane™ memory must have at least 16 GB capacity, and it must have equal or smaller capacity than
the hard drive/SSD to be accelerated. 3. The Optane™ memory cannot be used to accelerate an existing RAID array; the accelerated hard drive/SSD
cannot be included in a RAID array. 4. The hard drive/SSD to be accelerated must be a SATA hard drive or M.2 SATA SSD and must have Windows
10 64-bit (or later version) installed on it. (Must be formatted for GPT partition.)5. The motherboard driver disk
B. Installation GuidelinesB-1: Installation in AHCI mode If the SATA controller has been configured in AHCI mode, please install the Optane™ memory in the M2P_32G or M2Q_32G connector and follow the steps below:
(Note) If the system already has Intel® Rapid Storage Technology utility installed, you have to remove it first before installing the Intel(R) Optane Memory application.
Step 1: After entering the operating system, insert the motherboard driver disk into your optical drive. On the Xpress Install screen, select Intel(R) Optane(TM) Memory System Acceleration (Note) to install. Follow the on-screen instructions to continue. The system will auto-restart.
Step 2: After re-entering the operating system, the dialog box as shown above will appear. Click Yes to continue the installation and then restart the system.
Step 3: Launch the Intel(R) Optane Memory application from the Start menu. A message which says Intel® Optane™ Memory is disabled will appear on the main screen. Click Enable to activate the Intel® Optane™ Memory and restart the system again. (If you install more than one Optane™ memory, please select which one you are going to use).
Step 4: Launch the Intel(R) Optane Memory application from the Start menu and make sure the Intel® Optane™ Memory has been enabled. (The SATA controller mode is changed to Intel RST Premium With Intel Optane System Acceleration from AHCI mode. DO NOT change your SATA controller mode back to AHCI. Doing so will prevent Intel® Optane™ memory from functioning properly.

- 20 -
B-2: Installation in Intel RST Premium With Intel Optane System Acceleration mode If the SATA controller has been configured in Intel RST Premium With Intel Optane System Acceleration mode, please install the Optane™ memory in the M2P_32G or M2Q_32G connector first and follow the steps below:
• An Optane™ memory cannot be used to accelerate an M.2 PCIe SSD. • Do not abruptly remove the Optane™ memory. Doing so will cause the operating system to stop functioning
correctly. • If you want to change/remove the Optane™ memory, you must disable it using the Intel® Rapid Storage
Technology or Intel(R) Optane Memory application first. • After enabling the Optane™ memory, the related BIOS settings will remain even after a BIOS update.
Step 1:After system restarts, go to the BIOS Setup, make sure CSM Support under the BIOS menu is disabled.
Step 3: Enter the operating system, launch the Intel® Rapid Storage Technology utility from the Start menu, and then enable Intel® Optane™ Memory on the Intel® Optane™ Memory screen.
Step 4: If you install more than one Optane™ memory, please select which one you are going to use.
Step 5:Follow the on-screen instruction to continue the installation and then restart the system when completed.
Step 2:Go to Peripherals\SATA And RST Configuration and make sure USE RST Legacy ROM is disabled. If you want to enable the Optane™ memory installed in the M2P_32G connector, set PCIe Storage Device on Port 9 to RST Controlled; to enable the Optane™ memory installed in the M2Q_32G connector, set PCIe Storage Device on Port 17 to RST Controlled.

- 21 -
Configuring Intel® Virtual RAID on CPU (Intel® VROC)System Requirements1. An Intel® Core™ X series processor (44-lane or 28-lane CPU) (6-core or above)2. An Intel® VROC Upgrade Key (purchased separately)3. At least two Intel® NVMe SSDs (to ensure optimal performance, it is recommended that you use SSDs with
identical model and capacity).
Intel® VROC Upgrade Key Supported RAID Levels
No Key Installed RAID 0
Standard Key RAID 0, 1, 10
Premium Key RAID 0, 1, 5, 10
Installation GuidelinesA-1: Hardware InstallationPlug the Intel® VROC Upgrade Key into the VROC header on the motherboard and install the Intel® NVMe SSDs in the PCIe slot(s) or M.2(s) connector controlled by the CPU.
To install the operating system onto the RAID array, make sure the Intel® NVMe SSDs are installed in the PCIe slots managed by the same VMD controller.
� X299 AORUS Gaming 9PCIe Slot PCIEX16_1 PCIEX4_1 PCIEX16_2 PCIEX8
44-lane CPU Installed a r r a
28-lane CPU Installed a r r a
a: Same VMD, r: Not the Same VMD.
� X299 AORUS Gaming 7/X299 AORUS Ultra Gaming (Pro)PCIe Slot PCIEX16_1 PCIEX4_1 PCIEX16_2 PCIEX8
44-lane CPU Installed r a r a
28-lane CPU Installed a r r a
a: Same VMD, r: Not the Same VMD.
� X299 AORUS Gaming 3 (Pro)/X299 UD4 (Pro) (EX)PCIe Slot PCIEX16_1 PCIEX4_1 PCIEX16_2 PCIEX8
44-lane CPU Installed r a r a
28-lane CPU Installed r r r r
a: Same VMD, r: Not the Same VMD.
If you are installing four Intel® NVMe SSDs, make sure to install the graphics card in the PCIEX4_2 slot.

- 22 -
A-2: Creating a RAID Array
Step 1:After the system starts, go to the BIOS Setup, make sure Intel® VMD Technology under the BIOS menu is enabled.
Step 2:Go to Peripherals\SATA And RST Configuration. Enable SATA Controller(s), set SATA Mode Selection to Intel RST Premium, and enable iRSTe Support. Save the changes and exit BIOS Setup.
Step 3:After the system reboots, enter BIOS Setup again. Then enter the Peripherals\Intel(R) Virtual RAID on CPU sub-menu. Press <Enter> on All Intel VMD Controller.
Step 4:Press <Enter> on Create RAID Volume to enter the Create RAID Volume screen.
Step 5:Enter a volume name with 1~16 letters (letters cannot be special characters) under the Name item and press <Enter>. Then, select a RAID level. (The selections available depend on the number of the hard drives and type of the Intel® VROC Upgrade Key being installed)
Step 6:If the SSDs are installed to different VMDs, be sure to press the <Space> key on the Enable RAID spanned over VMD Controllers item to enable this function first. X means SSDs managed by different VMDs can be included in a RAID array but the RAID array can be used as a data drive only.

- 23 -
Step 8:Then set the stripe block size. The stripe block size can be set from 4 KB to 128 KB. Once you have selected the stripe block size, set the volume capacity. After setting the capacity, move to Create Volume and press <Enter> to begin.
Step 9:After completing, you'll be brought back to the Intel(R) Virtual RAID on CPU screen. Under Intel VROC Managed Volumes you can see the new RAID volume.
To delete a RAID array, press <Enter> on the volume to be deleted on the Intel(R) Virtual RAID on CPU\Intel VROC Managed Volumes screen. After entering the RAID VOLUME INFO screen, press <Enter> on Delete to enter the Delete screen. Press <Enter> on Yes.
Step 7:Under the Select Disks item, select the hard drives to be included in the RAID array. Press the <Space> key on the hard drives to be selected (selected hard drives are marked with "X").
A-3: Delete RAID Volume