Embed Size (px)
Citation preview
Configuration
• Configure the Network, page 1
• Set up Users on the Cisco Unified Communications Manager Workflow, page 2
• Change a User Password, page 6
Configure the NetworkRelated Topics
Port Requirements
DHCP Pool SetupIf your network uses DHCP, specify the domain name in the DHCP pool. Without this setting, DHCP doesnot assign a domain to the thin clients. Therefore, the devices cannot register with the Cisco UnifiedCommunications Manager, the client keypads are dimmed, and users cannot make calls.
Example:ip dhcp pool Non-VXCM servernetwork 10.2.209.0 255.255.255.0dns-server 10.2.25.11default-router 10.2.209.1domain-name rtpvxi.com!
Configuration FilesFor each Cisco Unified Client Services Framework (CSF) device that you add to the system, Cisco UnifiedCommunications Manager creates a configuration (CNF.xml) file. The CNF file contains the devicespecifications for the associated user.
When users sign in to Cisco Jabber, Cisco Virtualization Experience Media Edition starts the download ofthe associated CNF file to the thin client. To ensure the successful transfer of the file, open the relevant portsin all firewall applications to allow the thin client to access the ports. For more information about how to openports, see the documentation for the firewall software.
Deployment and Installation Guide for Cisco Virtualization Experience Media Edition for Windows Release 11.8
1

Download of the CNF.xml file follows the system setting for HTTP proxy. Ensure that the proxy doesnot route the HTTP request from the thin client outside of the corporate network.
Important
Set up Users on the Cisco Unified Communications ManagerWorkflow
Procedure
PurposeCommand or Action
Create a CSF Device and a Directory Number forEach User, on page 2.
Step 1
Associate New Devices with a User, on page 5.Step 2
Enable the CTI Protocol for Users, on page 5.Step 3
Enable the Unified CommunicationsManager IM and Presence Service. See
Configure Cisco Unified Communications Featuresfor Users, on page 6.
Step 4
the documentation for your version ofCisco Unified CommunicationsManager.
Create a CSF Device and a Directory Number for Each User
You can use the same Cisco Unified Client Services Framework (CSF) devices for the virtual environment,as you do for the nonvirtual environment. We recommend that you create only one CSF device for eachvirtual user. If multiple devices exist for a virtual user, virtual Jabber automatically selects the first devicein the list.
Note
Procedure
Step 1 From Cisco Unified Communications Manager Administration, choose Device > Phone.Step 2 Select Add New.Step 3 From the Phone Type drop-down list, choose Cisco Unified Client Services Framework, and then select
Next.Step 4 In the Phone Configuration window, enter the applicable information for the phone as follows:
Deployment and Installation Guide for Cisco Virtualization Experience Media Edition for Windows Release11.8
2
ConfigurationSet up Users on the Cisco Unified Communications Manager Workflow
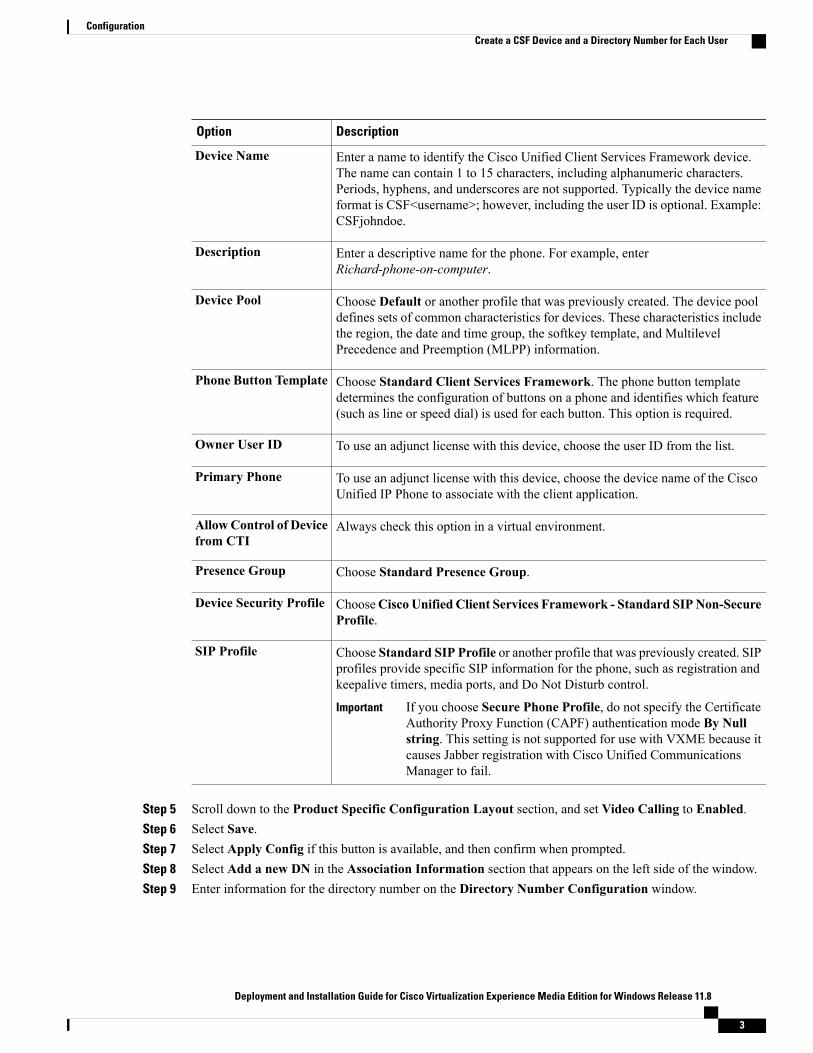
DescriptionOption
Enter a name to identify the Cisco Unified Client Services Framework device.The name can contain 1 to 15 characters, including alphanumeric characters.Periods, hyphens, and underscores are not supported. Typically the device nameformat is CSF<username>; however, including the user ID is optional. Example:CSFjohndoe.
Device Name
Enter a descriptive name for the phone. For example, enterRichard-phone-on-computer.
Description
Choose Default or another profile that was previously created. The device pooldefines sets of common characteristics for devices. These characteristics includethe region, the date and time group, the softkey template, and MultilevelPrecedence and Preemption (MLPP) information.
Device Pool
Choose Standard Client Services Framework. The phone button templatedetermines the configuration of buttons on a phone and identifies which feature(such as line or speed dial) is used for each button. This option is required.
Phone Button Template
To use an adjunct license with this device, choose the user ID from the list.Owner User ID
To use an adjunct license with this device, choose the device name of the CiscoUnified IP Phone to associate with the client application.
Primary Phone
Always check this option in a virtual environment.AllowControl of Devicefrom CTI
Choose Standard Presence Group.Presence Group
ChooseCisco Unified Client Services Framework - Standard SIPNon-SecureProfile.
Device Security Profile
Choose Standard SIP Profile or another profile that was previously created. SIPprofiles provide specific SIP information for the phone, such as registration andkeepalive timers, media ports, and Do Not Disturb control.
If you choose Secure Phone Profile, do not specify the CertificateAuthority Proxy Function (CAPF) authentication mode By Nullstring. This setting is not supported for use with VXME because itcauses Jabber registration with Cisco Unified CommunicationsManager to fail.
Important
SIP Profile
Step 5 Scroll down to the Product Specific Configuration Layout section, and set Video Calling to Enabled.Step 6 Select Save.Step 7 Select Apply Config if this button is available, and then confirm when prompted.Step 8 Select Add a new DN in the Association Information section that appears on the left side of the window.Step 9 Enter information for the directory number on the Directory Number Configuration window.
Deployment and Installation Guide for Cisco Virtualization Experience Media Edition for Windows Release 11.8
3
ConfigurationCreate a CSF Device and a Directory Number for Each User
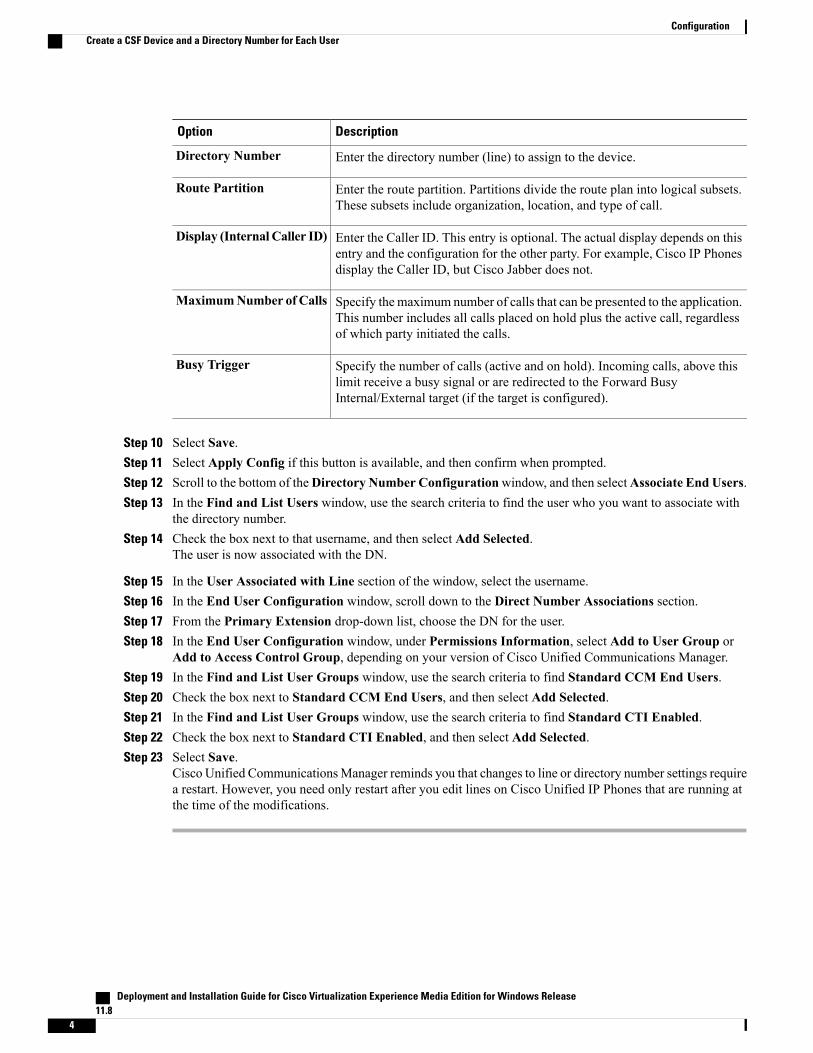
DescriptionOption
Enter the directory number (line) to assign to the device.Directory Number
Enter the route partition. Partitions divide the route plan into logical subsets.These subsets include organization, location, and type of call.
Route Partition
Enter the Caller ID. This entry is optional. The actual display depends on thisentry and the configuration for the other party. For example, Cisco IP Phonesdisplay the Caller ID, but Cisco Jabber does not.
Display (Internal Caller ID)
Specify themaximum number of calls that can be presented to the application.This number includes all calls placed on hold plus the active call, regardlessof which party initiated the calls.
MaximumNumber of Calls
Specify the number of calls (active and on hold). Incoming calls, above thislimit receive a busy signal or are redirected to the Forward BusyInternal/External target (if the target is configured).
Busy Trigger
Step 10 Select Save.Step 11 Select Apply Config if this button is available, and then confirm when prompted.Step 12 Scroll to the bottom of theDirectory Number Configurationwindow, and then selectAssociate End Users.Step 13 In the Find and List Users window, use the search criteria to find the user who you want to associate with
the directory number.Step 14 Check the box next to that username, and then select Add Selected.
The user is now associated with the DN.
Step 15 In the User Associated with Line section of the window, select the username.Step 16 In the End User Configuration window, scroll down to the Direct Number Associations section.Step 17 From the Primary Extension drop-down list, choose the DN for the user.Step 18 In the End User Configuration window, under Permissions Information, select Add to User Group or
Add to Access Control Group, depending on your version of Cisco Unified Communications Manager.Step 19 In the Find and List User Groups window, use the search criteria to find Standard CCM End Users.Step 20 Check the box next to Standard CCM End Users, and then select Add Selected.Step 21 In the Find and List User Groups window, use the search criteria to find Standard CTI Enabled.Step 22 Check the box next to Standard CTI Enabled, and then select Add Selected.Step 23 Select Save.
Cisco Unified CommunicationsManager reminds you that changes to line or directory number settings requirea restart. However, you need only restart after you edit lines on Cisco Unified IP Phones that are running atthe time of the modifications.
Deployment and Installation Guide for Cisco Virtualization Experience Media Edition for Windows Release11.8
4
ConfigurationCreate a CSF Device and a Directory Number for Each User

Associate New Devices with a User
Perform this task in Cisco Unified Communications Manager.Note
Procedure
Step 1 From Cisco Unified Communications Manager Administration, choose > User Management > End User.Step 2 Search for the user in the Find and List Users window.Step 3 Select the user.Step 4 Select Device Association in the Device Information section.Step 5 Search for the devices that you require in the User Device Association window.Step 6 Select the devices that you require.
For example, you can select a device whose type is Cisco Unified Client Services Framework, and a desk-phonedevice.
Step 7 Select Save Selected/Changes.Step 8 Select Back to User from the menu in the Related Links navigation box at the top right of the window.Step 9 Select Go.Step 10 Verify that the devices are listed in the Device Information section in the End User Configurationwindow.
Enable the CTI Protocol for UsersEnable the computer-telephony integration (CTI) protocol for each Cisco Virtualization Experience MediaEdition (VXME) user.
Procedure
Step 1 From Cisco Unified Communications Manager Administration, choose User Management > End Users.Step 2 Search for the user in the Find and List Users window.Step 3 Select the user.Step 4 In the End User Configuration window, scroll down to Permissions Information.Step 5 Select Add to User Group.Step 6 Select the following groups:
• Standard CCM End Users
• Standard CTI Allow Control of All Devices
• Standard CTI Enabled
Deployment and Installation Guide for Cisco Virtualization Experience Media Edition for Windows Release 11.8
5
ConfigurationAssociate New Devices with a User
Step 7 Select Save.
What to Do Next
Enable the Unified Communications Manager IM and Presence Service. See the documentation for yourversion of Cisco Unified Communications Manager.
Configure Cisco Unified Communications Features for UsersFor information about how to configure Cisco Unified Communications features for Cisco Jabber, see thedeployment and installation guide for your release, available from http://www.cisco.com/c/en/us/support/unified-communications/jabber-windows/products-installation-guides-list.html.
Change a User PasswordUse this procedure to change the password for a user only if LDAP Authentication is not enabled. If LDAPAuthentication is enabled, the passwords are stored on the LDAP Server. For Cisco Unified CommunicationsManager 9.0 or later, this procedure applies only to passwords for users created locally.
Procedure
Step 1 From Cisco Unified Communications Manager Administration, choose Cisco Unified CommunicationsManager Administration > User Management > End User.
Step 2 Search for the user in the Find and List Users window.Step 3 Select the user.Step 4 In the End User Configuration window, in the Password field, enter a new password for the user.Step 5 In the Confirm Password field, enter the new password for the user again.Step 6 Select Save.
Deployment and Installation Guide for Cisco Virtualization Experience Media Edition for Windows Release11.8
6
ConfigurationConfigure Cisco Unified Communications Features for Users