Embed Size (px)
Citation preview
OWNER’S MANUAL
OVER AND UNDER
SHOTGUN
CONDORSINGLE TRIGGER
EXTRACTOR MODEL

SINGLE TRIGGEREXTRACTOR MODEL
1
CONDOR

106
105
122
122
101
120
104100
200
300
114
224
216
217
222
218
221
225
220
223
219
225
379
342
342
349
378
381
366
341
341
102
107
373
353
36
346
114 103
101
2
CONDOR - SINGLE TRIGGER OVER/UNDEREXTRACTOR MODEL

0
400
350
348
368
369
350
340
495
487
338
485
347
343
337
358
374
372
335
375
351
344
369
351
352
376
353
7
332
332
352
376
331
330
494
486
495371
334
360
367
336
377
368
333
339
3

P. N.º Code N.º Description Quant.
4
101102103104105106107114120122
216217218219220221222223224225
330331332333334335
HL-12-100HL-12-101HL-12-102HL-12-103HL-12-104HL-12-105HL-12-106HL-12-107HL-12-114HL-12-120HL-12-122
HL-12-200HL-12-216HL-12-217HL-12-218HL-12-219HL-12-220HL-12-221HL-12-222HL-12-223HL-12-224HL-12-225
HL-12-300HL-12-330HL-12-331HL-12-332HL-12-333HL-12-334HL-12-335
Barrel AssemblyBarrelBarrel LatchForearm Iron CatchTop RibBarrel Junction ProfileFront SightExtractorLateral RibsIntermediate SightScrew-in Choke Tubes
Forearm AssemblyForearm/Rod IronCocking LeverCocking Lever PinForearm LockForearm Lock SpringForearm Lock PinWood ForendForend WasherVertical Forend ScrewHorizontal Forend Screw
Frame AssemblyFrameFrame TailTrunnion PinLever Lock PinTop Lever SpringTop Lever Pin
-2111111212
-1111111112
-112111

5
P. N.º Code N.º Description Quant.
1111122111111222211112211111211
336337338339340341342343344346347348349350351352353358360366367368369371372373374375376377378
HL-12-336HL-12-337HL-12-338HL-12-339HL-12-340HL-12-341HL-12-342HL-12-343HL-12-344HL-12-346HL-12-347HL-12-348HL-12-349HL-12-350HL-12-351HL-12-352HL-12-353HL-12-358HL-12-360HL-12-366HL-12-367HL-12-368HL-12-369HL-12-371HL-12-372HL-12-373HL-12-374HL-12-375HL-12-376HL-12-377HL-12-378
Lever Lock Impeller PinLever LockLever Impeller SpringTop LeverRetainer PinFiring Pin SpringFiring PinTop Firing Pin PlungerBotton Firing Pin PlungerHammer Cocking CamHammer - LeftHammer - RightHammer PinHammer SpringHammer ImpellerSear SpringSear and Trigger PinSafety SpringSafety Fastening PinTrigger Guard Front Fastening PinTrigger Guard Rear Fastening PinHammer Activactor GuideHammer Impeller Spring Limiter NutEqualizer Impeller PinEqualizer Impeller SpringTriggerEqualizerSafety CatchSearSafety Activating Spring ScrewEqualizer Fastening Pin

6
P. N.º Code N.º Description Quant.
379381
485486487494495
HL-12-379HL-12-381
HL-12-400HL-12-485HL-12-486HL-12-487HL-12-494HL-12-495
Trigger GuardTrigger Spring
Stock AssemblyWood StockStock Bolt WasherStock BoltRubber Butt PadButt pad Screws
11
-11112

— OVER AND UNDER SHOTGUN —
CONDOR
7
TO ASSEMBLE GUN — Your shotgun is shipped from the factorywith barrel assembly and forearm assembly removed from gun.Before assembling, remove forearm and clean lubrication frommetal parts and barrel bores. Rotate top lock lever to right (counter-clockwise) to can top lock open. Carefully fit barrel assembly intoframe. Fit the two small circular cuts on underside of barrelassembly to pivot pins protruding form inside of frame. Hold thisengagement and rotate barrel assembly upward until action isclosed and top lock latches into place. Carefully place forearmassembly over bottom barrel it a slight angle. Adjust to fit radius onforearm iron to matching radius on front of frame. Press forearmassembly upward to latch into place. Please notice that the lever isslightly loose. This looseness will disappear as the gun adjust withuse.SAFETY — The gun has an automatic safety. By opening the gunfor loading or unloading, automaticaly the safety button moves tothe “S” position, which inicates that the gun is locked. If on yourgun the safety is mechanic, push the button to the “S” position.TO LOAD — CAUTION — Before loading, make sure barrel boresare clean and free of any grease, heavy oil, snow or otherobstruction. With safety selector on safe position, rotate top locklever to right to unlatch top lock. Rotate barrel assembly downwardto break (open) action. Place shells into barrel chambers and closeand lock action, if required.

8
TO UNLOAD — Rotate top lock lever to right and open action.Shells will be automatically extracted from gun and may beremoved by hand, or ejected (if the case).TO REMOVE FOREARM IRON ASSEMBLY — Remove forearmassembly. Unscrew front forearm screw and rear forearm screw.Pull iron from forearm. Slide forearm iron assembly from forearm.Assemble in reverse.TO REMOVE FOREARM ASSEMBLY — Press forearm latchforward. Push front of forearm assembly downward.TO REMOVE BARREL ASSEMBLY — Remove forearm assembly.Open action. Move barrel assembly downward slightly todisengage from pivot pins. Lift upward and remove from frame.TO REASSEMBLE STOCK — If stock has been removed, takespecial care in reassembly. The stock bolt should be tightened, totorque not exceeding 5 ft. lbs. Over tightening of stock bolt mayadversely affect proper functioning of gun.CLEANING AND CARE — Open action. Clean barrel bores withcleaning rod and soft, lightly oiled cloths. If necessary, scrub boreswith nitro solvent. Wipe clean and re-oil very lightly.Should cleaning of par ts of forearm iron assembly be required,remove assembly from forearm. Wash assembly in solvent, dryand re-oil sparingly. When using gun in below freezing weather,remove excess oil. If a lubricant is needed use dry graphite orsimilar non-congealing lubricant, lightly applied. After handling gun,oil wipe all steel parts. Invisible “prints” of moisture can cause rustunless removed. After using in wet weather, always dry and wipesteel par ts with oil. Abrupt changes in temperature can alsocause wetness due to condensation. Using a quality gun grease,lightly lubricate radius on front of frame where it matches forearm

iron, pivot pins and adjacent inside walls of frame where contact,is made with barrel assembly. Keep all other bearing points andpolished breech surfaces clean and lightly oiled. Clean top surfacesof frame. Accumulation of dir t or residue in this area may restrictcomplete closing of action and prevent gun from firing.NOTE — This gun, like all over and under shotguns, is a precisionfirearm manufactured to close tolerances. With proper handling itwill assemble and function correctly. Never use excessive force inopening or closing barrels to the action. Proper closing can beaccomplished by holding the forearm with one hand raising thestock assembly with the other hand until it locks.
Any disassembly of the over and under shotgun described inthe Gun Owner’s Manual in not recommended unless necessary forrepair or replacement of worm or damaged parts. Select a qualifiedgunsmith or return gun to store. When gun is new, it may be notedthat the lock lever may not return to a precise center position whenaction is closed. This assures that provision has been made forgradual adjustment of locking surfaces.
Our firearms are designed, manufactured and proof tested tostandard based factory loaded ammunition. Improperly loadedhandloads can be dangerous. The manufactures of this —shotguns cannot assume responsibility for damages injury causedby handloads or reloaded ammunition.
This gun has been manufactured to factory specifications andshipped from factory suitable for use. Stoeger does notrecommend and is not responsible for alteration or modificationson gun not made by authorized personnel, nor the replacement ofworn or damaged par ts being those not of our manufacture.
9

Special care should be taken to insure that gun is not loadedwith any size other than marked on gun barrel.
DO NOT SHOOT STEEL SHOT THROUGH A FULLCHOKED BARREL
IMPORTANT
1 — When closing the gun thetop lever (A) must be firm onposition 2, otherwise the lockinglugs (B) will remain exposed andmay damage the extractor (C)preventing a correct assembly,hampering performance.
10
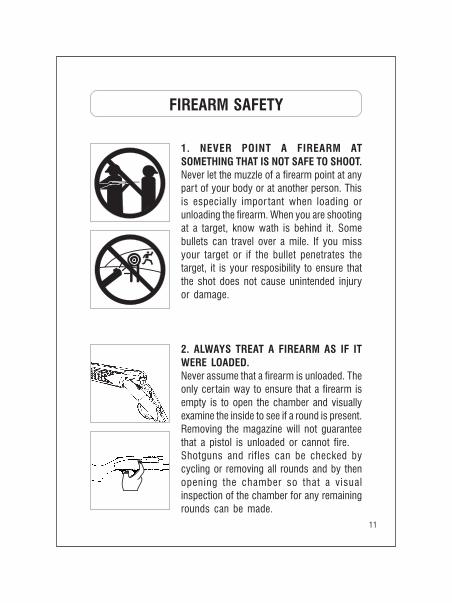
FIREARM SAFETY
1. NEVER POINT A FIREARM ATSOMETHING THAT IS NOT SAFE TO SHOOT.Never let the muzzle of a firearm point at anypart of your body or at another person. Thisis especially impor tant when loading orunloading the firearm. When you are shootingat a target, know wath is behind it. Somebullets can travel over a mile. If you missyour target or if the bullet penetrates thetarget, it is your resposibility to ensure thatthe shot does not cause unintended injuryor damage.
2. ALWAYS TREAT A FIREARM AS IF ITWERE LOADED.Never assume that a firearm is unloaded. Theonly cer tain way to ensure that a firearm isempty is to open the chamber and visuallyexamine the inside to see if a round is present.Removing the magazine will not guaranteethat a pistol is unloaded or cannot fire.Shotguns and rifles can be checked bycycling or removing all rounds and by thenopening the chamber so that a visualinspection of the chamber for any remainingrounds can be made.
11

3. STORE YOUR FIREARM SO THATCHILDREN CANNOT GAIN ACCESS TOIT.It is your responsibility to insure that childrenunder the age of 18 or other unauthorizedpersones do not gain access to your firearm.To reduce the risk of accidents involvingchildren, unload your firearm, lock it and storethe ammunition in a separate locked location.Please note that devices intended to preventaccidents - for example, cable locks,chamber plugs, etc, - may not prevent useor misuse of your firearm by a determinedperson. Steel gun safes may be moreappropriate to reduce the likelihood ofintentional misuse ofa firearm by an unauthorized child orperson.
4. NEVER SHOOT AT WATER OR AT A HARDSURFACE.Shooting at the surface of water or at a rockor other hard surface increases the chanceof ricochets or fragmentation of the bullet orshot, which can result in the projectile strikingan unintended or peripheral target.
12

5. KNOW THE SAFETY FEATURES OF THEFIREARM YOU ARE USING, BUTREMEMBER: SAFETY DEVICES ARE NOT ASUBSTITUTE FOR SAFE HANDLINGPROCEDURES.Never rely solely on a safety device to preventan accident. It is imperative that you knowand use the safety features of the particularfirearm you are handling, but accidents canbest be prevented by following the safehandling procedures described in these safetyrules and elsewhere in the product manual.To fur ther familiarize yourself with the properuse of this or other firearms, take a FirearmsSafety Course taught by an expert in firearmuse and safety procedures.
6. PROPERLY MAINTAIN YOUR FIREARM.Store and carry your firearm so that dirt orlint does not accumulate in the working parts.Clean and oil your firearm, following theinstructions provided in this manual, aftereach use to prevent corrosion, damage tothe barrel or accumulation of impurities whichcan prevent use of the gun in an emergency.Always check the barrel prior to loading toensure that it is clean and free fromobstructions. Firing against an obstructioncan rupture the barrel and injure you or othersnearby. In case you hear an unusual
13

noise when shooting, stop firing immediately,engage the manual safety and unload thefirearm. Make sure the chamber is free fromany obstruction or possible bullet blockedinside the barrel due to defective or improperammunition.
7. USE PROPER AMMUNITION.Only use factory-loaded, new ammunitionmanufactured to industry specifications: CIP(Europe and elsewhere), SAAMI (U.S.A.). Becertain that each round you use is in theproper caliber or gauge and type for theparticular firearm. The caliber or gauge of thefirearm is clearly marked on the barrels ofshotguns and on the slide or barrel of pistols.The use of reloaded or remanufacturedammunition can increase the likelihood ofexcessive cartridge pressures, case-headruptures or other defects in the ammunitionthat can cause damage to your firearm andinjury to yourself or others nearby.
8. ALWAYS WEAR PROTECTIVE GLASSESAND EARPLUGS WHEN SHOOTING.The chance that gas, gunpowder or metalfragments will blow back and injure a shooterwho is firing a gun is rare, but the injury thatcan be sustained in such circumstances issevere, including the possible loss ofeyesight. A shooter must always wear impactresistant shooting glasses when firing
14
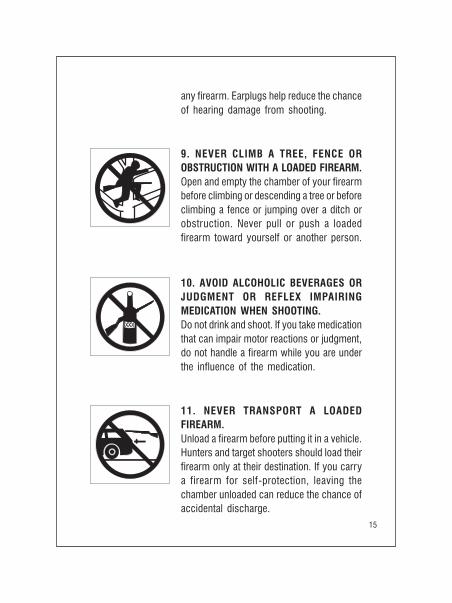
any firearm. Earplugs help reduce the chanceof hearing damage from shooting.
9. NEVER CLIMB A TREE, FENCE OROBSTRUCTION WITH A LOADED FIREARM.Open and empty the chamber of your firearmbefore climbing or descending a tree or beforeclimbing a fence or jumping over a ditch orobstruction. Never pull or push a loadedfirearm toward yourself or another person.
10. AVOID ALCOHOLIC BEVERAGES ORJUDGMENT OR REFLEX IMPAIRINGMEDICATION WHEN SHOOTING.Do not drink and shoot. If you take medicationthat can impair motor reactions or judgment,do not handle a firearm while you are underthe influence of the medication.
11. NEVER TRANSPORT A LOADEDFIREARM.Unload a firearm before putting it in a vehicle.Hunters and target shooters should load theirfirearm only at their destination. If you carrya firearm for self-protection, leaving thechamber unloaded can reduce the chance ofaccidental discharge.
15

12. LEAD WARNING.Discharging firearms in poorly ventilatedareas, cleaning firearms, or handlingammunition may result in exposure to leadand other substances known to cause birthdefects, reproductive harm, and other seriousphsical injury. Have adequate ventilation atall times. Wash hands thoroughly af terexposure.
For information about safety courses in yourarea plase visit www.nra.org
16

SHOTGUNS
Instructions for installation, removal and maintenance of thescrew-in choke.
Inser t the SCREW-IN CHOKE “B”inside barrel “A”. Use the choketube wrench for tightening andremoval “C”. When inserting pressfirmly to the end.
Periodically (each time after 100 shots) remove theSCREW-IN CHOKE and clean internally a and externally using
lubricant oil and a piece of flannel cloth.
Obs.
• Each time after 50 shots, verify if the SCREW-IN CHOKE istightly set.
• Use the choke tube wrench “C”.
17
1.
2.3.4.5.
6.
7.
8.
STOEGER INDUSTRIES, INC901 Eighth StreetPocomoke City, MD 21851
Stoeger Firearms AuthorizedService CenterInstructions:
Pack each weapon in durable car ton, padding eachcomponent withnewspaper or similar material.Label and address clearly.Insure shipment for full value.Include a note stating reason for return of merchandise.If the gun is under warranty, include letter withexplanation and proof of purchase with the gun.If the warranty has lapsed, the Service Center will prepareand mail a written, itemized estimate for the cost ofnecessary repairs. If you do not approve the estimateand request that your gun be returned unrepaired youare responsible for the estimate preparation fee plusthe cost of return shipping and insurance.FORWARD ALL STOEGER SHOTGUNS TO THEADDRESS LISTED BELOW.Please call Stoeger Industries at (301) 283.6300 to request aReturn authorization number for your gun.
901 Eighth StreetPocomoke City, MD 21851
WARNING: Do NOT send live ammunition or a loaded firearm.Insure merchandise for full value and ship prepaid only.
18

STOEGER SHOTGUN LIMITED WARRANTYSTOEGER warrants this shotgun to be free of defects in
workmanship and materials and STOEGER will, within one yearfrom the date of sale to the original purchaser, repair or, at STOEGERoption, replace the shotgun which shall prove to be so defective.
This Warranty shall be invalid if the shotgun is subjected tomisuse or abuse, including but not limited to, the use of improperammunition, or if any repairs are attempted by anyone other thanauthorized representative of STOEGER.
Within ten days of the time the defect becomes apparent thedefective shotgun must be sent, with shipping costs prepaid, toStoeger Industries, 901 Eighth St Pocomoke.
The duration of all implied warranties, includingMERCHANTABILITY, shall also be for one year from the date ofsale to the original purchaser. Some states do not allow limitationson how long an implied warranty lasts, so the above limitationmay not apply to you.
This Warranty shall provide the purchaser’s sole remedy fordefects in material or workmanship and neither STOEGER nor thisrepresentatives shall be liable for any incidental or consequentialdamages, so the above limitation or exclusion may not apply toyou.
The attached Registration Card should be completed and mailedwithin ten days of purchase; its return is not required in orderfor this Warranty to be effective.
This Warranty is given by STOEGER P.O. Box 59 VeranópolisR.G.S. Brazil 95330-000.
This Warranty gives you specific legal rights and you may alsohave other rigths wich vary from state to state.
STOEGER INDUSTRIES, INC.901 Eighth Street, Pocomoke City, MD 21851
19

KEEP THIS CARD FOR YOUR RECORDS
Make
Model
Serial No.
Caliber
Finish
Barrel Length
Dealer
Date Purchased
THE FIREARM LISTED ABOVE IS ONE OF THE FINESTOBTAINABLE.However, it is just one of the many distinguished gunsimported and sold by Stoeger Industries. Ask your dealer toshow them to you.
20

(sep
arat
e he
re)
STOEGER SHOTGUN WARRANTYREGISTRATION CARD
WE MUST HAVE THIS CARD COMPLETED AND RETURNED SO WE HAVEYOUR NAME AND ADDRESS ON FILE IN THE EVENT IT IS NECESSARY TONOTIFY YOU REGARDING A PROBLEM WITH THE GUN YOU HAVEPURCHASED.
Date
Owner’s Name
Phone No.
Address
City
State
Zip
Make
Model
Serial No.
Caliber (Gauge)
Date of Purchase
Purchase Price
Dealer’s Name
Dealer’s Phone No.
Address
City
State
Zip
21

(sep
arat
e he
re)
1. What influenced you to buy the weapon?
Newspaper Ad Magazine Ad
Friend’s Recommendation
Dealer’s Recommendation
Other (explain)
2. What features influenced you in selecting our product?
Design Price
Accuracy/Performance Workmanship
Other (explain)
3. Intended use: Plinking Target
Hunting Protection
Enclosed is my payment of $14.95. Please send me the latestedition of the Shooters Bible post paid.
Check enclosed
Charge to my
Visa: #
Exp. Date
Mastercard: #
Signed
Exp. Date
22

From:
PLACE
STAMP
HERE
STOEGER INDUSTRIES, INC.901 Eighth StreetPocomoke City, MD 21851(301) 283.6300
Attn: Service Dept.
23
(sep
arat
e he
re)


STOEGER INDUSTRIES, INC.17603 Indian Head Highway, Suite 200
Accokeek, MD 20607


![USER’S GUIDE TO - Andor...DH220 338 DV420 338 DV437 339 [CONTROLLER] 340 ReadOutSpeeds 340 PipeLine 340 Type 340 SECTION 14 – LICENSE AGREEMENTS 341 FITSIO 341 LIBXML2 342 ZLIB](https://img.dokumen.tips/doc/110x75/614aa7b912c9616cbc698e68/useras-guide-to-andor-dh220-338-dv420-338-dv437-339-controller-340-readoutspeeds.jpg)


